Updated 27 March 2019
In the new version of Google Tag Manager, one of the most visible and profound changes to the previous version is how tags are fired (and blocked). First of all, there’s the obvious terminological distinction: we talk about triggers now, not rules. Second, triggers have become an integral part of the tag creation workflow, and as such have far more significance in the user interface than before.
The following text is a standalone article. It’s not an update to the guide I wrote for the previous GTM version: Google Tag Manager: Playing By The Rules, and many of the concepts covered therein are still valid.
Triggers introduce many new features and functionalities (a new way of doing auto-event tracking, for example), which require special attention.
Here are the contents of this guide:
As always, feel free to add your thoughts in the comments after this post, if there’s some aspect of triggers that wasn’t adequately covered.
The Simmer Newsletter
Follow this link to subscribe to the Simmer Newsletter! Stay up-to-date with the latest content from Simo Ahava and the Simmer online course platform.
1. What’s changed
There are three major changes, in my opinion, to how triggers compare with the rules of the previous GTM version.
I) Triggers are integrated into the workflow
Sure, this is more a cosmetic thing, but it’s significant. In the previous version of Google Tag Manager, the entry-level for beginners was quite high. This was partly due to the fact that it wasn’t clear just what firing rules and blocking rules do. It got even more confusing once you started learning about stuff like implicit events and conditions, and it didn’t help that the UI gave very little hints about what to do next.
In the new UI, everything is about the workflow. There’s actually a question there now: What triggers this tag to fire? Nothing about firing rules or blocking rules, nothing about event conditions, and so forth. Just the simple, quite self-explanatory question. Of course, to understand what “fire” means, you will need to do some exploration, but the question sets the scene: a tag needs a trigger to fire.
So the biggest obvious change is in the UI. Triggers are an integral part of the workflow, and it’s impossible to not notice them, as you may have with rules in the previous version.
II) You don’t need to explicitly state the ’event’ condition
The second major change is how you input the event condition. If you’ve read my previous posts about rules, or if you’ve paid attention to the developer guides, you’ll know that every single tag needs an ’event’ push to fire. With ’event’ push I’m of course referring to a dataLayer.push() command that gives a value to the key labelled ’event'.
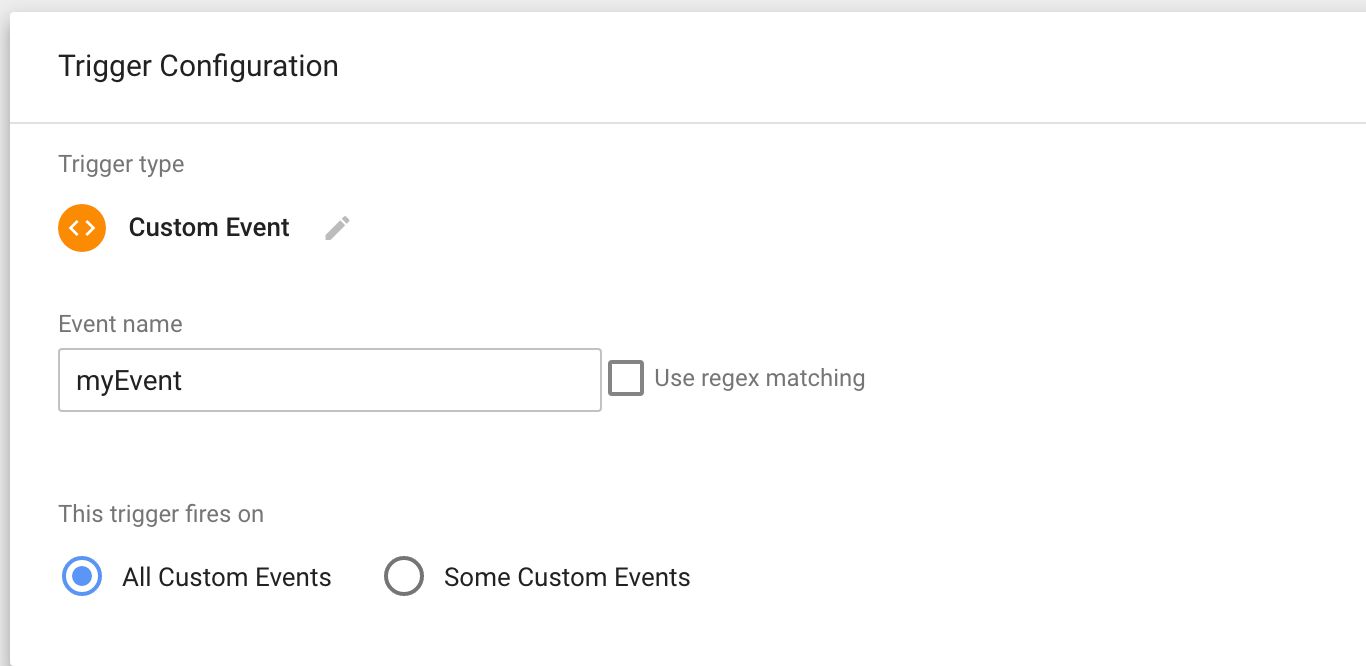
This time around, you don’t need to explicitly state the required Event condition (i.e. the value that ’event’ key needs to have for the tag to fire). Instead, you rely on the available trigger types to set this condition up for you. In fact, the only time you have to explicitly state the name of the event is if you use a Custom Event type, and even then you don’t have to worry about setting it up as a proper condition. You just give the event its name in the required field (you can also use RegEx matching if you want more flexibility):
The point is that since Event is such a super-important part of any tag or trigger, it’s taken out of the normal condition-based setup for triggers and elevated to a grander status.
III) Auto-event tracking has changed
I’ve already written a guide on this, and I’ll cover some of the concepts in this article as well, but this is really significant. Auto-event tracking is no longer tag-based, as it was in the previous version. Instead, you specify the event (click, link click, form submit, error, history event, or timer) by choosing one of the respective trigger types. Once you create a trigger for an auto-event type, GTM automatically starts listening for these events on your site.
This is incredibly convenient, since it reduces clutter in your tags, and it makes event tracking a very central part of any tagging setup (as it should be).
These are, in my view, the biggest changes. As a GTM fanboy, my honest and utterly biased opinion is that the improvements are amazing. There’s a learning curve, and I know that improvements are made to the UI constantly. But the way that triggers have been integrated into the tag workflow, without compromising any of the features carried over from rules, is a wonderful display of design skill.
2. Technical overview
It’s not like I’ve reverse engineered the GTM container JavaScript library (well, not all of it), but there are some interesting things to consider when working with triggers.
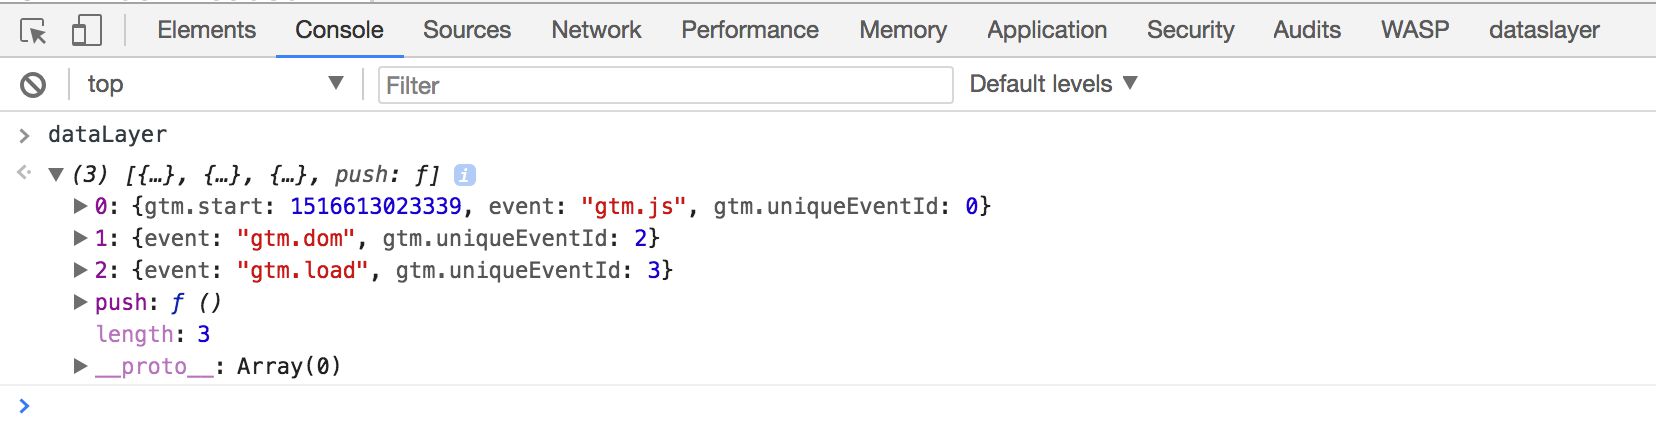
First of all, as I said above, triggers require a dataLayer.push() or a pre-container-snippet declaration to fire a tag. If a push() command doesn’t have an ’event’ key, it becomes merely a “message” that’s added to the message bus. It does nothing for tags. You can see this in the debug mode. If there’s an ’event’ key in the message, the instance gets the name of the event (unless it’s one of the three default GTM events, see below) or just “Message” if there’s no ’event’ key in the command:
So if there’s an ’event’ key in the push(), a data layer helper object activates and goes through all the active triggers in your container. If any one of these matches the value of the ’event’ key, and if all the other conditions in the trigger pass, the tag is injected into the site and its code is executed.
Very little has changed, then. You will still need to push ’event’ values to fire tags. The three default events are still gtm.js (pushed when the container snippet is first rendered in the page template), gtm.dom (pushed when the DOM has loaded), and gtm.load (pushed when the window has loaded):
One thing that has changed is how multiple triggers of same type on the same page are handled.
Since there’s no longer a listener tag that you work with, it’s more than possible that you can have many link click triggers, for example, activating tags on the same page. It doesn’t mean that GTM always attaches a new event listener to the document node, because that would be an exercise in redundancy. Rather, all the triggers that use the same auto-event, e.g. gtm.linkClick, are evaluated when the event occurs.
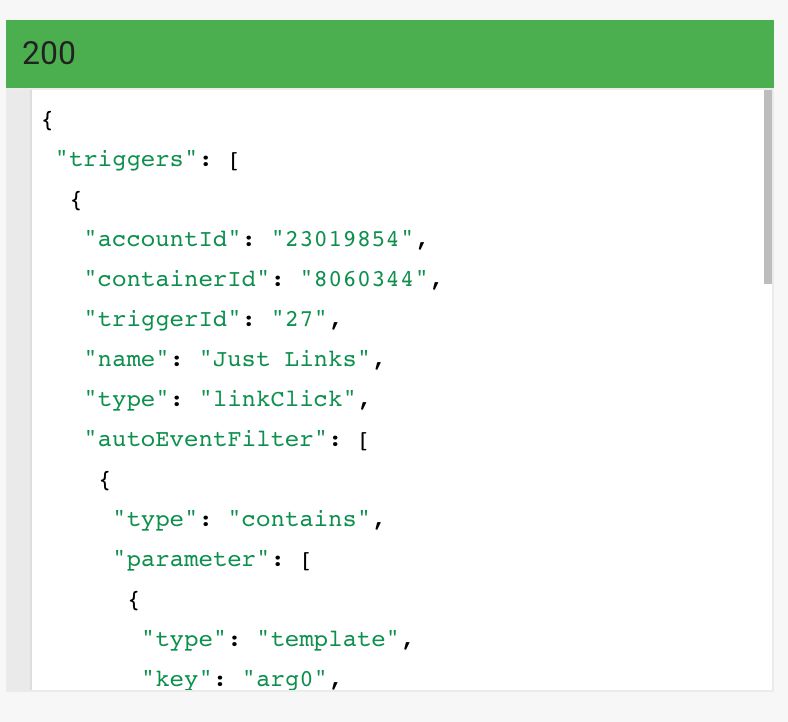
This is fine in most cases, but it’s also possible that you have two Link Click triggers, where on one you have “Check Validation” set to ON, and on the other it’s OFF. This means that the first one only fires if the default action of the link click has not been prevented by other scripts, and the latter fires regardless. Since there’s just one listener controlling the firing of your tags, GTM leverages the gtm.triggers key in the auto-event object to specify which trigger should fire upon the event:
The value of the key is containerID_triggerID. So in this particular example, I had two Link Click triggers firing on the page, and one of them had “Check Validation” ON. I then clicked a link where I had prevented the default action of the click with event.preventDefault(). Thus, the gtm.triggers key tells our tags that only the trigger where “Check Validation” was OFF (id 27) is allowed to fire.
This makes for a very economical but still extremely robust setup for your auto-event triggers.
3. Triggers in the workflow
There are two obvious paths to creating triggers: 1) through the tag workflow, and 2) via the Triggers menu.
Both paths take you essentially through the same steps.
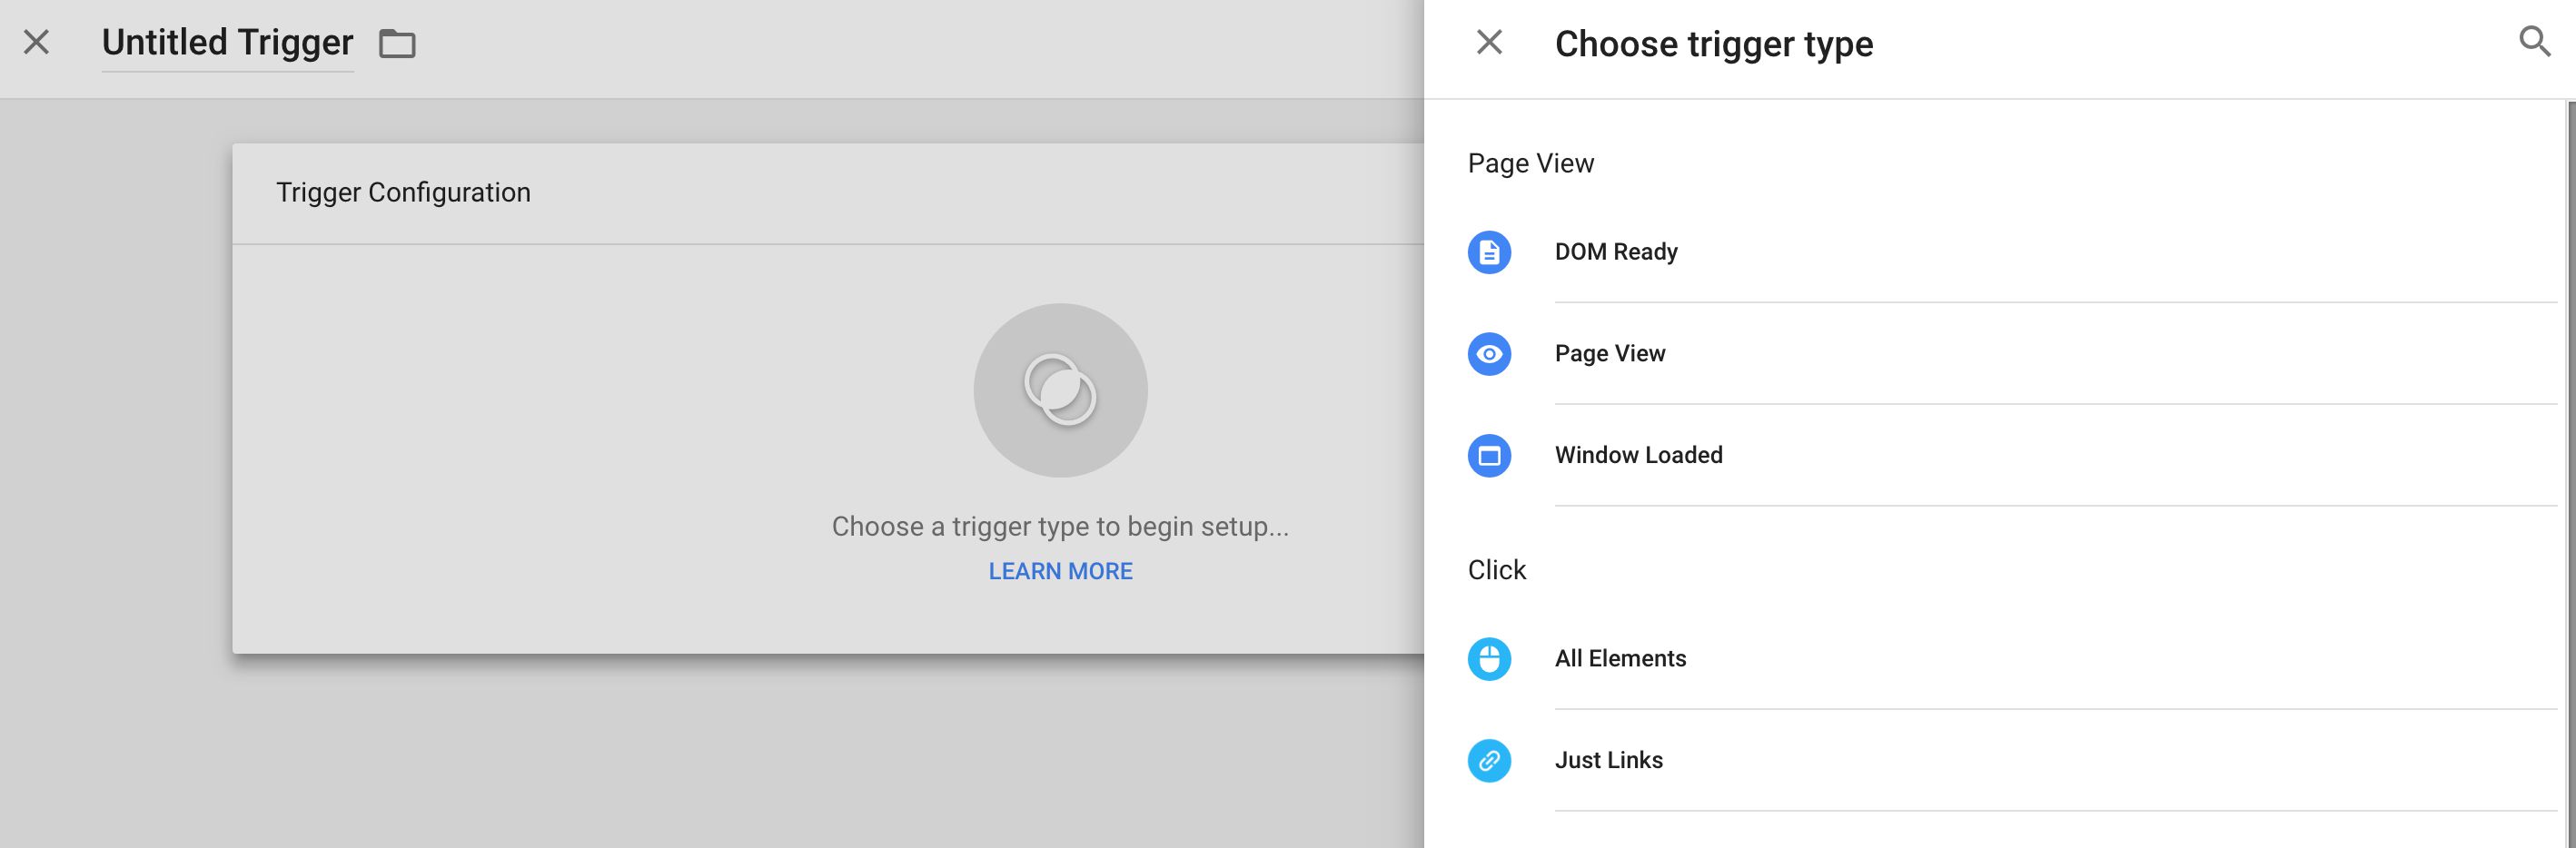
In the tag workflow, you can enter the trigger selection screen in three different ways:
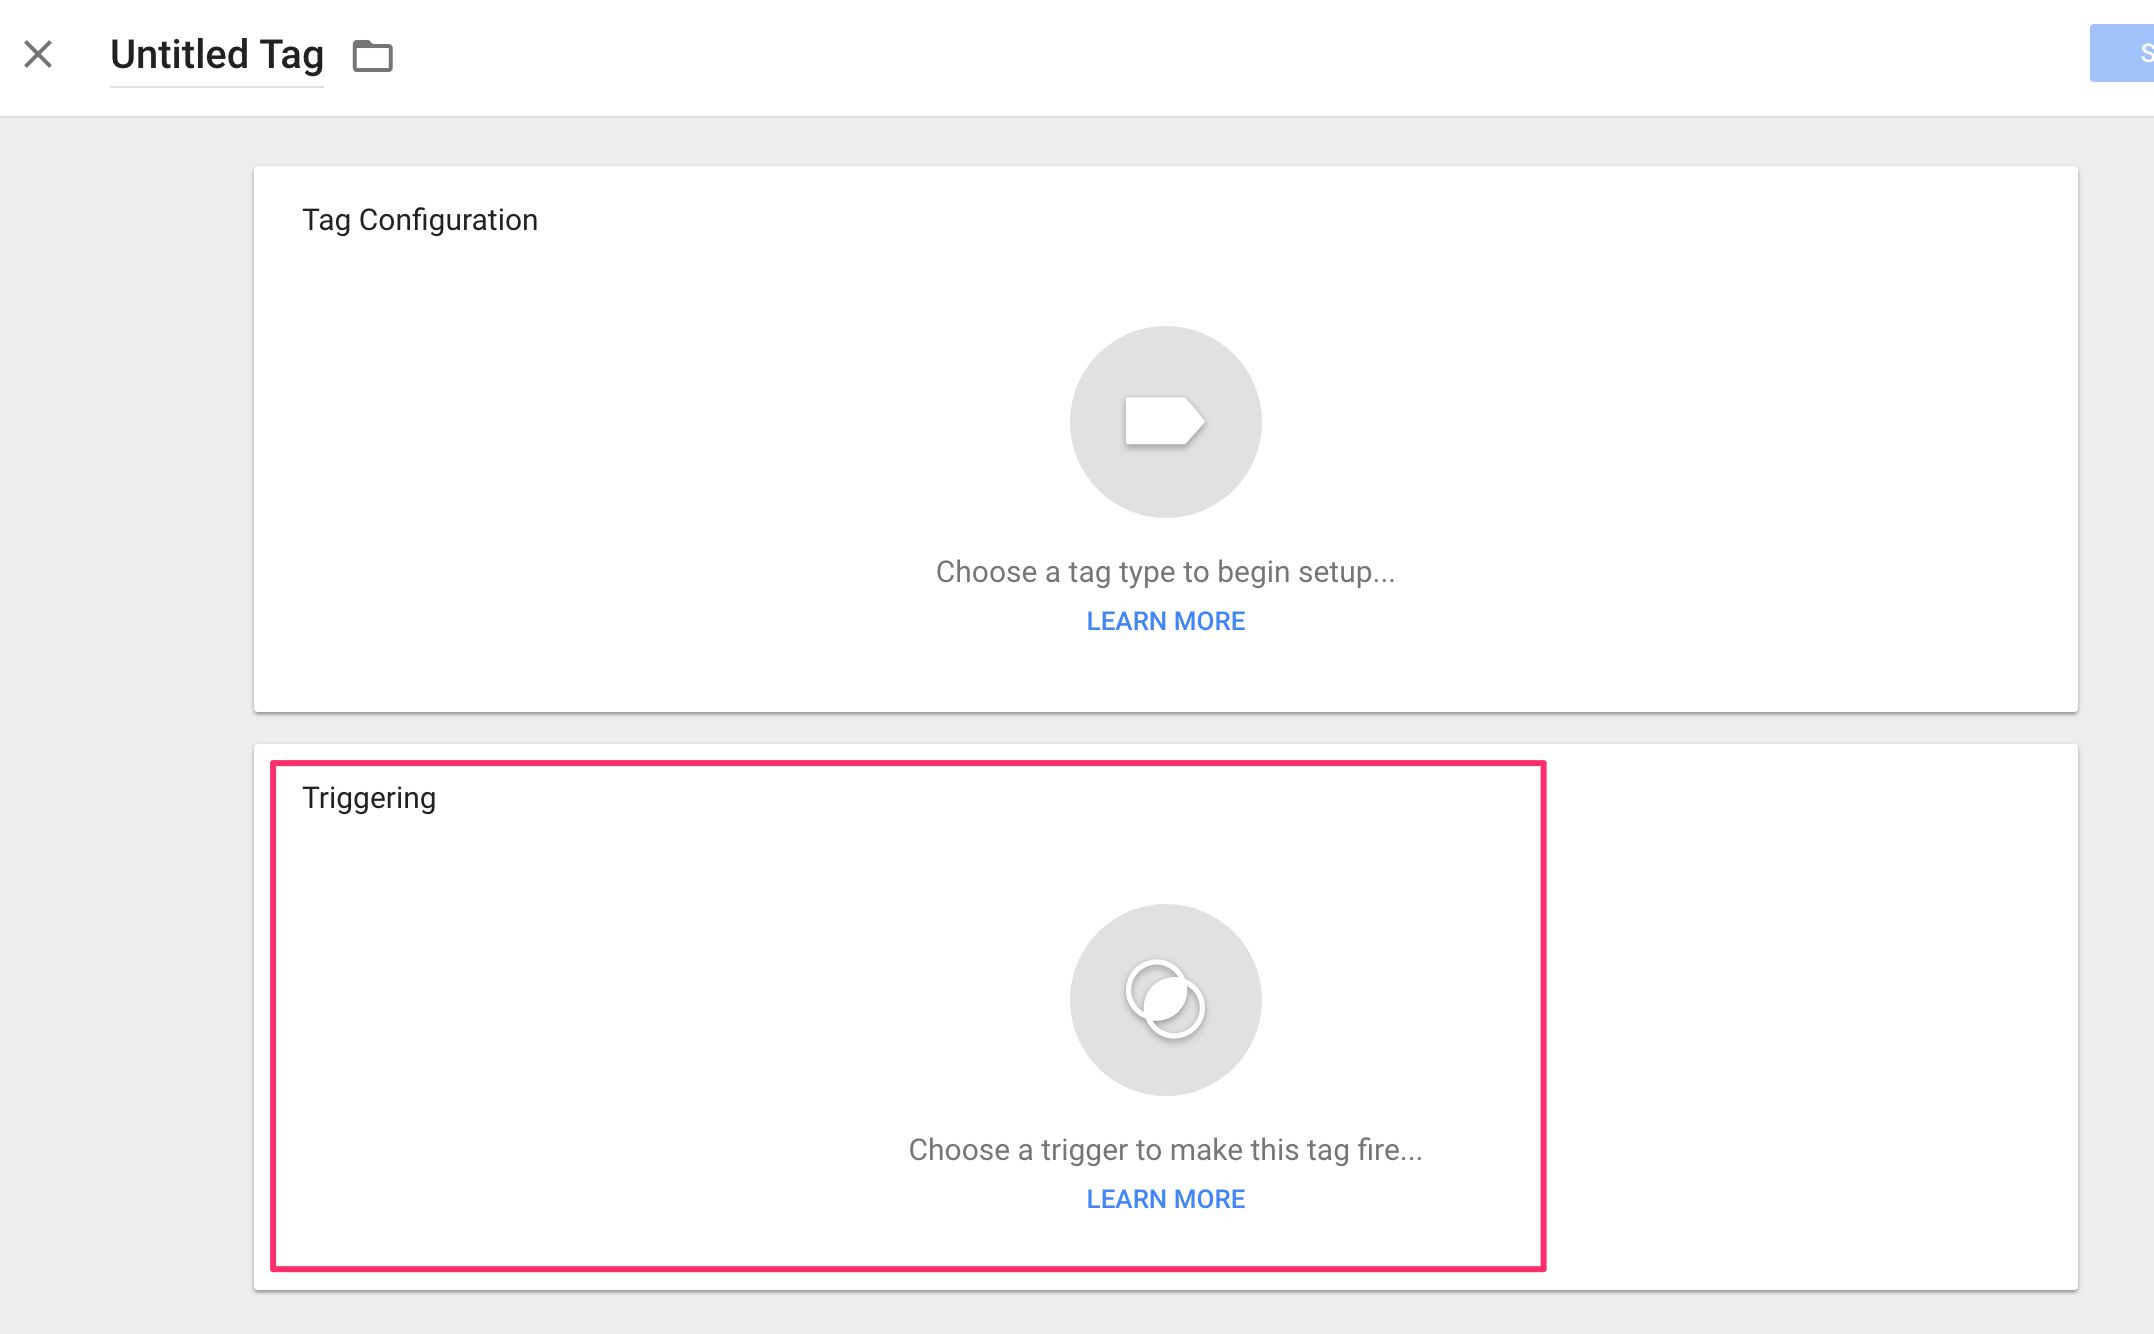
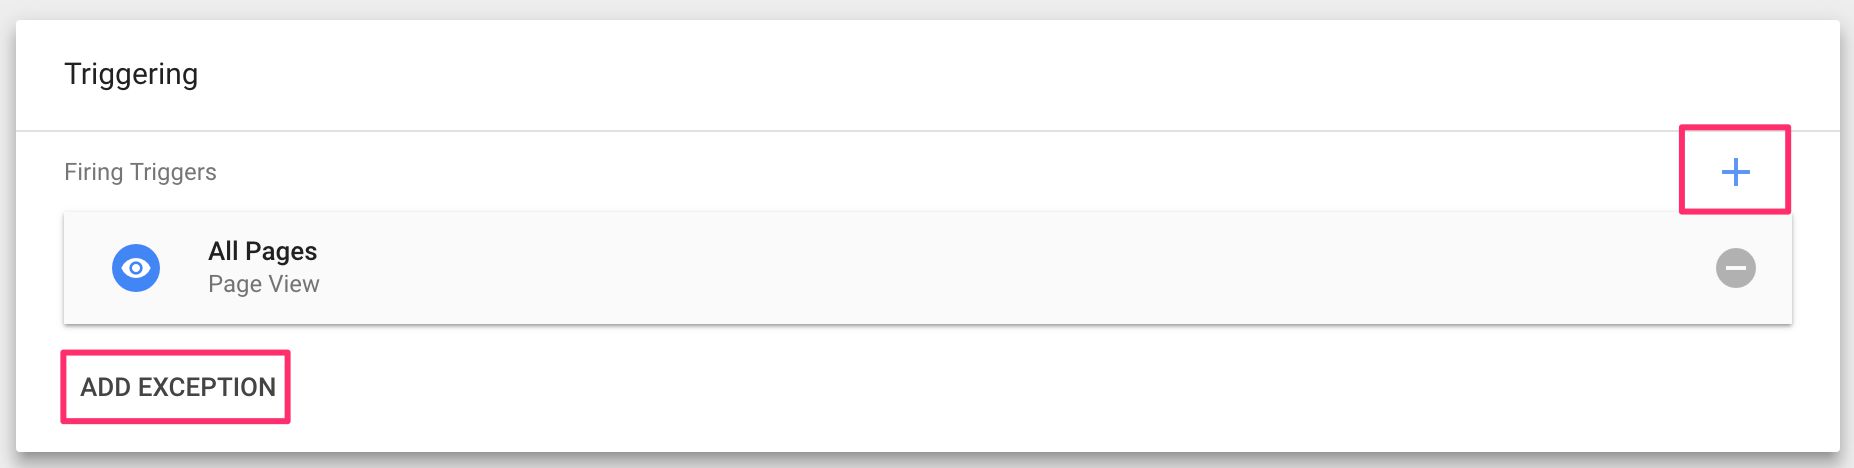
If the tag has no triggers, then clicking the big empty space with “Choose a trigger to make this tag fire…” will open the trigger selector.
If the tag already has triggers, then clicking the blue plus symbol lets you add new triggers to the tag.
You can also click the ADD EXCEPTION link to add triggers that block the tag from firing.
In the trigger selection screen, clicking the blue plus button in the top right corner takes you to trigger creation mode.
You can also enter trigger creation mode by browsing to Triggers and clicking the red NEW button in the UI.
Regardless of which path you take, this is what you’ll see:
Read on for information how to create your new trigger.
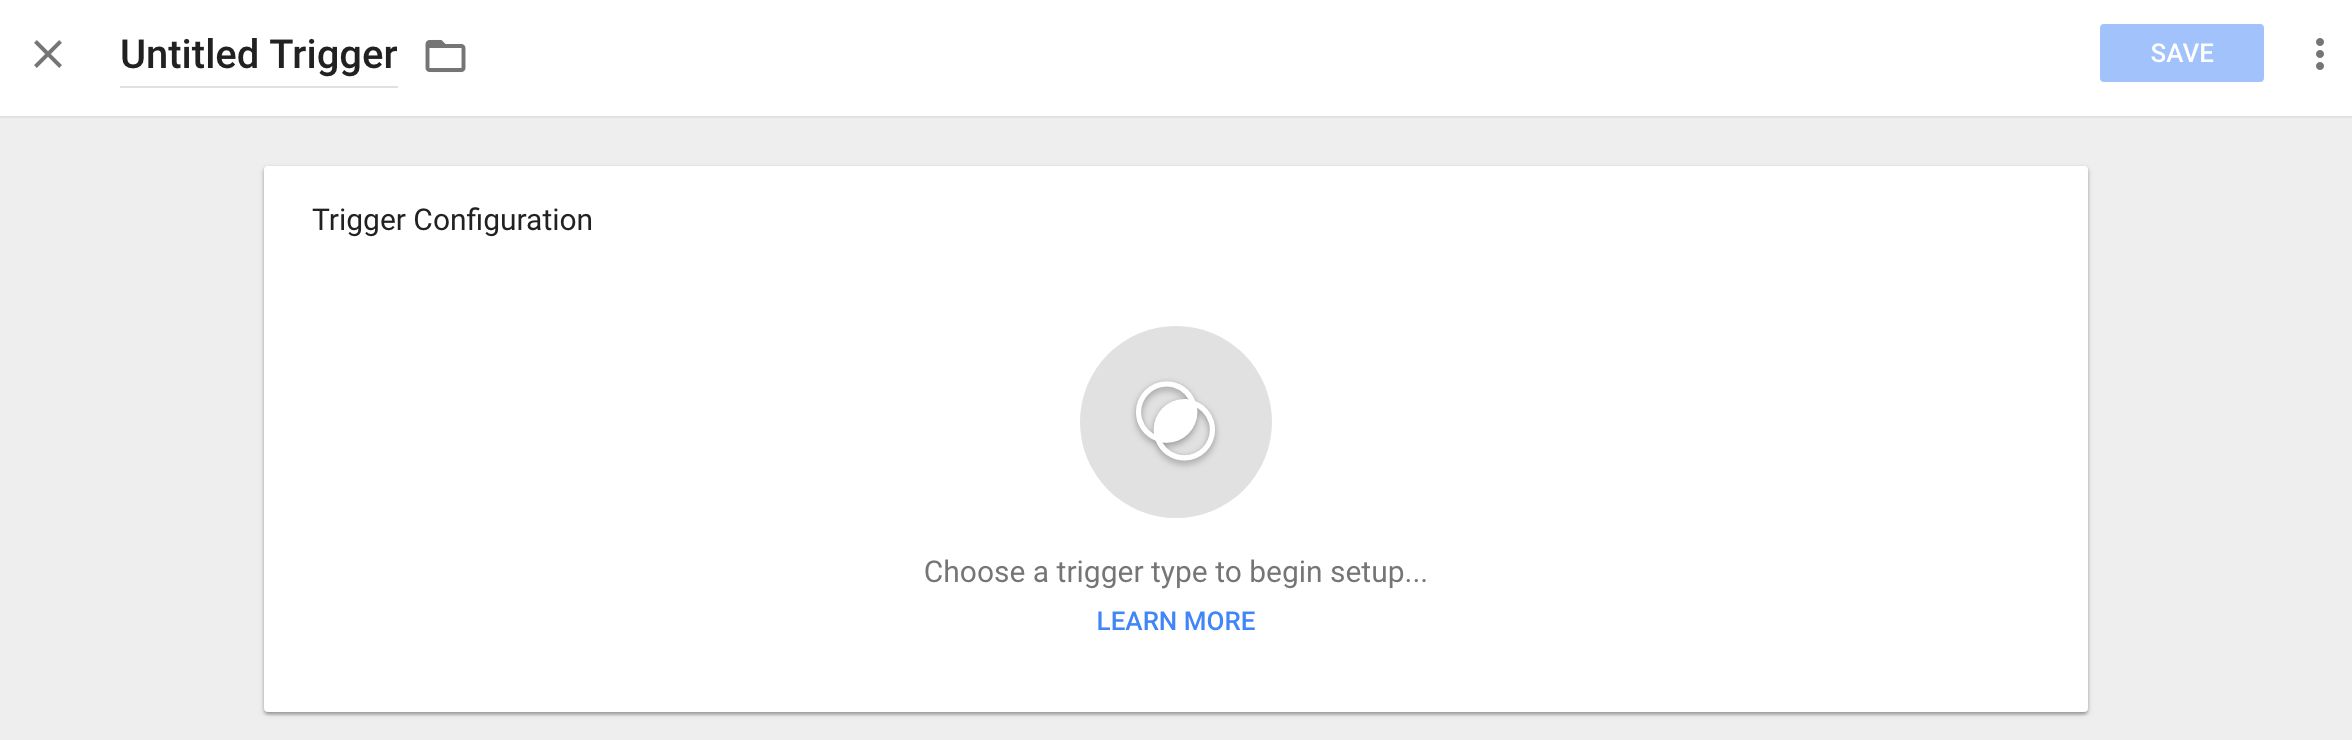
4. New trigger creation
When you start creating a new trigger, you should already have a good idea of which GTM event should fire your tag.
The trigger type is essentially a combination of the GTM event and the type of interaction (or event) you want GTM to start listening to.
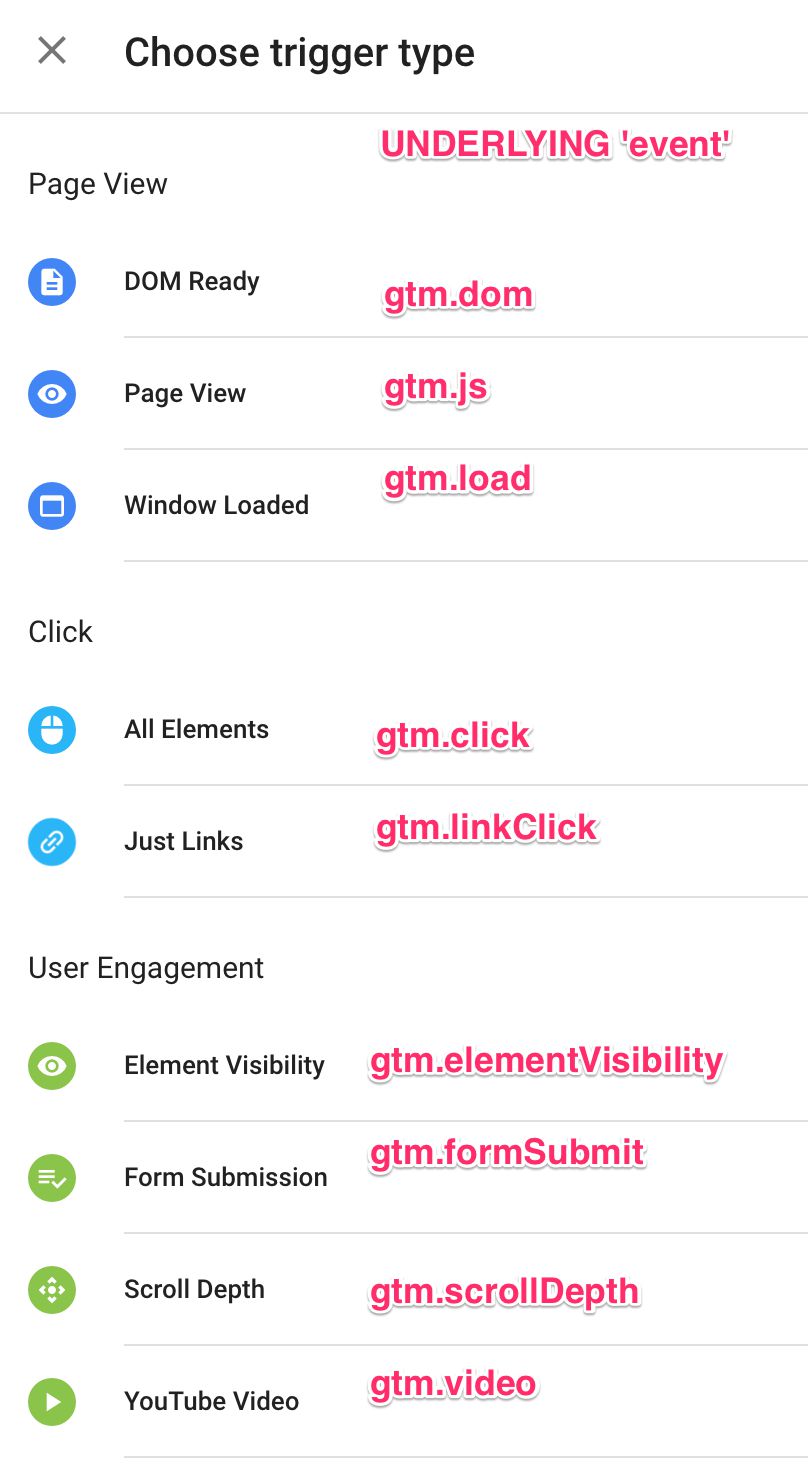
Here are the trigger types currently available:
Page View:
DOM Ready - fires the trigger on the
gtm.domevent, once the browser has loaded the document object model.Page View - fires the trigger on the
gtm.jsevent, as soon as the GTM container has loaded.Window Loaded - fires the tirgger on the
gtm.loadevent, dispatched once the entire page and all linked resource have completed loading.
Click:
All Elements - fires the trigger on the
gtm.clickevent, dispatched when any element is clicked on the page.Just Links - fires the trigger on the
gtm.linkClickevent, dispatched when a link (<a>) HTML element is clicked on the page.
User Engagement:
Element Visibility - fires the trigger on the
gtm.elementVisibilityevent, when an element becomes visible on the page.Form Submission - fires the trigger on the
gtm.formSubmitevent, dispatched when a form submission is detected.Scroll Depth - fires the trigger on the
gtm.scrollDepthevent, dispatched when the user scrolls the page.YouTube Video - fires the trigger on the
gtm.videoevent, dispatched when a video is viewed on the page.
Other:
Custom Event - fires the trigger when an
eventkey is pushed intodataLayerwith a custom value.History Change - fires the trigger on the
gtm.historyChangeevent, dispatched when a window history event is detected.JavaScript Error - fires the trigger on the
gtm.pageErrorevent, dispatched when an uncaught JavaScript error is thrown on the page.Timer - fires the trigger on the
gtm.timerevent, dispatched when the timer trigger interval is met.Trigger Group - the trigger group fires when all the included triggers have fired at least once.
There’s bound to be more in the future. Especially the various events you can listen to with JavaScript are still vastly under-utilised (check this post for ideas how to extend them).
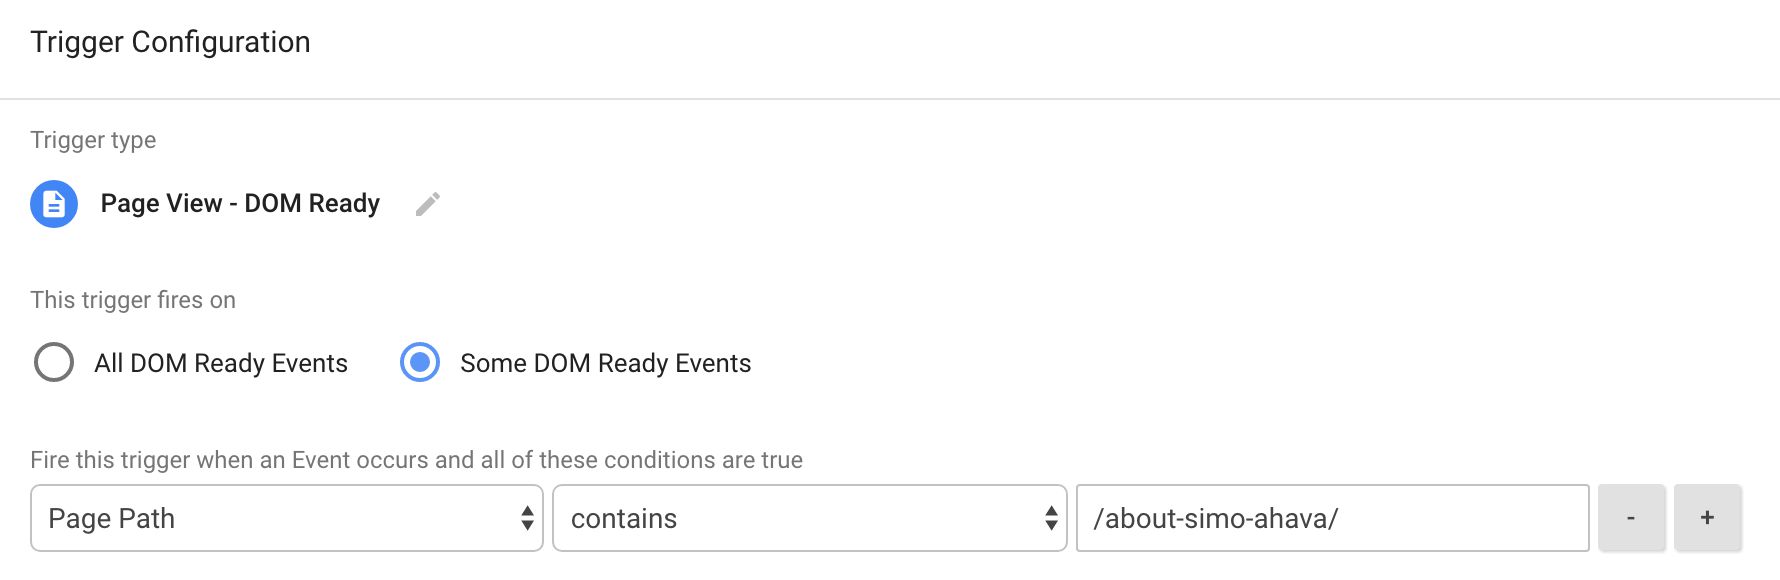
The next step is to choose any trigger-specific settings. With the DOM Ready trigger, for example, you can delimit the trigger to only fire on specific page URLs.
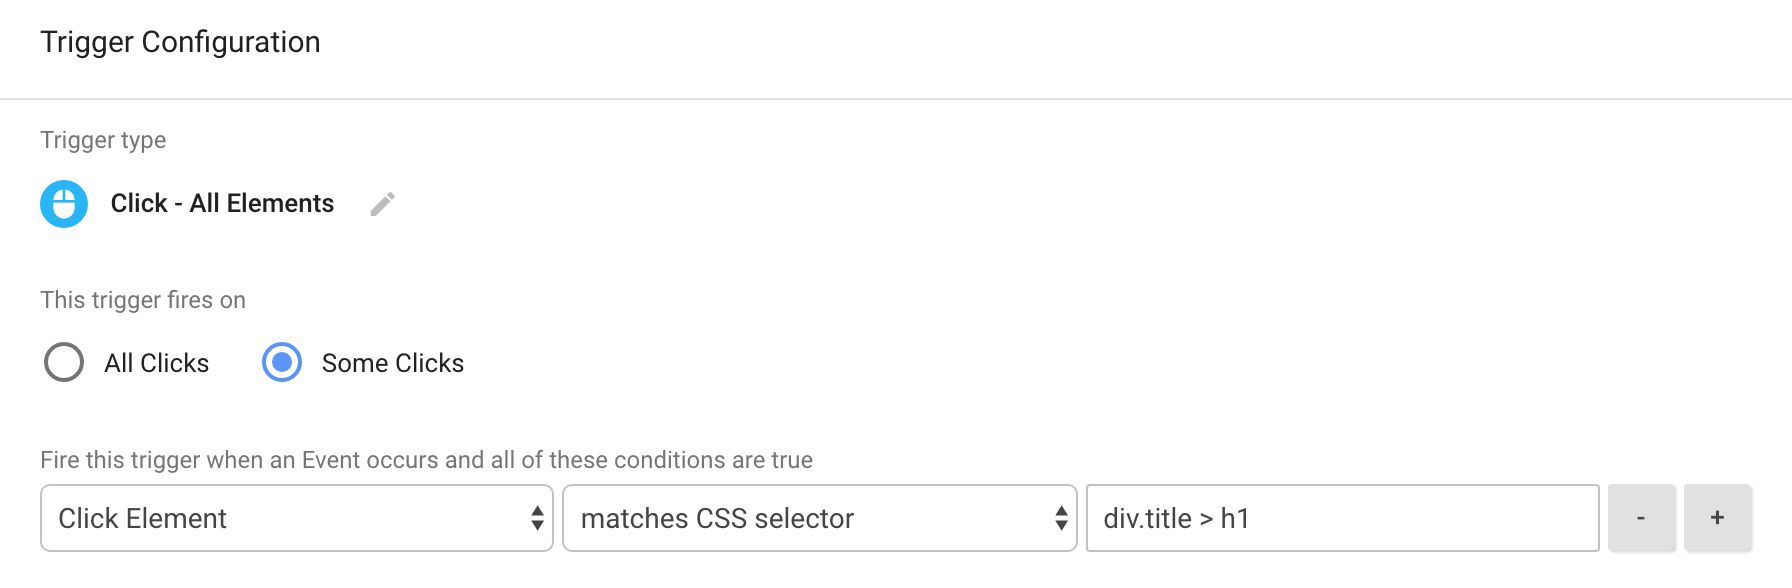
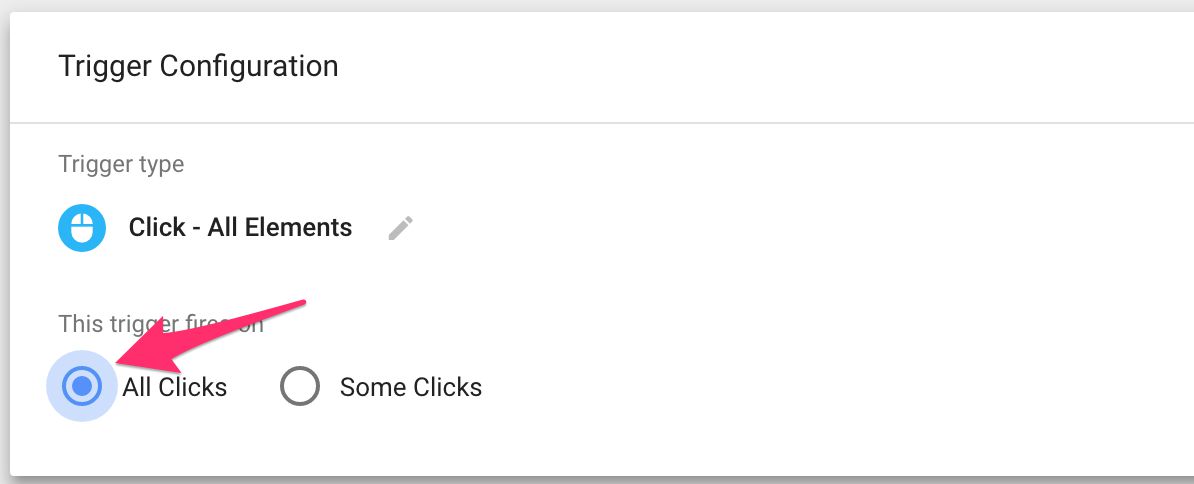
If you choose All (event type), the only condition in the trigger will be the event type. That means that your tag will fire every single time the event you specified is pushed into dataLayer. So if, for example, you chose a Click / All Elements trigger type, and you specify All Clicks as the filter, your tag will fire every single time a click is registered on the site (overkill much?).
If you choose Some (event type), you will need to specify the other condition(s) for your tag to fire. These can be anything you like, such as data layer variable values, page path matches, etc. As before, you can specify multiple conditions, but if you do, every single one of these conditions must pass for your tag to fire. There’s no either-or relationship here. Conditions are final.
With “Link Click”, “Timer” and “Form” triggers, you’ll see some extra settings in the Trigger, depending on what settings you choose. With “Timer”, you can set up the timer that will fire your tag after a given interval (or given intervals), and with Link Click and Form triggers, you might need to specify the conditions for the listener itself (see next chapter).
And that’s it. If you’re in the tag creation workflow, you will now return to your tag, where you can add other triggers or an exception.
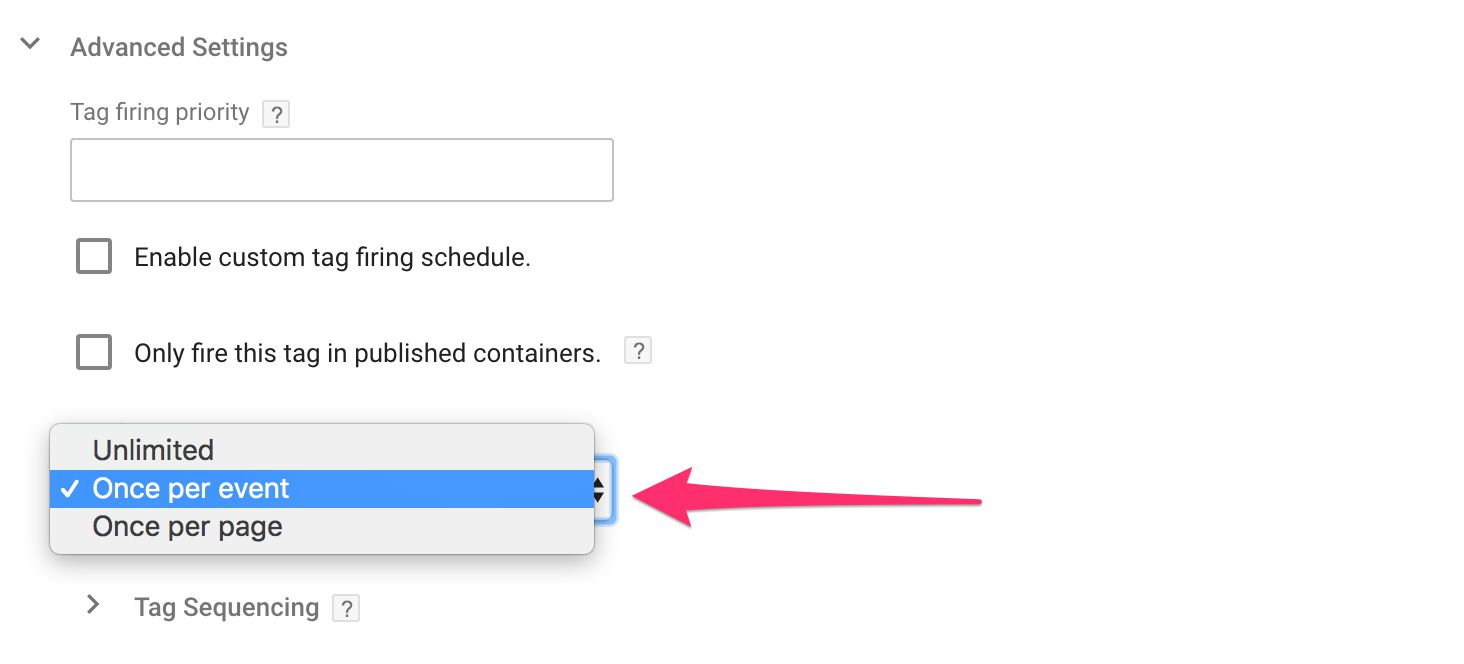
If you want to add multiple triggers to a single tag, do note that multiple triggers on the tag are in an either-or relationship. So having multiple triggers on a tag will make the tag fire when any of the triggers fire, which means that your tag can fire multiple times on a page unintentionally.
However, if the underlying event on these multiple triggers is the same (e.g. Click), your tag will, by default, fire only once for every click event regardless of if there’s overlap in the triggers. You can change this behavior by opening the tag’s advanced settings:
Adding exceptions is simple enough. Just click ADD EXCEPTION in the tag’s trigger selection, and choose a trigger which will block the firing of the tag.
With exceptions, blocking triggers will always win against firing triggers. However, blocking triggers always need a firing trigger with the same underlying event, otherwise they’re useless. This is because when an ’event’ key is pushed into dataLayer, the blocking trigger can only block a trigger which fires on the same ’event’, since they are evaluated at the same time against the same value of the ’event’ key (complicated, I know!).
Read more about it here: #GTMTips: Block Your Tags With Trigger Exceptions.
5. Click and Form triggers
Since I’ve already written about these in my latest auto-event tracking guide, I want to just briefly explain what makes these two triggers special.
First of all, skip the generic Click / All Elemenets trigger. Nothing special about that. It just listens to all clicks on your site, regardless of what element you click.
The Just Links trigger, however, only listens for clicks which propagate up to a link (<a/>) node. This means that you can click on a SPAN in a BUTTON in a DIV, but as long as there’s a link wrapper somewhere up the ancestral tree, and as long as the event propagates, GTM will register the event as a link click.
The Form trigger waits for a submit() event to be dispatched. This means that if some script on your site hijacks the form event and proceeds with some proprietary Ajax function, for example, GTM’s listener will not be able to pick it up.
So remember these two things: Just Links triggers require a click on a link, and Form triggers require a valid browser form submit event. Both need propagation to work.
You might have noticed the two clickable options on these two particular trigger types: Check Validation and Wait For Tags. Once you check either, you’ll see an extra step, Enable When, in the Trigger settings:
The point with this step is that you’ll be able to specify a condition for when the trigger is actively listening for the specified event. The most common condition types you’ll use here are page conditions, since you might want to specify that the Form Submit trigger only listens for submit events on pages with forms.
The reason this step was introduced is due to how the two checkable options, especially Wait For Tags, work. So let’s do a quick overview.
Check Validation, when checked, will require that a valid action is propagated to GTM’s listeners. With both Just Links and Form this means that there’s no event.preventDefault() called by other scripts on the event object before it reaches GTM’s handlers.
However, in many cases it’s not just that the default action of the event is prevented, in which case GTM’s listeners will still pick up the event if Check Validation is OFF. Often you’ll see that propagation is stopped as well, which prevents GTM’s listeners from picking anything up. Be sure to see my previous two posts on the topic.
Wait For Tags ensures that all tags that fire on the trigger execute first before proceeding with the action of the event. So if it’s a Just Links trigger, the redirect (or whatever is the action) is programmatically halted long enough for all dependent tags to complete execution, after which the action is resumed. Same thing with forms.
And this is the reason you need to specify the secondary filter. Since GTM is the one that halts the default action of the event, it’s possible that it screws something up in the propagation path. I’ve seen cases where the “Wait For Tags” option caused a pop-up blocker to pick up otherwise perfectly innocent lightboxes. Only by deactivating “Wait For Tags” was the problem solved.
NOTE!!! The “Wait For Tags” can be very invasive on single-page apps, where link handling is completely customized. On single-page apps, an “internal” link should never lead to a redirect. GTM, however, does not know this. By pausing the event and then proceeding with the default action, it’s possible that “Wait For Tags” causes links to redirect when they shouldn’t.
Thus you should always be very careful with Wait For Tags and ONLY activate it on pages where you have THOROUGHLY tested it doesn’t interfere with the site’s default functionality.
6. Triggers in the API
Since I’ve such a huge fan of the GTM API (see my GTM Tools), I wanted to say a few quick words about triggers and the API.
Triggers are a pollable resource just like anything else in the API. You can list them, retrieve them, update them, delete them, create them, etc.
However, in their current state, there’s a complication. If you want to copy a tag from one container to another, the problem is the trigger ID. Each trigger has an ID, which, I think, is roughly the first available number in a sequence starting with 1. If you use a trigger in a tag, the tag will refer to this trigger using this ID.
Now, when you want to copy this tag to another container, you create a new tag in the target container with this tag resource as the body. The problem is that the target container can already have a trigger with the ID, since they all follow the same logic when assigning the ID!
This means that when copying a tag with triggers to another container, what you actually need to do is this:
First create the trigger(s) in the new container
Use the object you receive in the response to see what the new trigger IDs are
Update the tag resource with the new trigger IDs
Create the tag in the target container
It’s a pretty complex operation for something as simple as resource cloning, and I hope it will resolve to a simpler solution in the future.
You don’t have this problem with variables, as variables are referred to by name, not ID.
7. Tag Sequencing
One important thing to know about triggers and tag sequencing is that if a tag is part of a tag sequence (either as a Setup or Cleanup tag), all its triggers are ignored.
In other words, tag sequencing trumps triggers. If a tag fires either before or after the main tag in a sequence, it will be completely controlled by the triggers of the main tag. The only way to prevent the tag from firing in a sequence is to pause it.
8. Summary
That’s all I have to say about triggers, for now. I’m cautiously apprehensive about possible changes to the UI, as I’m sure there will be in the near future.
To sum it up, triggers work like a charm. It’s so important for usability to have them integrated into the workflow as they are now. At the same time, they haven’t lost any of their power, quite the contrary. The new, Trigger type -based approach to underlying events is an excellent addition, since it helps us focus on what’s important, instead of having to battle with confusing condition syntax.
There are things to be improved in the workflow. I don’t especially enjoy having to work through the Variables page to prepare my triggers (if the variables I need do not exist), and I think there’s still some unification of the UI called for, since, for example, the Some Pages view is so very different from all the other trigger choices.
Please sound off in the comments if I’ve missed something obvious. I would love to keep this guide as up to date as possible.