Holy visibility, Batman! Visibility is a seriously undervalued aspect of web analytics tracking. Too often, we fall into the trap of thinking that “Page Views” actually have something to do with “viewing” a page. Or that tracking scrolling to 25%, 50%, or 75% of vastly different pages makes sense on the aggregate level. So you will be very pleased to know that the Google Tag Manager team (who have been on FIRE recently), have just published the Element Visibility trigger. And oh BOY what a trigger it is!
It’s a very impressive trigger. Not only does it let you do some proper scroll tracking (track to elements, not percentages), but it also includes a feature that lets you track changes in the DOM. This has typically been quite difficult to track purely client-side, so having the feature natively in Google Tag Manager is very cool. On top of that, you can actually measure true view impressions (impressions for items that are visible to the user) AND combine that with the actual time the element was viewed for.
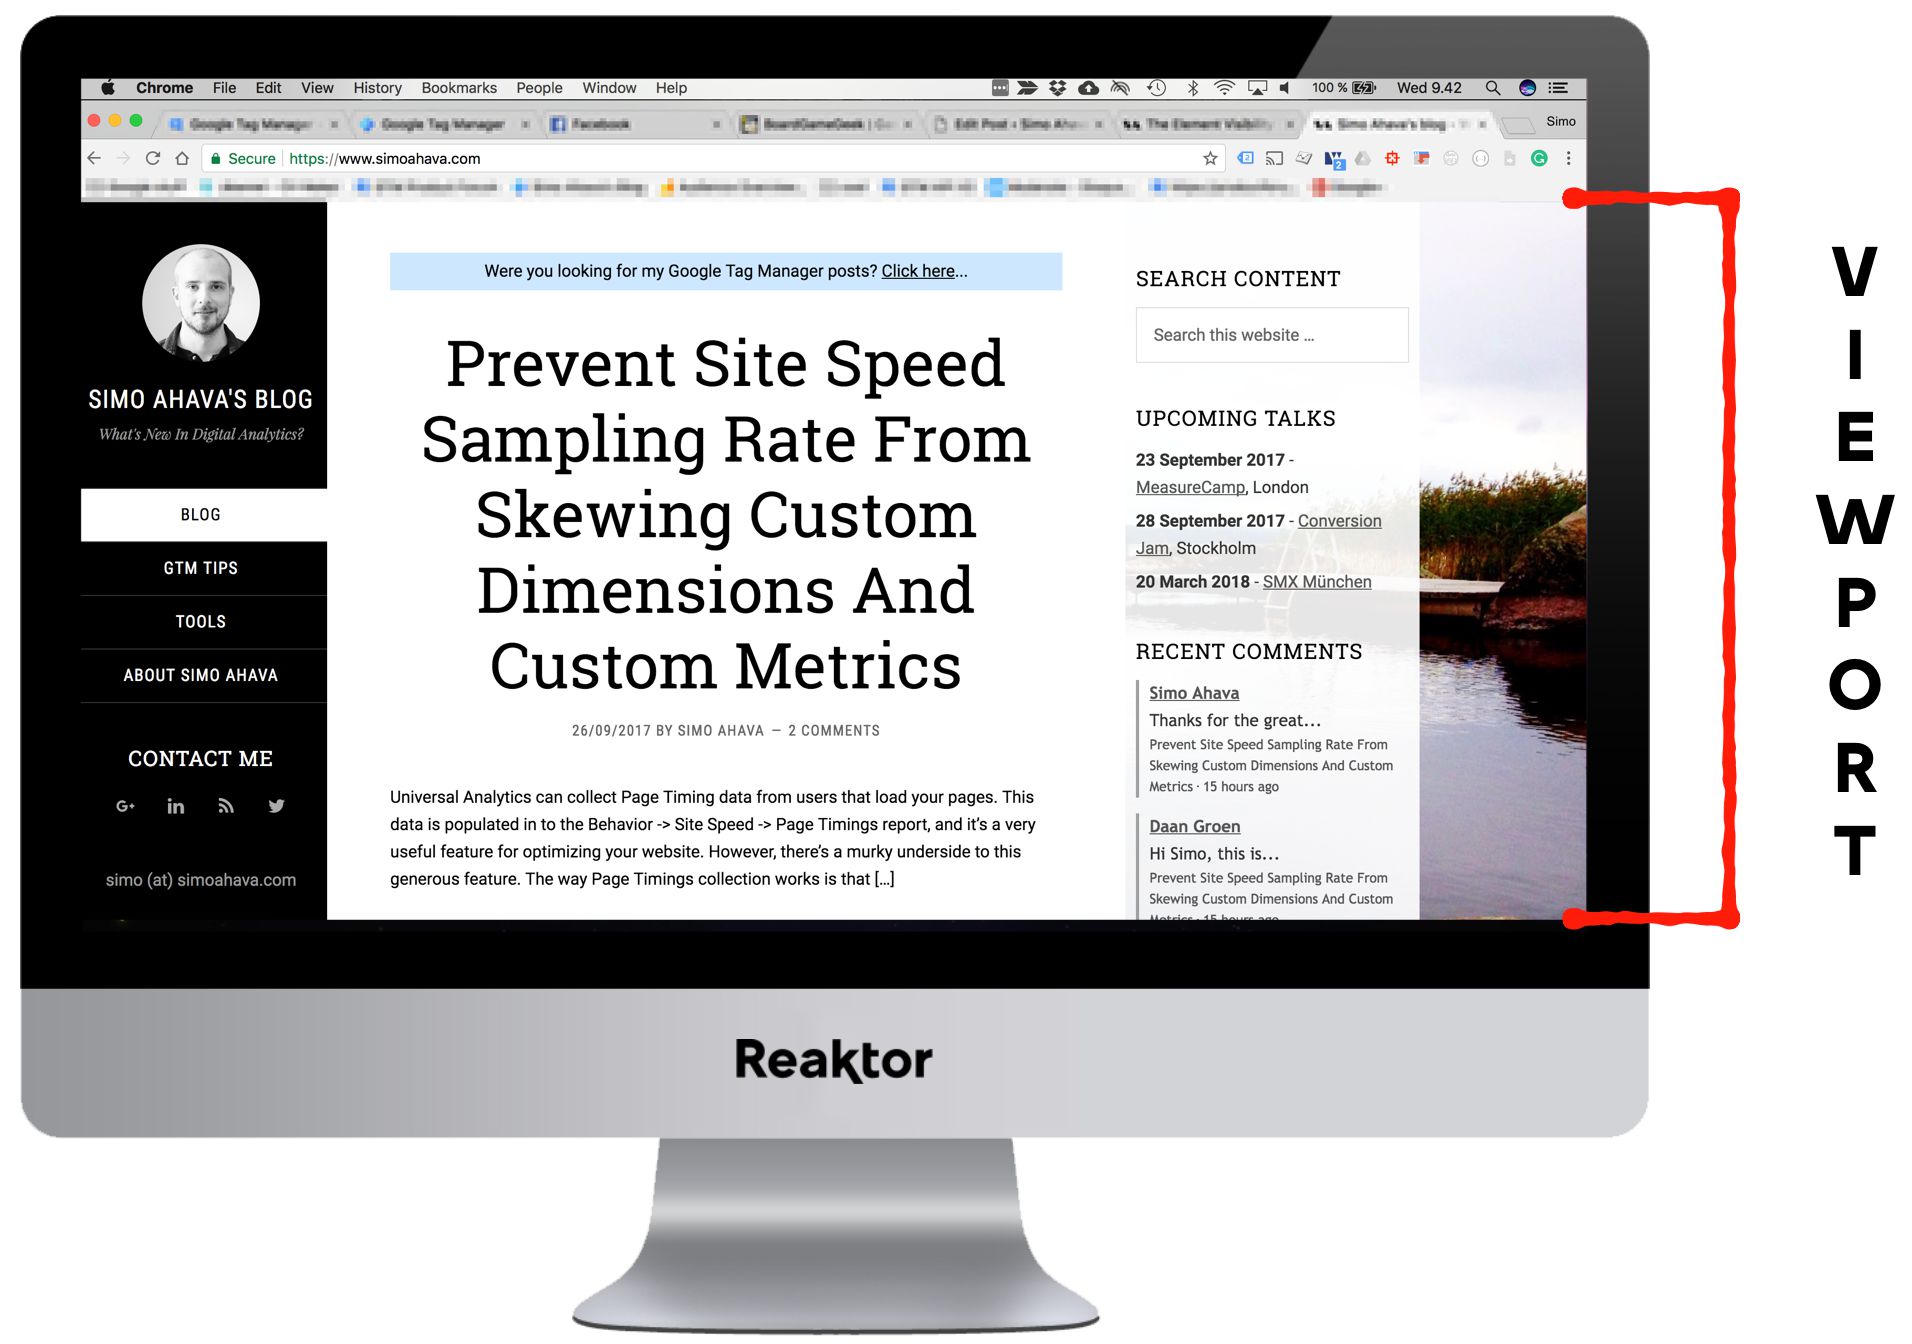
In short, the Element Visibility trigger fires whenever an element, or elements, you specify appear in the browser’s viewport. The viewport is the visible area of the browser window, meaning if an element is visible there, it is viewable by the user.
With this in mind, let’s jump straight to the features.
The Simmer Newsletter
Follow this link to subscribe to the Simmer Newsletter! Stay up-to-date with the latest content from Simo Ahava and the Simmer online course platform.
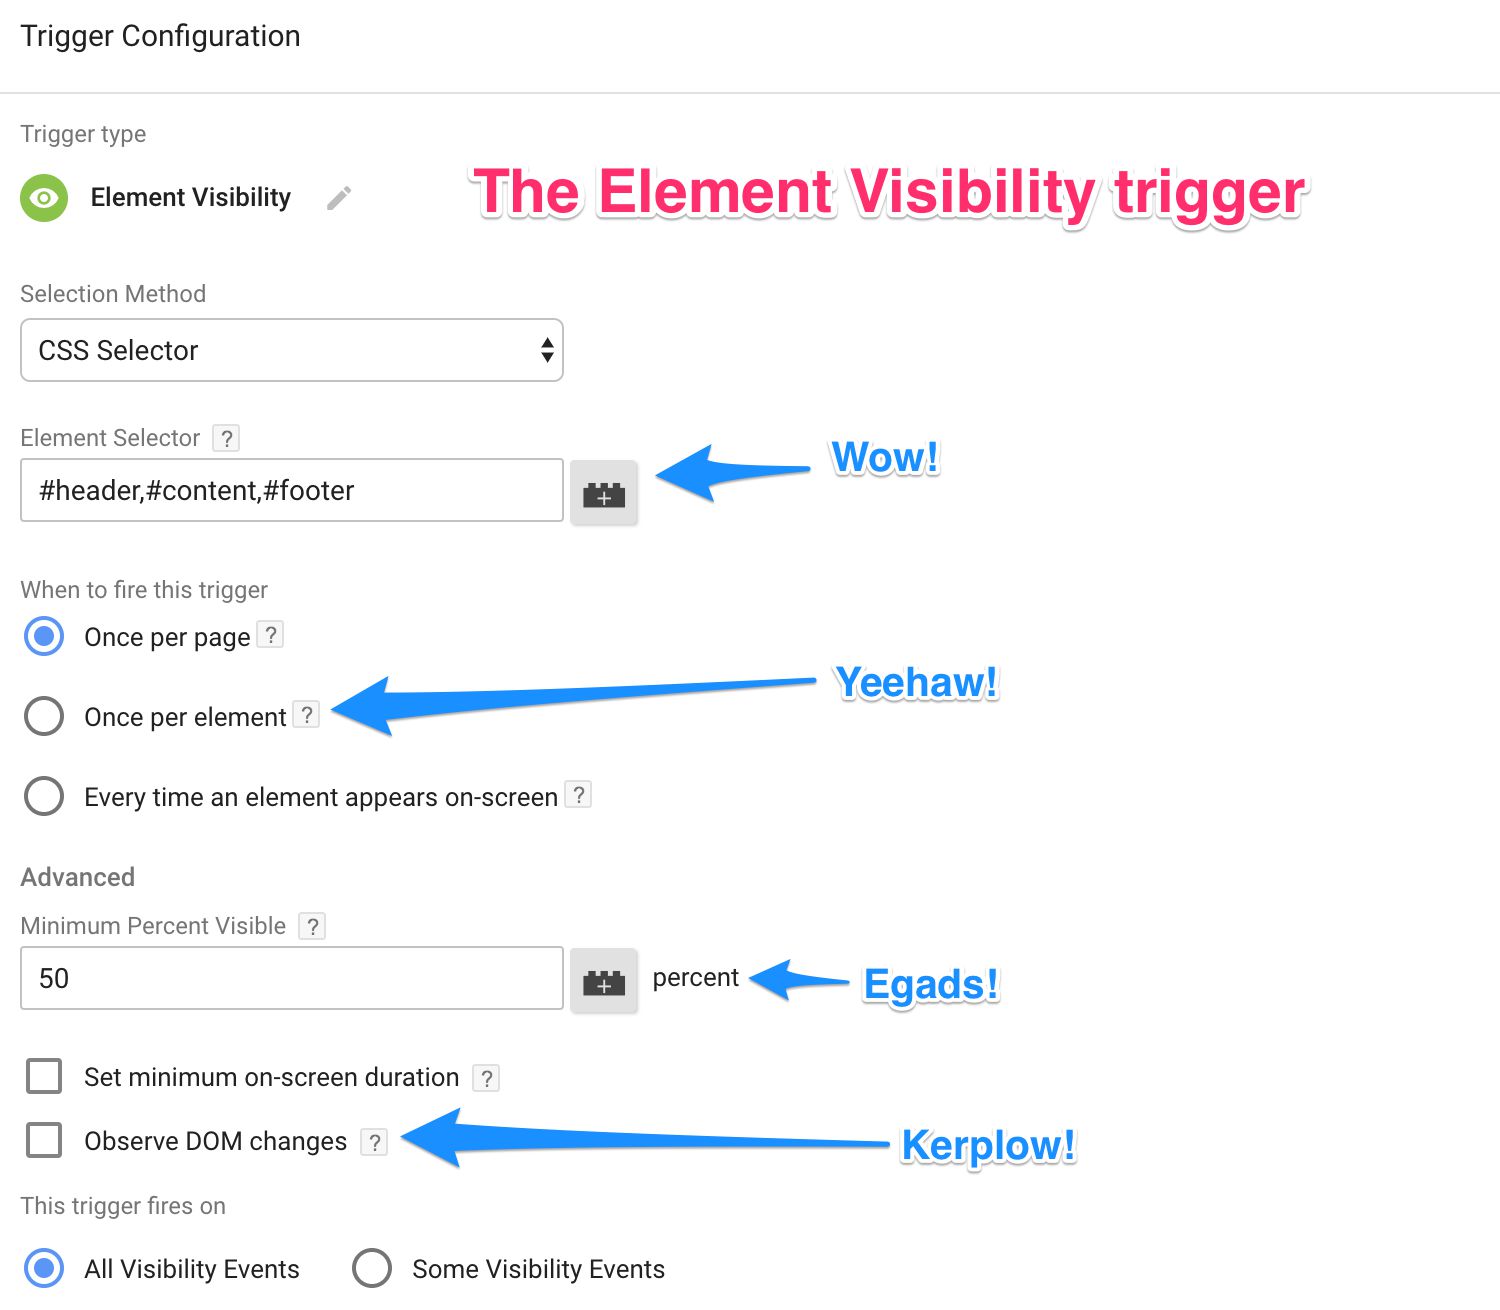
Selection method
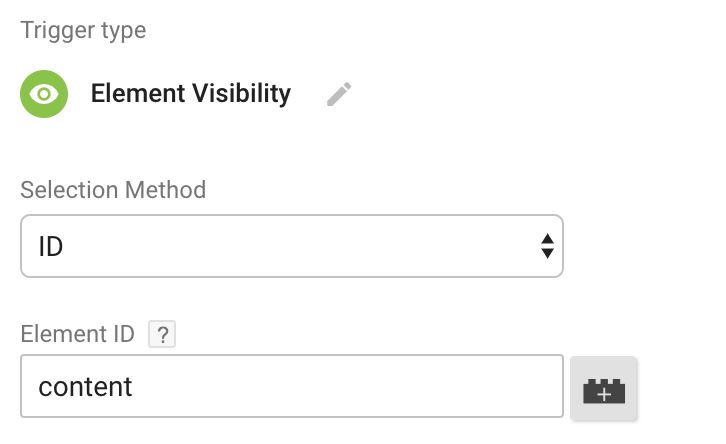
You have two options here - element ID and CSS Selector. The former uses document.getElementById to match the first element in the page with the given ID. The latter uses CSS Selectors to match the element or a group of elements on the page.
At this point I really recommend you read up on CSS selectors (see also my article on the topic). They really make Google Tag Manager more than just the sum of its parts.
ID - the trigger waits for an element with a specific
idattribute to appear in the viewport.CSS Selector - the trigger waits for elements that match the CSS selector string to enter the viewport.
The obvious difference between the two is that you can add multiple element selectors into the CSS selector string. For example, if I want to track when the header, the article title, the article body, and the article footer enter the viewport, I could use something like this as the selector:
#header, h2.title, div.content, div.footer
The trigger could then fire when each one of these enters the viewport (see below).
The ID selector, on the other hand, performs better if you have only one element to track.
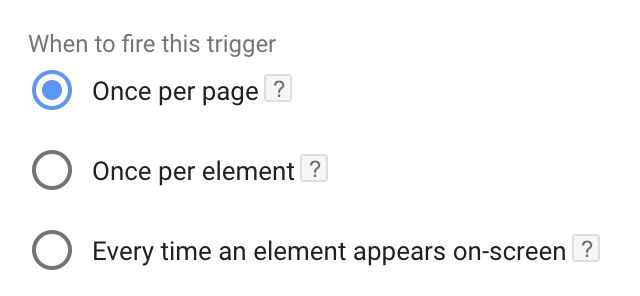
When to fire this trigger
This is where you’ll govern what this trigger actually is. Is it a check to see if a certain element is in the viewport when the page is loaded, or is it an advanced scroll trigger?
Once per page - this trigger will only fire once on the current page. The moment is when the first element that matches the ID or the selector string enters the viewport. Thus if you’ve specified multiple selectors or there are multiple elements with the same ID, this trigger setting will make the trigger fire only once - when the first matched element enters the viewport.
Once per element - this trigger will fire just once if an element with a specific ID appears in the viewport (even if multiple elements share the same ID, in which case it will fire just for the first one). However, when using CSS selectors, this setting will fire once for each element matched by the selector(s). In other words, this would be the setting to use if you wanted to create a trigger that fires when different parts of the page enter the viewport!
Every time an element appears on-screen - this trigger fires whenever any matched element appears in the viewport, and will do so each time the element reappears.
Of these, I wager the first two will be most used. Tracking if an element is visible is very useful for e.g. true view impression tracking, and tracking when multiple different elements appear can be used to create an advanced scroll trigger. There might be use cases for the last option too, though.
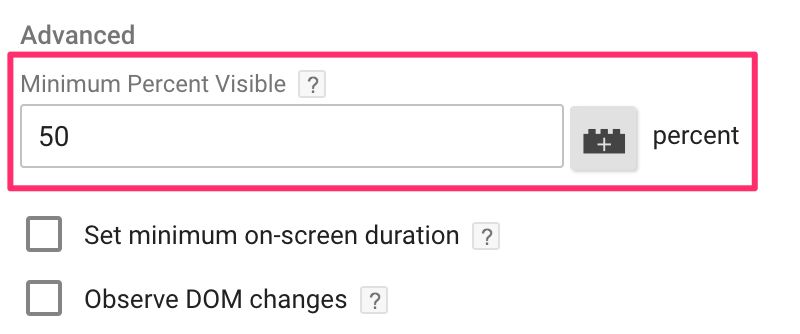
Advanced - Minimum Percent Visible
Here you can specify a value in percentages, which is how much of the element needs to be in the viewport for the trigger to fire. So if you set the value to “50”, at least 50% of the matched element needs to be visible for the trigger to fire.
This is a great way to make sure that enough of the ad or content piece is visible for you to interpret the data as meaningful.
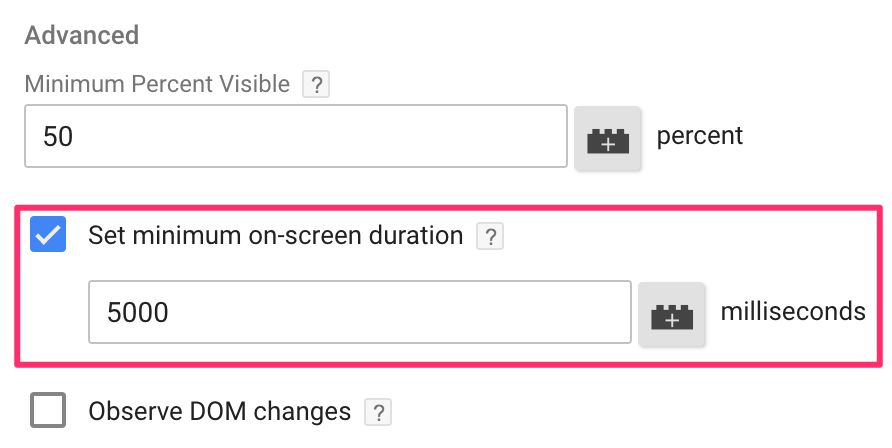
Advanced - On-Screen Duration
In this field, you can specify the total time in milliseconds the element must be visible in the viewport for the trigger to fire. Note that this is cumulative, so let’s say you have the following setting:
This would fire the trigger only after the matched element(s) have been visible in the viewport for a total of 5 seconds. In other words, the user could first scroll to the element, view it for one second, then scroll until the element disappears, then scroll back to the element, view it for four additional seconds, at which point the trigger fires.
Note that because GTM has to manage a timer for each element that you want to monitor, tracking a single element with the Element ID selection method performs better than a bunch of elements defined with CSS selectors.
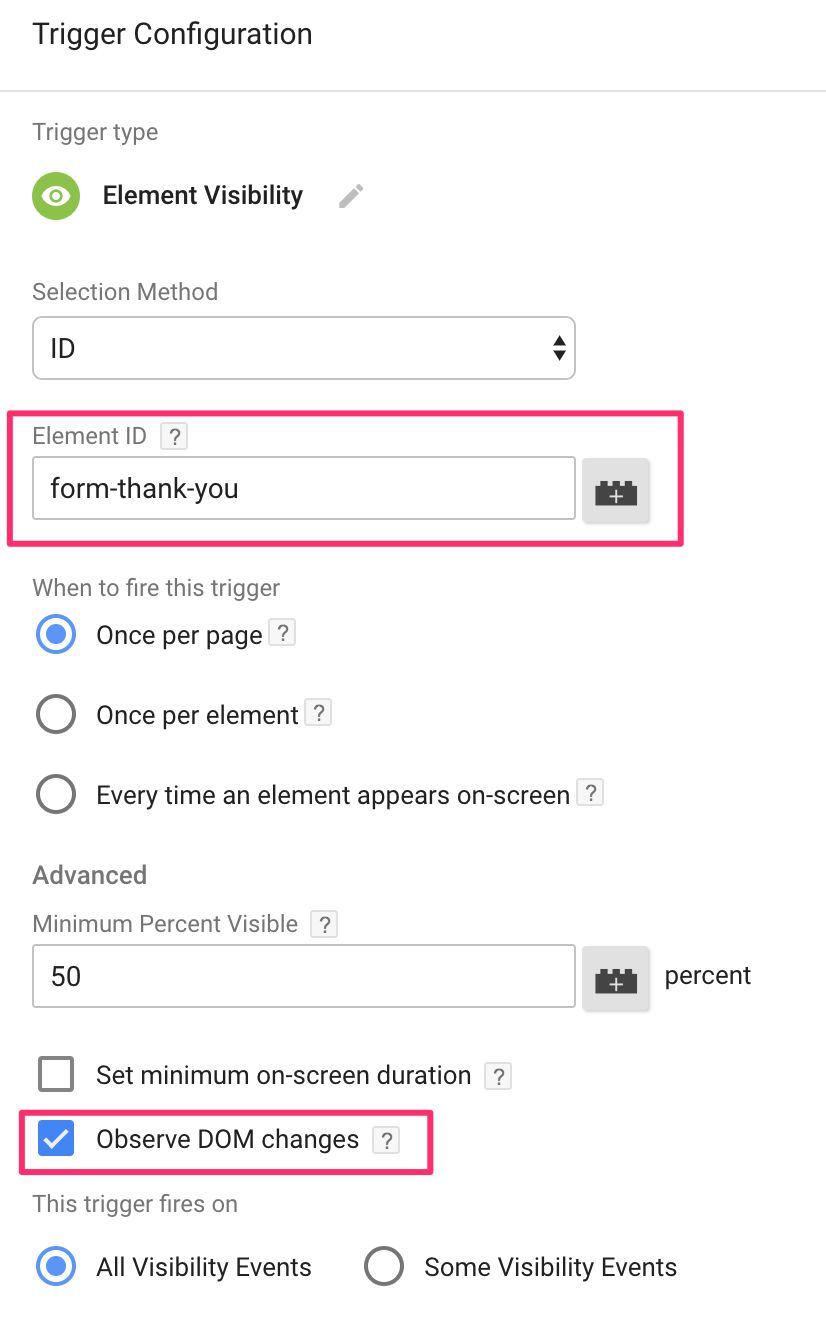
Advanced - Observe DOM changes
This setting lets you track the visibility of elements that might not exist in the DOM when the page first loads! In other words, if you have dynamically inserted elements, you can check this box to track when they become visible, too.
The most obvious use case is if you have a form which is resilient to GTM’s Form Trigger due to complications in the on-site JavaScript, you can use this trigger setting to wait for an HTML element with the thank you message to pop up. So something like this:
Now the trigger will fire when an element with the ID #form-thank-you becomes visible, even if it’s dynamically inserted into the Document Object Model!
Similar to tracking On-Screen Duration, the DOM Changes setting performs better when you track a single element with the Element ID selection method.
The event object contents
When the visibility trigger fires, an event with the name gtm.elementVisibility is pushed into Data Layer. The object has a number of variables you can refer to using Built-in Variables (or Data Layer Variables if you want to configure them manually).
gtm.element- the element that became visible. You can capture this with the Click / Form Element Built-in Variable.gtm.elementClasses- the class name string of the element that became visible. You can capture this with the Click / Form Classes Built-in Variable.gtm.elementId- the ID value of the element that became visible. You can capture this with the Click / Form ID Built-in Variable.gtm.elementTarget- the target attribute value of the element that became visible. You can capture this with the Click / Form Target Built-in Variable.gtm.elementUrl- the href or action attribute value of the element that became visible. You can capture this with the Click / Form URL Built-in Variable.gtm.visibleRatio- a decimal number between 0 and 100, telling you how much of the element was visible in the viewport when the trigger fired in percentages. You can capture this with the Percent Visibile Built-in Variable.gtm.visibleTime- the total cumulative time the element has been in the viewport when the trigger fires. The number is in milliseconds. You will only see a value larger than 0 if you’ve set the “On-Screen Duration” in your trigger (because without a minimum on-screen duration, the trigger will always fire immediately when the element appears). You can capture this with the On-Screen Duration Built-in Variable.gtm.visibleFirstTime- the time in milliseconds when the element first became visible in the viewport. This time is calculated as the delta from the moment the browser started rendering the Google Tag Manager container snippet to the moment the trigger fired.gtm.visibleLastTime- the time in milliseconds when the element most recently became visible in the viewport. The calculation is similar togtm.visibleFirstTime, except this time each time the trigger fires for the given element, the value is updated.
You can use these variables (preferable as Built-in Variables) to create even more advanced configurations in your other tags, triggers, and variables.
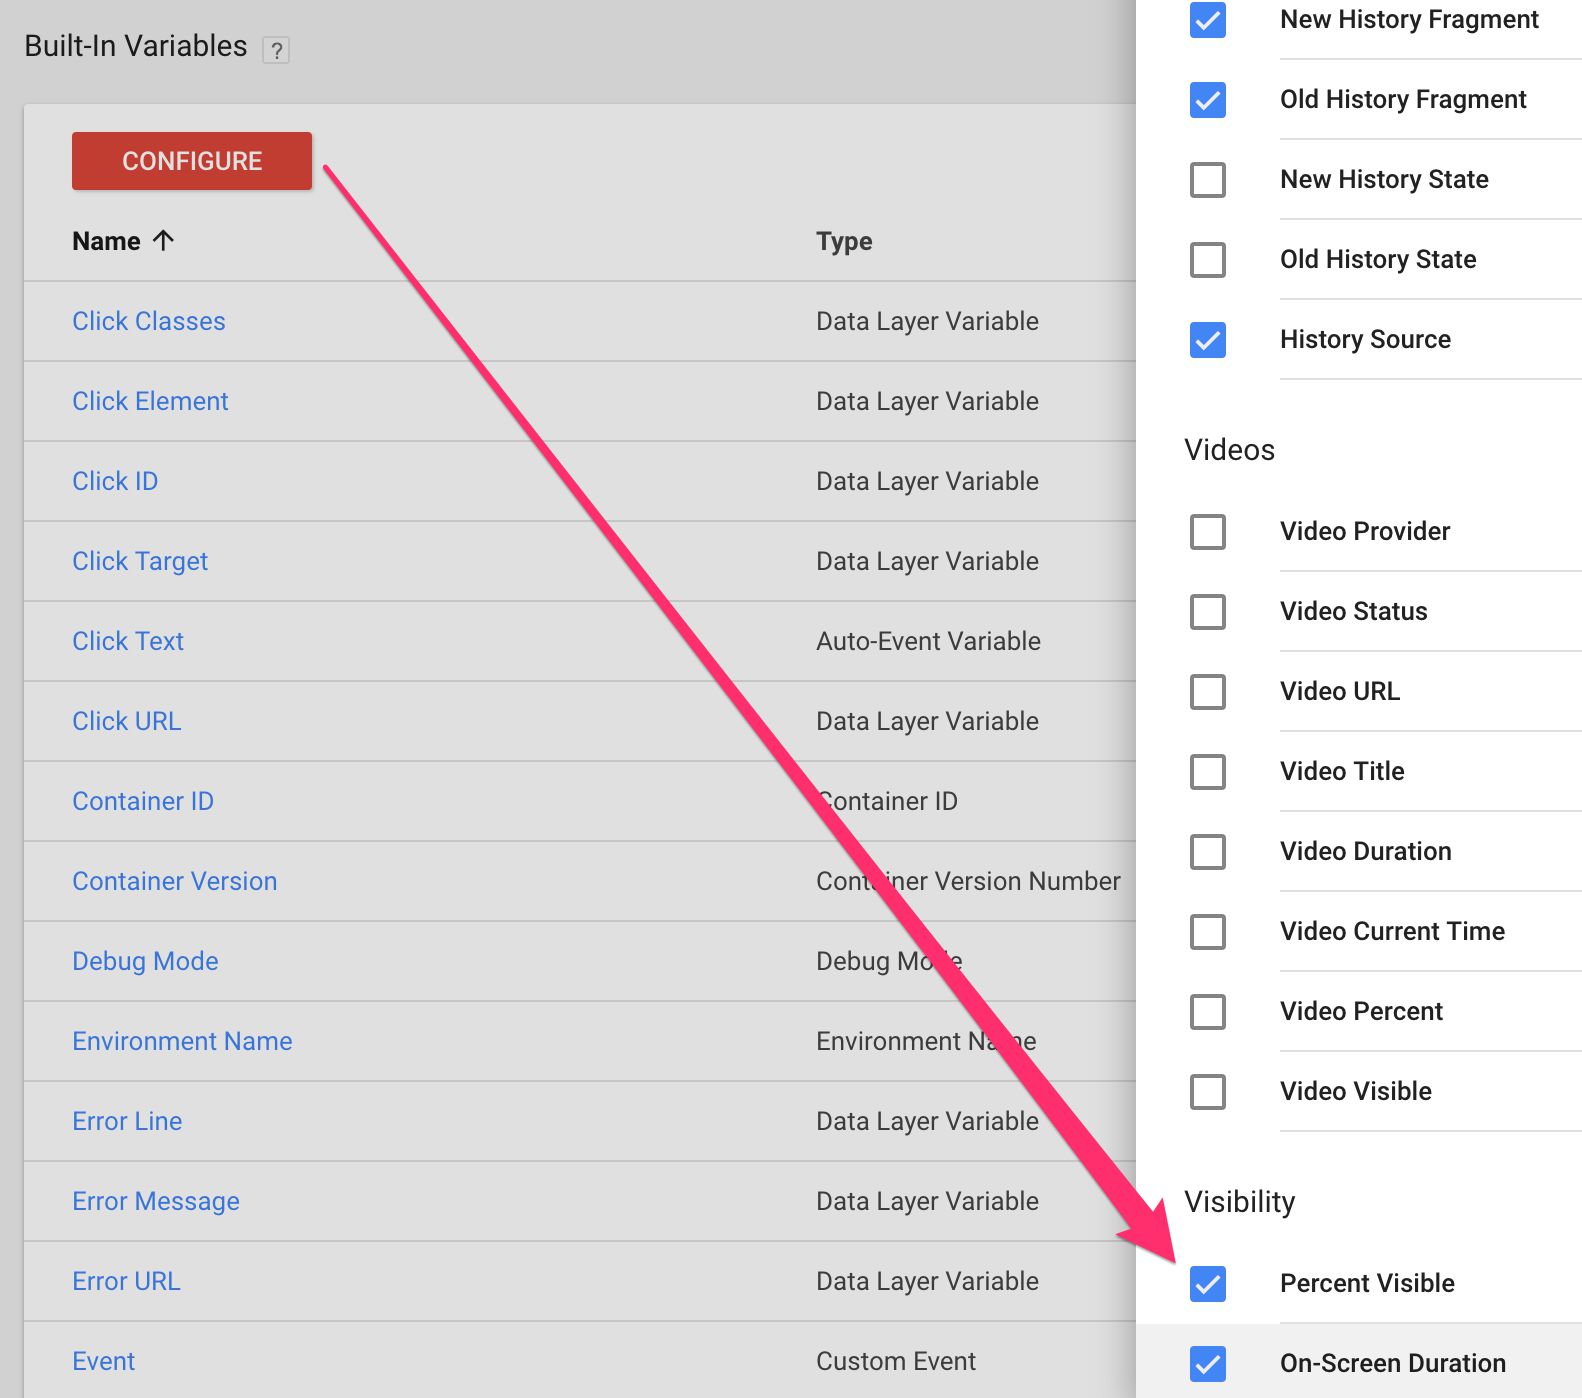
Built-in Variables
There are some new built-in variables introduced, too:
In addition to these, you have the regular Click / Form Built-in Variables at your disposal, since the element that fired the Element Visibility trigger is used to populate these Built-in Variables.
Summary
The past month or two have been crazy in Google Tag Manager land. Features that we’ve been dying to see have been released with impressive speed and attention to detail.
Out of the bunch, I think this new Element Visibility is my favorite one. It has the potential to turn your entire web analytics tracking around, since you can actually focus on tracking interactions that matter rather than interactions that simply take place. Visibility is such a huge aspect of things we do on a web page. If an element is not visible, it can’t really be engaged with by a user.