Without a doubt, the possibility to leverage CSS selectors in Google Tag Manager’s trigger conditions is one of the most useful features of the platform. It gives you an amazing amount of flexibility, especially when combined with GTM’s click and form triggers.
Essentially, CSS selectors let you test an HTML Element against a selector string. This check verifies that the element matches the given selector. In practice, this would mean that when you use the click or form trigger, you can check if the Click Element or Form Element built-in variables match a specific selector, allowing you to confirm that the action happened on the correct element. I’ll explain this with more detail further down.
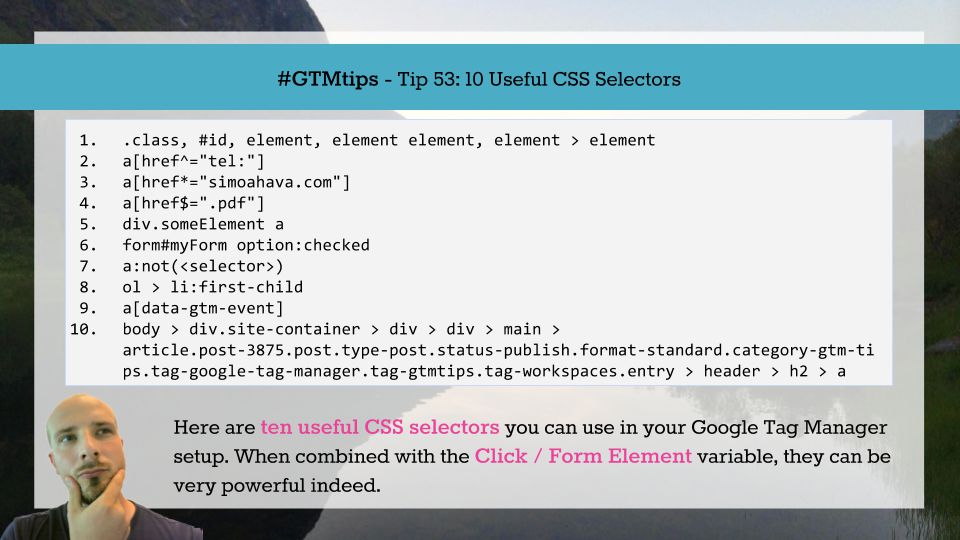
In this #GTMTips article, I’ll showcase ten useful CSS selectors which might come in handy in your Google Tag Manager setups.
The Simmer Newsletter
Follow this link to subscribe to the Simmer Newsletter! Stay up-to-date with the latest content from Simo Ahava and the Simmer online course platform.
Tip 53: 10 Useful CSS Selectors
Even though you can use CSS selectors in any JavaScript (or CSS) you deploy in your site or in GTM, I’m guessing your most typical scenario would be the matches CSS selector trigger condition.
This trigger condition is used when you want to evaluate the element that was clicked (or submitted, in case it was a form). In other words, to use a CSS selector against the clicked element, you would first need a trigger which records clicks or forms, and then you’d need to append it with a condition like so:
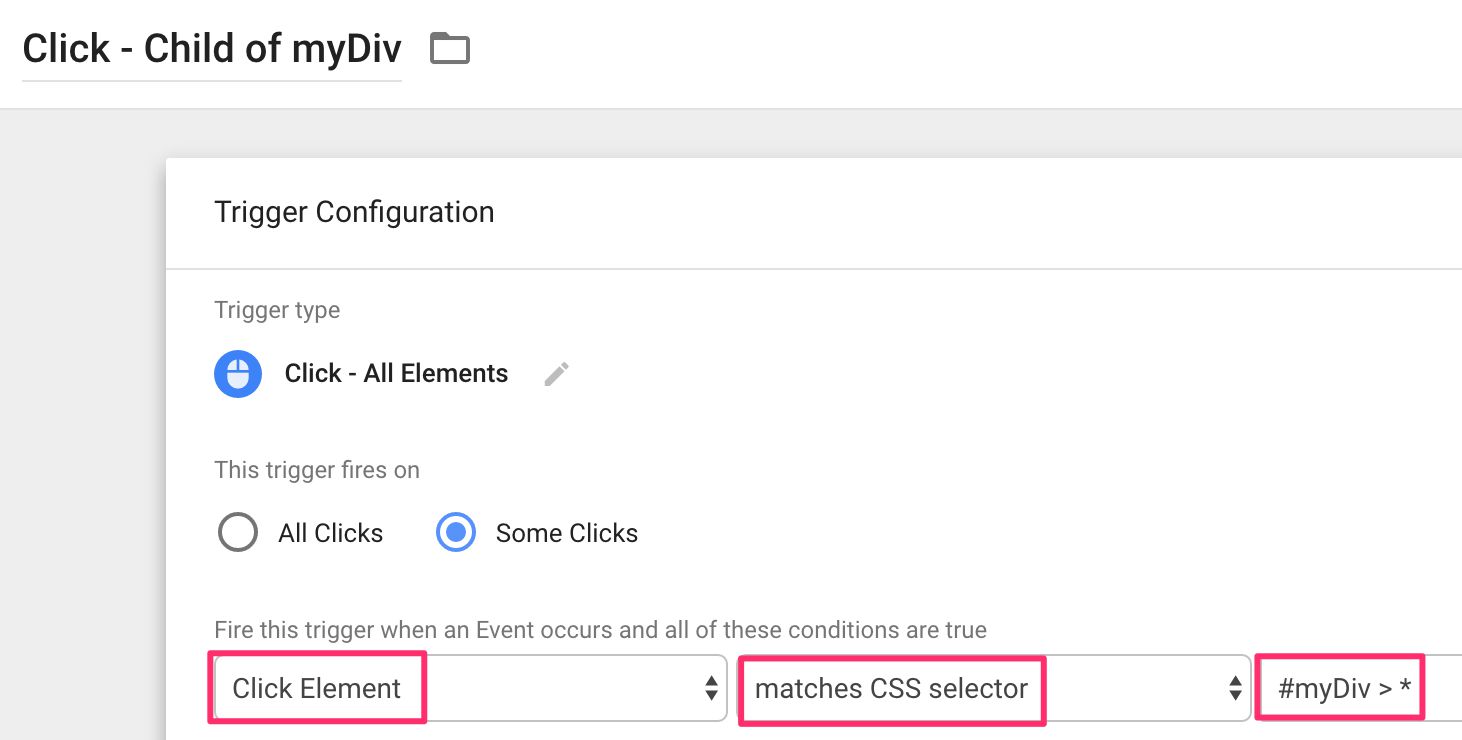
For example, the trigger above would only fire if the clicked element was a direct child of an element with the ID myDiv.
And that’s how CSS selectors can be used with triggers. Note that CSS selectors are very useful in general, too. It goes without saying that you’ll need them in stylesheets, but they can also be used with the querySelector() and querySelectorAll() DOM methods, as well as with matches() (cross-browser support might need some tweaks).
Anyway, without further ado, here are 10 useful CSS selectors for your viewing pleasure.
1. Generic selectors
The following selectors are used to pinpoint elements based on their attributes or their position in the DOM. Selectors can be combined by putting them one after the other. For example, div[title="someTitle"][data-gtm-event="someEvent"] would match any div element that has both the title and data-gtm-event attributes.
.someClass- matches an element with class “someClass”, e.g.<div class="someClass">.#someId- matches an element with id “someId”, e.g.<span id="someId">.element- matches any HTML element named “element”. For example, “div” would match alldivelements on page, and “div#myId” would match<div id="myId">.element element- matches any HTML element that is the descendant of the preceding element. Doesn’t need to be a parent-child relationship - the first element just needs to precede the second one in the same tree. For example, “span.myClass div#myId” would match anydiv#myIdthat is the descendant of aspan.myClass. You can add as many links to the chain as you want: “div#main ol li”, for example, would match anylithat is the descendant of anolthat is the descendant ofdiv#main.element > element- matches any HTML element that is the direct child of the preceding element. For example, “div#myId > a#contactUs” would match<a id="contactUs">that is the direct child of<div id="myId">.selector, selector- two selectors separated by a comma are evaluated with EITHER-OR logic when used in a trigger. So you can specify multiple selectors, and as long as one of them matches, the trigger will fire.
These generic selectors are the basis for pretty much everything you do with CSS selectors, so it’s a good idea to learn how they work.
2. a[href^=“tel:”]
This selector matches any link element (<a>) whose href attribute begins with the string “tel:”, such as: <a href="tel:01010101">. This is useful for tracking clicks on telephone numbers that have been encoded to use the “tel:” protocol.
You can also make it work with email links: a[href^="mailto:"], the SMS protocol: a[href^="sms:"], and the outdated but still prevailing JavaScript protocol: a[href^="javascript:"].
3. a[href*=“simoahava.com”]
This selector matches any link element whose href attribute contains “simoahava.com”. Thus I can use it to weed out (or include) clicks on internal links on my website.
4. a[href$=".pdf"]
This selector matches any link element whose href attribute ends with “.pdf”. This is useful for tracking PDF links. To measure other filenames, you can simply replace “.pdf” with whatever filetype you want to track.
5. div.someElement a
I already covered this in the generic selectors, but there’s a very important use case I should highlight.
When working with the Click / All Elements trigger, it’s a good idea to add a wildcard check for every element you want to track:
Click Element matches CSS selector a[href*="simoahava.com"], a[href*="simoahava.com"] *
In other words, after the actual selector, add a second selector that matches any descendant of that selector. This is useful because the All Elements trigger captures the very element that was clicked. With a nested DOM structure, this might often be something unexpected. For example, if you have a link that looks like this:
<a href="mailto:some@email.com">
  <span>some@email.com</span>
</a>
A click on the link element above will actually land on the <span/>. By setting the selector to a[href="mailto:some@email.com"], a[href="mailto:some@email.com"] *, you’re capturing clicks on the link element itself as well as any descendants (including the <span>).
6. form#myForm option:checked
You can use the pseudo-selector :checked to match any checked element. For example, form#myForm option:checked looks for any selected <option> element(s) in the form. This is useful when you want to identify which element in a drop-down list is currently selected.
7. a:not()
The :not pseudo-selector matches if the opposite of the given selector holds true. So, a selector like a:not([href*="simoahava.com"]) will match clicks on any links that do not have “simoahava.com” in their href attribute value.
8. ol > li:first-child
The :first-child selector will match the given element that is the first child of its parent. So ol > li:first-child will match the first <li> element of an <ol> list.
Other similar selectors are :last-child (matches the last child of its parent) and :nth-child(N) (matches the Nth child of its parent, so :nth-child(3) would match the element that is the third child of its parent).
9. a[data-gtm-event]
Square brackets denote attributes, and if you leave out the equals sign (=), you can simply check if an element has the given attribute. a[data-gtm-event] will match any link element that has the attribute data-gtm-event regardless of what the value of that attribute is.
10. body > div.site-container > div > div > main… ARGH
This is actually a tip rather than a useful selector. Try to avoid really long, complex selector chains. The longer chain it is, and the more you insist on direct parent-child relationships (>), the more points of failure you introduce into the selector.
All it takes is one element to change along that DOM path and your selector will stop working. Thus, try to always find the most generic selector that is still specific enough to match exactly what you are trying to capture. This requires some knowledge of the HTML structure of your templates.
The long, complex selector in this post’s feature image could be replaced simply with:
header > h2 > a
and it will be just as accurate, because I know for a fact that my HTML reserves that DOM sequence for the article titles you see on the main page.
Summary
And there you have it! These selectors should come in handy when you are tweaking your GTM setup.
Do you have any other really useful selectors you’d like to share with others? If you do, please share them in the blog comments!