Scroll depth tracking in web analytics is one of those things you simply must do, especially if you have a content-heavy site. Tracking scroll depth not only gives you an indication of how much users are digesting your content, but it also lets you turn meaningless metrics such as Bounce Rate into something far more useful.
If you’ve already been tracking scroll depth in Google Tag Manager, you’ve probably been using either Rob Flaherty’s brilliant Scroll Depth jQuery plugin, or Bounteous’ equally ingenious Scroll Tracking recipe. I’m sure you’ll be very pleased to know that Google Tag Manager just released a native Scroll Depth trigger, with which setting up scroll depth tracking will be a doozy!
The new trigger comes with all the base features you’d expect in a scroll depth tracking plugin. There’s no option to track scrolling to specific HTML elements, but luckily the recently released Element Visibility trigger takes care of this.
The Simmer Newsletter
Follow this link to subscribe to the Simmer Newsletter! Stay up-to-date with the latest content from Simo Ahava and the Simmer online course platform.
The trigger configuration
You can find the trigger in the Google Tag Manager user interface, by navigating to Triggers, clicking the NEW button, and selecting the Scroll Depth trigger template from the list.
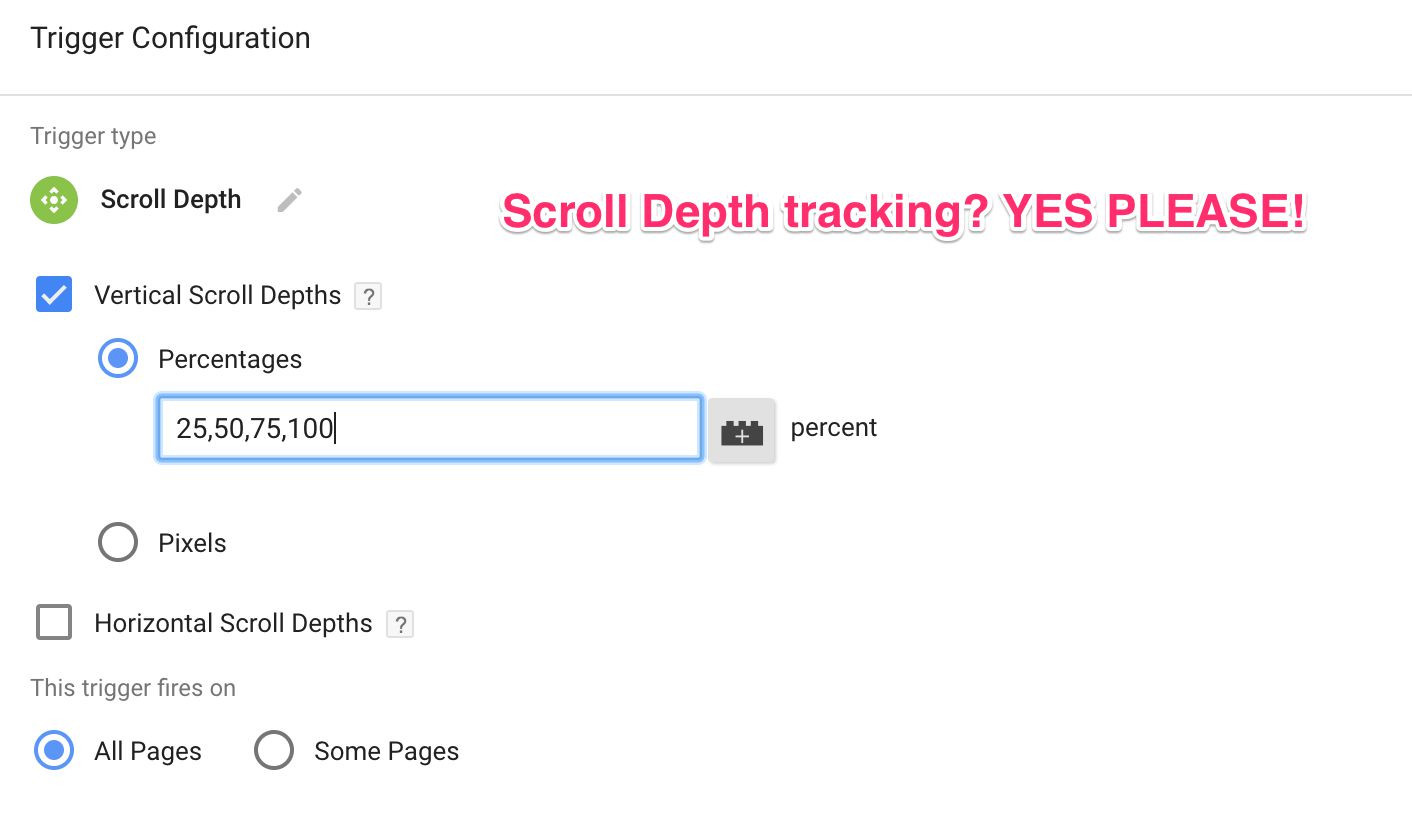
When you create the trigger, you’ll see the following configurable options:
- Vertical Scroll Depths - set the trigger up for tracking vertical scroll
1. **Percentages** - track percentages of vertical scroll

2. **Pixels** - track vertical pixel depths
- Horizontal Scroll Depths - set the trigger up for tracking horizontal scroll
1. **Percentages** - track percentages of horizontal scroll

2. **Pixels** - track horizontal pixel depths
- All pages / Some pages - enable the trigger either on all pages or only on some pages
The settings should be quite self-explanatory. For example, to track vertical scroll (i.e. scrolling from top to bottom) so that an event is triggered with 25% of page scrolled, 50% of page scrolled, 75% of page scrolled, and reaching the end, you’d set the trigger up as in the very first image of this article.
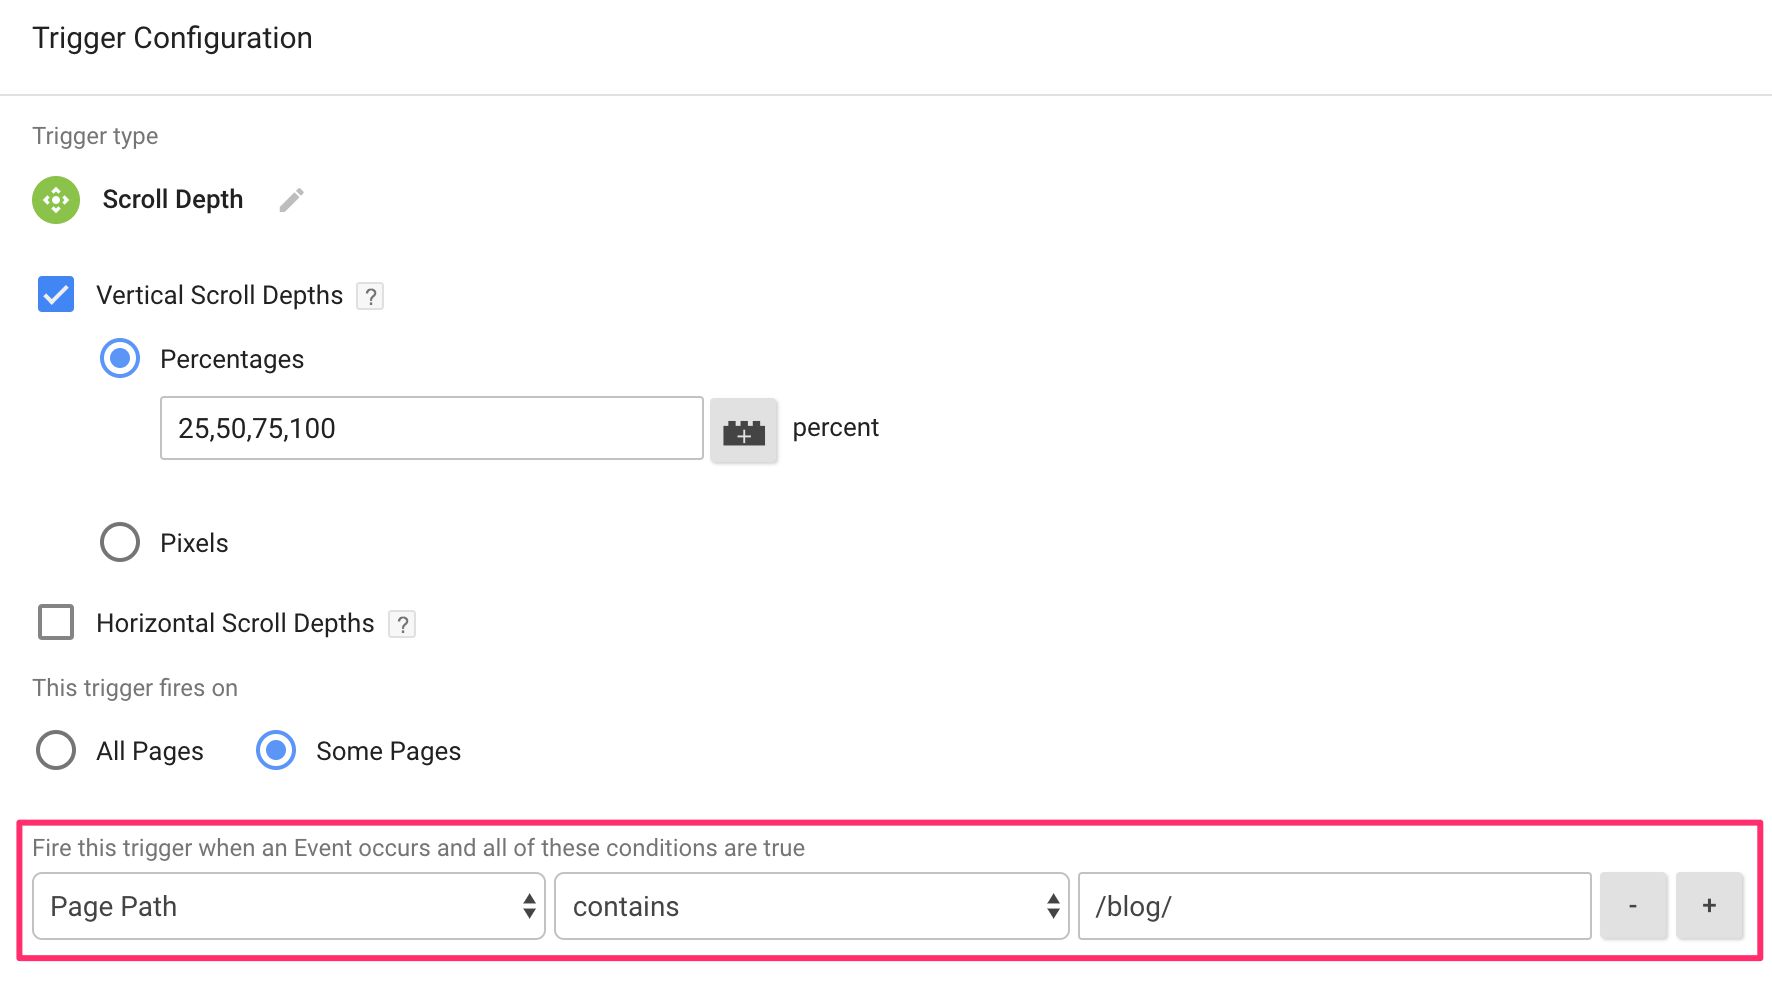
You might want to delimit the trigger to collect data only on content pages, which is where the Some pages option will come useful:
That’s it for the configuration.
How to use the trigger
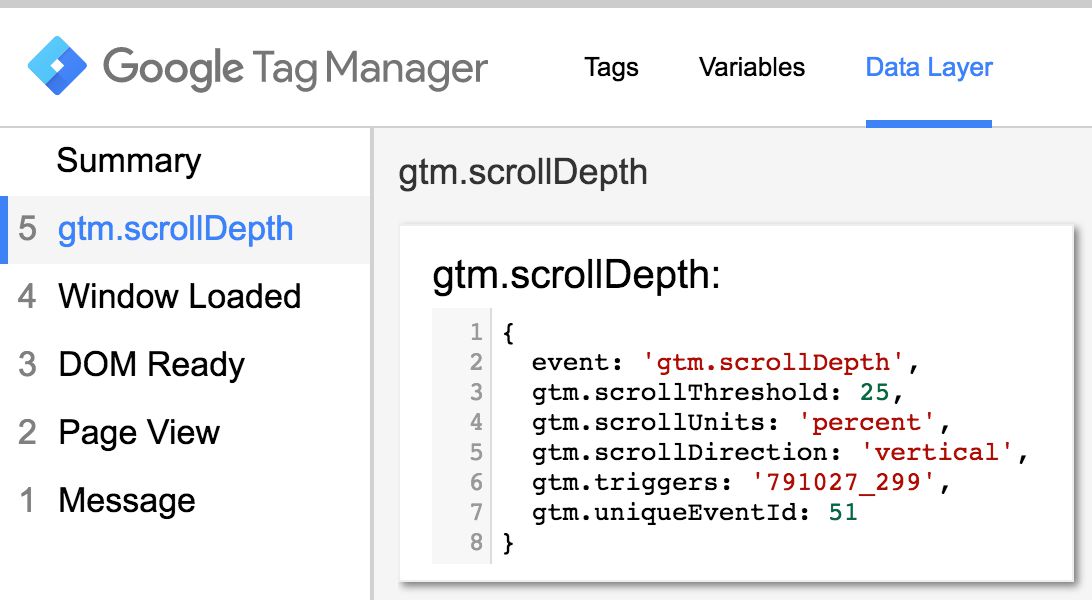
It’s a good idea to use the Preview mode for this. Set the trigger up with e.g. 25% thresholds (as in the image at the beginning of this article), visit a page on your site, and scroll some. You’ll see the following Data Layer object pushed when you reach a scroll threshold:
Here are the relevant Data Layer variables that are created:
event: 'gtm.scrollDepth'- this is the name of the event that is automatically pushed intodataLayer. This event, in turn, activates the Scroll Depth trigger.gtm.scrollThreshold: 25- this is the value of the threshold that was crossed. For example, when I scrolled to 25% of the page, I see the value25here. If I’d set 25 pixels as the threshold, I’d still see25here.gtm.scrollUnits: 'percent'- this will show either'percent'or'pixels', depending on which unit you chose for the trigger.gtm.scrollDirection: 'vertical'- this will show either'vertical'or'horizontal', depending on which type of scrolling action caused the threshold to be passed (and what you configured the trigger to listen to).
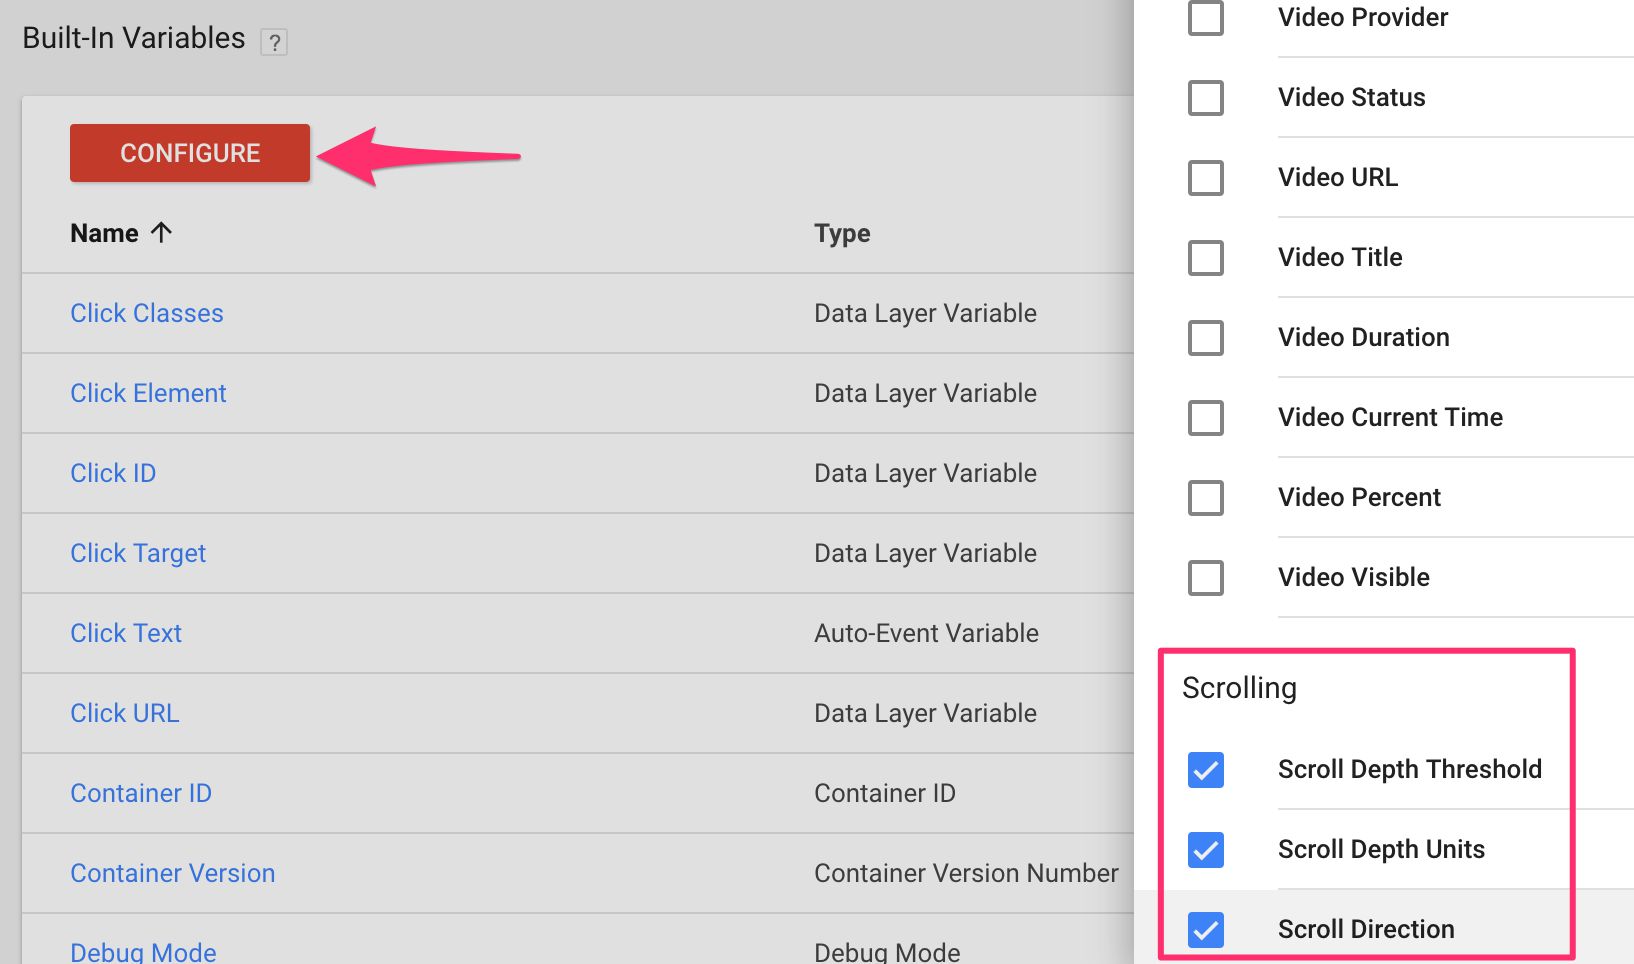
Note that you don’t need to create Data Layer Variables for gtm.scrollThreshold, gtm.scrollUnits, or gtm.scrollDirection. They have been added as new Built-in Variables, named Scroll Depth Threshold, Scroll Depth Units, and Scroll Depth Direction, respectively.
You’ll find the new Built-in Variables by navigating to Variables in the Google Tag Manager user interface, and clicking CONFIGURE under the “Built-In Variables” heading.
Putting it together
With this information, it will be easy to setup a Google Analytics Event tag to collect your scroll tracking data. For example, the following tag fires for each 25% of page scrolled.
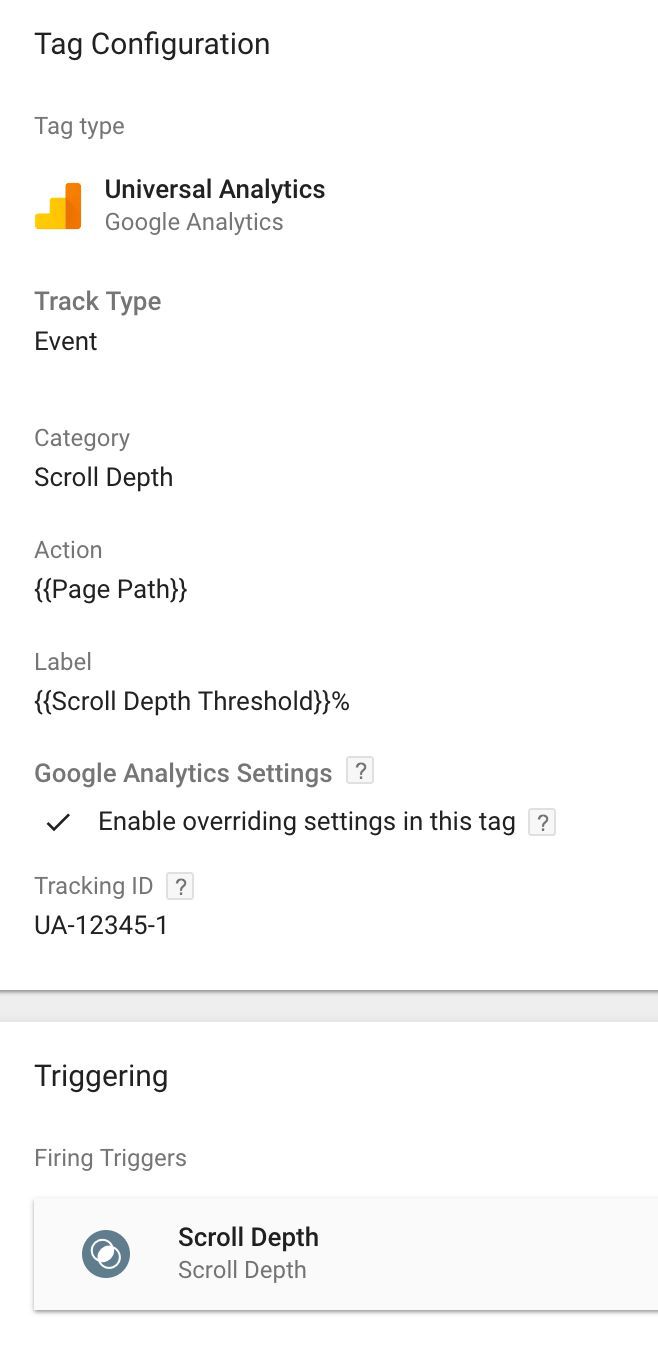
You can even configure the “Non-Interaction” field to be true for the 25% mark, and false for the rest. This will make sure that your site’s Bounce Rate isn’t affected by minimal scroll. The Custom JavaScript variable you’d use in the Non-Interaction field would look like this:
function() {
  return {{Scroll Depth Threshold}} === 25;
}
This returns true if the user crossed the 25% mark, and false otherwise.
Caveat
You need to be mindful of one thing when working with a scroll depth tracking plugin. If you load the page so that you are on or have crossed any one of the defined thresholds, the gtm.scrollDepth trigger will automatically fire for all the thresholds you have crossed.
So, if you are at the very bottom of a page and you reload the page, GTM will fire a trigger for each of the thresholds 25%, 50%, 75%, and 100%, without the user explicitly scrolling.
This might have an impact on your data collection, so you just need to be mindful of this. This is also one reason why it’s a good idea to have the first threshold as non-interactive, because if the page is very short, it’s possible the trigger will fire even if the user didn’t scroll one bit.
Summary
The scroll depth trigger now offered by Google Tag Manager natively works very nicely, and checks most of the boxes you’d expect in such a plugin.
If you want to track scrolling to specific elements, be sure to check out the Element Visibility trigger!
One thing that is questionable is how well this jives with a single-page app. When you transition from one page to the other, any scroll tracking trigger that was active on the previous page would still be active, and thus the depth tracker would not reset to accommodate scrolling on the new, dynamically loaded content. It remains to be seen if the plugin will support somehow “resetting” it for single-page transitions.
What do you think of this release? Does this make the alternatives out there obsolete, or do you think this new trigger is desperately in need of some additional features?