With the release of the latest Google Tag Manager API version, it’s time to release the new version of GTM Tools. Most of the changes have been done under the hood, with the entire codebase refactored for improved stability.
I released the first toolset in October 2014, and quickly released an updated UI a few months later. Aside from a few bug fixes and stability improvements, the tools have remained largely unchanged since then. Now with the new API version, it was time to update the tools again.
Thus this current version is actually the third iteration of the tools. The changes might not seem that dramatic, but trust me when I say this is the best version of the tools so far. The added features should make it easier to use the tools, the stability upgrades should prevent the tools from bugging out as often as before, and there are plenty of improvements that make it easier for me to manage and release new versions of the tools.
This article will be the closest thing to a “user guide” the tools can have, so I’ll jump straight to the subject matter right after this disclaimer:
GTM Tools is not a commercial product.
This toolset is my own, personal, intellectual property, with no purpose of making money out of it or making it the best possible product out there. It’s got bugs, the code is still pretty convoluted in places, and I haven’t done nearly enough testing. It’s a toolset that you might find useful or then you might not.
When you use GTM Tools you need to accept this.
Note also that when you use the Library feature, the assets you save into the library will be viewable by me, as I need to access this information for debugging and management purposes. I will, under no circumstances, use or copy your data. I will only read the data in situations where I deem it necessary to keep GTM Tools functional.
I would also appreciate if you sent me email (simo(at)simoahava.com) when encountering any bugs, errors, or freezes. Just remember to check the Known Issues part of this guide first.
The tool is located in this URL:
The Simmer Newsletter
Follow this link to subscribe to the Simmer Newsletter! Stay up-to-date with the latest content from Simo Ahava and the Simmer online course platform.
Latest releases
21 Feb 2020
- Removed the Slack integration. It was a fun experiment, but it turned out to be a resource hog. GTM doesn’t have a notification system, so the solution was to poll GTM periodically to see if there’s a new container version. This is expensive and full of memory leaks, so I decided to abandon this proof-of-concept.
27 Aug 2019
Added an option in Workspace mode where you can show a list of all links to the selected item.
If no links are found, a Delete button appears in the item row.
If the button is clicked, the item is marked for deletion.
Once the workspace is updated, the item is deleted.
The purpose of this feature is to let users easily delete items that are not used in the container in any way.
26 Jun 2019
Added support for Custom Templates.
Custom Templates are included when cloning an entire container.
If cloning a tag from cart that is based on a Custom Template, the clone will fail unless the template is included in the cart OR the target container already has the exact required template.
Templates are included in Workspace mode and in Visualizations.
9 Jun 2019
- Set an expiration of three months (since creation or last time the container was cloned) to stored containers. The container must be cloned every three months at the latest or it will be automatically deleted from the library.
16 Oct 2018
Added the option to choose container version when cloning a container.
Change all progress indicators to follow the pattern of Workspace mode, i.e. list all assets and show a green checkmark next to each when it’s cloned.
Added better error handling - now an error will simply skip the item that caused the error rather than cause the whole process to abort.
Prevent closing of a modal if a cloning process is in progress.
Added the possibility to flush the cart from anywhere, not just the cart page.
Force reload of the page after a cloning process is complete - this is necessary so that the user doesn’t return to the main page and work with outdated data.
2 Oct 2018
Released Workspace mode.
With Workspace mode, you can mass edit items in the selected Workspace.
30 Sept 2018
Improve support for Tag Sequencing in Inspect mode (sequences are preserved as long as all sequenced tags are in the cart).
Add button to clear cart directly from the nav bar.
6 Sept 2018
List folders in Inspect view.
Clicking a folder row highlights all items in the folder.
You can add all items in a folder into the cart.
Added Expand/collapse all toggle to item list in Inspect view.
5 Sept 2018
- Preserve Tag Sequencing details for tags when cloning an entire container from one account to another.
11 Jan 2018
Added Slack integration to container pages.
Fixed “Last Modified” when viewing version details to match the last modified of the version and not the container.
29 Dec 2017
- Switched to HTTPS
3 Apr 2017
- Published the new version of the tools. Main changes are listed in 1. What’s changed?.
1. What’s changed?
Here are the main changes to this latest version of GTM Tools:
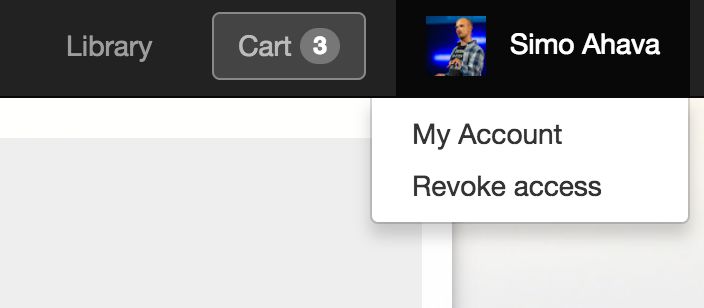
You can now revoke GTM Tools’ access to your data via the profile drop-down (Revoke access).
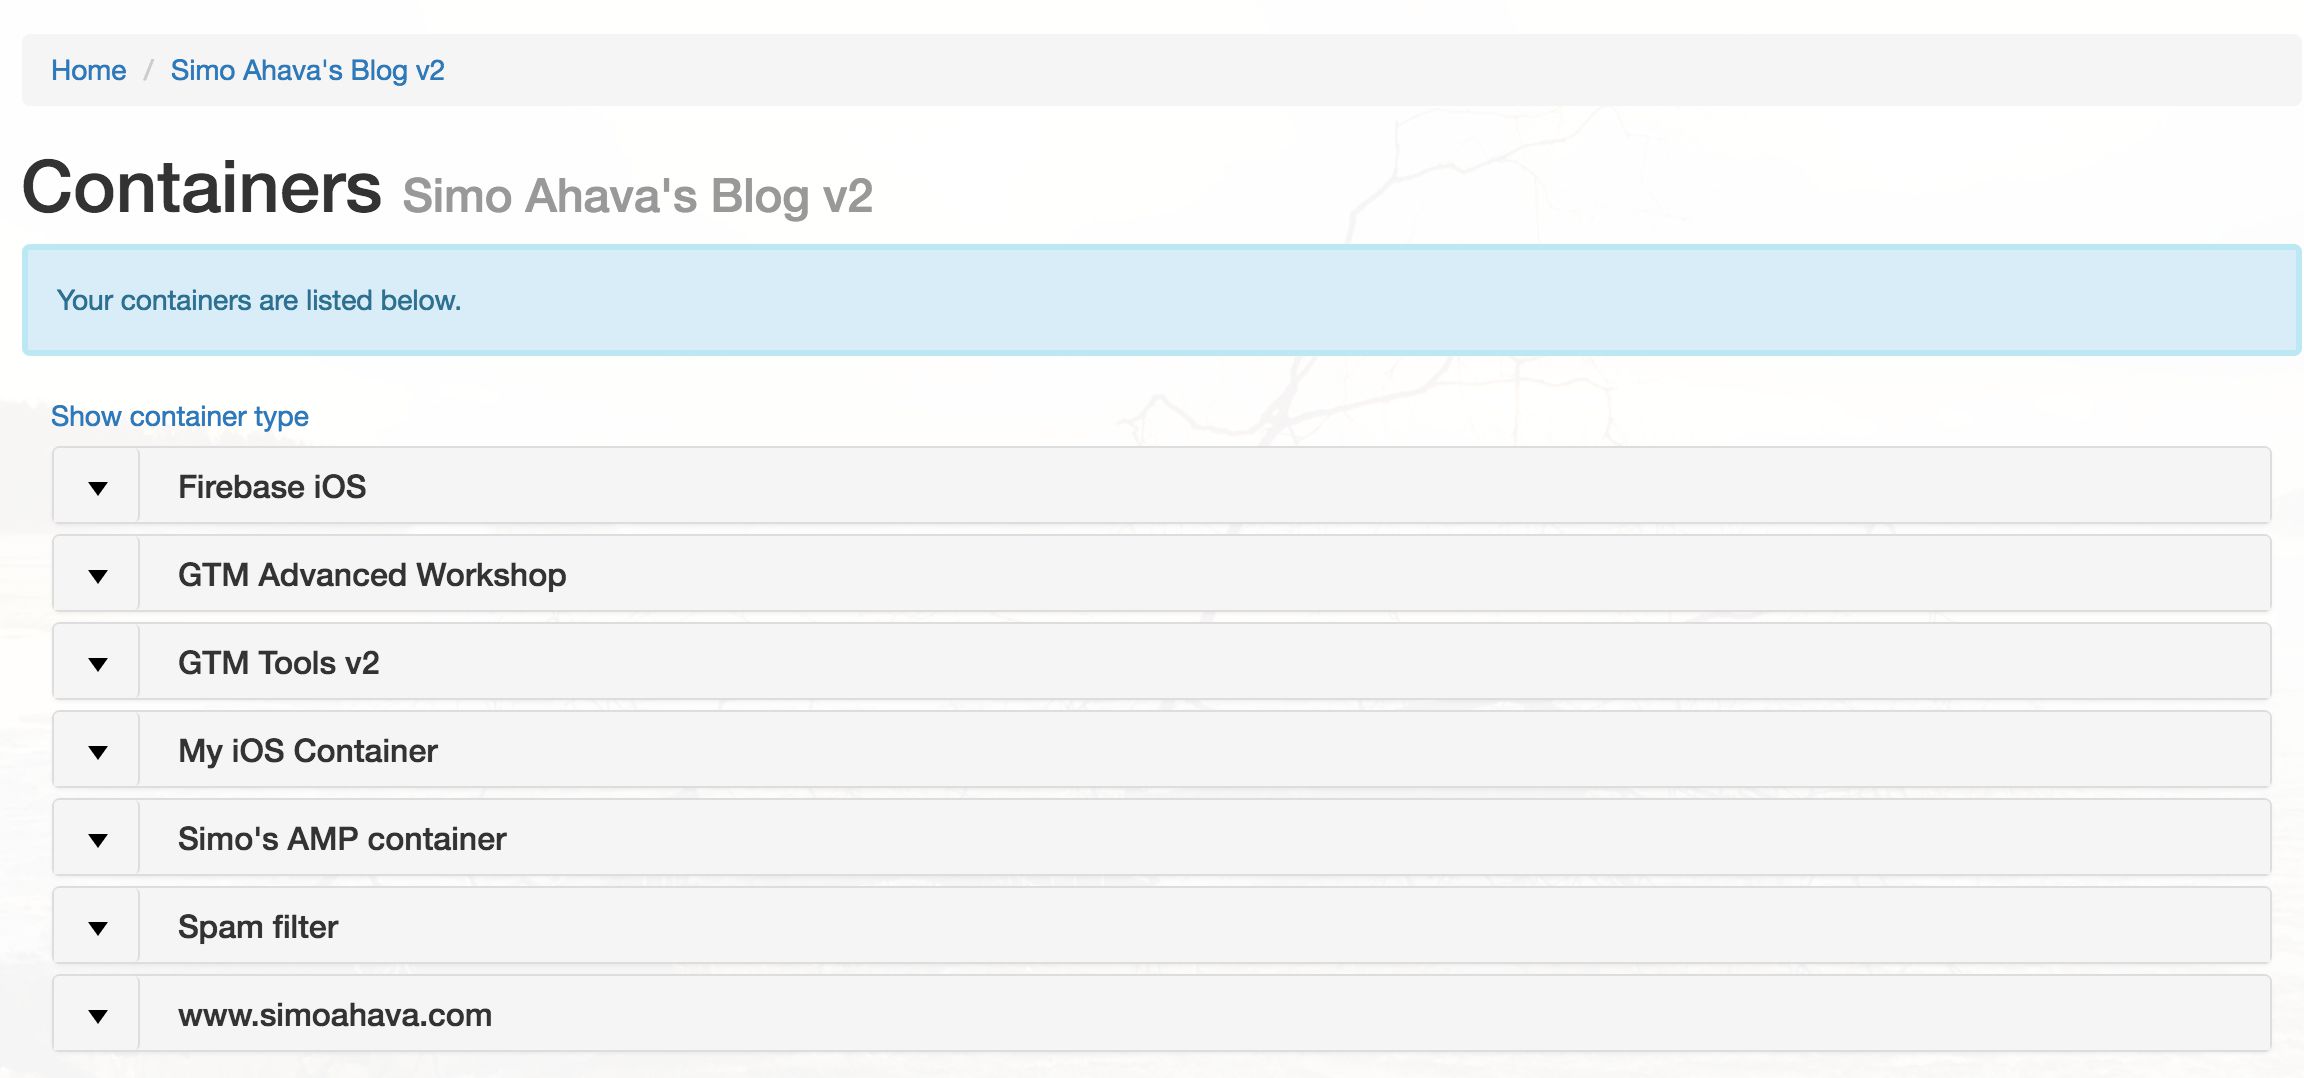
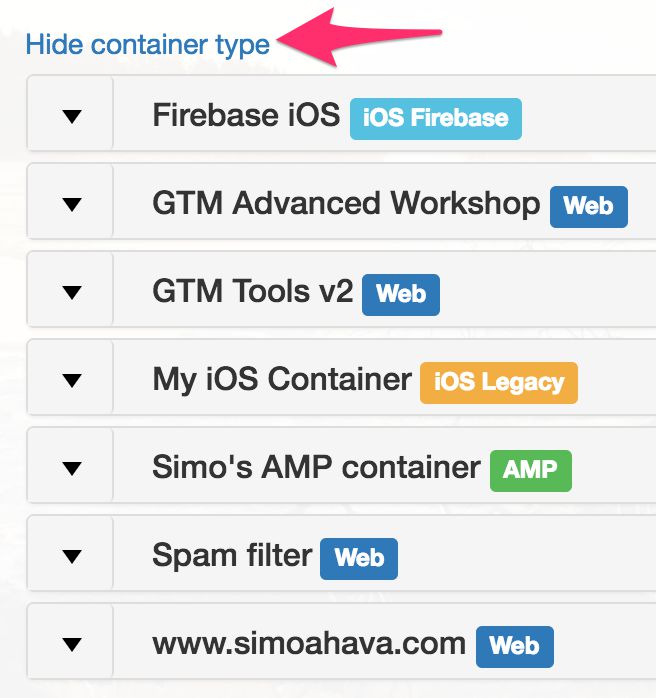
Click Show container type in any container list to see what type each container is.
You can only Save to cart an asset if it matches the container type already saved in cart. In other words, you can’t combine assets of different container types (e.g. Web and Firebase) in the cart.
You can only Clone cart contents to container if the cart type matches the container type. Thus you can’t clone Web assets to a Firebase container, for example.
This means that you can only Save to library a cart of a single type. And this, in turn, means that if you want to clone a saved container to an existing container, they must have the same type.
You can now Display notes in any Inspect container view.
You can export a Container overview as CSV in any Inspect container view.
You can select the Container version you want to inspect.
You can’t have multiple assets with the same name in the cart. If you do, these conflicting assets are flagged in the cart page.
Added Workspaces to all clone operations. Basically, you need to select a Workspace you are cloning into. You can also create a new Workspace as the target, if you wish.
Improved stability and error handling.
I rewrote almost the entire codebase, so stability and performance should have improved. This doesn’t mean it’s error-free (far from it).
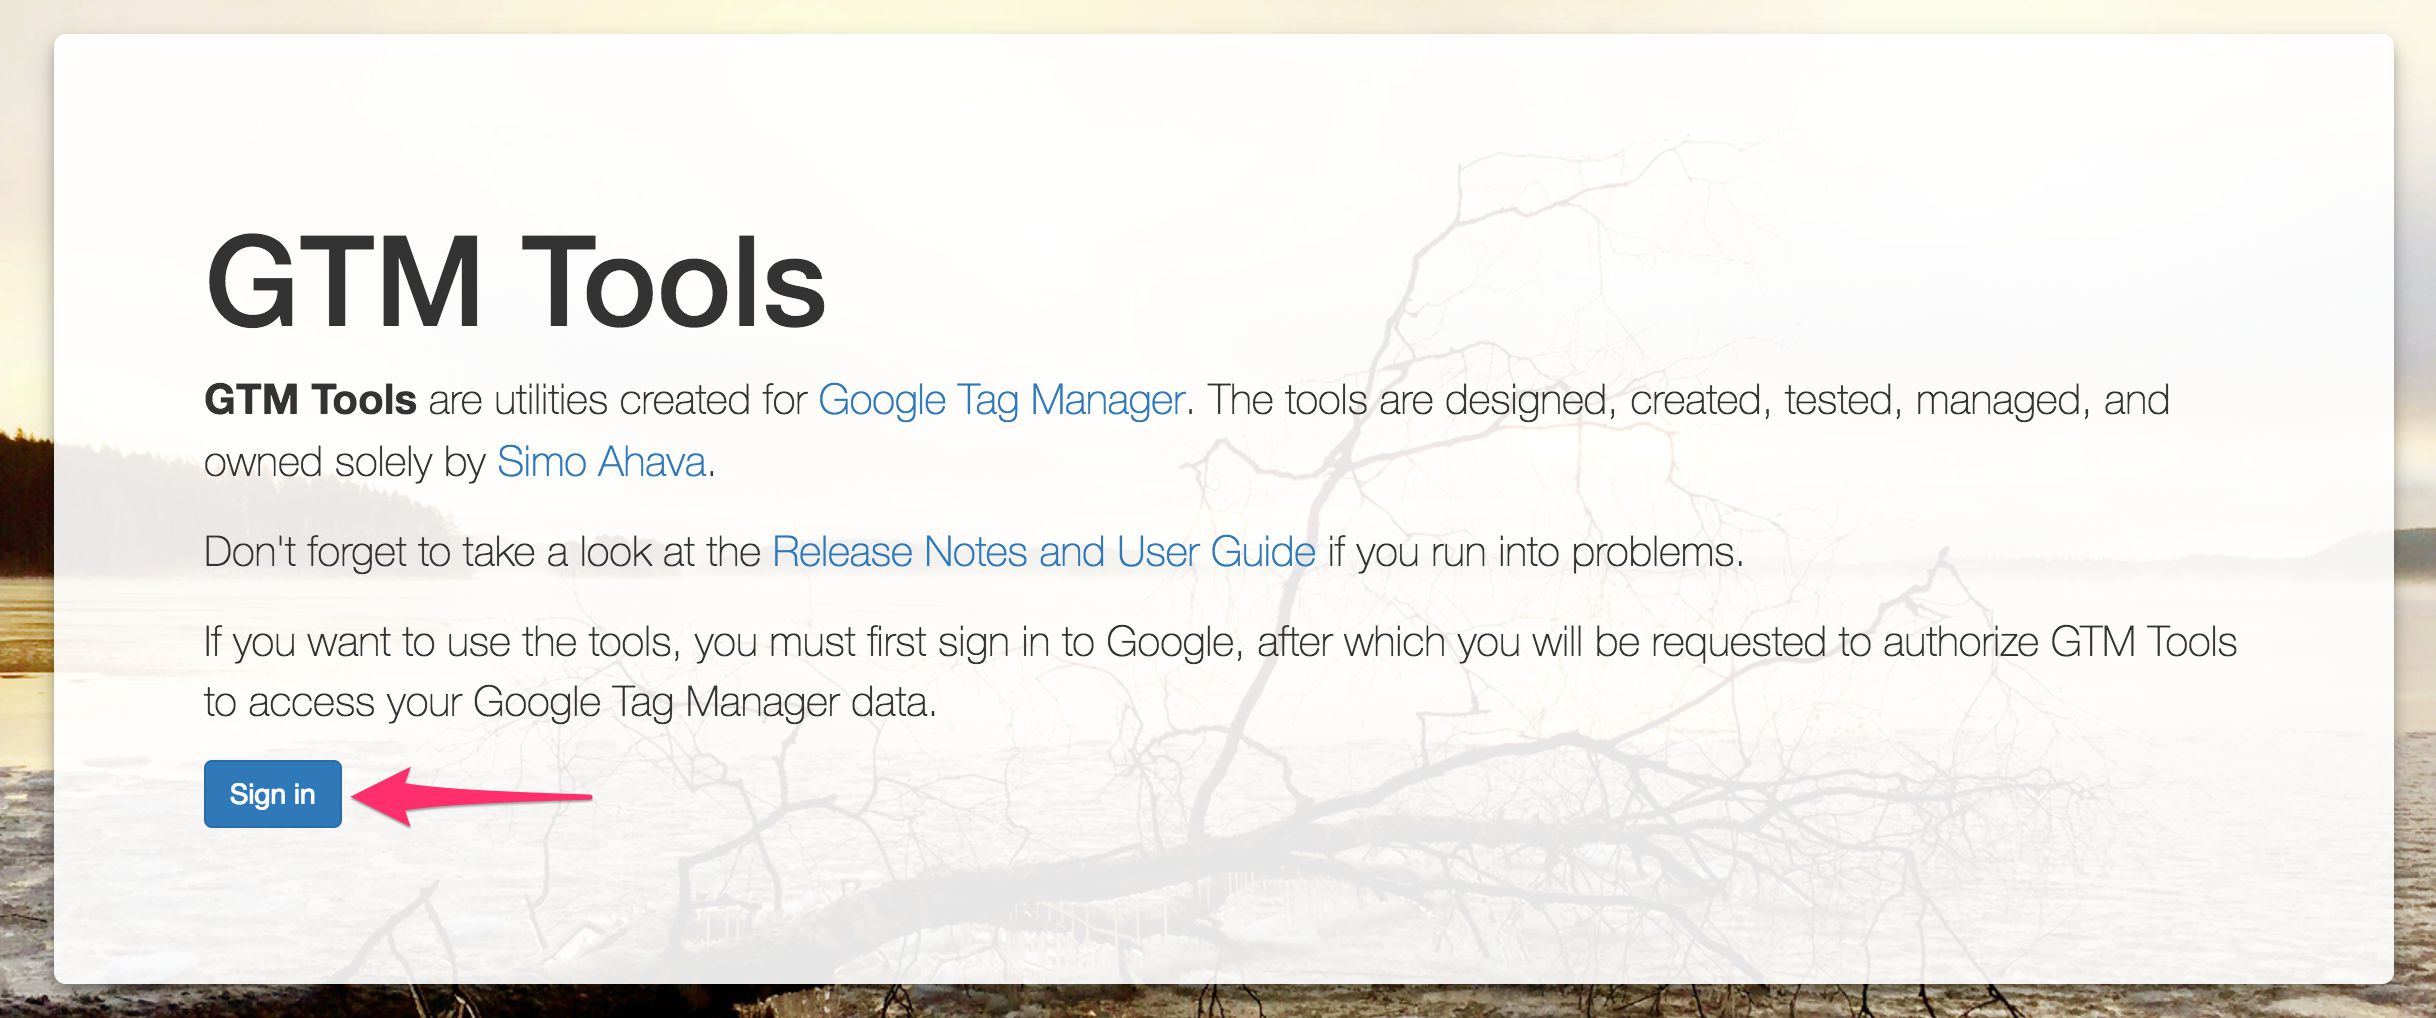
2. Login And Authentication
GTM Tools uses your Google Account for authentication. This means that when you first open the tool website, you will need to Sign in with your Google credentials. Note that GTM Tools has no sign in of its own. The tools use your Google sign-in to access your data. The only data that is permanently stored is your Asset Library data.
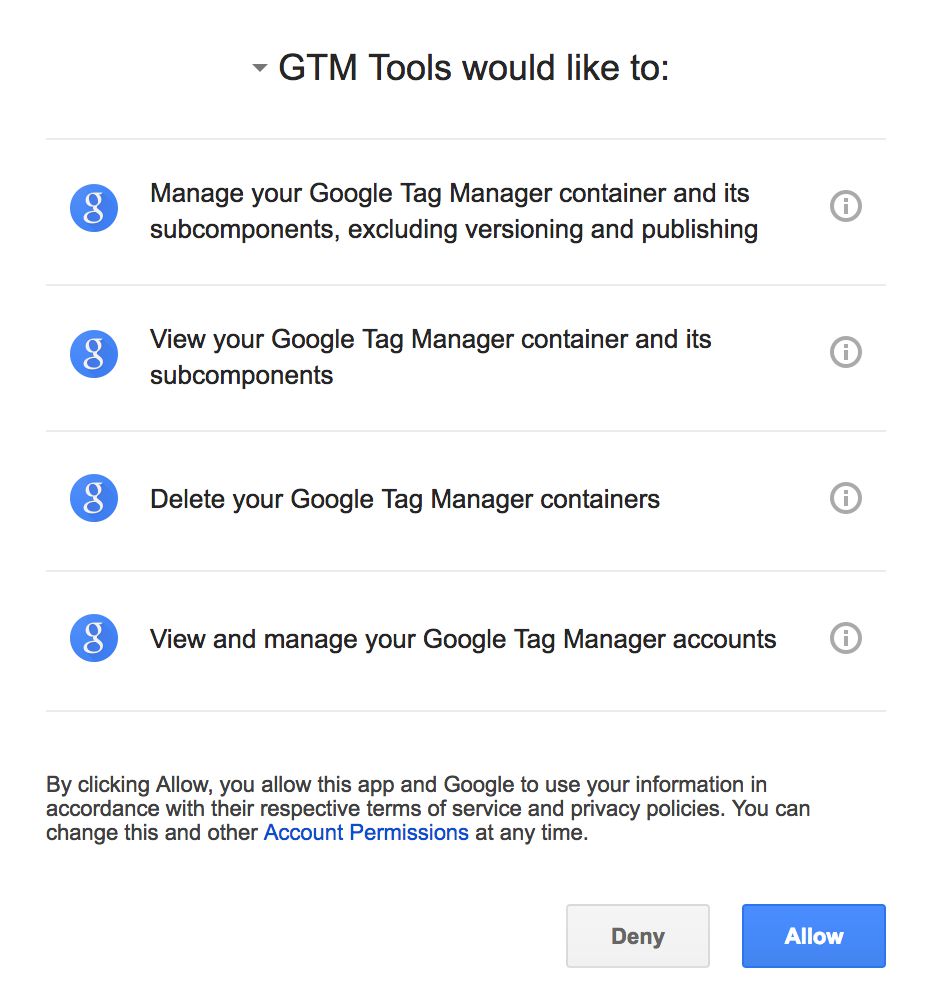
Once you’ve signed in, you will need to authorize GTM Tools for access to Google Tag Manager and your Google profile. Specifically, here are the authorization scopes you allow access to:
If you refuse to allow access, you will not be able to use the toolset.
Once you’re in the actual tool interface, you can see the profile you’ve logged in with in the upper right corner of the page. You can click this link and select Revoke access to revoke the tool’s access to your data at any time. This will not sign you out of your Google account. You can click My Account to access your Google Account settings.
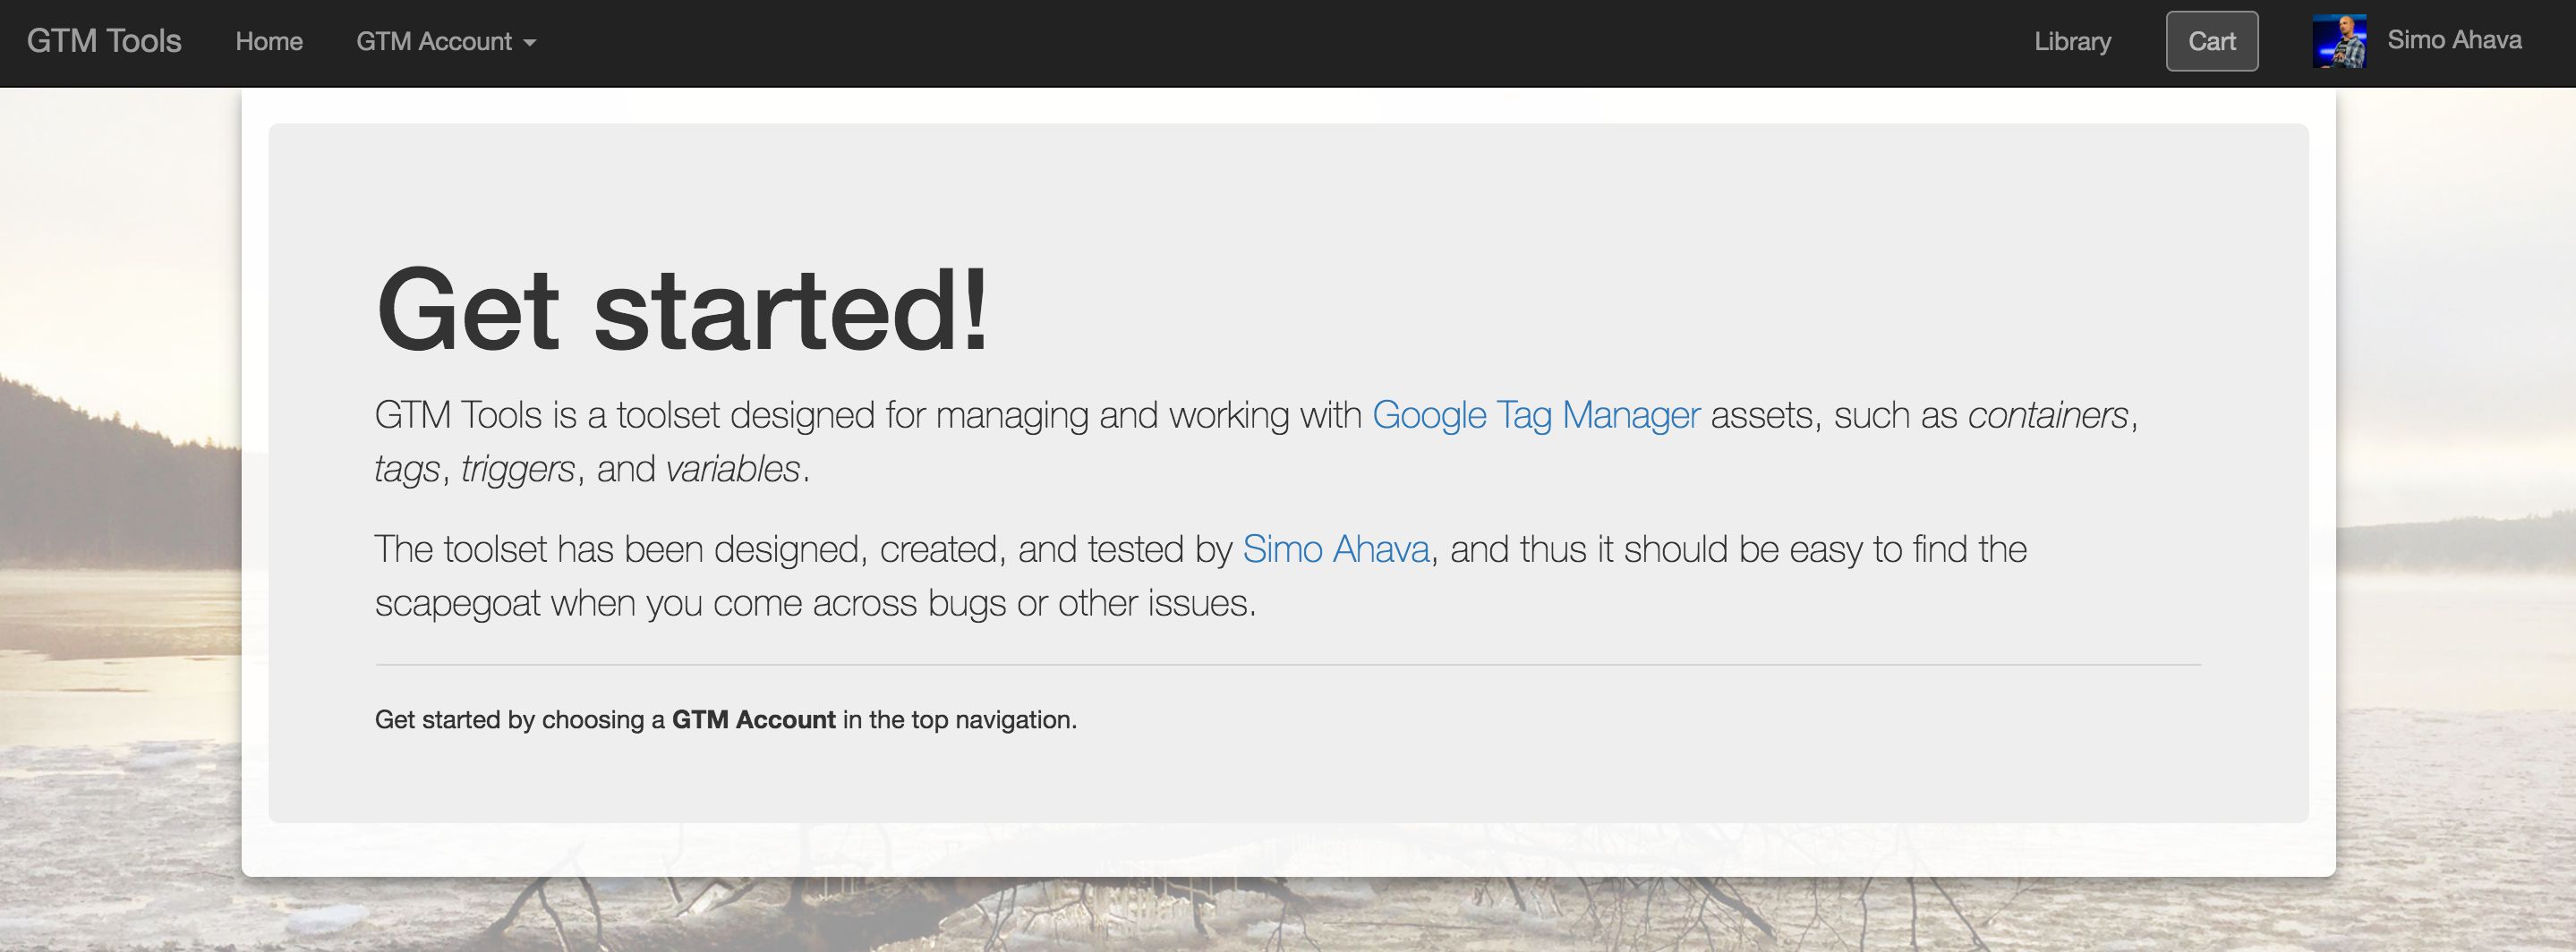
3. Home Page
The first page you’ll see in the tools is the home page. This page is a placeholder, and you should use the navigation bar in the top of the page to move on in the site.
The navigation has the following selections in the home page:
Home – Takes you back to the home page
GTM Account – This lists all the GTM accounts you have access to with the signed in Google Account.
Library – Takes you to the Asset Library where you can find your stored containers
Cart – Shows you how many items you have in your cart, and by clicking the button you will be taken to the Cart page
Your Profile – Clicking this shows a drop-down menu, where you can choose to access your Google Account settings and/or revoke GTM Tools’ access to your data.
4. Account Page
When you choose a GTM account in the Accounts navigation, you will be taken to a page that lists all the containers in the selected GTM account. If you click a container name, you will be taken to the respective Container page.
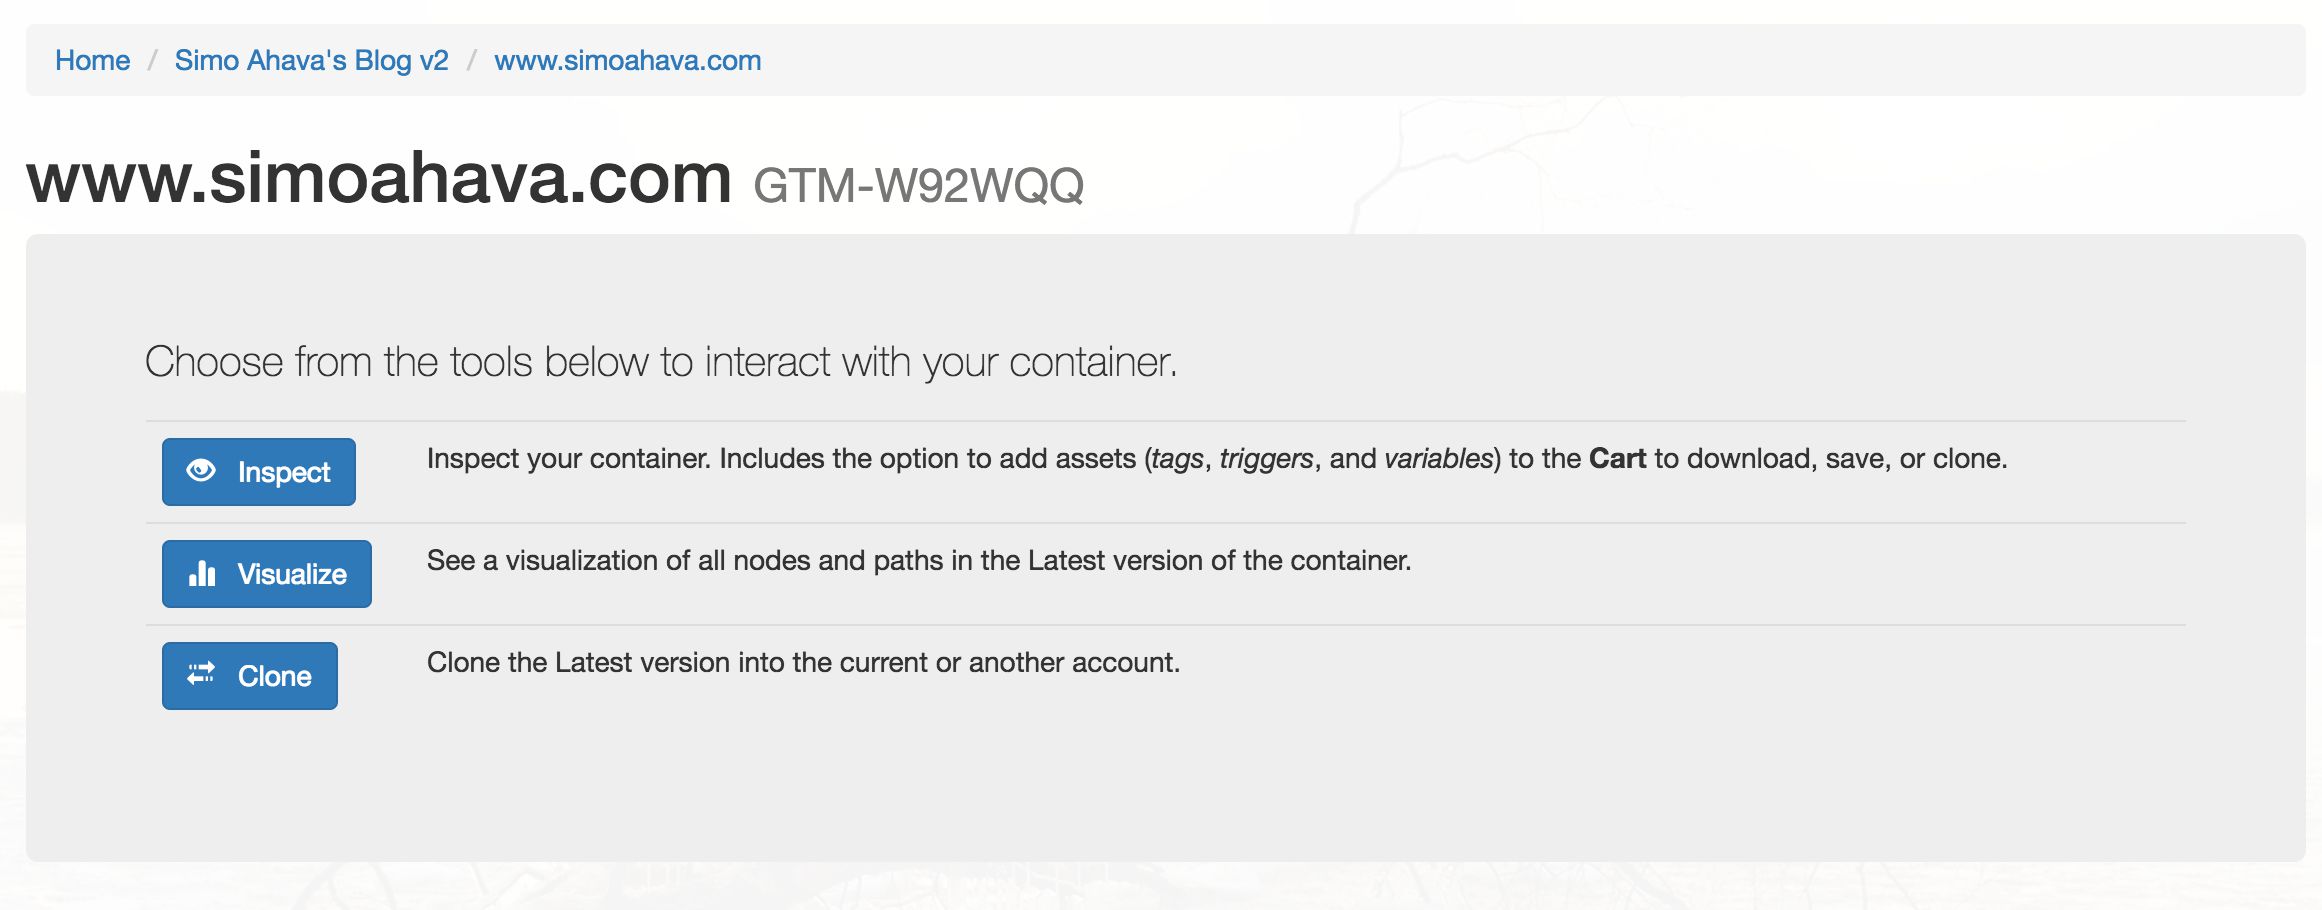
If you click the small down arrow next to a container name, you’ll see quick links for the following container actions:
Inspect - Takes you to the Inspect Container page, where you can view information about the container, and where you can add / remove assets from the container into the cart
Visualize - Takes you to the Visualize Container page, where you can view a visualization of the Latest Version of the container
Clone - Opens a modal dialog that lets you clone the Latest Version of the container
Note that only Inspect supports accessing other versions than the Latest Version. This is something I intend to fix in a future release. Until then, Clone and Visualize only access the latest container version.
If you click Show container type, you’ll see a label indicating what type each container is. This is relevant for cart interactions.
Read more about these actions in the following sections of this guide.
5. Container Page
The container page is here more for navigational reasons than to add any extra value. You can move through it to the individual actions (Inspect, Visualize, Clone), which you can also do from the account page, as you just learned.
The following chapters will include details about the various actions you can take.
Inspect Container
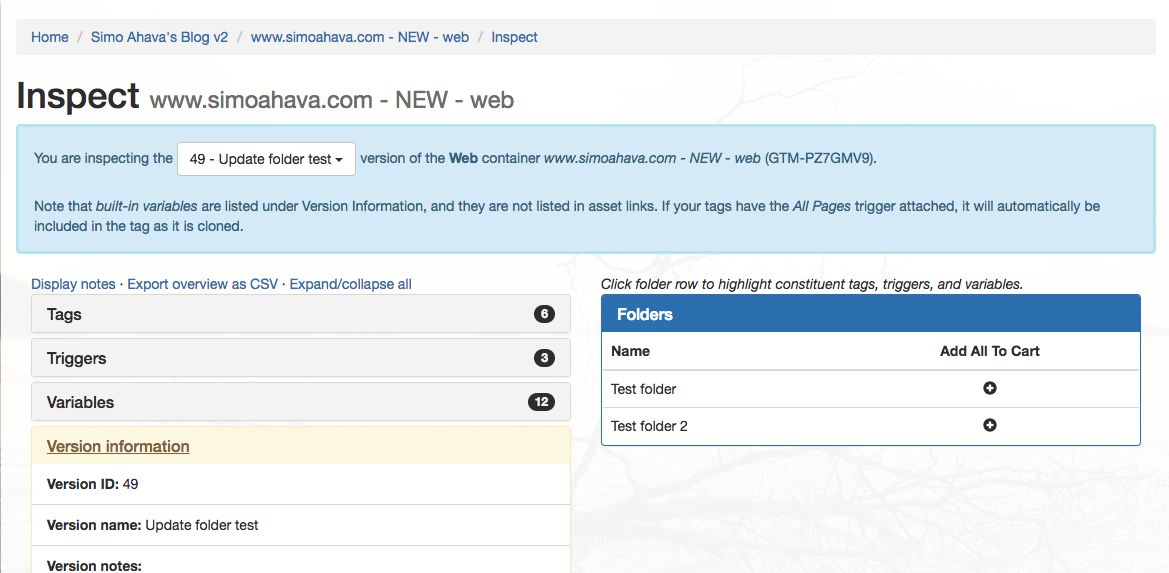
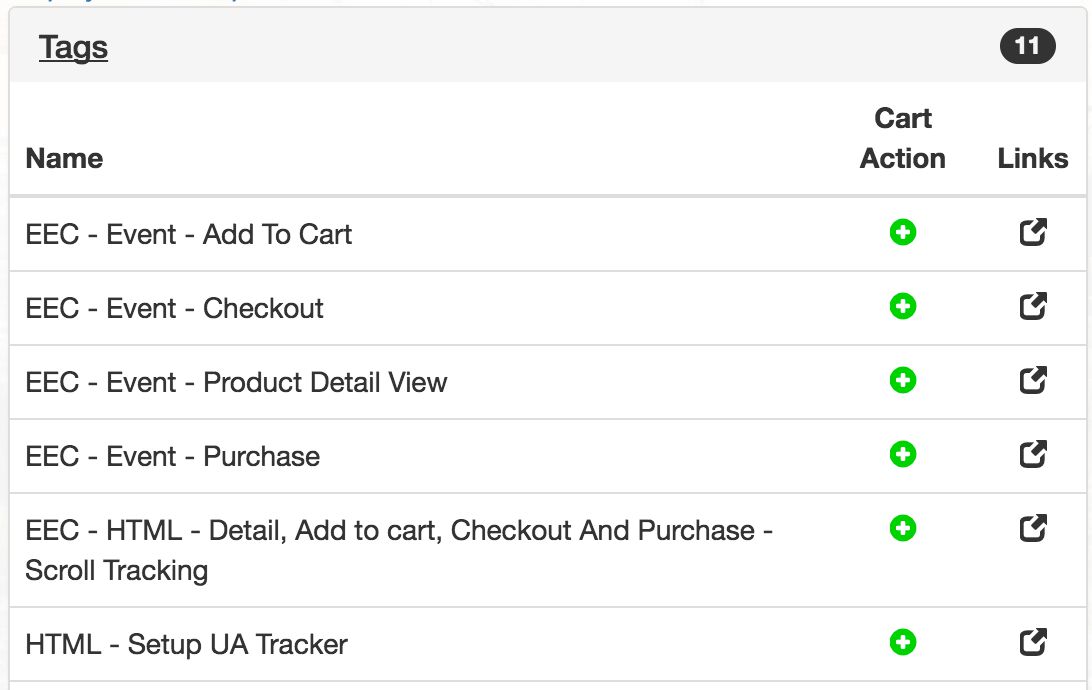
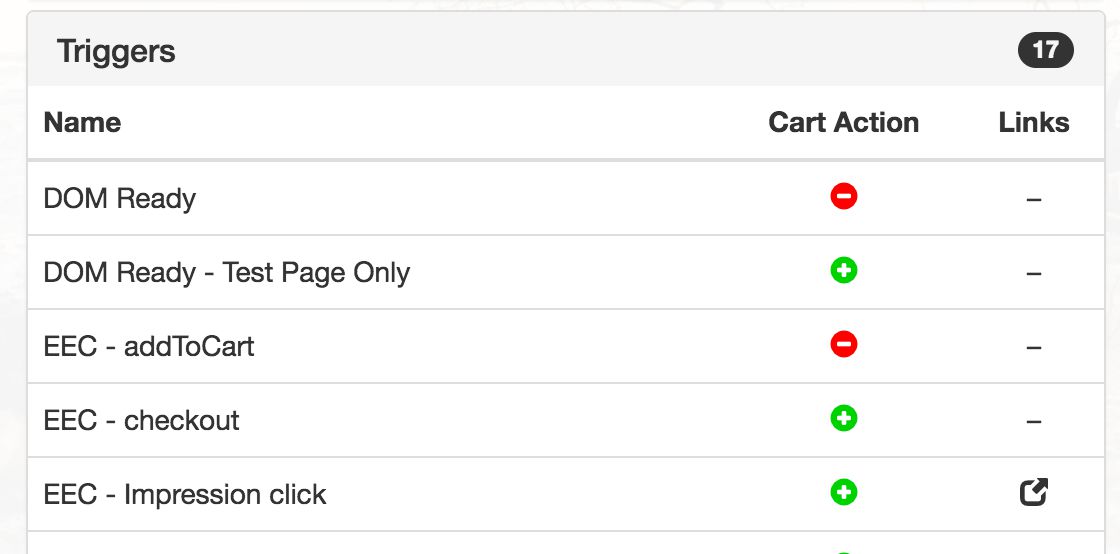
On the Inspect Container page, you can see a list of all tags, triggers, and variables in a container. You will also see information about the selected version by clicking the Version Information panel.
The number on the right-hand-side of a panel title tells you how many assets are in each respective category.
By expanding an asset category, you’ll see a list of all the assets under that category.
If you click Display notes, an additional column is added, where you can see the notes added for each asset (if any).
You will also see two selections:
Green plus + for adding the asset to your cart (if not added yet)
Red minus - for removing the asset from your cart (if already added)
Icon in the Links column if there are dependencies (i.e. linked assets) that you should probably add to your cart as well
The green plus or red minus will appear depending on if the asset is in the cart or not. If there are no dependencies, you will only see a dash in the “Links” column.
When you click on the Links icon for dependencies, a modal dialog will open up which lists all the dependencies of the current asset. This means that these dependencies are linked to directly from the asset itself, or from one of its linked assets (it’s a recursive check). It’s strongly recommended that you include all linked dependencies when adding an asset to the Cart.
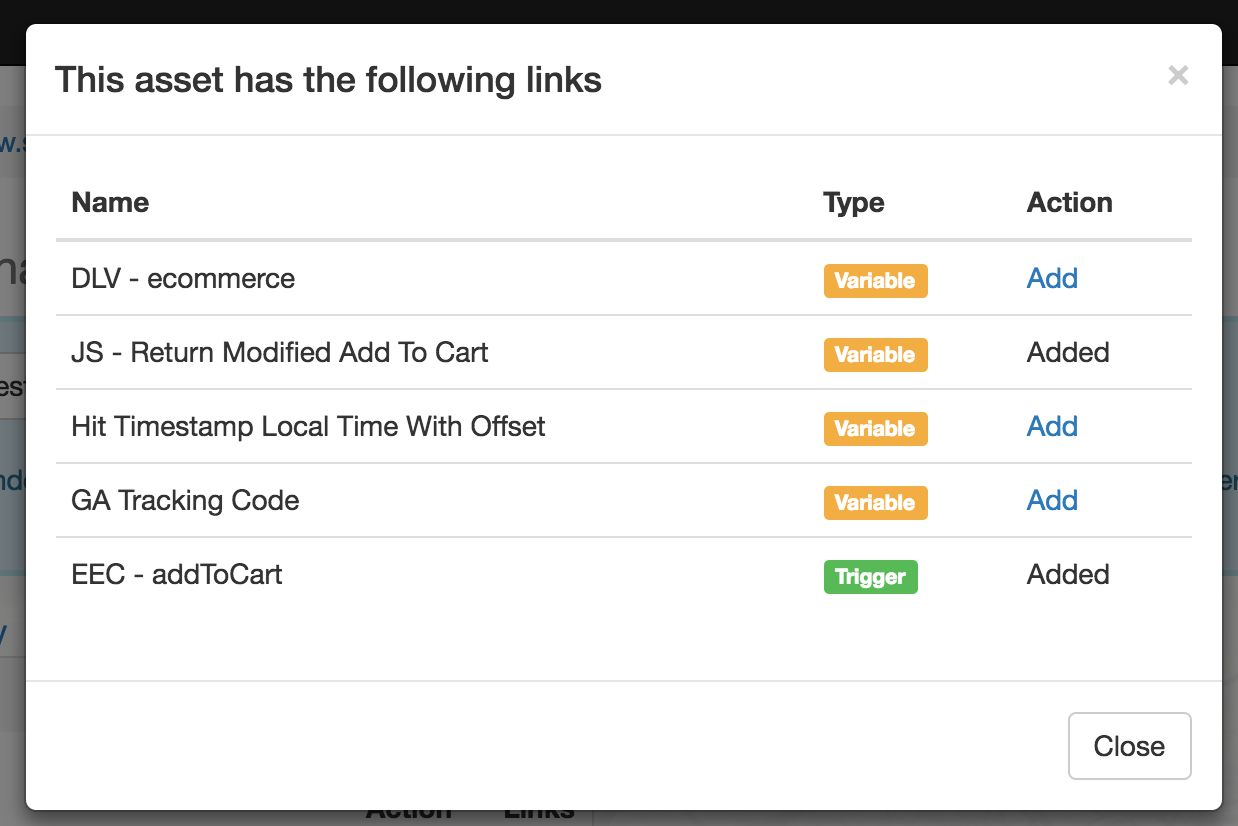
You can add a dependency to the cart by clicking the Add link, after which you’ll see the text Added next to the dependency.
You can change the version you are inspecting from the drop-down in the header of the page.
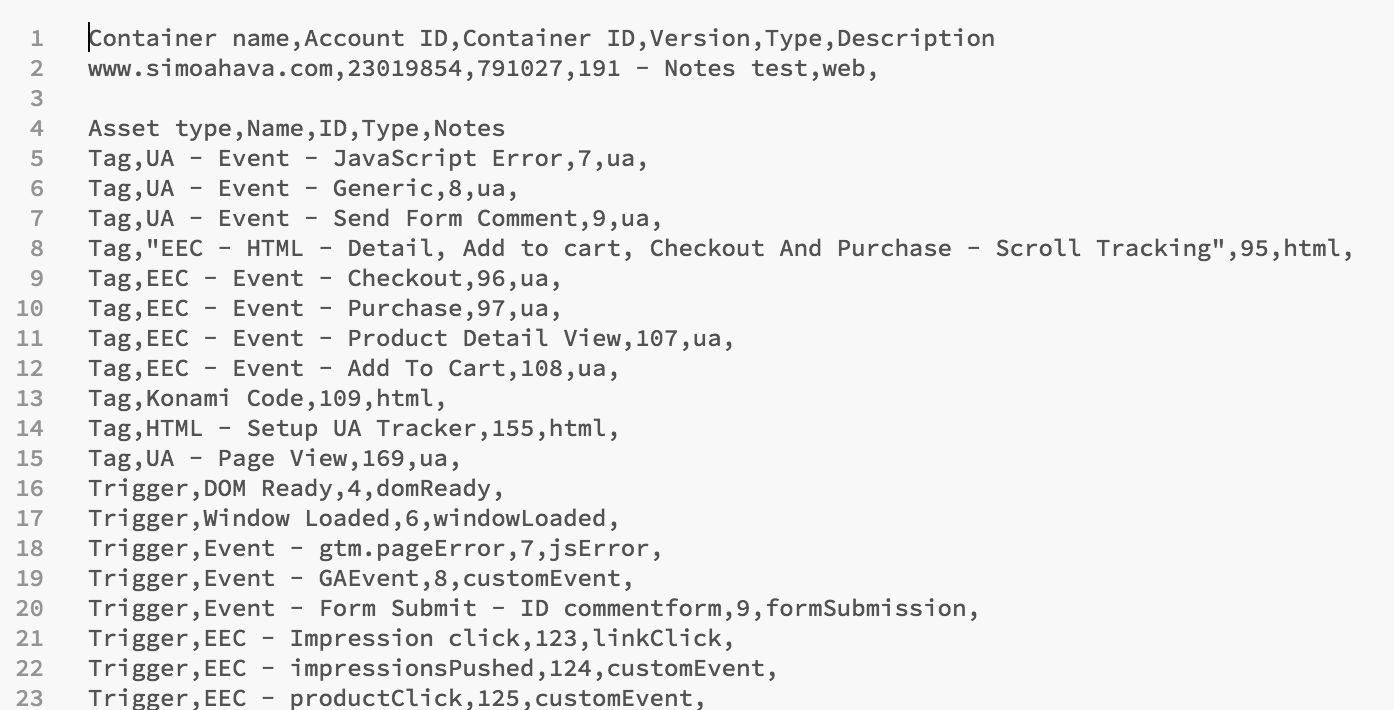
By clicking Export overview as CSV, you can export a CSV file that has the current container information in CSV format.
Folders
The Folders panel lists all the folders you have created in the container.
Here you can highlight all the items in any given folder (by clicking a folder row in the list).
You can also add all items in a folder to the cart by clicking the respective button.
Visualize Container
The Visualize Container page first shows you a brief description of what the tool does. Once you click the Start visualization button, a full-screen modal dialog will open, and you will be able to see a visualization of all the assets in the container as well as any links between them.
The asset colors are:
Grey - Built-In Variables
Green - Tags
Blue - Variables
Red - Triggers
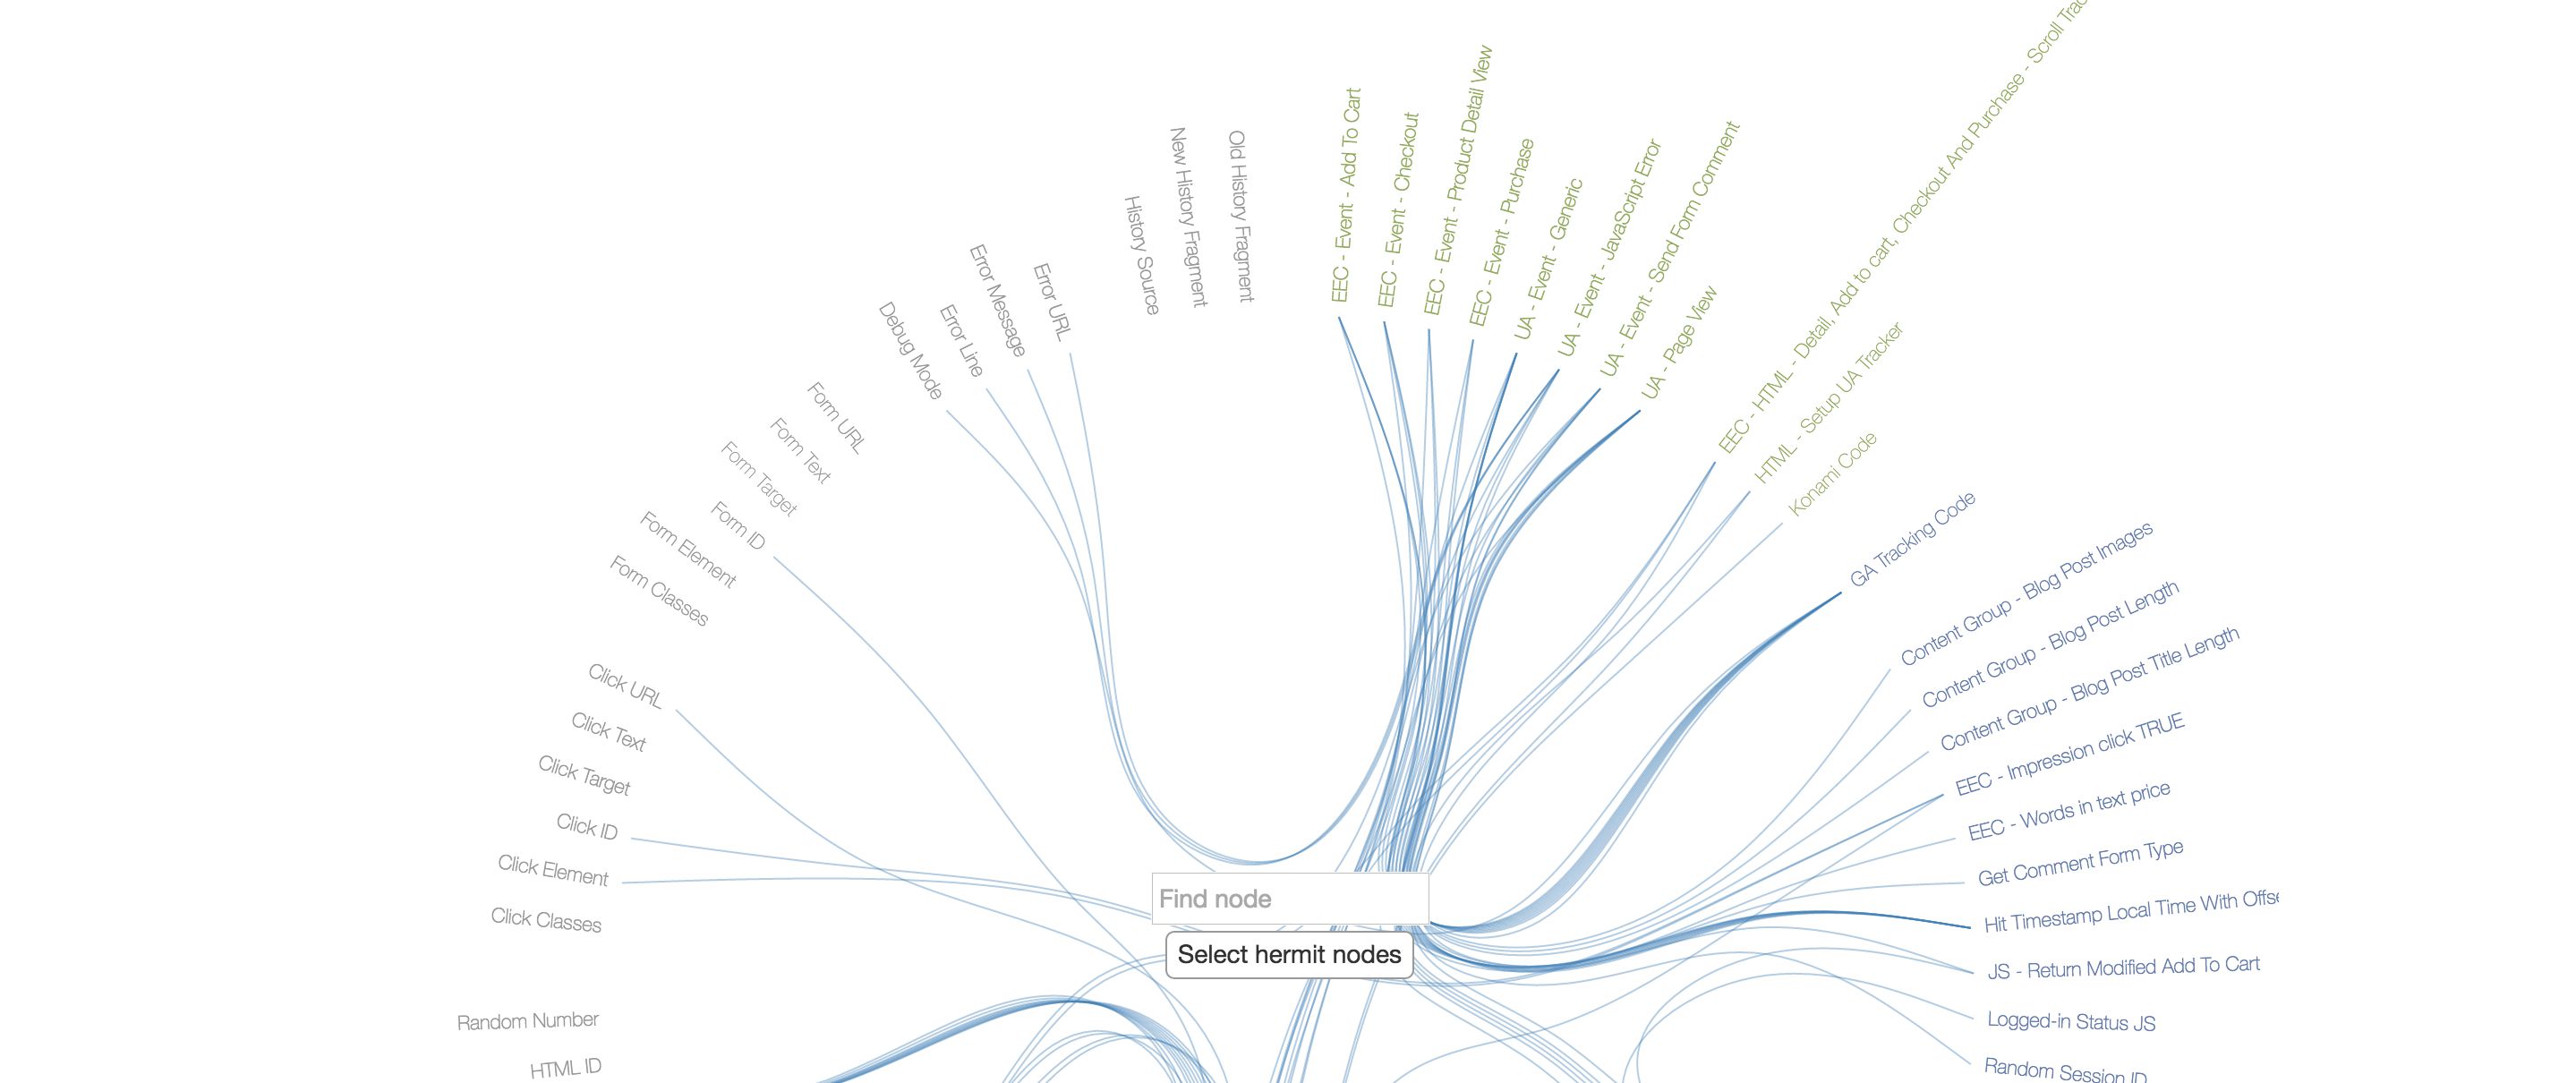
If you hover your mouse over an asset, any links to or from that asset will be highlighted. The path color is red if the link is from the selected asset, and the path color is green if the link is to the selected asset.
Hovering over the asset will also show information about it in the small box that appears in the center of the visualization.
Clicking an asset name freezes the paths, so that it’s easier for you to navigate to the other end of the path.
Clicking Select Hermit Nodes will highlight all the assets that have no links to or from other assets.
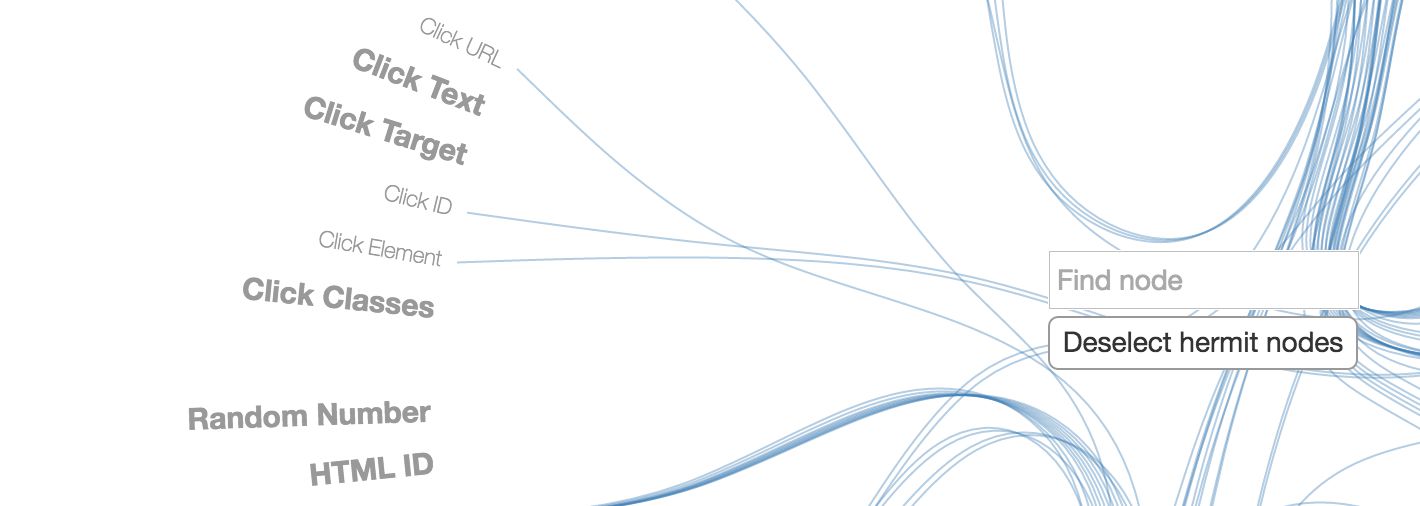
You can use the search box to find assets. Start typing, and the assets that match whatever you’ve typed will be highlighted as you type.
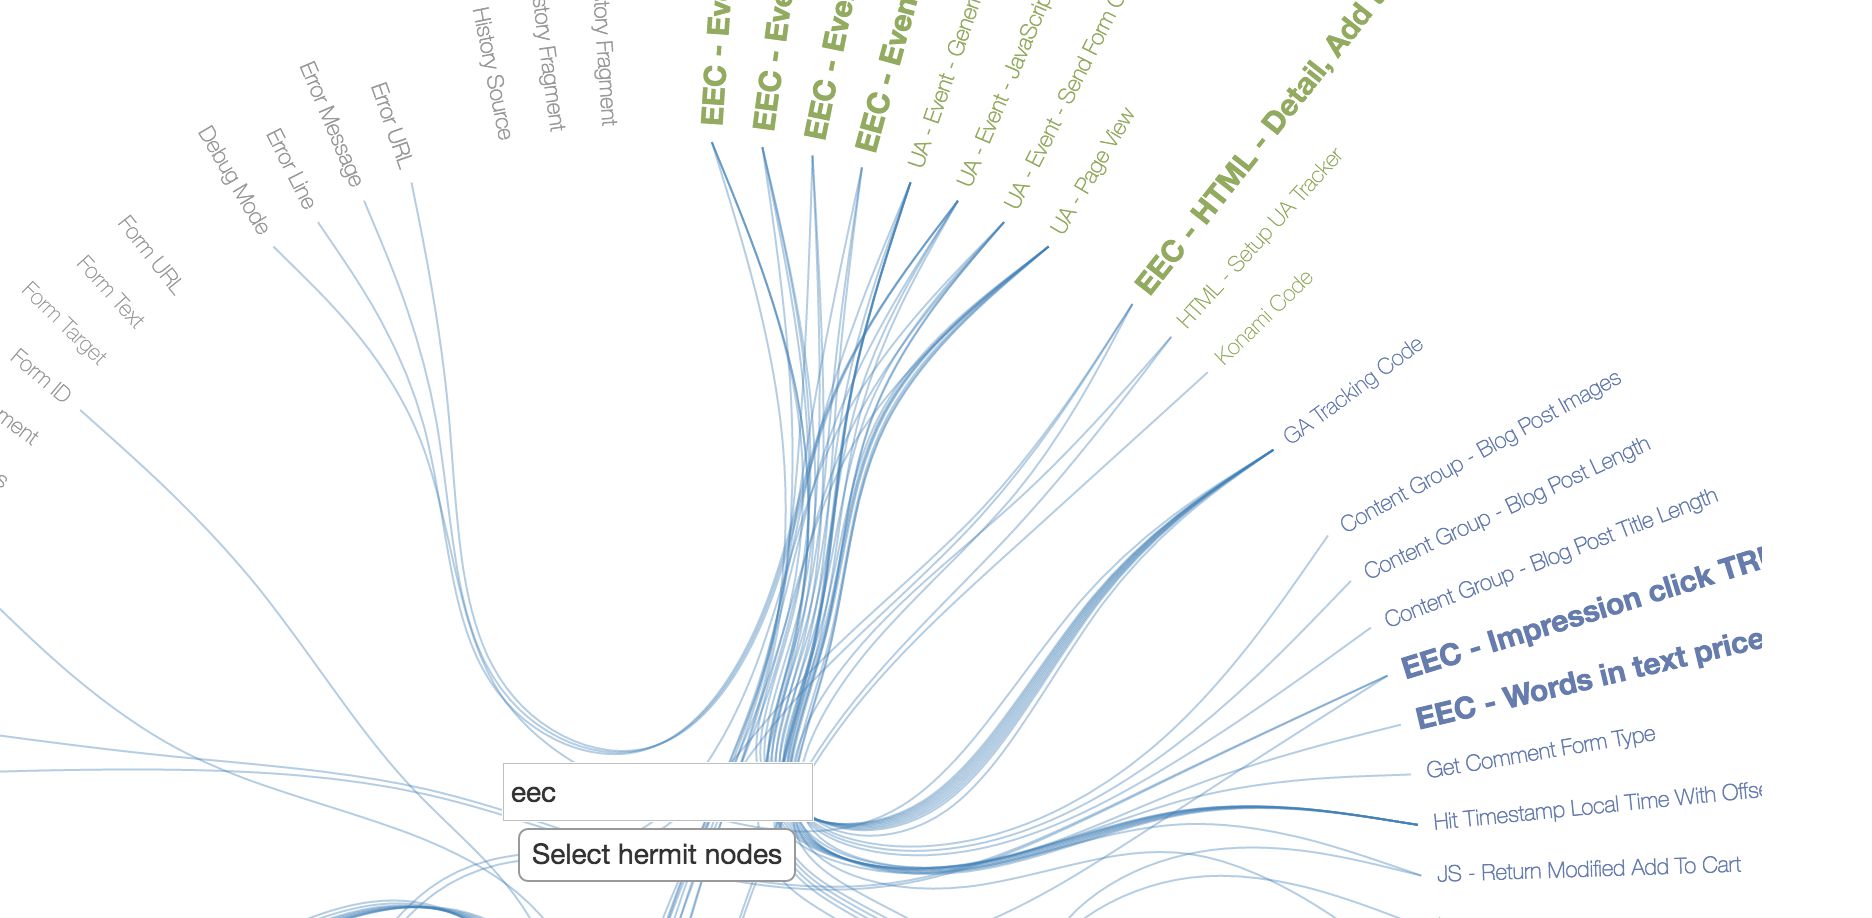
Clone Container
There are two ways to clone a container in GTM Tools. Due to architectural reasons, they are a bit different.
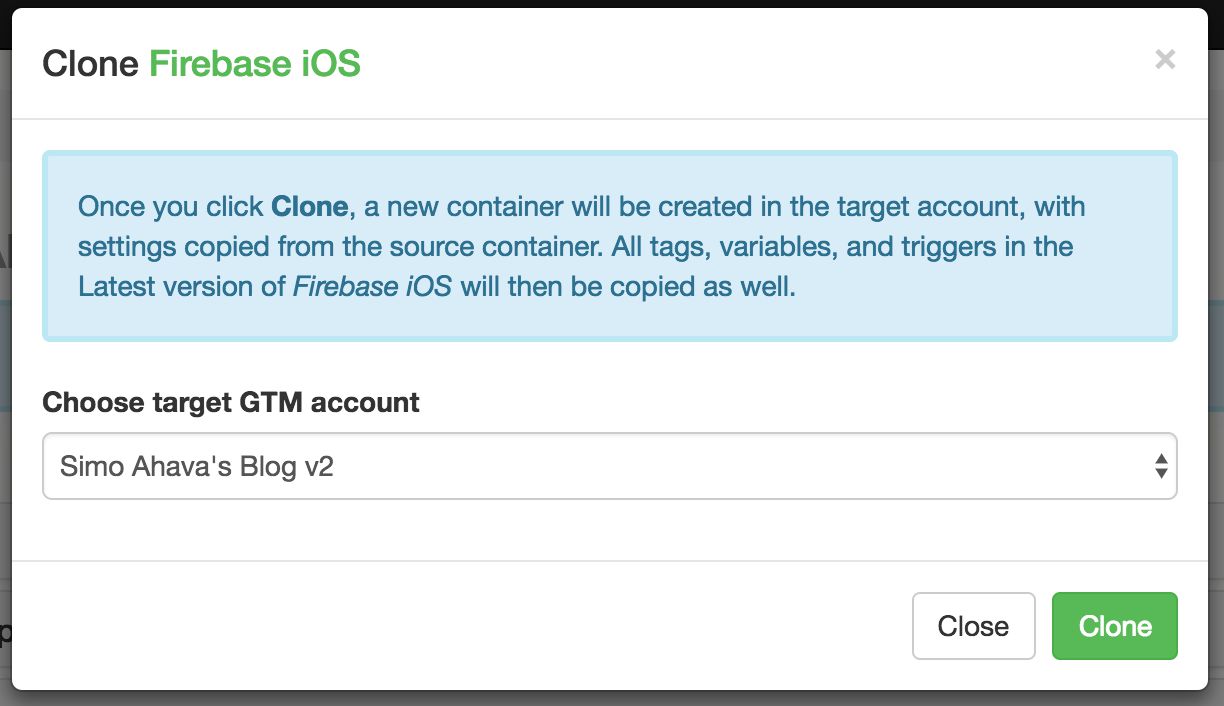
The first way is through the Account page and the Container page. So either you choose Clone from the drop-down menu next to the container name in the account page, or you click the Clone button on the container page itself.
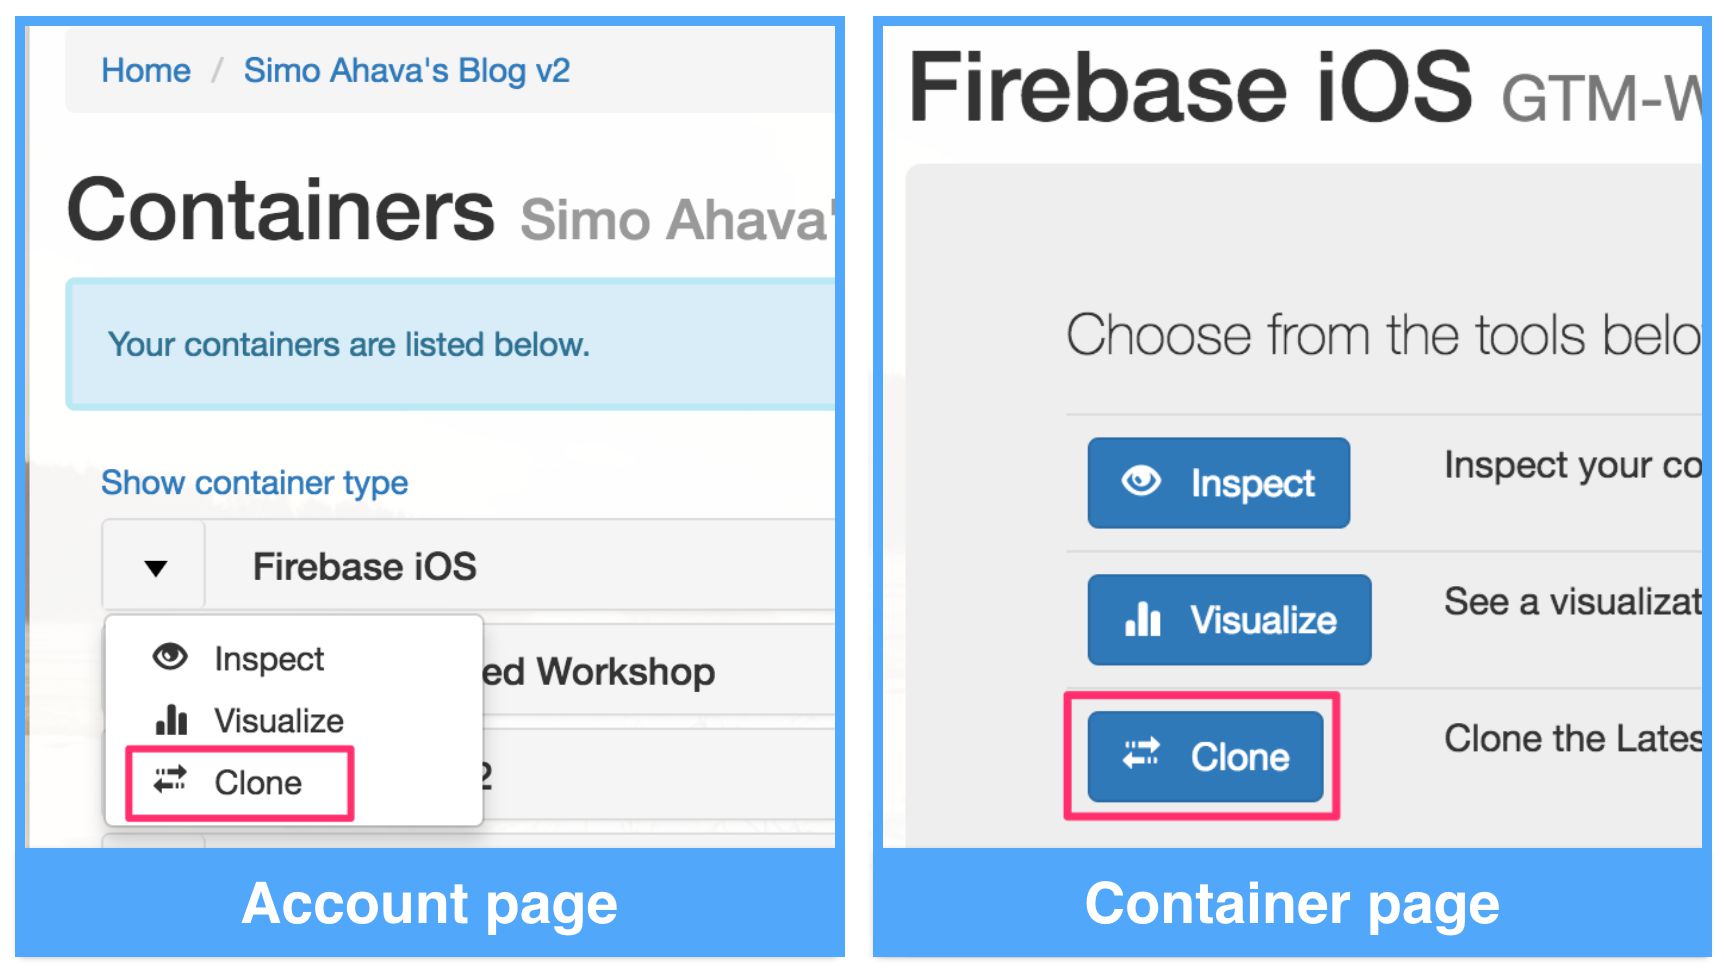
When you choose this clone option, you will be able to choose the GTM account where this container will be cloned to. You can also choose the same GTM account where the container originates from.
Once you’ve chosen the account and clicked Clone, the process begins, and the source container with all its assets is cloned to the target account.
If there already is a container with this name in the target account, the container name will be prefixed with “copy of “ during the process.
The second way of cloning a container is with your custom-created containers. This means that you choose to Clone either directly from the Cart page or from your Asset Library page.
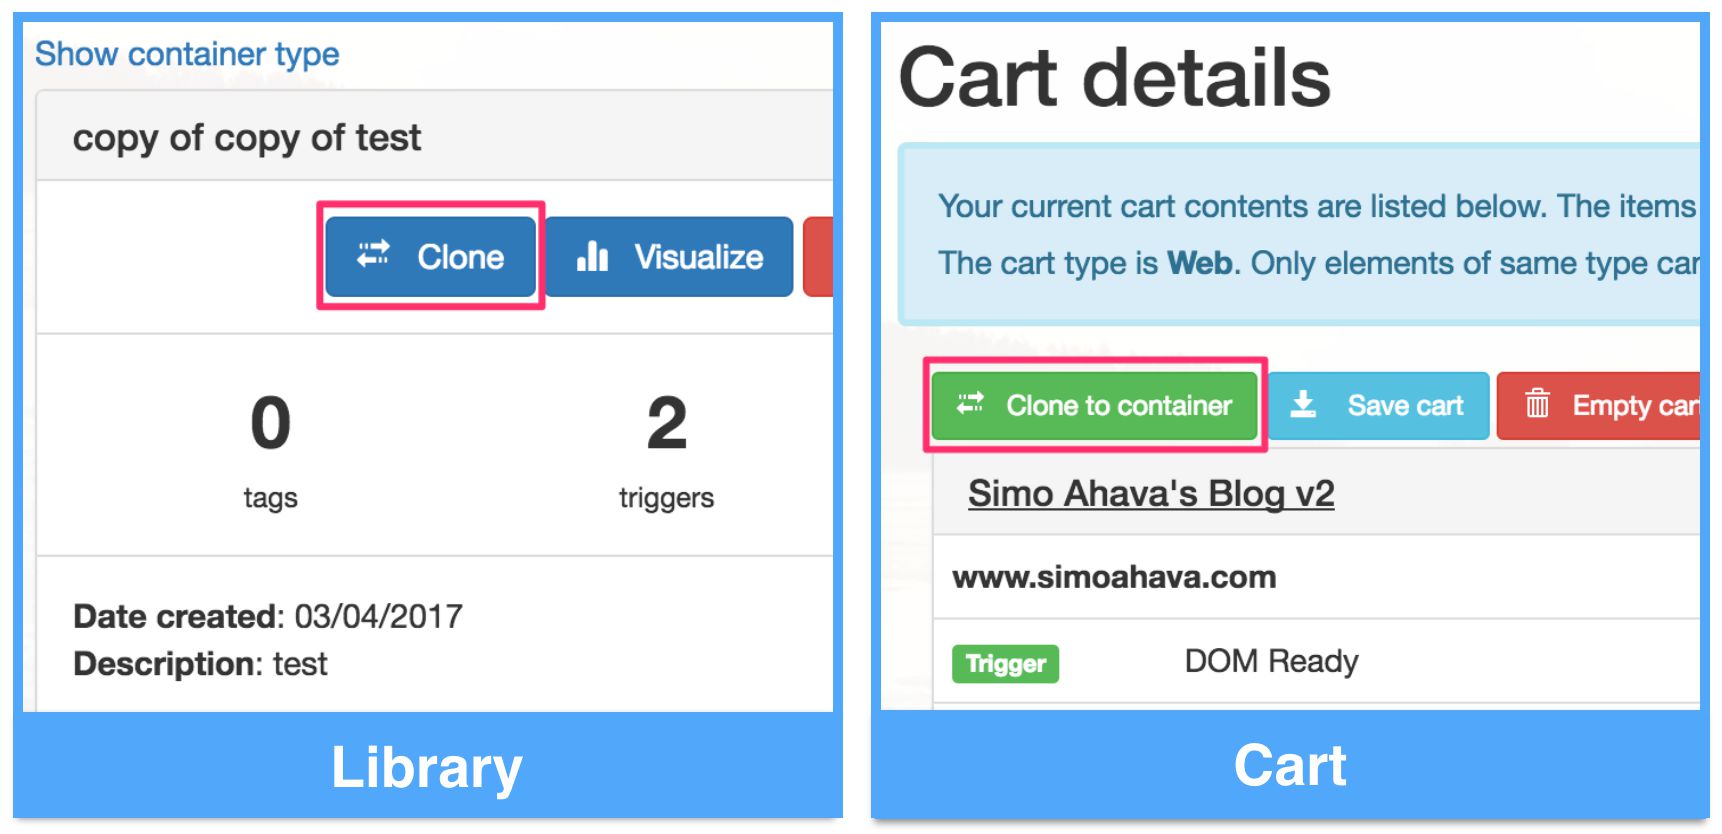
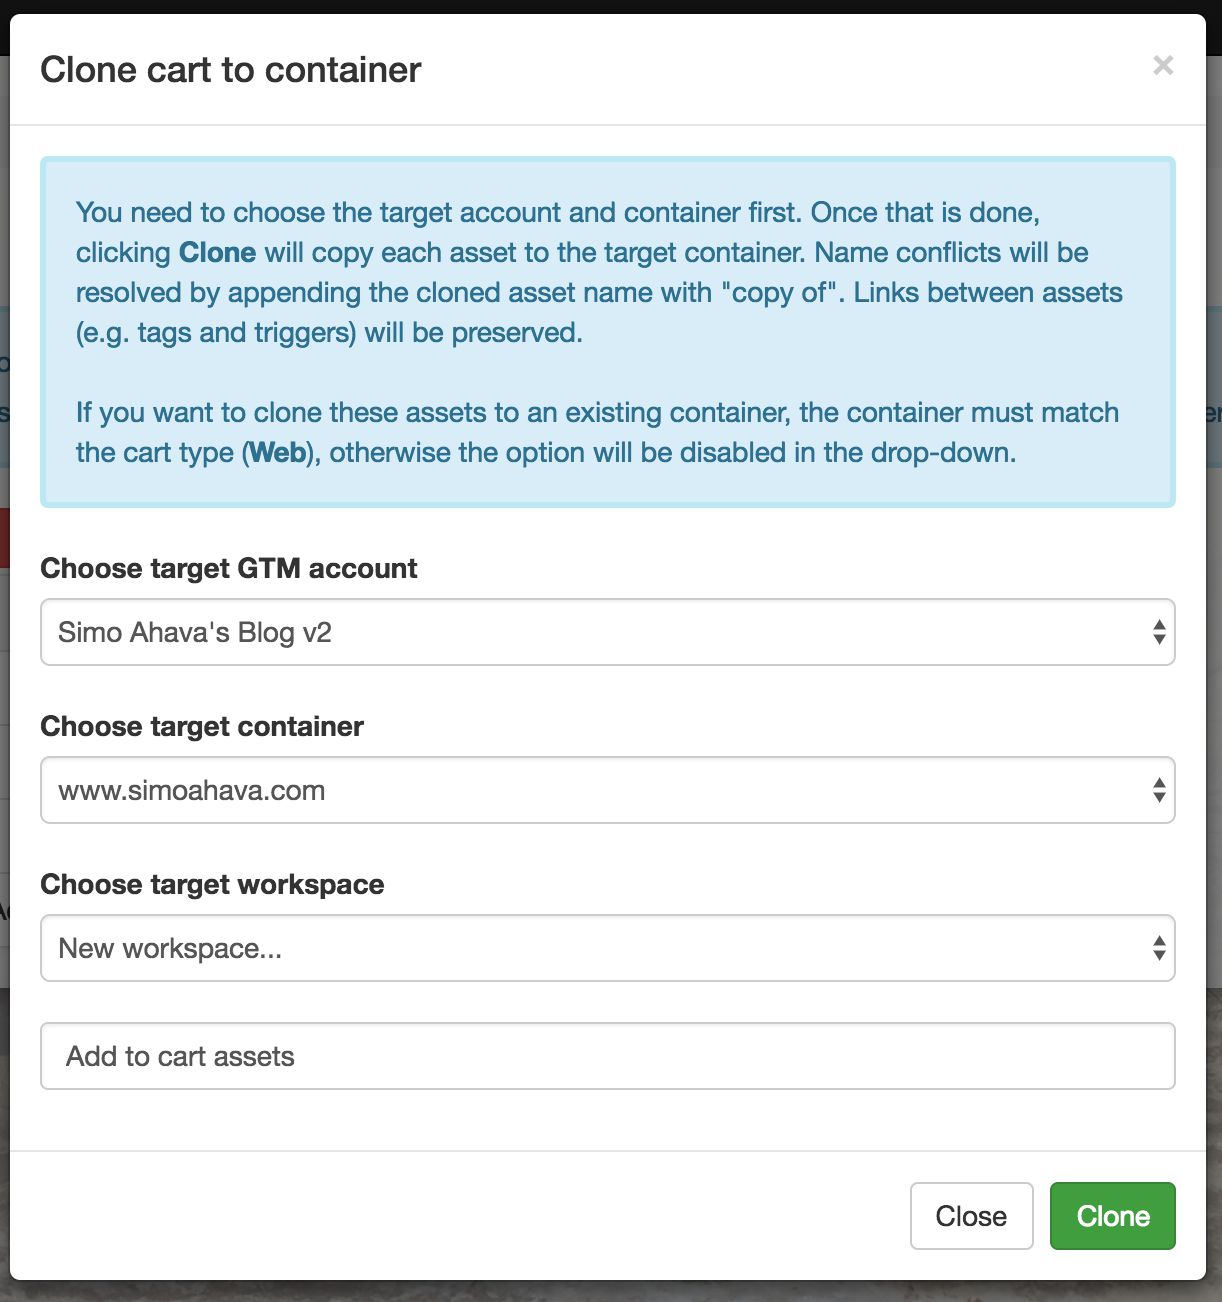
If you choose this option, it will be possible to merge the stored container with an existing container, or you can choose to create an entirely new container, if you wish.
Note that you will need to specify to which Workspace you want to clone the contents to. Alternatively, you can also create a new workspace.
Additionally, you can only clone the cart or library container to a container that matches the type of the container you are cloning. So you cannot, for example, clone a Firebase cart into a Web container.
When you choose to create a New Container, a new container with the name (and workspace name) you give will be created, and all the assets will be copied to that container.
If a container already exists with the name you gave, the new container name will be prefixed with “copy of” during the cloning process.
If you choose to clone the assets to an existing container, the contents in your cart or in the stored container will be merged with the assets in the target container. This means that if there is a naming conflict, i.e. an asset with the same name already exists in the target container, the asset’s name will be prefixed with “copy of”, and any links to the asset in other cloned assets will be updated accordingly.
Renaming containers and assets like this makes merging containers possible while still preserving the established links between assets in the source container.
If you choose to merge the assets to an existing container, no existing assets in the target container are modified in any way, so you don’t have to worry about data or integrity loss.
Once the cloning process begins, there’s no way to interrupt it except by refreshing the page or moving away from the page.
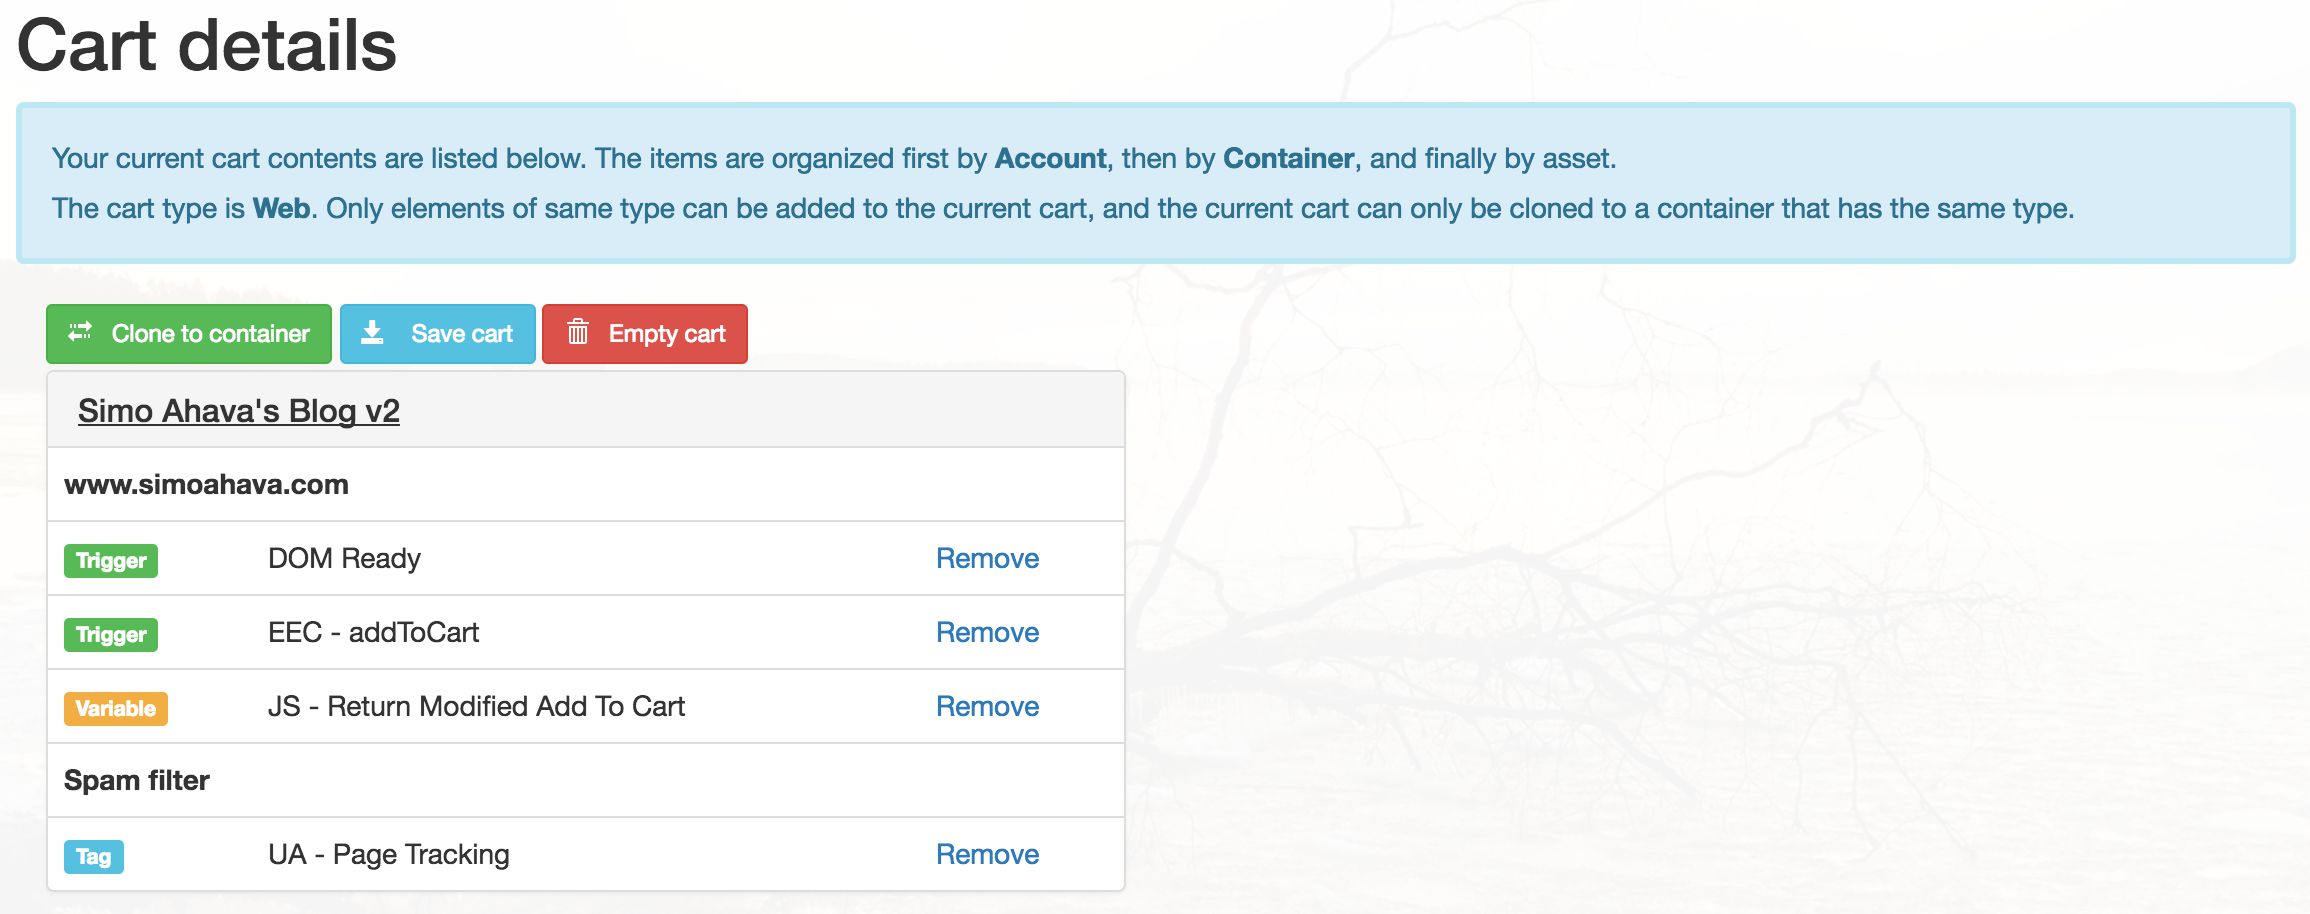
6. Cart Page
On the cart page you can see all the assets that you have stored in your cart. You store assets in the cart through the Inspect Container page. The assets are listed first by GTM account name, then by container name, and finally by asset type.
Clicking the Remove link next to an asset removes the asset from your Cart.
Clicking the Clone to container button opens a modal dialog that lets you clone the cart contents into an existing container or a new container. If you choose an existing container, the target container must match the container type of the cart.
Clicking the Save cart button opens a modal dialog that lets you save the cart contents into your Asset Library. This way you can save your favorite container configurations to be used later.
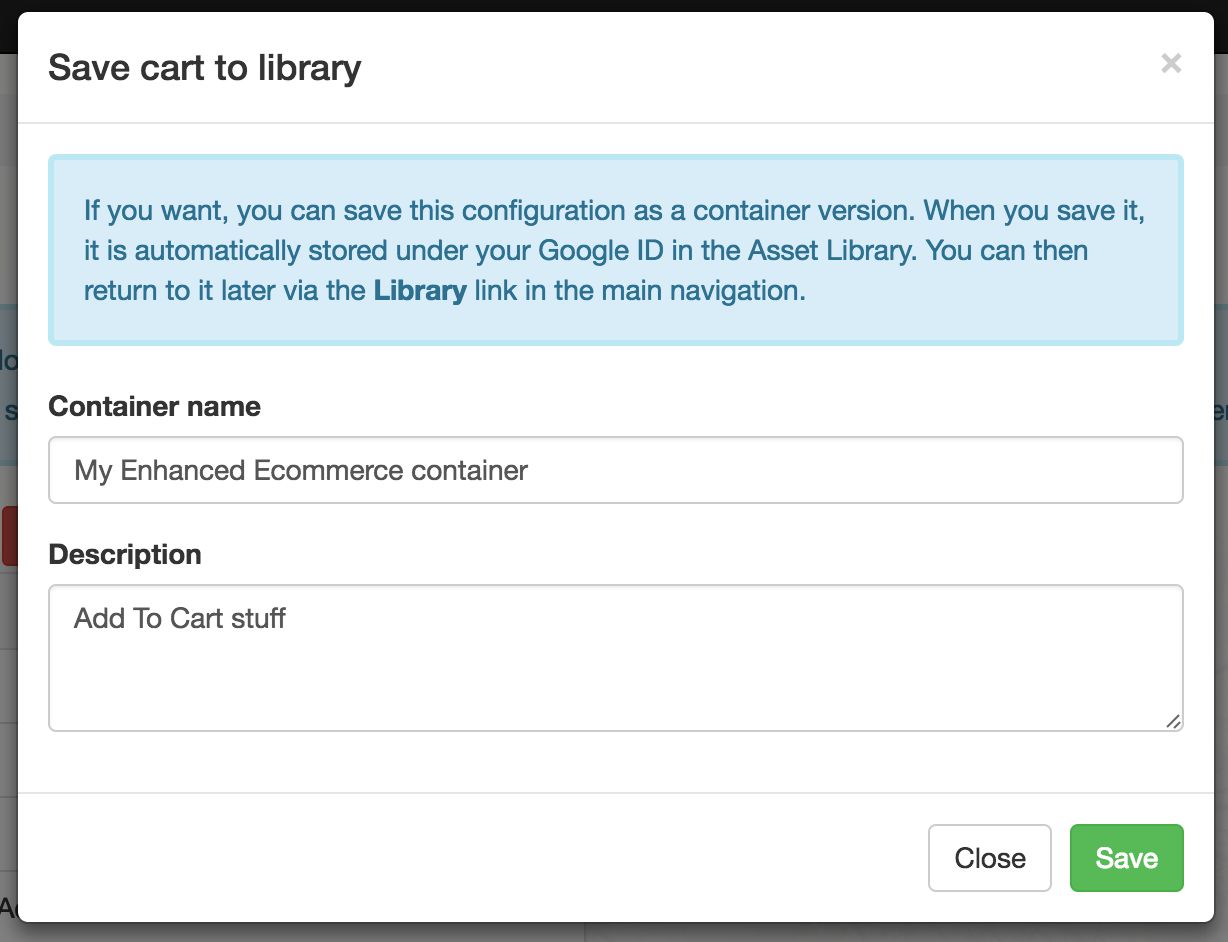
Clicking the Empty cart button flushes the cart contents.
If you have multiple items in the cart with the same name, they will be flagged with details about the container version from which the items were added. You must resolve these conflicts before doing anything with the cart. Currently GTM Tools does not support storing or cloning multiple assets with the same name, so you will need to remove the items from the cart until only one asset per name remains.
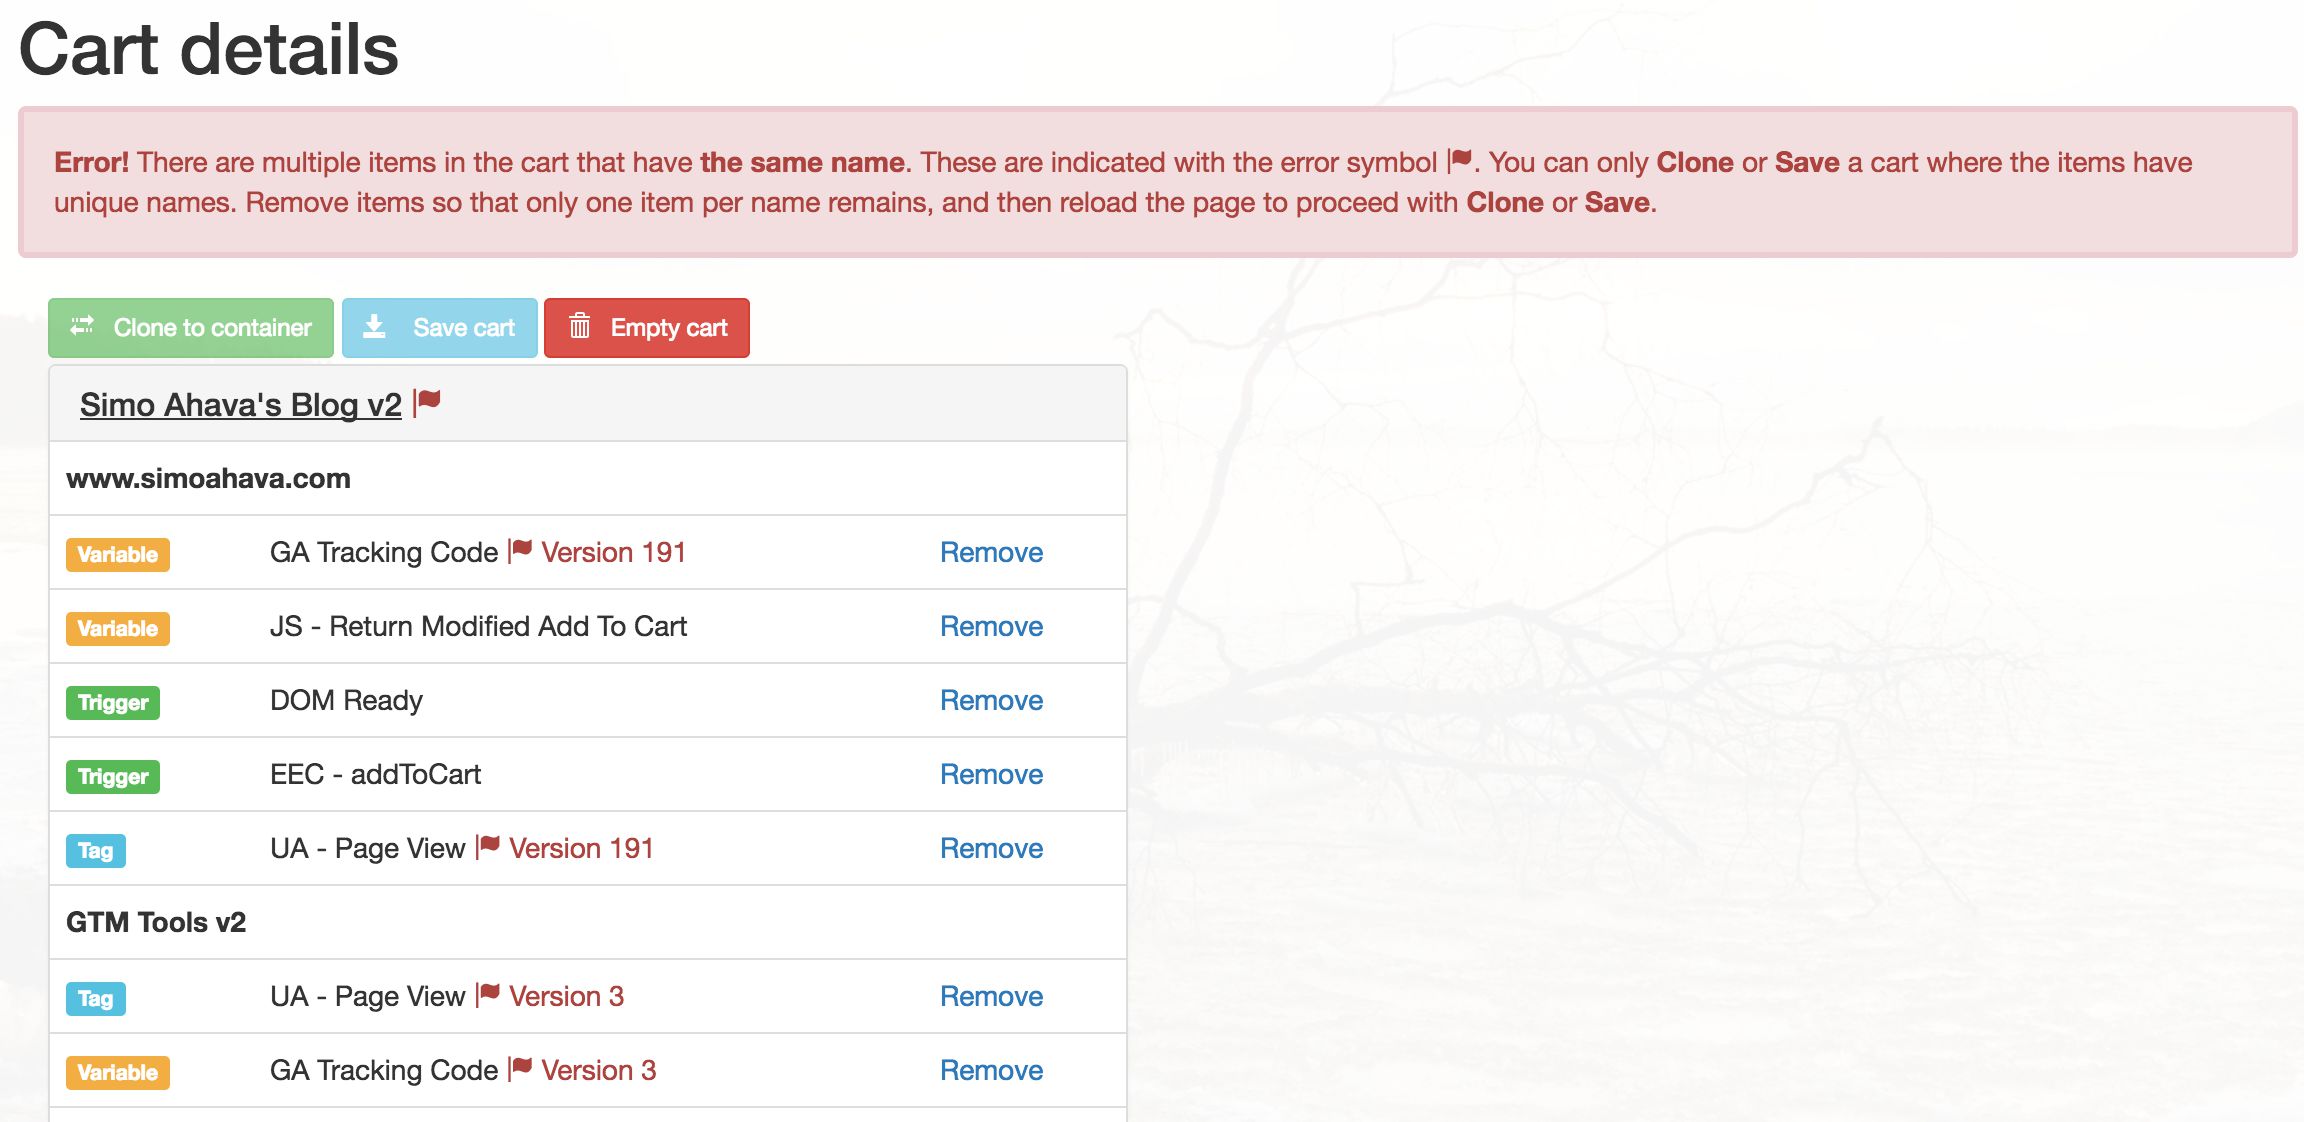
7. Asset Library
The Asset Library page shows you all your stored containers. When you click a container name, you will see how many tags, triggers, and variables are in the stored container. You’ll also be able to see when the container was created, as well as the description you gave the container when you saved it.
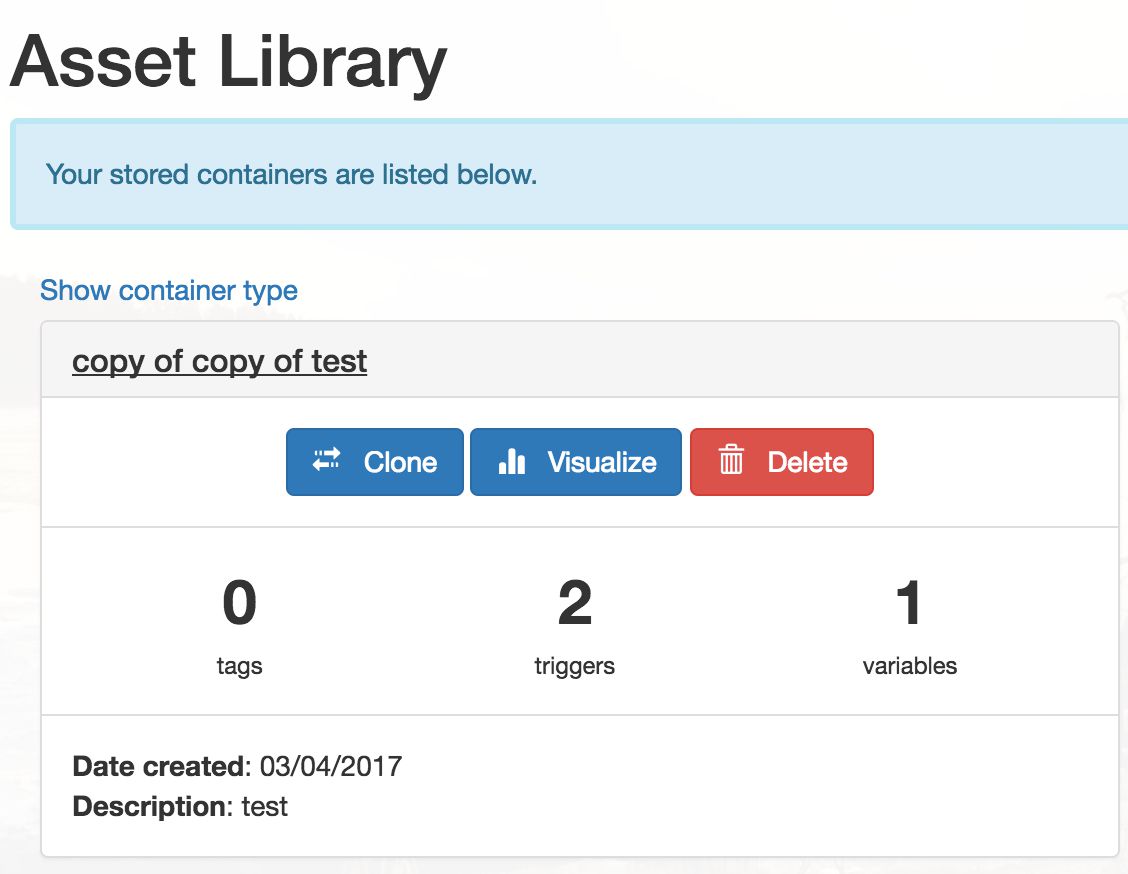
If the library already (globally) has a container of the name you tried to save, the container name will automatically be prefixed with “copy of”, so don’t be surprised if you see this in your stored container name.
Clicking the Clone button lets you clone this container into an existing container or a new container.
Clicking the Visualize button takes you to the Visualize Container page, where you can see a visualization of all the assets stored in the container.
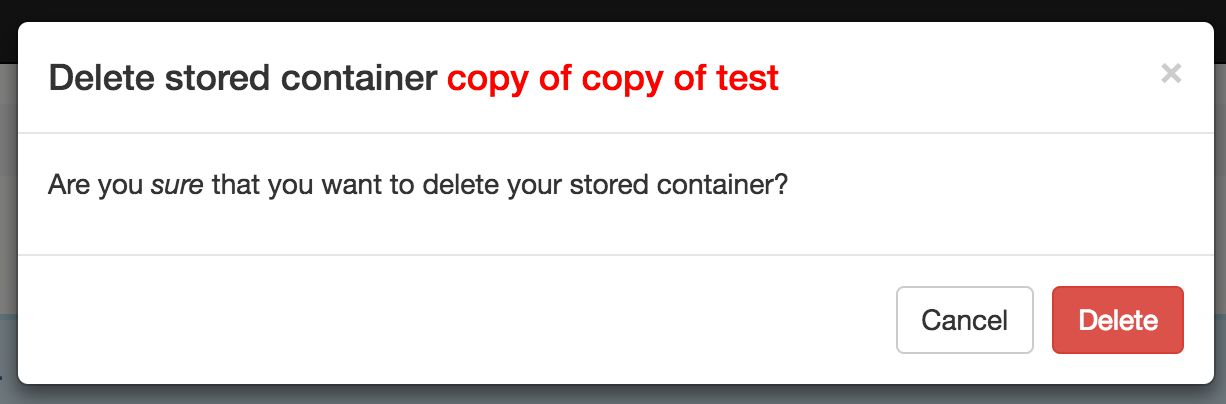
Clicking the Delete button opens a modal dialog which confirms this action. If you choose to delete the Container, you’ll see a success message shortly, after which the page will automatically reload.
8. Known Issues
Here are some of the issues I know exist in the toolset.
1) You can add all items in a folder to the cart, but the folder designation itself doesn’t carry over. So when you clone the cart, these items will not be put into any folders in the target container. I’m trying to figure out a way to do this elegantly. When cloning an entire container, the folder structure is preserved.
2) Version selection should be added to the Visualize function of containers as well.
3) There are lots of little features that I’d like to work on at some point, such as: clone to multiple containers, interact with cart without having to move to the cart page, modify asset settings, etc.
10. Summary
As I hopefully made clear in the introduction, this toolset is my own playing ground. It’s not a fully-formed platform, it’s not a sponsored product, and it doesn’t have a team of engineers working on it 24/7. Thus I hope you will find it useful, and I’ll do my best to fix bugs and new features, but don’t expect Premium-level support from me in making things right.
Use the toolset at your risk.
There’s no risk to your existing assets, since I don’t have any overwrite features in the toolset. The only thing you can botch up is cloning something into something else, and in that case only the thing you were cloning will suffer. Easy enough to clean up afterward in your GTM account.
I still hope you find the toolset useful, and I would very much appreciate any feedback that you might want to direct to my developer team (i.e. me).