(UPDATE 1 Oct 2014 Due to a change in how macros work in Debug Mode, the {{generic event handler}} macro no longer works when testing in Debug Mode. That means that you’ll have to test your custom listener in a live container (I know, ouch!). If you want to test in Debug Mode, you’ll have to skip using the {{generic event handler}} as a macro, and instead copy the inner function into the Custom HTML Tag, give the function a name, and use that as the callback in addEventListener or attachEvent.
Also, to preserve the ‘gtm.’ namespace for native GTM features only, I have changed the prefix of the custom event name from ‘gtm.’ to ’event.’)
When the good folks at Mountain View introduced auto-event tracking for Google Tag Manager, a collective sigh was heard around the world (I’m just slightly exaggerating).
Finally, the true power of GTM was unleashed.
With auto-event tracking, one of the more difficult aspects of web analytics, tracking user interactions beyond the page load, was greatly simplified.
However, as a species we are in a perpetual state of dissatisfaction.
When we got the Click, the Link Click and the Form Submit, we wanted more. So then we got the History listener. Again, we wanted more. And we got the Error listener. And then we wanted more again.
To satisfy this undying thirst for more listeners, the community has been very helpful. In fact, before you read on, I want you to familiarize yourself with Doug Hall’s excellent post on extending GTM’s auto-event listeners. The following guide will expand upon the ideas put forth by Doug, while striving to approach the elegance of his prose and wisdom.
I’ve also written many posts on GTM’s listeners. I’ll link to them at the end of this article.
What follows is a step-by-step guide to creating a generic listener for all the various events you want to capture that are not yet captured by GTM’s own listeners. Once GTM introduces a proprietary listener for whatever event you want to handle, it would be best to start using that.
The Simmer Newsletter
Follow this link to subscribe to the Simmer Newsletter! Stay up-to-date with the latest content from Simo Ahava and the Simmer online course platform.
The listener prototype
The prototype of the custom event listener will require two components:
A Custom HTML Tag for each listener type you want to activate (e.g. change, blur, copy)
A generic Custom JavaScript Macro, which returns the handler function that pushes the event into the dataLayer
As you can see, it looks pretty simple. And it is. As long as you observe proper design patterns and best practices, these two components will get you far.
The generic event handler macro
Let’s start with the macro, since it’s the truly generic component here.
The macro returns a function, which serves as the handler for the listener you’ll create in the next step. For this function to be as generic as possible, it will be agnostic as to what the event was. It will do this by accepting the Event object as its parameter, and parsing that for all the data it needs.
Showing is easier than telling, so here’s the code for you to copy-paste:
Macro Name: {{generic event handler}}
Macro Type: Custom JavaScript
function() {
  return function(e) {
    dataLayer.push({
      'event': 'event.'+e.type,
      'gtm.element': e.target,
      'gtm.elementClasses': e.target.className || '',
      'gtm.elementId': e.target.id || '',
      'gtm.elementTarget': e.target.target || '',
      'gtm.elementUrl': e.target.href || e.target.action || '',
      'gtm.originalEvent': e
    });
  }
}
This, in my opinion, is a pretty close emulation of how GTM’s listeners work. What’s important is that the object pushed into dataLayer does its best to mimic the design pattern of GTM’s own listeners.
Let’s go over the code line-by-line.
return function(e) { ... } is the wrapper. The point here is that this macro must return a function, since the listener we’ll create in the following chapter requires a function or object as a parameter. If the macro wouldn’t return a function but rather run the code itself, you’d be sending some weird empty events every time the listener tag is written to the page template.
dataLayer.push({ ... }); is where the magic happens. Here the triggered event is pushed into dataLayer by observing the design patterns of GTM’s own listeners. Now, you can observe these patterns if you want, or you can use your own syntax. I’m a big fan of symmetry, which is why I prefer to follow GTM’s syntax. This might result in some conflicts if GTM introduces a similar event listener out-of-the-box, but in that case it would be a good idea to migrate to this proprietary listener anyway.
'event': 'event.'+e.type, pushes a value into the ’event’ data layer variable. It takes the type property from the event object, which is a string representing what type of listener was fired, e.g. “change”, “blur”, “copy”. So if the event was of type change, this push would actually look like: 'event': 'event.change'. (By the way, remember E-Type?)
'gtm.element': e.target, pushes the element the event occurred on into the dataLayer variable ‘gtm.element’. This is a design pattern, and if you look at your click listeners and link click listeners, a similar object is always found in those as well. The idea here is that you can then use your Data Layer Variable Macro to explore properties of this ‘gtm.element’ object if you want to dig deeper into the DOM.
'gtm.elementClasses': e.target.className || '', pushes the class of the event target into the variable ‘gtm.elementClasses’. If there is no class on the HTML object, an empty string is pushed instead.
'gtm.elementId': e.target.id || '', pushes the ID of the event target into the variable ‘gtm.elementId’. If there is no ID on the HTML object, an empty string is pushed instead.
'gtm.elementTarget': e.target.target || '', pushes the target of the event target (sounds weird) into the variable ‘gtm.elementTarget’. If there is no target attribute on the HTML object, an empty string is pushed instead.
'gtm.elementUrl': e.target.href || e.target.action || '', pushes either the href or the action attribute of the event target into the variable ‘gtm.elementUrl’. If there are no such attributes on the HTML object, an empty string is pushed instead.
'gtm.originalEvent': e is my own addition to this design pattern. Every now and then you might want to access the original event, exposed by the listeners. With GTM’s out-of-the-box listeners, this is currently not possible, since they only expose the e.target property of this event object. However, especially if you want to do stuff like identify clicks created by code and not by the user, access to the event object is a must. I hope this will be a standard feature in GTM’s own listeners as well.
So that’s what the macro looks like. It’s possible some of the patterns need more work, and nothing is stopping you from extending the number of variables that are pushed into the dataLayer. I consider these variables to be the minimum set you’ll need in order to provide enough information for your tags while still remaining economical and conscious of best practices.
The listener tag
Now that we have our generic event handler, the next step is to create a tag which sets up the listener. The key here is recognizing just which listener you want to set up. Also, for symmetry’s sake I will only show how to prime the event listener on the document node, because that’s the generic way AND the way GTM’s own proprietary listeners work. If you want, you can attach the listeners to specific DOM nodes, which reduces the risk of propagation problems, but as a solution it won’t be as generic any more.
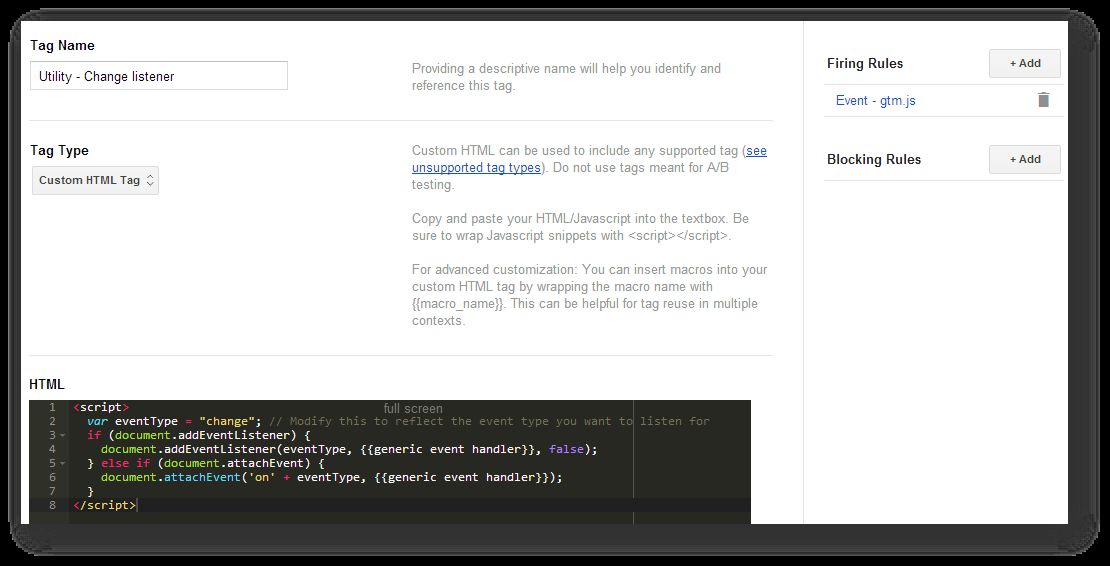
First, here’s the listener code itself. Put this in a Custom HTML Tag, and add a firing rule which uses either {{event}} equals gtm.js if you’re attaching the listener on the document node, or {{event}} equals gtm.dom if you’re listening on specific HTML elements.
<script>
  (function() {
    var eventType = "change"; // Modify this to reflect the event type you want to listen for
    if (document.addEventListener) {
      document.addEventListener(eventType, {{generic event handler}}, false);
    } else if (document.attachEvent) {
      document.attachEvent('on' + eventType, {{generic event handler}});
    }
  })();
</script>
On the first line, you specify just what type of event you want to listen for. For the full list of supported types, follow this link. Remember, you can also dispatch and listen to your own custom events, which makes this solution even more flexible. Here’s MDN’s excellent guide on creating and triggering events.
Anyway, here’s a list of some of the most popular event types:
beforeunload - Fire a listener when the window, the document, and all resources are about to be unloaded (e.g. when someone is closing the browser window).
blur - An element has lost focus (e.g. the user has left a form field). Note, this doesn’t bubble by default, meaning a listener on the
documentnode won’t be able to catch it. To activate event delegation, you’ll need to set the last parameter in thedocument.addEventListener()call to true instead of false.change - The value of an element changes between receiving and losing focus (e.g. the user enters a form field, types something in, and leaves the field).
click - A click is registered on an element (use GTM’s Click Listener instead).
contextmenu - The right mouse button is clicked.
copy - Text is copied to the clipboard.
cut - Text is cut to the clipboard.
dblclick - A double-click is registered on an element.
focus - An element has received focus (e.g. the user has left a form field). Note, this doesn’t bubble by default, meaning a listener on the
documentnode won’t be able to catch it. To activate event delegation, you’ll need to set the last parameter in thedocument.addEventListener()call to true instead of false.keydown - A key is pressed down.
keyup - A pressed down key is released.
mousedown - The mouse button is pressed down.
mouseenter - The mouse pointer is moved over the element where the listener is attached. Won’t really work if the listener is on the
documentnode.mouseleave - The mouse pointer is moved off the element where the listener is attached. Won’t really work if the listener is on the
documentnode.mouseout - The mouse pointer is moved off the element where the listener is attached or one of its children.
mouseover - The mouse pointer is moved over the element where the listener is attached or one of its children.
mouseup - The pressed down mouse button is released.
orientationchange - The orientation (portrait / landscape) of the screen changes.
reset - A form is reset.
scroll - A document view or element is scrolled.
submit - A form submit is registered (use GTM’s Form Submit Listener instead).
When the Custom HTML Tag is written on the page, it attaches the listener of your choice on the document node. The event handler is the generic event handler function you created in the previous chapter. Then, when the event occurs, the function is executed with the event object as its parameter. This event object is then parsed and pushed into dataLayer with a bunch of properties that you can access with the Data Layer Variable Macro.
Example with the Change Listener
Here’s a simple example. I have some form fields on a web page. Whenever a value of a form field changes, i.e. a user writes / edits / deletes text in it, I want to push a virtual pageview with the URL path /form/(field-name)-(field-value). So if the form field’s name is “search” and value is “GTM”, I want to send the virtual pageview with the path /form/search-GTM.
So let’s get started. I have my {{generic event handler}} macro which I created earlier, and I have my Change Listener Tag firing on {{event}} equals gtm.js as you can see:
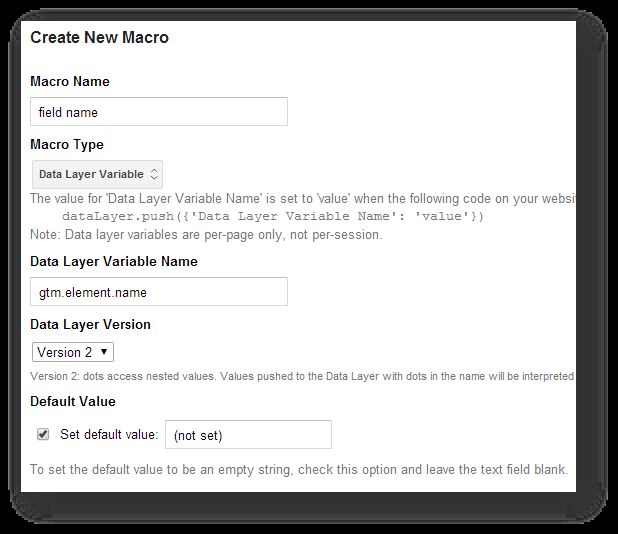
Next, I’ll need to create two new Data Layer Variable Macros to capture the field name and field value, respectively. First, here’s the Data Layer Variable Macro {{field name}}:
As you can see, I use “(not set)” as the placeholder if the field has no name attribute.
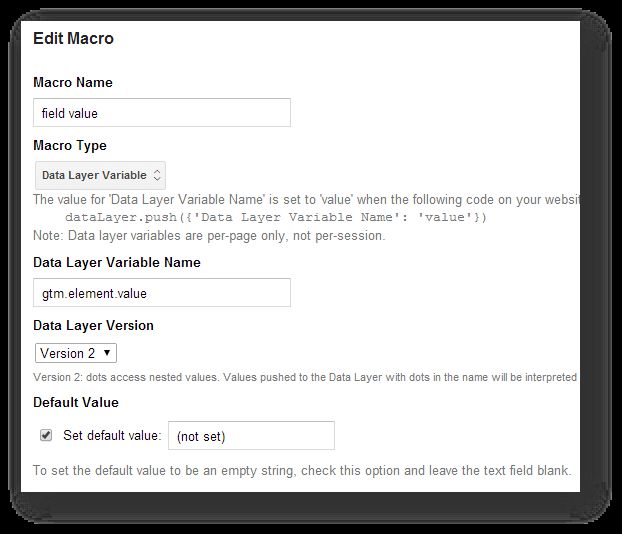
And here’s the Data Layer Variable Macro {{field value}} for the field value:
Again, I use “(not set)” if the field has no value.
Finally, I’ll need my virtual pageview tag. It’s just a normal Universal Analytics pageview tag, but it uses the Document Path field. Also, the firing rule for this tag needs to be {{event}} equals event.change, so that the tag fires only when a ‘change’ event is registered by the custom listener.
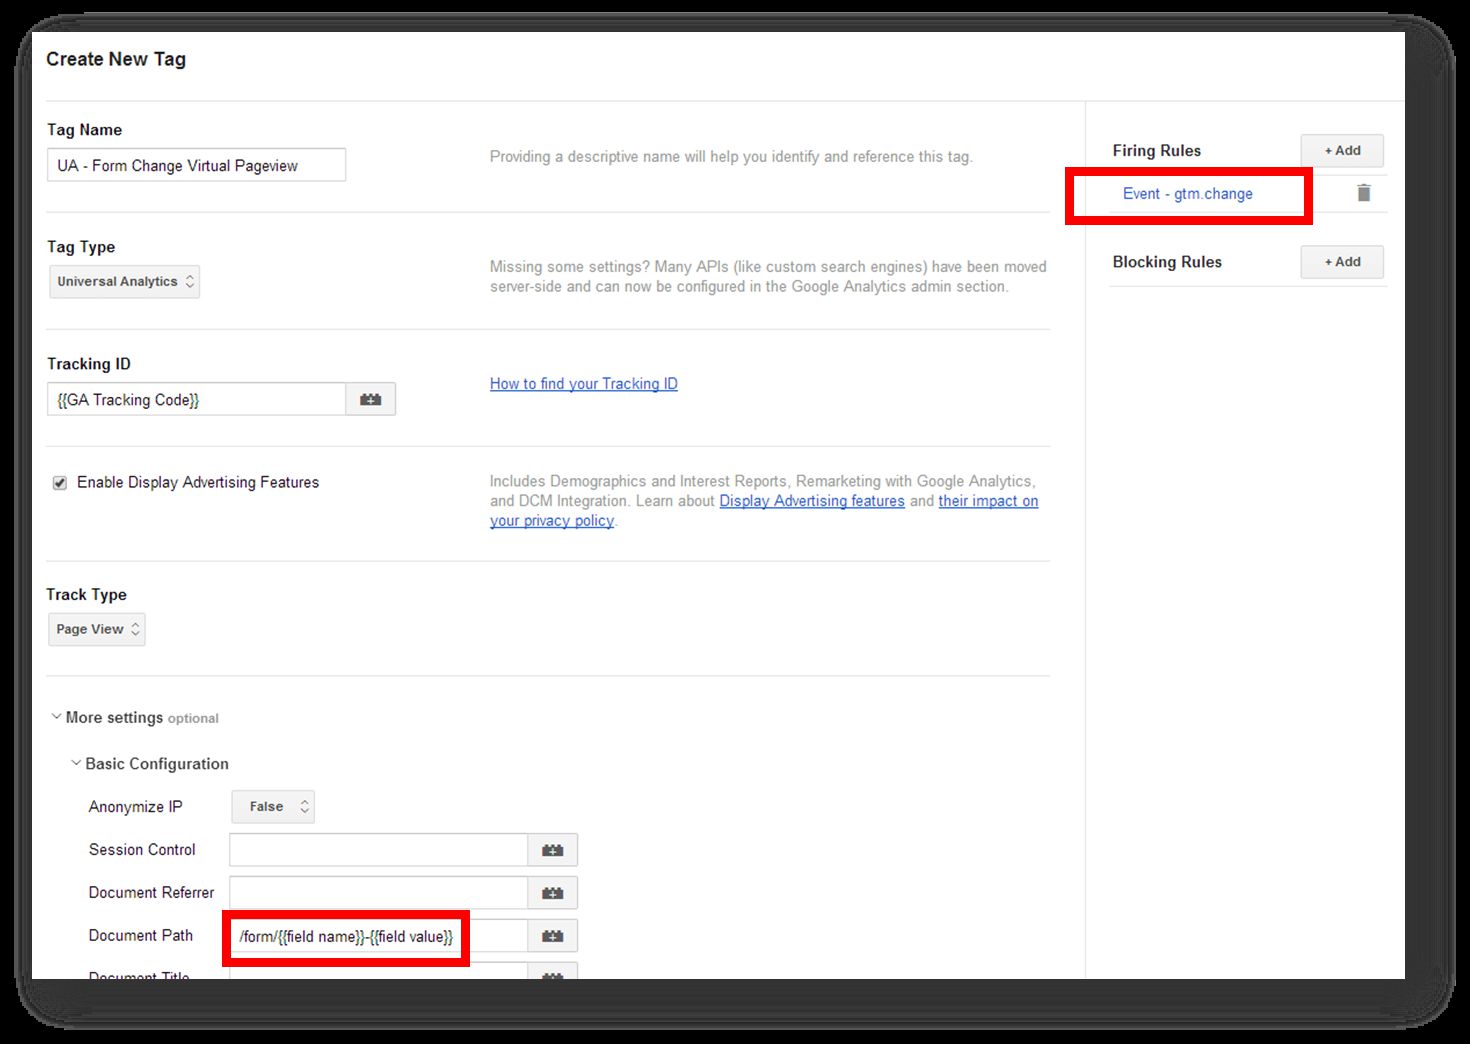
I concatenate the string “/form/{{field name}}-{{field value}}”, since the macros are resolved at runtime, and I’ll end up with a nice, clean URL path.
I manage to test this live by typing text into the search field and leaving the field. The event.change listener fires, and my debug panel shows that the Document Path has been processed correctly:
Naturally, don’t forget to check GA’s Real Time report to verify the data is flowing in correctly.
Conclusions
This post was about creating a generic event handler for all your custom listener needs. I urge you to explore beyond the out-of-the-box setups that GTM provides. However, once there’s overlap with GTM’s features, I strongly suggest you leverage the tag manager’s own listeners, since that will ensure that they’ll stay up-to-date with possible changes under the hood. I also recommend that you try to observe best practices, and that you emulate GTM’s design patterns to your best ability.
Like I said, I’ve written a lot about GTM’s listeners in various posts. Here are some guides you might enjoy reading as well:
Why Don’t My GTM Listeners Work? This is still one of the most asked questions I get. Please, read this post. You’ll learn about event delegation, and why so often interfering code prevents events from bubbling up to GTM’s listeners. Here’s a more recent rant on the topic: My Google+ rant.
Google Tag Manager: The DOM Listener You can use MutationObserver to listen for changes on the page that occur without an actual event firing or page refreshing.
Google Tag Manager: The History Listener A review of GTM’s History Listener.
Also, I allude to listeners in most of my Google Tag Manager posts, so be sure to read the rest of them if you have time.
This was a long and rather advanced guide. Go and eat an ice cream, you’ve earned it!