Last updated 9 October 2020:
customTaskupdated to a more stable version.
I’m a big fan of Enhanced Ecommerce in Google Analytics. In fact, I think it’s the only valid way to deploy Ecommerce tracking today, especially when using Google Tag Manager. The ability to use a Custom JavaScript variable and the possibility to tackle the full ecommerce funnel are some of the benefits of using Enhanced Ecommerce.
However, tracking certain view-based events, impressions in particular, has a significant problem when it comes to how Google Analytics processes events. In a nutshell, when implemented by the book, impressions are sent for all the product impressions on the page when the page is loaded. In other words, you are collecting hits from impressions the user might not actually have seen.
This also compounds into a number of problems:
Google Analytics has a maximum hits per session of 500. And this is a hard limit. Anything past 500 will simply not be recorded in the session (though if you’re using the paid GA360 you’ll still be billed for them!). If you send each impression separately, or even if you send them in batches but don’t discard the ones the user never saw, you might be approaching or going past this quota limit.
The maximum payload length is 8192 bytes for any GA request. This is easily surpassed if you’re sending 50-60 impressions in a single hit.
In this article, I want to tackle both of these problems by introducing a way of tracking only those impressions that were viewable in the browser viewport.
This solution is written for Google Tag Manager, as it utilizes a number of features that are built natively into the platform.
I’m also going to use customTask, because I want to write the whole solution without using a Custom HTML tag.
The Simmer Newsletter
Follow this link to subscribe to the Simmer Newsletter! Stay up-to-date with the latest content from Simo Ahava and the Simmer online course platform.
How it works
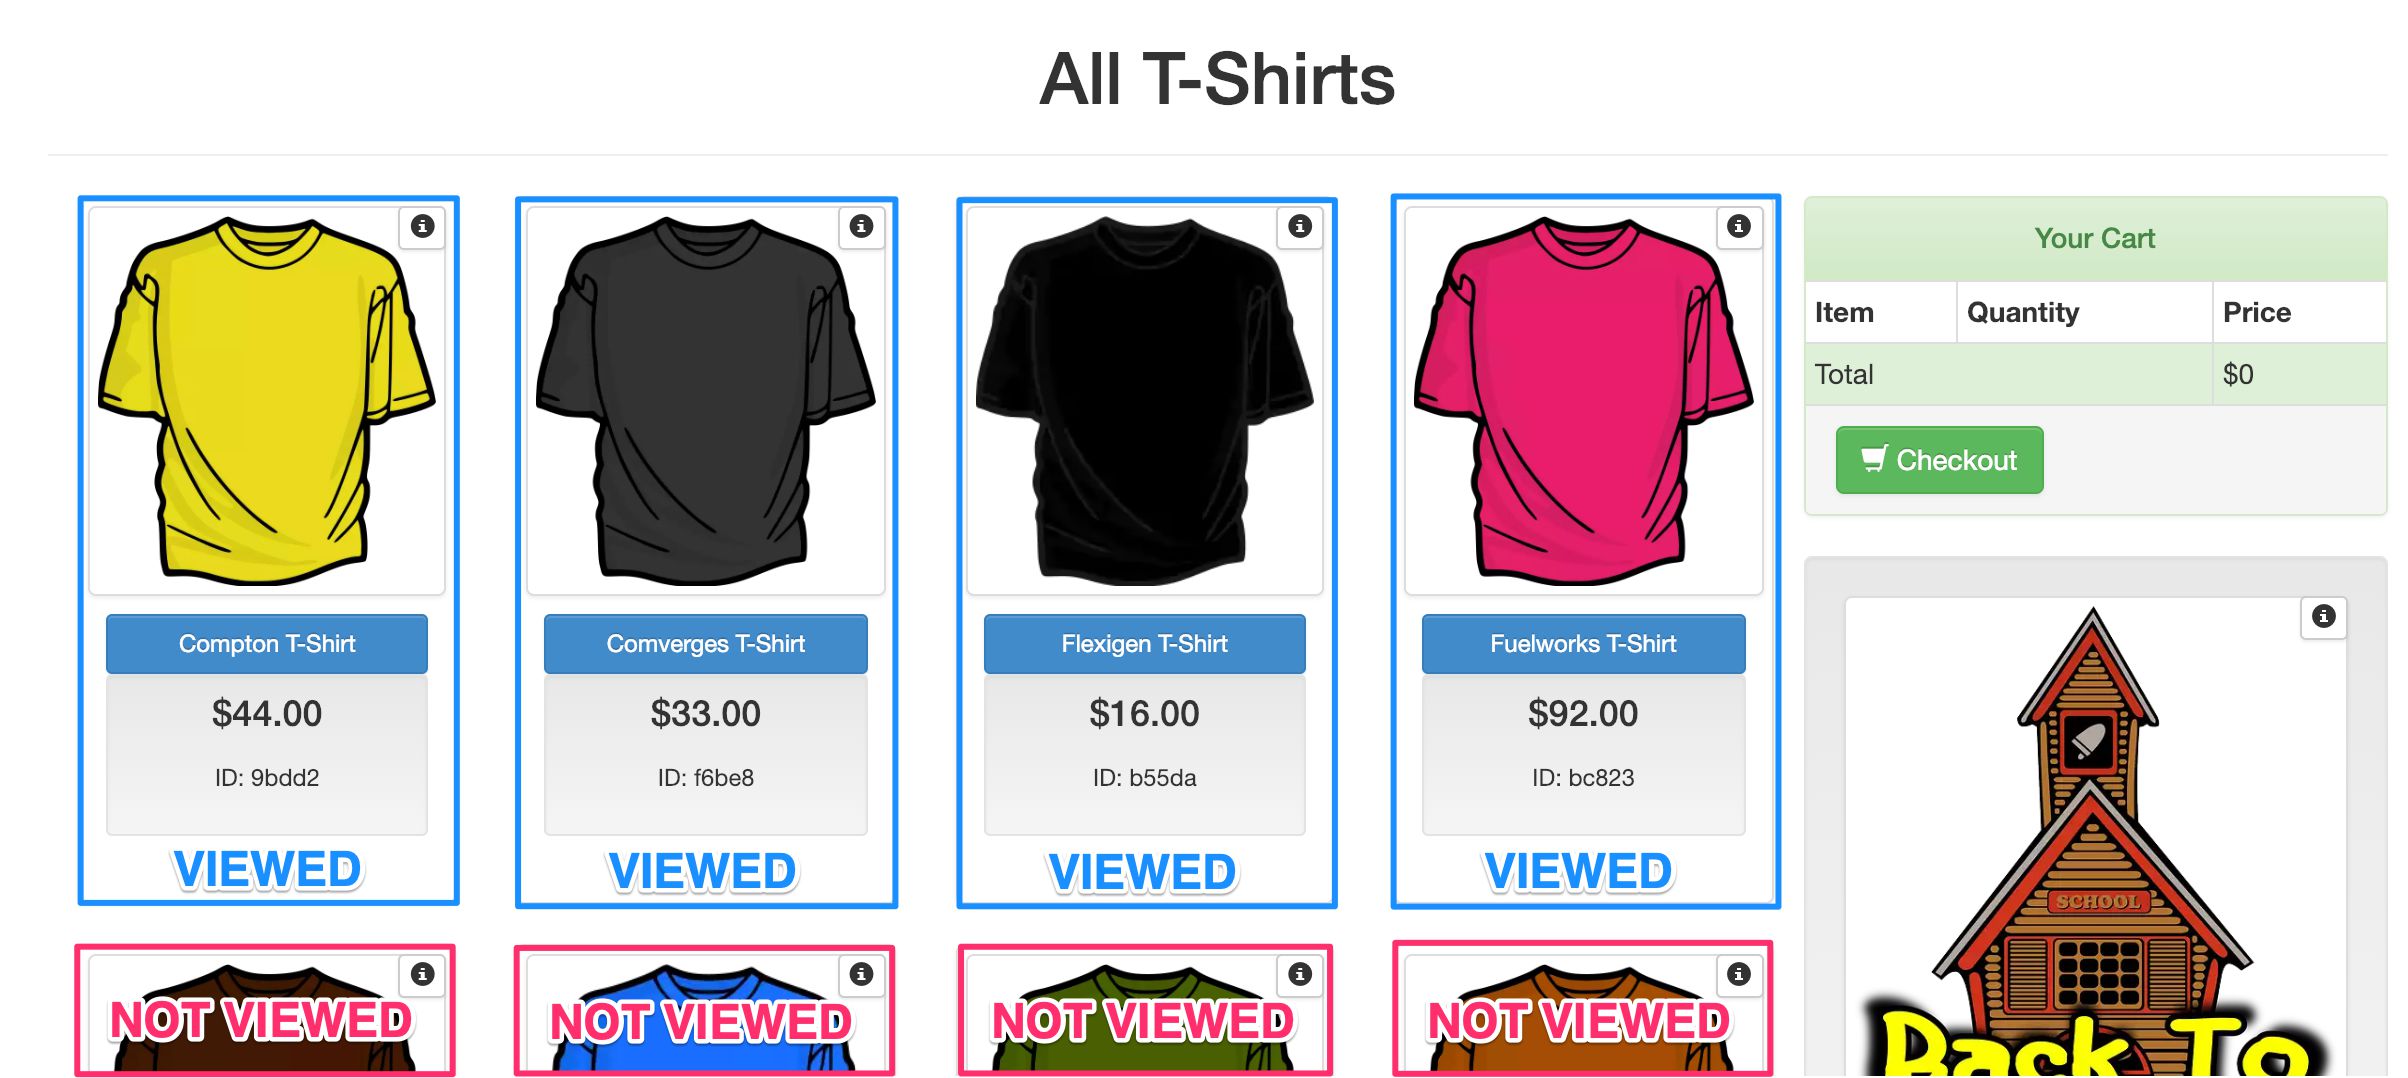
The solution relies on the Element Visibility trigger to identify impressions in the viewport and push them into a batch queue. A Timer trigger is also used to purge the batch queue in case the user is inactive. Finally, if a user clicks on an impression, all the items in the batch queue are sent, as are they if the user leaves the page.
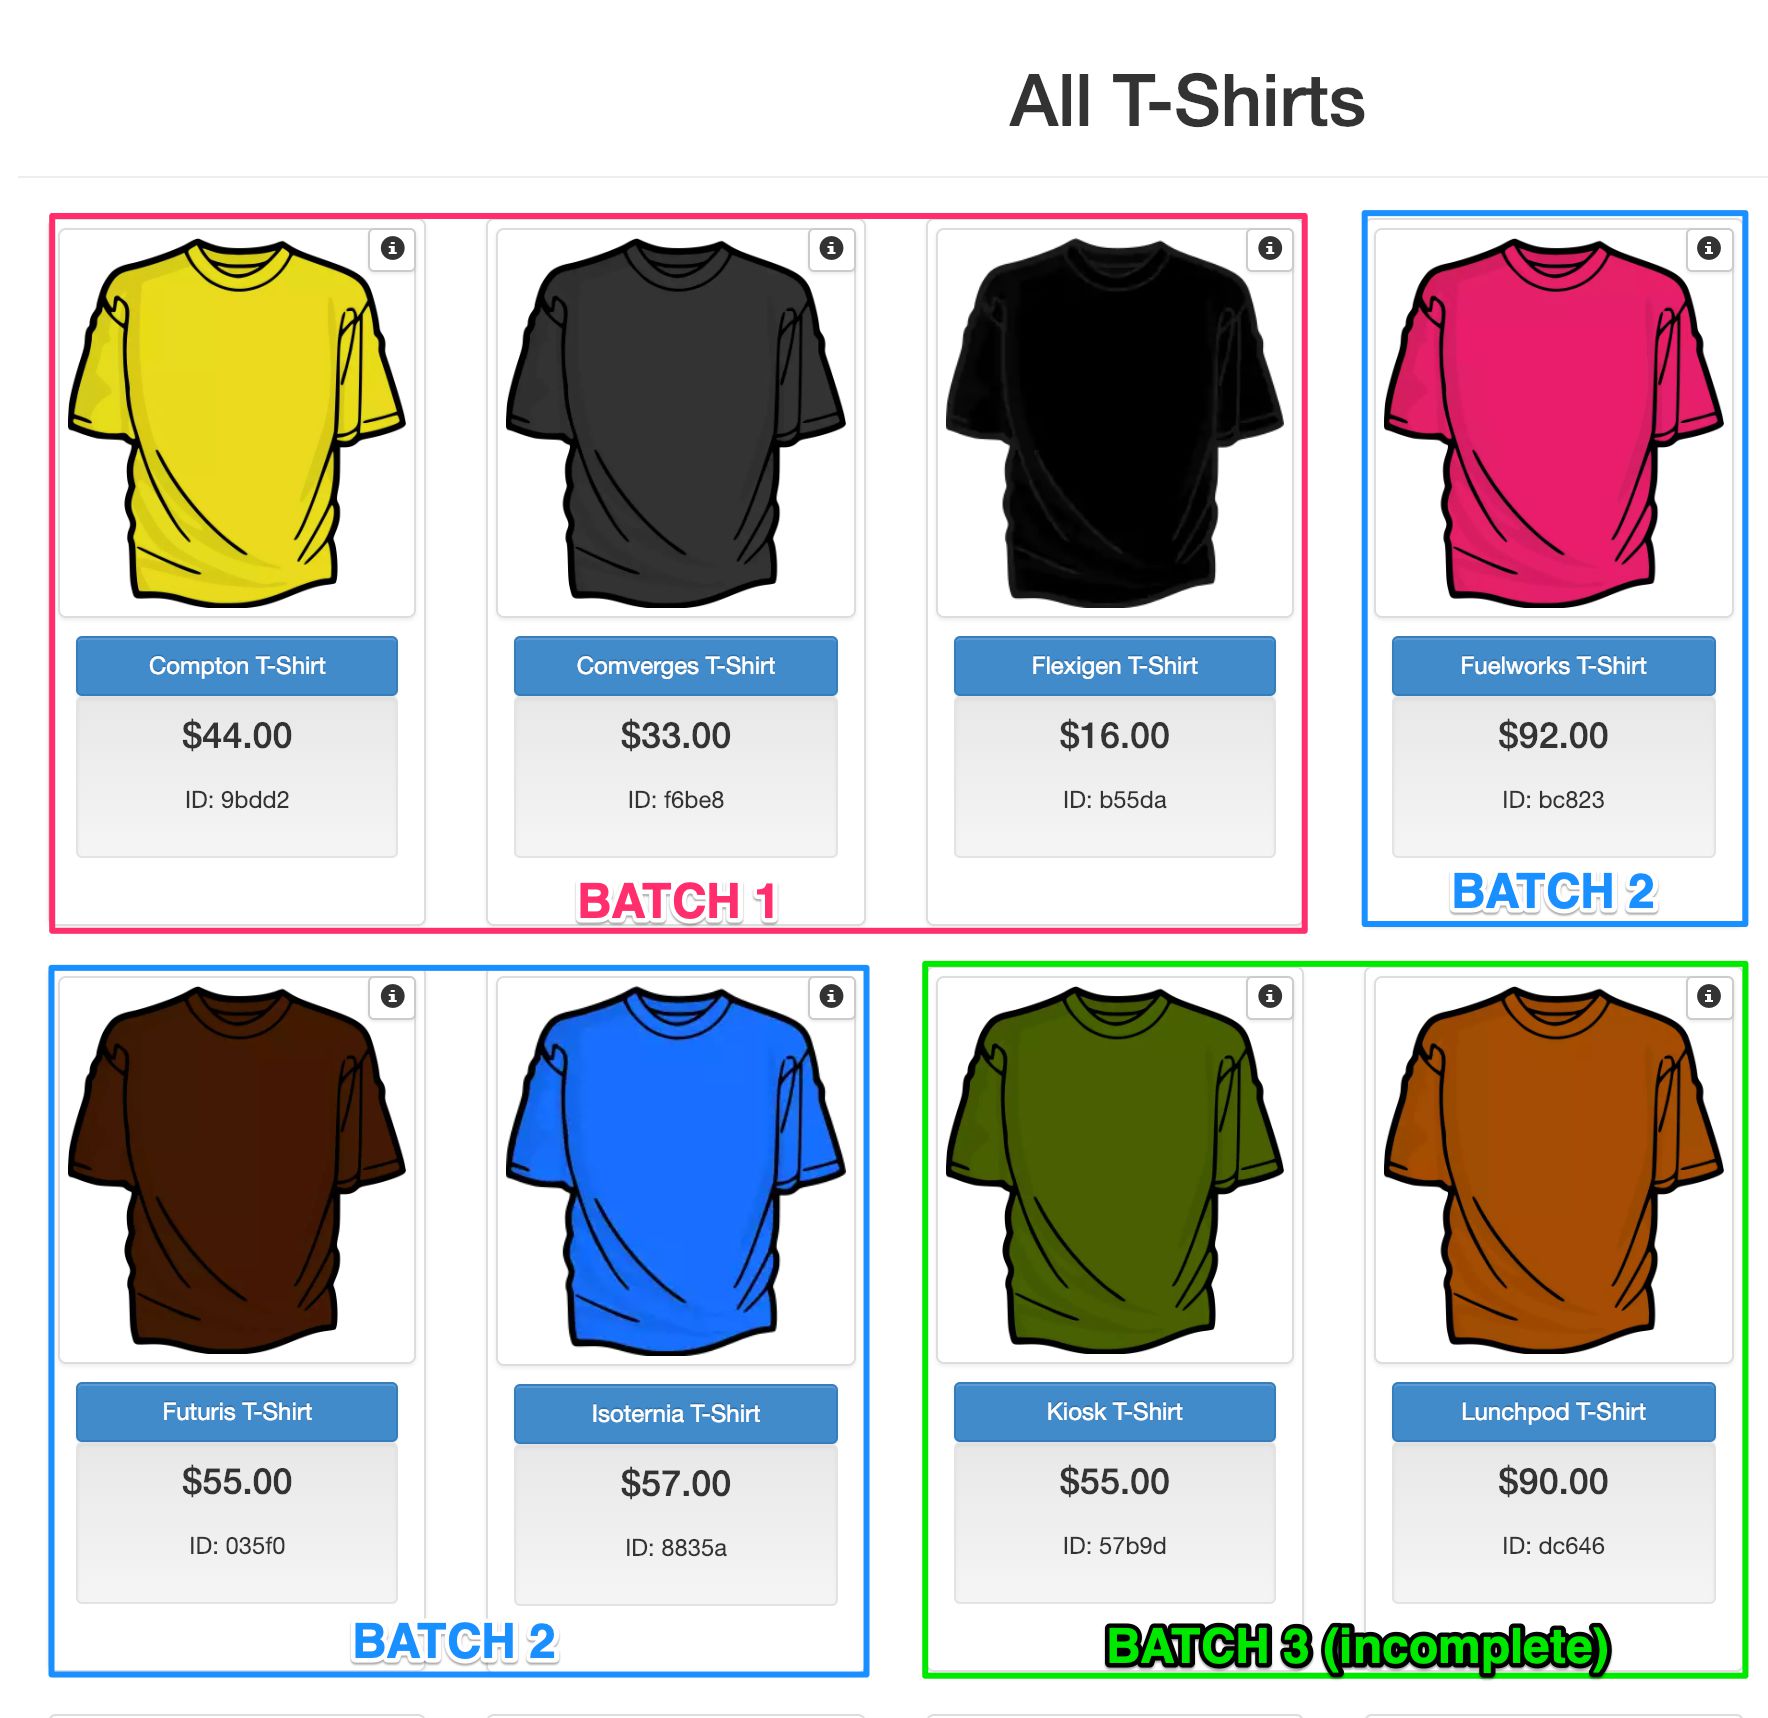
A batch queue is what we’ll use to group the viewed impressions together into units of certain size, so that the request to GA is neither too crowded (risking going past the payload length limit) or too sparse (risking having too many hits in the session).
Here’s a simple flow of how the solution works:
When the page is first loaded, an inventory of impression objects is built by identifying an
ecommerce.impressionsobject in thedataLayer.Every single product impression on the page itself will need to have an identifying attribute that links the product impression with the corresponding object in the
ecommerce.impressionsarray indataLayer. This should be something likedata-productid="impression1"whereimpression1is the ID of the impression.The Element Visibility trigger waits for items with this
data-productidto become visible on the page, adding each into a batch array of viewed impressions.When the array length reaches the batch maximum you define, the impressions in the batch array are sent to GA and then deleted from the array (so that you don’t end up sending them again).
If the user clicks a product impression on the page, a Product Click event is sent with that impression data together with all the items in the current batch queue.
Every 60 seconds (configurable), the batch queue is also emptied and sent to GA to avoid the impressions from being stuck in the queue for a long period of time if the user is inactive.
When the user leaves the current page, a custom
beforeunloadlistener will also send any impressions left in the batch queue.
The end result is that as impressions are viewed by the visitor, items are added to the batch queue and sent whenever the queue fills up. There are safeguards (timer, beforeunload) which ensure that items are never forgotten in the queue.
It’s not trivial to set up, so let’s get to it.
What you need
First of all, you need a fairly solid understanding of what Enhanced Ecommerce impressions are, how they are (traditionally) tracked, and how they appear in your GA reports. This guide will not go over the basics. Check out my Enhanced Ecommerce guide, as well as Google’s official support documentation for more information.
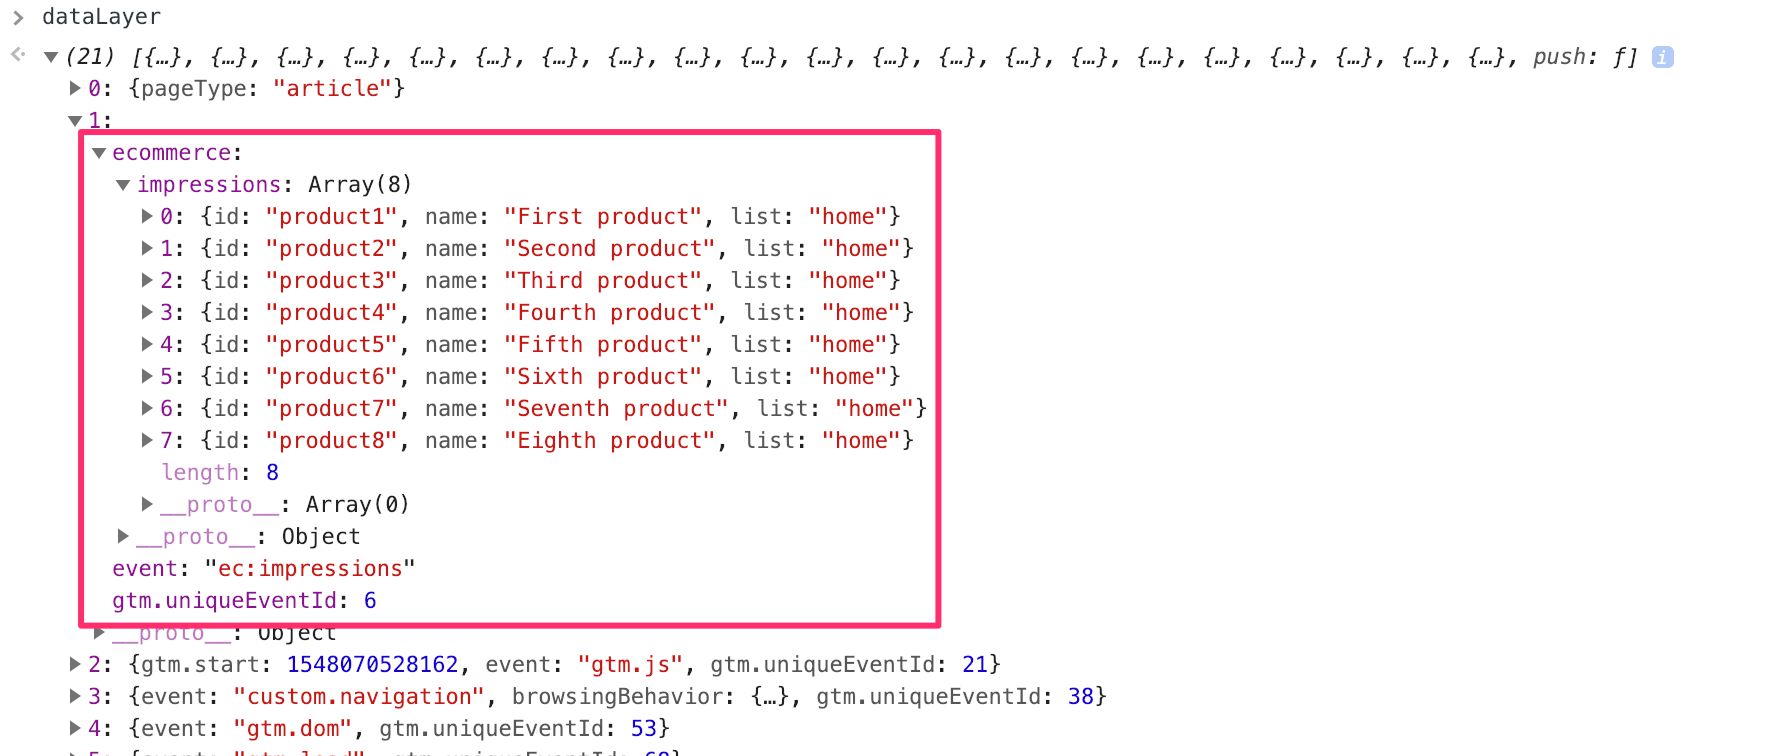
For the solution to work “out-of-the-box”, you will need a properly formatted ecommerce.impressions object in the dataLayer deployed into the page template preferably before the GTM container snippet. This is what you should already have if you’ve implemented Enhanced Ecommerce impressions by the book.
It’s possible to modify the code so it works with objects with a different composition, and it’s also possible to modify it to work with impressions scraped from the page. However, this guide will not tackle these edge cases. If you want to make these modifications yourself, feel free to do so (let me know in the comments if you need help).
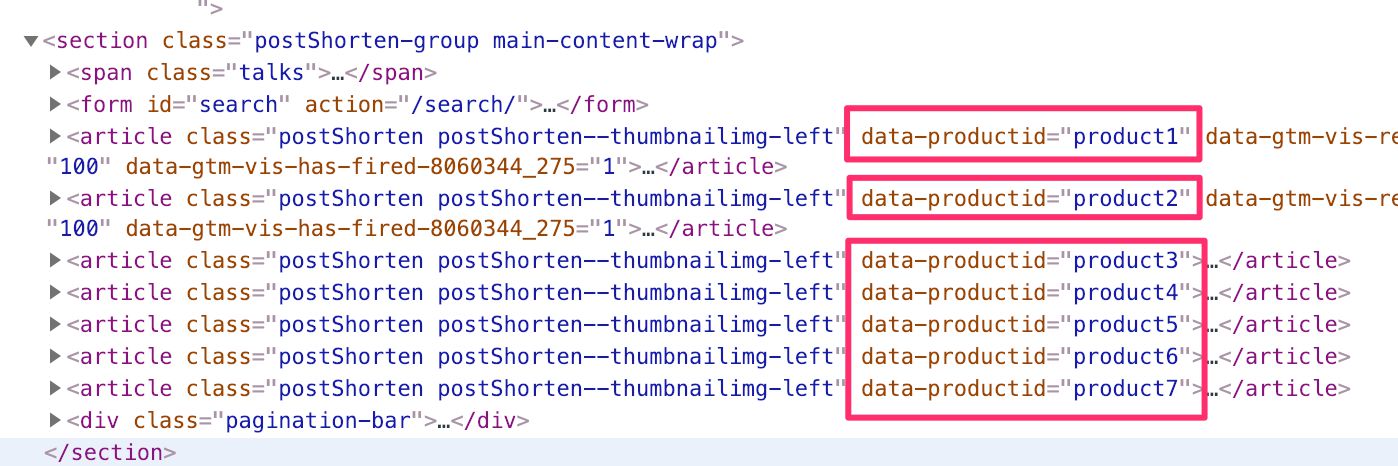
Another thing you’ll need is a way to tag all the HTML elements that contain impressions with the custom attribute that will link the impression to the corresponding dataLayer object. For example, this is what the first seven products on the page would look like if using the impressions data from the screenshot above:
As you can see, the value in data-productid corresponds with the individual id values in the ecommerce.impressions object.
You could add these dynamically using a Custom HTML tag and some DOM manipulation magic, but I do recommend doing this correctly from the start. Adding the attributes directly into template code prevent any race conditions from emerging, such as the Element Visibility trigger not identifying the items to which you dynamically added the new attributes.
Once you have the dataLayer object and the data attributes in place, you can get to work on the Google Tag Manager tags, triggers, and variables.
Create the variables
We’re going to need a handful of variables. Two Lookup Table variables will handle some of the event tag logic. A Custom JavaScript variable for the customTask will be where most of the magic happens. Then, we’ll also need a Custom JavaScript variable to handle the Enhanced Ecommerce object compilation.
There are many moving parts here, so let’s get to work.
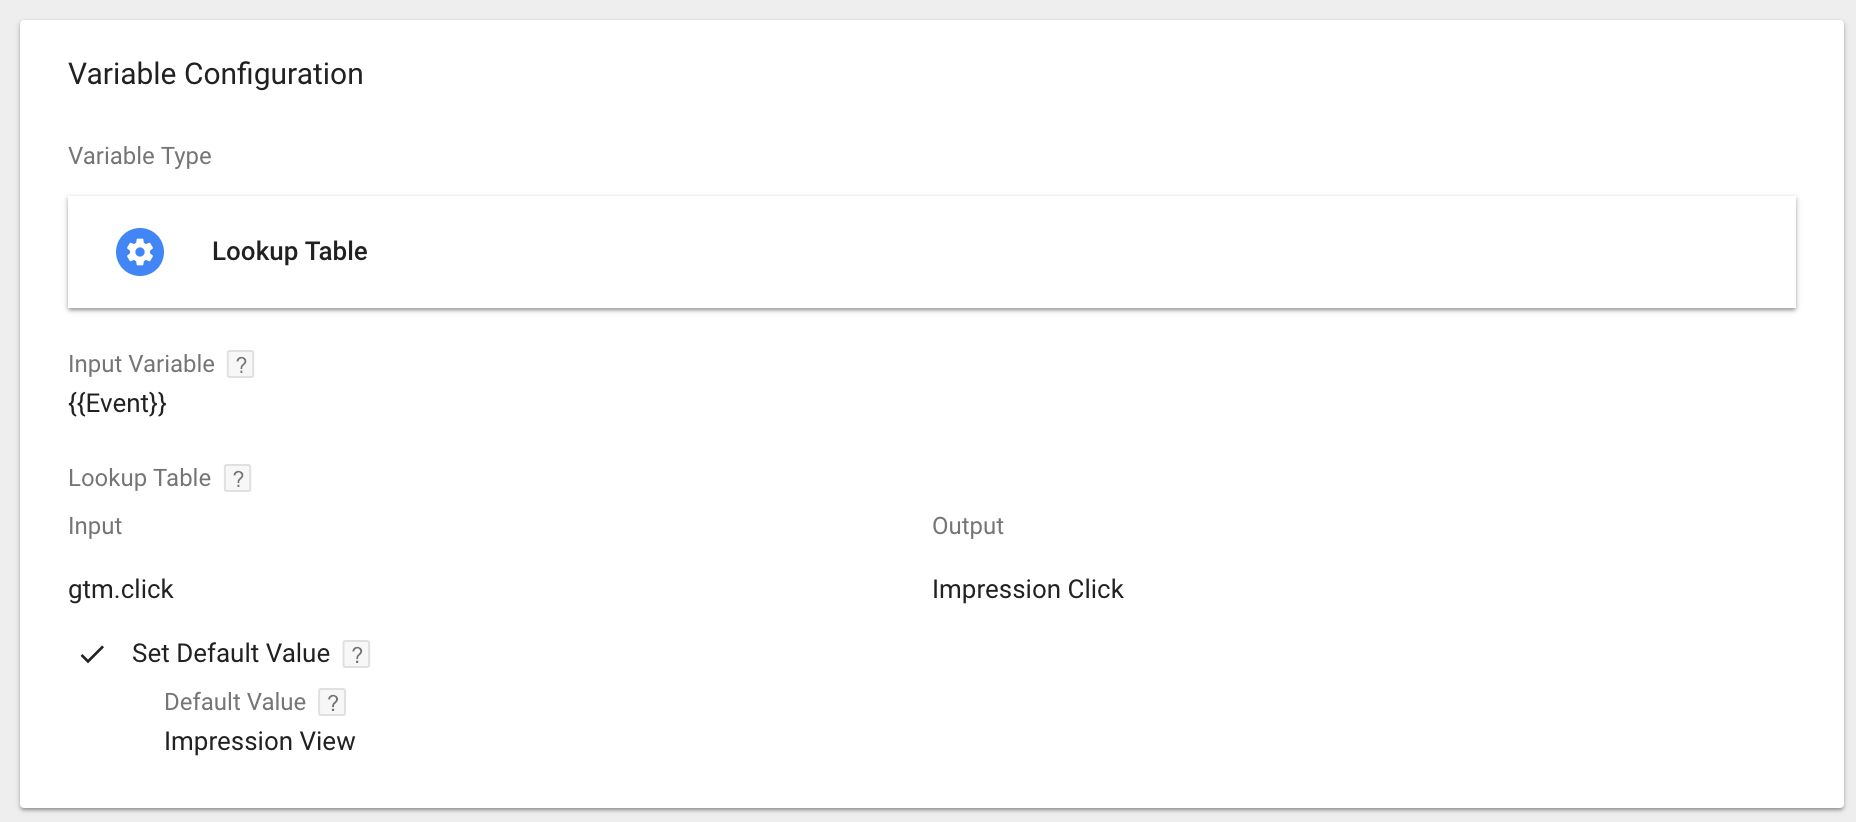
{{Lookup - Get Impression Label}}
This Lookup Table variable will be used to populate the Event Label field of the tag we’ll create label. As the label, i’m using either “Impression View” or “Impression Click”, depending on what type of event caused the tag to fire. As you can guess, the tag will fire for both impressions views and clicks.
This is what the Lookup Table variable should look like:
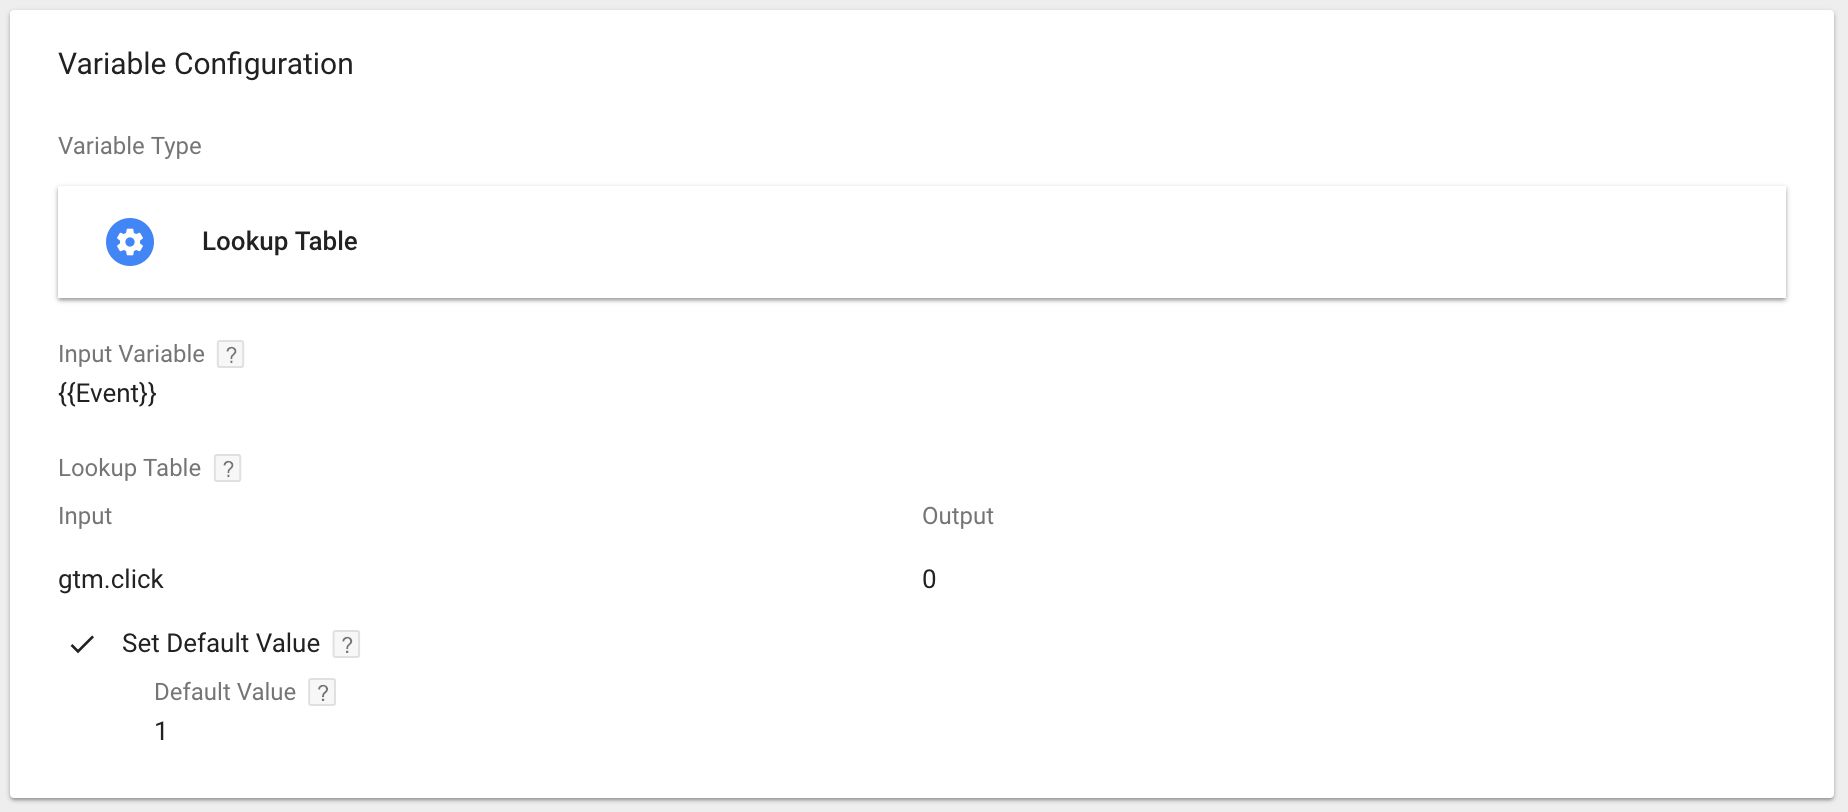
{{Lookup - Get Impression Interaction}}
This Lookup Table variable will return either true or false, depending on whether the hit was non-interaction or not. We’ll create all impression views as non-interactive, and the product impression click will be interactive.
{{JS - Function - True view impression handler}}
This is the main driving force of the solution. It’s a customTask variable, designed to build the batch queue, to create the beforeunload handler, to allow hits to fire (when the batch queue is full or a product is clicked), and to block GA hits from being dispatched (if the impression was simply added to the queue).
Here’s what the code in the Custom JavaScript variable should look like:
function() {
  // Configure the following
  var maxBatch           = 10,
      batchVariableName  = '_impressions_batch',
      productIdAttribute = 'data-productid';

  // Do not touch anything below this
  var targetElement = {{Click Element}},
      event         = {{Event}};

  if (event === 'gtm.click') {
    while (!targetElement.getAttribute(productIdAttribute) && targetElement.tagName !== 'BODY') {
      targetElement = targetElement.parentElement;
    }
  }

  return function(customModel) {

    // Set up the beforeunload listener only when the tag is first run.
    if (typeof window[batchVariableName] === 'undefined') {
      window.addEventListener('beforeunload', function() {
		window.dataLayer.push({
          event: 'sendFinalBatch'
        });
      });
    }

    var shouldFire = false,
        batch      = window[batchVariableName] = window[batchVariableName] || [],
        impressionId,
        ost;

    if (event === 'gtm.elementVisibility') {
      impressionId = targetElement.getAttribute(productIdAttribute);
      batch.push(impressionId);
      if (batch.length === maxBatch) { shouldFire = true; }
    }

    if (['sendFinalBatch', 'gtm.timer'].indexOf(event) > -1 && batch.length > 0) { shouldFire = true; }

    if (event === 'gtm.click') { shouldFire = true; }

    if (shouldFire) {
      ost = customModel.get('sendHitTask');
      customModel.set('sendHitTask', function(sendModel) {
        ost(sendModel);
        window[batchVariableName] = [];
      });
    } else {
	  customModel.set('sendHitTask', null);
    }
  };
}
First, modify the three variables in the beginning of the returned function.
Set
maxBatchto the maximum length of the batch queue. The default value of10is probably enough in most cases.Set
batchVariableNameto what the global variable that stores the batch queue should be named. The default value is, again, probably OK, but you’ll want to rename it in the rare case that a global variable named_impressions_batchalready exists and is in use.Set
productIdAttributeto the HTML attribute name that stores the ID with each product HTML block on the page. The default value isdata-productid, which means that the HTML structures that contain each product impression should have the attributedata-productid="some_product_id"in one of the elements (preferably an element that wraps the entire impression).
Let me tear this code apart and show you what each individual part does.
if (event === 'gtm.click') {
  while (!targetElement.getAttribute(productIdAttribute) && targetElement.tagName !== 'BODY') {
    targetElement = targetElement.parentElement;
  }
}
This is a simple iterator which climbs up the element tree from the clicked element until it finds the element with the aforementioned product ID attribute.
if (typeof window[batchVariableName] === 'undefined') {
  window.addEventListener('beforeunload', function() {
    window.dataLayer.push({
      event: 'sendFinalBatch'
    });
  });
}
When the customTask is fired for the first time on the page, a beforeunload listener is created. The idea is that when the user leaves the current page, the beforeunload event that is automatically dispatched triggers a window.dataLayer.push() call that we can then use to send the remaining items in the batch queue.
var shouldFire = false,
    batch      = window[batchVariableName] = window[batchVariableName] || [],
    impressionId,
    ost;
By default, the customTask blocks the Google Analytics request from firing (shouldFire = false). Also, here we create the batch queue if one doesn’t already exist.
if (event === 'gtm.elementVisibility') {
  impressionId = targetElement.getAttribute(productIdAttribute);
  batch.push(impressionId);
  if (batch.length === maxBatch) { shouldFire = true; }
}
If the tag was fired due to a visibility event, the product ID that triggered the event will be pushed into the batch queue. If the batch queue thus reaches its maximum length, customTask will allow the hit to fire.
if (['sendFinalBatch', 'gtm.timer'].indexOf(event) > -1 && batch.length > 0) { shouldFire = true; }

if (event === 'gtm.click') { shouldFire = true; }
If the trigger event was sendFinalBatch (i.e. the user is trying to leave the page) or gtm.timer (i.e. 60 seconds have passed since the previous timer event or page load) AND if the batch queue has items in it, the hit will be allowed to fire, thus clearing the batch queue and sending all the items within to GA.
If the trigger event was a click, meaning the user clicked a product impression, the GA request will be allowed to complete as well.
if (shouldFire) {
  ost = customModel.get('sendHitTask');
  customModel.set('sendHitTask', function(sendModel) {
    ost(sendModel);
    window[batchVariableName] = [];
  });
} else {
  Object.keys(customModel.data).forEach(function(key) {
    customModel.data[key] = null;
  });
}
If the GA hit is allowed to fire, the first part of the if clause will do just that. After the hit has been sent, the batch queue is cleared of all items.
If the GA hit was blocked, then the else clause will clear the model object thus effectively preventing the Google Analytics hit from being dispatched.
{{JS - Get True View object}}
This variable builds the Enhanced Ecommerce object when the tag fires. It’s used to build both the impression view object and the impression click object.
So, create a Custom JavaScript variable, and put the following code within:
function() {
  // Configure the following:
  var maxBatch           = 10,
      batchVariableName  = '_impressions_batch',
      productIdAttribute = 'data-productid';

  // Do not touch anything below this
  var targetElement = {{Click Element}},
      event         = {{Event}},
      batch         = window[batchVariableName],
      impressions   = google_tag_manager[{{Container ID}}].dataLayer.get('ecommerce.impressions'),
      ecomObj       = {ecommerce: {}};

  if (event === 'gtm.click') {
    while (!targetElement.getAttribute(productIdAttribute) && targetElement.tagName !== 'BODY') {
      targetElement = targetElement.parentElement;
    }
  }

  var latestImpression = impressions.filter(function(impression) {
    return impression.id === targetElement.getAttribute(productIdAttribute);
  }).shift();

  var impressionsArr = batch.map(function(id) {
    return impressions.filter(function(impression) {
      return impression.id === id;
    }).shift();
  });

  if (event === 'gtm.elementVisibility'){
    impressionsArr[maxBatch - 1] = latestImpression;
  }

  ecomObj.impressions = impressionsArr;

  if (event === 'gtm.click') {
    ecomObj.click = {
      actionField: {
        list: latestImpression.list
      },
      products: [latestImpression]
    };
  }
  return {
    ecommerce: ecomObj
  };
}
As you can see, you’ll need to configure the exact same settings (maxBatch, batchVariableName, productIdAttribute) in the beginning of this script as you had to in the previous Custom JavaScript variable. It’s important that these match exactly to the settings you configured earlier, so double-check to make sure they are the same.
Other than that, the purpose of the JavaScript is to compile the impression product IDs in the batch queue to the corresponding Enhanced Ecommerce objects. If the event was a click, then the impression that was clicked will be sent as the Product Click target.
Create the triggers
We’ll need a whopping four triggers all attached to the tag.
An Element Visibility trigger will handle building the batch queue from product impression views.
A Custom Event trigger will fire the tag when the user is trying to leave the page.
A Timer trigger will send the items in the batch queue periodically.
A Click trigger will fire the tag when the user clicks a product impression.
The Element Visibility trigger
The Element Visibility trigger will fire whenever a new product impression becomes visible. It will only fire once per element, which ensures that those elements for which an impression hit has already been sent won’t get another impression sent while the user is on the page.
The Element Visibility trigger will be set to fire when any element with the give product ID attribute becomes visible. It’s important that you use the same attribute name you used in the two Custom JavaScript variables created above. If the attribute name was, for example, data-productid, the CSS selector you’d need to configure in the Element Visibility trigger should be [data-productid]. Check this if you need a refresher on CSS selectors.
Anyway, make sure the trigger looks like something like this (with the change in the CSS selector if needed):
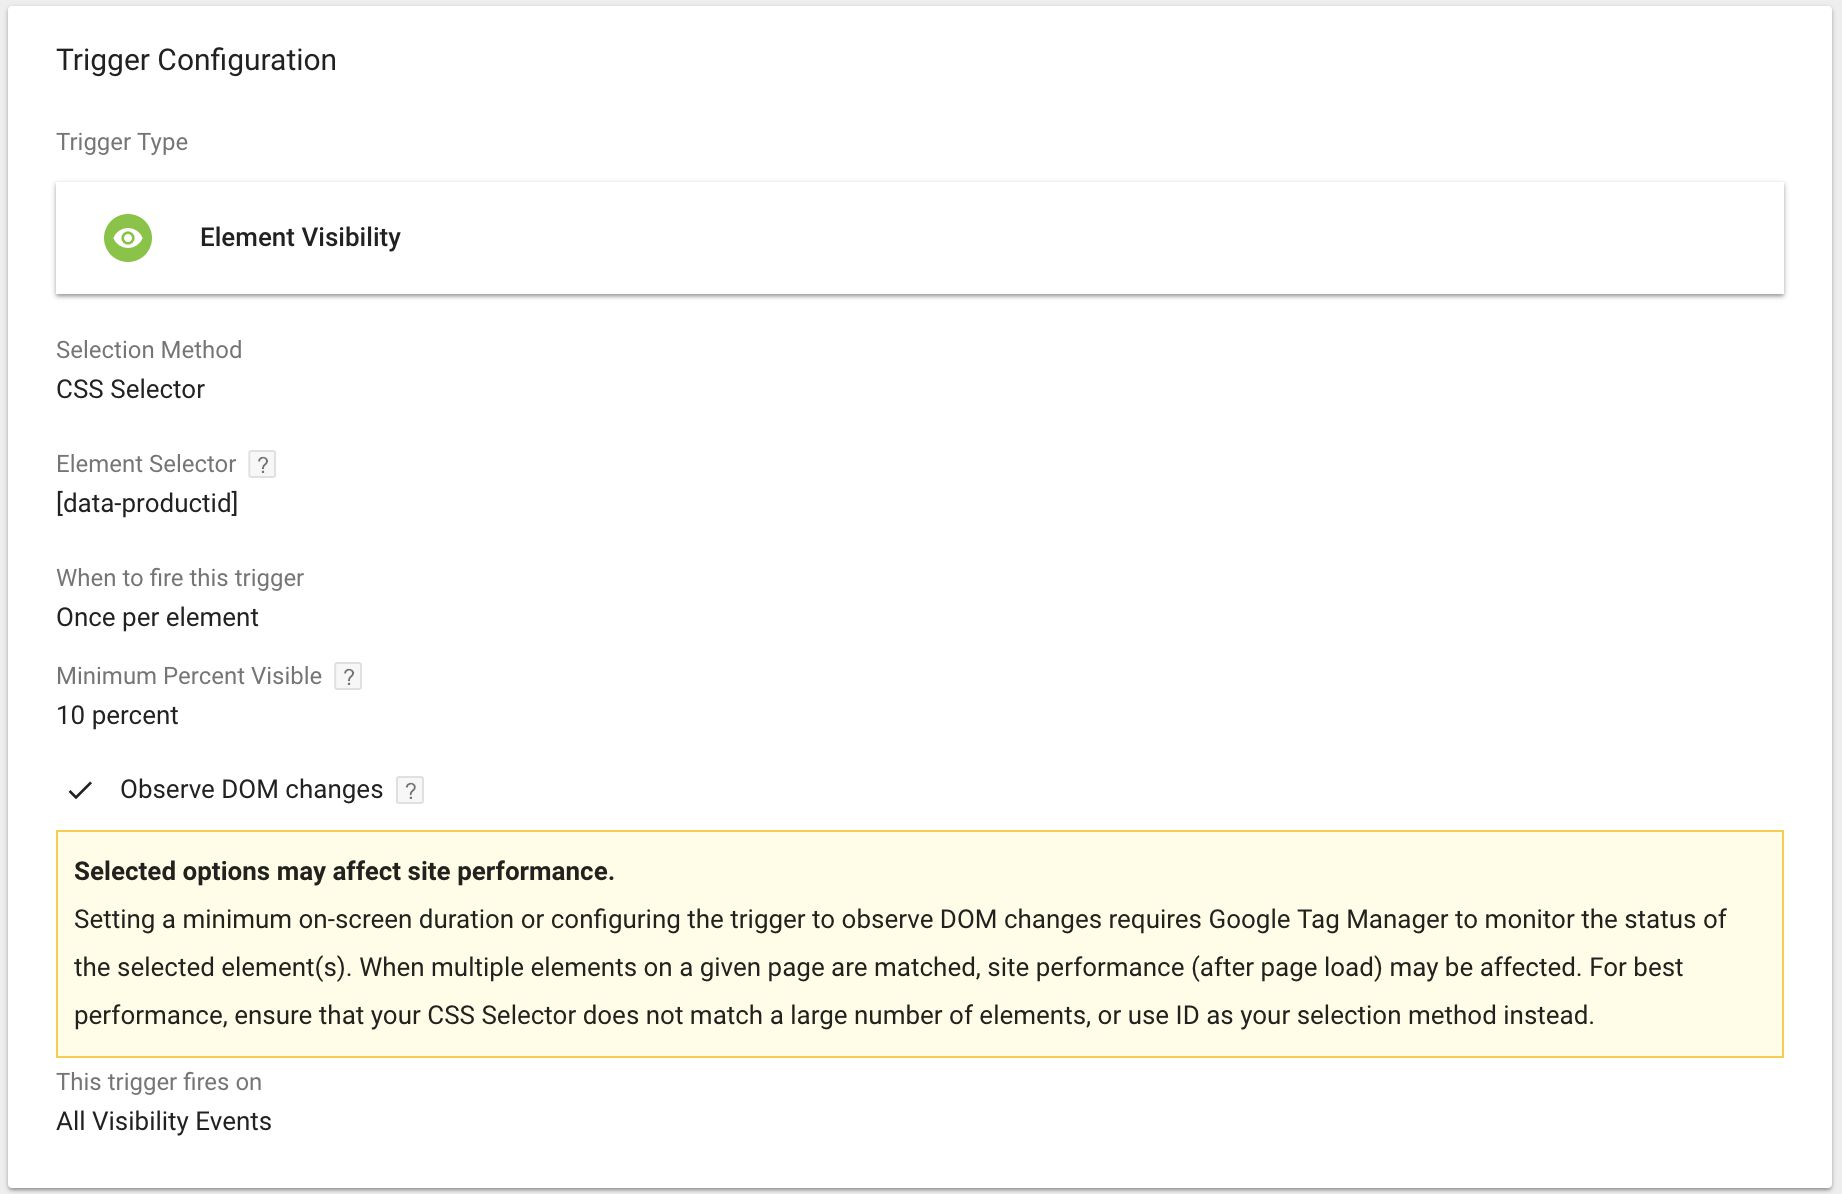
You can change the percentage of the element that needs to be visible if you wish.
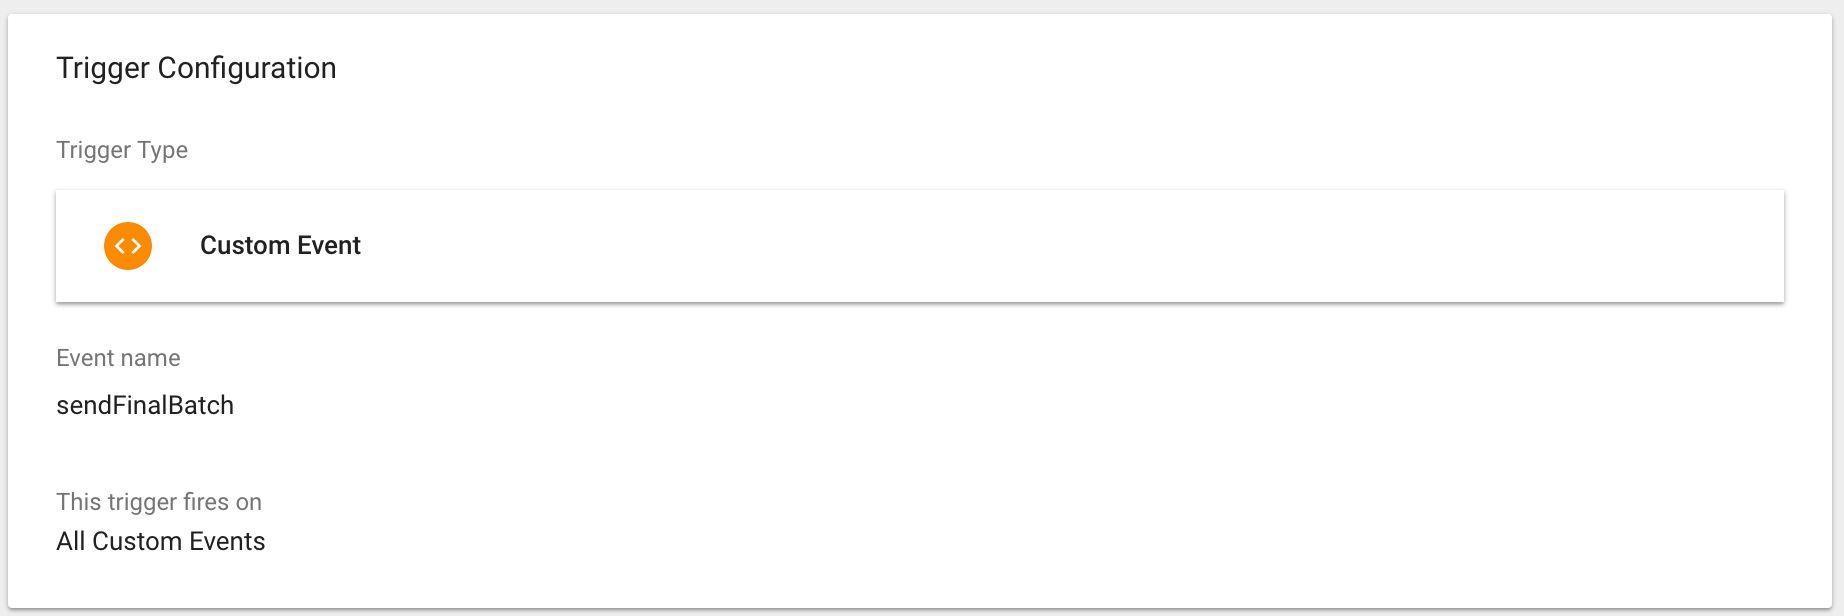
The Custom Event trigger
The Custom Event trigger is simple. It fires whenever the beforeunload listener (created in the customTask variable) is triggered by the user trying to leave the page.
The Timer trigger
The Timer trigger will dispatch the items in the queue when it goes off. It’s a good backup to have, because otherwise you run the risk of items being left in the queue indefinitely, only to be dispatched when the user triggers another visibility event some time in the future. This might lead to hermit sessions, where the only hits are these impression view hits. Not very useful.
You can freely modify the settings of the trigger. Having it fire continuously isn’t that big a deal. The Google Analytics tag will always fire, yes, but the customTask will make sure that no hit is actually built unless the batch queue actually has items in it.
As you can see, I also make sure that the timer trigger only fires on valid pages by checking if a Data Layer variable for the key ecommerce.impressions is not undefined. This way the trigger will only activate on pages where there’s the possibility of viewing impressions. You can change the condition to something else if it makes more sense.
The Click trigger
The Click trigger has a simple purpose. It fires when a product impression is clicked, thus sending a Product Click payload to Google Analytics (along with any impressions that might have been in the batch queue).
Remember to change the CSS selector to match the HTML attribute you use to encode the product ID for every product impression element on the page.
If you’re curious about the [data-productid], [data-productid] * syntax, take a look at this article.
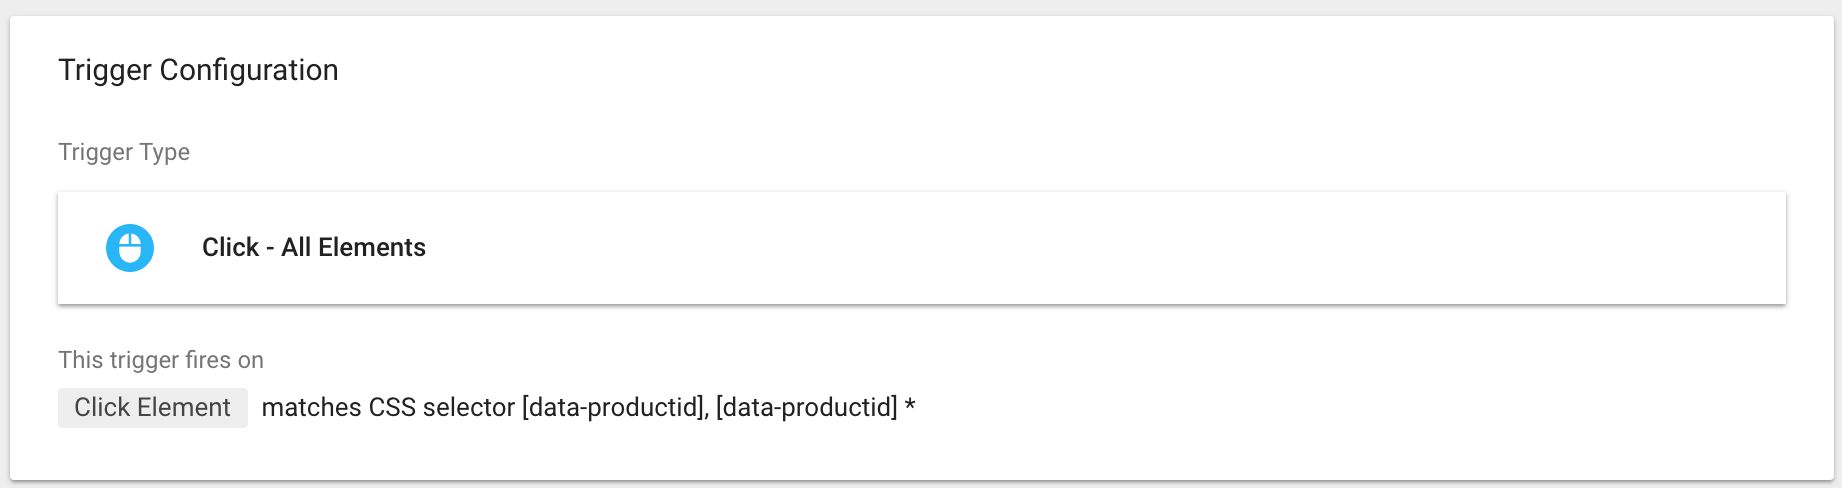
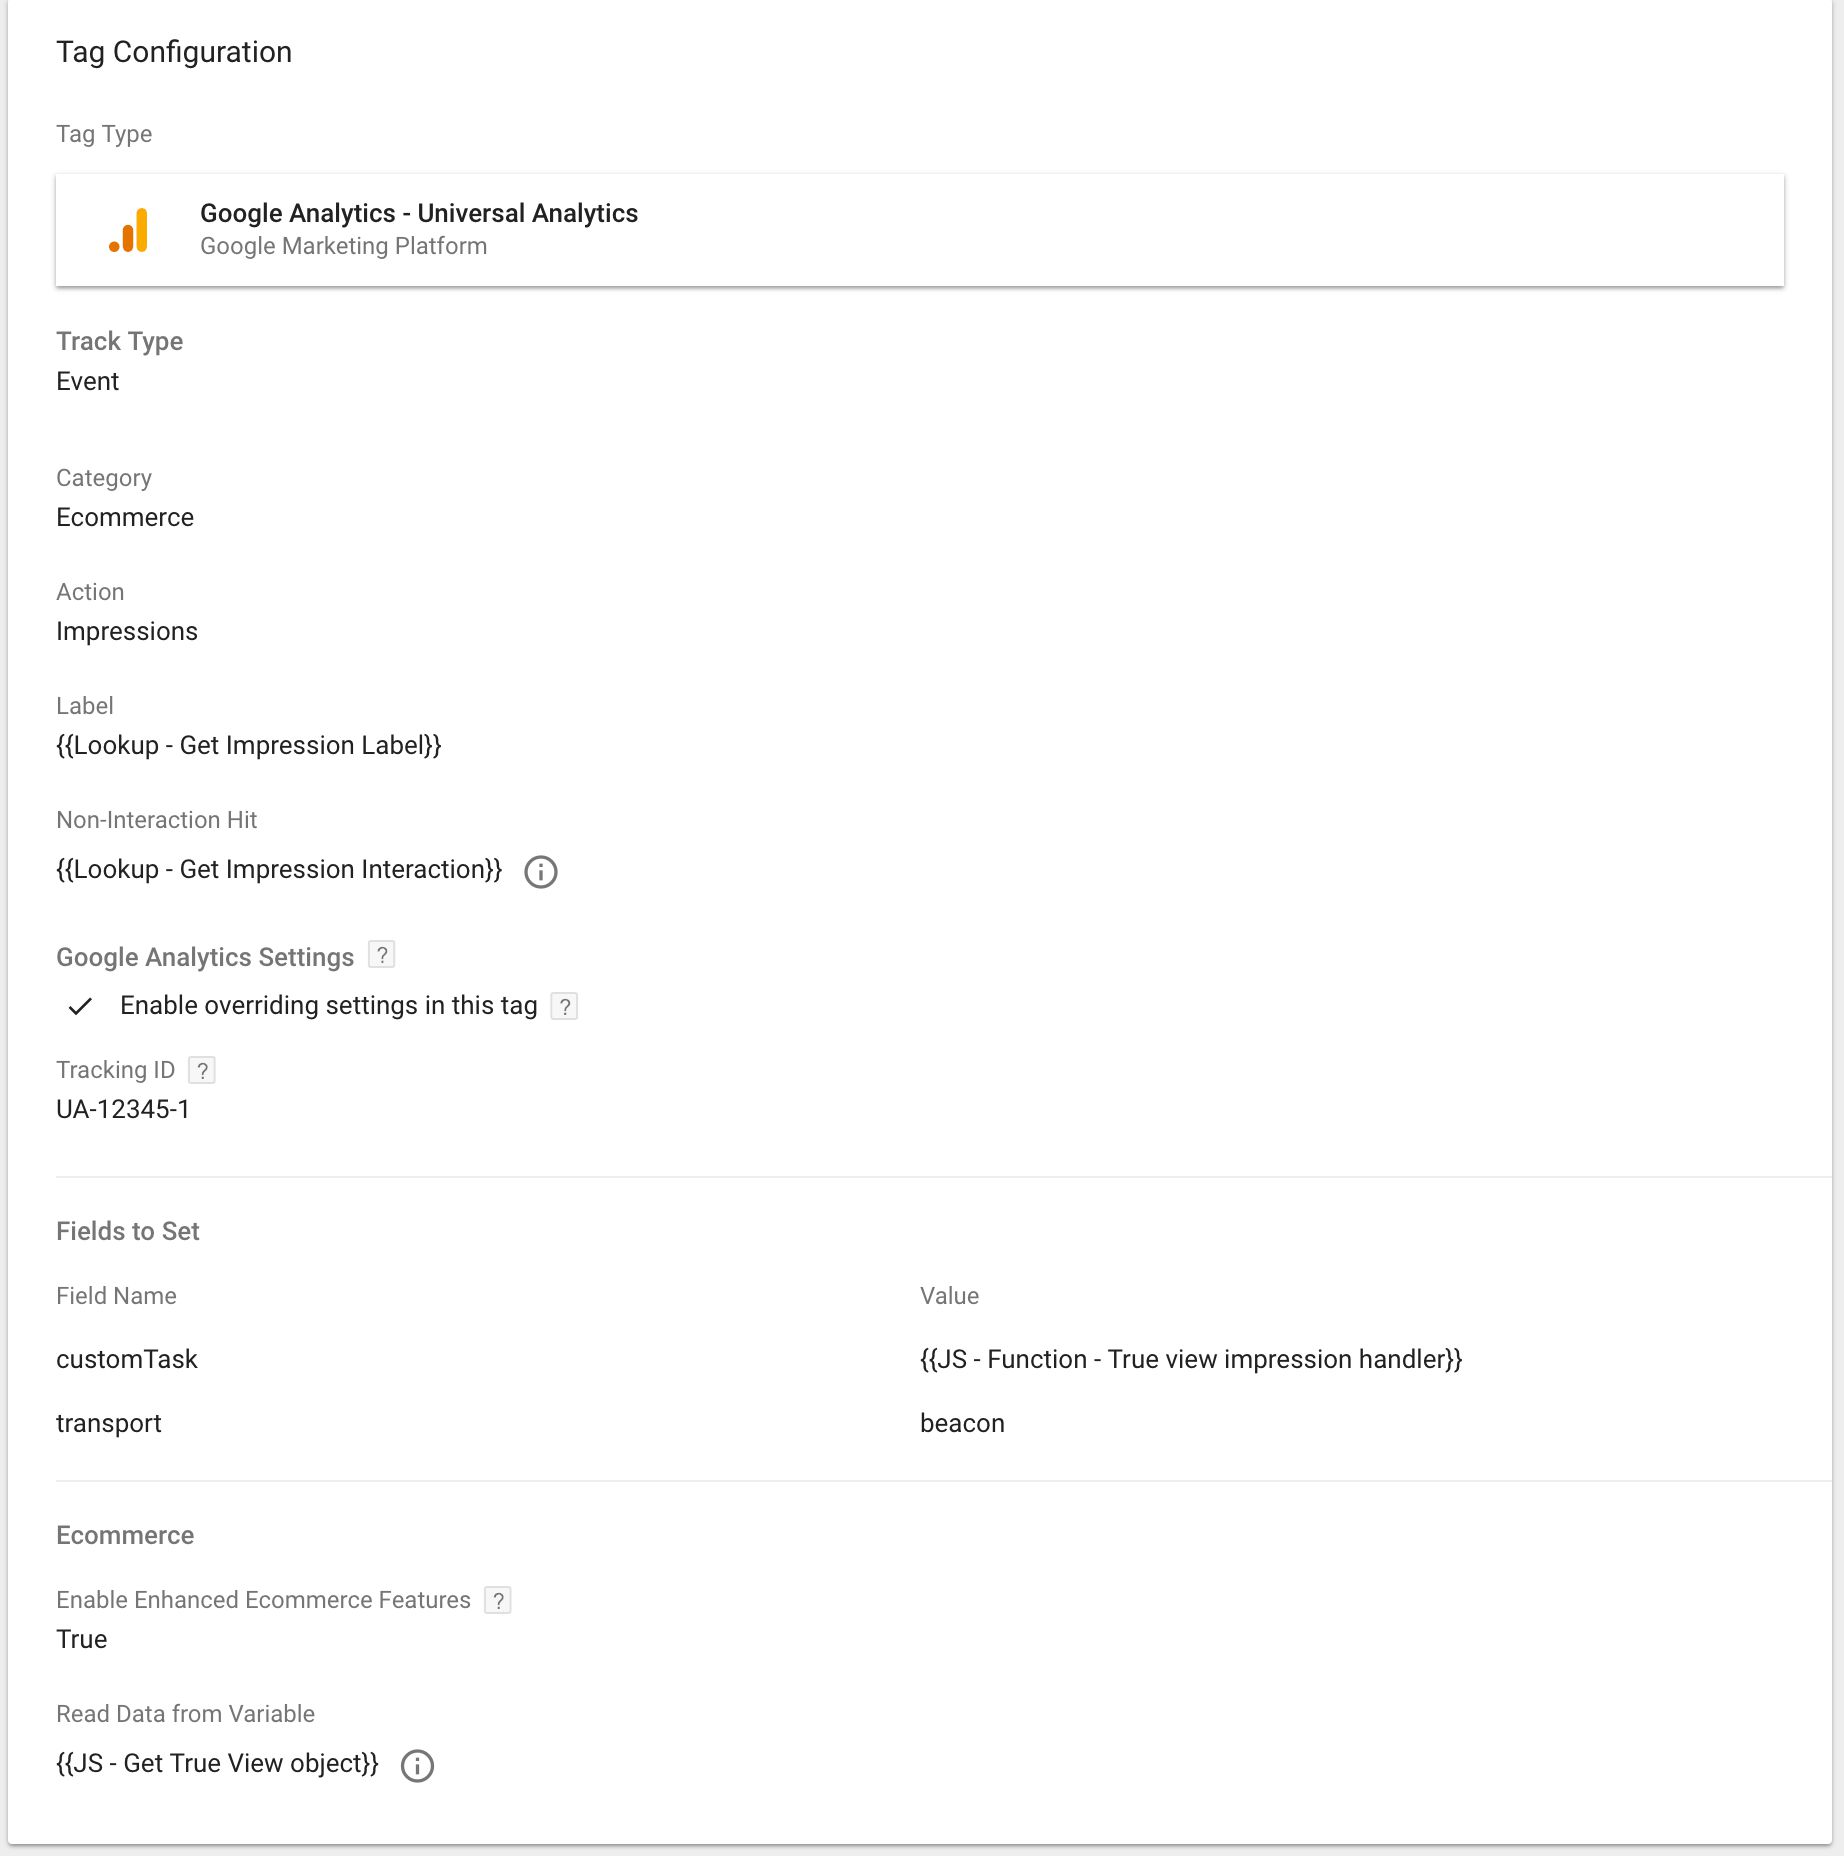
Create the tag
Finally, the tag itself. Now that you have all the necessary variables and triggers created, it’s just a question of putting them all together in the tag.
Feel free to modify what you send with Event Category, Event Action, and Event Label.
Make sure you have the transport field set to beacon, since you’ll want those beforeunload hits to be sent even if the page has already been unloaded.
Tag Type: Universal Analytics
Track Type: Event
Category: Ecommerce
Action: Impressions
Label: {{Lookup - Get Impression Label}}
Non-Interaction Hit: {{Lookup - Get Impression Interaction}}
Enable overriding settings in this tag: Checked
Tracking ID: UA-XXXXXX-Y
Fields to Set:
– Field Name:customTask, Value: {{JS - Function - True view impression handler}}
– Field Name:transport, Value:beaconEnable Enhanced Ecommerce Features: True
– Read Data from Variable: {{JS - Get True View object}}
Finally, add all four triggers created in the previous chapter to this tag.
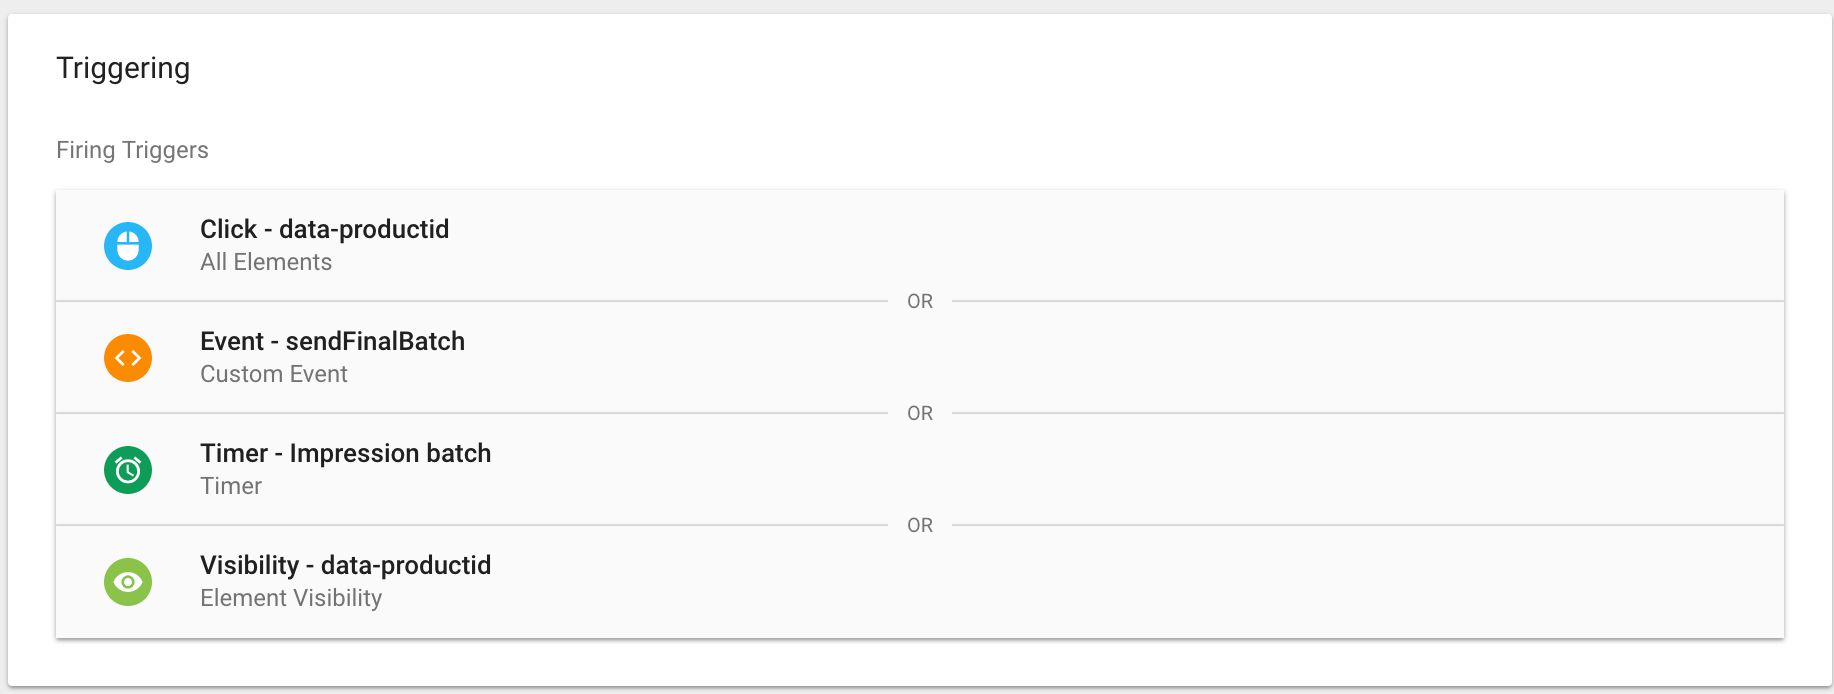
And you’re all set! Then it’s time to test things out.
How to test
It’s important not to rely on Google Tag Manager’s debug mode to test this out. Why? Because even if it says that a Google Analytics tag has fired, it’s customTask that governs whether the request was completed or not.
So, I recommend you install David Vallejo’s excellent GTM/GA Debug extension. It shows you what hits are actually sent to Google Analytics, and it has an excellent Enhanced Ecommerce tab for seeing exactly what impressions are dispatched.
Test the batch queue first
When a page with impression loads, test how your batch queue works.
You should see one gtm.elementVisibility event in the Debug mode panel for every product impression you see in the viewport of the page. These events should not dispatch the hit to GA until you reach the same number of visibility events as the maximum queue size.
So if you’ve configured the maxBatch in the Custom JavaScript variables to 10, then the first nine gtm.elementVisibility events should do nothing, but the tenth one should fire an Impressions hit with ten impressions within. And after that, every tenth visibility event should send another batch, etc.
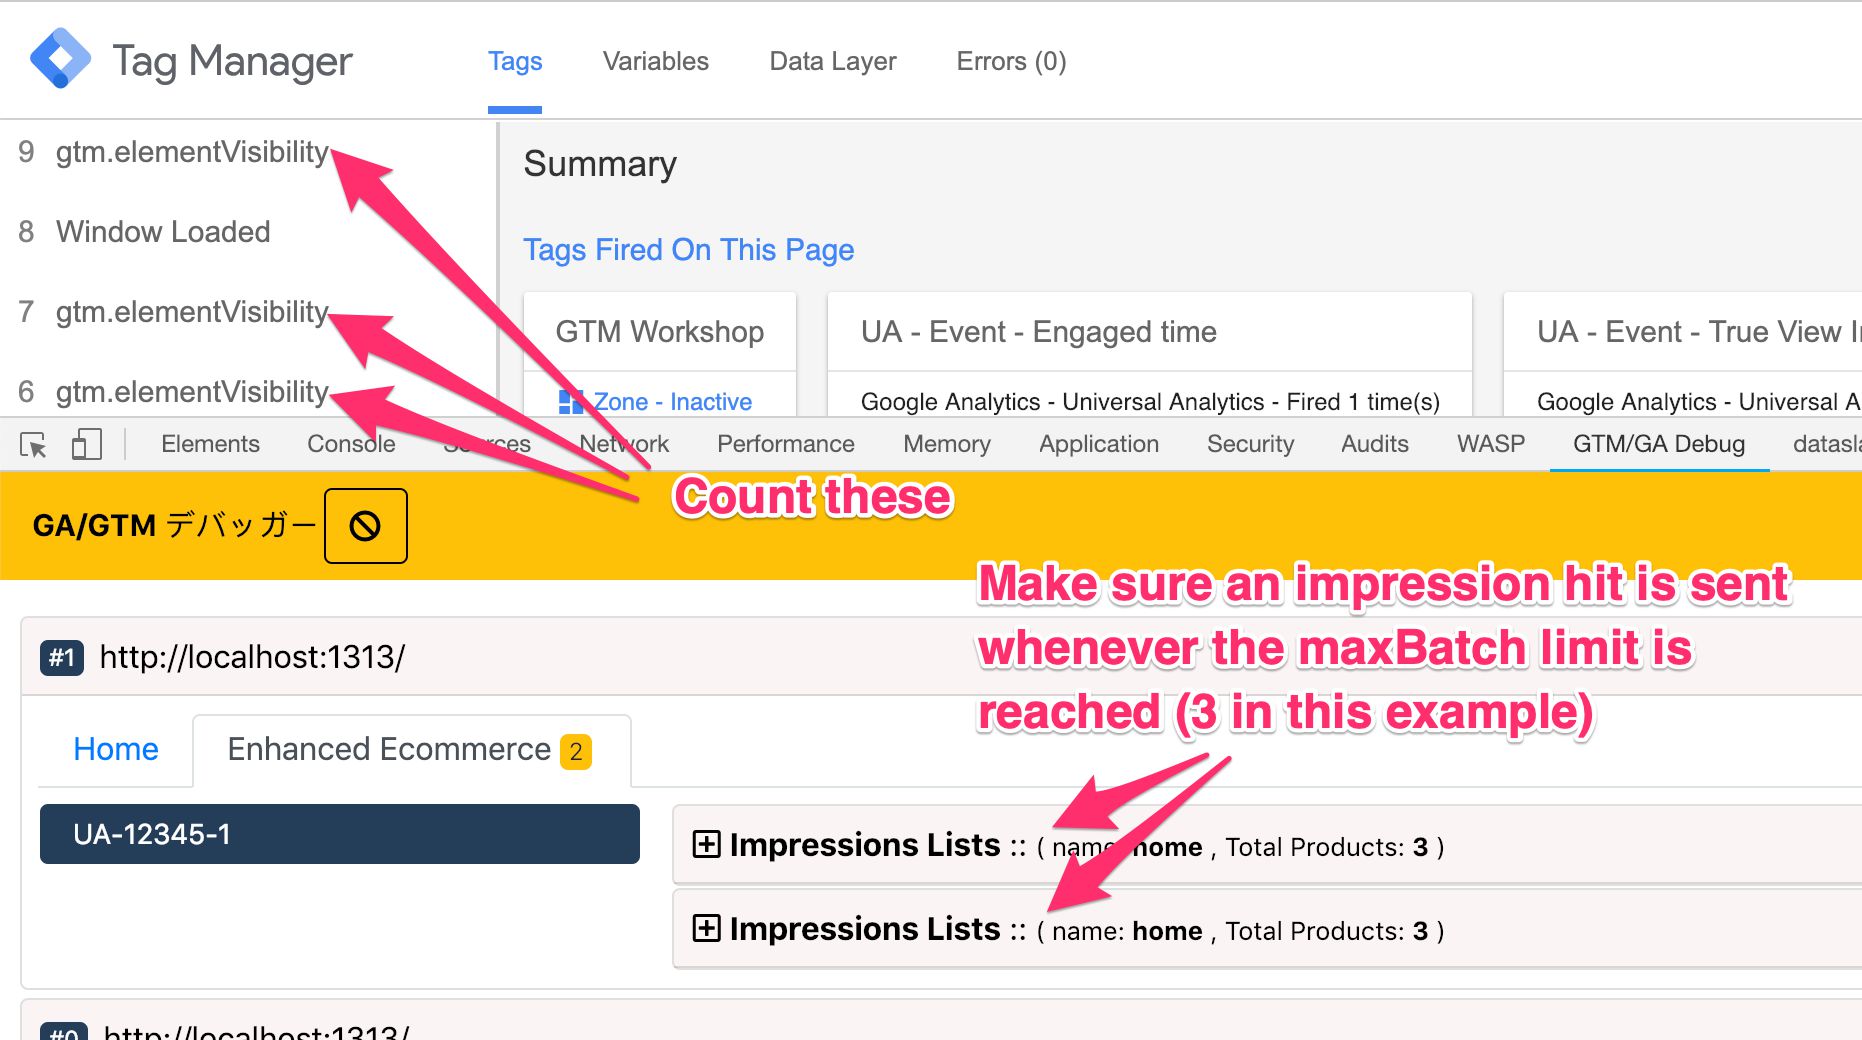
Test with a timer
Next, make sure you have some Element Visibility triggers fired after the previous batch has been sent, but not enough to send another batch. In other words, you want the queue to contain some impressions, but not enough to trigger a batch dispatch.
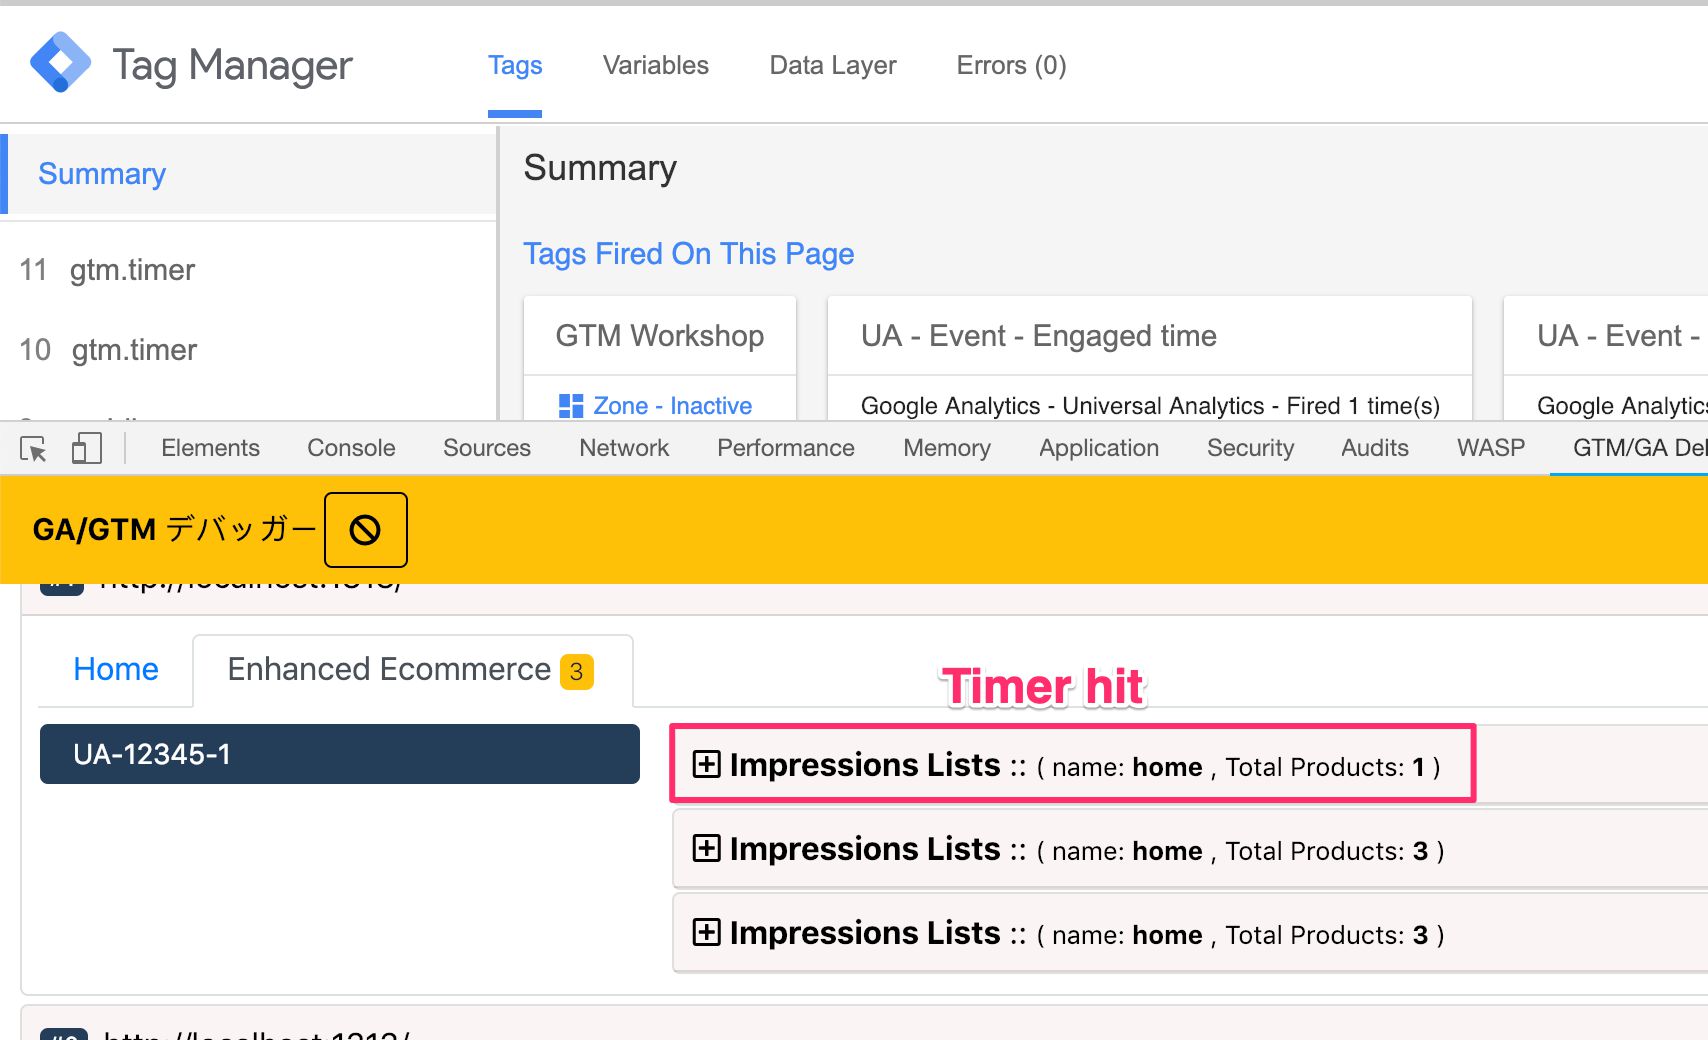
Then, wait for the Timer trigger to go off. It will fire as soon as the interval is reached. In this guide, I’m using a 60 second interval, so within one minute of the page load the trigger should fire. When the trigger fires, it should send the items in the batch queue as an impression hit. The number of impressions should be less than what would be sent if the queue filled up.
For example, here the batch queue limit has been reached twice, sending two sets of three impressions to Google Analytics. The third impression hit with just one impression is due to the timer trigger sending the remaining impression.
Test a product click
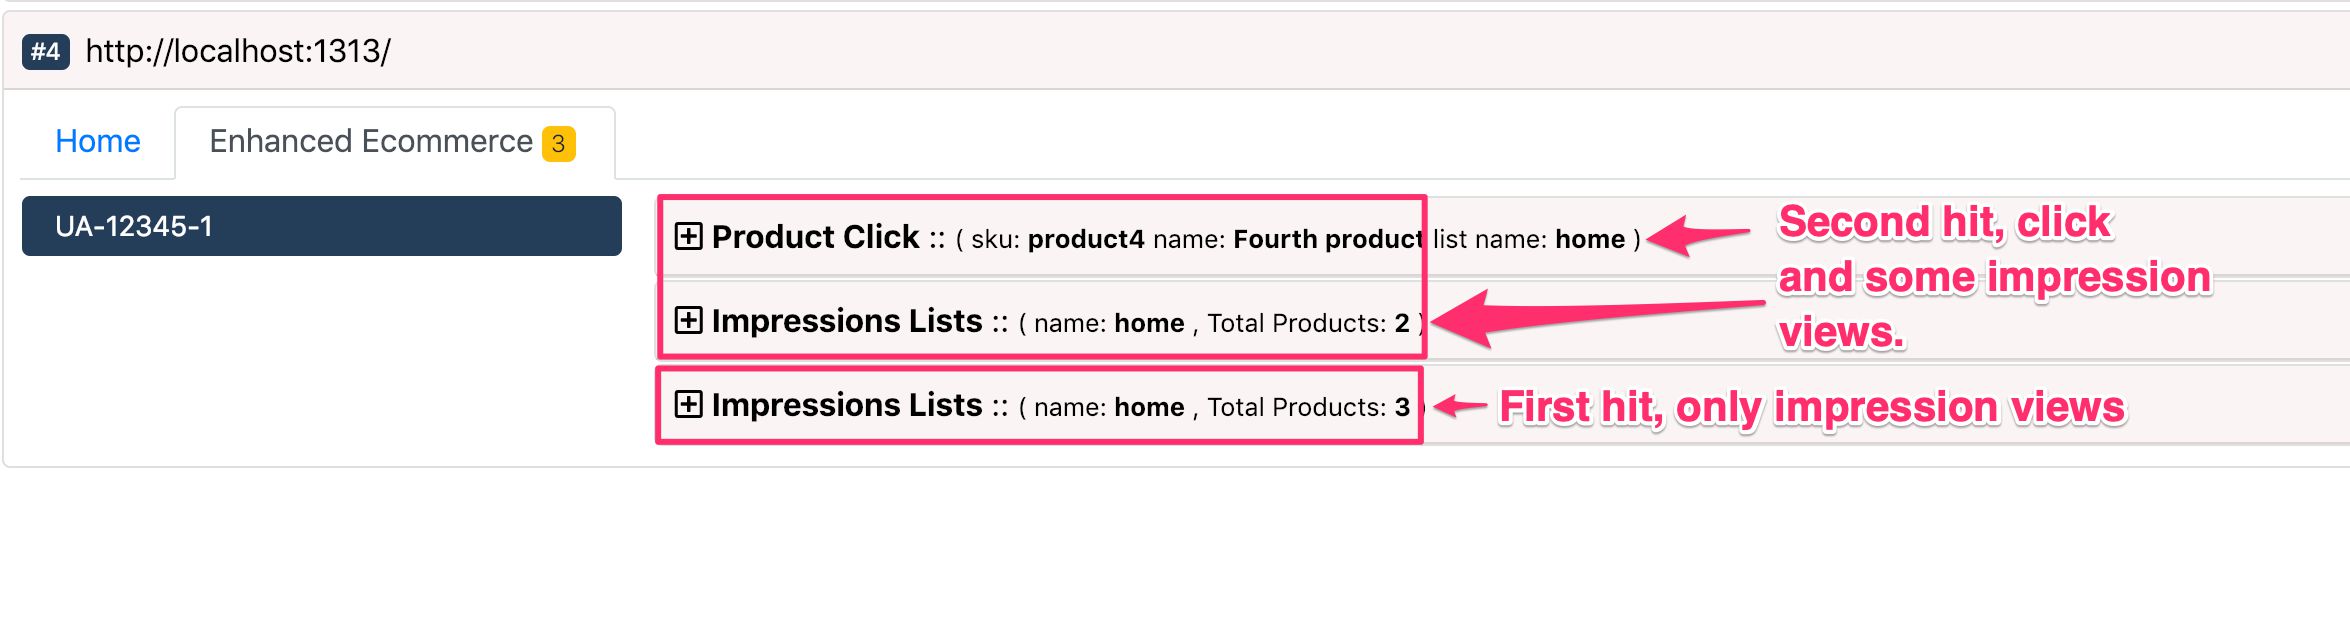
Again, scroll until the queue has items but not enough to fill the queue up to its maximum length. Then, click one product impression. What you should see is an Enhanced Ecommerce hit with the Product Click details of the impression that was clicked, and a list of impression views that were in the queue.
Test the beforeunload listener
Finally, scroll until the queue has items but not enough to fill the queue. Then, click a link away from the current page (not a product impression!). Using the GTM/GA Debug extension, you should see the hits for the previous page including an impression view hit with some impressions (less than the maximum queue length):
Final words
This is a fairly simple implementation. The “catch” is that it doesn’t use a Custom HTML tag. Everything is handled through a single Universal Analytics tag, utilizing the power of customTask to get the work done.
It’s not perfect. Without a Custom HTML tag, you’ll need to use the default Timer trigger which leaves a lot to be desired. For example, optimally I’d want to create a custom timer that would let me reset it whenever the batch queue is cleared and the first new item is added. That way the timer would not fire needlessly on the page. This isn’t really doable in the customTask - you would need a Custom HTML tag to do it.
And why not use a Custom HTML tag? For one, this is a fun exercise to do. The other reason is that GTM has a fairly robust thing going on with the Element Visibility trigger, and I want to make use of it without polluting the page with numerous Custom HTML tags; one for every product impression found by the Element Visibility trigger.
Some might also consider the prerequisites unreasonable. Being forced to have an Enhanced Ecommerce dataLayer object AND the HTML elements decorated with custom data attributes might seem like too much work. It’s a lot of work, but not too much work. Tracking impressions reliably by utilizing the Element Visibility trigger requires a strong link between the items on the page and those in the dataLayer. You could build your own custom system to support DOM scraping and custom dataLayer object compositions, but I’ll leave that to your capable hands.
Anyway, I hope you found this guide inspiring. Let me know in the comments what you think!