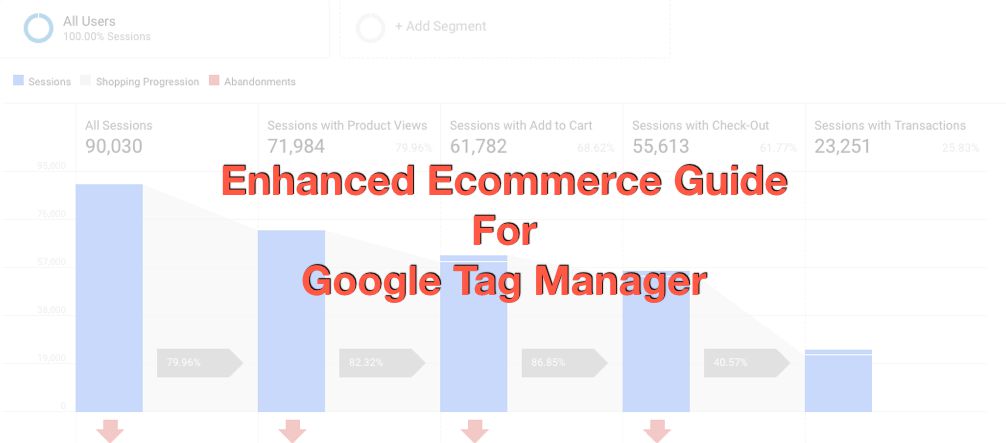
Enhanced Ecommerce is certainly one of the finest reporting user interface features that Google Analytics has to offer. Enhanced Ecommerce, as the name implies, is a set of dimensions, metrics, and reports, which combine to provide you with a fairly complete view into how users are interacting with your products in your webstore. The main downside of Enhanced Ecommerce is, as with all good things, that it’s complicated to implement.
Luckily, there’s Google Tag Manager. Theoretically, you could implement Enhanced Ecommerce through Google Tag Manager without ever adding a single line of functional logic into the codebase of your web site. You could do everything by simply scraping the Document Object Model (DOM). However, as we have hopefully learned over the years - GTM is a tool with which fastidiousness trumps fast.
Whenever you’re working with dataLayer, for example, you’re investing into the stability of your data collection process. Thus, even though I will be talking about DOM scraping further on in the guide, the focus here will be on a setup where the front-end produces HTML documents and/or JavaScript that populates the Ecommerce values into the dataLayer without using DOM scraping or other client-side hacks to do the job.
There is a lot of information in this article. Much of it is already covered in Google’s excellent Enhanced Ecommerce Developer Guide, but there are plenty of gotchas that I might have covered in earlier articles (see the Further Reading chapter), or which I might not even have written down before.
NOTE! This is an implementation guide. If you want to know how Enhanced Ecommerce works or how to map your site into relevant interactions, you’ll want to look at Google’s support center documentation.
The Simmer Newsletter
Follow this link to subscribe to the Simmer Newsletter! Stay up-to-date with the latest content from Simo Ahava and the Simmer online course platform.
How to read this guide
Obviously, it would make sense if you read the guide from top-to-bottom. However, I fully acquiesce that the loquaciousness of my rhetoric might be tedious to some in all its verbose glory. Also, sometimes I write douchy things like that.
So, depending on what your role is in the implementation project, there might be only some chapters that are relevant for you. However, don’t neglect to consult with all the stakeholders in the project! It doesn’t make sense for a developer to write code without understanding what the code is needed for. Similarly, it doesn’t make sense for the person operating Google Tag Manager to utilize the dataLayer structures without understanding the limitations of the back-end or front-end systems.
If you are a developer, tasked with implementing the
dataLayerobjects, you’ll want to read the following chapters (in order):
- Introduction
- Populate the Data Layer
- A word on scraping the DOM
- Combining different data types in a single EEC hit
- Product-scoped Custom Dimensions and Metrics
- Remember: be consistent
- Data types: Actions and all its sub-sections
- Data types: Impressions and all its sub-sections
- Data types: Promotions and all its sub-sections
If you are the person tasked with setting up EEC via the Google Tag Manager User Interface, you’ll want to focus on the following chapters (in order):
- Introduction
- Differences (and similarities) to Standard Ecommerce
- Send the data to Google Analytics using the Data Layer
- Send the data to Google Analytics using a Custom JavaScript variable
- Page View or Event tag
- Data types: Actions and all its sub-sections
- Data types: Impressions and all its sub-sections
- Data types: Promotions and all its sub-sections
- Debugging the setup
- Golden rules of Enhanced Ecommerce
As I said, I still wish you’d spend the time reading the entire guide. I don’t think there’s any irrelevant information to anyone working on the project, and it makes sense to understand the full complexity of the implementation rather than focus only on the things that are directly relevant to your work.
Introduction
Implementing Enhanced Ecommerce requires an overview of the following components:
The various data types that can be sent to GA (Actions, Impression Views, Promotion Views).
How the
'ecommerce'object is compiled and pushed todataLayer(or generated with a Custom JavaScript variable).How this data is sent with a tag to Google Analytics.
All three of these components are necessary, and all three require some understanding of how Google Tag Manager works, how tags and triggers interact with dataLayer, and how the Enhanced Ecommerce data is sent to Google Analytics. These will all be covered in this guide.
Needless to say, if you want a robust implementation, interaction and co-operation with your site’s front-end developers is an absolute must. Typically, the front-end developers utilize page templates and server-side variables (using PHP or React.js, for example) to build the HTML structure of any given page. On Enhanced Ecommerce pages, it’s important that they integrate the front-end with whatever ecommerce system you have in use, so that this system produces the necessary values dynamically for the front-end developers to funnel through into the dataLayer.
For interactions that take place after the page load, such as cart interactions, the front-end developers might need update the site JavaScript to populate the dataLayer object with the necessary values in the client.
Or you can just throw caution to the wind and scrape everything off the HTML itself through Google Tag Manager. The purpose of this guide isn’t to recommend any specific course of action, but to highlight the different ways in which you can run the Enhanced Ecommerce implementation project.
Differences (and similarities) to Standard Ecommerce
If you’ve been running Standard Ecommerce through Google Tag Manager, there are mainly three major differences between that and Enhanced Ecommerce.
Standard Ecommerce only collects transactions (i.e. “Purchase” hits in EEC) - there are no other components to its funnel (in fact, there is no funnel).
Standard Ecommerce uses a different
categoryformat.Standard Ecommerce doesn’t support Product-scoped Custom Dimensions and Metrics.
One thing to pay heed to is that you can collect both Standard Ecommerce and Enhanced Ecommerce hits to an Enhanced Ecommerce -enabled Google Analytics view! This means that if you leave your “old” tracking in place and run an Enhanced Ecommerce implementation in parallel, you might end up double-counting transactions.
Google Analytics does deduplicate identical transactions sent in a session, but it’s enough for some component in the two different tracking methods to differ for GA to collect the data twice.
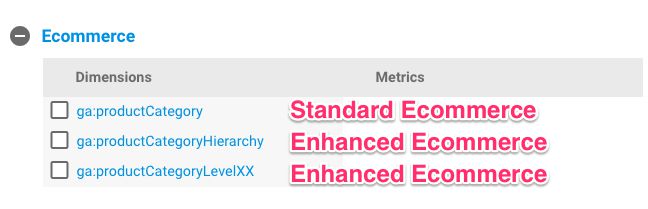
Product Category is collected to a different dimension, depending on which method you are using. So if you populate the category key for a product using either method, the dimension you’re looking for in GA is going to be different.
Implementation guidelines
The following chapters will cover certain aspects of an Enhanced Ecommerce implementation. As I stated in the Introduction, how the values are populated into dataLayer depend on the integration between your site’s front-end and the Ecommerce platform you use. Some platforms such as WooCommerce for WordPress introduce this integration using a plugin, others such as Magento provide it out-of-the-box as a feature.
However, there are plenty of custom Ecommerce platforms and setups out there which require tinkering for them to produce the values into variables that your front-end developers can then utilize.
The next chapter, for example, simply instructs what the generic dataLayer object needs to look like. How you end up populating the values into the required keys is up to you, but typically it’s done in one of the following ways:
The
dataLayer.push()is written directly into the page template by whatever server-side mechanism you have for producing the templates.The
dataLayer.push()is generated dynamically by your web server or the Ecommerce platform using typically a combination of JavaScript and HTTP requests.The key-value pairs are populated by scraping the page HTML using Google Tag Manager.
Populate the Data Layer
Enhanced Ecommerce requires a specific syntax for the objects pushed to dataLayer or generated with a Custom JavaScript variable. For example, a dataLayer.push() with the minimum required Ecommerce object for a Purchase looks like this:
window.dataLayer = window.dataLayer || [];
window.dataLayer.push({
event: 'eec.purchase',
ecommerce: {
purchase: {
actionField: {
id: '1'
},
products: [{
id: 'p'
}]
}
}
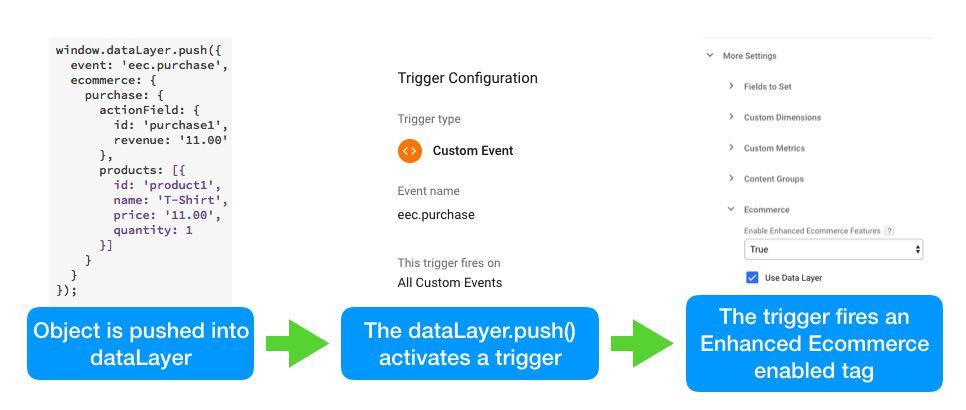
});Do note that Google Tag Manager only reacts to dataLayer.push() commands. No other array methods will do anything in GTM, so it’s imperative that you do not improvise with this. All the interactions with dataLayer must be done with push().
Within the push, all the keys listed under and including ecommerce are required. The event key is something I strongly recommend to add to every single dataLayer.push() object.
Now, you will need to populate the keys in the object with relevant values. For example, the value for ecommerce.purchase.actionField.id would need to be a unique identifier of the order itself. You could generate one randomly using JavaScript, but typically you’ll want to use the same order ID that was included in the actual transaction. That way you can later augment details about this transaction using Data Import, for example.
Similarly, you’ll need to collect details about the products in the transaction, and send any variant, brand, and category information as metadata, too.
How you do this really depends on what the integration to your Ecommerce system is like. It’s impossible to give generic instructions, because each Ecommerce platform differs in how it provides the values for you to exploit in other on-site code. But if you already have an Ecommerce system in place, I recommend you read through its documentation and try to find out how you can request or access these values and variables from this system.
Send the data to Google Analytics using the Data Layer
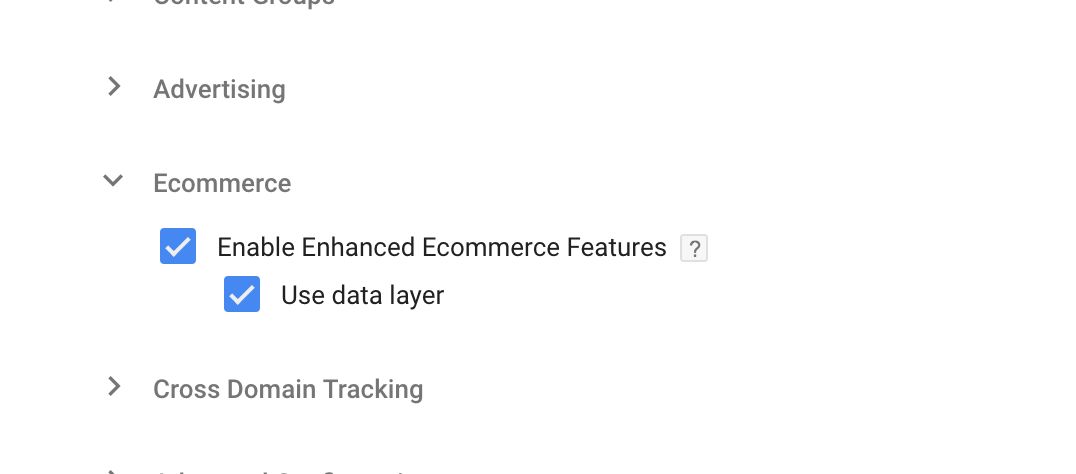
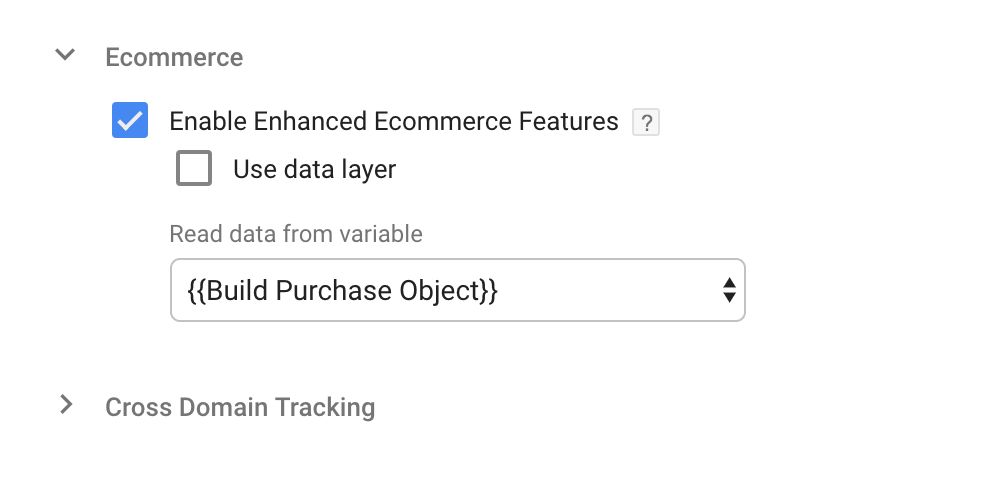
When you select the Use data layer option in the Enhanced Ecommerce settings of a Google Analytics Page View or Event tag (or a Google Analytics Settings variable), you instruct the tag to look into the Data Layer and pull the key-value pairs from the ecommerce object pushed most recently into dataLayer.
This sounds pretty straight-forward. All you need to do is make sure the object pushed into dataLayer follows the exact correct syntax, and that it’s pushed into dataLayer before (or in the same push as) the tag that accesses the data via Use data layer fires.
However, there are two important things to note here.
The
dataLayer.push()must be perfectly formed. There’s no way to modify it on-the-go if you activate the “Use data layer” option. So it’s absolutely vital that you specify and audit the object that is being pushed intodataLayerfor Enhanced Ecommerce data collection.When a tag with “Use data layer” fires, it really only accesses the most recent
ecommercepush. So, if you’ve split Product Impressions into multiple pushes and then fire the tag when the last one is done, if the tag has “Use data layer” checked, only the last impressions object is sent to Google Analytics.
Point (2) might sound counter-intuitive, but it actually makes sense. If GTM didn’t exhibit this behavior, then all ecommerce pushes done on a single page would tag along with all the subsequent Enhanced Ecommerce payloads. By sending only the most recently pushed object, this behavior can be avoided.
It’s precisely because of this behavior that I again strongly recommend to always include the event key in every single Enhanced Ecommerce object. Why? Because then you can use Custom Event triggers to fire your Enhanced Ecommerce tags at precisely the correct time, and the most recent object they access will always be the one that triggered the tag. That way you won’t lose any data because of pushes that didn’t trigger any tags.
However, you might want to take a look at the next section, too.
Send the data to Google Analytics using a Custom JavaScript variable
One of my main issues with the dataLayer object syntax for Enhanced Ecommerce in Google Tag Manager is its rigidity. The “Use data layer” option requires that you follow a very specific, unwieldy syntax.
This means that it might be a huge effort to get the data into the correct format in the first place. But then you also need to have a process in place so that you can update it with minimal delay, and so that you can audit it to make sure no data is lost.
So, thankfully, Google Tag Manager also lets you send the data using a Custom JavaScript variable.
Using the variable has a very simple logic. All the variable needs to do is return a valid ecommerce object. In other words, the variable needs to return exactly the same thing that the developers would push into dataLayer in a perfect world.
And how is this useful? Well, you could have the Ecommerce data pushed into dataLayer in any format, and then use the Custom JavaScript variable to transform it into a valid ecommerce object. This way, you don’t need to confuse matters with a rigid dataLayer specification, but rather the Ecommerce platform can push the data into dataLayer in whatever format suits it best. Then, with some JavaScript magic, you can pull this data through the Custom JavaScript variable into your tag.
Or, if you want to go the DOM scraping route, you can do all the scraping in the Custom JavaScript variable, and have it return a valid ecommerce object with all the key-value pairs in place.
You can also modify a valid ecommerce object in the dataLayer in case you need to add some dynamic updates to it (such as Product-scoped Custom Dimensions). For example, here’s me adding a Product-scoped Custom Dimension to all the products in a Purchase object:
function() {
  // Create a copy of the variable to avoid
  // modifying the source object by reference
  var ecom = JSON.parse(JSON.stringify({{Data Layer Variable - ecommerce}}));
  try {
    ecom.purchase.products.forEach(function(prod) {
      prod.dimension10 = {{get discount}}(prod.id);
    });
  } catch(e) {}
  return {
    ecommerce: ecom
  };
}
With this simple example, I’m updating a perfectly valid ecommerce object (represented by {{Data Layer Variable - ecommerce}}), by adding a new field to every single product.
As you can see, I’m making a copy of the original variable with the JSON.parse(JSON.stringify(obj)) method. Because JavaScript copies objects by reference, any changes you make to the ecom variable would reflect in the original object stored in dataLayer. This might have adverse effects if the variable is run more than once, especially if you’re running calculations on any fields (the calculations would be done over and over again).
One additional important thing to note. Data Layer Variables are, by default, Version 2. This means that they will merge all the existing ecommerce pushes into one big ecommerce object. So when you create the variable for ecommerce, you might want to use Version 1. Read this article for more information.
Page View or Event tag
Whether you want to use a Page View or Event tag and how you setup your Custom Event triggers is completely up to you.
Personally, I always use Event tags. Why? Because if you use a Page View tag, you lack insight into what Enhanced Ecommerce events have been collected in Google Analytics. This might make debugging a broken implementation difficult. By using events, I can always look at the Top Events report to see all the Enhanced Ecommerce hits sent to GA.
You can even add things like order ID as the Event Label of these hits, so that you can really start debugging if the event for the order was sent but no transaction was actually received in the Ecommerce reports.
If you do use an Event tag, setting the nonInteraction field is, again, up to you. Personally, I set it to true when the event is sent with the page load, and false in all other instances.
But you do exactly what works best for you. Sometimes you might want to avoid events if you’re approaching the 500 hits per session limit. Not a good reason, but a reason nonetheless.
A word on scraping the DOM
Scraping the DOM refers to the habit of accessing the dynamic HTML representation of the page (the Document Object Model) directly with JavaScript and populating the Enhanced Ecommerce key-value pairs with values found on the page. On a receipt page, for example, you often see the order ID, the total value of the transaction, all products, shipping costs, and so forth. So you could just as well scrape these from the page rather than going through a complicated specification project with your front-end developers.
function() {
  var orderId = document.querySelector('#order span.id').textContent,
      revenue = document.querySelector('#order span.total').textContent,
      products = [].map.call(document.querySelectorAll('#order .product'), function(prod) {
    return {
      id: prod.getAttribute('data-id'),
      name: prod.innerText
    };
  });
  return {
    ecommerce: {
      purchase: {
        actionField: {
          id: orderId,
          revenue: revenue
        },
        products: products
      }
    }
  };
}
It’s not pretty, and it comes with a lot of baggage and technical debt. For one, you’re introducing a huge weak link in your tracking. If anything changes on the page, e.g. due to an A/B-test, it’s possible your scraper will break.
Furthermore, it’s fairly common to not include all details about products on the receipt page. Typically, just the name, ID, price, and tax of the line item is enough. This means you’ll miss all the other vital metadata such as product category, brand, variant, etc.
In other words, scraping might be the easy way to get some data quick, and for that it’s a great tool. But used on its own to carry the data quality of your entire Enhanced Ecommerce process? Not so much.
Combining different data types in a single EEC hit
Enhanced Ecommerce in Google Tag Manager allows you to send more than one data type in a single Enhanced Ecommerce hit. This is because all the data types are deconstructed into parameters of the Google Analytics request, and as long as each parameter only has a single value, you can combine them to your heart’s content.
However, you can’t combine them in any way you like. The rule of thumb is that each hit can only contain one Action, one Impression, and one Promotion object. But it gets a bit more complicated than that, since there are more shared fields between the different data types, invalidating certain combinations. Here are the valid combinations you can send:
Impression View with Promotion View and Action
Impression View with one of Promotion View or Action
Promotion View with one of Impression View or Action
See the chapter titled Data types: Actions to understand what Actions comprise. Note that Impression Click and Promotion Click are Actions even if they’re listed in a different chapter (it was more logical to group them with impression and promotion views, respectively).
A typical mistake is to try to send a Product Detail View and a Product Add To Cart in the same push, or a Product Add To Cart and a Product Checkout in the same push. This isn’t valid, since these objects occupy many of the same parameter names (e.g. all the product keys), so by trying to populate them twice in the same hit, you end up making a royal mess of things.
Product-scoped Custom Dimensions and Metrics
With Enhanced Ecommerce, Google Analytics introduced Product-scoped Custom Dimensions and Metrics. These are extra metadata that can be added directly into the objects within a products array.
The dataLayer syntax is, again, fairly rigid. They must be named dimensionN and metricN (where N is the index number), and they must be embedded in the product object that is included in the products array. For example, this is a valid way to send a Product-scoped Custom Dimension into index 5:
{
  ecommerce: {
    purchase: {
      actionField: {
        id: 't1'
      },
      products: [{
        id: 'p1',
        dimension5: 'Black' // Product-scoped Custom Dimension in index 5
      }]
    }
  }
}
As you can see, dimension5 is in the object within in the products array.
Because of this rather rigid way of adding the dimensions and metrics, I suggest taking a look at the Custom JavaScript variable option for mutating the object pushed into dataLayer into a valid Enhanced Ecommerce object.
The Product List
Product List is a very important attribute in Enhanced Ecommerce tracking. For one, it’s really one of the only places in Enhanced Ecommerce where some sort of attribution takes place. But also, it’s a great way to look at how different parts of the site contribute to the success of your ecommerce efforts.
The Product List is a key that you can add into the actionField object of all Action data types. You can also add it to Impression View objects directly.
The attribution works in a very specific way. When you send the list attribute in one of your Enhanced Ecommerce actions or impressions, then after that every single subsequent Enhanced Ecommerce action will be credited to that list as long as the product IDs in those subsequent actions match those of the one where you sent the list.
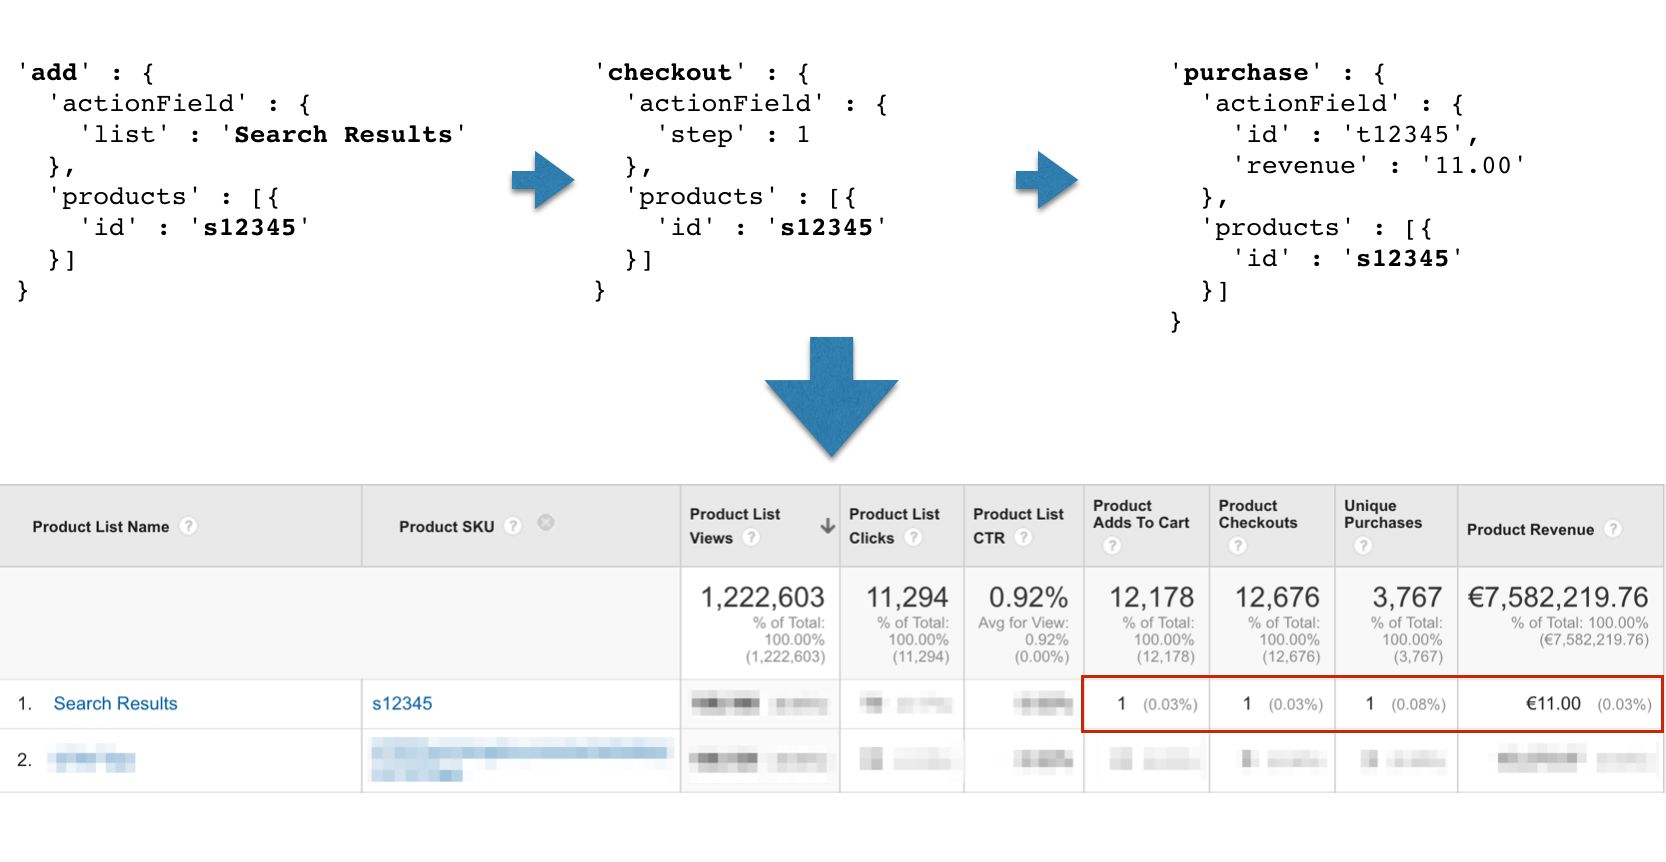
In other words, if you send a Product Detail View for a product with ID 123, and you use the list value “discount”, then every single subsequent Enhanced Ecommerce action for a product with ID 123 within that session will be attributed to that list.
As soon as the Product ID changes or you send some other list value, this funnel will break and a new one will start.
You’ll also see plenty of (not set) product lists in your reports. This is due to sessions expiring and new ones starting without any Product List information. Naturally, if your funnel doesn’t include a Product List for all possible interactions, you’ll see (not set) due to this, too.
Do note that attribution is always session-scoped, so if the session timeout is reached or the session is broken for some other reason, attribution will break, too.
If this sounds confusing, please read my article on the topic.
Local Currency
If visitors to your site can choose to shop with different currencies, you can utilize Google Analytics’ Local Currency feature to normalize these values once they hit your GA reports. All you need to do is specify the currency code either directly in the dataLayer object, or as a field in the tag which sends the Enhanced Ecommerce data to GA.
For example, here’s what a dataLayer.push() for a purchase made with Euros would look like:
window.dataLayer = window.dataLayer || [];
window.dataLayer.push({
  event: 'eec.purchase',
  ecommerce: {
    currencyCode: 'EUR',
    purchase: {
      actionField: {
        id: 'order_id',
        revenue: '11.00'
      },
      products: [{
        id: 'product_id',
        price: '11.00',
        quantity: 1
      }]
    }
  }
});
Note that if you use a local currency, remember to set keys like revenue and price in that local currency (so no need to do any conversions in the client).
GA will then convert these local currencies to whatever currency you have configured in the Google Analytics view.
If you want to add this currency code as a field in the tag (or Google Analytics Settings variable), you can add it by browsing to Fields to Set, and adding a new field:
Field name: currencyCode
Value: EUR
Instead of “EUR”, you can use a variable that pulls the currency code from e.g. the Data Layer or a browser cookie.
Remember: be consistent
One very important thing about Enhanced Ecommerce is that it’s (mostly) hit-scoped. The only exception is the minimal attribution with Product Lists and promotions.
In other words, if you send a Product Category of T-Shirt with a product in a Product Detail View, that information will only be available to queries involving Product Detail Views and that particular product. Nothing carries over or persists to the subsequent hits.
You’ll need to include all metadata about all products and all actions in all Enhanced Ecommerce objects.
This is one of the reasons why DOM scraping is not a good idea. It’s rare to see the same information on every single page where you have Enhanced Ecommerce actions.
This is also one of the reasons why implementing Enhanced Ecommerce might be a headache to developers. It’s possible that the different parts of the funnel are governed by different systems. For example, a fairly typical CMS setup could handle Product Detail Views, but then cart additions are done using a SaaS cart service, checkout is done using PayPal, and purchase receipt page is yet another system.
In order to persist all product data from one page to another, you might need to introduce client-side persistence using cookies or browser storage, for example.
Data types: Actions
Actions are Enhanced Ecommerce events that include some type of user-initiated action. This isn’t always a clear definition, and e.g. Product Detail Views could arguably not be user-initiated actions. But that’s the definition that Google uses.
The following chapters will depict what the dataLayer object for each action should look like, and what a typical tag/trigger combination would be.
Product Detail Views
Product Detail Views are typically sent when the user views details about a product. This is, again typically, on a dedicated product page, but it could just as well be expanded content in a search results list, or something else.
Data Layer composition
Available fields in the ecommerce object:
| Key | Type | Example | Comment |
|---|---|---|---|
actionField.list | String | 'Expanded content' | Where the Product Detail View occurred. Useful if you want to see how different “lists” contribute to funnel success. |
products[].id | String | 'P12345' | The SKU of the product. I recommend sending any variant IDs using a Product-scoped Custom Dimension. |
products[].name | String | 'T-Shirt' | The name of the product. Any variant name can be sent with the variant key. |
products[].category | String | 'clothes/shirts/t-shirts' | Product category of the item. Can have maximum five levels of hierarchy. |
products[].variant | String | 'Large' | What variant of the main product this is. |
products[].brand | String | 'NIKE' | The brand name of the product. |
products[].dimensionN | String | 'Blue' | A Product-scoped Custom Dimension for index number N. |
products[].metricN | Integer | 3 | A Product-scoped Custom Metric for index number N. |
This is what the dataLayer.push() for a Product Detail View would look like with all the relevant keys populated:
window.dataLayer = window.dataLayer || [];
window.dataLayer.push({
  event: 'eec.detail',
  ecommerce: {
    detail: {
      actionField: {
        list: 'Search Results'
      },
      products: [{
        id: 'product_id',
        name: 'MY PRODUCT',
        category: 'guides/google-tag-manager/enhanced-ecommerce',
        variant: 'Text',
        brand: 'SIMO AHAVA',
        dimension3: 'Ecommerce',
        metric5: 12,
        metric6: 1002
      }]
    }
  }
});
Remember, if you want to use a Custom JavaScript variable instead, the variable must return the
ecommerceobject from thedataLayer.push()above.
Tag configuration example
Typical Event tag:
The trigger would be a Custom Event trigger with the following setting:
Event name: eec.detail
Add to Cart
The Add to Cart hit is sent whenever a product (or products) are added to cart. The quantity of each product needs to reflect the number of items that were added to the cart in this action, and not the final tally of each item in the cart.
Data Layer composition
Available fields in the ecommerce object:
| Key | Type | Example | Comment |
|---|---|---|---|
actionField.list | String | 'Search results' | Where the Add to Cart happened. If there are multiple places on the site where products can be added to cart, it’s a good idea to differentiate between them using the Product List attribute. |
products[].id | String | 'P12345' | The SKU of the product. |
products[].name | String | 'T-Shirt' | The name of the product. |
products[].category | String | 'clothes/shirts/t-shirts' | Product category of the item. Can have maximum five levels of hierarchy. |
products[].variant | String | 'Large' | What variant of the main product this is. |
products[].brand | String | 'NIKE' | The brand name of the product. |
products[].quantity | Integer | 1 | The quantity of this product added to cart. |
products[].dimensionN | String | 'Blue' | A Product-scoped Custom Dimension for index number N. |
products[].metricN | Integer | 3 | A Product-scoped Custom Metric for index number N. |
This is what the dataLayer.push() for an Add to Cart would look like with all the relevant keys populated:
window.dataLayer = window.dataLayer || [];
window.dataLayer.push({
  event: 'eec.add',
  ecommerce: {
    add: {
      actionField: {
        list: 'Shopping cart'
      },
      products: [{
        id: 'product_id',
        name: 'MY PRODUCT',
        category: 'guides/google-tag-manager/enhanced-ecommerce',
        variant: 'Text',
        brand: 'SIMO AHAVA',
        quantity: 2,
        dimension3: 'Ecommerce',
        metric5: 12,
        metric6: 1002
      },{
        id: 'another_product_id',
        name: 'MY ADD-ON',
        quantity: 1
      }]
    }
  }
});
Remember, if you want to use a Custom JavaScript variable instead, the variable must return the
ecommerceobject from thedataLayer.push()above.
Tag configuration example
Typical Event tag:
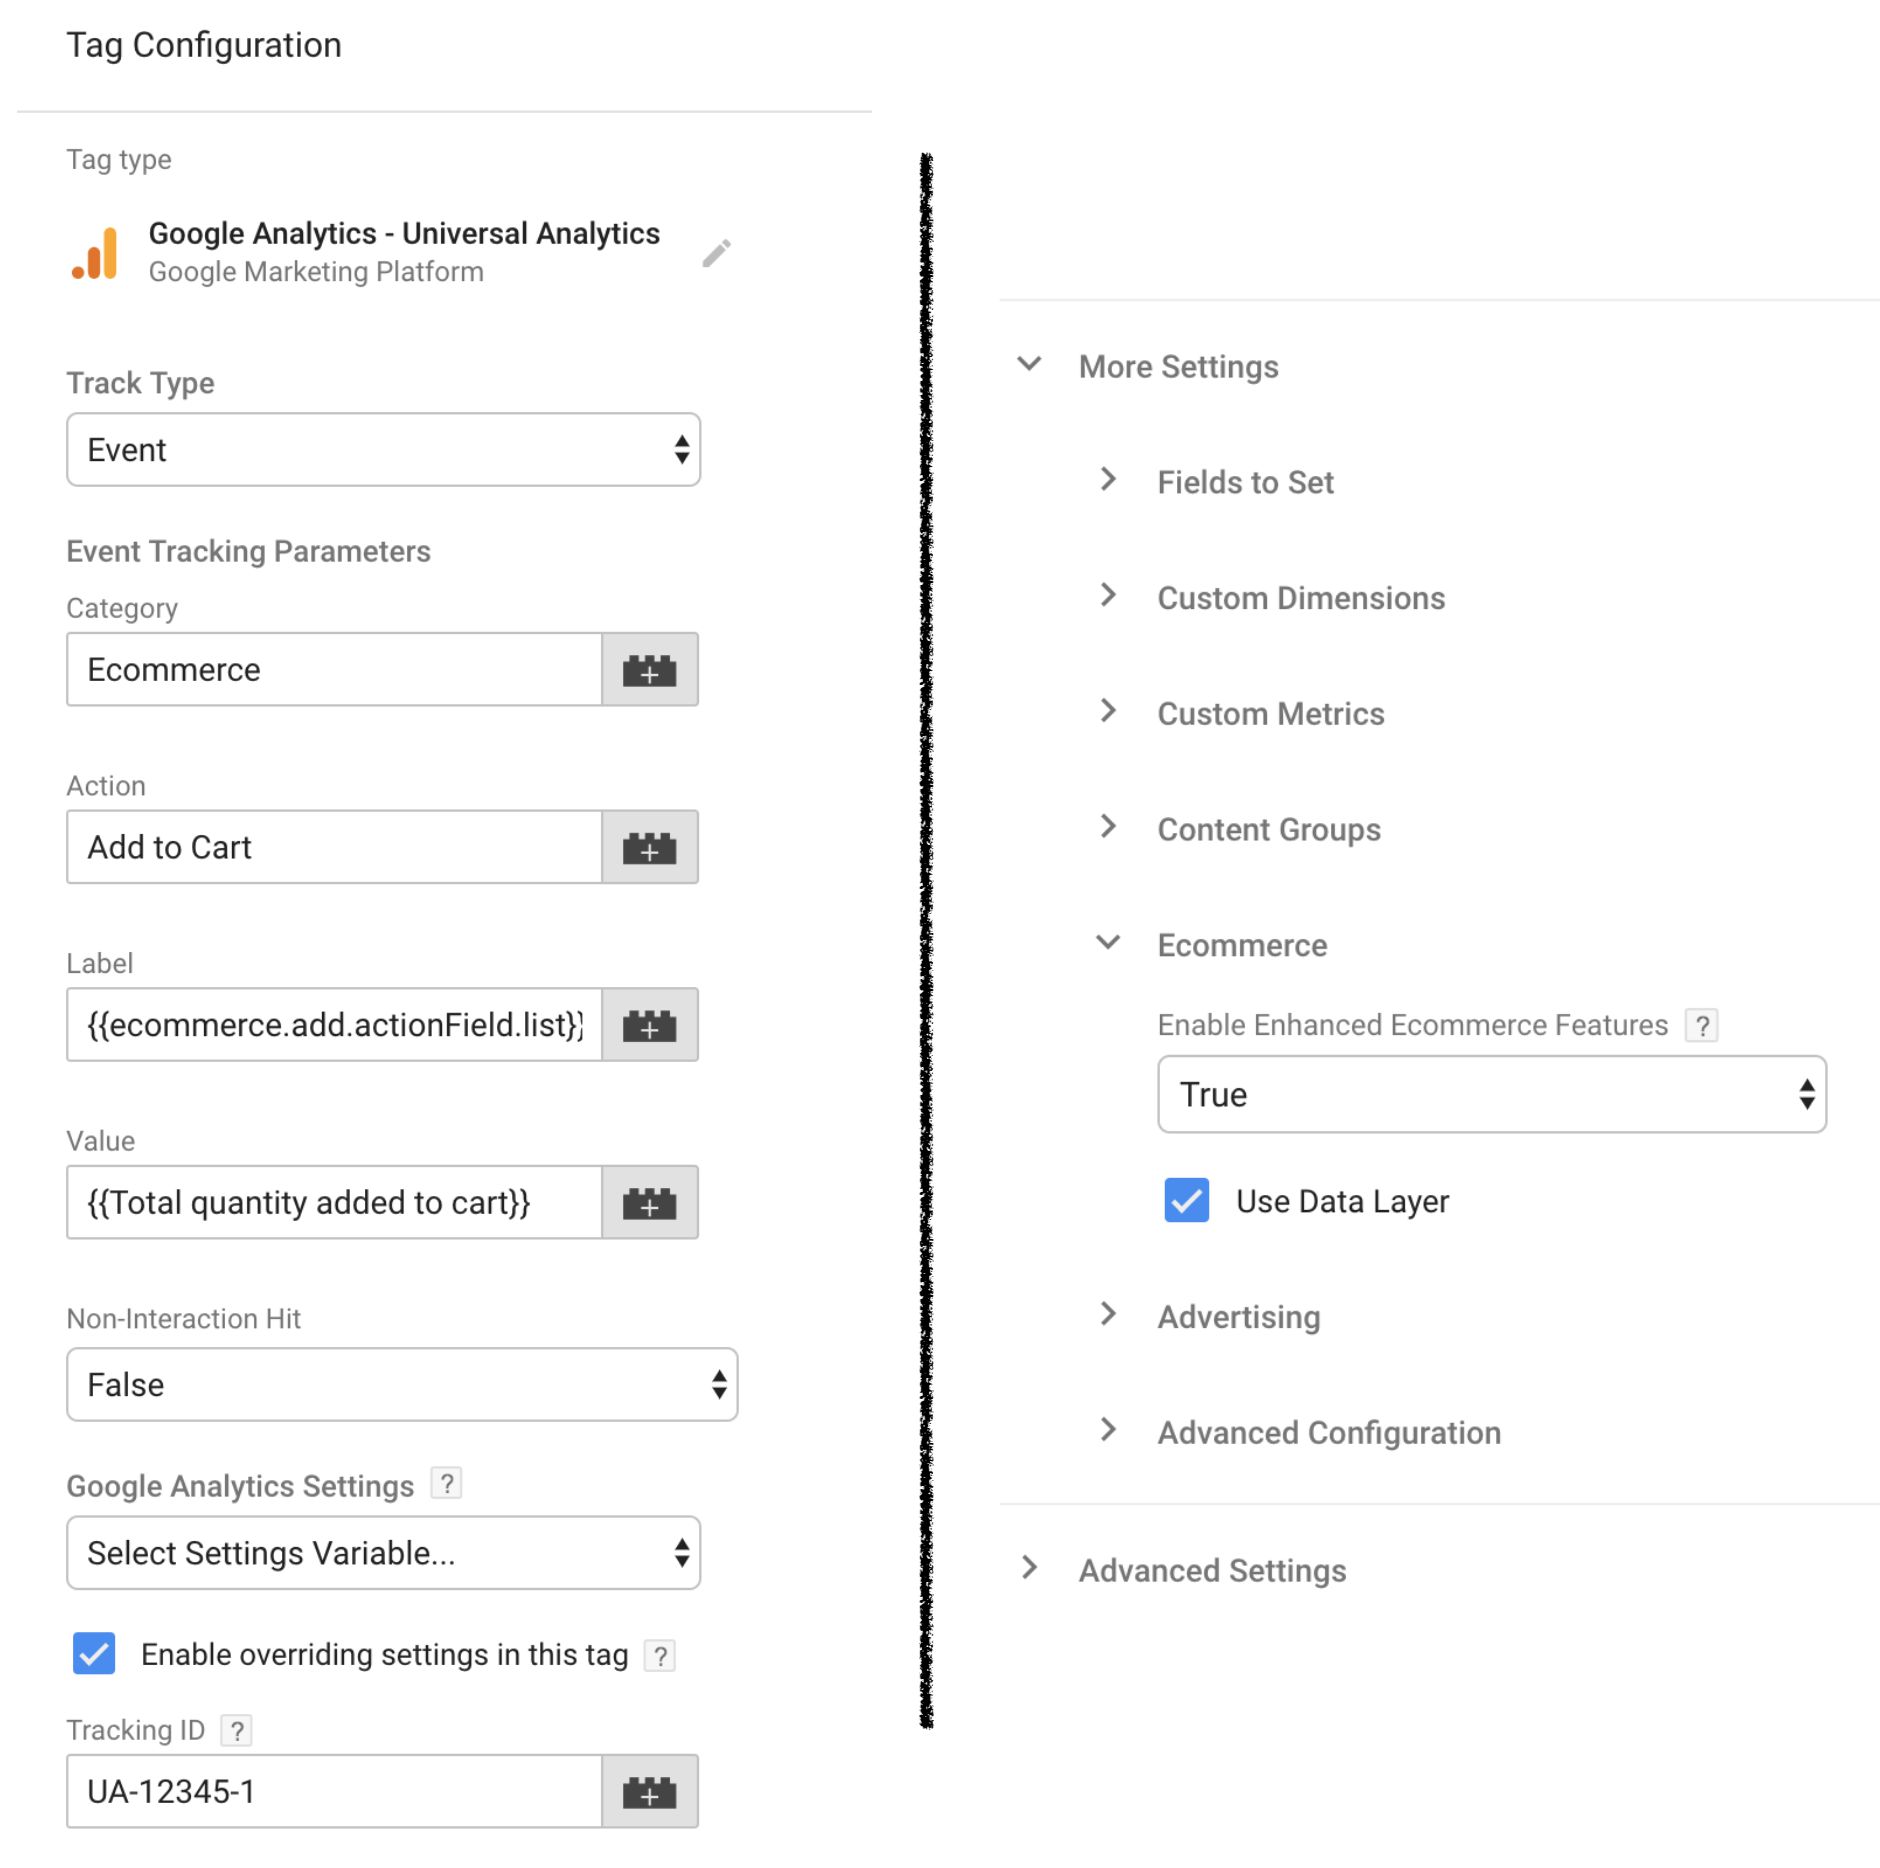
The variable in Event Label is a Data Layer Variable that points to ecommerce.add.actionField.list. This returns the Product List of the hit, if any.
The trigger would be a Custom Event trigger with the following setting:
Event name: eec.add
Remove from Cart
Remove from Cart is what you would send when items are removed from the cart. The quantity you send for each item needs to reflect the quantity that was removed in the action, and not the quantity of items remaining in the cart.
Data Layer composition
The Data Layer composition for Remove from Cart is identical to that of Add to Cart.
Similarly, the dataLayer.push() example would be identical, except the first key under ecommerce is named remove rather than add, and the event name is different:
window.dataLayer = window.dataLayer || [];
window.dataLayer.push({
  event: 'eec.remove',
  ecommerce: {
    remove: {
      actionField: {...},
      products: [...]
    }
  }
});
Remember, if you want to use a Custom JavaScript variable instead, the variable must return the
ecommerceobject from thedataLayer.push()above.
Tag configuration example
Typical Event tag:
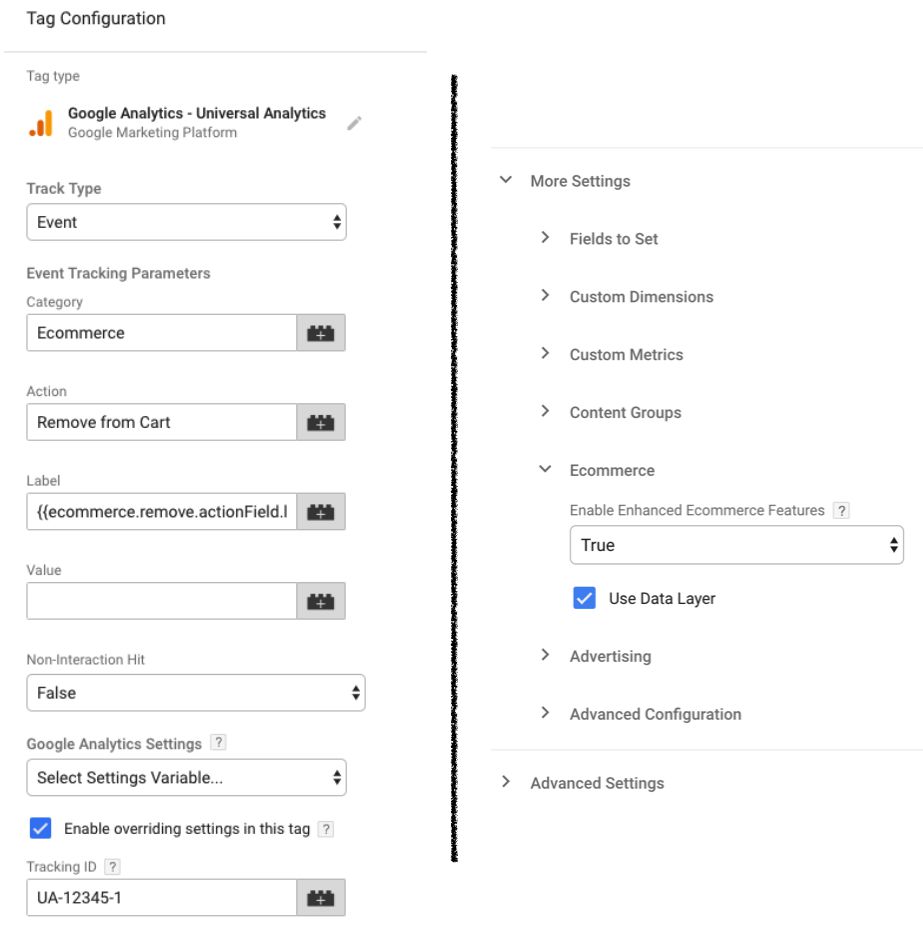
The variable in Event Label is a Data Layer Variable that points to ecommerce.remove.actionField.list. This returns the Product List of the hit, if any.
The trigger would be a Custom Event trigger with the following setting:
Event name: eec.remove
Checkout
A Checkout is sent when the user enters the checkout funnel. For every discrete step in the funnel, you send a checkout hit to GA. Steps are typically pages (on a multi-page checkout) or sections of the form (on a single-page checkout).
The products array should only be sent with the first step. Sending it with any other step will do nothing.
You can also add an option key to the checkout hit, in case you want to send extra details about the checkout step itself (such as selected payment method or shipment method). Alternatively, you can use the Checkout Option action to send the option information after the step has first been sent-
Data Layer composition
Available fields in the ecommerce object:
| Key | Type | Example | Comment |
|---|---|---|---|
actionField.step | Integer | 1 | The number of the checkout step. These should be sent in order, where the first step is 1. You can define what these steps mean in the Google Analytics Admin user interface. |
actionField.option | String | 'Visa' | You can send the option key if there is extra metadata (e.g. shipping or payment method) you want to send with the step hit itself. |
products[].id | String | 'P12345' | The SKU of the product. |
products[].name | String | 'T-Shirt' | The name of the product. |
products[].category | String | 'clothes/shirts/t-shirts' | Product category of the item. Can have maximum five levels of hierarchy. |
products[].variant | String | 'Large' | What variant of the main product this is. |
products[].brand | String | 'NIKE' | The brand name of the product. |
products[].quantity | Number | 3 | The quantity of the given product checked out. |
products[].dimensionN | String | 'Blue' | A Product-scoped Custom Dimension for index number N. |
products[].metricN | Integer | 3 | A Product-scoped Custom Metric for index number N. |
This is what the dataLayer.push() for the first Checkout step would look like with all the relevant keys populated:
window.dataLayer = window.dataLayer || [];
window.dataLayer.push({
  event: 'eec.checkout',
  ecommerce: {
    checkout: {
      actionField: {
        step: 1
      },
      products: [{
        id: 'product_id',
        name: 'MY PRODUCT',
        category: 'guides/google-tag-manager/enhanced-ecommerce',
        variant: 'Text',
        brand: 'SIMO AHAVA',
        quantity: 2,
        dimension3: 'Ecommerce',
        metric5: 12,
        metric6: 1002
      },{
        id: 'another_product_id',
        name: 'MY ADD-ON',
        quantity: 1
      }]
    }
  }
});
The dataLayer.push() for the second Checkout step where you also send the payment method would look like this:
window.dataLayer = window.dataLayer || [];
window.dataLayer.push({
  event: 'eec.checkout',
  ecommerce: {
    checkout: {
      actionField: {
        step: 2,
        option: 'MasterCard'
      }
    }
  }
});
Remember, if you want to use a Custom JavaScript variable instead, the variable must return the
ecommerceobject from thedataLayer.push()above.
Tag configuration example
Typical Event tag:
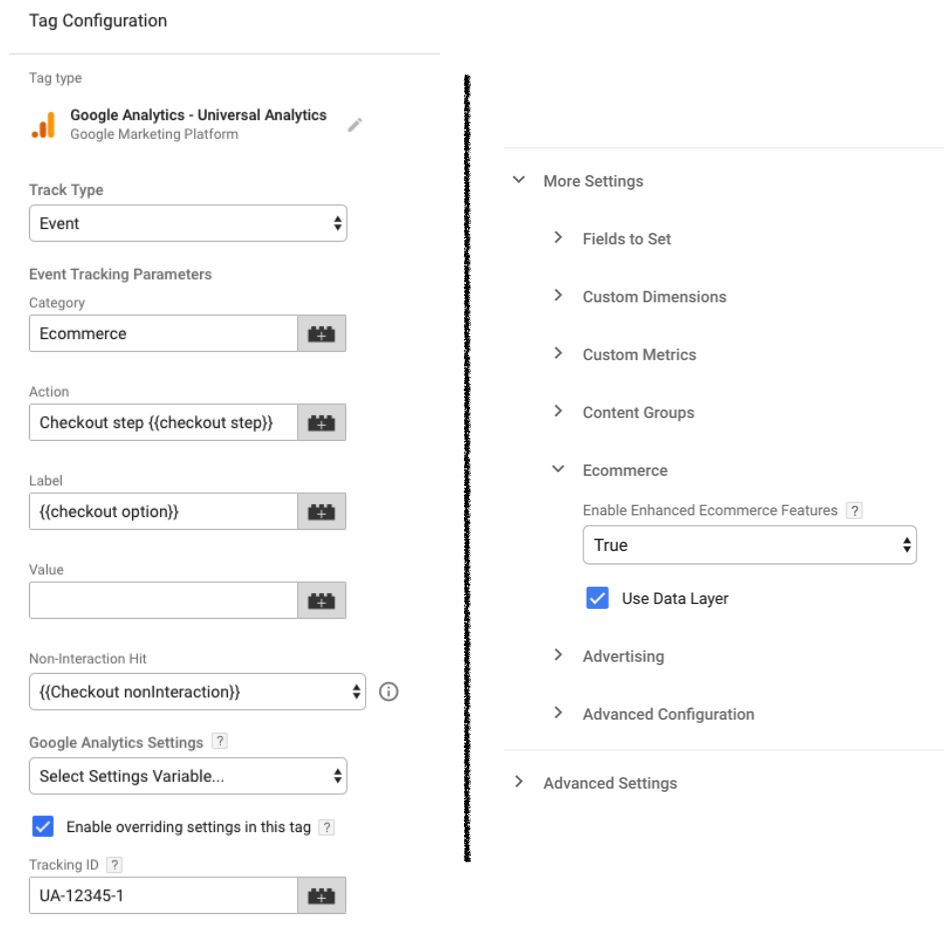
The variables {{checkout step}} and {{checkout option}} are Data Layer variables for ecommerce.checkout.actionField.step and ecommerce.checkout.actionField.option, respectively. They return the corresponding values from the checkout hit.
The trigger would be a Custom Event trigger with the following setting:
Event name: eec.checkout
Checkout option
A Checkout option hit is always sent after the corresponding Checkout Step has already been sent. So you can’t send a Checkout option hit for step 2 if you haven’t first sent a regular Checkout hit for step 2.
Use the Checkout option hit to send extra information about a checkout step. For example, if Checkout step 2 is where the user chooses the payment method, you’ll want to send Checkout step 2 when the user first lands on the payment method selection page, and then the Checkout option hit after they’ve clicked or selected the payment method.
Data Layer composition
The dataLayer.push() is very simple. In actionField, you indicate with step to which Checkout step this option should be attached (Integer), and option is the option value itself.
window.dataLayer = window.dataLayer || [];
window.dataLayer.push({
  event: 'eec.checkout_option',
  ecommerce: {
    checkout_option: {
      actionField: {
        step: 2,
        option: 'Expedited delivery'
      }
    }
  }
});
Remember, if you want to use a Custom JavaScript variable instead, the variable must return the
ecommerceobject from thedataLayer.push()above.
Tag configuration example
Typical Event tag:
The trigger would be a Custom Event trigger with the following setting:
Event name: eec.checkout_option
Purchase
The Purchase hit is, arguably, the most important hit in the Enhanced Ecommerce funnel. Without a reliable Purchase hit being collected, all the funnels, attribution models, goal values, conversion calculations, and transaction data become fairly unusable.
In other words, make sure most of the resources is invested in getting the Purchase hit right.
Data Layer composition
Available fields in the ecommerce object:
| Key | Type | Example | Comment |
|---|---|---|---|
actionField.id | String | order_12345 | The unique order ID of the transaction. Should match the actual ID of the order. |
actionField.affiliation | String | 'Simo Shop' | Extra details about where the purchase happened. |
actionField.revenue | String | '11.00' | Total transaction value. You can include tax and shipping, or you can choose to send the revenue without tax and shipping. The value must not include anything else except number separated by a decimal point. Don’t use a comma as the separator, and don’t include any currency symbols. |
actionField.tax | String | '1.00' | Tax paid. Same formatting instructions as with revenue. |
actionField.shipping | String | '2.00' | Cost of shipping. Same formatting instructions as with revenue. |
actionField.coupon | String | 'SUMMER2019' | The coupon code that was used for the entire transaction. |
products[].id | String | 'P12345' | The SKU of the product. |
products[].name | String | 'T-Shirt' | The name of the product. |
products[].category | String | 'clothes/shirts/t-shirts' | Product category of the item. Can have maximum five levels of hierarchy. |
products[].variant | String | 'Large' | What variant of the main product this is. |
products[].brand | String | 'NIKE' | The brand name of the product. |
products[].quantity | Number | 3 | The quantity of the given product purchased. |
products[].price | String | '10.00' | The price of one item. Same formatting instructions as with revenue. |
products[].coupon | String | 'SHIRTSOFF' | The coupon code used for this particular product. |
products[].dimensionN | String | 'Blue' | A Product-scoped Custom Dimension for index number N. |
products[].metricN | Integer | 3 | A Product-scoped Custom Metric for index number N. |
This is what the dataLayer.push() for a Purchase hit would look like with all the relevant keys populated:
window.dataLayer = window.dataLayer || [];
window.dataLayer.push({
  event: 'eec.purchase',
  ecommerce: {
    currencyCode: 'EUR',
    purchase: {
      actionField: {
        id: 'ORDER12345',
        affiliation: 'Simo\'s shop',
        revenue: '11.00',
        tax: '1.00',
        shipping: '2.00',
        coupon: 'SUMMER2019'
      },
      products: [{
        id: 'product_id',
        name: 'MY PRODUCT',
        category: 'guides/google-tag-manager/enhanced-ecommerce',
        variant: 'Text',
        brand: 'SIMO AHAVA',
        quantity: 2,
        price: '3.50',
        dimension3: 'Ecommerce',
        metric5: 12,
        metric6: 1002
      },{
        id: 'another_product_id',
        name: 'MY ADD-ON',
        price: '1.00',
        quantity: 1,
        coupon: 'ADD-ONS OFF'
      }]
    }
  }
});
Remember, if you want to use a Custom JavaScript variable instead, the variable must return the
ecommerceobject from thedataLayer.push()above.
Tag configuration example
Typical Event tag:
The variable {{order id}} is a Data Layer variable for ecommerce.purchase.actionField.id, and it returns the transaction ID. The variable {{revenue}} is a Data Layer variable for ecommerce.purchase.actionField.revenue, and it returns the revenue of the transaction.
The trigger would be a Custom Event trigger with the following setting:
Event name: eec.purchase
Refund
The Refund hit should be sent if the user requests a refund of the product through the website.
Important: this does NOT remove the original transaction or negate it in any way. The Refund hit is a hit of its own, and will be used to populate metrics like “Refund Amount” and “Product Refund Amount”. This makes the Refund hit type fairly useless, in my opinion, but it might have its uses if you simply want to know whether refunds are requested via the website.
Data Layer composition
Available fields in the ecommerce object:
| Key | Type | Example | Comment |
|---|---|---|---|
actionField.id | String | order_12345 | If the user requested a full refund of the order, then you only need to send the transaction ID with the hit. |
products[].id | String | 'P12345' | If the user only wanted a refund for some items, you need to also send the id of each along with the quantity refunded. |
products[].quantity | Number | 3 | The quantity of the given item refunded. |
This is what the dataLayer.push() would look like for a completely refunded transaction:
window.dataLayer = window.dataLayer || [];
window.dataLayer.push({
  event: 'eec.refund',
  ecommerce: {
    refund: {
      actionField: {
        id: 'ORDER12345'
      }
    }
  }
});
This is what the dataLayer.push() would look like for a partially refunded transaction:
window.dataLayer = window.dataLayer || [];
window.dataLayer.push({
  event: 'eec.refund',
  ecommerce: {
    refund: {
      actionField: {
        id: 'ORDER12345'
      },
      products: [{
        id: 'another_product_id',
        quantity: 1
      }]
    }
  }
});
Remember, if you want to use a Custom JavaScript variable instead, the variable must return the
ecommerceobject from thedataLayer.push()above.
Tag configuration example
Typical Event tag:
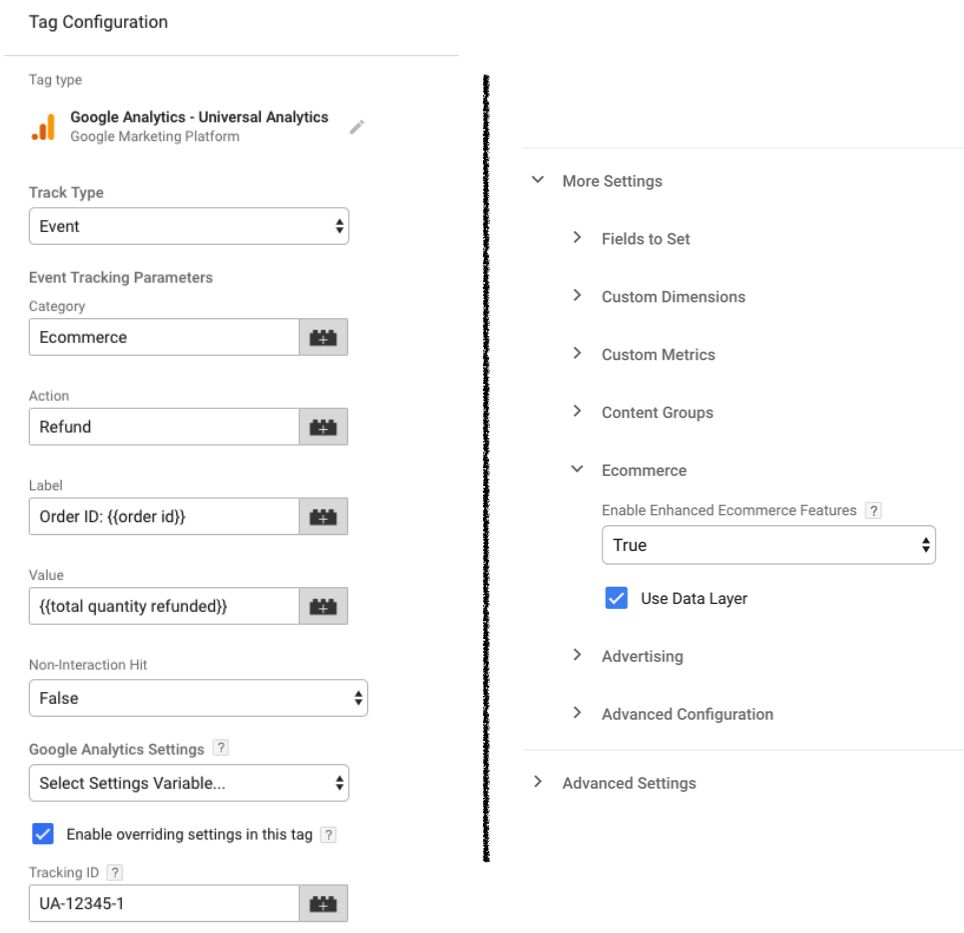
The variable {{order id}} returns the transaction ID that was refunded. The variable {{total quantity refunded}} is a Custom JavaScript variable which returns the total quantity of all items that were refunded.
The trigger would be a Custom Event trigger with the following setting:
Event name: eec.refund
Data types: Impressions
Impressions are what you send when the user sees a listing of products in a Search Results page, for example. Basically, wherever you show a listing of products without going into enough detail for that to count as a Product Detail View, use impressions.
Impressions comprise of a “view”, where the user sees the product in a listing, and a “click”, where the user clicks a product in the listing (to go to its Product Detail page, for example).
Note that you might be tempted to send all the products on the listing page as impressions in a single hit. This might get you into trouble with Google Analytics’ maximum payload size of 8KB (that’s typically around 30-50 product impressions). To avoid this, you can do a number of things, such as automatically reduce the payload length, or split the impressions into multiple hits.
The best thing you can do, but also the most complicated thing to implement, is to create a true view listener, where impressions are sent in batches depending on what the user actually sees in the viewport. So when the user scrolls to a new set of product impressions, you send only those impressions in a hit once they’ve all entered the viewport. This requires a lot of coordination with your developers, but it’s well worth the effort.
Impression Views
Impression Views are collected when the user sees a product impression in some listing, such as Search Results, Recently Viewed Products, or Related Products.
With Impression Views, it’s important to populate the list field with a label that describes the listing where the impression view happened.
Data Layer composition
Available fields in the ecommerce object:
| Key | Type | Example | Comment |
|---|---|---|---|
impressions[].id | String | product_id | The SKU of the product. |
impressions[].name | String | 'T-Shirt' | The name of the product. |
impressions[].category | String | 'clothes/shirts/t-shirts' | Product category of the item. Can have maximum five levels of hierarchy. |
impressions[].variant | String | 'Large' | What variant of the main product this is. |
impressions[].brand | String | 'NIKE' | The brand name of the product. |
impressions[].list | String | 'Related products' | The list name where the impression was viewed. |
impressiosn[].position | Integer | 3 | The position of the item in the list (e.g. was it the first item in the list, the second, the third, etc.). |
impressions[].dimensionN | String | 'Blue' | A Product-scoped Custom Dimension for index number N. |
impressions[].metricN | Integer | 3 | A Product-scoped Custom Metric for index number N. |
This is what the dataLayer.push() would look like for a set of product impressions with all the relevant keys included:
window.dataLayer = window.dataLayer || [];
window.dataLayer.push({
  event: 'eec.impressionView',
  ecommerce: {
    impressions: [{
      id: 'product_1',
      name: 'Great article',
      category: 'guides/google-tag-manager/javascript',
      list: 'Related products',
      position: 1,
      dimension3: '500 pages'
    },{
      id: 'product_2',
      name: 'Greater article',
      category: 'guides/google-tag-manager/java',
      list: 'Related products',
      position: 2,
      dimension3: '1500 pages'
    }]
  }
});
Remember, if you want to use a Custom JavaScript variable instead, the variable must return the
ecommerceobject from thedataLayer.push()above.
Tag configuration example
Typical Event tag:
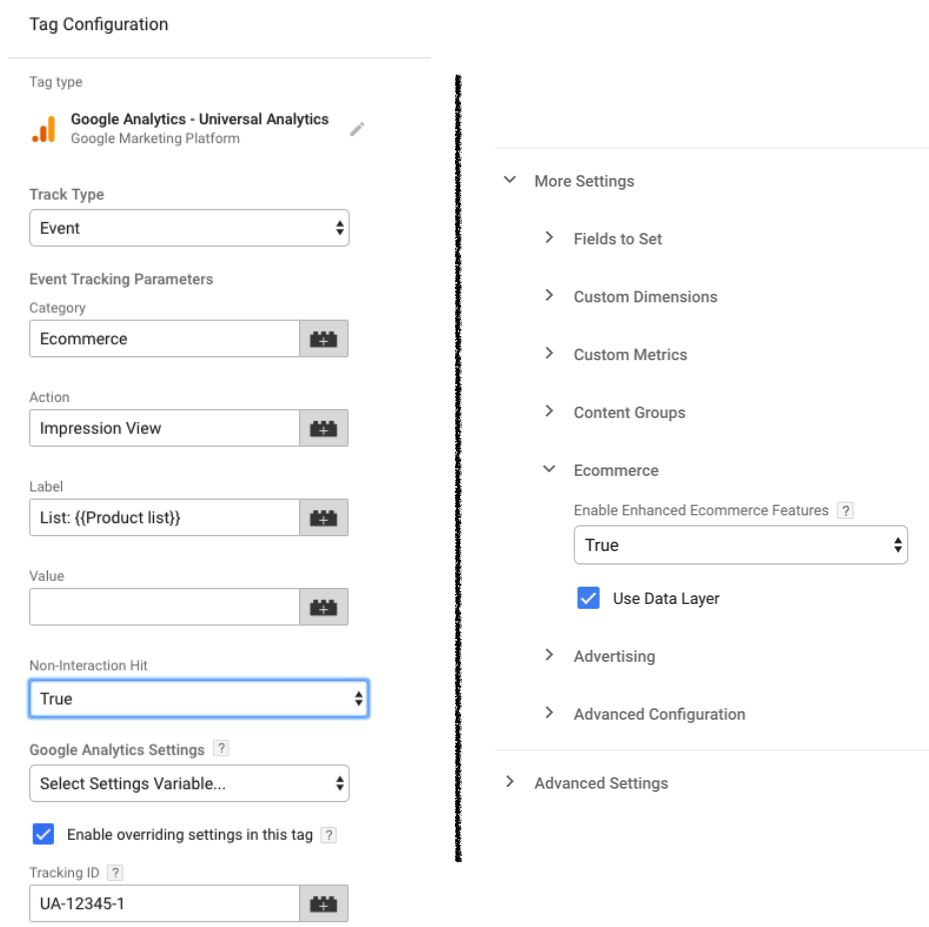
The trigger would be a Custom Event trigger with the following setting:
Event name: eec.impressionView
Impression Clicks
Impression Clicks (or Product Clicks) are technically Actions, but I decided to group them under Impressions since that’s where they belong.
An Impression Click is sent when an impression that the user has viewed is clicked. It’s an important metric to follow in case you are measuring Impression Views, because once you start collecting Impression Clicks, too, you can measure things like click-through-rates per product list, position, and individual impression.
Data Layer composition
Available fields in the ecommerce object:
| Key | Type | Example | Comment |
|---|---|---|---|
actionField.list | String | 'Related products' | The list where the user first viewed the product and then clicked it. Make sure the value of the list attribute matches that sent with the Impression View. |
products[].id | String | 'P12345' | The SKU of the product. |
products[].name | String | 'T-Shirt' | The name of the product. |
products[].category | String | 'clothes/shirts/t-shirts' | Product category of the item. Can have maximum five levels of hierarchy. |
products[].variant | String | 'Large' | What variant of the main product this is. |
products[].brand | String | 'NIKE' | The brand name of the product. |
products[].position | Integer | 1 | The position of the impression that was clicked. |
products[].dimensionN | String | 'Blue' | A Product-scoped Custom Dimension for index number N. |
products[].metricN | Integer | 3 | A Product-scoped Custom Metric for index number N. |
This is what the dataLayer.push() for an Impression Click would look like with all the relevant keys populated:
window.dataLayer = window.dataLayer || [];
window.dataLayer.push({
  event: 'eec.impressionClick',
  ecommerce: {
    click: {
      actionField: {
        list: 'Related products'
      },
      products: [{
        id: 'product_2',
        name: 'Greater article',
        category: 'guides/google-tag-manager/java',
        position: 2,
        dimension3: '1500 pages'
      }]
    }
  }
});
Remember, if you want to use a Custom JavaScript variable instead, the variable must return the
ecommerceobject from thedataLayer.push()above.
Tag configuration example
Typical Event tag:
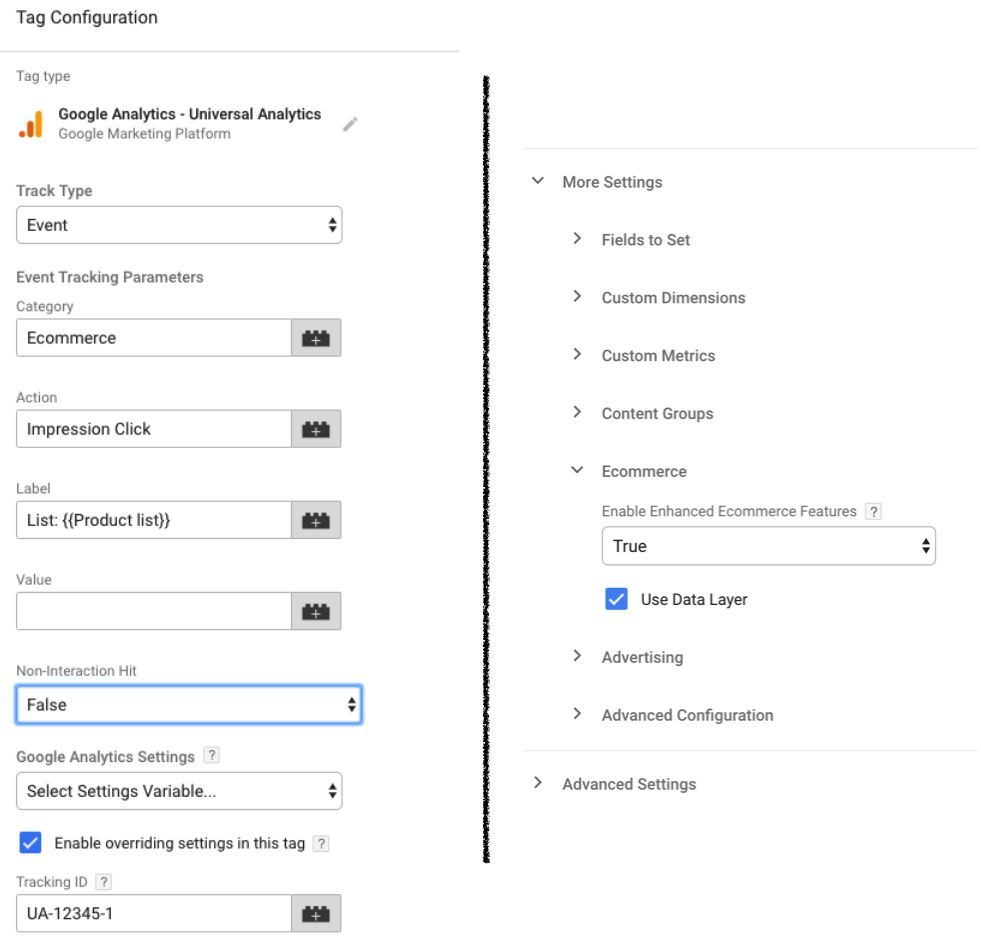
The trigger would be a Custom Event trigger with the following setting:
Event name: eec.impressionClick
Data types: Promotions
Promotions are similar to impressions in that they, too, comprise a View and a Click. However, unlike any of the other Enhanced Ecommerce data types, promotions do not involve products. Rather, you are measuring the promotions themselves. These would typically be banners, product category highlights or something similar.
With promotion tracking, you can measure the success of your site marketing efforts, by seeing if viewing and clicking individual banners and advertisements lead to ecommerce success.
Promotion Views
Promotion Views are sent when the user sees a promotion on the site. As with impressions, you can send more than one Promotion View in a hit, but as with impressions, you need to be careful not to group too many views into one hit, as you might be in danger of breaching the 8KB size limit for the Google Analytics payload.
Data Layer composition
Available fields in the ecommerce object:
| Key | Type | Example | Comment |
|---|---|---|---|
promotions[].id | String | 'summer_campaign' | Unique identifier for the promotion. |
promotions[].name | String | 'Summer Campaign 2019' | The name of the promotion. |
promotions[].creative | String | 'front_page_banner_1' | A name for the creative where the promotion is showing. |
promotions[].position | String | 'slot_2' | Some way to distinguish the position of the promotion in the creative (e.g. second slide of a carousel). |
This is what the dataLayer.push() would look like for a set of Promotion Views with all the relevant keys included:
window.dataLayer = window.dataLayer || [];
window.dataLayer.push({
  event: 'eec.promotionView',
  ecommerce: {
    promoView: {
      promotions: [{
        id: 'summer_campaign',
        name: 'Summer Campaign 2019',
        creative: 'Front Page Carousel',
        position: 'Slide 1'
      },{
        id: 'fall_campaign',
        name: 'Fall Campaign 2019',
        creative: 'Front Page Carousel',
        position: 'Slide 2'
      }]
    }
  }
});
Remember, if you want to use a Custom JavaScript variable instead, the variable must return the
ecommerceobject from thedataLayer.push()above.
Tag configuration example
Typical Event tag:
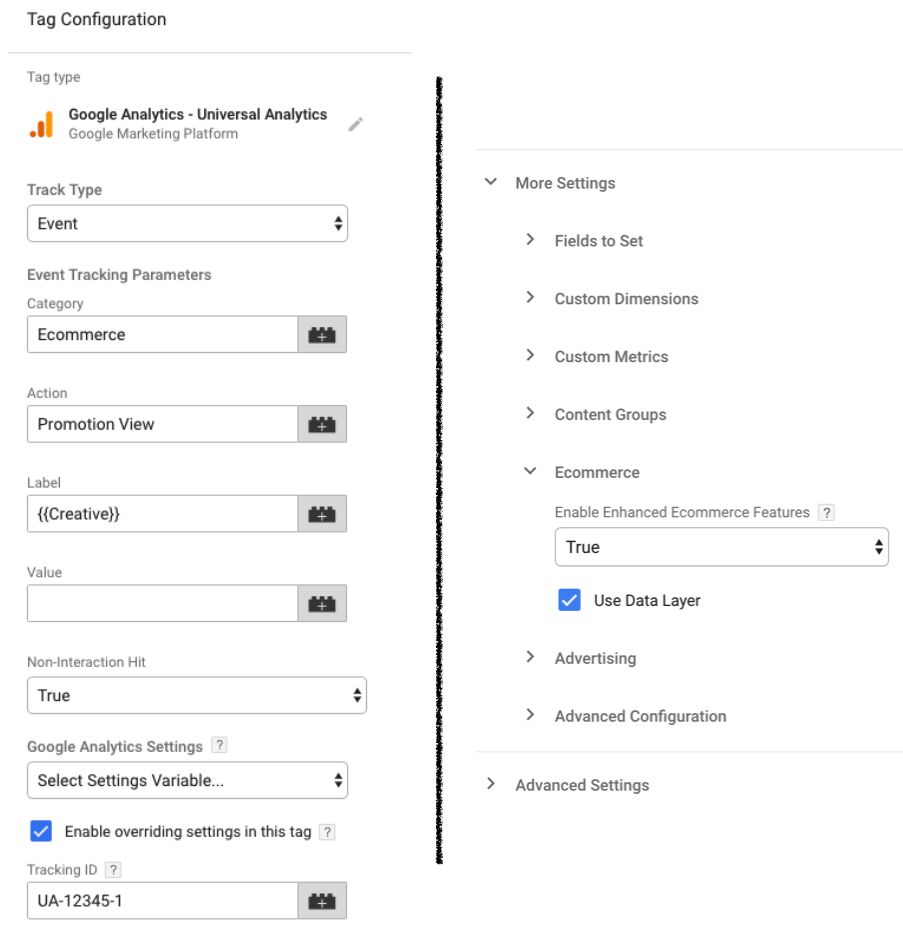
The trigger would be a Custom Event trigger with the following setting:
Event name: eec.promotionView
Promotion Clicks
A Promotion Click is collected when an individual promotion is clicked. It’s important to measure these if you are also measuring Promotion Views, because this way you’ll get a solid understanding of the click-through rate of individual promotions and how these promotions are involved in generating revenue in your webstore.
Available fields in the ecommerce object:
| Key | Type | Example | Comment |
|---|---|---|---|
promotions[].id | String | 'summer_campaign' | Unique identifier for the promotion. |
promotions[].name | String | 'Summer Campaign 2019' | The name of the promotion. |
promotions[].creative | String | 'front_page_banner_1' | A name for the creative where the promotion was clicked. |
promotions[].position | String | 'slot_2' | Some way to distinguish the position of the promotion in the creative (e.g. second slide of a carousel). |
This is what the dataLayer.push() would look like for a Promotion Views with all the relevant keys included:
window.dataLayer = window.dataLayer || [];
window.dataLayer.push({
  event: 'eec.promotionClick',
  ecommerce: {
    promoClick: {
      promotions: [{
        id: 'fall_campaign',
        name: 'Fall Campaign 2019',
        creative: 'Front Page Carousel',
        position: 'Slide 2'
      }]
    }
  }
});
Remember, if you want to use a Custom JavaScript variable instead, the variable must return the
ecommerceobject from thedataLayer.push()above.
Tag configuration example
Typical Event tag:
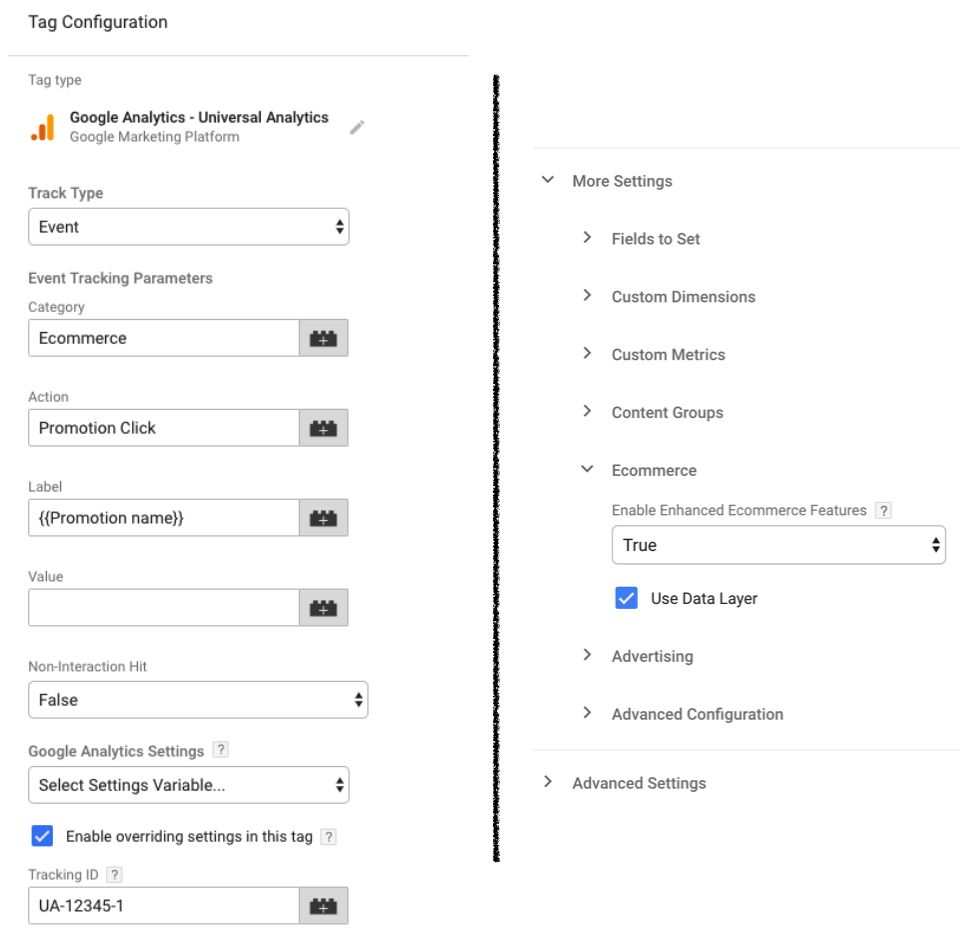
The trigger would be a Custom Event trigger with the following setting:
Event name: eec.promotionClick
Debugging the setup
Once you have everything in place, you’ll want to debug your setup. The things you are looking for are:
Are all the keys configured in the
dataLayer.push()(or the Custom JavaScript variable) getting picked up and being sent to Google Analytics?Is the payload length too long?
Is there a risk of data duplication with some hits?
To debug these, you really only need three tools: GTM’s own Preview mode, the Google Analytics Debugger browser extension, and Google Chrome browser’s DevTools. Yes, there are plenty of other tools you can use, but these have proven to be more than enough in my own experience.
Preview mode
With Preview mode, you can analyze what fields were sent with your Enhanced Ecommerce -enabled Google Analytics tag. You can also compare these fields with what was originally pushed into dataLayer, or what the Custom JavaScript variable returned.
Once you have your ecommerce object either pushed into dataLayer or generated by a Custom JavaScript variable, the next step is to go to Preview mode, then browsing the site and generating the action that sends the ecommerce data to GA.
Here’s what you’re looking for in the Preview mode:
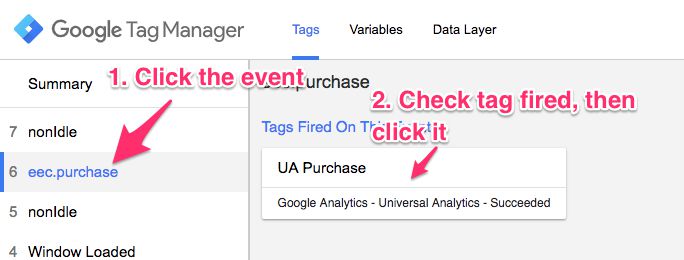
In the left-hand side, you’re looking for the Event name that you pushed into dataLayer with the 'event' key. Remember, you should add one in to every single push?
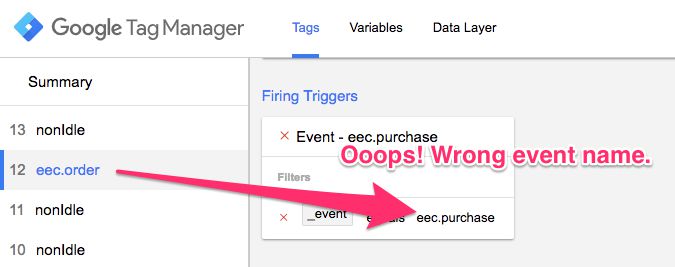
Click that event, and you should see your Enhanced Ecommerce tag in the list tags that fired. If you don’t, it means there’s something wrong with its trigger. So find the tag in the list of tags that did not fire, select it, and scroll down to its triggers. You’ll see a red X next to each trigger condition that failed, so double-check them and make sure the conditions pass when they should.
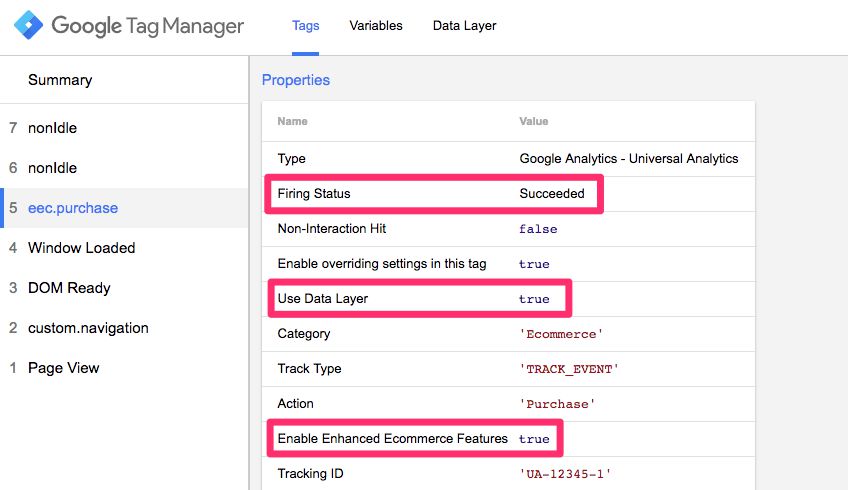
Anyway, if the tag DID fire and if it sent an event (or page view) hit to Google Analytics successfully, you’ll see Succeeded as its Firing Status. Double-check that the Enhanced Ecommerce settings are correct, too.
Google Analytics Debugger and Chrome DevTools
Now you know that your tag fired and that it sent the event/pageview to GA successfully. But what about the Enhanced Ecommerce payload? Were all the keys and values you configured included?
For this, you have plenty of options. You can use a tool like Google Tag Assistant which will tell you what parameters were included in the hit. Or you can use David Vallejo’s excellent GTM Debug Chrome extension, which has a great visualization of the Enhanced Ecommerce data.
The key is to see what data was included in the hit and to compare that against what was pushed into dataLayer or what the Custom JavaScript variable returned.
Personally, I simply use the Google Analytics Debugger extension. It uses the JavaScript Console of the web browser to output a log of all the interactions with Google Analytics trackers on the page.
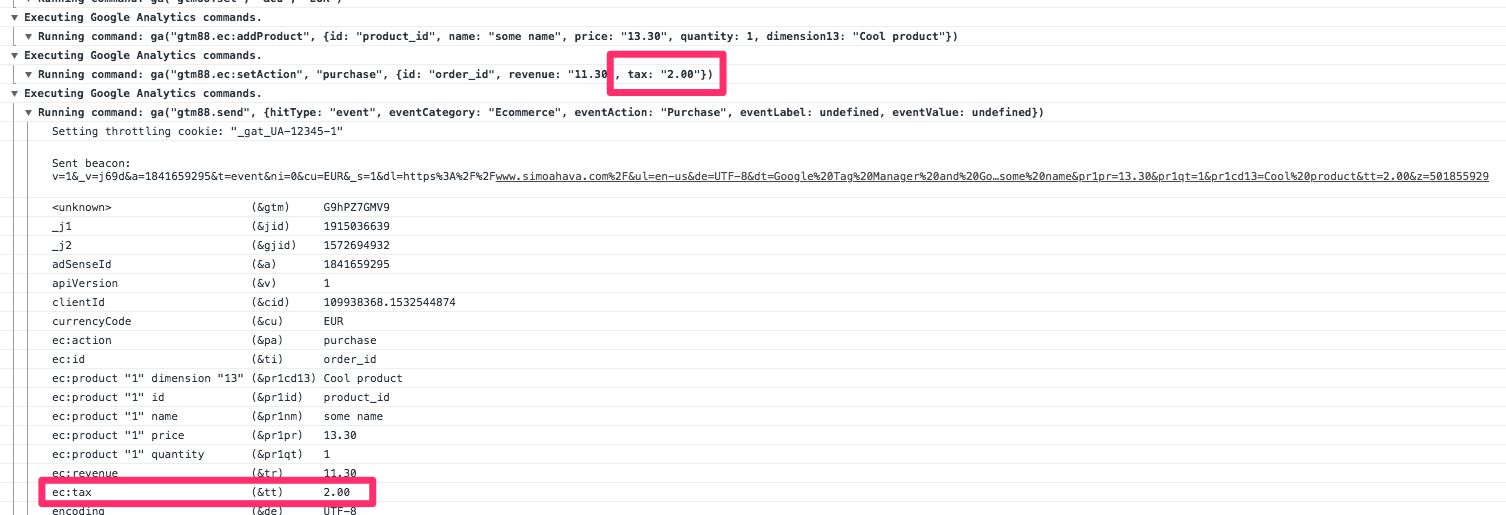
For example, in my Purchase example above, this is what the GA debugger will tell me:
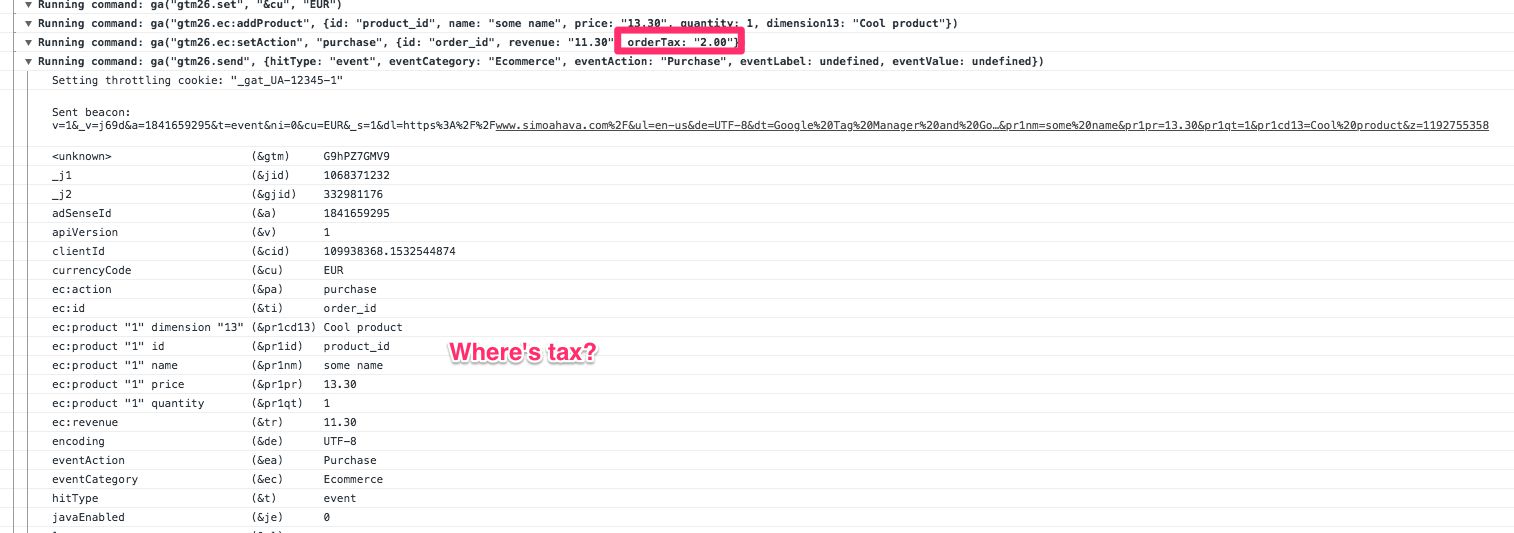
Here, you can see that the hit is missing the tax that I pushed into dataLayer. The key I used was orderTax, as you can see in the screenshot.
So now I open this guide again, scroll all the way to the Purchase hit, look at the Data Layer Composition example, and see my mistake. It shouldn’t be orderTax, it should be just tax.
I fix the dataLayer.push(), re-run the test and now I can see that everything works.
Here’s the most important thing about debugging Enhanced Ecommerce hits:
Never be satisfied with using Preview mode alone. Preview mode will only tell you if a tag fired, NOT if it sent the correct data to Google Analytics. You must debug the actual payload sent to Google Analytics, too. For this, Chrome’s DevTools are a great tool, but there are plenty of extensions out there that outline the data in a clear and concise manner.
Golden rules of Enhanced Ecommerce
Now follow some Enhanced Ecommerce tips that I consider absolutely vital for any implementation. I’ve accumulated them over years of practice, and I don’t hesitate to call them “rules” even if I’m typically very cautious to give any kind of recommendations to anyone.
So read through them, and if you have more suggestions for golden rules, let me know in the comments!
Do whatever you want
This is important. You can use Enhanced Ecommerce however you want. There’s no law that forces you to use the data types in the way that Google recommends you to.
For example, not all websites have a shopping cart. You directly buy products from product pages. In those cases, don’t send the Add to Cart event. Or, alternatively, send a dummy Add to Cart whenever the user moves to the checkout funnel.
It’s entirely up to you.
Heck, you can even use Enhanced Ecommerce for something completely unrelated to ecommerce. For example, you can use it to track content engagement on your site.
The Purchase action is most important
The Purchase action is absolutely the most important part of Enhanced Ecommerce. You can ignore or mess up all the other steps in the funnel, but you will never want to screw up the purchase hit. So many metrics and dimensions rely on the transaction data to be accurate.
When you’re calculating the investment for implementing Enhanced Ecommerce, add some extra buffer to getting the purchase right. It’s that important.
Only one action per hit
Remember to only send one action per hit. There are other limitations, too, but this is the most common mistake.
You might be tempted to send multiple Checkout steps, for example, but this would violate this rule.
You can only include a single action in a dataLayer.push (or in the returned object from a Custom JavaScript variable), so make sure to debug this thoroughly.
Include all the necessary details in every hit
Consistency is key. If you send product details such as product variant, brand and category in a Product Detail View, you’ll want to send these with all the subsequent actions (Add to Cart, Checkout, Purchase), too. Otherwise when analyzing the funnel using any of these dimensions as the primary dimension of analysis, you’ll only see data for Product Detail Views and not for any of the other steps.
There is no automatic persistence or attribution of product metadata - you must send them with every single hit.
Also, the metadata must be in the same format in every step. You can’t send brand: 'NIKE' in one step, brand: 'Nike' in another, and brand: 'nike' in another, and expect Google Analytics to treat these as the same value. They will generate three different rows with their own funnels when analyzed using Product Brand as the dimension.
There is some attribution
Note that there is some attribution in Enhanced Ecommerce; in Product Lists and Promotions, specifically.
When a product is purchased, this purchase will be attributed to the last promotion the user clicked (or viewed if there was no click) in the session.
Similarly, when any Ecommerce action is taken, this action is also attributed to the last Product List that was included in an earlier action, as long as the Product ID in these two actions match.
In other words, if you send a Product Detail View for product with ID my_shirt, using product_page as the Product List attribute value, then any subsequent action that also involves my_shirt will be attributed to the product_page list. Useful, right?
Just remember that attribution is session-scoped. If the session timeout is reached, or if the session cuts off for some other reason, any Product List and Promotion attribution information is lost. That’s why you might see (not set) in the corresponding reports.
Be wary of the payload size limit
Remember that the maximum payload length of a Google Analytics request is 8192 bytes. If you’re collecting Product Impressions, or if the typical cart size in your store is 30+ products, you’ll want to see if you’re approaching this limit.
The Google Analytics Debugger will output an error into the console in case you are trying to send hits that are longer than this limit.
See this article for information how to track payload length, and this for a little tool that automatically reduces the payload length.
Further reading
I’ve written a lot about Enhanced Ecommerce. The easiest way to find this content is to simply do a search on my site.
As for other content, here is a random selection of goodies found on the web:
Google’s Enhanced Ecommerce Developer Guide for Universal Analytics
Google’s Enhanced Ecommerce Developer Guide for Google Tag Manager
Summary
I hope this guide is useful! It is written as an implementation manual rather than a guide for Enhanced Ecommerce in general.
Google’s own documentation is excellent, but there are places where it’s a bit misleading. With this guide, I wanted to get all the relevant information into one place.
Note that I don’t mention Google Tag Manager For Firebase at all. There’s a reason for that: it’s still underdeveloped. There is basic support for Enhanced Ecommerce, but nothing for Product-scoped Custom Dimensions or Metrics, for example. Hopefully these will be introduced soon into the SDKs.
As always, any comments are much appreciated! Please let me know if the guide was useful and if I glossed over or neglected to add some important information. Thank you!