In my intense love affair with the Google Cloud Platform, I’ve never felt more inspired to write content and try things out. After starting with a Snowplow Analytics setup guide, and continuing with a Lighthouse audit automation tutorial, I’m going to show you yet another cool thing you can do with GCP.
In this guide, I’ll show you how to use an open-source web crawler running in a Google Compute Engine virtual machine (VM) instance to scrape all the internal and external links of a given domain, and write the results into a BigQuery table. With this setup, you can audit and monitor the links in any website, looking for bad status codes or missing titles, and fix them to improve your site’s logical architecture.
The Simmer Newsletter
Follow this link to subscribe to the Simmer Newsletter! Stay up-to-date with the latest content from Simo Ahava and the Simmer online course platform.
How it works
The idea is fairly simple. You’re using a Google Compute Engine VM instance to run the crawler script. The purpose here is that you can scale the instance up as much as you like (and can afford) to get the extra power you might not have with your local machine.
The crawler runs through the pages of the domain you specify in the configuration, and writes the results into a BigQuery table.
There are only a few moving parts here. Whenever you want to run the crawl again, all you need to do is just start the instance again. You won’t be charged for the time the instance is stopped (the script auto-stops the instance once the crawl is done), so you can simply leave the instance in its stopped state until you need to do a recrawl.
You could even create a Google Cloud Function that starts the instance with a trigger (an HTTP request or a Pub/Sub message, for example). There are many ways to skin this cat, too!
The configuration also has a setting for utilizing a Redis cache by way of GCP Memorystore, for example. The cache is useful if you have a huuuuuuge domain to crawl and you want to be able to pause/resume the crawl, or even utilize more than one VM instance to do the crawl.
The cost of running this setup really depends on how big the crawl is and how much power you dedicate to the VM instance.
On my own site, the ~7500 links and images being crawled take about 10 minutes on a 16 CPU, 60 GB instance (without Redis) VM instance. This translates to around 50 cents per crawl. I could scale down the instance for a lower cost, and I’m sure there are other ways of optimizing it, too.
Preparations
The preparations are almost the same as in my earlier articles, but with some simplifications.
Install command line tools
Start by installing the following CLI tools:
To verify you have these up and running, run the following commands in your terminal:
$ gcloud -v
Google Cloud SDK 228.0.0

$ git --version
git version 2.19.2
Set up a new Google Cloud Platform project with Billing
Follow the steps here, and make sure you write down the Project ID since you’ll need it in a number of places. I’ll use my example of web-scraper-gcp in this guide.
Clone the Github repo and edit the configuration
Before getting things up and running in GCP, you’ll need to create a configuration file first.
The easiest way to access the necessary files is to clone the Github repo for this project.
Browse to a local directory where you want to write the contents of the repo to.
Run the following command to write the files into a new folder named
web-scraper-gcp/:
$ git clone https://github.com/sahava/web-scraper-gcp.git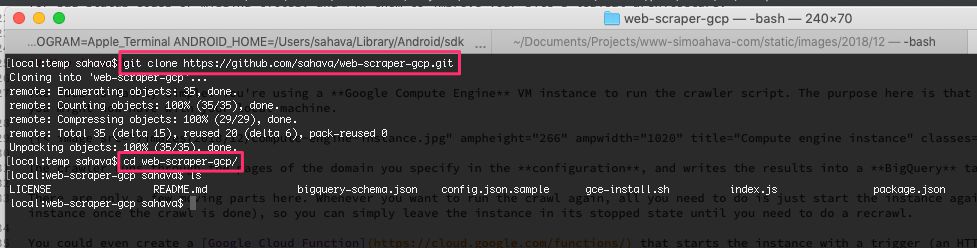
Next, run the command mv config.json.sample config.json while in the web-scraper-gcp/ directory.
Finally, open the file config.json for editing in your favorite text editor. Here’s what the sample file looks like:
{
  "domain": "www.gtmtools.com",
  "startUrl": "https://www.gtmtools.com/",
  "projectId": "web-scraper-gcp",
  "bigQuery": {
    "datasetId": "web_scraper_gcp",
    "tableId": "crawl_results"
  },
  "redis": {
    "active": false,
    "host": "10.0.0.3",
    "port": 6379
  }
}
Here’s an explanation of what the fields are and what you’ll need to do.
| Field | Value | Description |
|---|---|---|
"domain" | "gtmtools.com" | This is used for determining what is an internal and what is an external URL. The check will be a pattern match, so if the crawled URL includes this string, it will be considered an internal URL. |
"startUrl" | "https://www.gtmtools.com/" | A fully qualified URL address that represents the entry point of the crawl. |
"projectId" | "web-scraper-gcp" | The Google Cloud Platform project ID. |
"bigQuery.datasetId" | "web_scraper_gcp" | The ID of the BigQuery dataset the script will attempt to create. You must follow the naming rules. |
"bigQuery.tableId" | "crawl_results" | The ID of the table the script will attempt to create. You must follow the naming rules. |
"redis.active" | false | Set to true if you want to use a Redis cache to persist the crawl queue. |
"redis.host" | "10.0.0.3" | Set to the IP address via which the script can connect to the Redis instance. |
"redis.port" | 6379 | Set to the port number of the Redis instance (usually 6379). |
Once you’ve edited the configuration, you’ll need to upload it to a Google Cloud Storage bucket.
Upload the configuration to GCS
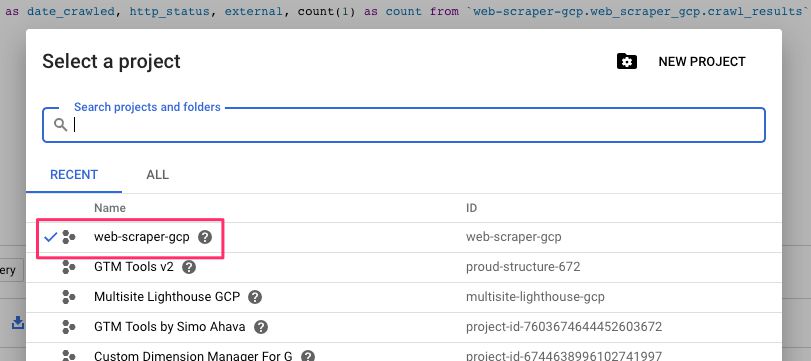
Browse to https://console.cloud.google.com/storage/browser and make sure you have the correct project selected.
Next, create a new bucket in a region nearby, and give it an easy-to-remember name.
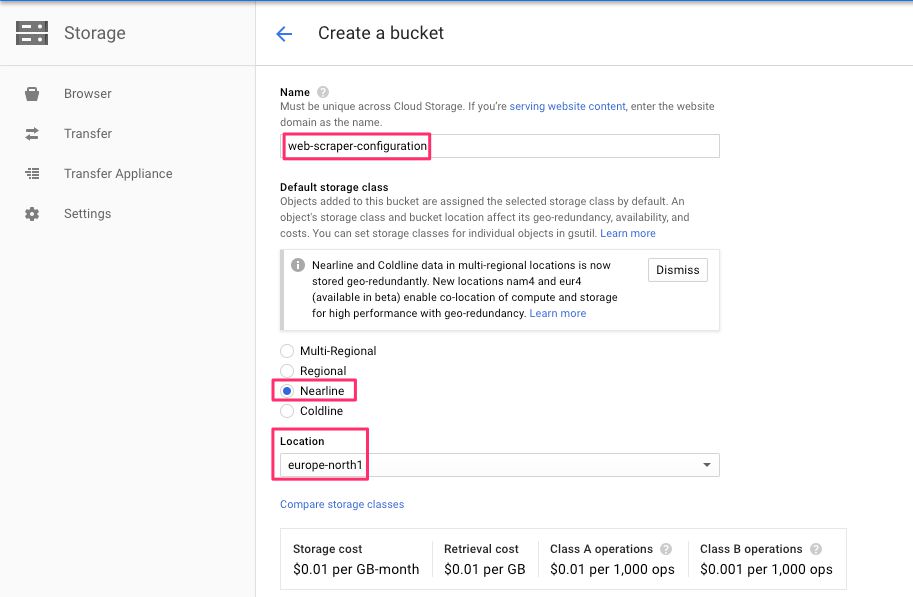
Once done, enter the bucket, choose Upload files, and locate the config.json file from your local computer and upload it into the bucket.
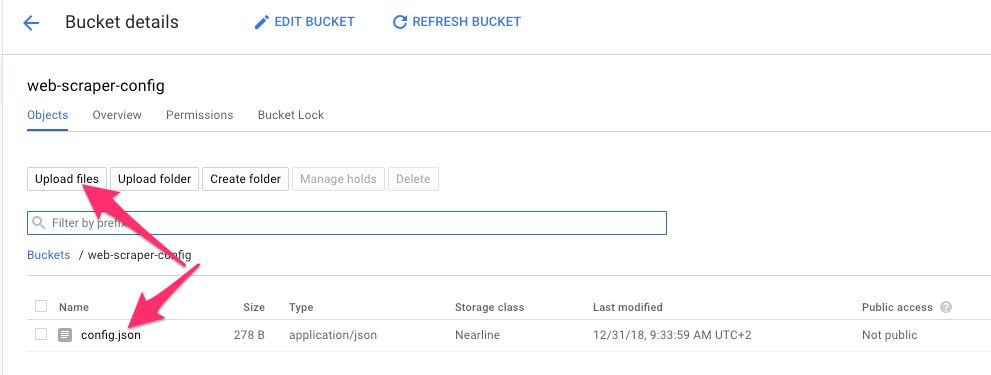
Edit the install script
The Git repo you downloaded comes with a file named gce-install.sh. This script will be used to fire up the VM instance with the correct settings (and it will initiate the crawl when started). However, you’ll need to edit the file so that it knows where to fetch your configuration file from. So, open the gce-install.sh file for editing.
Edit the following line:
bucket='gs://web-scraper-config/config.json'Change the web-scraper-config part to the name of the bucket you just created. So if you named the bucket my-configuration-bucket, you’d change the line to this:
bucket='gs://my-configuration-bucket/config.json'Make sure the required services have been enabled in Google Cloud Platform
Final preparatory step is to make sure you have the required services enabled in Google Cloud Platform.
Browse here, and make sure the Compute Engine API has been enabled.
Browse here, and make sure the BigQuery API has been enabled.
Browse here, and make sure the Google Cloud Storage API has been enabled.
Create the GCE VM instance
Now you’re ready to create the Google Compute Engine instance, firing it up with your install script. Here’s what’s going to happen when you do so:
Once the instance is created, it will run the
gce-install.shscript. In fact, it will run this script whenever you start the instance again.The script will install all the required dependencies to run the web crawler. There’s quite a few of them because running a headless Chrome browser in a virtual machine isn’t the most trivial operation.
The penultimate step of the install script is to run the Node app containing the code I’ve written to perform the crawl task.
The Node app will grab the
startUrland BigQuery information from the configuration file (downloaded from the GCS bucket), and will crawl the domain, writing the results into BigQuery.Once the crawl is complete, the VM instance will shut itself down.
To create the instance, you’ll need to run this command:
$ gcloud compute instances create web-scraper-gcp \
      --metadata-from-file=startup-script=./gce-install.sh \
      --scopes=bigquery,cloud-platform \
      --machine-type=n1-standard-16 \
      --zone=europe-north1-a
Edit the machine-type and zone if you want to have the instance run on a different CPU/memory profile, and/or if you want to run it in a different zone. You can find a list of the machine types here, and a list of zones here.
Once done, you should see something like this:
Check to see if it works
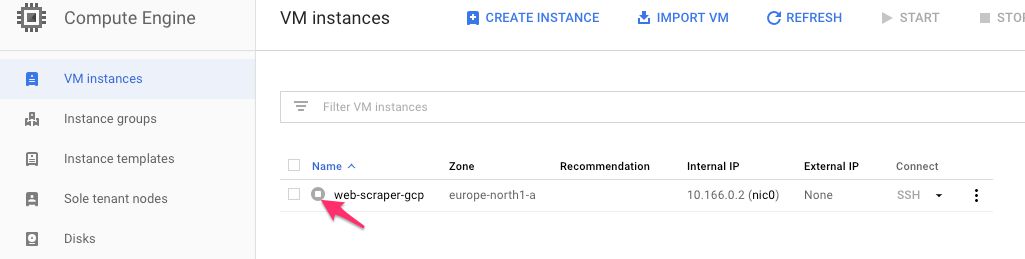
First, head on over to the instance list, and make sure you see the instance running (you should see a green checkmark next to it):
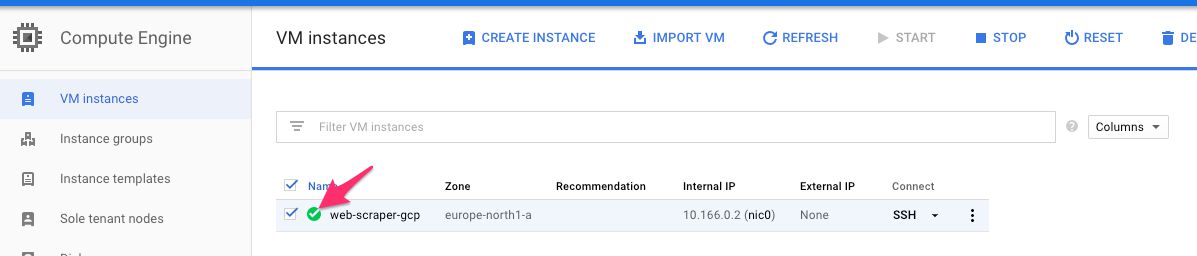
Naturally, the fact that it’s running doesn’t really tell you much, yet.
Next, head on over to BigQuery. You should see your project in the navigator, so click it open. Under the project, you should see a dataset and a table.
If you see them, the next step is to run a simple query in the query editor. Click the table name in the navigator, and then click the QUERY TABLE link. The Query editor should be pre-filled with a table query, so between the SELECT and FROM keywords, type: count(*). This is what the query should end up looking like:
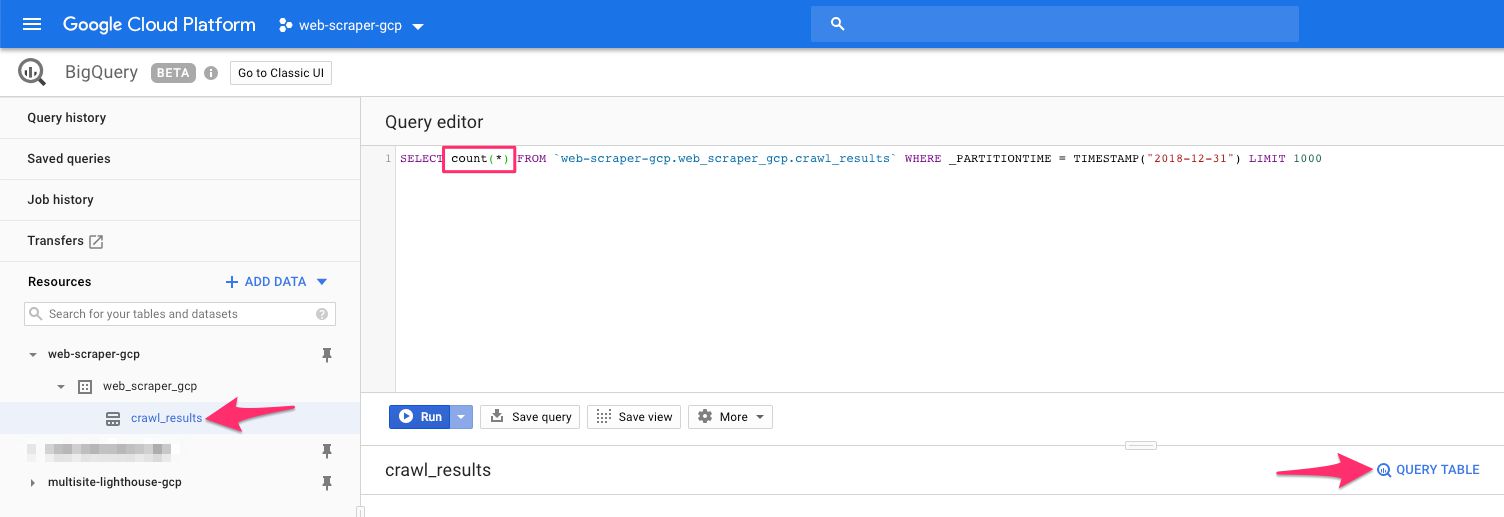
Finally, click the Run button.
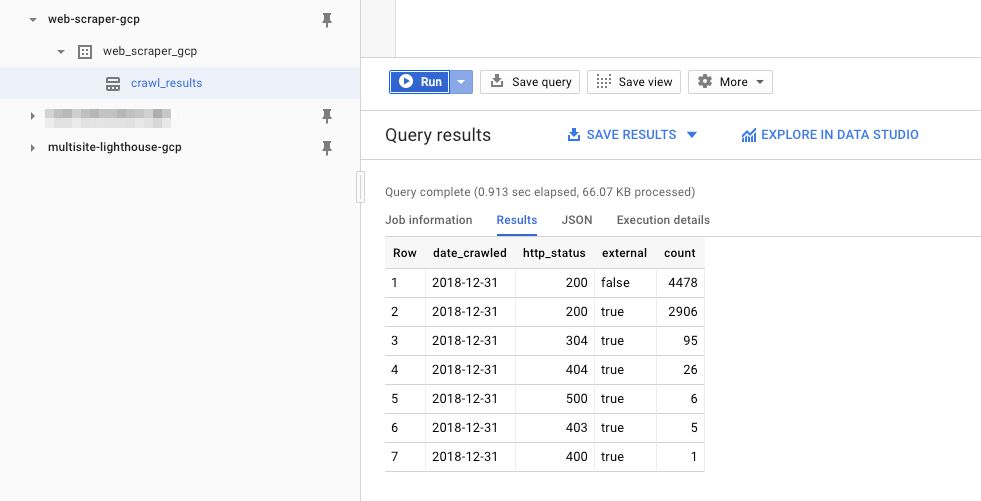
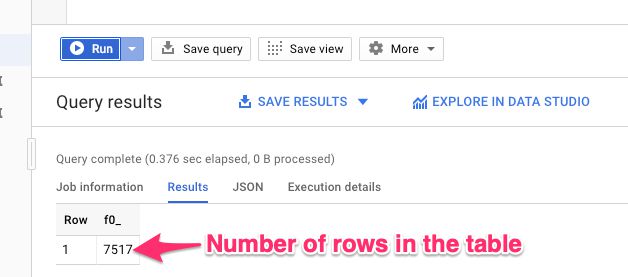
This will run the query against the BigQuery table. The crawl is still probably running, but thanks to streaming inserts it is constantly adding rows to the table. The query should return a result that shows you how many rows there are in the table currently:
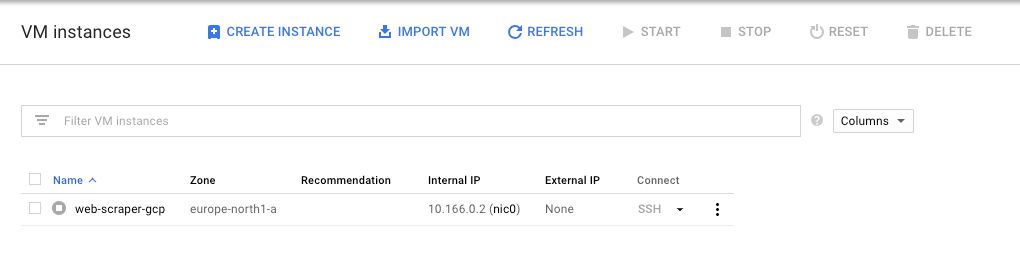
If you see a result, it means the whole thing is working! Keep on monitoring the size of the table. Once the crawl finishes, the virtual machine instance will shut down, and you’ll be able to see it in its stopped state.
Final thoughts
First of all, this was an exercise. I’m fully aware of awesome crawling tools such as Screaming Frog, which you can use to achieve very much the same thing.
However, this setup has some cool features:
You can modify the crawler with additional options, AND you can pass flags to the Puppeteer instance running in the background.
Since this crawler uses a headless browser, it works better on dynamically generated sites than a regular HTTP request crawler. It actually generates the JavaScript and crawls the dynamic links, too.
Because it writes the data to BigQuery, you can monitor the status codes and link integrity of your website in tools like Google Data Studio.
Anyway, I didn’t set out to create a tool that replaces some of the stuff already out there. Instead, I wanted to show you how easy it is to run scripts and perform tasks in the Google Cloud.
Let me know in the comments if you’re having trouble with this setup! I’m happy to see where the problem might lie.