Last updated 18 Jan 2019: Added details about the free tier limitations, and showed how to avoid the Dataflow jobs auto-scaling out of control.
I’m (still) a huge fan of Snowplow Analytics. Their open-source, modular approach to DIY analytics pipelines has inspired me two write articles about them, and to host a meetup in Helsinki. In my previous Snowplow with Amazon Web Services guide, I walked you through setting up a Snowplow pipeline using Amazon Web Services. This time around, I’m looking at the wondrous Google Cloud Platform, for which Snowplow introduced support in an early 2018 release.
I won’t be offering a comprehensive comparison between GCP and AWS, nor will I walk you through every single possible customization you could do when firing up the instances and building the pipeline. Those are left for you to discover by yourself, or to consult a data engineer who can help you with scale.
In fact, the setup I’ll walk you through will be suboptimal in many places. It won’t be the most robust setup for a large flow of data through the pipeline, but what it will provide you is the comprehensive list of steps you need to make to get things running.
Note that Snowplow also offers their own Snowplow Insights service for setting up and managing the pipeline so that you can jump straight into data collection and analysis. I really recommend this service especially if you are unsure about how to set up the pipeline in an economical and scalable way. You might accrue a lot of extra costs if you don’t know how to scale the required resources to suit what you actually need for efficient analysis.
You can also follow the official Snowplow wiki, if you wish. The steps are similar to what I go through in this guide, though I do think this guide will be better suited for you in case you are unfamiliar with how GCP works.
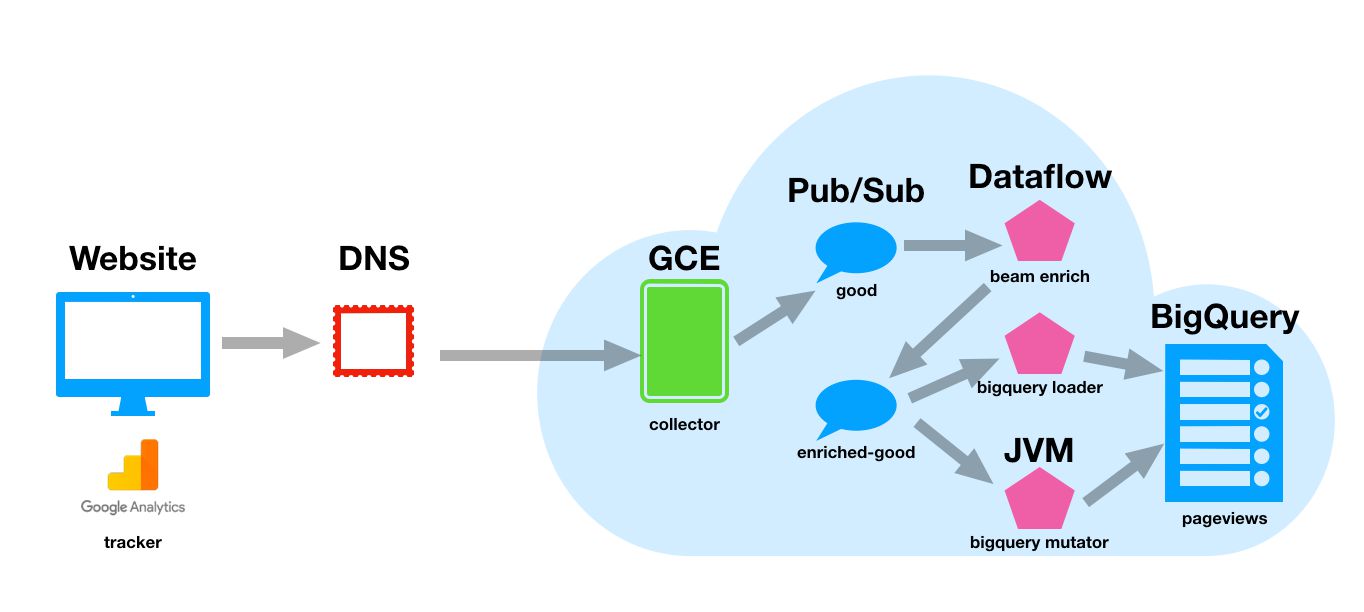
My Powerpoint visualization skills just get better and better each passing year!
The Simmer Newsletter
Follow this link to subscribe to the Simmer Newsletter! Stay up-to-date with the latest content from Simo Ahava and the Simmer online course platform.
Word of warning
This probably won’t come as a surprise to you, but working with a cloud platform is not free of charge. If you’re a first-time user, you should be eligible for the free trial of $300 to be spent during the first 12 months. This is more than enough to build a pipeline and test it out over a number of days, but it won’t get you far.
UPDATE 18 Jan 2019: The free tier only gives you 8 CPUs total across your entire project. That means that you must keep count of all the instances you’ll be using for the collector and for the ETL machine. Start with a low number, e.g. 1 or 2 CPUs per instance to see how Snowplow works. Once you have the budget, you can shoot for more ambitious setups.
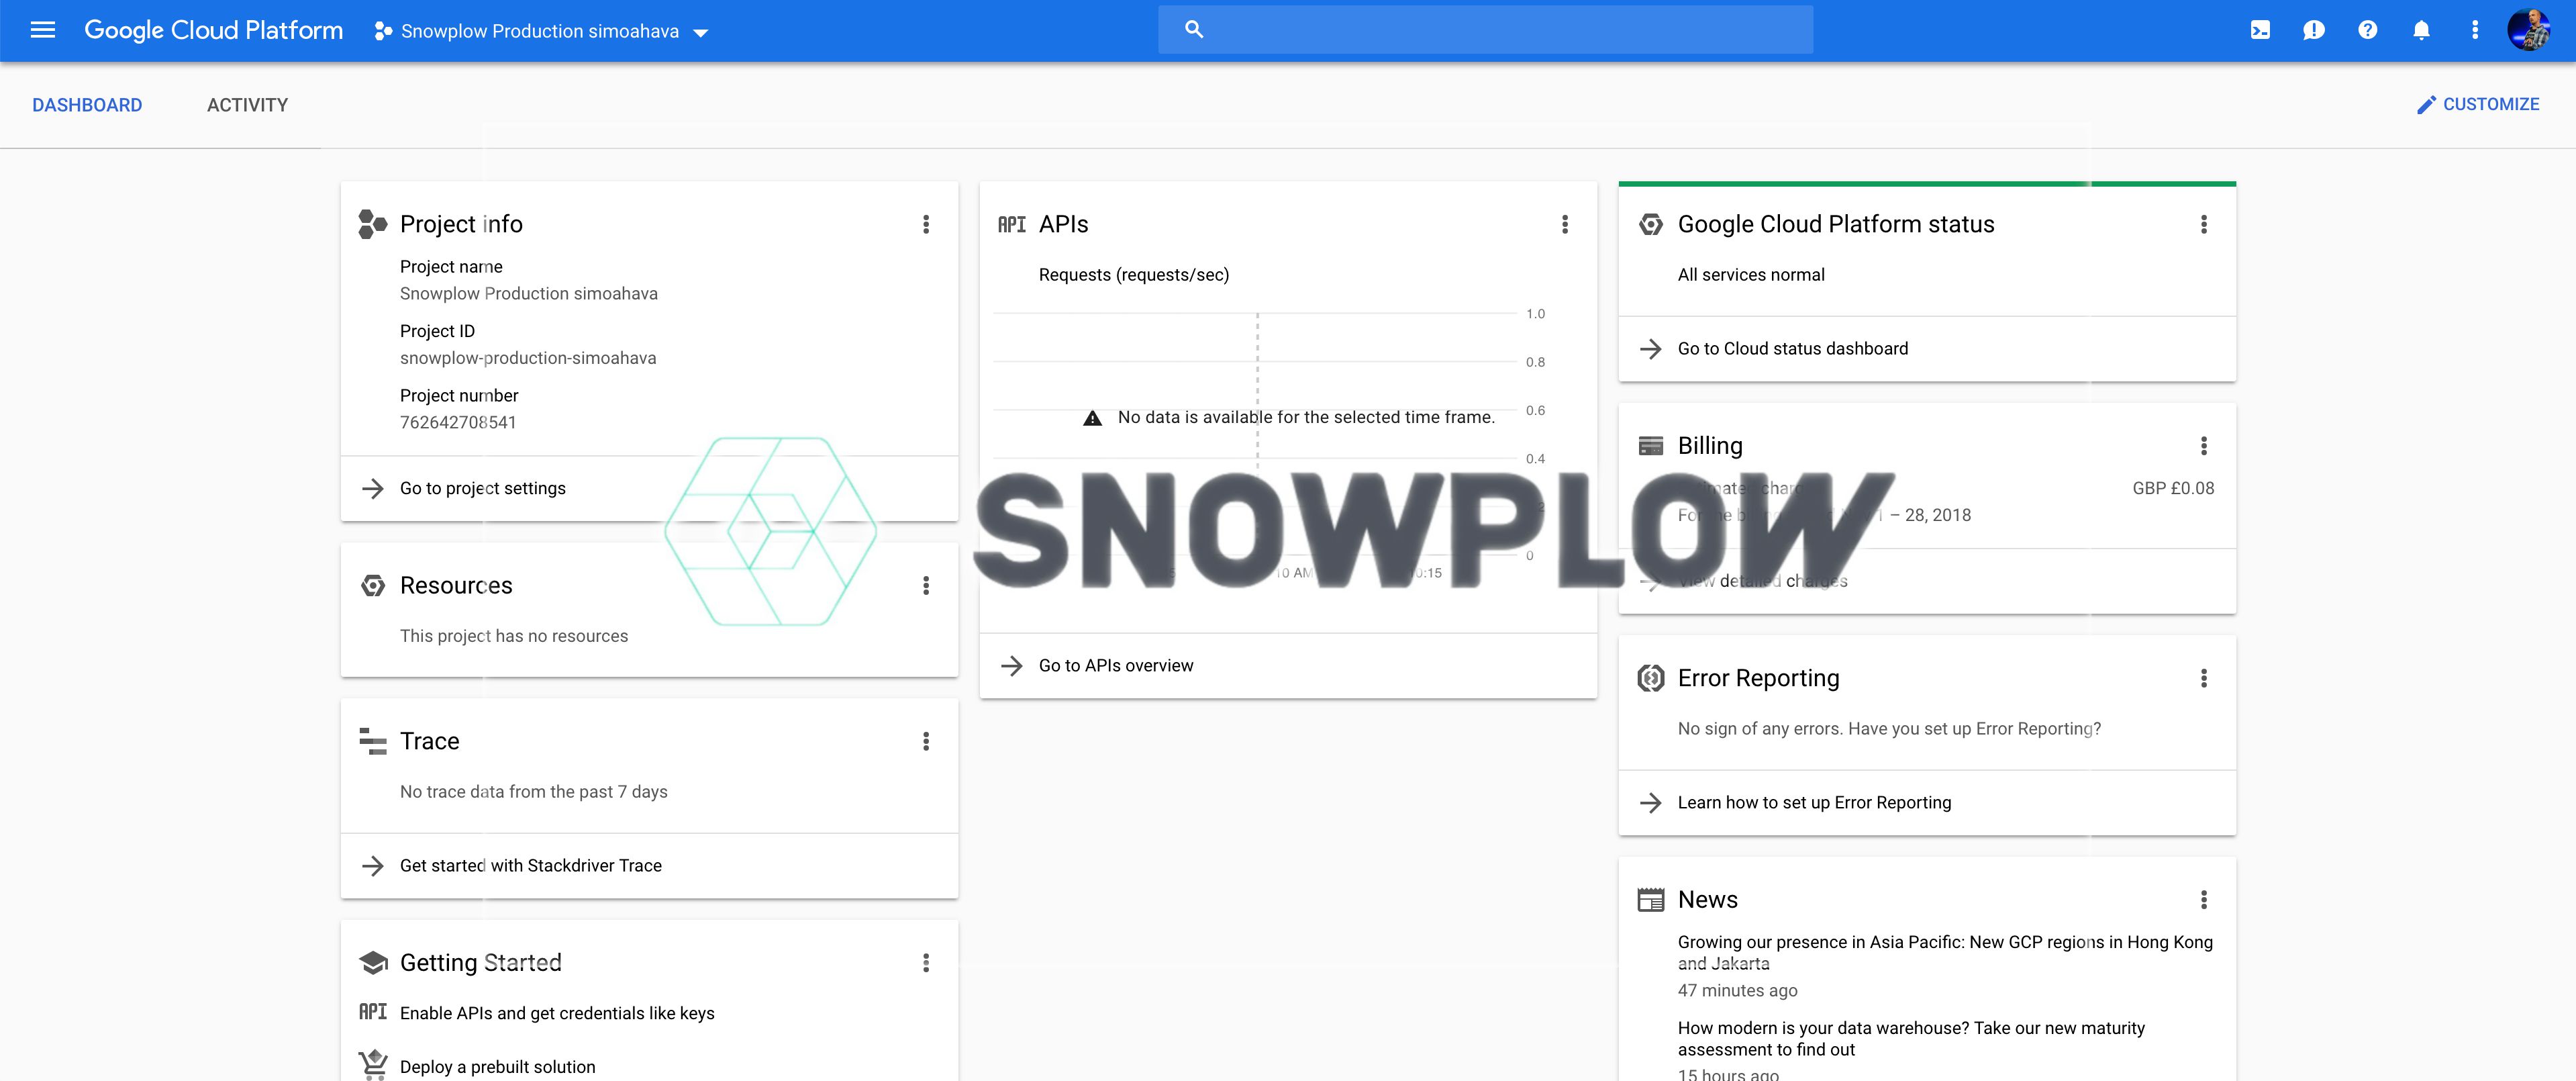
You’ll need to keep a close eye on the billing dashboard of your project. It helps you get an idea of how much cost you have factually accumulated to this day, and what the projected cost for the whole month will be.
What you’ll need
To follow this guide, you will need:
A Google account - something to log into Google services with, such as your Google Mail ID.
A credit card - you’ll need to enable billing in your Google Cloud account to fire up some of the services we need.
A custom domain name - this is optional, but it’s necessary if you want to set up the tracker as a secure HTTPS endpoint. Without a custom domain name, you’re forced to use HTTP only. You can get a cheap domain name from Google Domains. You might be able to set something up for free using Cloud Endpoints, but this guide will not cover this.
Good luck! Let me know in the comments if some part of this guide was particularly unclear.
First steps
Here we’ll setup the GCP project, make sure you have the necessary resources enabled, and we’ll also install the Google Cloud SDK so that you can interact with your project via your local terminal, too.
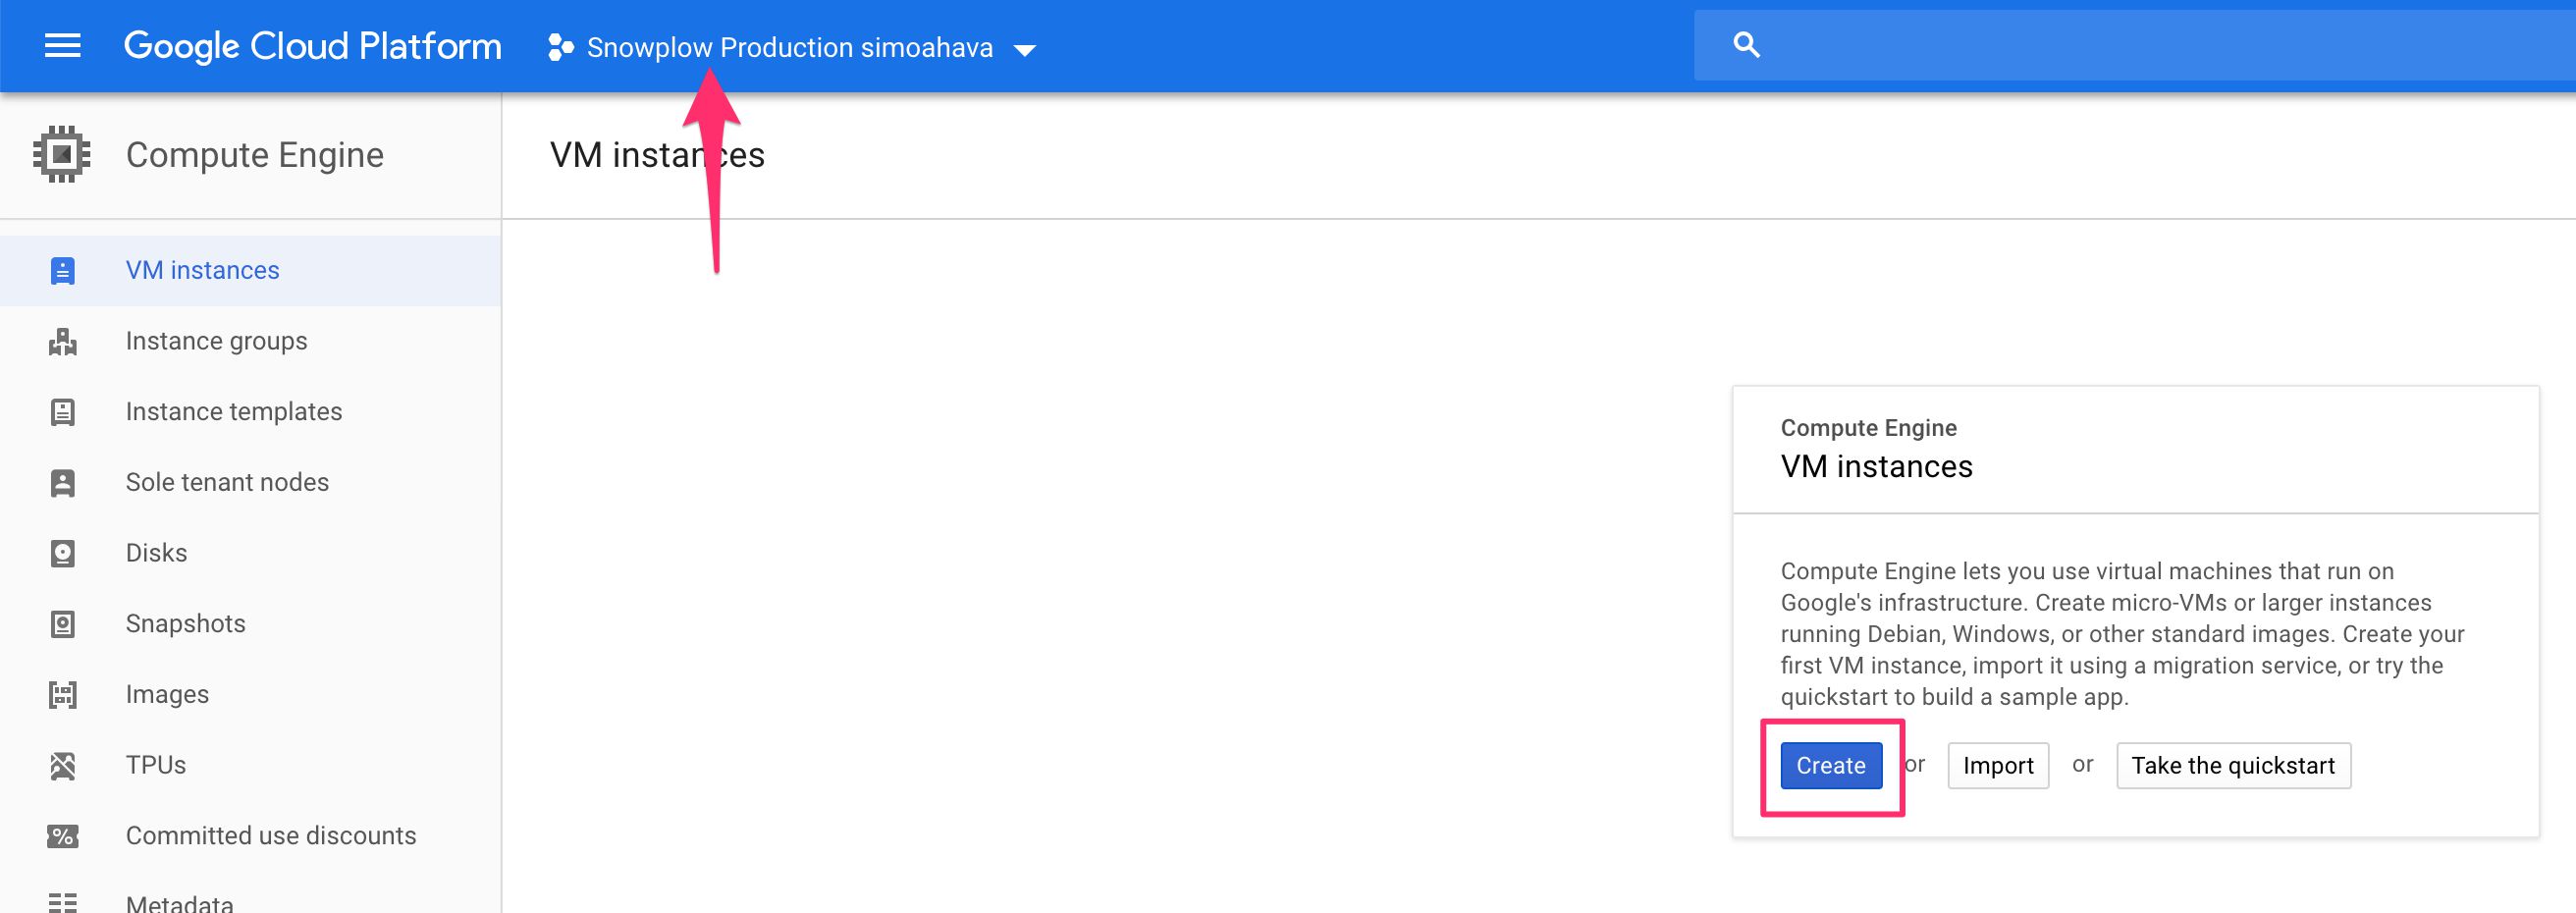
Step 1: Set up a new project
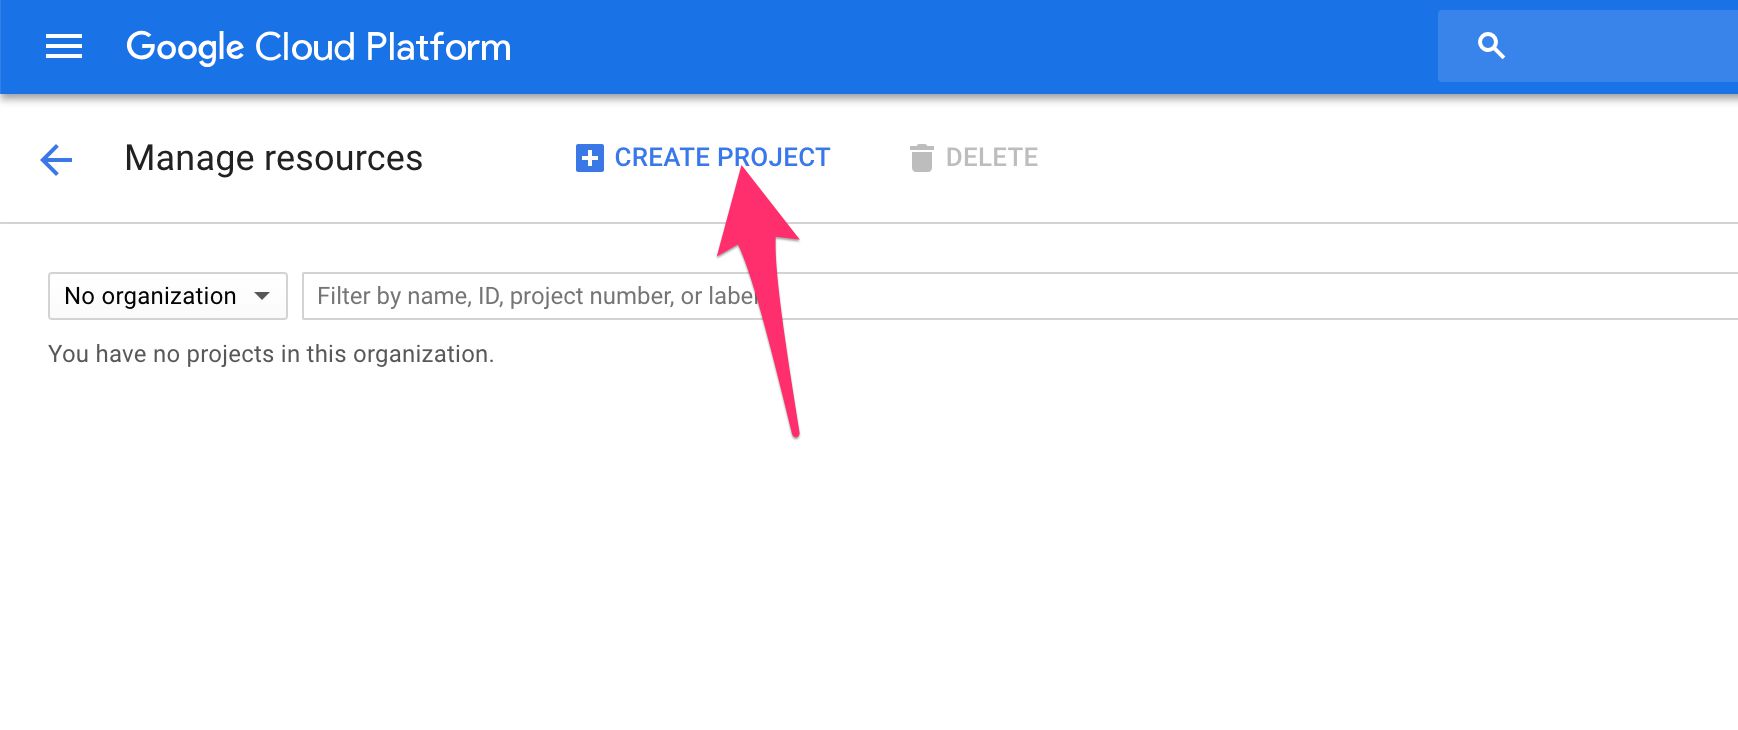
The first thing you’ll need to do is set up a new Google Cloud project.
(1) Browse to https://console.cloud.google.com/cloud-resource-manager/. Remember to login with the Google ID which you’ll use to manage this project. Click CREATE PROJECT.
If this is the first time you use GCP with this account, you might see an offer for free credit. Take it!
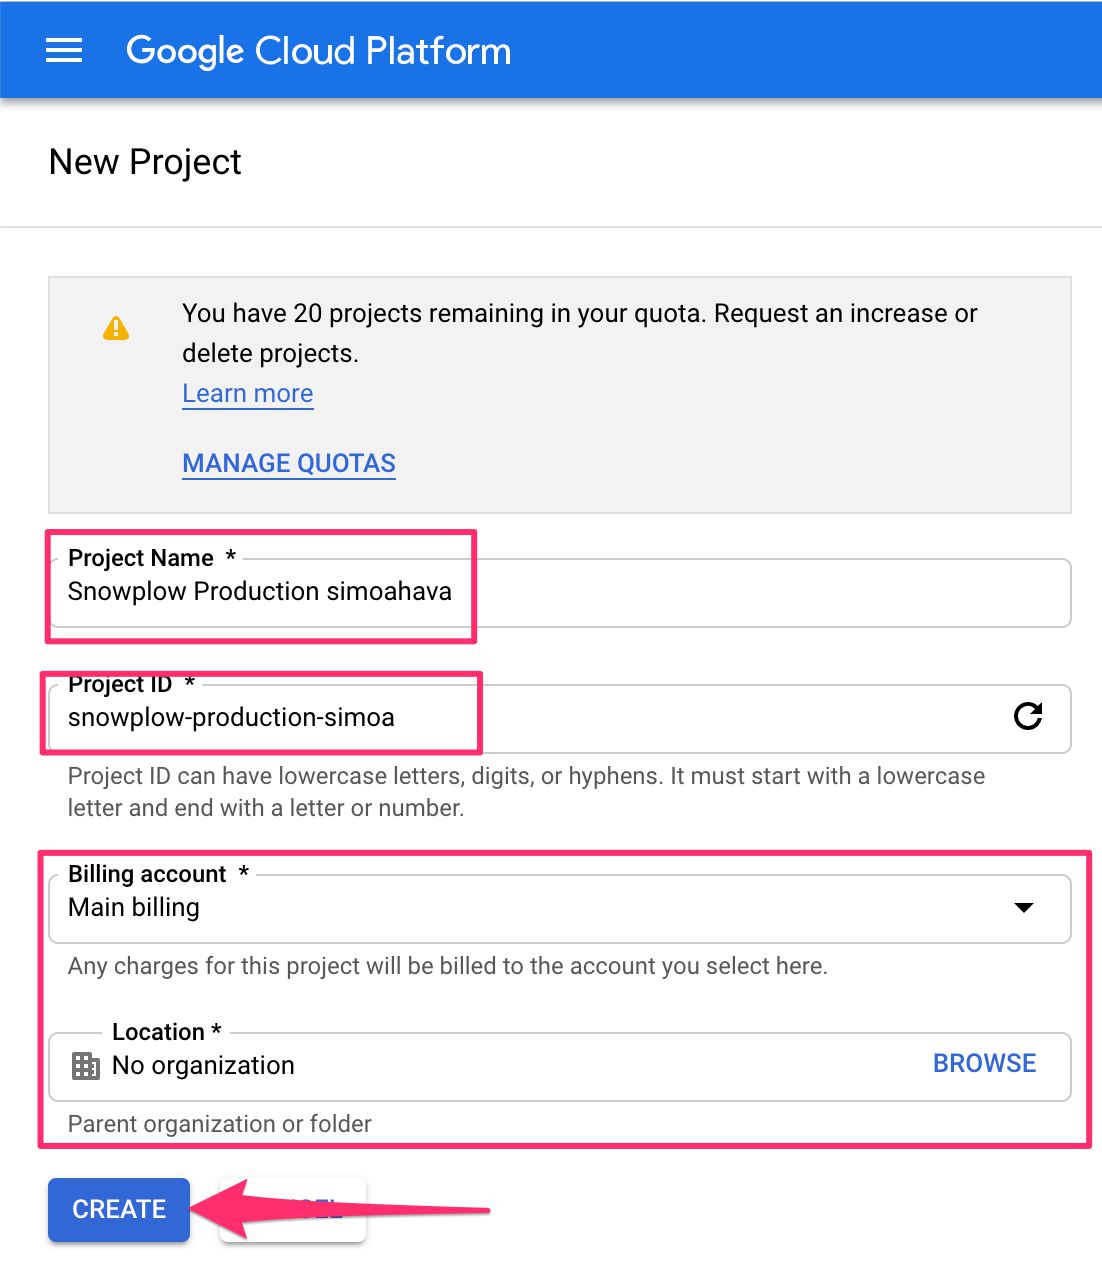
(2) Give the project a name.
For convenience, it might be good to change the Project ID to something more legible and easy to understand.
If you have Organizations and Locations (such as folders) set up for your Google Cloud account, choose the appropriate ones from the menu.
Also, if you already have a Billing Account set up, choose that as well from the respective drop-down menu.
Choose CREATE when you’re done.
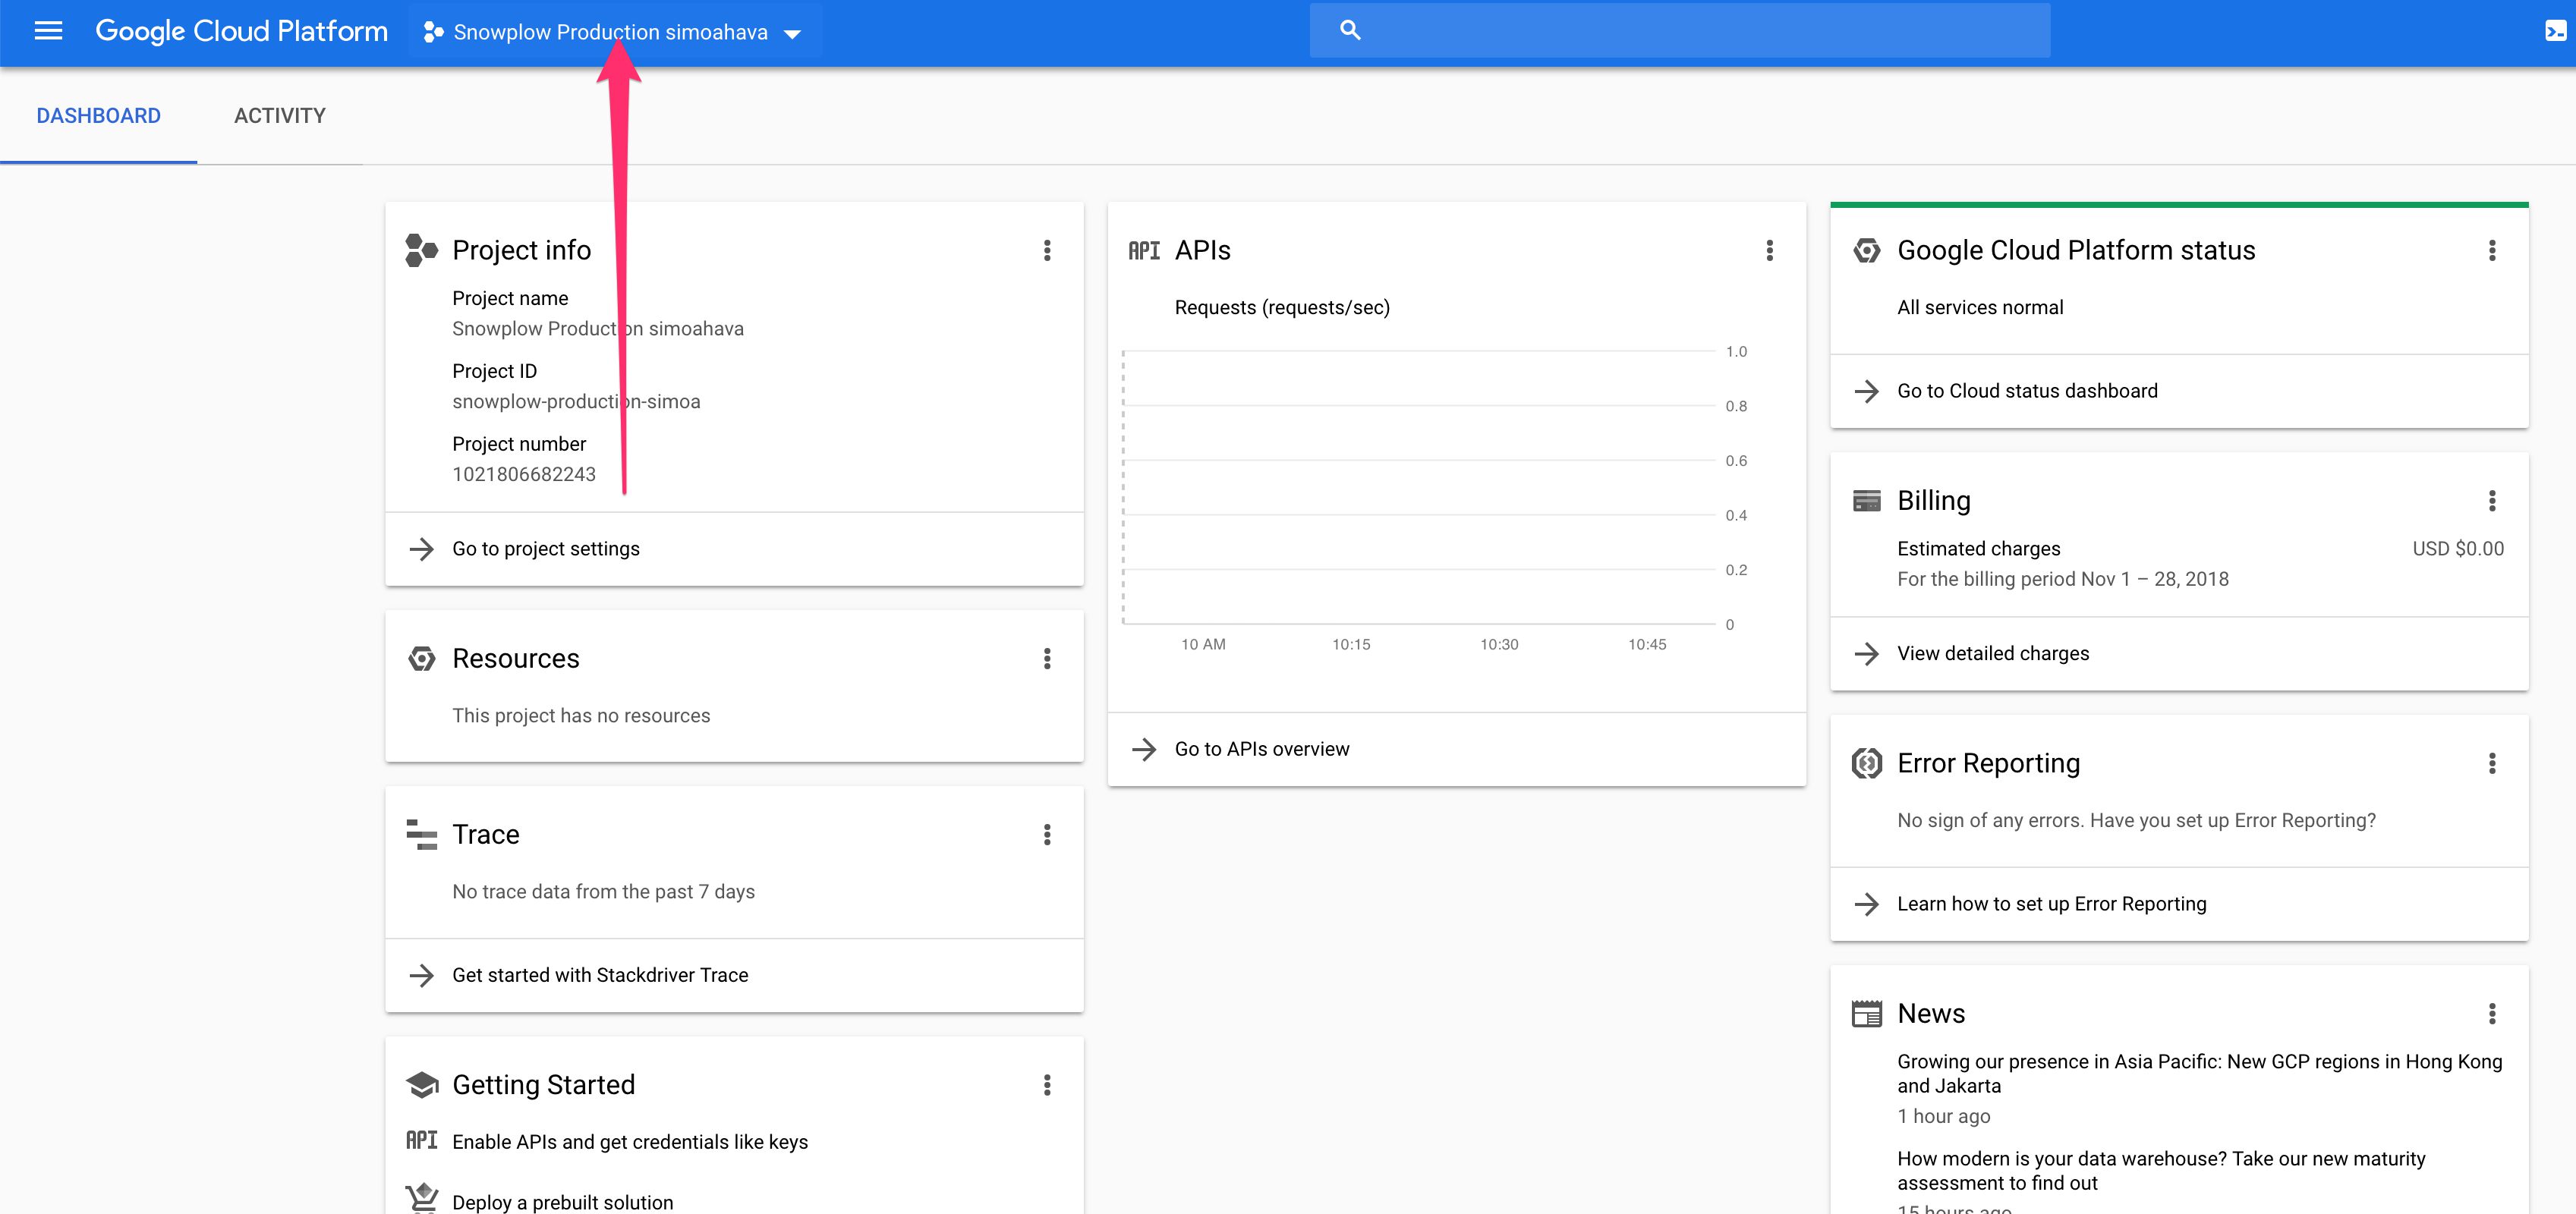
After clicking the button, GCP will do some loading and spinning for a while, after which you should see your new project dashboard. If you don’t, make sure to select it from the project selector menu.
Congratulations! You’ve created the project.
Step 2: Enable Billing
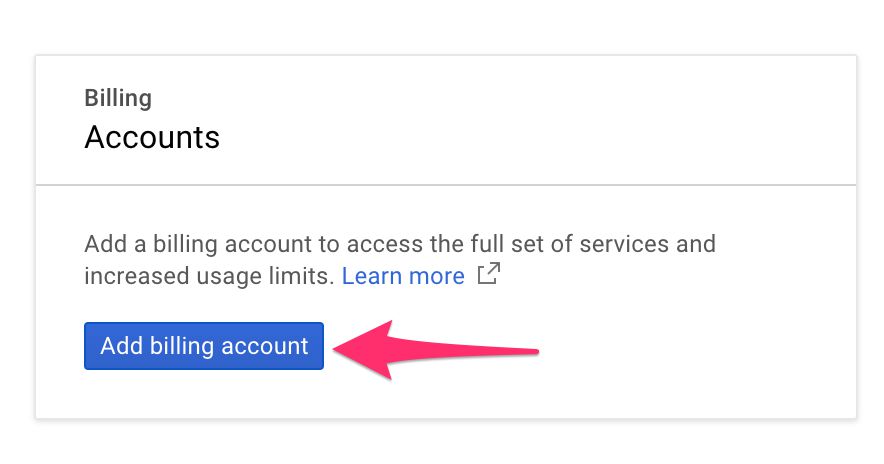
You’ll need to create a billing account so that GCP can invoice you if necessary (sucks, I know).
(1) Browse to https://console.cloud.google.com/billing.
(2) Click Add billing account.
Here, follow the steps to add your credit card, or, if you’re eligible for the free trial, to activate your free trial.
Make sure you follow the prompts to link your Snowpow project to the Billing account you just created.
Step 3: Enable the required services
Next, you need to enable the services and APIs we’ll need to get started. These steps let you set up the collector. When you move to the enrich and BigQuery load steps, you’ll need to enable additional services.
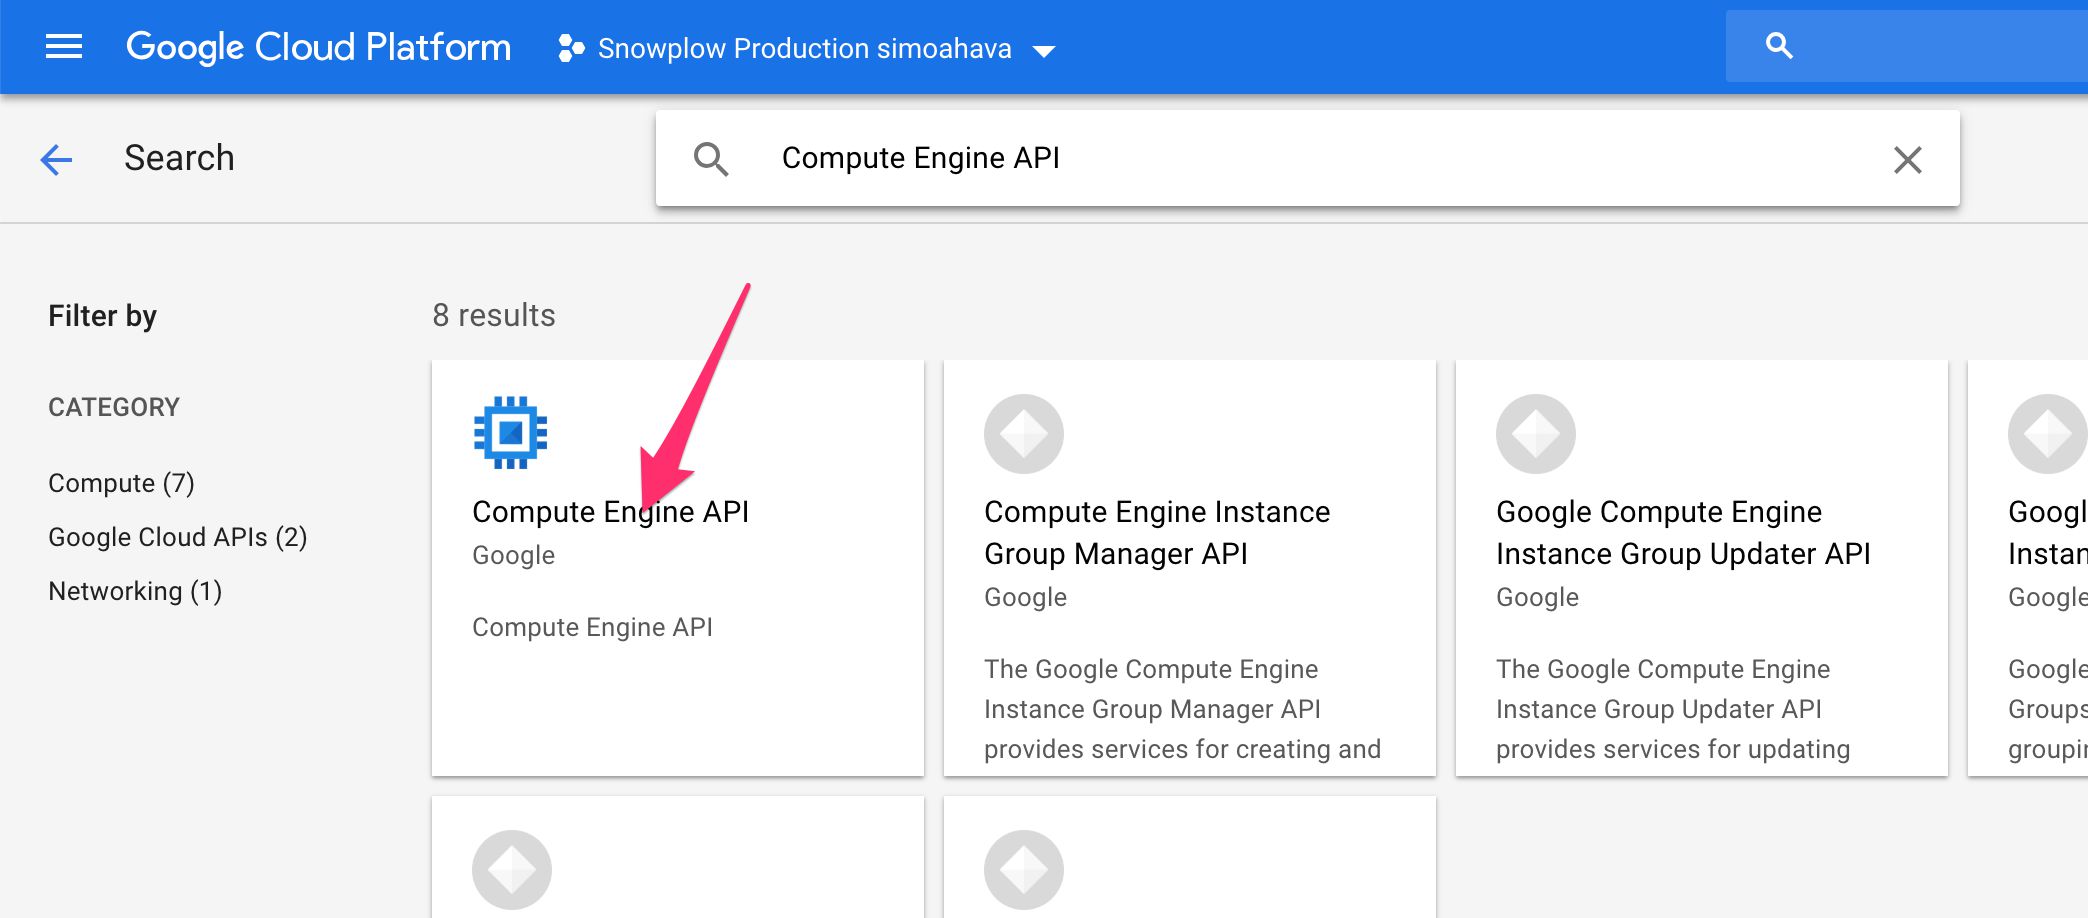
(1) Browse to https://console.cloud.google.com/apis/library.
You should see a search bar, so start by searching for Compute Engine API and click the relevant result. We’ll need the Compute Engine to fire up our virtual machines on which the Snowplow collector will reside.
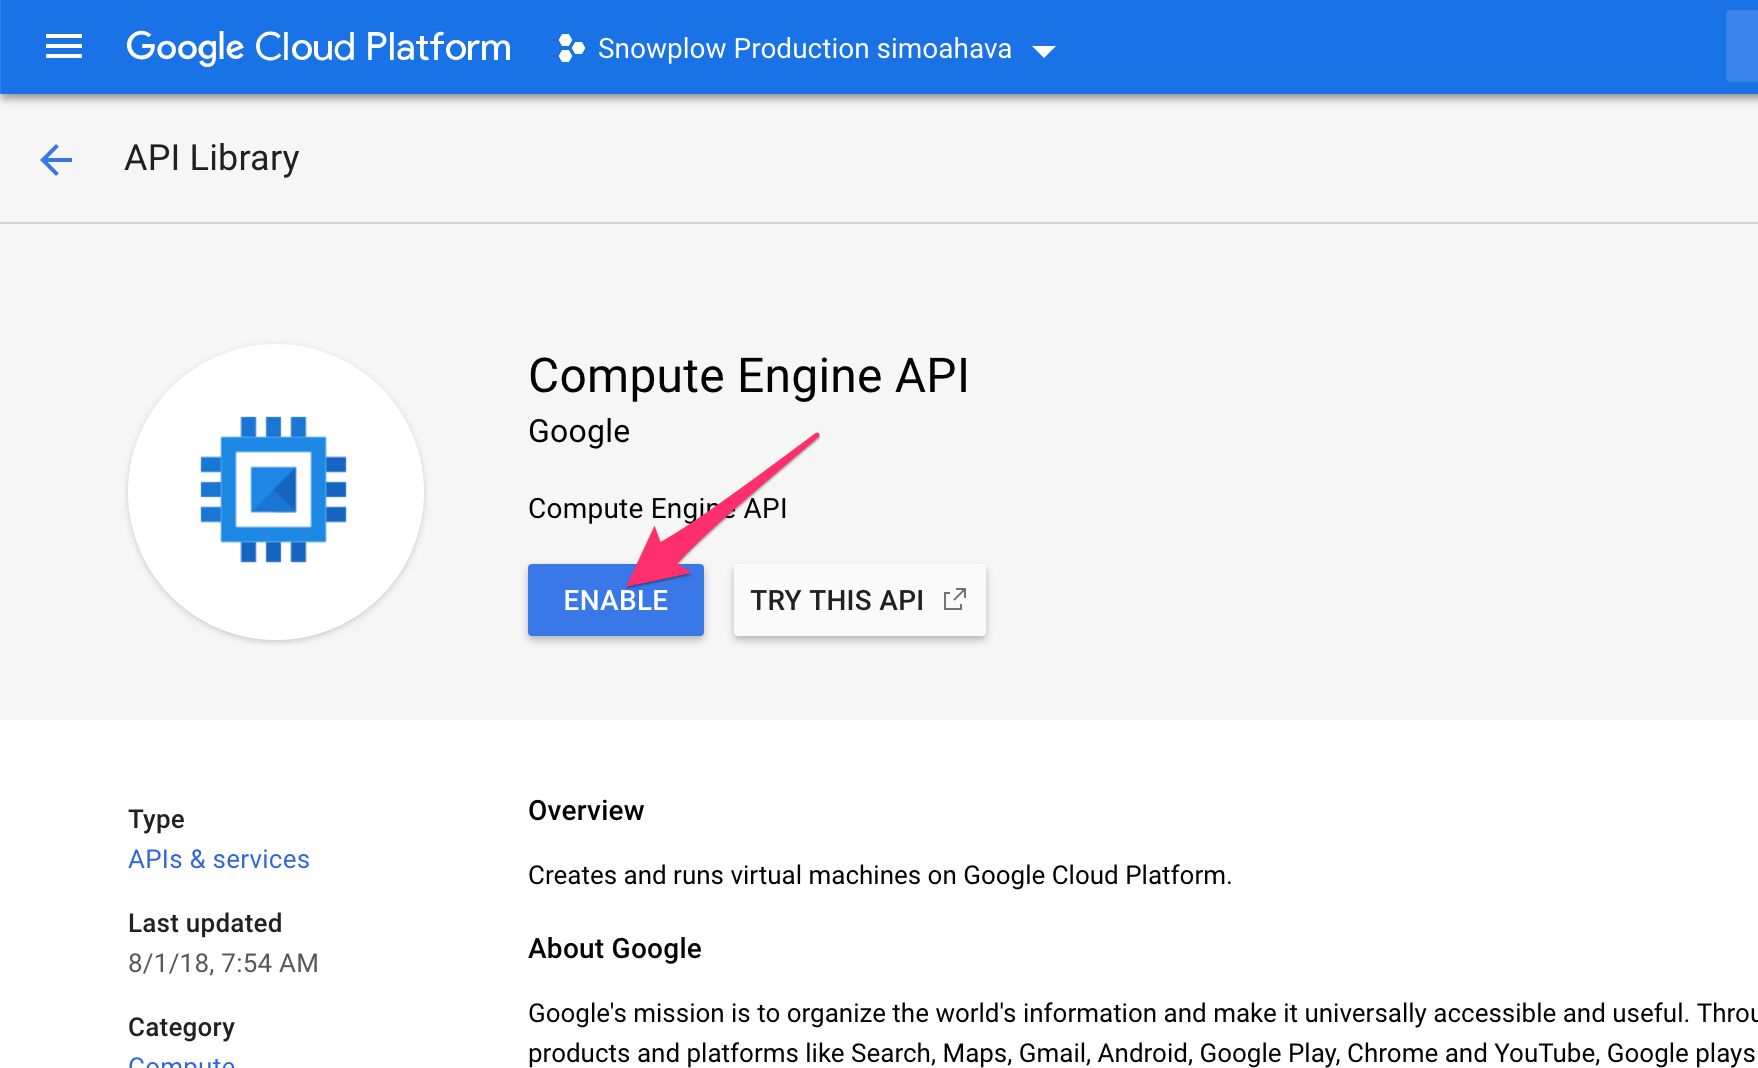
Upon entering the Compute Engine API page, simply click the blue ENABLE button at the top.
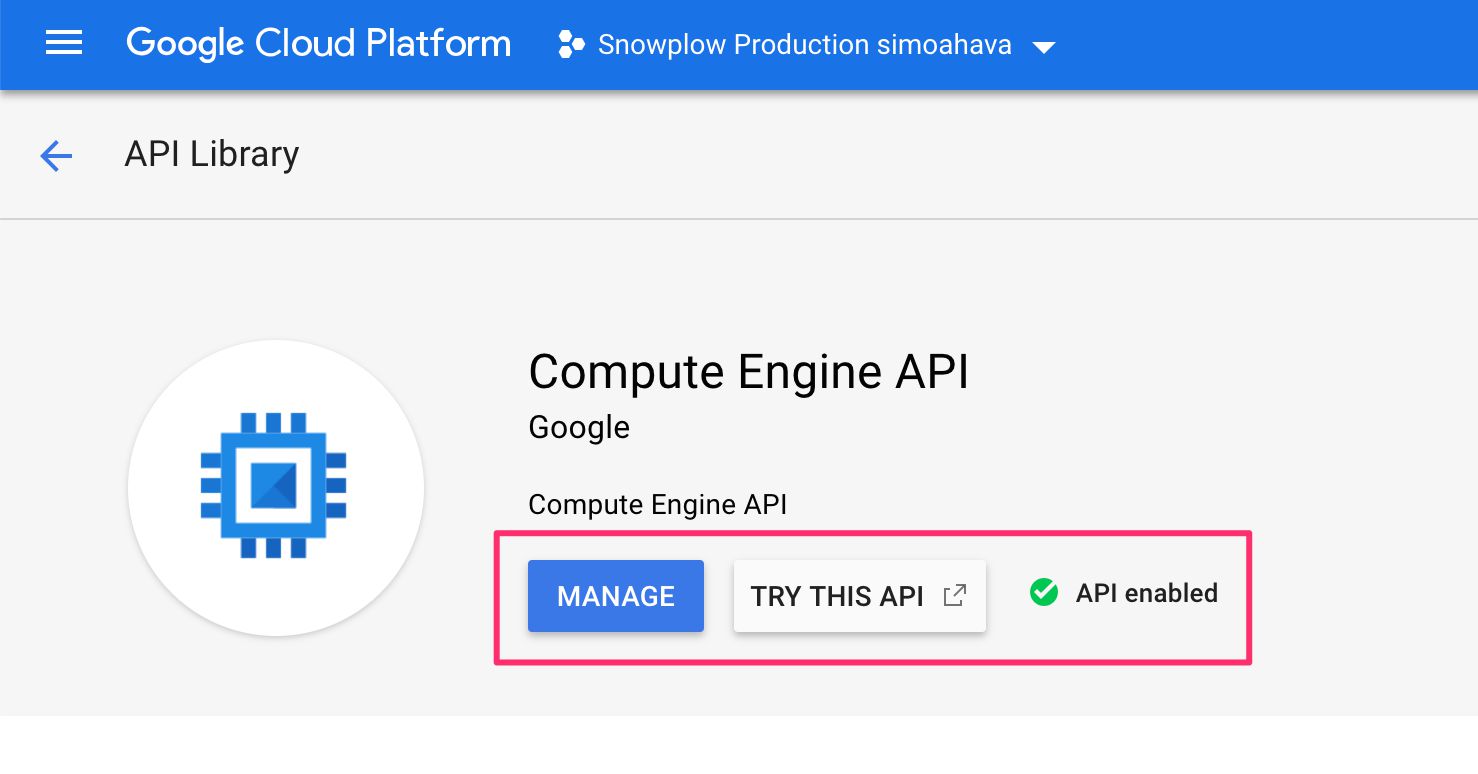
Once it’s done, you should see something like this where the Enable button used to be:
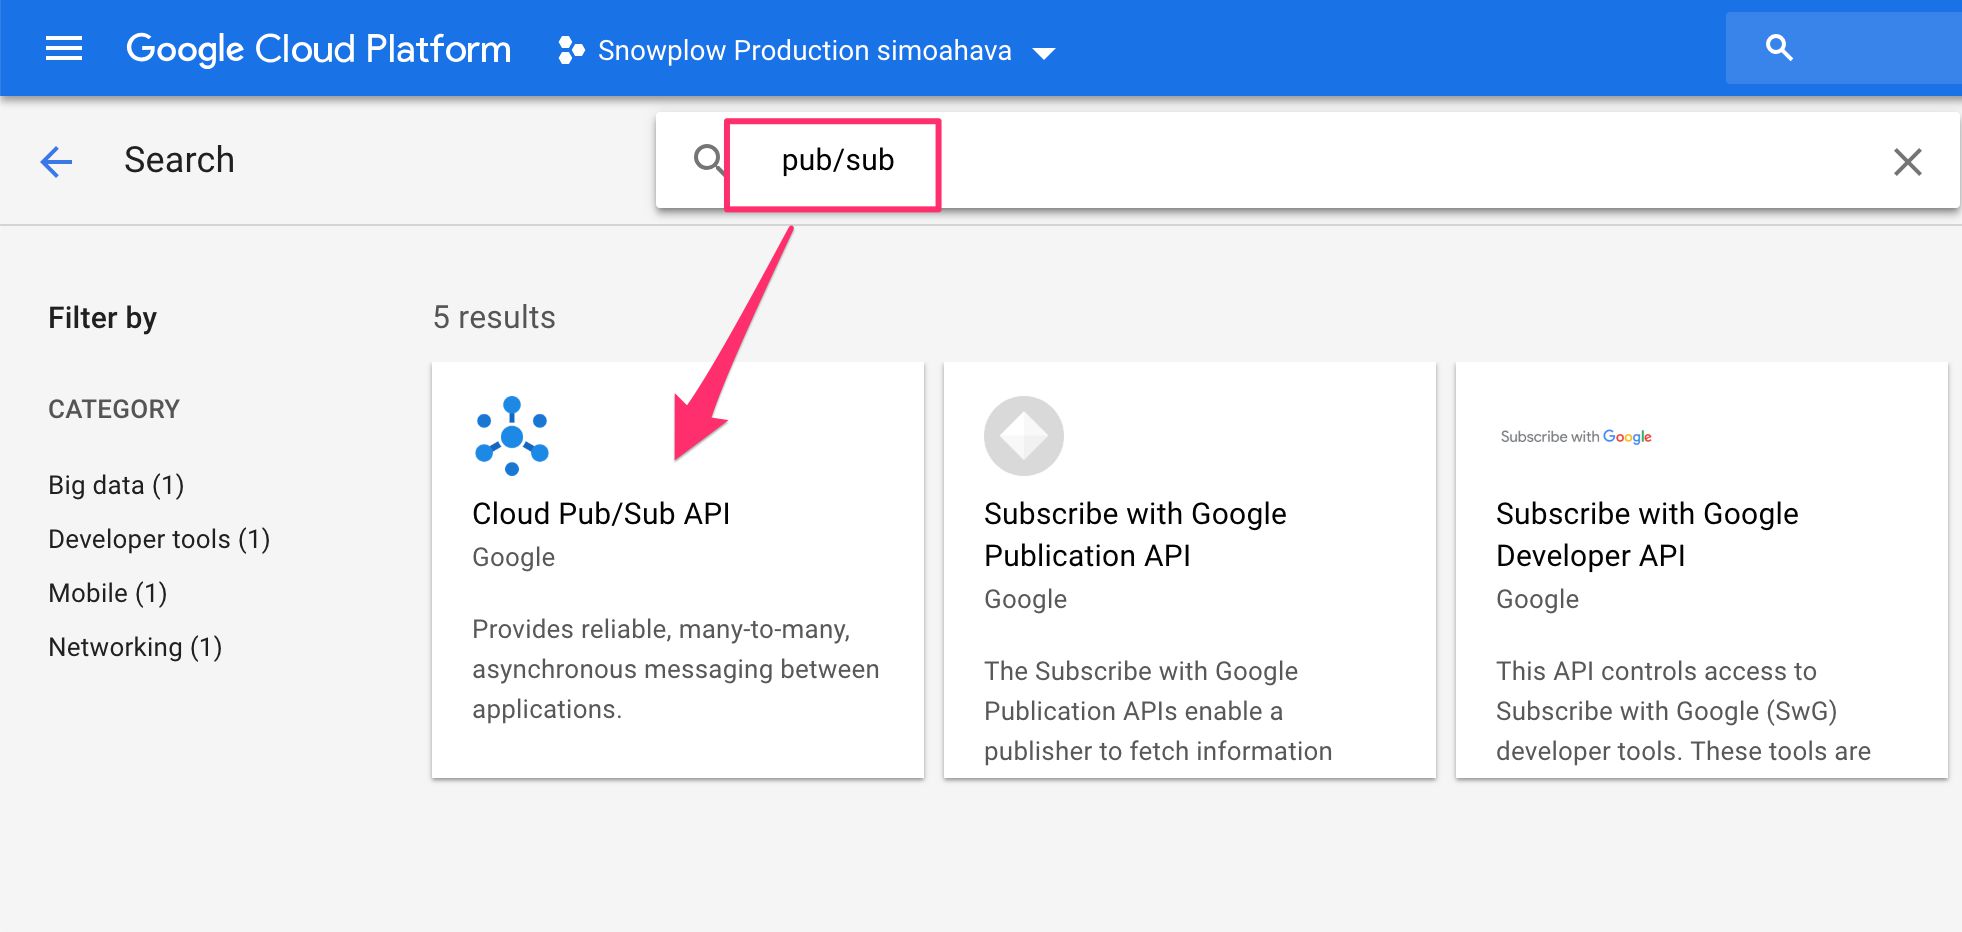
Now, follow these exact same steps for the Cloud Pub/Sub API. Pub/Sub (for Publisher/Subscriber) is a real-time message queue we’ll use to process the data fed into the Snowplow pipeline.
Once you’re done enabling these services, you’re ready to move onto the next step!
Step 4: Install the Google Cloud SDK
The next thing you’ll want to do is to install the Google Cloud SDK locally in your machine. It’s very convenient because it lets you access your GCP project from the command line, and it lets you test some of the services from your local machine rather than having to find the appropriate paths through the often confusing UI.
To install the SDK, follow the steps for your platform, starting from here.
Once you’ve installed the SDK, you should be able to run these commands in your terminal / shell:
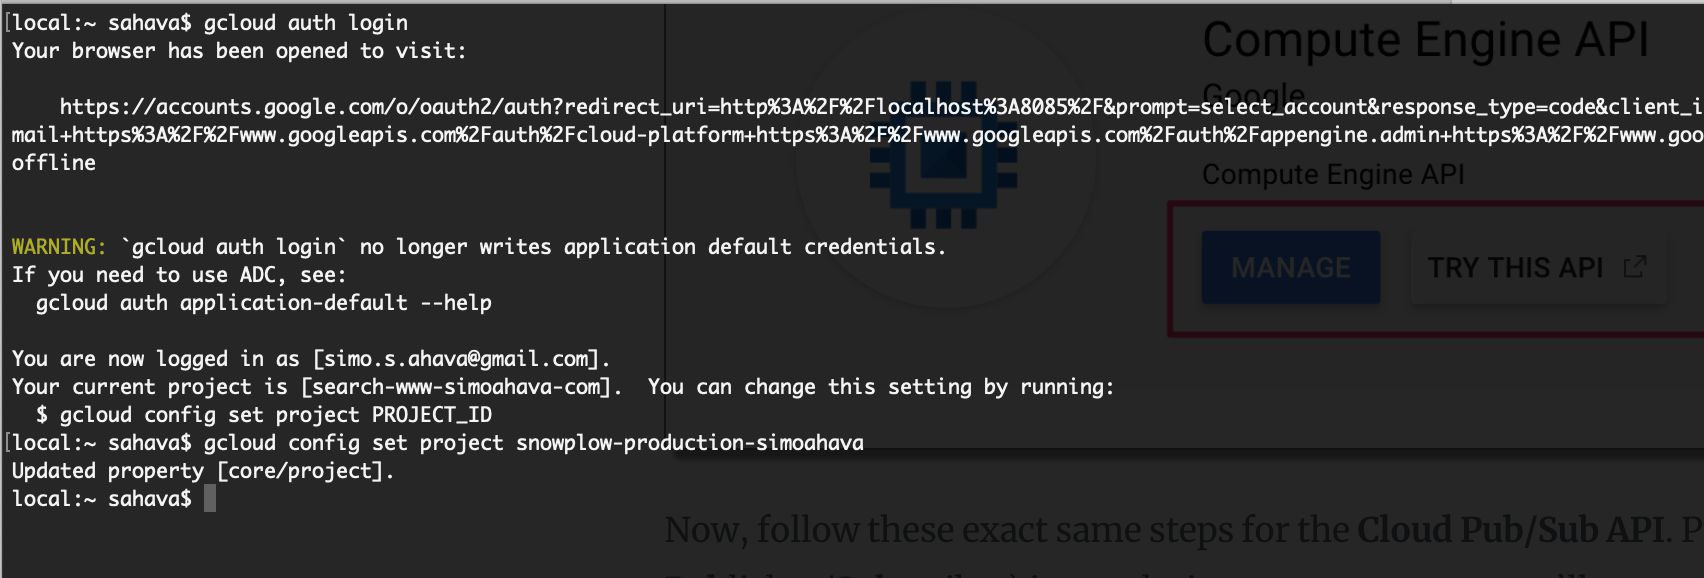
$ gcloud auth login
$ gcloud config set project PROJECT_ID
The first command logs you in with Google Cloud using the Google Account you choose in the web prompt. The second command points the current gcloud setup to the project ID you’ll give (replace PROJECT_ID with the ID you configured when you created the project). The end result should be something like this:
Step 5: Setup a service account
The final initialization step is to setup a service account. A service account is basically a Google Cloud account which has full access to your GCP services and resources. It’s a necessary step if you want to run services on GCP programmatically rather than with your own, personal Google account.
Note that when you enable Compute Engine API for your project, a Compute Engine default service account is created for you automatically. the steps below really only apply if you wanted to create a different service account for your pipeline.
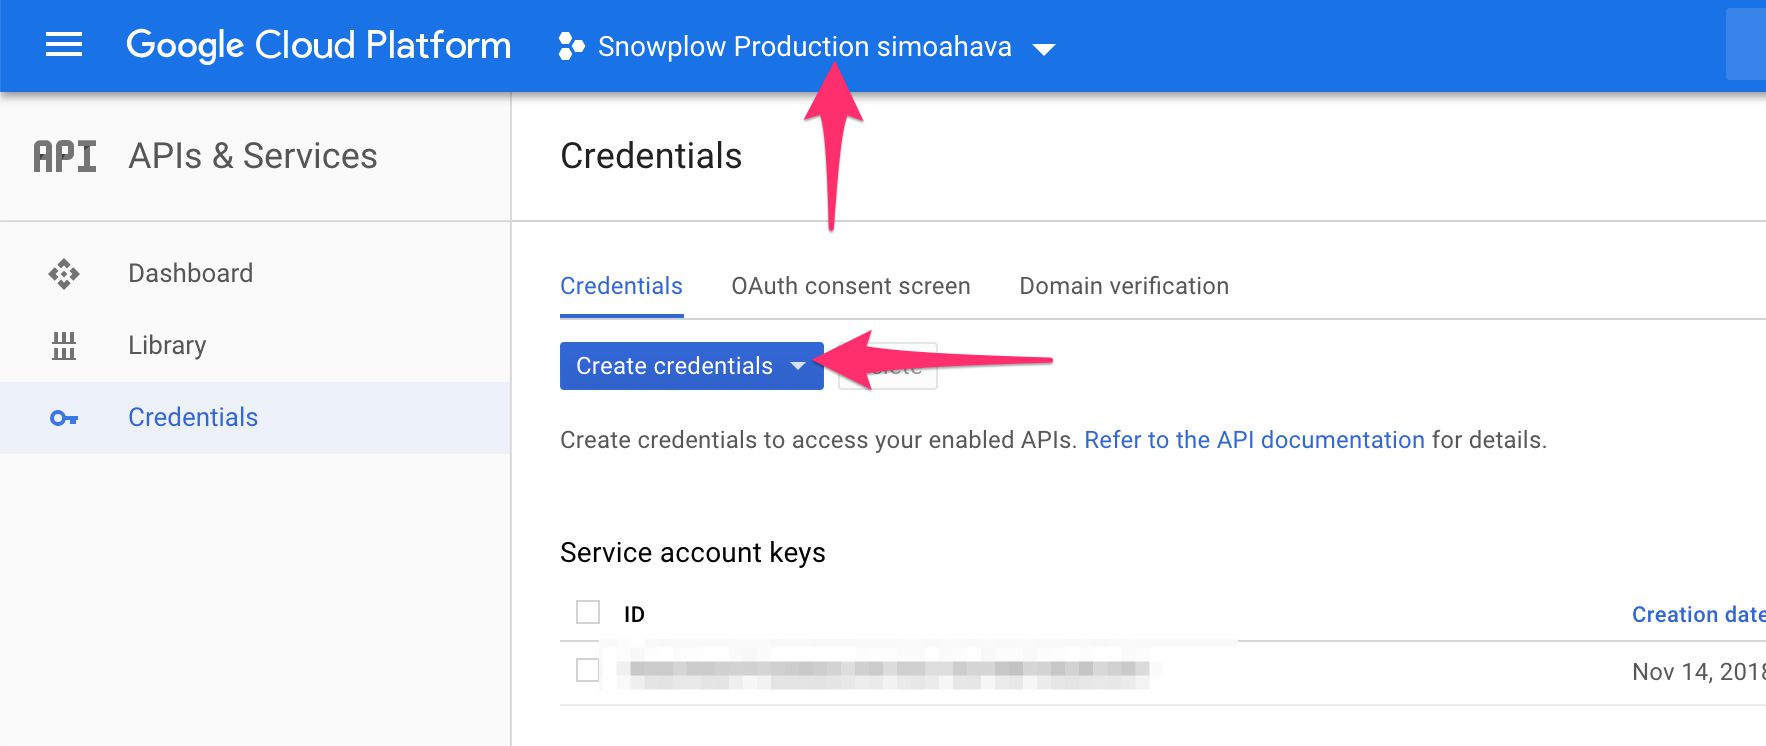
(1) Browse to https://console.cloud.google.com/apis/credentials.
(2) Make sure you have the correct project selected in the project selector menu.
(3) Click the blue Create credentials selector, and choose Service account key from the menu.
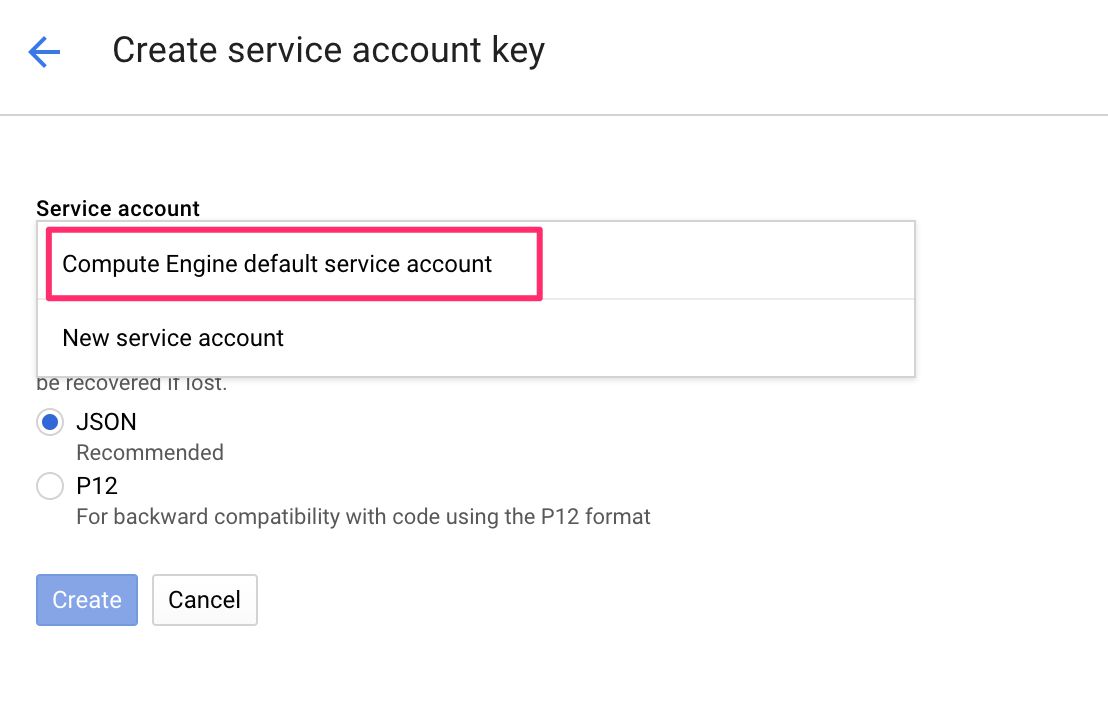
Since you’ve enabled the Compute Engine API, you should be able to choose the default GCE service account from the drop-down.
Keep the JSON option selected, and choose Create.
The browser should automatically download the JSON file, so make sure you find it in your local files and store it securely.
At this point, it would be a good idea to create a local folder for this entire Snowplow experiment. In that local folder, you can store this service account key and any temporary configuration files you’ll work on, and other stuff such as executables and binaries you’ll eventually upload to the GCP, if necessary.
Once you’ve created the service account you are ready to move on. All the initial steps have now been completed, congratulations!
Setting up the Pub/Sub topics
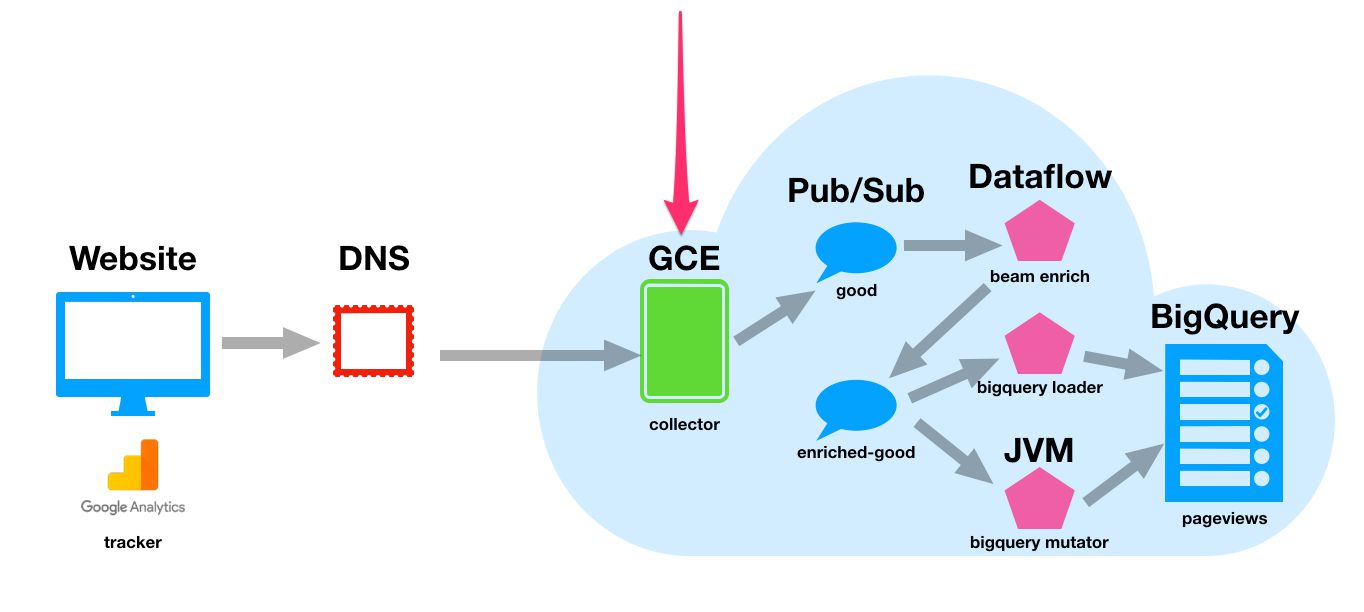
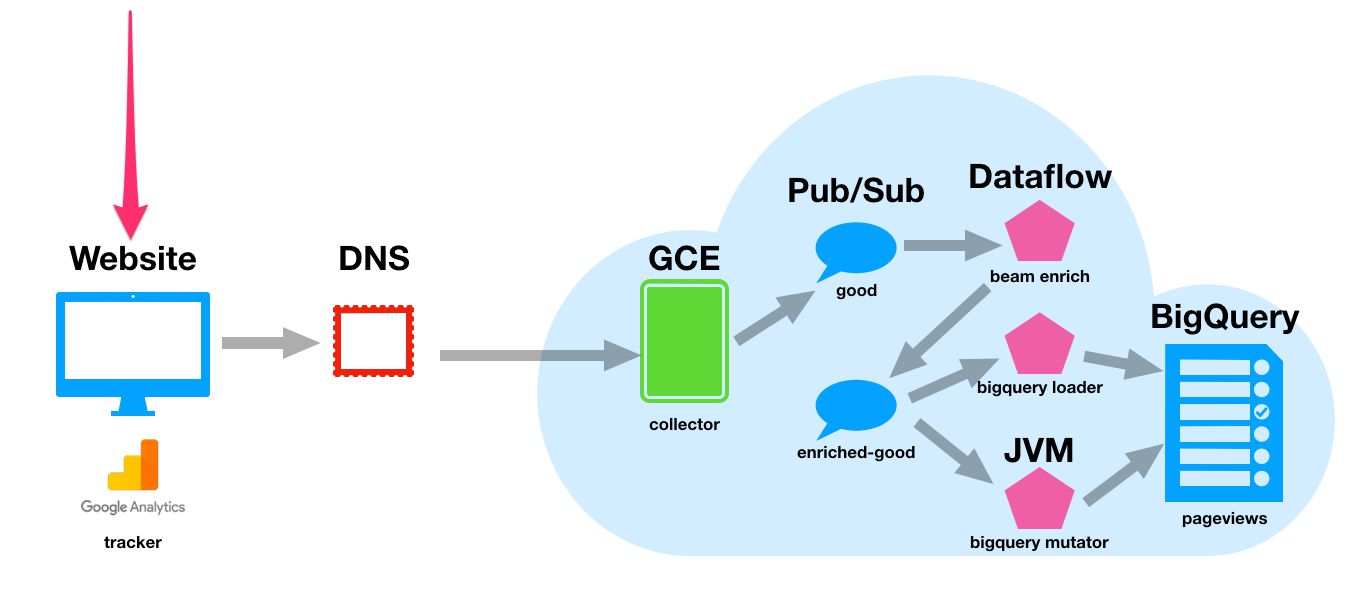
Snowplow uses a collector as the endpoint of your tracker requests. This collector resides in a Compute Engine instance (a virtual machine, basically), and it processes the requests you send to the endpoint.
These requests are then published into Pub/Sub topics, from where they are then passed on further down the pipeline for enrichment and parsing. Pub/Sub is essentially a real-time messaging pipeline, which collects messages in topics, which are then available for subscriptions to access.
Make sure you check out Snowplow’s official wiki for more information on this part of the pipeline.
Step 1: Create the Pub/Sub topics
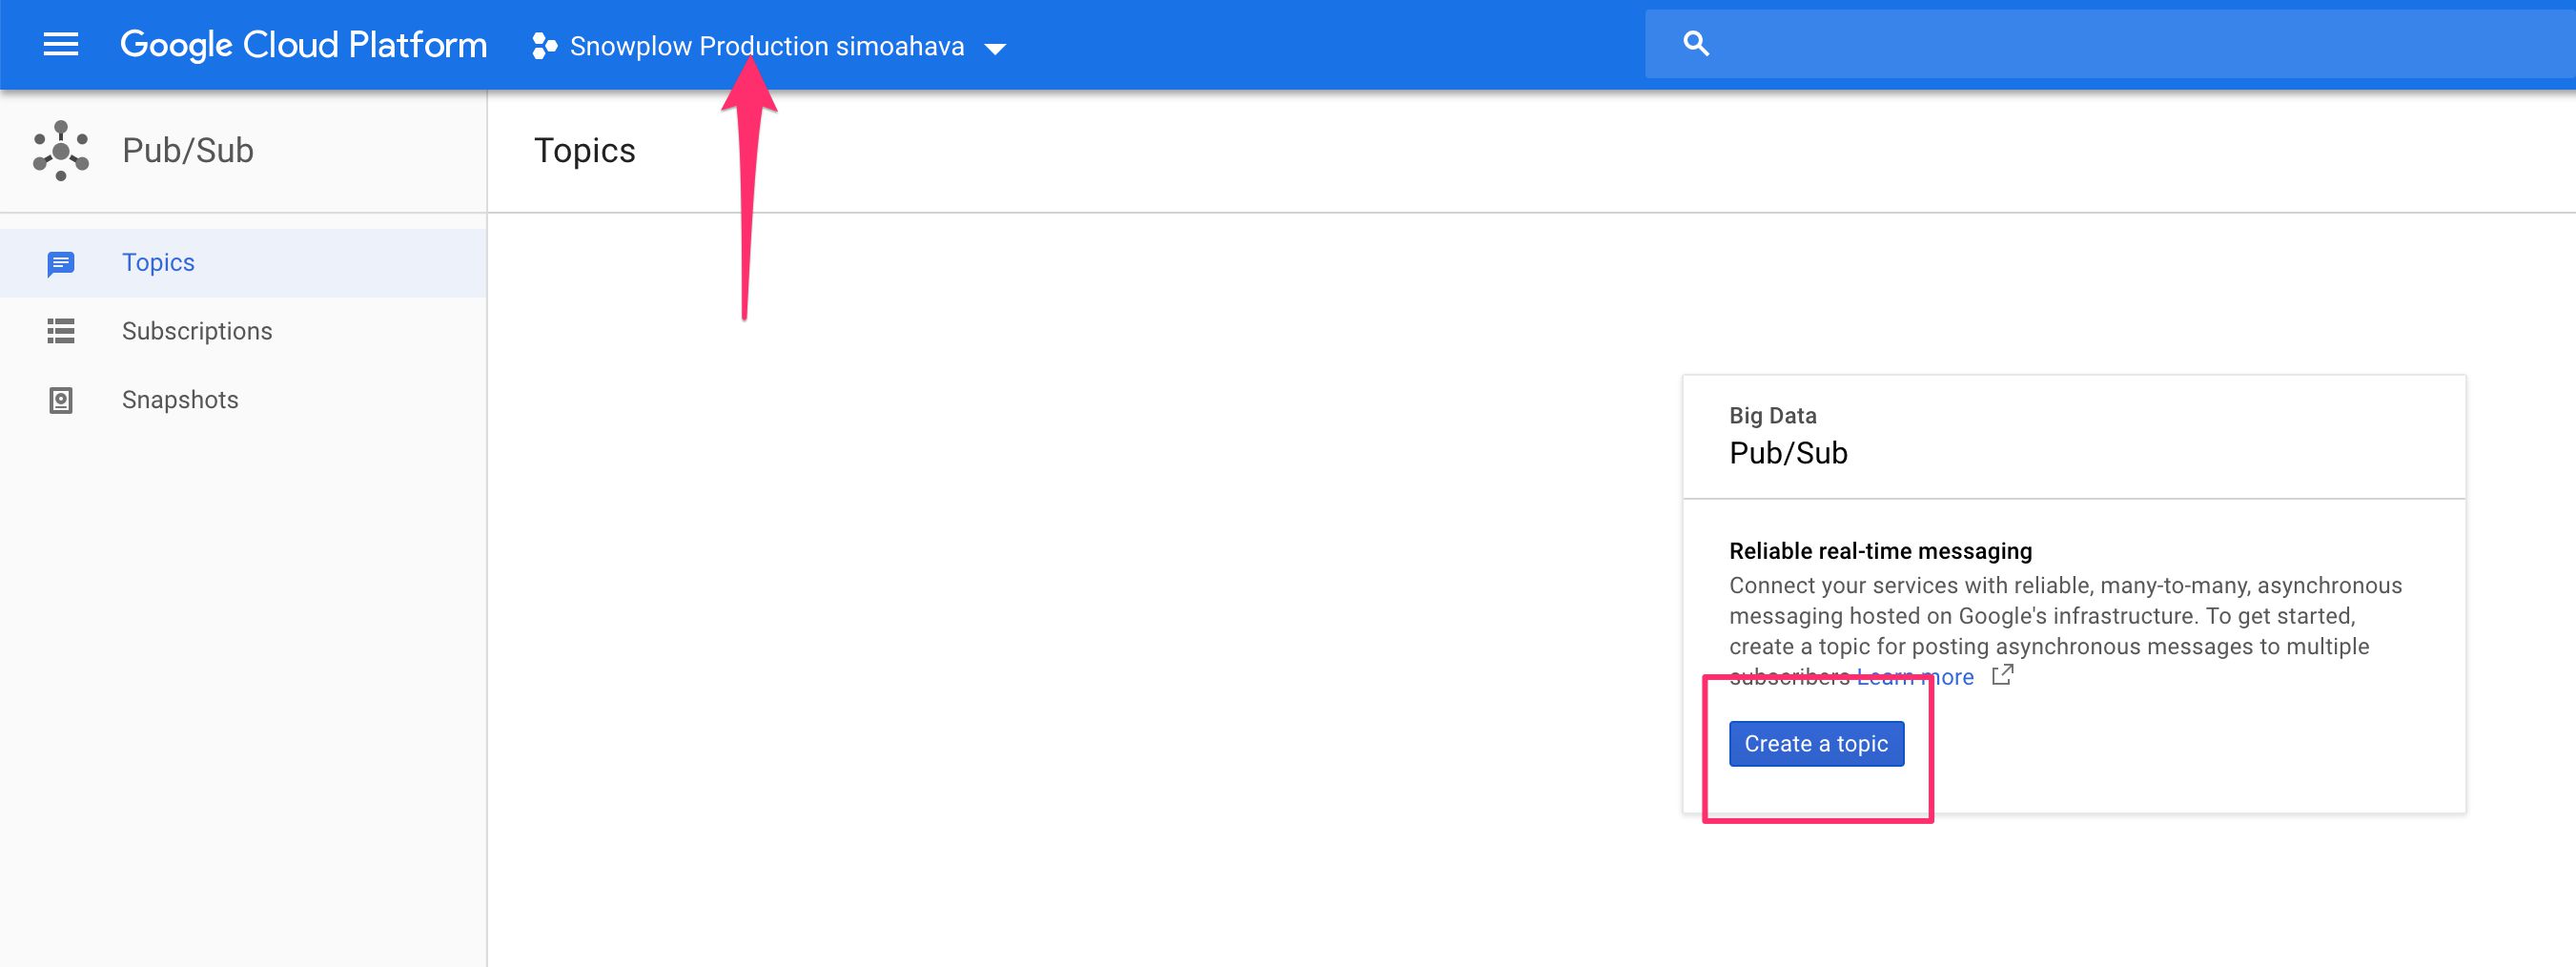
The first thing you’ll need to do is create topics in the Pub/Sub you’ve enabled for your project.
(1) Browse to https://console.cloud.google.com/cloudpubsub/topicList.
(2) Make sure you have the correct project selected in the project selector.
(3) Click the blue Create a topic button.
(4) Type good after the project path as in the screenshot below, and click CREATE.
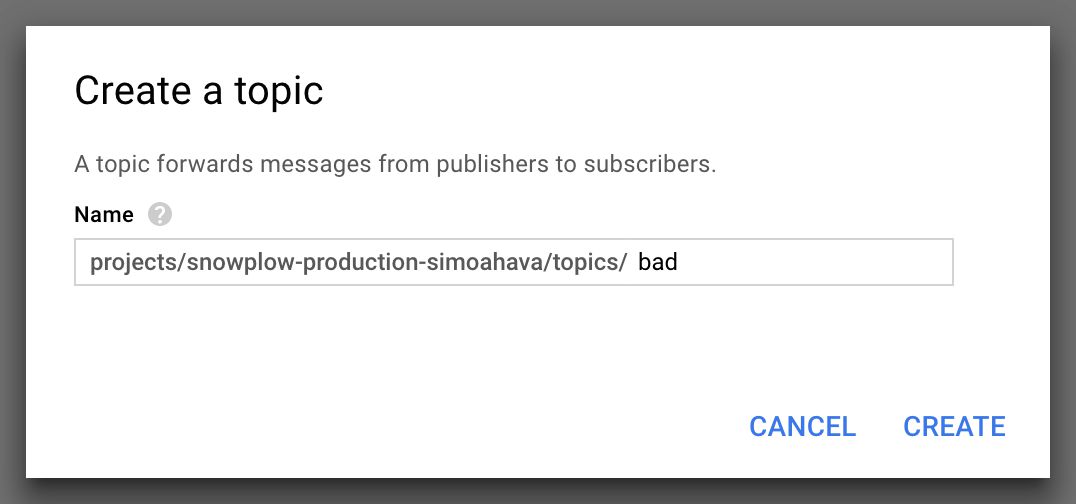
(5) Click CREATE TOPIC and type bad as the name of the new topic, and then click CREATE.
Snowplow uses these two topics to filter out hits and requests that validate (good stream) and those that have issues and errors (bad stream).
Step 2: Create a subscription (optional)
Next, you can create a subscription with which you can test the stream. This is optional, but might be a good idea if you want to see how the pipeline is working.
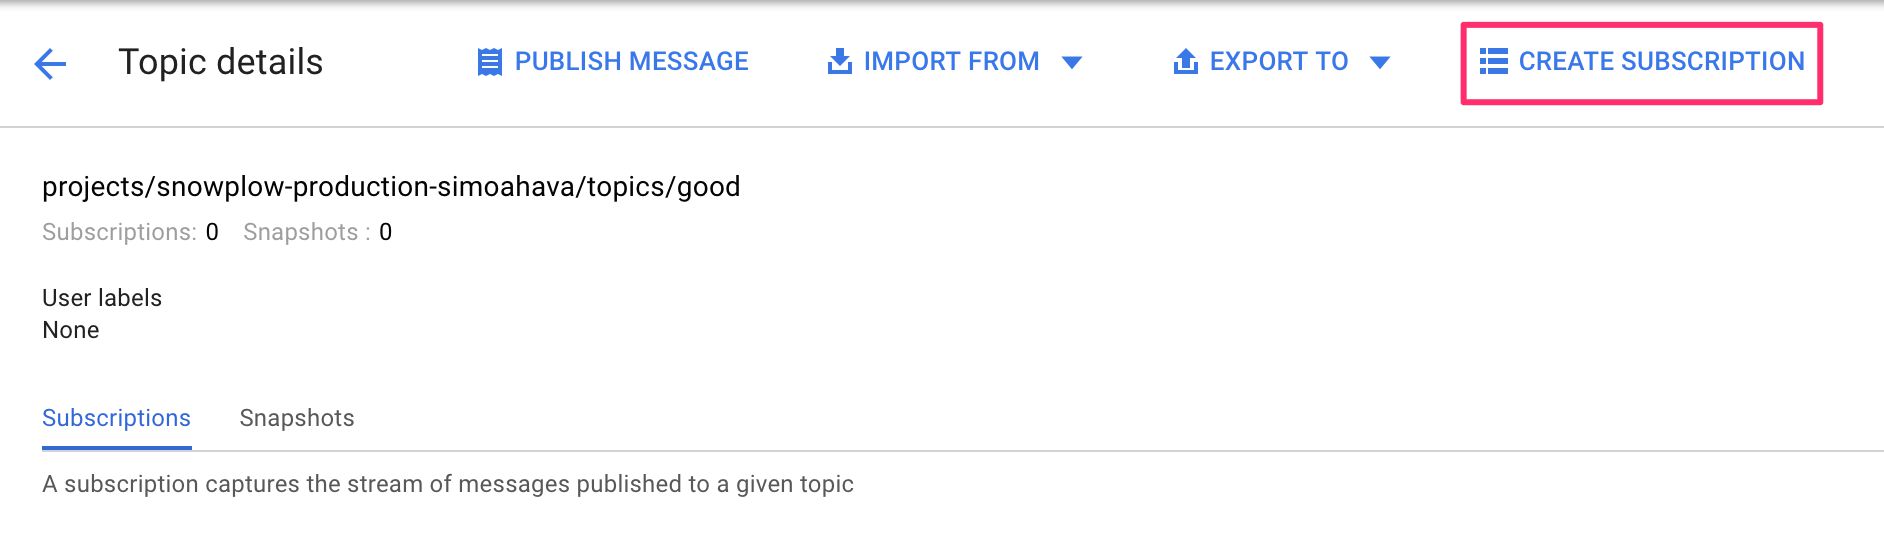
(6) Click the good topic to enter its configuration page.
(7) Choose CREATE SUBSCRIPTION from the top navigation.
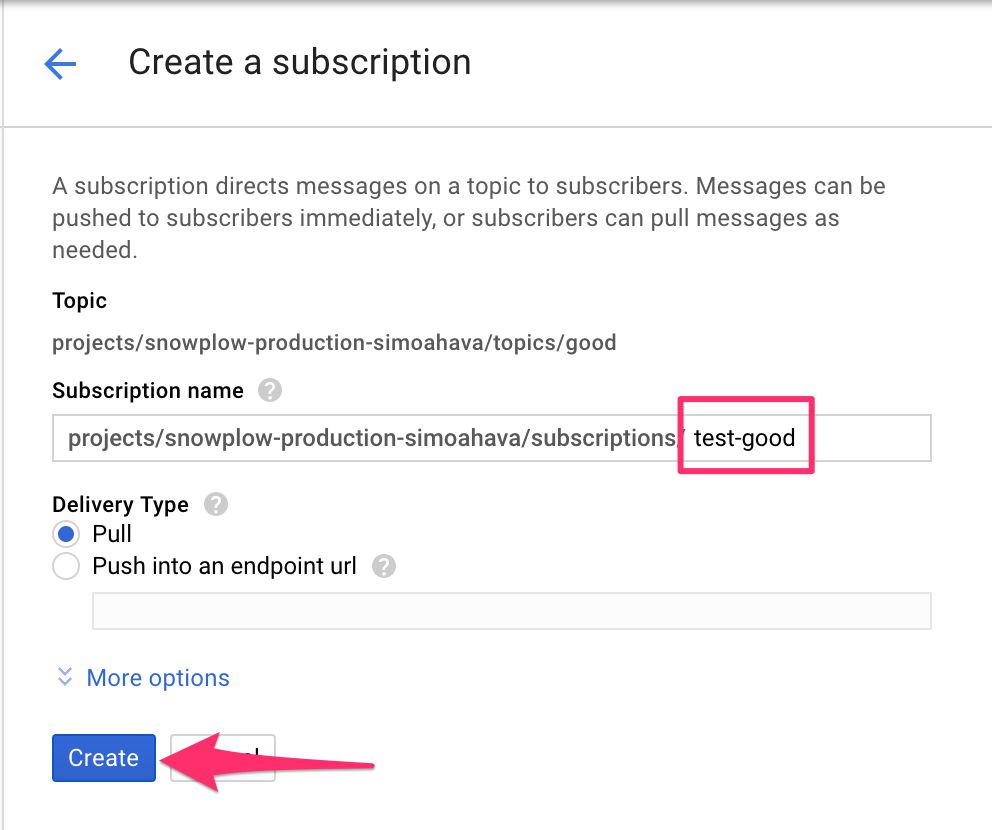
(8) Give the subscription a name (test-good).
(9) Leave the other settings as they are, and click CREATE.
Now that you’ve created the Pub/Sub topics, it’s time to step into one of the more complicated steps of this guide: setting up the collector itself.
Create an HTTP endpoint with the Scala Stream Collector
Snowplow uses a collector written in Scala for processing the requests sent from your website. These records are parsed by the Scala Stream Collector and then distributed into the Pub/Sub topics you created in the previous chapter.
We’ll start with a simple HTTP endpoint using the default IP address assigned to the Compute Engine instance you’ll spin up. This is only to test that the whole pipeline works. You’ll want to configure your own custom domain name with an HTTPS endpoint for the actual tracker!
Step 1: Create the config file
In the local directory where you’re storing all your project files (such as the service account credentials you created earlier), create a new file named application.config, and copy-paste the contents of this sample config within.
At this time, the only line you need to edit is the one with googleProjectId = your-project-id. Change your-project-id to your actual Google Cloud project ID.
Keep this file at hand, because you’ll need to make some changes to it soon.
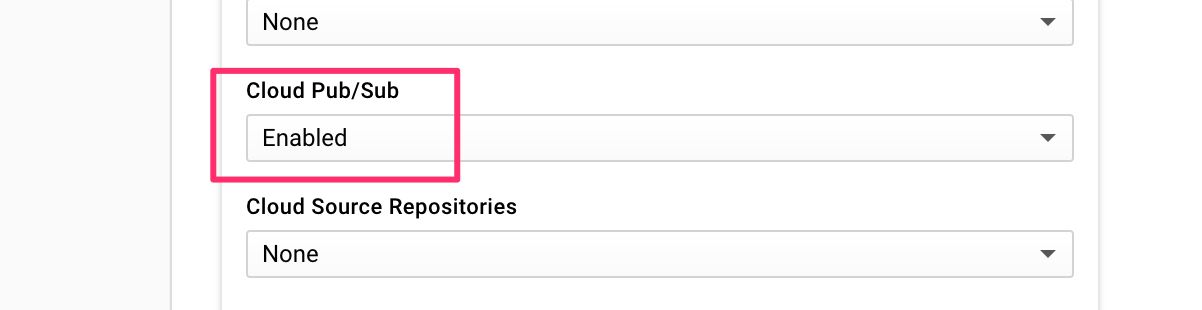
Step 2: Fire up a GCE instance
You are now ready to start a Compute Engine instance.
NOTE! Because this is just a test - remember to shut down the instance as soon as you’re done so that you don’t accumulate extra costs.
(1) Browse to https://console.cloud.google.com/compute/instances and make sure your project is selected in the project selector.
(2) Click Create.
Next, you’ll be transported to the configuration screen.
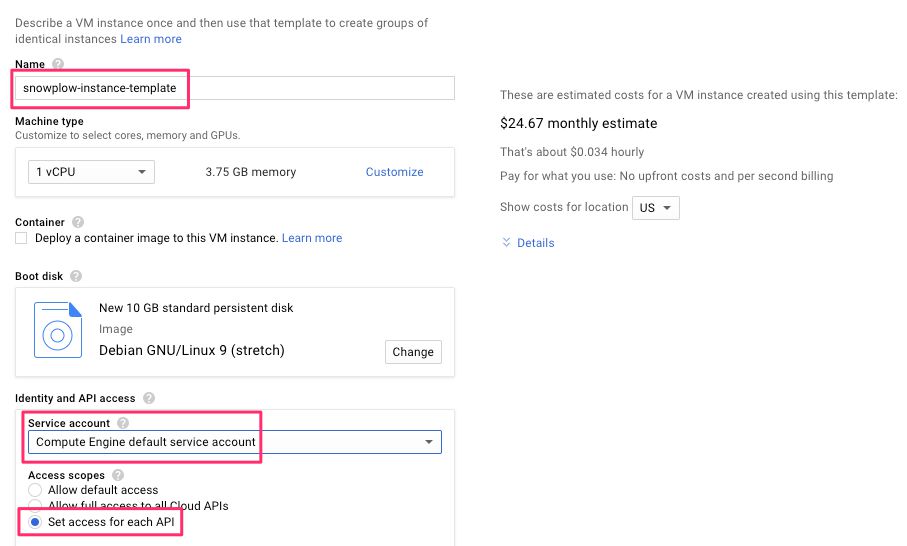
(3) Give the instance a name.
(4) Choose a region (somewhere close by, preferably) - you can use the default zone.
(5) Make sure the service account you’ve created (or the default Compute Engine service account) is selected in the relevant list.
(6) Choose Set access for each API from the scope selector.
(7) Scroll down the list of APIs, and choose Enabled for the Cloud Pub/Sub API.
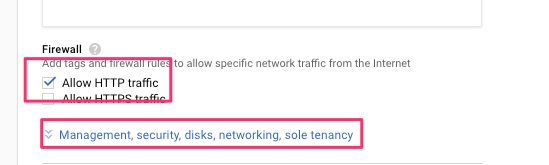
(8) Scroll down to Firewall and check Allow HTTP traffic. Next, click the Management, security, disks, networking, sole tenancy link.
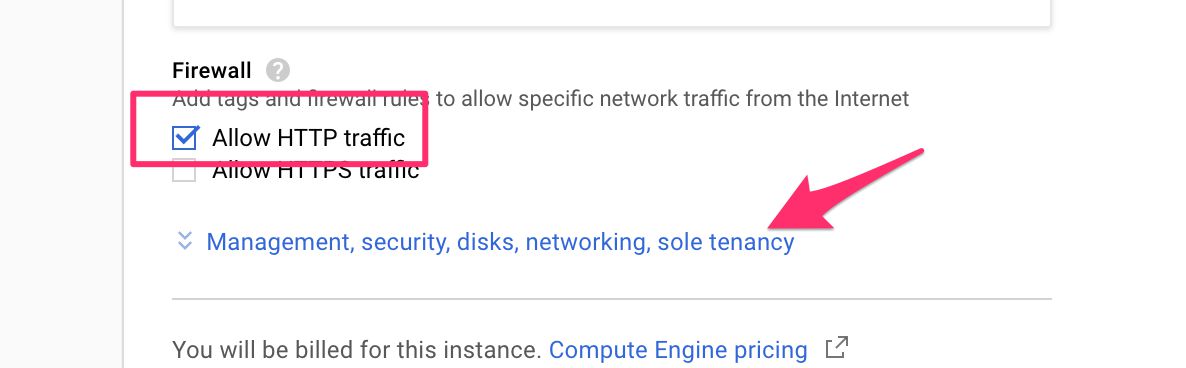
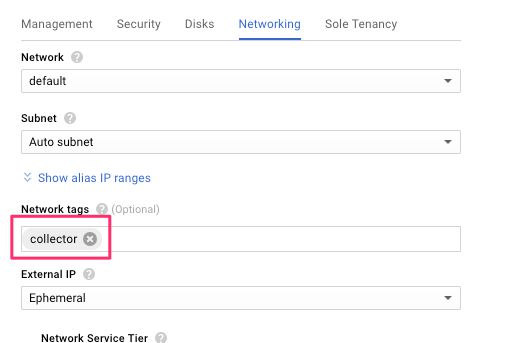
(9) Select the Networking tab, and type collector into the Network tags field.
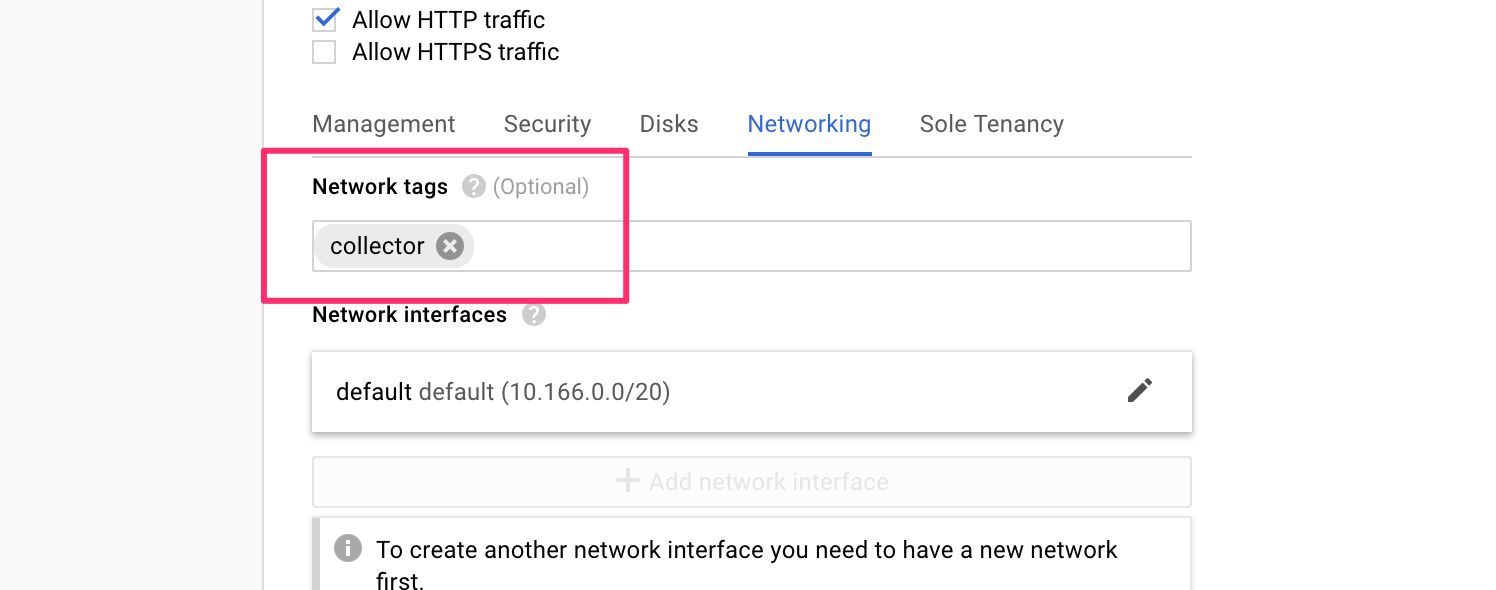
Once you’ve done these changes, click Create to fire up the instance!
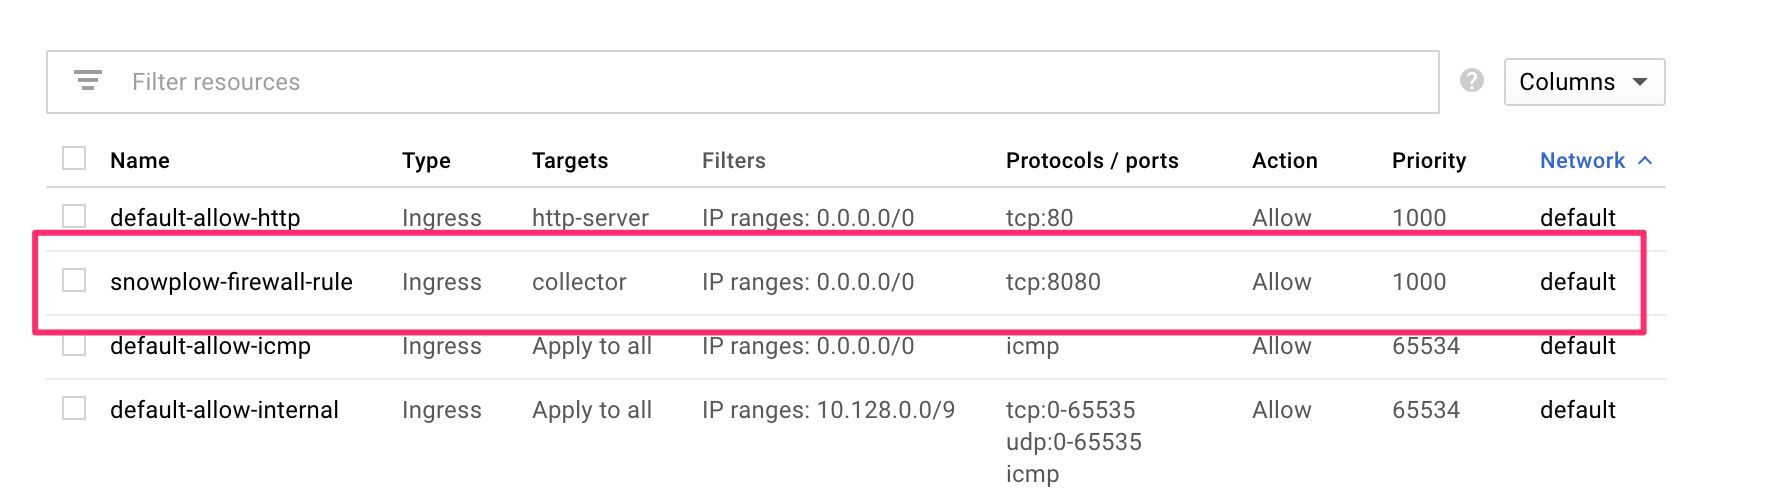
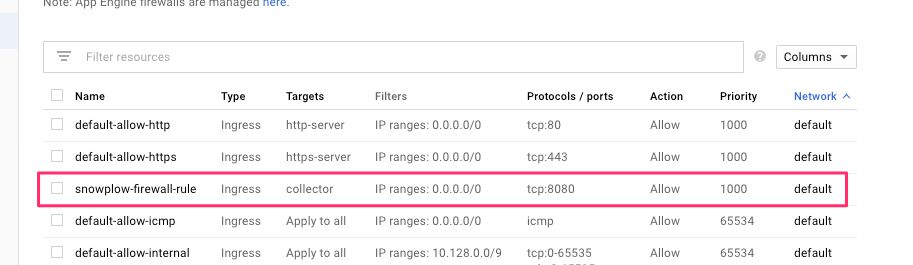
Step 3: Create a firewall rule
You’ll need to create a firewall rule which accepts incoming connections from your website.
(1) Browse to https://console.cloud.google.com/networking/firewalls/list and make sure the correct project is selected.
(2) Click CREATE FIREWALL RULE.
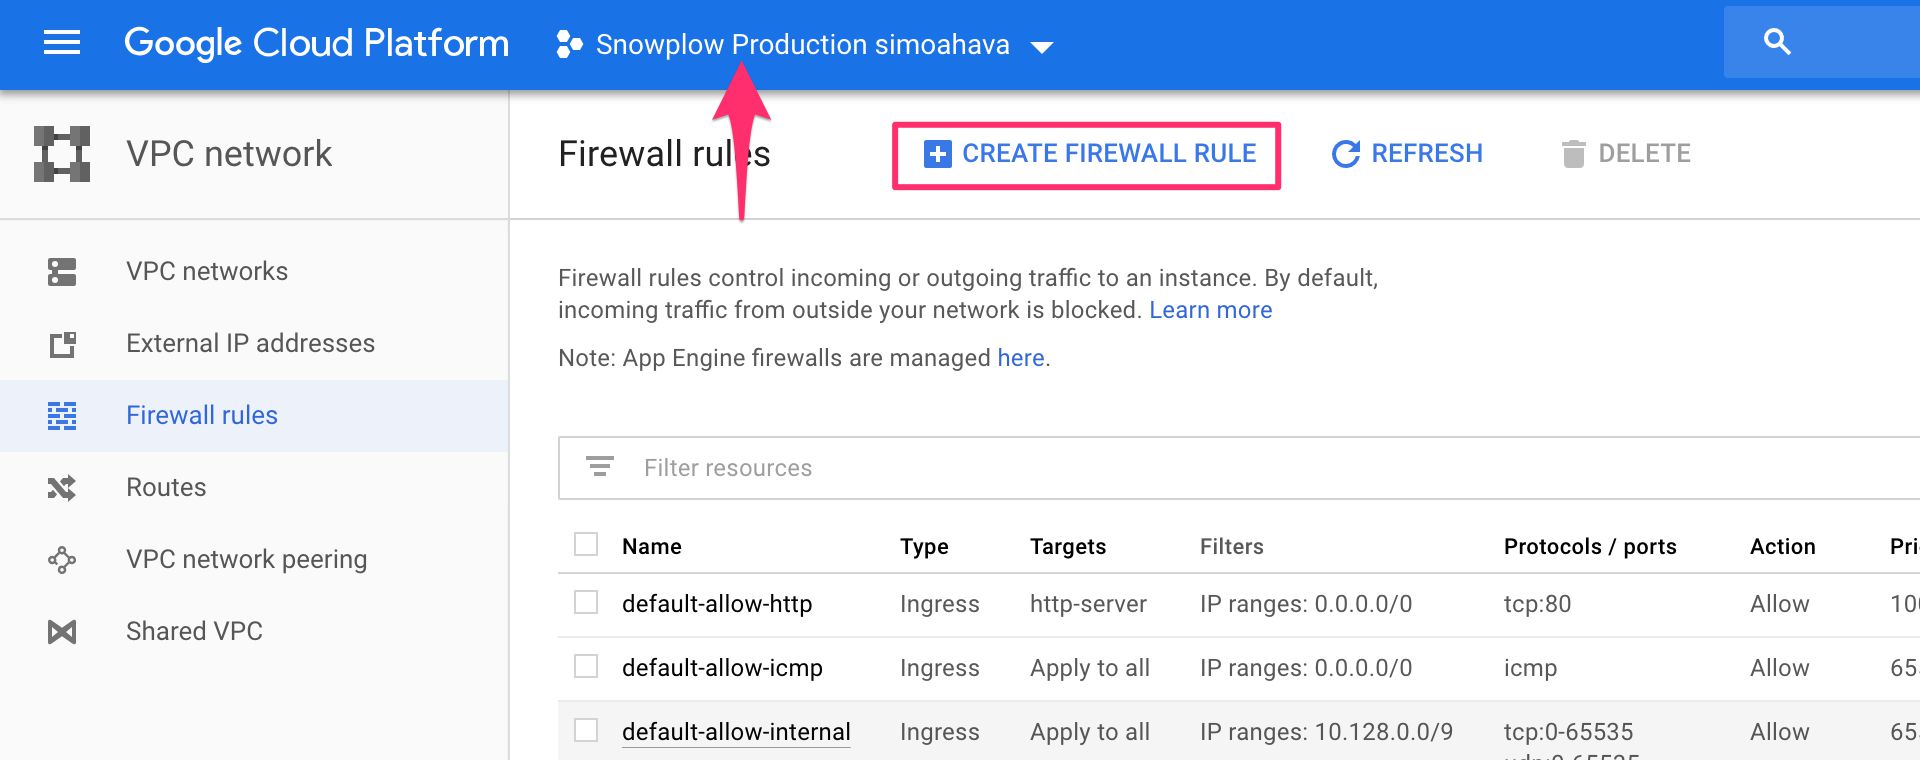
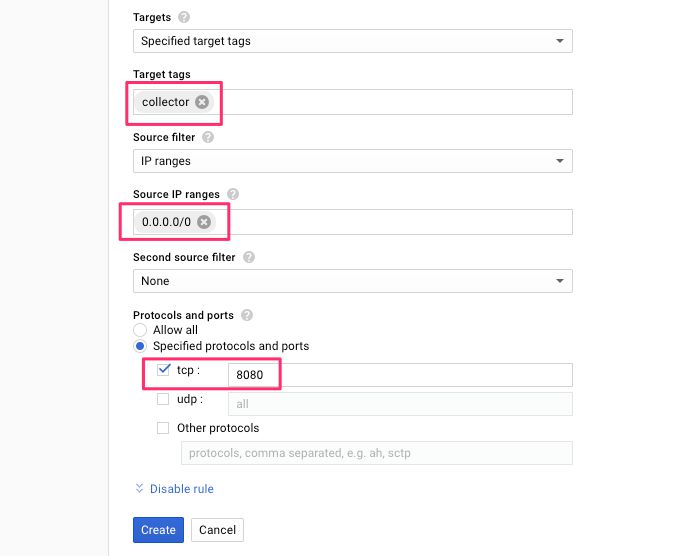
(3) In the configuration that opens, give the rule some name, e.g. snowplow-firewall-rule.
(4) Scroll down to Target tags and type in the tag name you gave in the end of the previous step (collector if you used my example).
(5) Make sure IP ranges is selected in the Source filter menu, and type 0.0.0.0/0 into the Source IP ranges field.
(6) Under Protocols and ports, check tcp and type 8080 as the port value.
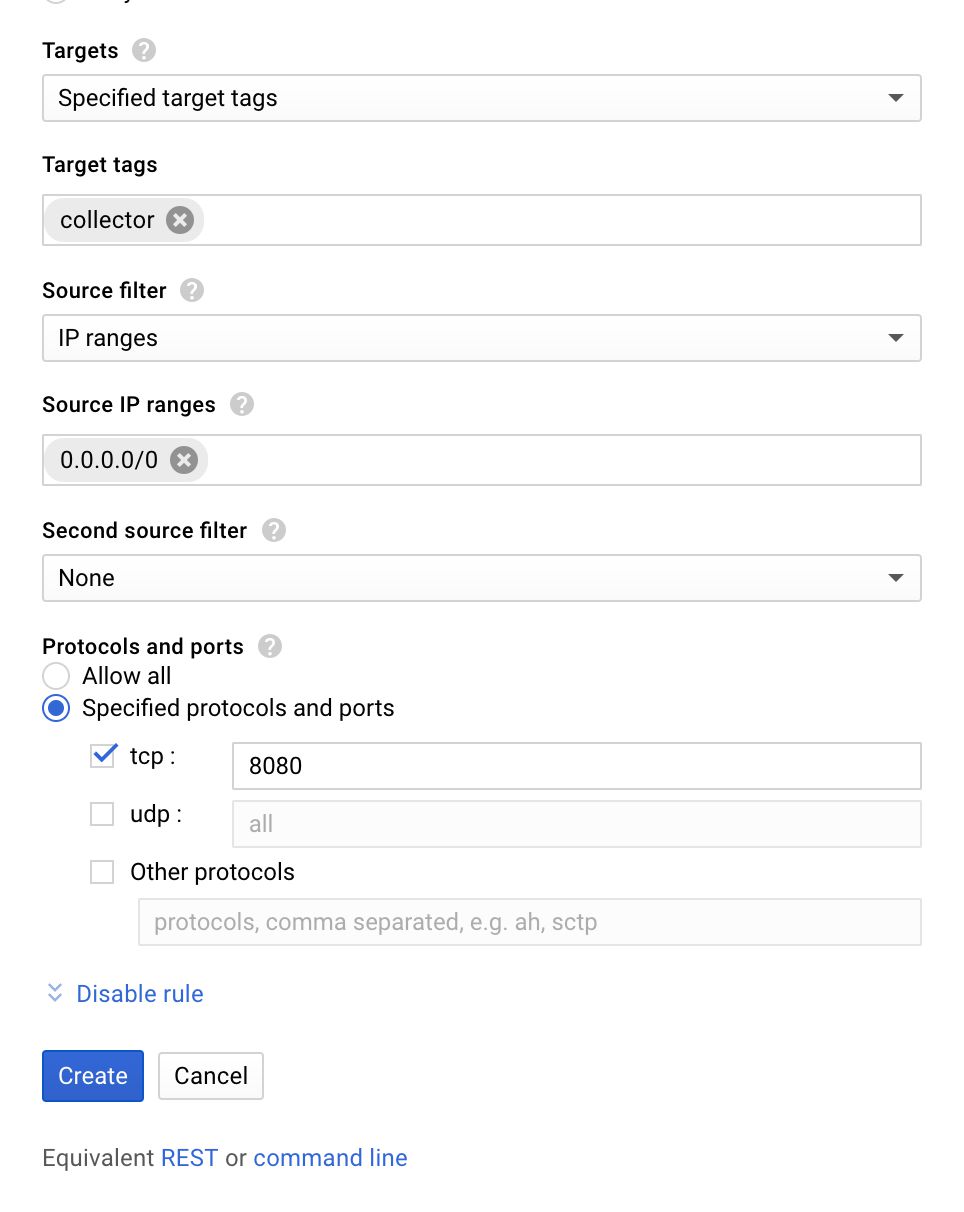
When ready, click Create to finalize the firewall setup.
Step 4: Create a storage bucket for your configuration file
Next thing you’ll need to do is upload the configuration file for the collector into a Cloud Storage bucket. This is because the file needs to be available for your instance to use, and it’s extremely convenient to have the file available in Google Cloud, because the service account can simply pull the file directly from the bucket.
(1) Browse to https://console.cloud.google.com/storage/browser, and, as always, make sure you have the right project selected before clicking Create bucket.
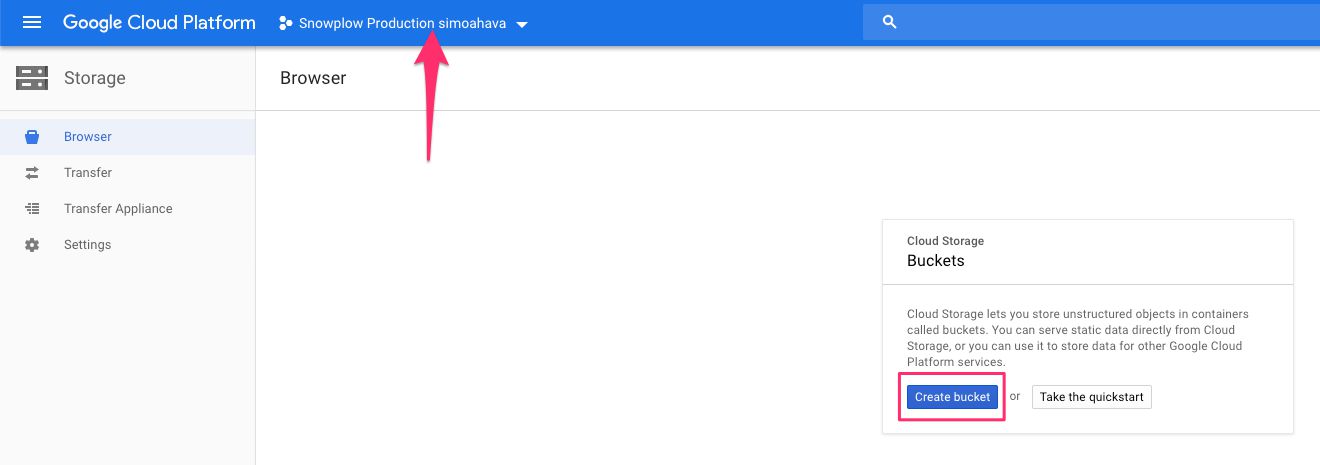
(2) Give the bucket a descriptive (and unique) name, such as snowplow-yourname-collector-bucket.
(3) You can leave the rest of the settings with their default values, then click Create.
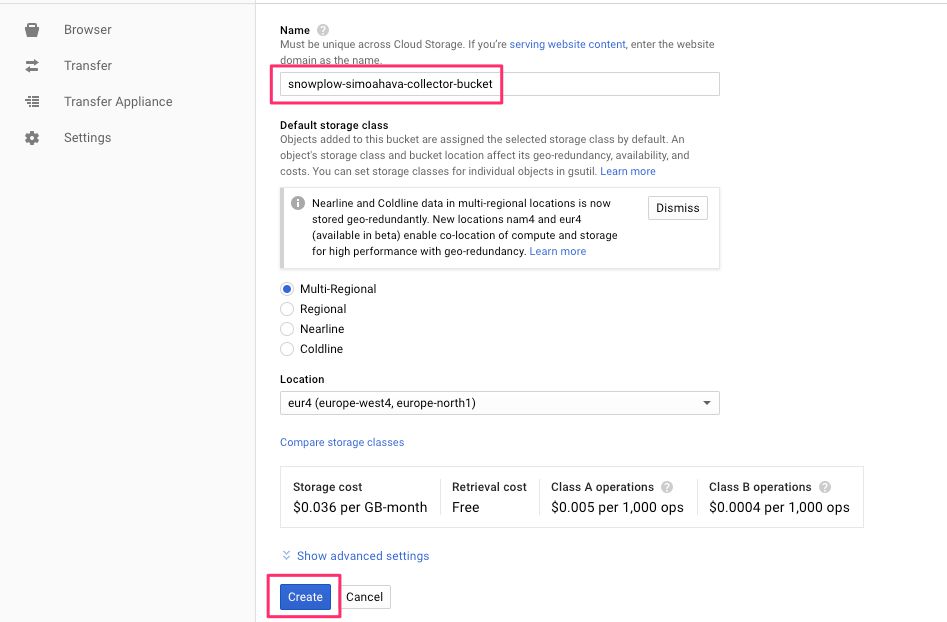
(4) In the view that opens up, click Upload files, find the application.config file you downloaded earlier, and upload it to the bucket.
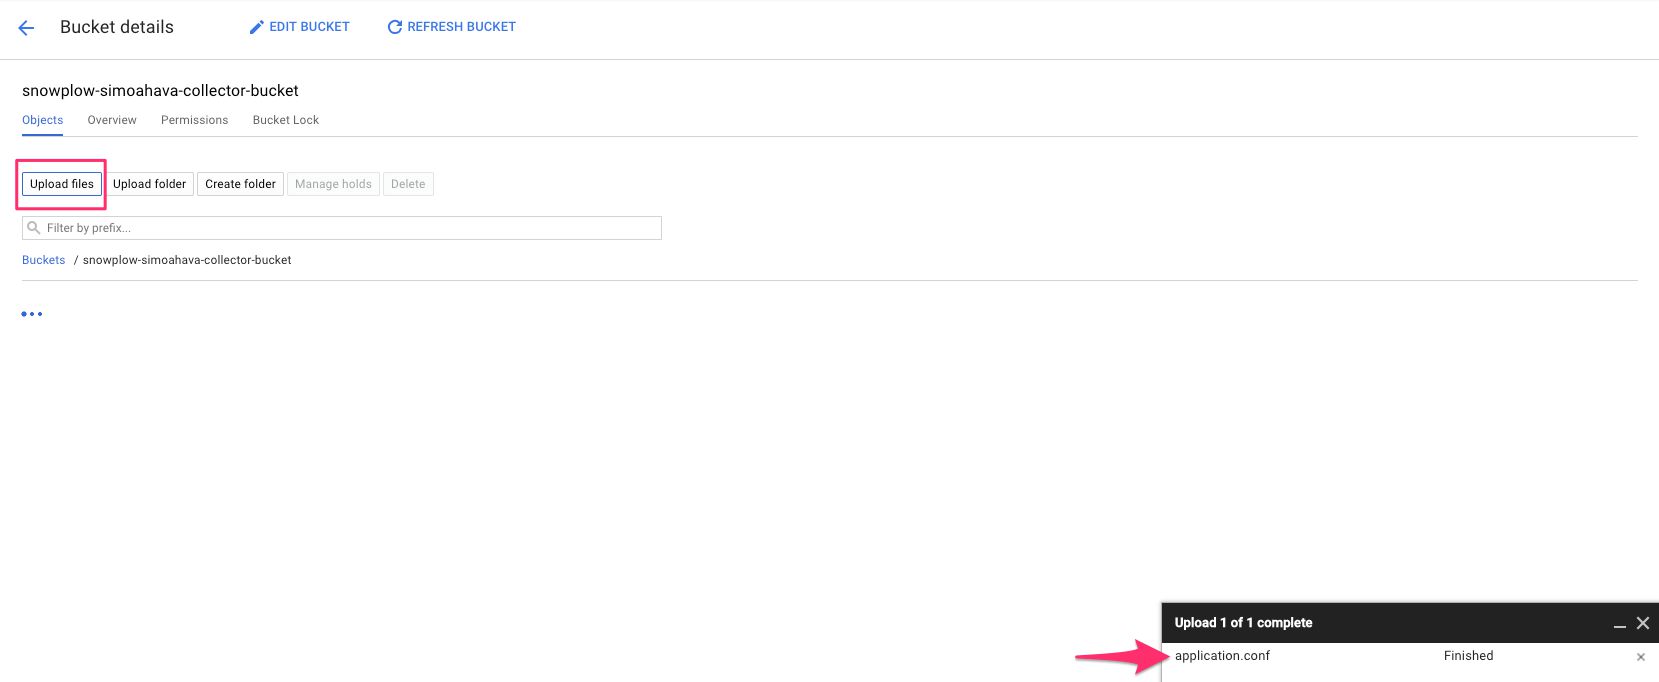
Good job! You are now ready to connect your GCE instance and fire up the collector!
Step 5: SSH into the Compute Engine instance
Now that you have the virtual machine running in the cloud, and you have the configuration file uploaded to a Cloud Storage bucket, the next step is to connect to the virtual machine, download all the remaining files, and start the collector.
It’s very simple and trivial to do the following steps using the Google Cloud SDK on your local machine, too. If you want to try it out, follow the relevant steps in Snowplow’s wiki.
(1) Browse to https://console.cloud.google.com/compute/instances.
(2) Click the SSH option next to your instance.
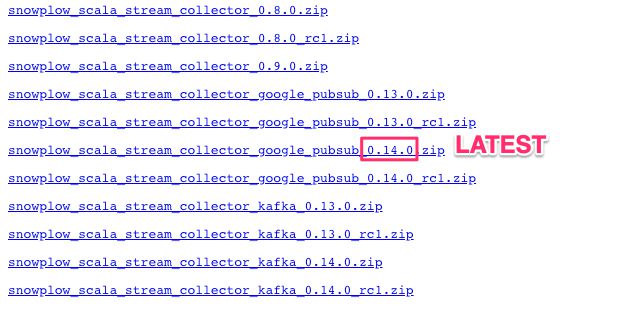
(3) Visit https://dl.bintray.com/snowplow/snowplow-generic/ and find the file that starts with snowplow_scala_stream_collector_google_pubsub_ and check what the latest version number is that doesn’t have the rcl suffix. Make note of this version number (e.g. 0.14.0), no need to download the file.
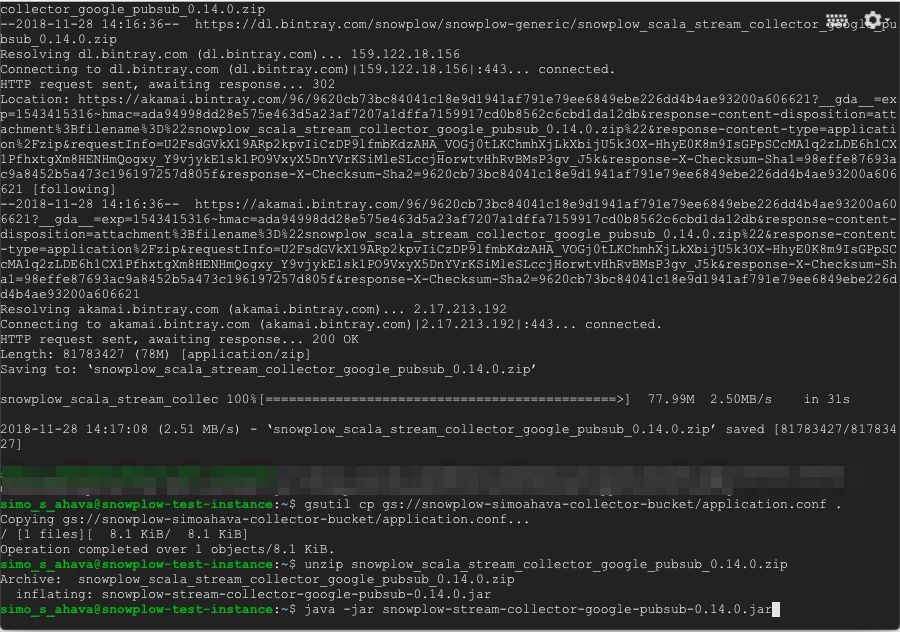
(4) Next, in the SSH window, run the following commands in order, pressing enter after each command.
$ sudo apt-get update
$ sudo apt-get -y install default-jre
$ sudo apt-get -y install unzip
$ wget https://dl.bintray.com/snowplow/snowplow-generic/snowplow_scala_stream_collector_google_pubsub_<VERSION>.zip
$ gsutil cp gs://<YOUR-BUCKET-NAME>/application.conf .
$ unzip snowplow_scala_stream_collector_google_pubsub_<VERSION>.zip
$ java -jar snowplow-stream-collector-google-pubsub-<VERSION>.jar --config application.conf
Replace all instances of <VERSION> with the latest version of the collector ZIP file which you checked in (3).
Replace <YOUR-BUCKET-NAME> with the name you gave the cloud storage bucket in the previous step (e.g. snowplow-yourname-collector-bucket).
After running the last command, if all has been configured correctly, you should see the following output in the instance shell:
You are now ready to send a test request to the endpoint, after which you can check your Pub/Sub subscription if it received the message!
Step 6: Send a test request and verify it was published into Pub/Sub
To send the request, you’ll first need to check what the external IP of your Cloud instance is.
(1) Browse to https://console.cloud.google.com/compute/instances and click the Snowplow instance name.
(2) Copy the IP address from the External IP field.
The next step requires you to send an HTTP POST request with a specific payload to this IP endpoint. There are many ways to do it - you could use the JavaScript console of the web browser, for example.
My preference for testing HTTP endpoints quickly is to use curl, which is a command-line tool available in almost any terminal. If you’re using an operating system that doesn’t come equipped with curl, I recommend downloading and installing it from here.
(3) Open the terminal on your local machine, and copy-paste the following command, switching <EXTERNAL_IP> with the actual external IP you copied from the GCE instance settings.
$ curl -d "&e=pv&page=curl-test&url=http%3A%2F%2Fjust-testing.com&aid=snowplow-test" -X POST http://<EXTERNAL_IP>:8080/com.snowplowanalytics.iglu/v1The payload is very simple - it basically has only four parameters:
| Parameter | Value | Description |
|---|---|---|
e | pv | Event type, Pageview in this case. |
page | curl-test | Page name. |
url | http://just-testing.com | Source URL. |
aid | snowplow-test | Application ID. |
The endpoint is suffixed with /com.snowplowanalytics.iglu/v1 to denote the schema you’ll be using for processing and validating the incoming data. Since we’re working with the most out-of-the-box solution available for testing purposes, you can use this default schema for now.
Later, we’ll use the Google Analytics plugin to simplify things and to send a more complete payload, but for the purposes of testing this will do.
(4) If everything worked, you should see a status code OK as a response.
Now you can test if your record was published in the good Pub/Sub topic. To test this, you need to pull the recent records from the topic by using the subscription you created earlier. The easiest way to do this is by using the Google Cloud SDK that you should now have installed and configured on your local machine.
(5) The command you’ll need to use is:
$ gcloud pubsub subscriptions pull --auto-ack test-goodWhere test-good is the name you gave to the subscription when you created it. If it worked, you should see the following output:
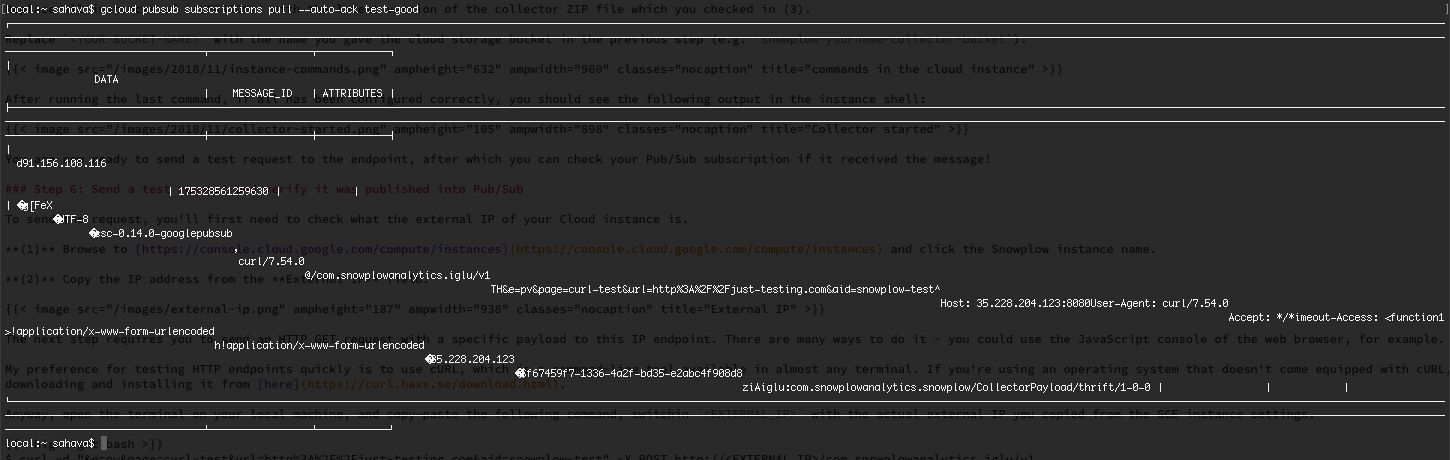
Don’t worry about the fact that it looks all garbled. This is the request stored in binary Thrift format. You should see all sorts of interesting bits and pieces such as your local machine IP address, the User-Agent string (just curl for now), and the data payload itself. If you see all this in the good Pub/Sub topic, it means everything is working!
You have now successfully created a collector behind an HTTP endpoint. You could proceed to the enrichment stage, but I urge you to first stop the GCE instance so you don’t accumulate extra costs for having it running.
I also recommend you continue with the next chapter, where you’ll learn how to use your own custom domain as an HTTPS-secured endpoint for the collector. Using HTTP is crippling, and you can’t really create a production-ready endpoint with a single GCE instance behind the HTTP protocol.
Create an HTTPS endpoint with a custom domain name
This step replaces the previous chapter, effectively. Instead of using an ephemeral, external IP behind the HTTP protocol, we’ll assign a static IP address to our virtual machine instance. On top of that, we’ll configure a custom domain name to point to this static IP, and we’ll have everything work behind the HTTPS protocol.
You’ll still want to read the previous chapter, though. We’ll be doing a lot of similar things here.
IMPORTANT! If you want to skip reading the previous chapter, then please note that you must do steps (1) and (4) from the previous chapter before moving on with the HTTPS endpoint.
This is, basically, what the final collector product should look like. You’re using a load balancing system to automatically scale the instances with incoming traffic, AND you’ll be able to avoid pesky cross-protocol errors due to using HTTPS as the sole endpoint. There’s the added security, too.
Step 1: Create an instance template
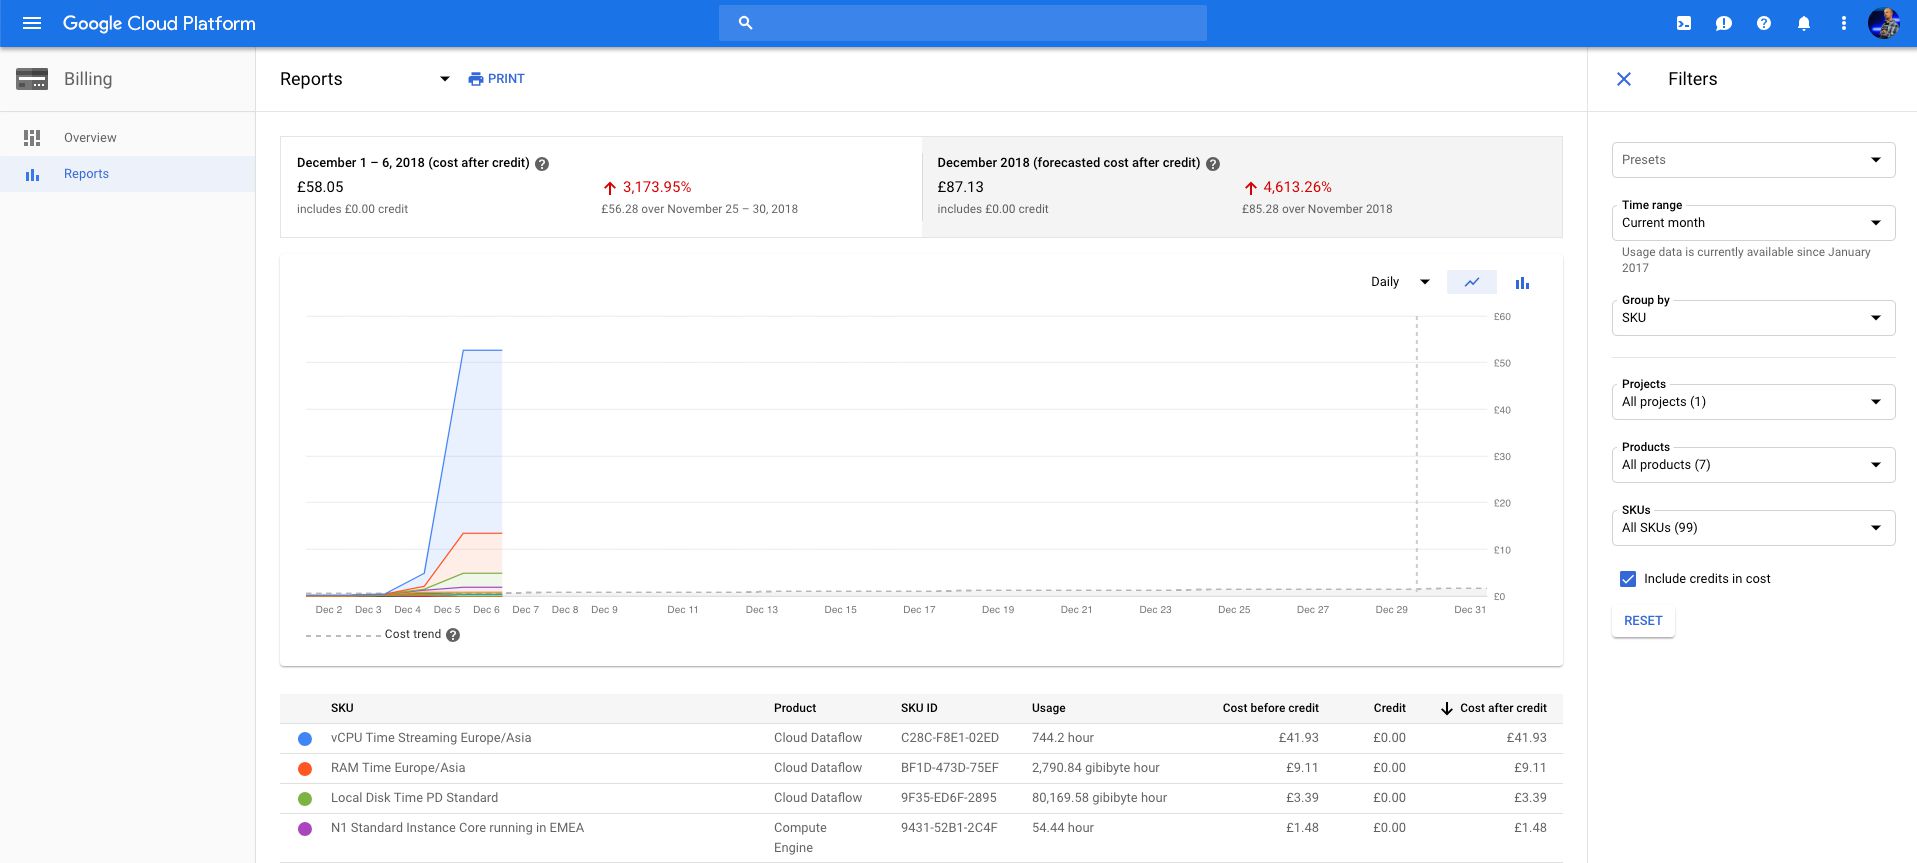
Instead of working with a single GCE instance, we’ll use a cluster of instances that will be scaled up and down automatically with traffic. This will, naturally, reflect on the cost structure of your monthly GCP invoices, so keep an eye on the estimated charges in your dashboard.
(1) If you followed the previous chapter, you can go ahead and delete the GCE instance and the Firewall Rule. You’ll start from scratch here.
(2) You can keep the application.conf file as it is in the storage bucket. The same settings you used in the previous chapter apply here.
(3) Go to https://console.cloud.google.com/compute/instanceTemplates/list and click Create instance template.
The instance template is what each new virtual machine will use as its “template”, meaning it will inherit the settings from this template as well as the startup script that will fire up the collector itself.
The steps for the instance template are almost the same as for a single GCE instance from the previous chapter, but let’s go over them anyway.
(4) Give a descriptive name for the instance.
(5) Make sure the default Compute Engine service account is selected.
(6) Choose Set access for each API in the Access Scopes list.
(7) Scroll down the list to Cloud Pub/Sub and choose Enable.
(8) Under Firewall, select Allow HTTP traffic.
(9) Expand the Management, security, disks, networking, sole tenancy accordion.
(10) Scroll down to Startup script, and copy-paste the following code within:
#! /bin/bash
sudo apt-get update
sudo apt-get -y install default-jre
sudo apt-get -y install unzip
archive=snowplow_scala_stream_collector_google_pubsub_<VERSION>.zip
wget https://dl.bintray.com/snowplow/snowplow-generic/$archive
gsutil cp gs://<YOUR-BUCKET-NAME>/application.conf .
unzip $archive
java -jar snowplow-stream-collector-google-pubsub-<VERSION>.jar --config application.conf &
(11) Edit the two instances of <VERSION> with the latest version number you can find for the snowplow_scala_stream_collector_google_pubsub_ prefix here (don’t use the version with the _rcl prefix). At the time of writing, the latest version was 0.14.0.
(12) Replace <YOUR-BUCKET-NAME> with the name of the Cloud Storage bucket that stores the application.conf file.
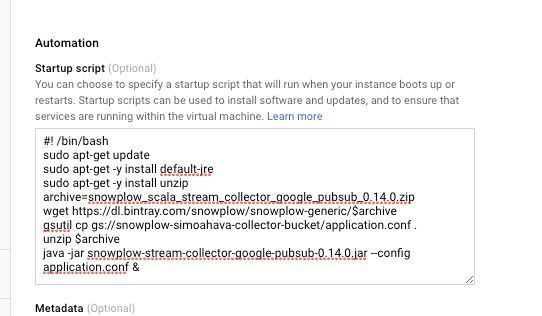
This startup script is run whenever a new instance is built with this template. It loads all the dependencies and the runs the collector Java file.
(13) Click open the Networking tab, scroll to Network tags, and add collector as a tag.
(14) Click Create when done.
Step 2: Create a firewall rule
You’ll need to create a Firewall rule to allow external connections to your GCE instances.
(1) Browse to https://console.cloud.google.com/networking/firewalls/list, and click CREATE FIREWALL RULE.
(2) Give the rule a name.
(3) Scroll down to Target tags, and type collector in the field.
(4) In Source IP ranges, type 0.0.0.0/0.
(5) Check the box next to TCP in the Protocols and ports selection (with Specified protocols and ports selected), and type in 8080.
(6) Click Create when ready.
Step 2: Create an instance group
Next, we’ll need to create an instance group, which is used by the load balancer as the backend service.
(1) Scroll to https://console.cloud.google.com/compute/instanceGroups/list, and click Create instance group.
(2) Give the group a descriptive name.
(3) Feel free to set the Location closer to home, if you wish.
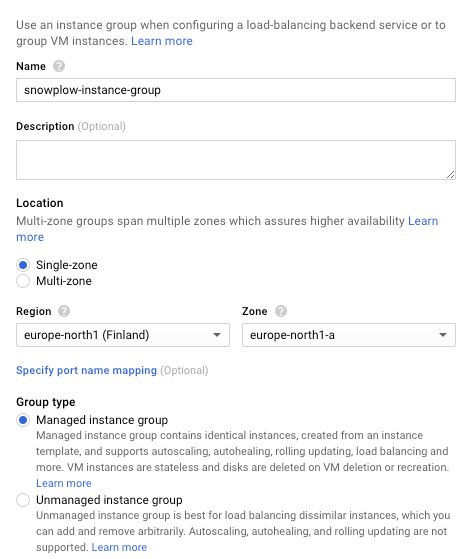
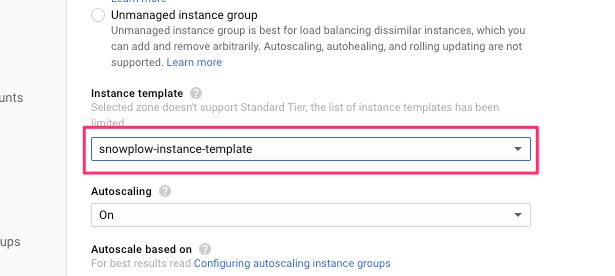
(4) Select the instance template you created in the previous step from the Instance template selector.
UPDATE 18 Jan 2019: You can also set Autoscaling
Off. This means that the instance will not generate new machines automatically. You can start off with this, and then move to an autoscaling setup if you find the Collector lagging behind a lot.
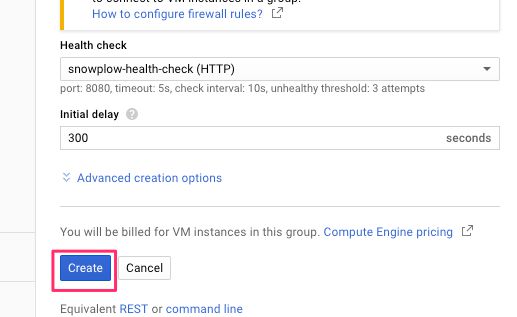
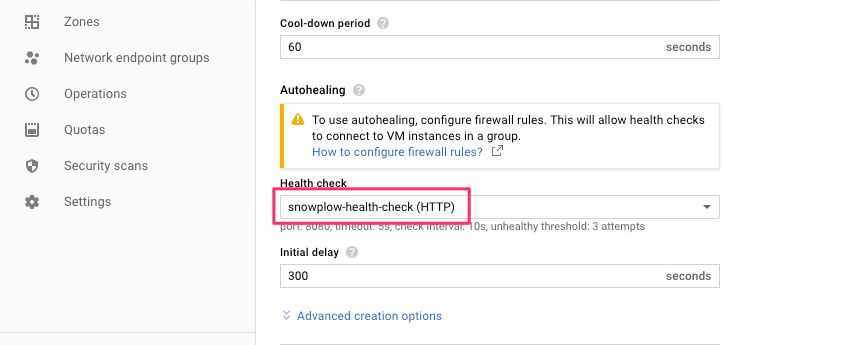
(5) Scroll down to Health check, click the menu, and select Create a health check.
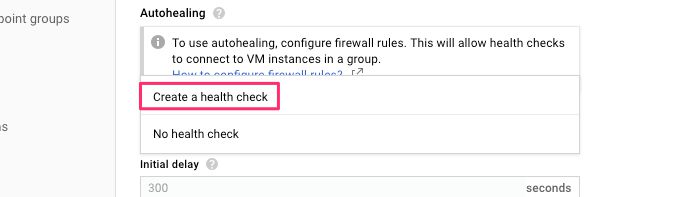
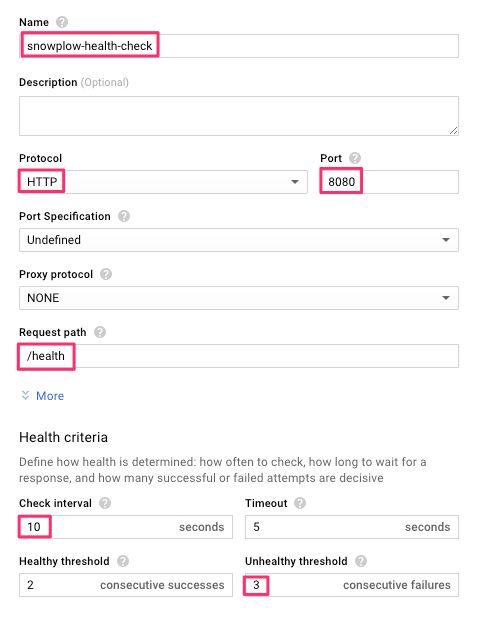
(6) Set the following options:
- Name: a descriptive name
- Protocol: HTTP
- Port: 8080
- Request path: /health
- Check interval: 10 seconds
- Unhealthy threshold: 3 consecutive failures
You can leave the rest of the settings to their default values.
(7) Click Save and continue once finished with the health check settings.
(8) Click Create to finish creating the instance group.
Once you create the group, you should see it loading for a while, after which you will see that the group has been created and a new instance has already been fired up!
At this point, you can quickly test if the instance is working.
(9) Browse to https://console.cloud.google.com/compute/instances, and copy the IP address from the External IP field next to the instance created from your instance group.
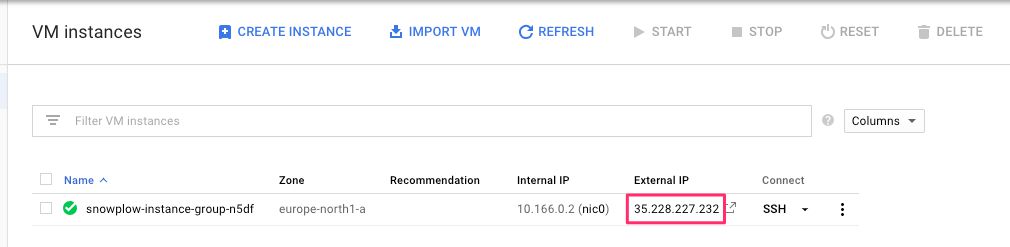
(10) Open your terminal software and run the following command:
$ curl http://<EXTERNAL_IP_HERE>:8080/healthReplace <EXTERNAL_IP_HERE> with the IP address you copied.
You should see a OK message as the response.
Next, try:
$ curl http://<EXTERNAL_IP_HERE>:8080/iYou should see a garbled GIF response (something like GIF89a????!?,D;).
If you see those two, your instance is working, and you’ve successfully created an HTTP endpoint.
Huh? That’s exactly what you did in the previous chapter!
But by using Instance groups you are now ready for the biggest step here: creating a load balancer.
Step 3: Create a load balancer
The purpose of the load balancer is to automatically scale your system up and down, depending on things like traffic spikes and CPU usage. It works by establishing a single IP address in the public-facing internet, which then tunnels/proxies the traffic to all the necessary internal IP addresses (your GCE instances, basically), without the outside world knowing this.
The other benefit of the load balancer is that we can use it to assign a static IP address to the balancer, and with a static IP we can apply our custom domain name so that a Google-managed SSL certificate can be applied to the endpoint.
So, there’s a lot of stuff in this step, pay attention!
(1) Browse to https://console.cloud.google.com/net-services/loadbalancing/loadBalancers/list, and click Create load balancer.
(2) Click Start configuration in the HTTP(S) Load Balancing panel.
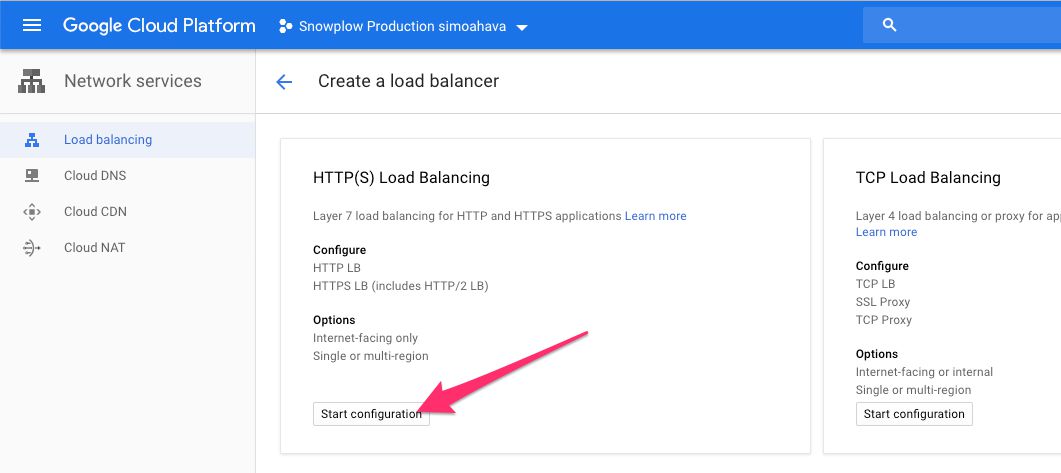
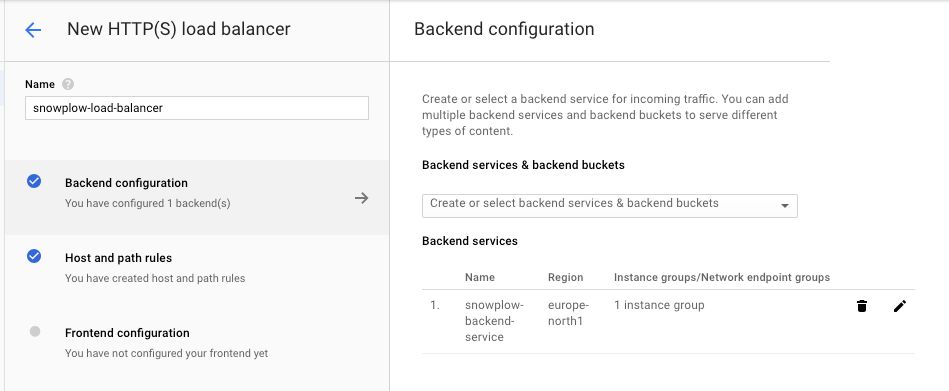
(3) Give the load balancer a name, click Backend configuration, then Create or select backend services & backend buckets, then choose Backend services -> Create a backend service.
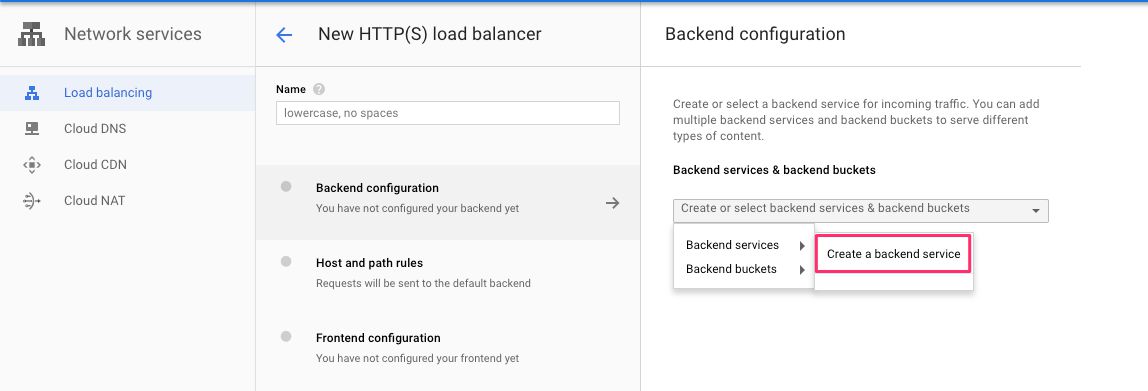
(4) Give the backend service a name.
(5) Leave all the other settings to their default values, but choose the Instance group you created earlier from the respective menu. Set 8080 in the Port numbers field, and select the Health check you’ve also created earlier in the Health check menu.
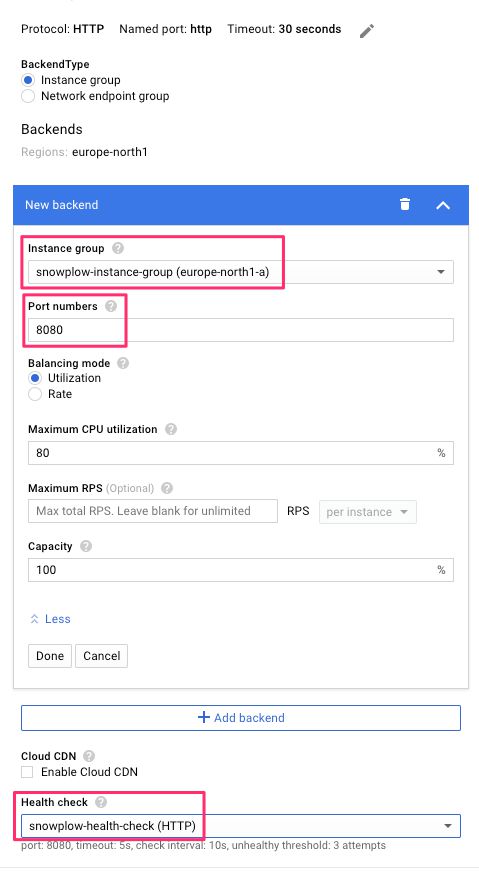
(6) Click Create when ready.
(7) Click open Host and path rules, and make sure the backend service you created is visible in the rule.
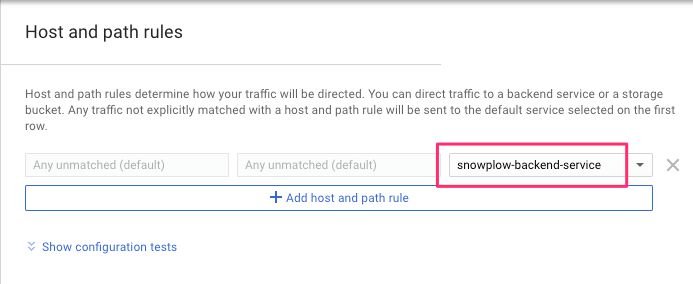
(8) Next, click Frontend configuration.
(9) Give the frontend service a name.
(10) Choose HTTPS as the Protocol.
(11) Select the IP Address list, and click create IP address.
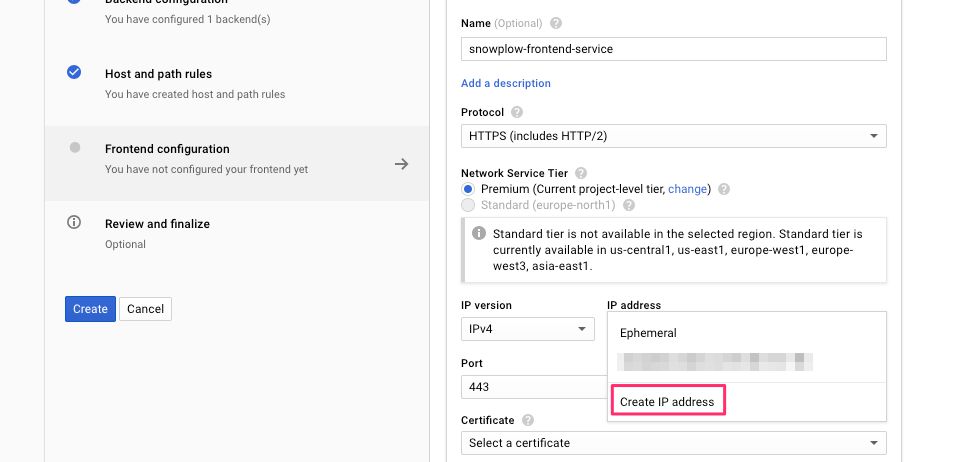
(12) Choose a name for the IP address and click RESERVE.
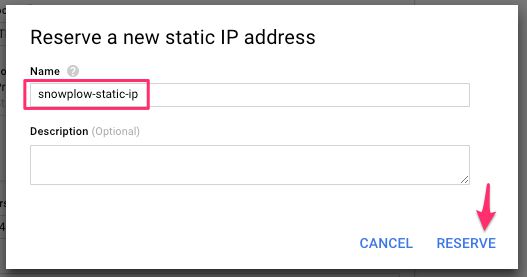
(13) Make sure the new IP address is selected in the frontend configuration, and copy the IP address to a text editor or something. You’ll need it when configuring the DNS of your custom domain name!
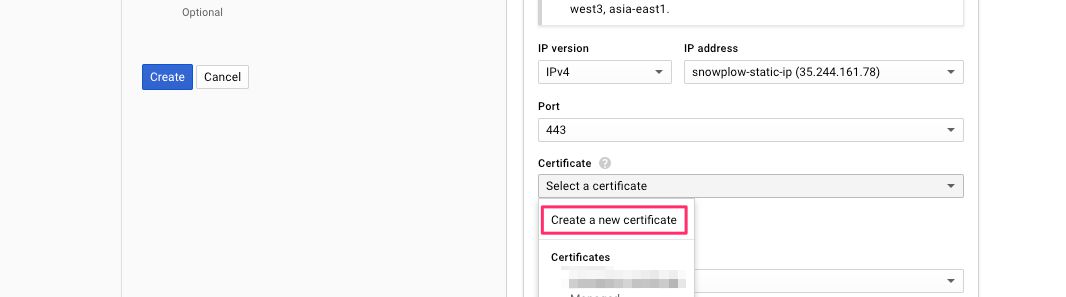
(14) Make sure 443 is set as the Port.
(15) In the Certificates menu, choose Create a new certificate.
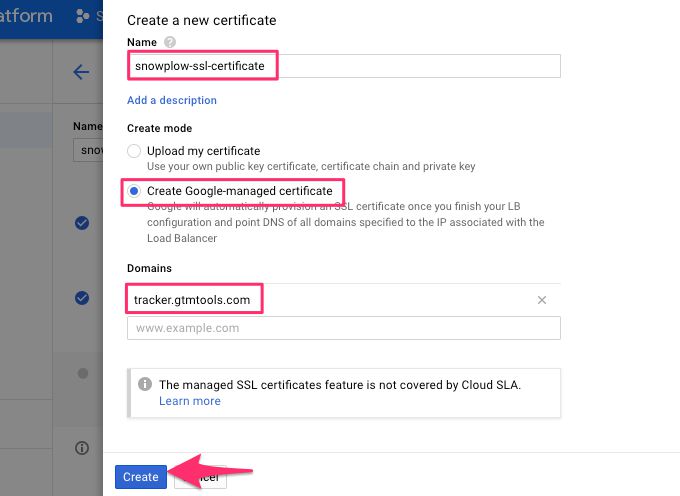
(16) Give the new certificate a name.
(17) Choose Create Google-managed certificate.
(18) Type the name of the domain you will set to point to your collector in the Domains field.
(19) When ready, click Create.
(20) When finished with the frontend configuration, click Done.
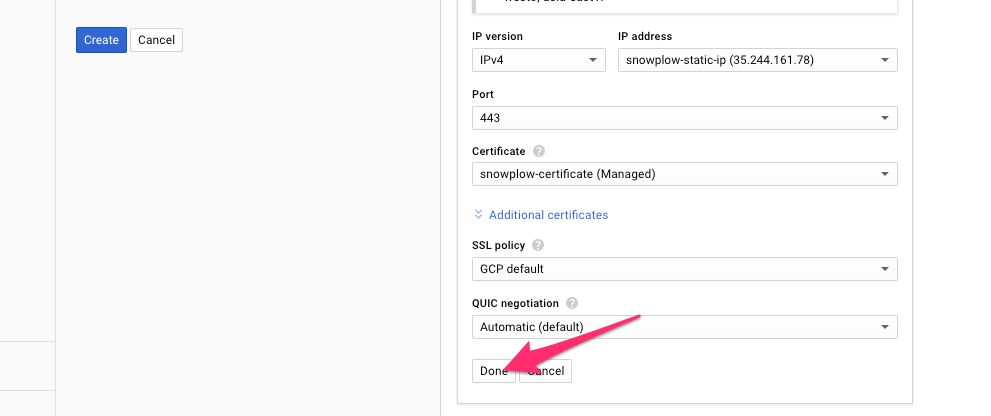
(21) Click Review and finalize to see all the changes. You’ll probably see that your certificate is still in the PROVISIONING status, because you haven’t updated your domain DNS yet.
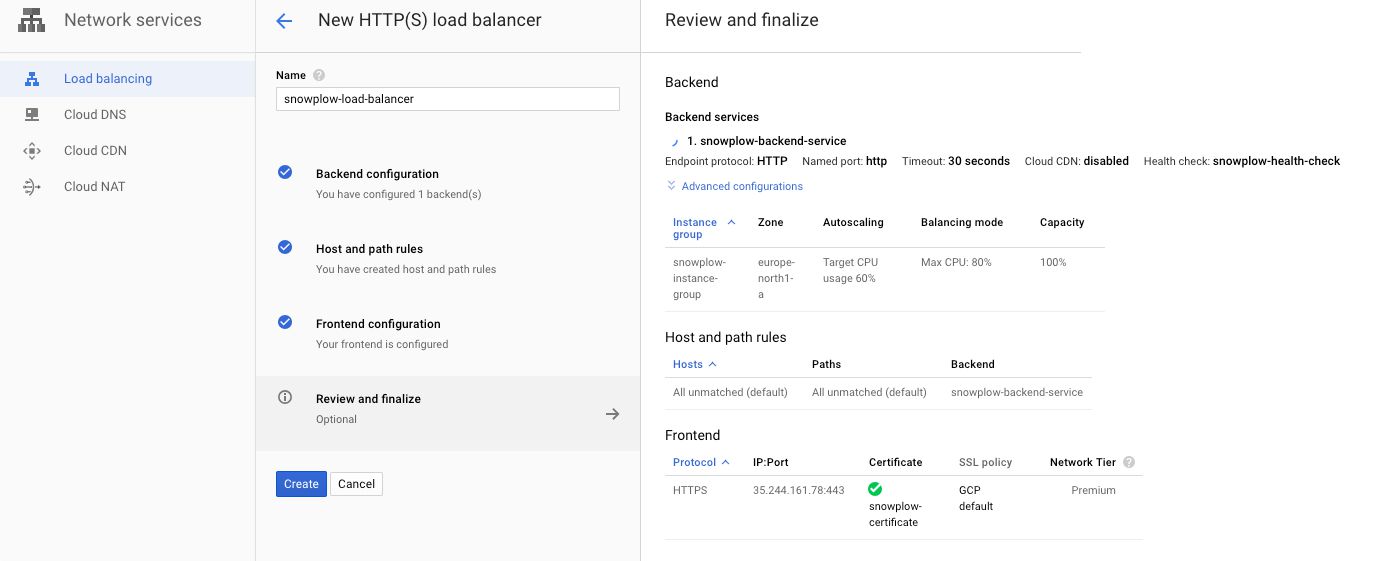
(22) When satisfied, click Create to create the load balancer.
Step 4: Configure your DNS
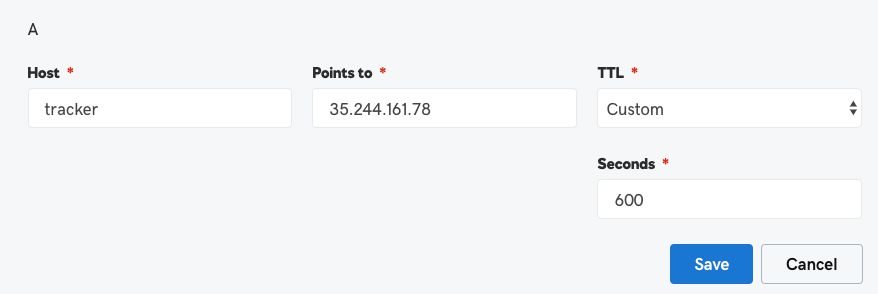
At this point, you need to go to your DNS settings for the custom domain name you want to point to your load balancing collector.
You need to create an A record for the domain name, which points to the static IP address you created for the load balancer frontend above. You can set the TTL to something like 600 seconds to see the change quicker.
This is what it would look like in GoDaddy.
Once you’ve configured the DNS, it will take a while for the new name to resolve. You can check what the status is by running this in your terminal:
$ host tracker.gtmtools.comReplace tracker.gtmtools.com with the domain name you configured in the DNS. If it works, you should see a response with the IP address you configured.
Step 5: Testing everything
Once you’ve configured the domain name and it resolves to the correct IP, you might still need to wait a while for the SSL certificate to be provisioned for the domain name. This might take anywhere from a couple of minutes to some hours, so be patient.
You can check the status of your system by browsing to the load balancer list and clicking the load balancer you created.
The frontend should show a green checkmark next to your certificate name to indicate that the certificate has been assigned.
In the backend service, you should see one healthy instance created.
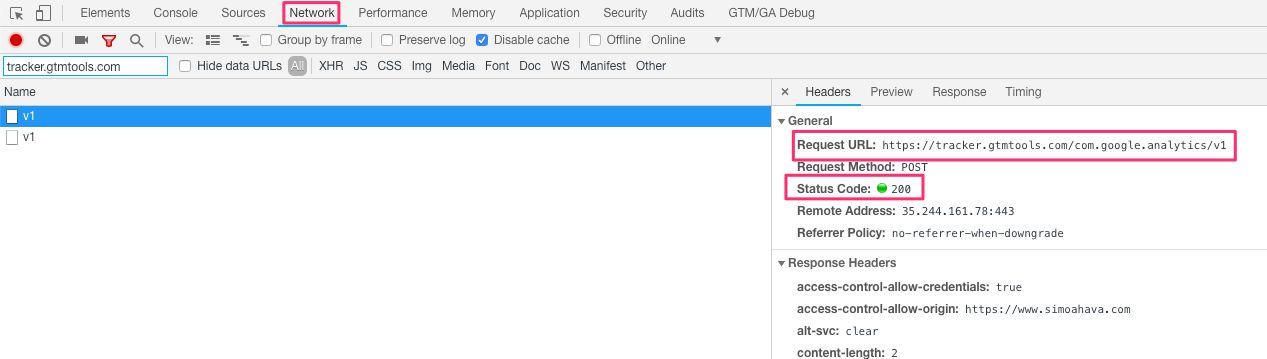
If all is fine, the next step is to test the endpoint itself. Open the terminal and run the following command:
$ curl -d "&e=pv&page=https-test&url=https%3A%2F%2Fjust-testing.com&aid=snowplow-test" -X POST https://<CUSTOM_DOMAIN>/com.snowplowanalytics.iglu/v1Replace <CUSTOM_DOMAIN> with the domain name you’ve configured to point to the load balancer.
If it worked, you should see an OK response.
Next, you can try and retrieve the payload from the Pub/Sub topic with:
$ gcloud pubsub subscriptions pull --auto-ack test-goodYou should see something like this as the response:
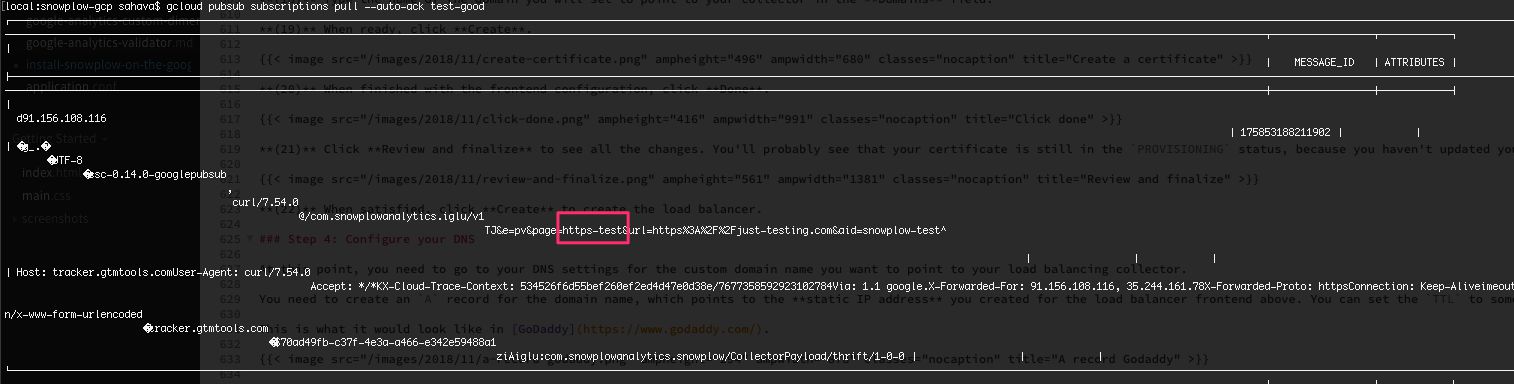
If you see that, then congratulations, you now have an HTTPS endpoint for your collector!
If something’s wrong, then you’ll need to start narrowing down where the problem is. Check your Google Compute Engine pages, make sure there’s a healthy GCE instance running. You can even SSH into the instance, browse to the /var/log/ directory, and open the daemon.log file for editing to see if there was a problem with the startup script.
Other than that, it’s very difficult to say what the likely source of the problem is. Personally, I made many mistakes initially with port configurations and setting up the individual components. But if you follow this guide to the letter, you should be fine.
Sometimes the problem is that you just need to wait for the DNS to resolve and the certificate to be assigned to the new domain name. This might take a while.
Next up, enrichment and loading the data into BigQuery!
Note! If you’re going to take a break now, remember to STOP your GCE instance. You can always restart it when ready to go on. You don’t want to accumulate any unwanted costs from having the instance running for no purpose!
Set up the Google Analytics tracker
Before we go on to enrichment, now is a good time to set up the tracker. For this purpose, we’ll be using the Snowplow Google Analytics plugin, because it’s an easy way to leverage existing tracking on your site. If you want, feel free to use the regular Snowplow JavaScript tracker.
To begin with, head on over to my customTask Builder Tool.
(1) Click the option labelled Copy Hits to Snowplow Collector Endpoint.
(2) Click Copy to clipboard.
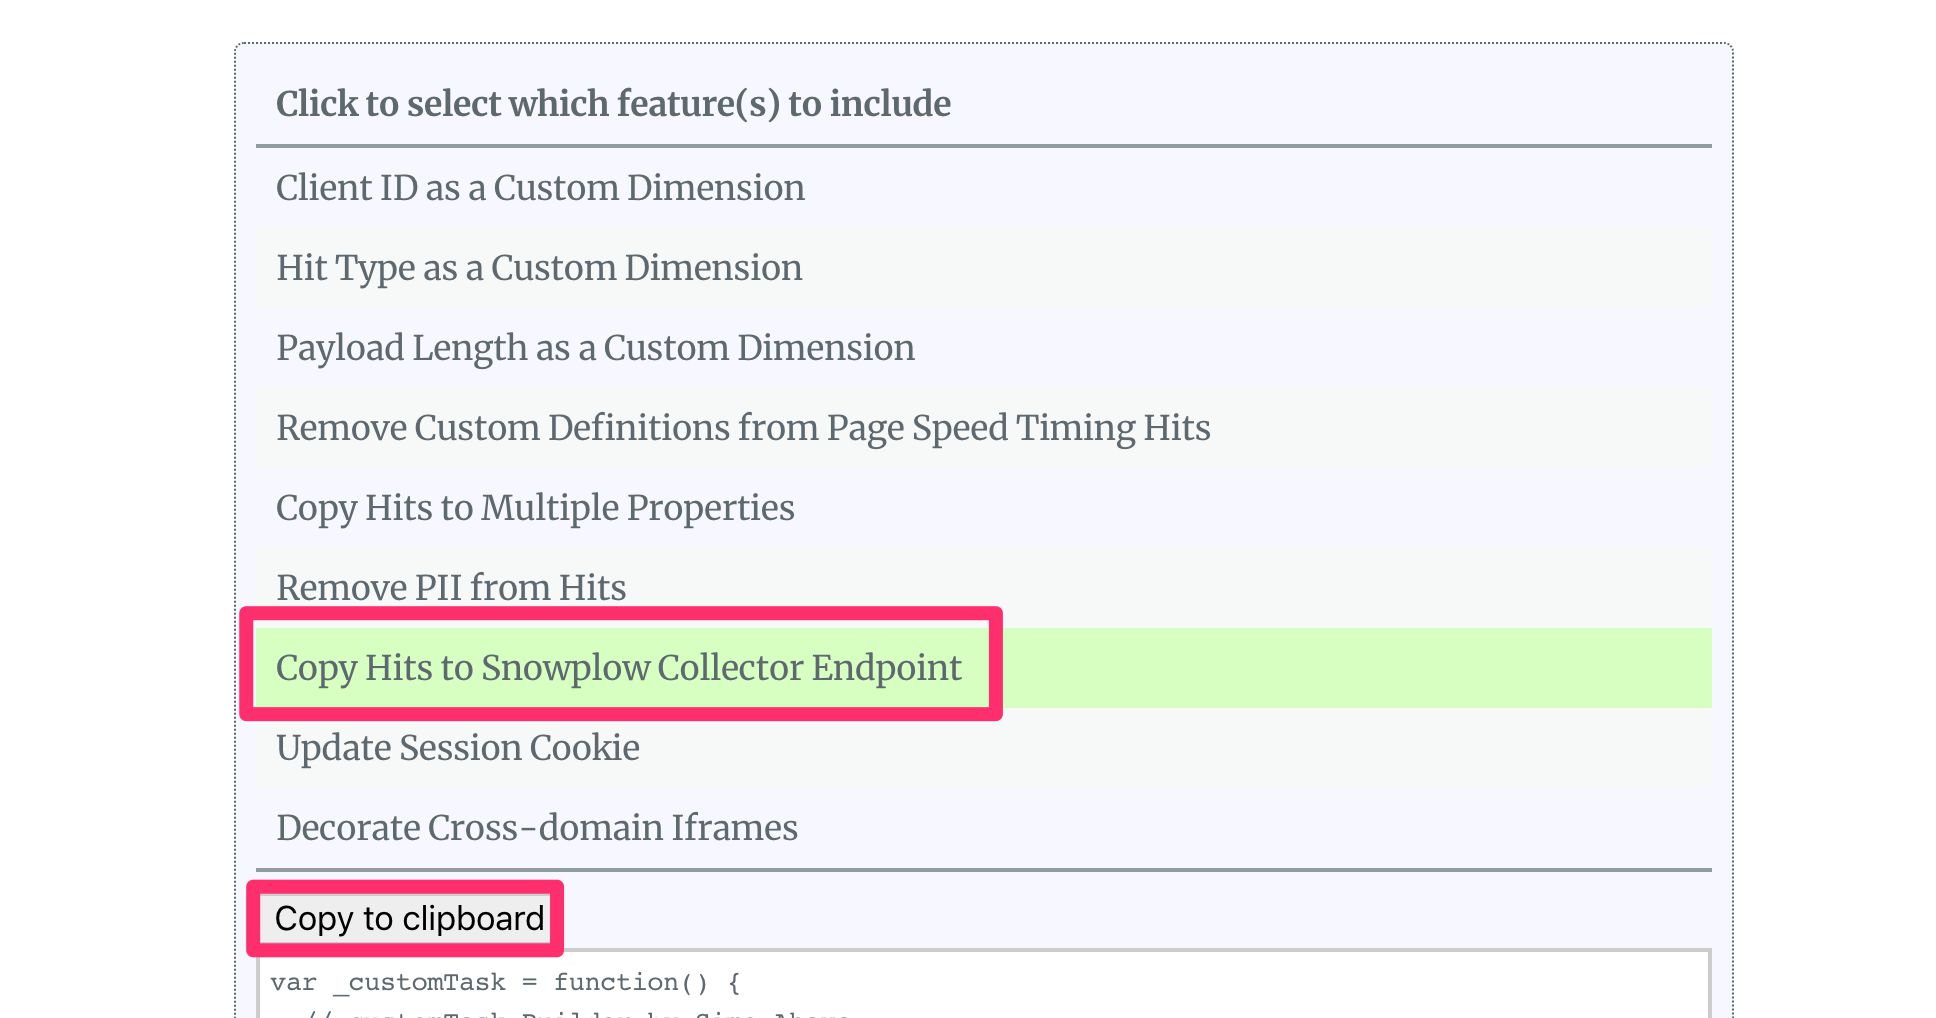
(3) Next, in Google Tag Manager, create a new Custom JavaScript variable, and paste the contents of the clipboard there.
(4) In the beginning of the code block, remove var _customTask = , so that the first characters of the block are function() {.
(5) In the end of the block, remove the semicolon that is the very last character of the block.
(6) Edit the line starting with var snowplowEndpoint = '...'; so that the string contains the URL to your collector endpoint.
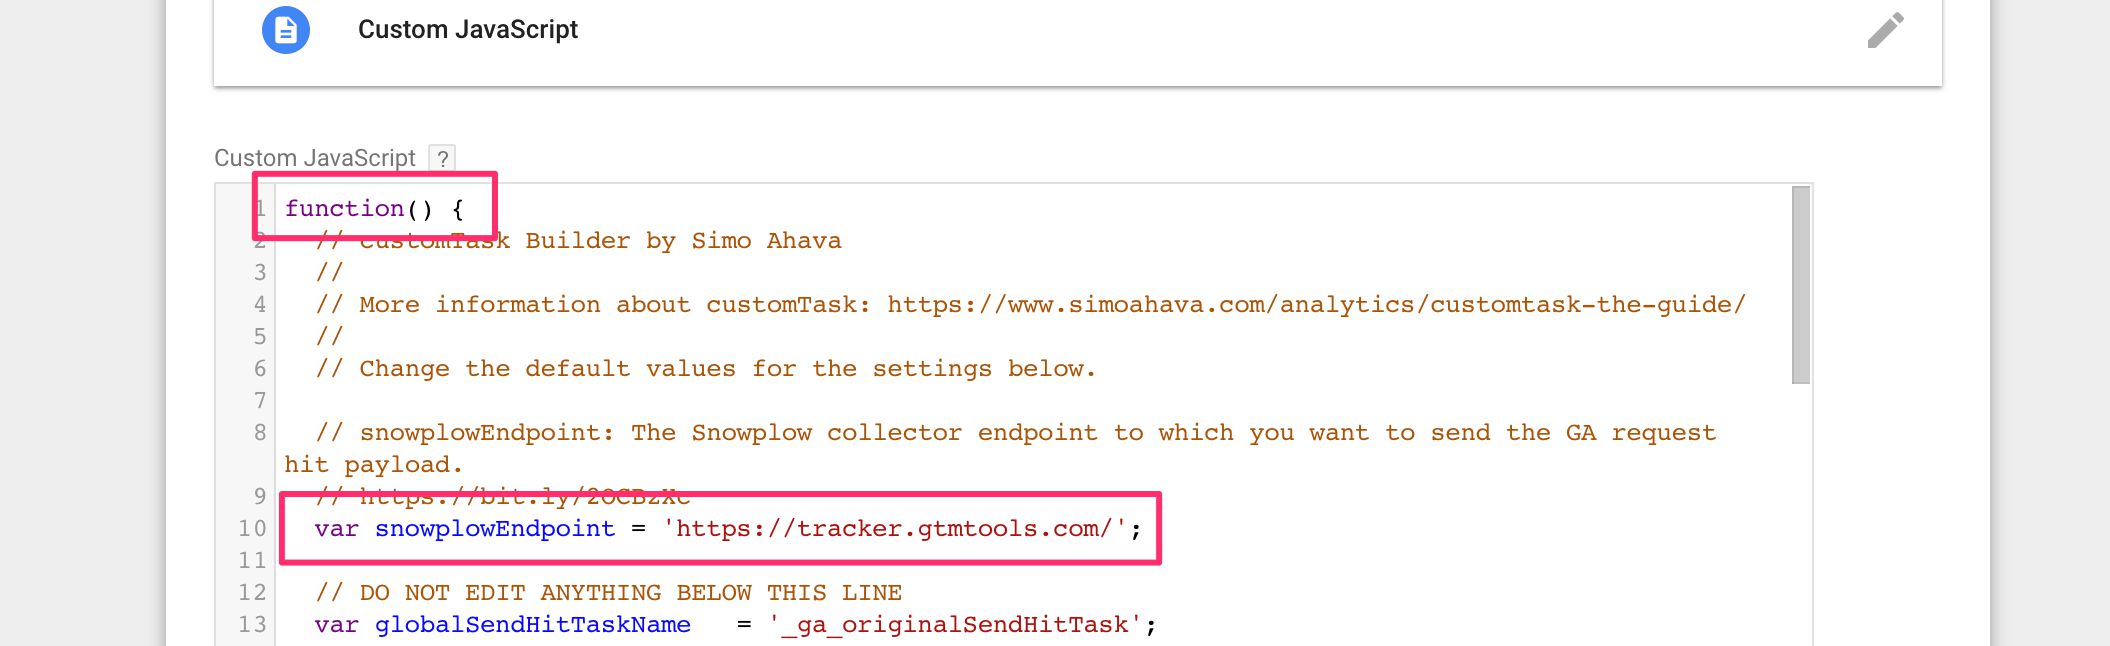
(7) Save the variable with some name, e.g. JS - Snowplow duplicator.
(8) Next, open your Page View tag, check Enable overriding settings in this tag, scroll down to More Settings > Fields to set, and add a new field:
Field name: customTask
Value: {{JS - Snowplow duplicator}}
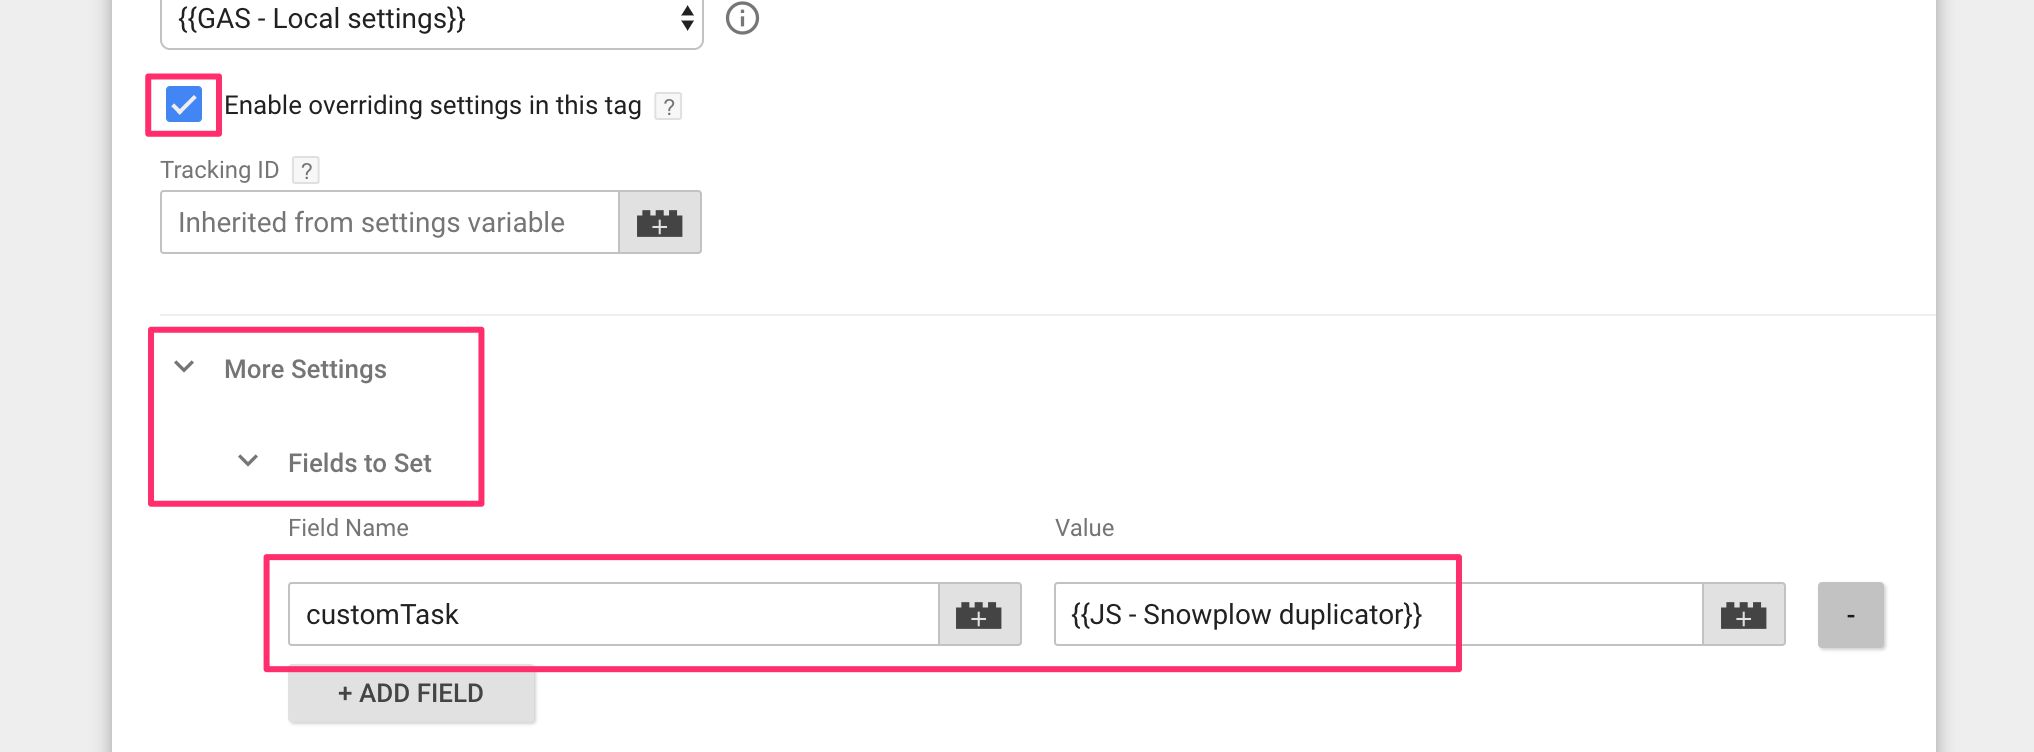
That’s it for the tracker. The way it works now is that whenever your Page View tag fires, it will copy the payload to the Snowplow collector endpoint.
If you want, you can publish your container now, after which every visitor to your website will start sending those Page Views to your collector. However, I recommend you use Preview mode for now, so that only your Page Views are sent to the collector.
Once the pipeline is up and running, you can start collecting more comprehensive data from your visitors.
Prepare the ETL step
Before moving forward to the extract, transform, and load (ETL) of your collector data, we’ll need to do some preparations.
Step 1: Enable the Dataflow API
The enrichment process and the BigQuery loader require a new service to be enabled.
(1) Browse to the API library.
(2) Search for dataflow, and click the Dataflow API selector.
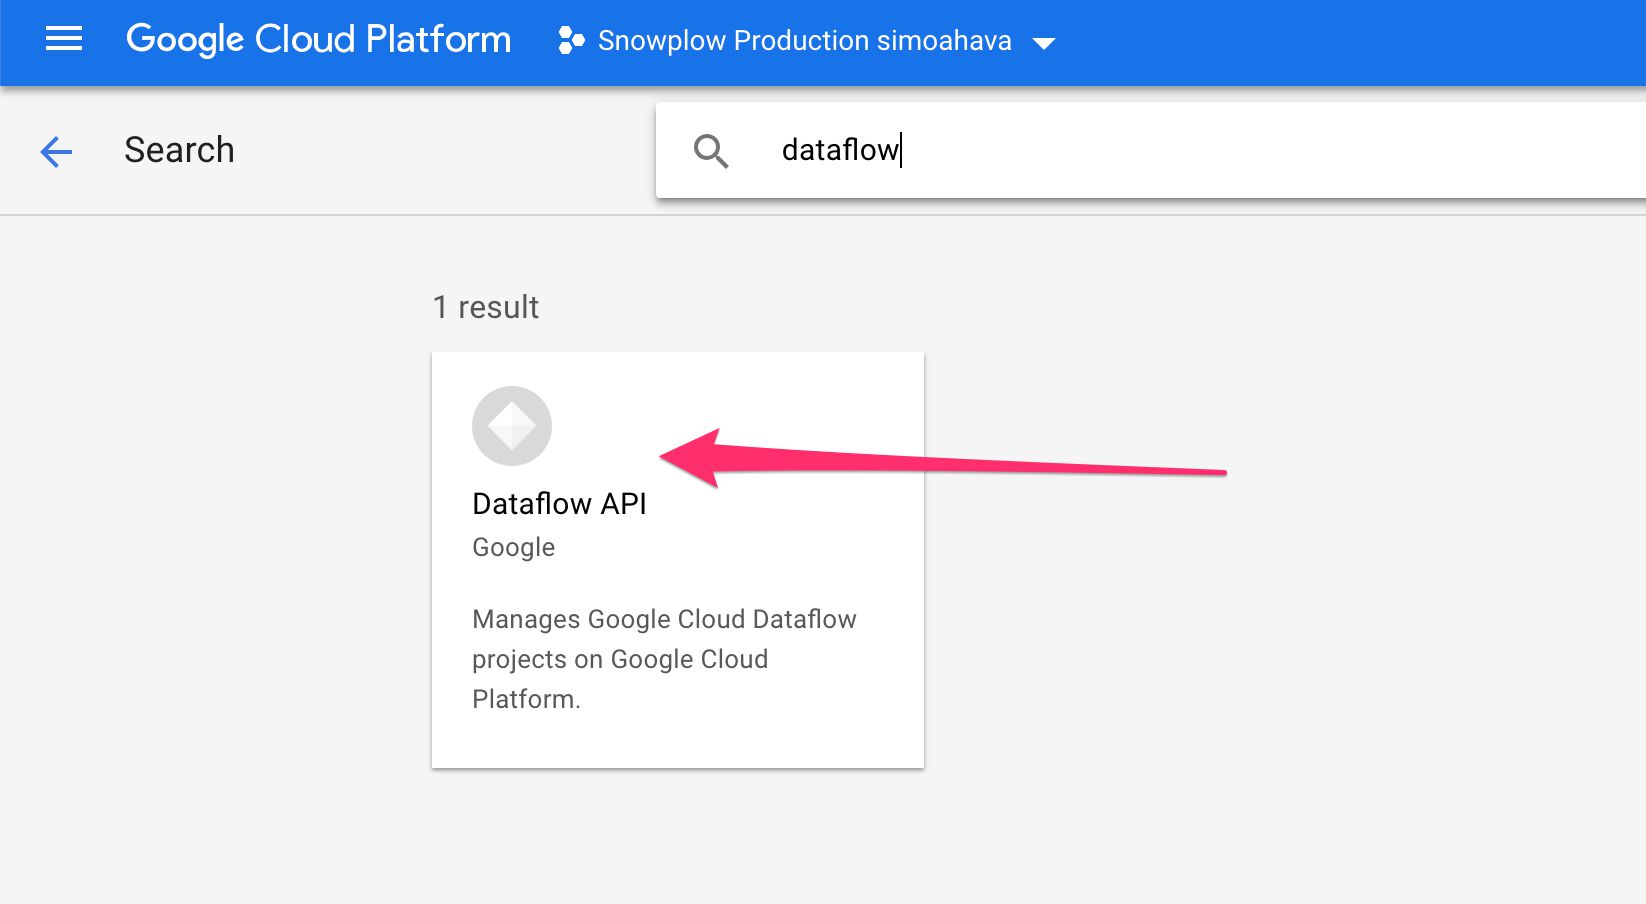
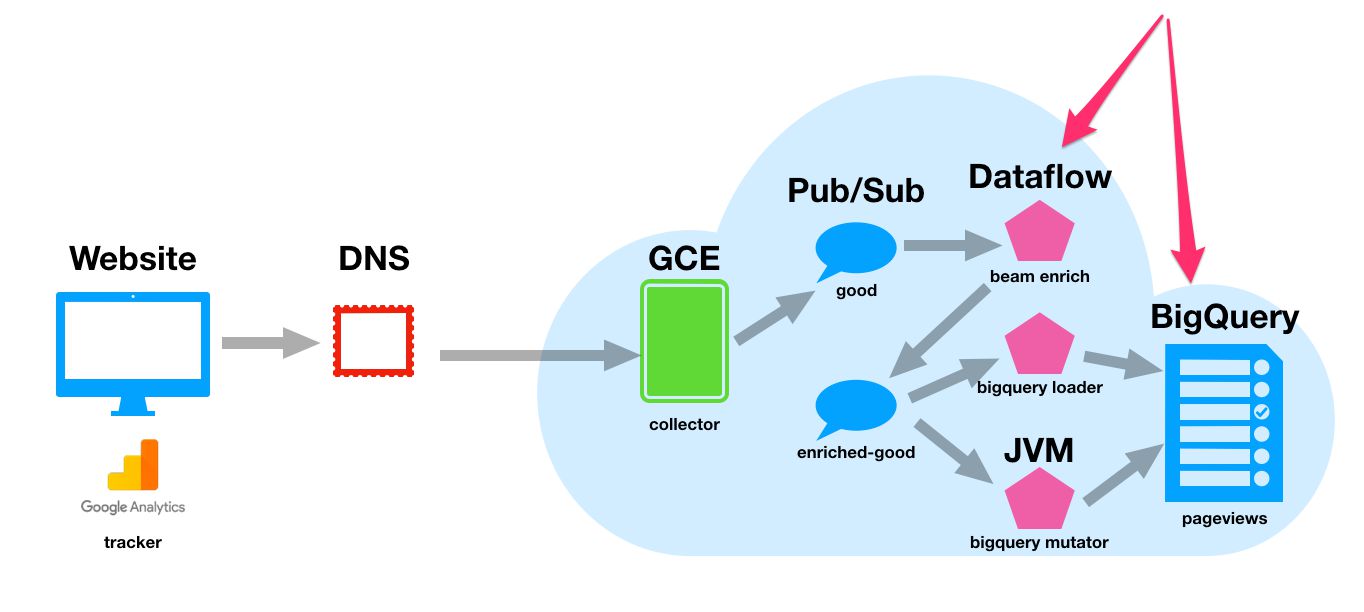
Cloud Dataflow lets you enrich a data stream with minimal latency. This is exactly what we need. We need the enricher to pull in events for the Pub/Sub topic to which the collector writes them, enrich and shred them to proper format, and write them back into a Pub/Sub topic for BigQuery loading.
(3) Click the ENABLE button in the API page to enable this service.
Step 2: Create the necessary Pub/Sub topics and subscriptions
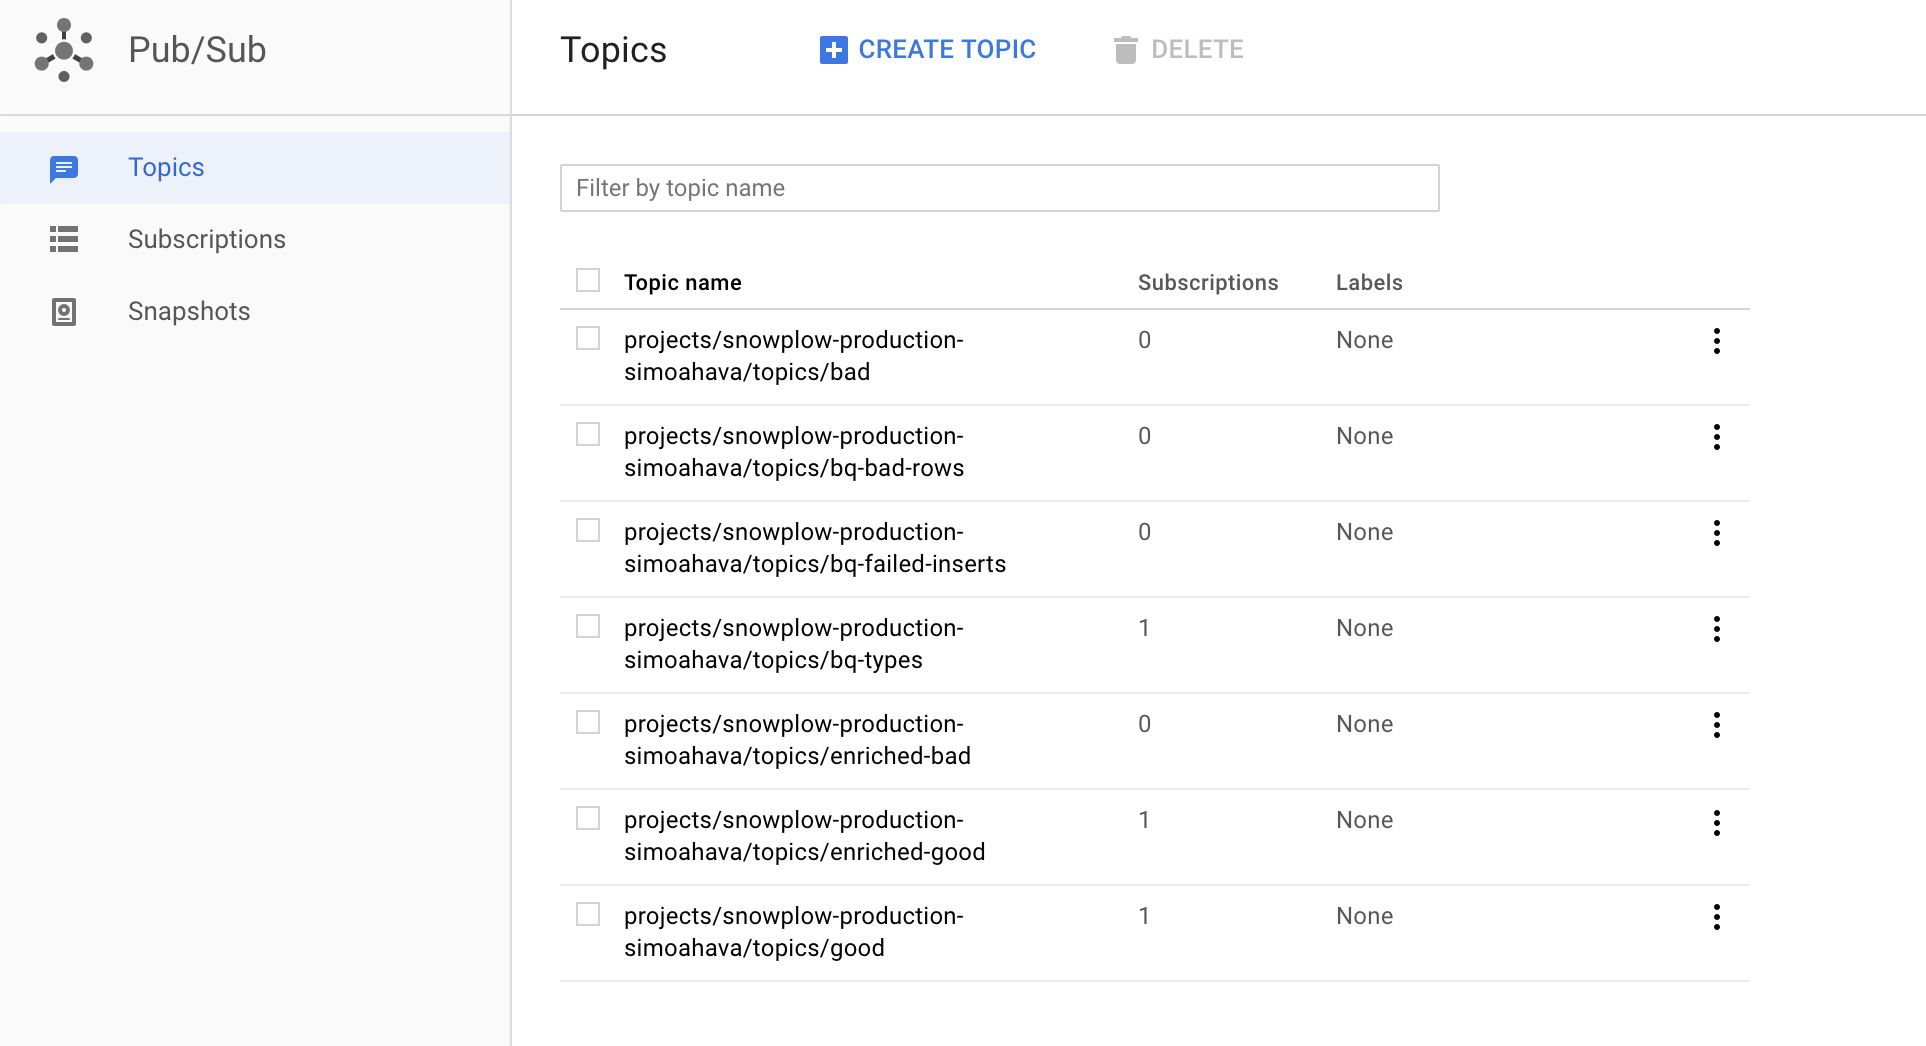
By now, you should have two Pub/Sub topics, good and bad for hits processed by your collector.
We’ll need to create a bunch of additional topics and subscriptions for the remaining steps of the pipeline.
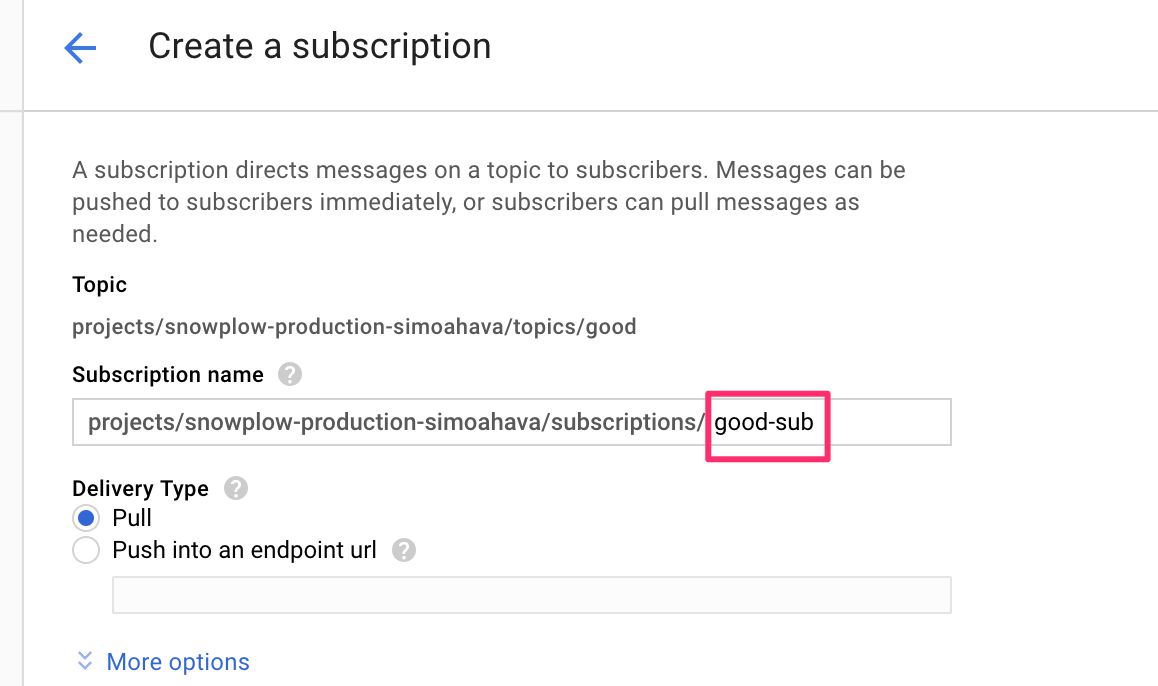
(1) Browse to https://console.cloud.google.com/cloudpubsub/topicList.
(2) Click open the good topic, and click Create Subscription. Give the subscription the name good-sub.
(3) Next, create the following topics:
bq-bad-rowsbq-failed-insertsbq-typesenriched-badenriched-good
(4) Then, click open bq-types and create a new subscription for it named bq-types-sub.
(5) Finally, click open enriched-good and create a new subscription for it named enriched-good-sub.
This is what the topic list should look like:
This is what the subscription list should look like:
You can, of course, create additional subscriptions for testing and debugging, but these are what the following steps of the pipeline specifically need.
Step 3: Create a new storage bucket for temporary files
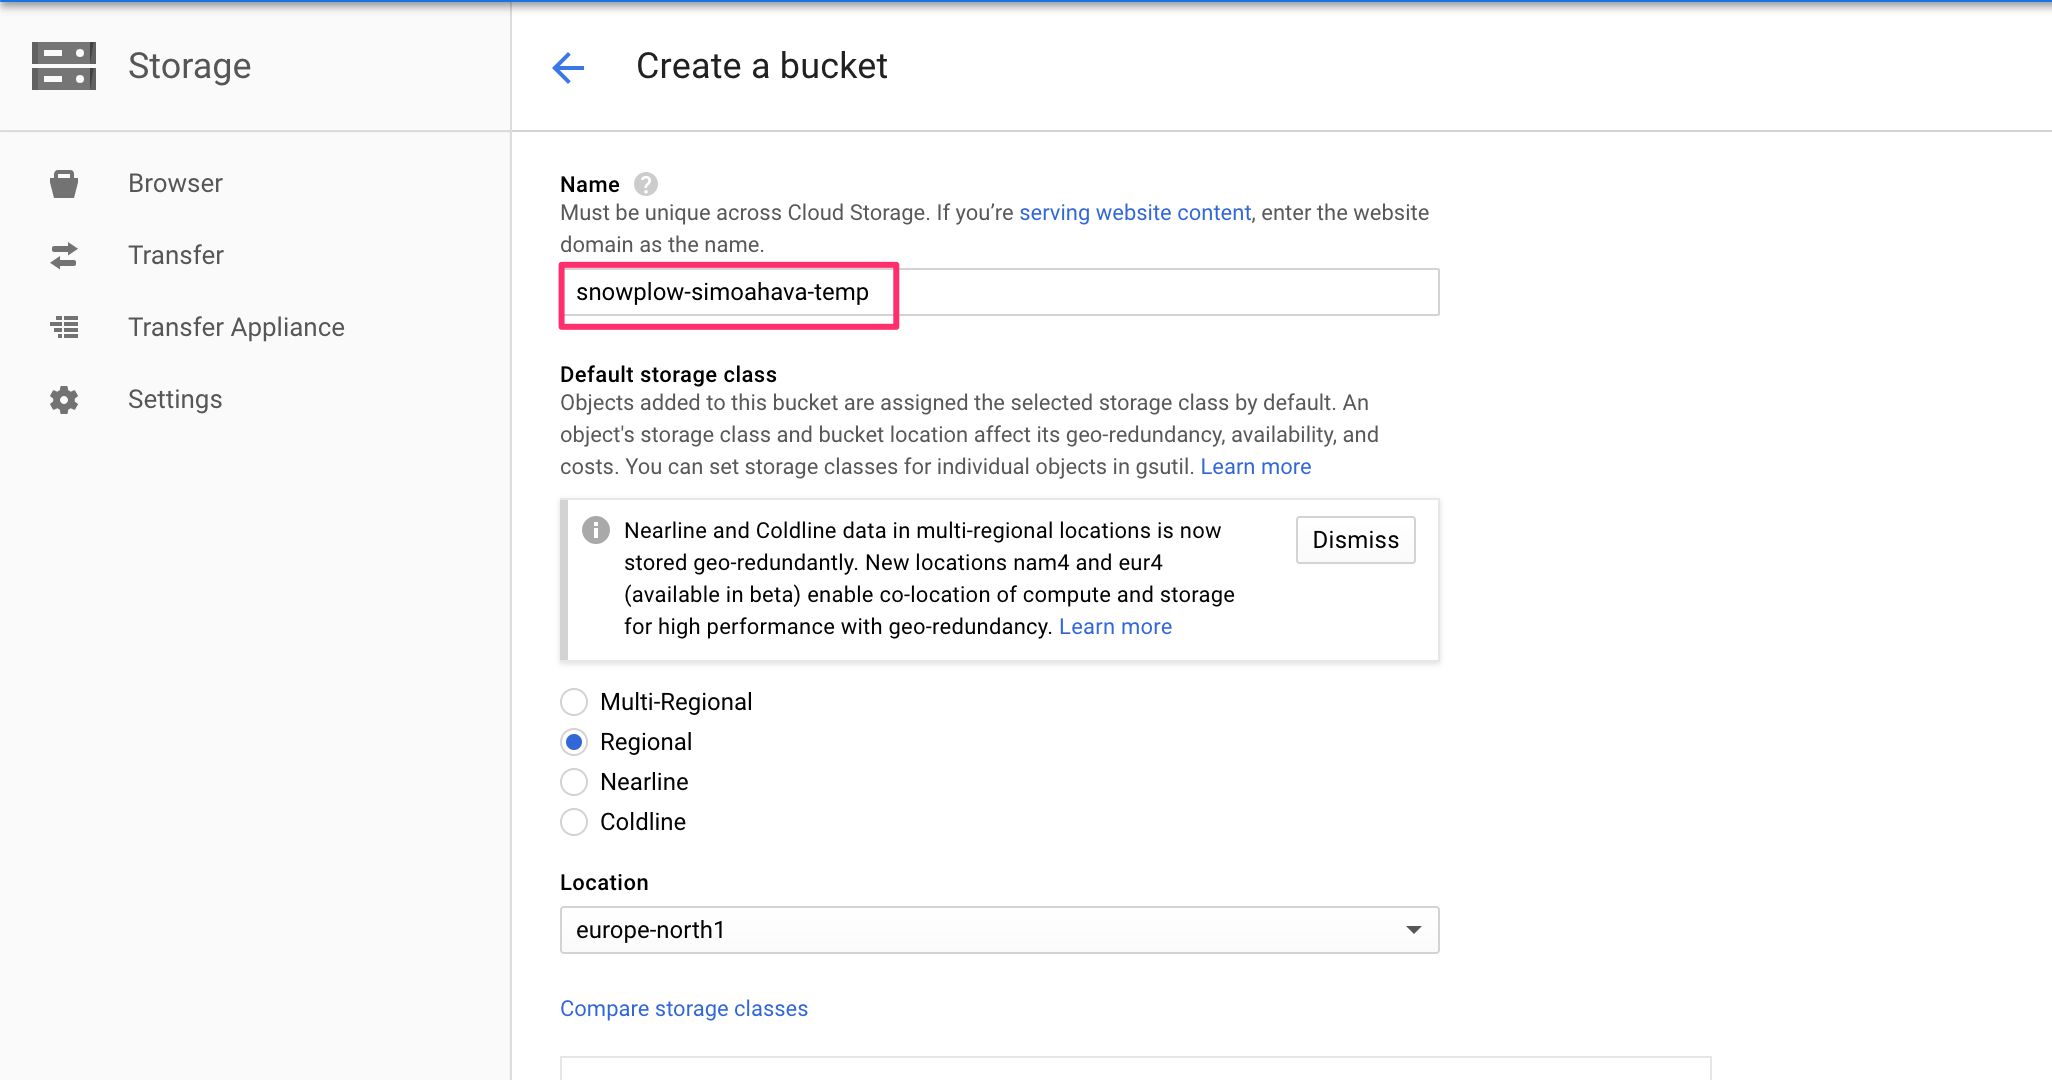
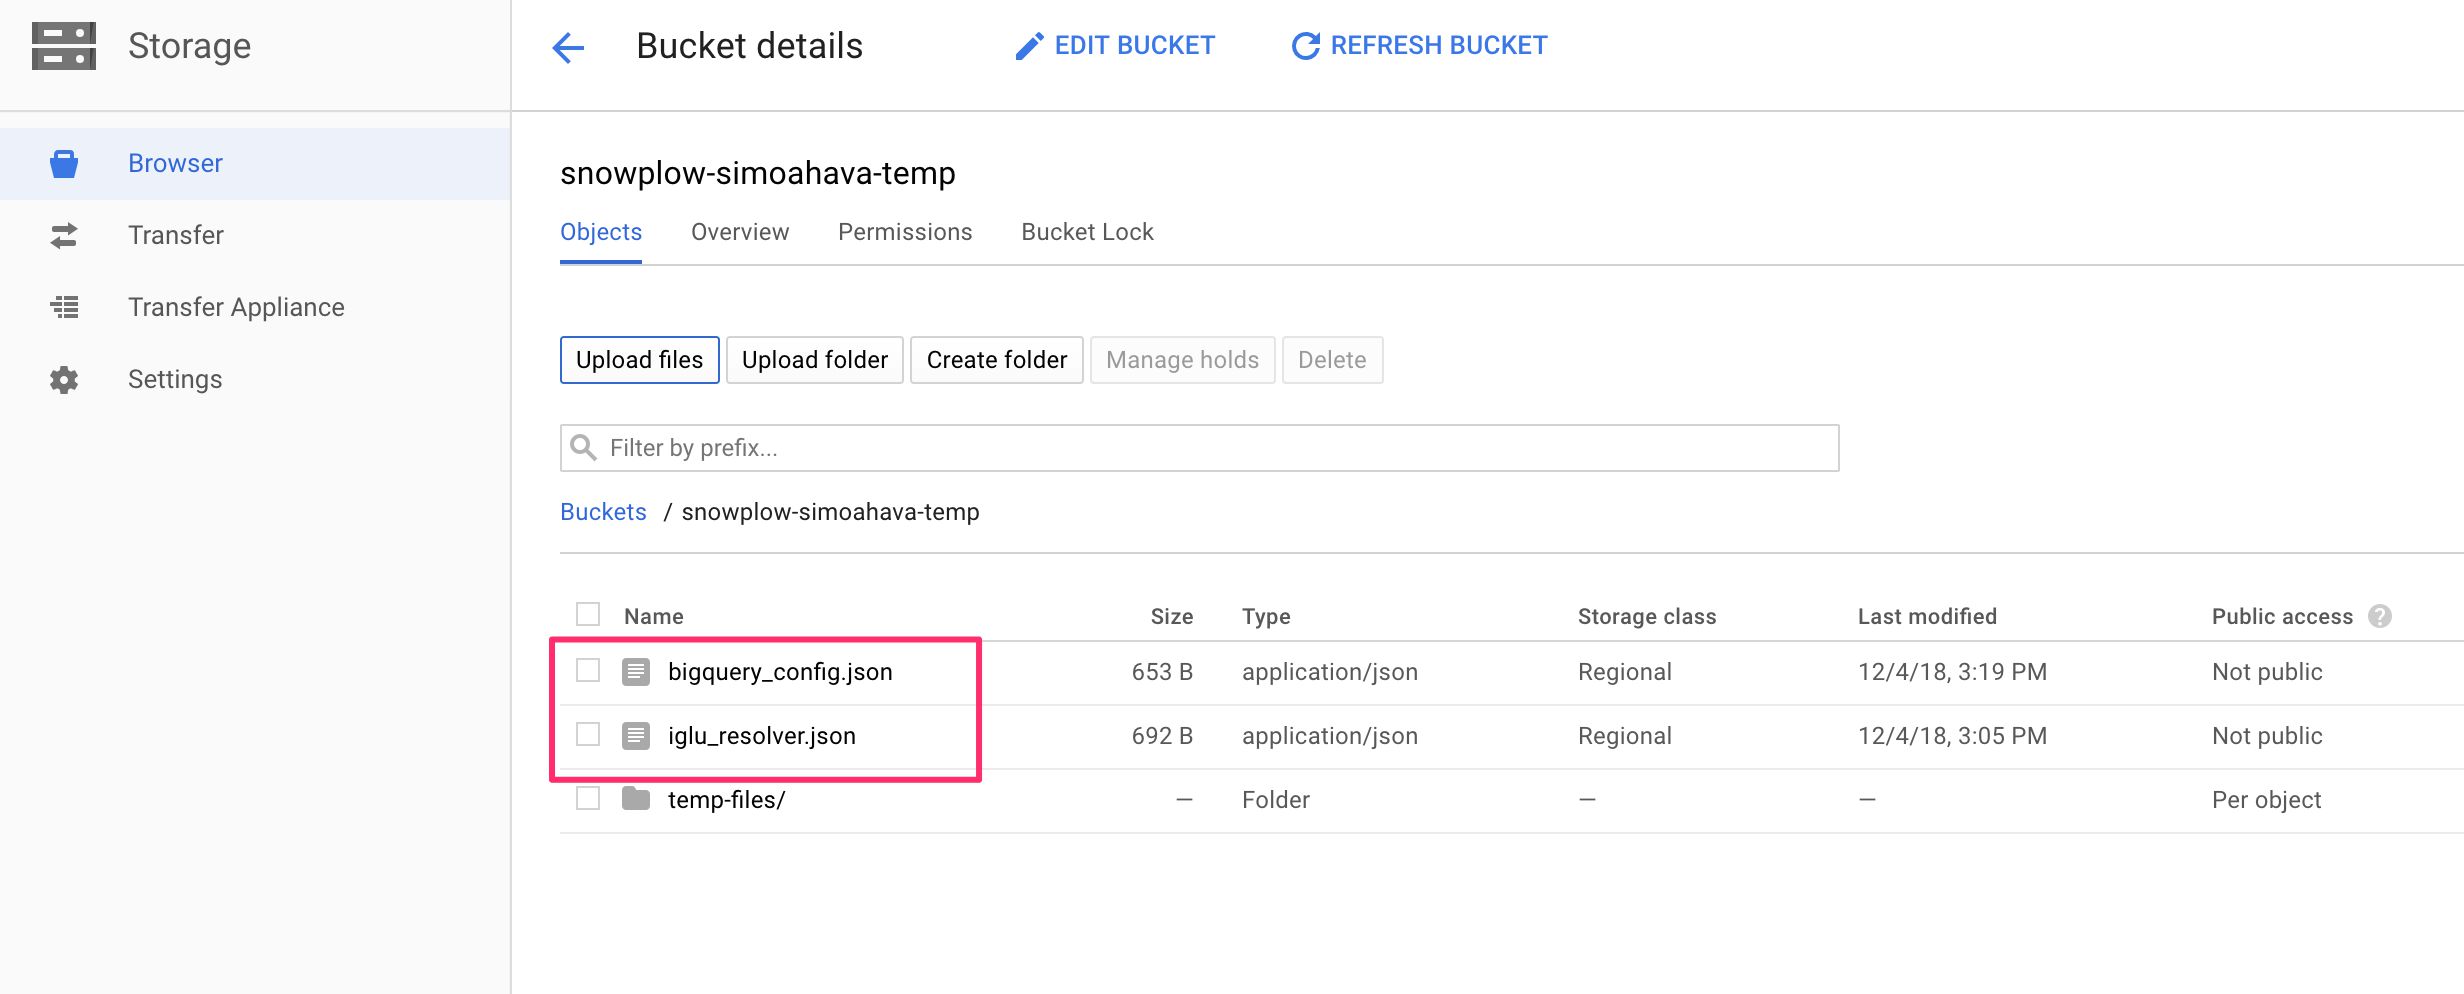
You’ll need to create a new storage bucket for temporary files created by the enrichment process. But this is a good place to also store some files required by the enrich and load stages.
(1) Browse to https://console.cloud.google.com/storage/browser/.
(2) Click CREATE BUCKET and create a new bucket with the name snowplow-yourname-temp like so:
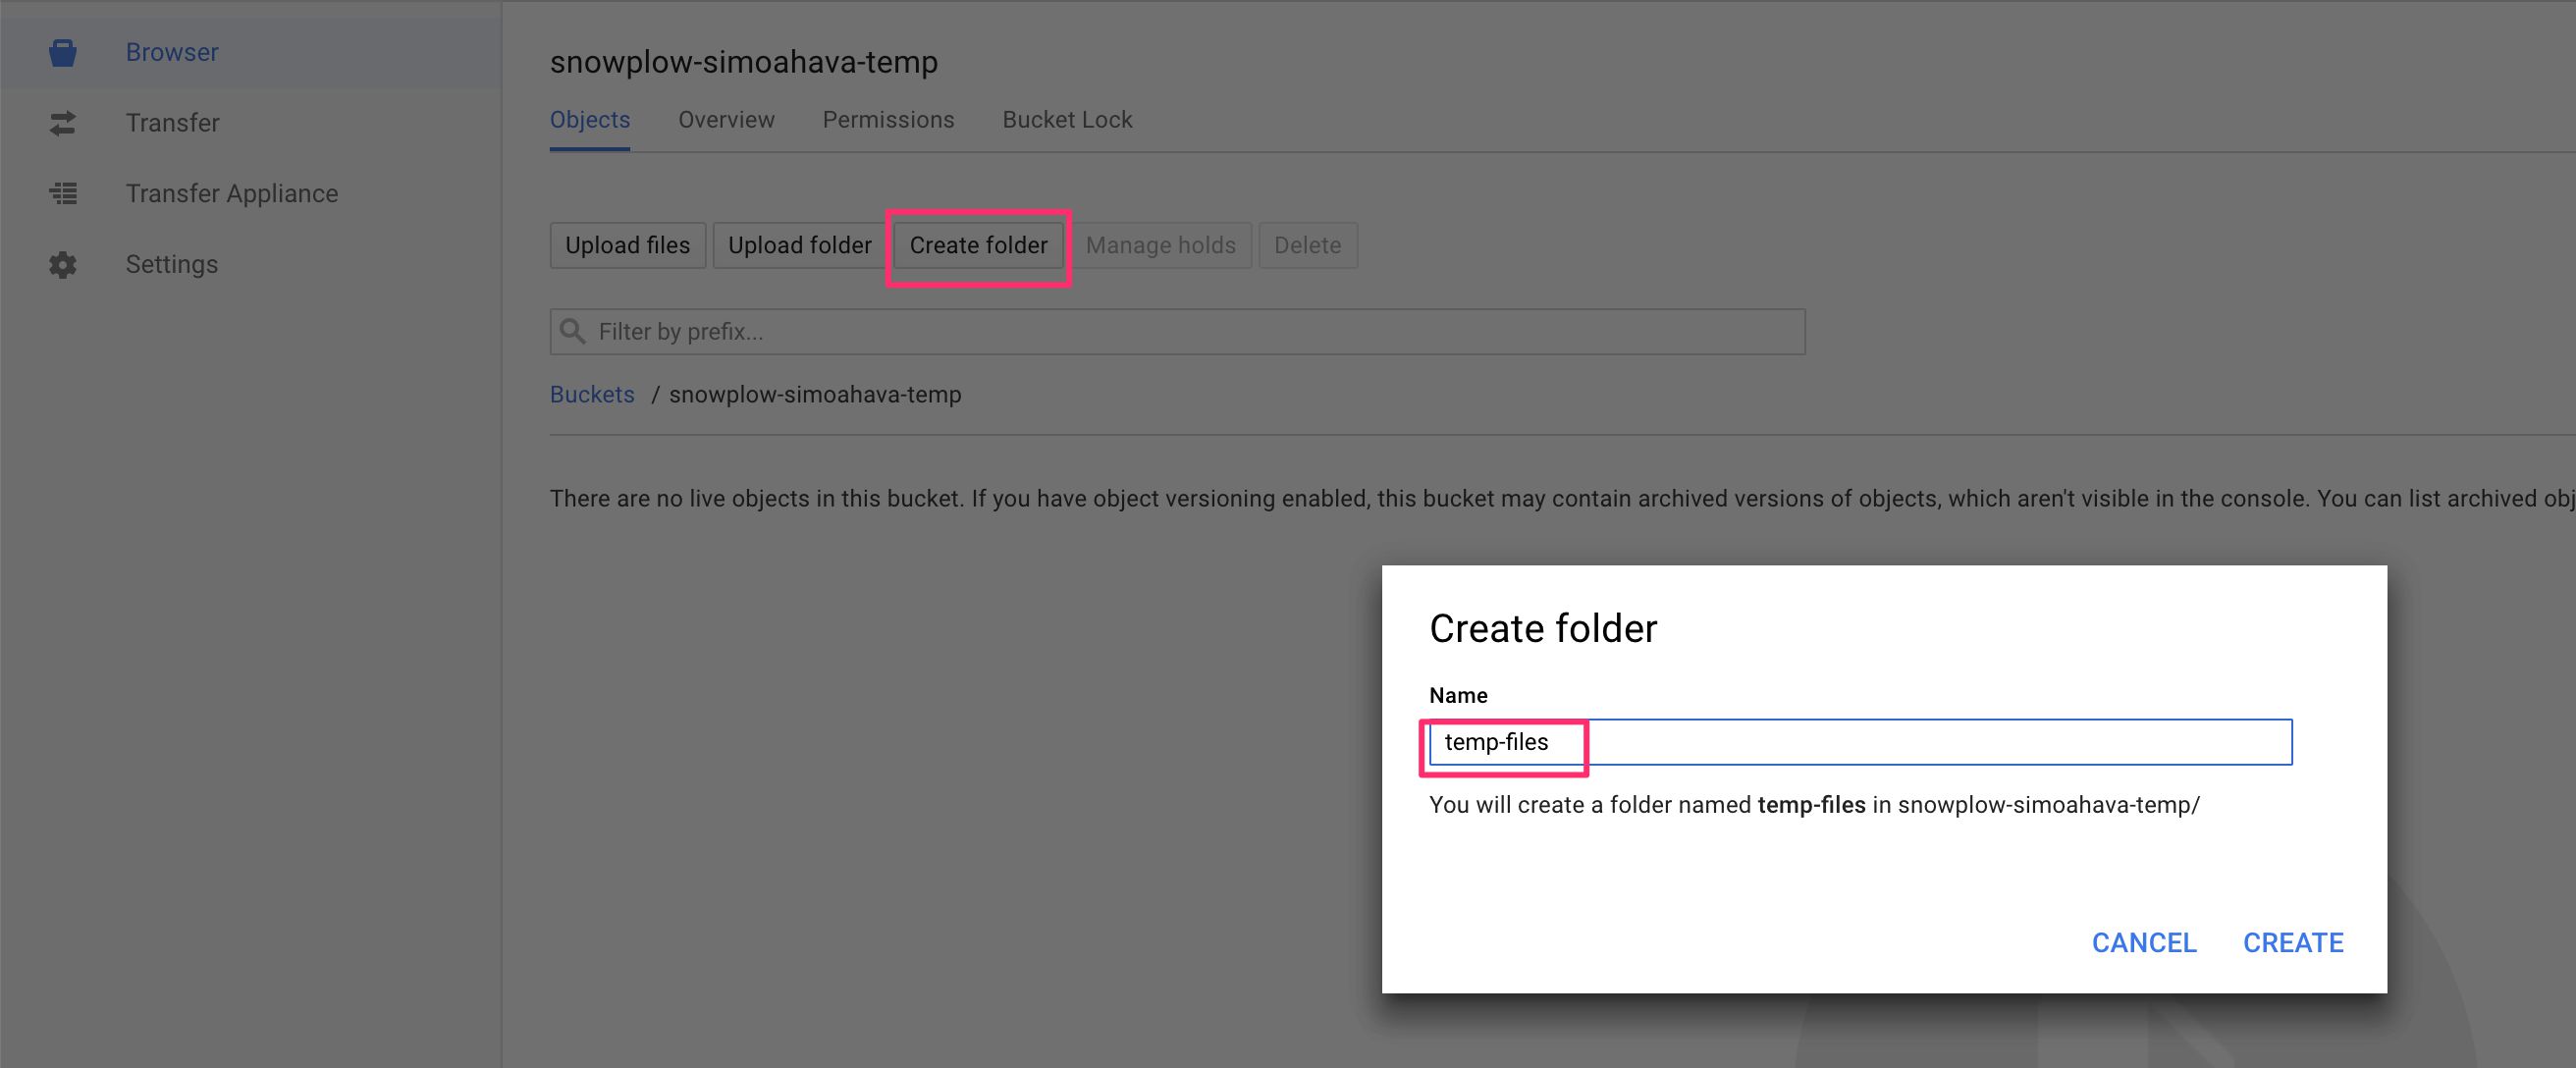
(3) Click into that bucket and click Create folder, and name the new folder temp-files:
Step 4: Create the iglu_resolver.json configuration
Snowplow uses something called resolvers to automatically identify the parameters of each incoming hit. This is necessary for many reasons, the main being hit validation (to identify valid requests from invalid ones), for enriching and shredding the hits to the proper data format, and for mutating and loading the data into BigQuery tables.
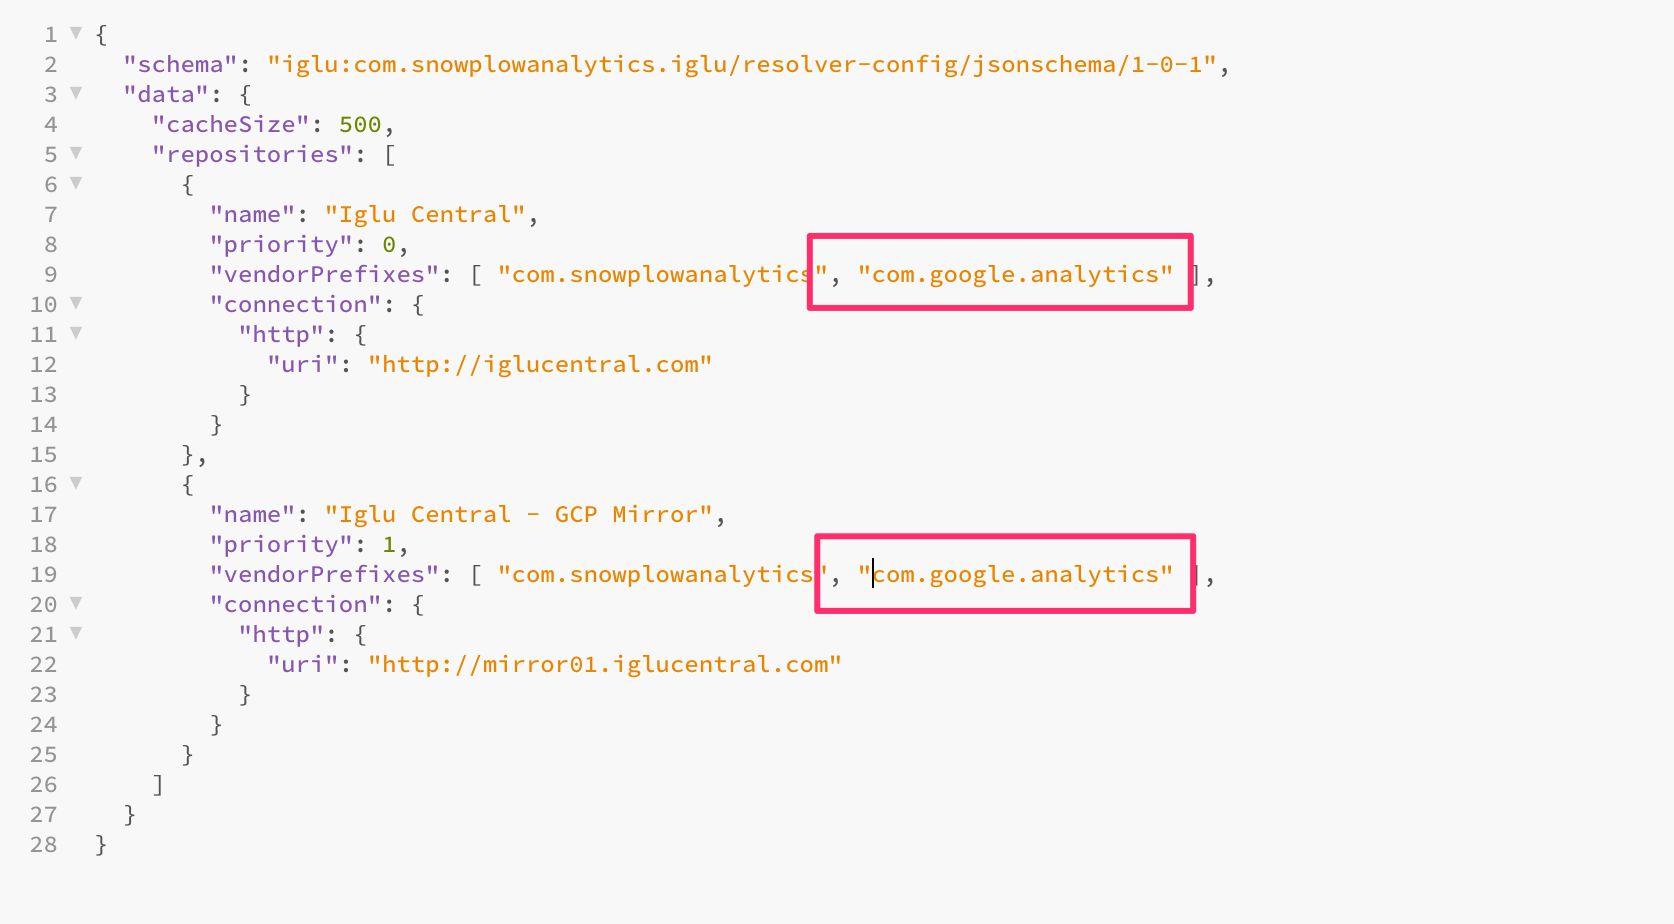
(1) Download the iglu_resolver.json file from here and open it for editing.
(2) Change the two vendorPrefixes parameters to also include the Google Analytics namespace (Note! You don’t have to do this if you’re using the vanilla Snowplow JavaScript tracker).
(3) Save the file locally.
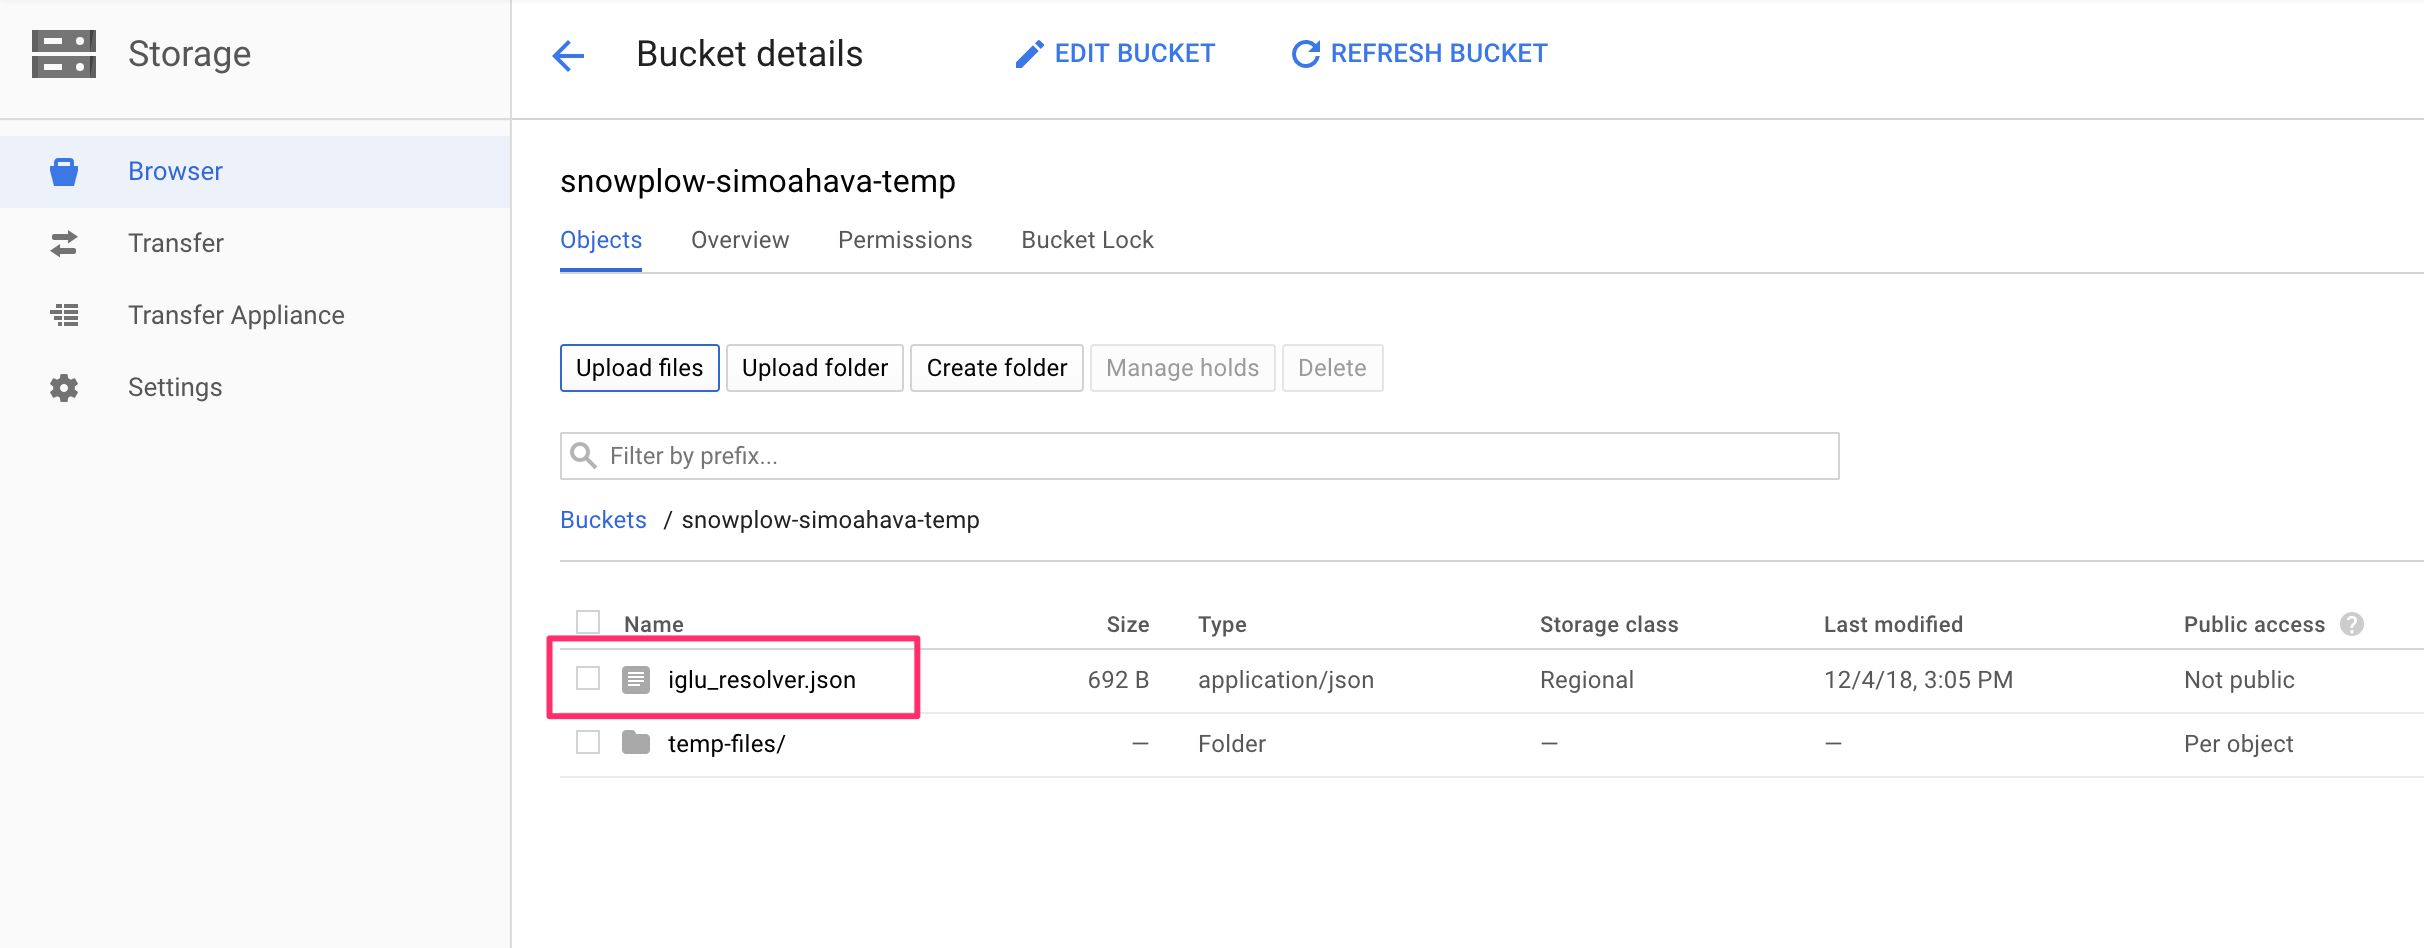
(4) Browse to https://console.cloud.google.com/storage/browser/, click open the temporary file bucket you just created, and upload the modified iglu_resolver.json to the root of that bucket (so not in the temp-files folder).
With this resolver configuration, you’re instructing the enricher and loader that hits using the Google Analytics namespace might be coming in.
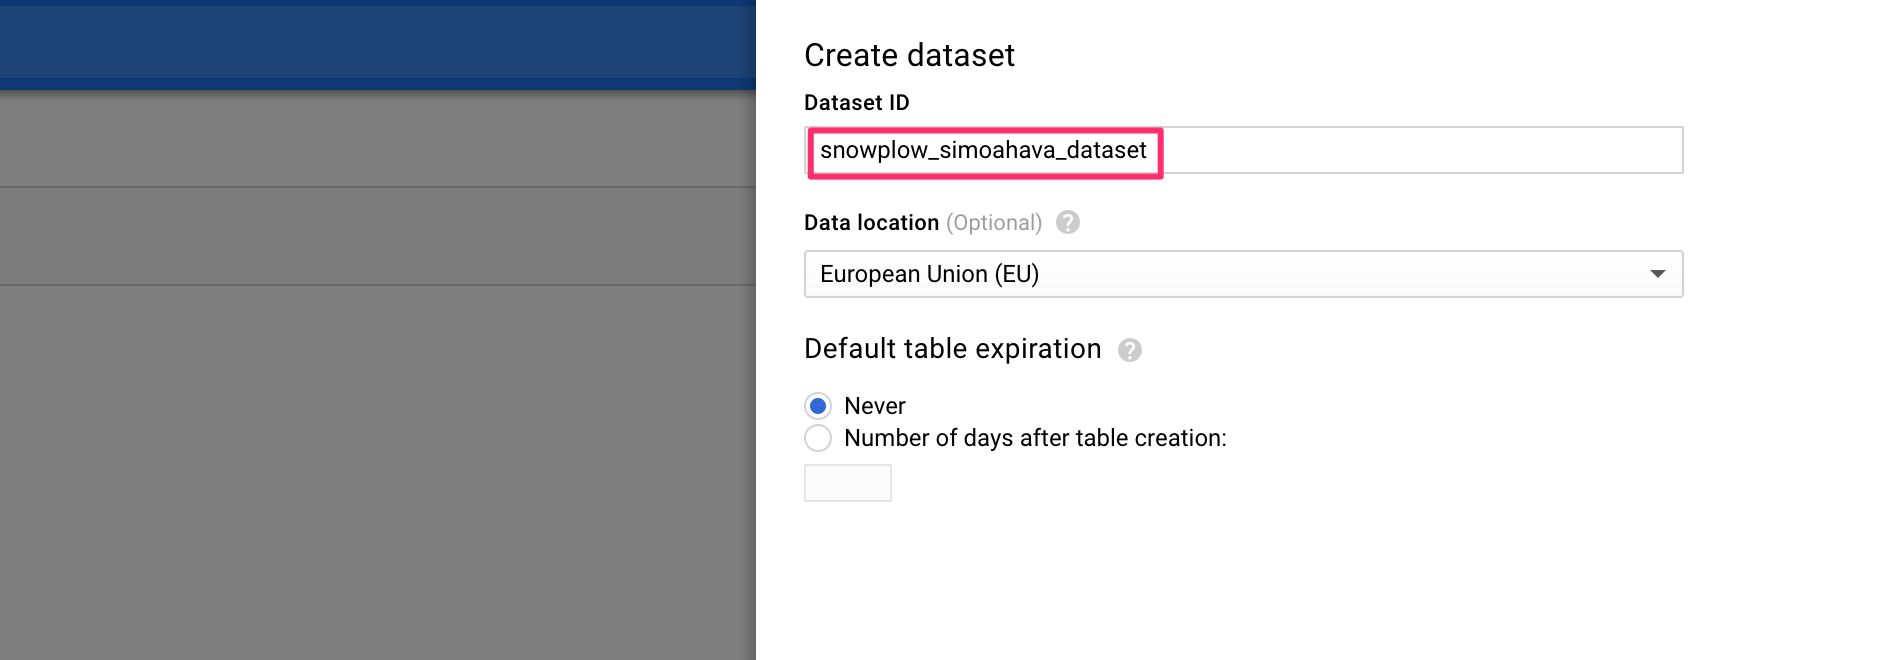
Step 5: Create a new BigQuery dataset
Before moving on, you’ll need to create a new dataset in BigQuery that will hold the table where your data will end up.
(1) Browse to https://console.cloud.google.com/bigquery, and choose your project from the selector to the left. Click CREATE DATASET.
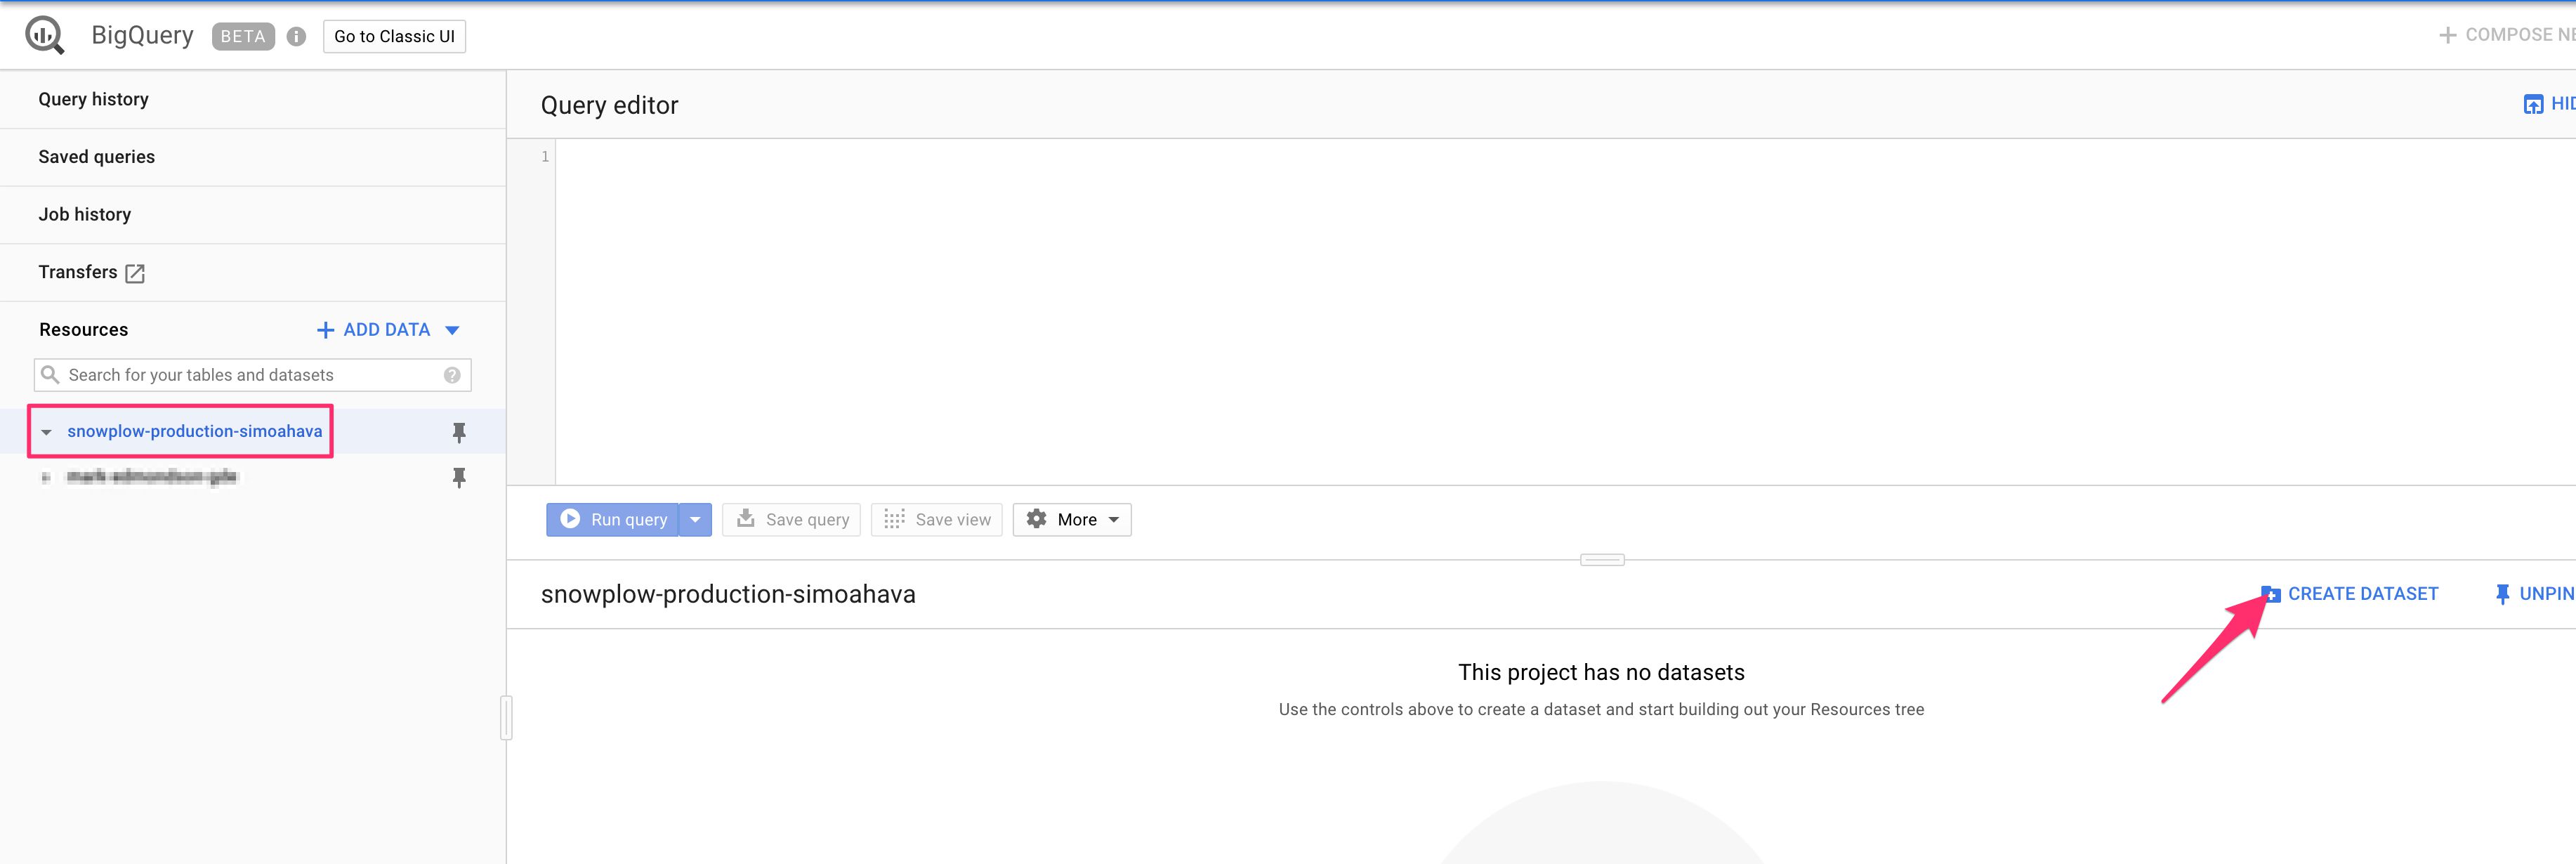
(2) Give the dataset an ID, such as snowplow_yourname_dataset, and click Create dataset.
NOTE! At this point you might want to just create a new table manually and partition that table on the derived_tstamp column. This way the BigQuery table is automatically partitioned by date of the hit, making it easier to manage and query by date.
This guide proceeds without creating a partitioned table just so that you can see how the mutator works.
Step 6: Create the BigQuery configuration file
(1) Open a new file for editing in a plain text editor.
(2) Copy-paste the following within:
{
    "schema": "iglu:com.snowplowanalytics.snowplow.storage/bigquery_config/jsonschema/1-0-0",
    "data": {
        "name": "Snowplow Page View Data",
        "id": "<Random UUID>",

        "projectId": "<Your GCP project name>",
        "datasetId": "<The BigQuery dataset ID>",
        "tableId": "pageviews",

        "input": "enriched-good-sub",
        "typesTopic": "bq-types",
        "typesSubscription": "bq-types-sub",
        "badRows": "bq-bad-rows",
        "failedInserts": "bq-failed-inserts",

        "load": {
            "mode": "STREAMING_INSERTS",
            "retry": false
        },

        "purpose": "ENRICHED_EVENTS"
    }
}
(3) Change the value of "id" to a random UUID which you can generate here. A valid value would be e.g. "3a27d47f-aeaf-4034-84b6-b1e82ca711d6".
(4) Change the value of "projectId" to your GCP project ID (e.g. "snowplow-production-simoahava").
(5) Change the value of "datasetId" to the ID you just gave your BigQuery dataset, e.g. "snowplow_simoahava_dataset".
(6) Make sure the Pub/Sub topic and subscription names correspond with those you created earlier in this chapter.
(7) Save the file locally as bigquery_config.json.
(8) Upload it to the temporary file bucket, where you already uploaded iglu_resolver.json to:
PHEW! That’s all the prep work done. Now you’ll need to just get the enricher and the BQ loader up and running in a new virtual instance group!
Finalize the ETL process
For ETL (extraction, transformation, and loading of your collector data), we’ll create a new instance template for an auto-scaling instance group.
You could use the same instance group as your collector, but this is not a sustainable way to run the pipeline, because the data streams from your site to the collector, from your collector to the enricher, and from the enriched stream to the BigQuery loader are vastly asymmetrical.
It will lead to a lot of redundancy and overhead if you have all your eggs in one basket.
Optimally, you’d run the enrichment and the BQ loader in their own groups, too, but for the sake of this exercise I’ll bunch them together for now.
Step 1: Create the instance template
Since you’ve done all the preparations in the previous chapter, this final step of the ETL is actually pretty simple. All you’ll need to do is create the instance template and fire an instance group off of it.
Well, it’s simple to you. It took me hours and hours and hours to get the thing working, so you’re welcome!
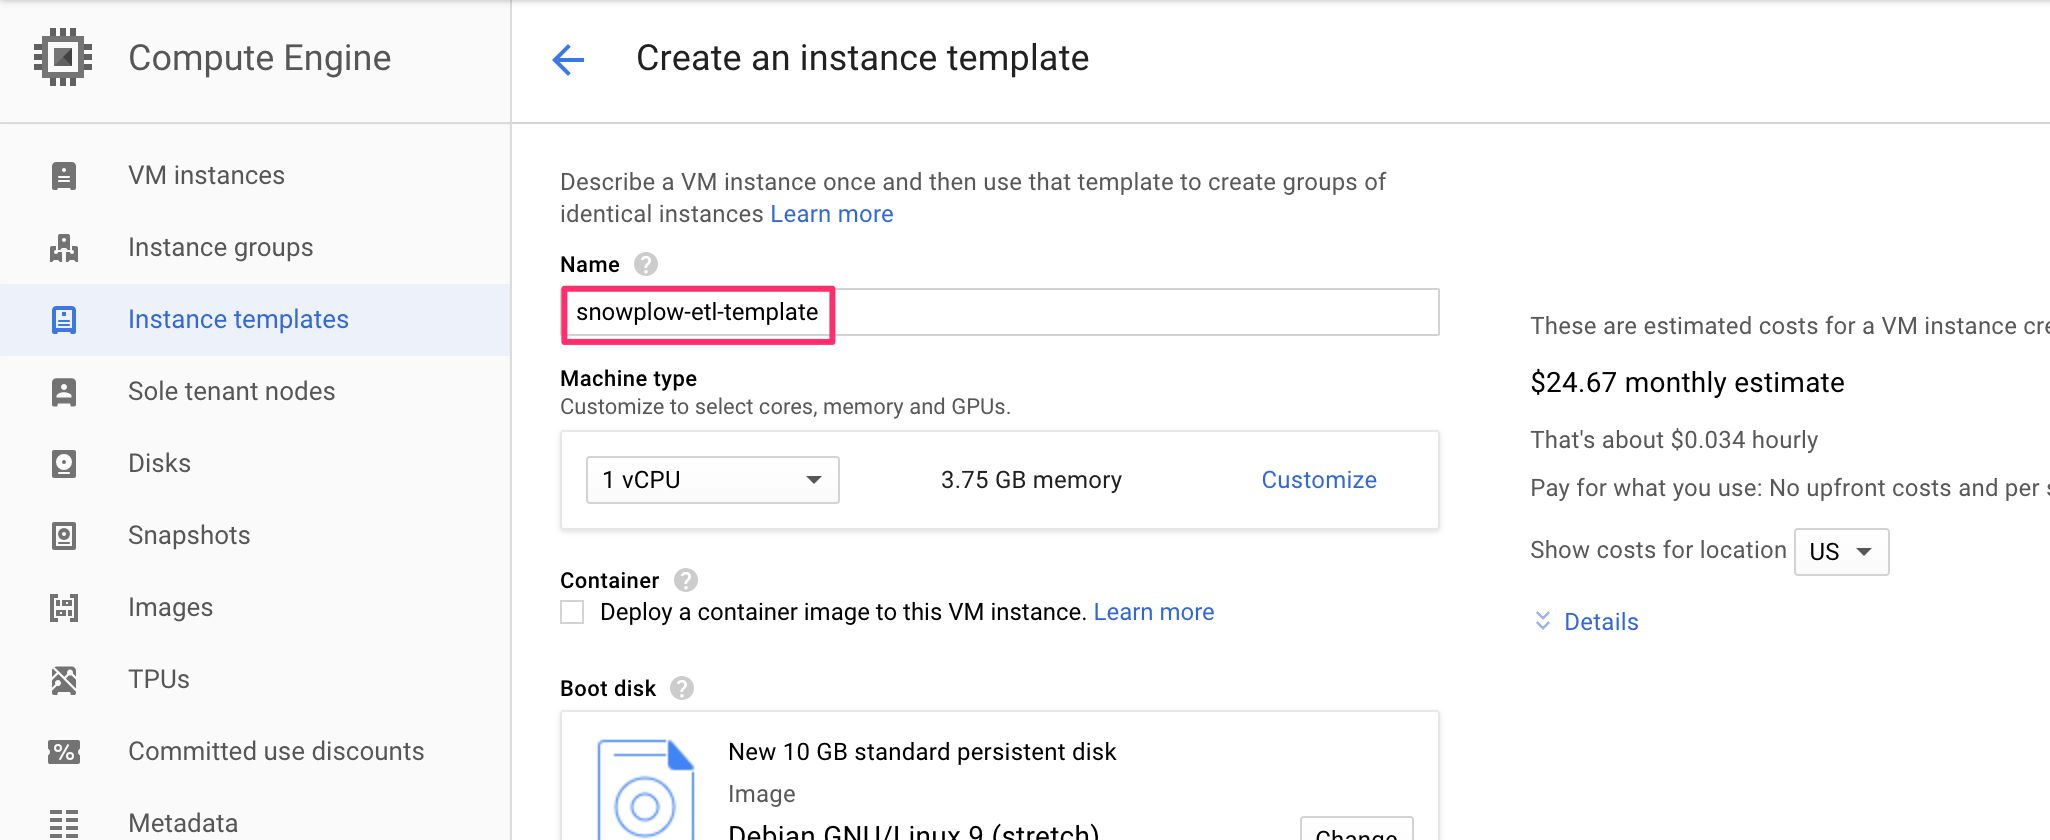
(1) Browse to https://console.cloud.google.com/compute/instanceTemplates/list, and click CREATE INSTANCE TEMPLATE.
(2) Give the template a name, e.g. snowplow-etl-template.
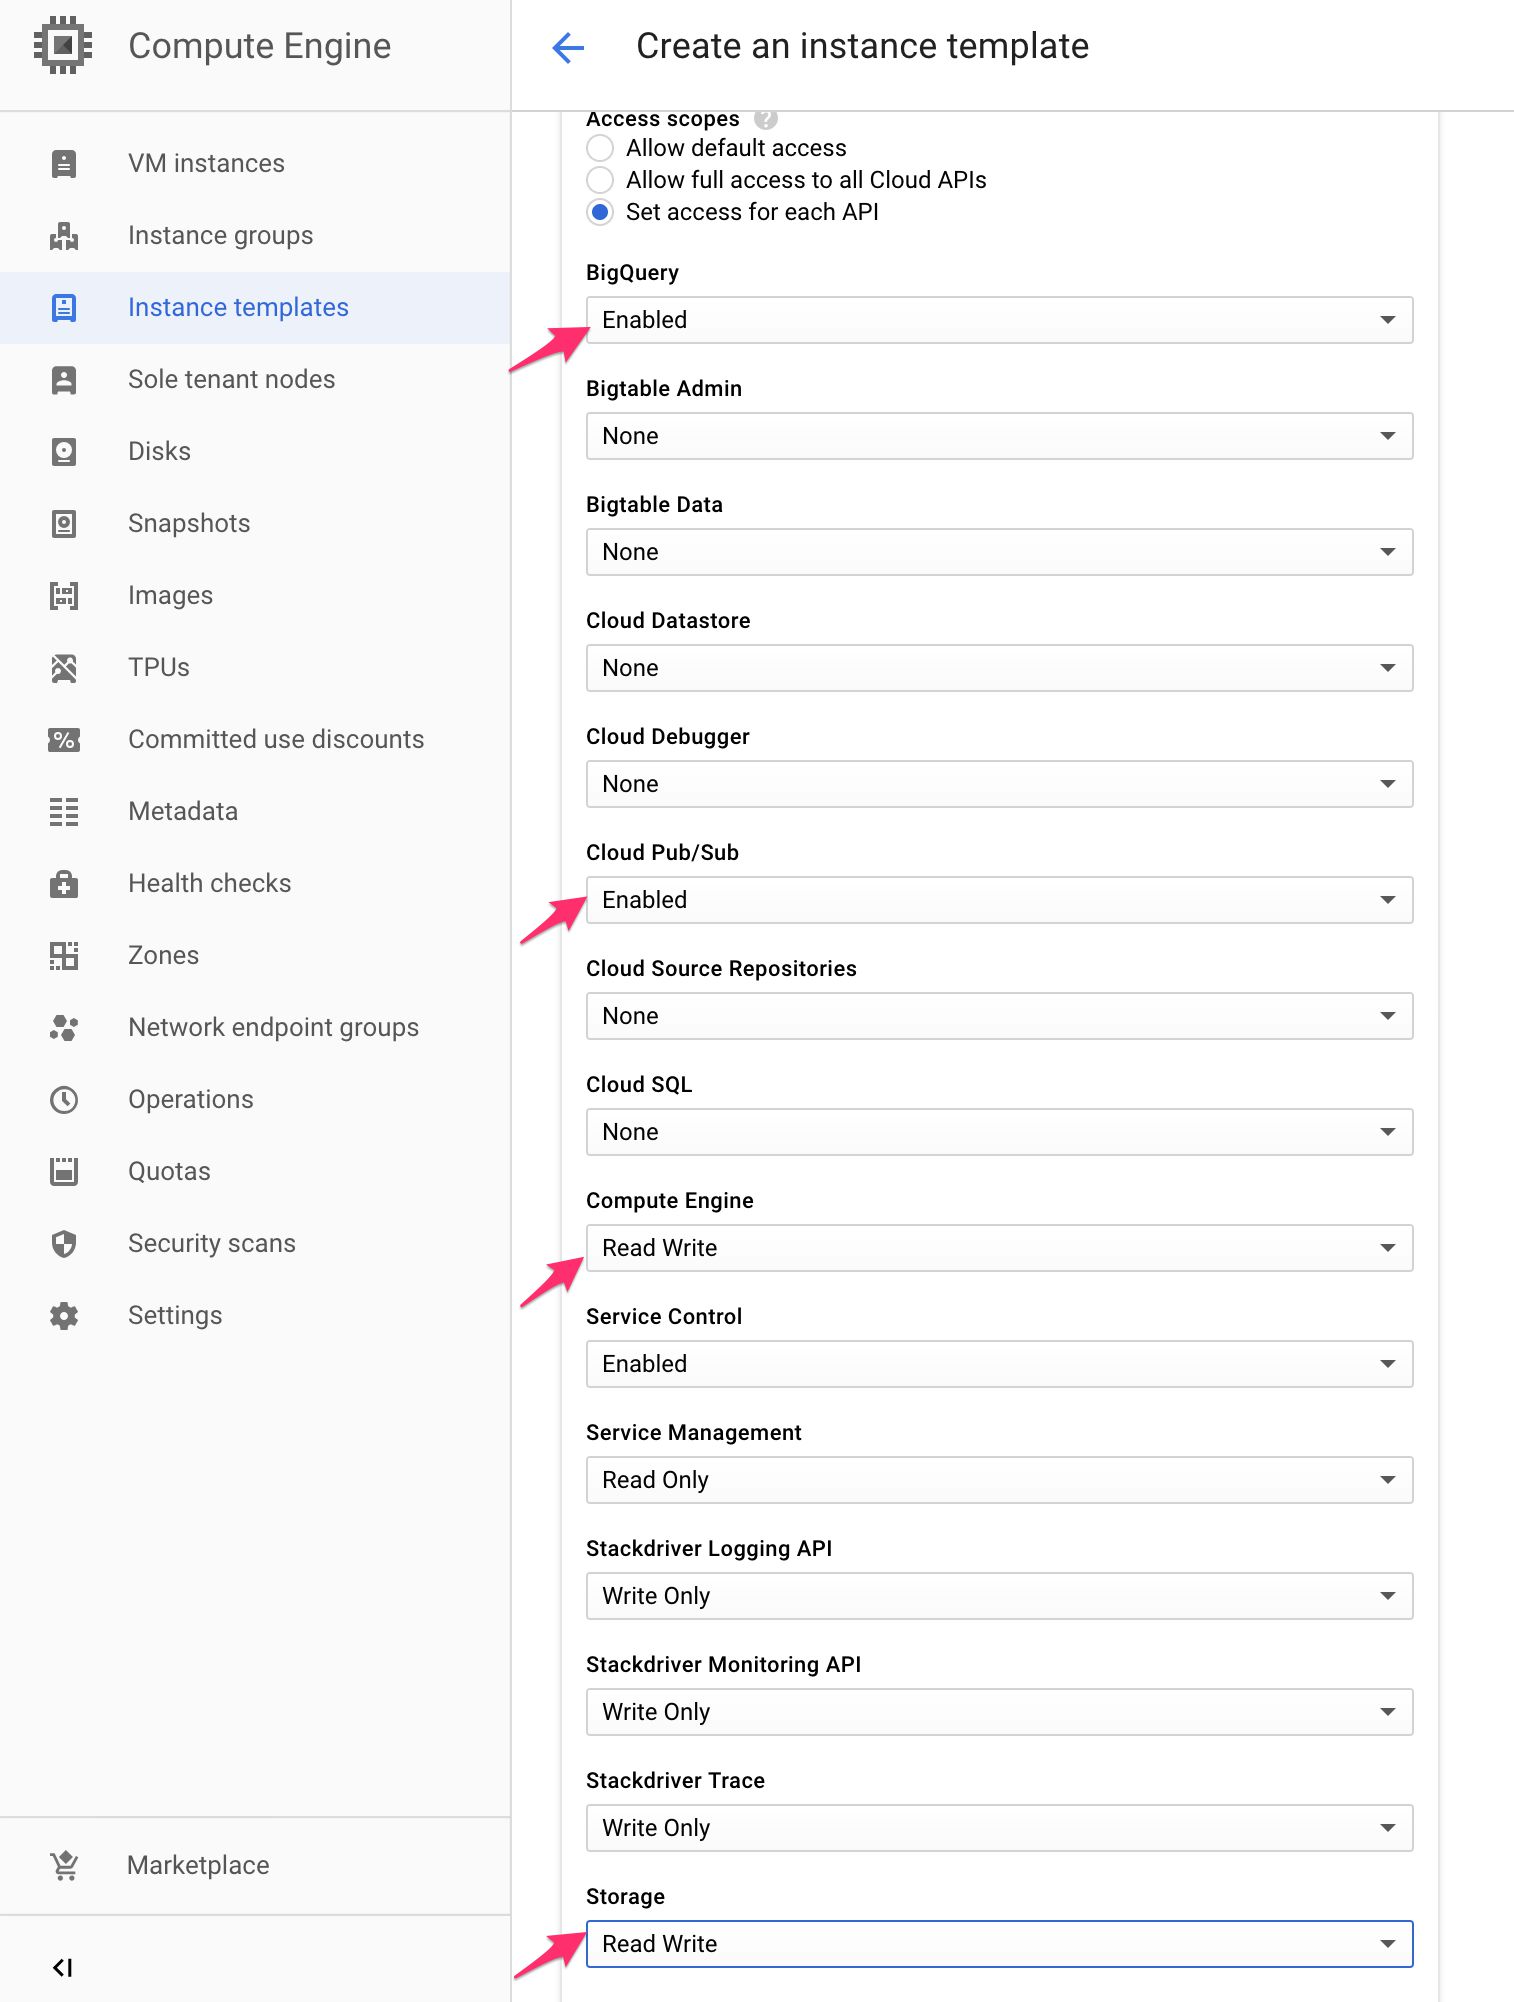
(3) Make sure the Compute Engine default service account is selected, and choose Set access for each API in the Access scopes list.
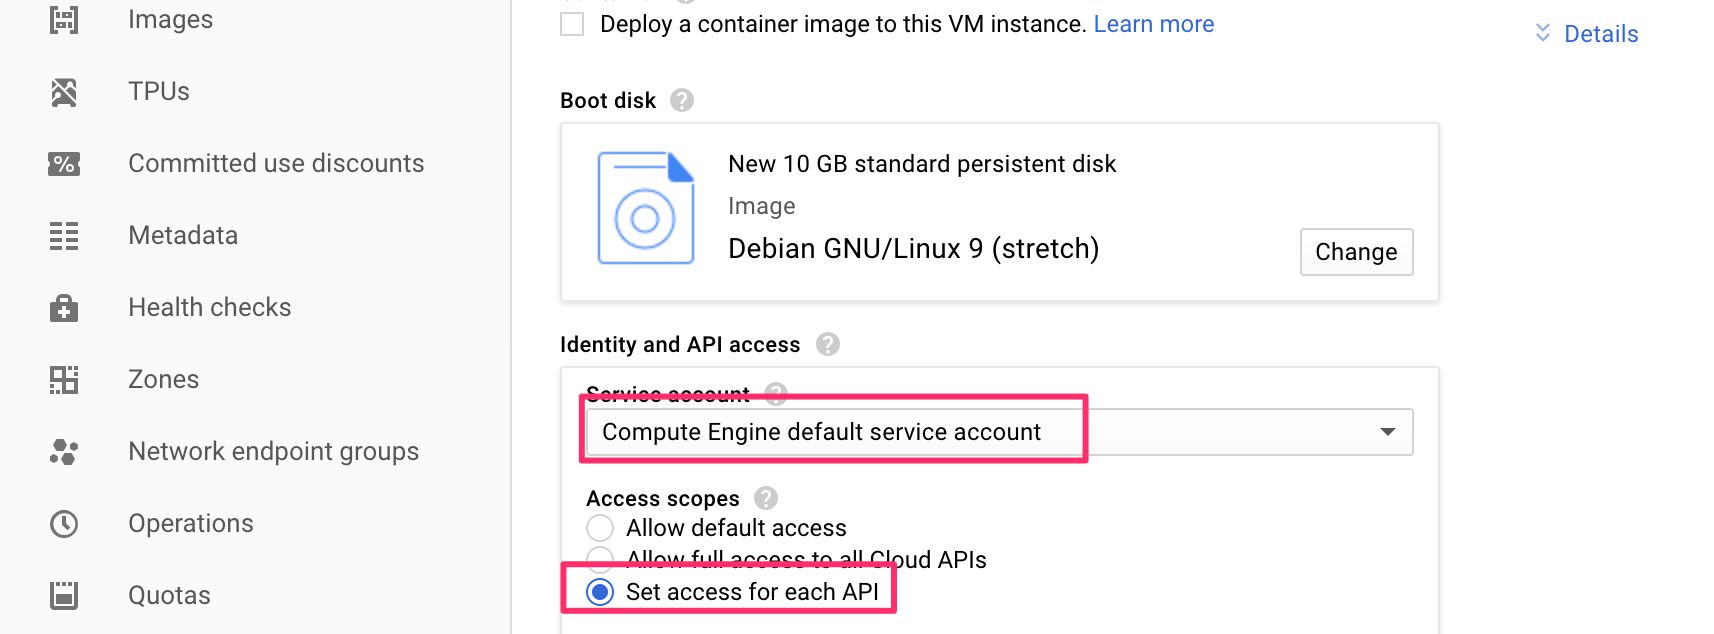
(4) Change the following API scopes:
- BigQuery: Enabled
- Cloud Pub/Sub: Enabled
- Compute Engine: Read Write
- Storage: Read Write
Leave the other options with their default values.
(5) Scroll down and click the Management, security, disks, networking, sole tenancy accordion heading.
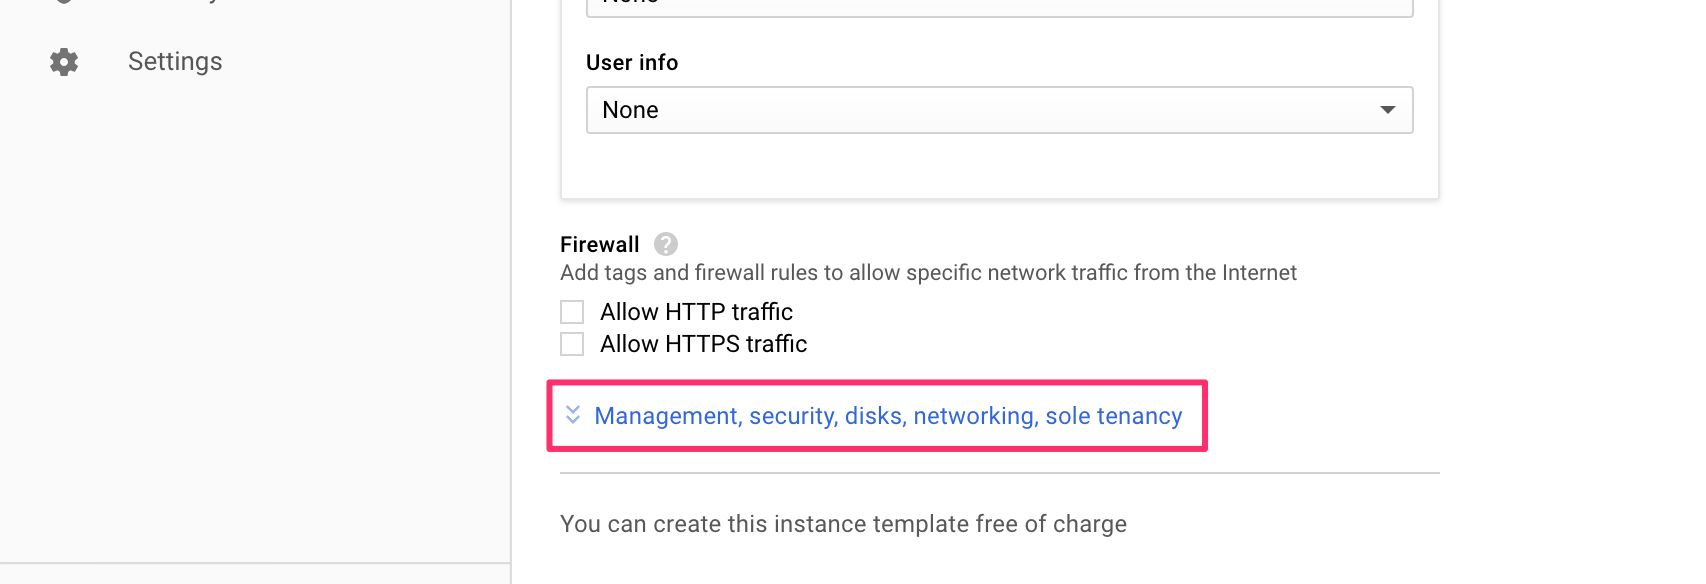
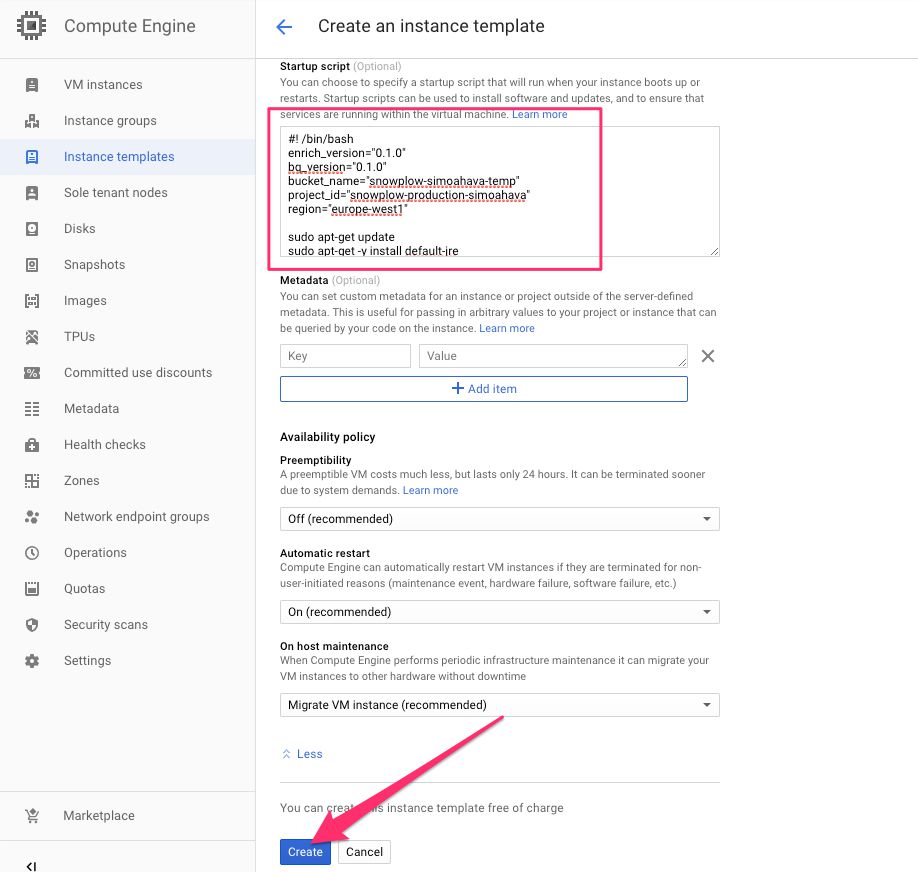
(6) Under Automation, copy-paste the following code into Startup script:
#! /bin/bash
enrich_version="0.1.0"
bq_version="0.1.0"
bucket_name="<cloud storage bucket name>"
project_id="<gcp project id>"
region="<region where to run the dataflow instances>"

sudo apt-get update
sudo apt-get -y install default-jre
sudo apt-get -y install unzip

wget https://dl.bintray.com/snowplow/snowplow-generic/snowplow_beam_enrich_$enrich_version.zip
unzip snowplow_beam_enrich_$enrich_version.zip

wget https://dl.bintray.com/snowplow/snowplow-generic/snowplow_bigquery_loader_$bq_version.zip
unzip snowplow_bigquery_loader_$bq_version.zip

wget https://dl.bintray.com/snowplow/snowplow-generic/snowplow_bigquery_mutator_$bq_version.zip
unzip snowplow_bigquery_mutator_$bq_version.zip

gsutil cp gs://$bucket_name/iglu_resolver.json .
gsutil cp gs://$bucket_name/bigquery_config.json .

./beam-enrich-$enrich_version/bin/beam-enrich --runner=DataFlowRunner --project=$project_id --streaming=true --region=$region --gcpTempLocation=gs://$bucket_name/temp-files --job-name=beam-enrich --raw=projects/$project_id/subscriptions/good-sub --enriched=projects/$project_id/topics/enriched-good --bad=projects/$project_id/topics/enriched-bad --resolver=iglu_resolver.json

./snowplow-bigquery-mutator-$bq_version/bin/snowplow-bigquery-mutator create --config $(cat bigquery_config.json | base64 -w 0) --resolver $(cat iglu_resolver.json | base64 -w 0)

./snowplow-bigquery-mutator-$bq_version/bin/snowplow-bigquery-mutator listen --config $(cat bigquery_config.json | base64 -w 0) --resolver $(cat iglu_resolver.json | base64 -w 0) &

./snowplow-bigquery-loader-$bq_version/bin/snowplow-bigquery-loader --config=$(cat bigquery_config.json | base64 -w 0) --resolver=$(cat iglu_resolver.json | base64 -w 0) --runner=DataFlowRunner --project=$project_id --region=$region --gcpTempLocation=gs://$bucket_name/temp-files
UPDATE 18 Jan 2019.
It might be wise to start off by capping the auto-scaling of the Dataflow jobs. Otherwise, since you’re working with streaming inserts, you might end up with lots and lots of virtual machines being started to support the hit stream.
To prevent the loader from auto-scaling out of control, you can cap the number of available workers at e.g. 3 (so max. 3 CPUs are used by the job), or you can turn off auto-scaling altogether by capping the worker number at 1.
To set the maximum of 3 workers to the loader, add this to the end of the snowplow-bigquery-loader command:
--maxNumWorkers=3
Setting the maximum to 1 will lead to a single-worker, non-autoscaling setup. To have more than one worker but no autoscaling, you’ll also need to add the option --autoscalingAlgorithm=NONE to the loader.
You’ll need to populate the five variables in the beginning of the code block before saving the instance template.
enrich_version: Get the latest Beam Enrich version number from here.bq_version: Get the latest BigQuery Loader version number from here.bucket_name: Type the name of the storage bucket for temporary files you created earlier.project_id: Type your GCE project ID.region: Choose a region for the Dataflow instances to run in (you need to choose from this list).
Once you’ve made the changes to the startup script, click Create.
Step 2: Start up a new instance group
Now that you have the template created, it’s time to create and start an auto-scaling instance group using this template. The idea is that when requests start flooding in, you’ll want to fire up new instances for your enrichment and loading steps so that your data collection won’t be impacted too severely by latency.
UPDATE 18 Jan 2019: Instead of creating an auto-scaling instance group, it’s more than enough to just use a single machine in the group to handle the Dataflow! This part of the guide was originally based on some misinformation. You can still go ahead with the instance template, but once we reach the section about the instance group, please read the steps carefully.
(1) While still in the instance template list, click open the template you just created.
(2) In the top of the page, click CREATE INSTANCE GROUP.
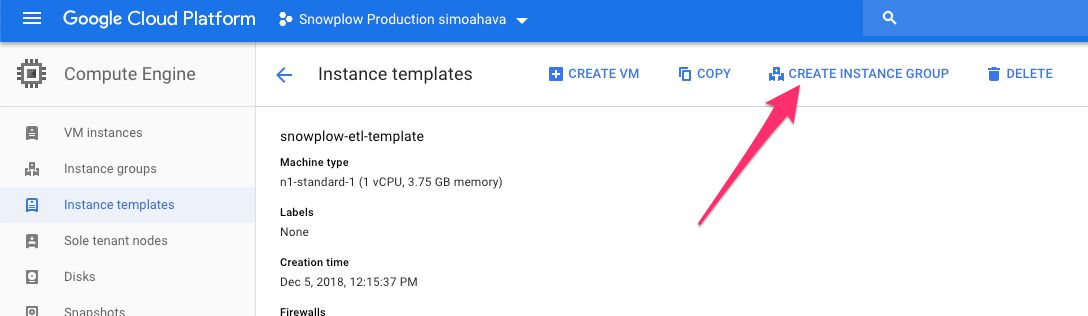
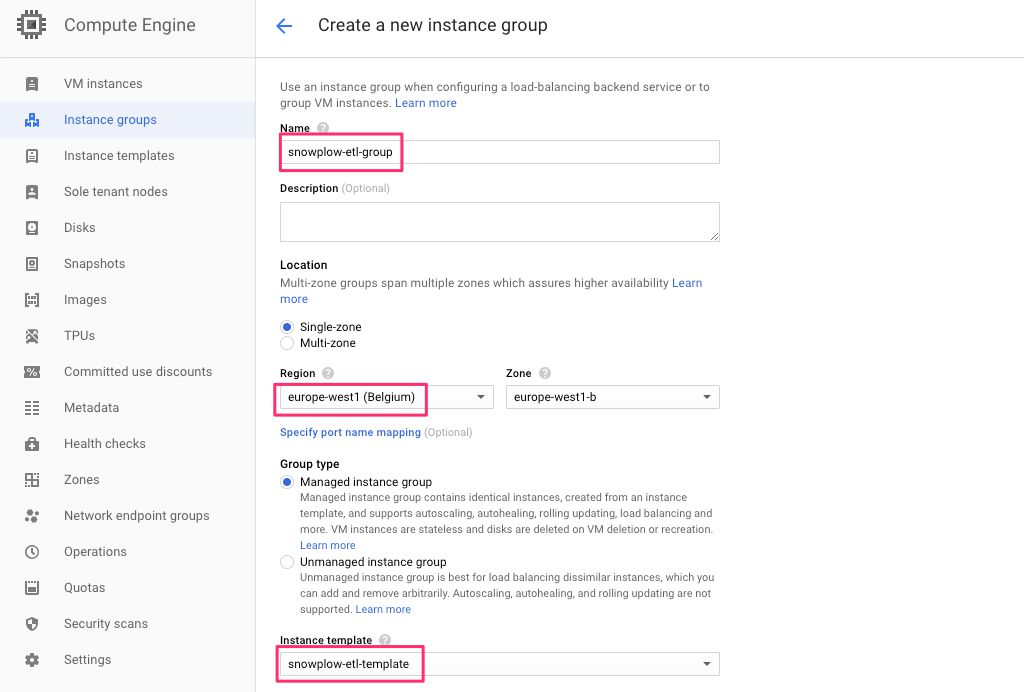
(3) Give the new group a descriptive name, such as snowplow-etl-group.
(4) Choose a region, e.g. europe-west1.
(5) Make sure the instance template you just created is selected in the Instance template menu.
UPDATE 18 Jan 2019: You can set Autoscaling
Off. The machine starting the Dataflow jobs does not need to autoscale. The Dataflow jobs are the ones that will require more power depending on the throughput rate, but you can start this machine with one static instance, scaling up manually if necessary.
(6) You can keep the rest of the options with their default values, but if you like, you can set the health check to what you use for the collector instance, too.
When ready, click Create.
Test everything
When you create the instance group, it runs the startup script from beginning to end. These are the steps it takes, in order:
Beam Enrich is started as a new Dataflow job, using
iglu_resolver.jsonfor configuration. The Dataflow job essentially starts a new GCE instance group for the job.The BigQuery Mutator is run with the
createcommand, and this creates thepageviewstable with a simple atomic structure in your BigQuery dataset.The Mutator is next run in its own thread with the
listencommand. This is basically a Java program which listens for incoming, enriched requests being populated in theenriched-goodPub/Sub topic. Each request is parsed for values and data types, and if thepageviewstable in BigQuery doesn’t have a corresponding column for some value in the request (validated against a schema resolved by the Iglu Resolver), a new column is created.Finally, the BigQuery Loader starts up as its own Dataflow GCE instance, and this will load your enriched data into the corresponding columns and rows in your BigQuery table.
Before starting the debugging, make sure you’re sending some hits from your site to the collector. So browse around, visit different pages, and check the network requests to make sure the requests to your collector are completing successfully.
Step 1: Check that Beam Enrich is running
To check if Beam Enrich is running, go to the Dataflow job list. You should see beam-enrich in the list with the status Running.
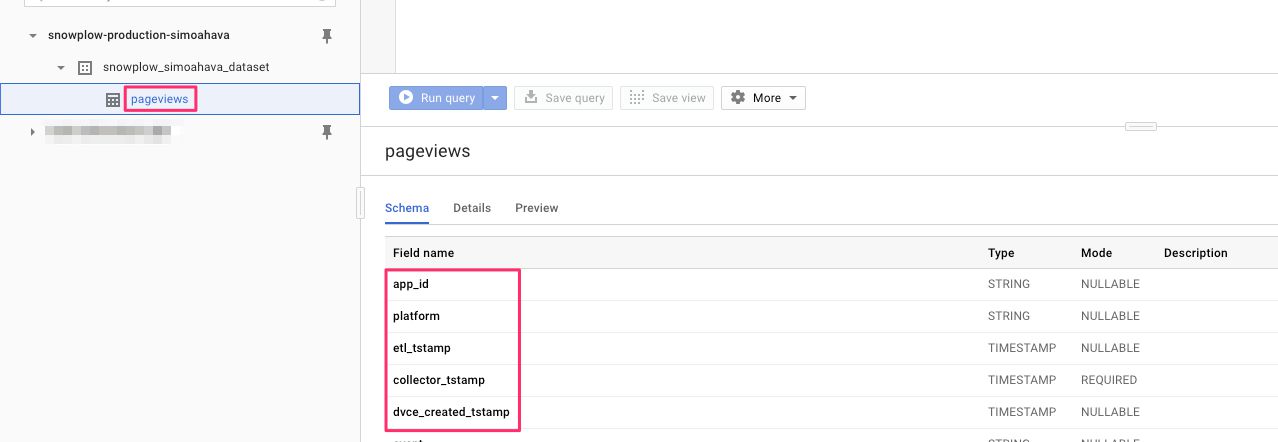
Step 2: Check that the mutator created the table
To check if the mutator’s create command worked, go to your BigQuery dataset, and expand it. You should see a table named pageviews under it, and the table should be populated with a number of columns, such as app_id, etl_tstamp, etc. These columns are the “default” atomic data columns Snowplow uses.
Step 3: Check that the mutator creates additional columns where necessary
Since you are collecting data with the Google Analytics tracker, you should shortly see a bunch of new columns added to the table description.
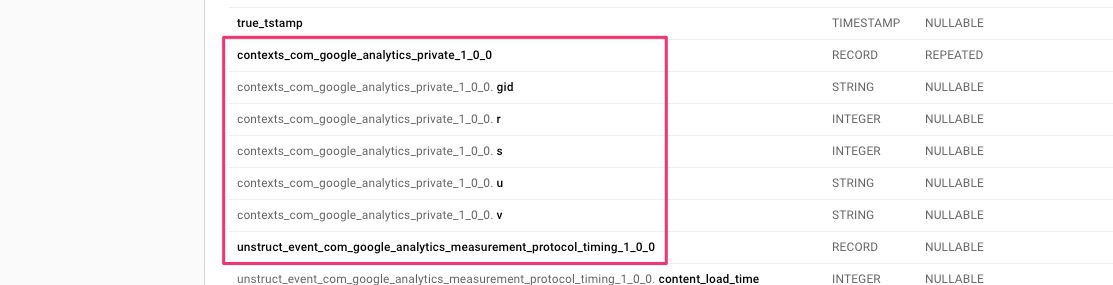
Step 4: Check that the BigQuery loader Dataflow job started
Visit the Dataflow job list again. You should see something like main-root-XXXXX-YYYYY in the list with the status Running.
Step 5: Check that data is flowing into your BigQuery table
Visit your BigQuery dataset/table again, and select the pageviews table.
In the Query editor, type the following query and press Run query:
SELECT * FROM `your_dataset_name.pageviews`Where your_dataset_name should be replaced with the name of your dataset. You should see a bunch of results returned after the query is complete.
Troubleshooting
You can visit the VM instances list and SSH directly into the ETL instance.
There, you can visit /var/log/, and open the file daemon.log for editing with e.g.
$ pico /var/log/daemon.logIt’s a full log of the the instance’s processes. You’ll need to run through the log and see where the error is.
There are many things that might have gone wrong, but the most common (in my own experience) are:
Incorrect access scopes in the instance template - double-check here.
Typo in
iglu_resolver.jsonorbigquery_config.json, or forgot to add them to the correct cloud storage bucket - double-check resolver here and BigQuery config here.Typo in the startup script - double-check here.
Collector not running - double-check here.
Impatience - wait 10-15 minutes before trying all the steps above again. It’s possible you’re just too hasty and the virtual machine instance hasn’t started up properly yet.
Final thoughts
It’s a long guide, but I still worry if it’s detailed enough. I’m a bit ashamed at not being able to tell you exactly how you should scale and group your instances, or how you should optimize your load balancing system. But these are things you need to experiment with by yourself, or with the help of a seasoned data engineer. Remember that you can also utilize the Snowplow Insights service to help you set things up and manage the pipeline!
I very much prefer the GCP user interface over AWS - there’s a flow to things, and related resources are grouped and linked together in a logical way. It makes moving from one service to another much smoother.
Setting up the pipeline is fun (if you’re into that kind of thing), but it does result in a huge data table full of columns and rows of often undecipherable data. One thing I tend to forget is that the real work begins after the pipeline is created. Making sense of the data requires, at the very least, visualization in a tool such as Data Studio, but you might want to look at what Snowplow has to say about data modelling, too.
I think Snowplow’s done an impressive job of making it possible create your own analytics pipeline with a fairly manageable cost. There are things that could have been done far more smoothly, such as utilizing Docker containers offered by Snowplow.
There are many moving parts in the pipeline. For me, personally, the race between different services enriching, shredding, mutating, and loading each incoming request is still a bit of a mystery. Snowplow has services (such as the BigQuery forwarder) that handle these problems, but setting it up was beyond the scope of this guide.
There’s also the whole world of enrichments that I deliberately skipped. It’s painful to see the columns for e.g. geographical data showing null, but I’ll leave those for another guide.
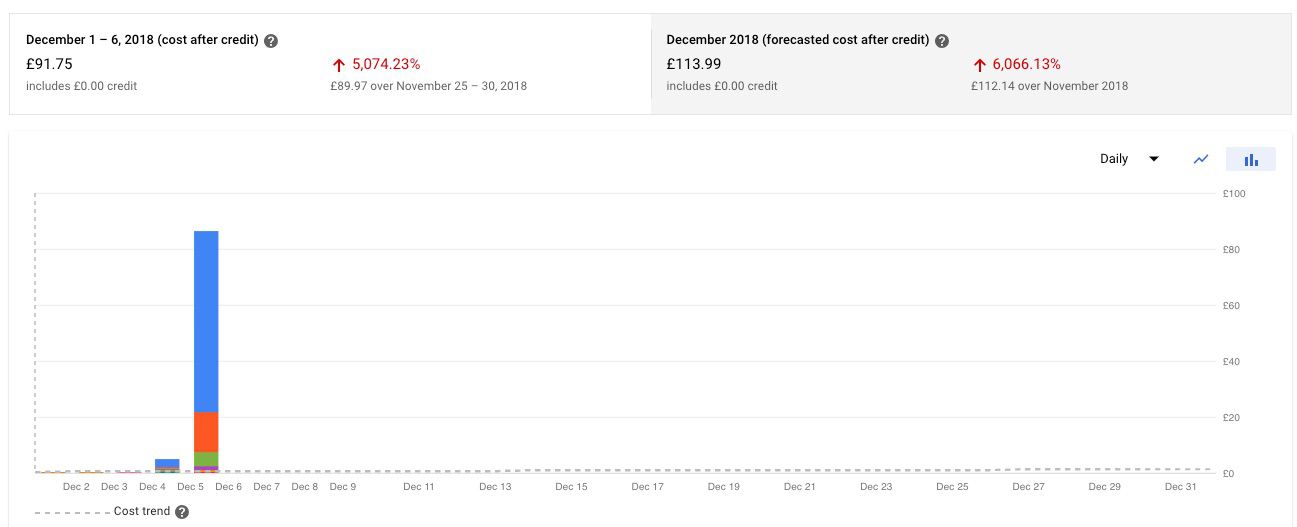
One thing to note is that you should keep a keen eye on projected and actualized costs. Once you’ve managed to build the pipeline itself, your next job as a data engineer is to look for optimization opportunities. With a scalable cloud infrastructure, it’s important to understand the often strenuous relationship between latency, scale, and cost.
I hope this guide has been useful. I also hope it doesn’t become outdated too soon.
Huge thanks to Snowplow for providing me with help and resources throughout writing this guide. I’m especially grateful to Yali Sassoon and Joao Luis for their support.