I’ve written about outbound link click tracking before. It’s a very solid way to track interactions on the site, as clicking a link that leads away from a site is a signal of … well, something.
In Google Tag Manager it’s now extremely easy and efficient to track outbound link clicks, thanks to the introduction of a new configuration in the Auto-Event variable.
This article will introduce the new method and show you how you can quickly set it up!
The Simmer Newsletter
Follow this link to subscribe to the Simmer Newsletter! Stay up-to-date with the latest content from Simo Ahava and the Simmer online course platform.
Tip 106: Track outbound link clicks with the Auto-Event variable
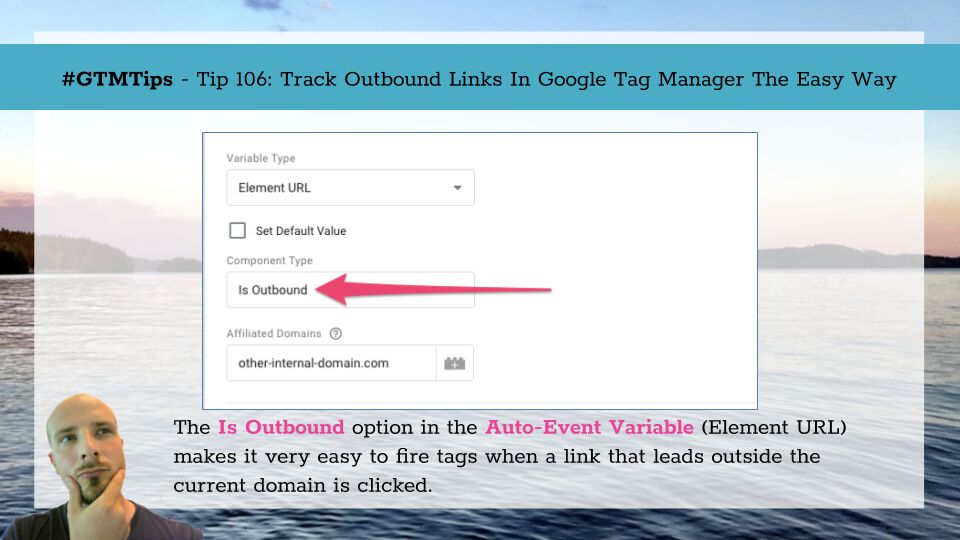
The method is simple. When you create a new Auto-Event variable in GTM, you can choose Element URL as the Variable Type.
Without special modifications, this variable would return the value of the href attribute of the clicked link.
However, you can now specify a new Component Type for this variable, and it’s called Is Outbound.
This variable returns true if the clicked link URL did not match the current domain, and false if it did. You can use this in your Just Links trigger to have the trigger only fire for outbound link clicks.
Here are the steps you need to take.
Step 1: Create the Auto-Event variable
Go to Variables in the Google Tag Manager user interface, and scroll down to User-Defined Variables. Click New.
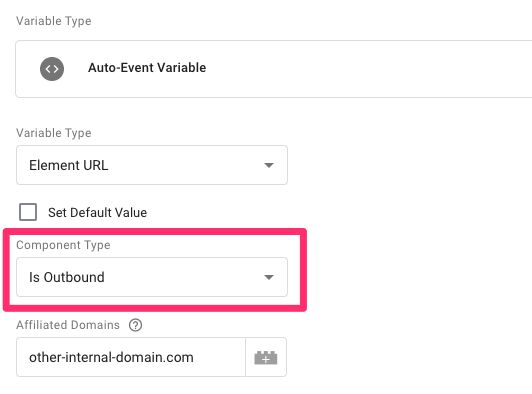
From the variable selector, choose Auto-Event variable as the variable template.
Then, to configure it, select Element URL as the Variable Type.
Select Is Outbound as the Component Type.
If you want Google Tag Manager to consider other domains as internal domains as well (to not have links to your blog or your webshop be considered as outbound link clicks, for example), you can add them as a comma-separated list in the Affiliated Domains field.
Give the variable a name such as Is Outbound Link and save it.
Step 2: Create the Just Links trigger
Then, go to Triggers in the GTM user interface, and click New.
Choose Click / Just Links as the trigger type.
Set the Wait for tags and Check validation options as you wish (see this for more details). If you do check either, you’ll need to make sure you set the trigger enabling options correctly (see this for more details).
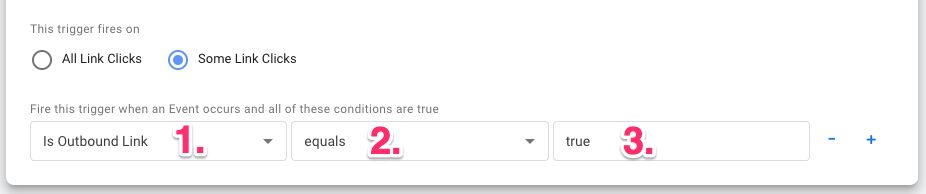
Then, choose Some Link Clicks as the firing setting for the trigger.
- Choose Is Outbound Link as the variable for the condition.
- Choose equals as the predicate.
- Set
trueas the expected value.
Once you save that trigger, any tag you add it to will only fire if the click landed on a link, and if the link leads to another domain than the one the user is currently on.
Note! The link href must be a valid URL. If it’s e.g. a
mailto:link or ajavascript:void(0), it will not be considered an outbound link.
What about Google Analytics: App + Web?
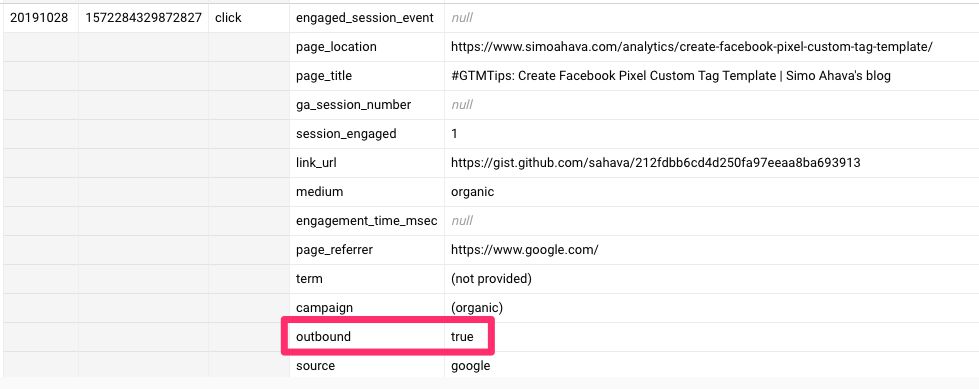
Well, you don’t have to worry about tracking outbound link clicks if you have Google Analytics: App + Web deployed on your site. Its enhanced measurement capabilities automatically track outbound link clicks. You can find them in the reporting UI by checking the outbound parameter value for the events.
If you want to do more elaborate analysis on the outbound parameter, you need to add it to parameter reporting, after which you can add it to the Analysis reports.
If you have BigQuery export configured, the outbound parameter is included in all click events.
Summary
I love writing articles like this. It’s all about some huge simplification in the Google Tag Manager user interface, and simpler is ALWAYS better.
This is a good direction for Google Tag Manager, and I hope they introduce smoother and smoother UI options for the most common use cases.