At one point in the turbulent year of 2020, you might have gasped in surprise when looking at the preview interface of Google Tag Manager. No, I’m not talking about the new preview mode interface.
Instead, I’m referring to how the Click Element and Form Element built-in variables would now display a CSS path string rather than the expected [object HTMLDivElement] (or equivalent).
There was good and bad in this update.
The good thing was that the Click Element variable was now much more informative in Preview mode. Honestly, there’s not much you can do with the object element string in terms of debugging. Being able to see the CSS path gives us more clues on how the clicked element was reached.
The bad thing was that the preview mode output is very misleading. It claims now that Click Element returns a string and a CSS path. It does neither. It still returns an HTML element which you can use with your CSS selector predicates and your custom DOM traversal scripts.
Just to reiterate: The behavior of Click Element has not changed. The only thing that’s changed is how the Click Element variable is displayed in the Preview interface.
I would have expected Google to keep the Click Element as it was and instead introduce a new built-in variable called Click CSS Path or something. This would have avoided the ambiguity while still adding value to the variables in the container.
Well, I want to show you how you can create your own CSS path variable. The variable uses the exact same method that GTM uses for determining the CSS path, so it should always match what you see in the Preview interface.
The Simmer Newsletter
Follow this link to subscribe to the Simmer Newsletter! Stay up-to-date with the latest content from Simo Ahava and the Simmer online course platform.
The CSS Path variable
In Google Tag Manager, go to Variables and click the New button to create a new user-defined variable.
Next, choose Custom JavaScript variable as the type.
Unfortunately, custom templates do not (yet) support DOM traversal or handling HTML elements, so you need to use a Custom JavaScript variable for this.
Copy-paste the following into the code editor:
function() {
  // Build a CSS path for the clicked element
  var originalEl = {{Click Element}};
  var el = originalEl;
  if (el instanceof Node) {
    // Build the list of elements along the path
    var elList = [];
    do {
      if (el instanceof Element) {
        var classString = el.classList ? [].slice.call(el.classList).join('.') : '';
        var elementName = (el.tagName ? el.tagName.toLowerCase() : '') +
            (classString ? '.' + classString : '') +
            (el.id ? '#' + el.id : '');
        if (elementName) elList.unshift(elementName);
      }
      el = el.parentNode
    } while (el != null);
    // Get the stringified element object name
    var objString = originalEl.toString().match(/\[object (\w+)\]/);
    var elementType = objString ? objString[1] : originalEl.toString();
    var cssString = elList.join(' > ');
    // Return the CSS path as a string, prefixed with the element object name
    return cssString ? elementType + ': ' + cssString : elementType;
  }
}
Save it and you’re good to go!
The script first builds the list of elements on the click path, all the way to the highest node in the document (html).
It does this by checking what the tagName of the element is, and then adding class and/or ID modifiers to it. Then, it moves to the next element up the DOM tree.
Once the list is built, the script finally takes the stringified element object name itself (e.g. HTMLDivElement) and adds that as the prefix to the CSS path string.
A sample return value of the script could be something like this:
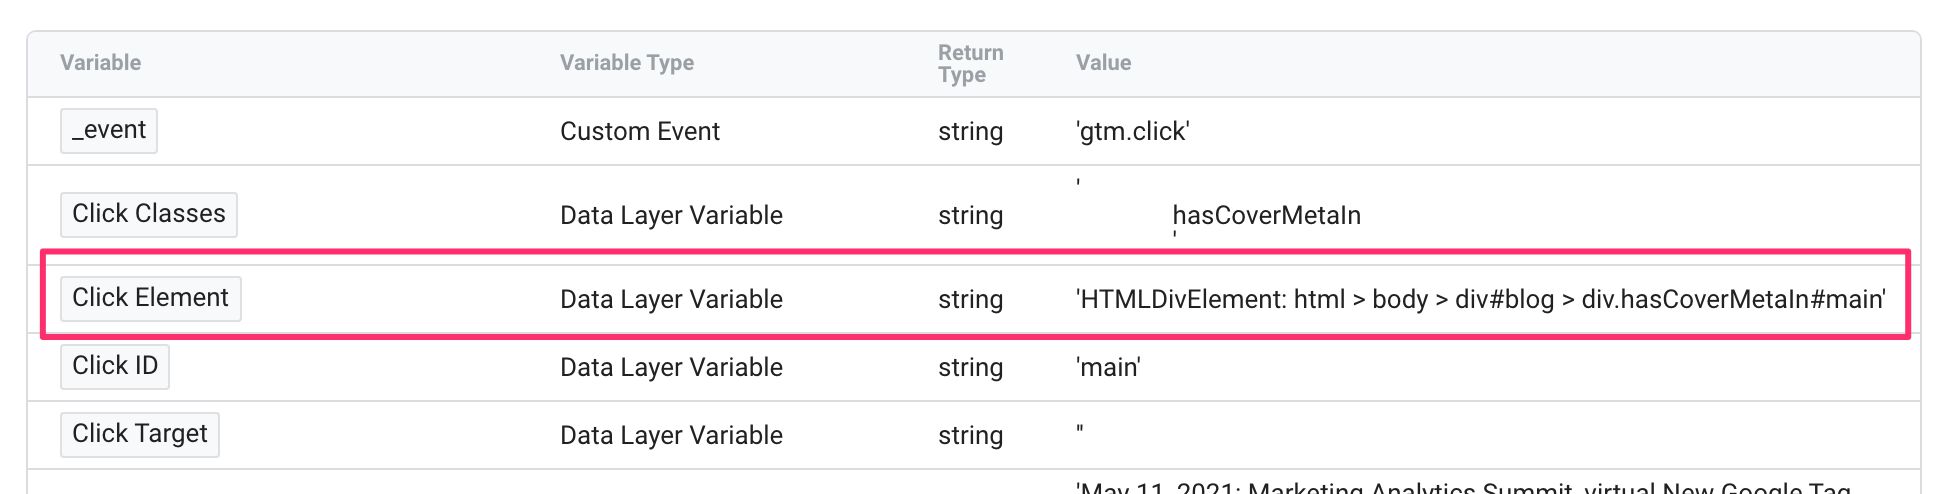
'HTMLDivElement: html > body > div#blog > div.hasCoverMetaIn#main'
This means that the clicked element is an HTMLDivElement (<div>), with a single class of hasCoverMetaIn and the ID main. The element has three ancestors: a <div id="blog">, the <body> tag, and finally the <html> node itself.
Summary
What is this script useful for? Good question!
It’s not very useful in a trigger, as you can use the matches CSS selector predicate for a more robust approach to identifying elements in the DOM tree.
However, it might be interesting metadata to send to your analytics tool of choice with the click event. Sometimes sending the click path will help uncover missing bits of information that you might not have considered sending in the first place.
For example, you might find out that your Click trigger has been too lax, collecting clicks from elements you never intended it to do. You can check the CSS path to see which “rogue elements” are receiving clicks, after which you can calibrate the Click trigger itself to be more precise.
Also, I miss writing articles like this, where I look at some nifty customization that is achievable with JavaScript.
I hope you enjoyed the article! If you can think of a use case for the CSS path variable, please let us know in the comments!