You can utilize Server-side tagging in Google Tag Manager to build your own custom Universal Analytics proxy.
This proxy comes in the shape of a new Client custom template, which takes the incoming /collect requests and sends them to Google Analytics. While doing so, it also returns the _ga cookie in a Set-Cookie header, thus preventing Safari’s Intelligent Tracking Prevention from capping its expiration to just 7 days.
You might also be interested in reading what Google’s own solution is for migrating from JavaScript cookies to those set in HTTP headers.
I’ve also created a video that is similar though a bit more advanced than this written tutorial.
NOTE! The video has one important omission. When creating the Client template, make sure to update the “Sends HTTP Requests” permission to include “Allow Google Domains”. Otherwise the proxying of analytics.js doesn’t work.
If the video doesn’t work, you can watch it here.
The Simmer Newsletter
Follow this link to subscribe to the Simmer Newsletter! Stay up-to-date with the latest content from Simo Ahava and the Simmer online course platform.
Tip 117: Build a Universal Analytics Client
To get things working, you need a couple of things:
- A fully functional Server-side tagging setup.
- A Client running in the Server container (we’ll build this now).
- A Universal Analytics tag in the Server container (I’ll instruct this as well).
- Modifications to all the Universal Analytics tags firing in the web container (yes, I’ll help with this as well).
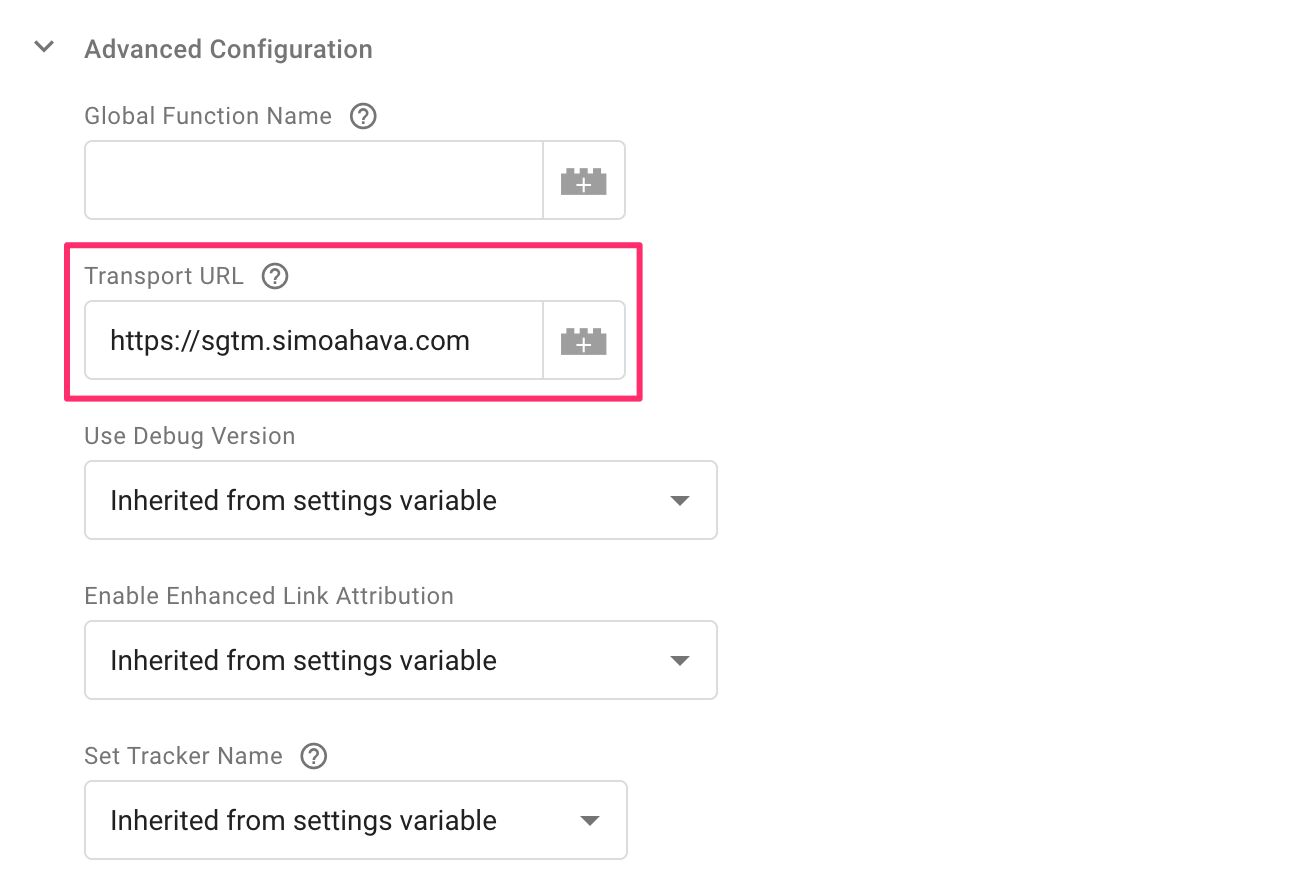
You will use regular Universal Analytics tags in the web container, but you’ll set their Transport URL field to point to your Server endpoint. These tags will only be used for sending the data to the Server container rather than directly to Google Analytics.
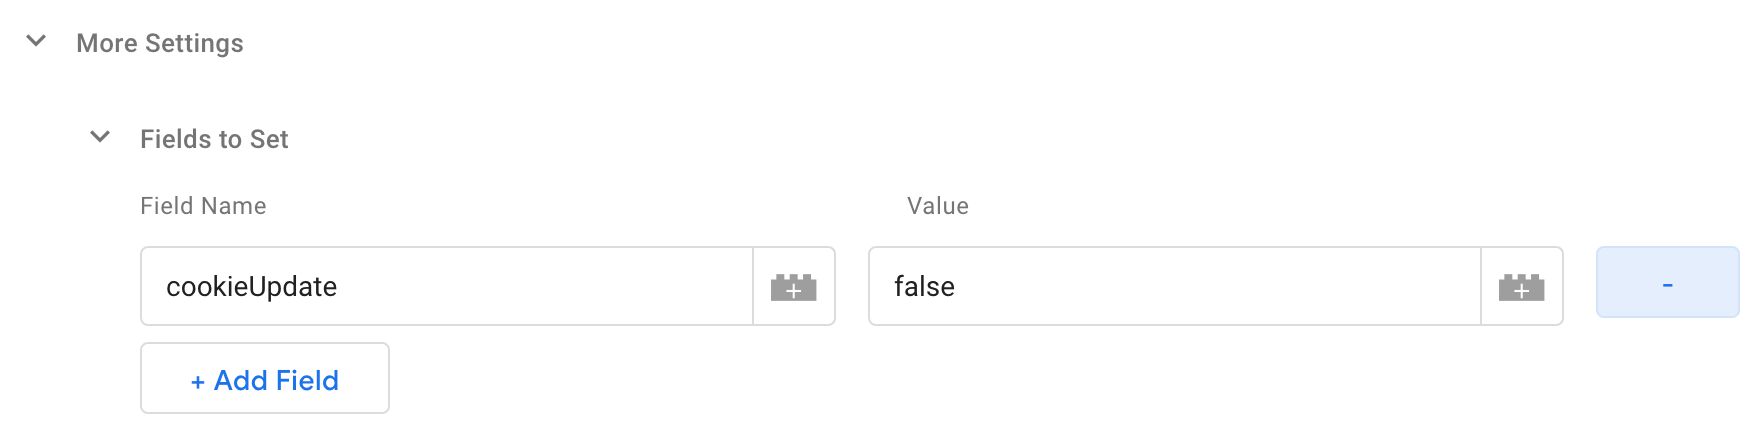
Next, all the Universal Analytics tags in the web container will need the following modification in their Fields to Set (using a Google Analytics Settings variable is recommended).
This field prevents the Universal Analytics JavaScript from refreshing the _ga cookie. You want to do this because the whole purpose of the Set-Cookie header we’ll configure in the Server container is to prevent the web browser from setting the _ga cookie with JavaScript. All JavaScript-set cookies are prevented by Safari from having a longer expiration than 7 days.
Remember, this field must be set in all Universal Analytics tags. Even a single tag without this will rewrite the cookie when it fires and thus will negate any benefit you derived from the custom Client.
Finally, the proxy itself.
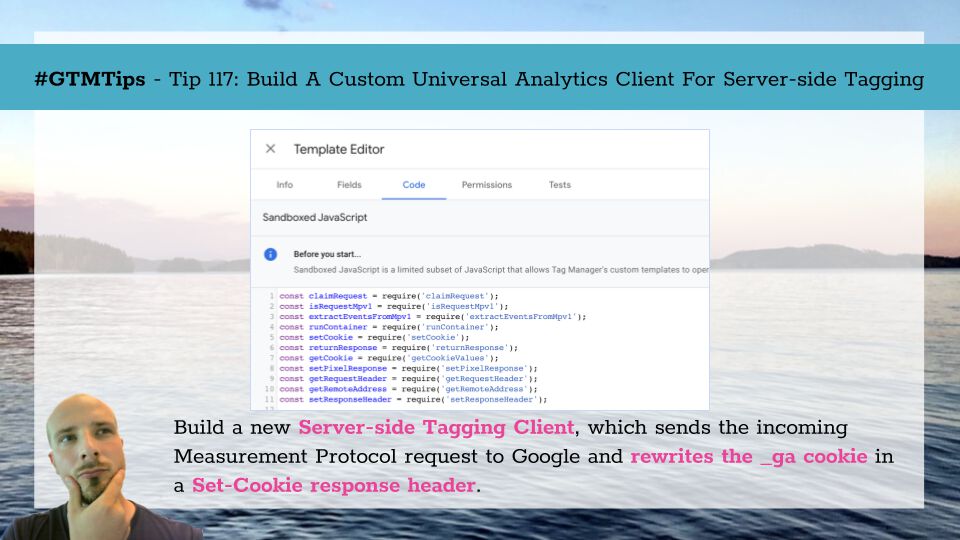
Build the Client
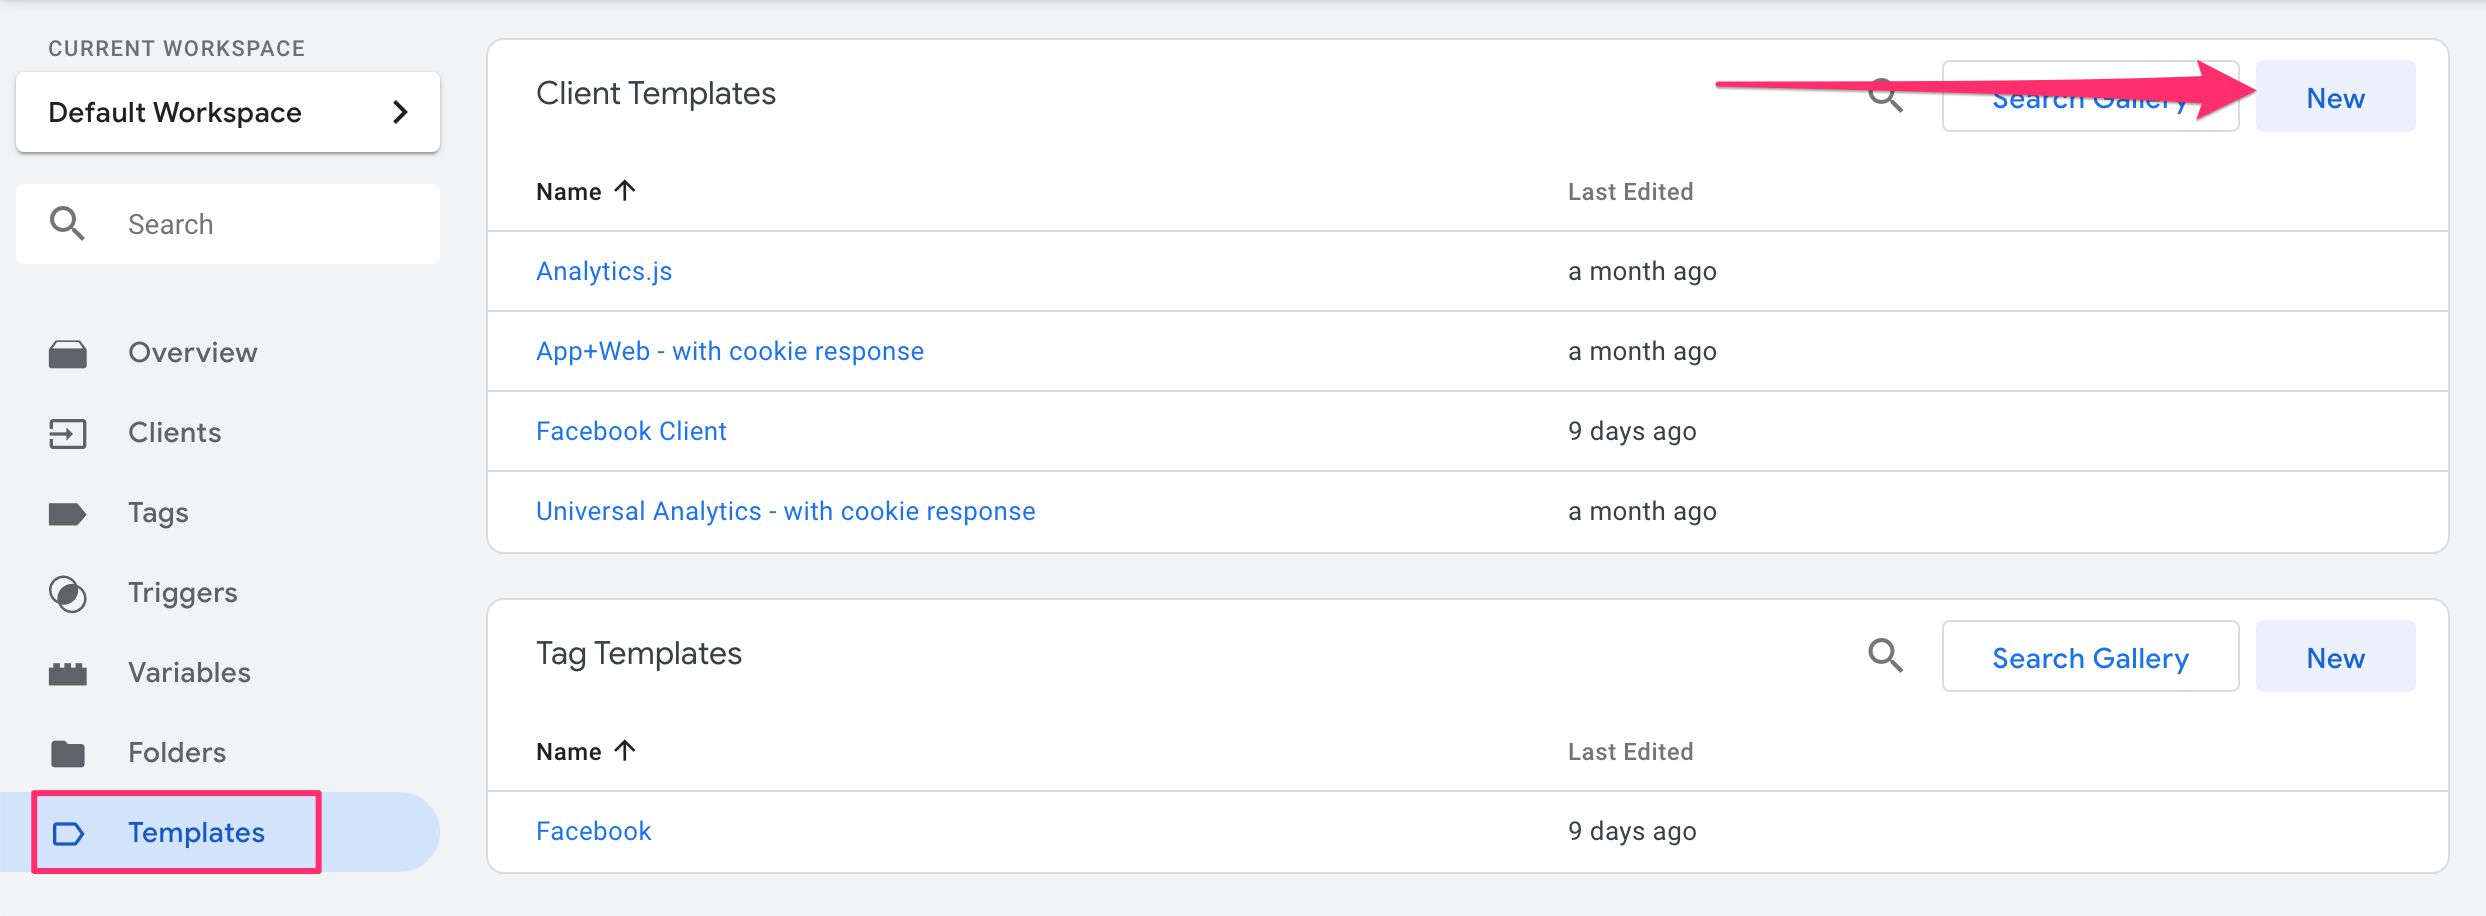
To build the proxy, you need a new Client template, built in the Server container. In the Server container UI, browse to Templates and click to create a new Client template.
In the first tab, give the template a name and a brief description. If you want, you can also add an icon image.
For this particular template, you can skip the Fields tab. We don’t need the Client to support any customization.
In Code, copy-paste the following:
const claimRequest = require('claimRequest');
const extractEventsFromMpv1 = require('extractEventsFromMpv1');
const getCookie = require('getCookieValues');
const getRemoteAddress = require('getRemoteAddress');
const getRequestHeader = require('getRequestHeader');
const isRequestMpv1 = require('isRequestMpv1');
const returnResponse = require('returnResponse');
const runContainer = require('runContainer');
const setCookie = require('setCookie');
const setPixelResponse = require('setPixelResponse');
const setResponseHeader = require('setResponseHeader');

// Get User-Agent and IP from incoming request
const ua = getRequestHeader('user-agent');
const ip = getRemoteAddress();

// Check if request is Measurement Protocol
if (isRequestMpv1()) {
  // Claim the request
  claimRequest();

  const events = extractEventsFromMpv1();
  const max = events.length - 1;
  events.forEach((event, i) => {
    // Unless the event had IP and user-agent overrides, manually
    // override them with the IP and user-agent from the request
    // That way the GA collect call will appear to have originated
    // from the user's browser / device.
    if(!event.ip_override && ip) event.ip_override = ip;
    if(!event.user_agent && ua) event.user_agent = ua;

    // Pass the event to a virtual container
    runContainer(event, () => {

      if (i === max) {

        // Rewrite the _ga cookie to avoid Safari expiration.
        const ga = getCookie('_ga');
        if (ga && ga.length) {
          setCookie('_ga', ga[0], {
            domain: 'auto',
            'max-age': 63072000,
            path: '/',
            secure: true,
            sameSite: 'lax'
          });
        }
        setPixelResponse();

        // Make sure no CORS errors pop up with the response
        const origin = getRequestHeader('Origin');
		if (origin) {
          setResponseHeader('Access-Control-Allow-Origin', origin);
          setResponseHeader('Access-Control-Allow-Credentials', 'true');
        }
        returnResponse();
      }
    });
  });
}
Once the APIs have loaded, the Client pulls in the source’s IP address and User-Agent string with this:
const ua = getRequestHeader('user-agent');
const ip = getRemoteAddress();
Next, the isRequestMpv1 API is utilized to automatically check if the incoming HTTP request is a Measurement Protocol (v1, i.e. Universal Analytics) request. If it is, then the Client claims the request, and thus prevents other Clients from processing it.
The rest of the Client is concerned with iterating through all the events in the request, parsing them automatically into the required event schema (using the extractEventsFromMpv1 API), and running the container with all the events in the batch.
Typically there will be just one event in each batch.
if (!event.ip_override && ip) event.ip_override = ip;
if (!event.user_agent && ua) event.user_agent = ua;
The two lines of code above have a very important function. They take the user’s IP address and User-Agent string and pass them to the event data object so that the Universal Analytics tag can then add them into the outgoing request to Google. If you didn’t set these, the IP address and User-Agent string would be set to those of the Server container itself, which is not very useful.
Once all the events have been processed by the container, the following code block is run:
const ga = getCookie('_ga');
if (ga && ga.length) {
  setCookie('_ga', ga[0], {
    domain: 'auto',
    'max-age': 63072000,
    path: '/',
    secure: true,
    sameSite: 'lax'
  });
}
This piece of code checks the incoming HTTP request for a cookie named _ga. If it finds one, it rewrites the cookie with a Set-Cookie header, thus converting it to an HTTP cookie and helping solve expiration issues with Safari’s ITP.
setPixelResponse() automatically configures the response back to the source of the request to resemble a 1x1 GIF image with cache-busting headers. Finally, returnResponse() is invoked to signal that the Client has completed its work and can respond back to the source of the initial request.
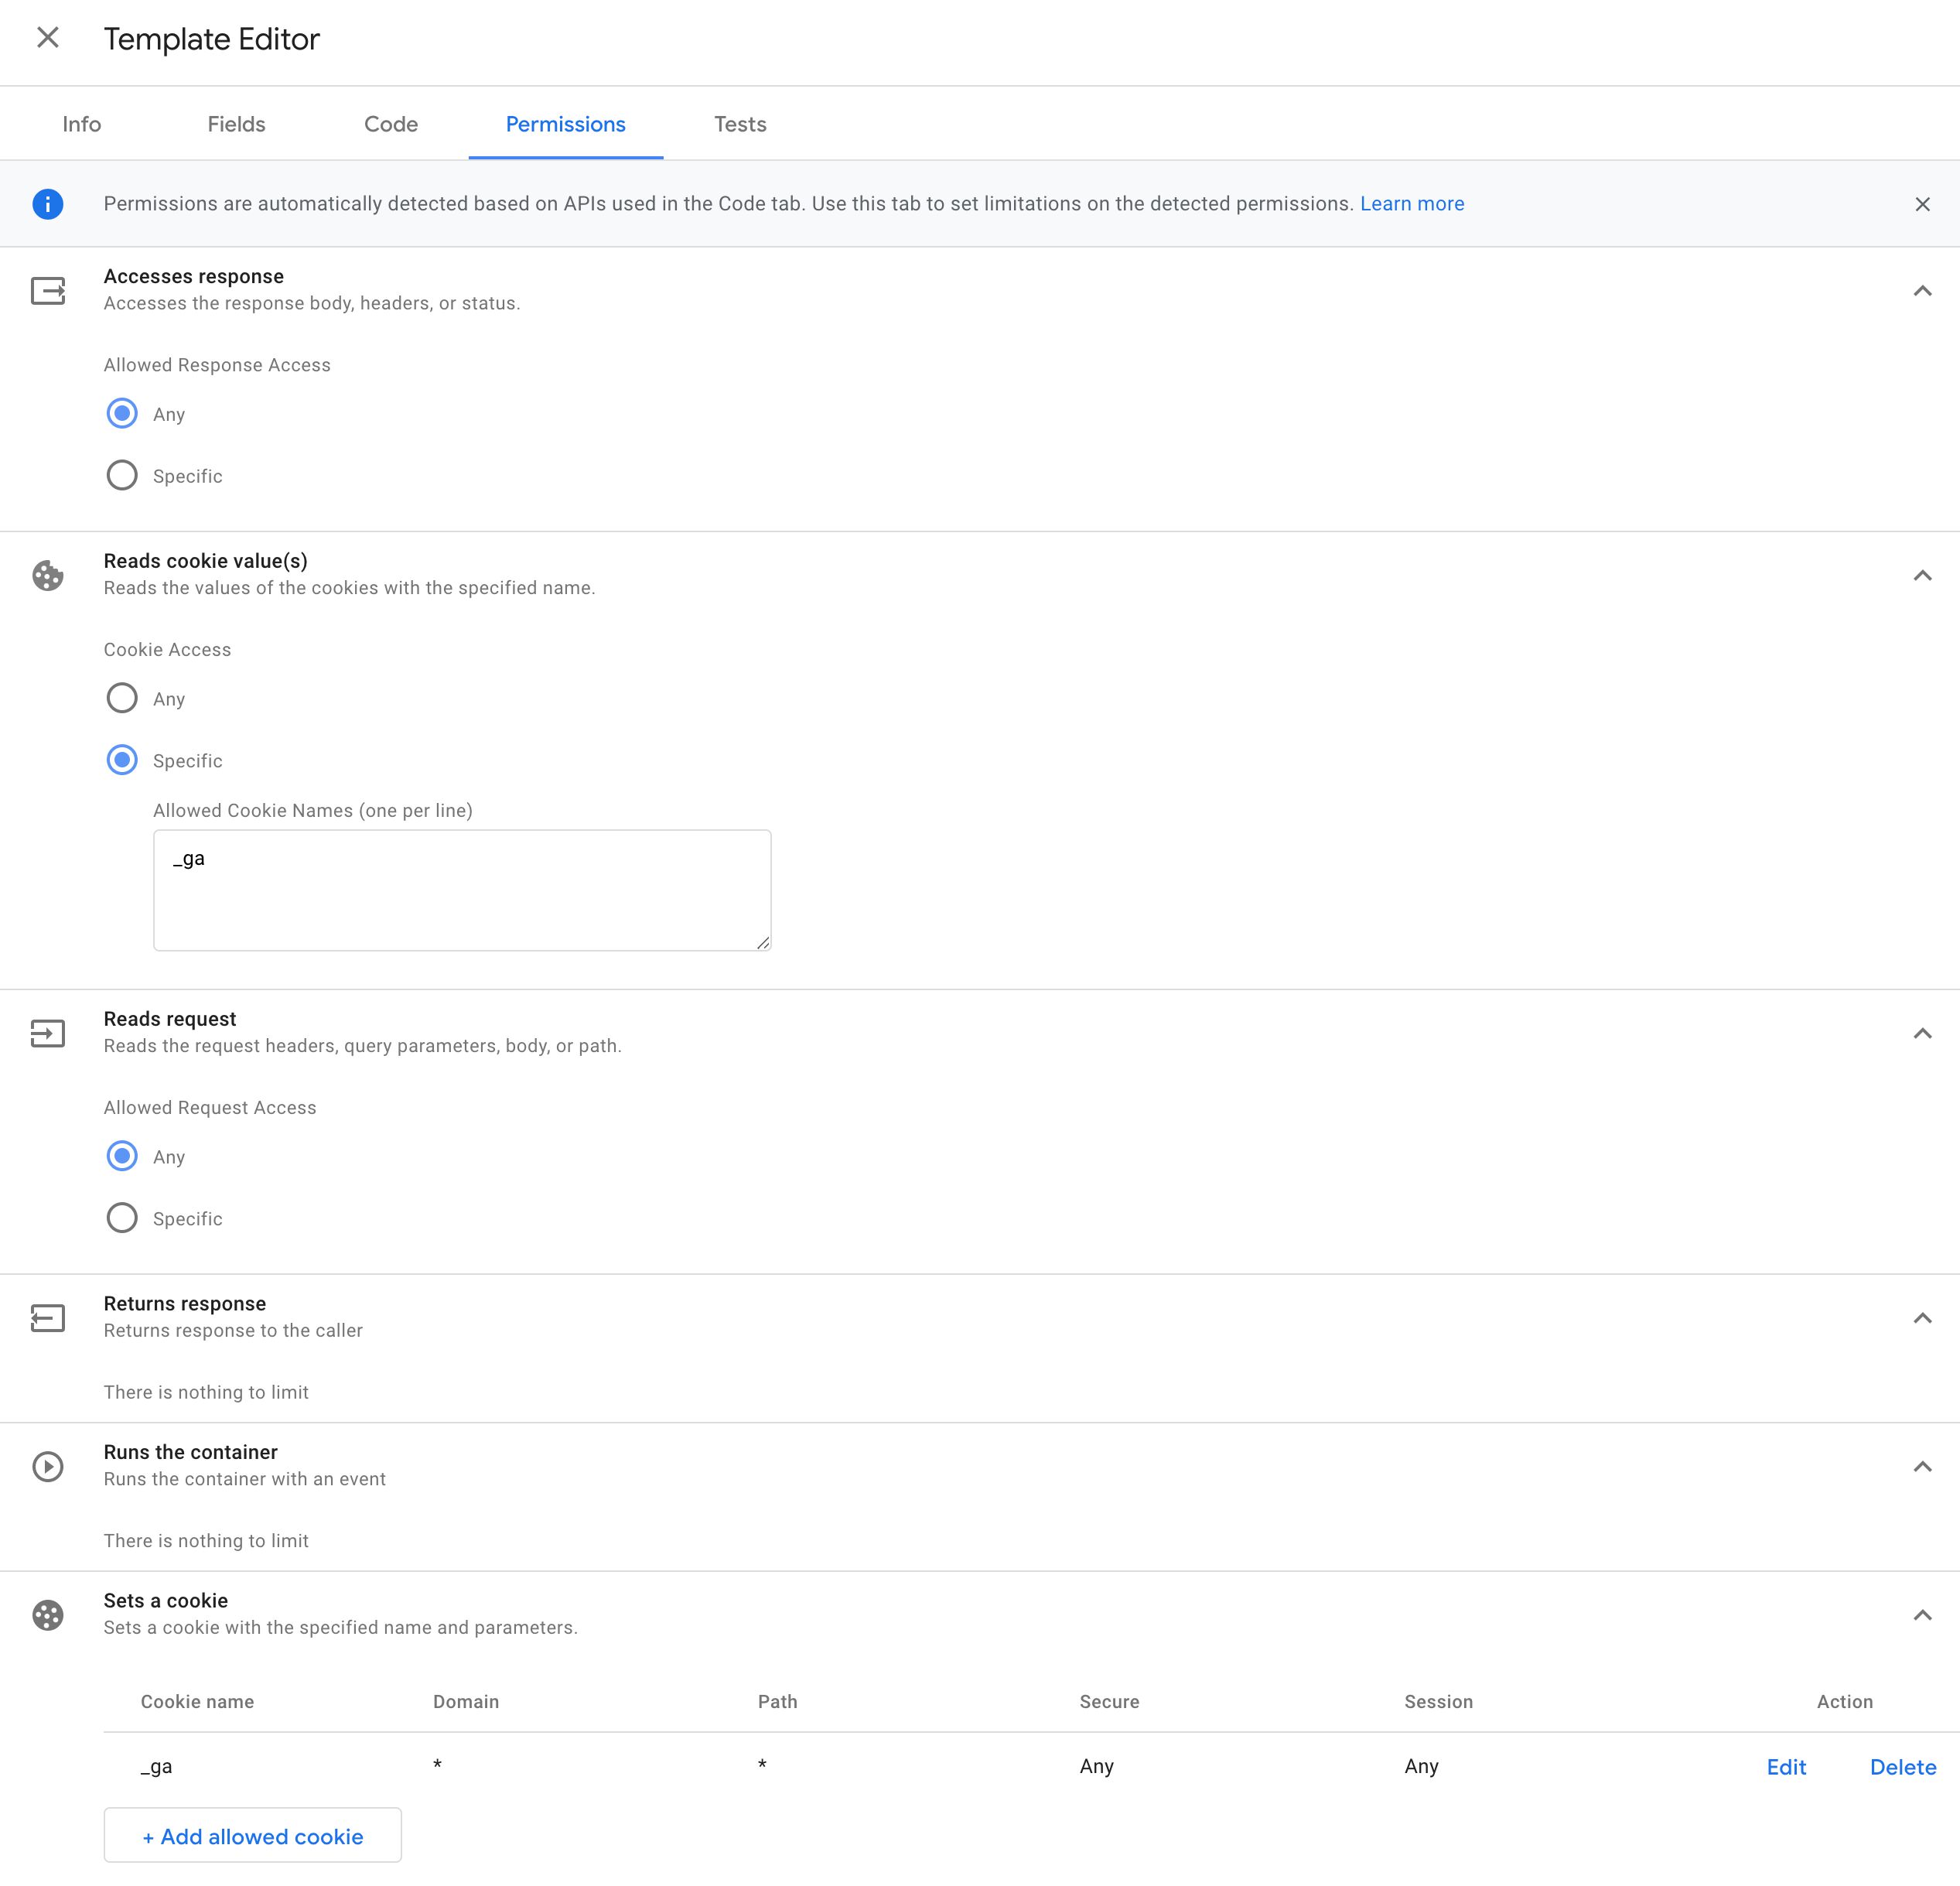
Set the permissions
While in the template editor, visit the Permissions tab.
Set the permissions as follows:
- Accesses response: Any
- Reads cookie value(s):
_ga - Reads request: Any
- Sets a cookie: Set as in the image above.
Once you’re done with the permissions, you can Save the template and exit the template editor.
Create the Client, trigger, and tag
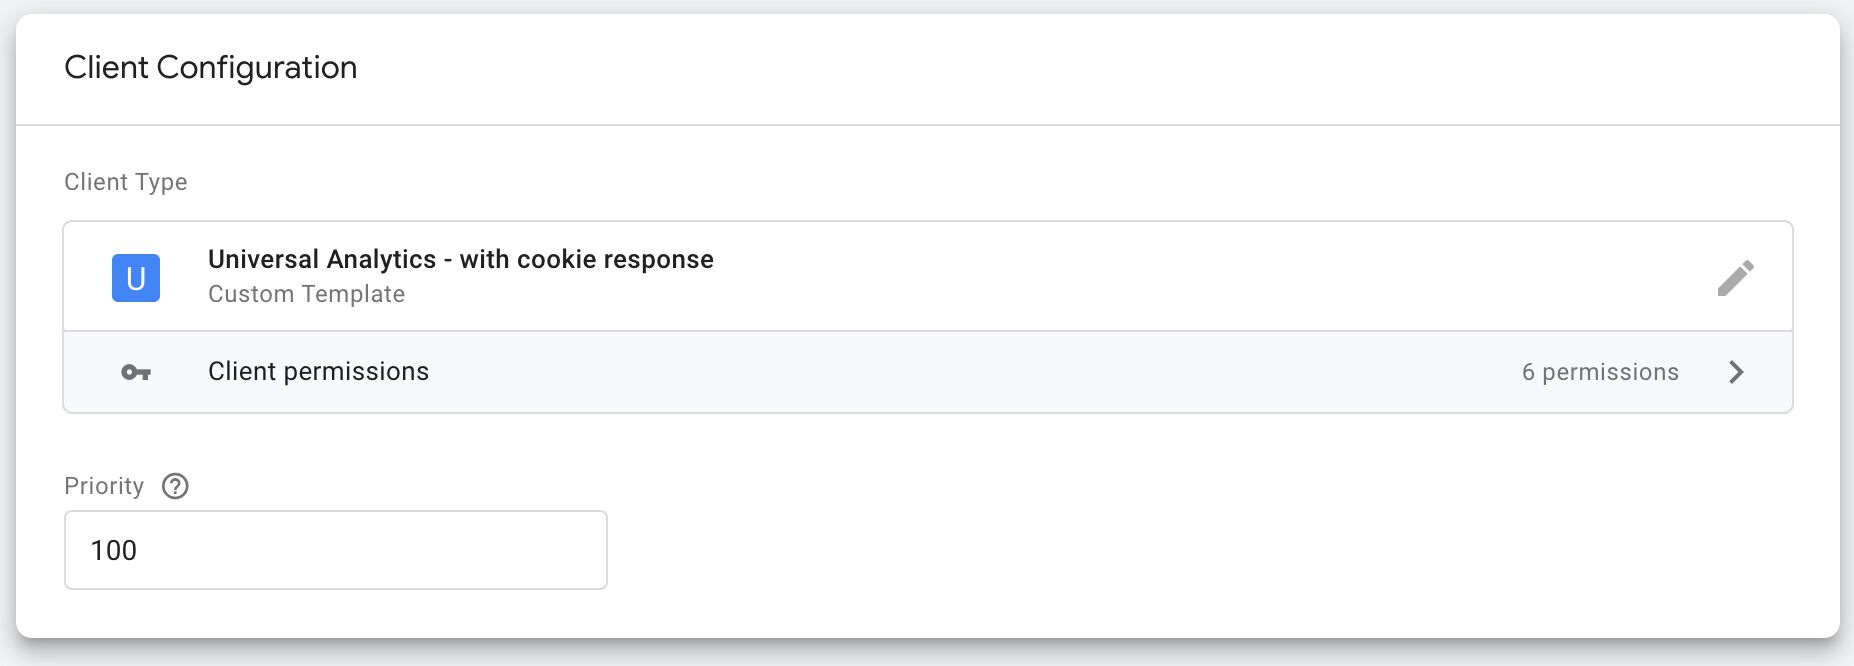
Next, go to Clients and click the New button to create a new Client.
Choose your new Client template from the list of available Client types. Next, set the Priority field to a high value. It’s important that this value is higher than any other Universal Analytics Client you might have in the container.
Give the Client a descriptive name (you’ll need this shortly), and then save this Client.
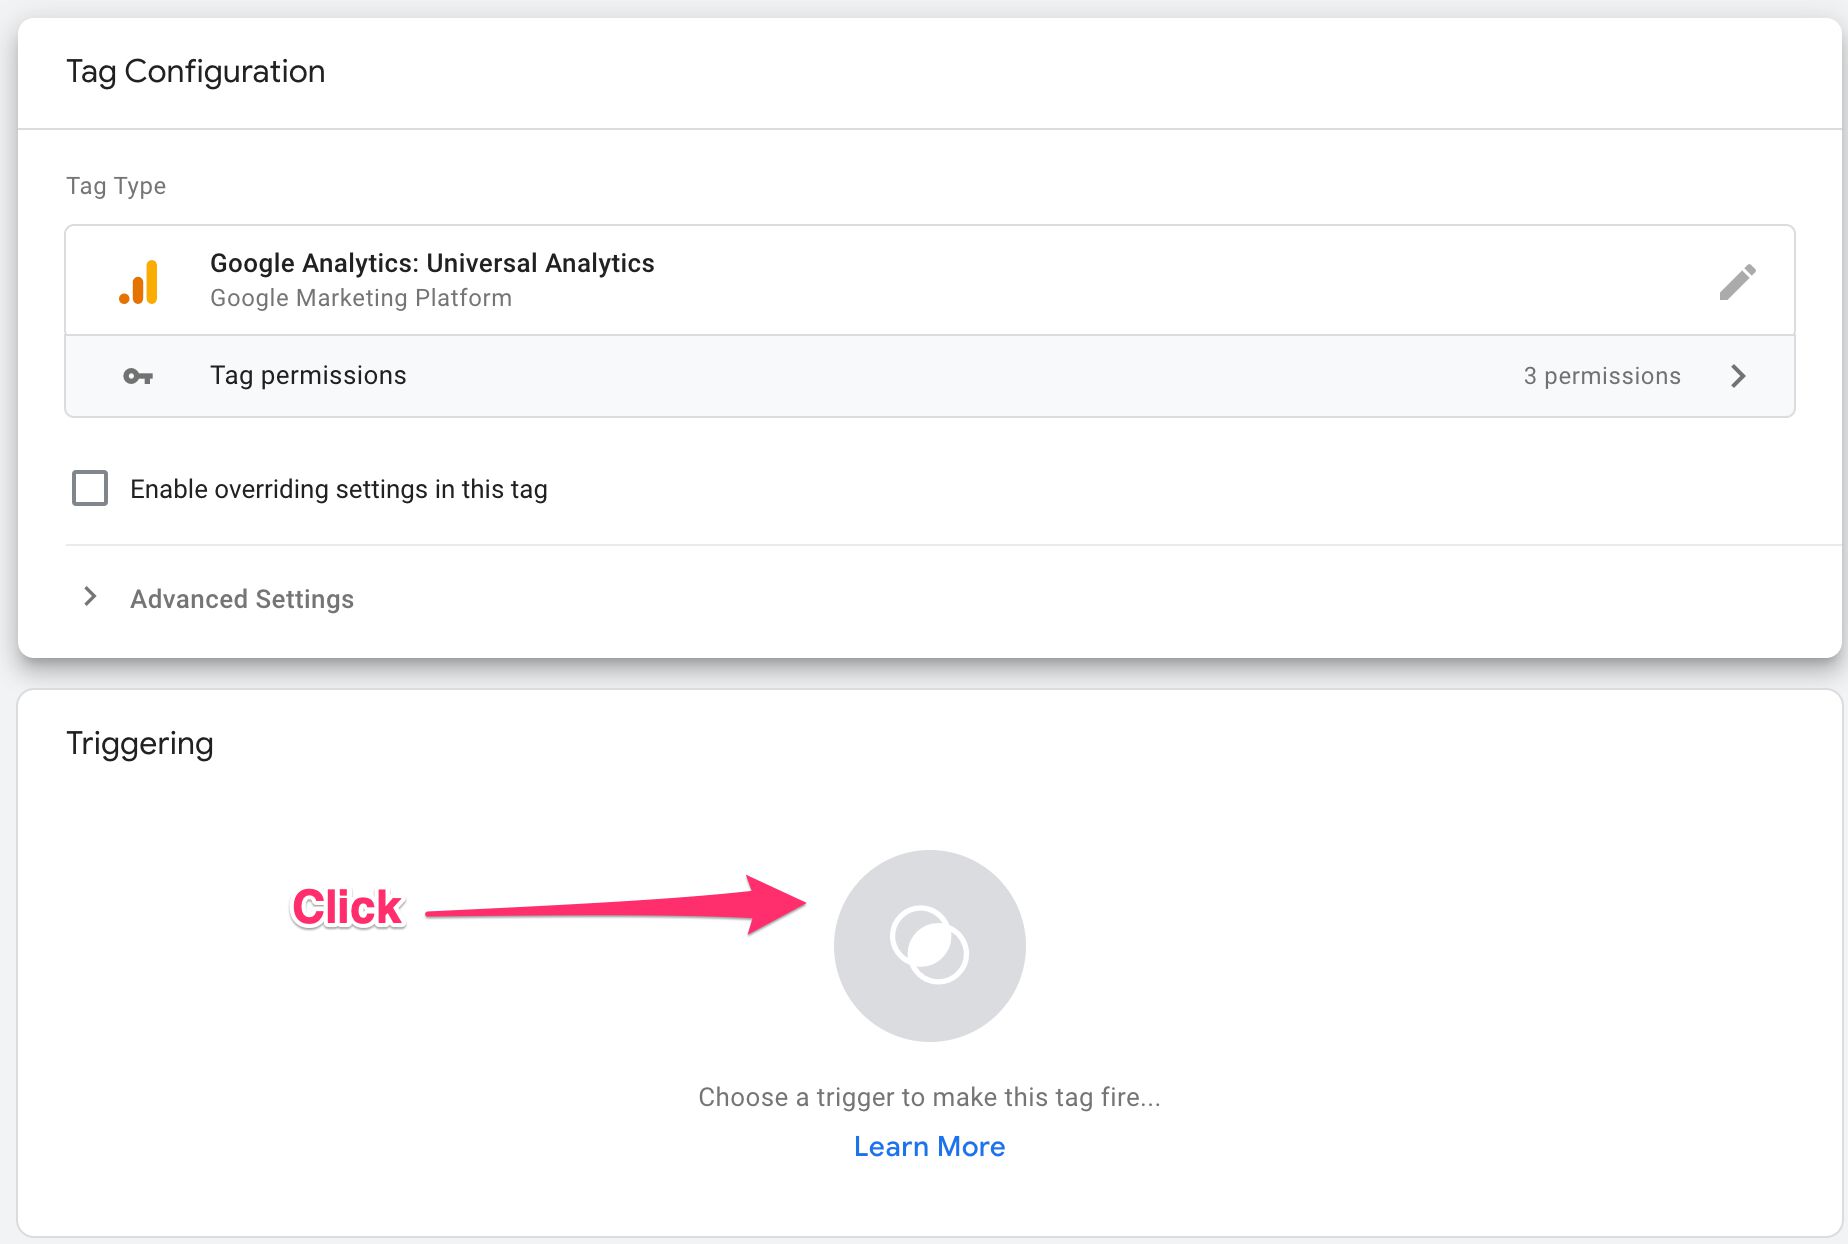
Then, go to the Tags UI and click the New button to create a new Tag.
Choose Google Analytics: Universal Analytics as the tag type. There’s no need to configure this tag in any way.
Under Triggers, click the trigger area to select a trigger.
In the overlay, click the blue + button in the top right corner to create a new trigger.
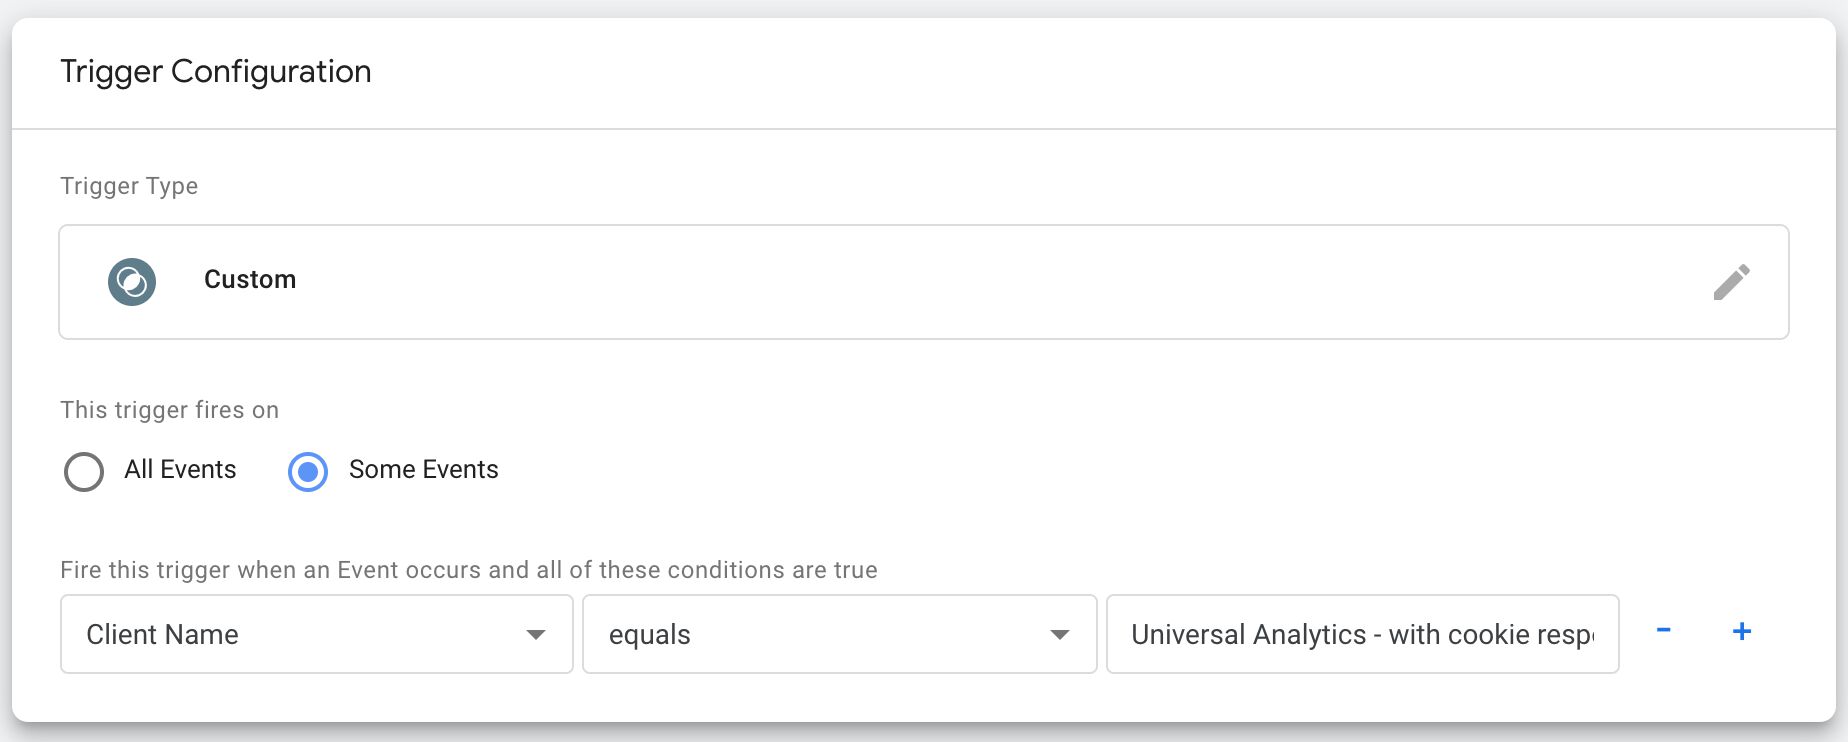
Set the trigger to look like the above. It just needs the single condition. The name you’re checking against is the name you just gave the new Client.
If you don’t see Client Name in the list of available variables, it means you haven’t enabled it as a Built-in variable yet. Select Choose Built-in Variable from the drop-down, and pick Client Name from the overlay that appears.
Once done, save the trigger. Then, save the tag.
You now have the Client, the trigger, and the tag.
You are ready to test the whole setup!
Preview and test
Click the Preview button in the Server container. A new tab should open with the Server container’s Preview panel.
In your web container, similarly click the Preview button.
Now you should have both your web container and the Server container in Preview mode.
Next, browse to your site and do something to fire one of the Universal Analytics tags you designed for server-side collection. Once the tag fires, check the Preview panel of your Server container. You should see something like this:
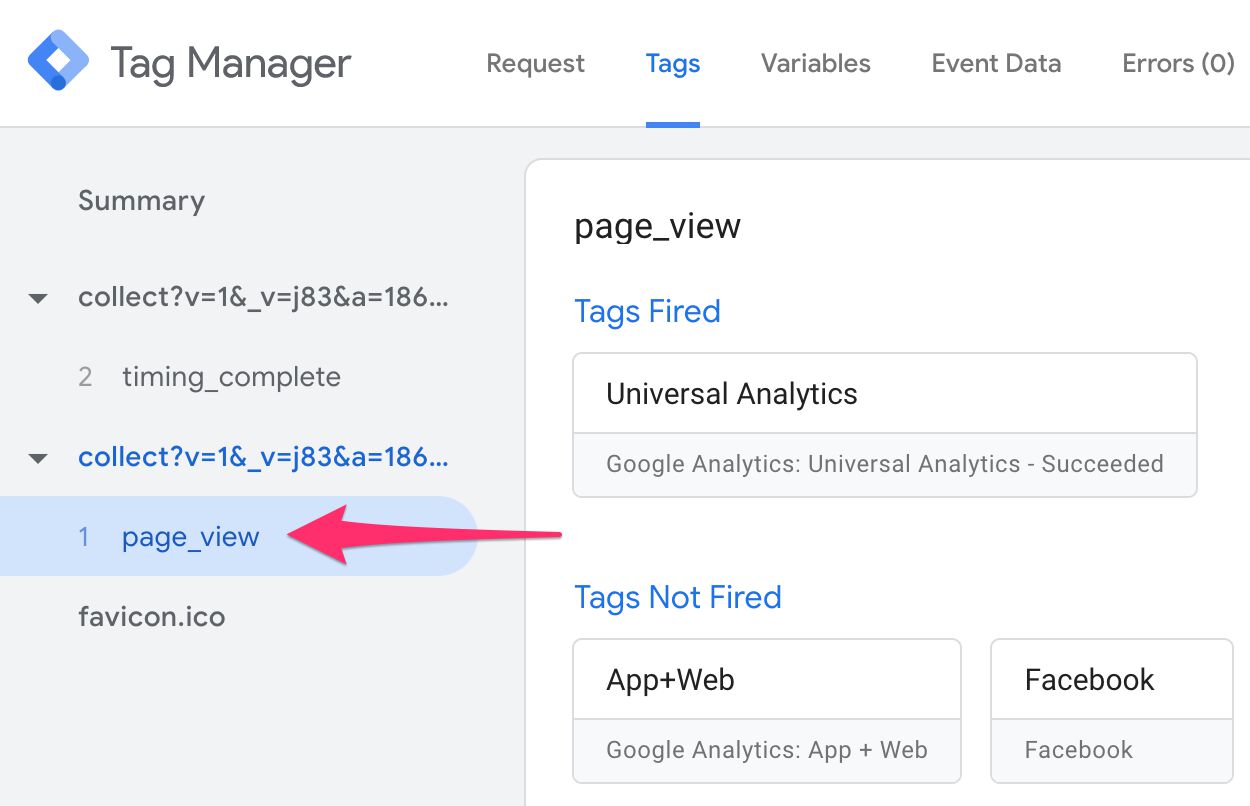
If you see it, and there are no errors in the Errors tab, it should work!
You can debug further by selecting the Universal Analytics tag itself and then clicking the Outgoing HTTP Requests box. This opens the details for the request to Google Analytics.
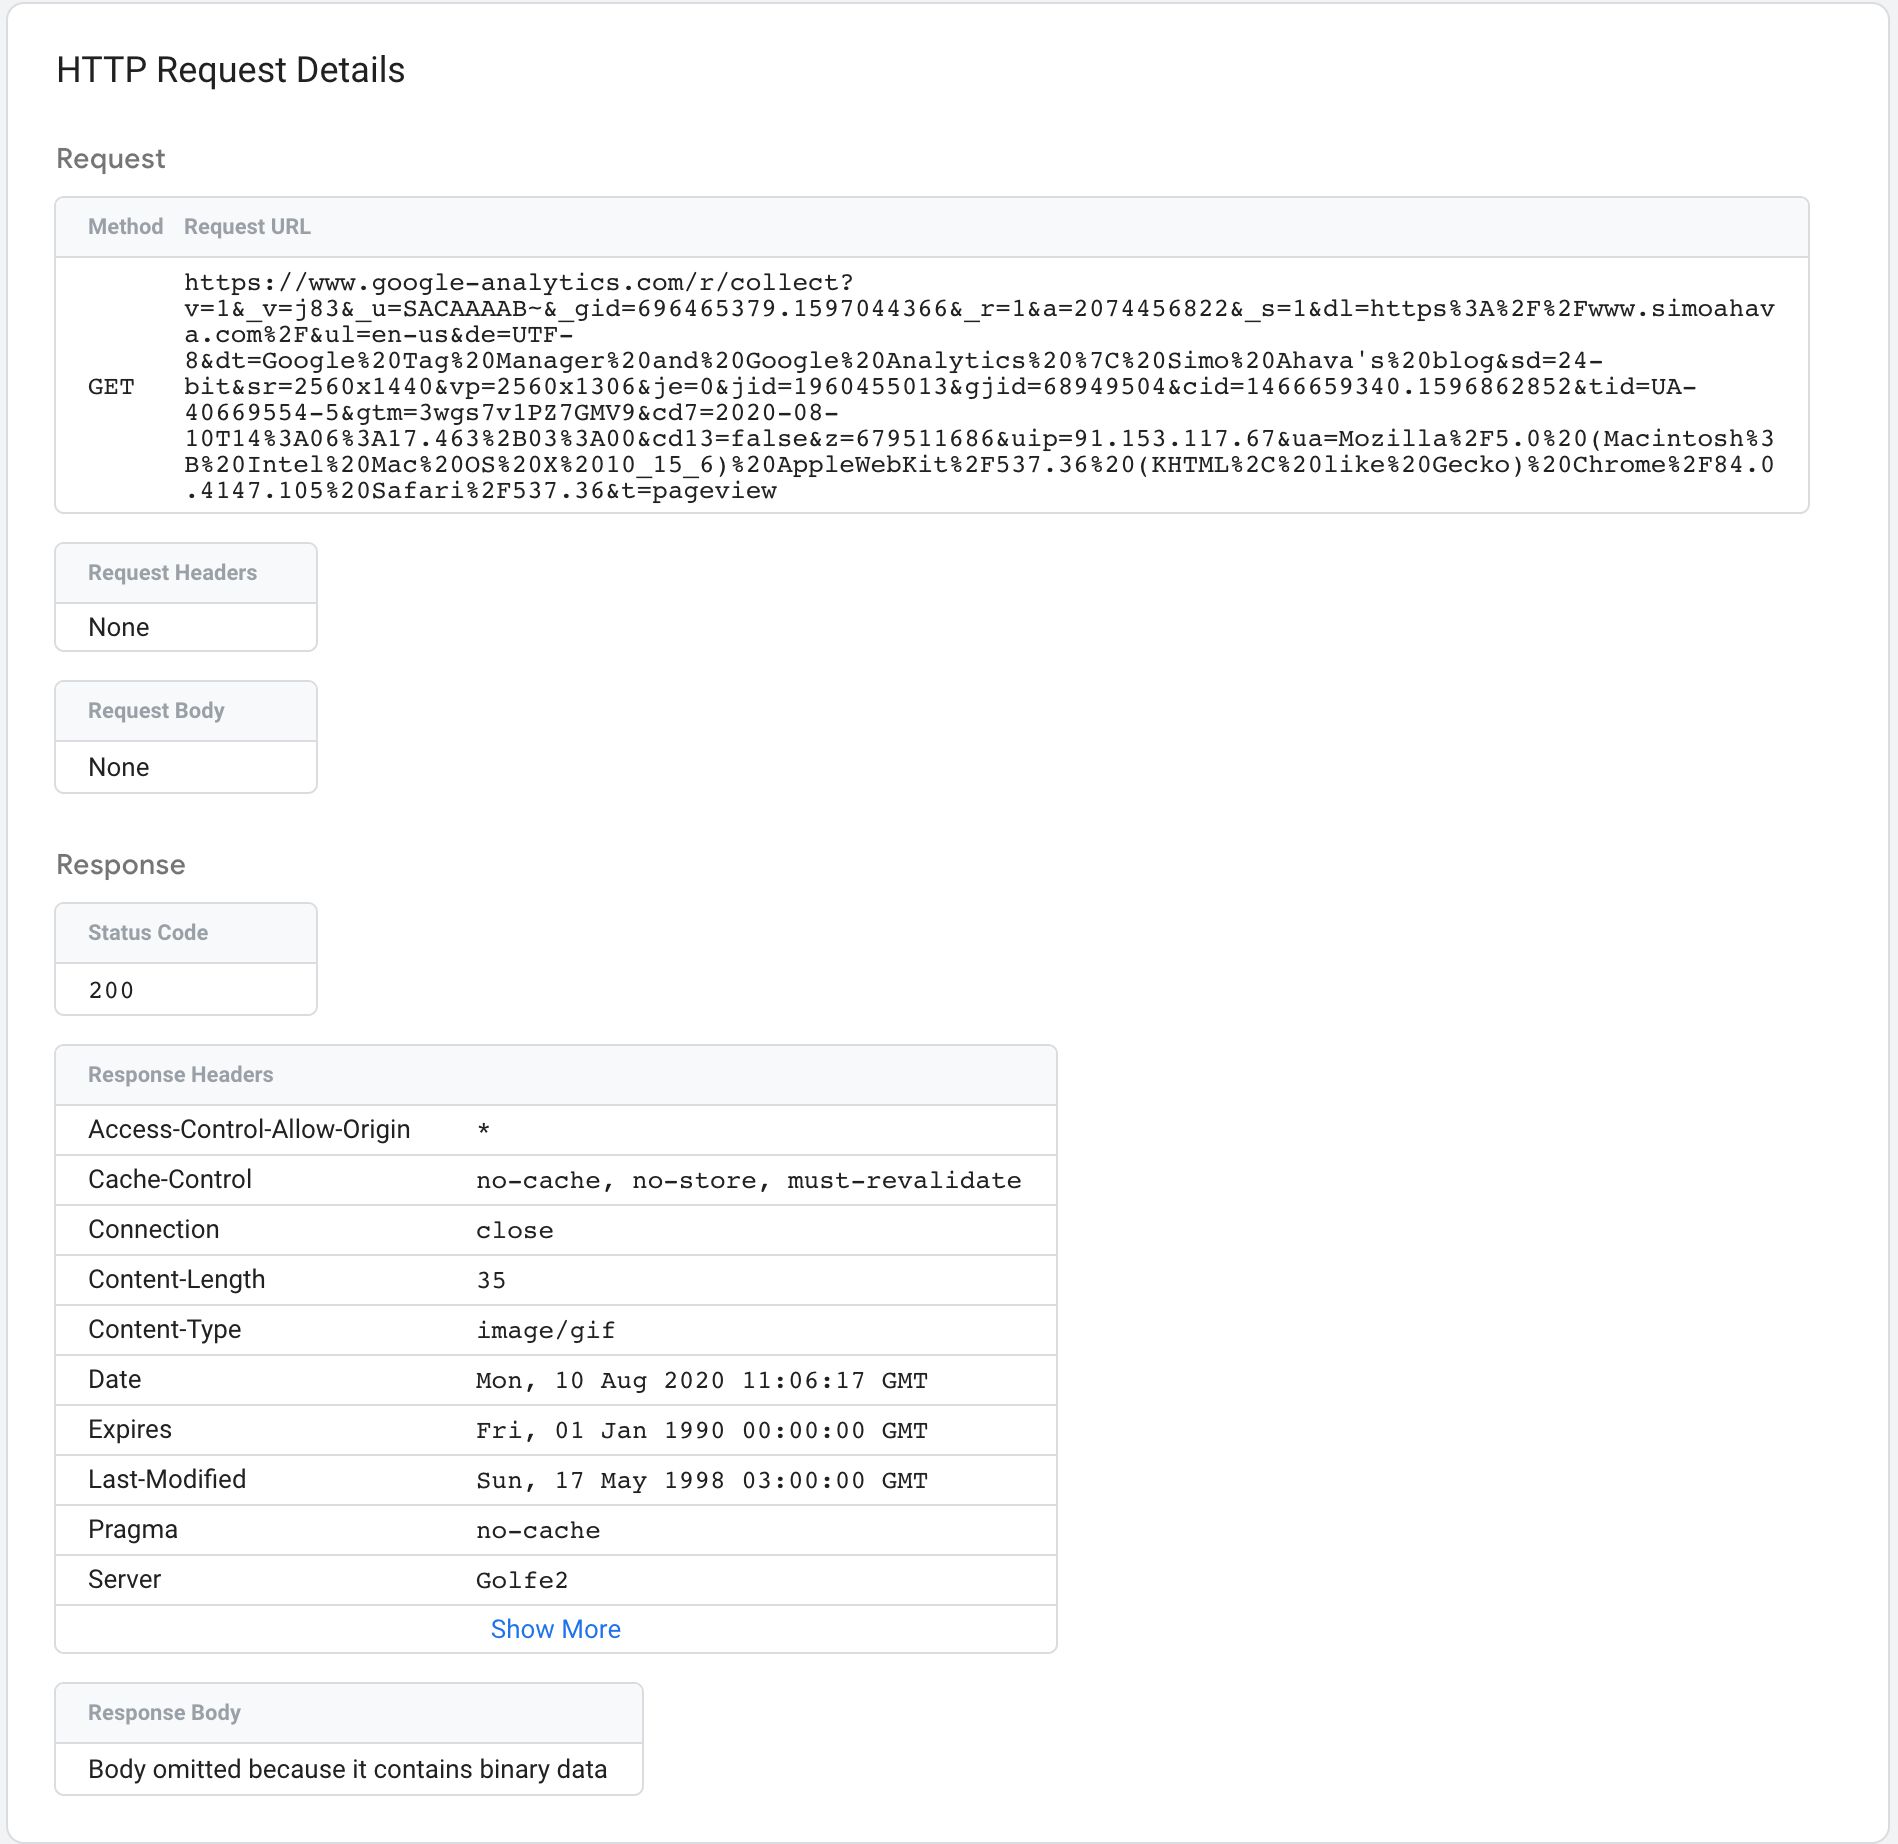
Check the Real Time report in your Google Analytics view (you have created a separate property for your Server-side tagging hits, right?), and make sure data is flowing in.
Finally, check the cookies in your browser. The _ga cookie should have the value of Secure set to true and the value of SameSite set to Lax. If that’s what you see, the cookie rewrite worked!
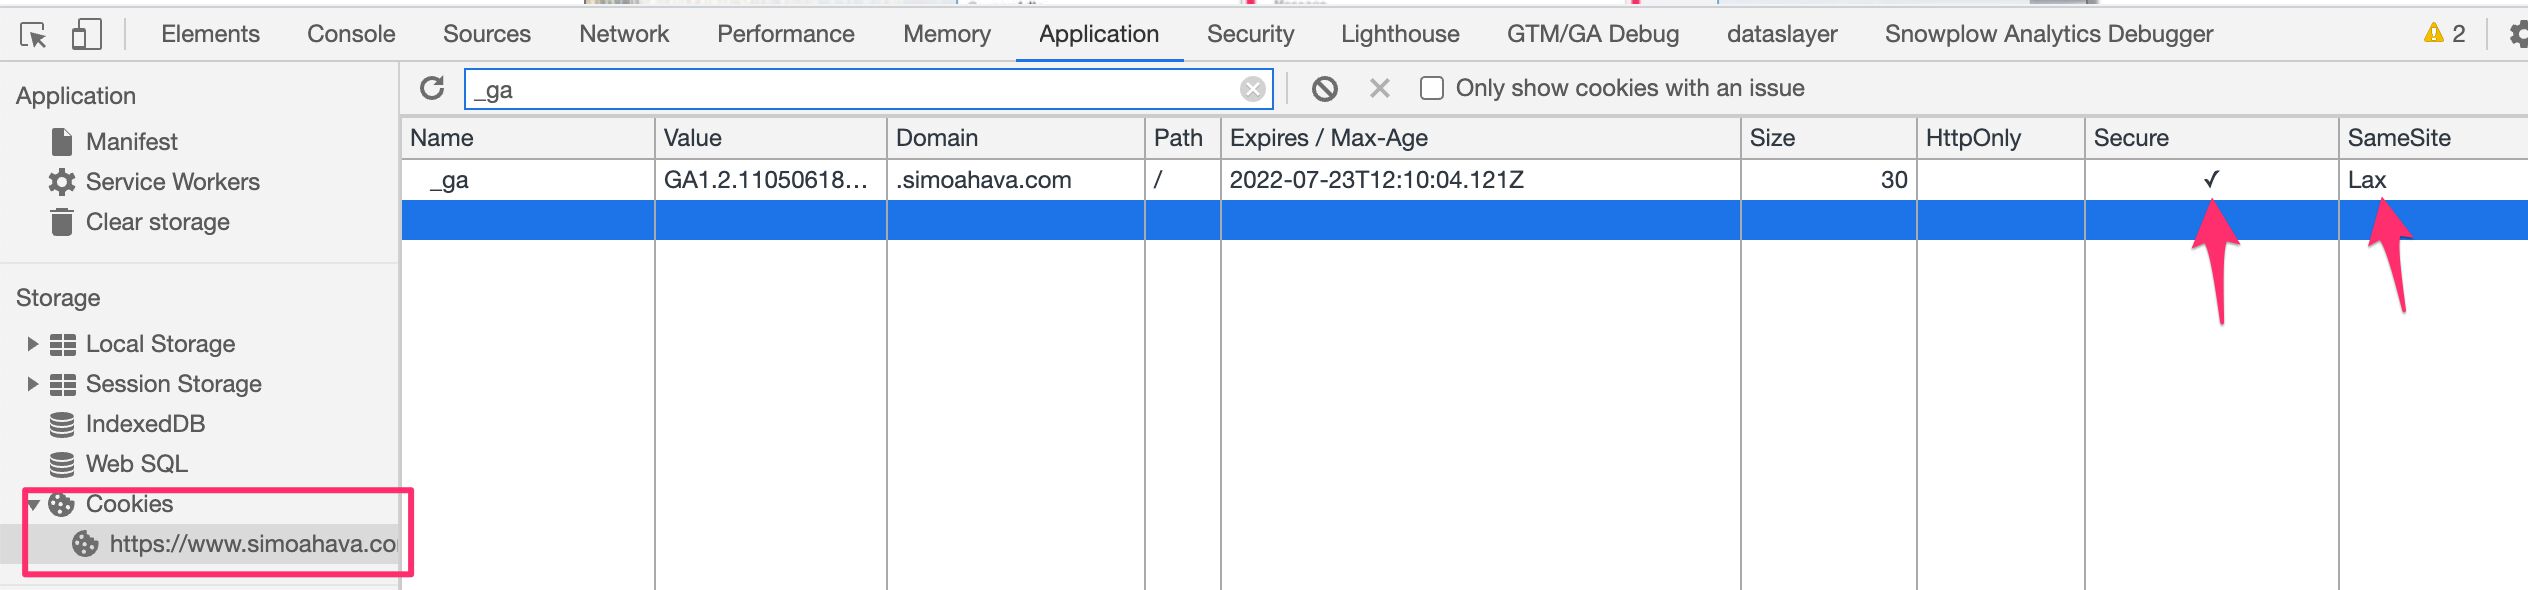
Summary
There’s a lot of new stuff here, so I wouldn’t be surprised if this is difficult to set up. However, if you follow this guide diligently, and make sure there are no rogue tags firing without cookieUpdate, the Client should do its job nicely.
If you run into issues, let me know in the comments and we can take a look together.
Server-side tagging is the new paradigm for Google’s tagging solutions. I can see a lot of amazing things you can do with it in the future, but right now you can also utilize it for improving the quality of your data incrementally with solutions such as this one.