Last updated 11 September 2020: Added important note about how the custom domain should be mapped with A/AAAA DNS records rather than a CNAME record.
Ah, Safari’s Intelligent Tracking Prevention - the gift that keeps on giving. Having almost milked this cow for all it’s worth, I was sure there would be little need to revisit the topic. Maybe, I thought, it would be better to just sit back and watch the world burn.
But then Mr. Charles Farina, a good friend and so amicable he’s practically Canadian, tempted me into testing out a quick proof-of-concept web service that would give us back our first party cookies.
As it turns out, it’s not all that time-consuming to do and it works pretty nicely. Want proof? Visit this site with Safari, and check the expiration of the _ga cookie. Cool, huh?
In this article, I’ll show you how to set it up.
The article will focus on the _ga cookie used by Google Analytics, but the same method can be used for any first-party cookie set by JavaScript libraries running on your site.
You can also follow the steps outlined in this article by watching the video above.
The Simmer Newsletter
Follow this link to subscribe to the Simmer Newsletter! Stay up-to-date with the latest content from Simo Ahava and the Simmer online course platform.
But why?
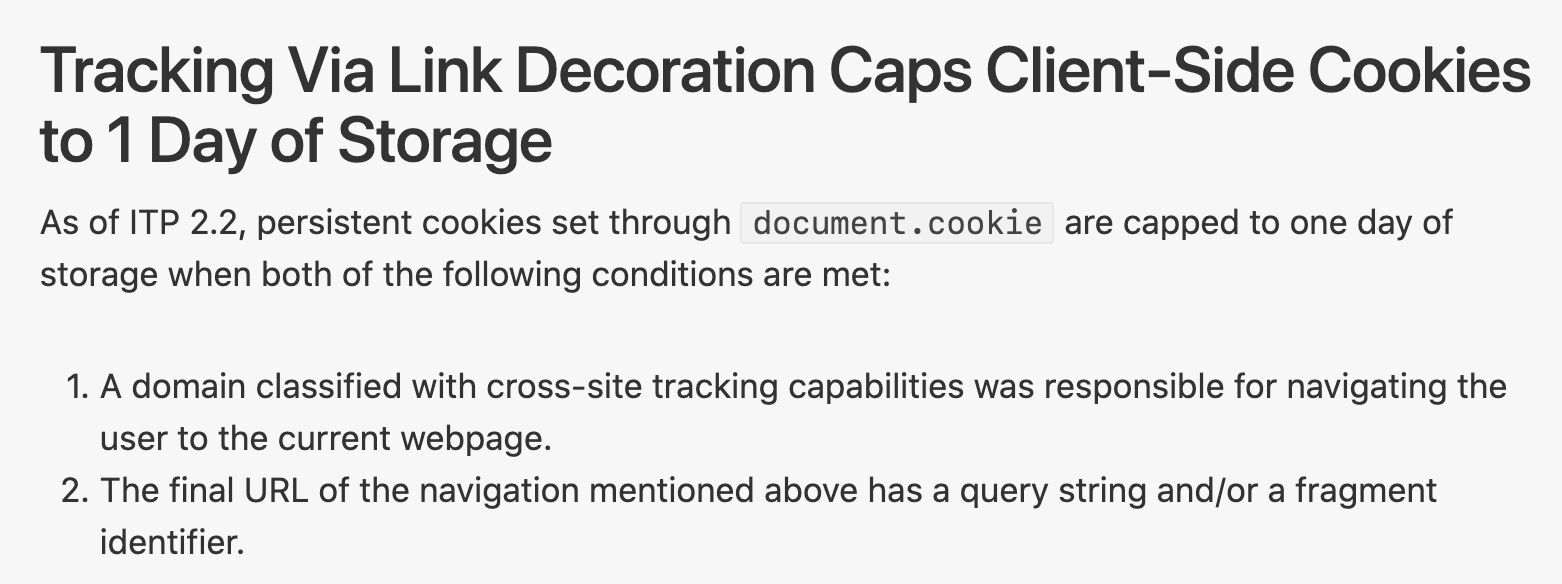
With ITP 2.1, Safari caps first party cookies written with JavaScript to a maximum 7-day expiration. The Google Analytics library writes its cookie with JavaScript. Ergo, on Safari, the Google Analytics cookie persists user data for only 7 days at a time, meaning if the user visits the site with more than 7 days between visits, they will be considered a new user in their return visit.
With ITP 2.2, expiration of some cookies is set to 24 hours.
However, Safari does not (currently) cap cookies set with the Set-Cookie HTTP header. Why? Because creating a setup that makes use of the Set-Cookie header requires developer resources and is always a deliberate decision how to handle first-party persistence.
ITP’s main beef is against third-party JavaScript libraries executing code that repurposes first-party storage for something other than first-party data collection (namely, cross-site tracking).
So when you have a site deliberately building or using a web service which requires the extension of resources to things like the creation of new DNS records, I guess Safari thinks that by doing all this work, you’re accepting responsibility for any of the scummy things that can be done on top of such a setup.
But I don’t care about any of that. I just want to tackle the problem itself and then share the solution.
How does it work?
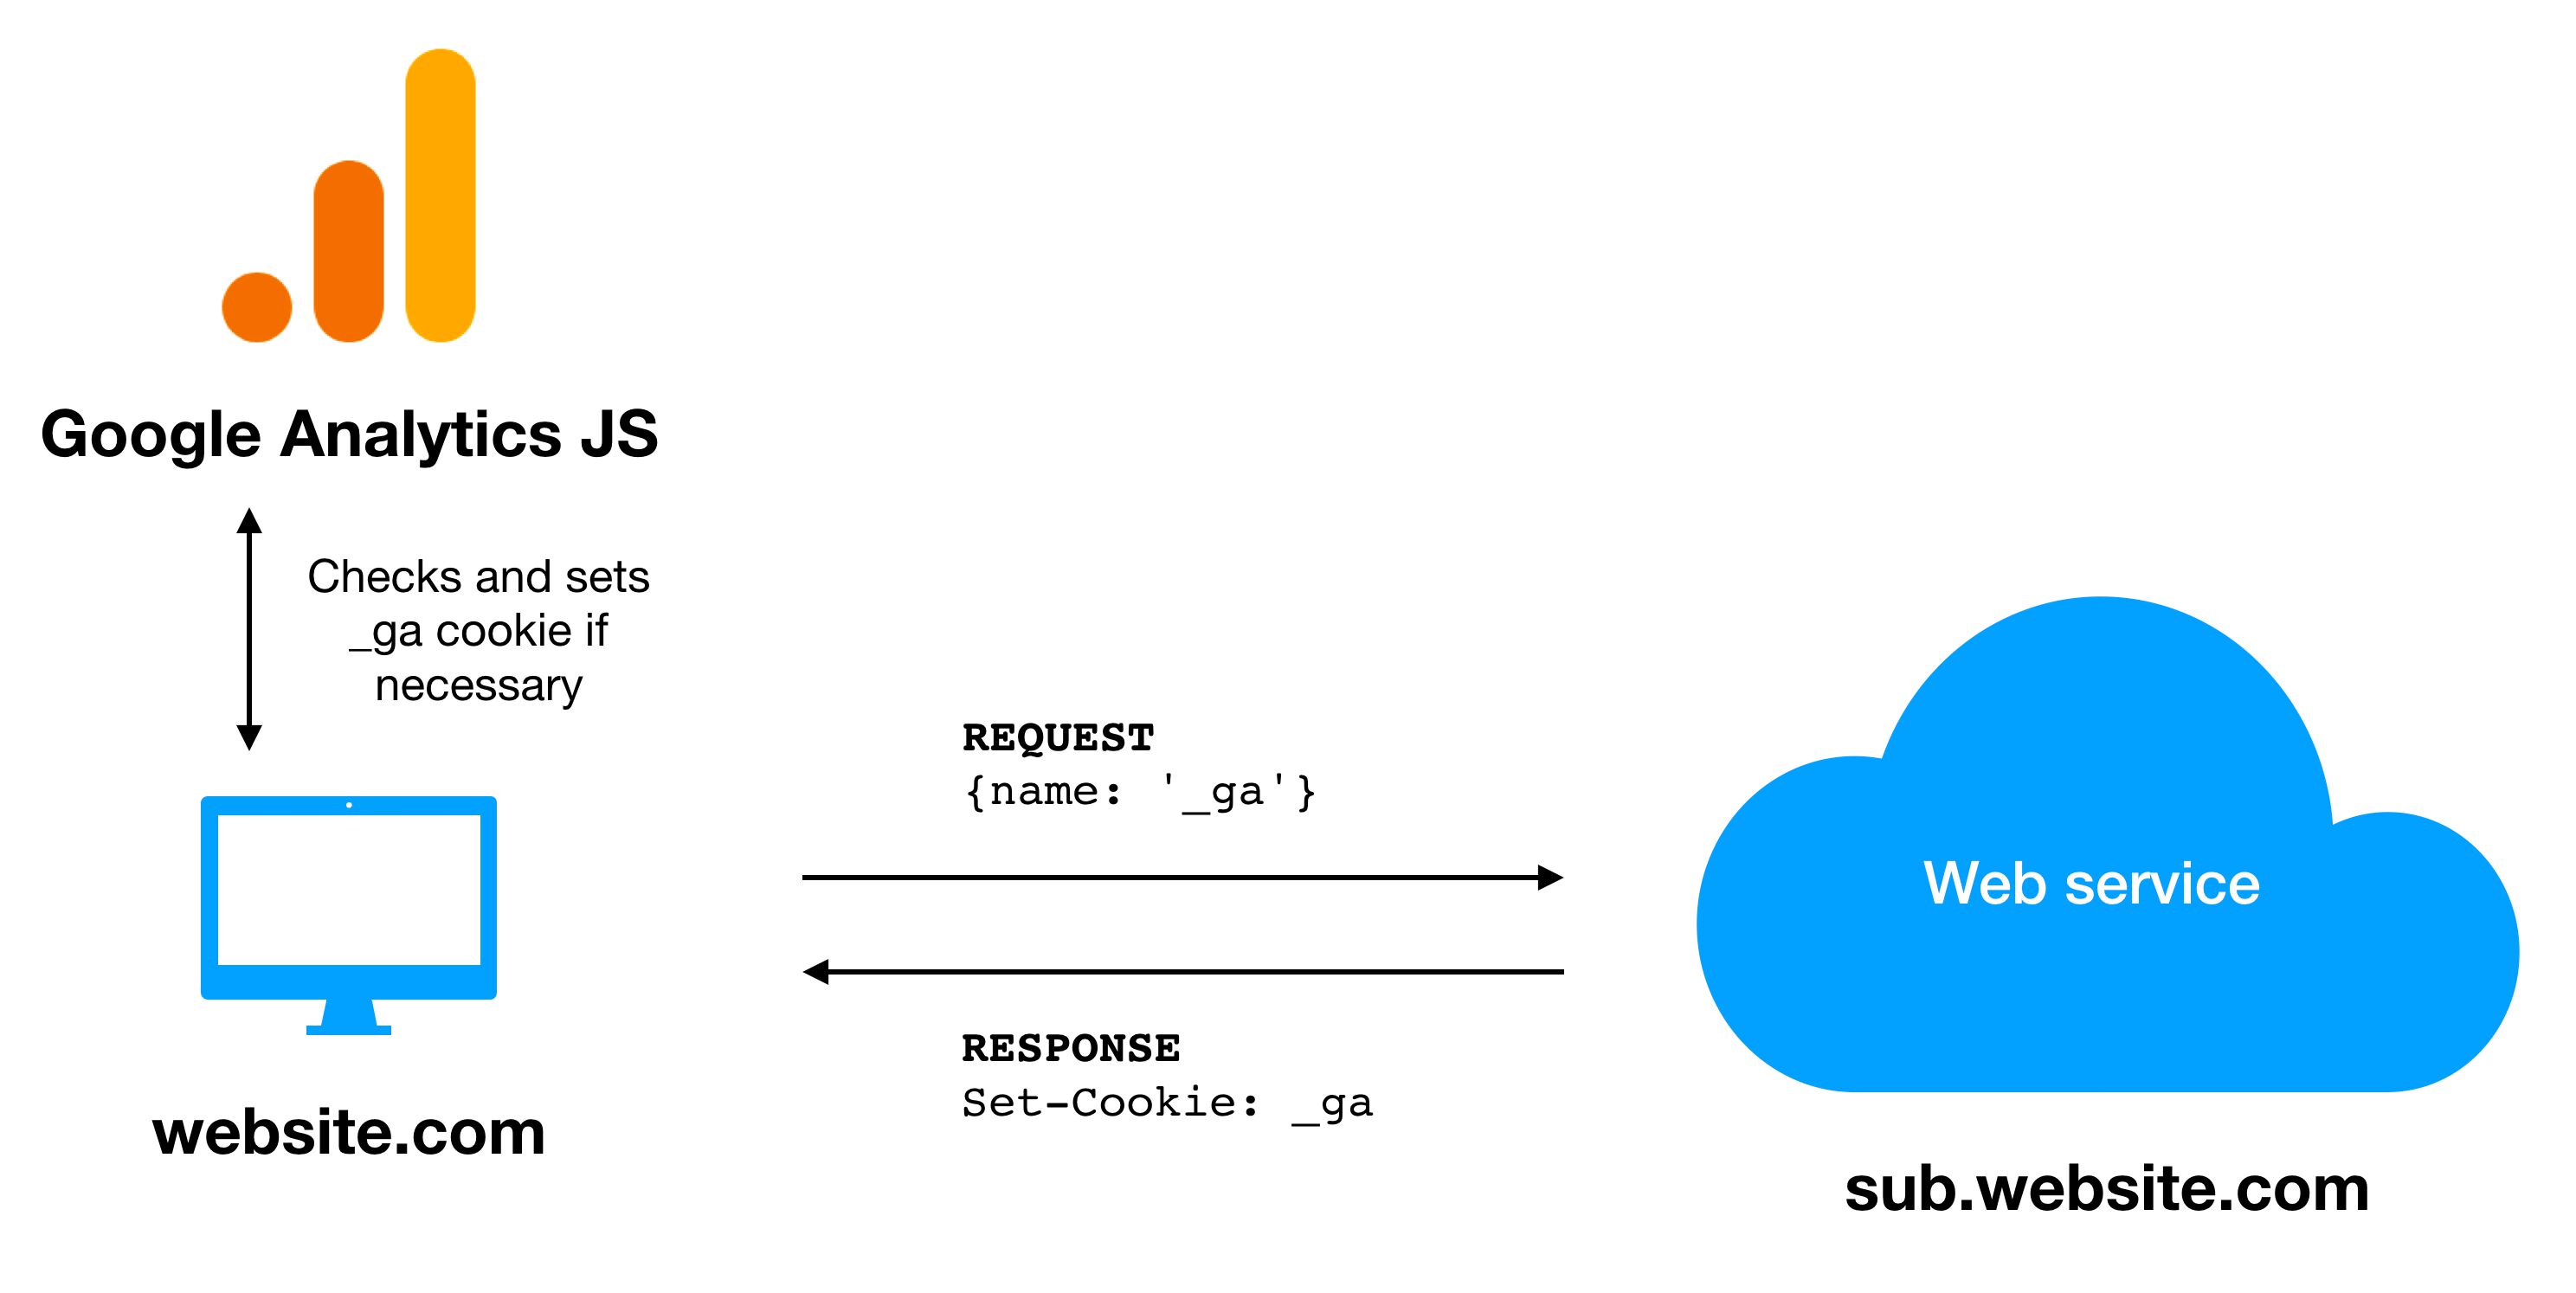
I’ve been at this blog for more than six years now, and my skills at drawing a process diagram or flowchart are just getting worse and worse. Sorry about the mess above.
Here’s how the setup works:
When the user loads a page, a Google Analytics tracker is generated with the first GA event.
This tracker checks if the browser has the
_gacookie. If not, a new one is generated.If the URL has cross-domain linker parameters and the tracker has the
allowLinker:truefield, then the tracker will use those parameters to update the_gacookie.Since this cookie is generated with JavaScript, it’s susceptible to ITP 2.1. Thus, in the
hitCallbackof the Page View tag, the web service is called with a request to return a cookie named_gawith the value from the cookie generated by analytics.js.The web service returns this in the
Set-Cookieheader, and thus the_gacookie is updated as an HTTP cookie, ignoring the impact of ITP 2.1 and ITP 2.2.
The only way the above works smoothly is by adding the new (and poorly documented) cookieUpdate field to the tag settings. This field ensures that the tracker does not update the expiration of the cookie if one is found. This is instrumental, as otherwise each time a tracker is initialized the cookie is updated from an HTTP cookie back to a JavaScript cookie.
What you’ll need
For the solution to work, you’ll need the following:
A credit card, since you won’t be able to efficiently create a Google Cloud Project without using a billing account.
A domain for which you have full access to DNS settings. This domain must share the same root/parent as the domain from where you’ll be sending requests to the web service. So if your site is at www.website.com, the domain you’ll set up as the web service must be a subdomain of (or the actual domain) website.com.
Necessary access to modify the settings of every single Google Analytics tag that fires on the site.
The domain mapping is important. Since the web service uses the Set-Cookie header to set the cookie, it can only do so in a first-party context if the header sets the cookie on a hostname shared by both the domain from where the request is originating (e.g. www.website.com) and the domain you have mapped to the web service (e.g. tracker.website.com).
Step 1: Set up Google Cloud
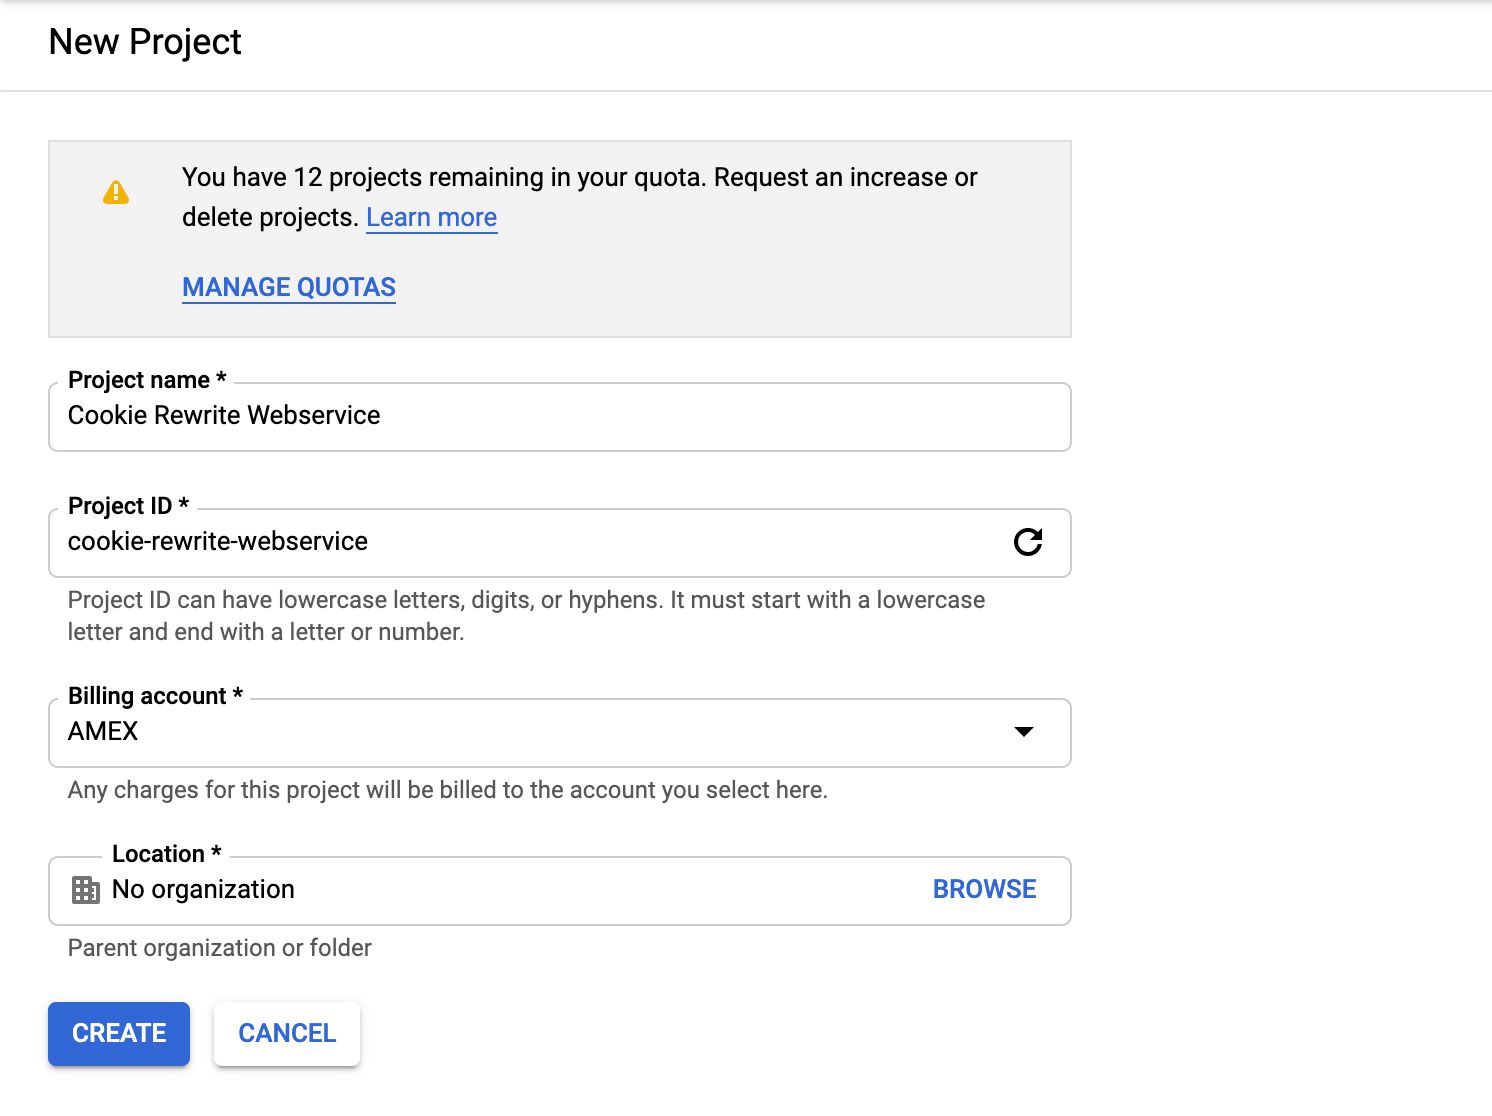
First, visit Billing management with your favorite Google ID and create a new Billing Account for your Google Cloud organization or project. If you already have billing accounts setup, you can skip this step. You’ll need to add your credit card details for situations where you blow past the free quotas. Don’t worry! You can add budgets to your billing account to avoid surprises.
Next, visit the Google Cloud console with the same login, and click to Create project.
Give the project a name and make sure to EDIT the ID so that it’s easier to remember / handle. You’ll be prompted to add a billing account to the project, so choose the one you just created, or whatever account you want to use.
Next, visit https://console.cloud.google.com/apis/api/cloudbuild.googleapis.com/overview and click Enable API to enable the Cloud Build API. We’ll need this to upload our configurations to the cloud.
Finally, go to https://cloud.google.com/sdk/install and follow the steps. You’ll want to install the Google Cloud SDK so that you can run most of the necessary commands from the command line.
After installing the SDK, run gcloud init in your terminal or command-line program. This will initialize the Google Cloud SDK for you, and it will let you choose which project to activate (choose the one you created earlier in this chapter).
Step 2: Clone the GitHub repository
First, make sure you have the git client installed. I’m using the command-line client in these examples, but feel free to use a GUI (graphical user interface) client if you wish.
Once the git client is installed, run git clone https://github.com/sahava/cookie-bouncer-service.git in a directory of your choice to clone the source code to your computer.
Let’s recap.
You have created a Google Cloud Platform project, linked to a Billing account with the Cloud Build API enabled.
You have installed the Google Cloud SDK, and you have initialized it with the same login you used to create the Google Cloud project, and you’ve configured it to set your new project as the active project.
You have cloned the GitHub repository.
Step 3: Create and deploy the App Engine application
Your next step is to create an App Engine application. App Engine is Google’s fully managed, serverless application platform. It’s like a light-weight virtual machine environment, where Google handles things like scaling and instance generation for you.
The web service we’ll create in this exercise will run on the App Engine Standard environment.
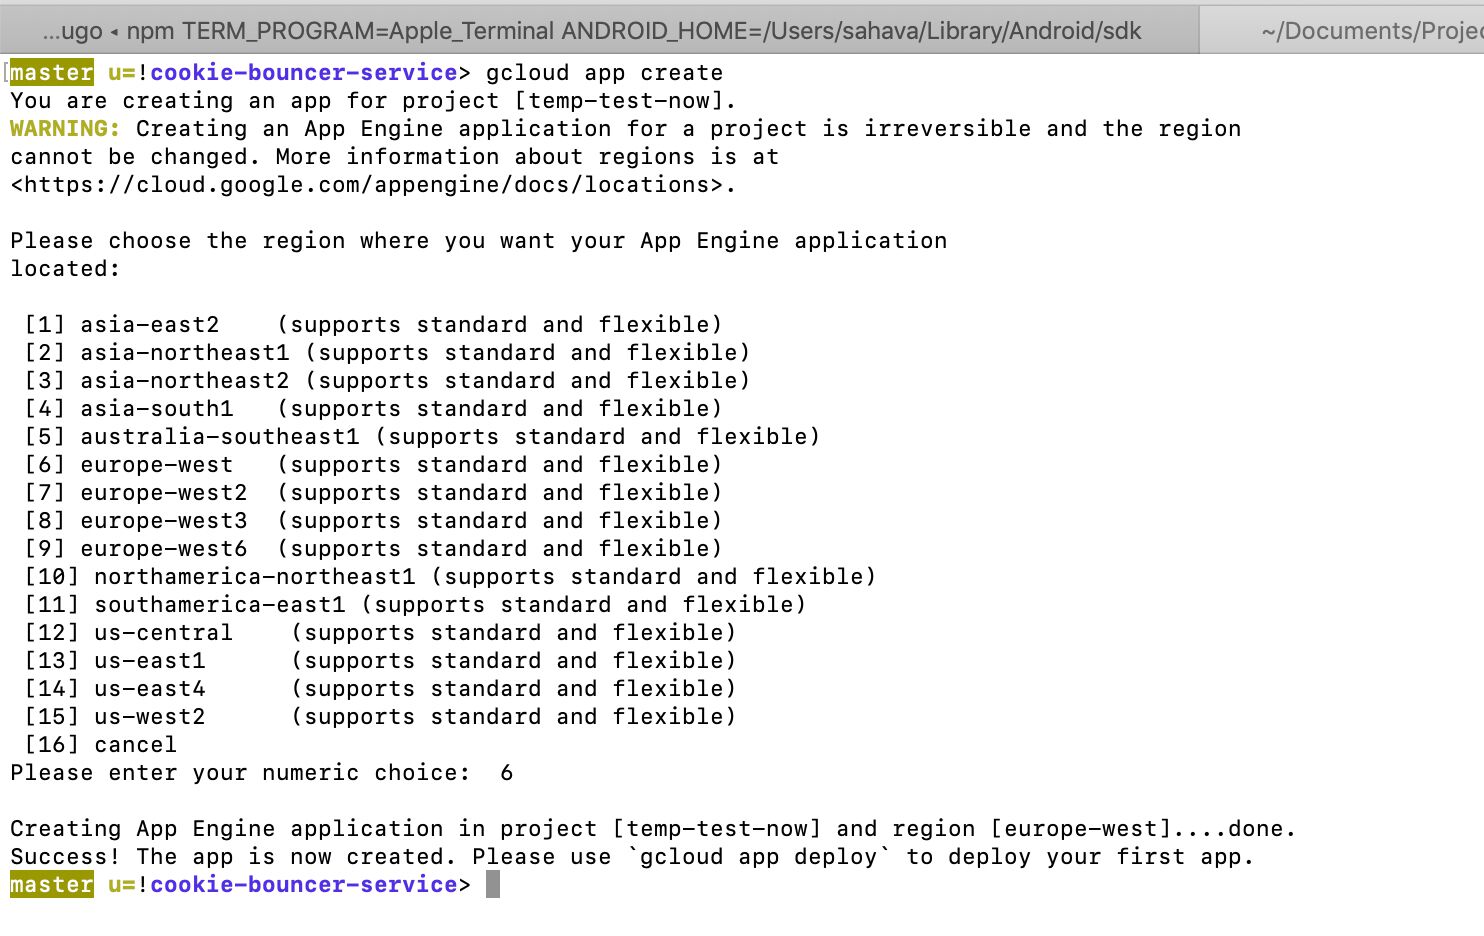
While in the folder where you cloned the Git repository, run the following command:
gcloud app create
This will initiate the App Engine creation process. It will ask you for a region, so choose one that is geographically close to your location, and make sure it supports the standard environment.
Next, open the file app.js for editing, and find the lines containing const allowedHosts = [...]. In this array, you need to add all the hostnames from which you expect to call the web service. Remember, they must share the root domain with all the custom domains you’ll map to the web service. For example, on my site I only intend to call the web service from https://www.gtmtools.com and any of its pages, so I would simply add:
const allowedHosts = [
  'https://www.gtmtools.com'
];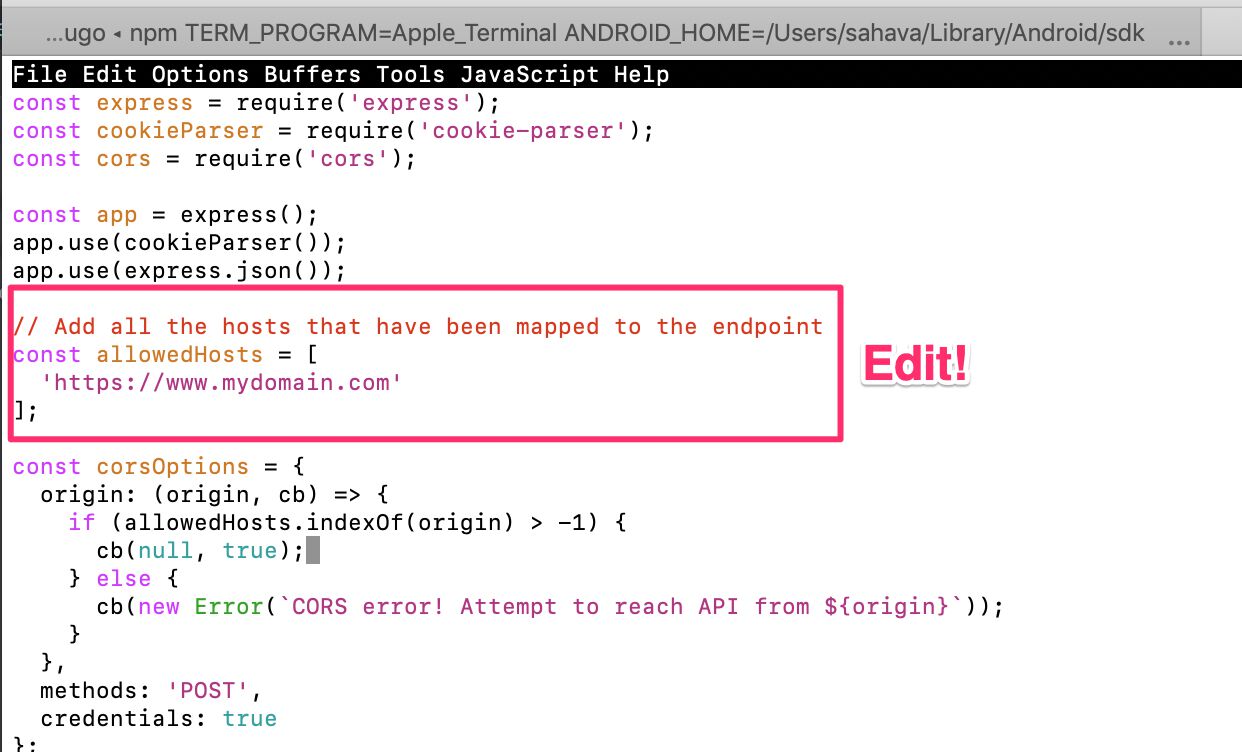
If I also wanted to map something like service.simoahava.com to the App Engine service (yes, you can add multiple domains), I could also add https://www.simoahava.com to the list of allowed origins.
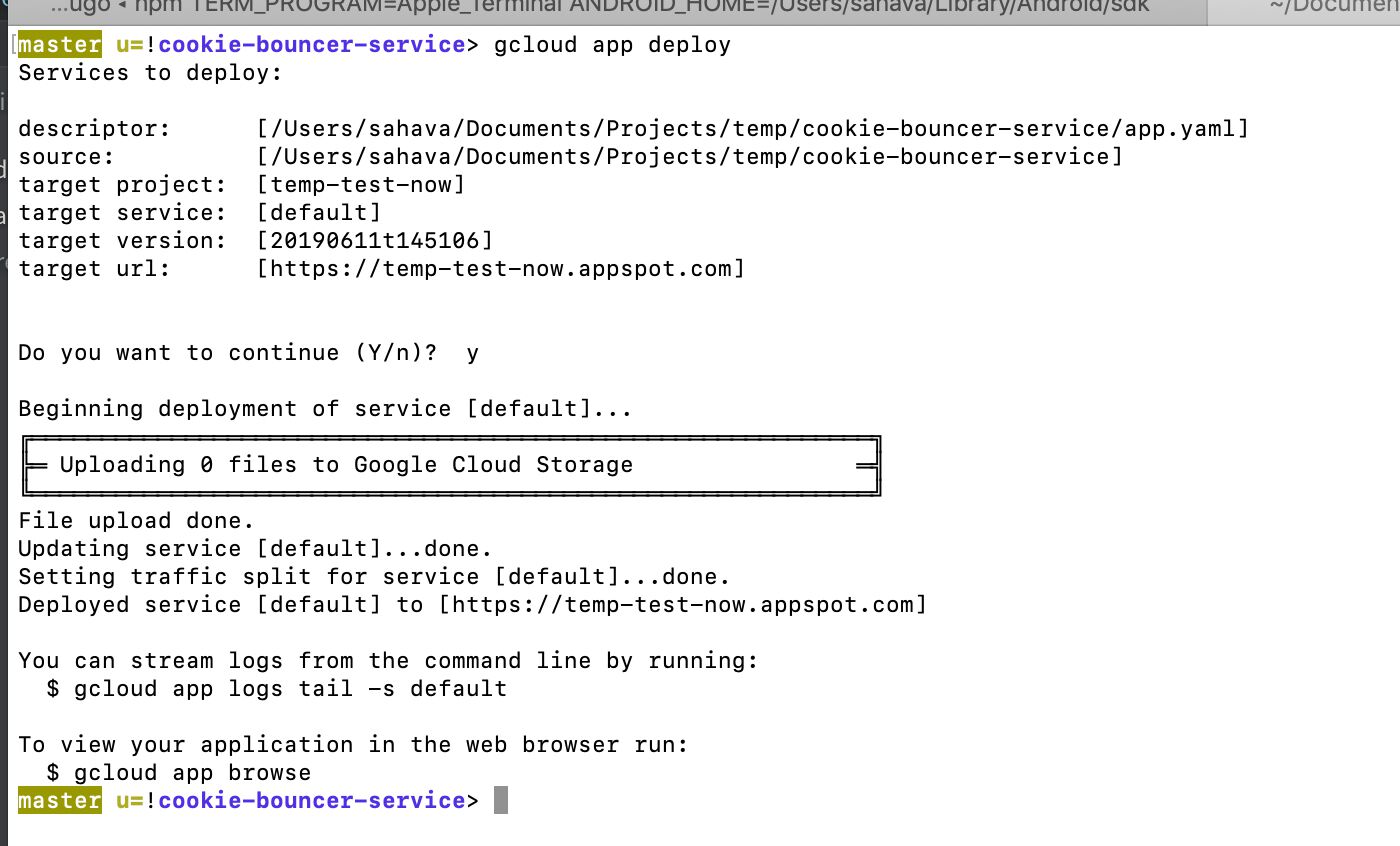
Next, run:
gcloud app deploy
It will deploy the App Engine application using the source code from the repository. Note! You must be in the folder with the app.yaml file from the repository for this command to work.
Soon it will tell you that everything is running. You can then type gcloud app browse to automatically open a browser window in the application root. If it works, you should see a warning that GET requests are not supported.
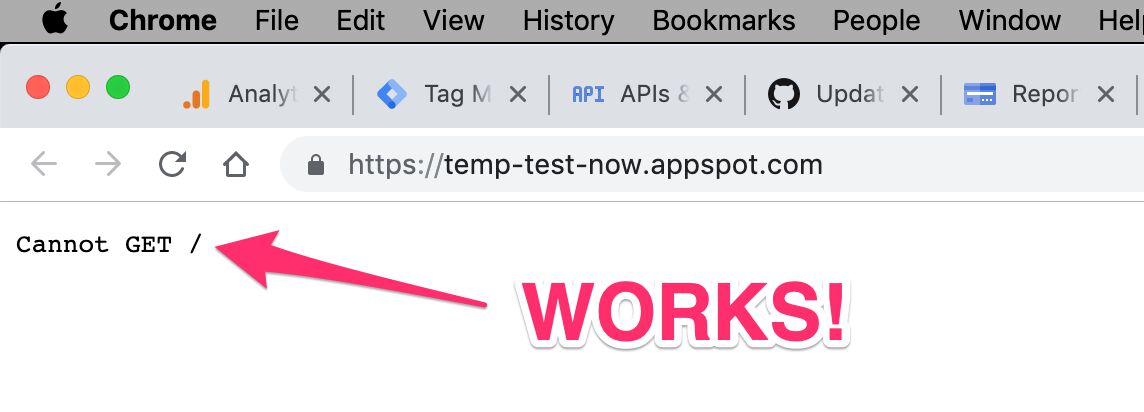
The reason it complains about GET is because the endpoint isn’t configured to handle GET requests. It’s only meant to handle POST requests.
You’re almost done with the web service. The one piece of the puzzle that’s missing is to map the web service to your custom domain, so that it can set cookies on your site with the Set-Cookie header.
Step 4: Map the custom domain to the endpoint
Browse to https://console.cloud.google.com/appengine/settings/domains and make sure you’ve got your App Engine project selected.
Click Add a custom domain to get the domain verification process started.
From the Select the domain you want to use, choose Verify a new domain, and type the domain name into the respective field. Click Verify.
NOTE! It’s important that you verify the subdomain that you want to use, rather than add a new subdomain to an already verified “naked” domain. The difference is that with the first option you need to set A/AAAA DNS records, and with the second option you need to set a CNAME record. With upcoming changes to Safari, it’s important that you do not use a CNAME record for this, as it negates the benefit of the entire solution.
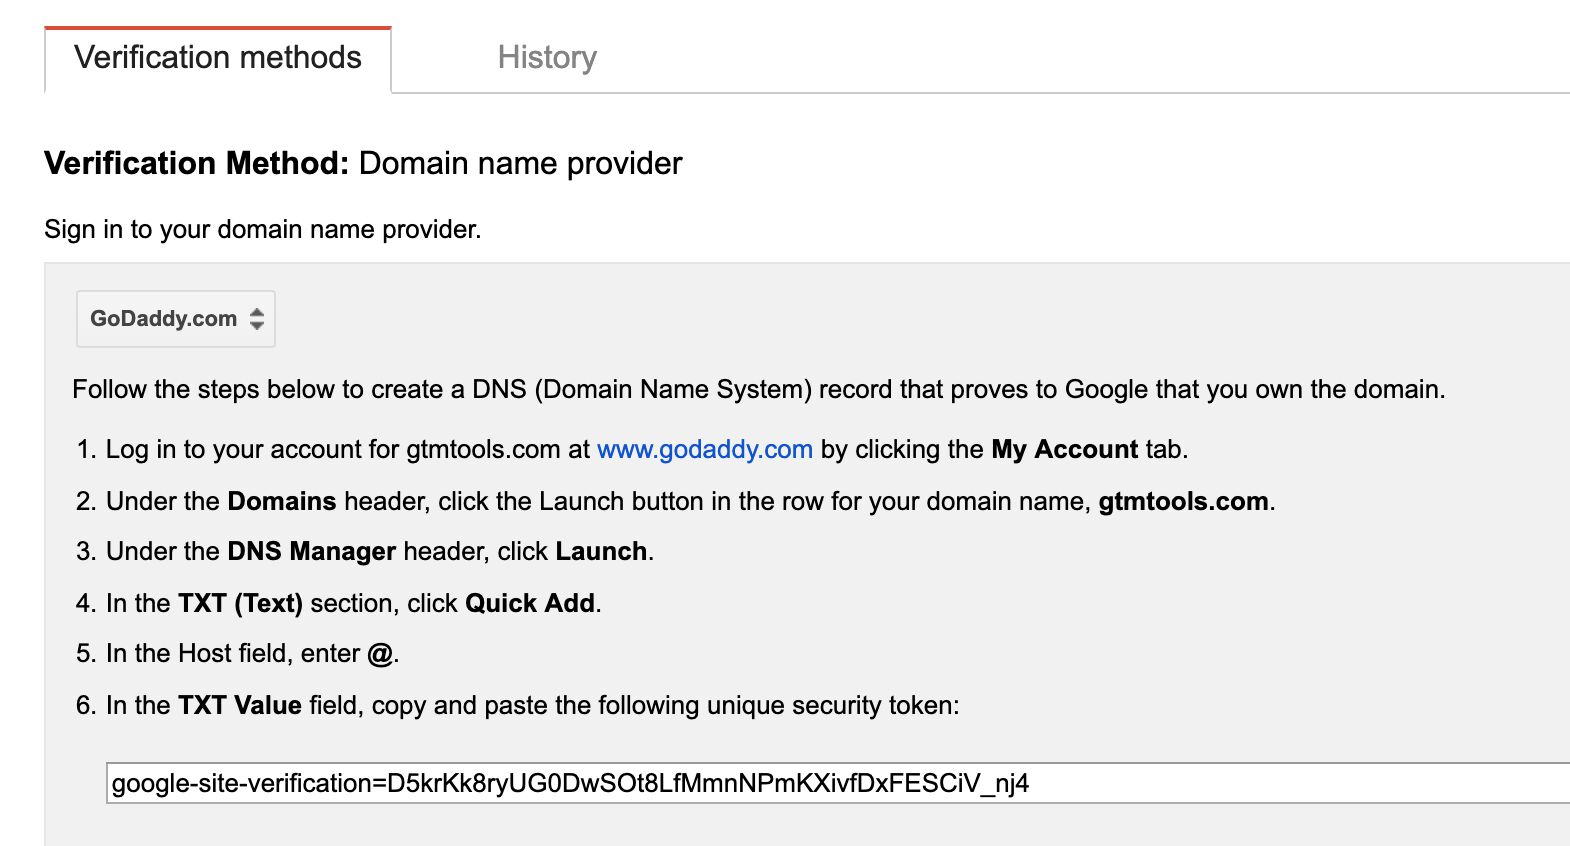
It will shuttle you off to something that looks very much like Google Search Console’s domain verification screen. You’ll need to verify that you own the domain you are trying to map to App Engine.
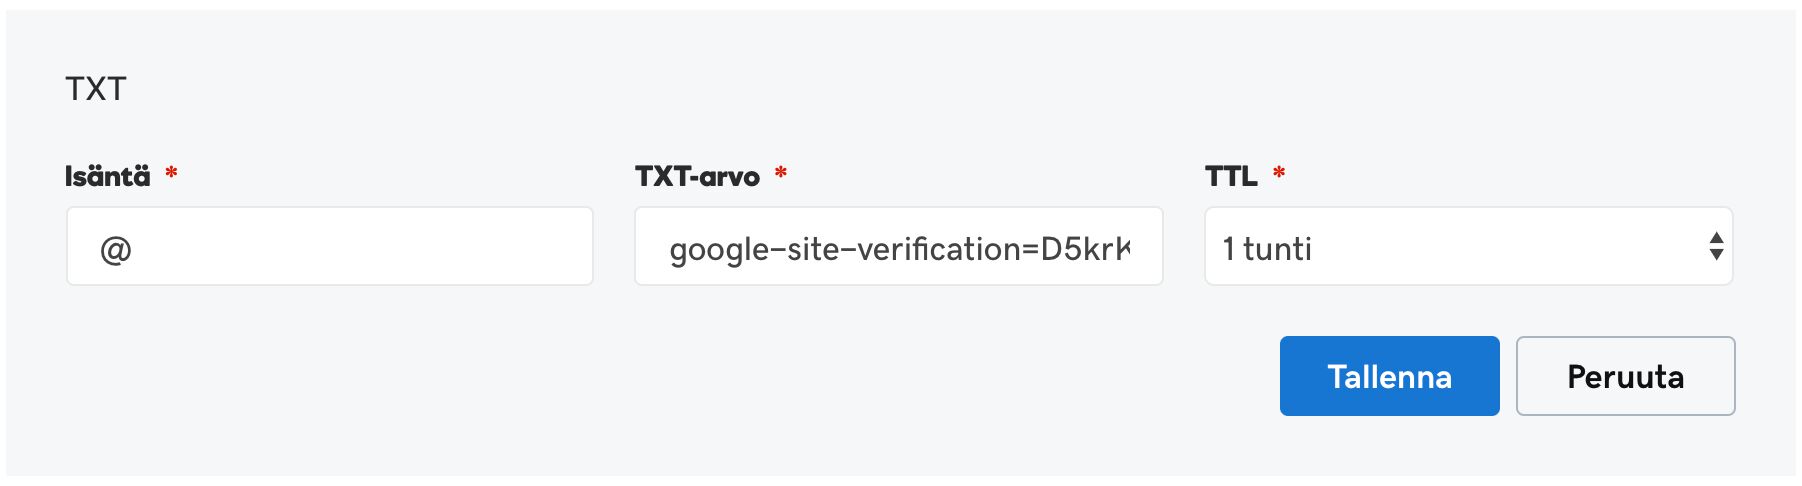
For example, I’m using GoDaddy as my service provider, so it’s easy to just follow the instructions and add the necessary TXT record.
Once you’ve done the change, you’ll need to wait for the DNS record to propagate. Sometimes it happens really fast, sometimes it can take hours. So just stay in the verification page, and click Verify every now and then to see if the TXT records have been updated.
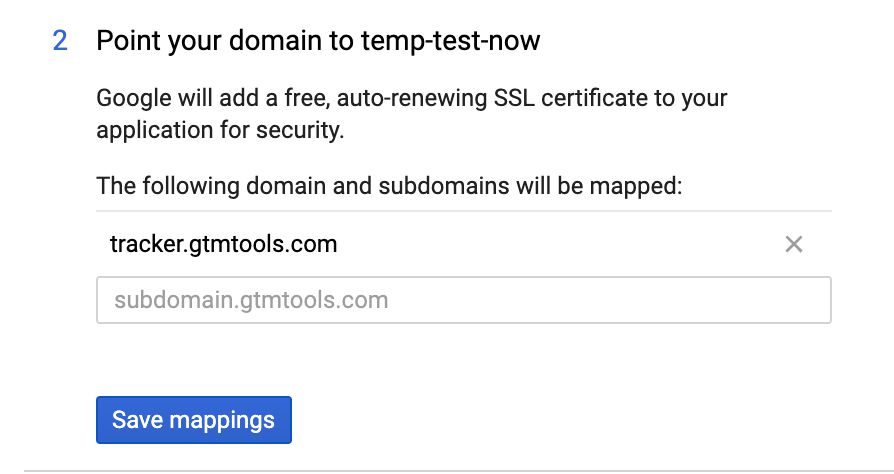
Once the domain is verified, you can click forward in the steps to add a custom domain to the App Engine project. Google will issue a free SSL certificate for the domain, securing the endpoint itself behind HTTPS.
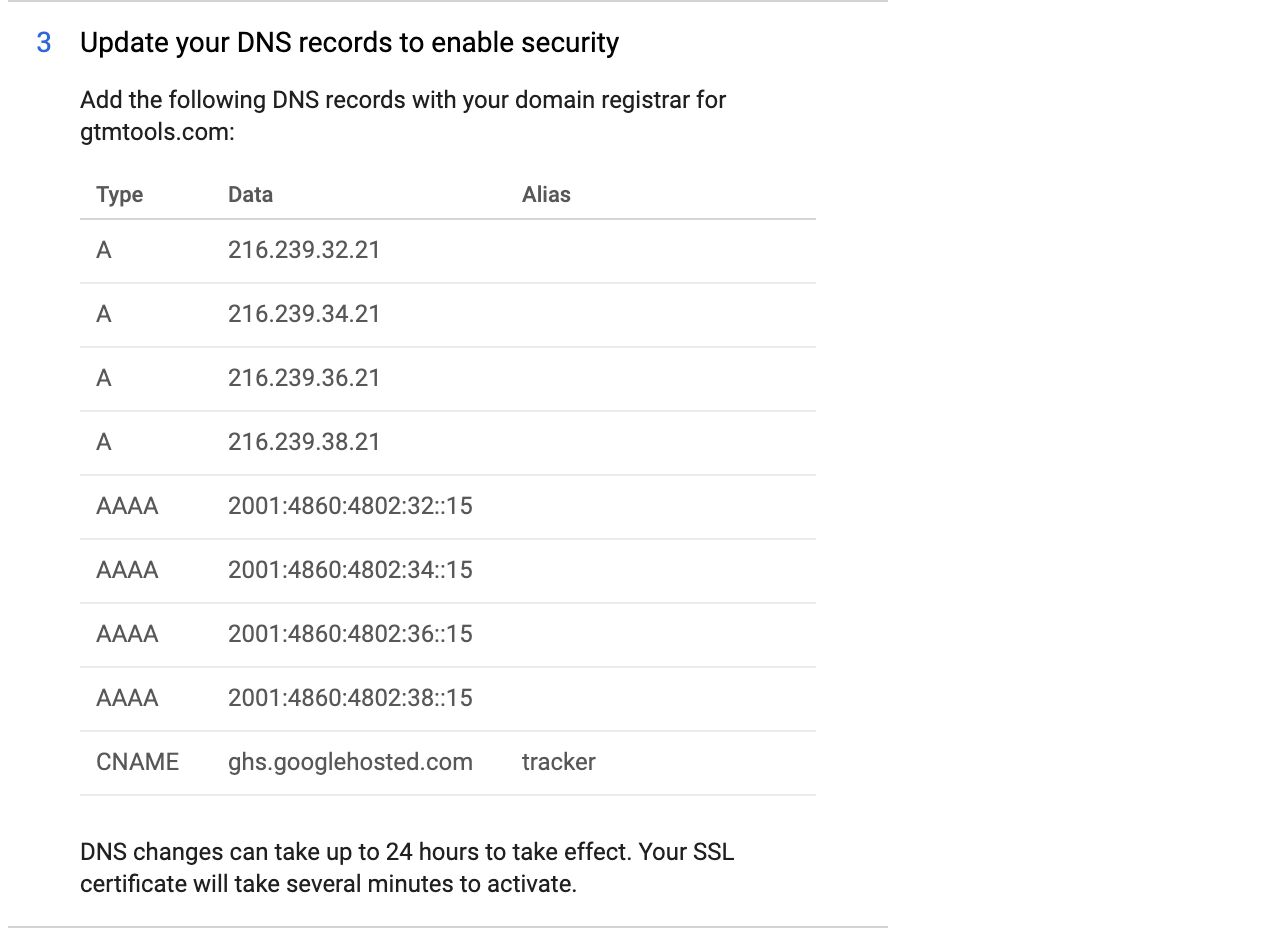
In the last step, Update your DNS records to enable security, it will list you a number of A and AAAA records you’ll need to add to your DNS settings for the host you want to map to App Engine. For example, in my example of tracker.gtmtools.com, I get the following records:
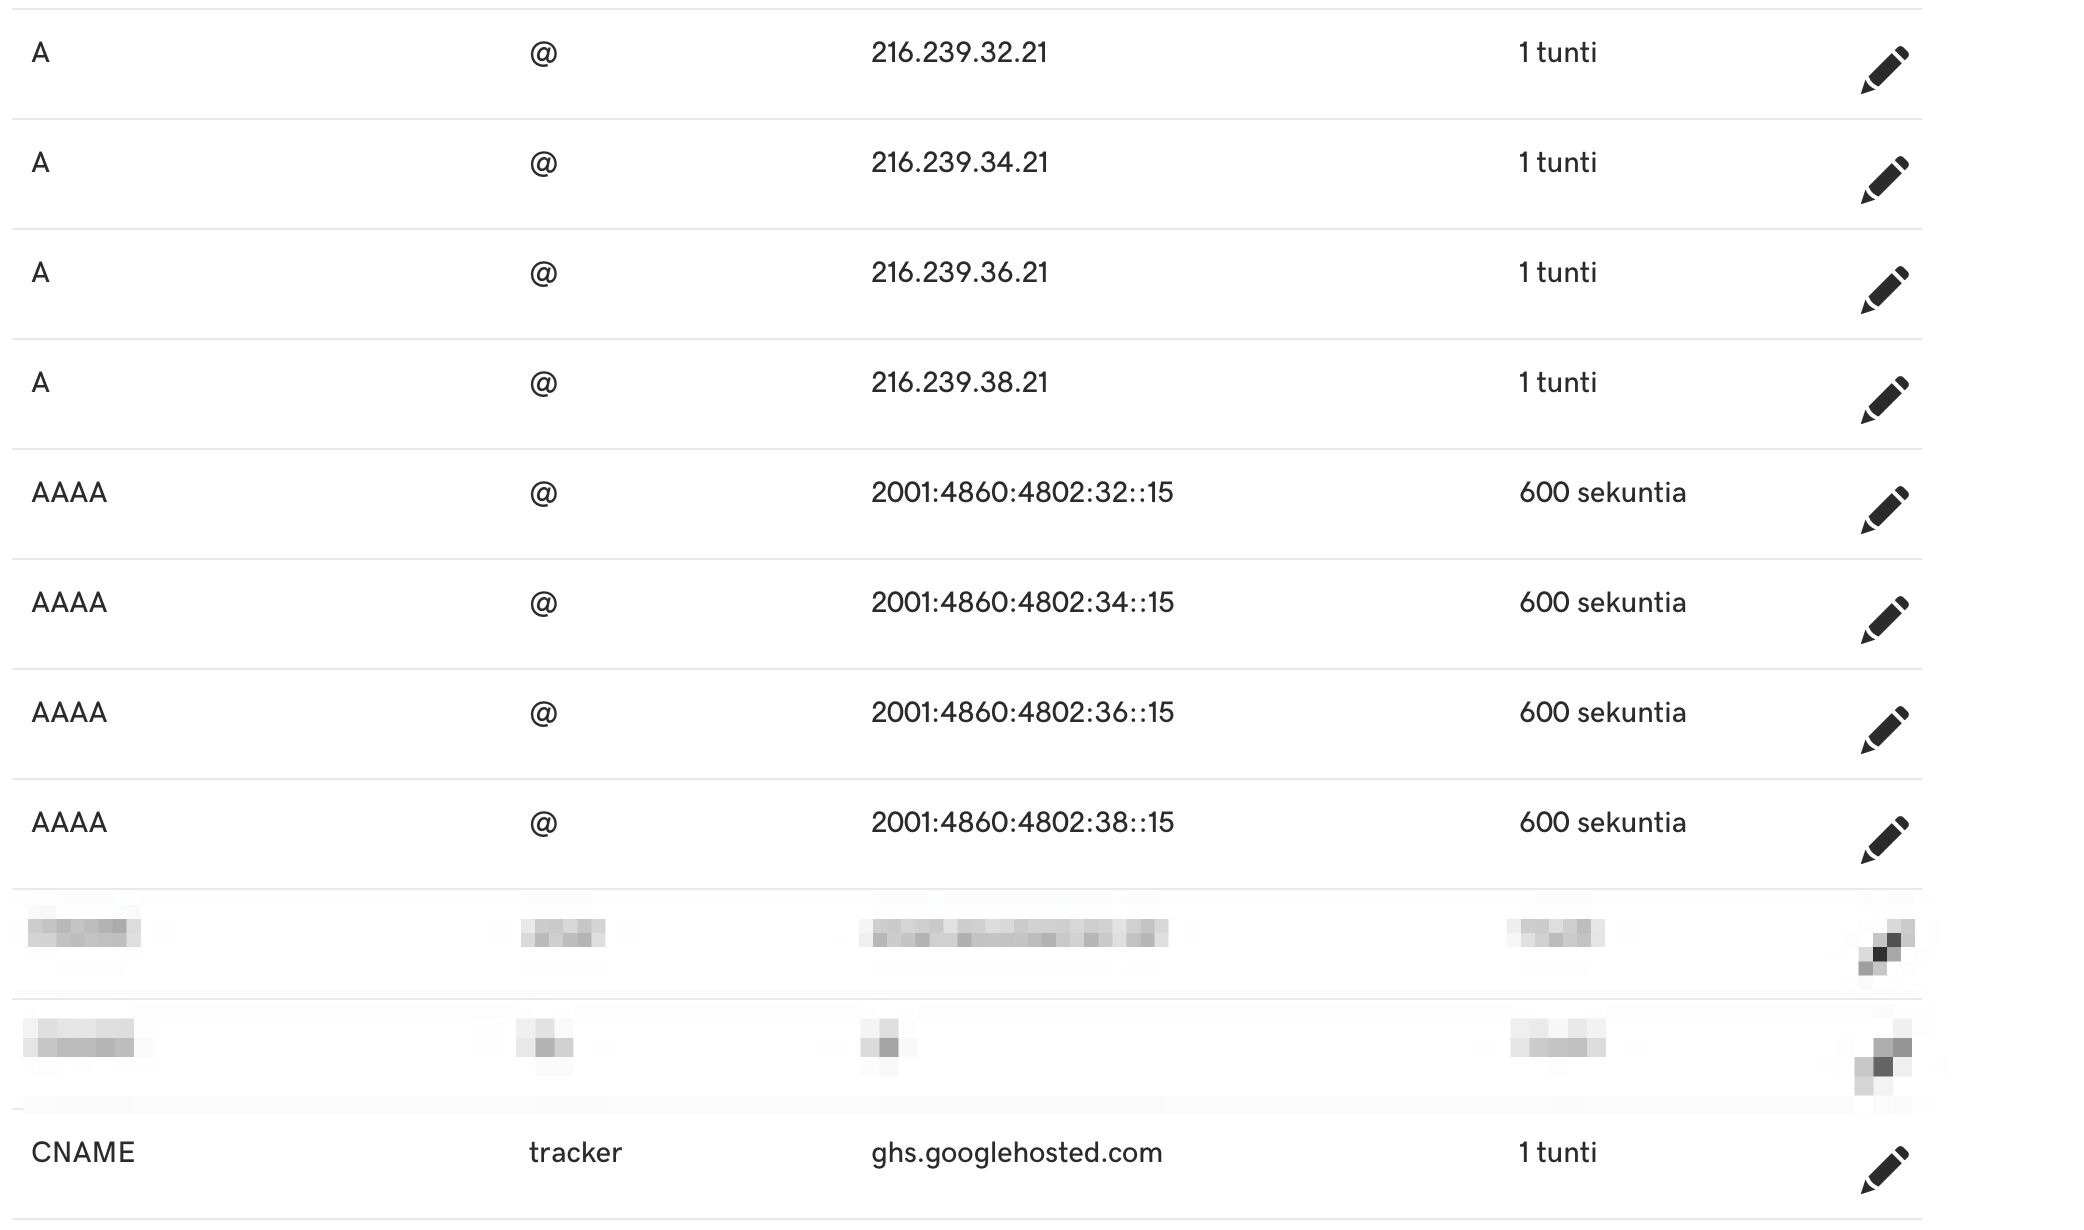
In GoDaddy, I’ve now added them as instructed:
Now, again, it’s a question of just waiting for the records to propagate. Once everything works, typically well within 24 hours of making the changes, you should be able to visit https://tracker.yourdomain.com, i.e. the custom domain you just mapped, and it should return the similar GET error you saw when visiting the App Engine endpoint directly.
Step 5: Test in the browser
Now it’s time to do a quick browser test. Browse to one of the domains that you configured in app.js in the allowedHosts array (see this chapter for a refresher). Use the Safari browser.
Then, open the JavaScript Console - that’s CMD-OPT-C on a Mac, but you can also find it in the Develop menu.
In the console, copy-paste this code. You need to change the value of the endpoint variable to the web service domain you configured in the App Engine domain mappings, and you need to change the value of the domain variable to match the root domain your site and the endpoint have in common.
const endpoint = 'https://tracker.gtmtools.com';
const domain = 'gtmtools.com';
const xhr = new XMLHttpRequest();
xhr.open('POST', endpoint);
xhr.setRequestHeader('Content-Type', 'application/json');
xhr.withCredentials = true;
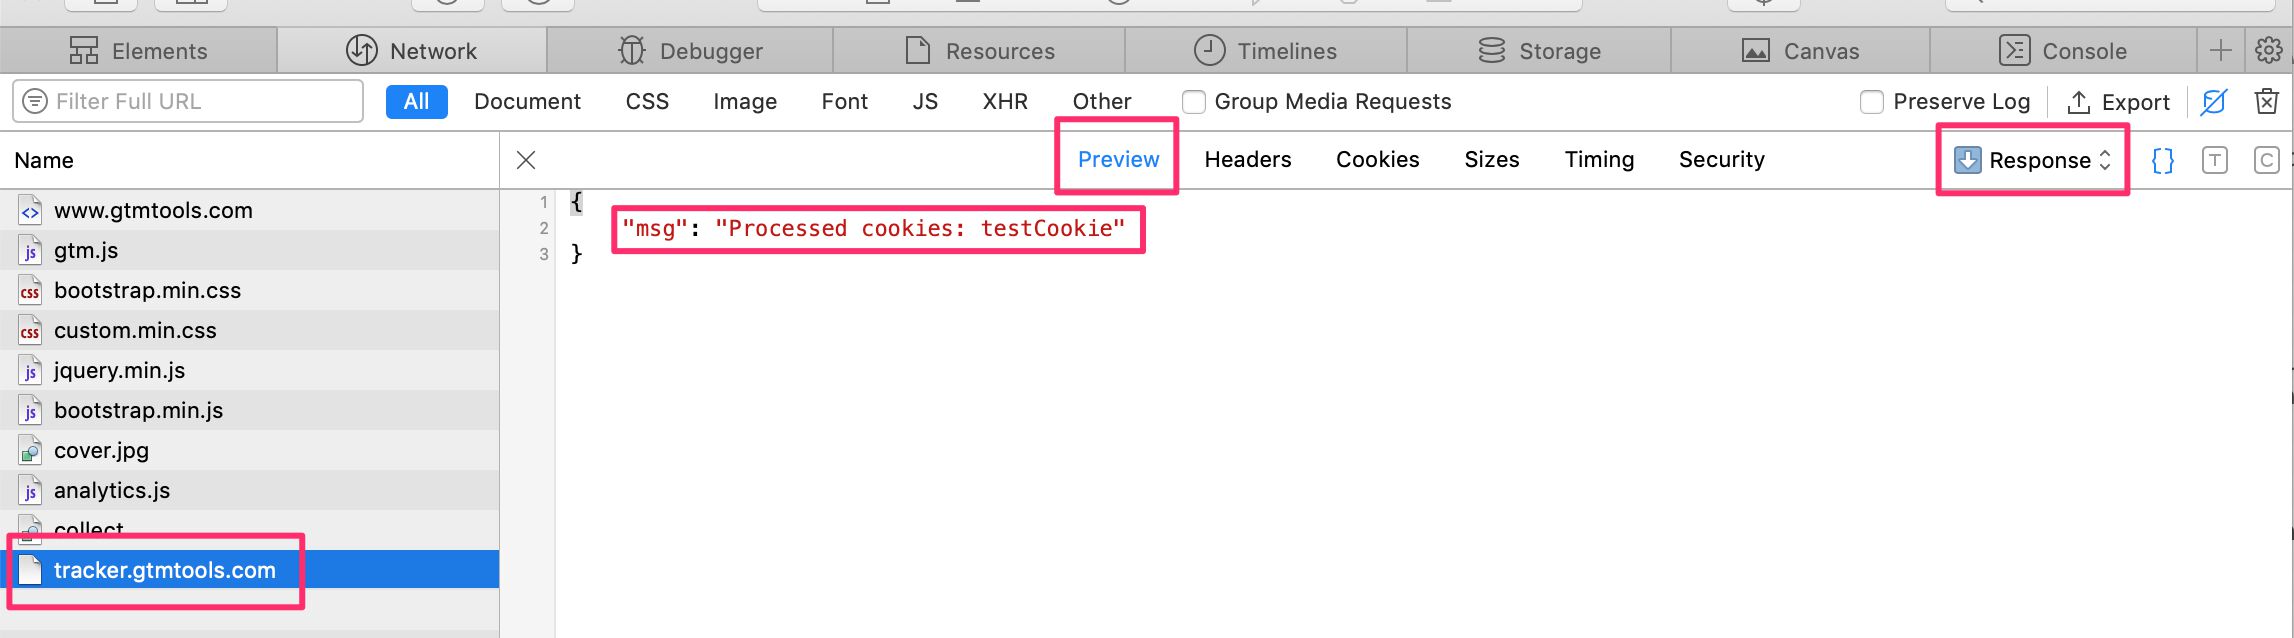
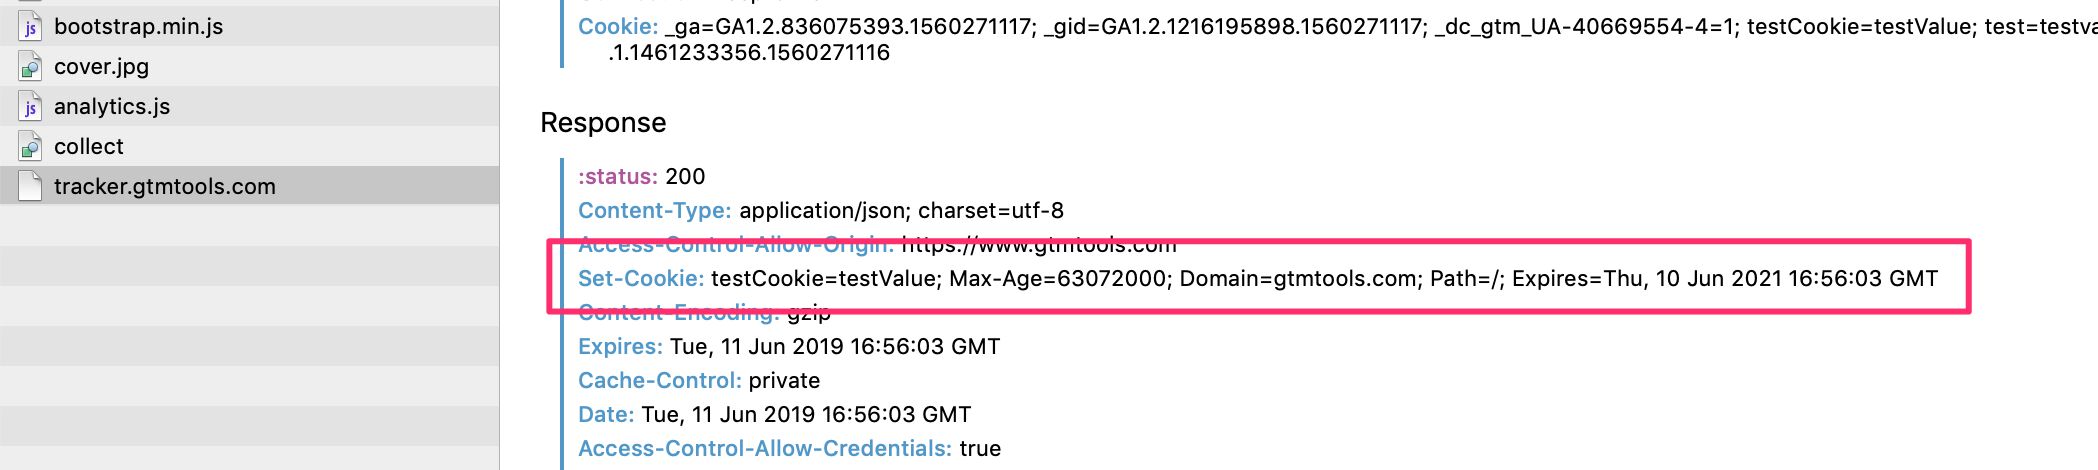
xhr.send(JSON.stringify({name: 'testCookie', value: 'testValue', options: {domain: domain, maxAge: 1000*60*60*24*365*2}}));This generates a POST request to the endpoint you have configured, and it instructs the web service to return a cookie named testCookie with value testValue, written on the root domain. Since you don’t provide an expiration, the cookie will have an expiration of two years.
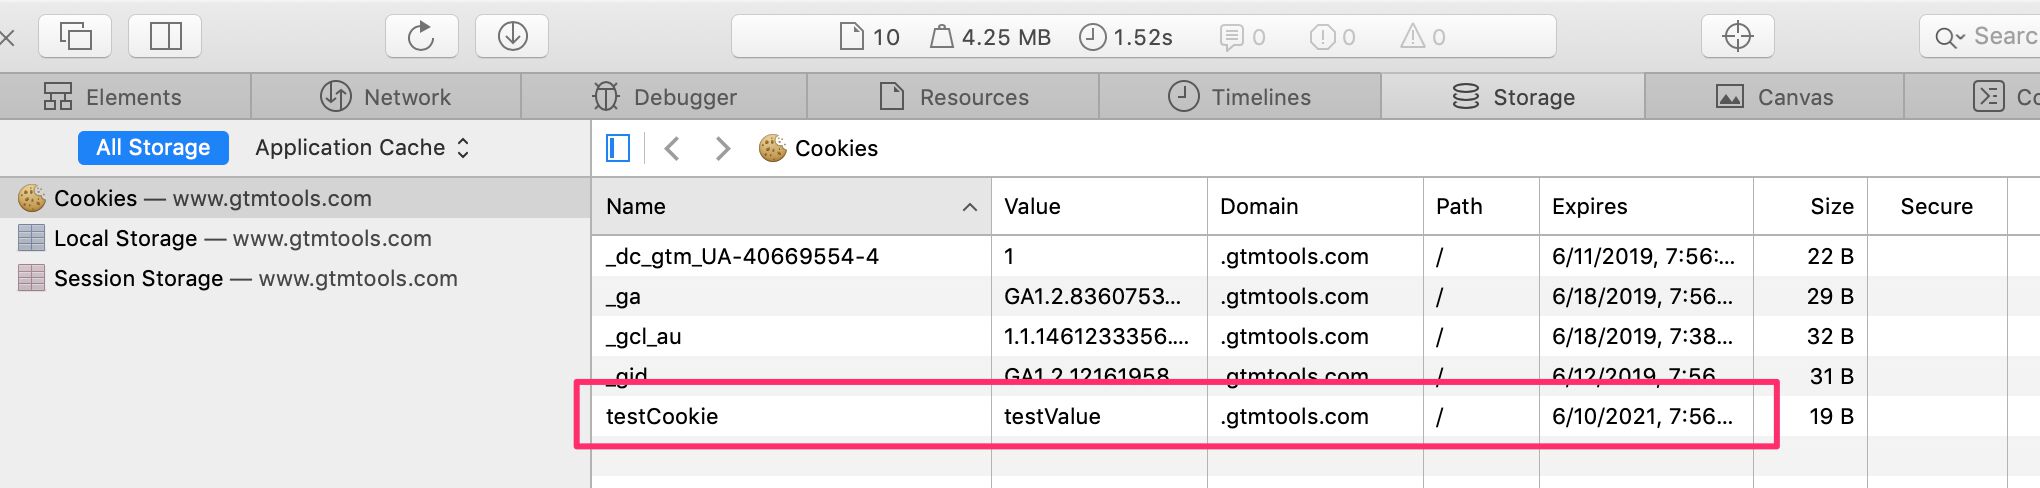
If all worked out, you should see the POST request come back with a response saying the cookie was processed. Also, the response should have a proper Set-Cookie header. Finally, the cookie should appear in the Storage section of Safari’s developer console.
So that’s how you create first-party cookies with no expiration limitations in Safari post-ITP-2.1!.
But let’s check out the final step - how to enable this in Google Analytics.
Step 6: Modify Google Analytics tags
To make the _ga cookie work with the web service, you need to do two things.
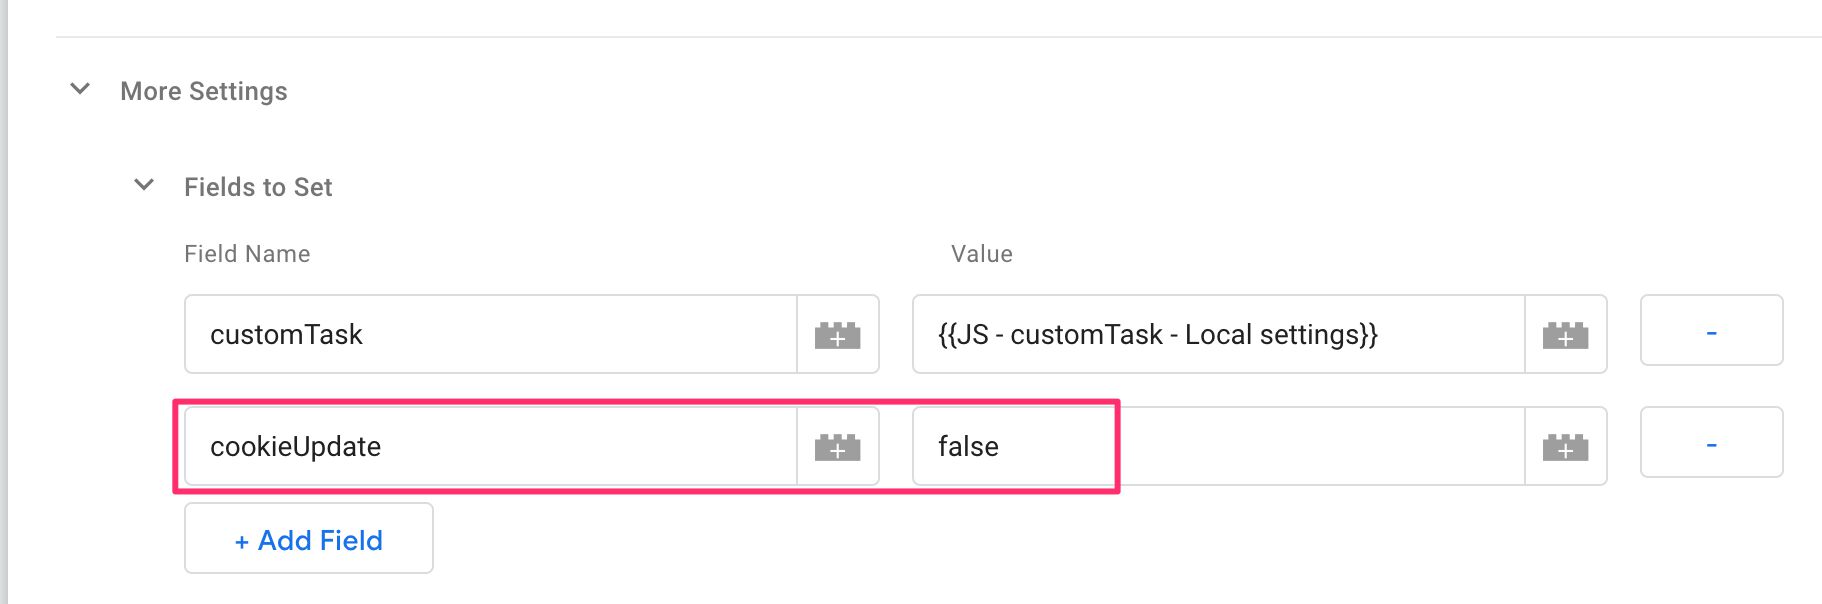
Add the
cookieUpdatefield with valuefalseto every single Google Analytics tag firing on the page. This is absolutely necessary. If there’s even a single GA tag that doesn’t have this field (and shares the cookie settings with your tags that DO have the field), the JavaScript cookie will keep on overwriting the cookie set in the HTTP response.Add a
hitCallbackfield and variable to your Page View tag (or whatever tag fires on every single page) that handles the actual logic.
The first step is easy. Just use a Google Analytics Settings variable or, alternatively, add the field manually to every single tag.
The key is to browse to More Settings -> Fields to Set, and add a new field with:
Field name: cookieUpdate
Value: false
If you’re using analytics.js, you set the field on the tracker like this:
ga('create', 'UA-12345-1', {cookieUpdate: false});And if you’re using gtag.js, it’s like this:
gtag('config', 'UA-12345-1', {
  cookie_update: false
});
Once that is done, the next step is to create the hitCallback function. I’ll show you how to do it in Google Tag Manager, but something similar could easily be done with analytics.js and gtag.js - it’s just JavaScript, after all.
In GTM, create a new Custom JavaScript variable.
What? Why not use custom templates? Well, unfortunately they don’t support creating POST requests yet. You could reconfigure the endpoint to work with GET requests, but POST is more suitable for handling structured data.
In the Custom JavaScript variable, add this code:
function() {
  return function() {
    // Change these
    var endpoint = 'https://tracker.gtmtools.com';
    var domain = 'gtmtools.com';

    // If your GA cookie name is something different than the default _ga, change this accordingly
    var gaCookieName = '_ga';

    // From https://www.w3schools.com/js/js_cookies.asp
    function getCookie(cname){var name=cname+"=";var decodedCookie=decodeURIComponent(document.cookie);var ca=decodedCookie.split(";");for(var i=0;i<ca.length;i++){var c=ca[i];while(c.charAt(0)==" "){c=c.substring(1)}if(c.indexOf(name)==0){return c.substring(name.length,c.length)}}return""}

    // Don't touch anything below

	// Using getCookie() because we need to fetch the cookie value when the variable is executed, not when its added to the tag
    var gaCookie = getCookie(gaCookieName);

    var safariApiPoll = {{Cookie - _safari_api_poll}};

    // Only run if GA cookie is set and if Safari hasn't been polled in the last 6 days
    if (!gaCookie || safariApiPoll) {
      return;
    }

    var data = JSON.stringify([{
      name: '_ga',
      value: gaCookie,
      options: {
        path: '/',
        domain: domain,
        maxAge: 1000 * 60 * 60 * 24 * 365 * 2
      }
    }]);
	var xhr = new XMLHttpRequest();
	xhr.open('POST', endpoint, true);
	xhr.setRequestHeader('Content-Type', 'application/json');
	xhr.withCredentials = true;
	xhr.send(data);
    document.cookie = '_safari_api_poll=true; domain=' + domain + '; path=/; max-age=' + 60*60*24*6;
  }
}
Remember to change the endpoint and domain to match the service endpoint and the root domain, respectively.
Give the variable name such as {{hitCallback - Cookie rewrite}}.
The hitCallback function does two things.
If the
_gacookie has been set, and if it’s been more than 6 days since the web service was last polled, it requests the web service to write a new cookie named_ga, using the value of the actual_gacookie written by Google Analytics.It sets a new cookie with a 6 day expiration to avoid polling the web service any more than necessary.
The reason we have the 6-day-expiration cookie is to prevent the API from being constantly polled by your tags. Since the API sets a cookie with a two-year-long expiration, it’s OK to only poll it once every six days.
There’s a complicated logic here, so bear with me.
There’s no way to know using JavaScript what the expiration of the _ga cookie is. Thus, we need to poll the API every now and then to make sure the cookie stays written without a short expiration.
The maximum length of time we can persist information about when the API was last polled is 7 days. Why? Because this information is stored in a cookie written with JavaScript. The 6 days is just a precaution - you could easily modify the max-age parameter to make the cookie last a while longer.
And if you don’t mind the API being polled constantly, feel free to remove this cookie check or to make it poll the API once a day, for example.
Anyway. Next you’ll need to create two First Party Cookie variables:
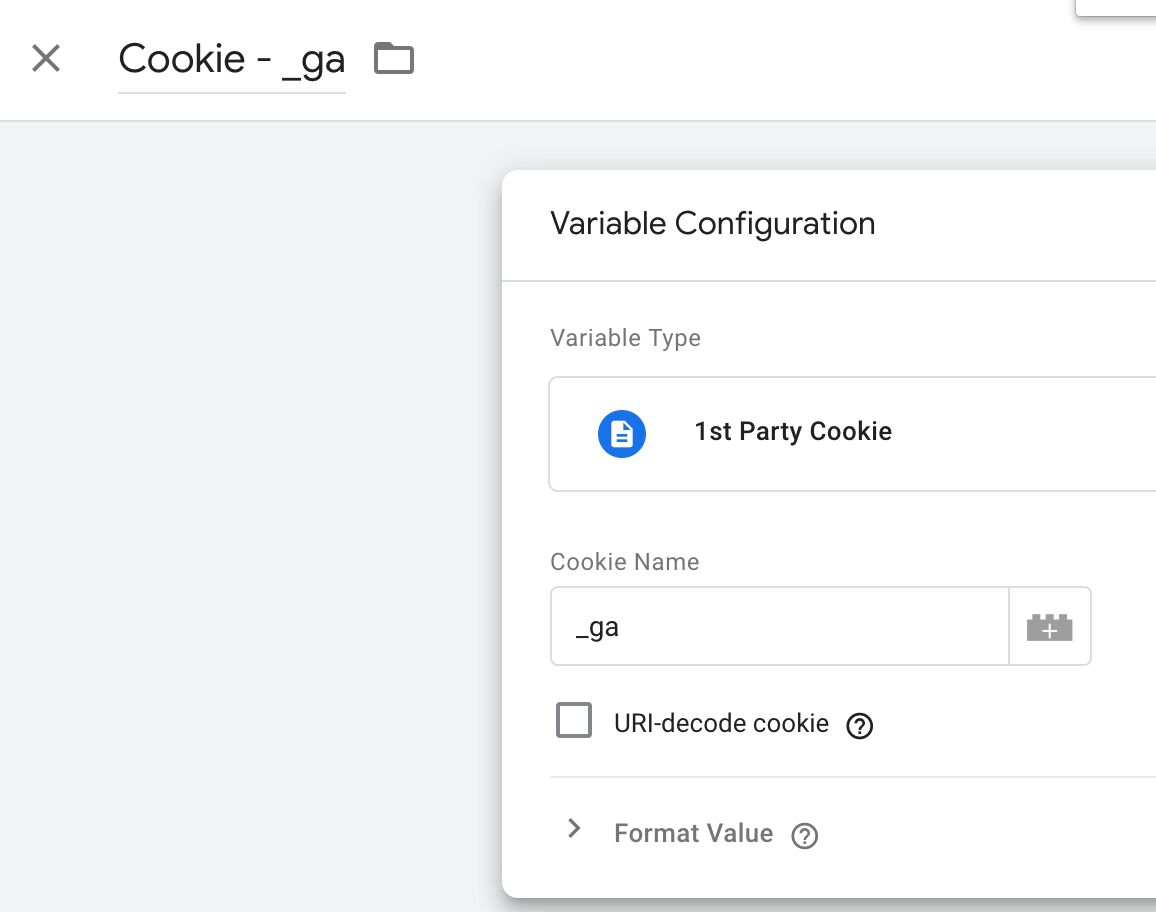
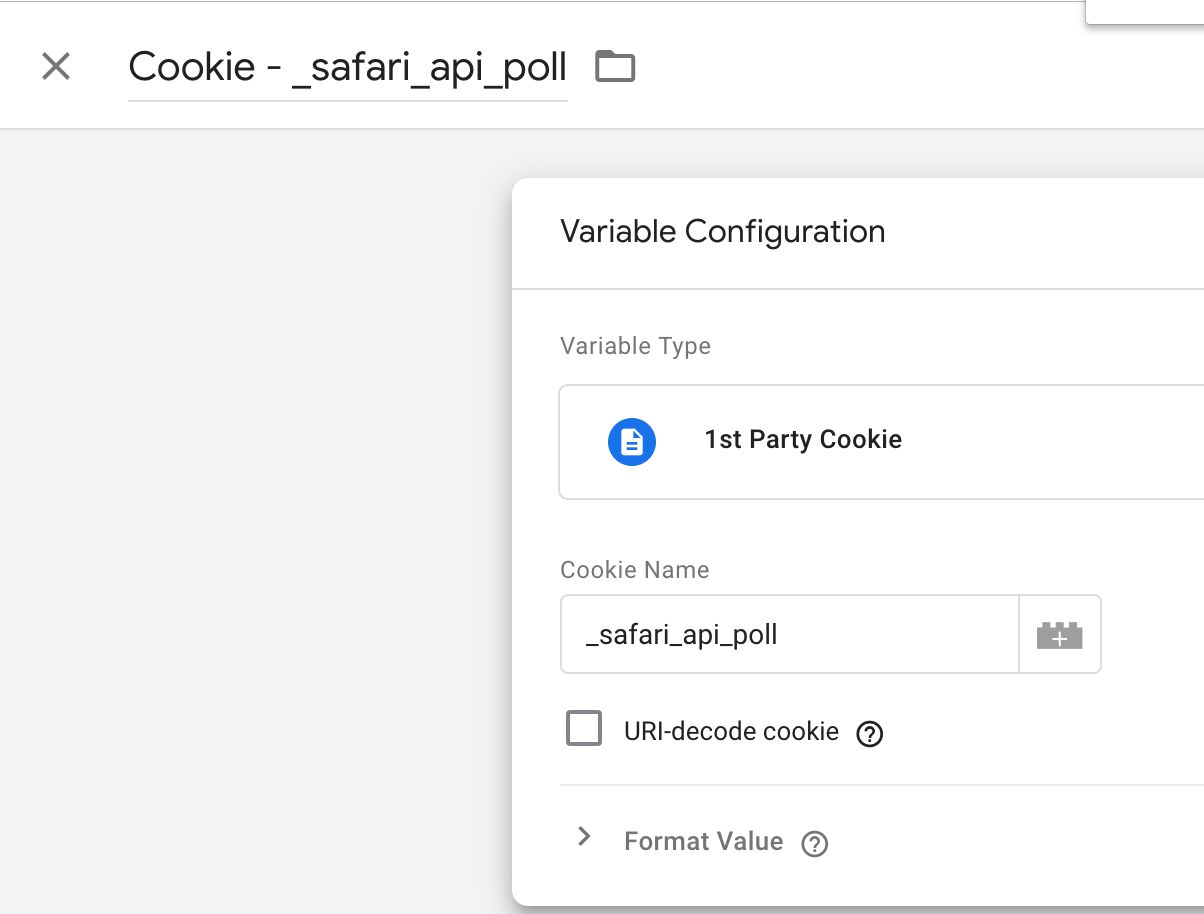
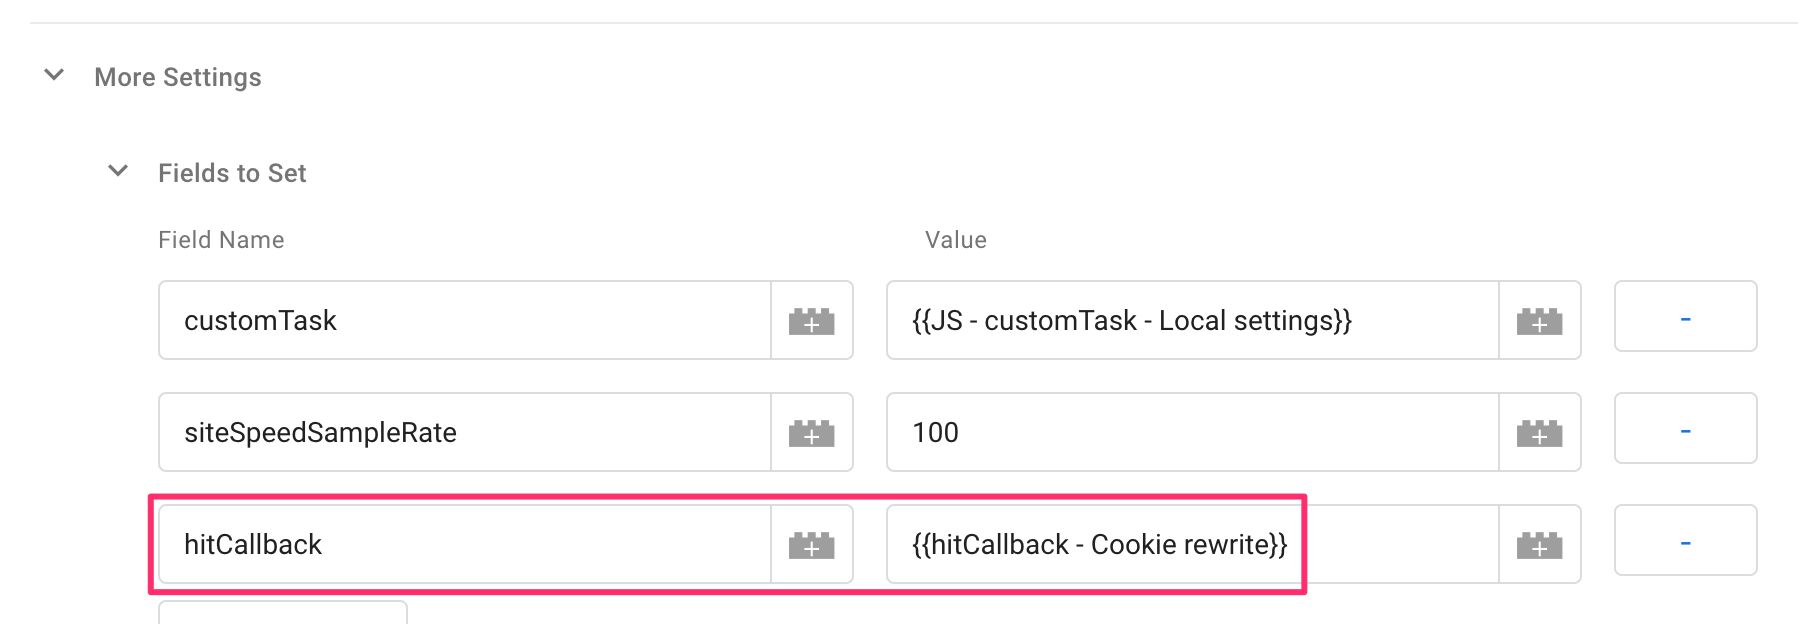
Finally, you need to find your Page View tag (or whatever tag fires consistently on every page), and scroll down to its More Settings -> Fields to Set (check “Enable overriding settings in this tag” first). Add a new field:
Field name: hitCallback
Value: {{hitCallback - Cookie rewrite}}
Now that you’re all set, it’s time to test!
Take the container to Preview mode, and visit the site with Safari. You should see a request to tracker.domain.com in the Network tab, and you should see your _ga cookie with a full two-year-long expiration. Reload the page and you should see no more requests to the web service, nor should the expiration of the _ga cookie change.
Troubleshooting
I don’t see any requests to tracker.mywebservice.com
Make sure you configure the hitCallback variable correctly and that you add it to the tag.
I see a request to tracker.mywebservice.com but it fails
Check the JavaScript console. There should be details about why the request failed. Most likely you’ve misconfigured the allowedHosts array in app.js, and thus the cross-origin request isn’t going through.
I see the Set-Cookie header but the cookie expiration doesn’t change
Make sure the domain is correct - it needs to be a root domain shared by your website and the web service.
Make sure you’ve set the cookieUpdate field to false in all your GA tags.
I have problems setting up the App Engine application or something else
Leave a question in the comments and I’ll try to help you out.
Final thoughts
I hope you find this exercise useful - it should give you some idea about what the technical steps are for creating some type of cookie routing service.
There are other ways to handle this, listed in this article. However, the beauty of an API service like this is that it’s as scalable as you like (or as your budget allows).
Using App Engine Standard environment isn’t too expensive. For example, the modest amount of hits my site is generating for the API (around 7000 requests per day) is well within the free quota. App Engine charges based on instance hours, and you’re given 28 instance hours for free per day. I’m barely hitting 25 with this load.
Naturally, there are ways to optimize this even further. For example, you could check if the user’s browser is Safari and only use the API then. Similarly, you could extend the API poll cookie from six days to far longer expirations by setting THAT cookie with the web service, too. Though it might create some sort of temporal cosmic paradox, I don’t know.
Regardless, let me know in the comments what you think of this solution!