I’ve written about Google’s reCAPTCHA v3 before. It’s a verification API, which analyzes the signals fed into it and returns a bot score, based on how “bot-like” the hits are.
It’s a great way to validate whether or not to collect data from certain sources that exhibit bot-like behavior. You’ll want to ignore those in your analytics tools, for example, as they tend to add a lot of (unrealistic) noise to the data set.
You can read more about how reCAPTCHA v3 works here.
In my previous article, you had to build the server endpoint for processing the reCAPTCHA requests yourself. If you remember, reCAPTCHA requires a custom-built API endpoint to process the verification requests.
Luckily, with the advent of the Google Tag Manager Server container, it’s now trivial to build “local” APIs yourself using the power of custom templates.
In this guide, I’ll show you how a new Client template I’ve created does the legwork for you. It’s designed to proxy the reCAPTCHA client-side library and to process the verification requests.
At the time of writing, Client templates are not yet available in the Community Template Gallery, so you’ll need to do some manual importing instead.
The Simmer Newsletter
Follow this link to subscribe to the Simmer Newsletter! Stay up-to-date with the latest content from Simo Ahava and the Simmer online course platform.
Prerequisites
At this point I’m assuming you already have a Google Tag Manager Server container. If not, check this video for instructions on how to get started with the deployment.
If you want to write the bot score in a first-party cookie, I’m also assuming you’ve already mapped a custom domain to your server-side endpoint. As it currently stands, the template can only write same-site cookies.
Import the Client template
The first thing you’ll need to do is import the Client template into your Server container.
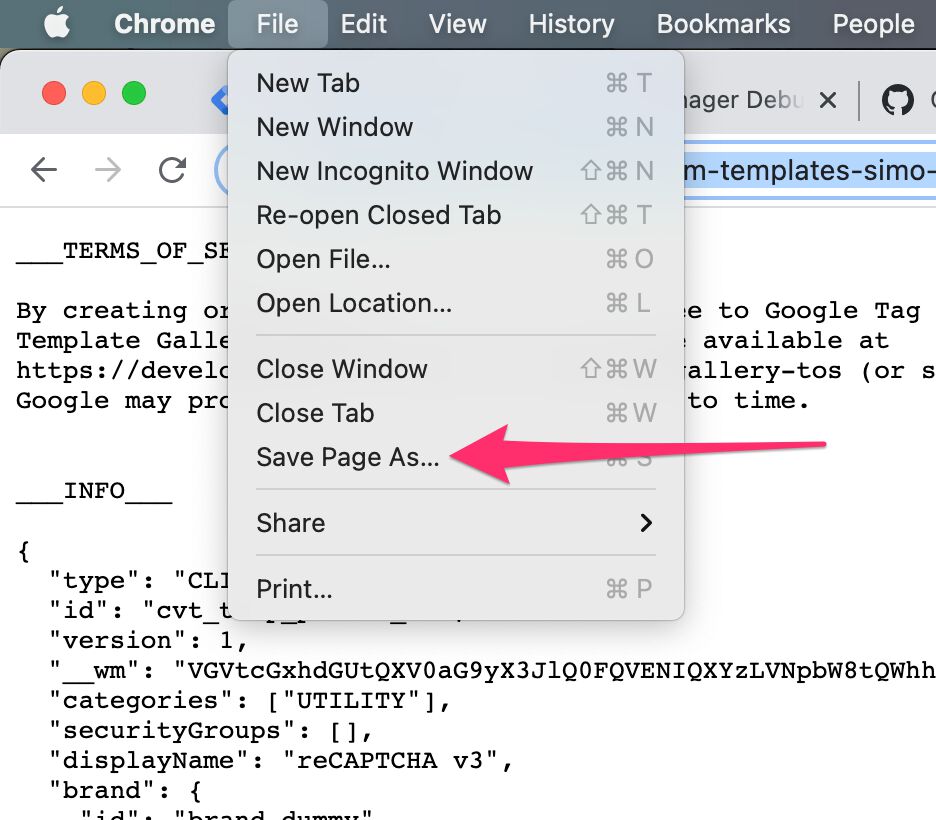
Open this link in a new browser tab, and then save the page as template.tpl. Make sure the file extension is .tpl and not something else.
Next, in the Server container, browse to Templates, and click New in the Client Templates section.
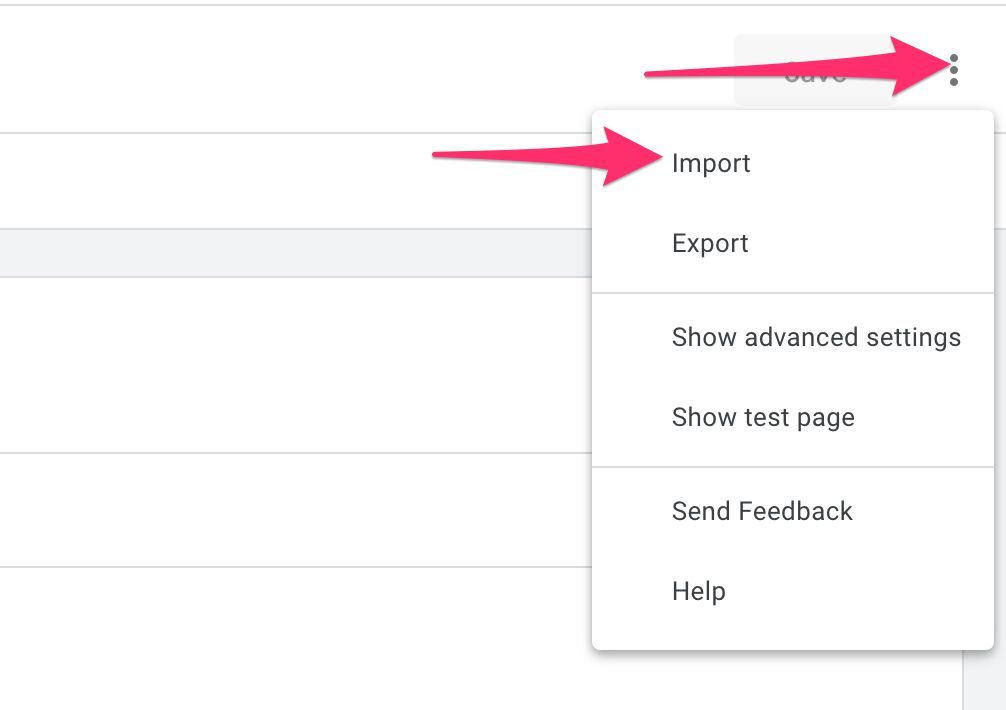
The Template Editor will now open. In the Template Editor, click open the overflow menu in the top-right corner, and choose Import.
On your computer, locate the template.tpl file you downloaded earlier, and import that file into the editor.
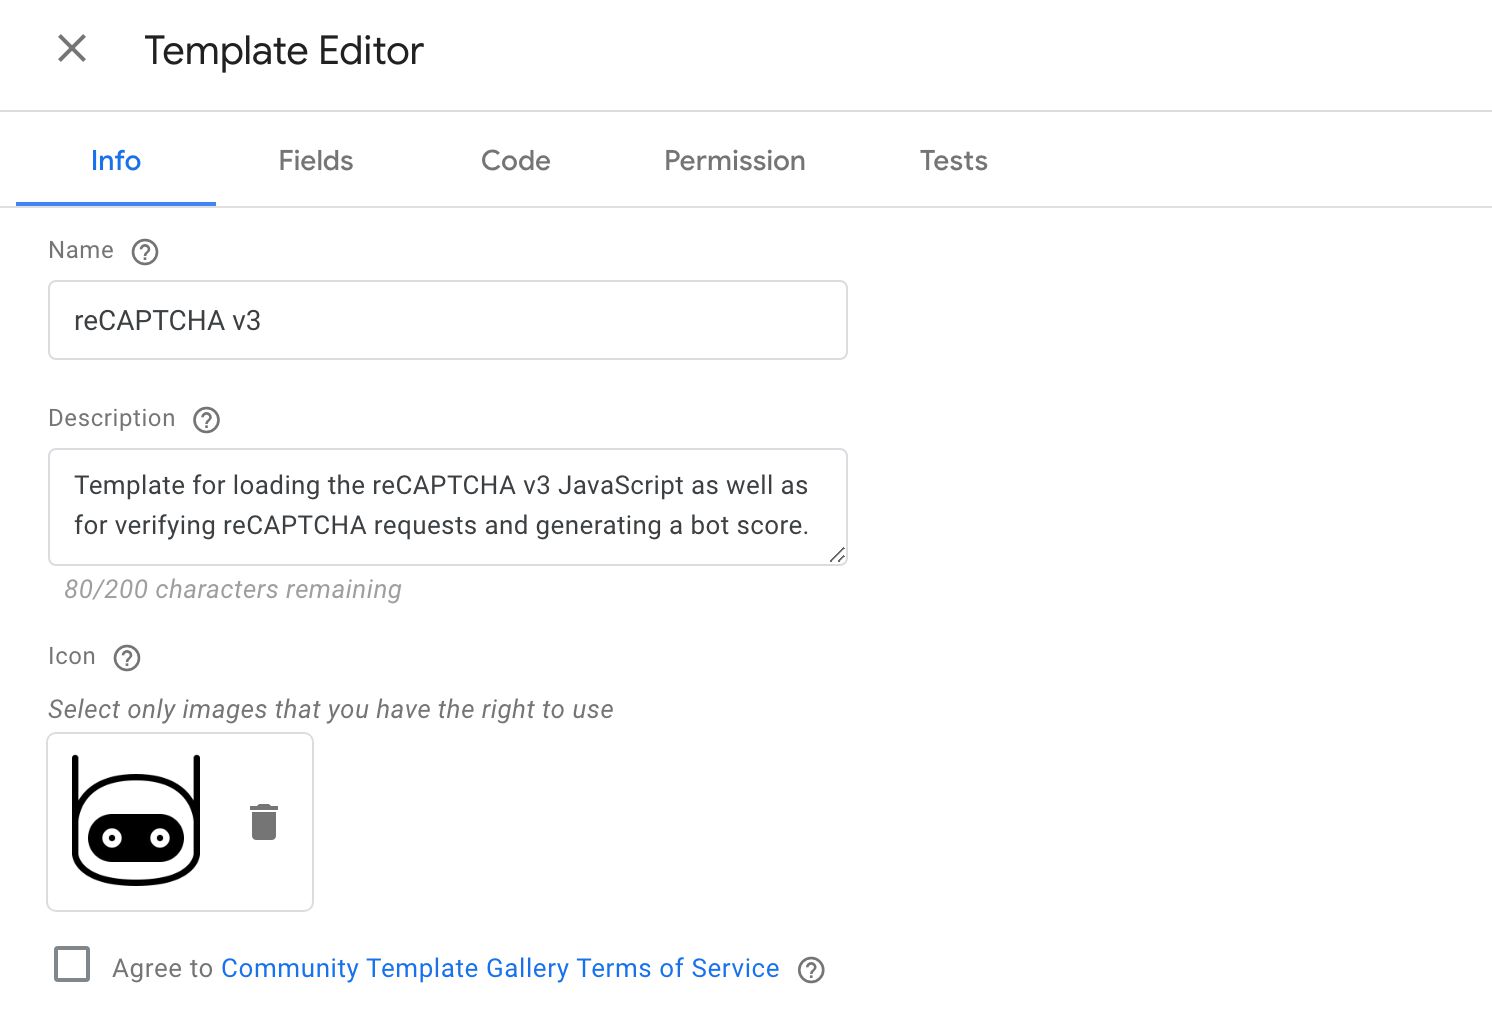
You should see the Template Editor change to reflect the contents of the reCAPTCHA v3 template.
Finally, click the blue Save button in the top-right corner of the Template Editor and close the editor.
You’ve now managed to import the Client template into your container, and it’s time to configure it.
Generate the secrets for reCAPTCHA v3
To work with reCAPTCHA v3, you need to generate a Site key and a Secret key.
Browse to https://www.google.com/recaptcha/admin/create to register a new site.
This is completely free to do!
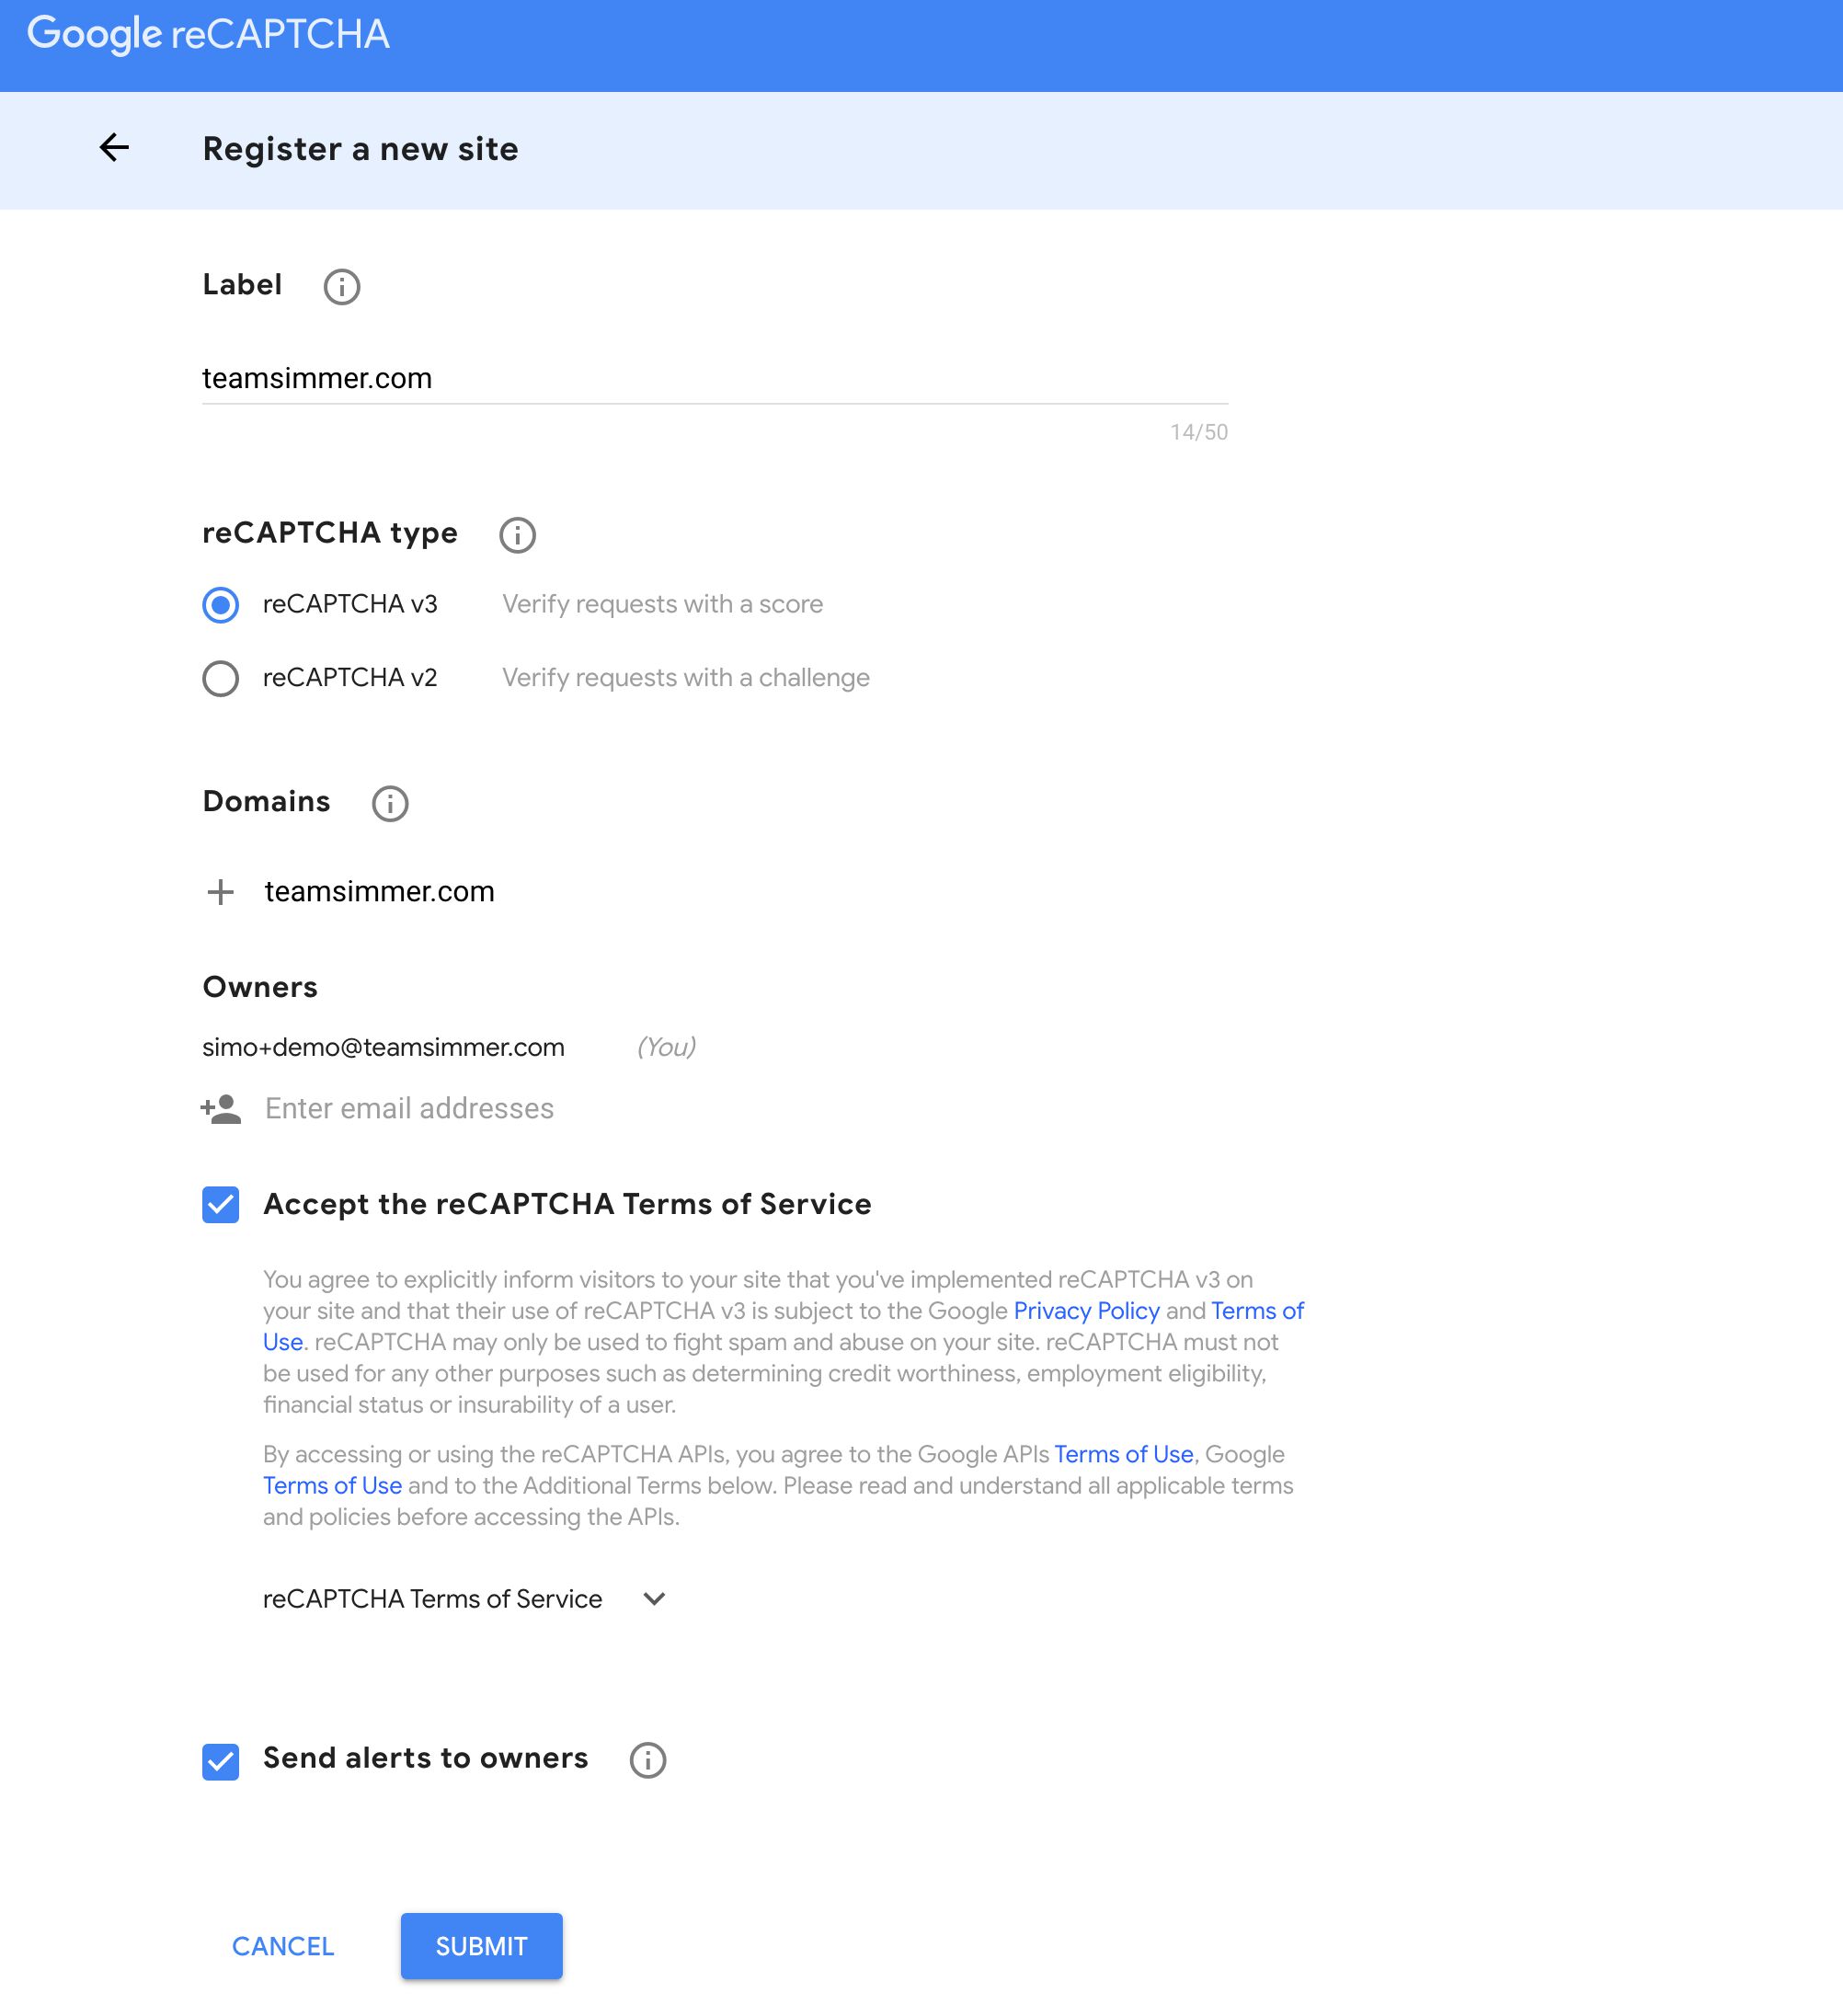
Fill in the fields as suggested. Make sure you’ve selected reCAPTCHA v3 as the service version, and add the domain(s) from which you will be communicating with the API into the Domains part. This is what the configuration looks like for https://www.teamsimmer.com/:
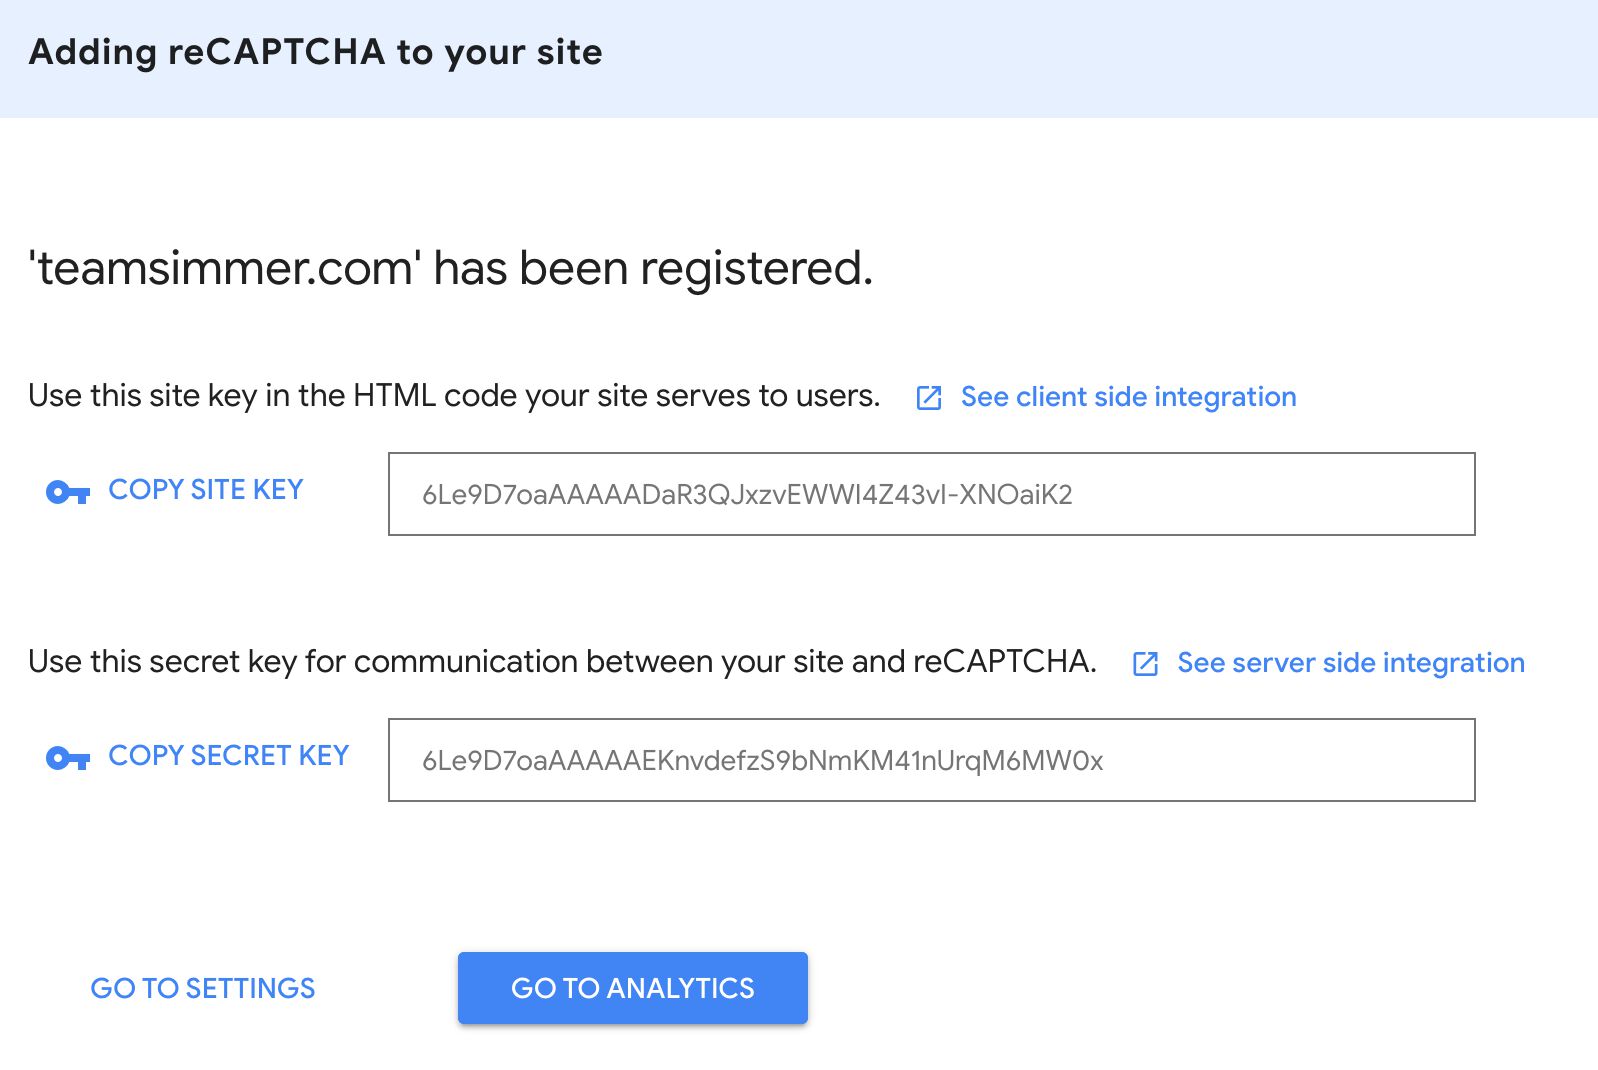
Once you click Submit, you’ll see a screen with your Site Key and your Secret Key.
Don’t close this tab! You’ll need this information shortly. You can find your reCAPTCHA site via the admin panel as well.
Create the Client in your Server container
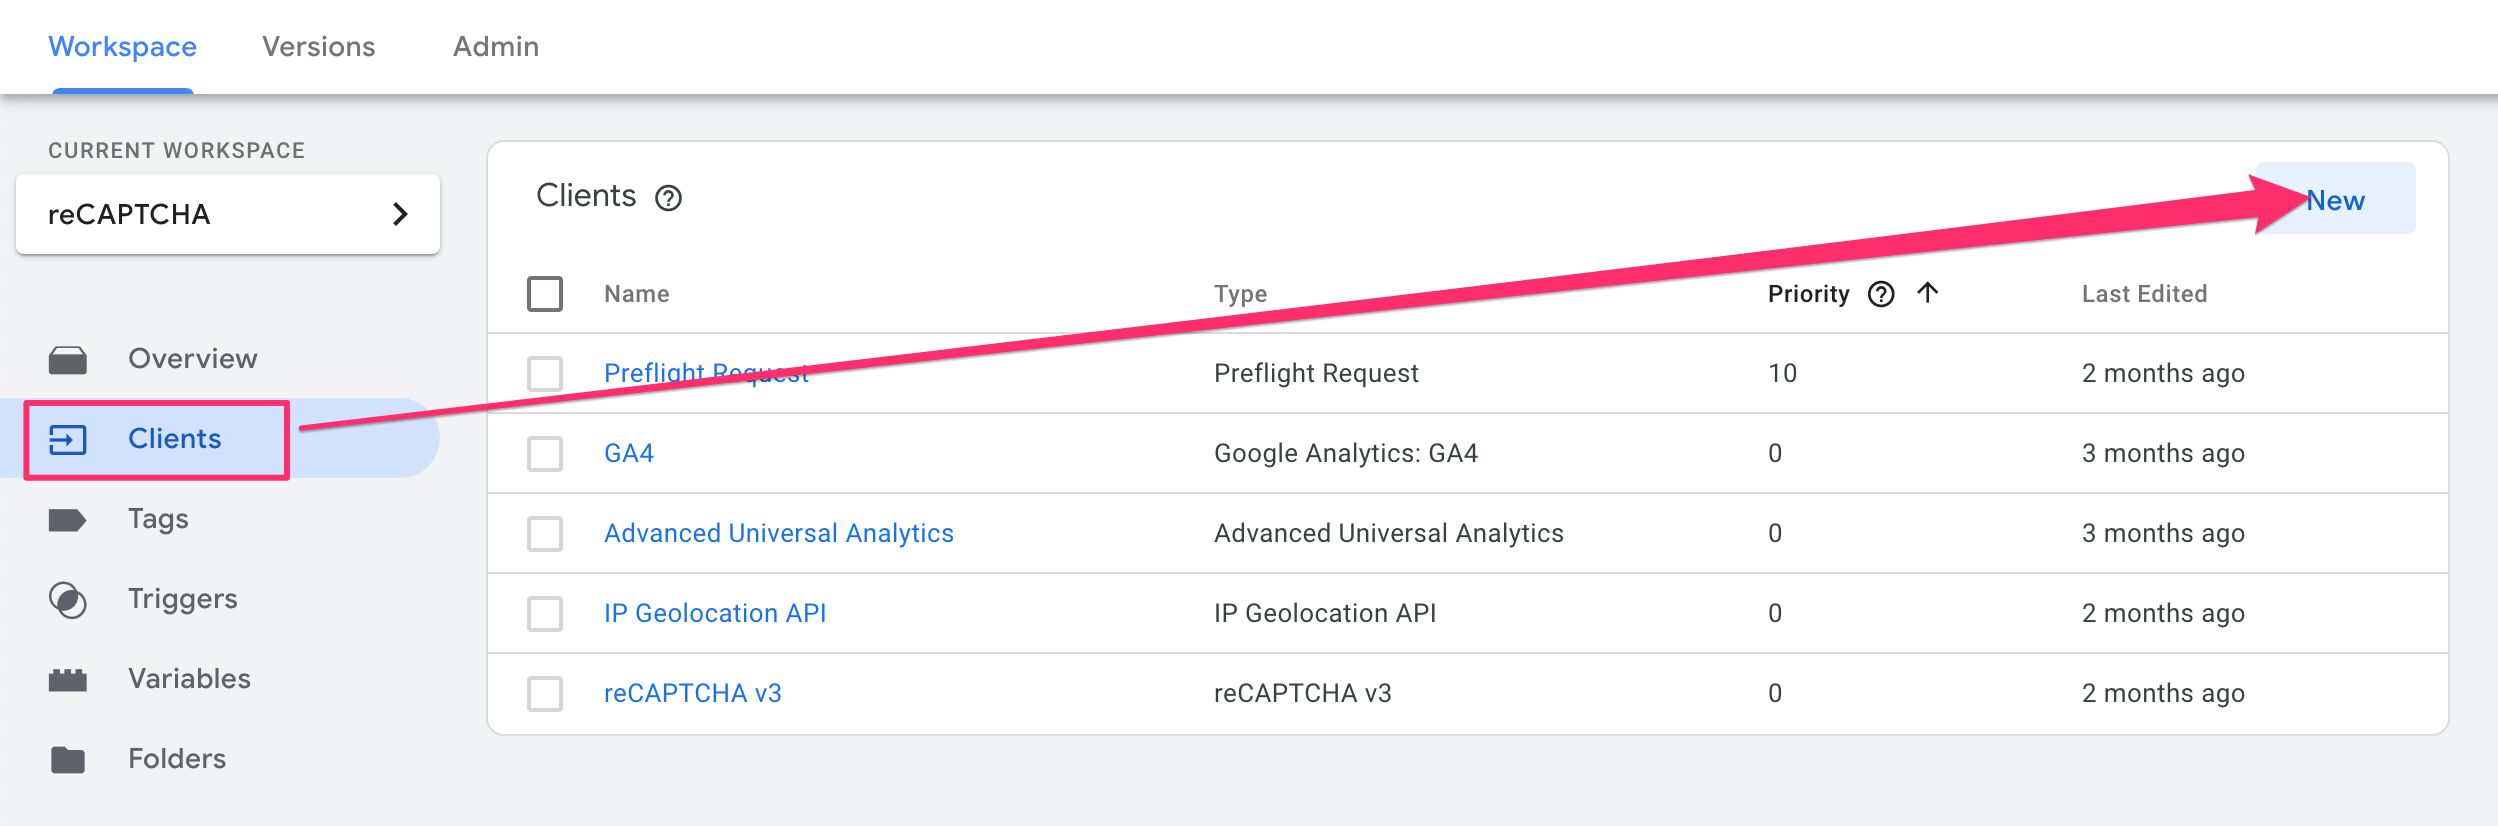
Back in the Google Tag Manager Server container, browse to Clients and click to create a new Client.
Choose the reCAPTCHA v3 Client template from the Custom category of Client types. You should now see the Client ready for configuring.
Add the keys to the Client
Open the tab with the reCAPTCHA v3 site configuration.
Remember, if you accidentally closed the tab, you can always locate the keys by opening the reCAPTCHA admin page, choosing the Site you want to work with, and then clicking the settings cogwheel in the top bar.
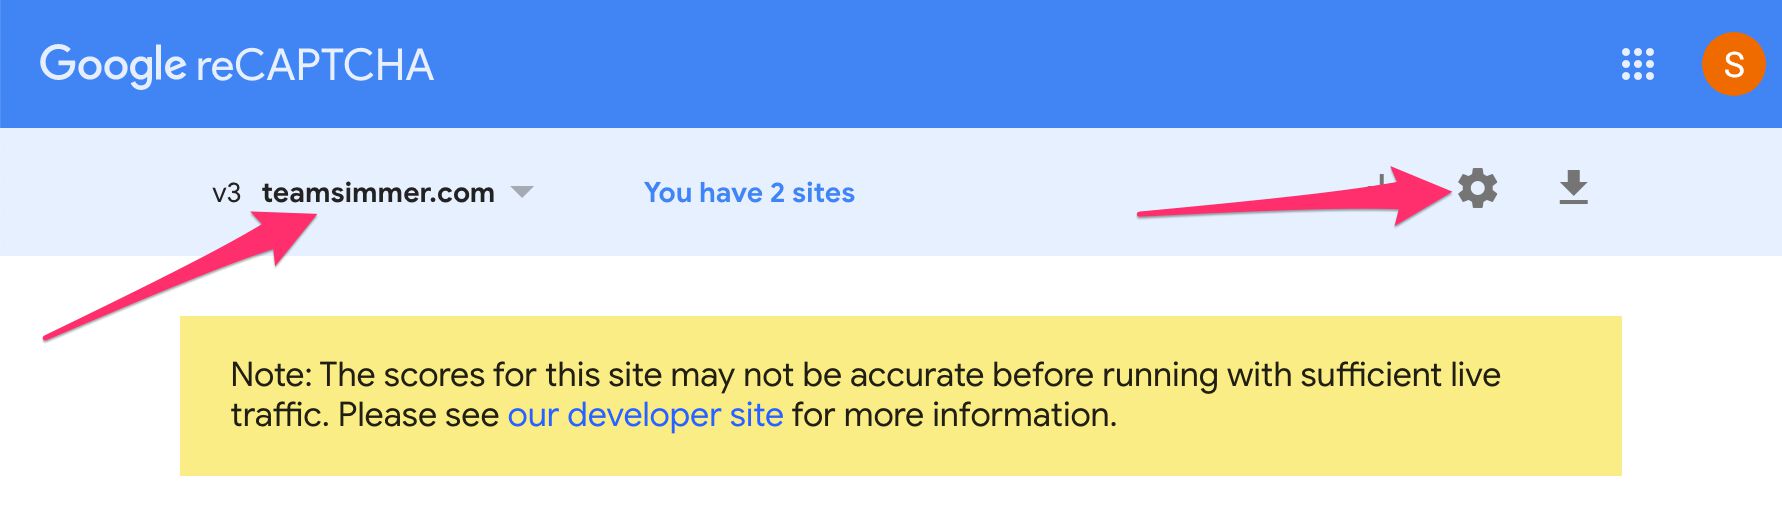
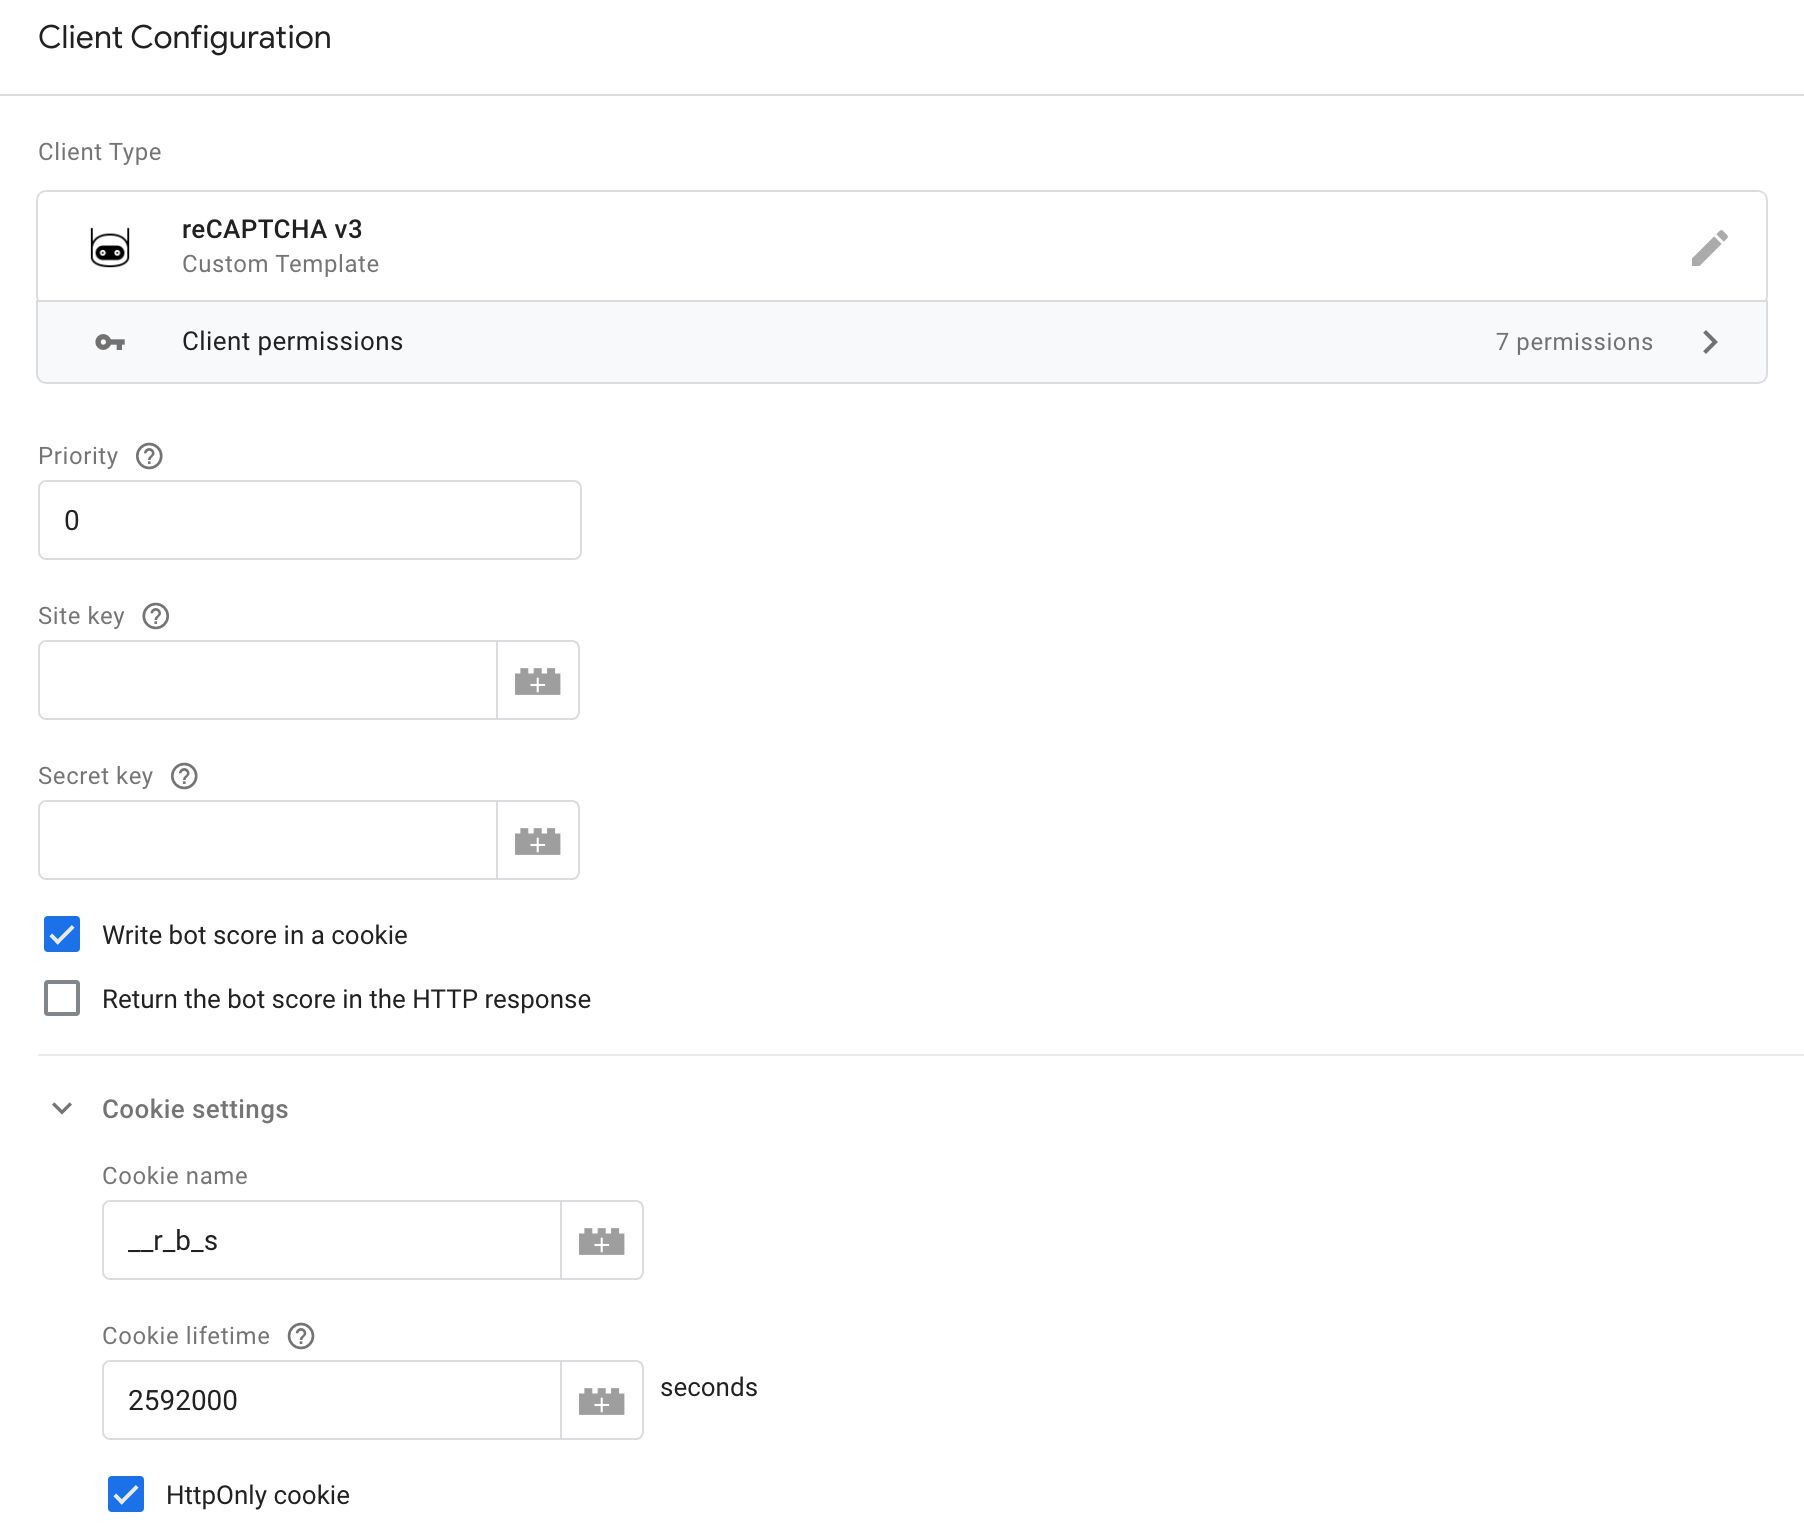
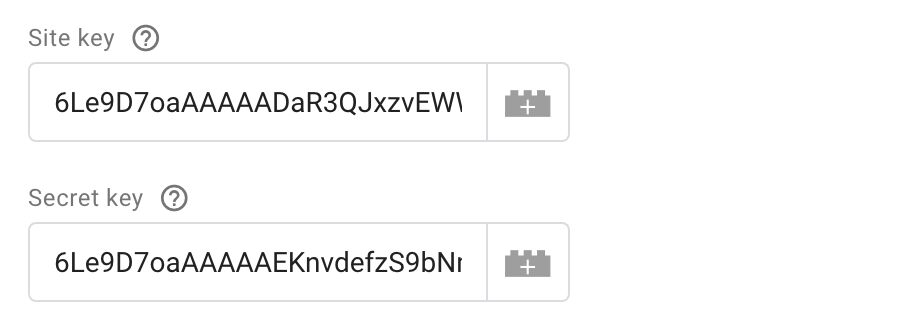
Copy-paste the Site key and the Secret key from the reCAPTCHA site configuration to their respective fields in the Client.
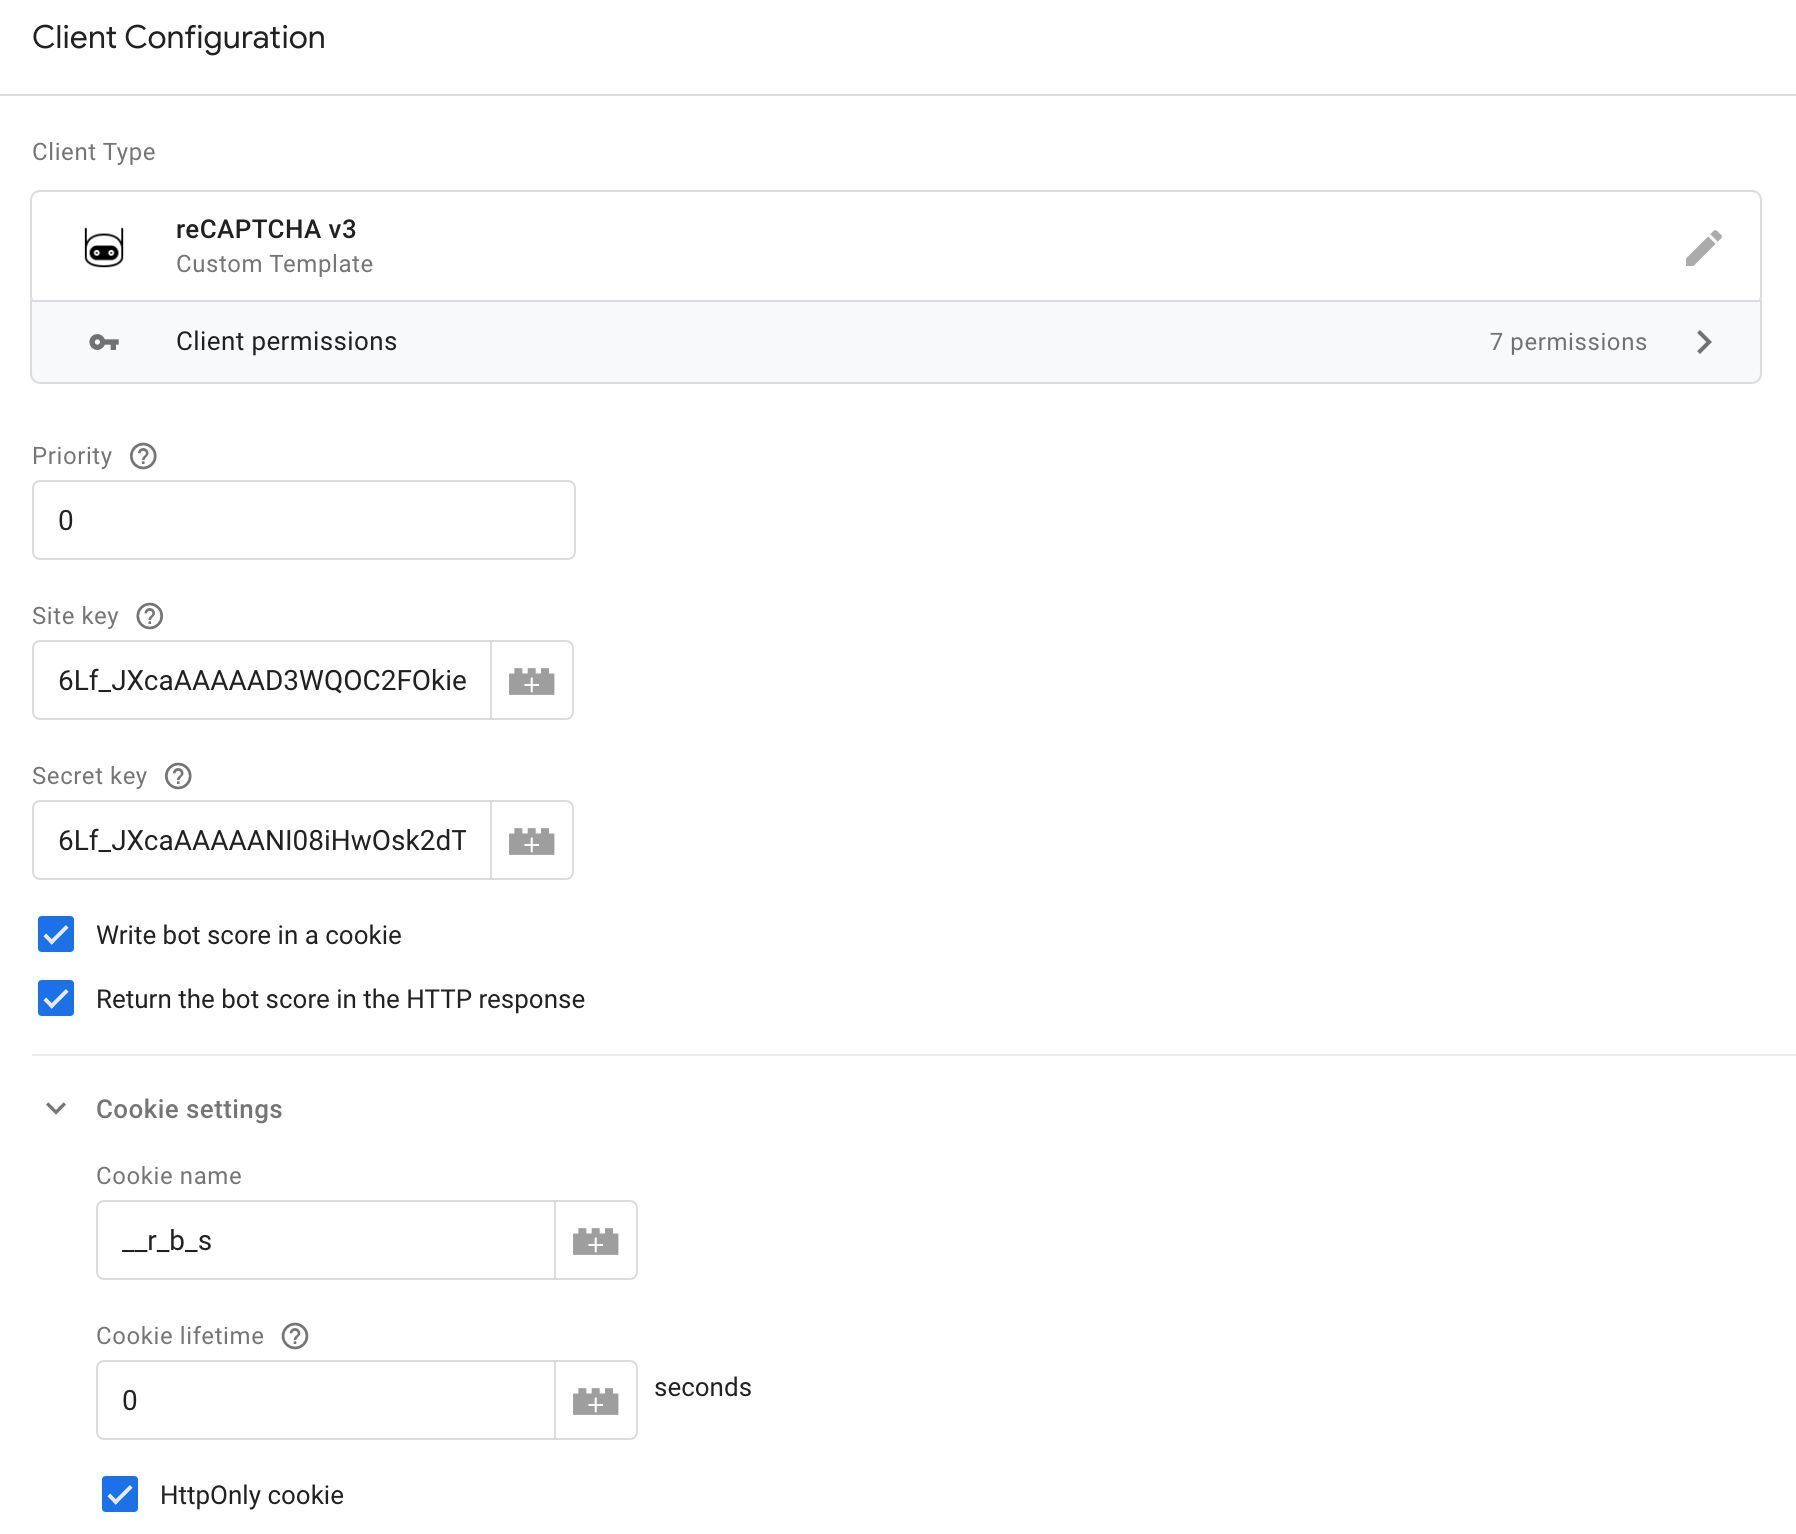
Configure the rest of the settings
If you want to write the bot score in a browser cookie in order to, for example, access the bot score in your GTM Server (if you want to enrich other hits with the information), keep the Write bot score in a cookie option checked.
If you also want to return the bot score in the HTTP response itself for processing client-side, check the Return the bot score in the HTTP response option.
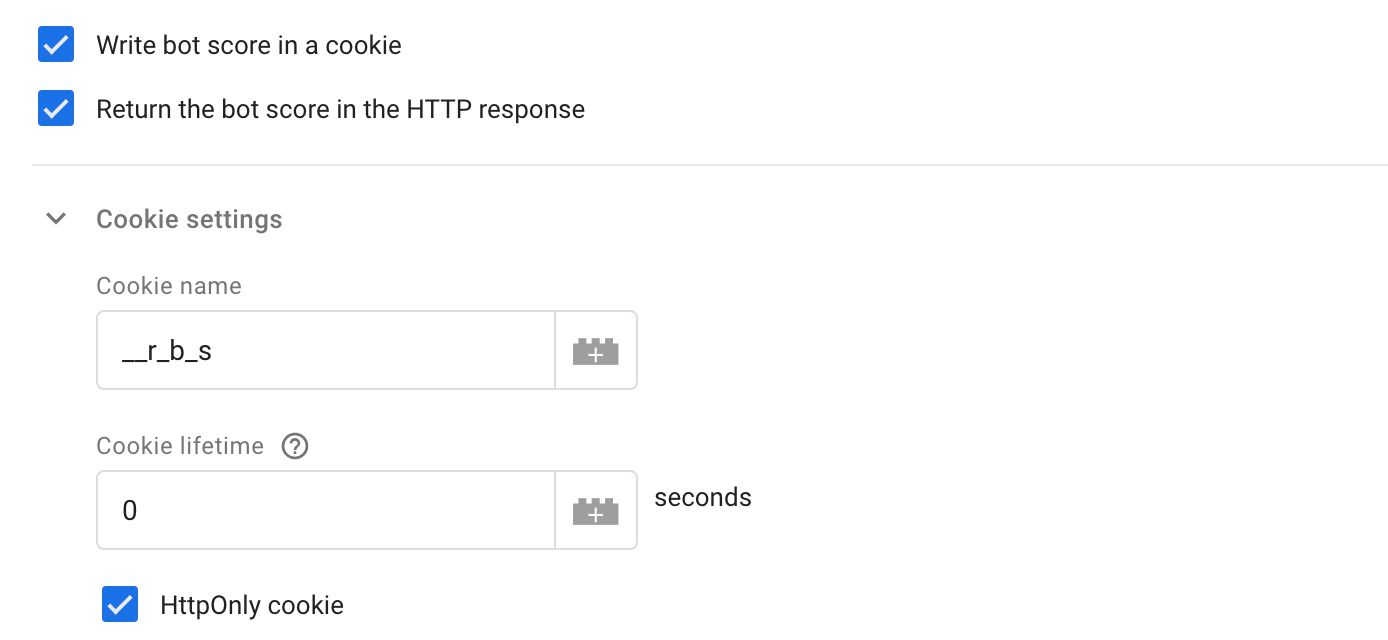
If you do choose to set the cookie, you can customize the cookie further by setting its name, its expiration (in seconds), and whether or not it should be an HttpOnly cookie.
Note! If you choose the HttpOnly option, remember that the cookie will not be accessible with JavaScript in the browser.
In the screenshot below, I’ve set the cookie name as __r_b_s, I’ve set it to be a session cookie (by setting the lifetime to 0), and I’ve configured it to be an HttpOnly cookie.
Once you’re happy with your configuration, Save the Client.
Configure the browser-side code
You’ve now configured your Google Tag Manager Server container to listen for requests for both the reCAPTCHA library and for the bot verification itself. Here’s how it works:
- The browser has to fetch the client-side library which is used to generate the verification token.
- Once the token is generated, the browsers sends it to the verification API and receives the bot score in the response.
Both the library fetch and the verification API are handled by the reCAPTCHA v3 Client you’ve now added to your Server container.
In this example, we’ll be creating the browser-side code in a Google Tag Manager web container, but you might as well run it directly in the page template or in some other linked JavaScript file.
The solution comprises two Custom HTML tags. The first one is the script loader, run just once per page, and the second is the verification request, run whenever an action happens which you’d like to contribute to the bot score calculation.
Create the script loader
You can build a simple Custom Template to load the reCAPTCHA v3 library, if you like.
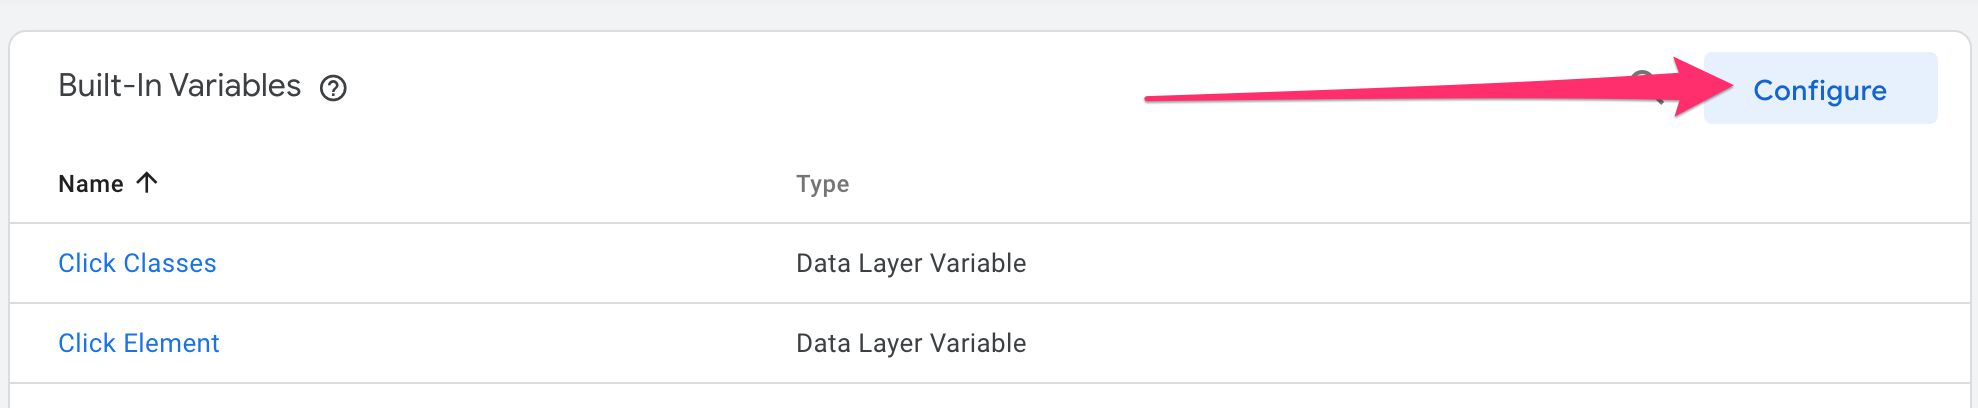
Before getting started with the tag, you need to go into Variables in the Google Tag Manager container, and click Configure for Built-in Variables.
Make sure to enable Container ID and HTML ID.
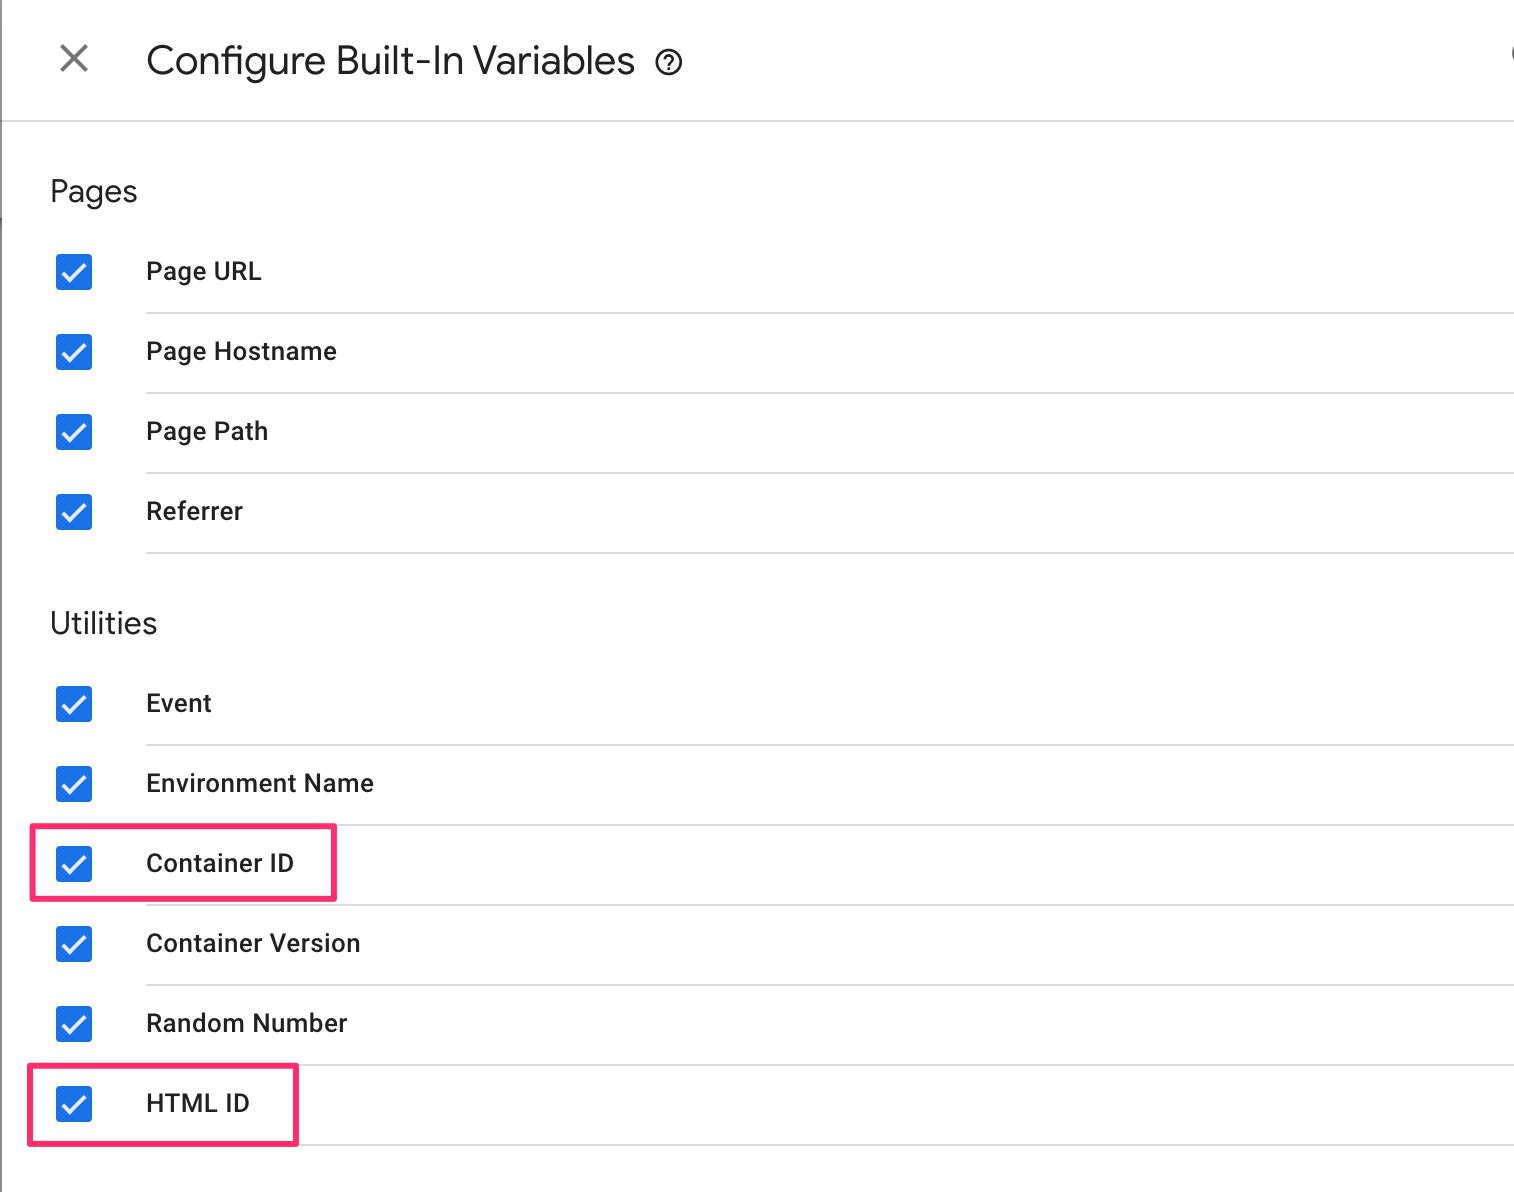
Next, go to Tags, create a new Custom HTML tag and copy-paste the following code into the tag:
<script>
  (function() {
    // Replace with the Site Key you got when registering the site for reCAPTCHA v3
    var siteKey = 'aaaabbbbccccdddd';
    // Replace with your server-side origin (just the https and domain name).
    var serverSideOrigin = 'https://sgtm.mydomain.com';

    var script = document.createElement('script');
    script.src = serverSideOrigin + '/recaptcha/api.js?render=' + siteKey;
    script.async = true;
    script.addEventListener('load', function() {
      window.google_tag_manager[{{Container ID}}].onHtmlSuccess({{HTML ID}});
    });
    document.head.appendChild(script);
  })();
</script>
Update the
siteKeyandserverSideOriginvariables per the instructions in the code.
This tag loads the library from your endpoint, and it adds a listener for the script load, signalling success once the library is fully loaded.
Once done, do not add a trigger to this tag. Instead, Save the tag, ignoring the warning about no triggers having been set.
Create the verification tag
Next, create a new Custom HTML tag and copy-paste the following code within:
<script>
  (function() {
    // Replace with the Site Key you got when registering the site for reCAPTCHA v3
    var siteKey = 'aaaabbbbccccdddd';
    // Replace with your server-side origin (just the https and domain name).
    var serverSideOrigin = 'https://sgtm.mydomain.com';
    // Replace this with the action type
    // See: https://developers.google.com/recaptcha/docs/v3#actions
    var action = 'page';

    // The following callback is invoked with the bot score as a function argument.
    // Feel free to change the dataLayer.push() to your liking.
    // Note! The callback is only invoked if you've configured the Server container
    // Client template to return a response back to the browser.
    var callback = function(score) {
      window.dataLayer.push({
        event: 'recaptcha',
        recaptchaScore: score
      });
    };

    if (window.grecaptcha && typeof window.grecaptcha.ready === 'function') {
      window.grecaptcha.ready(function() {
        window.grecaptcha.execute(siteKey, {action: action}).then(function(token) {
          var xhr = new XMLHttpRequest();
          xhr.withCredentials = true;
          xhr.open('POST', serverSideOrigin + '/recaptcha?token=' + token, true);
          xhr.onreadystatechange = function() {
            if (xhr.readyState === XMLHttpRequest.DONE && xhr.status === 200) {
              var response = JSON.parse(xhr.responseText);
              if (response.score) callback(response.score);
            }
          };
          xhr.send();
        });
      });
    }
  })();
</script>
Update the
siteKeyandserverSideOriginvariables per the instructions in the code.
Then, go to Advanced Settings -> Tag Sequencing, and set the Setup Tag to be the script loader you created in the previous section.
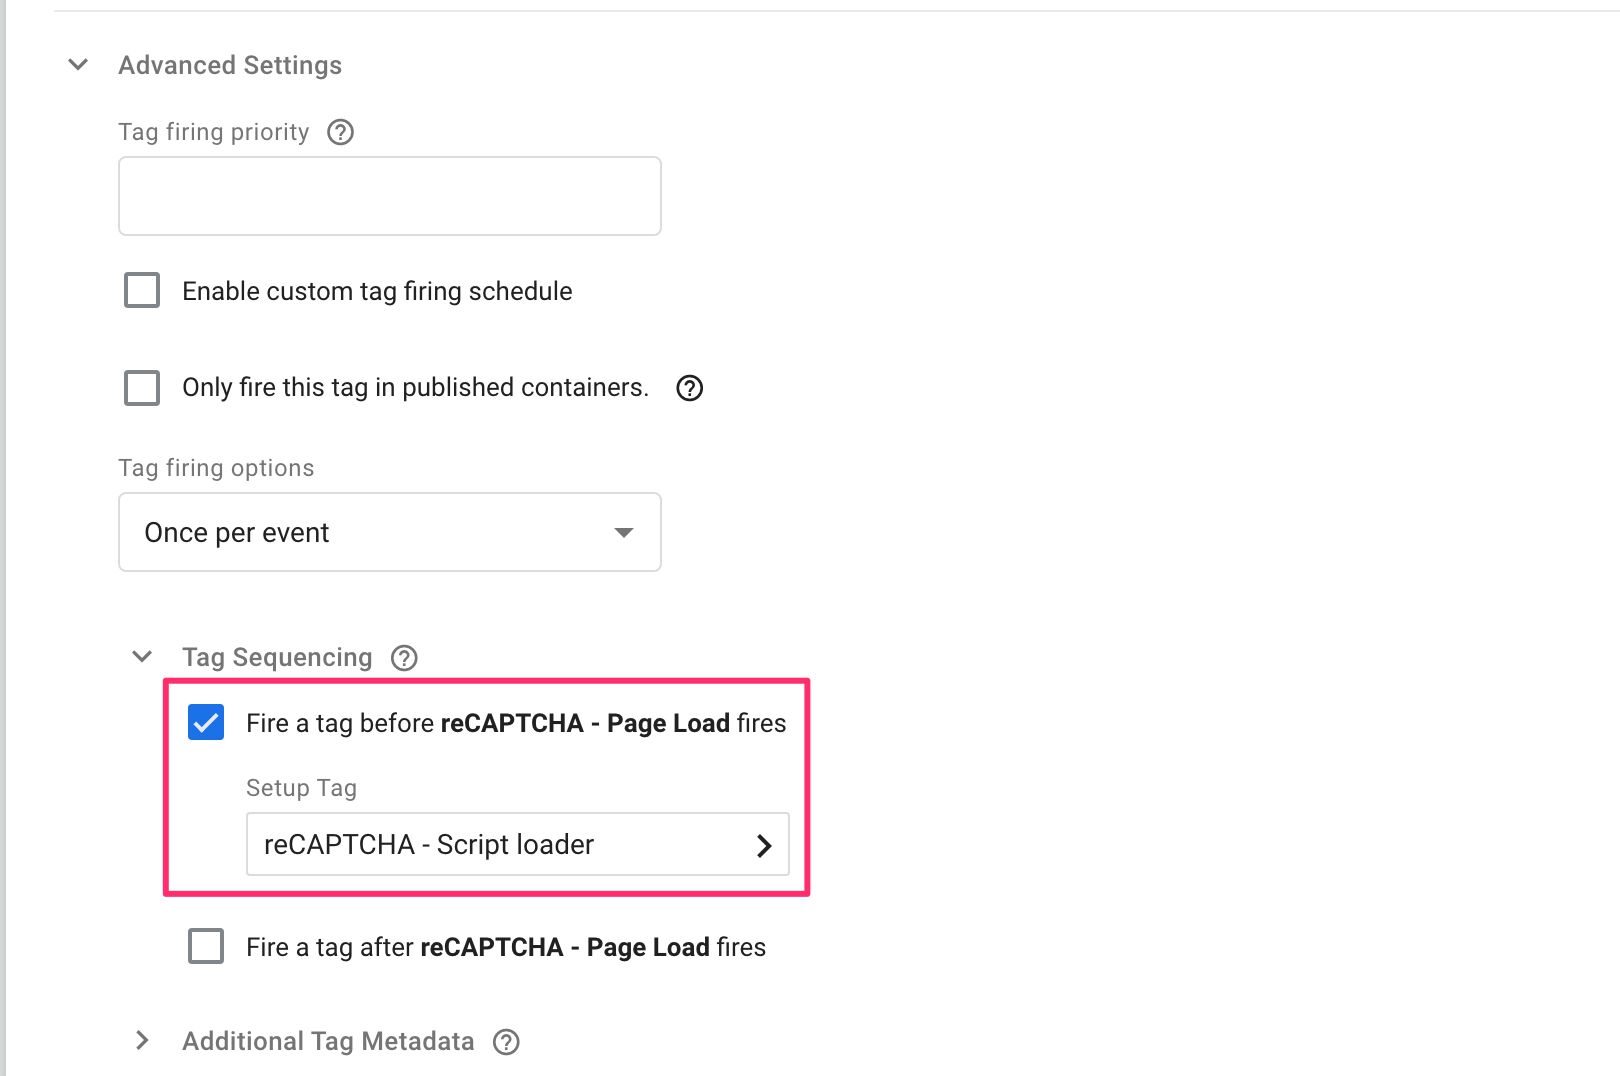
Finally, set this Custom HTML tag to trigger whenever an interaction happens that should contribute to the bot score. These interactions could be:
- Page load (set the
actionto e.g.page) - Form submission (set the
actionto e.g.submit) - Purchase (set the
actionto e.g.purchase)
And so forth. If you like, you can have a separate Custom HTML tag for each action type, or you can use a Lookup Table to set the action variable value dynamically based on the trigger event, for example.
Test everything
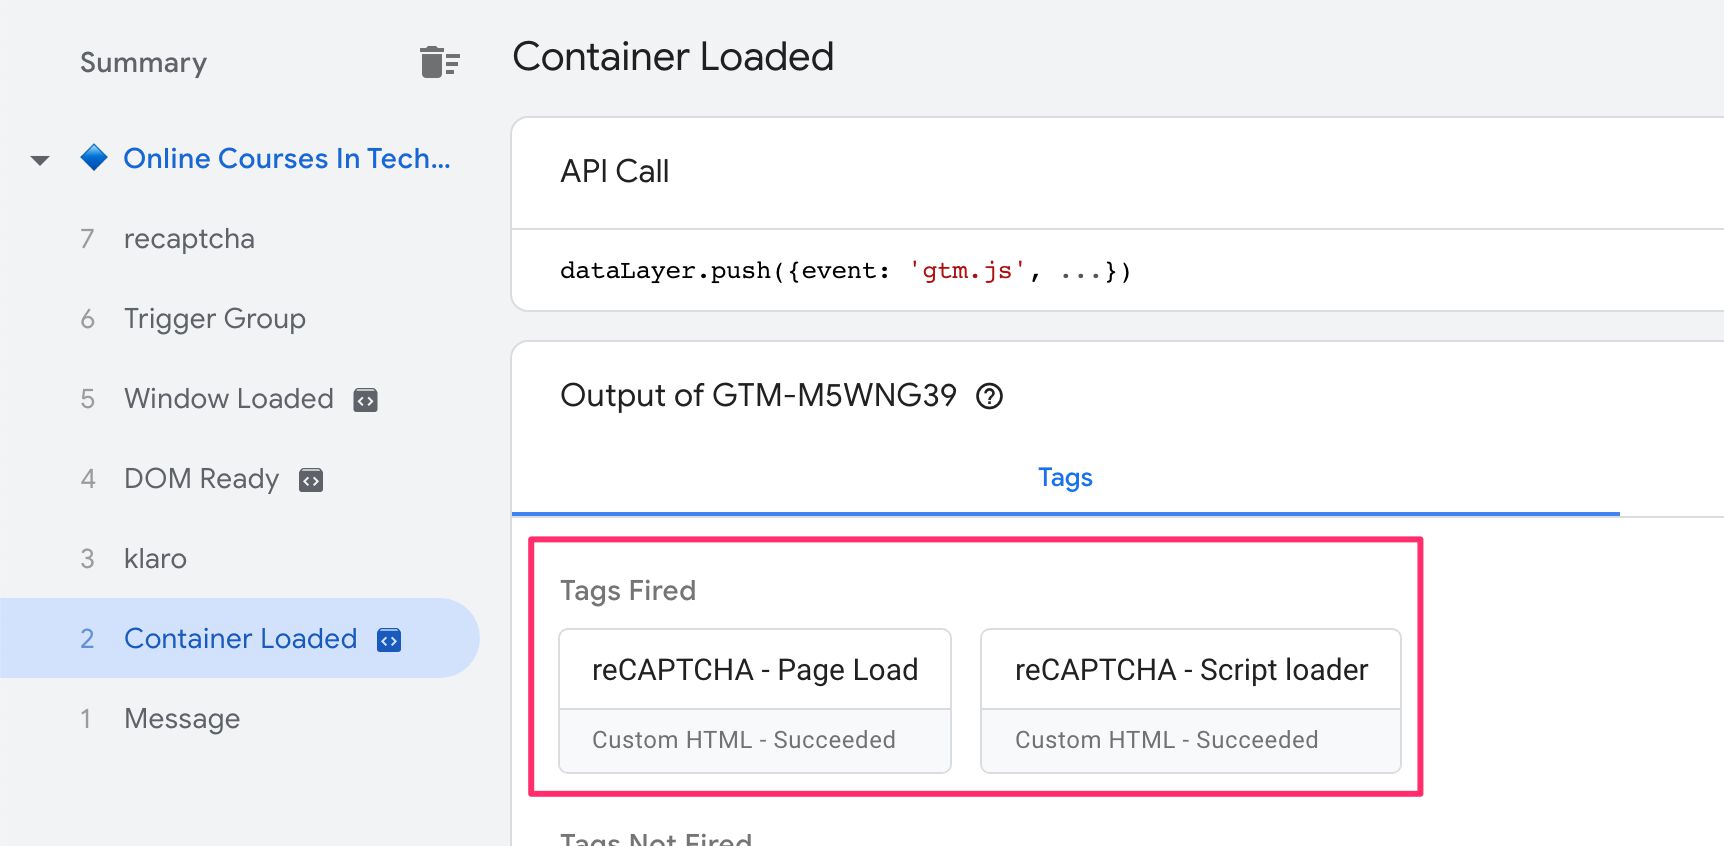
Once you’ve created the script loader and you also have the verification tags running, enter Preview mode in both your Server container and in the web container.
Load a page (or do something else that should make the verification tag fire).
In the web container Preview, you should see both the script loader and the verification tag fire:
In the Server container Preview, you should first see a request for api.js, which is responded to with a status code of 200.
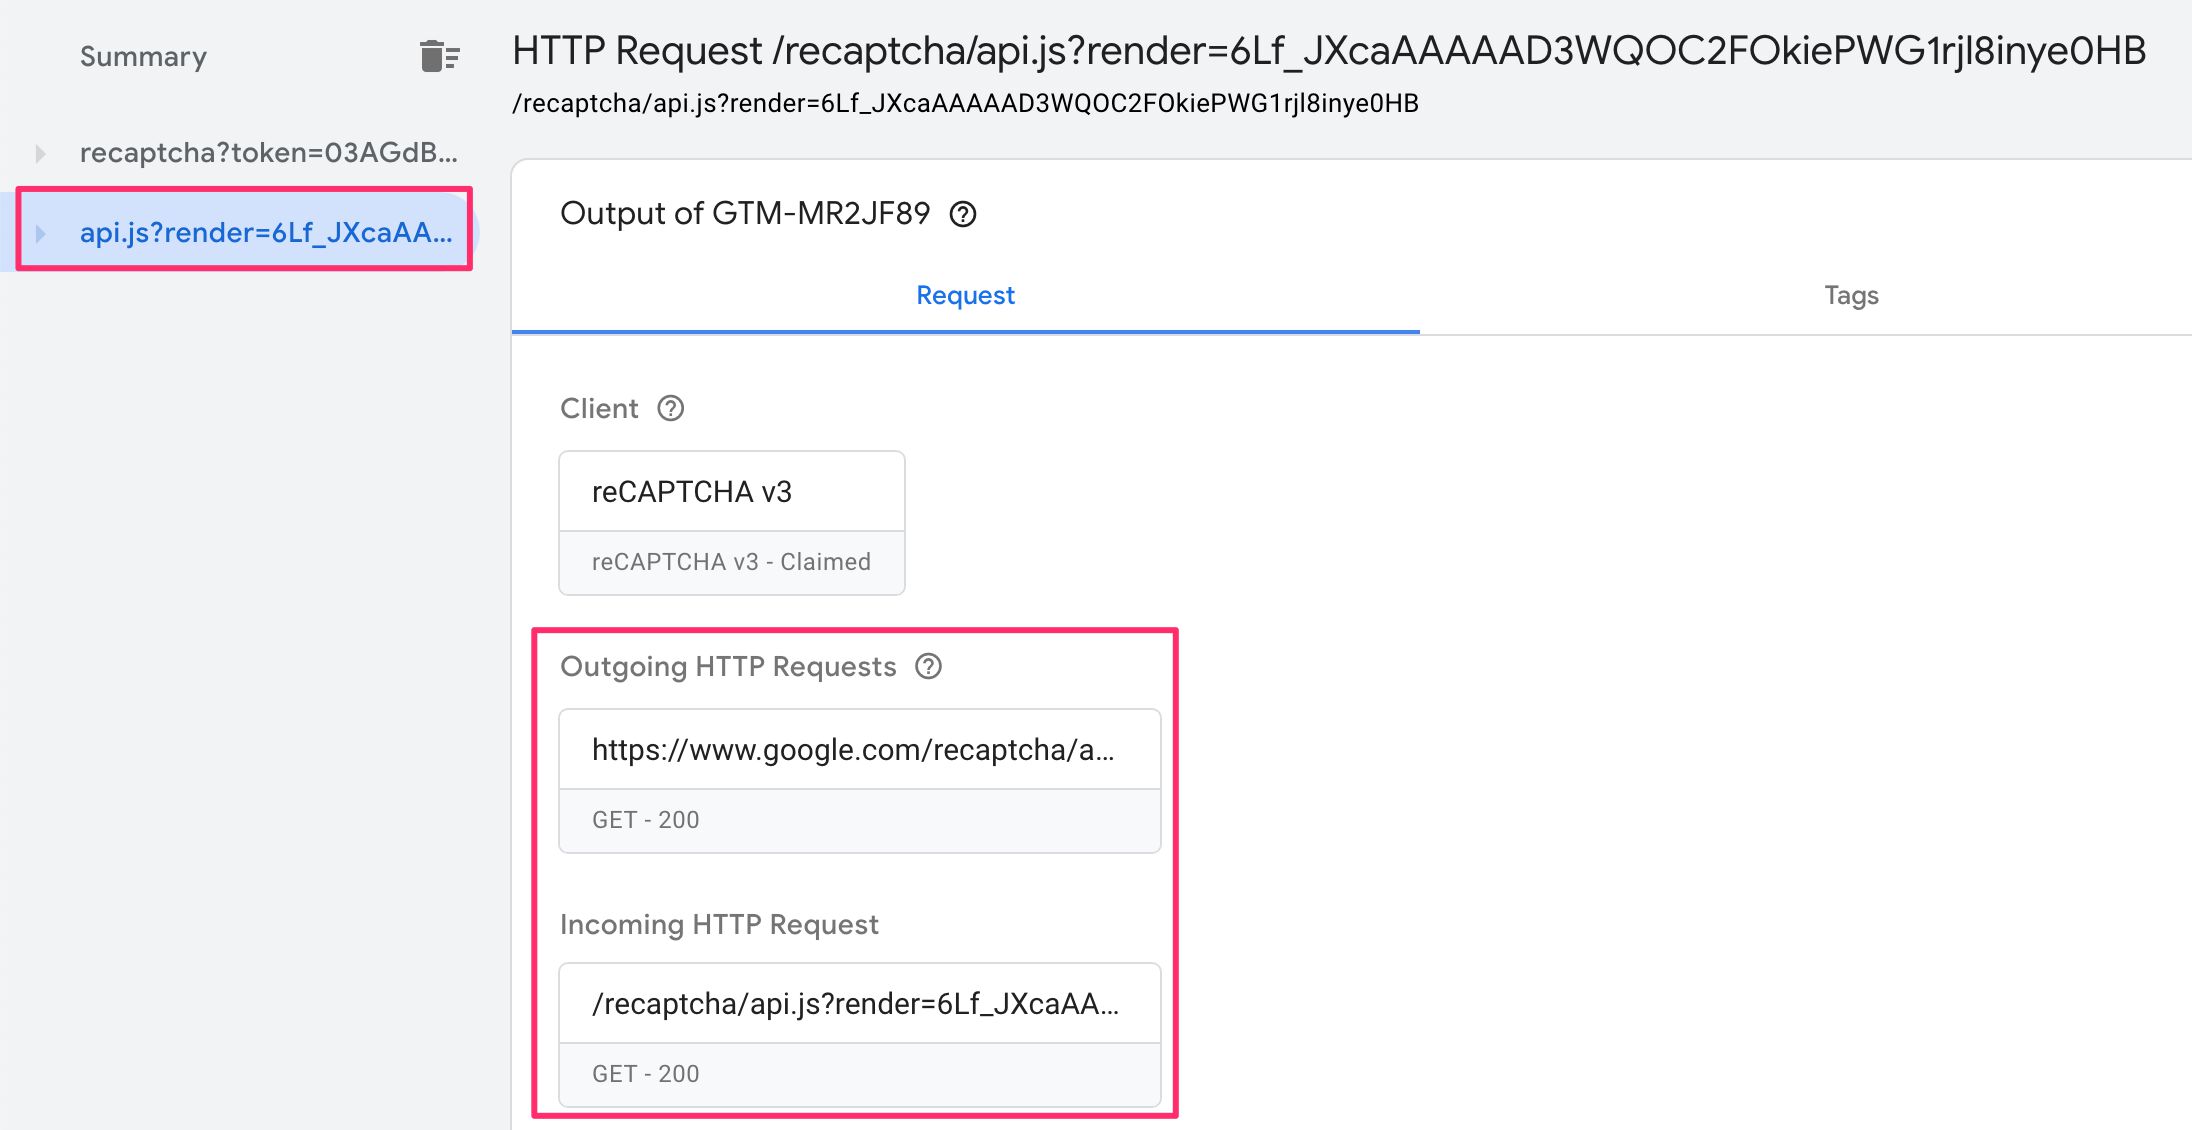
Then, if you expand the verification API request in the Server container (the request to path recaptcha), you can expand the Outgoing HTTP Request and check the response from the Google reCAPTCHA server:
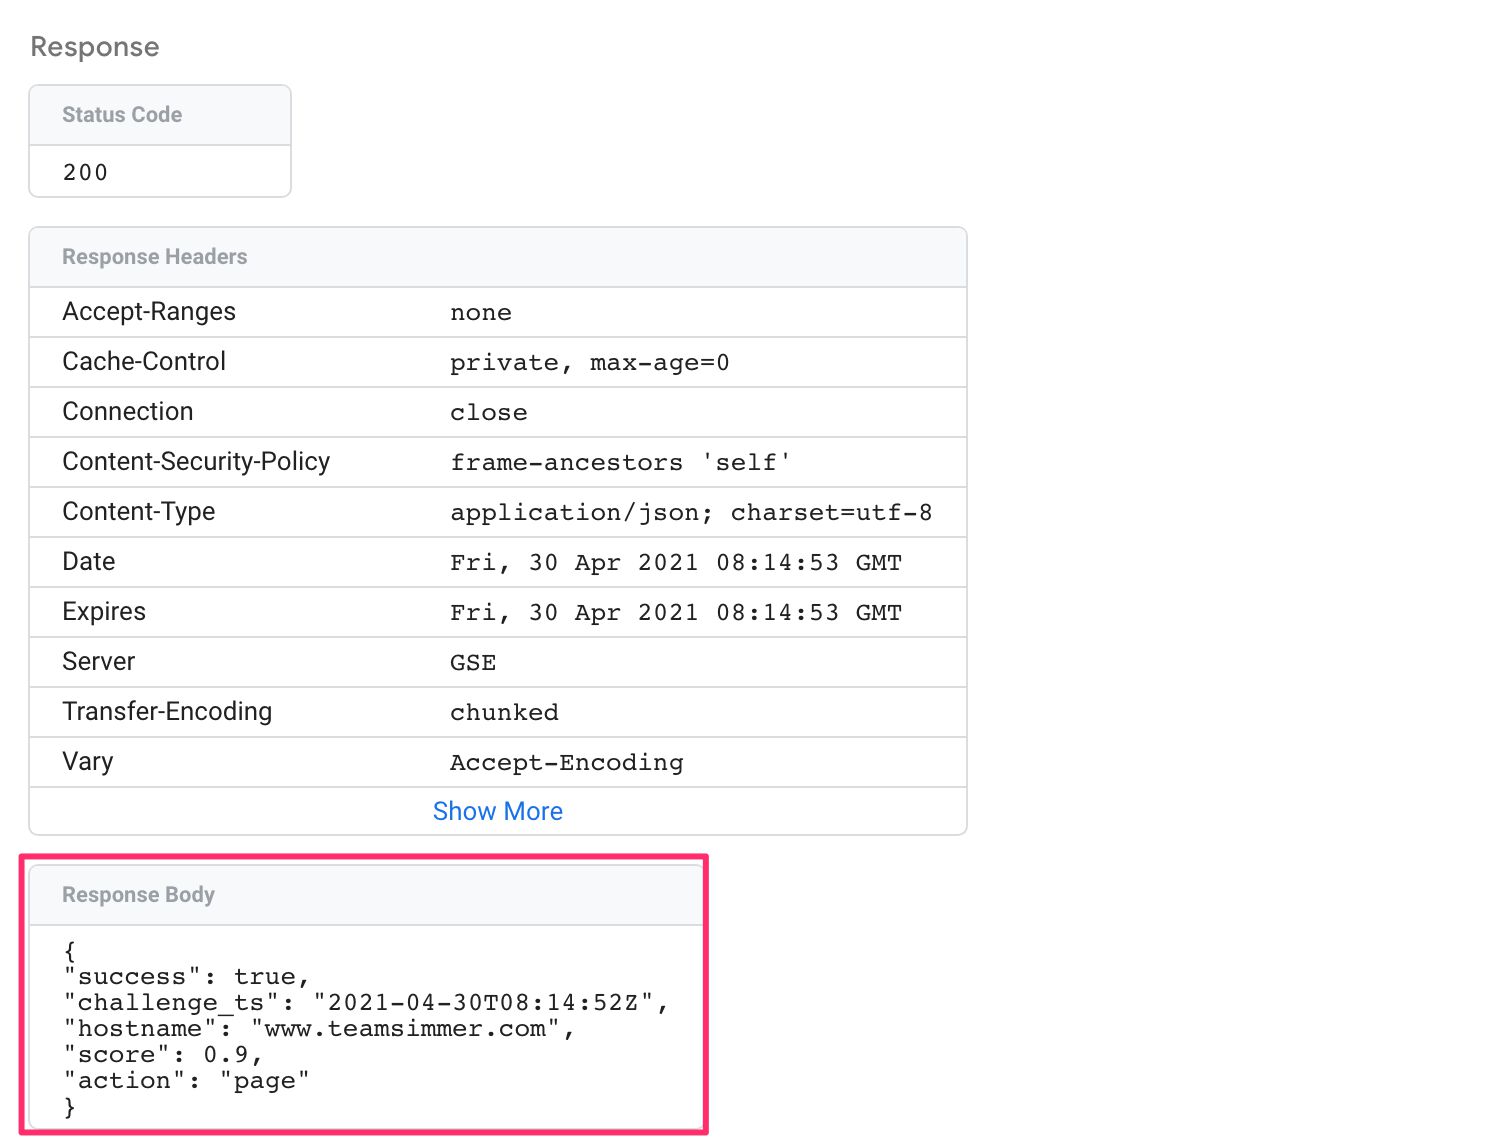
This indicates that the verification request worked and a valid bot score was returned.
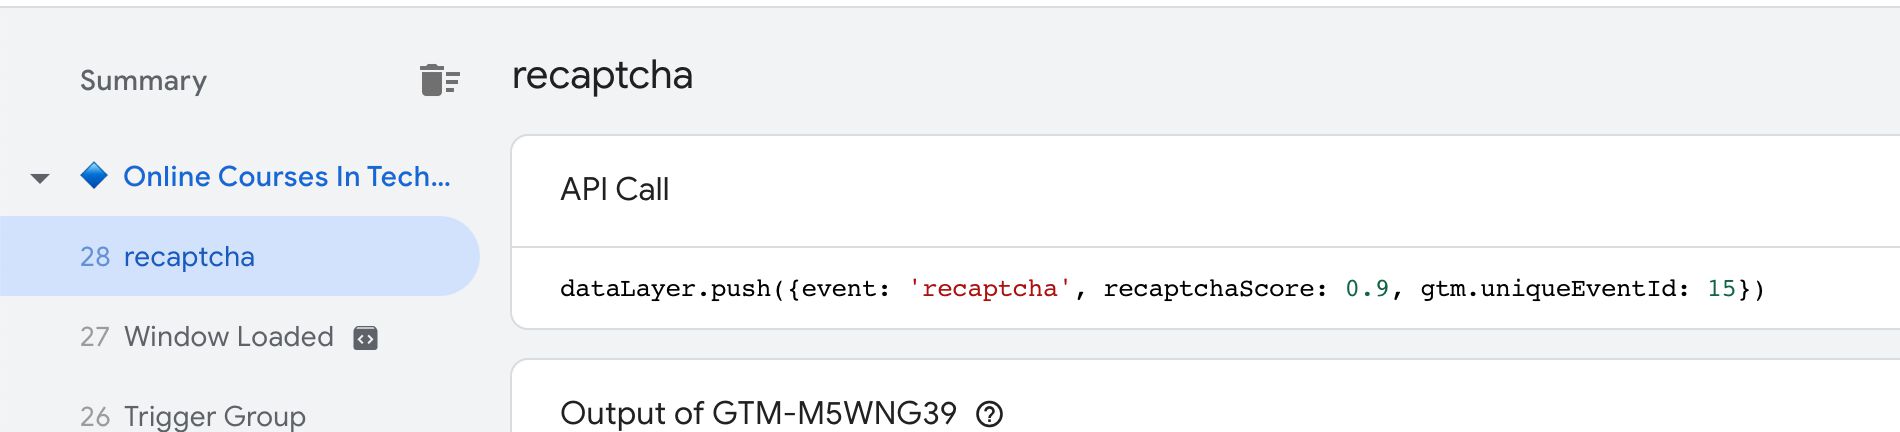
Finally, in your web container you should see a new Data Layer message with event name recaptcha (assuming you went with the default callback) and a recaptchaScore key containing the bot score for this particular request.
If you configure the cookie to be set, you can find it in your browser’s cookie list, too:
Summary
Once you’ve got the reCAPTCHA system up and running, you can use the bot score to selectively fire your tags either in the web container or in the Server container.
You can also use the __r_b_s cookie value to send with your Server container tags, in case you want to add additional metadata about the “bot-ness” of the user. Might be useful information in a GA4 custom dimension, for example!
As you collect more and more bot score data, make sure you visit the reCAPTCHA admin site to check out metrics about the bot score distribution for your site visitors. If you’ve diligently set the action variable in your requests, you’ll be able to see the distribution segmented by the action type, too.
Let me know in the comments what you think of this solution. It would be interesting to hear what use cases you have in mind for the bot score – would you use it to block requests or to annotate them, and why?