I’ve written a new Variable Guide for Google Tag Manager, which covers the new GTM UI. This guide is for the old UI.
You might be vaguely familiar with macros if you’ve ever used a computer. Basically, whenever you perform a complicated task with a simple gesture, or reuse complex code with a simple input mechanism, you’re using macros. Think keyboard shortcuts.
In Google Tag Manager, this is the essence of macros. You can do away with a lot of complexity by resorting to macros, especially if you ever find that you need the same piece of code or the same operation over and over again.
This guide will first take a cursory look at what macros really are, before going through the (current) list of available macros. I’ll add short examples and use cases for each, but there’s a whole lot more to be found online.
The Simmer Newsletter
Follow this link to subscribe to the Simmer Newsletter! Stay up-to-date with the latest content from Simo Ahava and the Simmer online course platform.
What is a macro
In Google Tag Manager, a macro is a construct that you can set up in the UI. However, it’s not a tag in the sense that it would be something you’d tag your page with. Rather, macros are turned into a function of the google_tag_manager object (more on this later), and they return a value when called.
So a macro is, in essence, a placeholder for some value that you might need in your tags. Most common uses for macros would be to:
Retrieve a constant string (e.g. your tracking code)
Retrieve a variable string (e.g. the href attribute of a clicked element)
Retrieve the result of some simple function (e.g. the date and time of the current visit)
Macros are thus used to call for and to retrieve certain values. You can surely see how they facilitate your day-to-day GTM use, can’t you? It’s much easier to just refer to a macro name rather than having to write the value-retrieving function over and over again.
Without macros, whenever you rewrite your hard-coded functions or variables, you have to remember to change them wherever they were used. It’s much easier to just have a macro refer to the original location.
Technical details
DISCLAIMER: Note that the following analysis is my own and only for illustrative purposes. Don't attempt to use the DOM functions uncovered here in your own code, since they are liable to change without notice. Use macros only via the GTM UI using the syntax required by the tool.
Well my skills at reverse engineering minified JavaScript code are pretty sparse, but you can uncover a lot just by going through the DOM (Document Object Model) tree of a page where macros are active. You can do this by using a JavaScript console in your browser’s developer tools. Just type window and click enter.
For example, if you go through the DOM, you’ll find an object called google_tag_manager:
Here you can see the google_tag_manager array and its contents. There’s an index for your container ID (GTM-XXXX), under which you’ll find the macro function. The function is actually defined in gtm.js, which you load in the GTM container snippet.
The macro function accepts a single parameter and returns something else.
It appears that the parameter is a numeral value which refers to a certain macro that you’ve set up in GTM. I didn’t find any way to actually identify which number returns which macro value, but just by testing you can find a lot of stuff. For example, I have a macro which stores the number of images on the page. Twiddling around with the macro function I finally found the correct index:
So as you can see, when you refer to a macro in your tag setup, e.g. {{number_of_images}}, it actually translates to a JavaScript function call that returns the value.
This is also the reason why your macros don’t accept parameters. The macro itself is a function call which only takes the index number of the macro as its parameter. Runtime evaluation is done on the spot with only elements found in the Document Object Model to work with.
This is why you’ll see undefined for those indices which expect a value in the data layer that hasn’t been pushed yet. As soon as the value is pushed into the data layer, you’ll find that the macro index returns the appropriate value.
How to use macros
To use a macro, you refer to it in GTM with its name between two sets of curly brackets:
{{macro name}}
Note that this is case-sensitive, so {{macro name}} and {{Macro name}} refer to different things.
You can use macros in any GTM fields which accept a text string, e.g.:
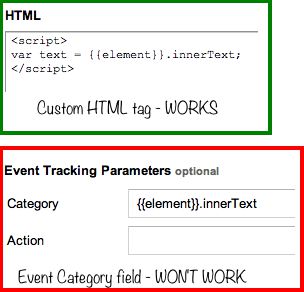
On top of that (and this is really cool), you can refer to macros in your custom HTML tags:
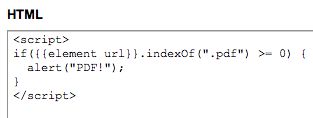
Here, I check whether or not the clicked link href contained the text “.pdf”. Since it’s an auto-event macro I’m using, the macro won’t return a proper value until the auto-event variable is pushed into the data layer. So upon page load the macro {{element url}} would return undefined, but after I click a link, it would return the href attribute of the link. This means that in order for this tag to work like it should, I need a firing rule which prevents it from firing until after the auto-event variable is pushed into the data layer. Runtime evaluation, remember?
You can also, and this is really REALLY cool, refer to macros in other macros!
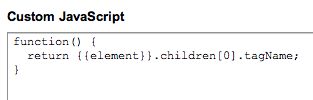
This returns the tag name of the first child of the clicked element.
There’s a small point to make about using macros and JavaScript. You can only treat a macro as a JavaScript object in the context of a script. This means that you can freely access macro properties with dot notion, e.g. {{element}}.innerText, in Custom HTML tags and Custom JavaScript macros. However, this won’t work in other GTM fields where you can use macros (e.g. Event Category), because these fields do not run JavaScript functions. So if you want to access a property of a macro in a tag field, for example, you will need to create a separate macro for this property.
You’ll also use macros a lot in your firing and blocking rules:
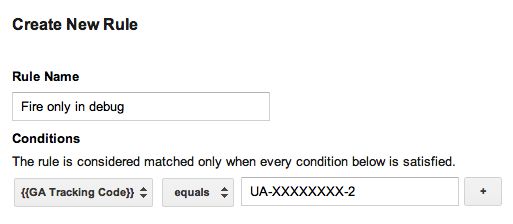
This rule would fire only when visits are tracked to my GA debug account.
Here’s the key takeaway:
Use a macro whenever you need to reuse a certain value or value-returning function.
I won’t add a separate section for when not to use a macro, but suffice to say, if you only need a certain value once or you have a function which you know won’t be reused, don’t bother creating a macro for it. Just hard-code it into your custom HTML tag or use the value directly in your tags. A macro is always, after all, another function call, which does increase the complexity of your code.
Rules are a bit different, since you must use macros in rules. You can’t write an ad hoc function into your rule; you must have a macro which you evaluate on runtime.
The different macro types in GTM
Here, I’ve listed all the different macro types you can create in Google Tag Manager (at the time of writing). I’ve added a short description, and an example use case for each.
All macros need a name, which you refer to (case-sensitive) using two sets of curly brackets, e.g. {{macro name}}.
Also, you can give a default value to some of the macros. It’s a good practice to use a default value, because you can use that as a blocking rule (e.g. {{macro}} equals “default”) in your tags, and you can avoid getting the pesky undefined as a return value.
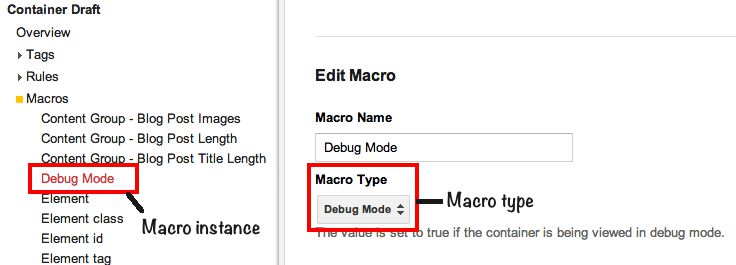
Note also that there’s a difference between macro type and macro instance. Below, I list all the different macro types you can use to create different macro instances. You can have as many instances of a macro type as you want (as long as they have different names). Macro types are provided by GTM, and you can’t edit or create new macro types.
When you create a new container, you get the following pre-populated macro instances. Encased in brackets is the type of macro the pre-populated macro is an instance of:
element (Auto-Event Variable / Element)
element classes (Auto-Event Variable / Element Classes)
element id (Auto-Event Variable / Element ID)
element target (Auto-Event Variable / Element Target)
element url (Auto-Event Variable / Element URL)
event (Custom Event)
referrer (HTTP Referrer)
url (URL / URL)
url hostname (URL / Host Name)
url path (URL / Path)
So you might be a bit confused at first, since you have these pre-populated macros which are named the same as the macro types they are instances of. But you’ll get the hang of it soon enough, don’t worry.
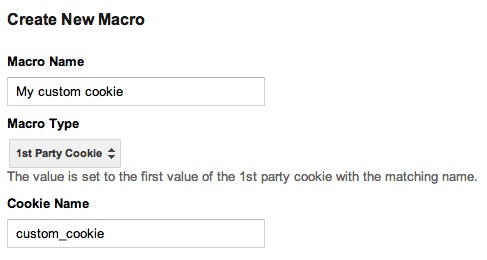
1. 1st Party Cookie
DESCRIPTION
The 1st Party Cookie macro returns the value of the cookie whose name you indicate in the Cookie Name field. For example, if you set up a cookie named “front-page-visits” which increases by one every time the visitor visits your front page, you can set up this macro to return the value (i.e. number of visits) every time the macro is used.
USE CASE
Check my previous article on the session cookie for a nice use case for this macro.
Basically this macro can be used to replace any code you used to have for retrieving cookie values.
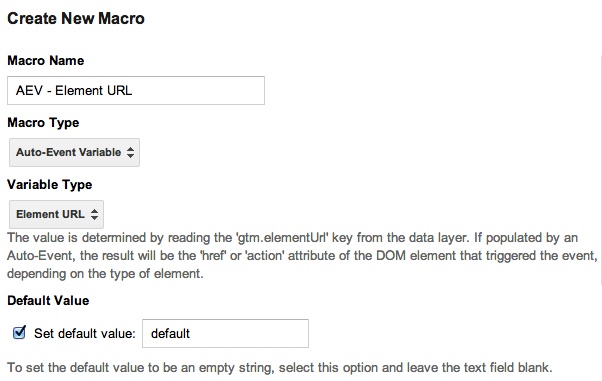
2. Auto-Event Variable
DESCRIPTION
When you set up an event listener using GTM, you can use the auto-event variable macros to return the value of various attributes of the element you were listening to.
You need to specify the variable type of the auto-event variable you want to use. Here are the different types.
Element: This returns the element that was clicked. Note that the macro returns an object, not a string, so the best use of it is for traversing the DOM tree of the clicked element (e.g. {{Element}}.children[0].tagName returns the tag name of the first child of the clicked element).
Element classes: This returns the class attribute of the element that was clicked. For example, if the element was <div class="mainBanner">, you’d get “mainBanner” as the return value.
Element ID: This returns the ID attribute of the element that was clicked. For example, if the element was <a href="/home" id="home-link"/>, the macro would return “home-link”.
Element target: This returns the target attribute of the element that was clicked. For example, if the element was <a href="/home" target="blank"/>, the macro would return “blank”.
Element text: This returns the text content (if any) of the element that was clicked. It returns either the innerText or the textContent property (depending on what browser the visitor uses).
Element URL: This returns the href (in e.g. links) or action (in e.g. forms) attribute of the clicked (or submitted) element. For example, if the element was <form action="/process-form" id="myForm">, the macro would return “/process-form”. You can also choose which URL component is returned by the Element URL macro (see the chapter on URL macros for a description of component types).
History New URL Fragment: The History macros are populated by the History Listener. History New URL Fragment returns the URL fragment set in the current history state. You can use this to fire your tags (e.g. pageview) when a certain URL fragment is in the URL.
History Old URL Fragment: Returns the URL fragment set in the previous history change event. For example, if you first navigate to #aboutus then to #contact, History New URL Fragment will return “aboutus” and History Old URL Fragment will return “contact”.
History New State: History New State returns the state object stored in the current history entry (if any). You can access the properties of this object to set up your content and fire your dynamic tags. Note that it’s an object that is returned, so you can’t use it directly in any GTM fields. You’ll need to use some programming logic to access the properties of this object if you want to send them as strings with your tags.
History Old State: The previous state stored in browser history (if any). You can use this to determine what the previous browser history state was, for example if navigation patterns determine the tags you want to fire.
USE CASE
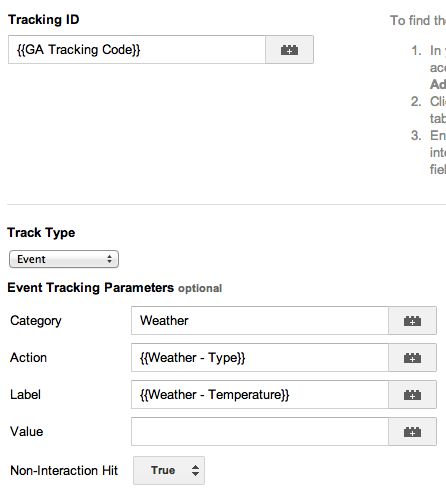
There’s a million different things you can use auto-event variables for. The variables are most frequently used to refer to certain aspects of the element in event descriptions. You could, for example, add {{element url}} as the action of a GA event which measures link clicks on your different pages.
Check my tutorial on auto-event tracking to see how the different auto-event variables can be used to improve your site measurement.
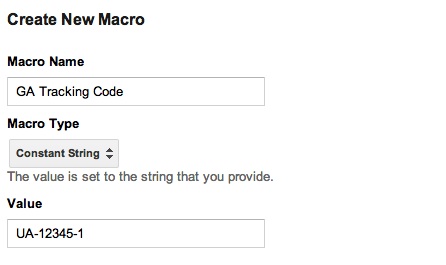
3. Constant String
DESCRIPTION
This macro can be used to store a string you’d use over and over again. In other words, it’s a time-saver.
USE CASE
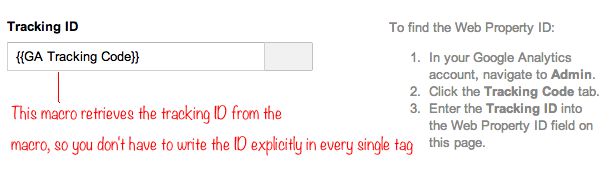
Store your GA tracking code in this, so you don’t have to remember it in every single tag. Just add the UA-XXXXXXX-X into the “Value” field, and name the macro “GA Tracking Code” or something similar. After that, whenever your tracking code is required (e.g. in tags), you can just use the macro {{GA Tracking Code}}.
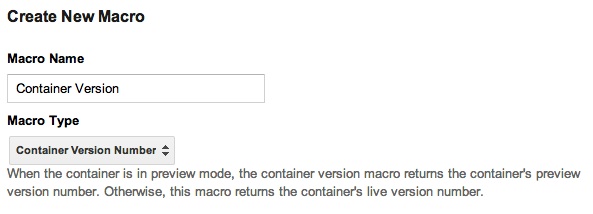
4. Container Version Number
DESCRIPTION
This returns your GTM container version number. If you’re in the Preview mode (as you should be whenever you’re testing), this returns the preview container version number.
USE CASE
A nice way to use it is to output the version number into the console using console.log({{container version}}); in your Custom HTML tag. This way you can always check the console if you’re unsure which version you’re currently running. It’s a good way to debug your live implementation.
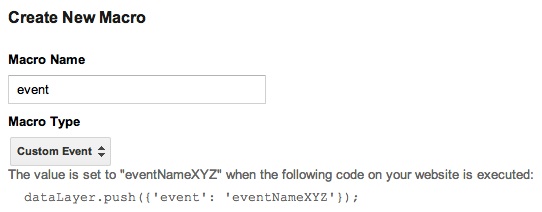
5. Custom Event
DESCRIPTION
This macro returns the data layer “event” value of the last event that was pushed into the array. So if you’ve just executed dataLayer.push({“event”: “myEvent”});, this macro will return “myEvent”.
USE CASE
This should be one of your most familiar macros. It comes with every container setup under the name {{event}}. There are about a zillion use cases for this, most notably in firing and blocking rules. For example, if you only want a tag to fire when the event “fireNow” has been pushed into the data layer, you can add the rule {{event}} equals fireNow to your tag. Then, as soon as you execute dataLayer.push({“event”: “fireNow”}); the event macro will be populated with the value “fireNow” and your firing rule will trigger.
6. Custom JavaScript
DESCRIPTION
Use this macro to perform a simple JavaScript function using either ad hoc values or elements in the DOM tree. The JavaScript function has to be encased in a function structure, it has to return a value and it can’t take parameters of its own.
USE CASE
You could use it with auto-event tracking to return the value “Outbound link” for all outbound links and “In-site link” for all in-site links. You can then use these as your Event Category in the event where you send information about the link that was clicked. The function would look like this:
function() {
  if({{element url}}.indexOf("http://www.my-domain.com") >= 0) {
    return "In-site link";
  } else {
    return "Outbound link";
  }
}
See how I’m referring to another macro within this macro? :) “www.my-domain.com/" would naturally need to be replaced with your hostname.
Another neat trick is to use a Custom JavaScript macro to retrieve the file extension of the link that was clicked. You can use this to create more dynamic tags. Check out the tip on this Google+ post.
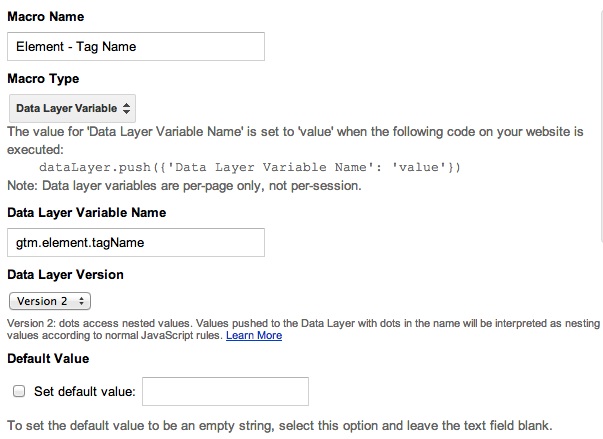
7. Data Layer Variable
DESCRIPTION
Use this macro to refer to the variables you push into the data layer. Remember, you do the push with dataLayer.push({“Variable_Name”: “Some value”});. If you set this macro to look for “Variable Name”, the return value will be “Some value”.
With “version 2” (now default), you can refer to nested values using dot notation. For example, if you’ve pushed dataLayer.push({“Products”: {“Product_1”: “Lawn mower”}});, by referring to Data Layer Variable Name Products.Product_1, you’ll get “Lawn mower” as the return value.
USE CASE
You can use it nicely in conjunction with auto-event tracking. When you click an element, the data layer is updated with the object gtm.element, which can be traversed like any DOM object. For example, to get the tag name of the object that was clicked, you’d create a data layer variable macro for gtm.element.tagName. Clicking an image would then return “IMG”.
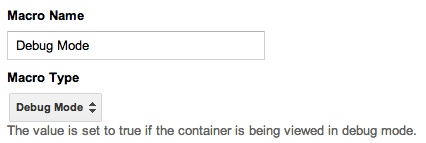
8. Debug Mode
DESCRIPTION
This returns “true” if you’re in Google Tag Manager Debug mode, and “false” if you aren’t.
USE CASE
See Lookup Table Macro below for a nice use case.
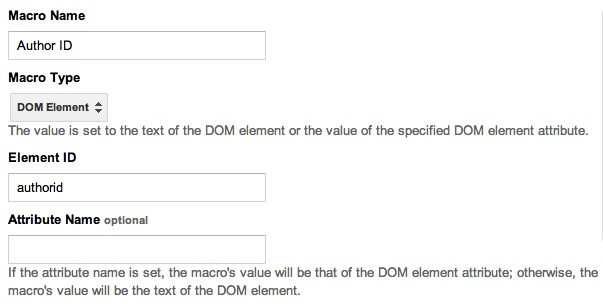
9. DOM Element
DESCRIPTION
Use this macro to refer to any element that can be found in the Document Object Model. The element needs a unique ID identifier. You can even specify the attribute whose value you want to get in return. If you don’t specify an attribute, you get the text content of the element (if any).
USE CASE
Let’s say I want a certain tag to only fire on pages where the text “By Simo Ahava” can be found in the <div id="author"> element. A good use case for just my article pages. For this to work, I’d create a DOM Element macro called “Author” with Element ID “author”. After that, I can create a firing rule {{Author}} contains “By Simo Ahava” for the tag that only fires on my article pages.
10. HTTP Referrer
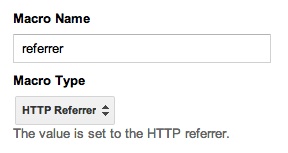
DESCRIPTION
This returns the HTTP referrer (i.e. the previous page URL). You can also choose which URL component is returned by the HTTP Referrer macro (see the chapter on URL macros for a description of component types).
USE CASE
You can use it to check if this is the first page of the visit or not. Create the macro and then use it like:
if ({{referrer}}.indexOf("http://www.mydomain.com") >= 0) {
  alert("Yay, not the landing page!");
} else {
  alert("Aww, this is the landing page");
}
11. JavaScript Variable
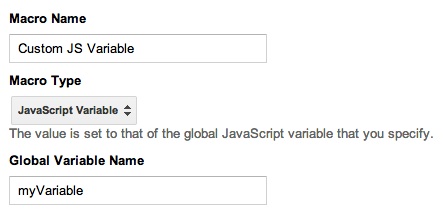
DESCRIPTION
This returns the value of a globally defined JavaScript variable.
You can use dot notation to refer to nested variables, e.g. document.doctype to get the doctype declaration of the current document. (Thanks +Brian Kuhn for pointing this out).
USE CASE
If you haven’t (or can’t) push the value into the data layer (preferred), or if you can’t find the variable in the DOM, you can use this macro to refer to it. A simple use case would be if you define a global variable (e.g. var myName=“Simo”;) in a Custom HTML Tag, you can use this macro to get the content of this variable in other tags as well. Sure, you could just use “myName” to refer to the global variable, but reusability is the key here. If you find that you need to change the variable reference, you just need to change it once in the variable definition and once in the macro, rather than many times in all the tags where you refer to the variable.
12. Lookup Table
DESCRIPTION
My favorite macro, by far. Check my five-star review of the lookup table macro for specifics. The lookup table macro is basically a simple runtime evaluation, where you assign value Y to variable Z if X is something.
USE CASE
Here’s a really nice use case (originally on Google+). If you use GTM Preview & Debug mode a lot (AND YOU SHOULD!), you might be annoyed at all the debug hits in your GA account (unless, of course, you filter yourself out). You can use a combination of Lookup Table and Debug Mode macros to make sure that debug mode hits are sent to your test account:
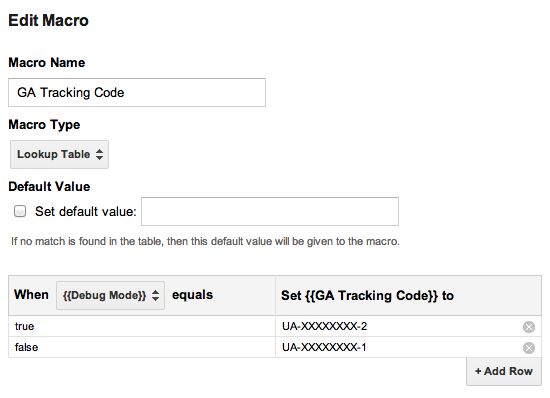
Here the macro {{GA Tracking Code}} is assigned a variable value depending on the value returned by the {{Debug Mode}} macro.
Remember that lookup tables only accept simple runtime evaluation of “when X equals Y”, so you can’t do calculations (e.g. “when X < 10”).
13. Random Number
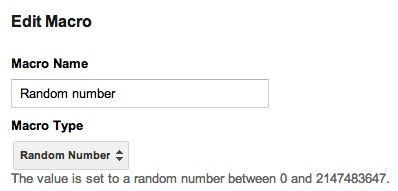
DESCRIPTION
Returns a random number between 0 and 2147483647.
USE CASE
You can use it to create a random hash for your URLs (for cache-busting) OR you can follow this example of using the random number to fire a tag for only a certain percentage of your visitors.
14. URL
DESCRIPTION
Returns the URL or a specific component thereof. The various component types are:
URL: Returns the entire URL minus fragment (fragment begins with a #).
Protocol: Returns the protocol of the URL address (i.e. http or https).
Host Name: Returns the full hostname of the URL (e.g. www.google.com) or you can choose to strip the www-prefix.
Port: Returns the port number of the hostname. If no port number is specified, the return value is either 80 or 443 (for http and https, respectively).
Path: Returns the URI of the URL address, i.e. the structure immediately following the hostname. You can also specify “default pages”, which are stripped out of the return value if found.
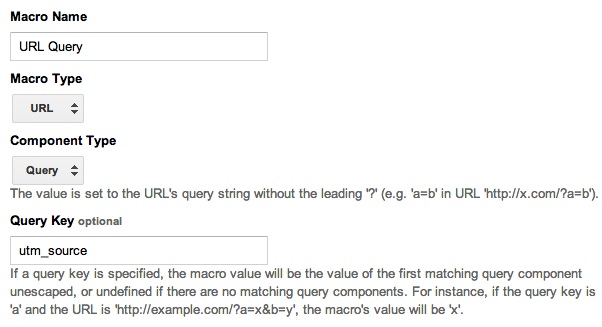
Query: Returns the query string of the URL address (without leading question mark and possible fragment). You can also specify a query key for the macro, after which only the value of the key is returned if found in the URL.
Fragment: Returns the fragment of the URL without the leading #.
USE CASE
You could query for only email campaign traffic by creating a URL of component type Query. Set “utm_medium” as the Query Key. Then you can employ a firing rule for only those visits which came via email with {{URL Query}} equals email.
Conclusions
Macros are a really powerful way of making a complicated setup simple. You can use macros to dramatically reduce the amount of code AND separate tags in your Google Tag Manager container.
When using macros, a bunch of best practices should be observed:
Name your macros so that you’ll instantly identify them (e.g. “Name - Macro Type”)
Only use macros when they facilitate either coding or maintenance; don’t use them as replacements for one-off functions or variables
Document your macro use somewhere so that you’ll know what repercussions changes might have
The last is especially important in large implementations, where dozens and dozens of macros are used in dozens and dozens of tags.
Do you have any questions about macros? Drop a comment on this post if you didn’t find what you were looking for above.