Well, well, well. Welcome to the Enterprise Game, Google Tag Manager! You know, if you took a look at all the feature requests and complaints that pass through the Google+ community or the Product Forums, you’d notice that a large portion of them revolve around lack of multi-user and multi-team support in the tool. Well GTM has taken a gigantic leap forward to soothe these concerns, with the release of its latest feature: WORKSPACES.
Now, not only did they roll out this new feature, but they completely revamped the Tag, Trigger and Variable creation and management process. This is so overwhelming that I’m not even going to complain how much work I have ahead of me, being forced to update all my current and future articles to align with the new interface. Anyway, I didn’t want to clog this post up with all the changes, so I wrote a short overview of the UI changes to GTM, where I walk you through some of the most meaningful changes to the user interface.
Gosh, I don’t even have a clue what Workspaces will do to my GTM Tools. Probably some sort of cosmic implosion. But it doesn’t matter. The new stuff is just so great that I can whine later.
Let this article serve as an introduction and a guide to how Workspaces function. I’m sure there will be many other guides online soon, which is great as always, as I predict this to be a defining moment in Google Tag Manager’s release history.
There’s lots of things here, so let’s just jump in.
The Simmer Newsletter
Follow this link to subscribe to the Simmer Newsletter! Stay up-to-date with the latest content from Simo Ahava and the Simmer online course platform.
1. What are Workspaces?
To help wrap your mind around the new feature, think of GTM of the past having just one Workspace. Everybody working in GTM had to work on the same Container Draft, and when a Version was created and/or published, all changes were added to the Version at that moment, regardless of who worked on them or when.
With Workspaces, you’ll be working with multiple Container Drafts. In essence, when a Workspace is created, a new Container Draft is separated from the latest GTM container version, and this becomes your new Workspace. From that moment on, it will live a separate life as a draft, and you can edit it, Preview it, and Debug it to your heart’s content without interference from other Workspaces. There will still remain just one main branch of Versions, so you won’t be able to publish your Workspaces into a completely separate branch, only merging them at some distant point in the future (if even then).
Work can be done in multiple Workspaces at the same time, as only once a Workspace is turned into a Version does it become part of the Google Tag Manager container. It follows that there’s no actual versioning of Workspaces themselves.
When another Workspace is turned into a Version, all other Workspaces will get a notification that the Latest Container Version has changed. Any changes implemented in this new Container Version need to be synchronized with all other Workspaces before those can be turned into new Versions. You don’t have to do it immediately, but you will see the notification in the Container Overview reminding you that you need to update the current Workspace with changes in the Latest Container Version.
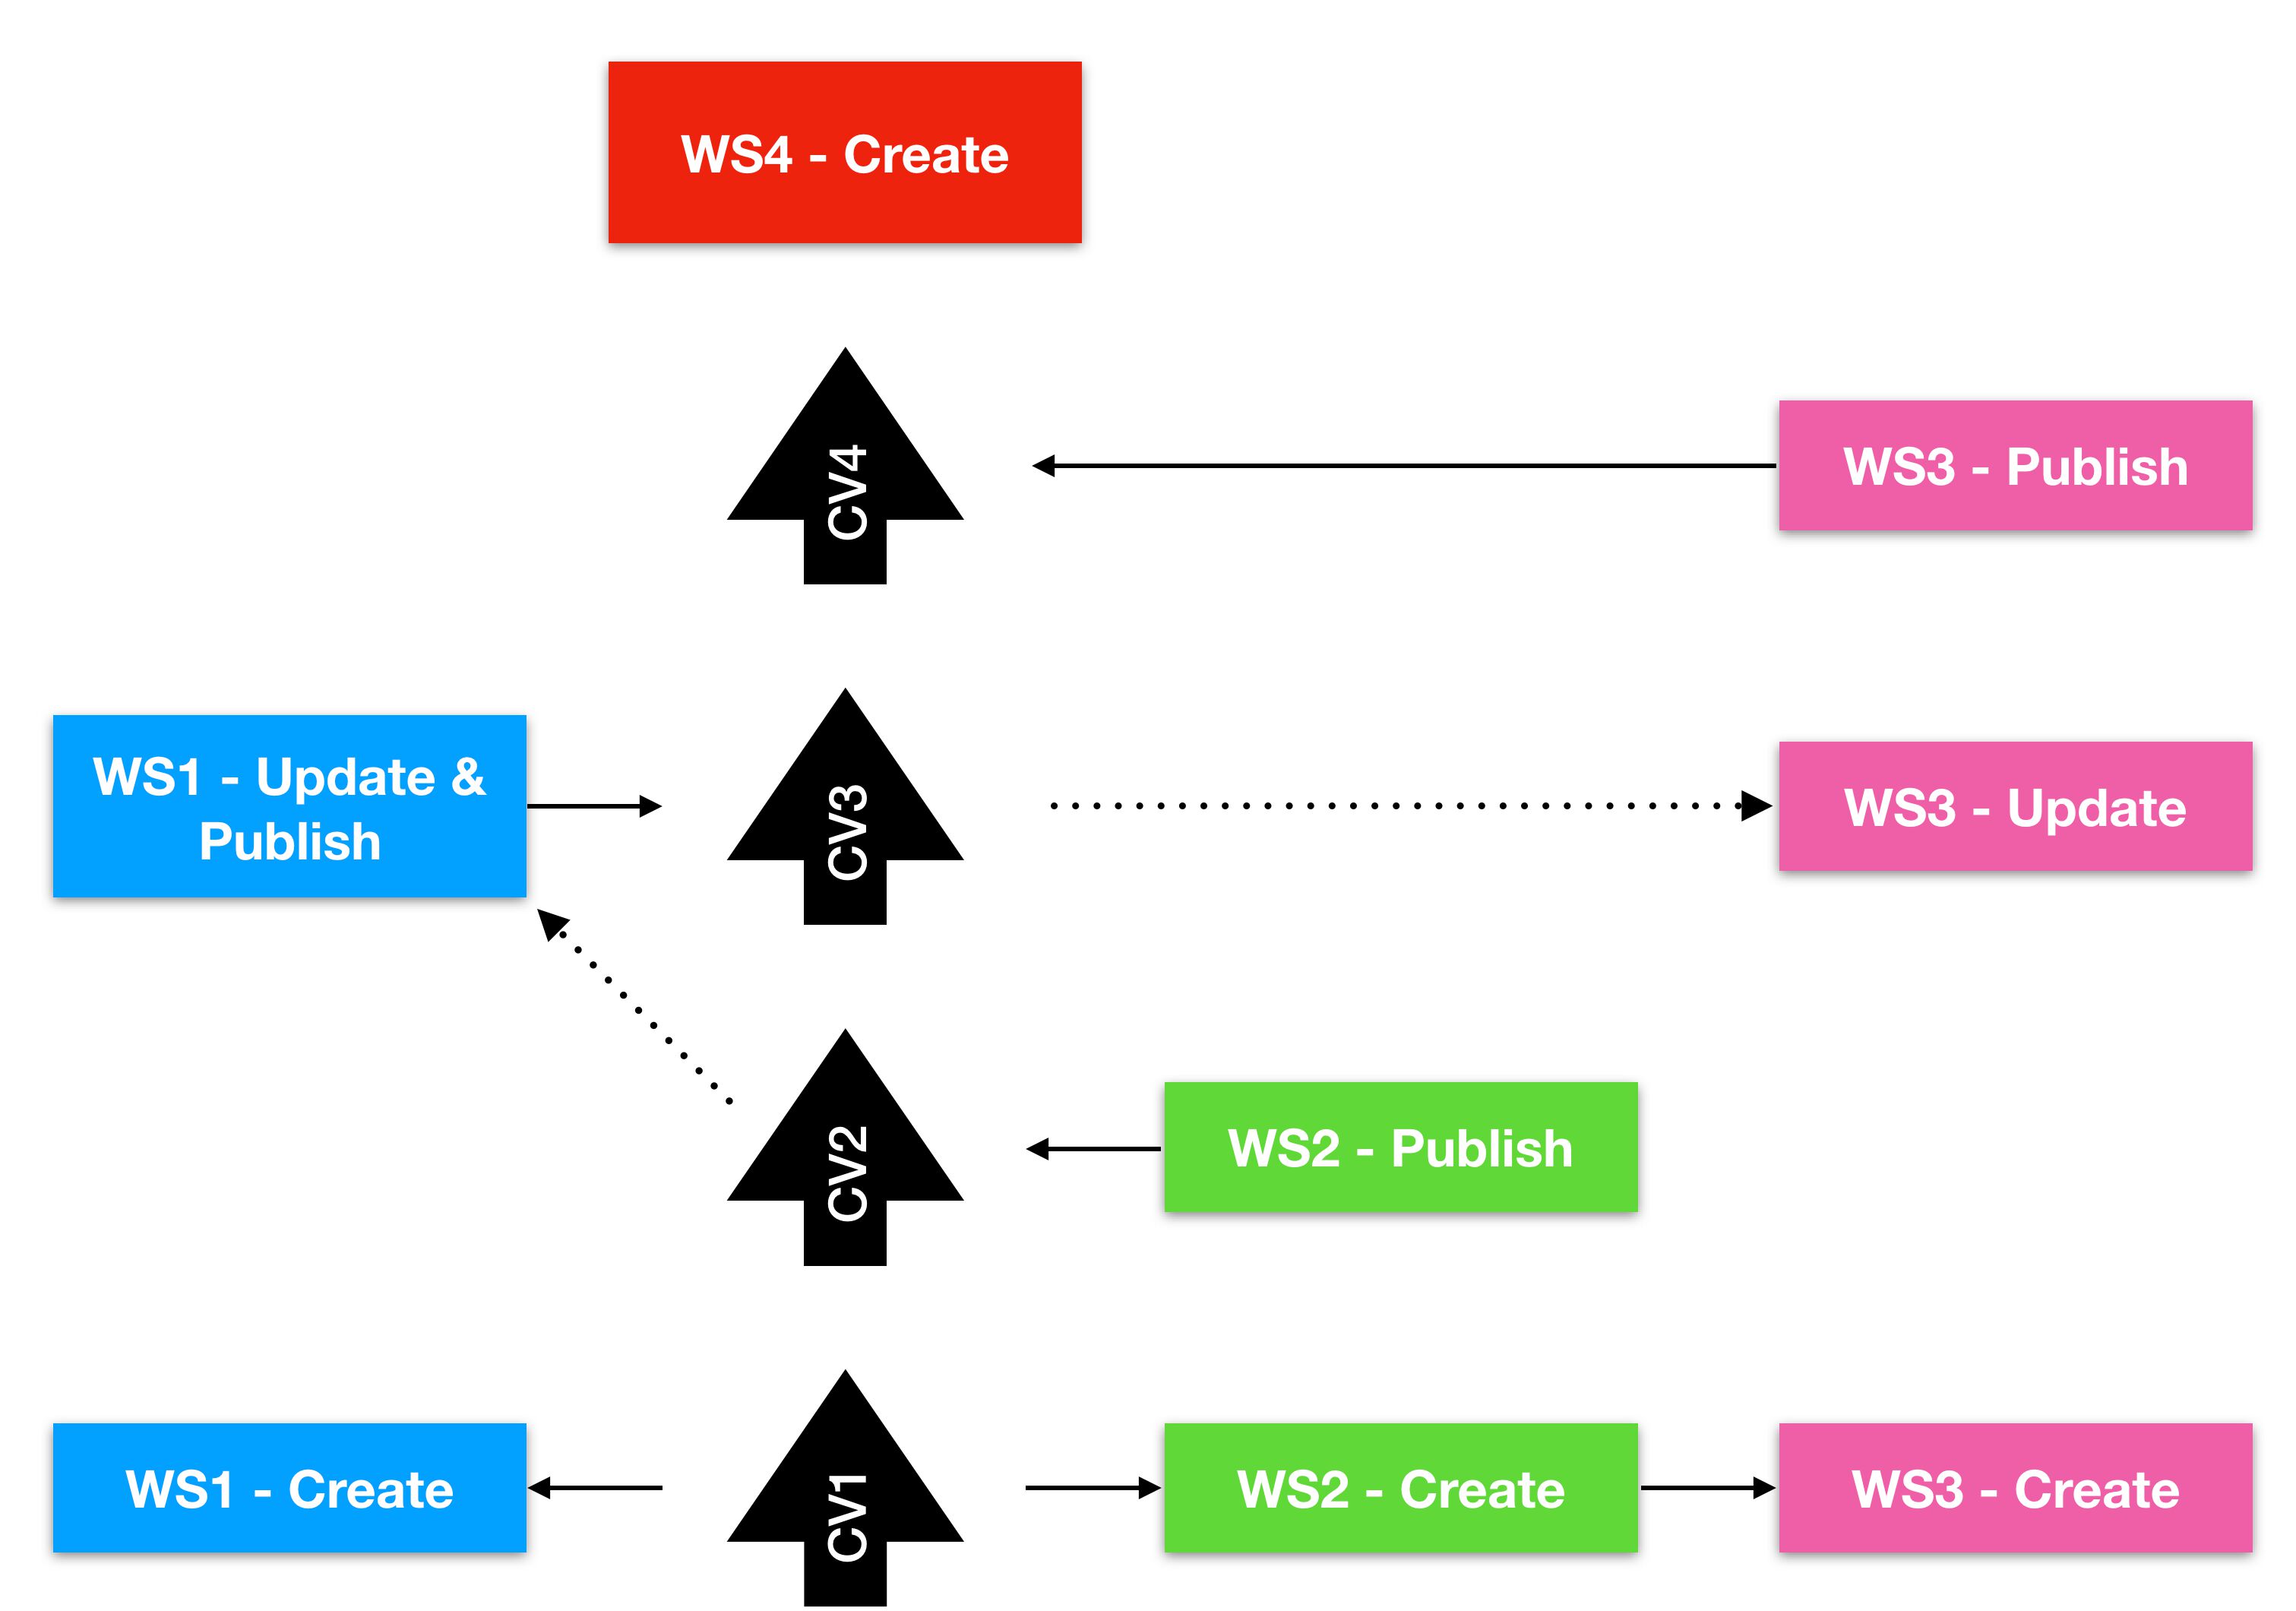
Perhaps my amazing flow diagram will help you understand this better:
Container Version 1 (CV1) has three Workspaces created out of it: WS1, WS2, and WS3. All are being actively worked on.
WS2 is published, so its contents become the new Container Version 2 (CV2).
Since WS1 was based on CV1, which is now replaced with CV2, WS1 gets a notification that the Latest Container Version has changed and a sync is required. The same notification is received in WS3.
WS1 is ready to publish, so the sync is done, and the workspace is published. This becomes the latest container version CV3.
WS3 ignored the sync request for CV2, but now it, too, is ready to publish. Since the latest container version is CV3, this is synced with WS3 (thus bringing in the changes from CV2 as well), and the workspace is published into CV4.
Finally, a new workspace is created from CV4, with all the changes from the previous, now published, workspaces.
So it’s like an abstraction of a typical branching version control system. There’s just one version tree, but you can “branch” drafts out of it, merging changes in the version tree to these branches, and merging branches into new versions of the version tree.
The main difference to e.g. GitHub is that a workspace is deleted as soon as it is published or created into a version. Thus, workspaces are ephemeral. They exist solely to deliver an incremental update to the container.
2. Managing (creating, saving, and deleting) a Workspace
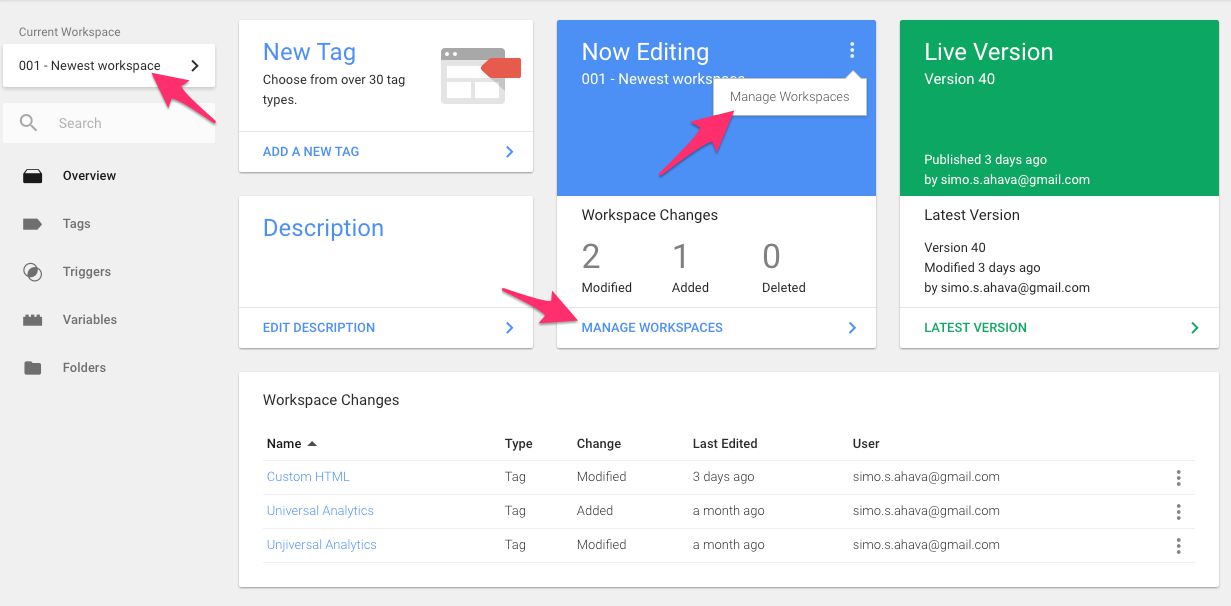
Creating a new Workspace is easy. Go to the Overview section of your Container, and click any one of the three options to “Manage Workspaces” you see in the image below.
Once you click one of those, you should enter the “Manage Workspaces” screen. To create a new Workspace, click the Plus icon in the top right corner to open the Workspace creation prompt.
By the way, notice the text saying 1 workspace left? In the free version of Google Tag Manager, you can have three Workspaces active at the same time. This might sound like a limitation, but it actually steers you into a more conservative approach to tag management. I’ll talk more about this in the last chapter of the post.
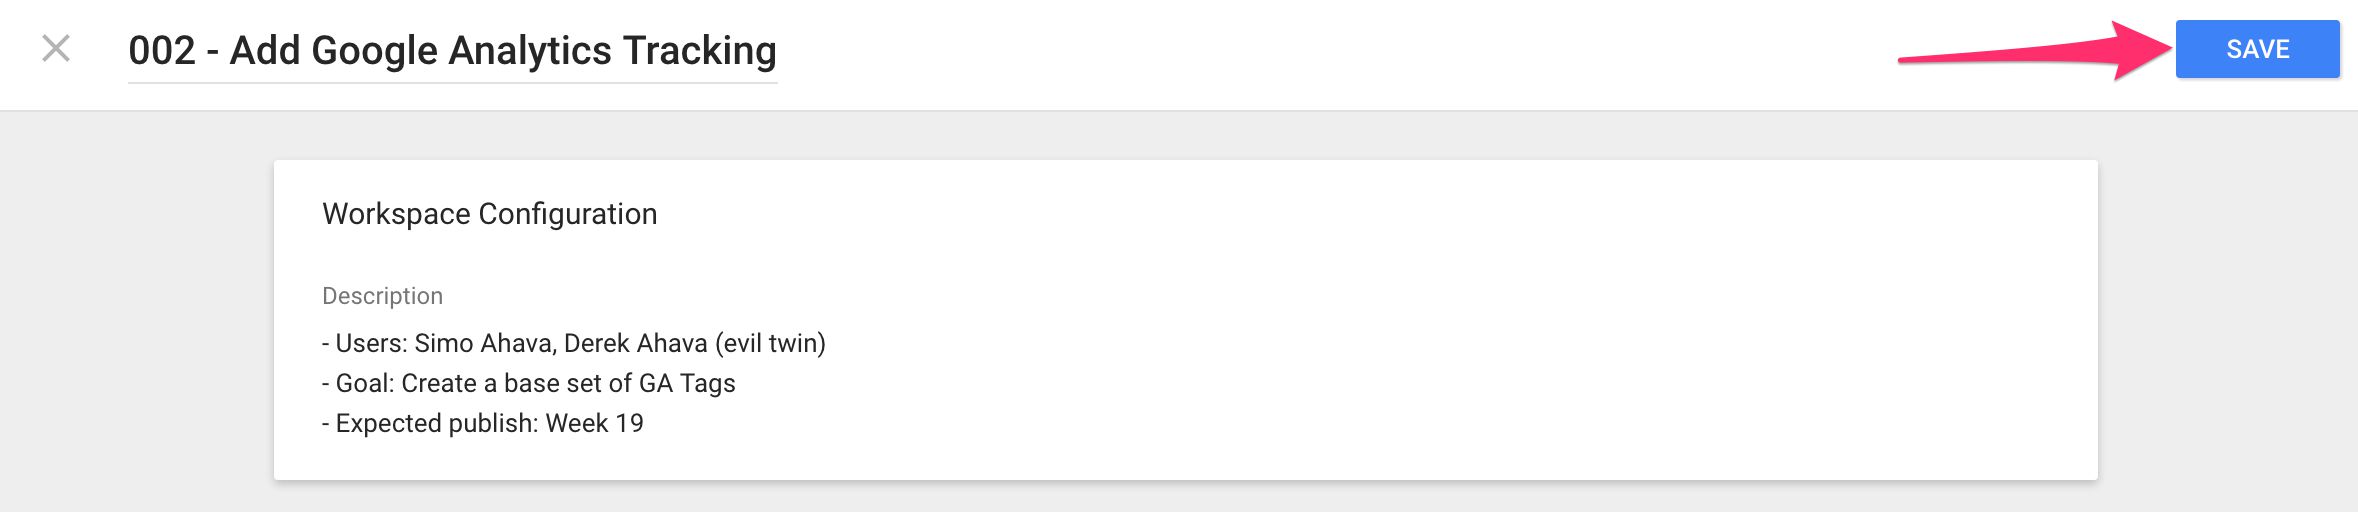
Once you click the plus icon, you can give your new Workspace a name and a description. I’m not one of those people who try to stick naming conventions down your throat, so I recommend you come up with a good schema all by yourself (or, preferably, within your team).
Even though these screenshots don’t reflect it, I’m actually using the following naming convention:
024 - AdWords Conversion Tracking - Ahava & Behava
The number would be the Version number the Workspace was created from, followed by the feature implemented in the Workspace, followed by the team working on the Workspace. A simple naming schema, with lots of information encoded within.
It’s a good idea to give a description to the Workspace, such as who’s working on it, what the goal is, when the expected publishing time is, etc. Once you’re done, just click Save in the top right corner.
You should see your fancy new Workspace in the list, and the Workspace you just created automatically becomes the draft that you’re currently editing.
Just remember - the new Workspace is created off the Latest GTM Container Version, not the Workspace draft you had active when you created the new Workspace, nor the Published version (if different from the Latest Version)!
Now, there’s no way to actually, explicitly save a Workspace. Since it’s a Container Draft, any Tags, Triggers, and Variables you save automatically become part of the draft. There are new, awesome ways to view and abandon any changes you’ve made in the current draft, and we’ll get to them shortly.
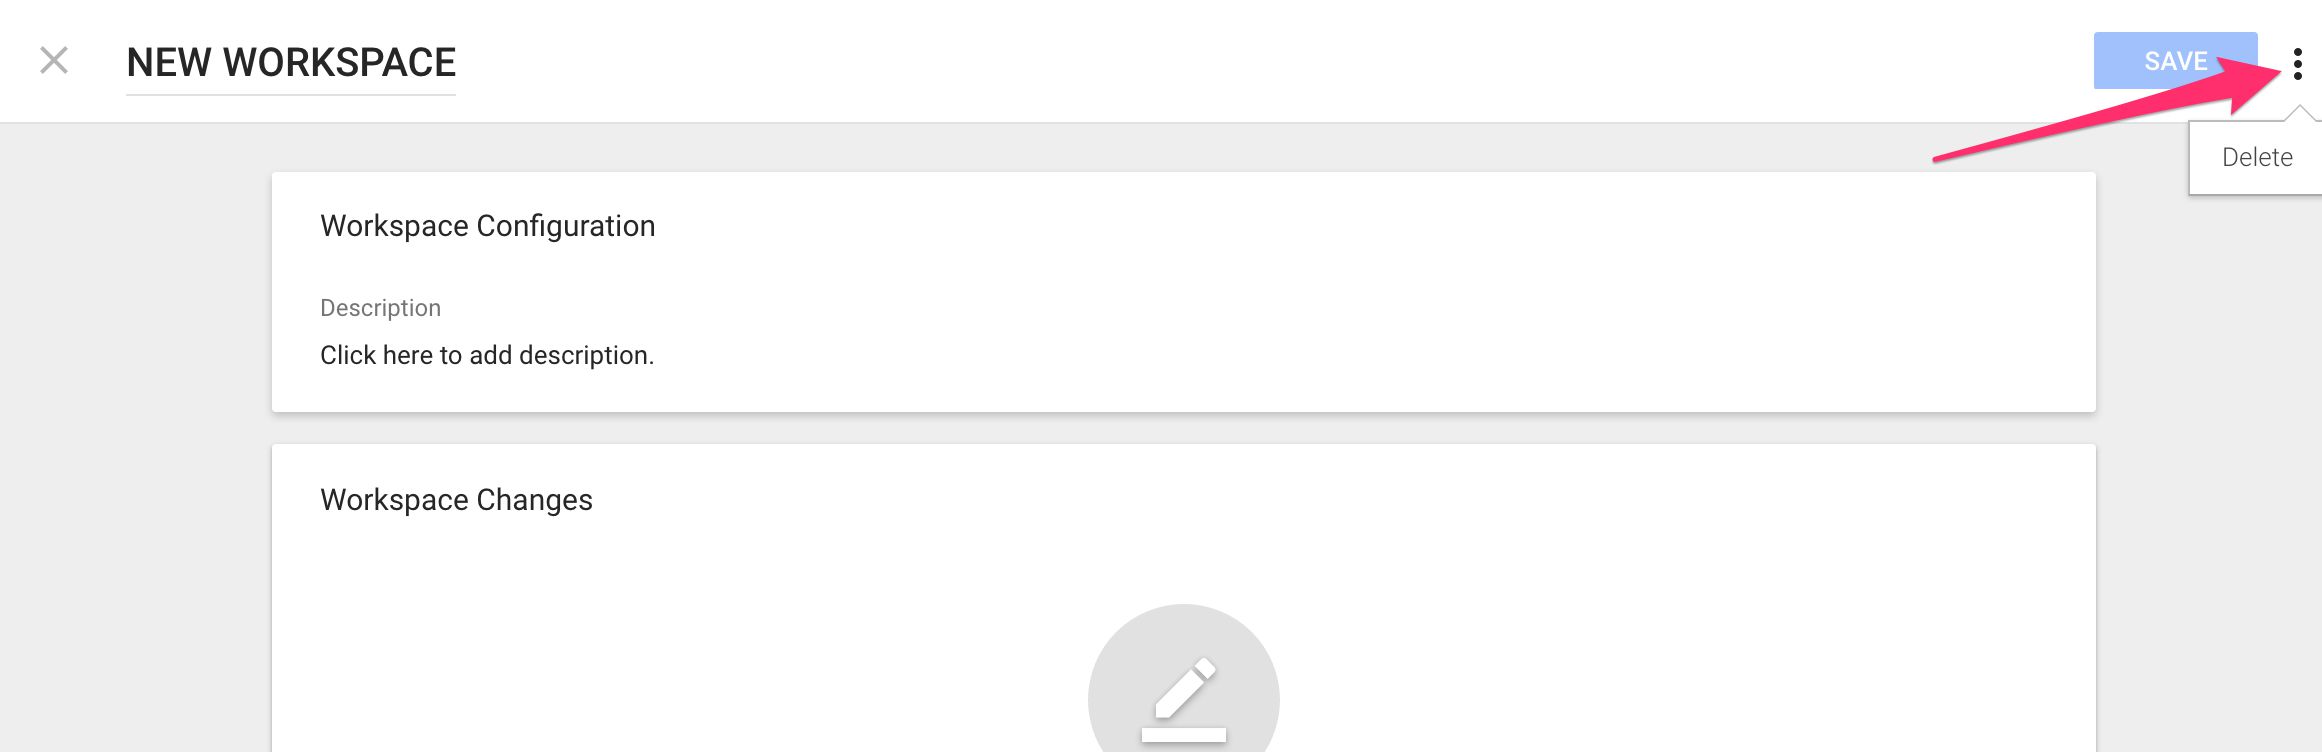
To delete a Workspace, you’ll need to open the Manage Workspaces overlay, and click the small info button next to the Workspace you want to delete.
In the view that appears, you can change the Workspace configuration (name, description), view its changes, and you can click the little menu in the top right corner to Delete the Workspace.
3. Switching between Workspaces, and Workspaces in Overview
To switch between Workspaces is easy. In the left navigation is a new menu for Workspaces. Whenever you click that, an overlay flies out, which lets you switch between Workspaces simply by clicking the Workspace name in the list that appears.
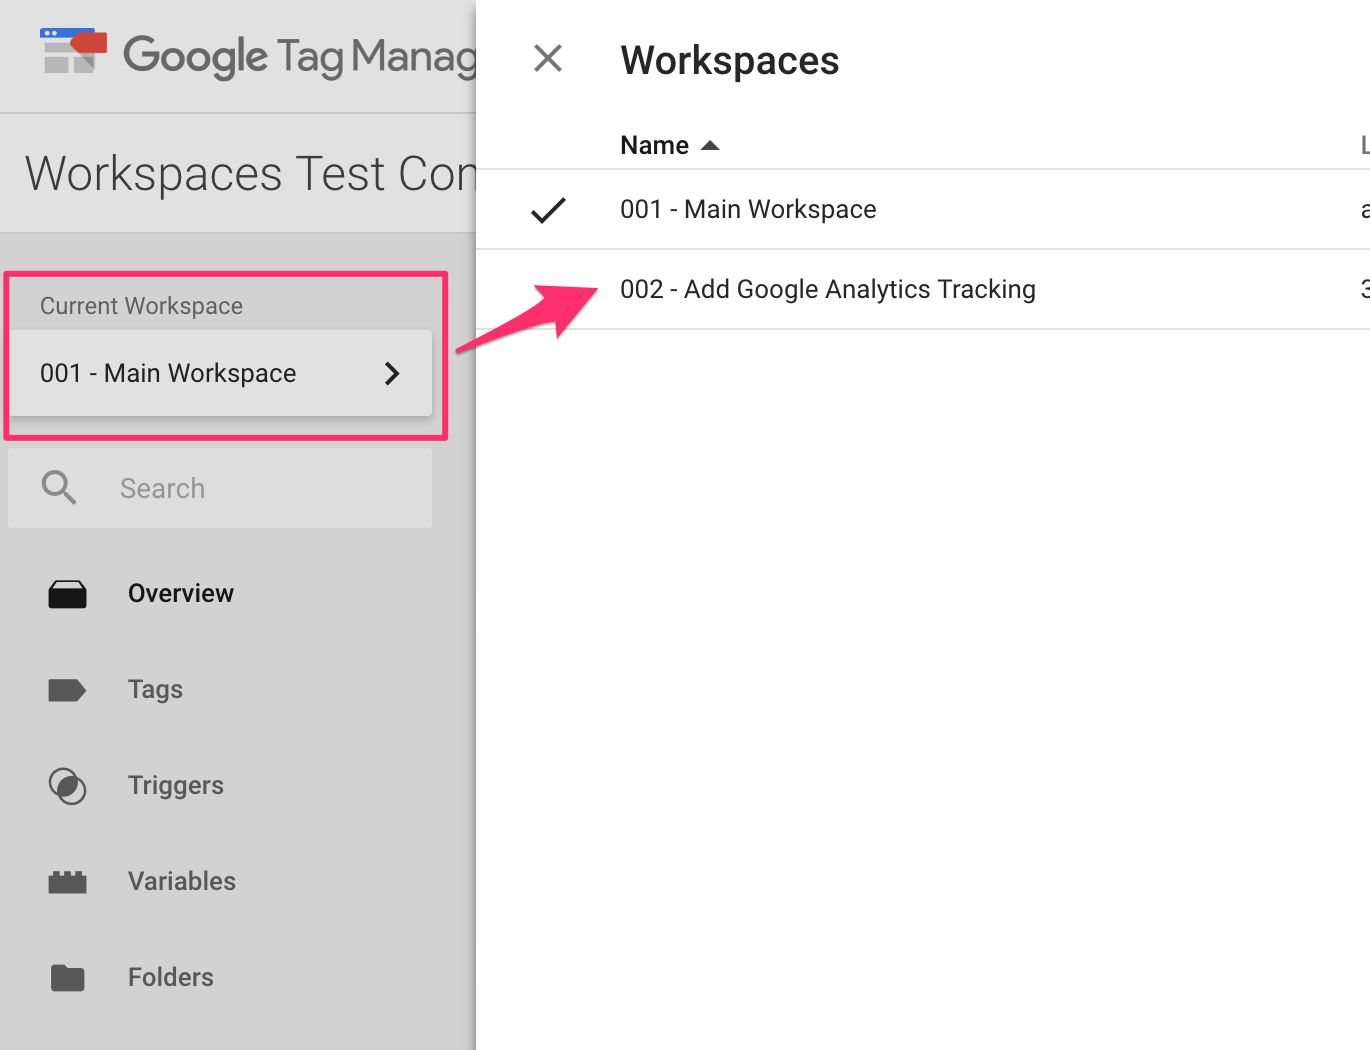
The new menu item in the navigation serves a two-fold purpose: First, it lets you know which Workspace you’re currently working on. Second, it lets you quickly open the Workspace management overlay, where you can jump between Workspaces really smoothly.
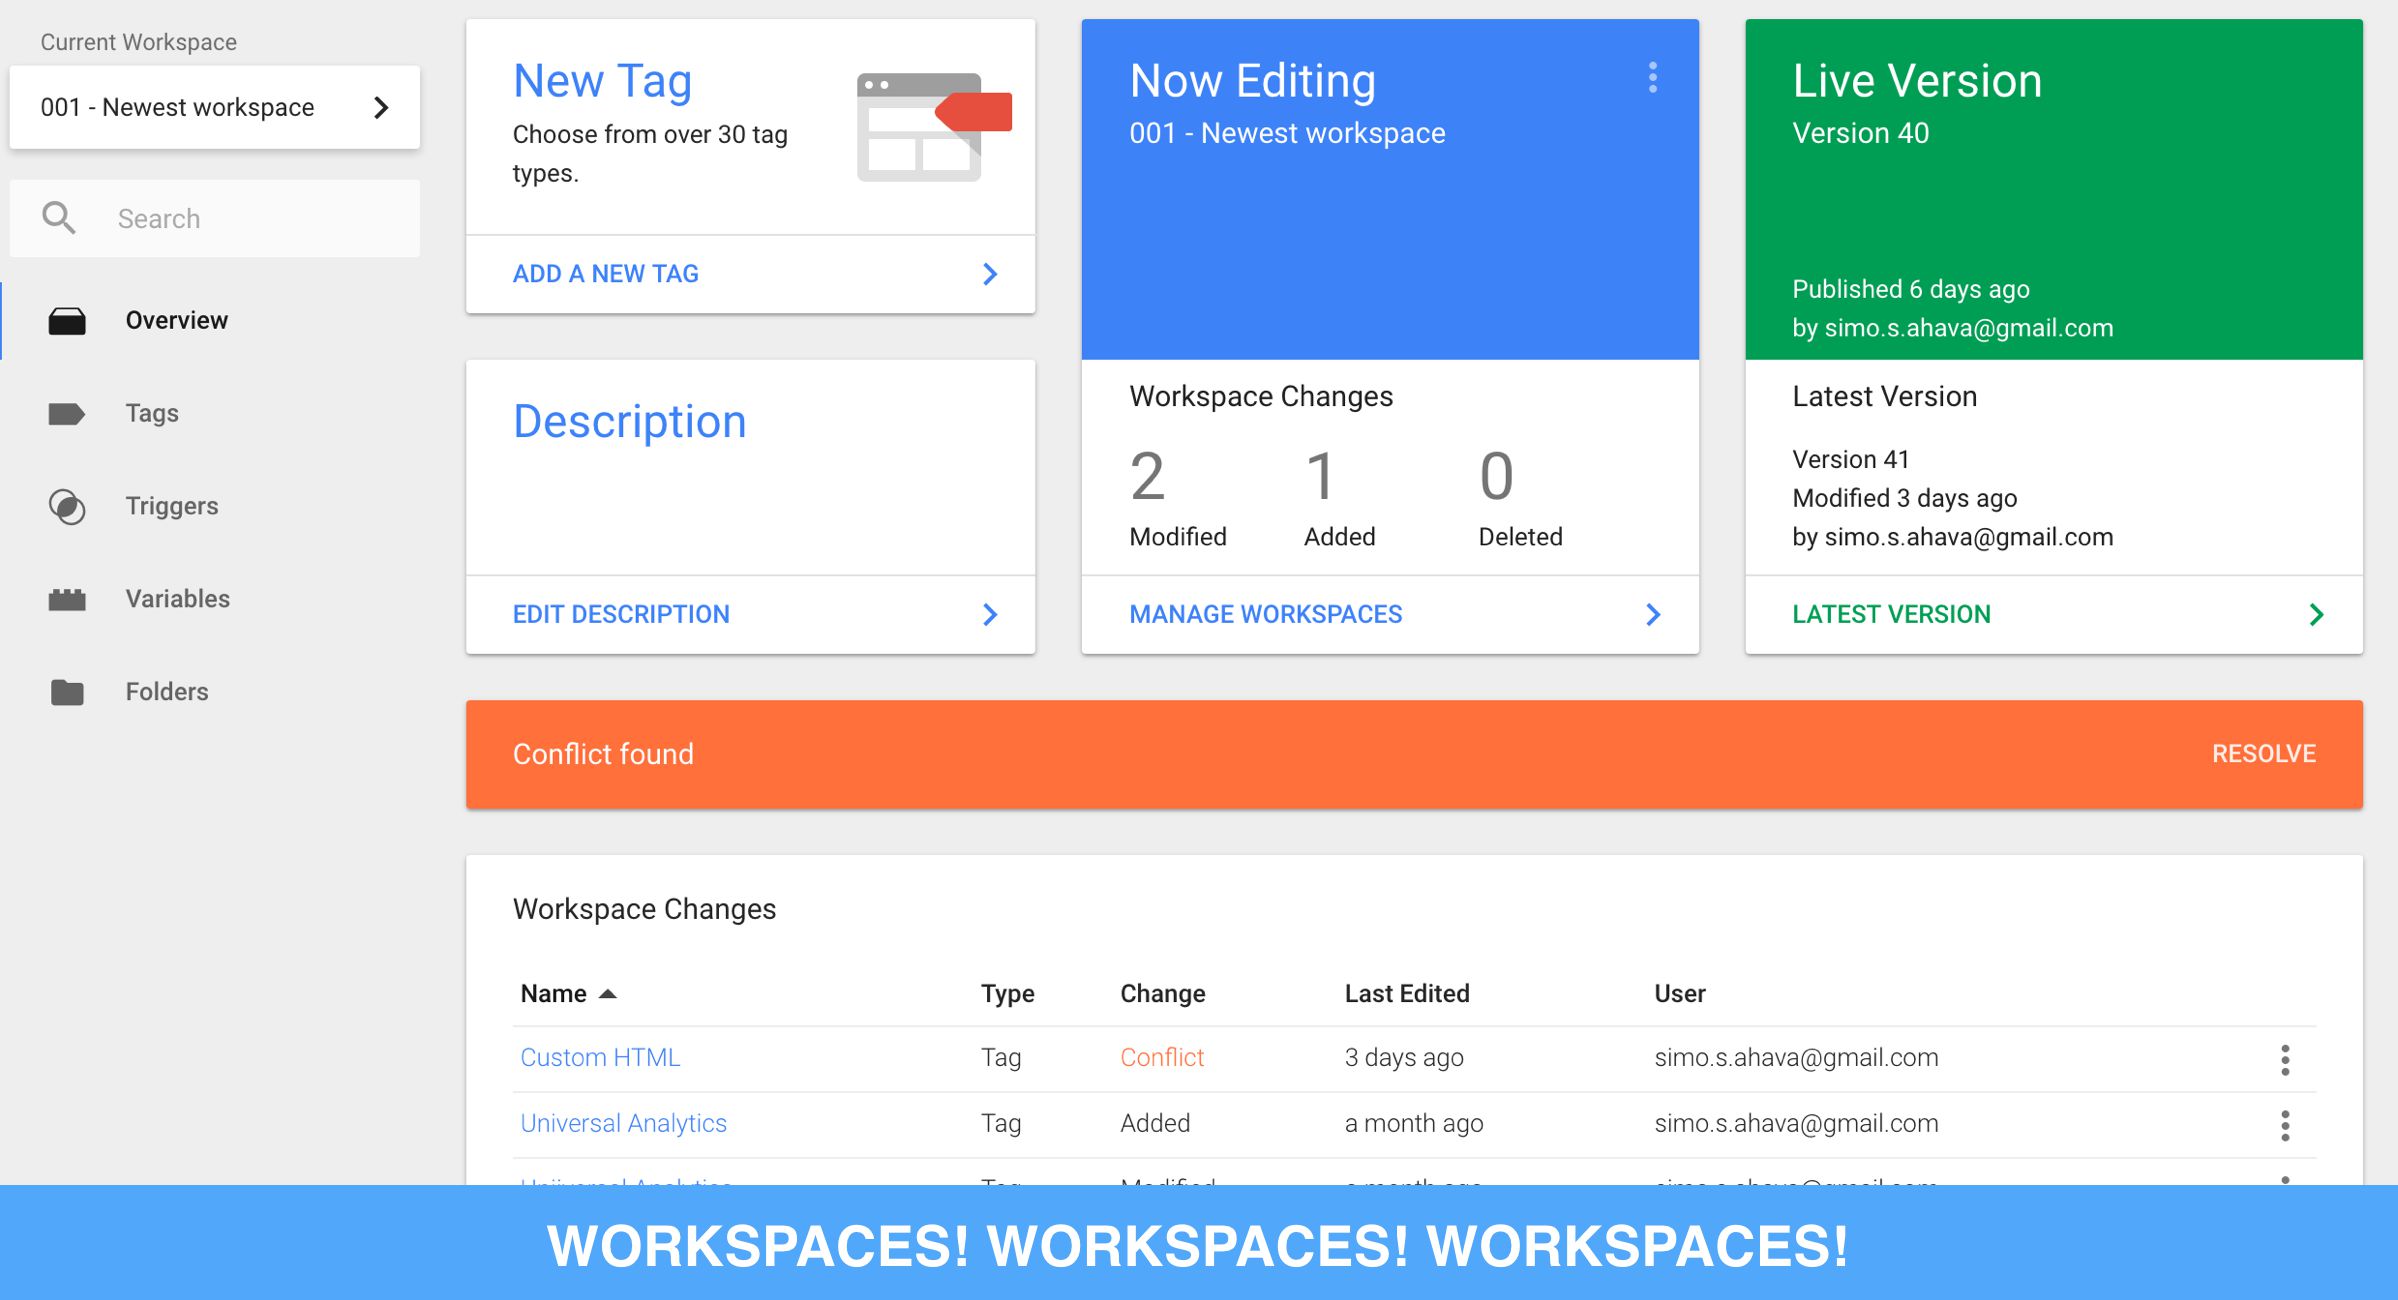
Now, head on over to Overview, and lets take a look at what’s changed.
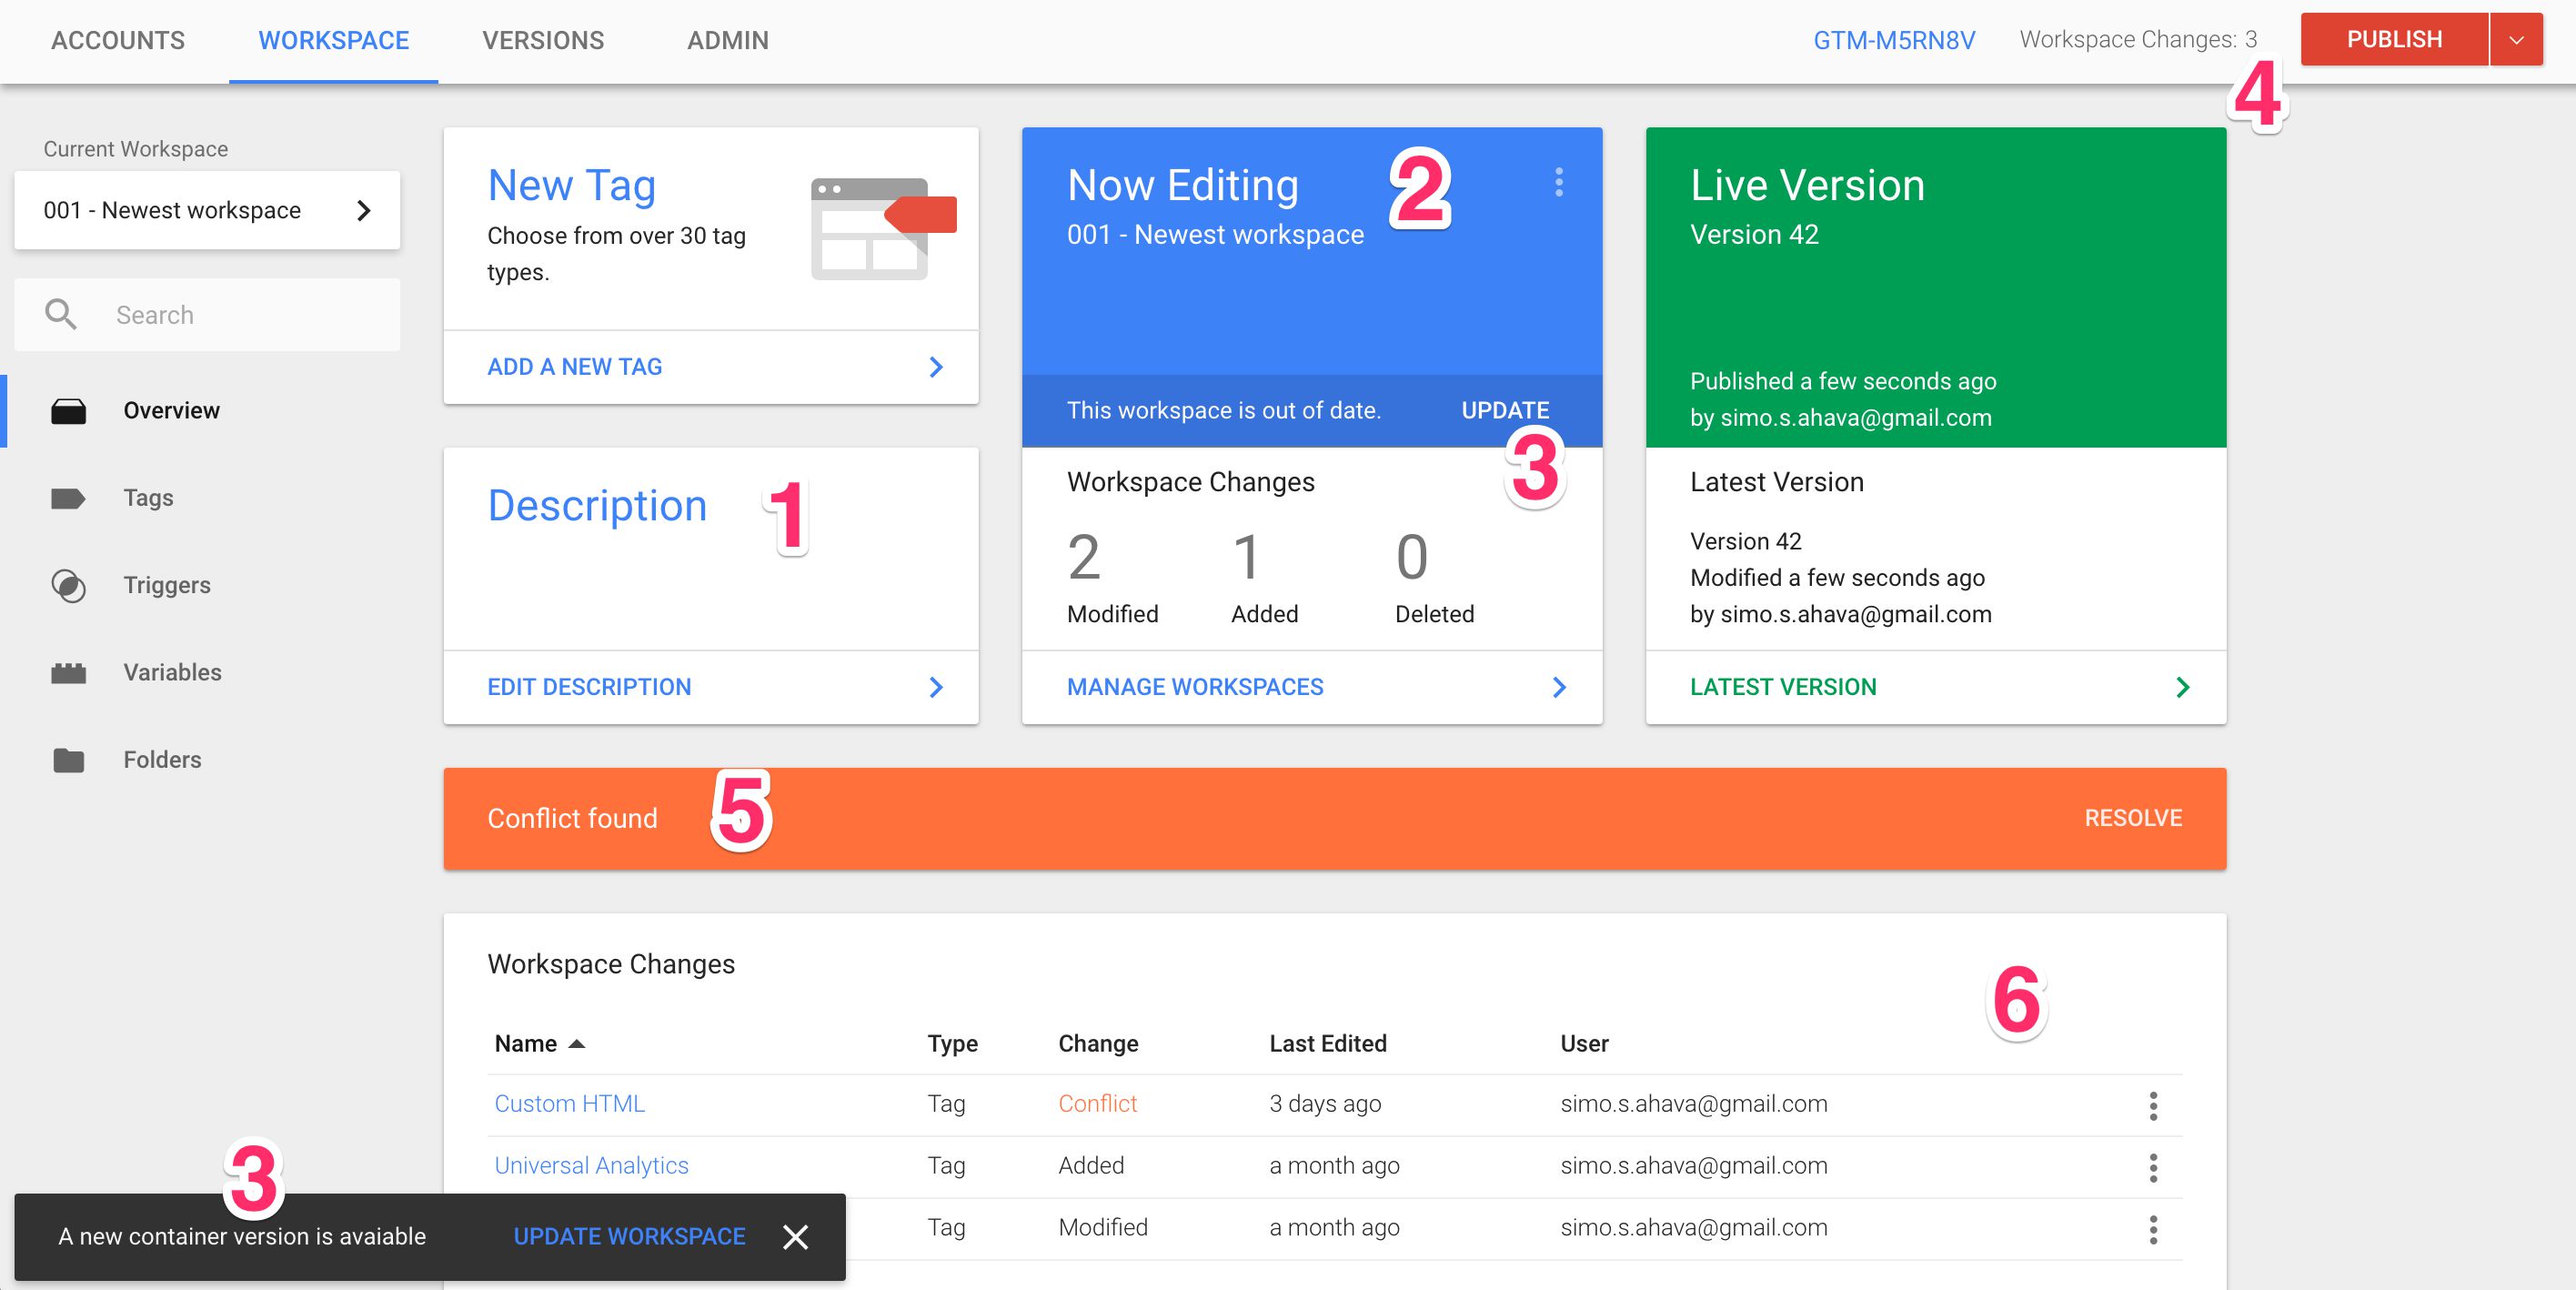
There are some vital changes to the Overview dashboard, so let’s see what we find.
The Description field is now the Description you entered when creating the Workspace.
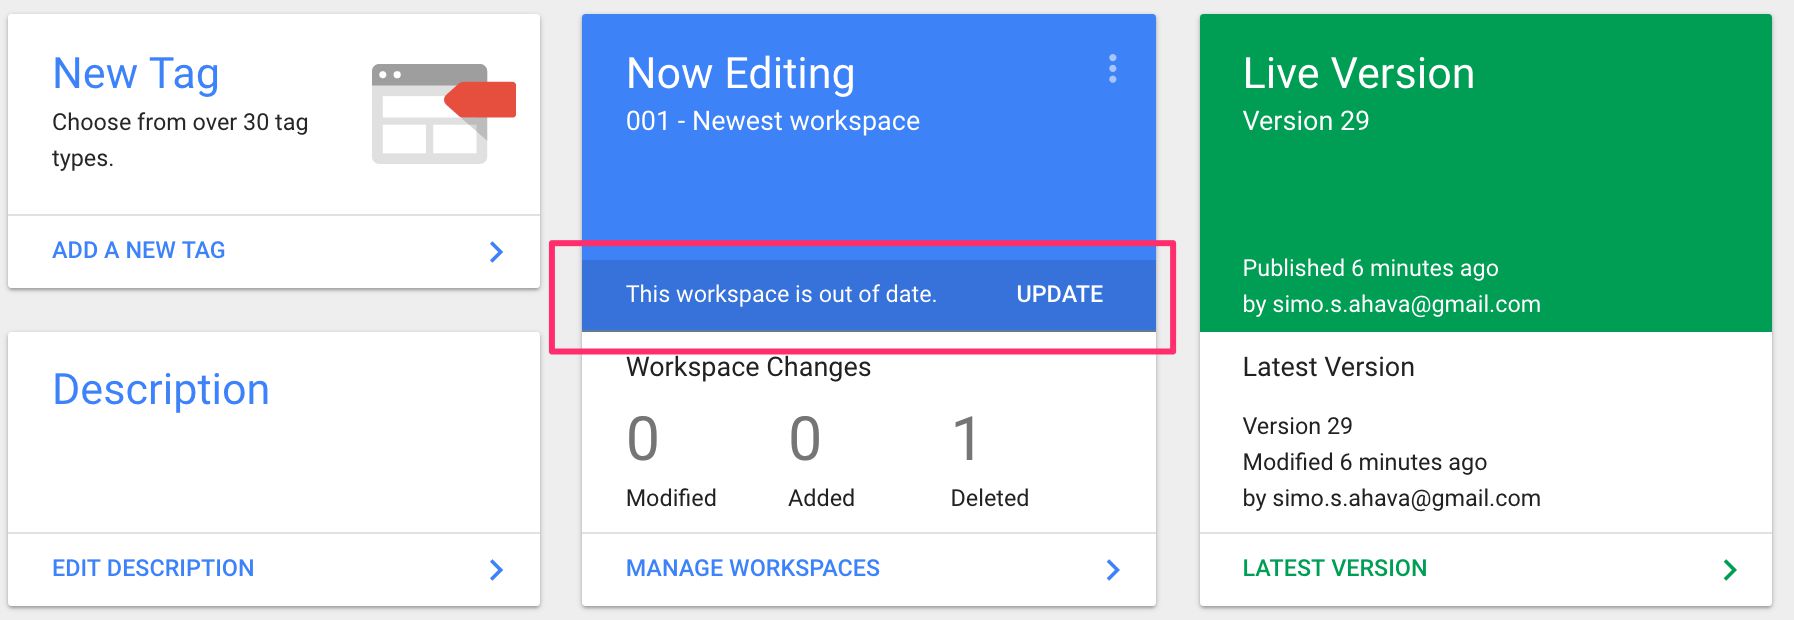
The whole central panel is reserved for Workspace-related information. The menu in the top-right corner of the box lets you either Update the Workspace or Manage Workspaces. The changes in this Workspace (compared to the Latest Container Version) are listed at the bottom.
If there’s a newer Container Version than the one that the Workspace was created from, you’ll see an alert here AND at the bottom of the screen, reminding you to update the Workspace.
Right next to the PUBLISH menu is another reminder of how many changes there are in the current Workspace when compared to the Latest Container Version.
The orange Conflict bar can pop up after you’ve updated your Workspace to merge the changes in the Latest Container Version. If, in the current workspace, you’ve made modifications to any of the Tags, Trigger, or Variables that were included in the update, you will need to resolve the conflicts either in favor of the Latest Container Version or your current Workspace.
A more detailed list of the changes in the current Workspace is here. By opening the menu aligned with each change, you can view what changes were made to each asset, and you can abandon the changes with the click of a button.
The usefulness of the Overview screen just multiplied by a zillion. I never used it before, now I find myself returning to it all the time.
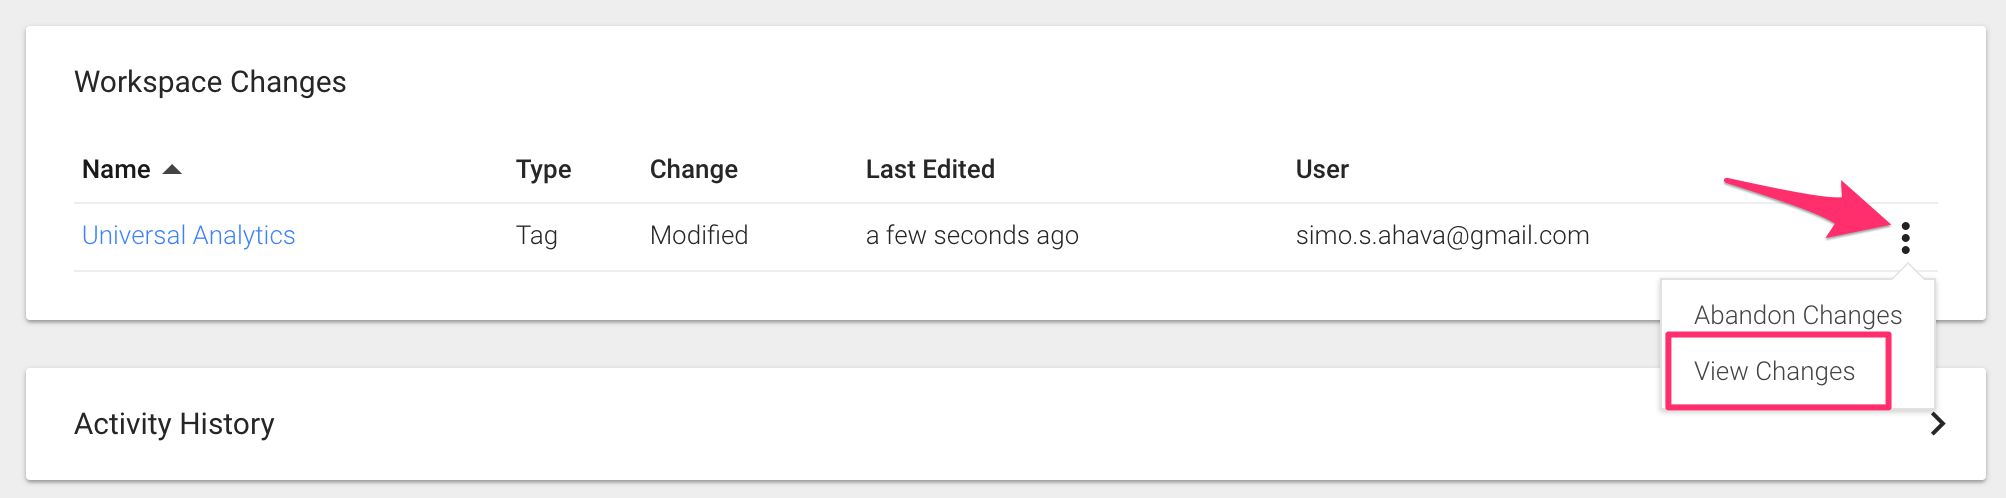
4. Viewing changes
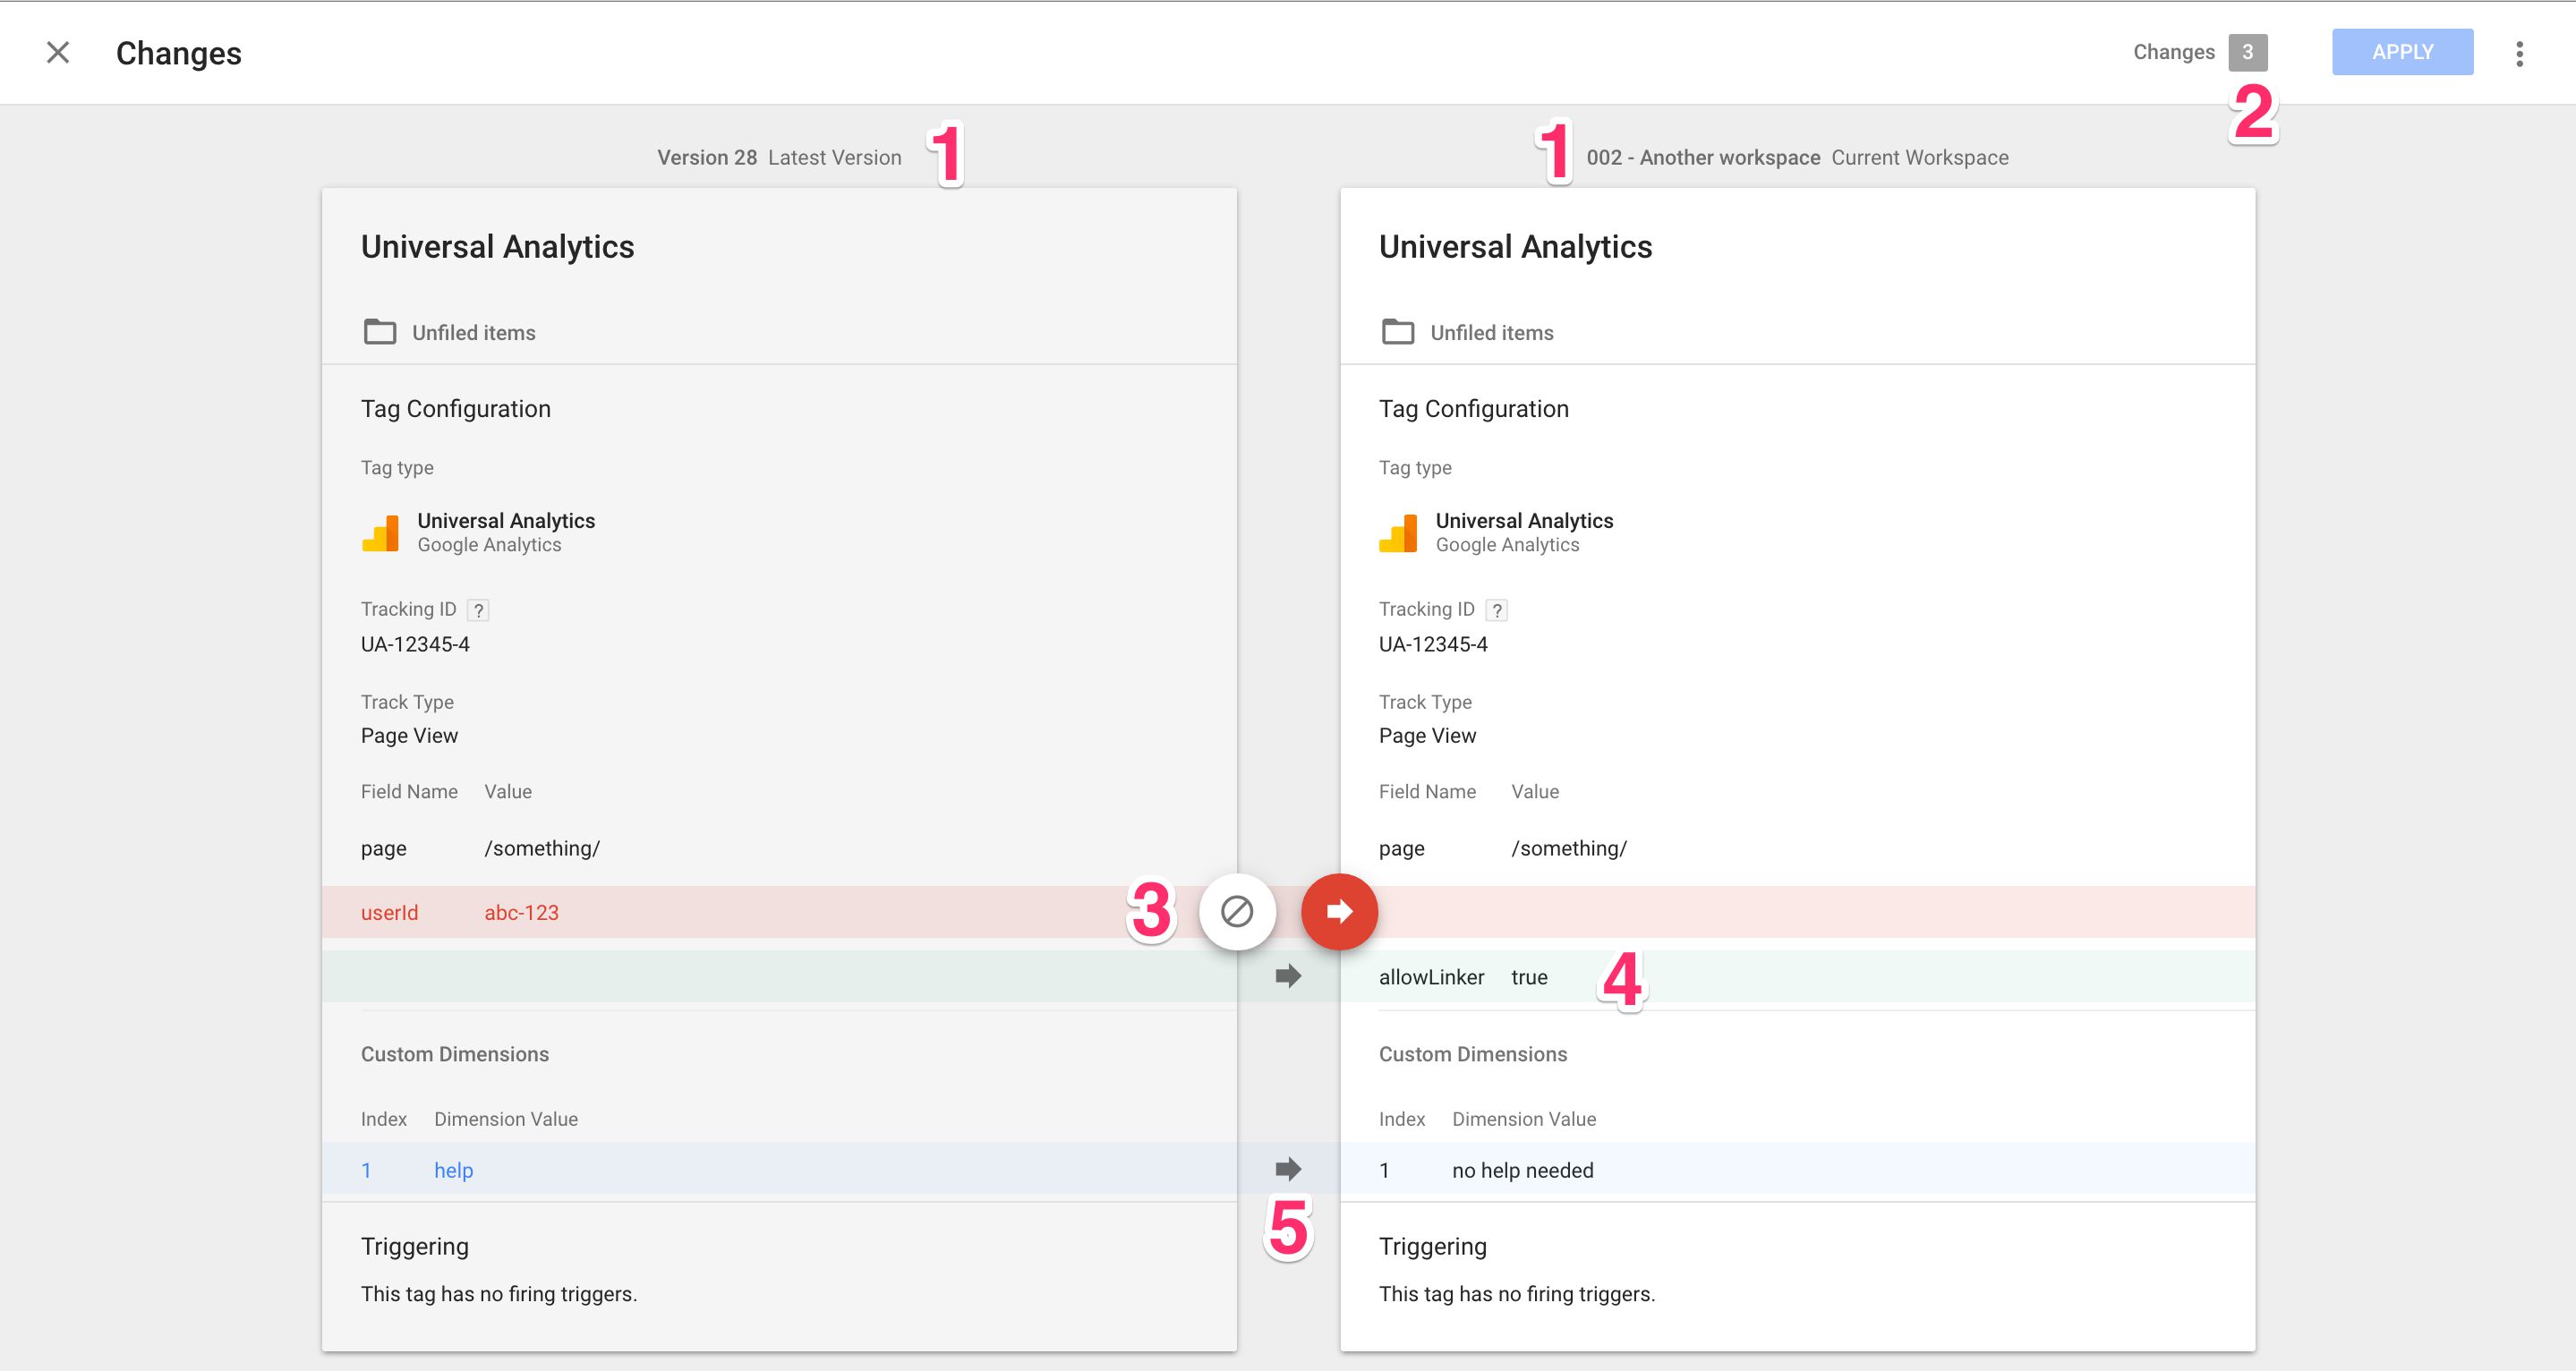
OK, get ready for pretty much the sweetest addition to the new user interface. In any of the places you can view changes to the Workspace, find the item you want to analyze and click open the menu next to the item. There are two options: Abandon Changes, which reverts any changes you made to that item back to their original settings (i.e. the values in the Latest Container Version), or View Changes, which lets you analyze all the changes you’ve made, and individually choose whether to keep or to abandon them!. Since the latter is more interesting, click “View Changes”.
What you see next can be pretty intimidating. Remember that “View Changes” is a completely optional operation. You don’t have to view any changes, nor do you have to accept any changes at any point when working with a Workspace. Indeed, once you’re happy with what you’ve done with the Workspace, you can just Create a new Version or Publish the Workspace without ever double-guessing your changes.
But if you DO want to check what you’ve (or someone else has) done, the overlay that opens is the perfect place to do so. Let’s first take a closer look at what we have here.
Here are the elements of this overlay:
On the left is the column which represents the item in the Latest Container Version. On the right is the column which represents the modified version in the current Workspace. This is, essentially, a diff of the two versions.
Up in the right you can see how many changes are yet to be resolved, and a disabled APPLY button, which you can click after you’ve resolved all the changes. Basically, any changes that you resolve in favor of the Workspace will remain as changes whenever you open this screen again, and any changes you resolve in favor of the Latest Container Version will be removed from the draft in your Workspace.
In Red are items you’ve REMOVED from the Latest Container Version. By clicking the arrow, you have two options: keep the change you’ve made to the Workspace (the IGNORE icon), or copy the original value from the Latest Container Version back to your Workspace (the COPY icon).
In green are NEW ADDITIONS to the current Workspace, which are absent from the Latest Container Version. You can click the arrow again to either abandon or keep the change.
In blue are actual MODIFICATIONS to existing properties. In this example, the value for a Custom Dimension has changed. You can use the arrow icon again to validate your change.
Anyway, don’t be too confused with the View Changes screen. Remember, you don’t have to accept or abandon any changes if you don’t want to. You can simply use this screen to check what changes have been made, and then close the overlay without applying or changing anything.
It’s simply an incredibly convenient way of verifying what changes have been made to the container. I love it!
5. Viewing changes item-by-item
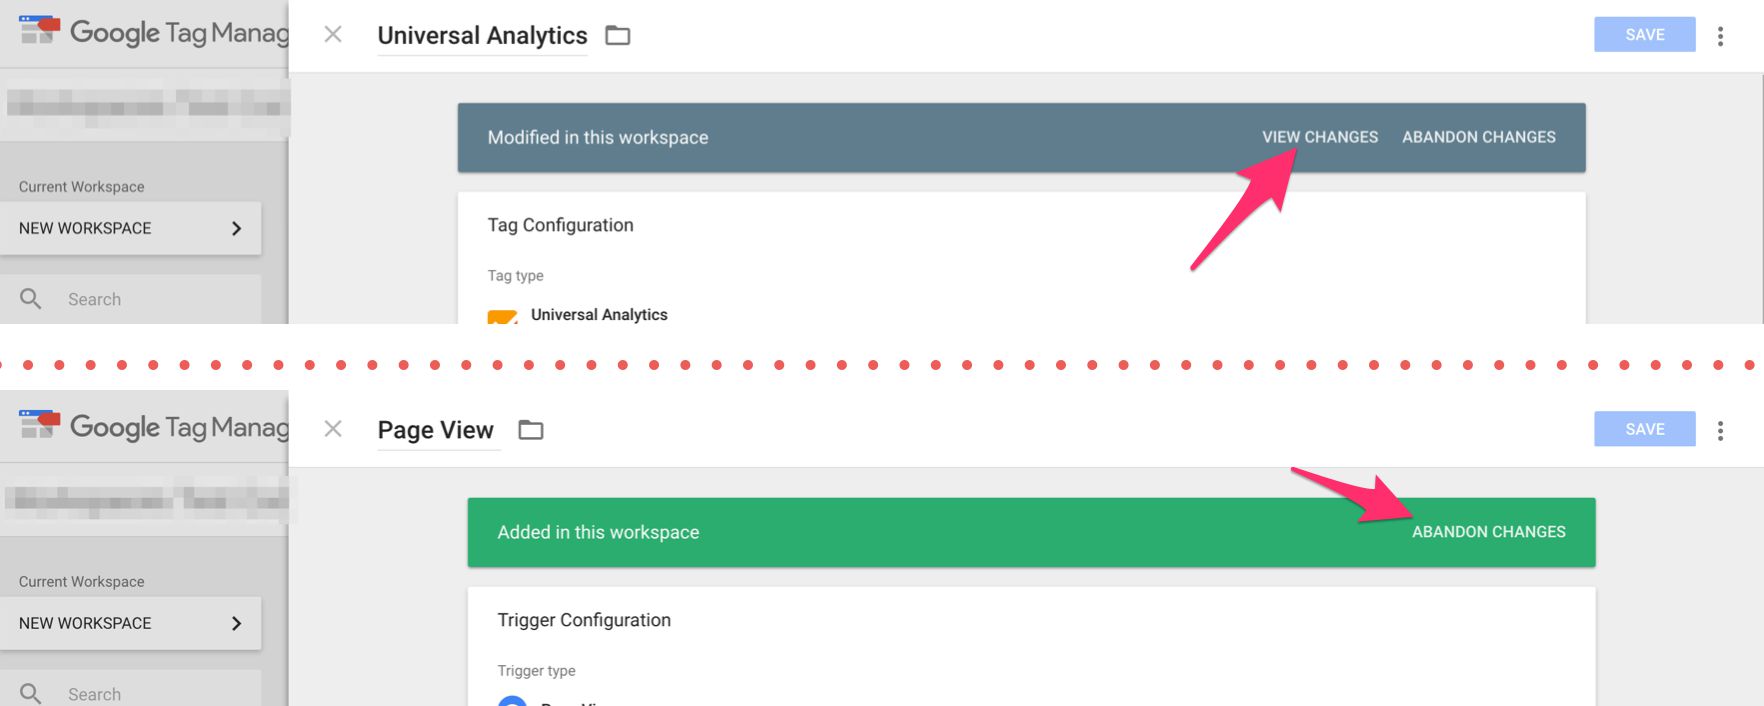
Another way to observe changes in items is to open an asset itself (Tag, Variable or Trigger). If any changes have been made in this Workspace, or if it’s a newly created item, the UI will inform you of this, and you have the option of Abandoning the Changes, or Viewing the Changes (for modified assets only).
See all that other cool stuff in the new UI? Read on!
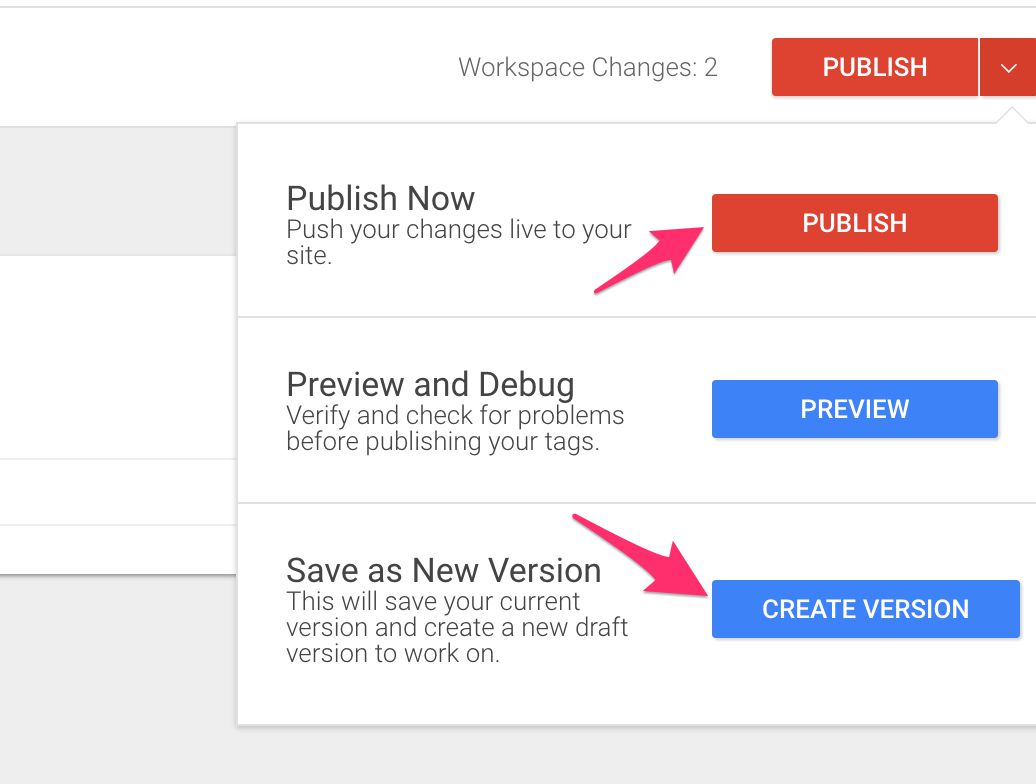
6. Creating a Version or publishing a Workspace
I want to remind you again: Workspaces are just Container Drafts. Just as before, a Container Draft becomes a Container Version in any of two ways: you either choose “Create Version” from a relevant menu (most common is the red menu in the top right corner of the container), or you choose “Publish”, which first creates the version and then publishes it as the new, live container.
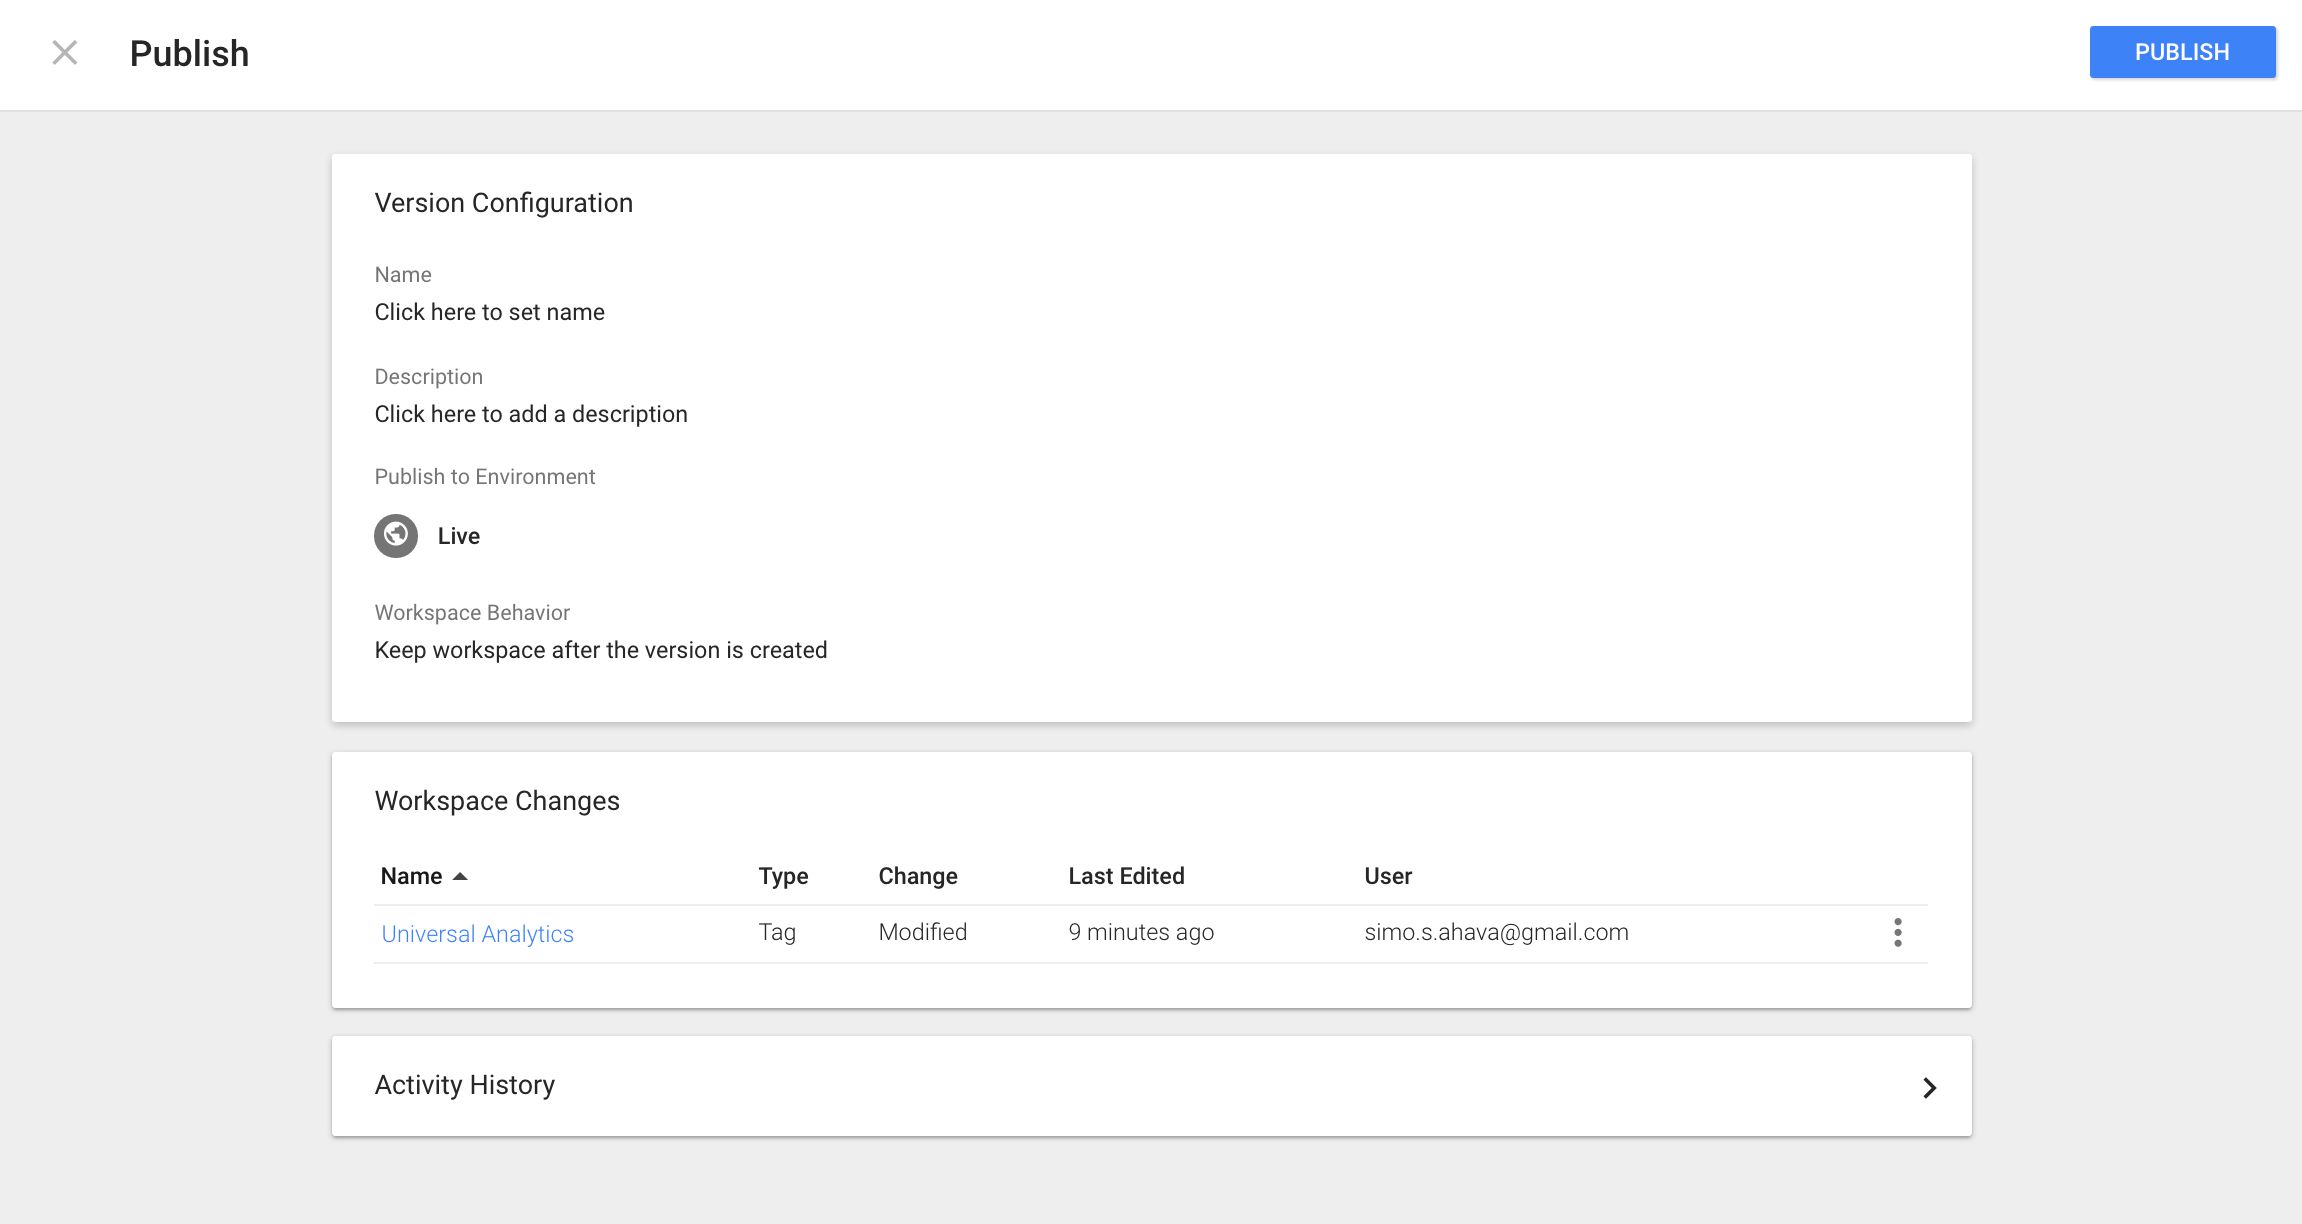
When you click the Publish (or Create Version) button, there’s a new overlay:
This is very convenient, as you have the options to:
Set Version Name - very useful for making sense of the Versions view
Set Description - same comment as above
Choose Environment to Publish to
Last chance to View / Abandon Workspace changes
View the Activity History for the current Workspace
Note that if there are changes you need to sync from the Latest Container Version, you’ll see this warning in the Publish / Create Version overlay:
When you Create a Version or Publish the Workspace, it’s exactly as it was before Workspaces. The current draft becomes the Latest Container Version, and it’s now visible to all users in the Versions screen.
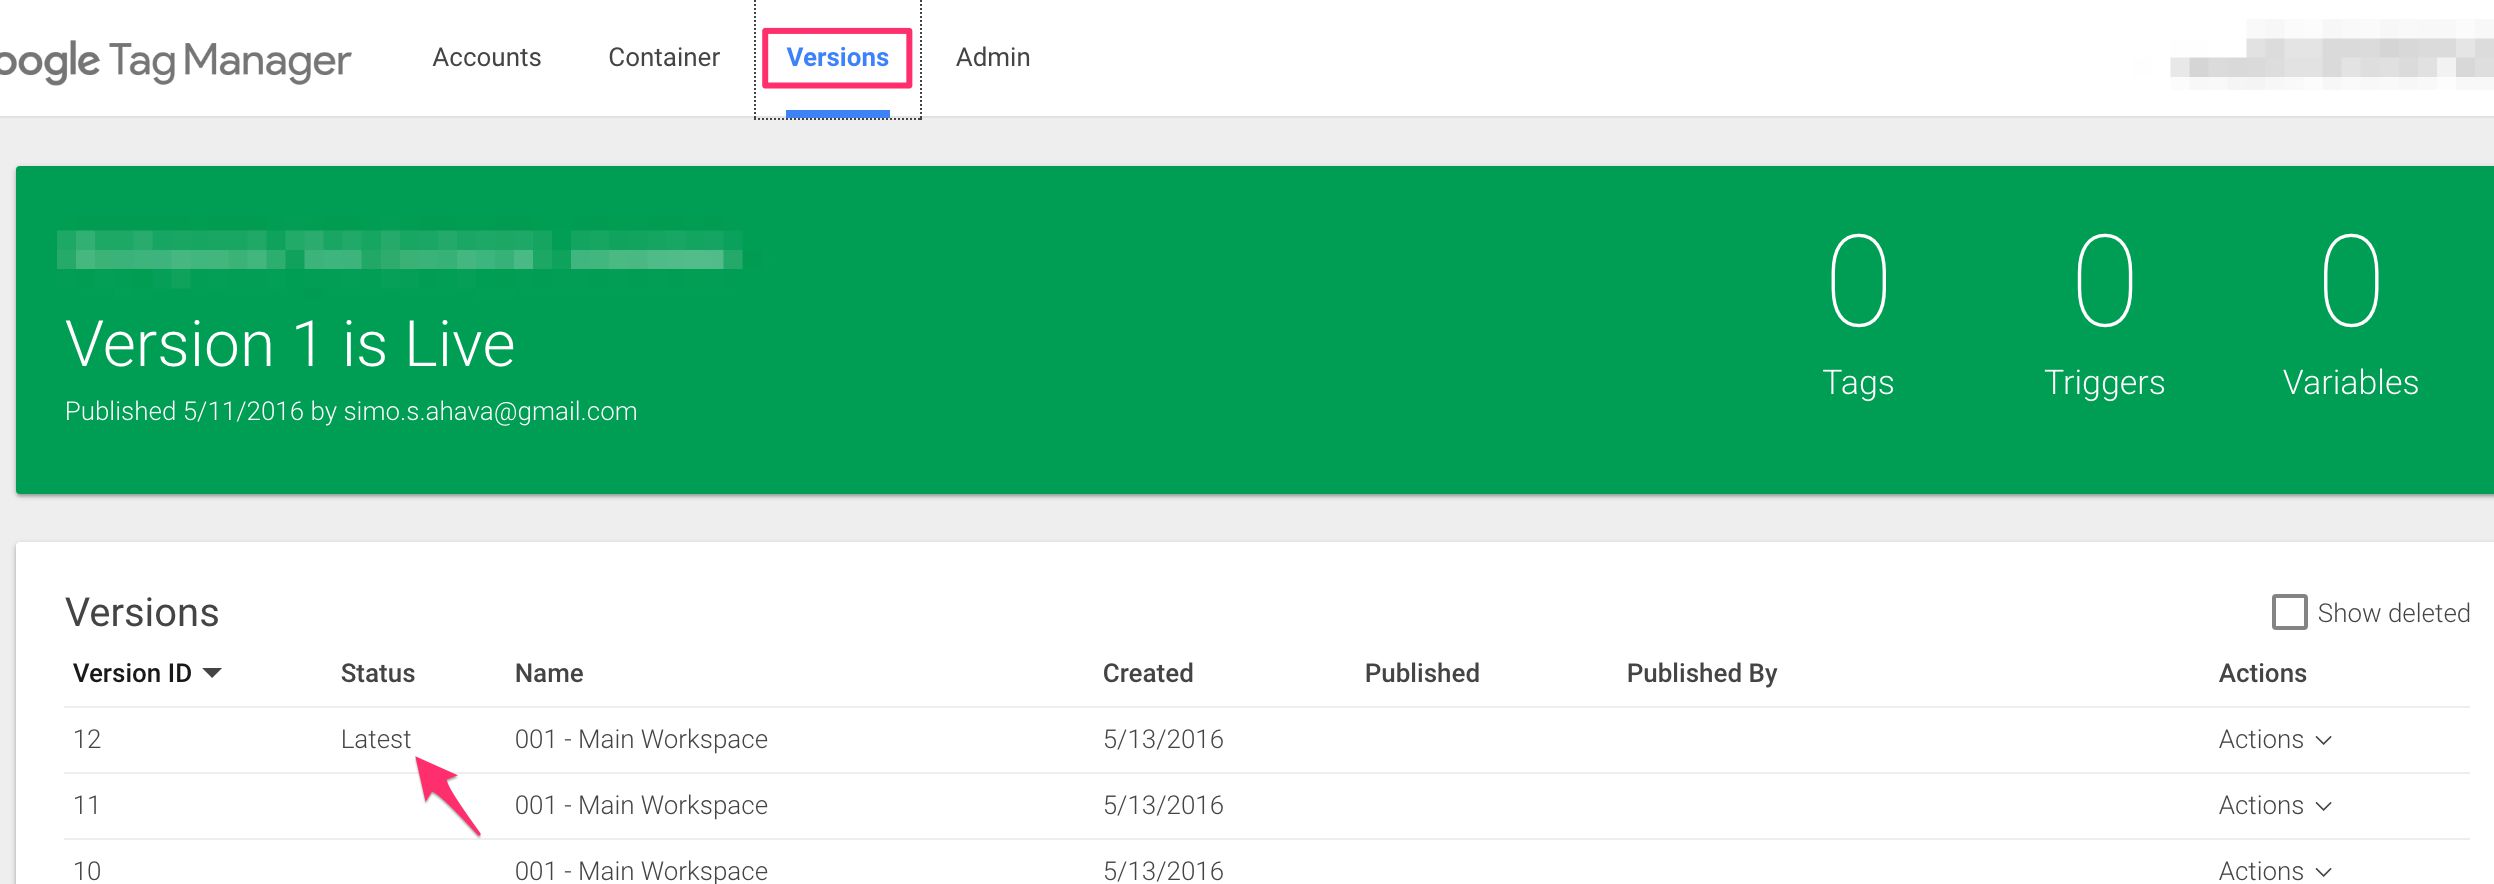
In this list, the Version name will match what you set when publishing the Workspace. You can, of course, rename it from the Actions menu as before. A feature update I’d like to see it the original Workspace name as a column of its own, so that I could make better sense of the publishing workflow (in the screenshot, the Version names are the respective Workspace names for clarity).
Remember that when you create a new version from the Workspace, it automatically becomes the Latest Container Version, which means two things:
Any new Workspaces will be automatically created from this Latest Version
All other, existing Workspaces will need to sync the changes you made to the Latest Version, before they can create a version out of their Workspace
So even though Workspaces give you plenty of wiggle-room in terms of organization and management, it doesn’t and shouldn’t eliminate the need to periodically discuss your version plans, and it definitely doesn’t remove the need for proper governance. So make sure everybody knows when new versions are created, so that they aren’t blind-sided by a version update!
7. Syncing a Workspace with an updated Latest Container Version
Let’s say you’ve decided to start your work for the day, and you fire up GTM. In the Overview screen, you see an alert that an update is required!
There’s also the bar at the bottom of the page prompting you to update the Workspace, too.
When you select to Update the Workspace (i.e. sync the changes with the Latest Container Version), a new overlay appears:
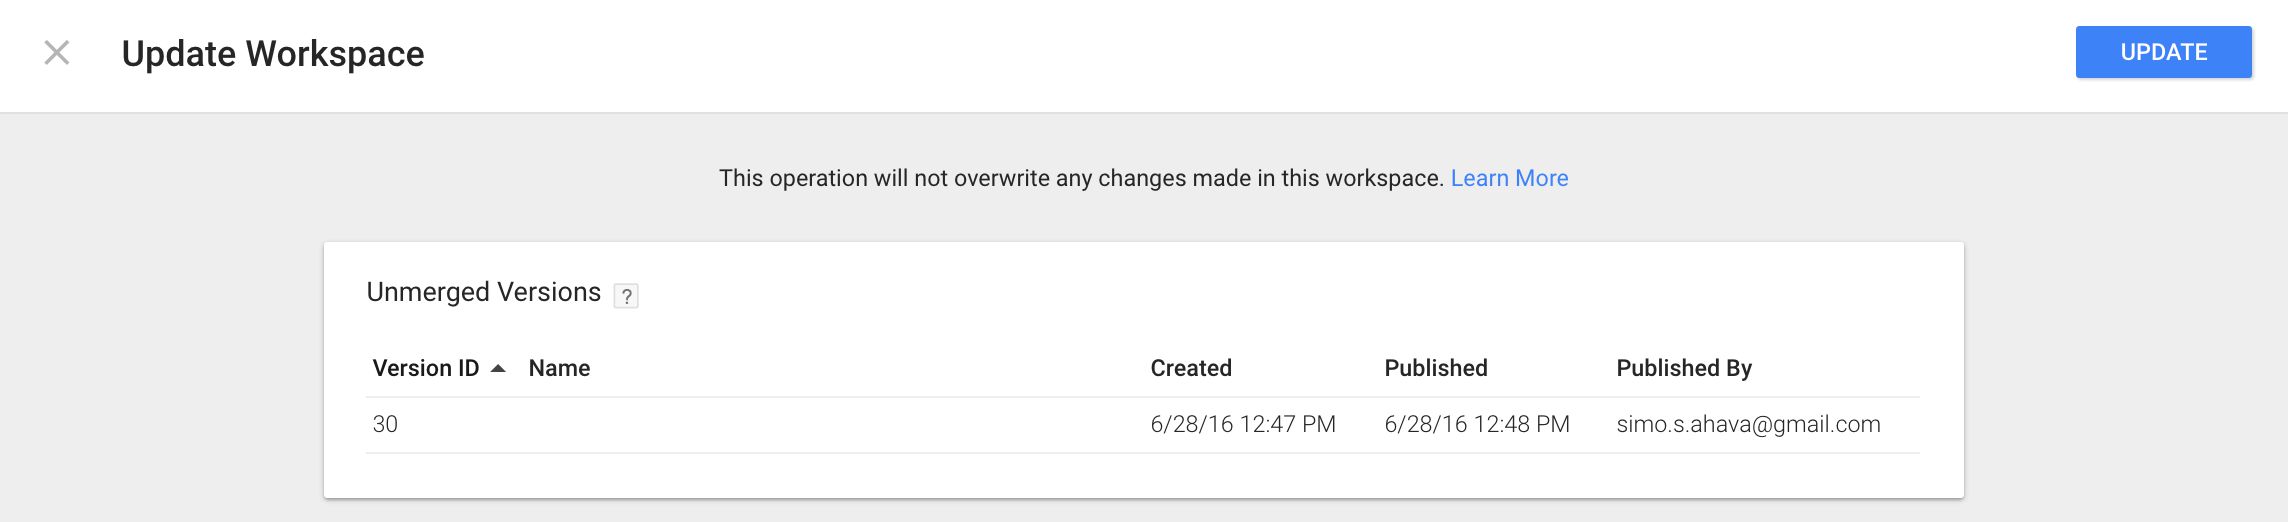
Here you’ll see which Versions need to be synced to the Workspace. So there might be multiple versions listed here, if there has been more than one update to the Latest Container Version since you’ve created the Workspace.
Remember that updating the Workspace isn’t necessary right away. You can keep on working on your changes, only merging the changes from the Latest Container Version once you’re ready to create a version out of your Workspace. Nevertheless, it’s a good idea to do periodic merges, since the further away you diverge from the Latest Container Version, the more conflicts will arise once you do decide to go ahead with the merge.
Anyway, when you select to Update the Workspace due to changes in the Latest Container Version, your Workspace files will be updated to reflect the modifications to the Latest Container Version. In other words, the very foundations of what you’ve been working on might have changed. It’s a good idea to closely research the Latest Version in the Versions view, so that you’ll know if any of the assets you have dependencies with have been changed.
8. Resolving Conflicts in Workspaces
Let’s say you did all the steps in the previous chapter, and happily clicked UPDATE to sync your Workspace with the Latest Container Version.
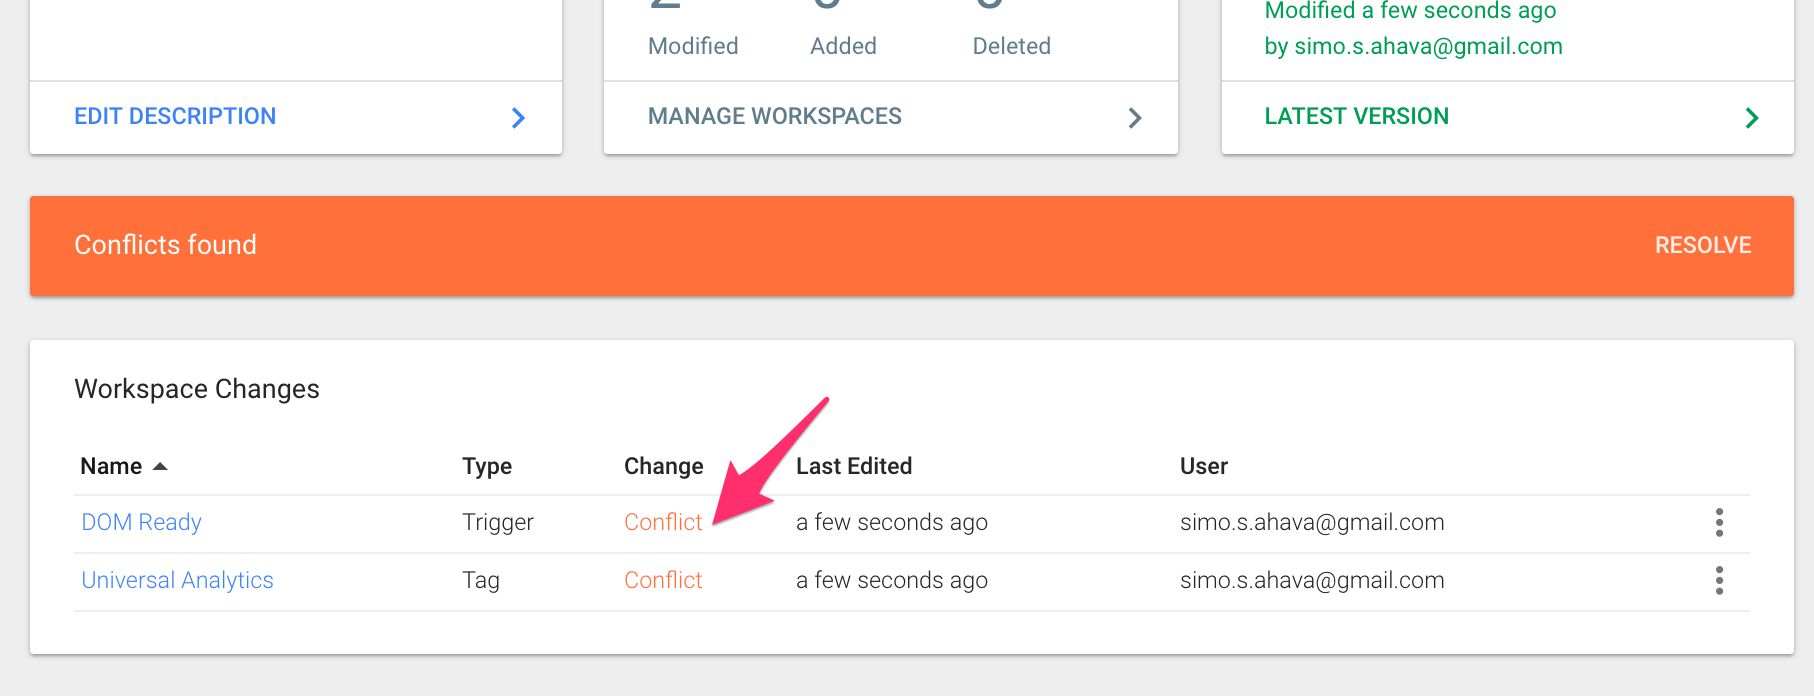
But something’s wrong, and a big, ominous, orange bar pops up in the screen, telling you that there was a conflict!
A Conflict arises when a Tag, Trigger, or Variable was changed in the Latest Container Version, and you have also modified that same item in your current Workspace. For you to be able to synchronize your Workspace with the Latest Container Version, you will need to resolve each conflict either in favor of the Latest Container Version or your Workspace. You can see which items are in conflict by looking at the list of Workspace changes in the Overview screen. This is, again, a typical way to deal with branches in version control.
By clicking the RESOLVE button in the orange bar, you’re taken to the conflict resolution screen. So let’s take a closer look at that:
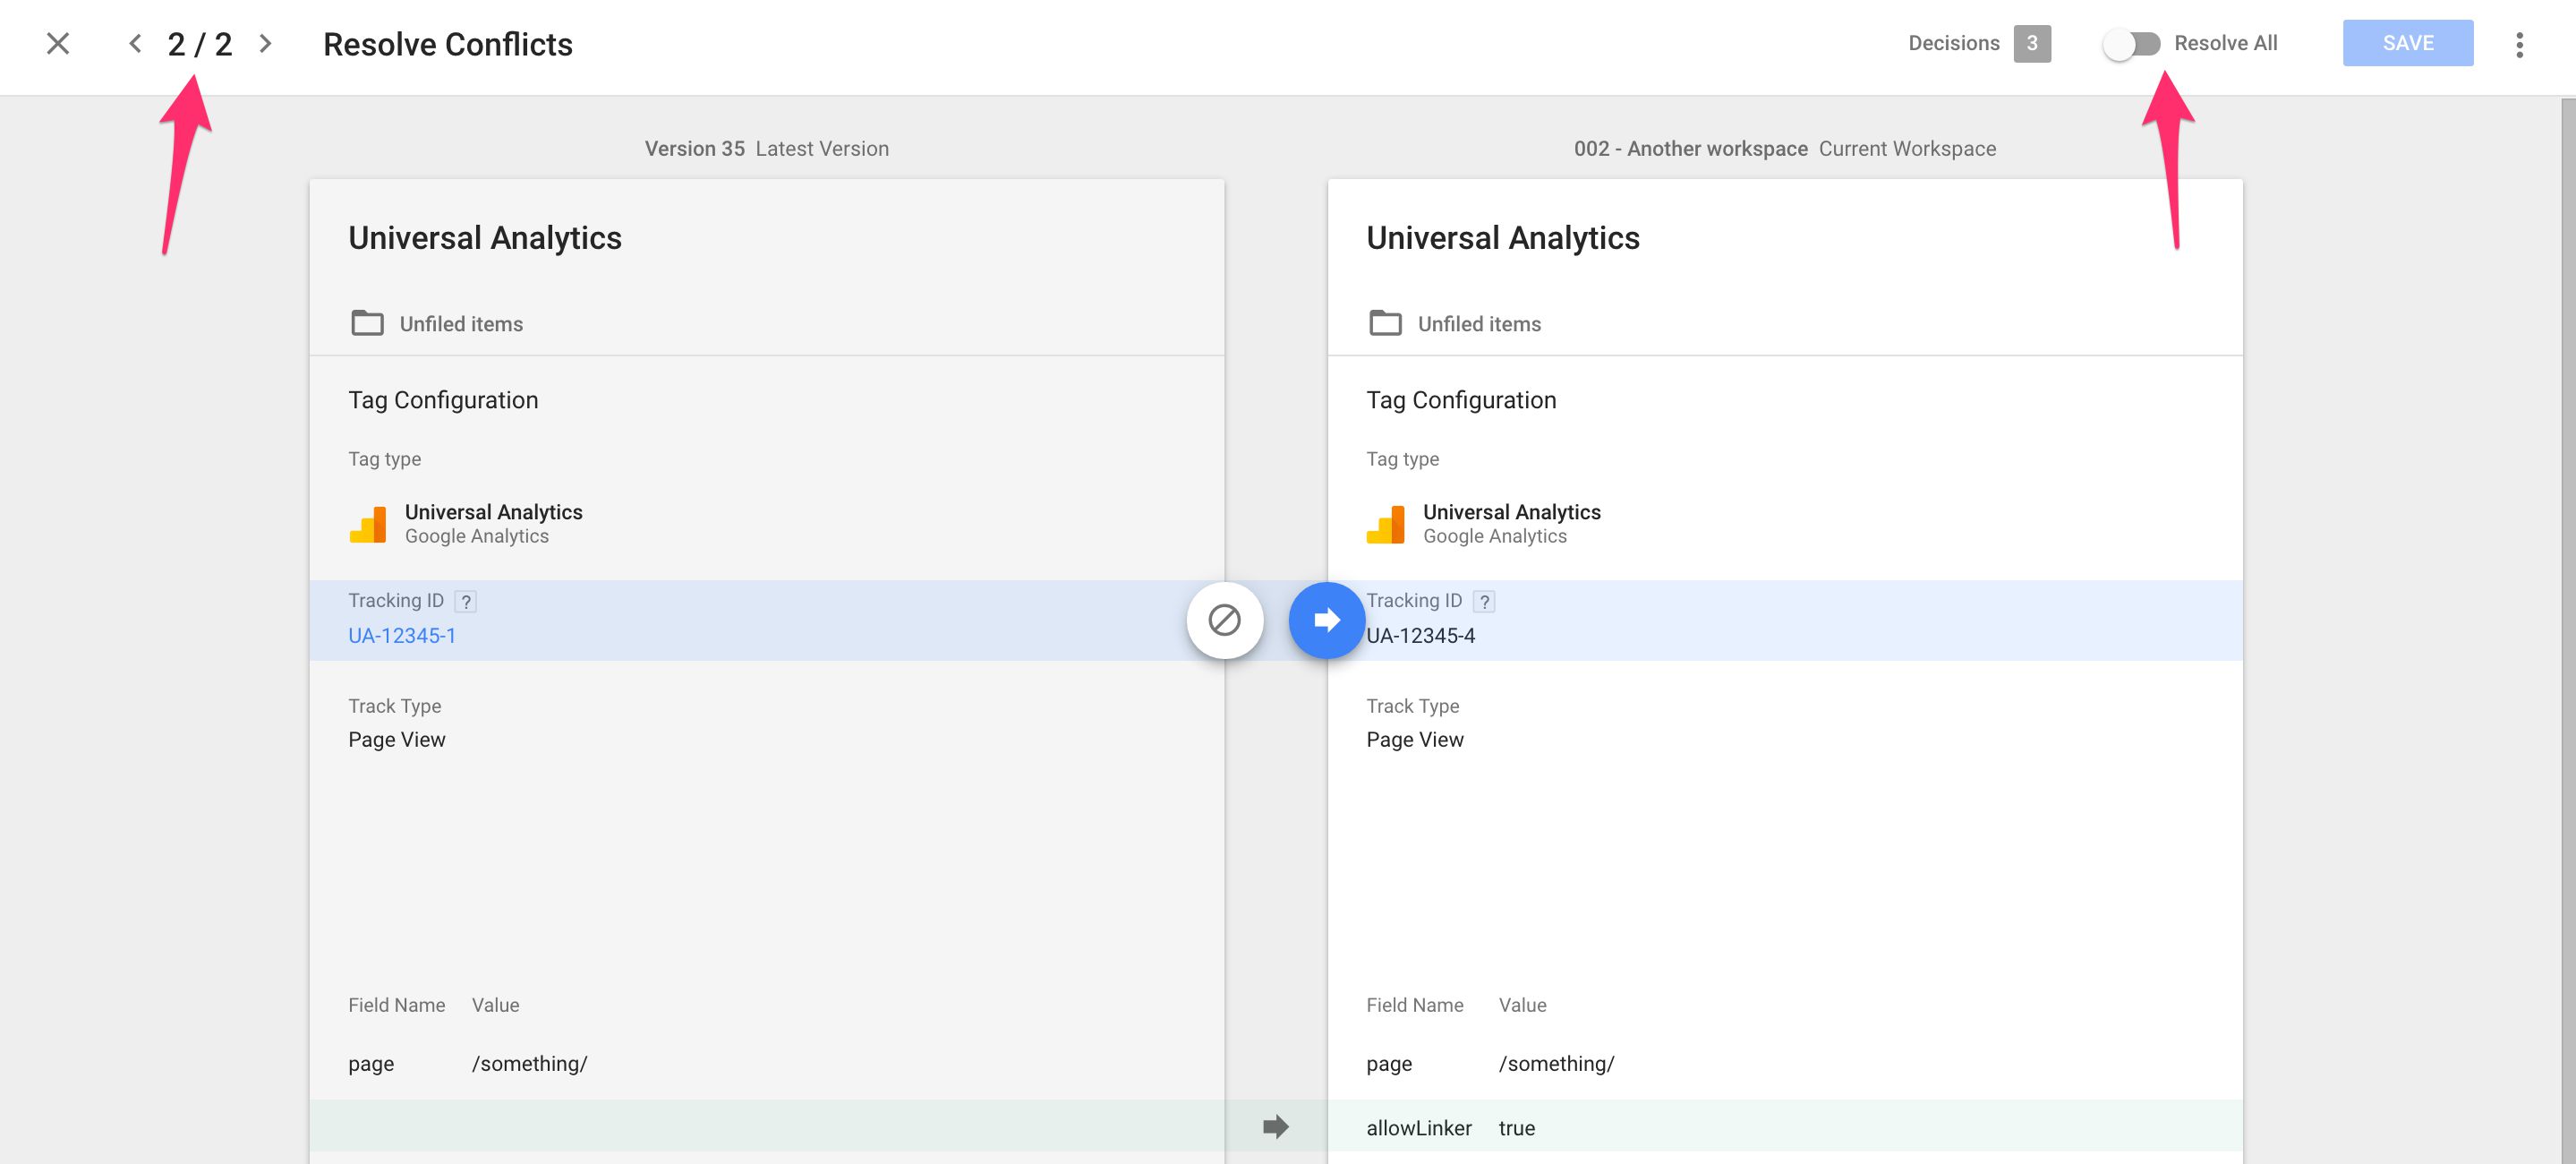
Conflict resolution is very similar to the View Changes interface I introduced earlier. Basically, each change is color-coded:
Blue for items you’ve modified in your Workspace
Green for items that you’ve added to the Workspace
Red for items that you’ve removed from your Workspace
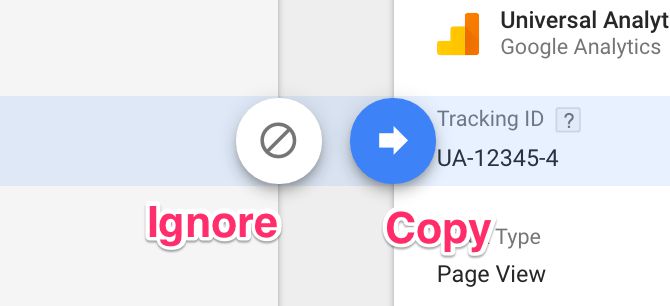
You can click the arrow by each conflict to choose whether to IGNORE the conflict (resolve in favor of your Workspace) or to COPY the change (resolve in favor of the Latest Container Version). In other words, if you click the COPY icon, the state of the field in the Latest Container Version will overwrite anything you had modified in your Workspace.
You can change from item to item in the top left of the screen, where you can see something like < 1 / 4 >, which would signify that there are altogether four assets (Tag, Trigger or Variable) with conflicts, and you’re resolving the first one.
When you click SAVE, any conflict resolutions you have made will be saved, and they will no longer appear as conflicts. So make sure you have it right before clicking the button! It’s always nasty if your hard work is overwritten due to misunderstanding what change is being overwritten.
In the top right corner, the number of Decisions marks the number of conflicts you still need to resolve in the currently open asset. The number goes down as your resolve the conflicts.
By clicking Resolve All, you resolve all remaining conflicts in the current asset in favor of your Workspace. You can always click the toggle again to reset your decisions, and you can click each individual conflict to roll back the clock, too. Just remember that clicking SAVE really saves your decisions.
Yes, the interface can be quite intimidating, and conflict resolution can be quite a chore, especially if there are many items. However, this is a vast improvement to the complete blind-groping we used to have with Google Tag Manager. Finally there’s transparency to the changes made in a container.
Again, remember that you don’t have to resolve conflicts or even update your Workspace the minute you see the alert. You can keep on making your changes as you wish. You’ll only need to resolve the conflicts before you want to Create a Version or Publish your Workspace. Nevertheless, it’s a good idea to get it out of the way as soon as possible, so that the changes don’t pile up.
9. New Workspace-related user permissions
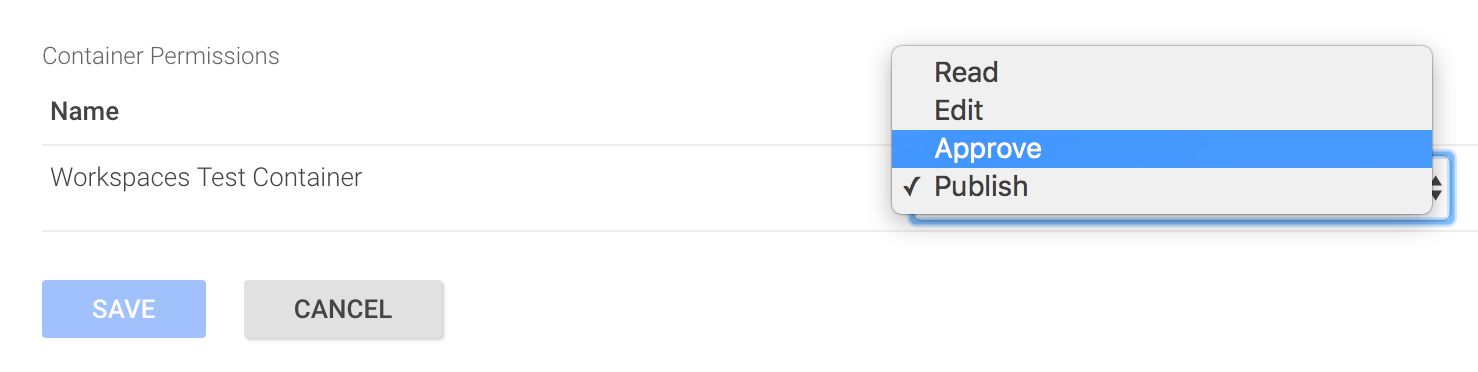
If you browse over to Admin / Container / User Management or Admin / Account / User Management, you can see some changes to the Container user permission levels. The new levels are:
View - Read-only access to the container
Edit - Can create and edit Workspaces, but can’t Create Versions or Publish them
Approve - Can Create Versions of Workspaces
Publish - Can Publish Workspaces
Basically, the Approve level is what Edit used to be, and the Edit level is completely new, allowing the user only to edit items in the Workspace, but nothing else.
The reason for this extra level of user access is simple: Creating a Version has new significance in Workspaces. It updates the main “branch” of the Container, prompting all active Workspaces to update with the changes. In other words, Creating a Version from a Workspace with sloppy code, or without being aware of the requirements of other Workspaces, can, at worst, result in major conflicts once the other Workspaces are updated.
10. Summary
I really, really love the feature (big surprise). Especially being able to view changes you’ve made on a granular level, and being able to compare between the Latest Container Version and your current Workspace is huge in allowing multiple users and teams to interact in the same Container.
Indeed, what Workspaces bring to the table will certainly alleviate friction in any organization using GTM. Just remember that you don’t have to use Workspaces. In fact, it might be best to restrict them to small, incremental changes only. The reason for this is that they still rely on the Latest Container Version, and the longer you work on a Workspace, the further it can deviate from the main version. Having to periodically sync the Workspace isn’t fun, either.
A good idea would be to work on features small enough that you can Create a Version from the Workspace without having to worry about it creating havoc in other Workspaces. And this is where the restriction of “just” three Workspaces in free GTM comes into play. Having so few Workspaces available forces you to be extra efficient when modifying the container. I was never a fan of implementations, where you create a zillion new things, and only then Create a Version or Publish the Container. It always resulted in a difficult traceback, if there were issues with the implementation. With only a handful of Workspaces available, and with the conflict resolution step initiated by a Latest Container Version update, you will have to be efficient and aware of what’s going on in the whole Container, and not just your own little corner of it.
A natural extension of this would be user-specific access to Workspaces themselves, but whether this is something that’s coming or not is known only by the GTM developer team.
Anyway, I don’t want to dole out any best practices (not my thing), but my suggestion is to be careful with Workspaces, even if they do bring a lot of great stuff to the table. They still won’t patch up a sick organization, nor will they miraculously improve your work in large projects with multiple stakeholders all wanting a piece of Google Tag Manager.
Communication and good governance will always rule over any feature update. If anything, Workspaces just makes this ever so much more important.