Custom Templates Guide For Google Tag Manager
Last updated 12 August 2020: Added details about server-side tagging.
As I have finally managed to pick up my jaw from the floor, it’s now time to tell you what’s got me so excited. Google Tag Manager recently released a new feature called Custom Templates. Actually, it’s not fair to call it a feature. It’s a full-blown paradigm shift in how we use Google Tag Manager. It’s a suite of features designed to help brands, companies, and users create and share their own custom JavaScript and HTML setups with ease, while taking care that the code is optimized for delivery in the web browser.
Custom Templates, in short, are tag, variable, and Client templates that you can create and configure. In other words, if you have a cool idea for a tag (e.g. an analytics tracking tag for a vendor not natively supported by GTM), a variable (e.g. a Custom JavaScript variable that does something with a string), or a Client (e.g. a server-side endpoint for some new analytics tool), you can now turn them into reusable templates which can, in turn, be shared with other users and containers via template export and import. You can also use the Community gallery to distribute your templates.
Templates use a customized, sandboxed version of JavaScript, which has its own idiosyncratic vernacular that you must learn (with the help of this guide, of course). The reason for this added complexity is that with templates you can ensure that the code being executed is safe, unintrusive, and optimized.
Furthermore, templates you create will define certain permissions that are required for the template code to be able to run. An additional level of governance is provided by way of policies defined on the web page itself where the template code might be run. The interplay between these permissions and policies is a core feature of template security.
There are lots and lots of things to cover in this guide, so let’s just get started.
Table of Contents
The Simmer Newsletter
Subscribe to the Simmer newsletter to get the latest news and content from Simo Ahava into your email inbox!
How to read this guide
This is a long guide. It has to be - there’s so much about custom templates that needs to be addressed in any document whose purpose is to provide a comprehensive treatment of the subject matter.
However, don’t interpret my inability to write concise prose as indicative of how complex custom templates are. I can assure you - they’re absolutely manageable by anyone who’s been using Google Tag Manager for a while.
This guide is a reference. Its purpose is to offer you documentation to support your work with custom templates.
Because of this, I want to suggest some different ways to approach this guide.
Everyone should read the chapters Custom Templates in a nutshell and Core concepts.
I really recommend that everyone take a look at the two walkthroughs in the Getting started chapter.
Keep the Official documentation handy at all times, particularly the API references for web templates and for server-side templates.
When working with templates, the Fields editor (with a deep-dive into Field configurations) chapter should be very useful - same as the one on Permissions.
If you’re a site admin, you might want to read through the Policies reference to get an idea of how you can further restrict the execution of custom code on your site.
If you suffer from insomnia, start from the beginning and don’t stop until you fall asleep. Should happen by the 10,000 word mark.
Be sure to check out my other guide on how to create a Facebook pixel template - it should shed more light on how templates work. You can also check the corresponding video if you prefer watching rather than reading.
You can also view all the custom templates I have created and/or collected in this GitHub repository and in the Templates section of this site.
Custom Templates in a nutshell
Google Tag Manager’s Custom Templates offer a way to build a user interface around the custom code you might want to run on the site using Google Tag Manager. The user interface is what you’ve come accustomed to when using GTM’s tags and variables. It comprises text input fields, settings, tables, labels, drop-down menus, and so forth.
Obviously, the UI itself is already a huge asset. Being able to offer a user interface in lieu of a complicated code block will minimize problems arising from input errors, and will help keep the code stable.
However, the templates have another, less apparent (but no less impactful) function. They add layers of protection and security to the code they abstract. Templates use a custom JavaScript framework which introduces a handful of APIs (application programming interfaces) that you must use if you want the code to actually do anything.
This introduces a steep learning curve, because you can’t just copy-paste code from Stack Overflow any more. If you want to set a global window property, you need to use an API for that. If you want to log to console, you need to use an API for that. If you want to check the value of a cookie, guess what, you need to use an API for that.
Basically any code that tries to access the global state of the page or run any native JavaScript functions defined on the global level requires an API call.
So why this added complexity? Well, for one, these APIs make sure that potentially dangerous and/or intrusive modifications to the global state are done in a controlled manner.
Whenever you want to use an API, you must require() it in the template code. And when you introduce an API like that, the template automatically generates a set of configurable permissions for that API call.

In a nutshell, templates encapsulate the logic you would otherwise introduce with custom code. By introducing APIs with permissions, the templates can be configured to work in a secure and easily managed context.
An added level of security is the introduction of policies, where you as the site owner can add some code to the web page itself, which can have additional levels of control over how template permissions are resolved.
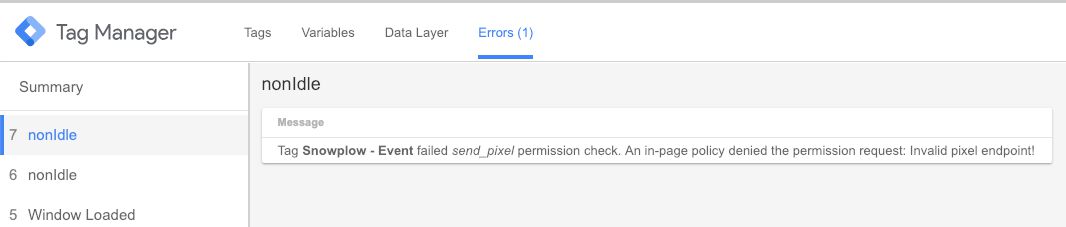
For example, if I have a tag configured to send hits to some endpoint, I can write a policy on the page that only allows pixel requests to one of the many endpoints configured in the tag.
window.dataLayer = window.dataLayer || [];
function gtag(){dataLayer.push(arguments);}

gtag('policy', 'send_pixel', function(container, policy, data) {
  if (data.url !== 'https://snowplow.simoahava.com/i') {
    throw('Invalid pixel endpoint!');
  } else {
    return true;
  }
});
With that policy in place, the image request will only be executed if the endpoint URL is https://snowplow.simoahava.com/i. Otherwise, the tag will fail in an error, and you can see the error message in the Errors tab of Preview mode.
An additional perk of using templates is that you don’t have to add the nasty unsafe-eval keyword to your Content Security Policy. Any code run through a template is compiled into JavaScript when the container is written, and thus doesn’t require the use of eval().
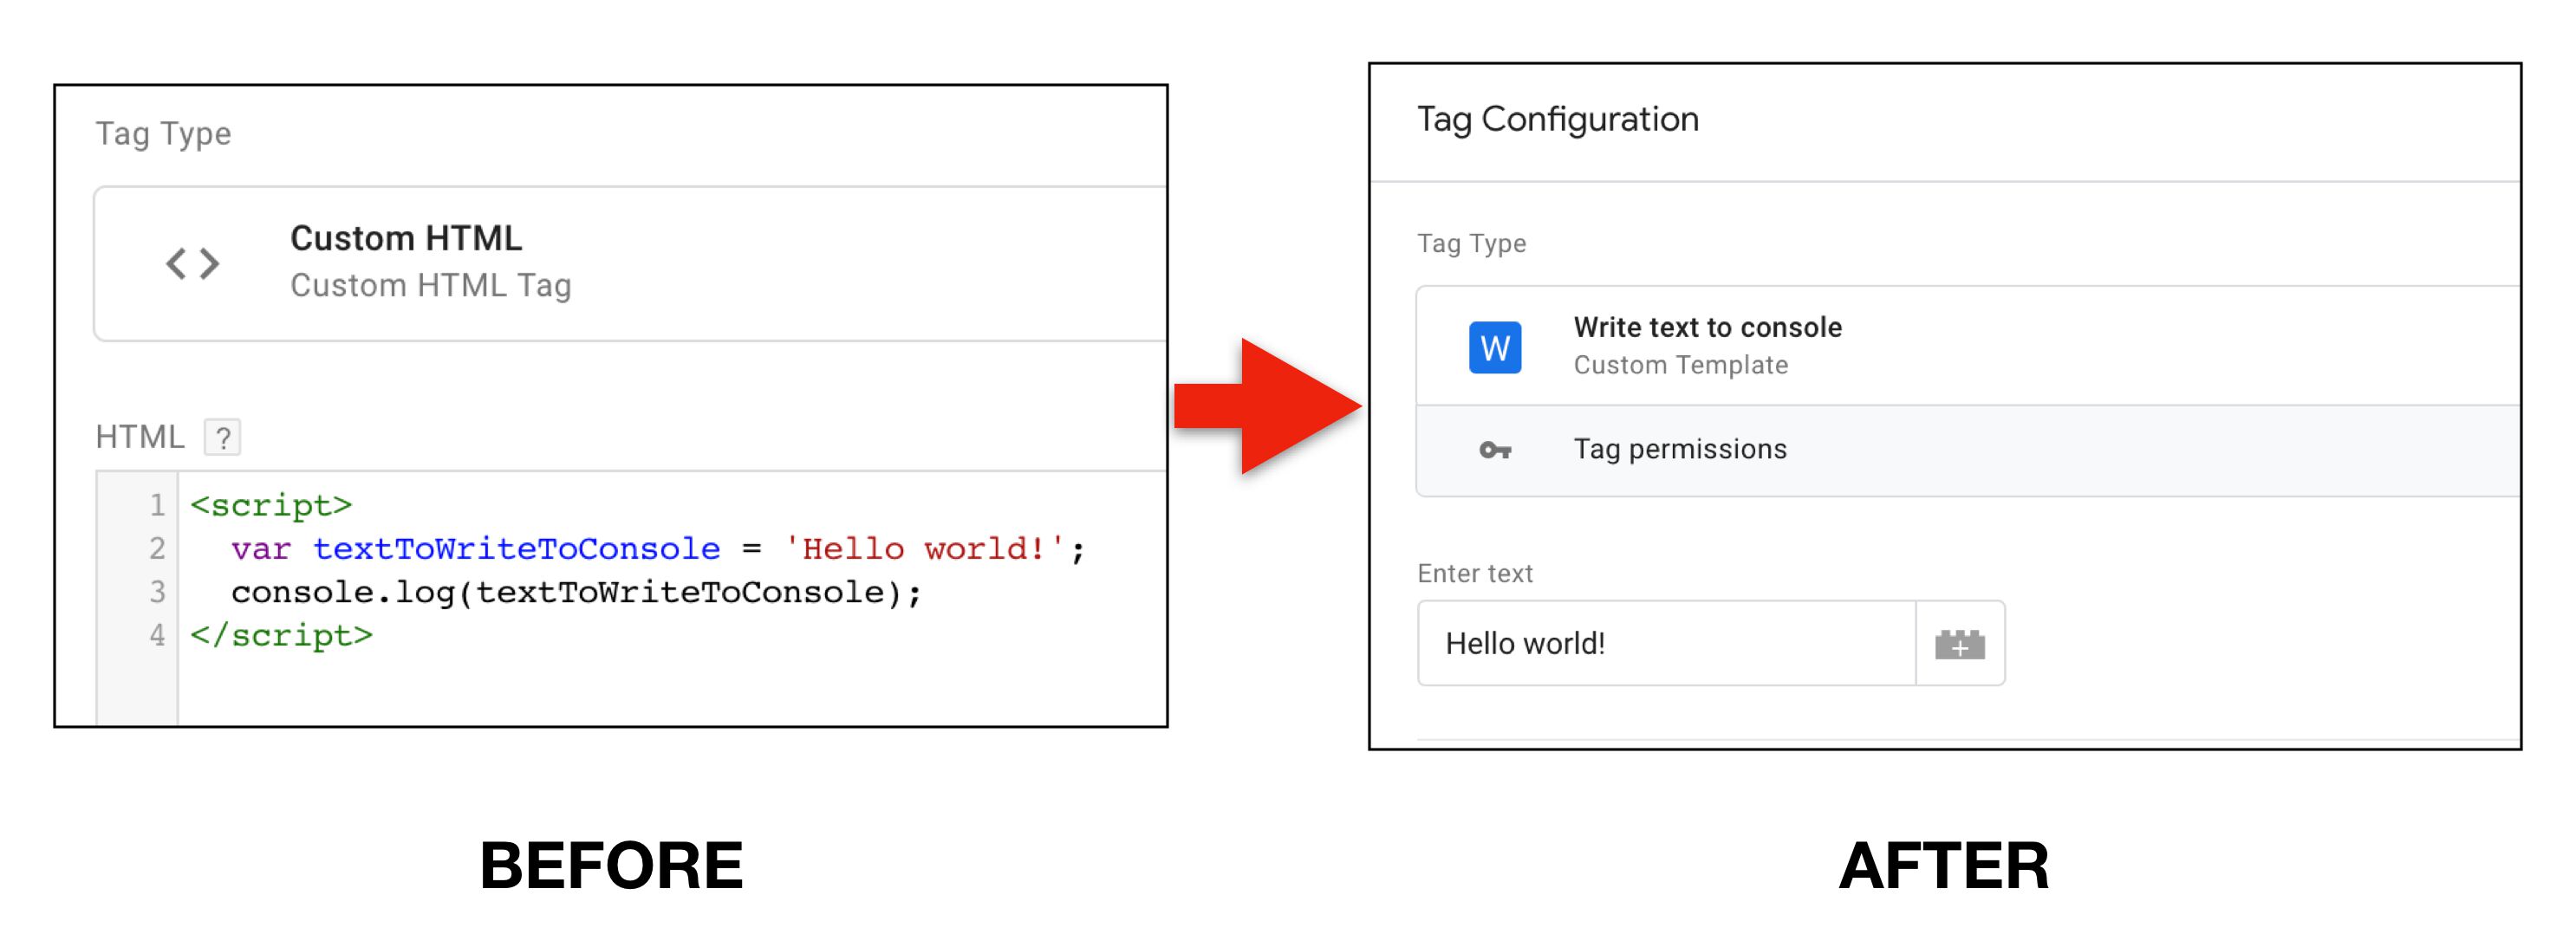
Conversely, with Custom HTML tags and Custom JavaScript variables, the code is written into a string which is then compiled with eval() at runtime. This is a bad practice and requires a huge compromise in security if using a Content Security Policy.
I hope you can see the usefulness of Custom Templates. Imagine a library of Custom Templates, where anyone can share their own work for others to download and use in their containers. Smaller brands and companies could finally get their tools and platforms out there for the masses using Google Tag Manager.
Update 2 October 2019: You no longer have to imagine such a library as it now exists. Check out the Community Template Gallery as well as my introduction to it.
Getting started
Before exhausting you with all the details about custom templates (and trust me, there’s a lot to digest in the feature), I want to start by walking you through creating a tag template and a variable template. We won’t use all the most complex features for this, but it should serve as a nice intro to how custom templates work in Google Tag Manager.
Be sure to check out this guide for a walkthrough of building a Client template for server-side tagging.
Don’t forget to check out my other article, which covers the creation of a Facebook pixel template. It should provide a more comprehensive (and more overwhelming) look at how templates are created.
Tag template walkthrough
In this walkthrough, we’ll go through how to create a simple script injection tag. This is how many of the third-party vendors out there want their scripts to be loaded.
We’ll use a wonderful company called Conductrics as an example. They have developed a tool with which you can do A/B-testing and personalization, using ML-driven targeting logic, dynamic goals, server-side and client-side deployment options, and a whole host of other features to help you answer those difficult business questions you have with data.
Note! You can of course replace the Conductrics-specific stuff with some other vendor source URL, if you want. The steps you take in this guide would still be identical.
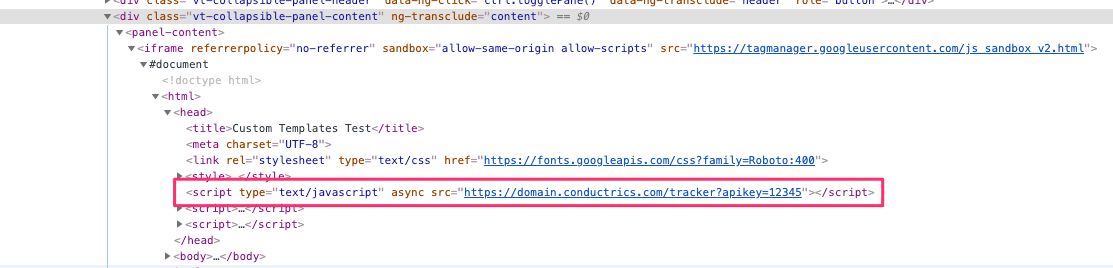
The tag template is simple, by design. Conductrics offers the option to host the required JavaScript for you, so all you need to do is add the <script> tag to the page that loads the JavaScript library from Conductrics’ server.
However, I’ve added some UI sugar to make the setup slightly more interesting.
Basically, all templates comprise four components:
The details, which determine the template name, logo, and description.
The user interface, which governs the fields and field configurations the template has.
The code editor, which makes use of whatever the user input into the fields to run the actual template code.
Permissions, which determine what type of code can be run by the tag.
We’ll walk through each of these steps here.
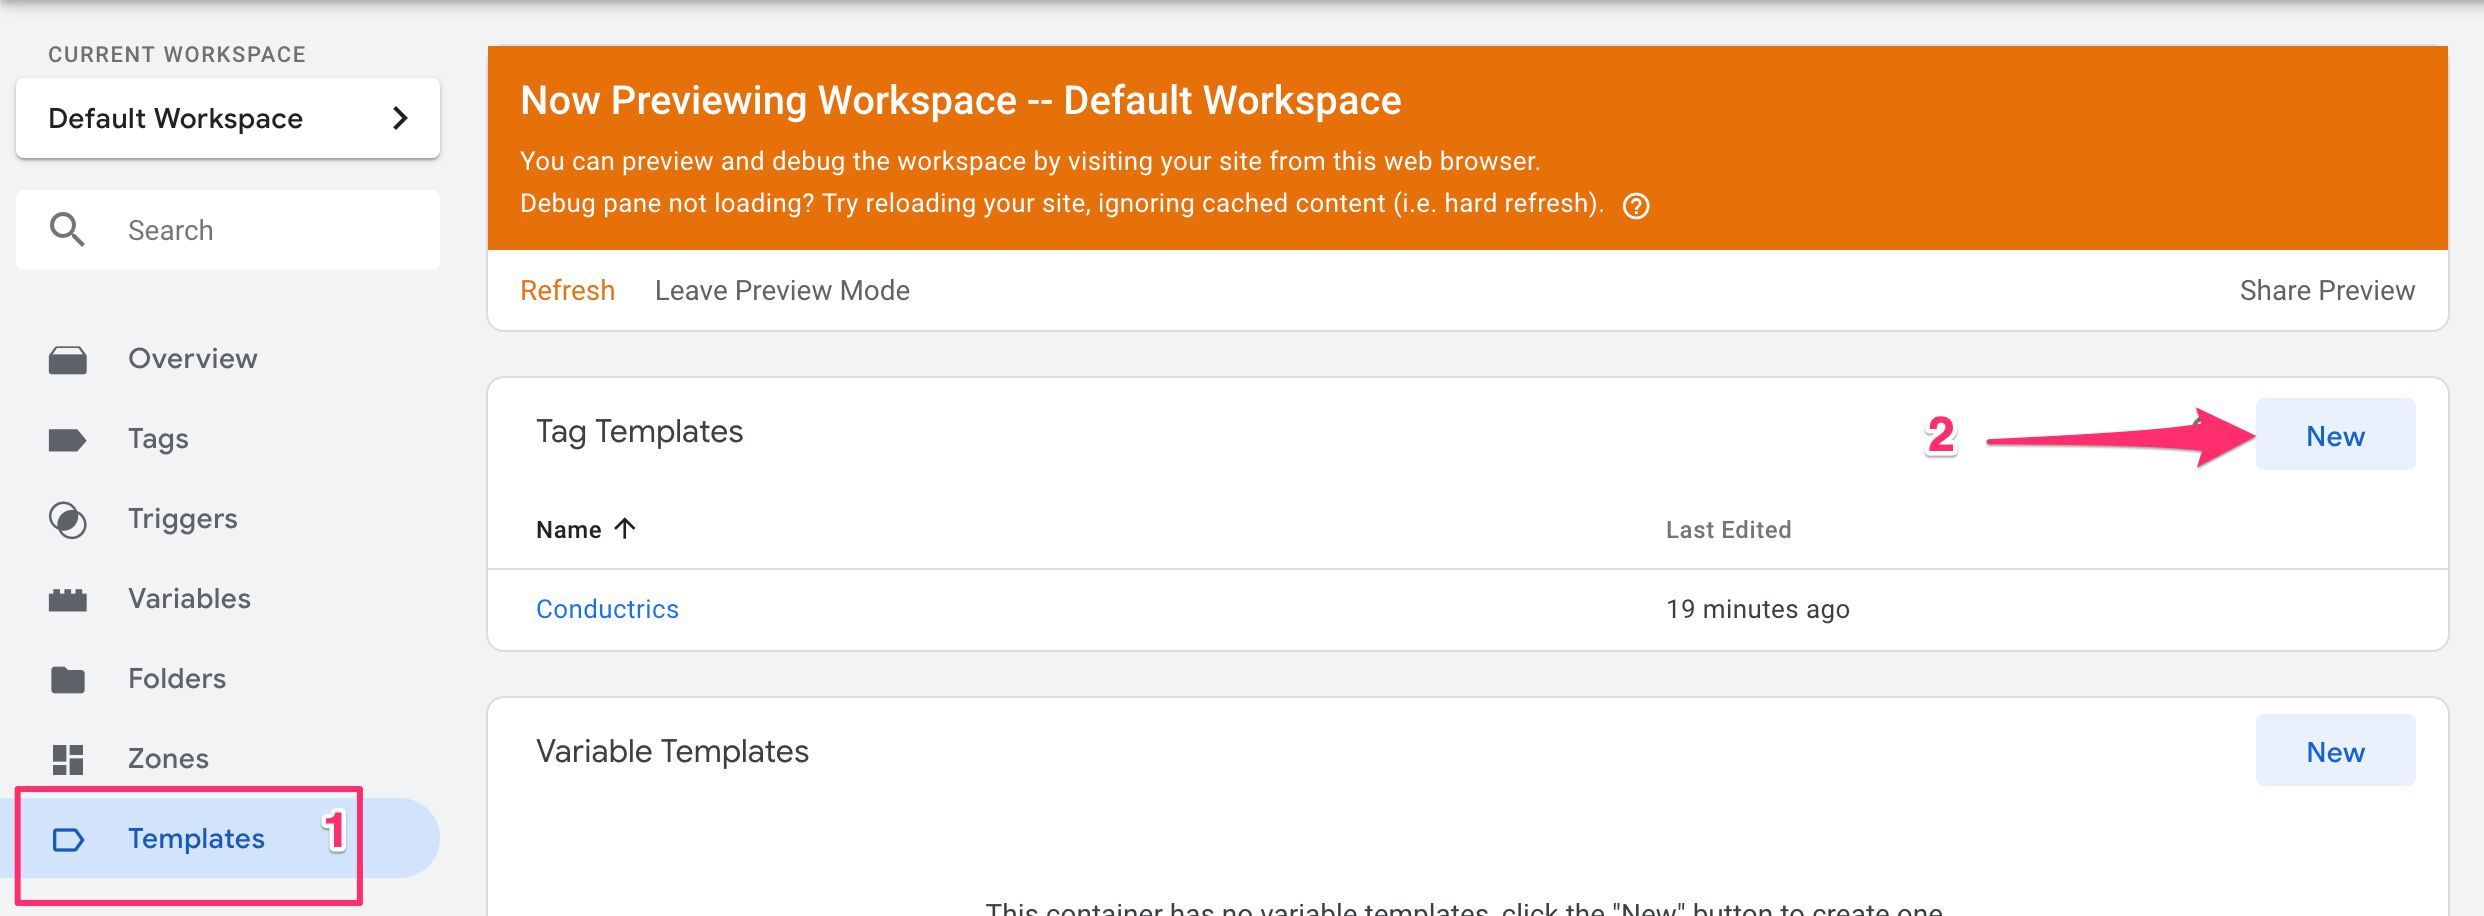
Step 1 - Create and set the details of the tag template
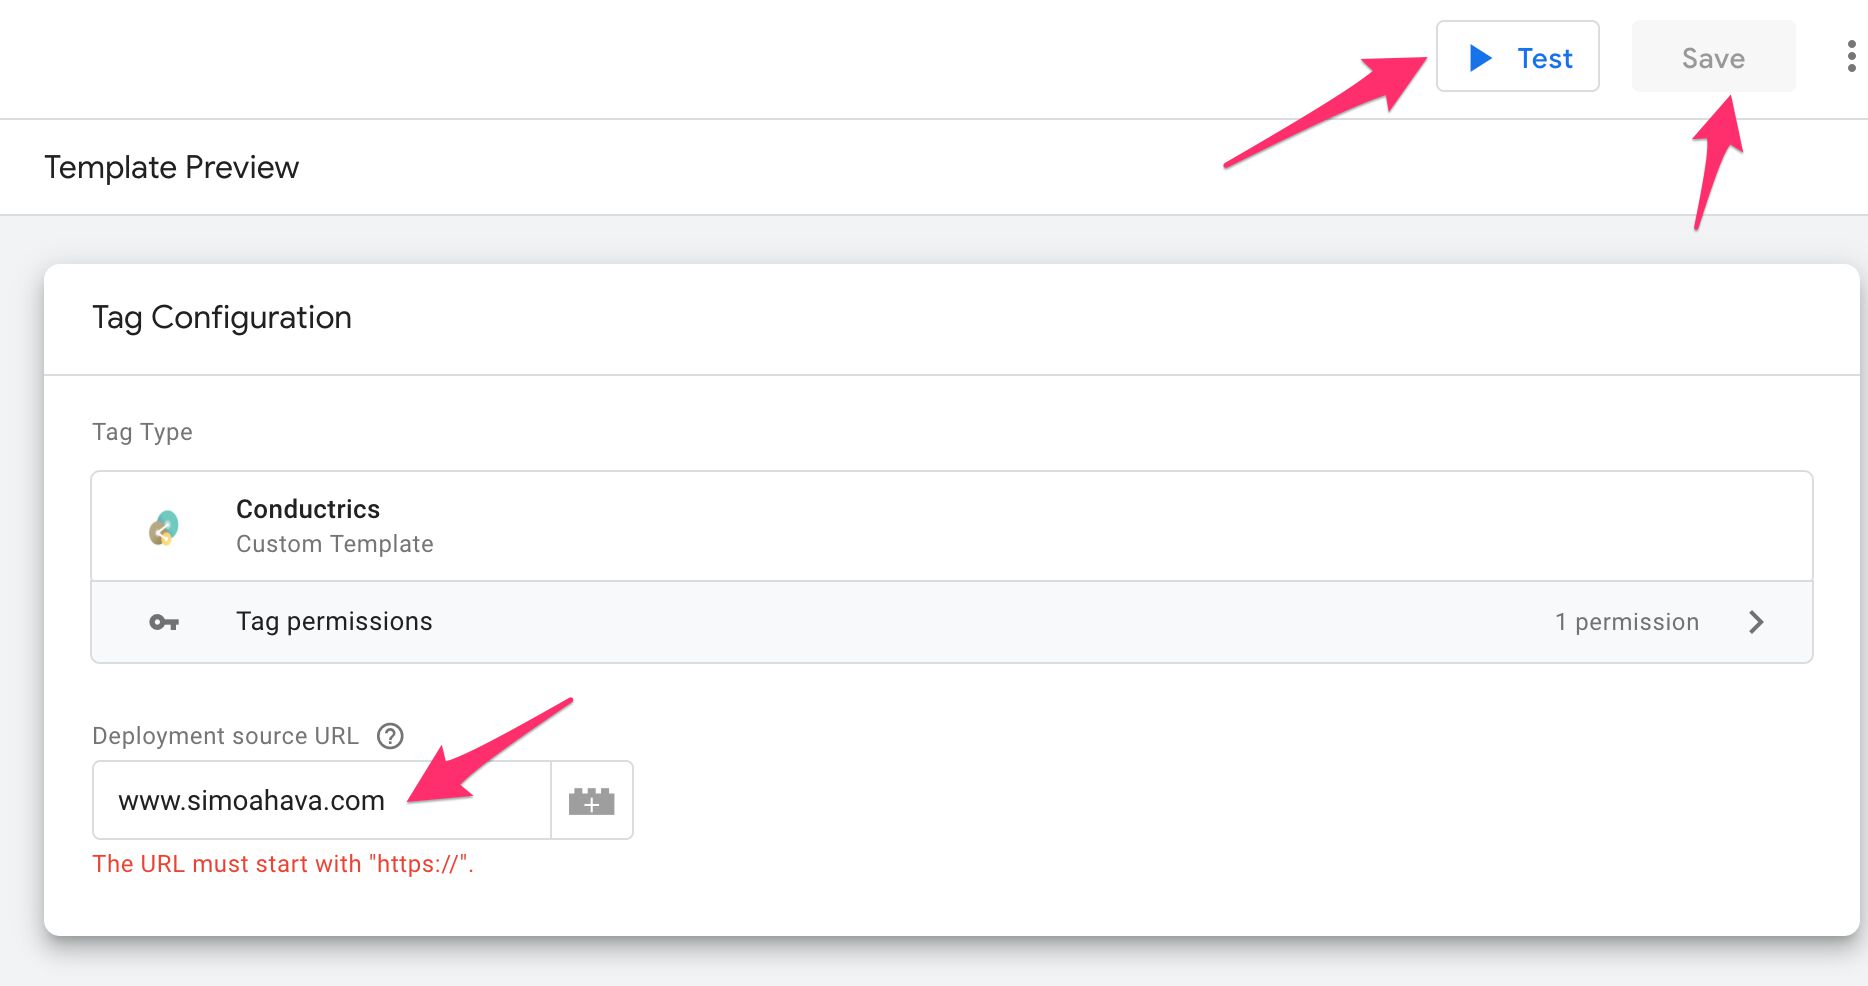
The first thing you need to do is create a new tag template:
Next, fill in some details. For the image, I used the logo created by Conductrics’ brand designer Joshua McCowen.
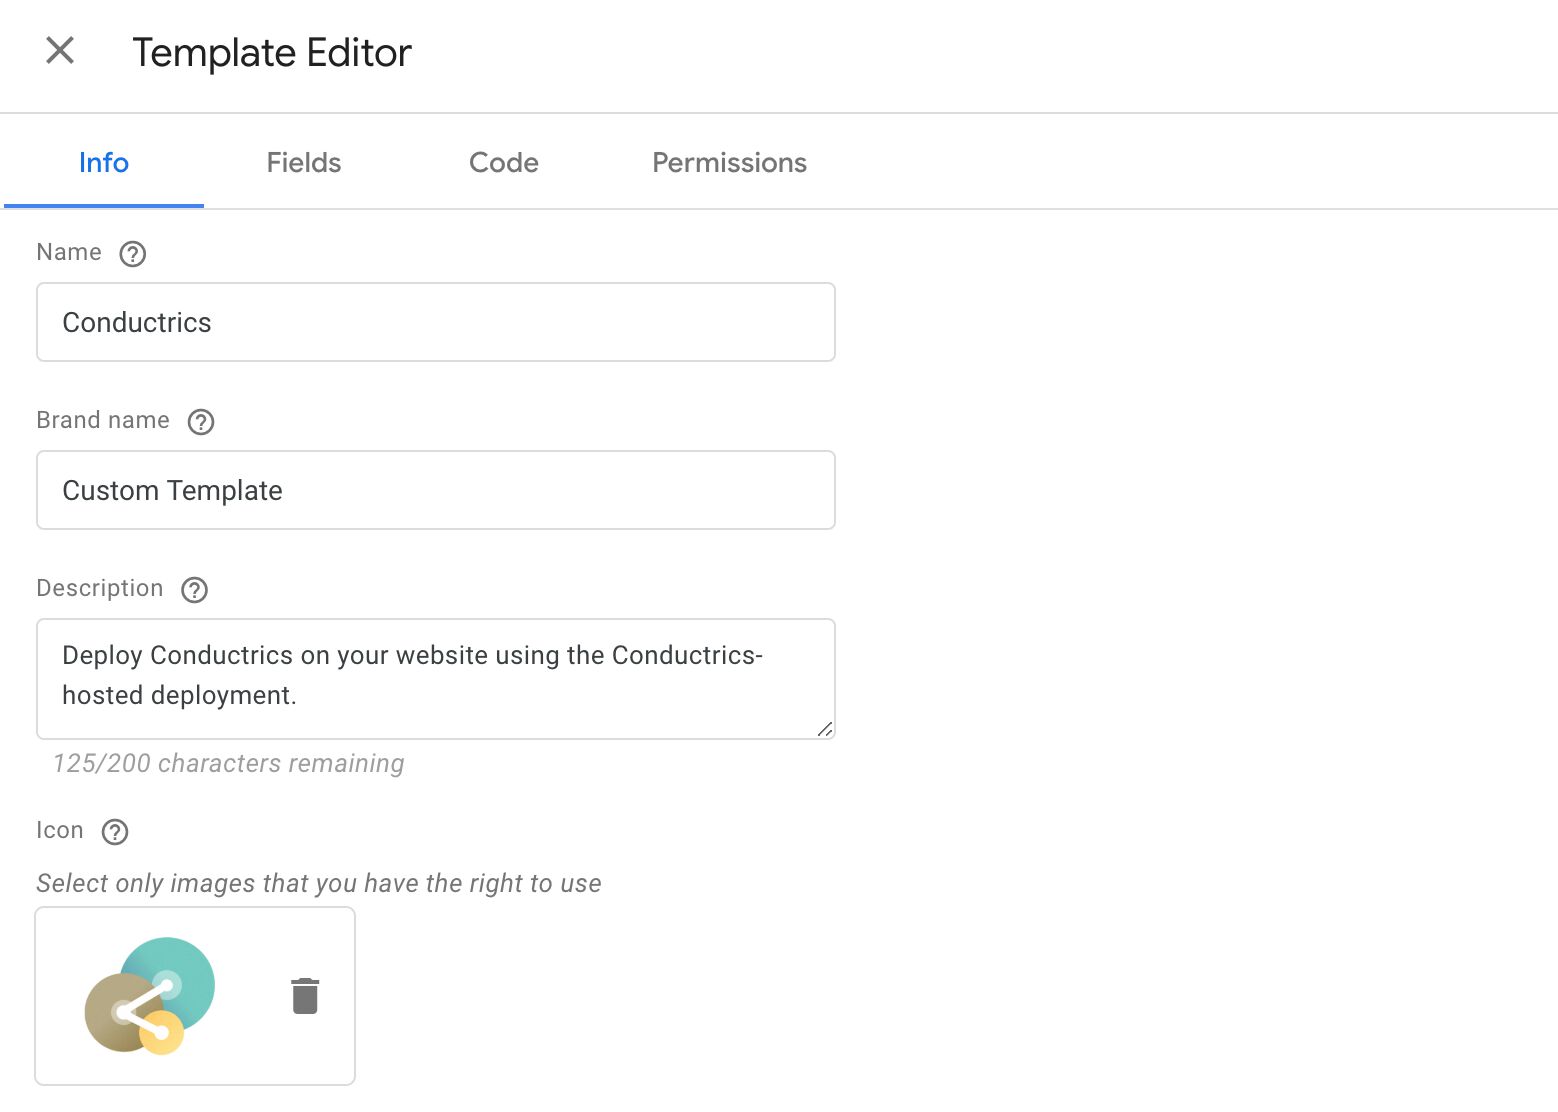
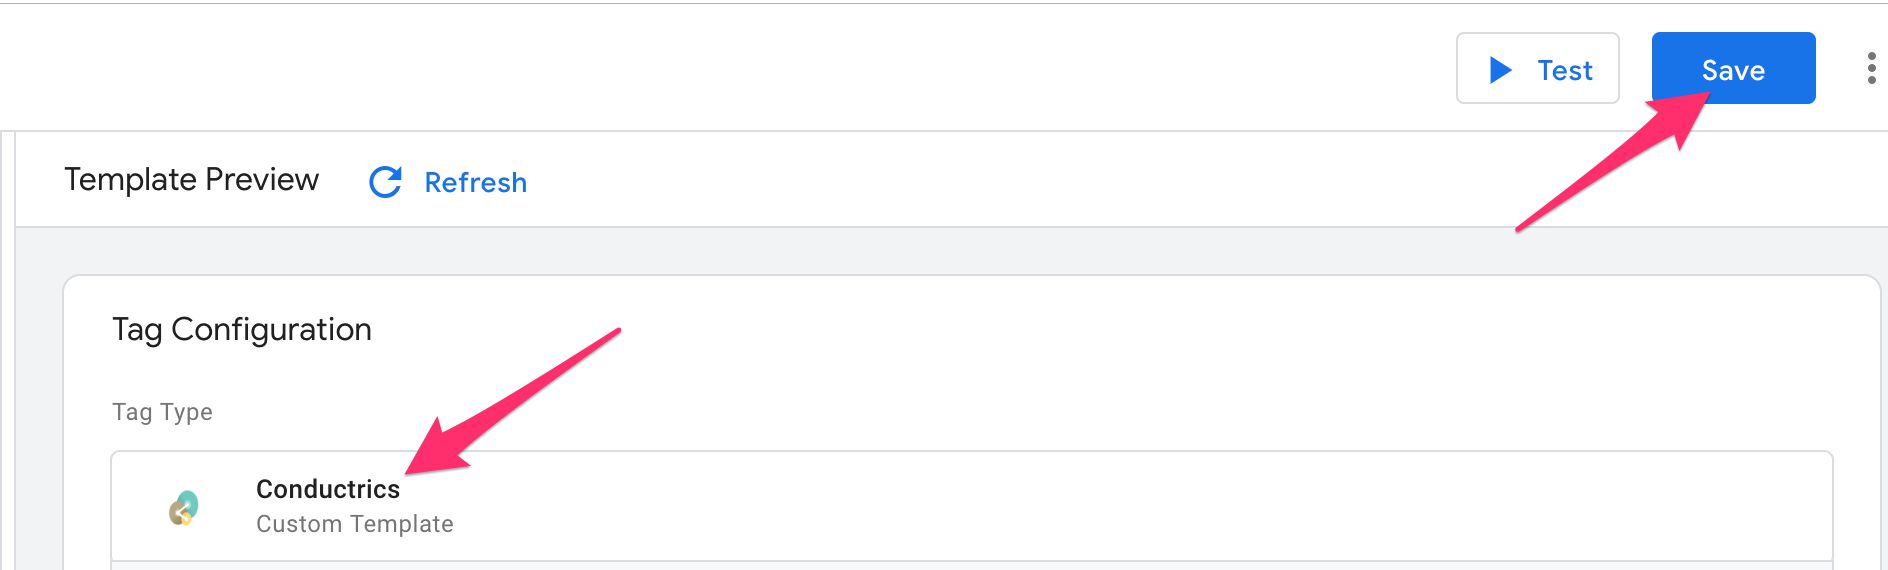
You can Save the template by clicking the respective icon in the top-right corner now. You should see the logo and the template title in the preview window.
There! Almost done. Well, not quite.
Step 2 - Create the UI
Now we need to create the bells and whistles of the tag’s actual user interface.
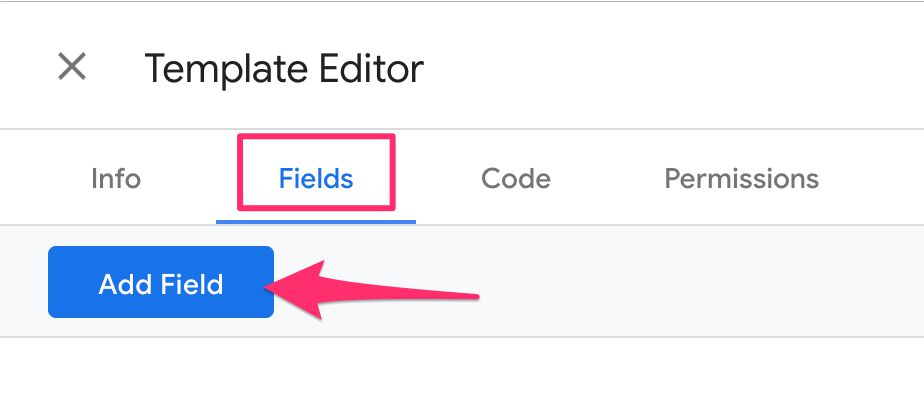
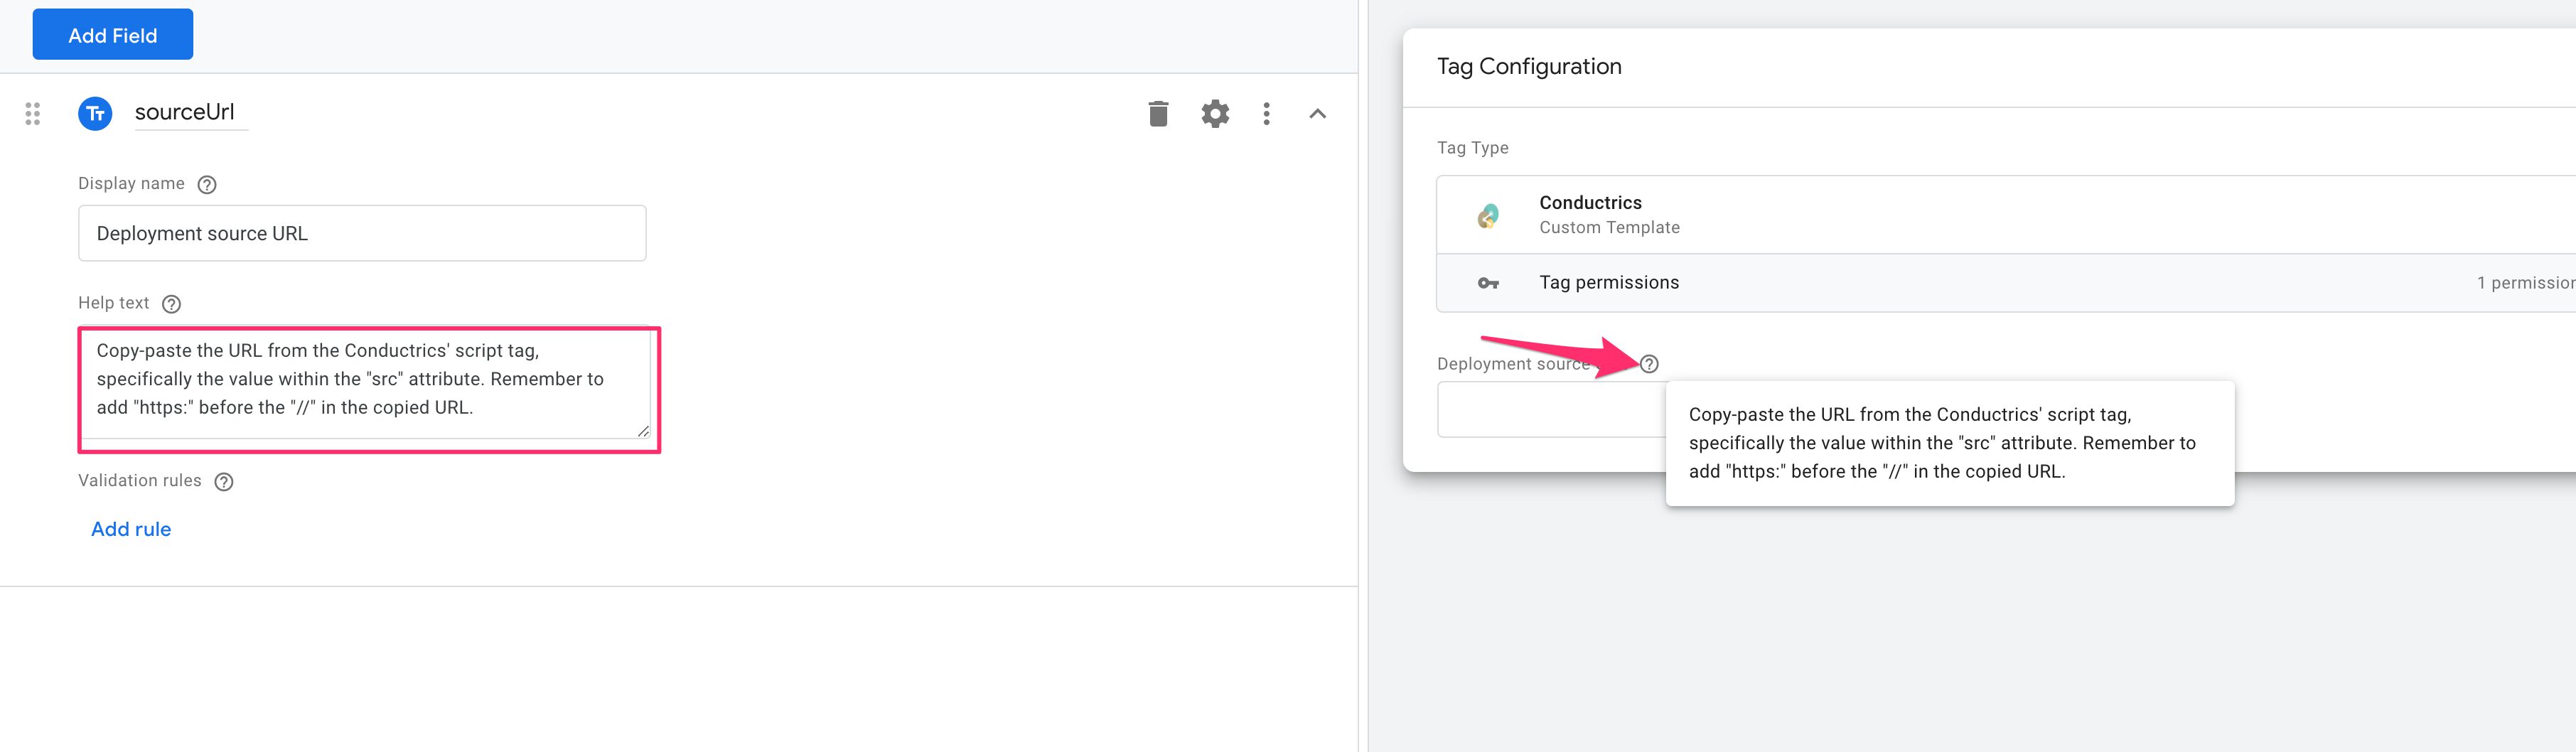
First, click the Fields tab to open the Fields editor. Then, click the blue Add Field button.
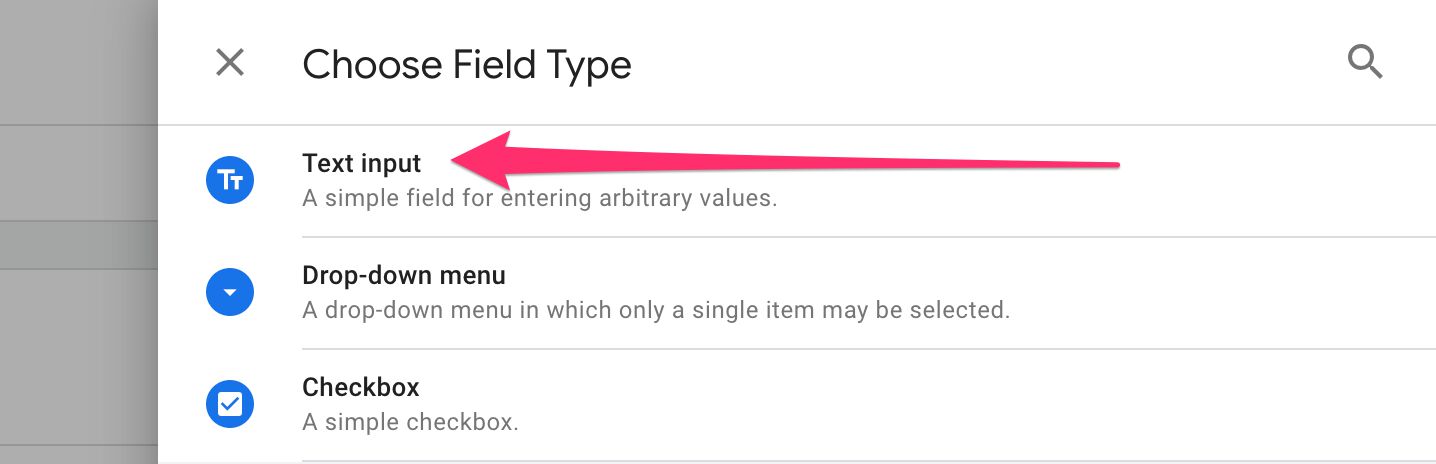
In the overlay that opens, select Text input.
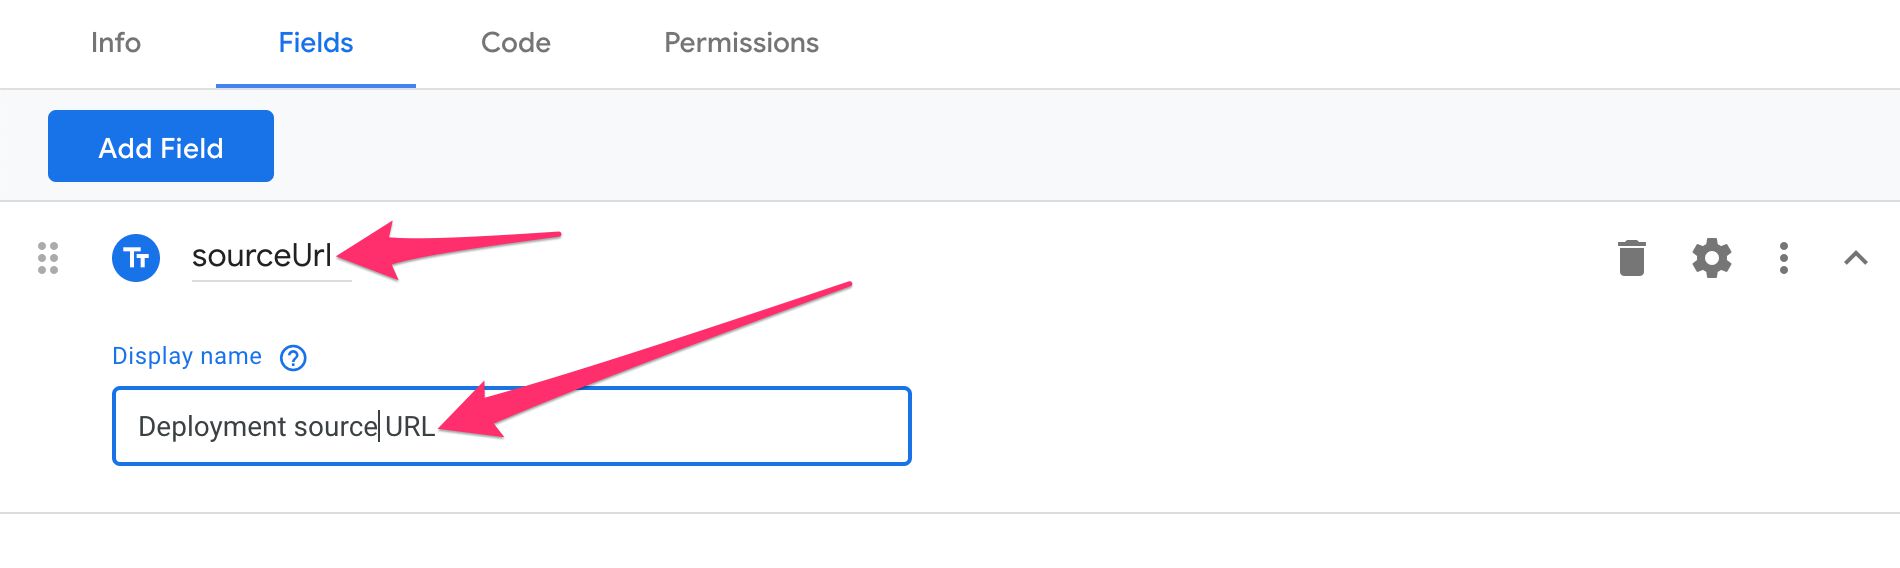
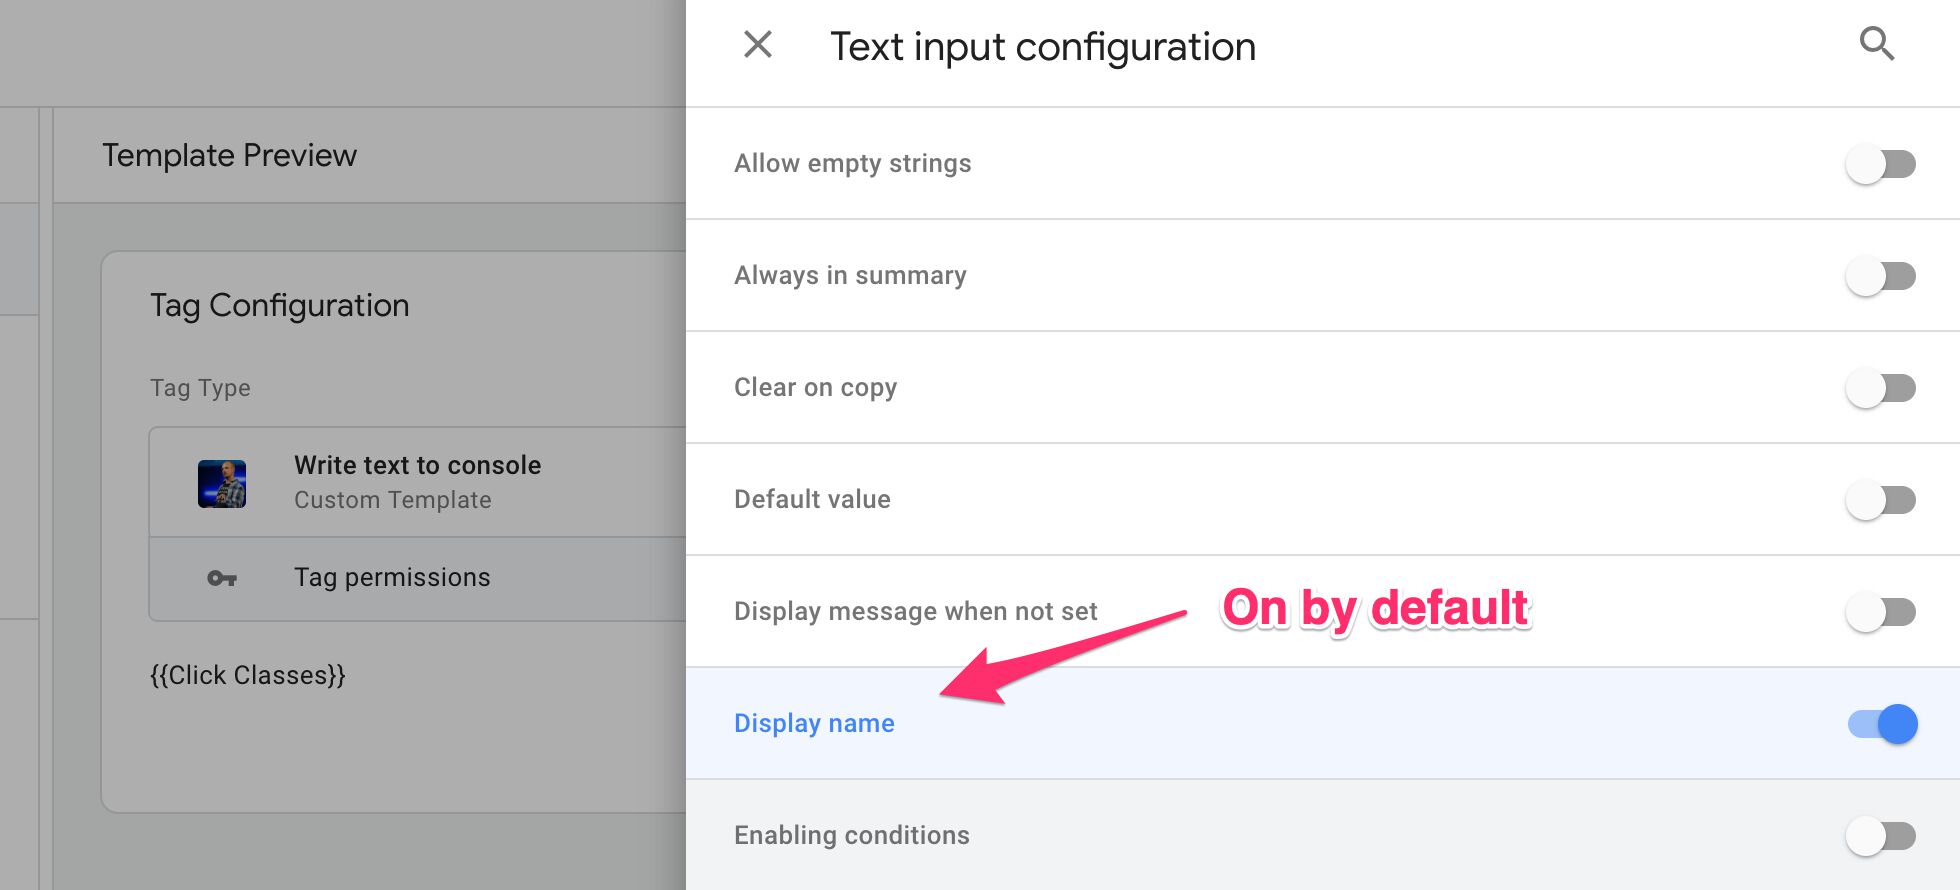
You should see a text input field appear in the Fields editor. Rename the field to sourceUrl, and edit the Display name setting. The field name is used in the code editor, and the Display name setting is what the user sees above the field when editing the tag settings.
The UI could be ready now - it’s really the only field and the only configuration you’d need.
But let’s make it a bit more robust by adding some validation.
Click the cogwheel icon associated with the field to open the Field configuration overlay. In the overlay, make sure Display name, Help text, and Validation rules are all toggled ON.
Each field type has its own set of configurations you can edit to make the field more versatile.

Close the overlay by clicking the X in the corner, or anywhere outside the overlay.
Next, add some Help text. Help text can be seen by hovering over the little question mark next to the Display name when editing the tag.
You can Save the template periodically to refresh the template preview and see the changes there.
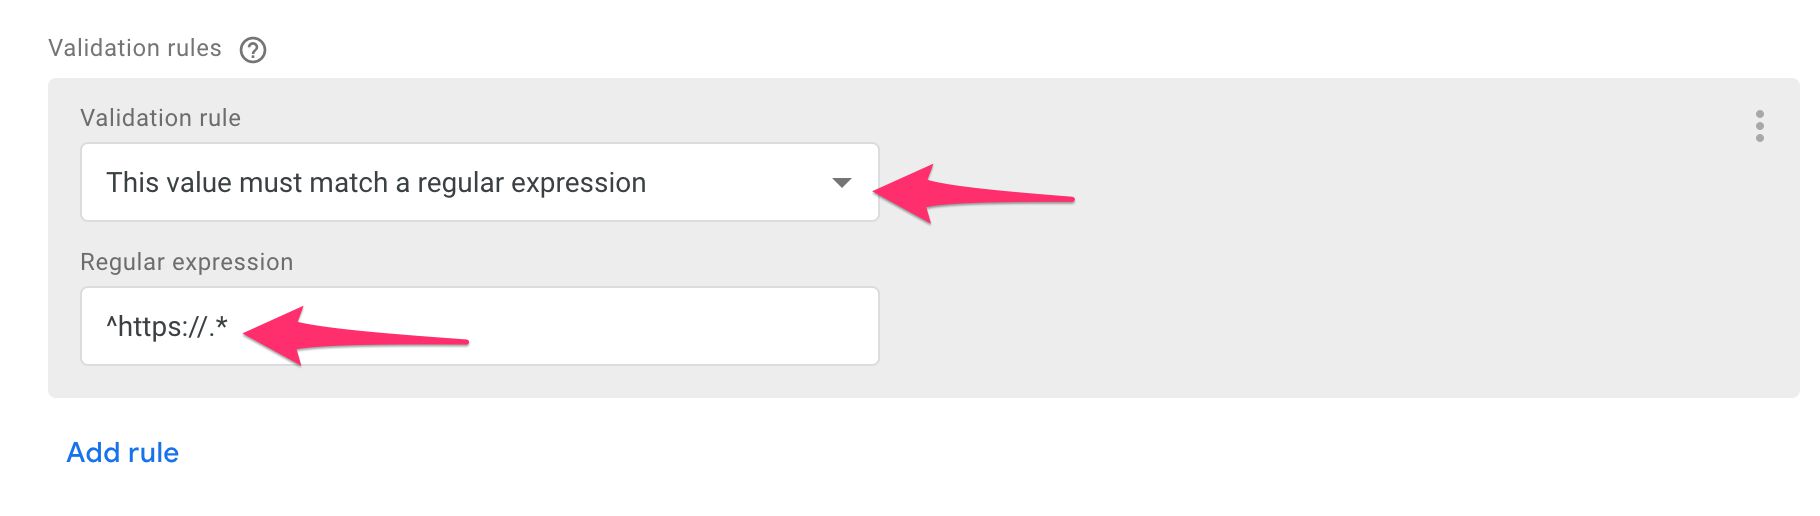
Next, let’s add some Validation rules. These can be used to ensure the user adds valid values to the fields.
Click Add rule and edit the rule to match a regular expression where the expression is ^https://.*. Validation regular expressions look for full matches only, so you need to add leading and/or trailing .* to use an open-ended pattern.
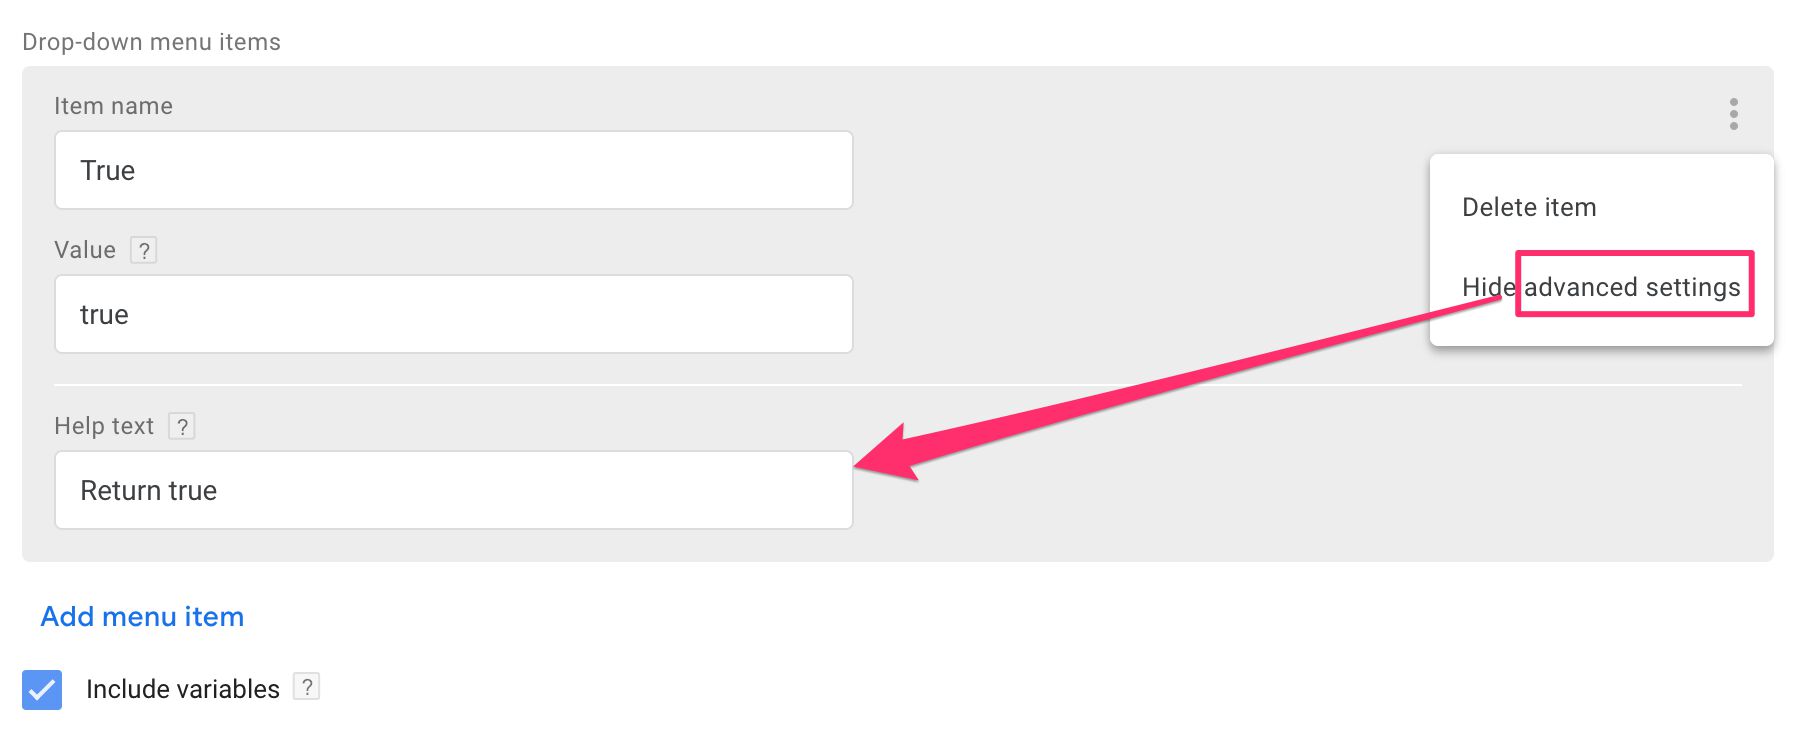
Next, click the little action menu in the top corner of the validation rule box, and select Show advanced settings.
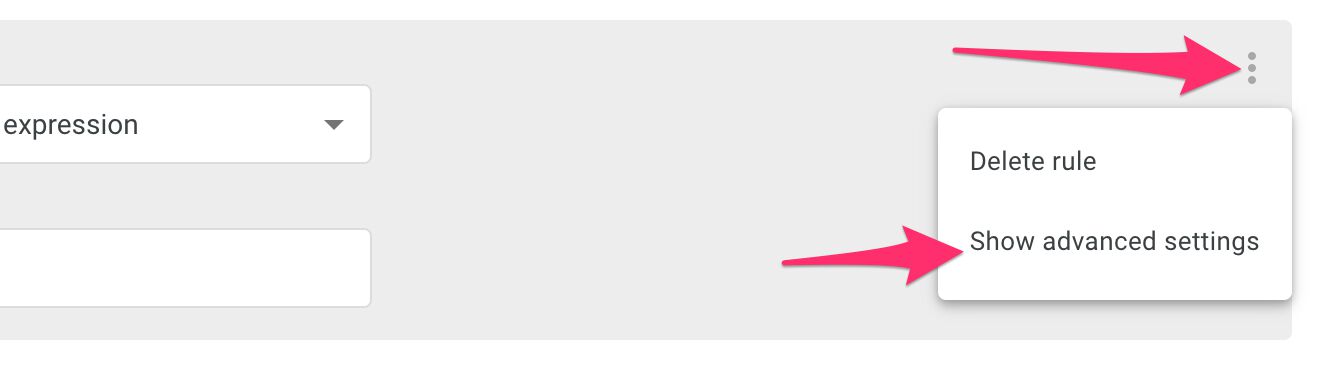
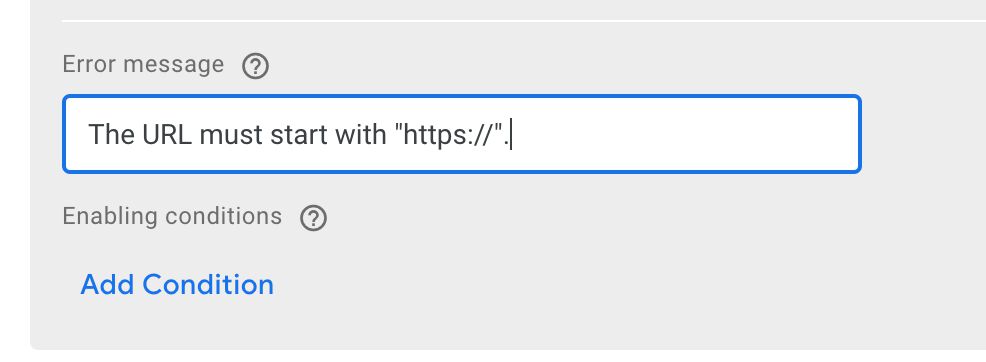
Validation rules have two advanced settings. The first is where you can provide a custom error message (which we’ll use). The second is one where you can establish conditions for when this validation rule is active (or inactive).
In this case, let’s add a descriptive error message. Set the Error message field to The URL must start with "https://"..
You can now quickly test how this works. Click Save in the top right corner, then click the tag template in the preview mode to enter edit mode. Add some string to the text input field that doesn’t start with “https://”, and click the Test button in the top-right corner. You should see your error message.
Cool, right?
Let’s add two more validation rules. Make them look like this:
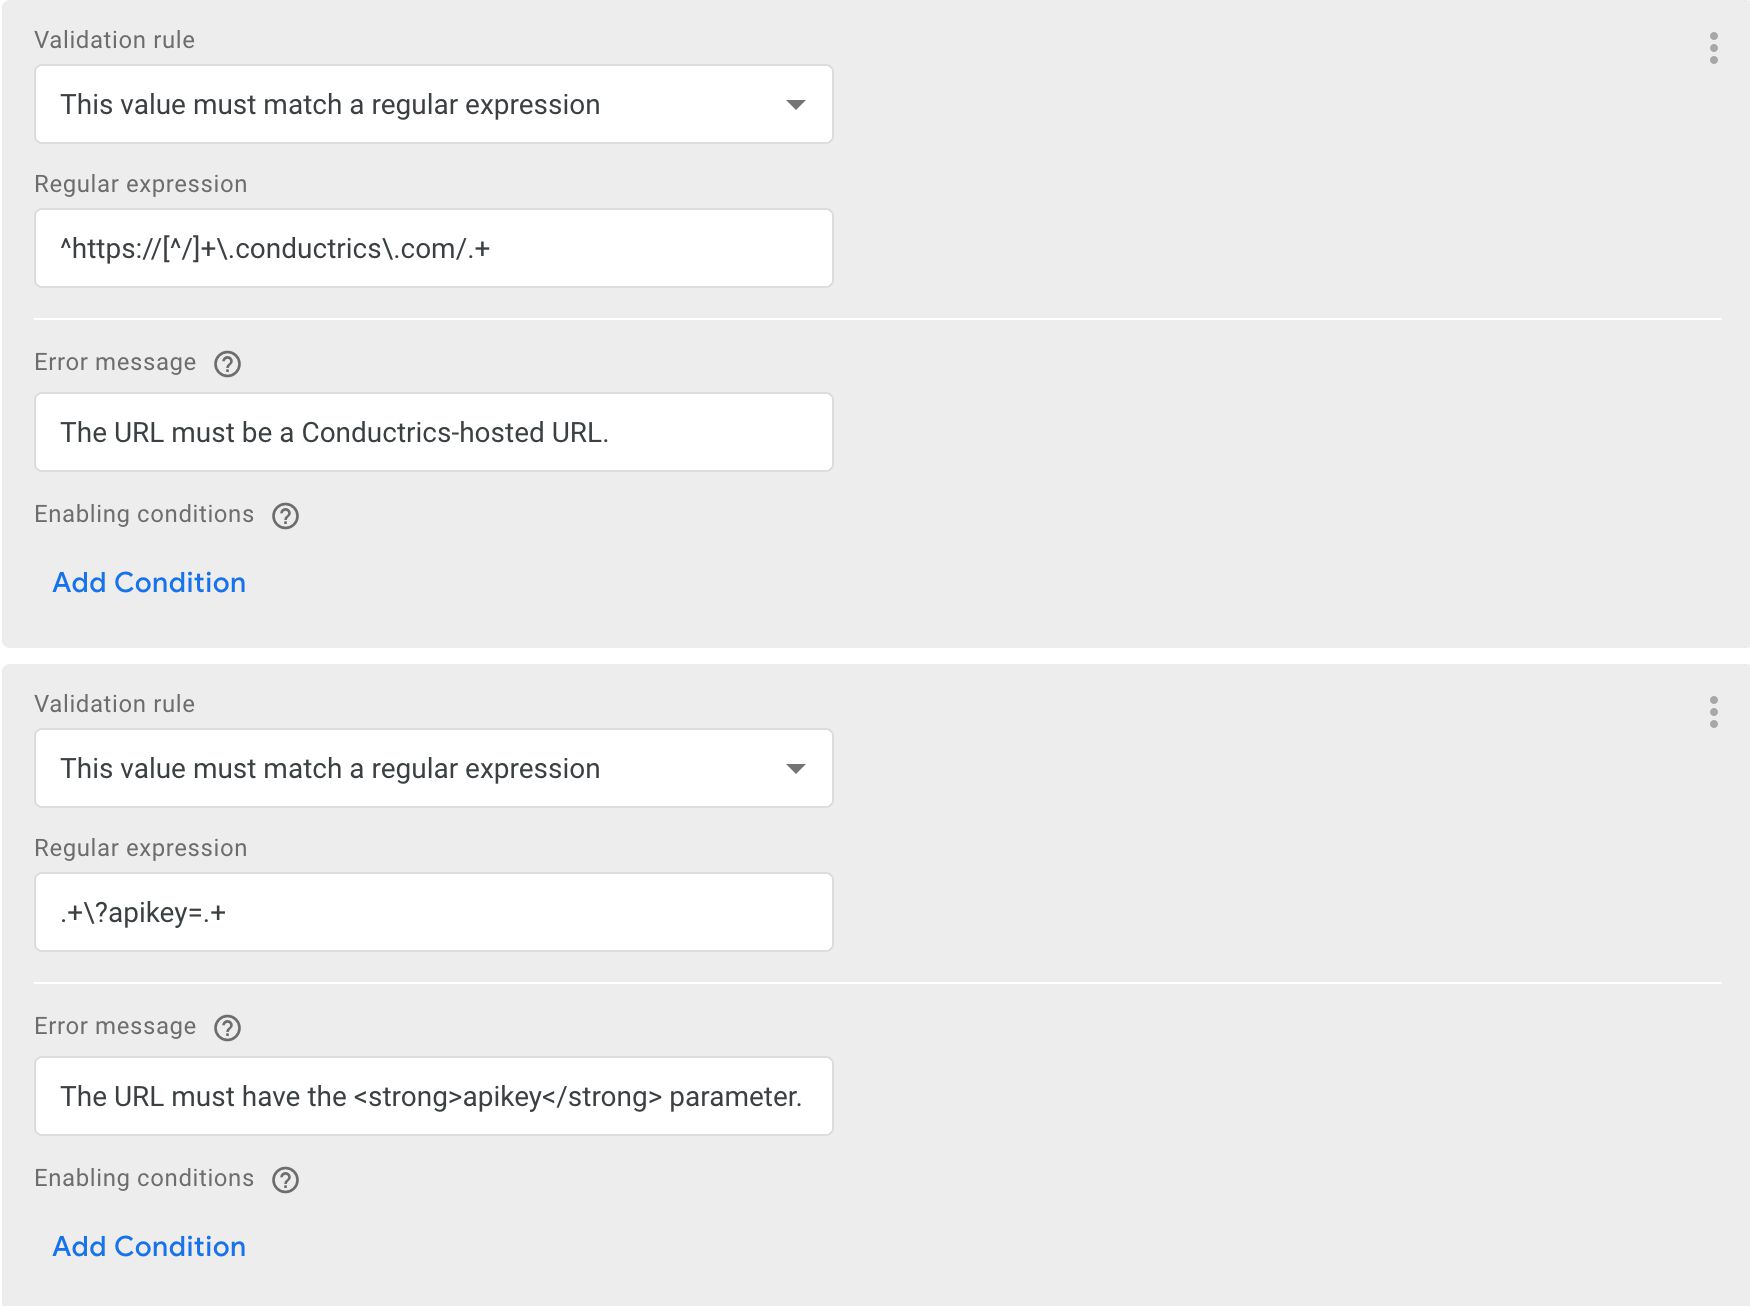
The first rule ensures that the script is loaded from a *.conductrics.com domain, and the second rule requires that the script URL has the apikey parameter.
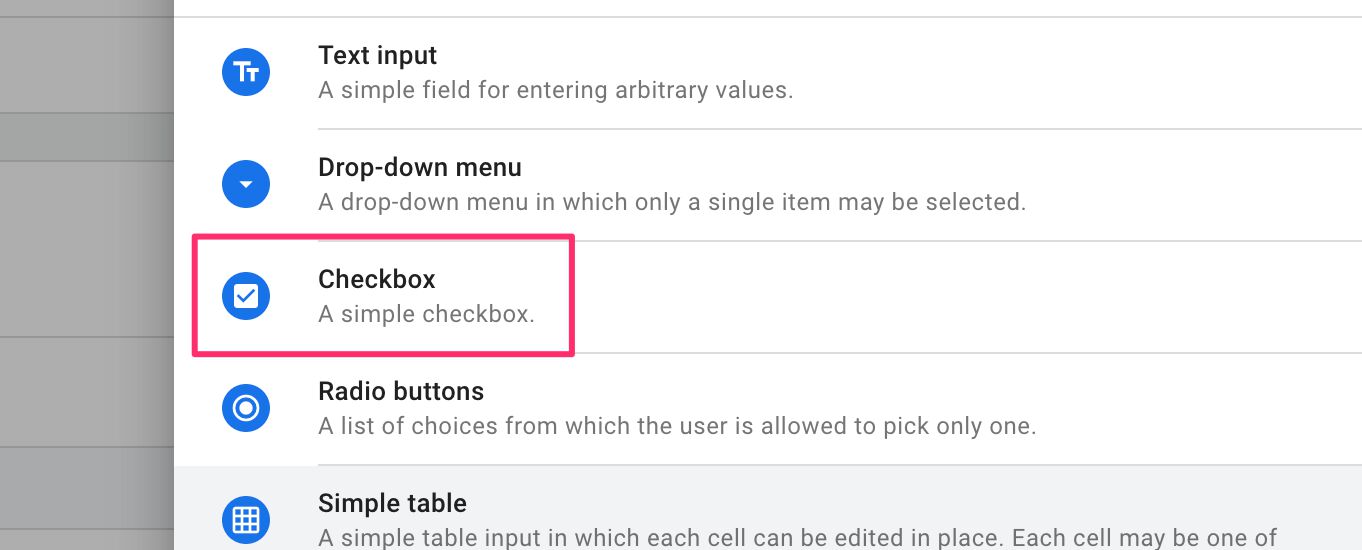
One final thing we’ll add to the user interface is a simple debug toggle.
Click the Add field button, and select Checkbox from the overlay.
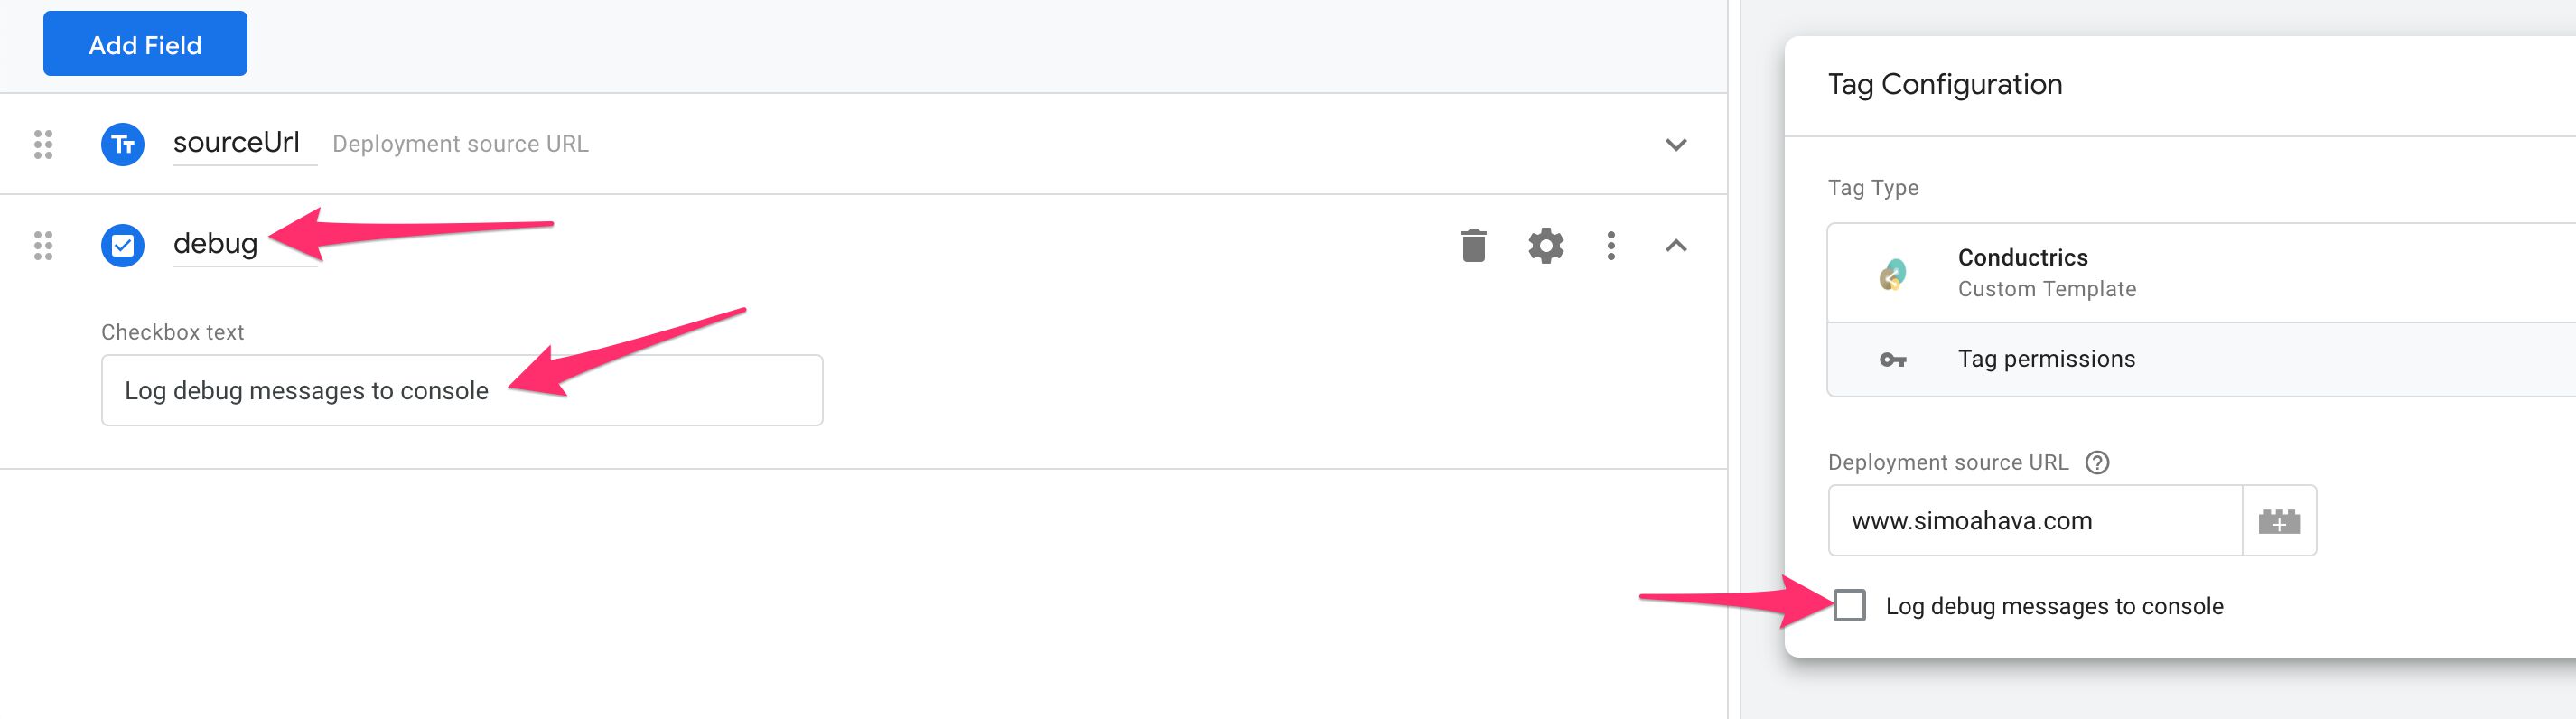
Set the field name to debug, and set the Checkbox text field to Log debug messages to console. Feel free to save the template to see how the checkbox looks like in the wild.
We’re all done with the UI, finally!
Step 3 - Add some code
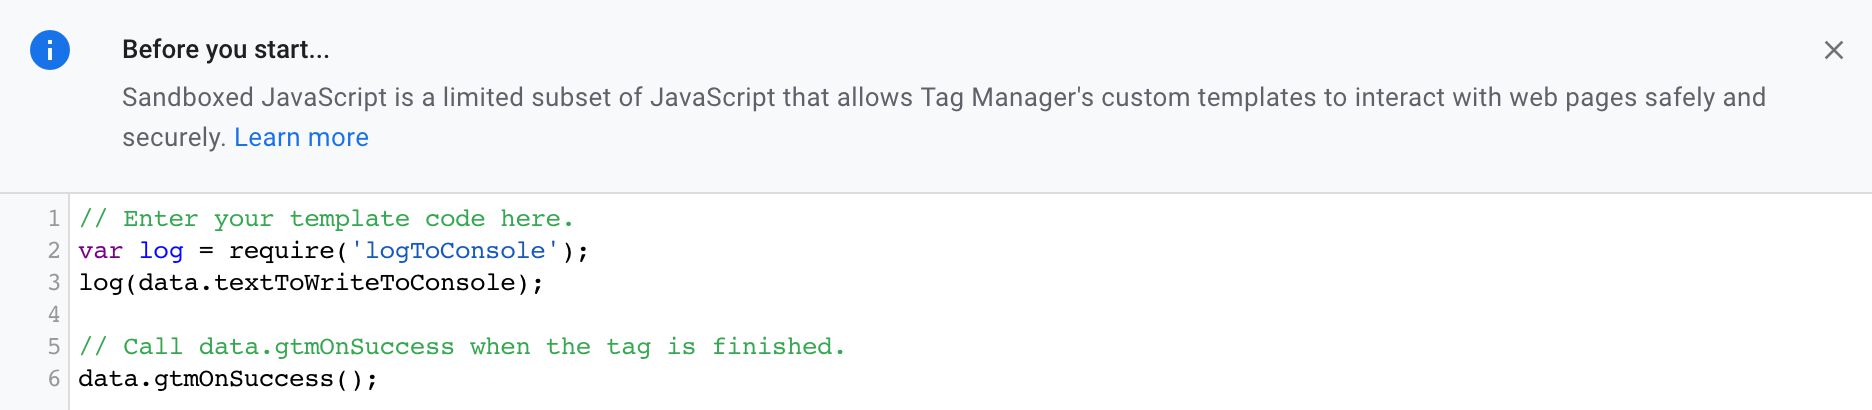
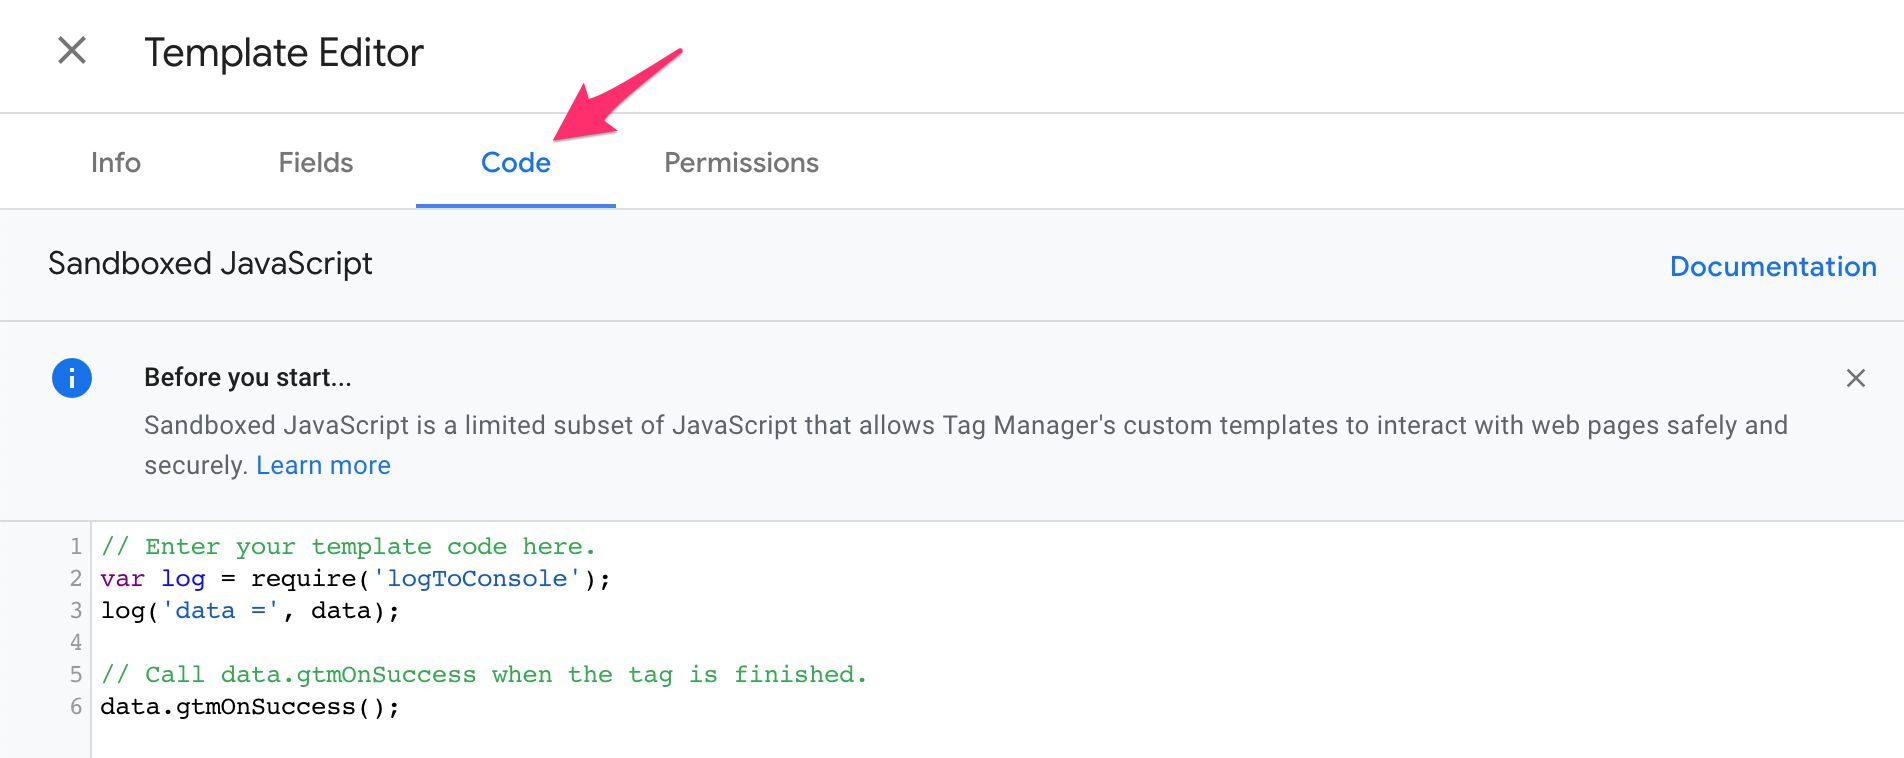
Now, select the Code tab from the template editor. You should see some boilerplate code that will help you get started (we’ll replace this with some other stuff soon enough).
For tag templates, the code you write has three components you need to be aware of.
The code format itself, which utilizes a special, sandboxed JavaScript. This sandboxed JS offers a bunch of template APIs you can use to work with JavaScript outside the scope of the code itself (access
dataLayer, write cookies, and so forth).The
dataobject, which comprises the contents of the tag fields the user might have interacted with.The
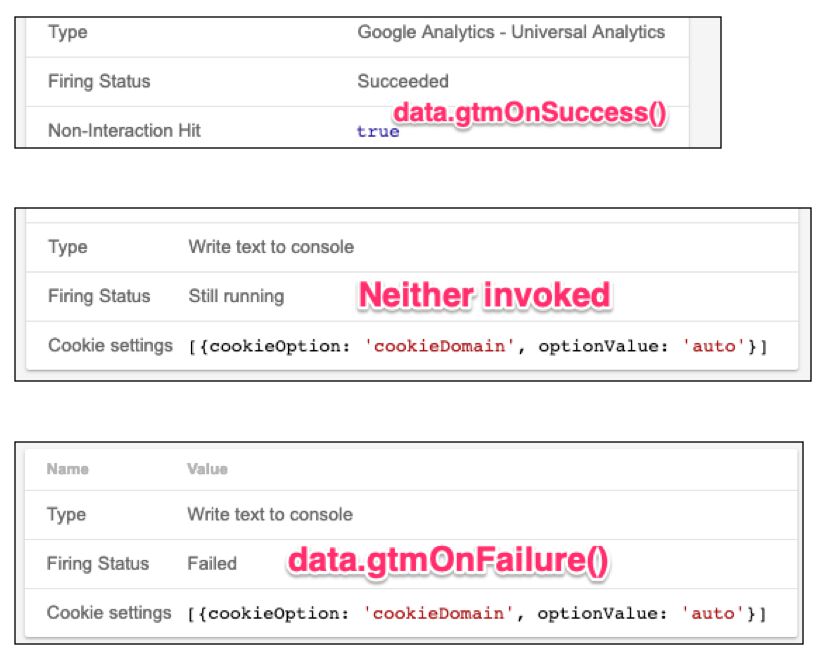
data.gtmOnSuccess()anddata.gtmOnFailure()methods, which indicate success or failure, respectively, of the tag execution.
With these three in mind, we need to do the following.
We need the tag to load Conductrics’ JavaScript from their network, which means we’ll utilize the
injectScriptAPI to do so.We’ll take the URL for the
injectScriptAPI from the text field in the tag, and if the user has chosen to write debug messages to the console, we’ll respect that choice.If the script loads fine, we’ll signal this with
data.gtmOnSuccess(), but if there’s a failure (such as a404error), we’ll call thedata.gtmOnFailure()method.
Success and failure are relevant for Preview mode output and also for tag sequencing.
Without further ado, here’s the complete code you should replace the contents of the code editor with:
// Require the necessary APIs
const logToConsole = require('logToConsole');
const injectScript = require('injectScript');
const queryPermission = require('queryPermission');

// Get the URL the user input into the text field
const url = data.sourceUrl;

// If the user chose to log debug output, initialize the logging method
const log = data.debug ? logToConsole : (() => {});

log('Conductrics: Loading script from ' + url);

// If the script loaded successfully, log a message and signal success
const onSuccess = () => {
  log('Conductrics: Script loaded successfully.');
  data.gtmOnSuccess();
};

// If the script fails to load, log a message and signal failure
const onFailure = () => {
  log('Conductrics: Script load failed.');
  data.gtmOnFailure();
};

// If the URL input by the user matches the permissions set for the template,
// inject the script with the onSuccess and onFailure methods as callbacks.
if (queryPermission('inject_script', url)) {
  injectScript(url, onSuccess, onFailure);
} else {
  log('Conductrics: Script load failed due to permissions mismatch.');
  data.gtmOnFailure();
}
The code comments should help you understand how the code works. Here are some key things about the code:
The APIs are loaded with the
require()method. You must use these APIs - their counterparts in browser JavaScript have been suppressed. For example,console.log()would not work, nor woulddocument.createElement().The
dataobject has keys matching the field names you edited in the field editor. Any value those fields have will be the values stored in thedataobject. Thus, if the user typedhellointo thesourceUrlfield, that value would be available viadata.sourceUrl.Using
queryPermission()is a good way to ensure the user input matches the permissions set in the template. The permissions are updated automatically when yourequire()a specific API in the code editor (we’ll get to the permissions in the next chapter).
Key thing to note is that this editor is a JavaScript editor. Thus, unlike with Custom HTML tags, you should not wrap the code with <script> and </script>.
Once you’re done, click Save and move on to the next chapter.
Step 4 - Modify permissions
The final thing to edit are the permissions. When you require() APIs, you’ll also automatically enable their permission configurations in the Permissions tab. See the chapter on permissions for more details on how these work.
Anyway, since you are using the logToConsole and injectScript APIs, their permissions are now available for editing. The queryPermission and require APIs don’t have any permissions associated with them.
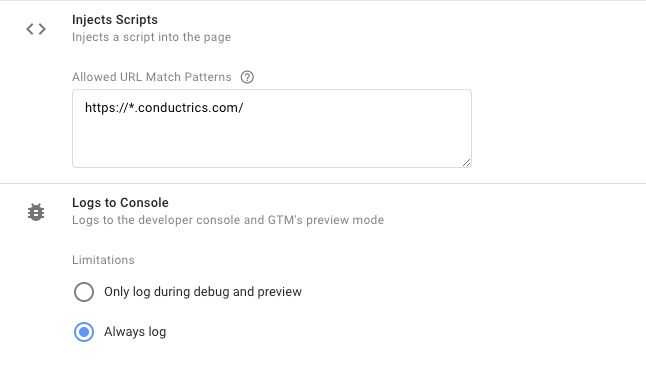
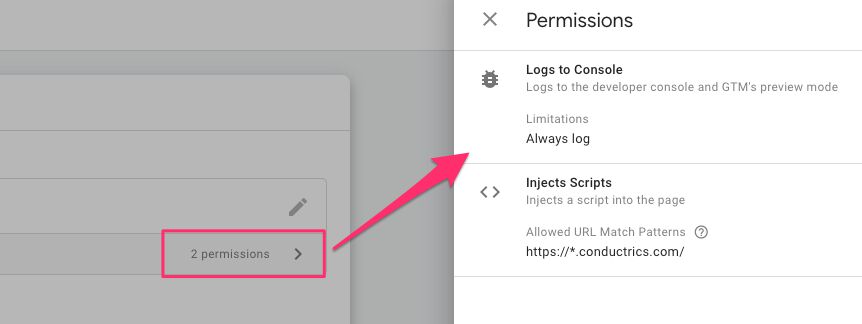
Click to the Permissions tab and expand the two permissions you find.

The Injects Scripts permission is, surprise surprise, for the injectScript API. It expects URL match patterns that the value input by the user into the text field must match.
Add the value https://*.conductrics.com/ into the text field.
This value basically means that the script URL injected in the page must be a subdomain of conductrics.com, and it can have any path structure (the / after the hostname acts as a wildcard). Thus it will match, for example:
https://conductrics.com/trackerhttps://de.cdn-v3.conductrics.com/ac-aBcDeFgH/v3/agent-api/js/f-aBcDeFggg/dt-b1234567?apikey=api-w123456
The Logs to Console permission should be self-explanatory. It governs how the logToConsole API works. You can check the Always log option, because we manage logging to console in the template code itself.
Right now, the permissions should look like this:
Click Save to save the current template.
Step 5 - Preview and test
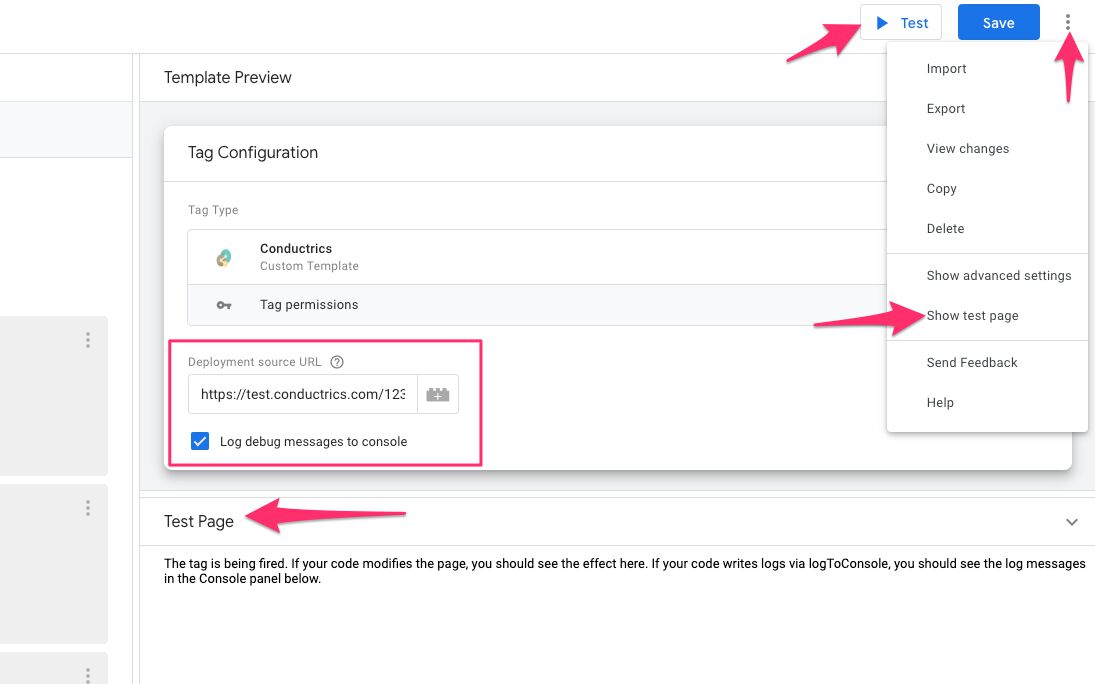
You can now click to edit the tag in the Template Preview window. When you’ve added some text, you can click the Test button to see what happens.
You can also choose to show a test page from the template menu:
Test different things:
Try with a random, non-URL string to see the warning about the missing
https://.Try with
https://but with a hostname that doesn’t containconductrics.comto see the error for incorrect URL.Try with
https://domain.conductrics.com/loaderto see the error for missingapikey.Try with
https://domain.conductrics.com/loader?apikey=12345to see the code pass with flying colors.Try with and without the Debug checkbox checked, and see how this impacts what you see in the Console.
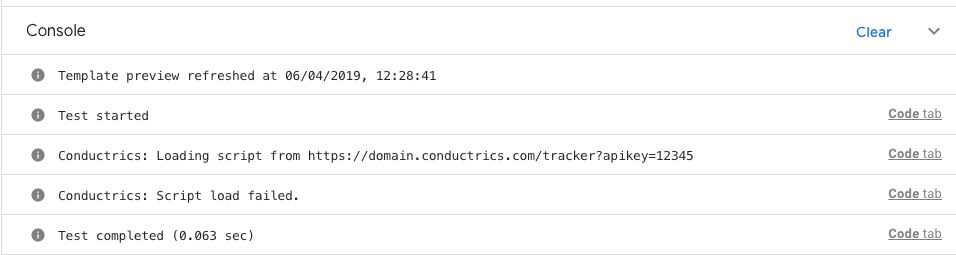
If you already have a Conductrics account, you can test with a real deployment URL to see the success message in the console.
Finally, you can dig deep into the iframe of the Test page to find your script tag there.
Once done testing to your satisfaction, you can do one final Save and then close the template editor - you are ready to create your first tag off of this template!
Step 6 - Create tag and preview
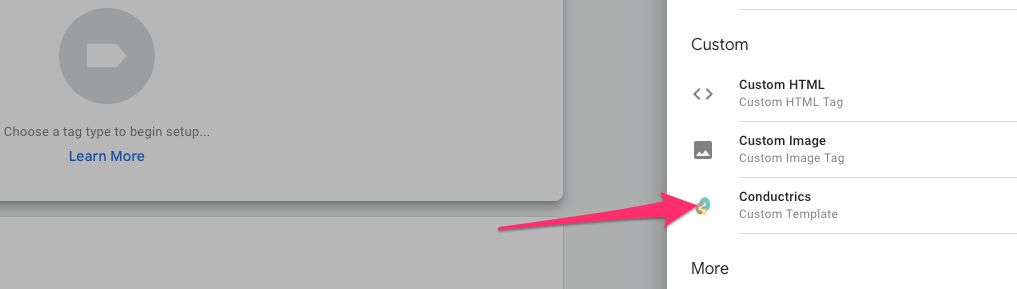
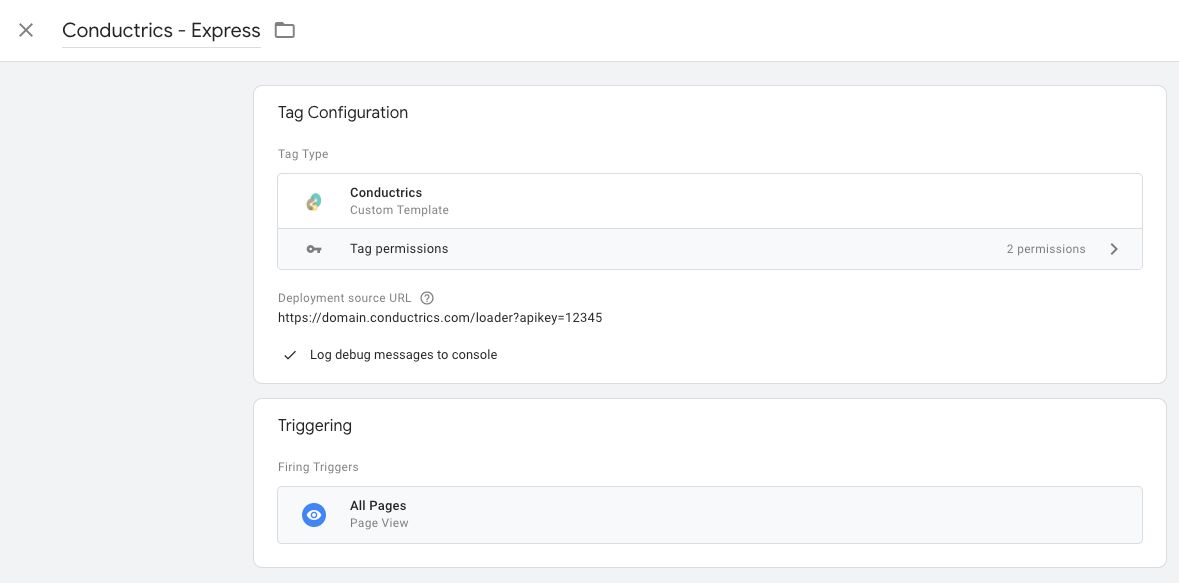
In the GTM UI, go to Tags and click New. In the overlay that opens, find your new template and click it.
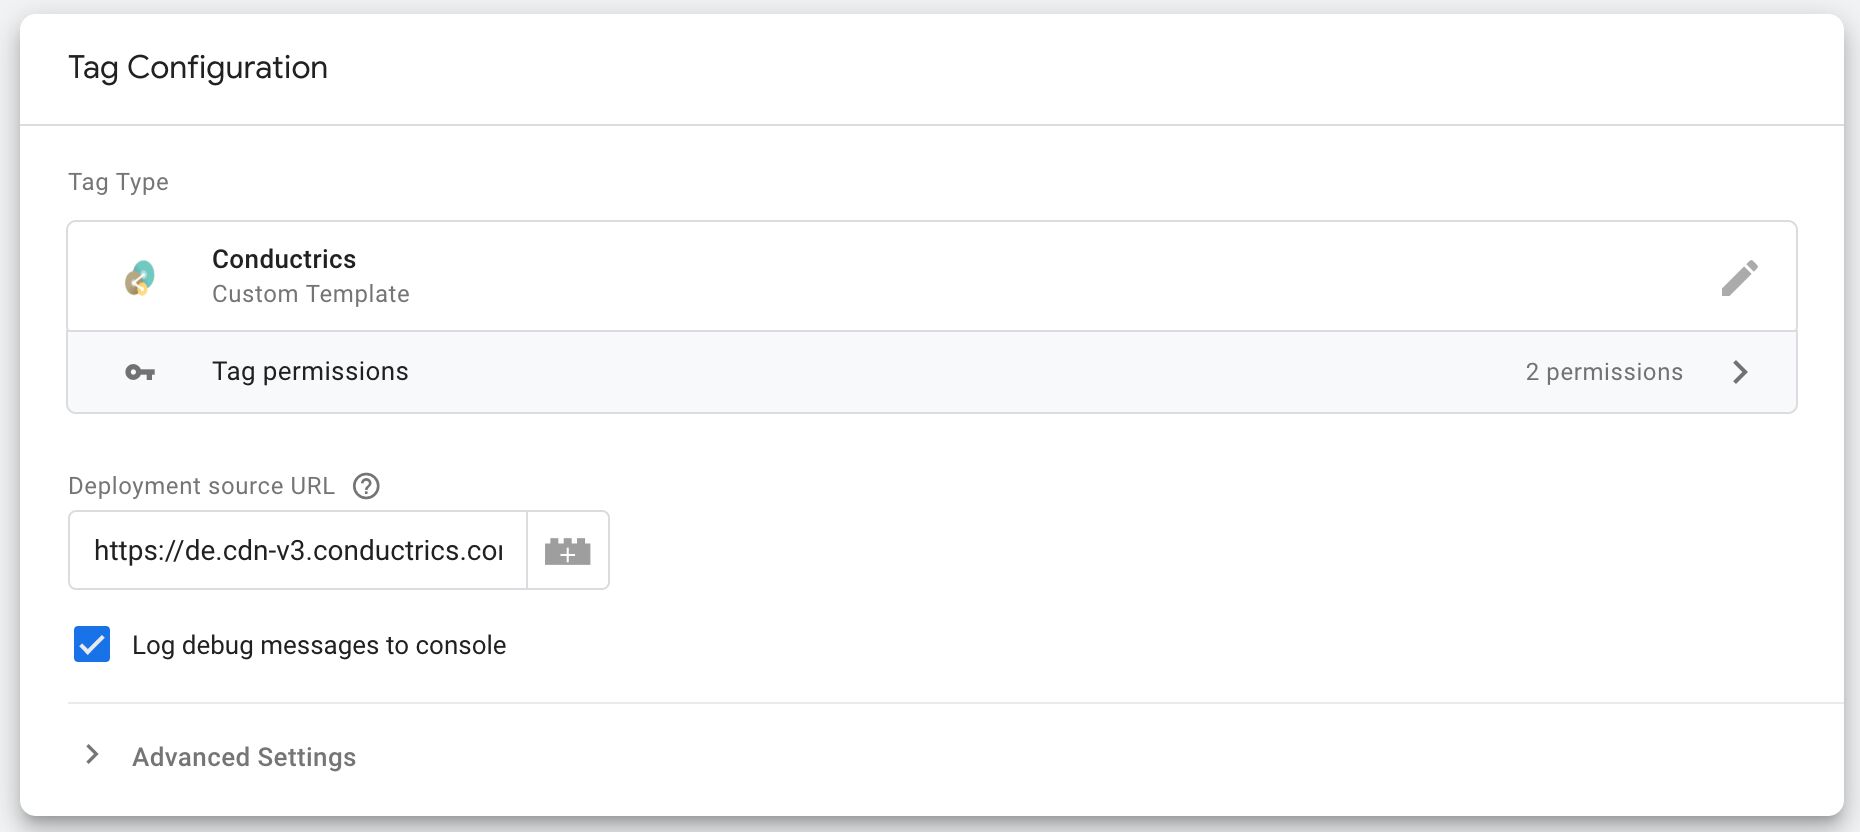
This screen should be familiar to you. The only difference to native templates in GTM is the Tag permissions bar. Click it to preview what permissions have been set for the template.
Then, fill in the tag fields as you would with a regular template. For testing purposes, just set it to fire on the All Pages trigger.
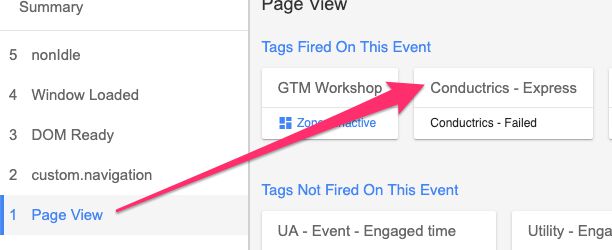
You can try with invalid URLs to see the error messages. However, to test how the tag actually works, use a correct (but ultimately invalid) URL like https://domain.conductrics.com/loader?apikey=12345, and the tag should look like this:
Then, go the Preview mode and enter your site.
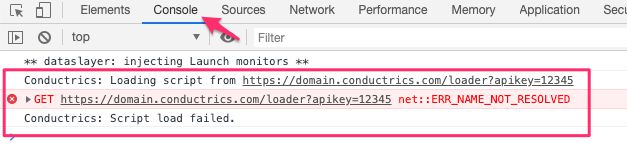
You should see the tag having fired, but in Failed state because the endpoint returned a 404 error.
Check out the JavaScript console, too. You should see some relevant output there.
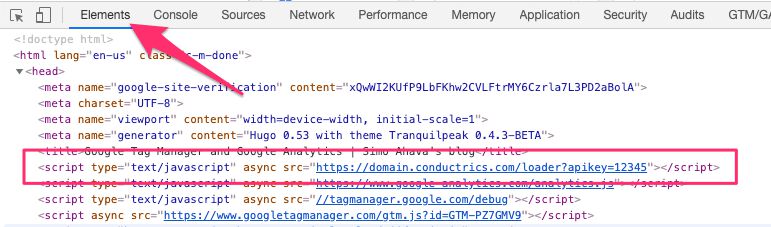
Finally, since we’re injecting a script, you can drill into the page elements to find it in the <head> of the page.
Step 7 - You’re done!
And that’s it!. This was an extremely simple use case, and it might seem like a really complicated way to go about it. However, remember that you’re providing controls for governance and responsible code injection here.
The use of permissions, sandboxed JavaScript, and, if you choose to use them, policies help you run a tight ship on what the custom tags can and can’t do on the site.
The template itself does a simple script injection, but I hope I convinced you how powerful the UI editor can be, and we barely scratched the surface!
Variable template walkthrough
Variable templates differ from tag templates in that they only have a singular purpose: to return a value. Optimally, they should not have any side effects, which include e.g. setting variables in the global scope, writing cookies, pushing to dataLayer, injecting scripts, or firing pixels.
In this example, we’ll create a simple variable which is intended to work with the hitCallback field of your Google Analytics tags.
The idea is that the variable will return a function (hitCallback always requires a function as its value), which when executed will write a cookie into the browser. This cookie can then be used to check if less than 30 minutes (the default expiration) have passed since the last Google Analytics hit to GA, thus giving you a very rough estimate of whether a GA session is currently active.
So yes, we’re breaking the “no side effects” rule I literally just mentioned, but this is a bit different. It’s not an uncontrollable side effect, which it would be if it fired every single time the variable is called. Instead, the functionality is restricted to the hitCallback function, which is only executed once, when the Google Analytics request has been dispatched.
Note, there are more elegant ways to handle this, but for the purposes of this guide I wanted to start off with something simple.
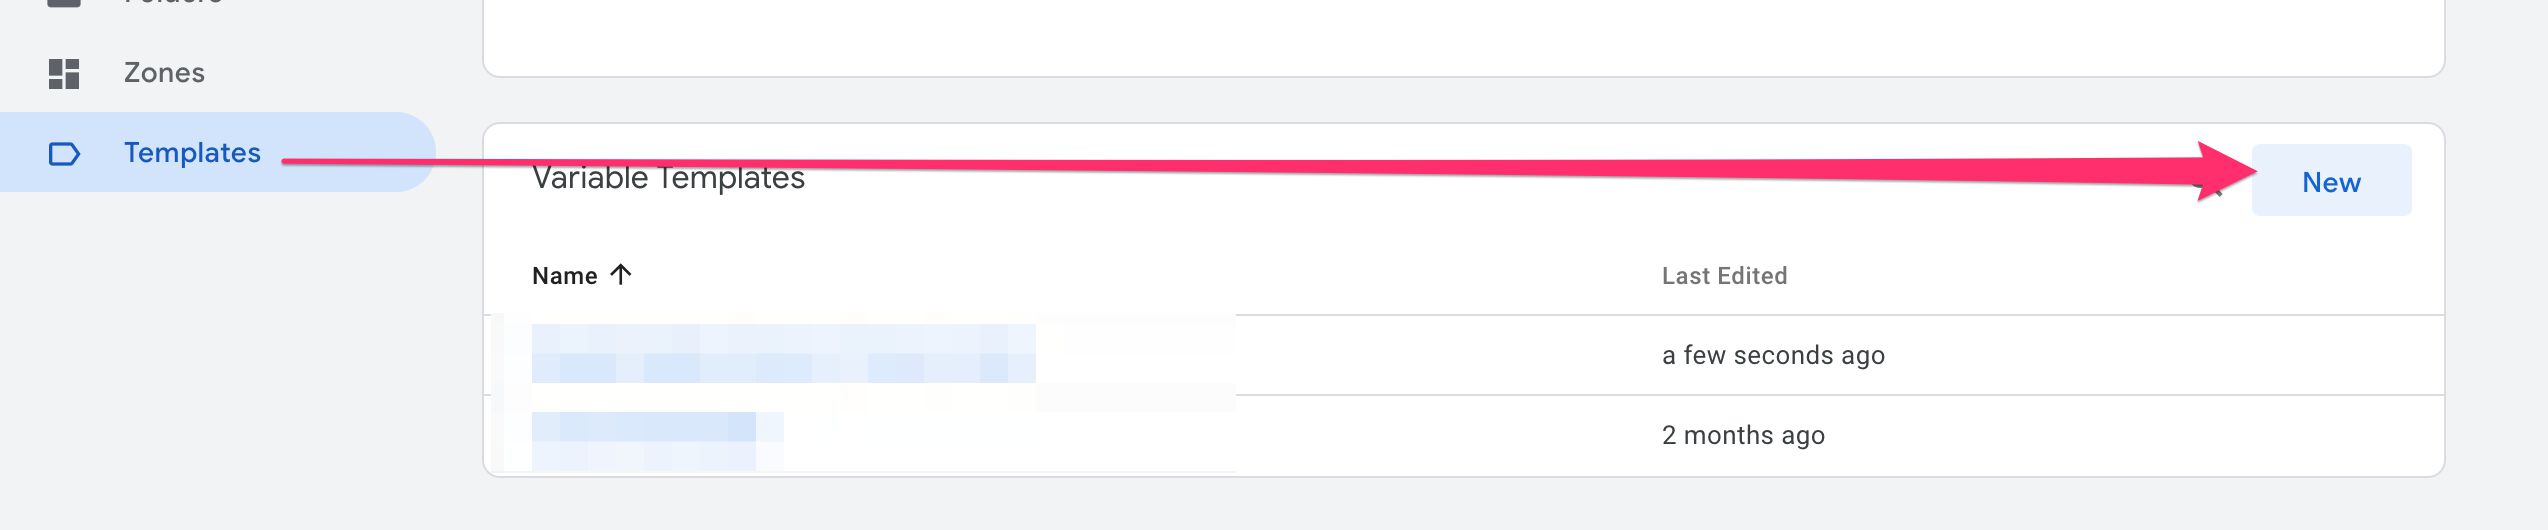
Step 1 - Create and set the details of the variable template
Browse to Templates, and click New in the corner of the Variable Templates area.
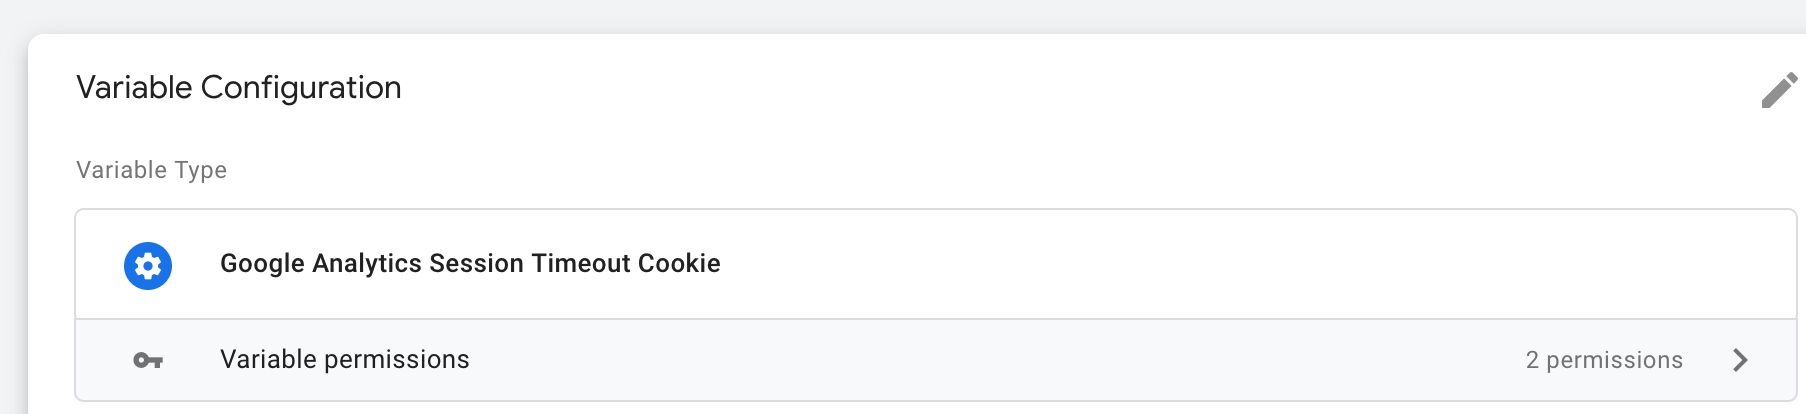
In the view that opens, make sure the Info tab is selected, and add a Name and Description to the variable.
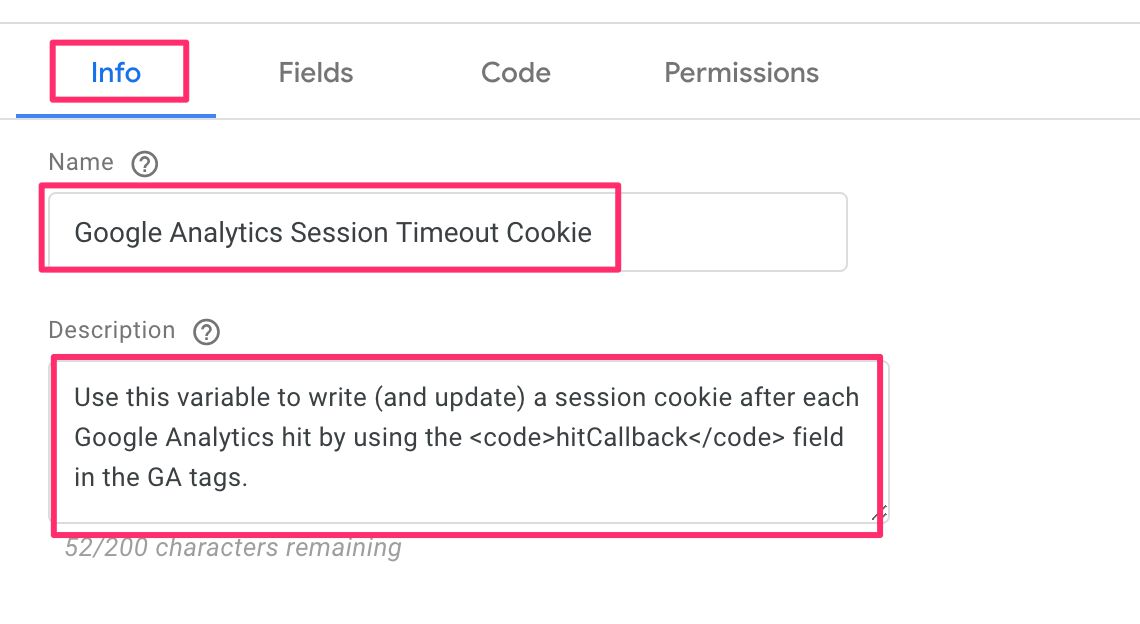
As you can see, you can add HTML styling to the description field. The text I wrote was this:
Use this variable to write (and update) a session cookie after each Google Analytics hit by using the <code>hitCallback</code> field in the GA tags.Once done, click Save in the top right corner and you should see the Template Preview area show the new template name.
Next, let’s create the user interface for this template!
Step 2 - Create the UI
Click over to the Fields tab in the template editor.
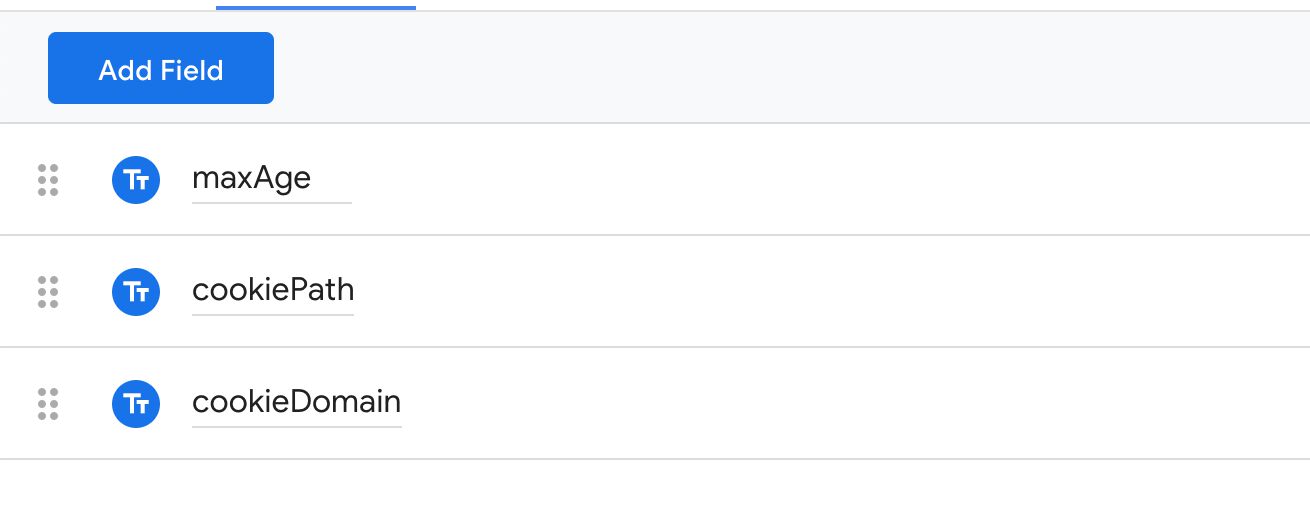
This template will comprise three text input fields. One for the cookie’s maximum age, one for the cookie path, and one for the cookie domain.
Click the Add Field button, and choose the Text Input field from the overlay.

Do this two more times, so that you end up with three text input fields.
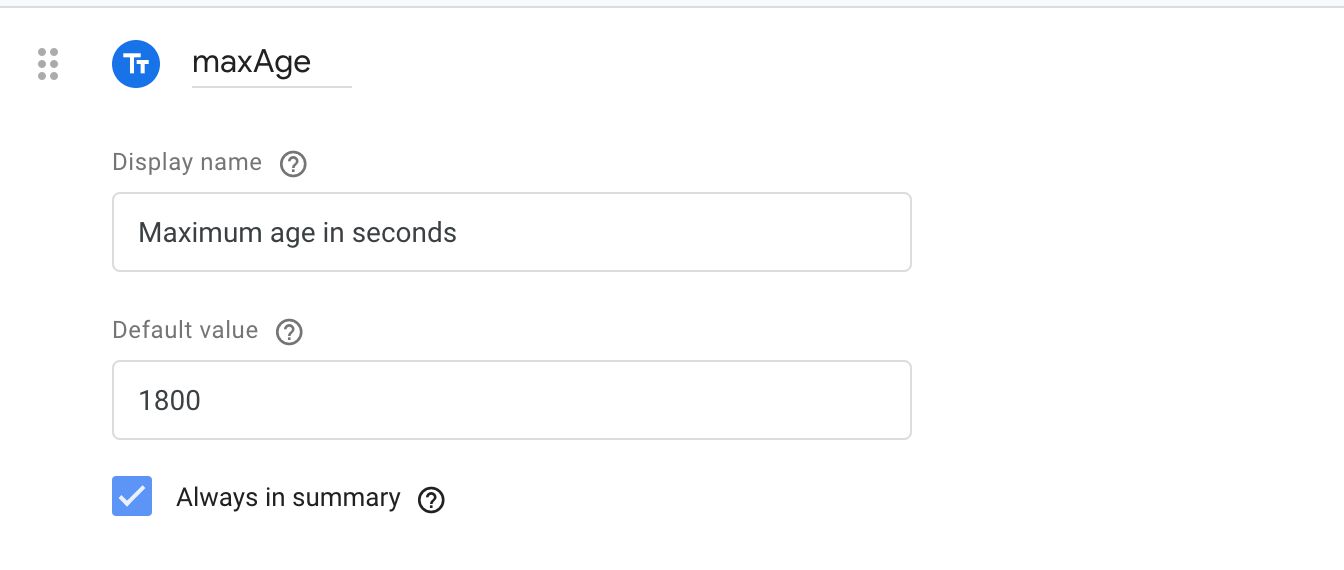
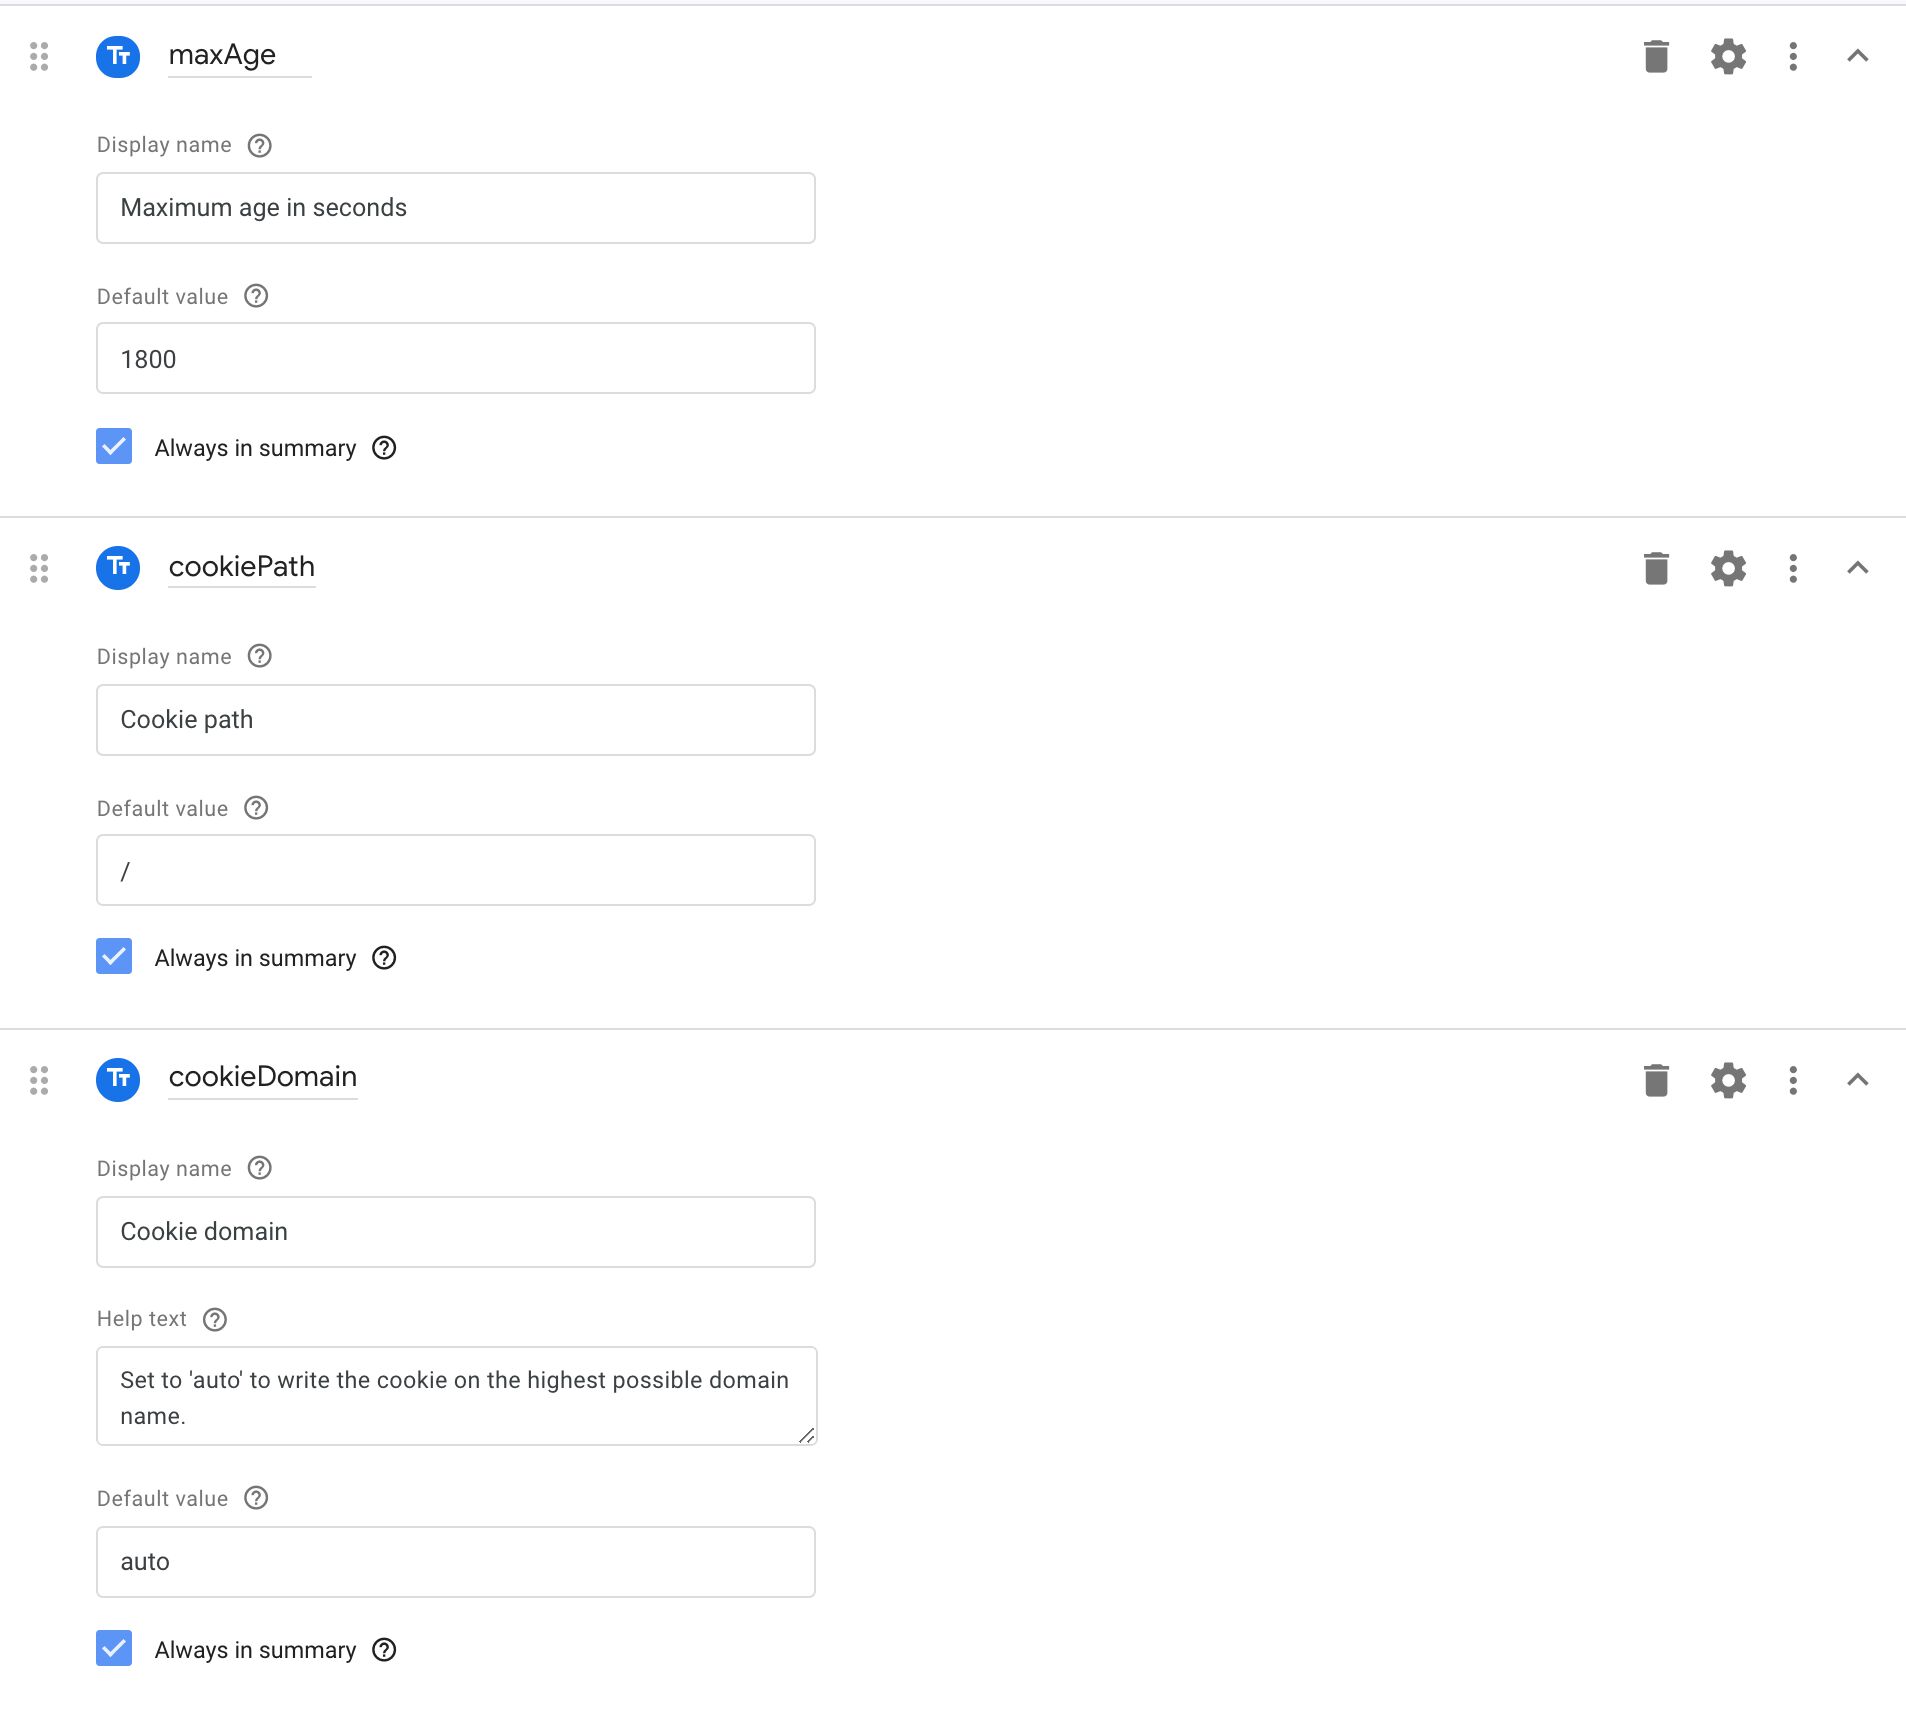
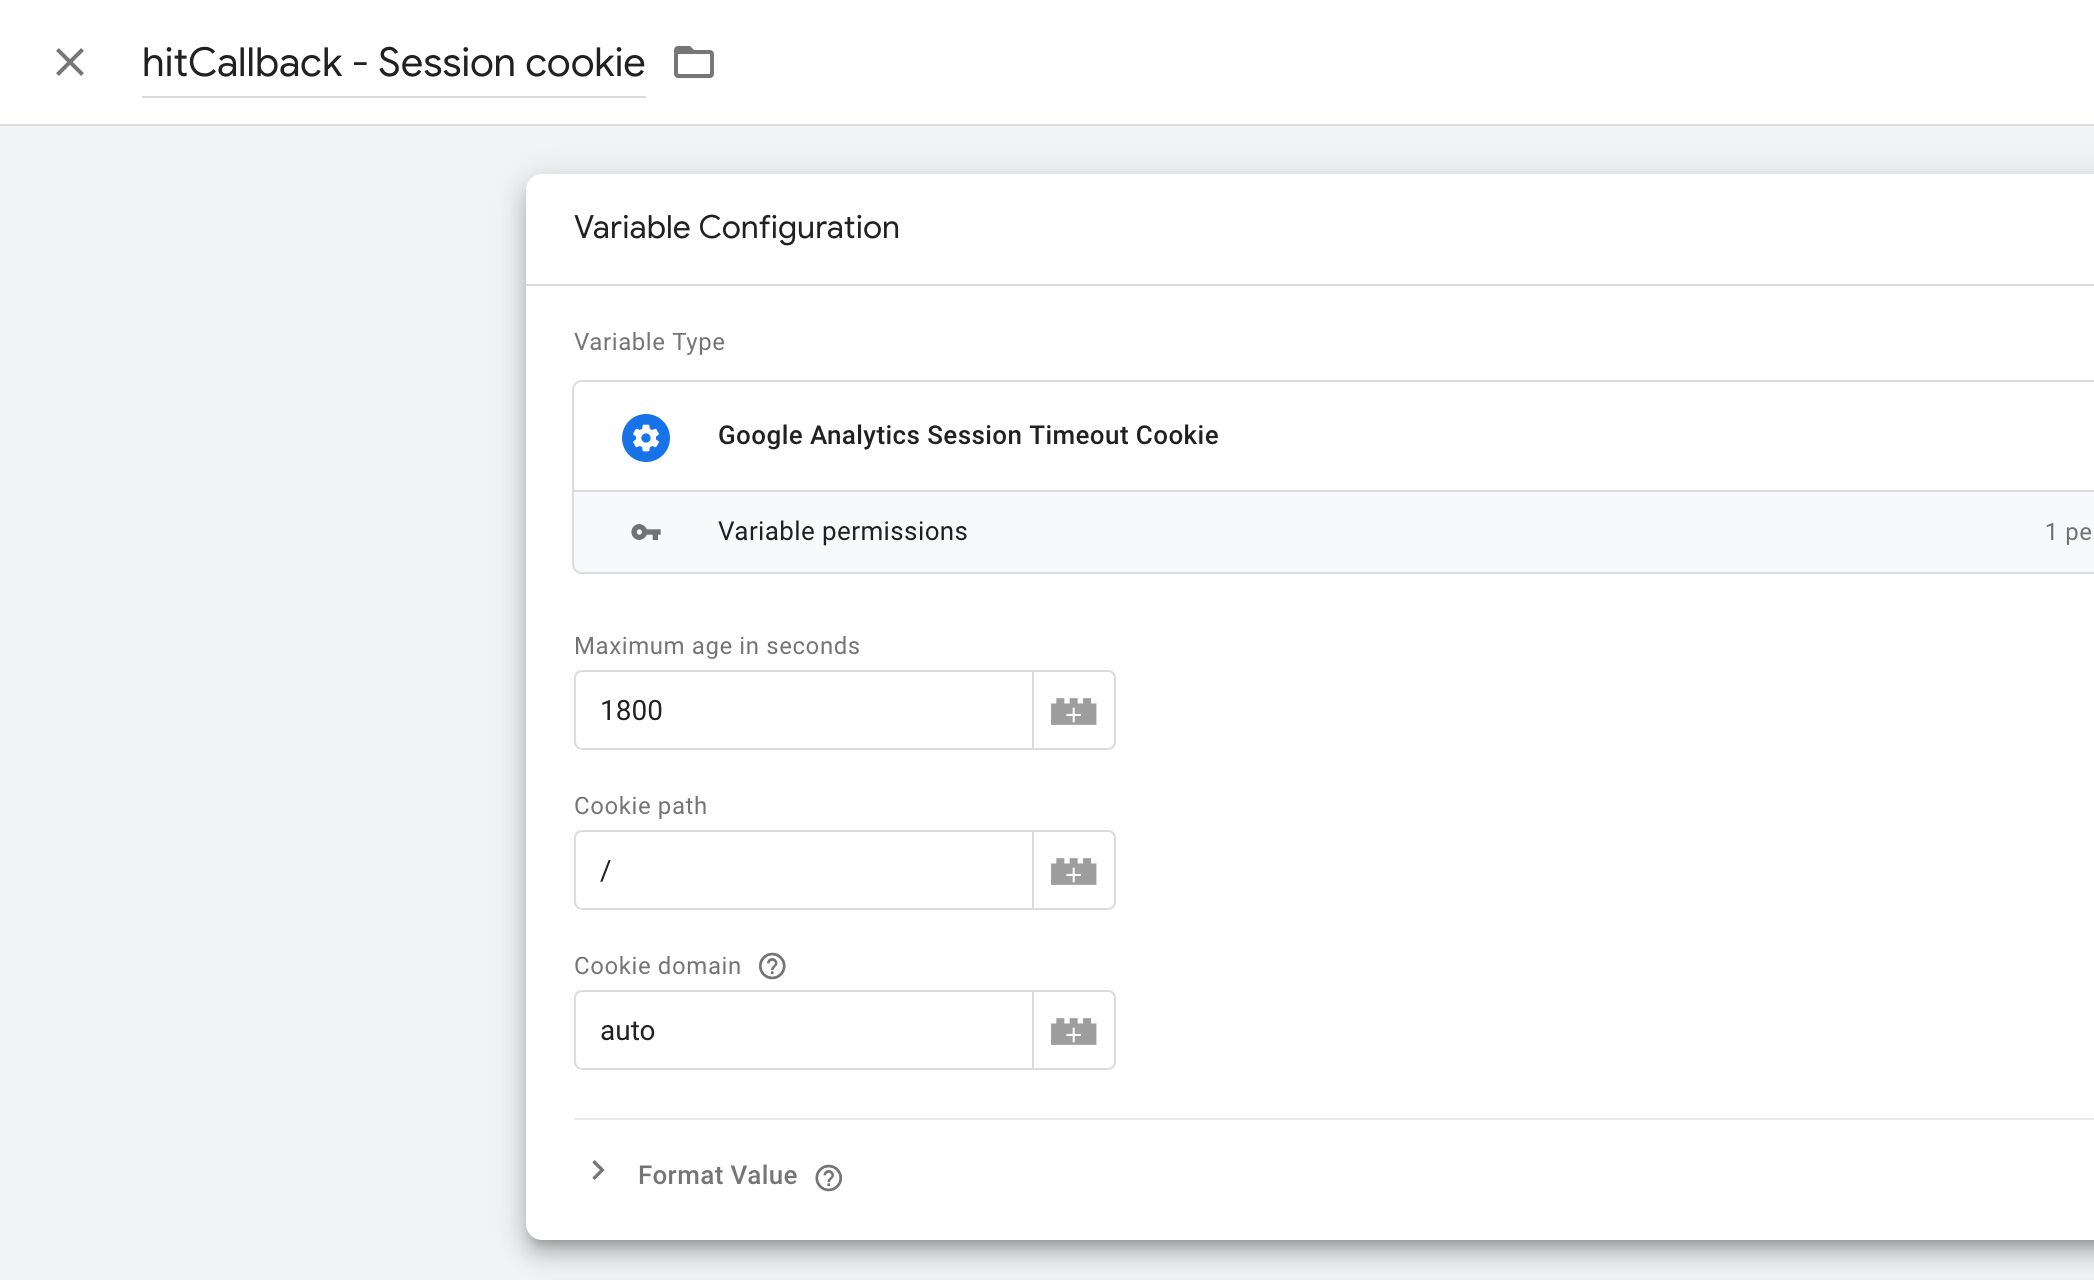
Name the first field maxAge, the second cookiePath, and the third cookieDomain.
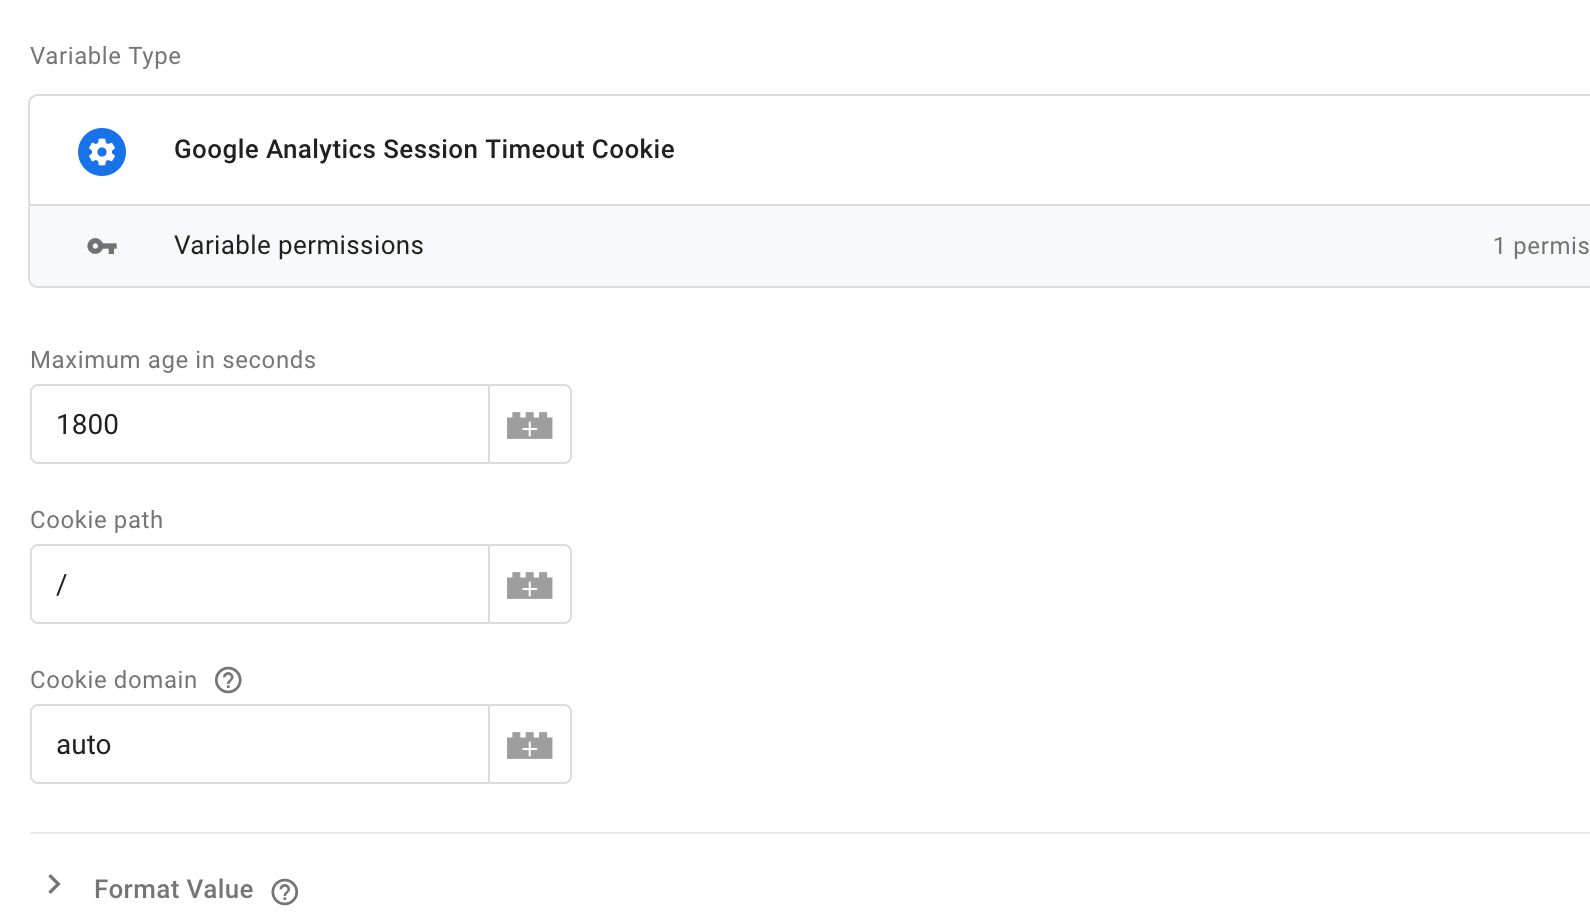
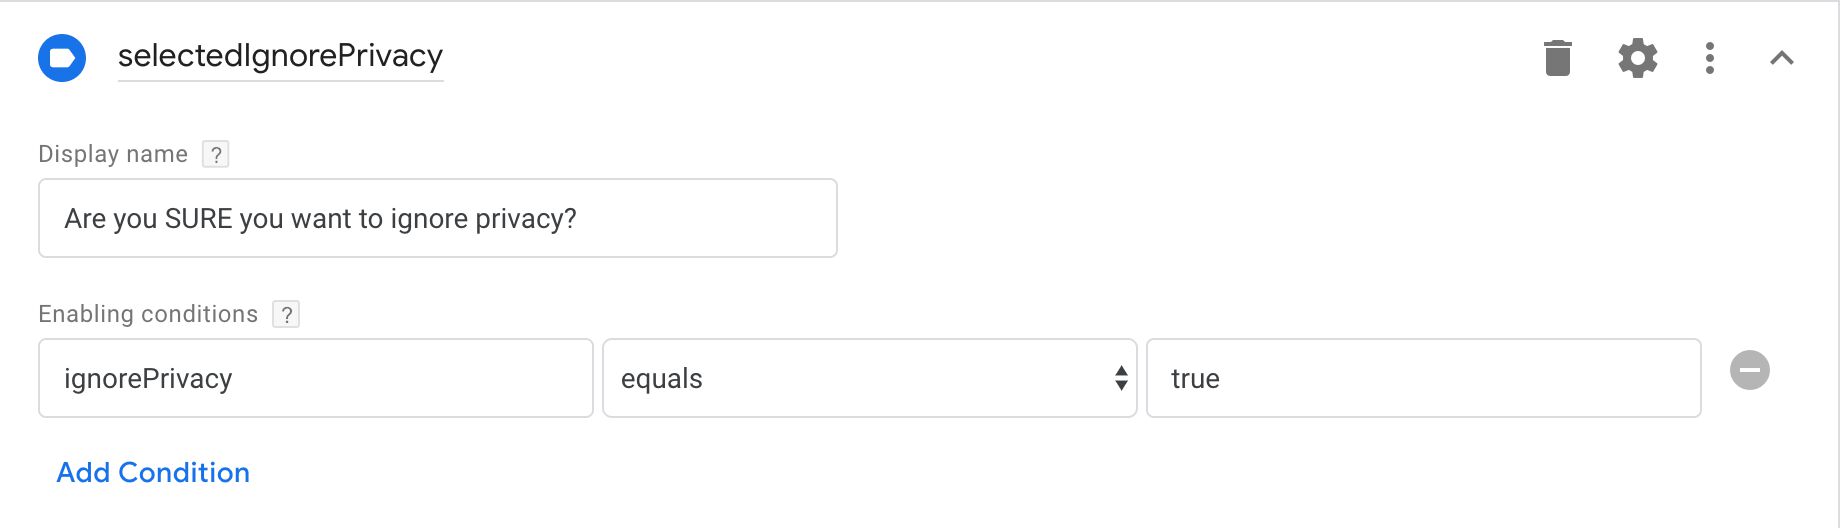
Expand the first field, maxAge, and click the cogwheel icon to open its field configurations. Toggle on Always in summary, Default value, and Display name.
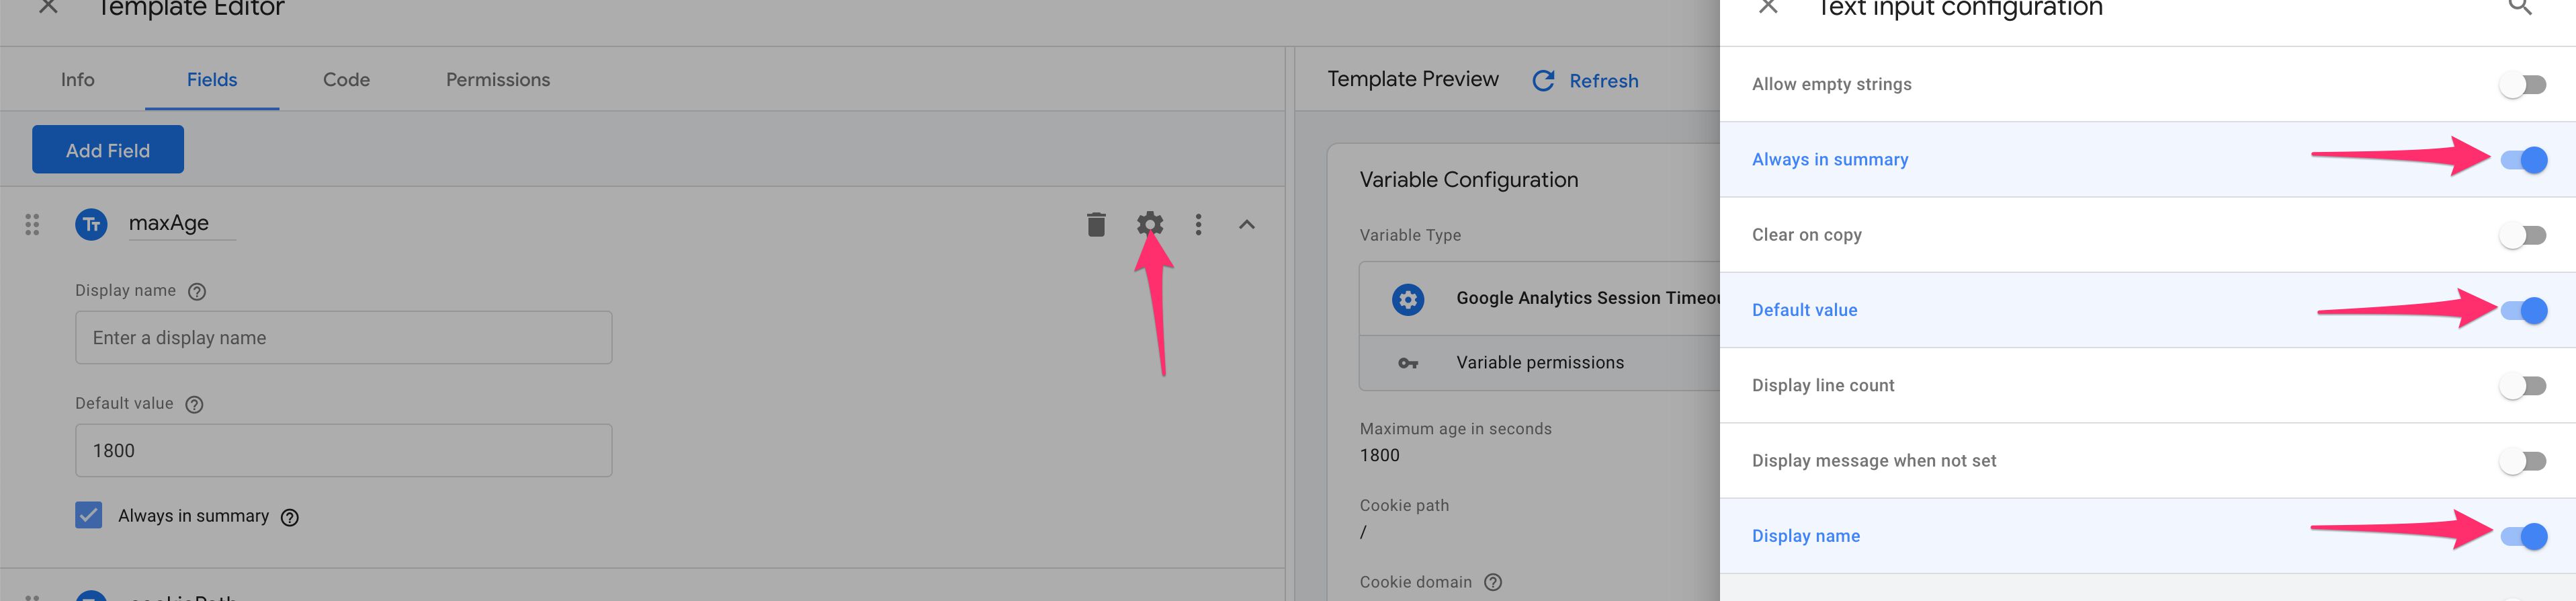
Edit the maxAge settings to be like this:n
Display name: Maximum age in seconds
Default value: 1800
Always in summary: Checked
The Display name is what appears above the field in the editor.
We’ll use a Default value of 1800 seconds (that’s 30 minutes), so if the user doesn’t touch the field, that’s the value that will be used.
Always in summary means that the field contents will show up when the variable is opened in the UI but not in edit mode. It’s a convenience thing, not vital in any way.
Next, click the cogwheel for the cookiePath field, and toggle the same configurations on (Display name, Default value, and Always in summary).
Set them to these values:
Display name: Cookie path
Default value: /
Always in summary: Checked
Finally, click the cogwheel for the cookieDomain field, and toggle the same conditions on, together with the Help text configuration.
Set them to these values:
Display name: Cookie domain
Help text: Set to ‘auto’ to write the cookie on the highest possible domain name.
Default value: auto
Always in summary: Checked
The fields should look like this:
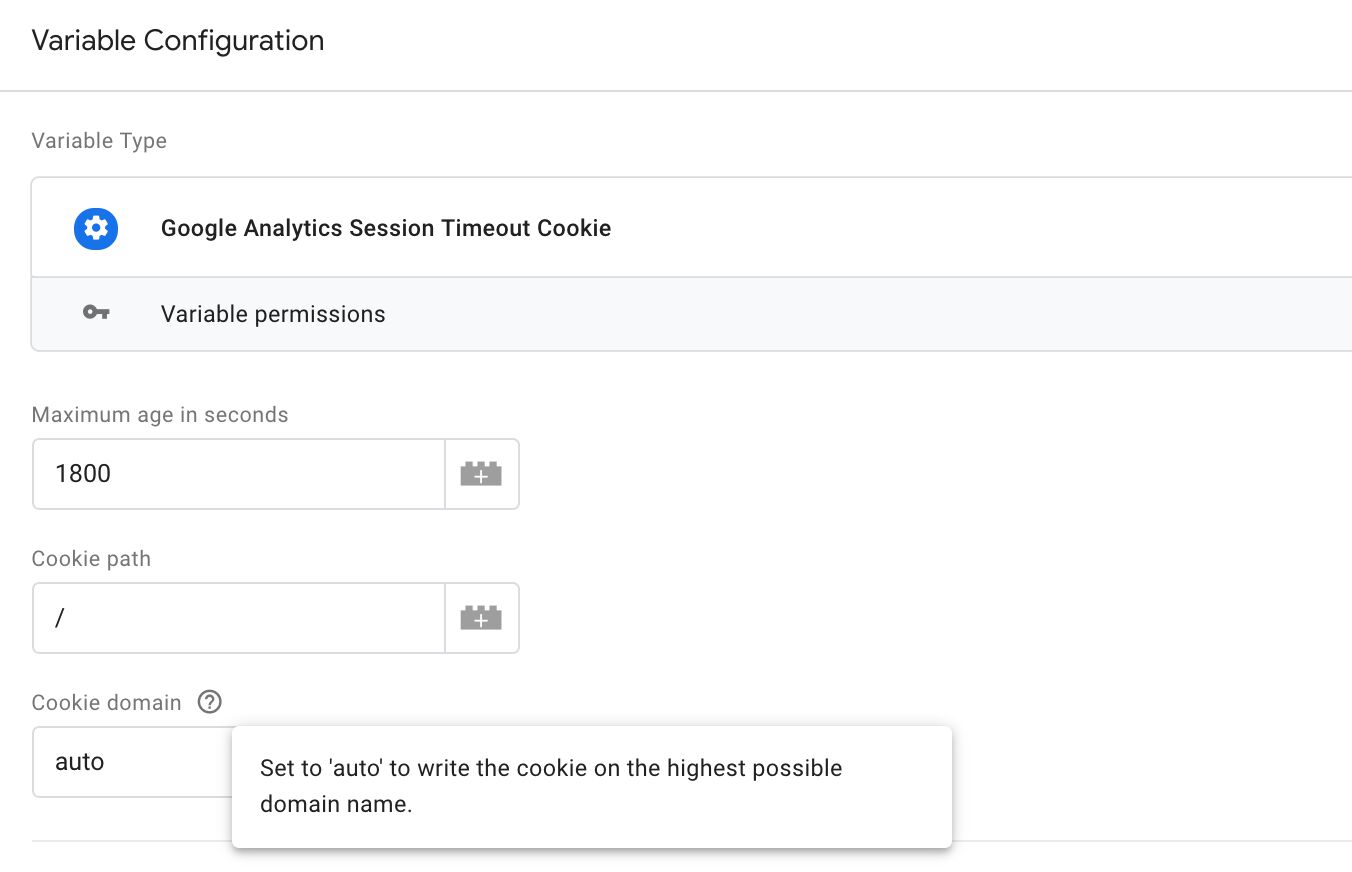
The Help text configuration is pretty cool. If you refresh the Template Preview, you’ll see how there’s a little question mark next to the Cookie domain field. By hovering over it, you’ll see the help text.
Now you’re ready to add the code!
Step 3 - Add some code
Click the Code tab, and replace the contents with the following:
// Require the necessary APIs
const setCookie = require('setCookie');

// Build the options object from user input
const options = {
  domain: data.cookieDomain,
  'max-age': data.maxAge,
  path: data.path
};

// Return the hitCallback function
return () => {
  // Set the cookie when the hit has been dispatched
  setCookie('_ga_session', 'true', options);
};
As you can see, it’s a very simple variable. It uses a single API, setCookie (for obvious reasons), and it has a return statement at the end, which returns a function wherever the variable is called.
If you read the setCookie specification, you can see that it takes three arguments.
setCookie(name, value, options)
To make things a bit easier, we’re building the options object before calling the method. The object has three properties, domain for the domain name, max-age for the maximum age, and path for the cookie path.
The setCookie API has a nice feature where if you set the value of domain to 'auto', it automatically finds the highest possible (i.e. shortest) domain name it can use. Thus, if the variable is called on sub.domain.simoahava.com, the API writes it on simoahava.com.
As you can see, there are no validations or permission checks going on here. After reading this guide, you’ll be able to extend the UI to do the validations directly on the fields, or you can also check the field values in code, falling back to some valid values in case the user input is not perfect.
Once you’ve added the code, make sure to save the template, and then click on over to the Permissions tab of the editor. You’ll need to make sure the template has permissions to write the cookie.
Step 4 - Modify permissions
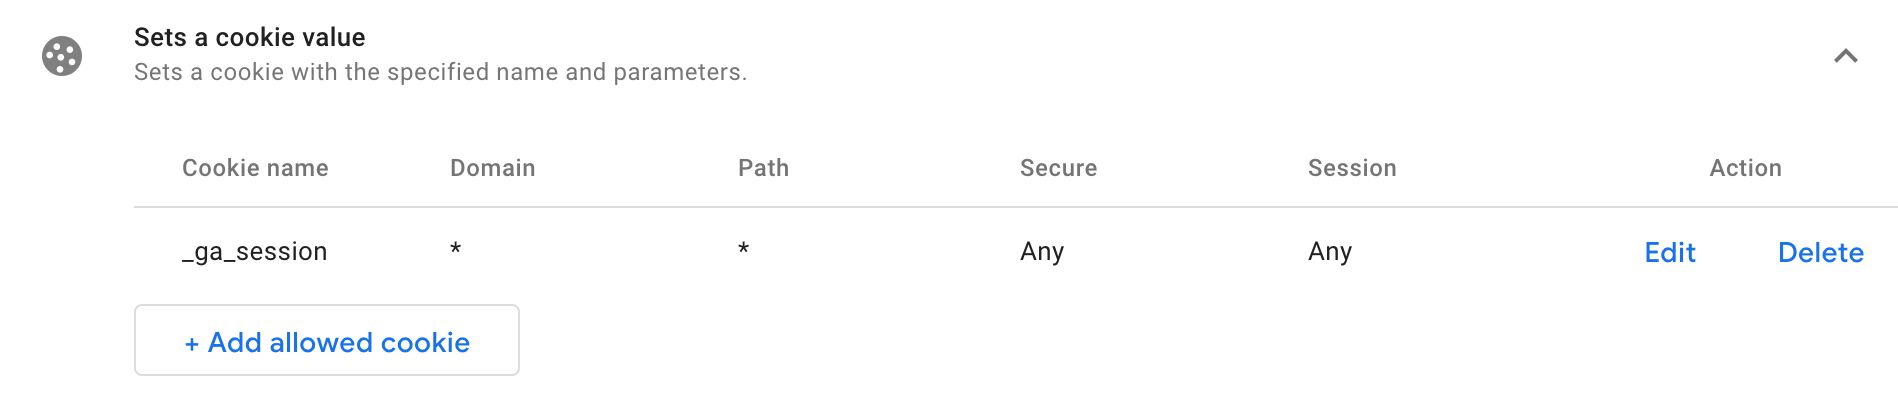
In the Permissions tab, you should now see a permission for Sets A Cookie Value. It’s added automatically when you run require('setCookie') in the template code. Pretty sweet!

Expand the permission, and click the + Add allowed cookie button. In the overlay that opens, configure the cookie as follows:
Cookie name: _ga_session
Domain: *
Path: *
Secure: Any
Session: Any
Click Save in the overlay when done. This is what you should see in the permissions area:
You’re done with the template! Remember to Save it one last time.
There’s not much sense in previewing or testing it in the template editor itself. The variable returns a function, so the only logical place to test it is in an environment where the function is actually executed in context.
Thus, it’s time to create a variable from the template and add it to a tag!
Step 5 - Create variable, add to tag, and preview
Click to Variables in the GTM UI, and click New in the User-Defined Variables section.
In the variable type picker, choose your newly created template from the list.

You can now configure the variable to your liking. The default settings are more than fine for most cases, though.
Next, find your Google Analytics Page View tag (or create one if you don’t have it), check its Enable overriding settings in this tag, and browse to More Settings > Fields to Set. Click +Add Field.
Set the Field Name to hitCallback, and Value to the variable you just created.
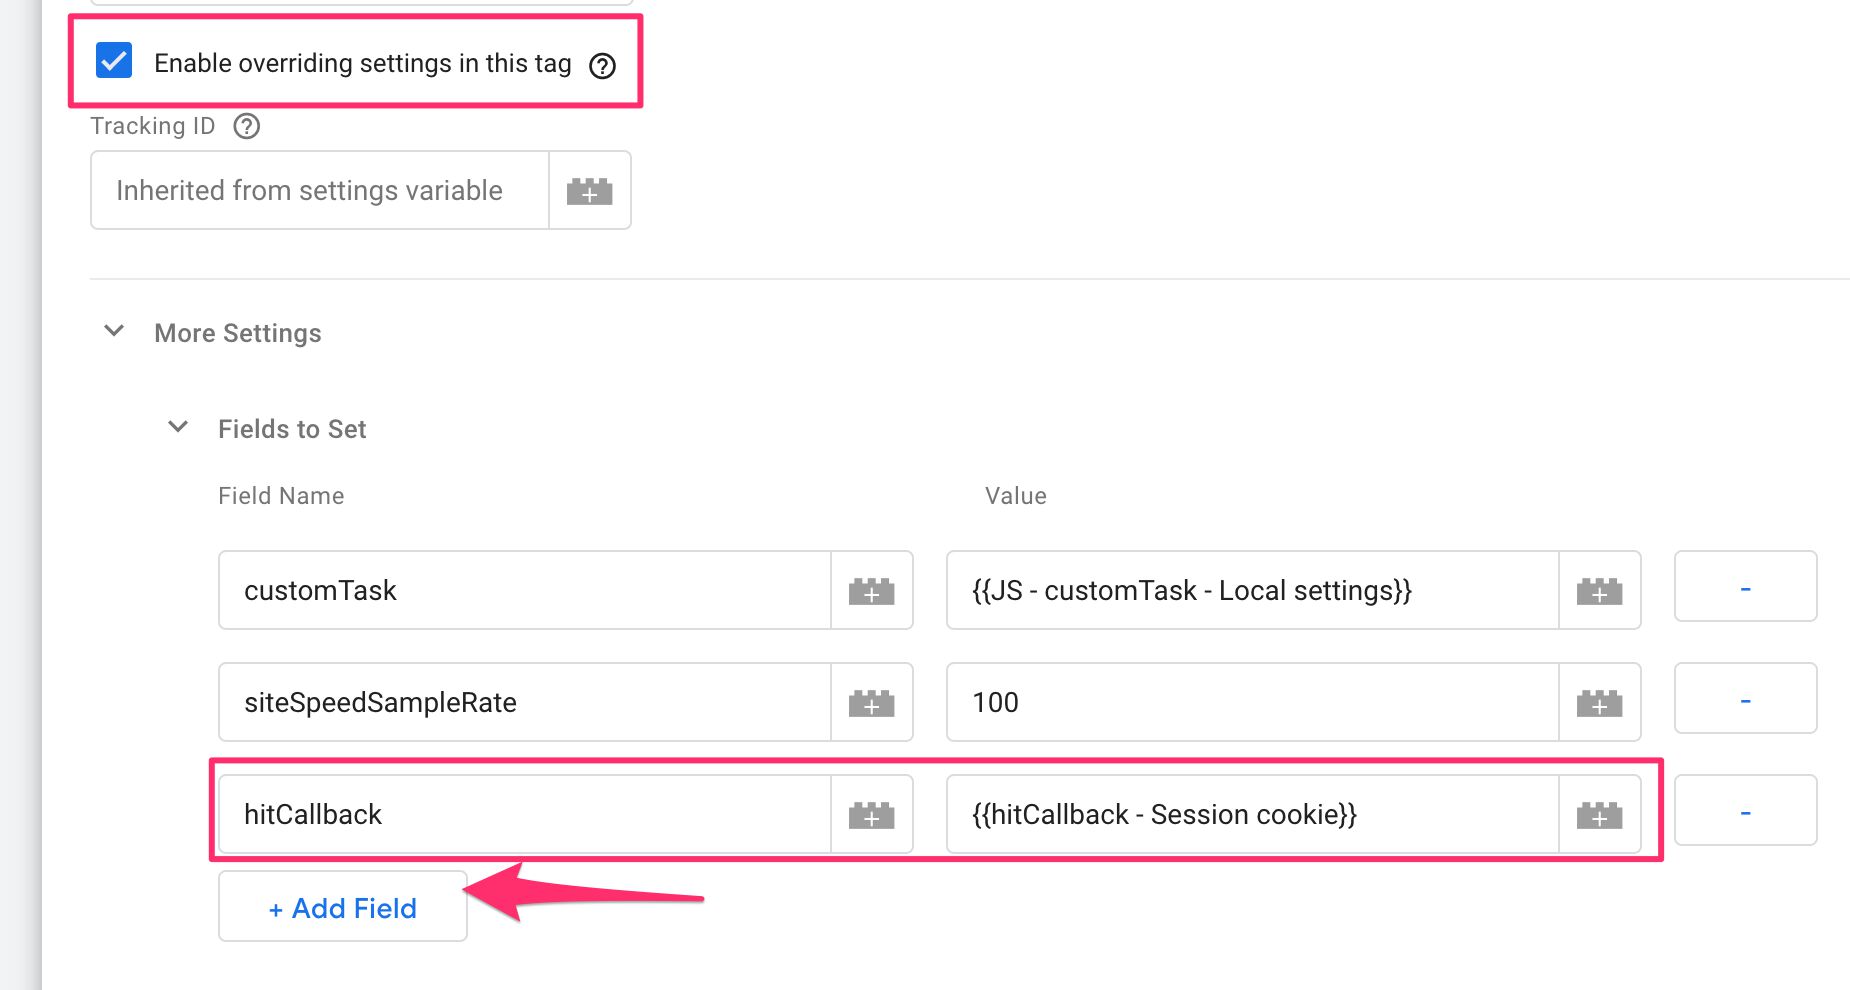
Save the tag, and go to Preview mode. Then, load the page where the Page View tag will fire.
If all goes as planned, you should now find a new browser cookie named _ga_session, with an expiration set to the number of seconds you set in the Maximum age in seconds field. Easiest way to find your browser cookies is to use the developer tools of your browser.
In Chrome, press CMD + OPT + I (Mac) or CTRL + SHIFT + I (Win/Linux) to open the developer tools. Then, activate the Application tab, and select the Cookies option for your domain. You should see the _ga_session cookie with value true, and an expiration in the future (or in the past if you set its maximum age to 0).
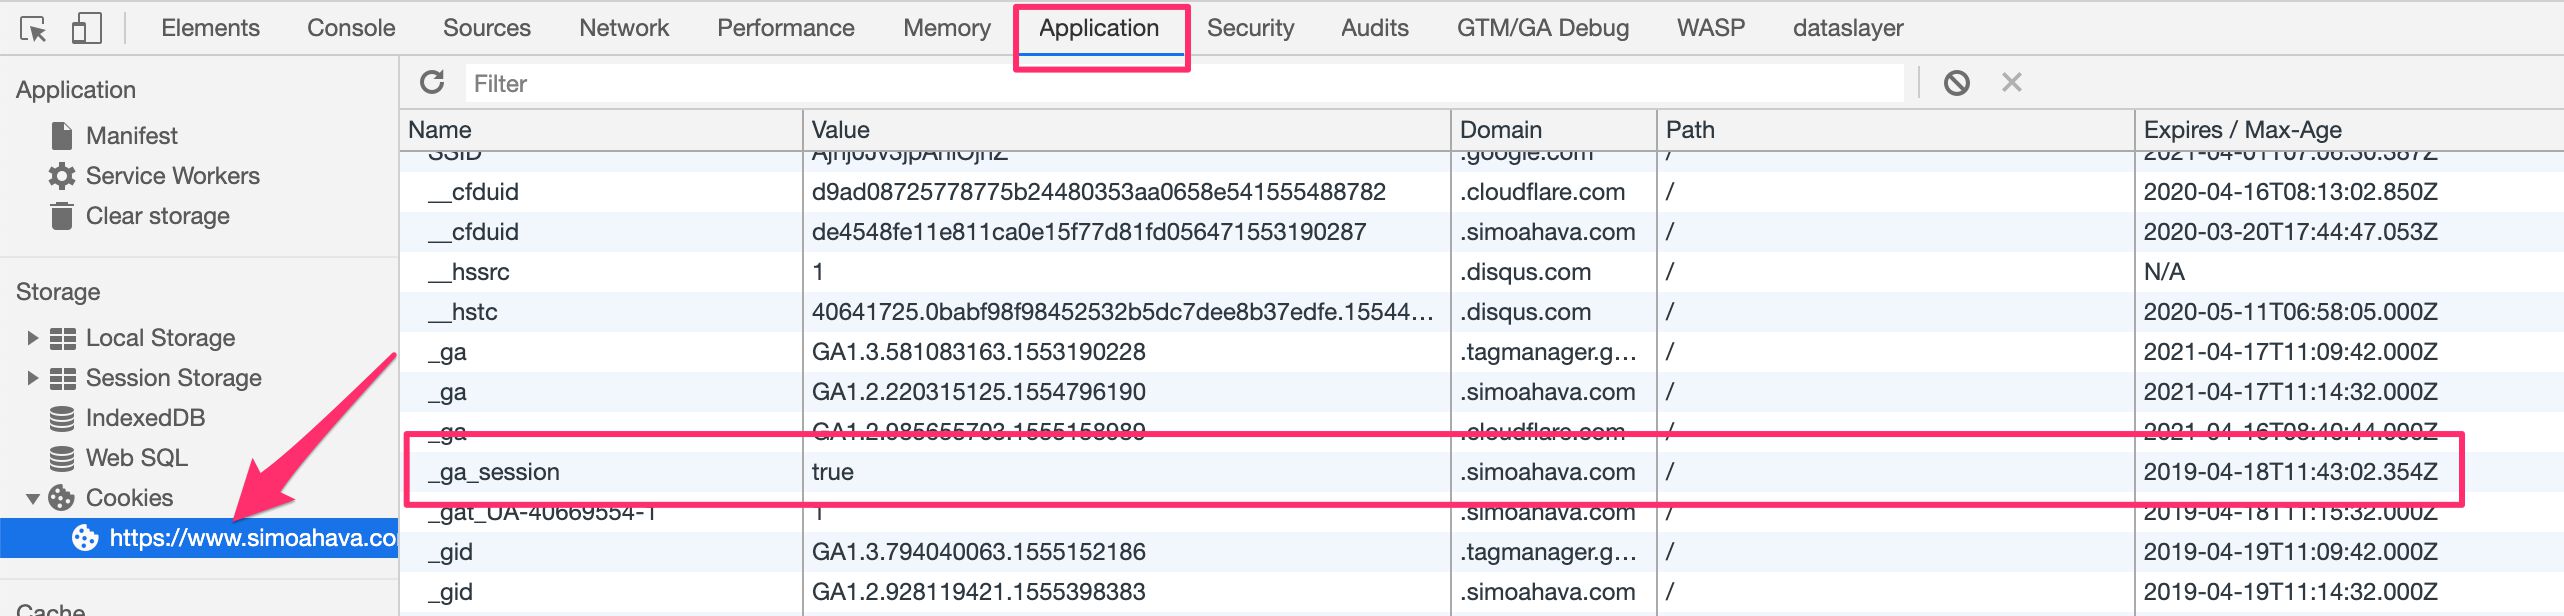
If you see the cookie then congratulations, your variable template works as intended!
Step 7 - You’re done!
The purpose of this guide was to walk you through the steps how to create a variable template.
Yes, we used an extremely simple example, but the idea was to get familiarized with the routine of template creation, rather than jump in the deep end with all the APIs, field configurations, and permissions available.
The main difference to tag templates is that the variable needs to return something. Whatever happens before that final return statement is up to you, but you might want to avoid too many side effects unless you are absolutely certain they are only invoked in a specific, predictable context (such as hitCallback).
That’s it for the tutorial part! Now it’s time to explore with more detail what custom templates are, how they work, and how they are such a game-changer for tag management with GTM.
But first, take a break. You’ve earned it.
Core concepts
Welcome back!
Before we get to the good stuff, let me go over some of the core concepts of Custom Templates. These concepts will emerge and re-emerge in much of the discussion below, and they are fundamental to understanding what Custom Templates are and what they can do.
Sandboxed JavaScript
Custom Templates are written with JavaScript. If you are unfamiliar with the language but still aching to start working with templates, I recommend taking a look at some learning materials before trying your hand with the template code. Check out these (free) learning portals, too:
freeCodeCamp - Excellent and comprehensive JavaScript and web technology tracks that span everything from the very basics to creating stateful web services.
Codecademy - Great tracks for all sorts of programming languages and disciplines offered in a nice, interactive way.
A further complication is that Custom Templates don’t actually use just any old browser JavaScript. They use a special, sandboxed version of the JavaScript language.
Basically, any code you write in the code editor will be automatically wrapped in a function that provides a single argument named data.
function(data) {
  // Start of code editor code

  const log = require('logToConsole');
  const copyFromWindow = require('copyFromWindow');

  const ga = copyFromWindow('GoogleAnalyticsObject');

  if (typeof ga === 'undefined') {
    log('Google Analytics not loaded!');
  }

  log(data.userInputText);

  data.gtmOnSuccess();

  // End of code editor code
}
The data object is really important. Each field in the template will be accessible as a property of the data object, and the value of that property will be the result of the user’s interaction with the field. The data object also has the gtmOnSuccess() and gtmOnFailure() methods you must use to signal the tag’s successful completion or its failure. Variable completion is signalled by a return statement.
In addition to being automatically wrapped as a function body, the set of JavaScript methods and accessors available to you is limited. Basically, you will have no access to the global window object. This includes things like location, document (and document.cookie), console, and any constructors (such as new Date().
To access these global methods and properties, you’ll need to use the template APIs exposed by the template editor.
ES6+ syntax
ES6 (ECMAScript 6) is one of the most significant updates the JavaScript standard, originally released in 2015, with prominent support in all the major browsers. The code editor in GTM’s templates supports some ES6 features. These features include:
constandletkeywords. These two keywords are offered as alternatives to JavaScript’svarkeyword. The main difference is thatconstandlethave block-level scope, meaning they are scoped to the context of the wrapping{and}, rather than the whole surrounding function context as withvar. Furthermore, there’s no variable hoisting -constandletvariables cannot be referenced before their declaration. Finally,constvariables cannot be reassigned.Arrow functions. Arrow functions are a new way to write JavaScript function expressions. It’s syntactically more compact, so pursuers of “elegant code” rejoice. For example,
var multiplyByTwo = function(a) { return a*2; };becomesconst multiplyByTwo = a => a*2;. Unlike “regular” JavaScript functions, there’s nothisbinding and no access to theargumentsobject.
You are of course free to use the “old” style of JavaScript. In the templates’ code editor, I will try to adhere to ES6 syntax purely out of habit, but also because using const and let actually has some functional weight in the code, too.
Restrictions to what type of data you can handle
To prevent users from circumventing template permissions and from running code that breaks through the templates’ sandbox, Google Tag Manager has a number of suppression mechanisms built in.
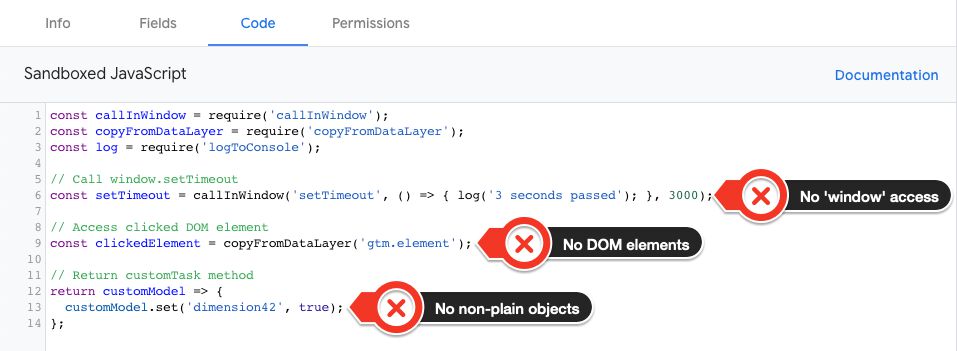
You can’t access
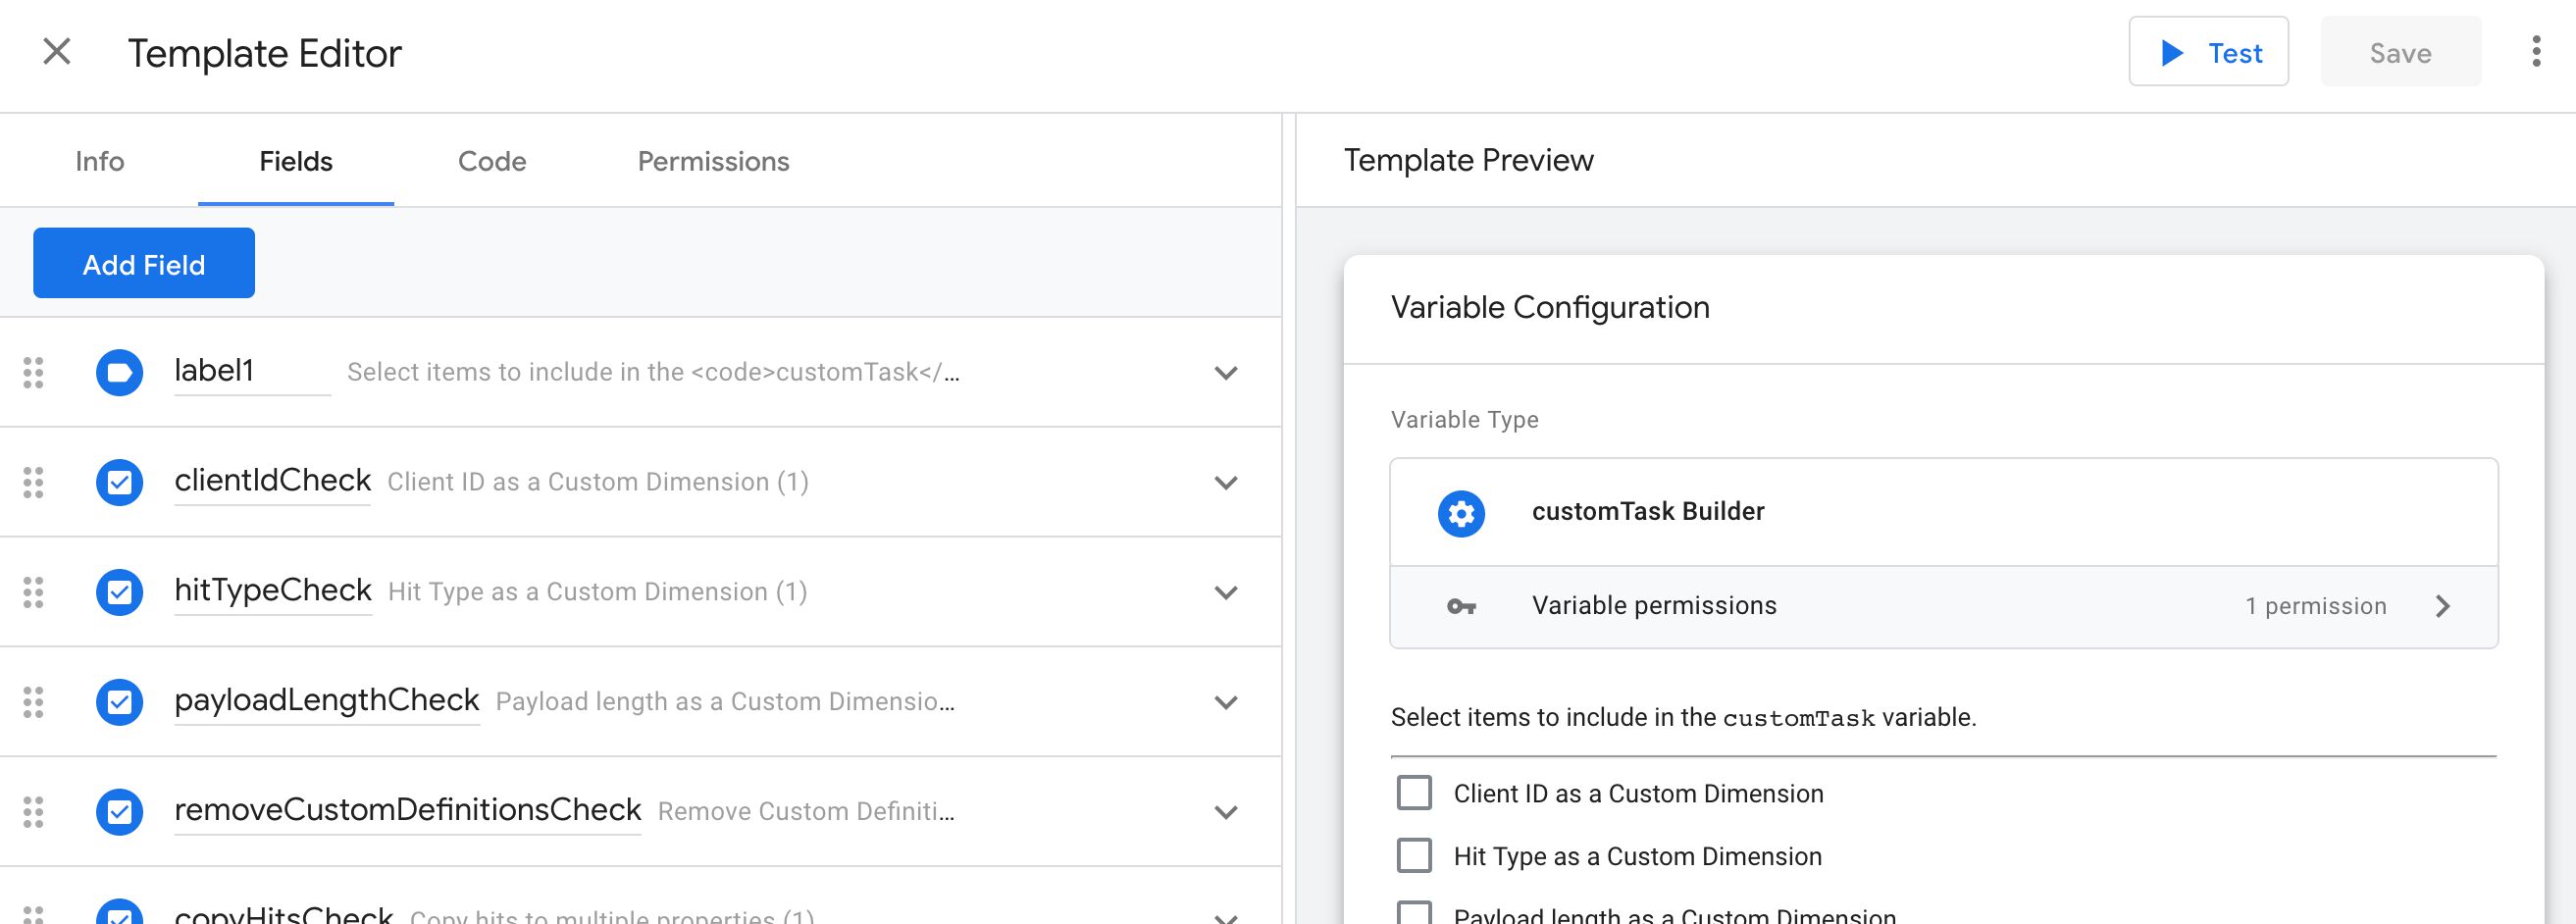
windowordocumentdirectly. Access to the global namespace is restricted to template APIs. Even if you tried something clever such as returningwindow.setTimeoutin a JavaScript variable, so that it’s technically not in the code editor itself, the template editor automatically parses all variables and user-based input brought into the template before it is made accessible to the code editor.You can’t pass non-plain objects, such as instances created with construtors, to the template code. It’s difficult to contain security of these, because the prototype chain can be manipulated by code outside the template, making the template itself vulnerable and less secure. This basically means that things like
customTaskwill not be possible to do with variable templates for now, because it requires access to a constructed, non-plainmodelobject to function.You can’t access DOM elements. This is kind of the same as (2), because a DOM element represents a complex, non-plain object type. Nevertheless, it means that you can’t access things like
{{Click Element}}in template code.
In time, I’m certain the proliferation of APIs in the template will solve many of the restrictions above, but first and foremost the point of templates is to add a layer of security to prevent scripts outside the template from messing with the code within.
Another one of the idiosyncracies of the templates’ sandboxed JavaScript is how function expressions exposed outside the template code are encapsulated in a wrapper by GTM.
The purpose of this wrapper is to make sure functions set in the window or returned by the variable template can’t be used to circumvent permissions set in the template.
The wrapper itself is almost always inconsequential, because it passes the parameters collected by the wrapper to the function created in or handled by the template. However, if any one of the parameters violates the restrictions listed above, the parameter is suppressed and replaced with undefined.
Template APIs
The most common global properties and methods you’ll need to use are abstracted behind custom APIs. We’ve covered a number of API examples in the preceding chapters. For example, there’s logToConsole for logging items to the JavaScript console of the browser, and there’s copyFromWindow for accessing global variables defined in the window object.
Each API comes with its own configurable set of permissions. The copyFromWindow API, for example, requires that you define the global keys the code has access to. As soon as you type the require('copyFromWindow') statement and refresh the template, the Accesses Global Variables permissions will become available in the respective tab.
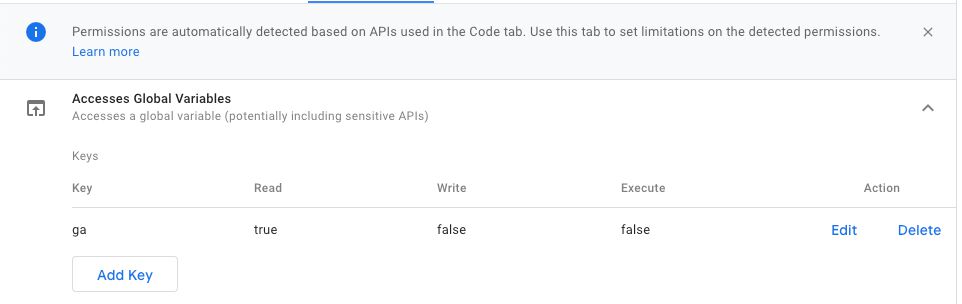
As you can see, for these particular permissions you can define the keys and whether the code has read and/or write and/or execution permissions for them. You might have guessed now that Access Global Variables is not limited to just copyFromWindow (which is read-only), but also determines the usefulness of e.g. setInWindow (for writing/setting global variables) and callInWindow (for calling global methods).
The purpose of this sandboxed JavaScript is to give you a safe and secure JavaScript environment to write and run your code in. The interplay between your code and the permissions model is designed to produce code that is as conservative as possible without compromising the runtime logic of what you want to do with the code.
This doesn’t mean that you can’t cause havoc with your custom template - quite the contrary. However, the user interface guides you to make the correct choices when choosing the APIs and the permissions thereof. Hopefully the guide you are currently reading will further help you understand how to make your code run in the most efficient and responsible way possible.
Server-side tagging
Server-side tagging has its own set of APIs, which mainly revolve around parsing HTTP requests and compiling HTTP responses. The purpose of a Client is to read the incoming requests, launch virtual container processes for tags and triggers, and then build a response back to the source of the original request.
This guide is mostly focused on Custom Templates in web containers, but all the main features apply to Server-side tagging as well.
Policies
The counterpart of permissions are policies. Policies give the site owner the ability to block potentially hazardous code from running. It’s somewhat similar to Google Tag Manager’s whitelist/blacklist feature, except with policies you have extremely granular access to how individual permissions are handled.
Policies are basically dataLayer commands which specify what happens when a Custom Template for which some permissions have been set tries to execute on the page.
If you don’t define any policies then the tag or variable will run its course unimpeded.
However, you can create a policy which is invoked whenever some specific permission is accessed by the template. Let me show you an example:
const getCookie = require('getCookieValues');
const log = require('logToConsole');

log(getCookie('_user_id'));
data.gtmOnSuccess();
The template code above uses the getCookieValues API to log the value of a cookie named _user_id. When you save that code, a new permission appears in the editor, and you need to whitelist the cookie names the code is allowed to access:
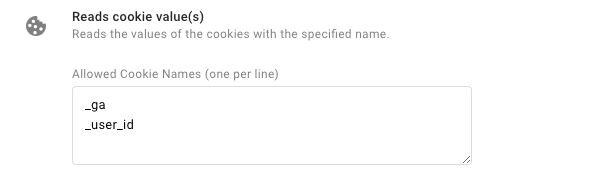
Now, if you didn’t specify a policy, the code would always log the cookie value into the console when the tag runs, because the _user_id cookie has been whitelisted in the tag permissions.
However, let’s say the page has the following code in the HTML:
window.dataLayer = window.dataLayer || [];
function gtag(){dataLayer.push(arguments);}

gtag('policy', 'get_cookies', function(container, policy, data) {
  if (data.name === '_user_id') {
    throw('You are not allowed to query _user_id on this page!');
  }
  return true;
});
Don’t be confused by the
gtag()command - policies use thegtag()method, which is essentially a helper to push the arguments intodataLayer. You do not need to download the gtag.js library to be able to run policies on the site template.
Now when the tag is run and the getCookie('_user_id') code is executed, the policy you created will activate. This policy checks if the requested cookie was named _user_id, and reacts by throwing an error. Perhaps the developers have deemed it too risky to allow GTM to query the _user_id cookie like this.
You don’t need policies to work with Google Tag Manager’s Custom Templates. However, given how popular Custom Templates are likely to become, I do expect to see more and more policies defined, too.
Be sure to check out the policy reference at the end of this guide for more details on how individual policies should be set.
Tests
Tests allow you to write unit tests for your template code directly in the editor. The tests feature comprises a number of APIs you can use to, for example, mock the data object and write assertions against the compiled and executed template code.
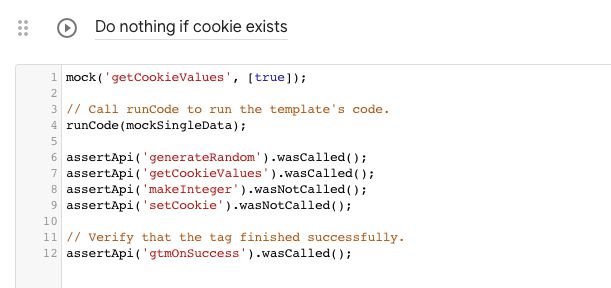
For more information about how to write and run tests with custom templates, see this guide:
Writing Tests For Custom Templates In Google Tag Manager
Official documentation
When working with Custom Templates, you should have two documents at hand:
Custom template APIs reference - This document introduces the various APIs you’ll need to use if you want your code to run beyond the boundaries of the sandbox.
Custom template permissions reference - This reference lists the permissions the APIs require, and which are used to create policies with which web pages can deploy an additional layer of governance for running custom templates.
**Custom template APIs for Server-side tagging - This document lists the APIs available for Client and tag templates in Server-side tagging.
Keep those documents open when working with Custom Templates. I won’t repeat their contents in this guide, but I do refer to them where necessary.
The editor
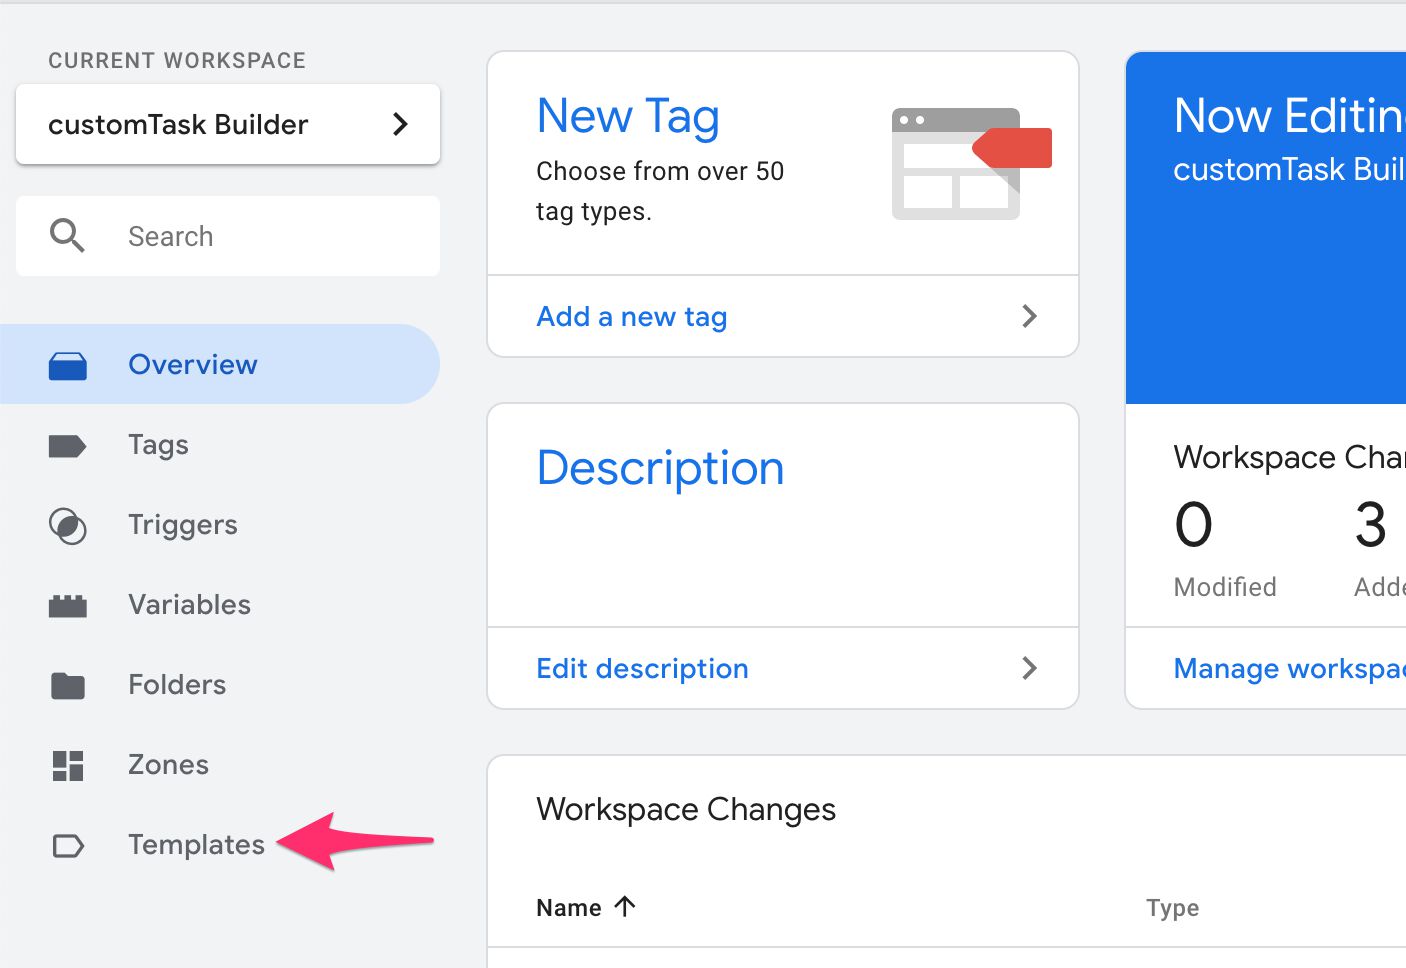
Let’s jump right in! To start creating a new template, click the Templates menu option.
Next, click New in the right corner of the Tag Templates card.

What you see now is the template editor. There are several views and menus here, so let’s start with a quick overview.
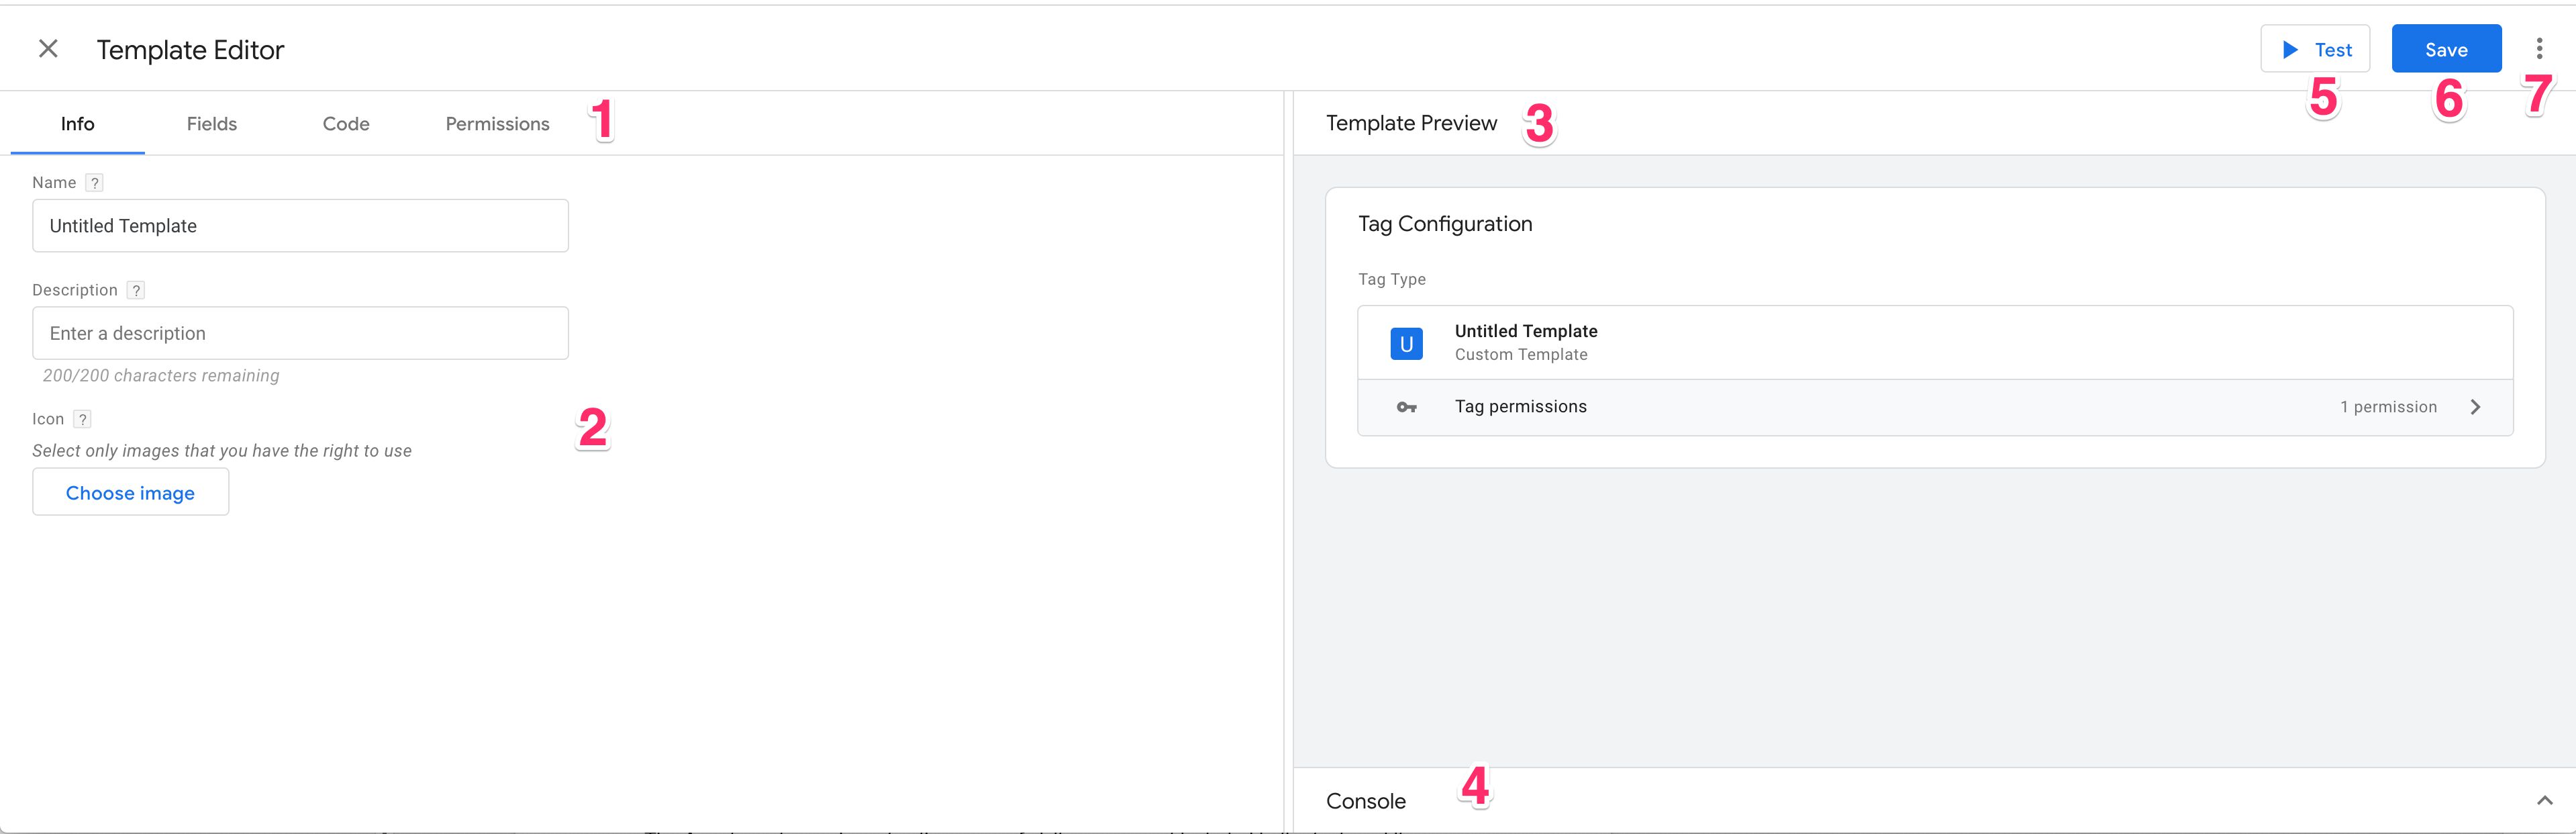
1 - The main navigation of the editor. If you have Show advanced settings checked in the editor menu, you’ll also see the Notes tab here.
2 - The editor view for the selected tab. If you have Show advanced settings checked in the editor menu, you might see extra options here.
3 - Template Preview shows what the template will look like when saved. If you’ve made changes to the template, you’ll see a Refresh link here, which will update the preview when clicked.
4 - The Console will log information about template performance when you Test the template. Additionally, any calls to the logging API will be output here, too.
If you select Show Test Page from the editor menu, you’ll see the Test Page window between the Template Preview and Console.
5 - Click Test to execute the template code with the settings you have entered in the preview. If you’ve chosen Show Test Page from the editor menu, then any code that modifies the page will impact what the Test Page shows.
6 - Save the template. The template cannot be saved if the code has syntax errors or invalid JavaScript. You need to fix the errors before saving. Note that the template can be saved even if you have incorrect permissions for the APIs you use.
7 - The editor menu. The editor menu has options for managing the template and for customizing the editor.
The editor for tag templates and variable templates is largely the same. The main difference is the absence of an icon/logo selector in the info view and how the code editor is utilized. With tags, the code editor needs data.gtmOnSuccess() for successful execution and data.gtmOnFailure() (if necessary) for a failure. Variables, on the other hand, don’t use this. You just need a return statement that returns whatever the variable is supposed to return.
Info view
The Info view is where you’ll customize what the template looks like. Verbosity is not a sin - try to be as clear and descriptive in the template name and description as possible.
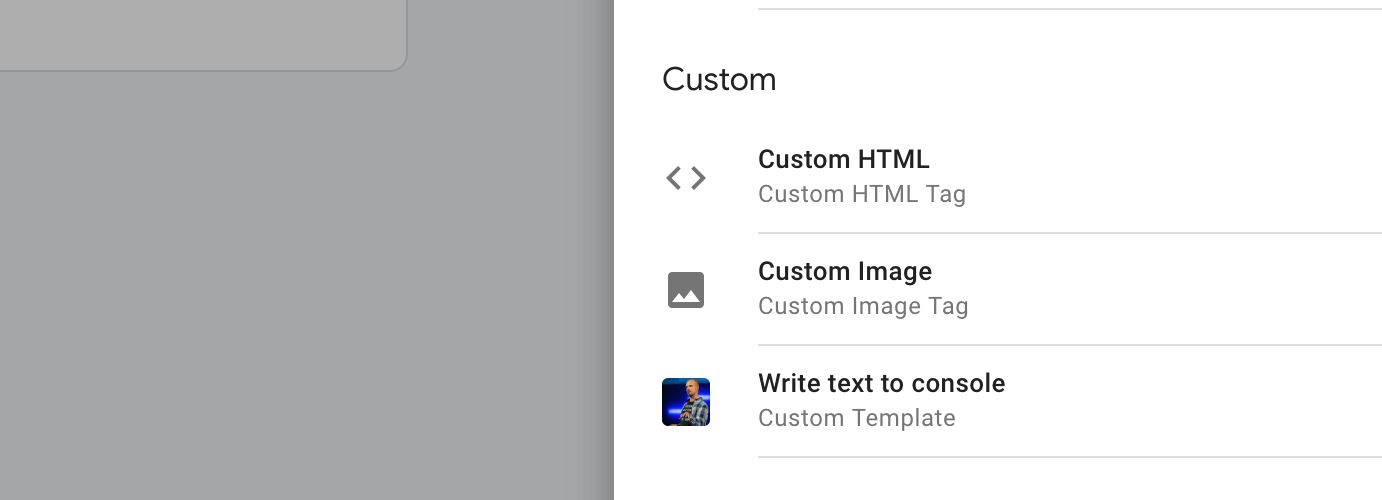
The Name of the template is what appears in the tag/variable selection menu as well as in the template itself when you create a new instance from it.
The Description will appear in the tag/variable selection menu below the template name.
Tag templates allow you to choose an image for the template. This image will appear in the tag selection menu and the template itself.
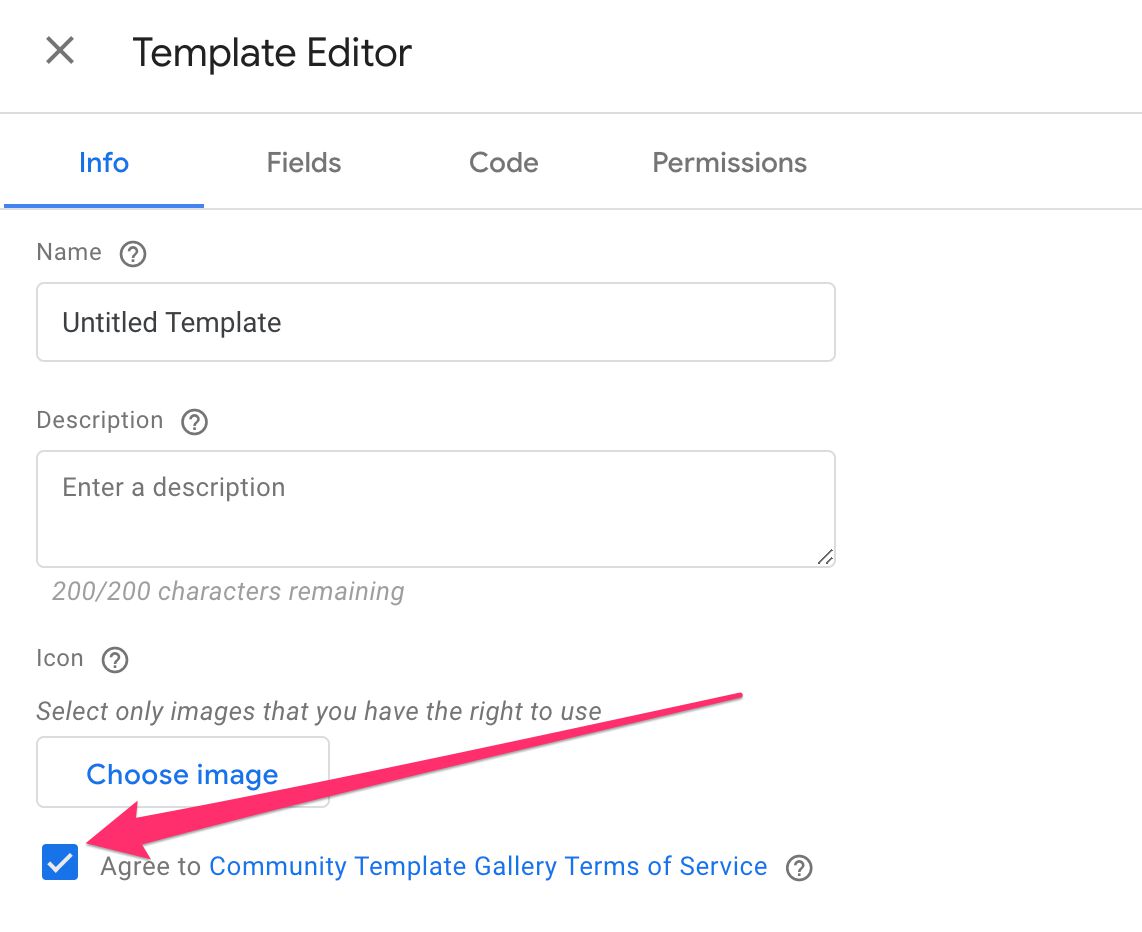
At the bottom of the Info view is the checkbox for approving the terms of service for the Community Template Gallery. You only need to check this if you want to submit your template to the gallery.
If you have Show advanced settings selected, you’ll also see the template version as well as the contexts in which the template works.
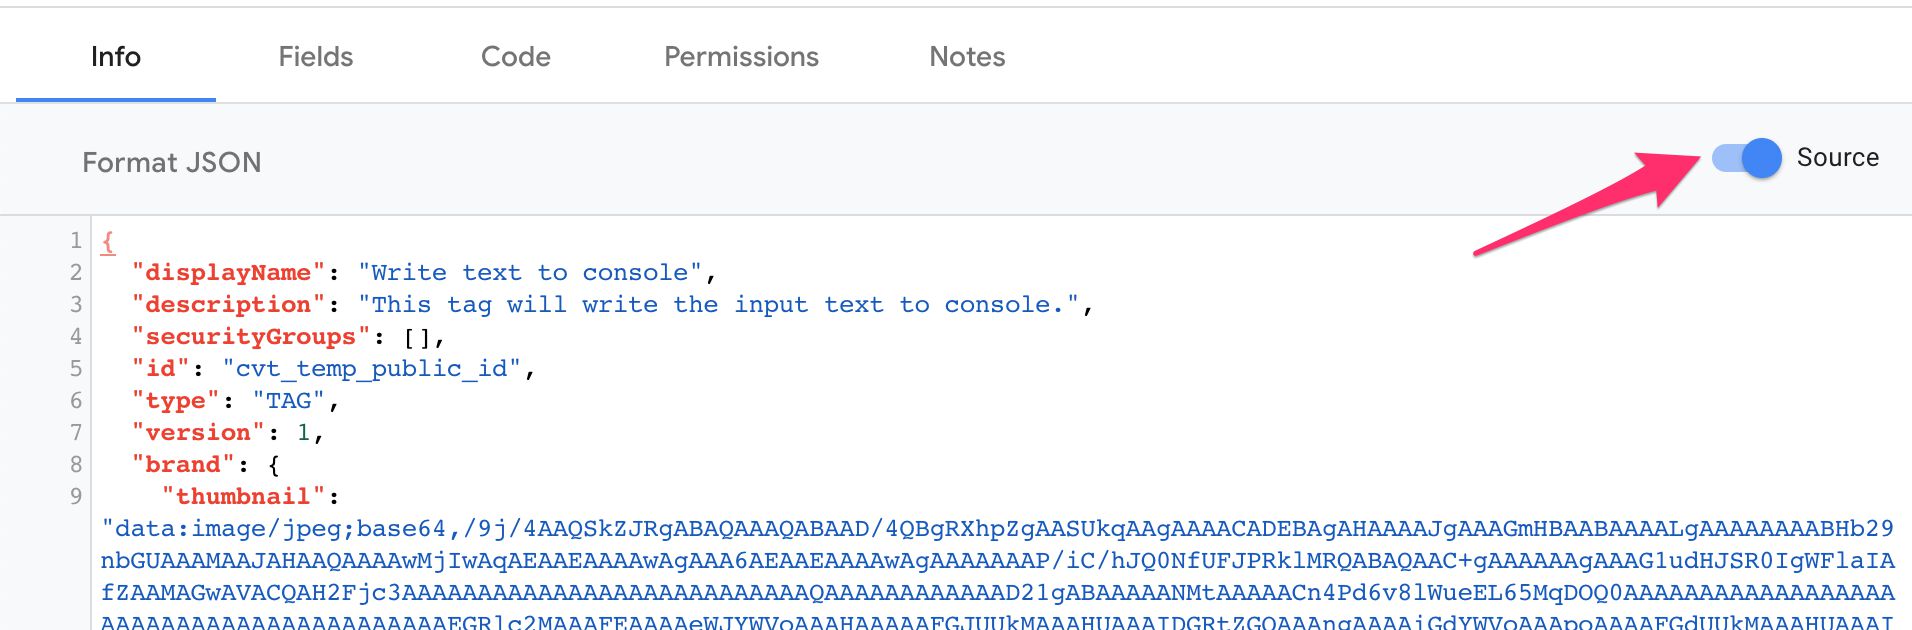
You’ll also see a Source toggle in the top of the view. By clicking the toggle, you’ll see the JSON representation of the template info, which you can edit (if you want to change the context, for example).
Fields editor
The Fields editor is where you’ll spend a lot of your time. You use this editor to establish what the tag or variable user interface will look like, and how individual fields interact with each other.
For each field you create, you need to specify (at least) a name with which you can refer to the field value in the code editor. The field name must be unique, since all fields (even those nested within other fields) will be directly accessible using the field name as a property of the data object. For example, to access the value of a field whose name is gaTrackingId, you’d use this in the code editor:
const ua = data.gaTrackingId;
log(ua); // logs UA-12345-1 or whatever the user set the value of the field to.
Furthermore, each field has a field configuration that you’ll use to establish how the field functions in the user interface of the template itself.
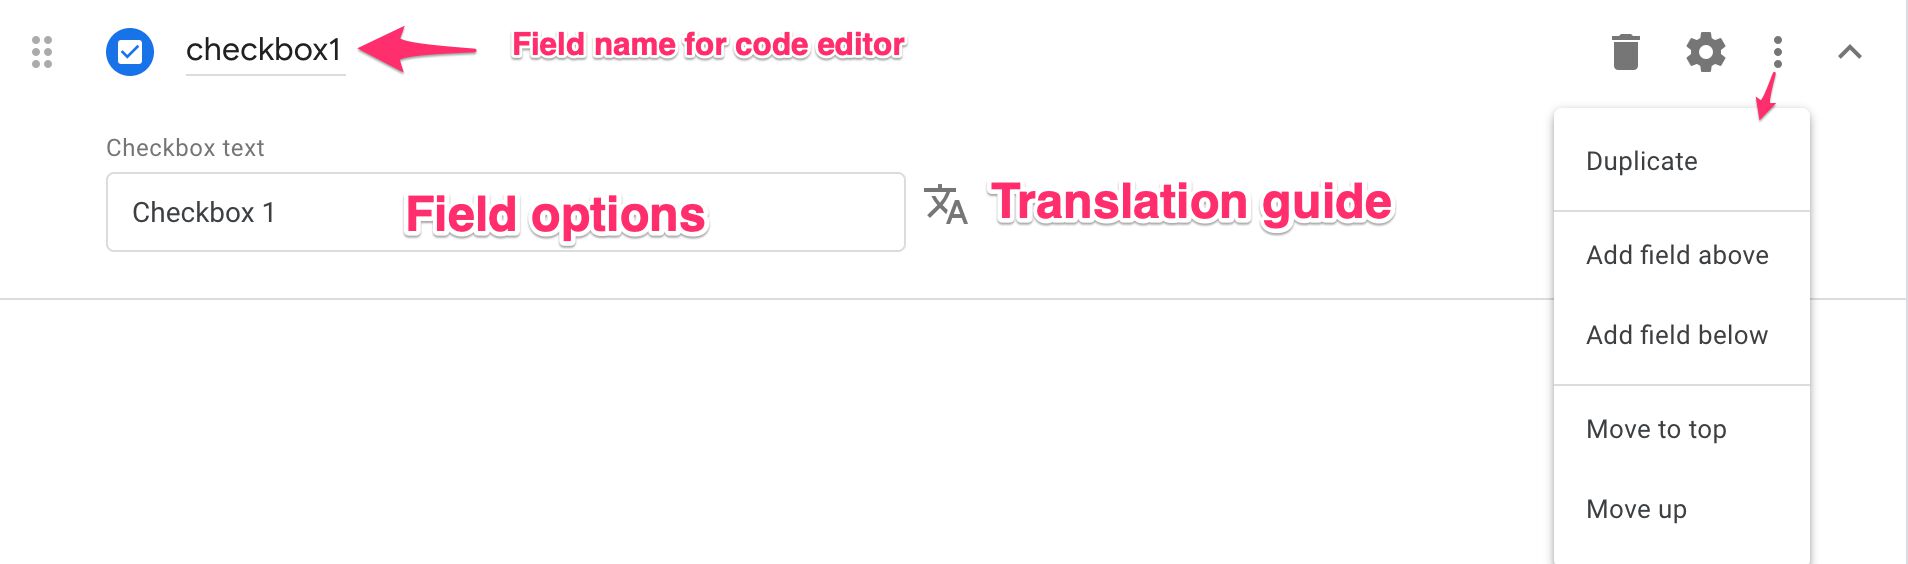
Below the field name are the options and settings for the field. You’ll see more of these as you add additional configurations.
In the top right corner of each field row you’ll see a trash can for deleting the field.
There’s also a cogwheel which opens the field configuration options.
The more options menu opens options for manipulating the positioning of the field (see screenshot above), and the caret at the very right lets you collapse and expand the field in the editor.
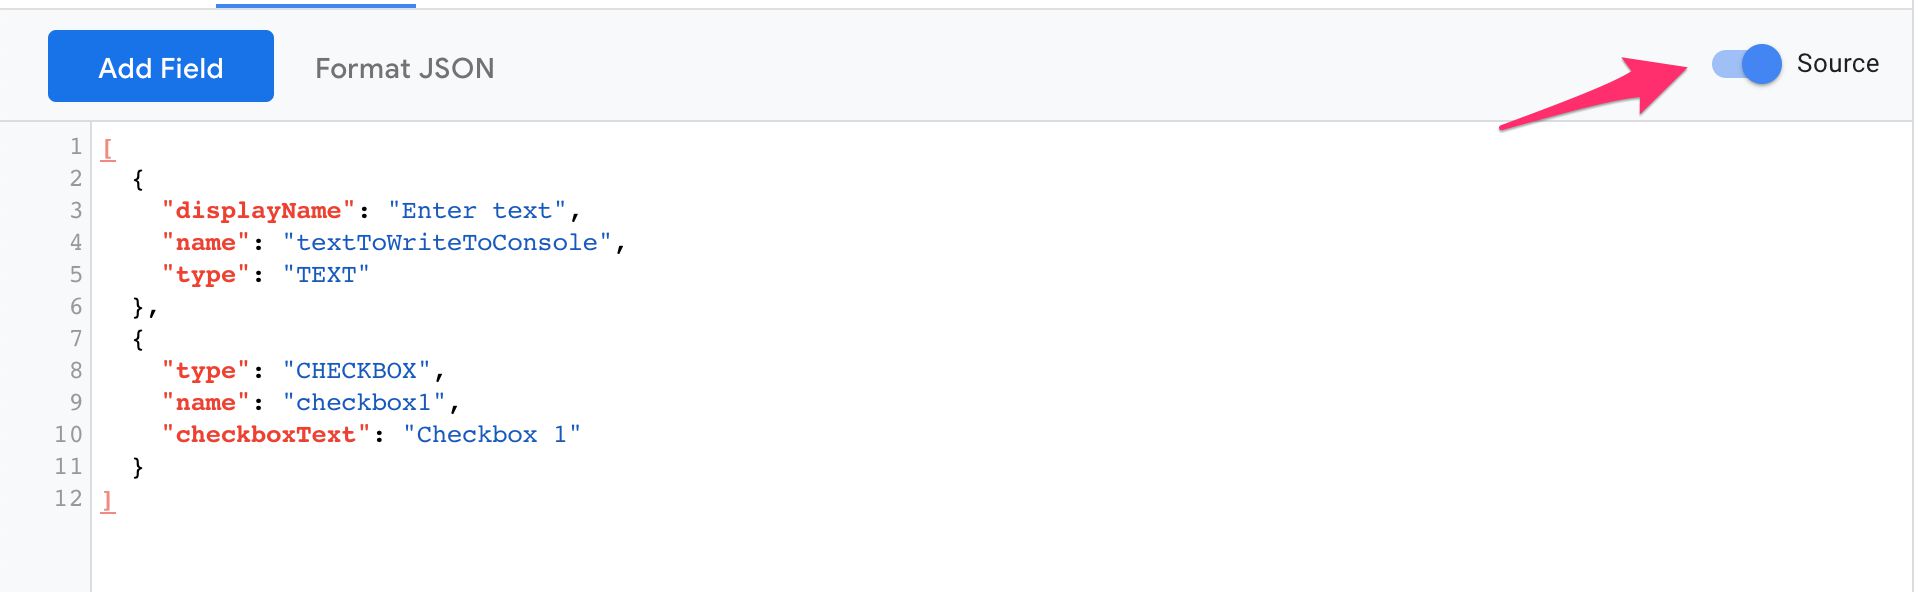
If you have Show advanced settings enabled, you can toggle the Source toggle in the top corner of the view to see a JSON representation of the fields.
Field configuration
Whenever you add a field in the editor, you have the option of configuring field-specific rules and settings by clicking the cogwheel icon next to the field.

Depending on the field you opened the configuration for, you’ll see a set of toggles that you can toggle on or off. Some toggles are on by default, again depending on the field you are configuring.
As you read through the field descriptions below, I’ve added the configuration options for each field. Furthermore, at the end of this guide there’s a field configuration reference which lists all the possible configuration options in more detail.
Note that some fields can be nested, and some fields actually include nested fields by default (e.g. the Param table field). In these cases, the nested fields are treated as their own fields with their own configurations. The only difference between an isolated and nested field is that the latter is subservient to the field configurations of its parent. For example, if the parent is disabled due to enabling conditions not validating, the nested fields will be disabled, too.
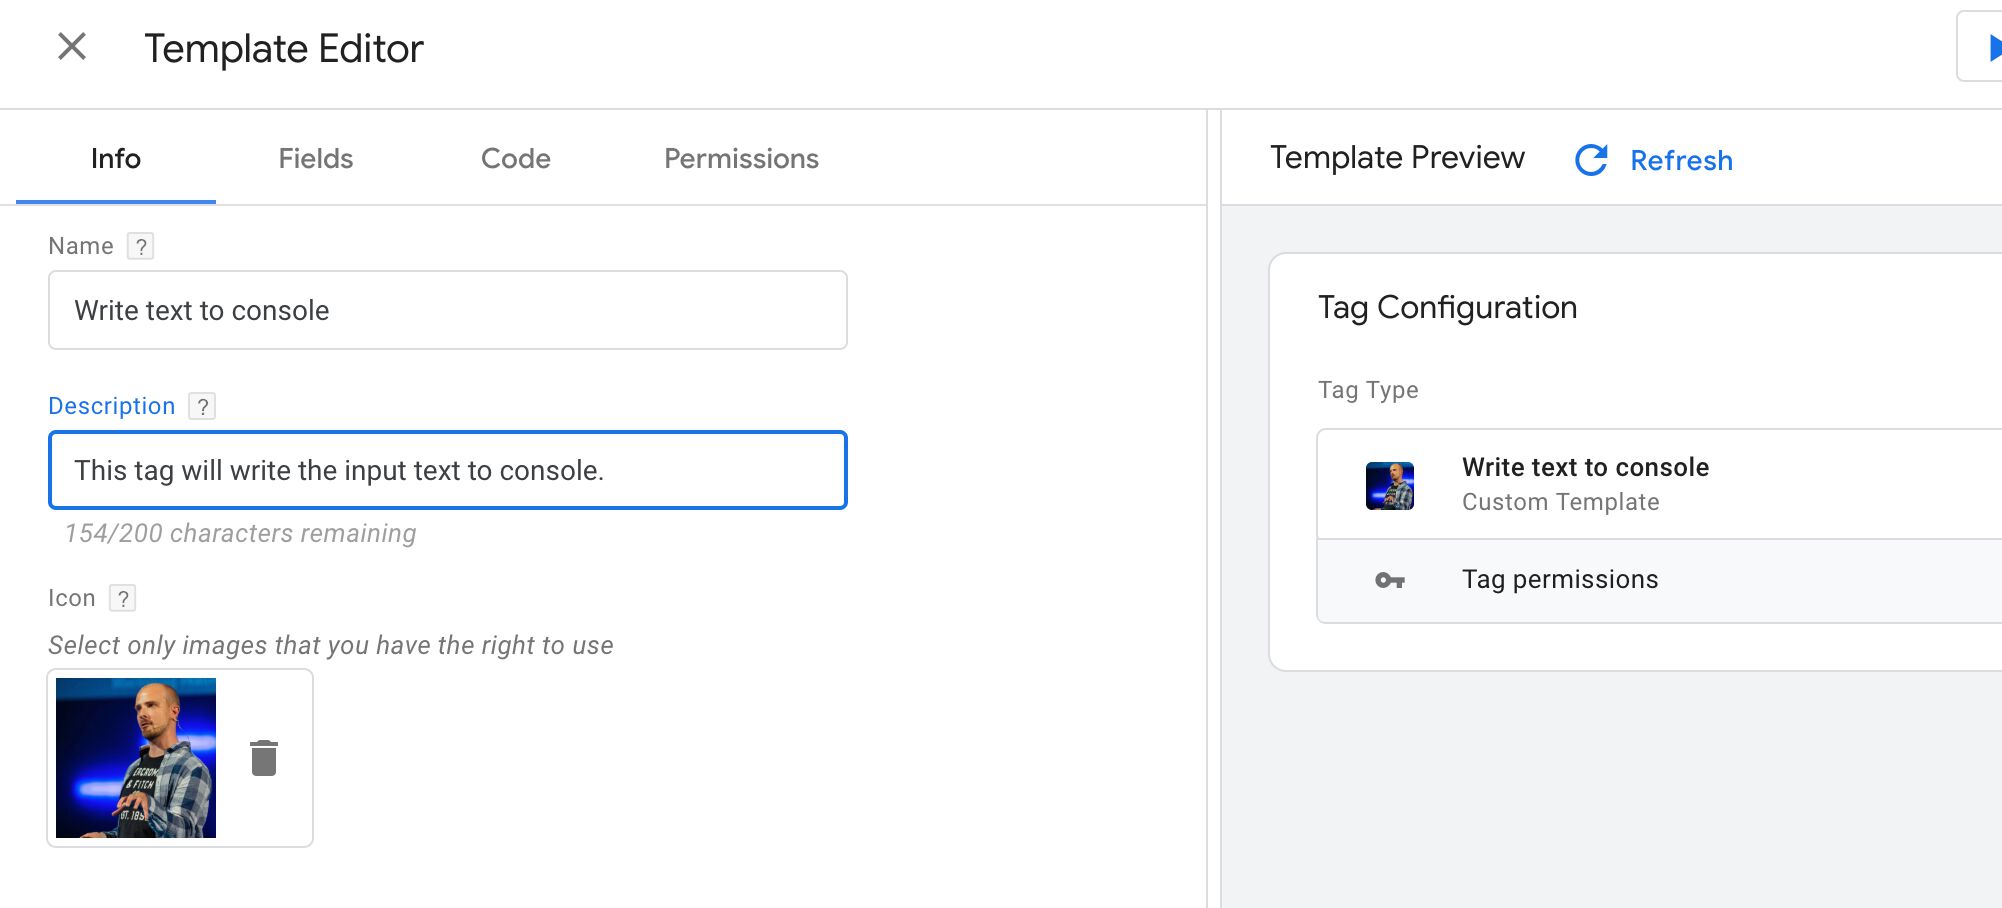
Text input
Description
The Text input field is a simple input box to which the user can write text.
 Text input field in the editor
Code editor output
The property data.fieldName will resolve to whatever the user typed in the field, or whatever a GTM variable used in the field resolves to.
// Using the example from the screenshot above
const textFieldValue = data.textToWriteToConsole;
Available field configurations
Click the configuration name to jump to details about the configuration in the reference at the end of this guide.
- Allow empty strings - Convert and unfilled field into an empty string. OFF by default.
- Always in summary - Show the field and its current value in the summary view of the tag or variable. OFF by default.
- Clear on copy - Prevent filled field values from being copied when a copy is made of the tag or variable. OFF by default.
- Default value - The value of the field until the user decides to change it. OFF by default.
- Display line count - Line count of greater than 1 turns the field into a text area. OFF by default.
- Display message when not set - When the field is untouched, show this text in the summary view. OFF by default.
- Display name - The label of the field shown in the GTM UI. ON by default.
- Enabling conditions - Establish conditions (based on other field inputs) for showing this particular field. OFF by default.
- Help text - Add text to a question mark tooltip shown next to the field. OFF by default.
- Text as list - When the text field is a text area (see Display line count above), store the value of the field as an array, where each item represents a row of input. OFF by default.
- Validation rules- One or more rules against which the field must validate before the user can save the tag or variable. OFF by default.
- Value hint - Text shown as a placeholder help text in the field before the user starts editing it. OFF by default.
- Value unit - Text shown next to the field. Useful to specify a format or type, for example. OFF by default.
Drop-down menu
Description
The Drop-down menu field provides a menu where only a single item can be selected. It’s often a combination of predefined items (such as True and False), and all the Google Tag Manager variables in the container.
 Drop-down menu in the editor
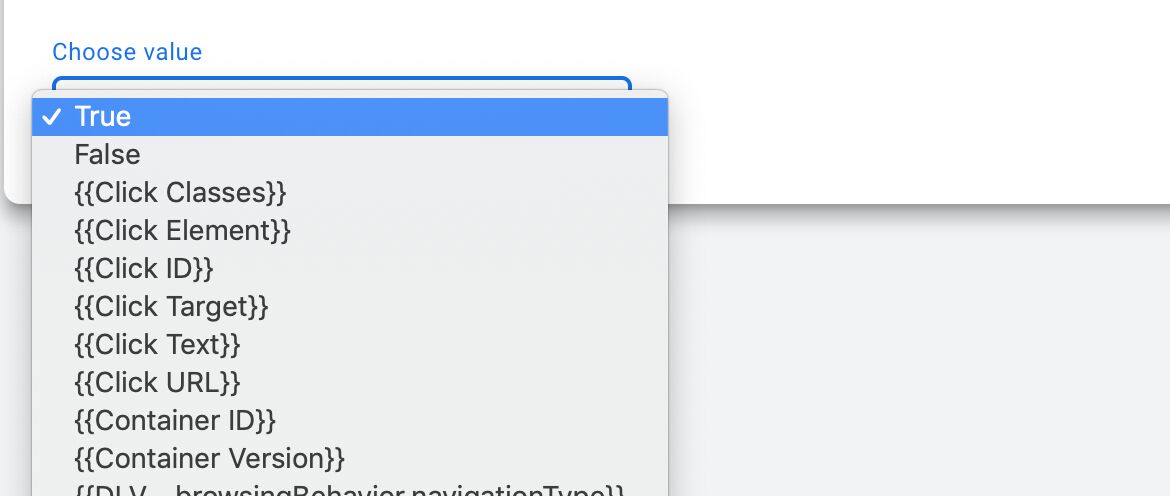 Drop-down menu in the UI
Code editor output
The data.fieldName property will resolve to the value of the item selected from the drop-down menu. If the item was one of those you defined in the template editor, then what you wrote in the Value field is what the property resolves to. If the user selected a GTM variable, then the value returned by that variable is what the property resolves to.
const dropDownFieldValue = data.dropDownMenu1;
log(dropDownFieldValue); // logs true if an item whose Value is true is selected.
Available field configurations
Click the configuration name to jump to details about the configuration in the reference at the end of this guide.
- “Not set” option - Show a placeholder value in the menu before the user has selected anything. If menu is left untouched, the field returns an empty string. OFF by default.
- Always in summary - Show the field and its current value in the summary view of the tag or variable. OFF by default.
- Clear on copy - Prevent filled field values from being copied when a copy is made of the tag or variable. OFF by default.
- Default value - The value of the field until the user decides to change it. OFF by default.
- Display name - The label of the field shown in the GTM UI. ON by default.
- Enabling conditions - Establish conditions (based on other field inputs) for showing this particular field. OFF by default.
- Help text - Add text to a question mark tooltip shown next to the field. OFF by default.
- Include variables - Check this box if you want to include all GTM variables in the drop-down menu. ON by default.
- Nested fields - Nested fields are useful if you want to show fields related to a specific value of the parent field only under certain conditions, for example. OFF by default.
- Validation rules- One or more rules against which the field must validate before the user can save the tag or variable. OFF by default.
- Value unit - Text shown next to the field. Useful to specify a format or type, for example. OFF by default.
Checkbox
Description
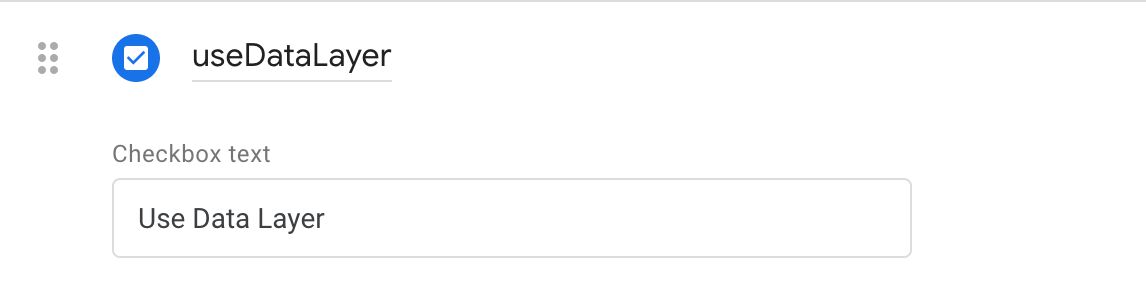
The Checkbox field should be self-explanatory. The checkbox doesn’t have a display name by default. Instead, text you type in the Checkbox text field will be shown next to the box in the UI.
 Checkbox in the editor
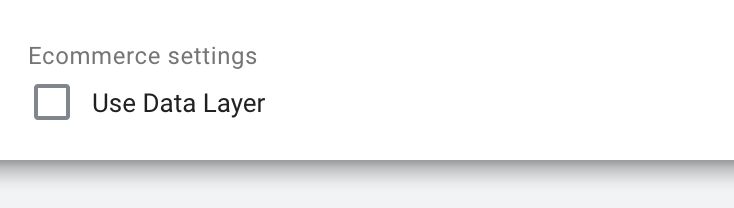 Checkbox in the UI
Code editor output
The data.fieldName property resolves to true if the checkbox was checked and false if not.
const checkBoxValue = data.useDataLayer;
log(checkBoxValue); // true
Available field configurations
Click the configuration name to jump to details about the configuration in the reference at the end of this guide.
- Always in summary - Show the field and its current value in the summary view of the tag or variable. OFF by default.
- Clear on copy - Prevent filled field values from being copied when a copy is made of the tag or variable. OFF by default.
- Default value - The value of the field until the user decides to change it. OFF by default.
- Display name - The label of the field shown in the GTM UI. OFF by default.
- Enabling conditions - Establish conditions (based on other field inputs) for showing this particular field. OFF by default.
- Help text - Add text to a question mark tooltip shown next to the field. OFF by default.
- Nested fields - Nested fields are useful if you want to show fields related to a specific value of the parent field only under certain conditions, for example. OFF by default.
- Validation rules- One or more rules against which the field must validate before the user can save the tag or variable. OFF by default.
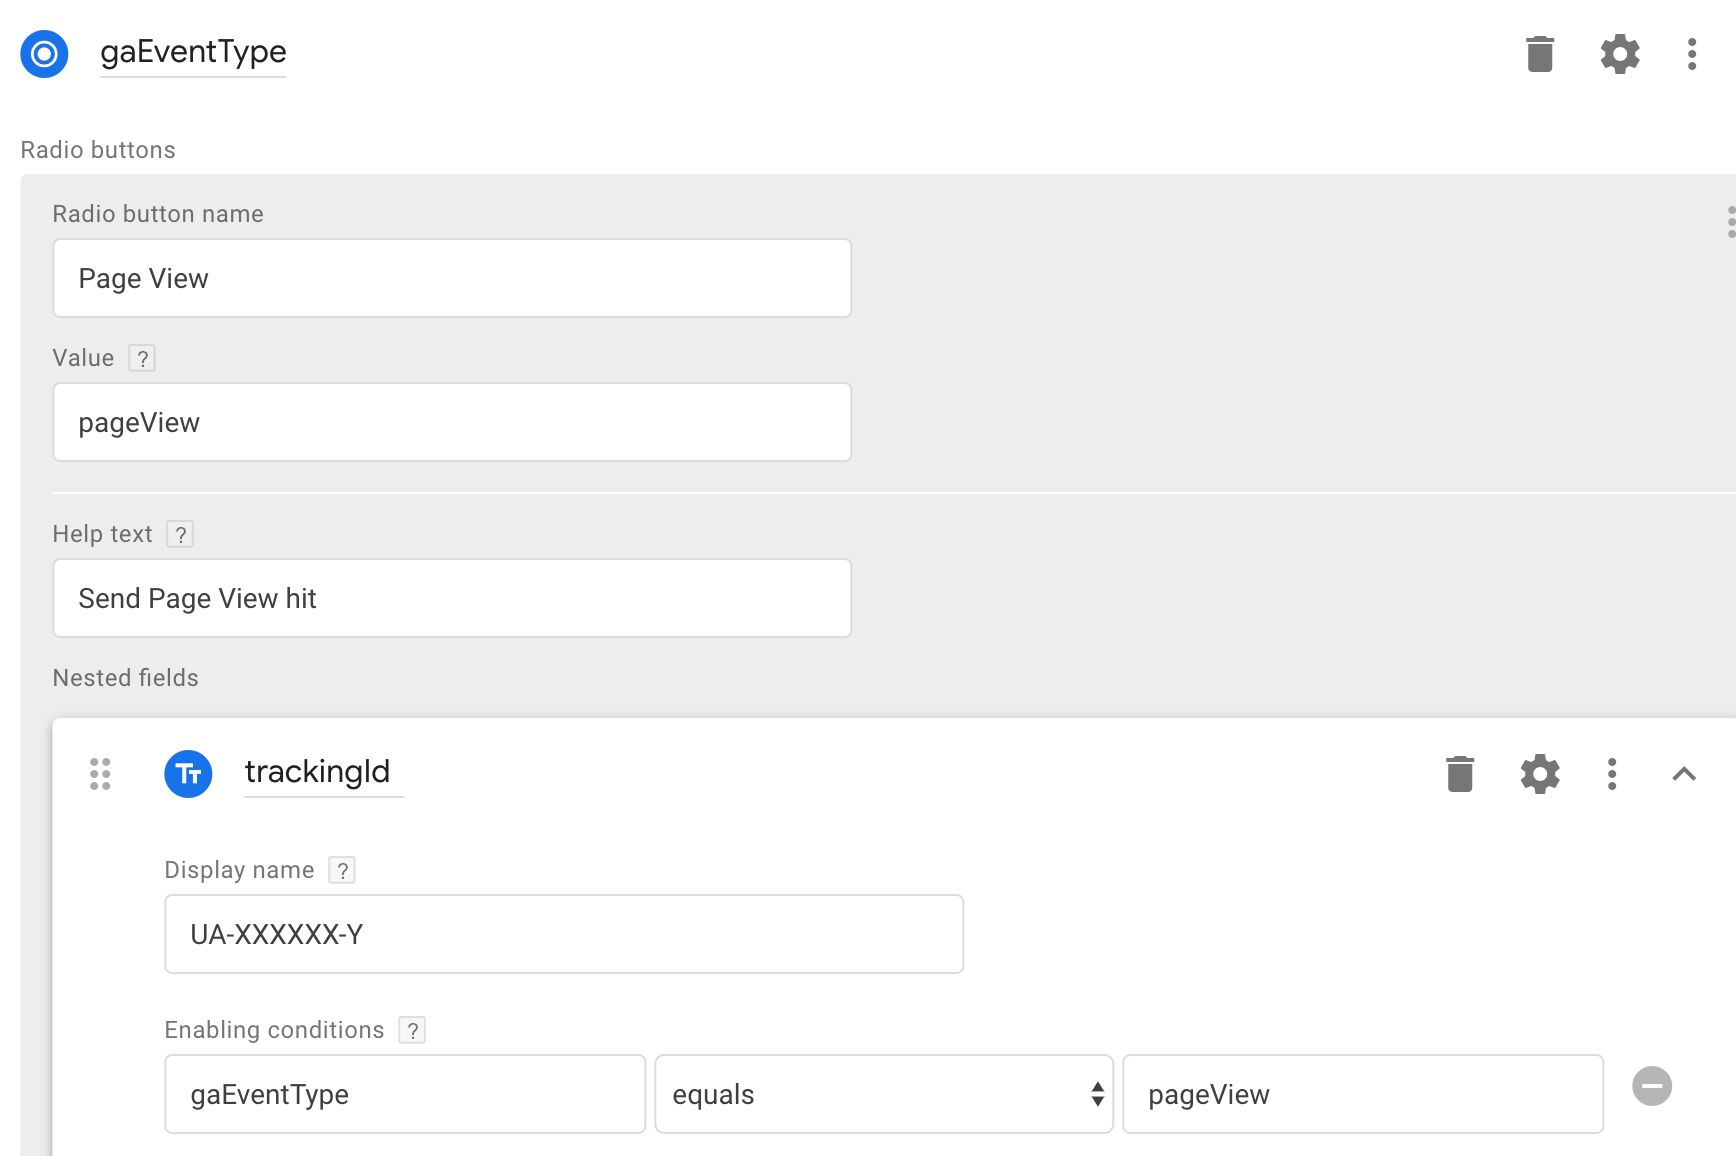
Radio buttons
Description
You can add one or more radio buttons into a single radio button group. The radio button group is treated as a single field. Each radio button has a name (displayed next to the button) and a value (what is returned if the button is selected). The user can only select one button from the group. You can expand advanced settings to add a help text and to add nested fields under each radio button selection.
 Radio buttons in the editor
 Radio buttons in the UI
Code editor output
The data.fieldName property, where fieldName is the name of the entire radio button group, will resolve to the value of the selected radio button.
const selectedButton = data.gaEventType;
if (selectedButton === 'pageView') {
  const gaId = data.trackingId;
  // Do something with gaId
}
Available field configurations
Click the configuration name to jump to details about the configuration in the reference at the end of this guide.
- Clear on copy - Prevent filled field values from being copied when a copy is made of the tag or variable. OFF by default.
- Default value - The value of the field until the user decides to change it. OFF by default.
- Display name - The label of the field shown in the GTM UI. ON by default.
- Enabling conditions - Establish conditions (based on other field inputs) for showing this particular field. OFF by default.
- Help text - Add text to a question mark tooltip shown next to the field. OFF by default.
- Nested fields - Nested fields are useful if you want to show fields related to a specific value of the parent field only under certain conditions, for example. OFF by default.
- Validation rules- One or more rules against which the field must validate before the user can save the tag or variable. OFF by default.
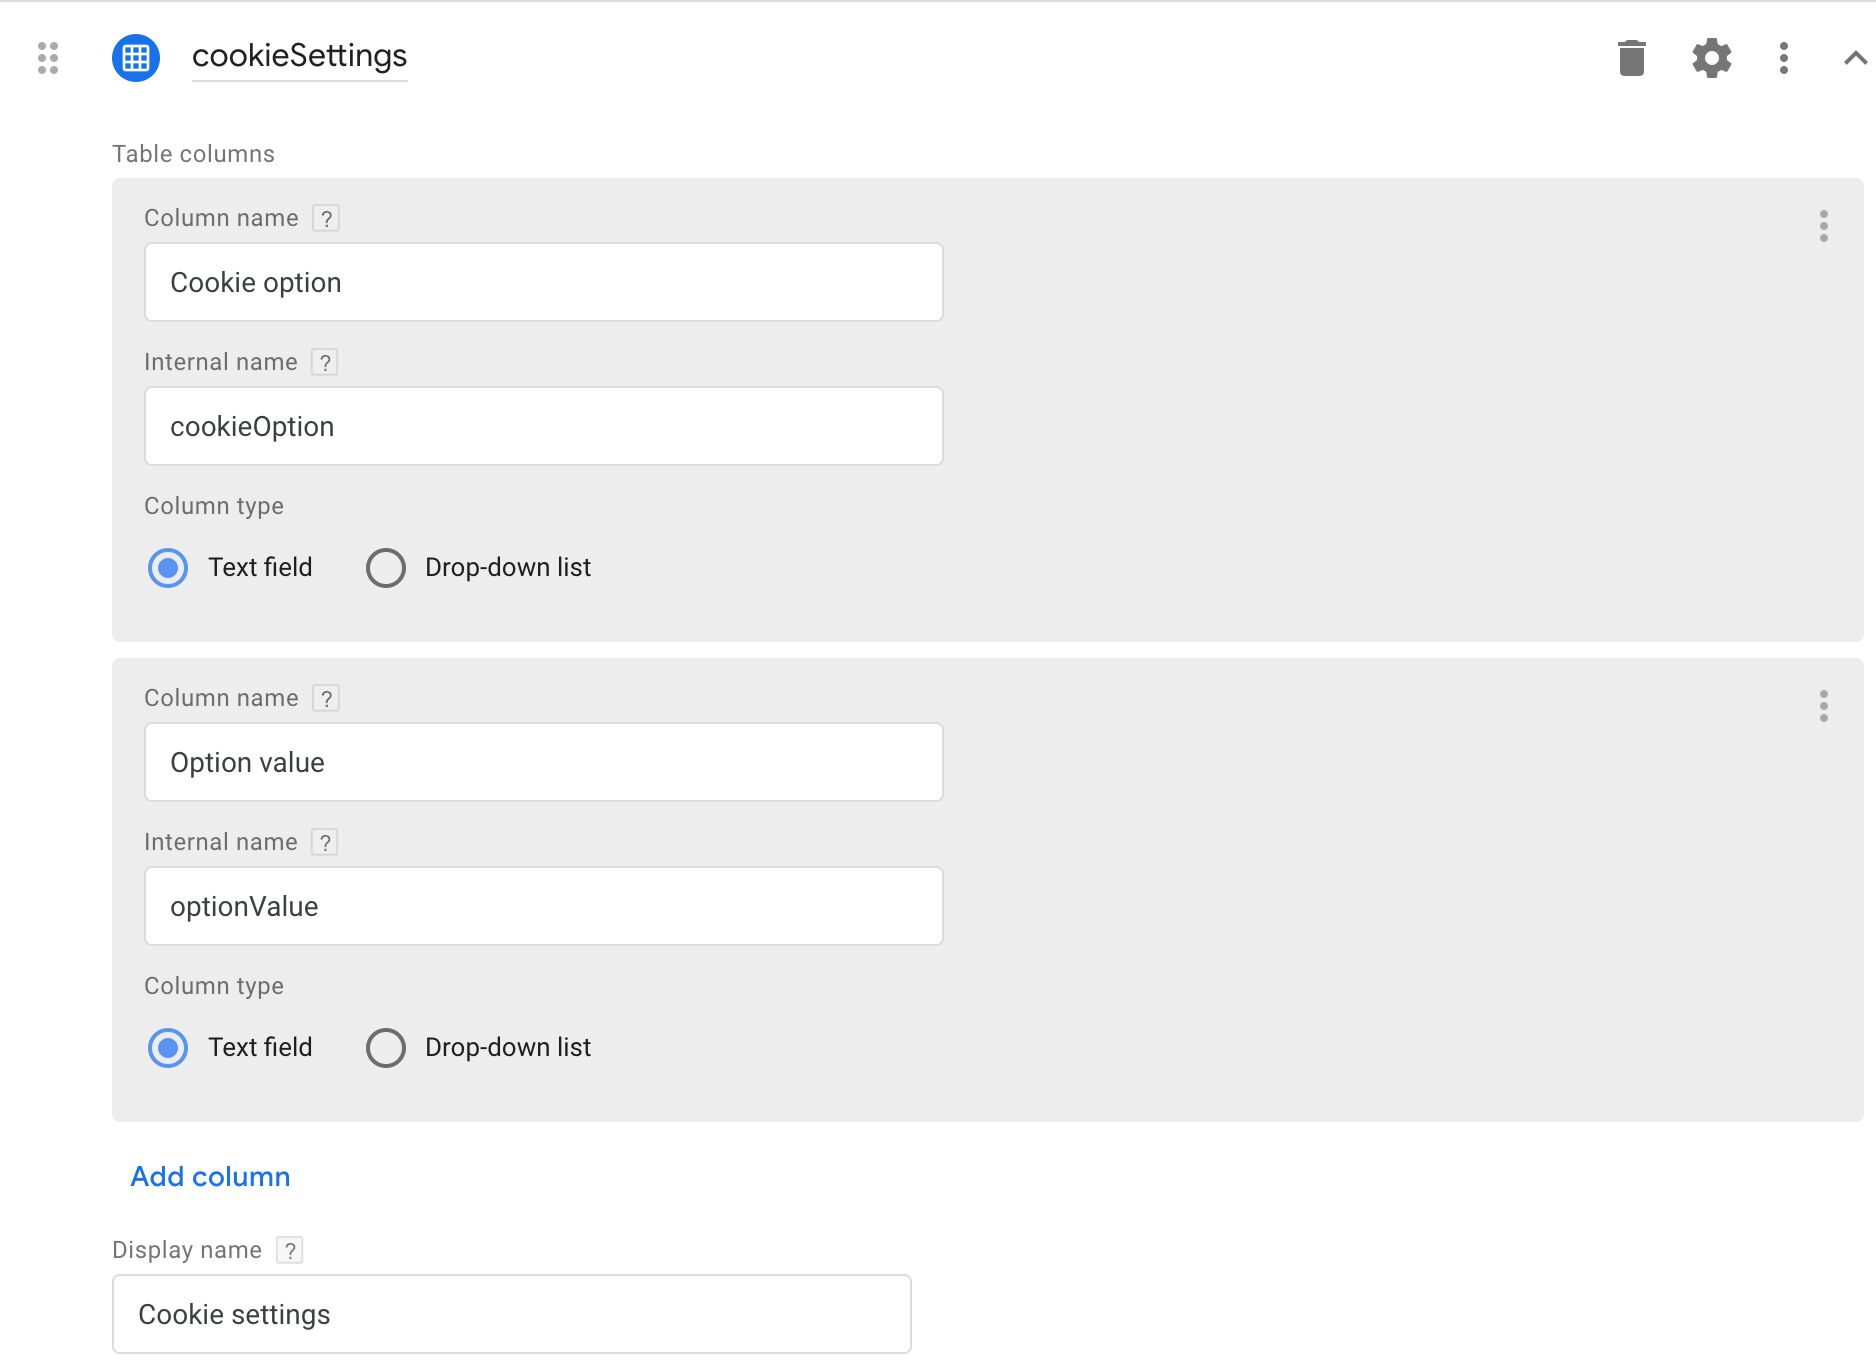
Simple table
Description
With a simple table, you can define columns (either text input fields or drop-down menus), and the users can add and remove rows to and from the table as they wish.
You can specify that all values in a column must be unique (i.e. the user can’t add multiple rows with the same value in such a column), and you can add things like default values and validation rules to each column, once you have selected to Show advanced settings for the column.
 Simple table in the editor
 Simple table in the UI
Code editor output
The data.fieldName property will resolve to an array of objects, where each object represents a row the user has added in the UI. Furthermore, each row object will have key-value pairs for every column, where the key is the column name and the value is the value of the input (the selection value if a drop-down menu or the input text if a text field).
log(data.cookieSettings);
/* Logs:
[
  {"cookieOption":"cookieDomain","optionValue":"simoahava.com"},
  {"cookieOption":"cookieName","optionValue":"myCookie"}
]
*/
Available field configurations
Click the configuration name to jump to details about the configuration in the reference at the end of this guide.
- “New row” button text - Change the value of the “Add row” button text. OFF by default.
- Always in summary - Show the field and its current value in the summary view of the tag or variable. OFF by default.
- Clear on copy - Prevent filled field values from being copied when a copy is made of the tag or variable. OFF by default.
- Default value - The value of the field until the user decides to change it. OFF by default.
- Display message when not set - When the field is untouched, show this text in the summary view. OFF by default.
- Display name - The label of the field shown in the GTM UI. ON by default.
- Enabling conditions - Establish conditions (based on other field inputs) for showing this particular field. OFF by default.
- Help text - Add text to a question mark tooltip shown next to the field. OFF by default.
- Validation rules- One or more rules against which the field must validate before the user can save the tag or variable. OFF by default.
Param table
Description
A Param table is a more complicated table. Instead of being able to edit individual column values in the table itself, a param table requires you to input all the values of the row in a special overlay menu that pops up when you click to add a row. The individual columns can be any of the supported field types, and thus you can add far more complexity into the table than you could with a regular simple table field.
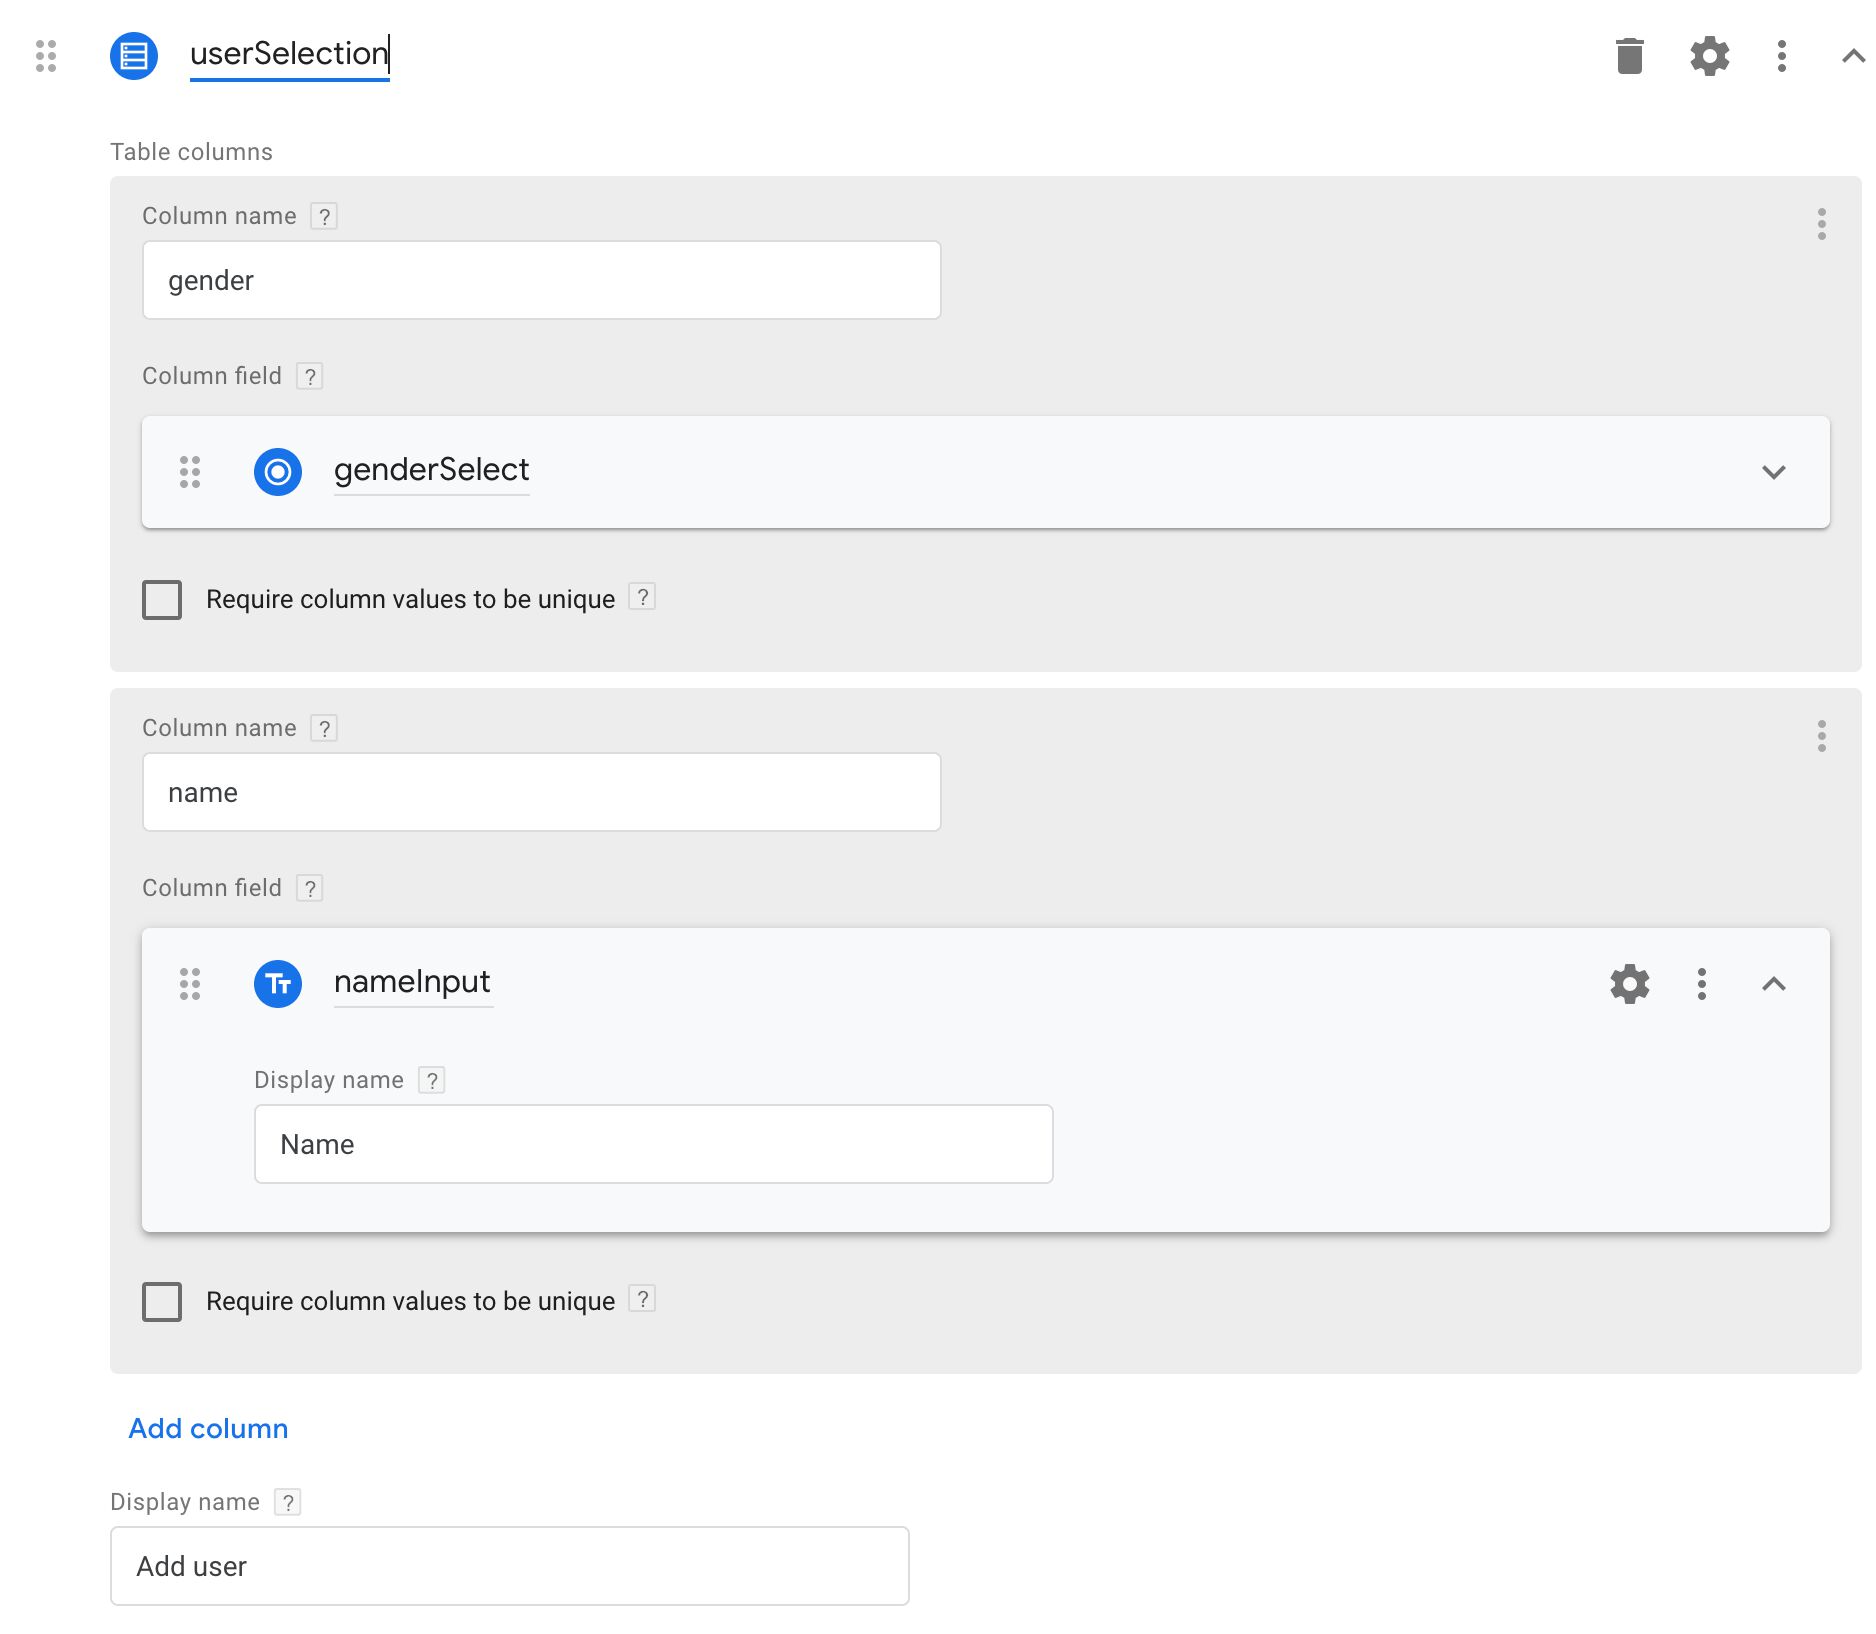 Param table in the editor
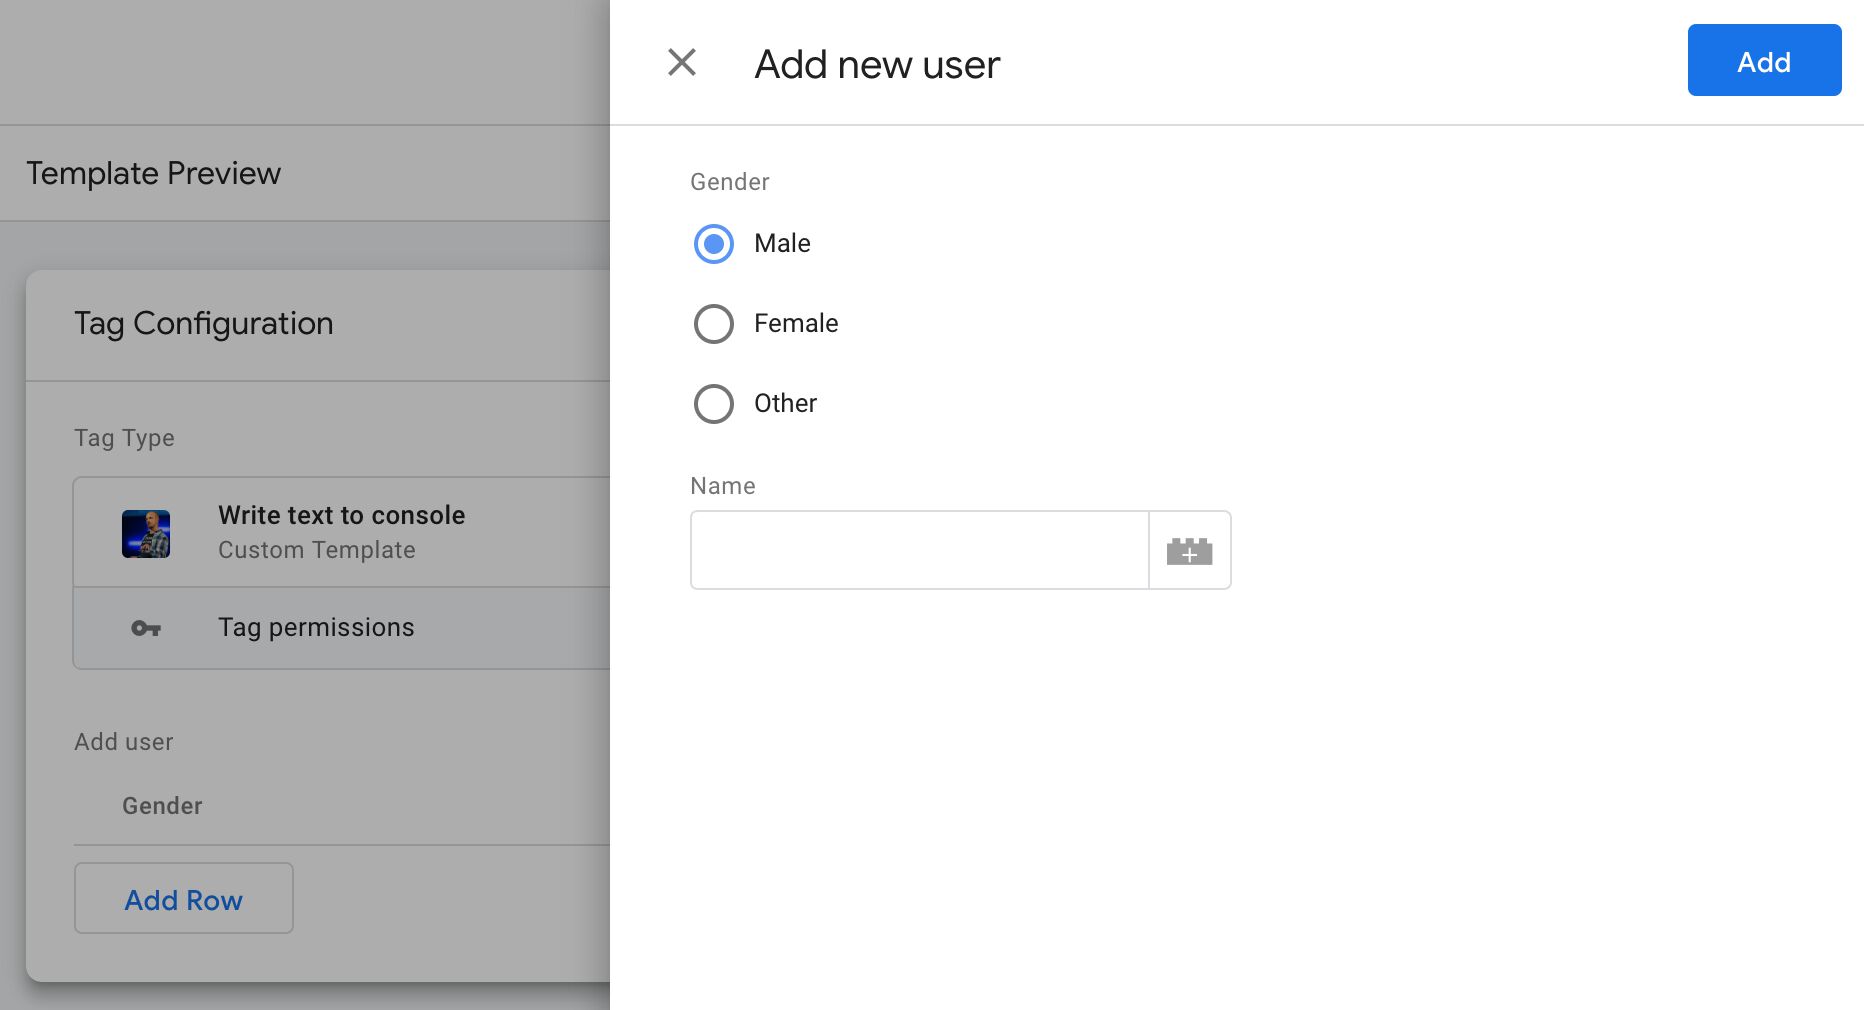 Param table in the UI
Code editor output
Similar to the simple table, the data.fieldName property resolves to an array of objects, where each object represents a row in the table. Each row object has key-value pairs for each column, and the value is whatever the column field returns. For example, the screenshot above would render as:
log(data.userSelection);
/* Logs:
[
  {"genderSelect": "male", "nameInput": "Simo Ahava"},
  {"genderSelect": "female", "nameInput": "Simona Ahava"}
]
*/
Available field configurations
Click the configuration name to jump to details about the configuration in the reference at the end of this guide.
- “Edit row” dialog title - You can change what the heading of the “Edit row” overlay is. OFF by default.
- “New row” button text - Change the value of the “Add row” button text. OFF by default.
- “New row” dialog title - You can change what the heading text is in the overlay you see when adding a new row. OFF by default.
- Always in summary - Show the field and its current value in the summary view of the tag or variable. OFF by default.
- Clear on copy - Prevent filled field values from being copied when a copy is made of the tag or variable. OFF by default.
- Default value - The value of the field until the user decides to change it. OFF by default.
- Display message when not set - When the field is untouched, show this text in the summary view. OFF by default.
- Display name - The label of the field shown in the GTM UI. ON by default.
- Enabling conditions - Establish conditions (based on other field inputs) for showing this particular field. OFF by default.
- Help text - Add text to a question mark tooltip shown next to the field. OFF by default.
- Validation rules- One or more rules against which the field must validate before the user can save the tag or variable. OFF by default.
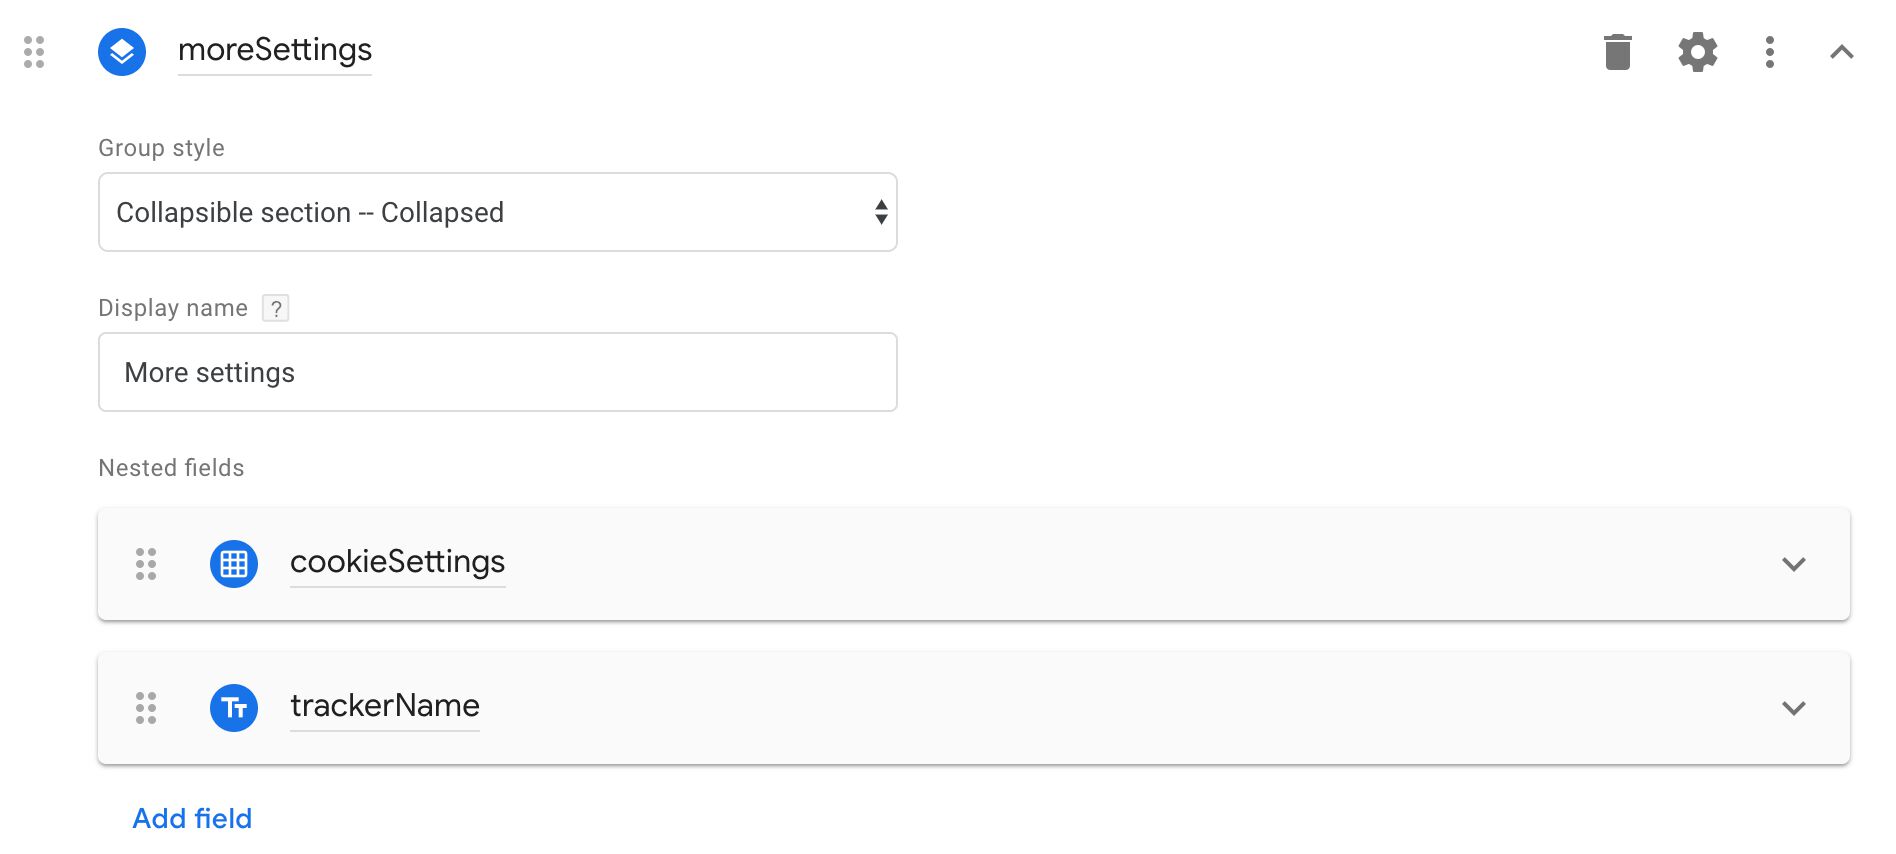
Group
Description
A Group is simply a logical way to group different fields together. The main benefit is that it offers you a Group style selection.
Simple section - This style simply shows the nested fields in the group without any collapsing.
Collapsible section – Open - This style shows the nested fields in a collapsible section which is open initially.
Collapsible section – Closed - This style shows the nested fields in a collapsible section which is collapsed initially.
Collapsible section – Open if not default - This style shows the nested fields in a collapsible section which is open if the nested field(s) don’t have default values (i.e. the user has changed the value of the fields).
A Group is useful if you want to section a set of fields separately, because you can also control the entire groups visibility with the Enabling condition field configuration.
 Collapsible group in the editor
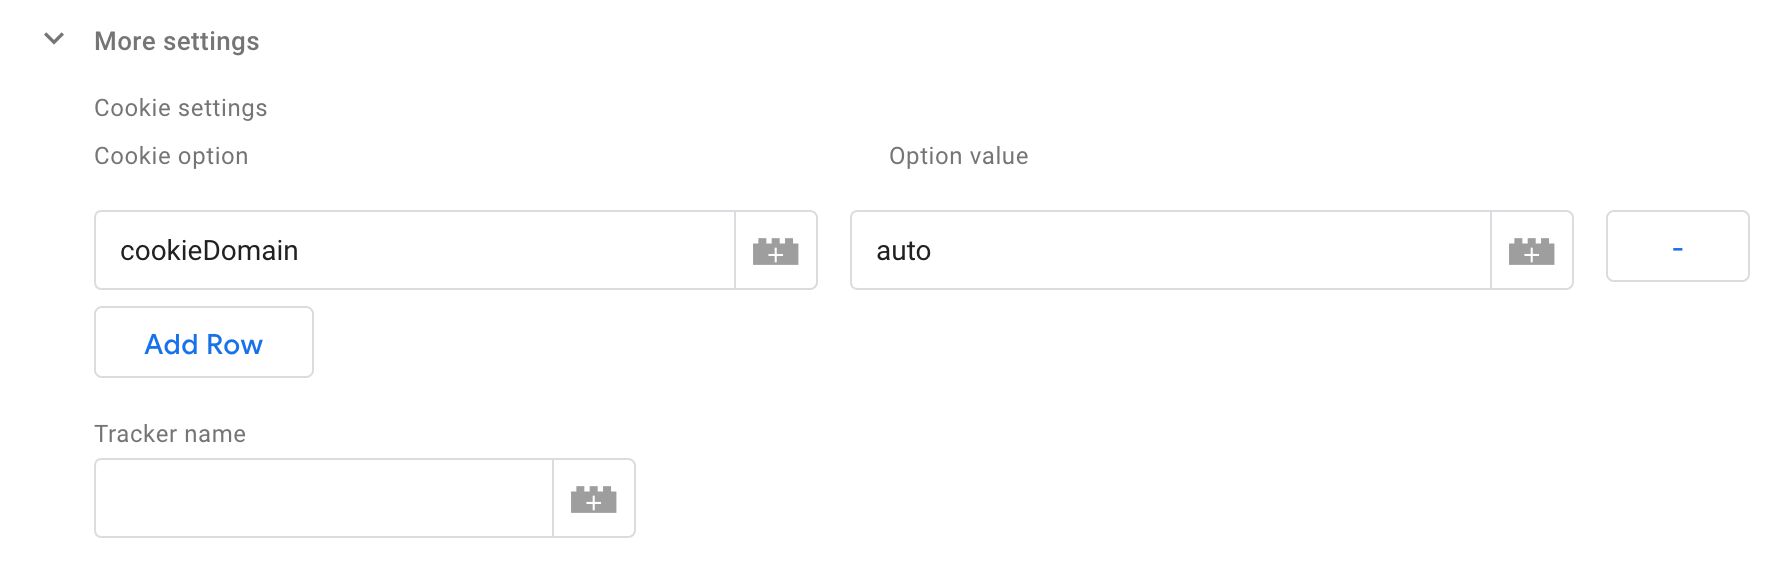 Collapsible group in the UI
Code editor output
The Group doesn’t bring anything extra to the code editor. The nested fields are accessed directly as properties of the data object - the group itself is not present in the object in any way.
log(data);
/* Logs:
[
  {"cookieSettings": [{"cookieOption": "cookieDomain", "optionValue": "auto"}]},
  {"trackerName": "_ga_tracker"}
]
*/
Available field configurations
Click the configuration name to jump to details about the configuration in the reference at the end of this guide.
- Display name - The label of the field shown in the GTM UI. ON by default.
- Enabling conditions - Establish conditions (based on other field inputs) for showing this particular field. OFF by default.
- Group style - How the group section is rendered in the GTM UI (simple vs. collapsed vs. open). ON by default.
- Help text - Add text to a question mark tooltip shown next to the field. OFF by default.
Label
Description
The Label field is extremely simple. It’s just text that you show in the GTM UI when the instance is opened. The Display name configuration determines the text that is shown. Additionally, a Label field has only one other configuration: an Enabling condition which you can use to conditionally show the text.
 Label in the editor
 Label in the UI
Code editor output
There is no way to access the label in the code editor.
Available field configurations
Click the configuration name to jump to details about the configuration in the reference at the end of this guide.
- Display name - The label of the field shown in the GTM UI. ON by default.
- Enabling conditions - Establish conditions (based on other field inputs) for showing this particular field. OFF by default.
Utilizing APIs
Template APIs are methods in the Google Tag Manager sandboxed JavaScript which let you invoke commonly used utilities of the browser. GTM restricts direct access to global methods to improve the stability and reliability of the code, and to optimize the way the code is delivered in the browser.
When working with the code editor, remember to always have the API reference document open in your browser.
Because the official documentation is pretty thorough, I won’t do an exhaustive overview of all the APIs. Instead, I’ll point out quirks or things you should know about some of the APIs, listed below in their separate chapters.
The require API
To invoke a template API, you must first require it in the editor. If you’ve been working with Node.js, you’ll recognize the require() method as a way to include JavaScript modules into your code.
In GTM templates, require() is used to gain access to template APIs, so the functionality is similar even if quite a bit more restricted, as the list of APIs you can integrate is limited.
To utilize an API, you simply run const method = require(name);, where name is the name of the API you want to use, and method is the name of the variable to which you will locally scope the API function.
For example, to make it possible to log to the console and to set cookies in the template code, you would need to require the respective APIs:
const log = require('logToConsole');
const setCookie = require('setCookie');
When you require an API that is governed by a set of permissions, those permissions will automatically appear in the Permissions tab of the template UI. When you use the API, you need to make sure that the permissions allow you to perform the tasks you are trying to perform.
The queryPermission API
Especially if you’ve written the template for public use, you might want to utilize the queryPermission API to wrap your code in a validator that only runs if the required permissions have been set.
For example, if you want to make sure you can actually set some cookie, you might want to use this type of syntax:
const queryPermission = require('queryPermission');
const setCookie = require('setCookie');

const options = {
  domain: 'www.simoahava.com'
};

// Check whether it's possible to write the cookie before writing it
if (queryPermission('set_cookies', '_gaClientId', options)) {
  setCookie('_gaClientId', 'abc123', options);
}
The setCookie() API code is only run if the permissions allow you to write a cookie named _gaClientId on the domain www.simoahava.com. This is a good way to avoid your tag running into errors.
The copyFromDataLayer API
This API is relatively straightforward - it fetches the item from GTM’s data model that you requested. For example, to fetch the current value for gtm.elementUrl, you’d run:
const copyFromDataLayer = require('copyFromDataLayer');
const clickUrl = copyFromDataLayer('gtm.elementUrl');
This code would fetch the value from the data model at the time that the tag was run.
However, there’s a very important catch here.
If the template code fetching the dataLayer value is run asynchronously (e.g. with the callLater API), or if the tag built from the template is part of a tag sequence, the value fetched from dataLayer will be whatever is currently stored in the data model. In all other scenarios, the code is run synchronously, relative to the dataLayer.push(), so the value returned by copyFromDataLayer will reflect what was included in the pushed object.
To illustrate, consider the following code executed on the site:
window.dataLayer.push({
  event: 'fire',
  key: 'value'
});

window.dataLayer.push({
  event: 'fire',
  key: 'otherValue'
});
These two dataLayer.push() calls are run one after the other. If you’ve built a tag that fires on the “fire” event, and the template for that tag uses copyFromDataLayer to fetch the value for key, then in most cases it will always return whatever the value of key was during the trigger push.
In other words, the first time the tag fires, key will be set to value, and the second time the tag fires, key will return otherValue. This is understandable, and it’s how Google Tag Manager has always worked.
However, if the template uses copyFromDataLayer in an asynchronous method, or if the tag is part of a sequence, then when the first tag fires, it’s possible that key will actually return otherValue, because by the time the tag resolves that code, the second push will have happened and the values stored in GTM’s data model will have been updated.
This is something to be mindful of. I hope that we get the chance to control this behavior by providing a flag that lets us choose whether to use this asynchronous behavior or to fall back to the original, synchronous process.
The “global variable” APIs
Templates offer you a handful of APIs that all interact with the global namespace (namely, the window object). These APIs are:
aliasInWindowfor creating a copy of a global variable in another global variable.callInWindowfor executing a global function.copyFromWindowfor creating a local copy (a proper copy, NOT a reference to the original) of the global variable.createArgumentsQueuefor creating an array as well as a helper function that passes its arguments to the array.createQueuefor creating an array as a global variable.setInWindowfor setting a global variable.
These APIs have a number of permissions associated with them, so you need to make sure you make the necessary modifications to the template permissions.
Another thing to keep in mind is that when you access these global variables in the context of the templates, GTM creates a local copy of each and does NOT copy objects by reference, which is the typical way of handling JavaScript objects.
See this example:
const copy = require('copyFromWindow')
const obj = copy('someObject');

obj.someProperty = true;
This sets someProperty on the object to true only in the template code. It doesn’t change it to true in the global object itself. That’s because GTM creates a clone of the global variable rather than a reference to it.
Finally, GTM handles functions in a special way. When you try to run setInWindow('someVariable', someFunction), where someFunction is a function you have created, what gets set in the global variable someVariable is not the actual function, but rather a wrapper created by GTM which ends up calling the function.
This shouldn’t be a big deal - since the end result is always the same. Whatever you call the global variable with gets executed in the function you created.
However, it does mean that you won’t be able to set individual properties to that function. Take this example:
const func = str => str + " Simo";
func.loaded = true;

setInWindow('someFunction', func);
If you now call window.someFunction('Hello');, the code ends up returning "Hello Simo", so it works. However, if you check someFunction.loaded, you’ll notice it’s undefined when it should be true.
The makeTableMap API
The makeTableMap API makes the simple table field more manageable.
The simple table field itself returns an array of objects, where each object represents a row of the table and is comprised of key-value pairs. Each key-value pair corresponds to a column.
For example, if the simple table had two columns:
Column 1: fieldToSetName
Column 2: fieldToSetValue
The resulting data object would look like this:
[
  {
    "fieldToSetName": "page",
    "fieldToSetValue": "/home/"
  },
  {
    "fieldToSetName": "userId",
    "fieldToSetValue": "abc123"
  }
]
The makeTableMap API turns this into a single object whose contents are mapped from the values the user input. Naturally, this means that the column you use as the “key” of this new map must have unique values.
To continue the example from above, if you run makeTableMap against the array above, this is the result:
const makeTableMap = require('makeTableMap');
const log = require('logToConsole');

const data = data.properties; // This is the array from the example above
const newMap = makeTableMap(data, 'fieldToSetName', 'fieldToSetValue');

log(newMap);
/* LOGS:
  {
    "page": "/home",
    "userId": "abc123"
  }
*/
The data object
If you want to access values the user has input into the template fields, you need to use the data object. Furthermore, to signal tag template completion (or failure), you will also need to use the data object in your template code.
Every single user input in the template fields is encoded in the data object as properties, where the property name matches the field name you gave in the editor.

To access the values the user input into the cookieSettings field above, you would use this syntax:
const input = data.cookieSettings;You don’t need to require() any API to access the user input - the data object is always available for fetching the values the user has entered. Read through the Fields editor chapter to see how each different field type is encoded into the dataobject.
Variable templates in the code editor
Variable templates have just one requirement, similar to Custom JavaScript variables in GTM: they must return a value. If you don’t have a return statement in the template, the variable will always return undefined (not very useful).
const userInput = data.someNumber;

return userInput * 2;
The variable template above would take the value entered by user into the someNumber field and return it multiplied by 2.
Tag templates in the code editor
With tag templates, you must invoke one of two methods in the code:
data.gtmOnSuccess()to indicate that the tag was a success.data.gtmOnFailure()to indicate that the tag execution failed.
I recommend to always have data.gtmOnSuccess() (after all, why create a tag that doesn’t indicate successful completion). If there is a clear point of failure, such as something you want to block a tag sequence with, you should also add a data.gtmOnFailure() call into the code.
Try to avoid paths in the code that do not lead to either data.gtmOnSuccess() or data.gtmOnFailure(), as the tag will be in “Still running” status for perpetuity.
Here’s an example. Let’s say the template’s purpose is to write a cookie into the browser storage. If the template permissions allow the cookie to be written, data.gtmOnSuccess() is called after the write. If the permissions prevent this, a warning is logged into the console and data.gtmOnFailure() is run instead.
const log = require('logToConsole');
const setCookie = require('setCookie');
const queryPermission = require('queryPermission');

if (queryPermission('set_cookies', '_gaClientId')) {
  setCookie('_gaClientId', 'abc123');
  data.gtmOnSuccess();
} else {
  log('Unable to write cookie due to missing permissions!');
  data.gtmOnFailure();
}
Tag success/failure/incompletion status is shown in Preview mode, too.
Client templates in the code editor
With Client templates, you need to invoke the claimRequest API when you want the Client to parse the HTTP request and not let other Clients use it any longer. For example, if you have a Client that is designed to handle requests coming to /my-pixel/, you’d build a Client like this:
const getRequestPath = require('getRequestPath');
const claimRequest = require('claimRequest');

if (getRequestPath() === '/my-pixel/') {
  claimRequest();
}
When the Client has done its work, it must return a response back to the source of the request. This is done with the returnResponse API.
runContainer(event, () => {
  // onComplete callback called, return the response.
  returnResponse();
});
I do recommend to read this article for an overview of how Client templates work.
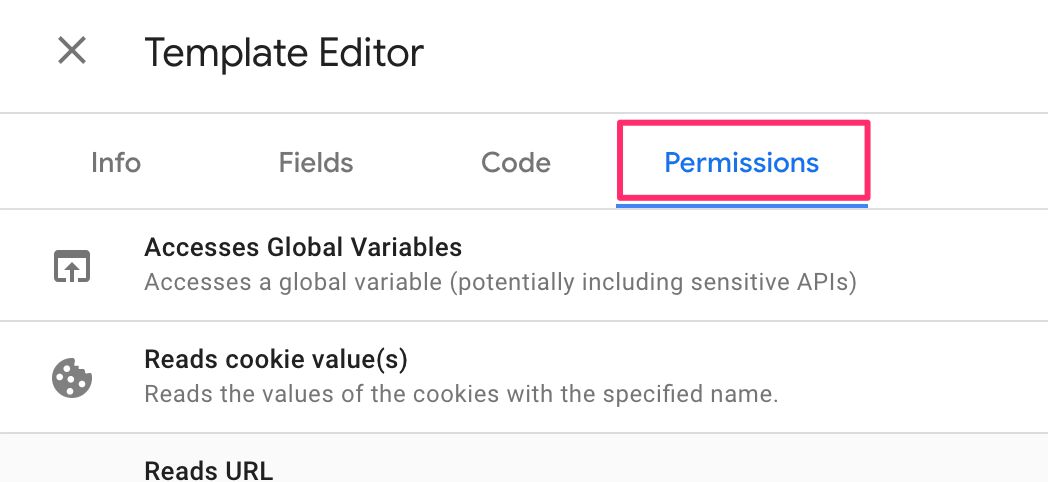
Permissions
When you add one of the supported APIs using the require method in the code editor, the associated permissions for that API are automatically displayed in the Permissions tab.
Read this document for a comprehensive list of permissions used by Server-side tagging templates.
Permissions are described at length in the official documentation. Nevertheless, in this chapter I’ll show what the UI for each permission looks like, and what the different settings are used for.
Note that you can save a template with code that conflicts with a permission. It’s not until the tag is run that an error is thrown, and this error is surfaced in the Errors tab in Preview mode, signalling that there was a permissions conflict within the tag.
Accesses Global Variables
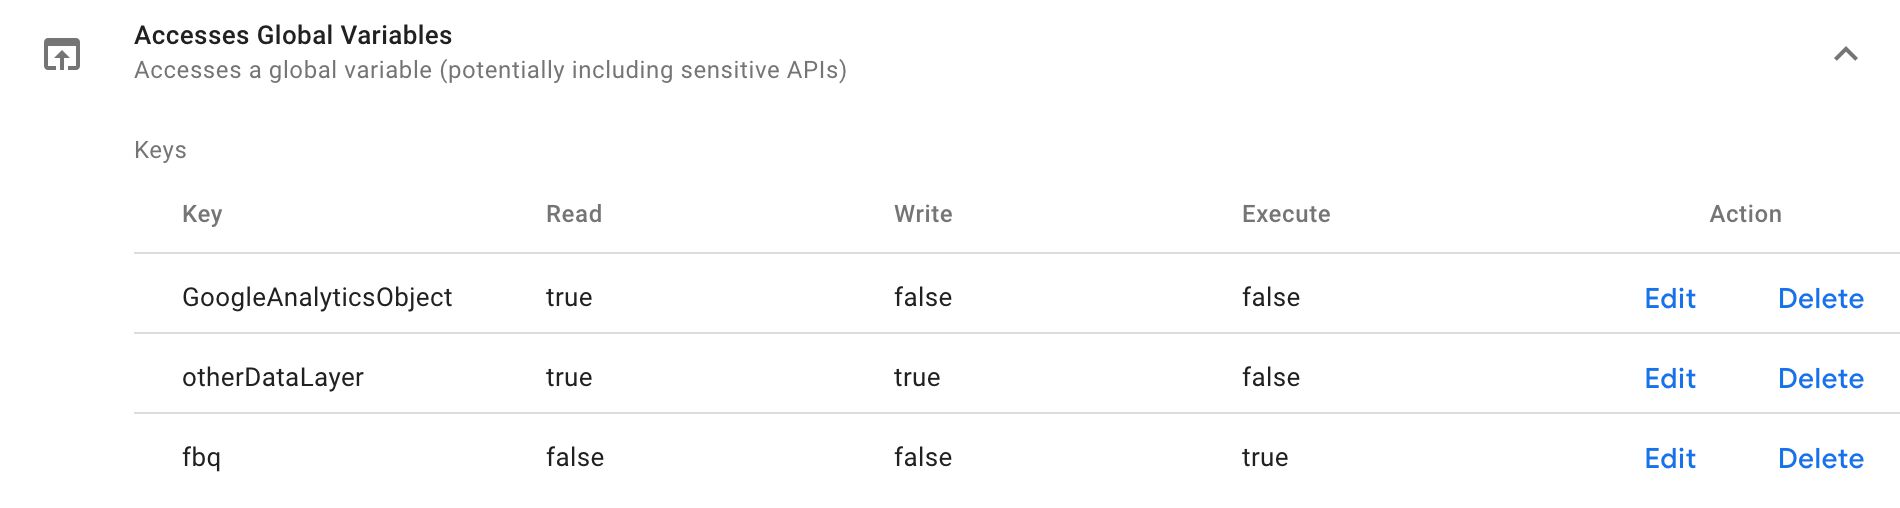
The Accesses Global Variables permission allows the code to Read (see what value is assigned to the variable), Write (update the value assigned to the variable), and Execute (if the variable is a function, execute it) global variables. The Key is the name of the global variable, accessed via window[key].
Here are the APIs and the relevant permissions for them:
| API example | Permission |
|---|---|
aliasInWindow('copyTo', 'copyFrom') | Write on copyTo, Read on copyFrom. |
callInWindow('someFunction') | Execute on someFunction. |
copyFromWindow('copyFrom') | Read on copyFrom. |
createArgumentsQueue('helper', 'queue') | ReadWrite on helper, ReadWrite on queue. |
createQueue('someArray') | ReadWrite on someArray. |
setInWindow('someVariable', 'someValue', true) | ReadWrite on someVariable (regardless of third parameter). |
In other words, if your code needs to access any global variable using e.g. setInWindow or copyFromWindow, you need to add those variables into these permission settings, and you need to specify if the code can read, write, and/or execute the variable in question.
Name used with the
queryPermissionAPI and policies:access_globals.
Accesses Local Storage
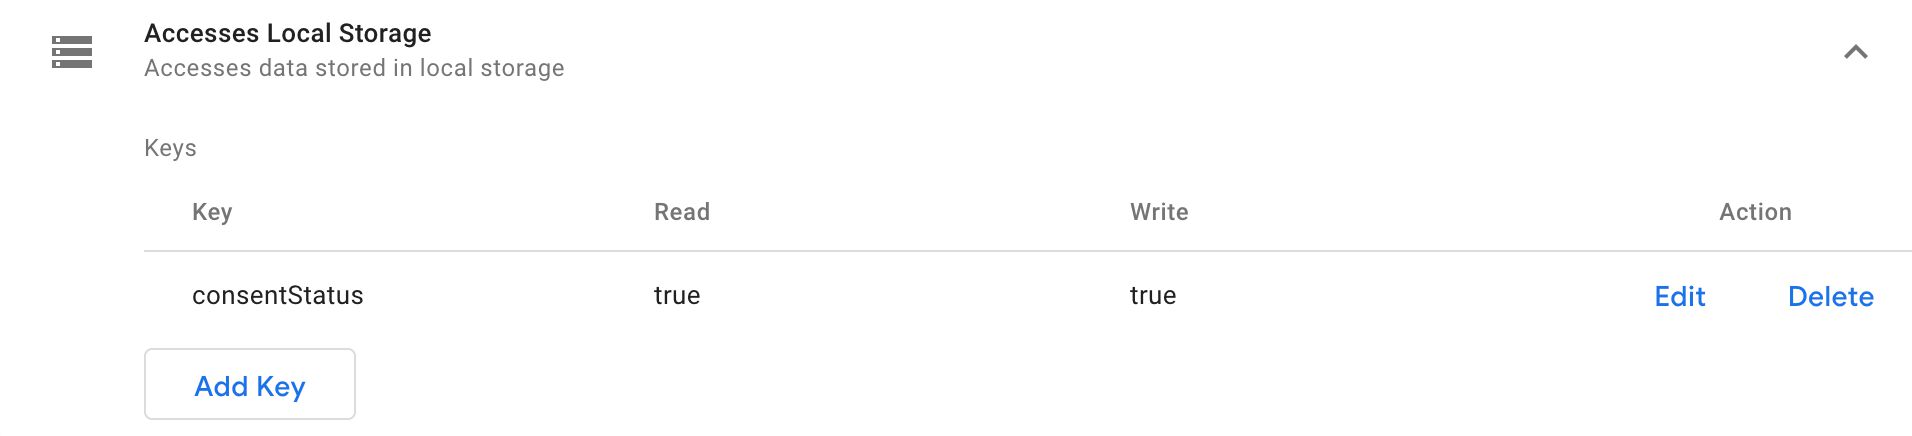
The Accesses Local Storage permission allows the code to Read (get items from localStorage) and Write (set items in localStorage) items in the browser’s localStorage, by utilizing the localStorage template API.
If your code needs to access localStorage, you need to specify Read and/or Write permissions for every key in localStorage the template needs to access.
Name used with the
queryPermissionAPI and policies:access_local_storage.
Accesses Template Storage

The Accesses Template Storage permission allows the code to Read and Write to a temporary storage which exists for the current page load. It’s useful if you need to persist information that persists across template executions.
For example, if you want to make sure your template doesn’t run some code more than once per page load, you could use templateStorage like this:
const templateStorage = require('templateStorage');
const ids = templateStorage.getItem('ids') || [];
if (!ids.includes(data.id)) {
  // Run code
  ...
  ids.push(data.id);
  templateStorage.setItem('ids', ids);
}
The permission has no configuration - read, write, and delete operations are always permitted.
Name used with the
queryPermissionAPI and policies:access_template_storage.
Reads Cookie Value(s)

The Reads Cookie Value(s) permission lists all the first-party cookies the tag or variable code can access with the getCookieValues API. To allow the code to read from a first-party cookie, you need to list all the cookie names that can be accessed on their own line in the text box in the permission settings.
Name used with the
queryPermissionAPI and policies:get_cookies.
Reads Referrer URL
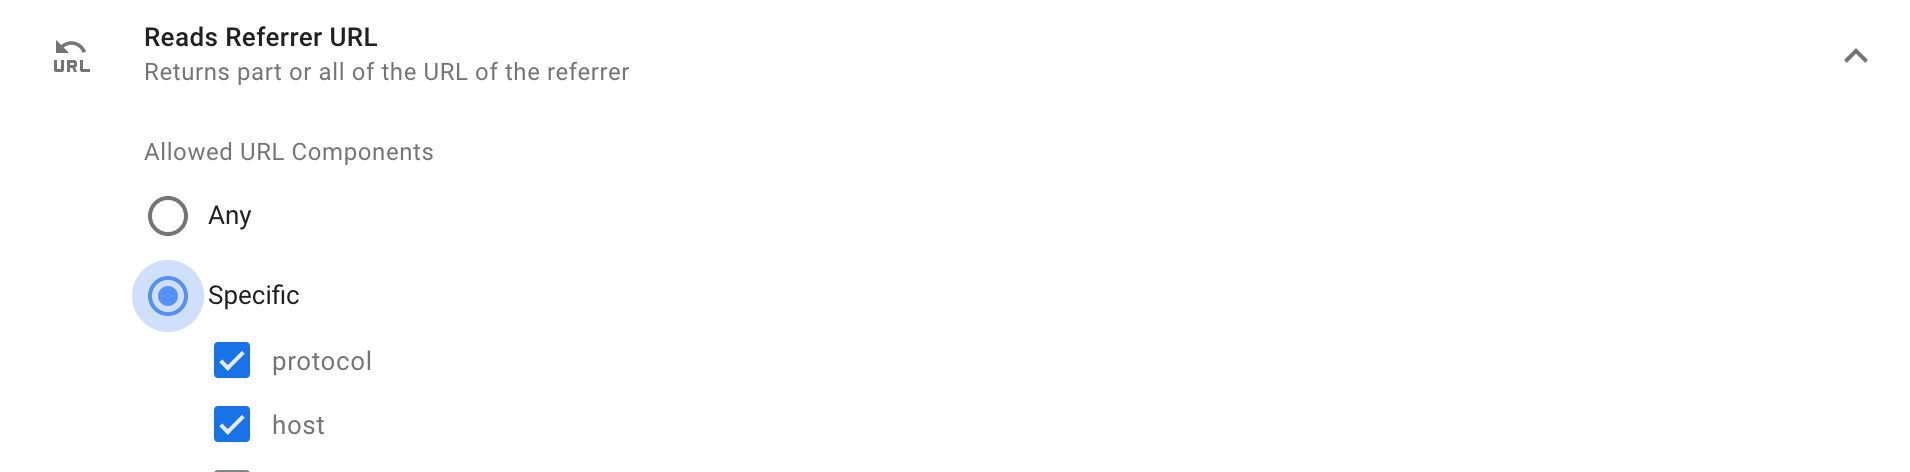
The Reads Referrer URL permission allows template code to access any or only parts of the referring page URL (from document.referrer. You can restrict access to any combination of its URL components. Since the permission model is the same as for the Reads URL permission, please read the very next section for more details.
Name used with the
queryPermissionAPI and policies:get_referrer.
Reads URL
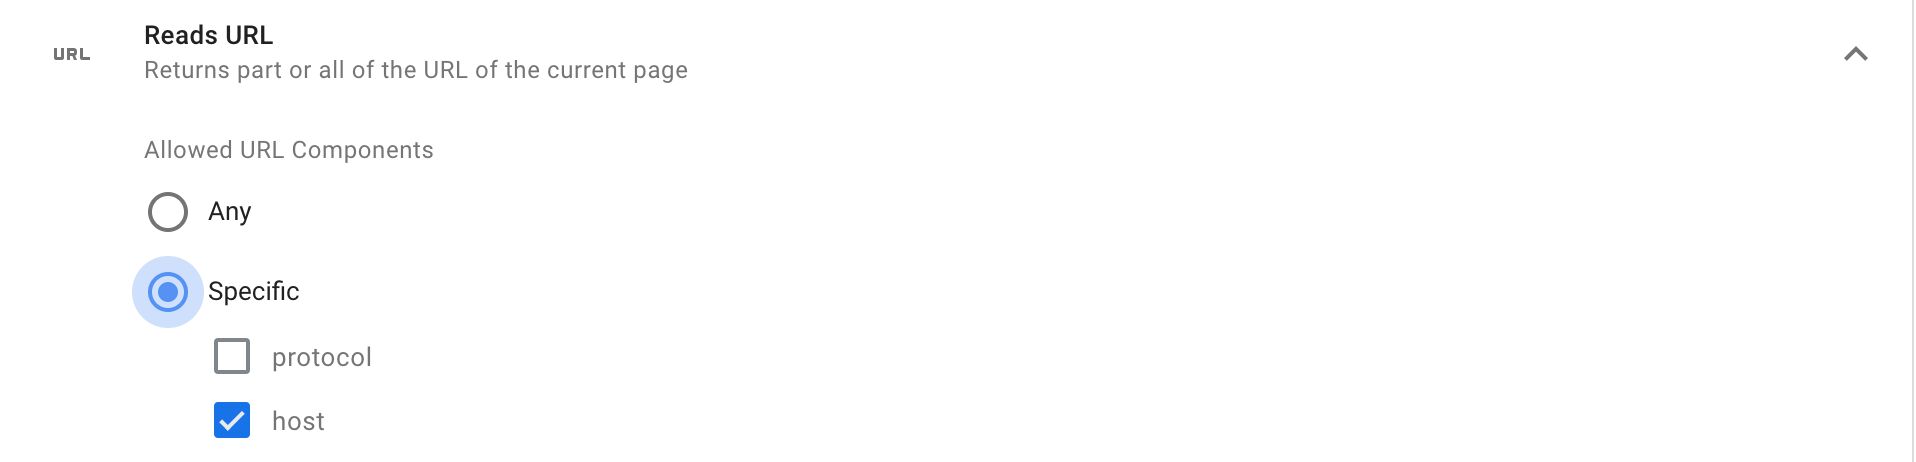
The Reads URL permission allows template code to access any or only parts of the current page URL. You can restrict access to any combination of the following URL components:
| Component | Example |
|---|---|
| protocol | http, https, or file |
| host | blog.simoahava.com |
| port | 443 |
| path | /analytics/articles/ |
| extension | html |
| fragment | about-us |
| query | gclid=1.2.3.4 |
After selecting query, You can specify which query keys the getUrl API is allowed to access, or you can leave it to its default setting which is any query keys.
Name used with the
queryPermissionAPI and policies:get_url.
Injects Hidden Iframes

You can list a number of URL patterns, each on its own row, that must match those in the code editor used to inject hidden iframes on the page. The src attribute of the iframe the editor wants to inject must match one of these parameters.
The URL patterns must include https://, a valid hostname, and a valid path. Hostnames can use asterisk to wildcard match any subdomains, and paths can use asterisk to wildcard match any characters. Path ending with a / is also a wildcard match for anything that follows.
For example, given these three patterns:
https://*.simoahava.com/tracker.htmlhttps://www.gtmtools.com/https://www.tracksimo.com/*tracker.html
Any of these will be valid matches:
https://simoahava.com/tracker.htmlhttps://blog.tracker.simoahava.com/tracker.htmlhttps://www.gtmtools.com/track/https://www.gtmtools.com/tracking/this/https://www.tracksimo.com/tracker.htmlhttps://www.tracksimo.com/track/superdupertracker.html
Name used with the
queryPermissionAPI and policies:inject_hidden_iframe.
Injects Scripts

You can list a number of URL patterns, each on its own row, that must match those in the code editor used to inject scripts on the page. The src attribute of the script the editor wants to inject must match one of these patterns.
The URL patterns must include https://, a valid hostname, and a valid path. Hostnames can use asterisk to wildcard match any subdomains, and paths can use asterisk to wildcard match any characters. Path that only consists of a / is also a wildcard match for anything that follows.
For example, given these three patterns:
https://*.simoahava.com/tracker.jshttps://www.gtmtools.com/https://www.tracksimo.com/*tracker.js
Any of these will be valid matches:
https://simoahava.com/tracker.jshttps://blog.tracker.simoahava.com/tracker.jshttps://www.gtmtools.com/tracking/gtmtracker.jshttps://www.tracksimo.com/tracker.jshttps://www.tracksimo.com/track/superdupertracker.js
Name used with the
queryPermissionAPI and policies:inject_script.
Logs To Console

You can choose whether the logToConsole API can log into the browser console only when in preview/debug mode, or whether it can log to console whenever the tag fires, regardless of debug context.
Name used with the
queryPermissionAPI and policies:logging.
Reads Data Layer

In the permission configuration, add the Data Layer keys the code has access to, each on its own row.
You can use wildcards to allow the code access to any subproperties of the key. For example, a permission like this:
ecommerce.*
Will allow the code editor to read ecommerce, ecommerce.purchase.actionField.id, ecommerce.purchase.products, and any other key nested under ecommerce.
Name used with the
queryPermissionAPI and policies:read_data_layer.
Reads Document Character Set

An extremely simple permission for an extremely simple API. This permission governs whether or not the code editor can use the readCharacterSet API, which, in turn, returns the value of document.characterSet.
There are no configuration options you can pass to the permission, so it’s always permitted (unless a policy is used to block it).
Name used with the
queryPermissionAPI and policies:read_character_set.
Reads Container Data

Very simple permission (nothing to configure), which is used when the template code needs to use the getContainerVersion API.
Name used with the
queryPermissionAPI and policies:read_container_data.
Reads Event Metadata

This permission allows the code to use the addEventCallback API, which updates the eventCallback of the dataLayer.push() that triggered the tag created from this template. A data object of tags that fired for the dataLayer event is passed as an argument to the callback.
Take a look at this article for more details on how this API works.
This permission doesn’t take any configuration options, so it’s always permitted (unless a policy is used to block it).
Name used with the
queryPermissionAPI and policies:read_event_metadata.
Reads Document Title

Another really simple permission for a really simple API. This permission allows the code to use the readTitle API, which returns the value of document.title.
This permission doesn’t take any configuration options, so it’s always permitted (unless a policy is used to block it).
Name used with the
queryPermissionAPI and policies:read_title.
Sends Pixels
You can provide a list of URL patterns (each on its own row), and when using the the sendPIxel API, the URL the pixel is dispatched to must match one of these patterns.
For example, given these three patterns:
https://*.simoahava.com/collecthttps://www.gtmtools.com/https://www.tracksimo.com/*/track
Any of these will be valid matches:
https://simoahava.com/collecthttps://blog.tracker.simoahava.com/collecthttps://www.gtmtools.com/tracking/collecthttps://www.tracksimo.com/tracker/trackhttps://www.tracksimo.com/collect/analytics/track
Name used with the
queryPermissionAPI and policies:send_pixel.
Sets A Cookie Value
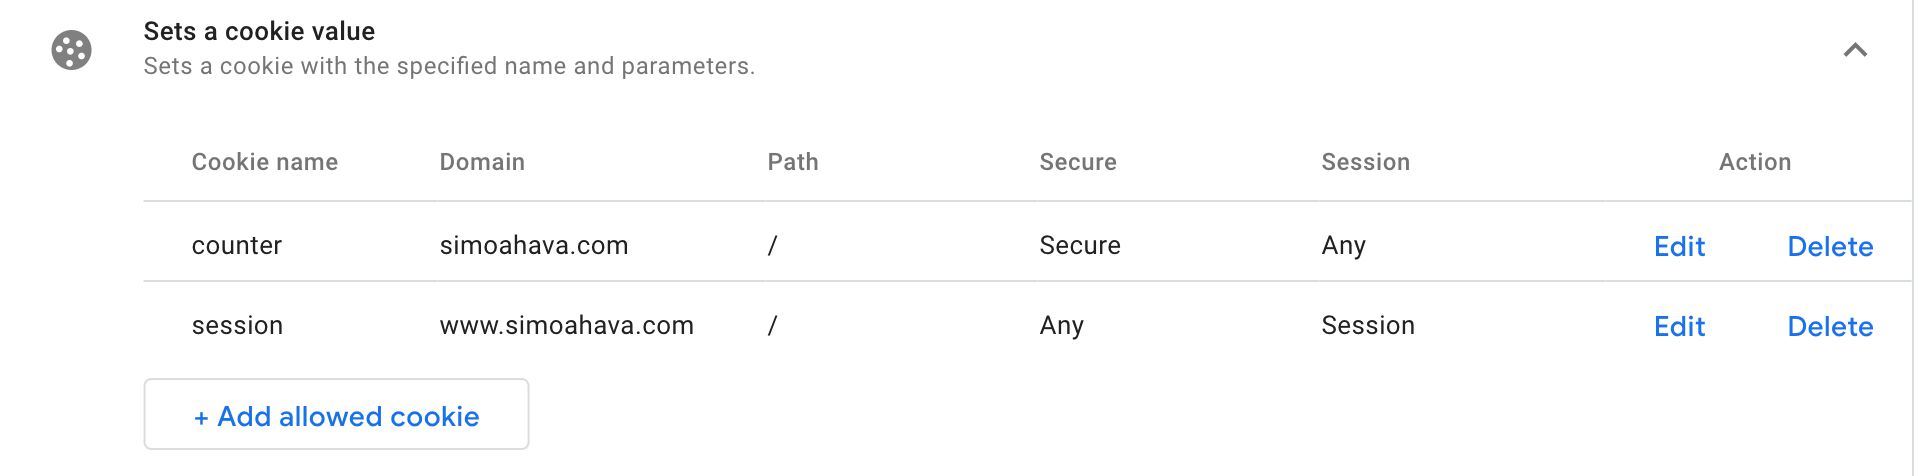
This permission lets you configure which cookies the template code is allowed to set. You can also configure the following parameters per cookie:
Domain - on which domain the cookie can be written on or
*for any.Path - on which path the cookie can be written on or
*for any.Secure - whether the cookie must be set with the
secureflag, without thesecureflag, or either.Session - whether the cookie must be a session cookie, a cookie with an expiration, or either.
Name used with the
queryPermissionAPI and policies:set_cookies.
Tests
For more information on writing and running tests against your template code, see this chapter, and read this article.
Template preview
The Template Preview window is where you can see what your template user interface looks like in its current state, and you can also try filling in the inputs before testing the template.
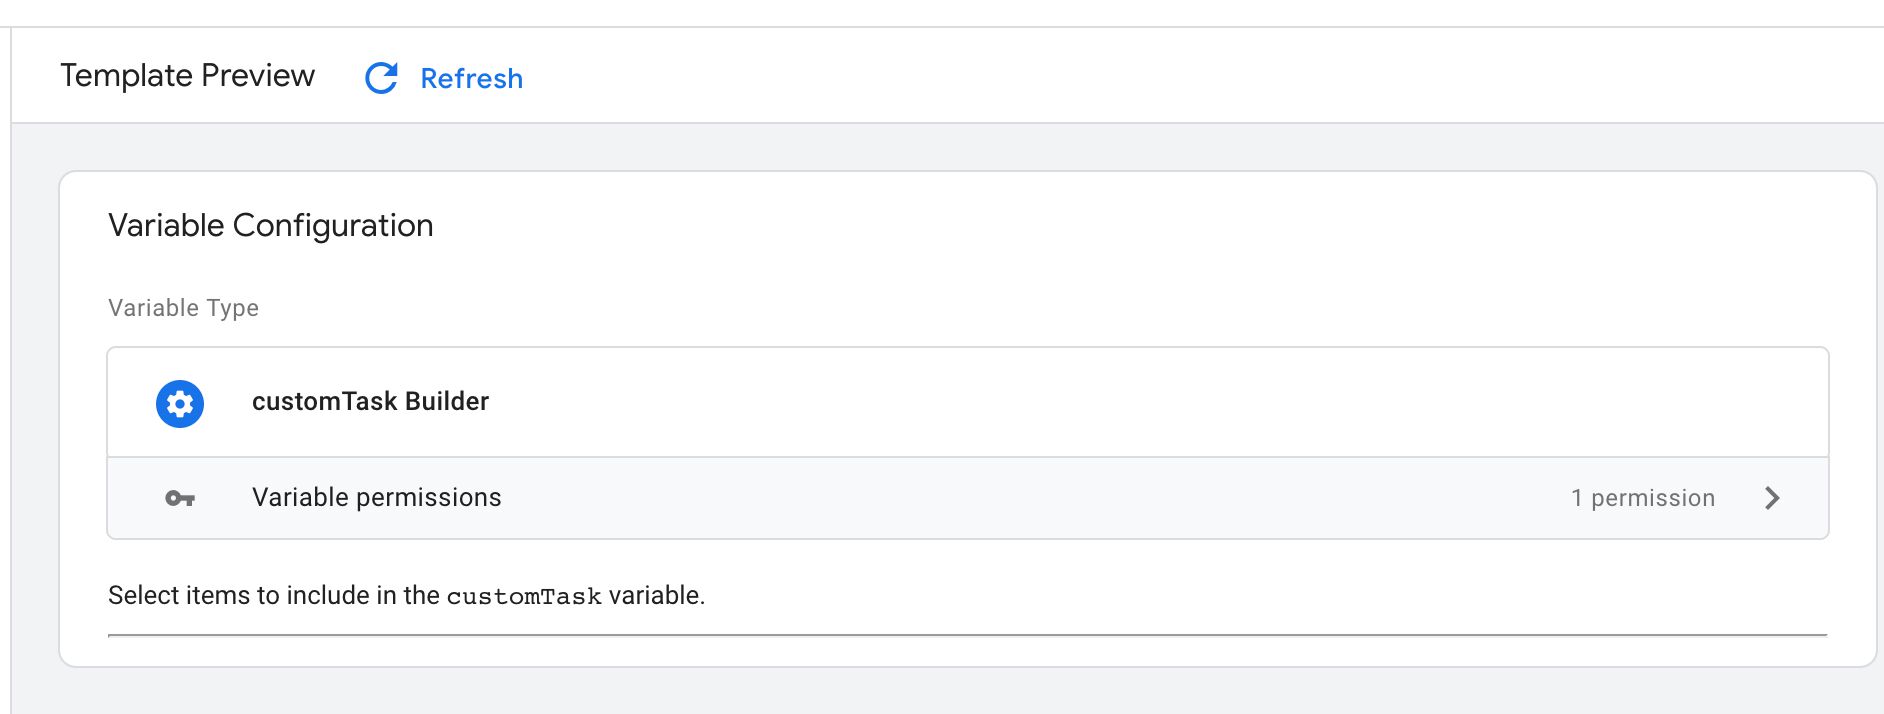
When you make changes to the template, whether in the Info, Fields, Code, or Permission tabs, the Refresh icon appears. By clicking this icon, the template preview is updated to reflect the changes you have made to the template in the editor.
Other than that, the template preview should perform exactly as the real thing. In the summary view, i.e. before you click it for editing, the template will show you only those fields that are included in summary. You can manually toggle this with the Always in summary field configuration.
The template preview is the perfect place to try out your template user interface before testing how the template actually runs, and finally saving it into the template library of your container.
Importing and exporting
Importing and exporting templates will almost certainly be one of the most useful things you can do with templates. By exporting your custom templates, you can create a store or library of Google Tag Manager templates for others to use. By importing templates, you can add custom templates created by others into your own template library.
To export a template, click open the editor menu and choose Export.
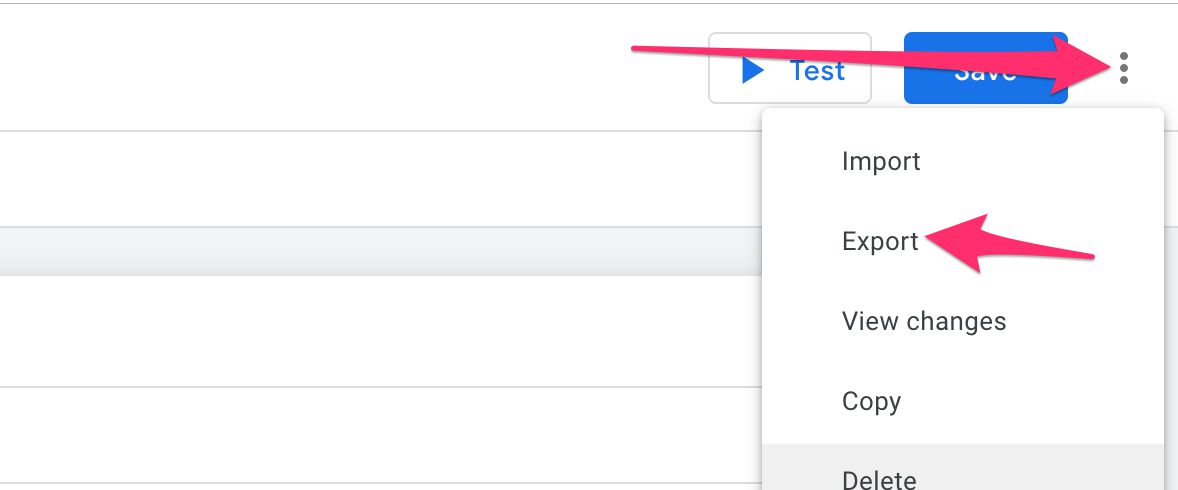
Your browser should automatically download a file named <your template name>.tpl. The TPL suffix is a custom file format for Google Tag Manager templates. If you open the file in a text editor, you can see that it’s a combination of JSON objects and plain text.
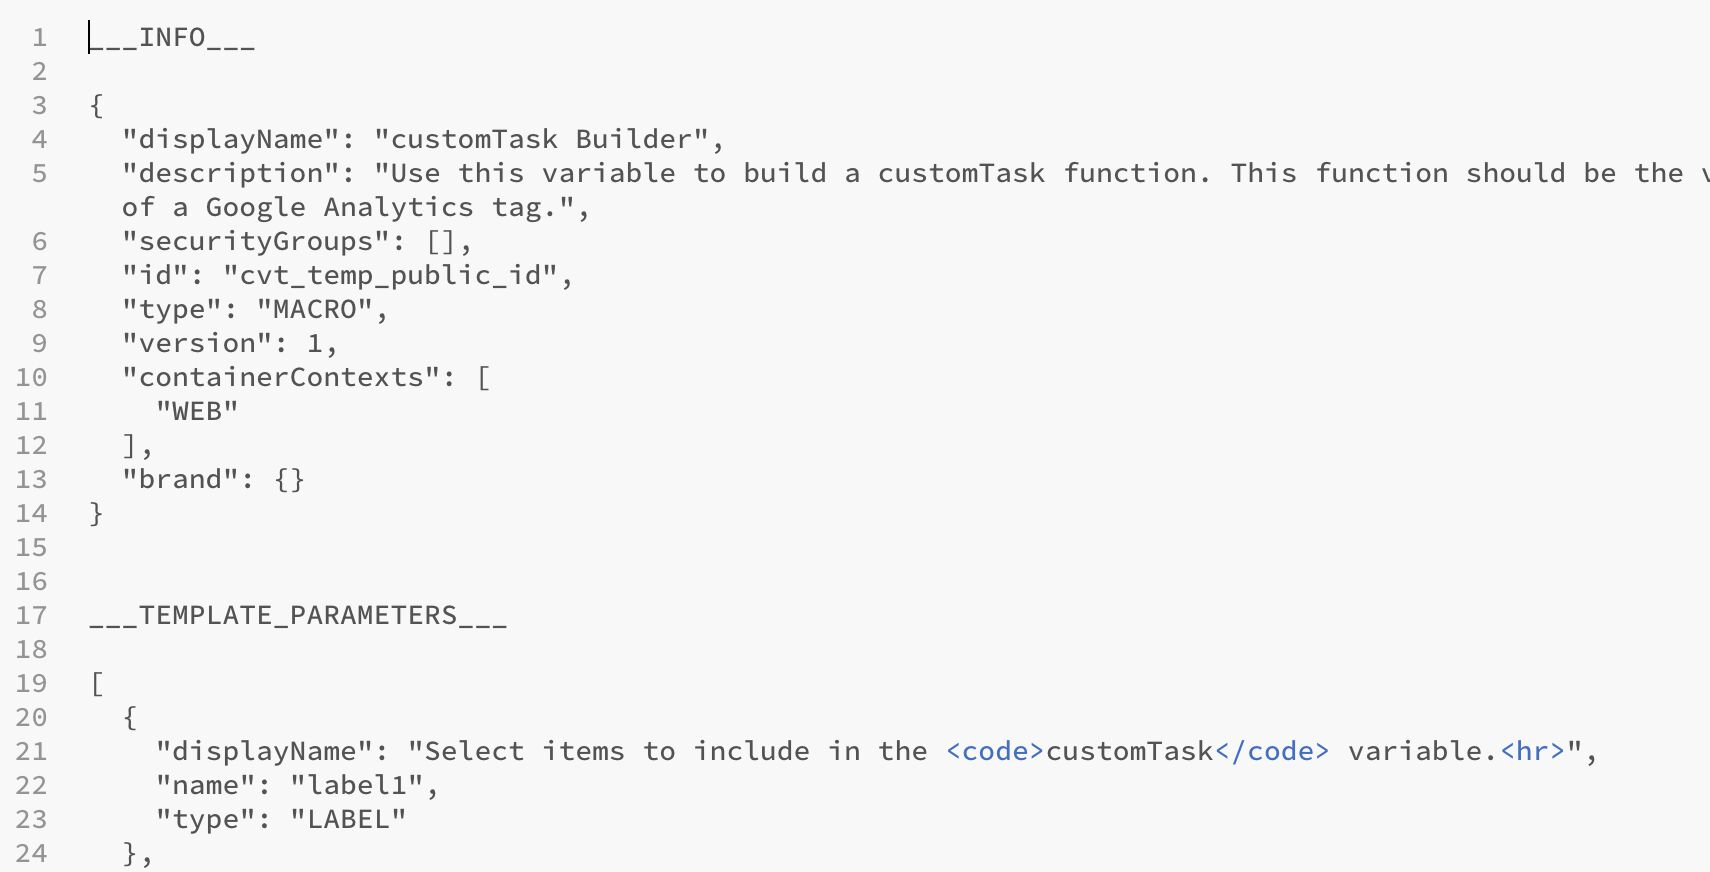
To import a template, click open the editor menu and choose Import. When importing a template, it’s a good idea to first create a new template which will host the imported item. Unless of course you are deliberately updating an existing template with a newer version of the import.
Once you’ve chosen the file, a pop-up will warn you that importing the file will overwrite the template currently being edited.
Why is this significant? Well, an import completely overwrites the template to which it is imported. So if you expect some sort of “merging” being an option, well, at the time of writing there’s no such feature.
Advanced settings
When you select Show Advanced Settings from the editor menu, a number of changes takes place in the UI.

- A Notes option becomes visible in the editor navigation. You can write anything you want into this text area, such as developer documentation, instructions for use, etc. The Notes field contents are included with the template export/import.
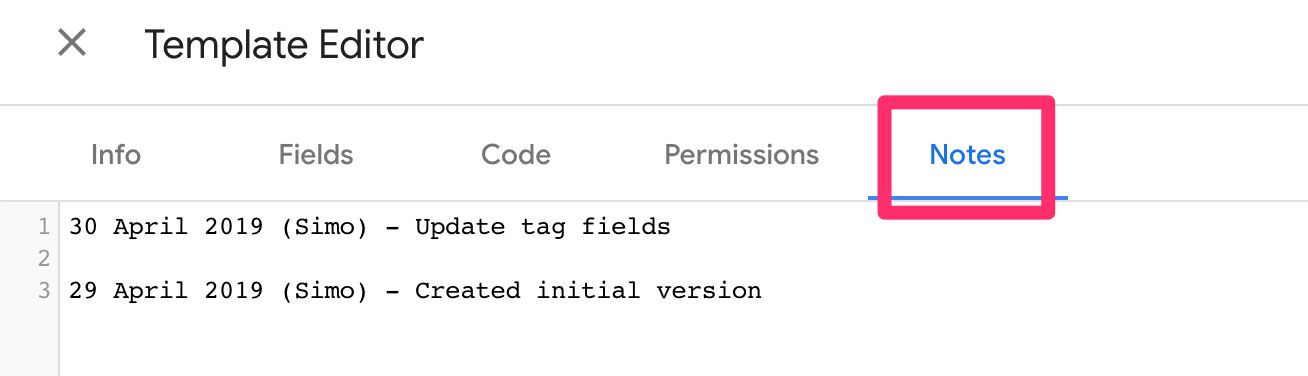
- The Info tab will now show the Version (of the templating system itself) and the Container Context (whether the template is for web containers or for app containers). You can’t change either of these values - they are set when you start creating the template. The Info tab will also show the Brand Name field.

- In the Info and Fields tabs, you can directly edit the JSON source. Note that even though this lets you edit anything you want in the source, trying to change things that can’t be changed (such as Version and Container Context from above) will result in the template issuing a warning when you try to refresh it in the preview or save it.
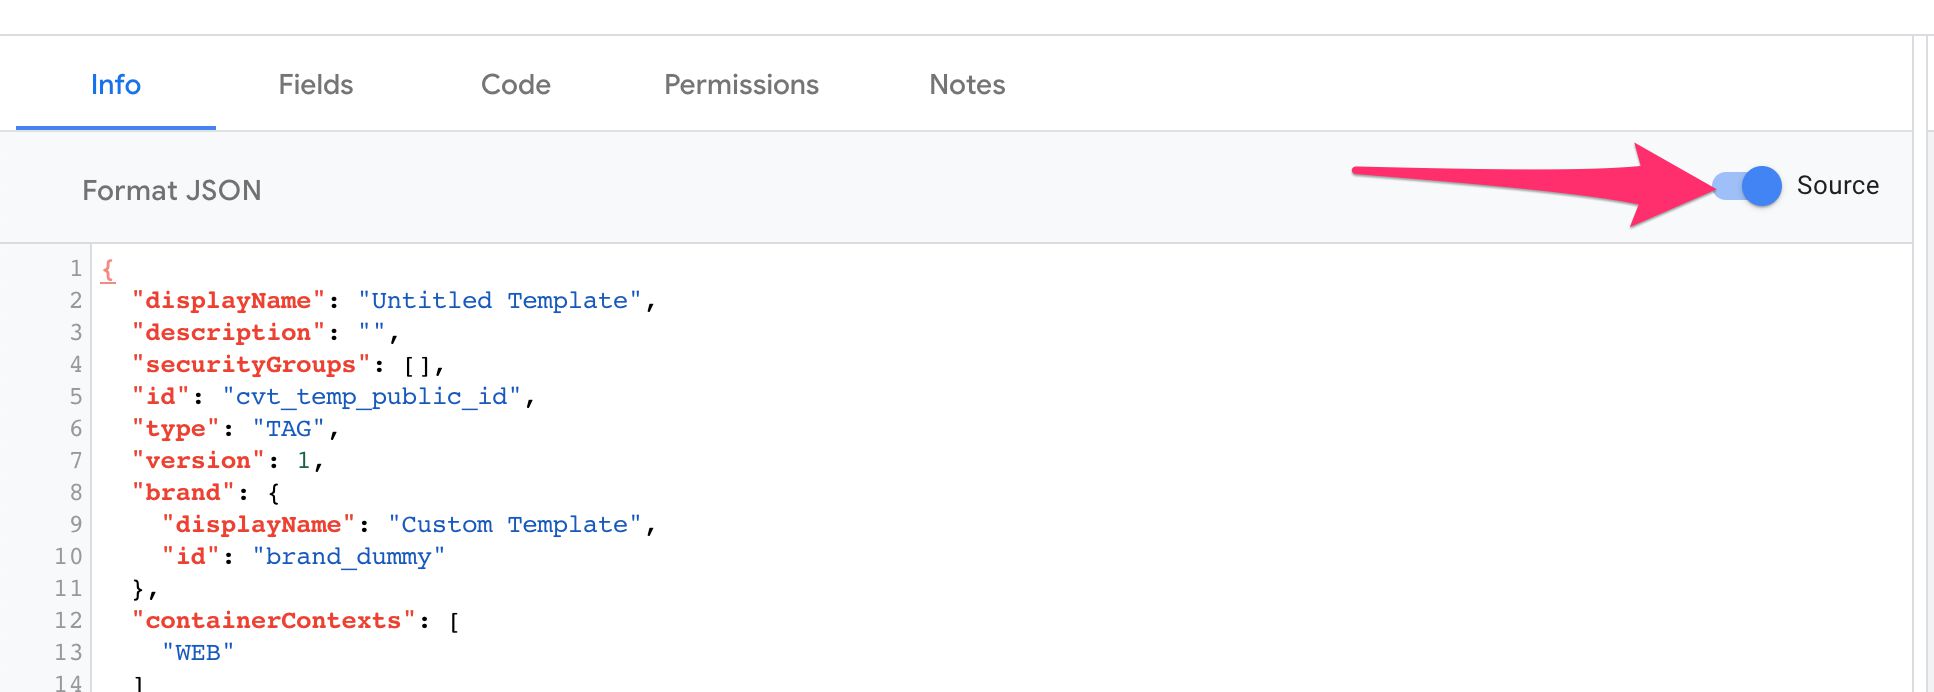
Running the template code
Whenever you want to test how the template actually runs, you can click the Run code button in the Template Preview window. This executes the tag/variable template code itself, outputting any debug messages into the console.
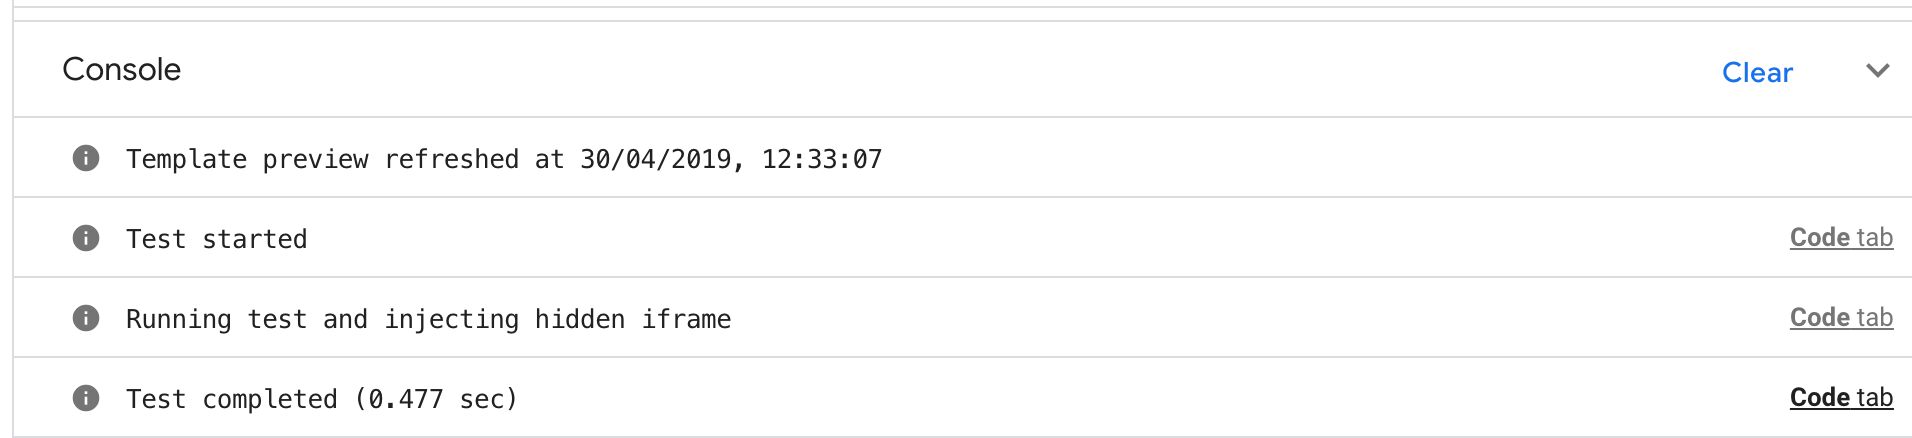
For tag templates, the console will tell you when the preview was last refreshed. It will also output any test logs, such as test start and completion (with elapsed time), as well as any errors.
If you don’t change anything in the code editor, the default code snippet will output the contents of the data object into the console.
Generally, the console will display any strings you write into the console using the logToConsole API.
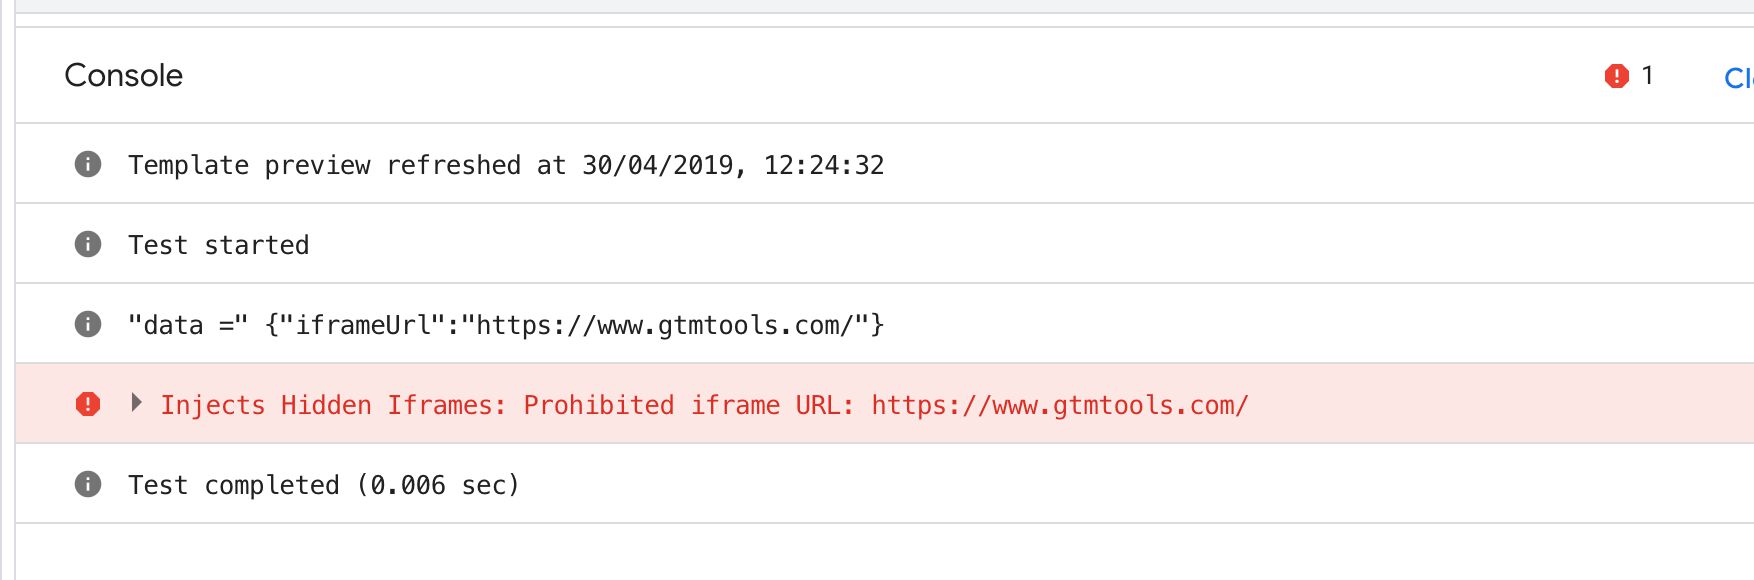
Furthermore, when you choose to Show test page in the editor menu, a content area will pop up which you can inspect to find any changes the tag code has made to the page on which the tag runs. This is useful if you want to check if and how your hidden iframe was added to the page, for example.
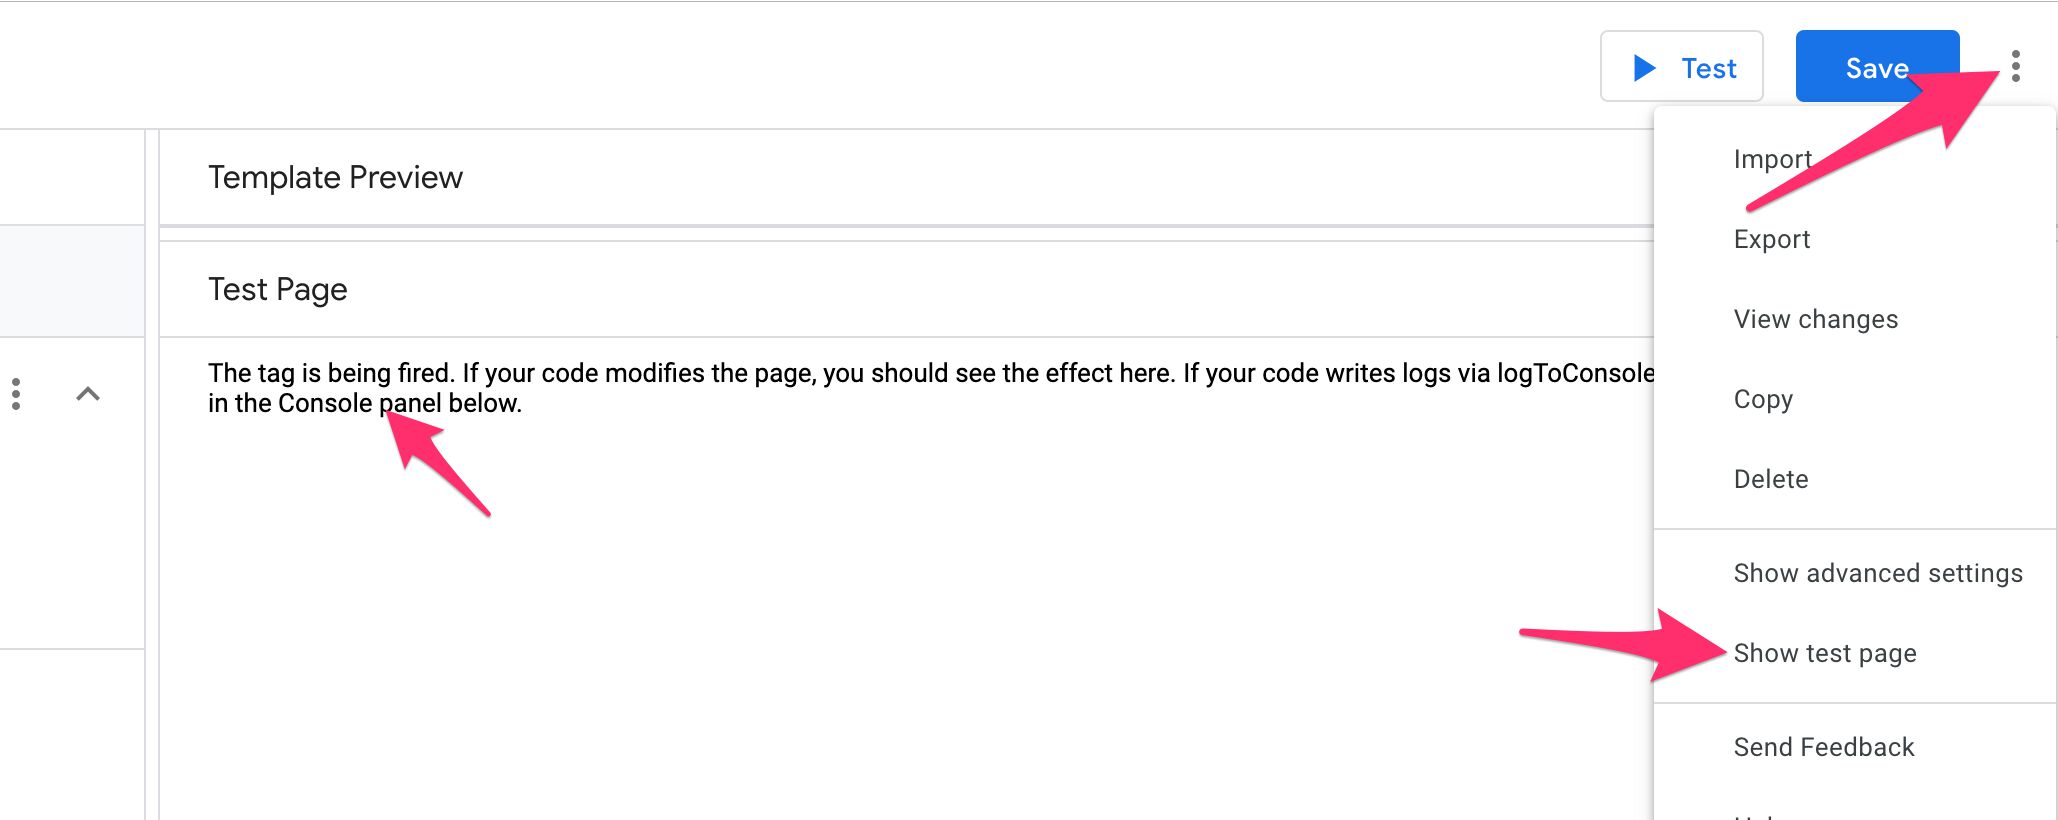
To find your modifications to the test page, right-click it in your browser and choose Inspect (this may vary by browser). Start drilling down the DOM until you find an iframe with GTM’s sandbox HTML file. The <body> of that iframe should contain any modifications your tag did to the page.
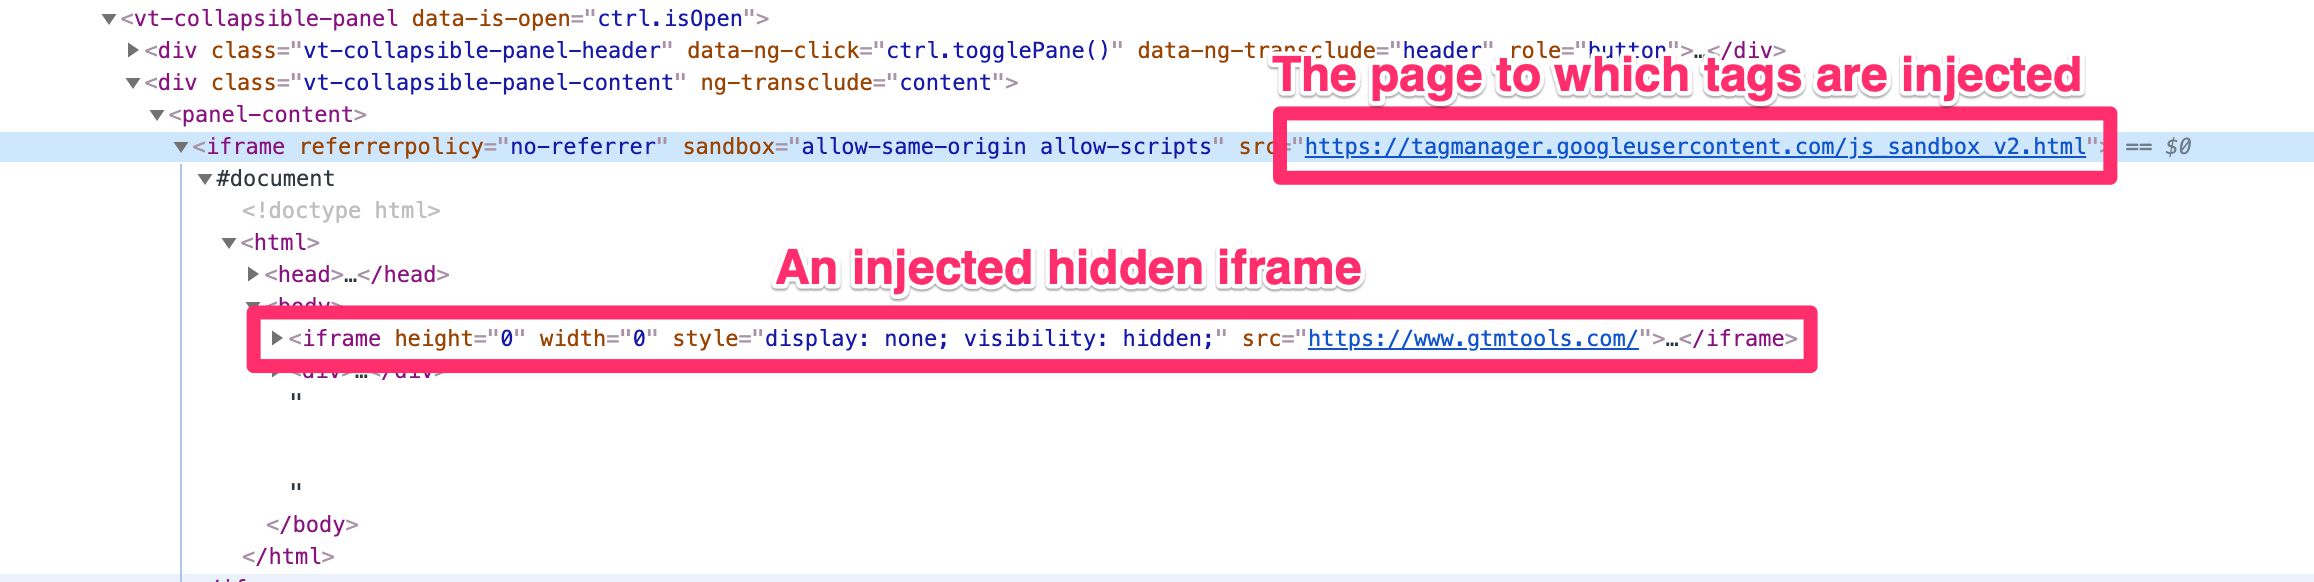
Variable templates differ in that they don’t modify the underlying page (or, they SHOULDN’T modify the underlying page). Instead, when you test the template, the console outputs what the variable will return.
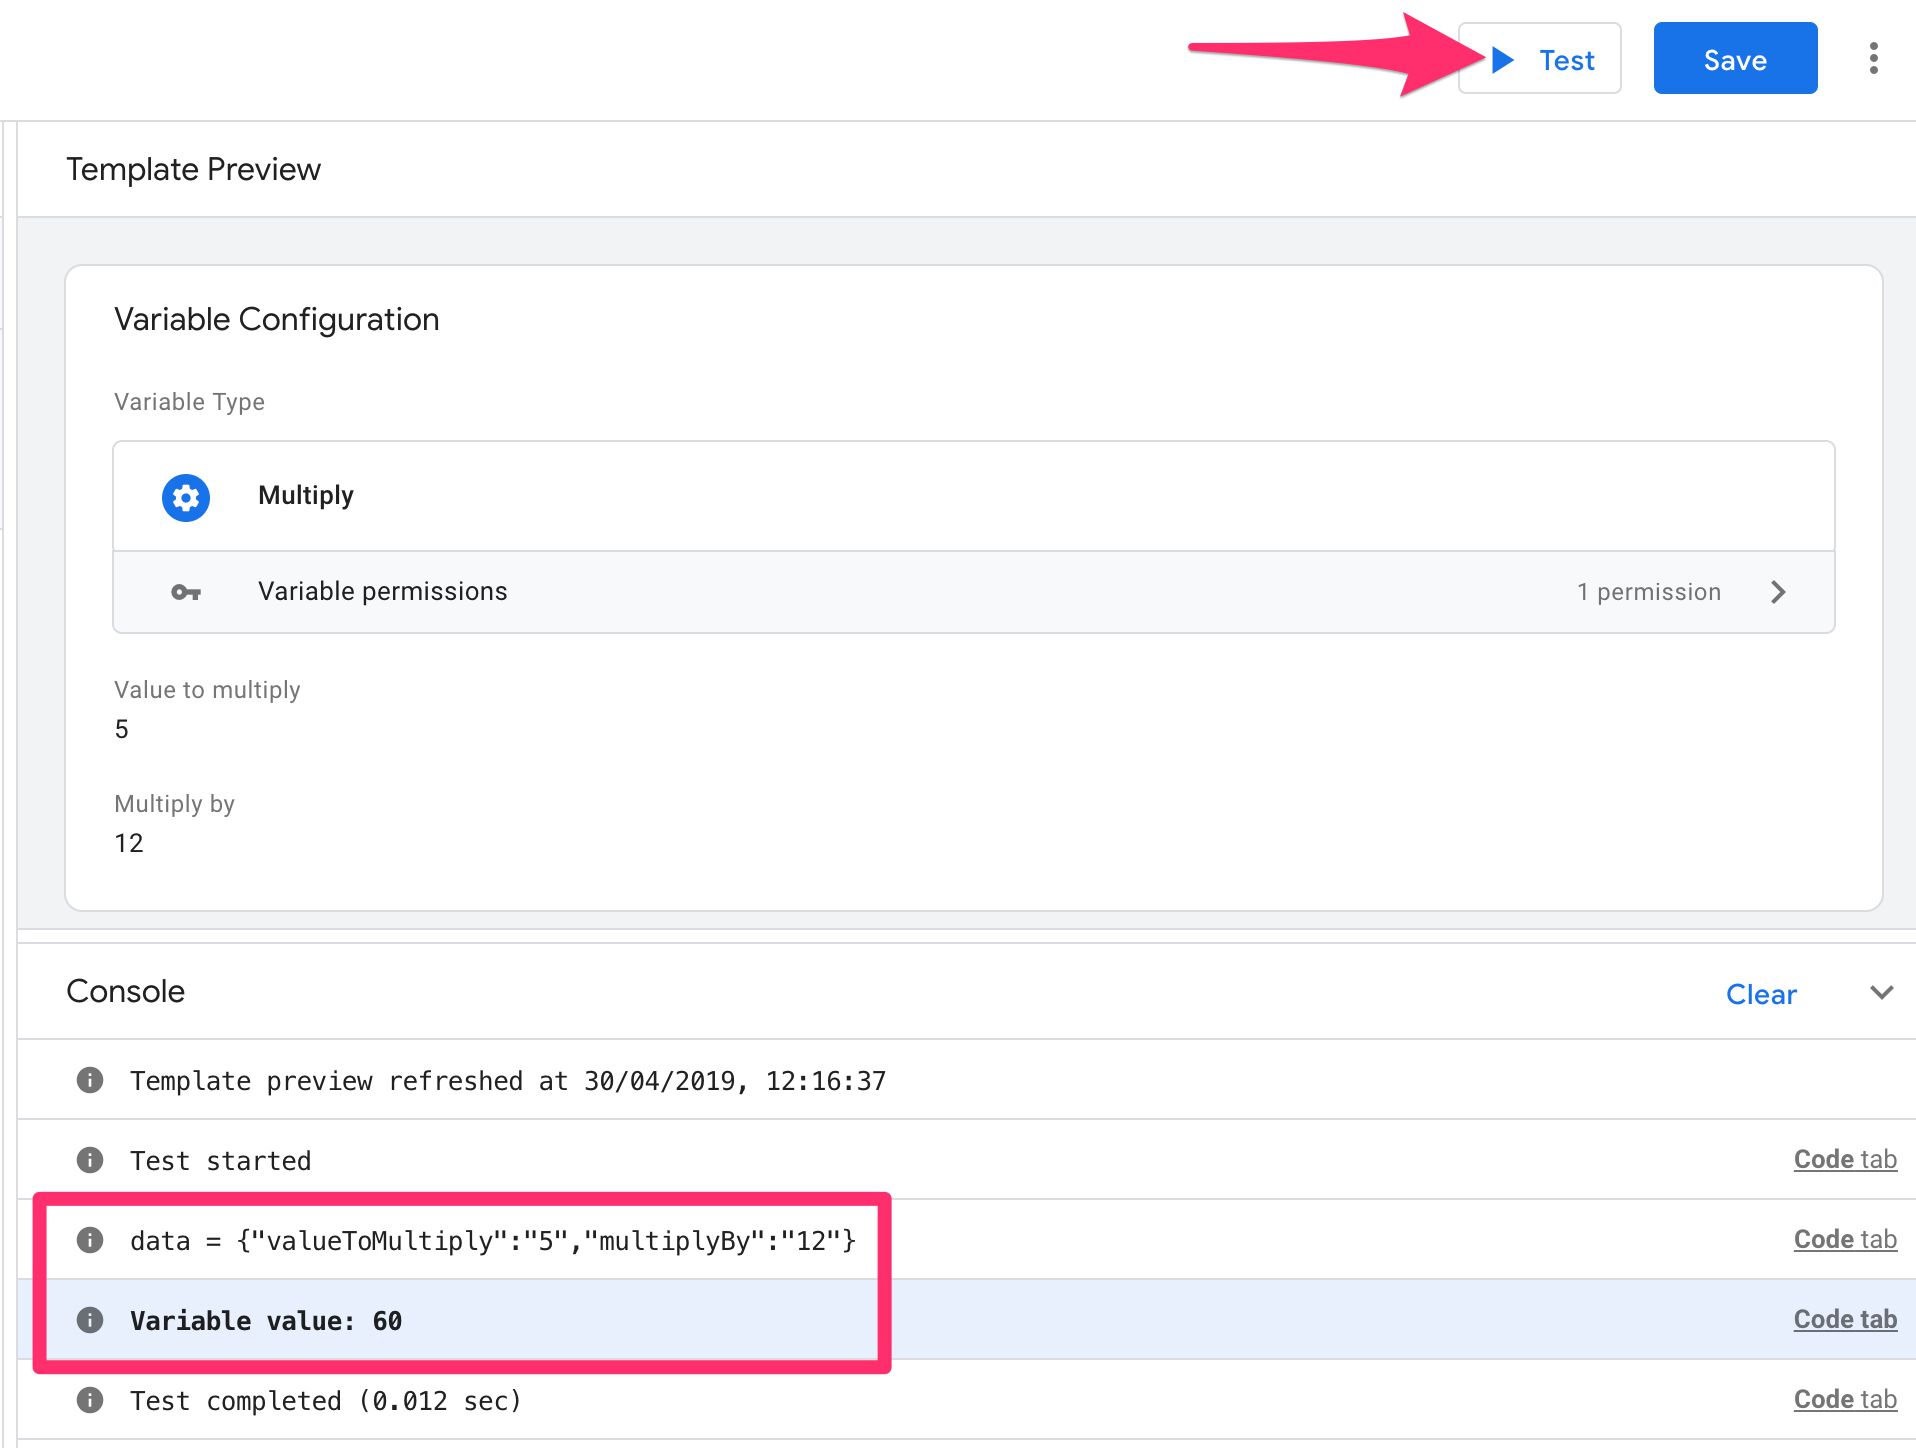
Templates in GTM’s Preview mode
In Preview mode, tag and variable templates work just like their built-in template counterparts.
For tags, you’ll see the tag name and properties.
Two default properties are always included:
Type - which is the template name, basically.
Firing Status - which will show “Succeeded” if
data.gtmOnSuccess()was reached in the tag code, “Failure” ifdata.gtmOnFailure()was reached in the tag code, andStill runningif neither was reached or if the tag is, actually, still running (due to e.g. the endpoint timing out).
The rest of the properties mirror the fields and field configurations you have generated. In the example below, a text input field named Iframe URL has been populated with the value https://www.gtmtools.com/, and a param table field named Iframe parameters has been populated with the values you see.
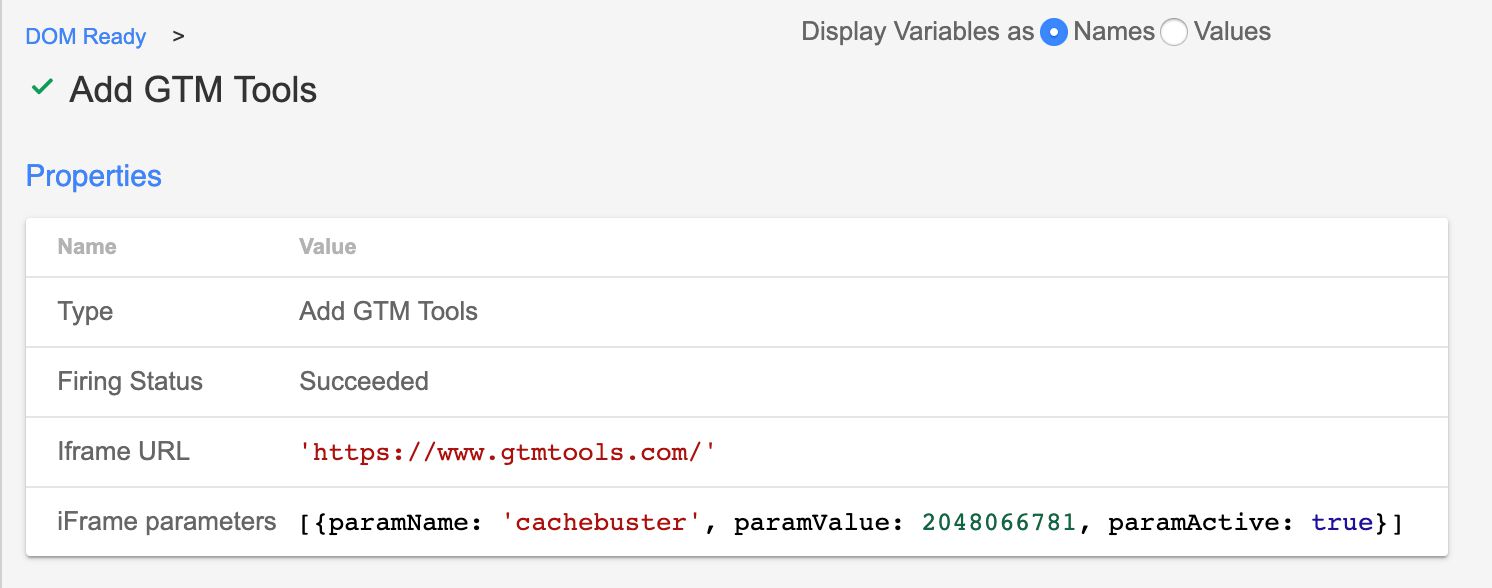
For variables, the output can be found in the Variables tab of Preview mode, and you can see the return value of each custom variable in exactly the same way you can see the return values for all predefined variable templates.
The variable template type will be the name of the custom template (“Multiply” in the example below).

The Errors tab will surface any errors thrown by policies or if the template failed a permission check.
Field configuration reference
This chapter lists all the Field configuration options you can configure for individual fields. Remember to check out the Fields editor chapter for a detailed description of the fields and the configurations available to them.

“Edit row” dialog title
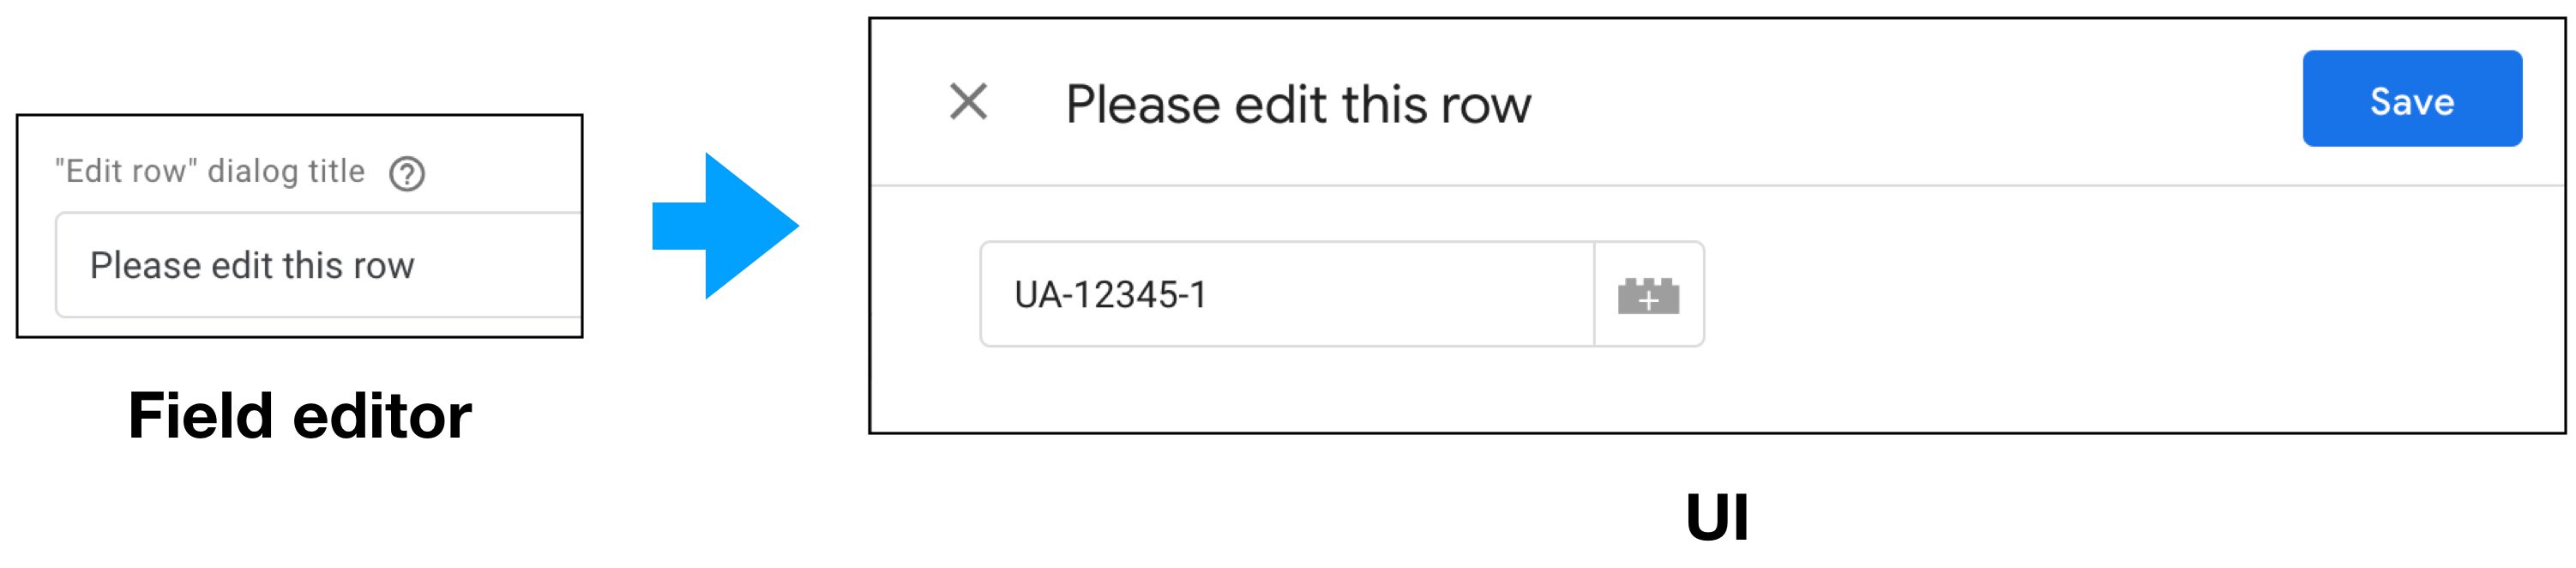
Description: The “Edit row” dialog title is available in fields where the user adds rows to a table and can edit those rows in an overlay. Defaults to “Edit row”.
How it works: The text you write into the configuration field will appear as the title of the overlay which pops out when the user edits a row they have already added to the table.
Used in: Param table.
“New row” button text

Description: The “New row” button text determines the button text with which the user can add a new row to a table field.
How it works: The text you type into the configuration field will be the text of the button below the table, which the user can use to add new rows to the table. Defaults to “Add row”.
Used in: Param table, Simple table.
“New row” dialog title
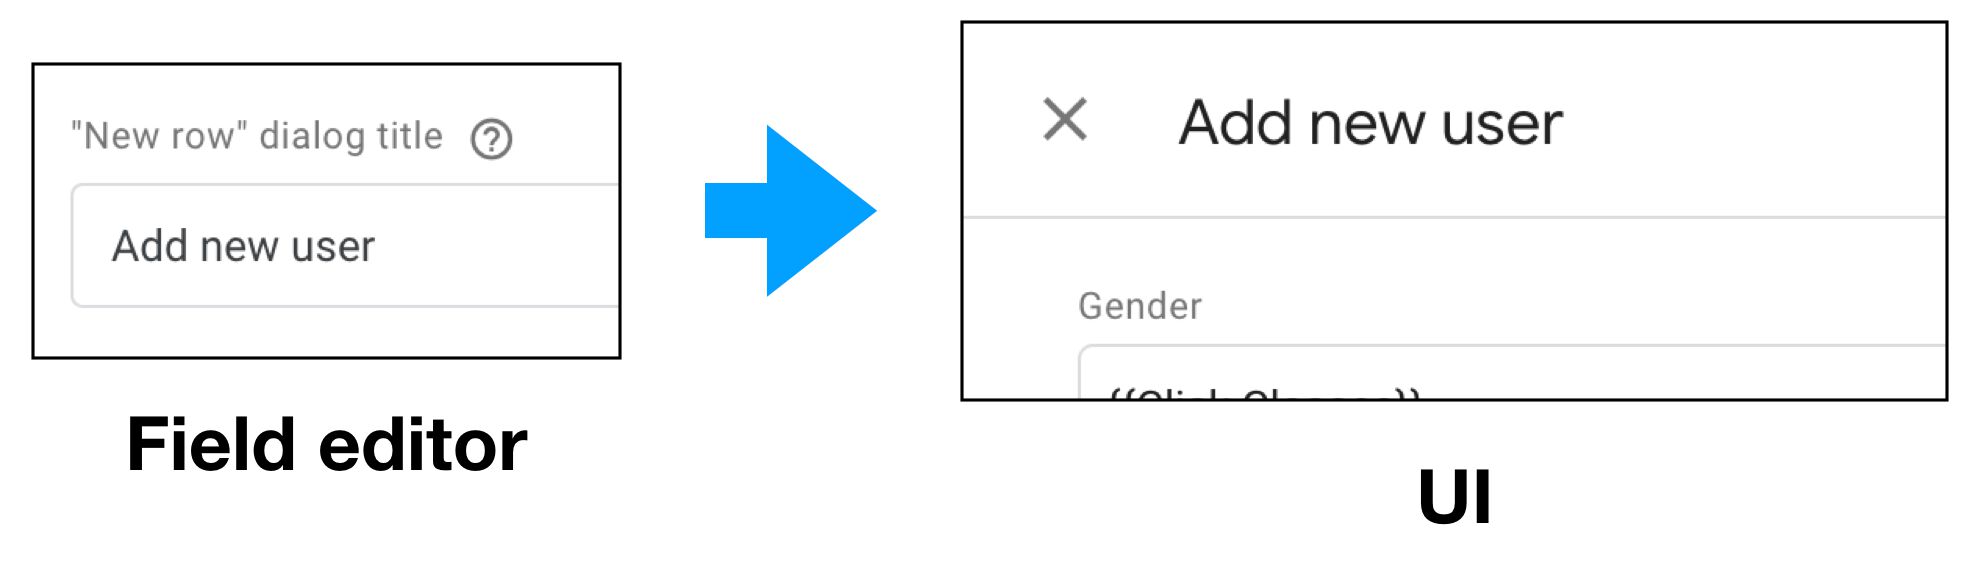
Description: The “New row” dialog title determines the text you see as the heading of the overlay that pops out when you choose to add a new row into a table. Defaults to “New row”.
How it works: Type the new title into the configuration field, and it will show as the heading of the overlay the user sees when adding a new row to a table that uses overlays for data input.
Used in: Param table.
“Not set” option
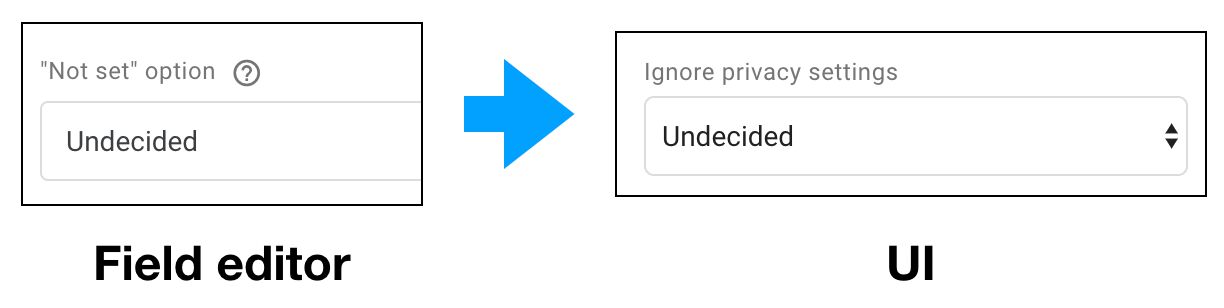
Description: Before the user chooses an item in the drop-down list, you can use the “Not set” option to show a placeholder value.
How it works: The “Not set” option is a selectable option in the drop-down list, which also shows up if the user hasn’t made any selection yet. If the user leaves the “Not set” option as the selected item, the value of the field in the code editor will be a blank string.
Used in: Drop-down menu.
Allow empty strings
Description: The Allow empty strings checkbox lets you determine whether or not an empty text input field shows up as an empty string when accessing the field value in the data object.
How it works: If the checkbox is checked, the text input field value in the code editor will be an empty string. If unchecked or if the configuration hasn’t been added to the field, the value will be undefined for empty text fields.
Used in: Text input
Always in summary
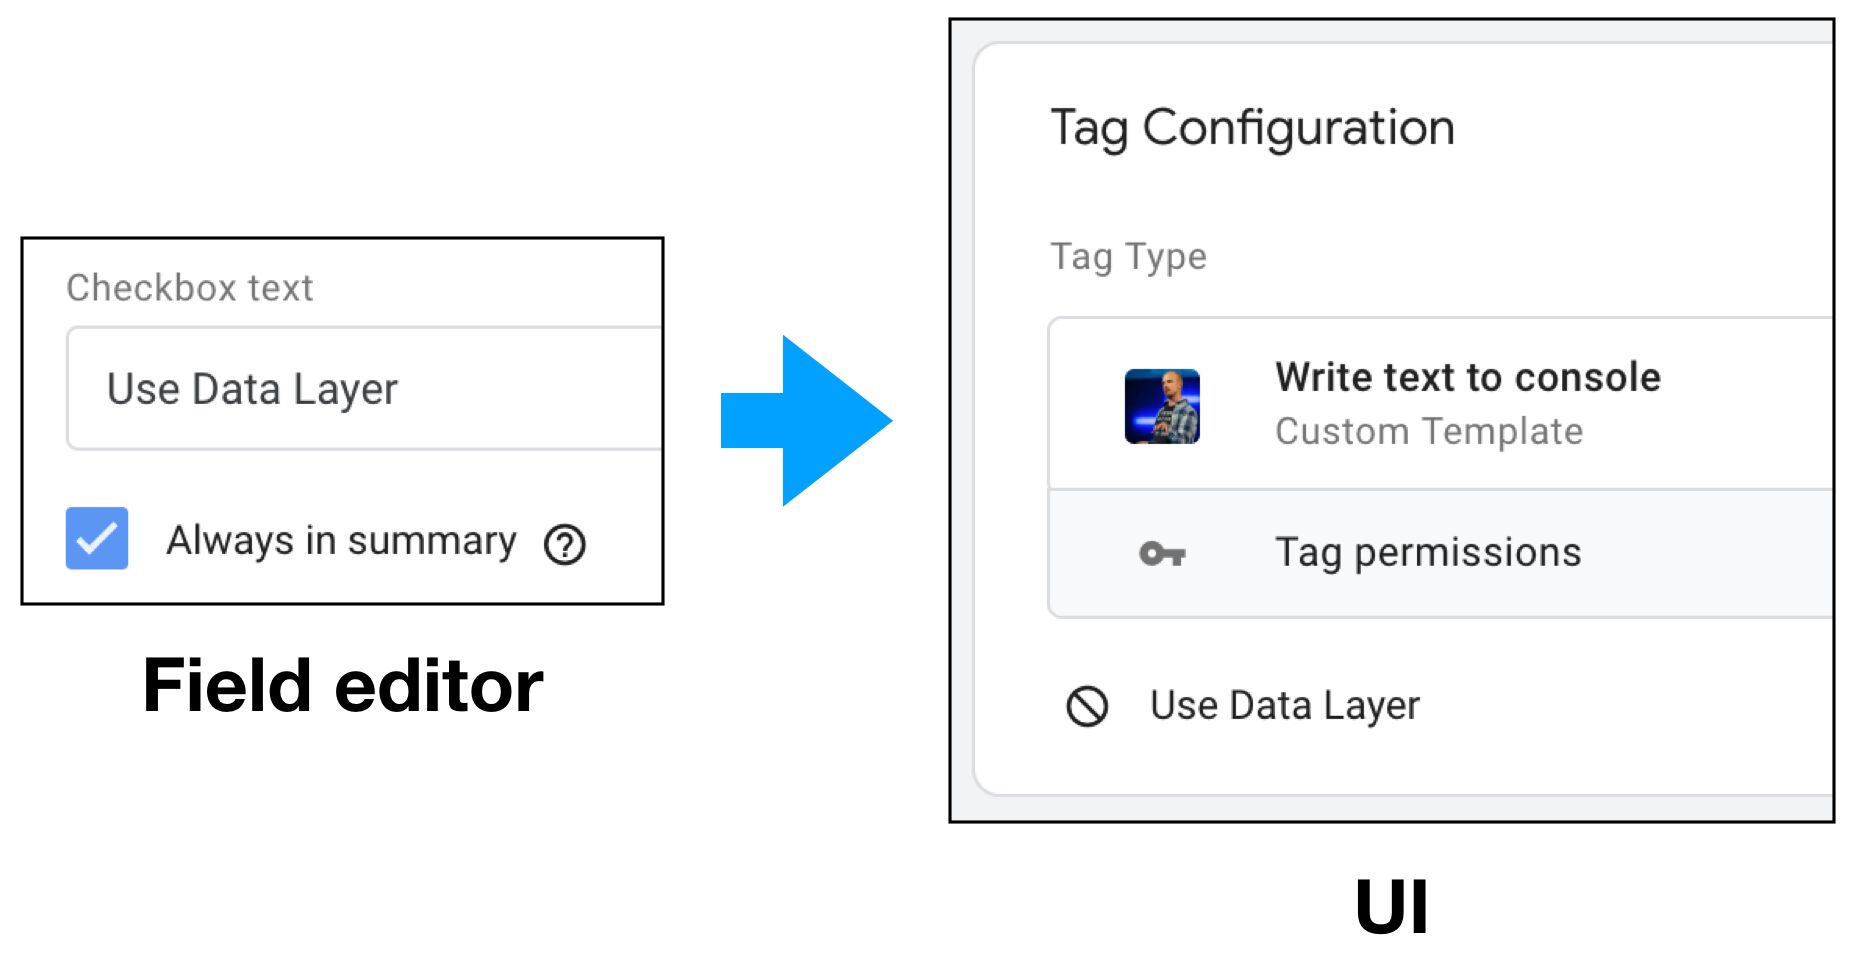
Description: The Always in summary configuration determines whether the field name and current value will show up in the summary view of the item.
How it works: When the checkbox is toggled, the user will see the name (if Display name is configured) and current value of the field in the summary view if the item. The summary is view what you see when the tag or variable is not in edit mode.
Used in: Text input, Drop-down menu, Checkbox, Simple table, Param table.
Clear on copy
Description: With Clear on copy, you can toggle whether or not the field will retain or clear its value if a copy is made of the tag or variable.
How it works: If Clear on copy is checked, then when the user makes a copy of an item created with this template, the field will have its value cleared (returned to its initial state) in the copy. If Clear on copy is unchecked or missing, the value of the field from the original item will be preserved in the copy.
Used in: Text input, Drop-down menu, Checkbox, Radio buttons, Simple table, Param table.
Default value
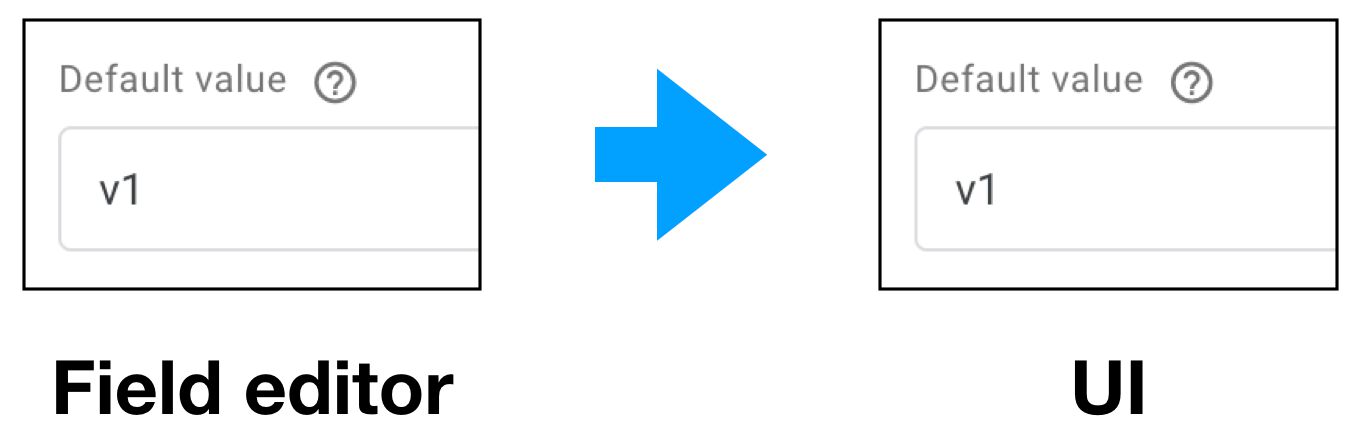
Description: The Default value option determines what the value of the field is before the user inputs anything into the field.
How it works: Default value represents the initial value of the field. It is considered a true value, meaning if the user doesn’t delete or change it, the default value will be what the field returns in the code editor.
Used in: Text input, Drop-down menu, Checkbox, Radio buttons, Simple table, Param table.
Display line count
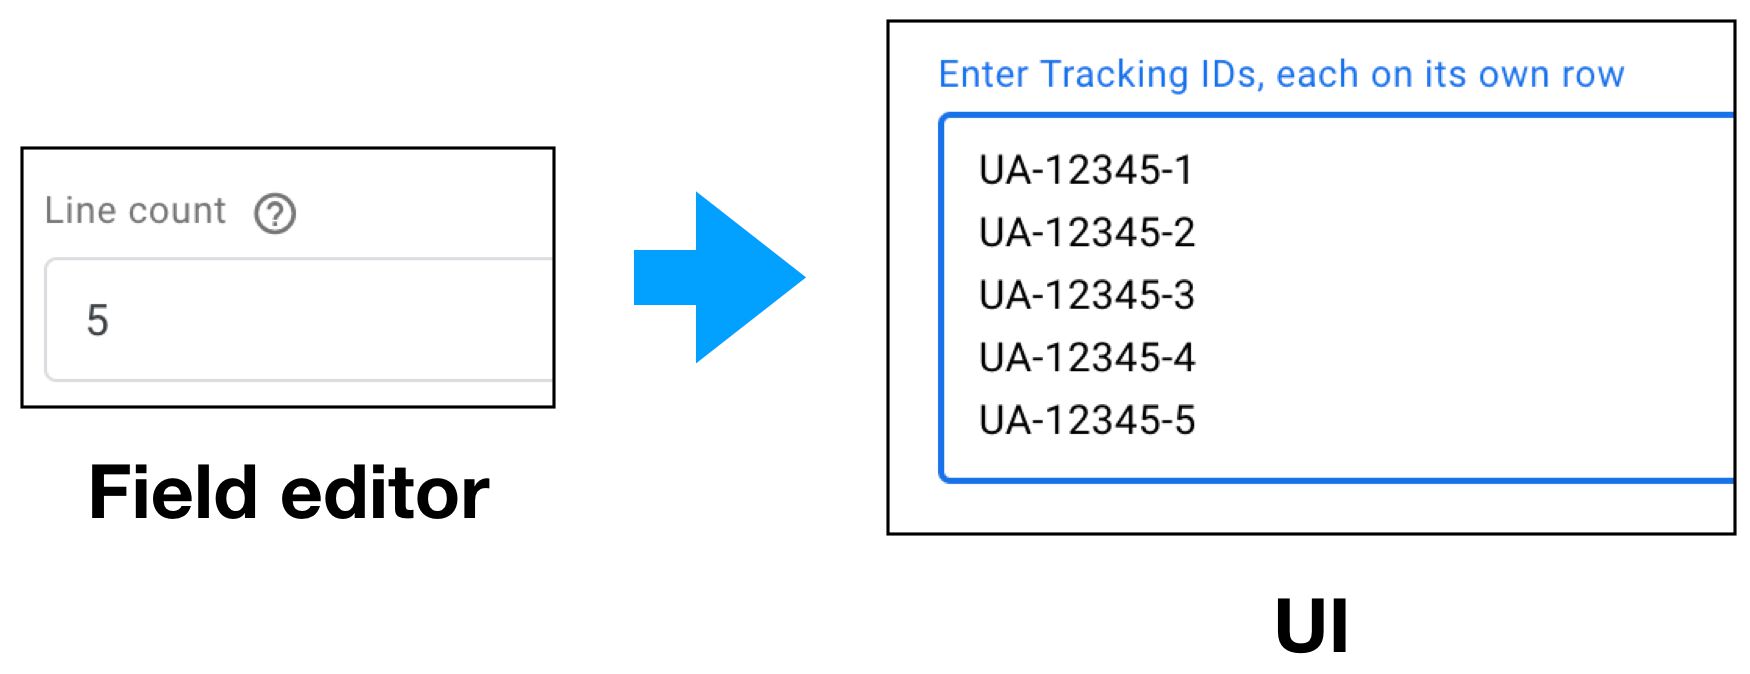
Description: Set the height of the text input area, and whether or not a multi-line value can be given.
How it works: If Display line count is set to 1, then only one row of data can be input into the field. Anything larger than 1, and the height of the text area grows as a result, and the user can type on multiple rows in the text input field.
Used in: Text input.
Display message when not set

Description: The Display message when not set allows you to show a “default value” for the field when in the summary view and the field doesn’t have a value.
How it works: The text will show up only in the summary view when the field is not set, i.e. has no determinable value. It will not impact what the code editor returns as the field value.
Used in: Text input, Simple table, Param table.
Display name
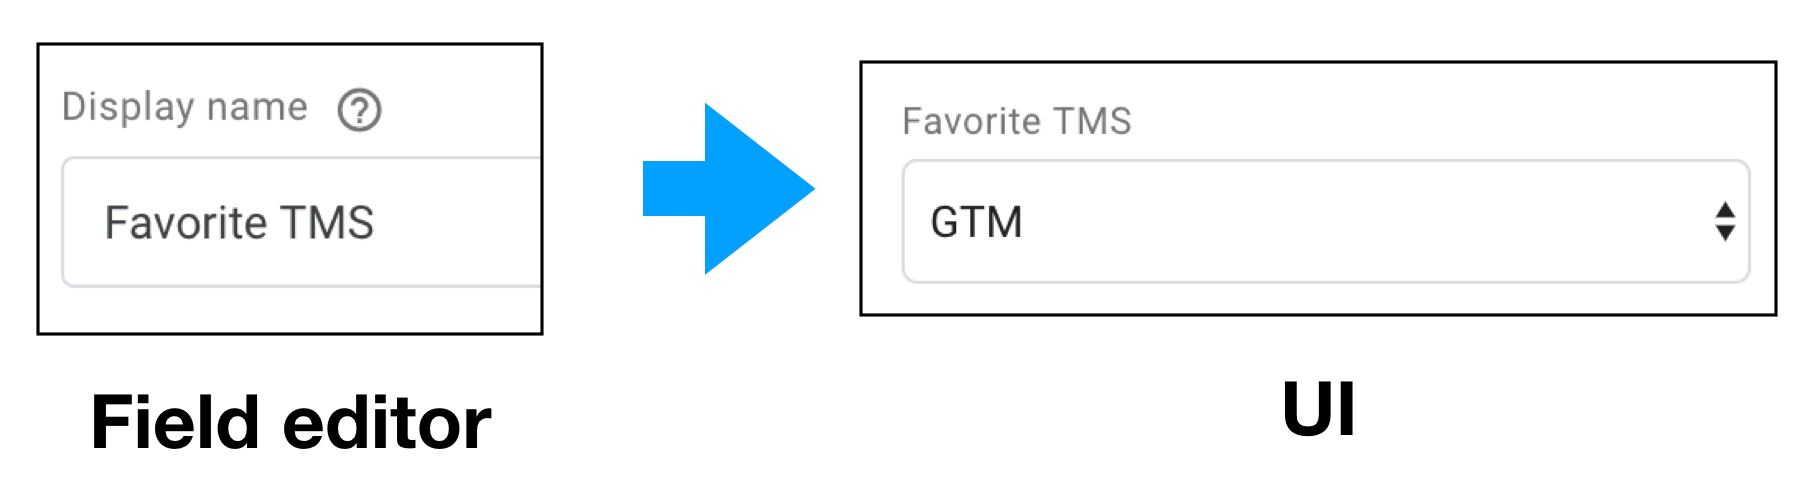
Description: The Display name configuration lets you set a label for the field.
How it works: The text you input in the Display name is shown as a label for the field when both in edit mode and the summary view.
Used in: Text input, Drop-down menu, Checkbox, Radio buttons, Simple table, Param table, Group, Label.
Enabling conditions
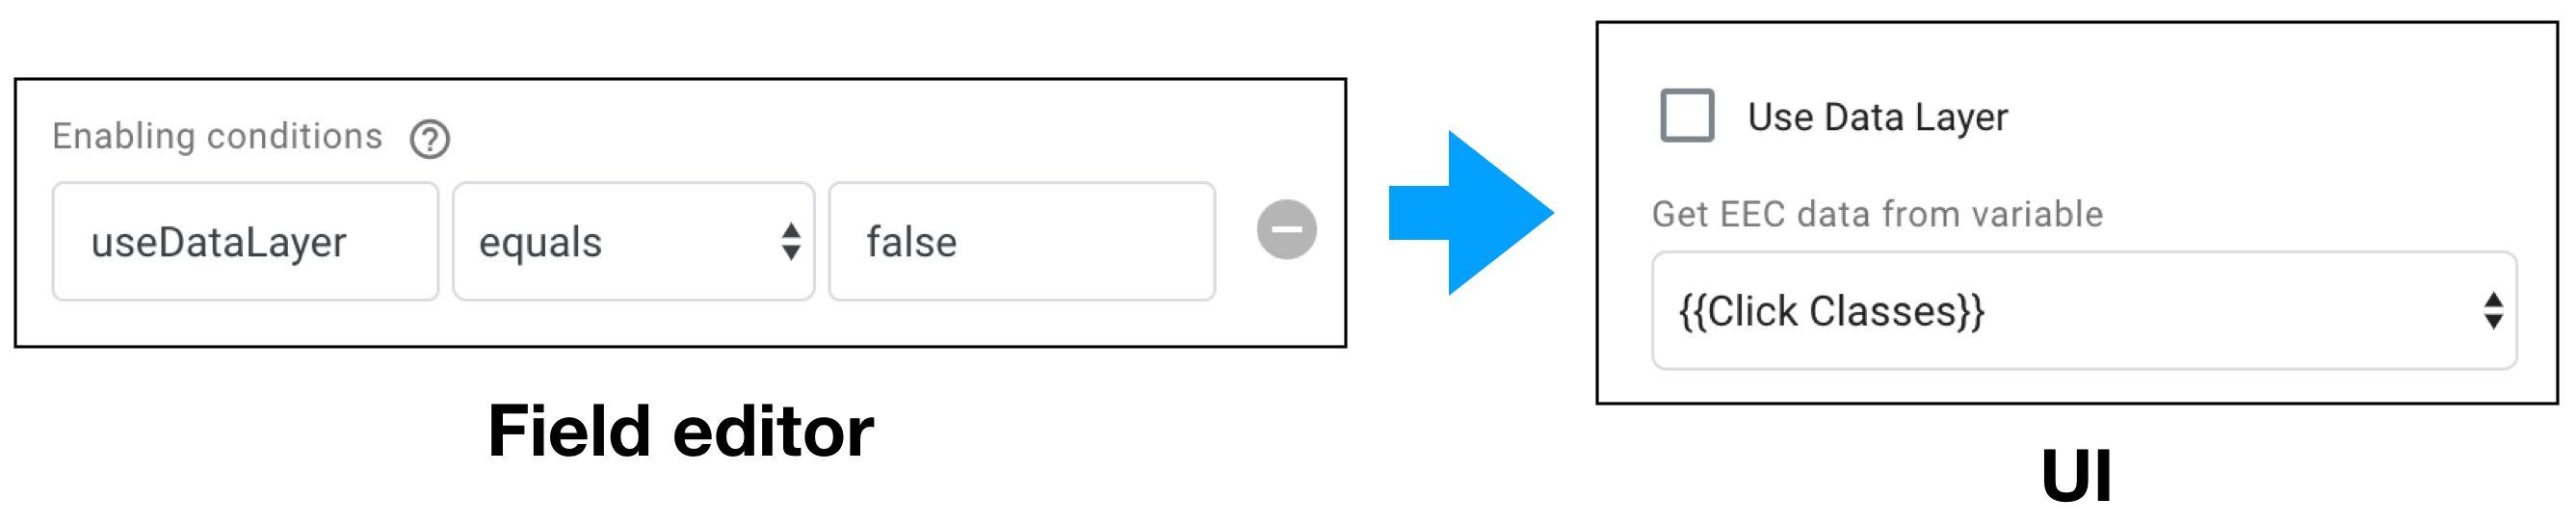
Description: You can establish a dependency with Enabling conditions. The field will only be visible in the UI if the enabling condition validates.
How it works: An Enabling condition is essentially a check against some other field’s value. You can use it to check whether some checkbox is unchecked, for example (as in the screenshot above).
Used in: Text input, Drop-down menu, Checkbox, Radio buttons, Simple table, Param table, Group, Label.
Group style
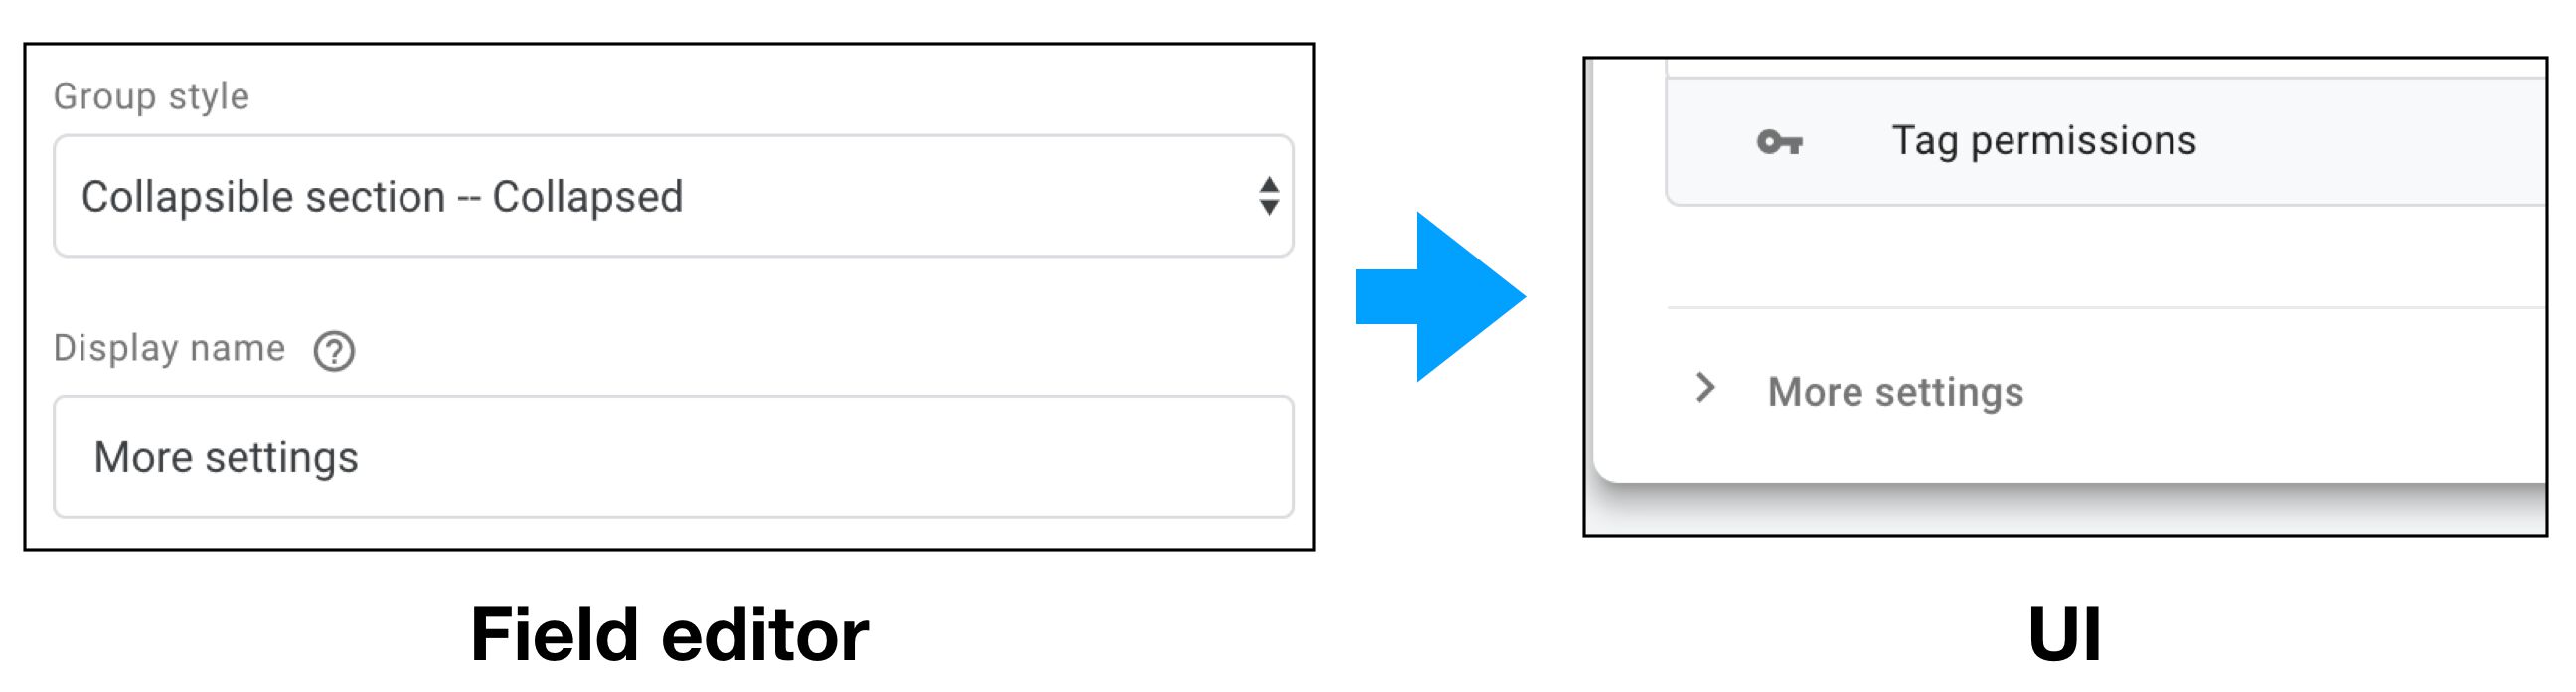
Description: Use the Group style configuration to determine how the Group field works.
How it works: The options you can choose are:
Simple section: the fields are simply grouped without UI impact. This is useful if you simply want to have the field configurations for the group impact the nested fields within.
Collapsible section – Open: The fields are in a section that can be collapsed, and the section defaults to being open.
Collapsible section – Closed: The fields are in a section that can be collapsed, and the section defaults to being closed.
Collapsible section – Open if not default: The fields are in a section that can be collapsed, and if the fields have not been edited, the section is closed.
Used in: Group.
Help text

Description: Use Help text to show a little tooltip when hovering over the question mark icon next to the field in the UI.
How it works: The text you type into the Help text configuration field will appear in the UI when the user hovers the mouse cursor over the little question mark icon.
Used in: Text input, Drop-down menu, Checkbox, Radio buttons, Simple table, Param table, Group.
Include variables
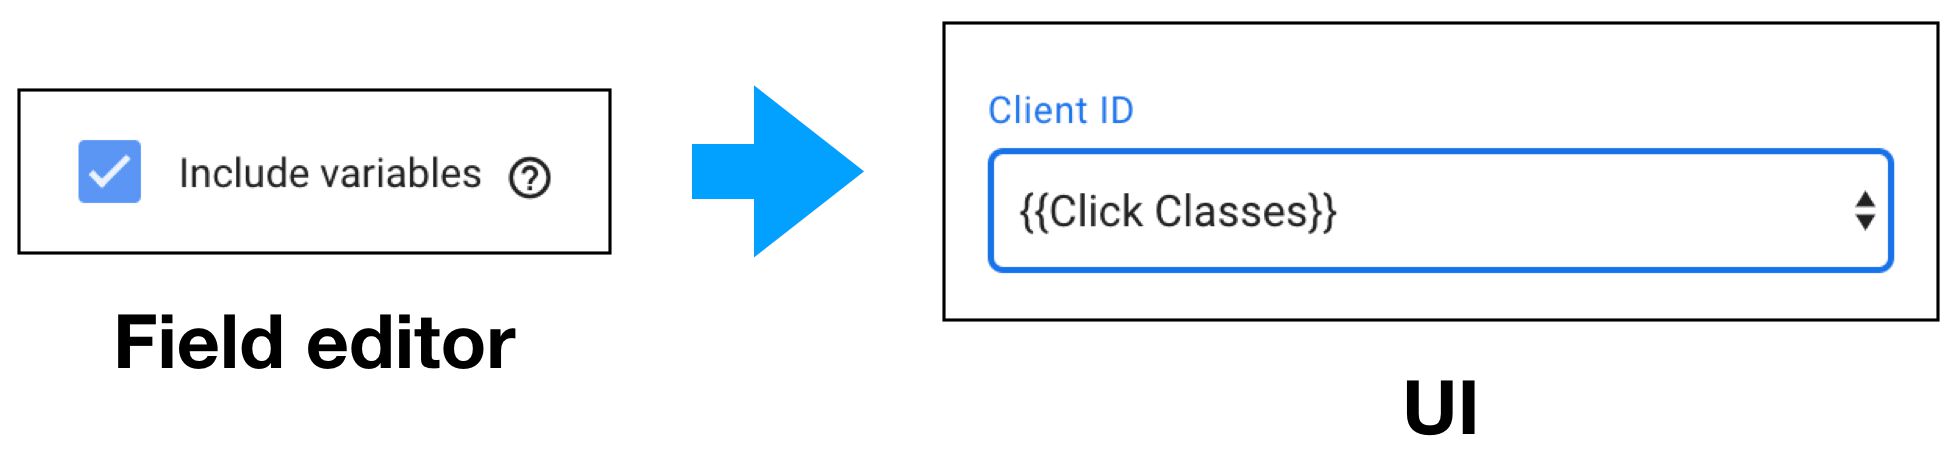
Description: When checked, Include variables will make the full list of GTM variables available for selection as the field value.
How it works: The drop-down menu will include all the GTM variables as selectable options if this field configuration is checked.
Used in: Drop-down menu.
Nested fields
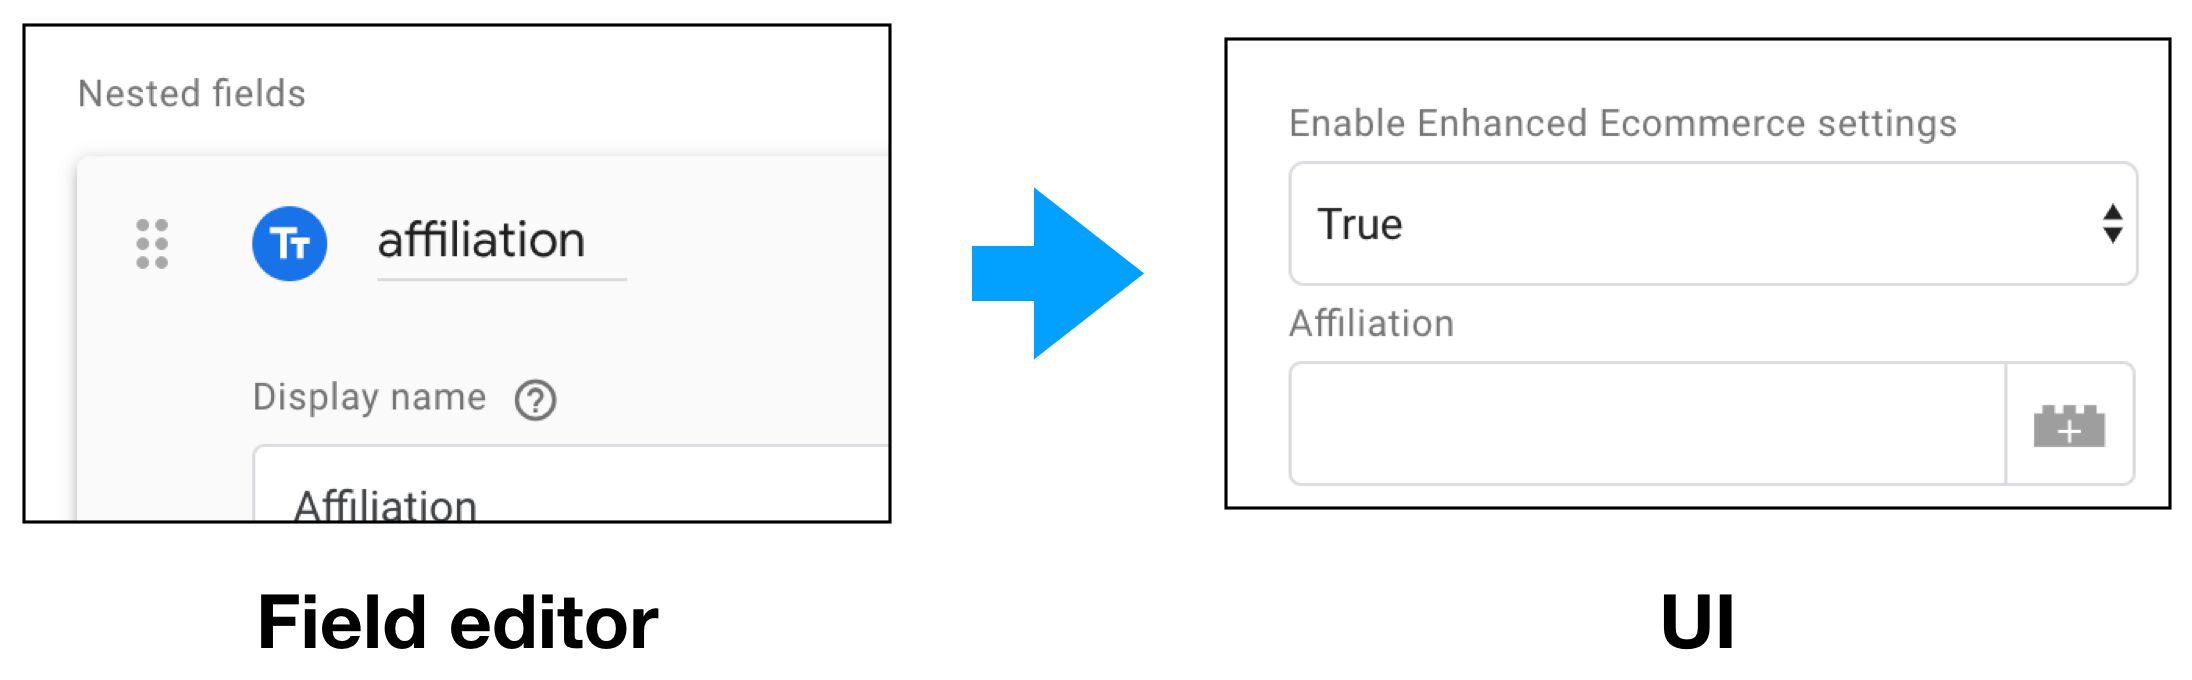
Description: When you add Nested fields to a field, those fields become dependent on the enabling condition set for the parent field. Also, visually they will be placed closer to the parent field compared to if they were regular, non-nested fields.
How it works: Toggle Nested fields on, and you can add any available field type as a nested field of the current field. After that, if the parent field is disabled due to an invalid Enabling condition, for example, the nested fields will be disabled, too.
Used in: Drop-down menu, Checkbox, Radio buttons.
Text as list
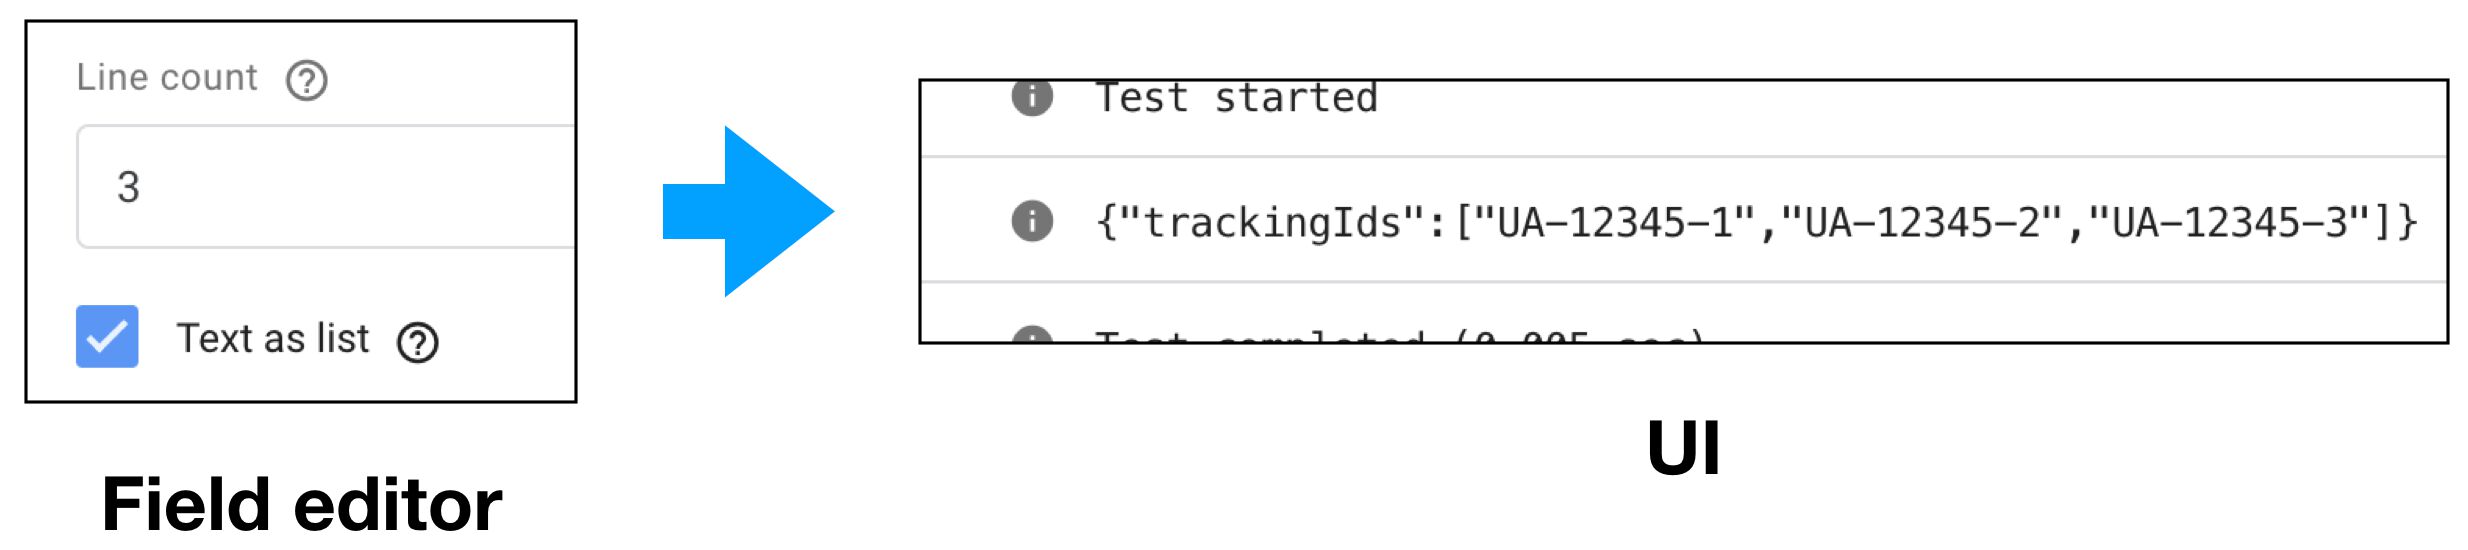
Description: Use this with Line count to access the field value as an array of strings (where each row corresponds to an item in the array).
How it works: When Text as list is checked, then each row in a Text input field (when Line count is also configured) will be an item in the array of the resulting data object. Without Text as list, a multi-line input will result in a single string, where each row is separated with the newline character (\n).
Used in: Text input.
Validation rules
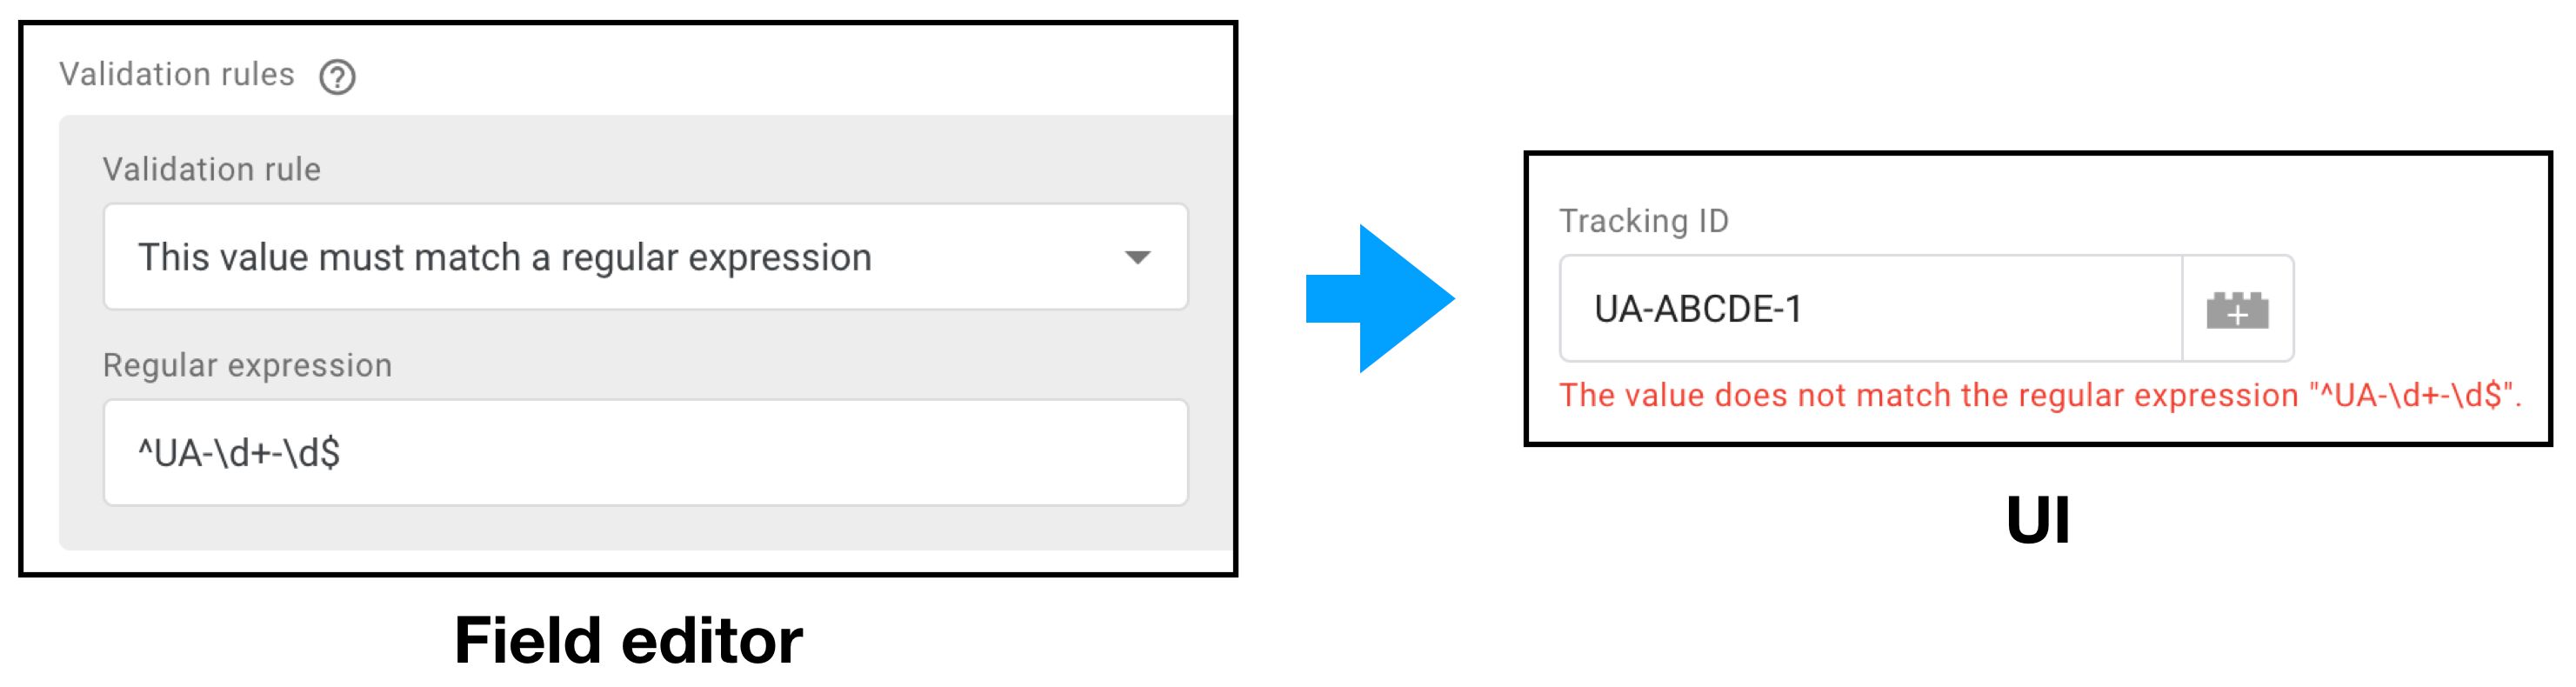
Description: Use the Validation rules configuration to establish validation criteria for the field.
How it works: When you add a Validation rule to the field, the field must pass the validation, or the user won’t be able to save the tag or variable. The available rules are:
| Rule | How to fail validation |
|---|---|
| …cannot be empty | User does not input anything into the field. |
| …must be a string of the required length | User inputs a string that is less than the minimum or more than the maximum length. |
| …must be a number | User inputs a value that is not an integer number. |
| …must be a positive number | User inputs an integer number that is equal to or less than 0. |
| …must be a positive number or 0 | User inputs an integer number that is less than 0. |
| …must be an integer between 0 and 100 (inclusive) | User inputs an integer number that is less than 0 or more than 100. |
| …must be a number between 0 and 1 (inclusive) | User inputs a number (integer or floating point) which is less than 0.0 or more than 1.0. |
| …must match a regular expression | User inputs a value that does not match the given regular expression. The RegEx accepts full matches only, so don’t forget to add leading and/or trailing .* if you want it to be an open-ended match. |
| …must be a valid GA tracking ID | User inputs a value that does not match the GA tracking ID format (UA-11111-1). |
| …must be a list of the required length | User inputs rows into a table fewer than the minimum length or more than the maximum length. Applies also to a Text input field where Text as list is being used. |
NOTE! For fields that are governed by enabling conditions, the validation rule will only apply if the field has been enabled.
You can click the action menu for the Validation rule configuration to Show advanced settings.

The advanced settings include:
Error messages: You can customize the error message that is shown if the field does not pass validation.
Enabling conditions: You can add enabling conditions to the validation rule itself, meaning if the enabling conditions do not pass, the validation rule is ignored.
Used in: Text input, Drop-down menu, Checkbox, Radio buttons, Simple table, Param table.
Value hint
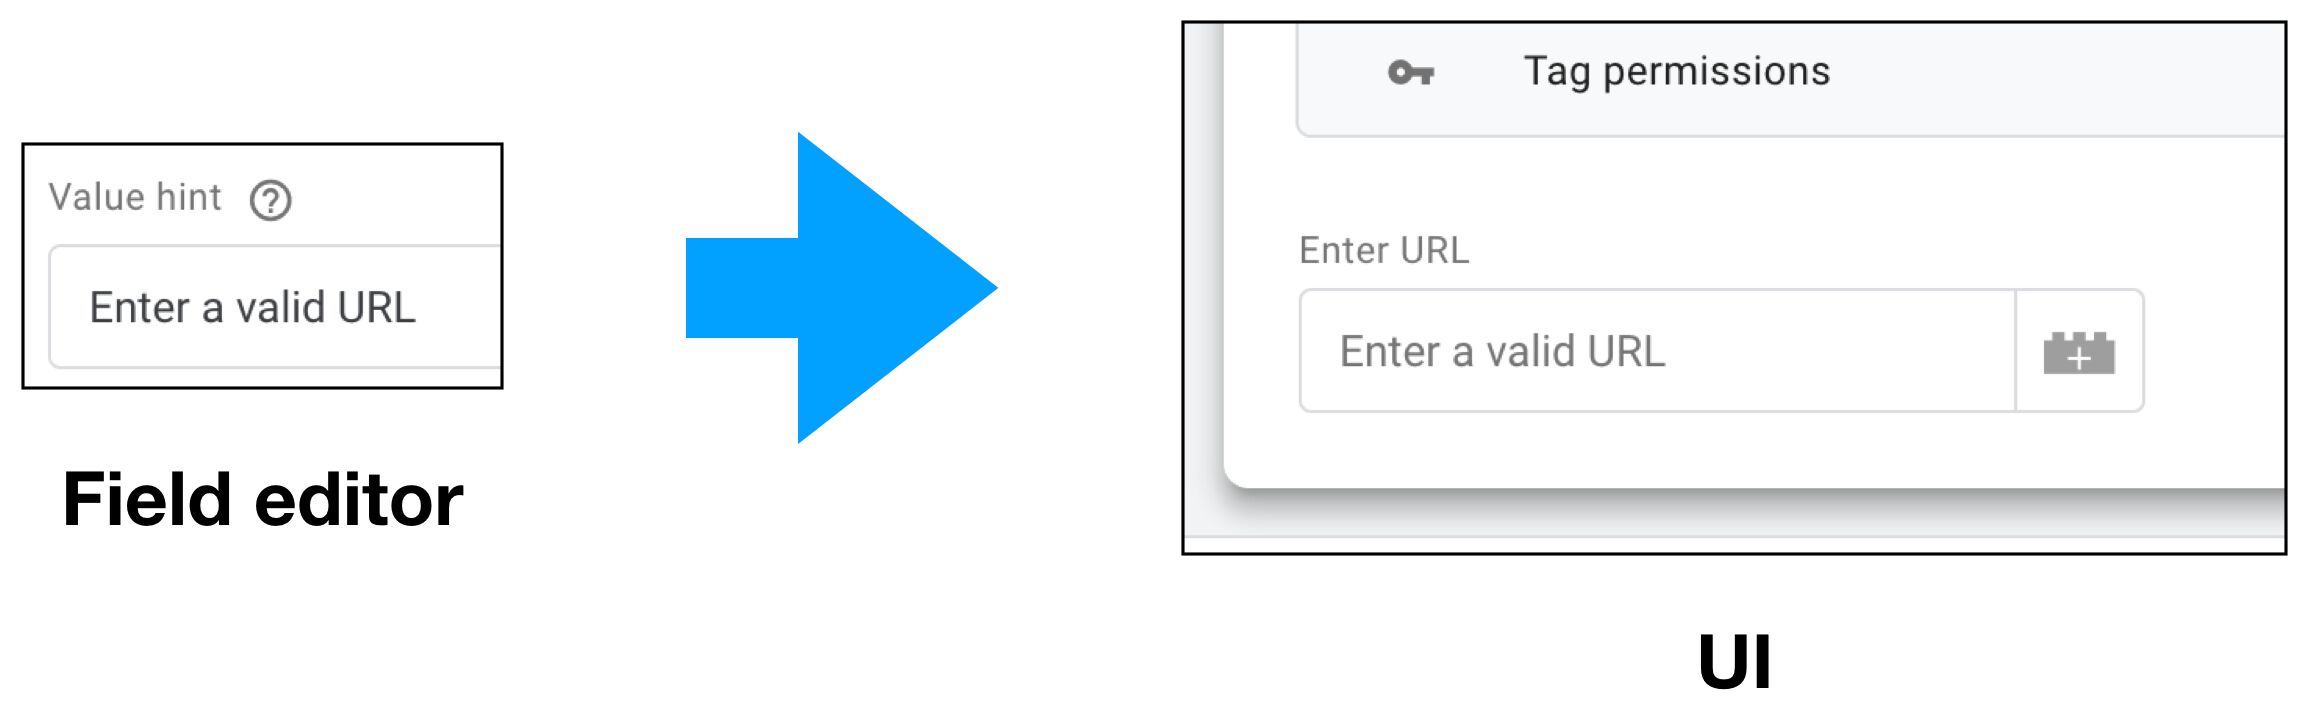
Description: The text you enter here will be shown as a placeholder value in the field before the user has added any input.
How it works: The text will simply be a placeholder - it will not be the value of the field if saved without any input.
Used in: Text input.
Value unit
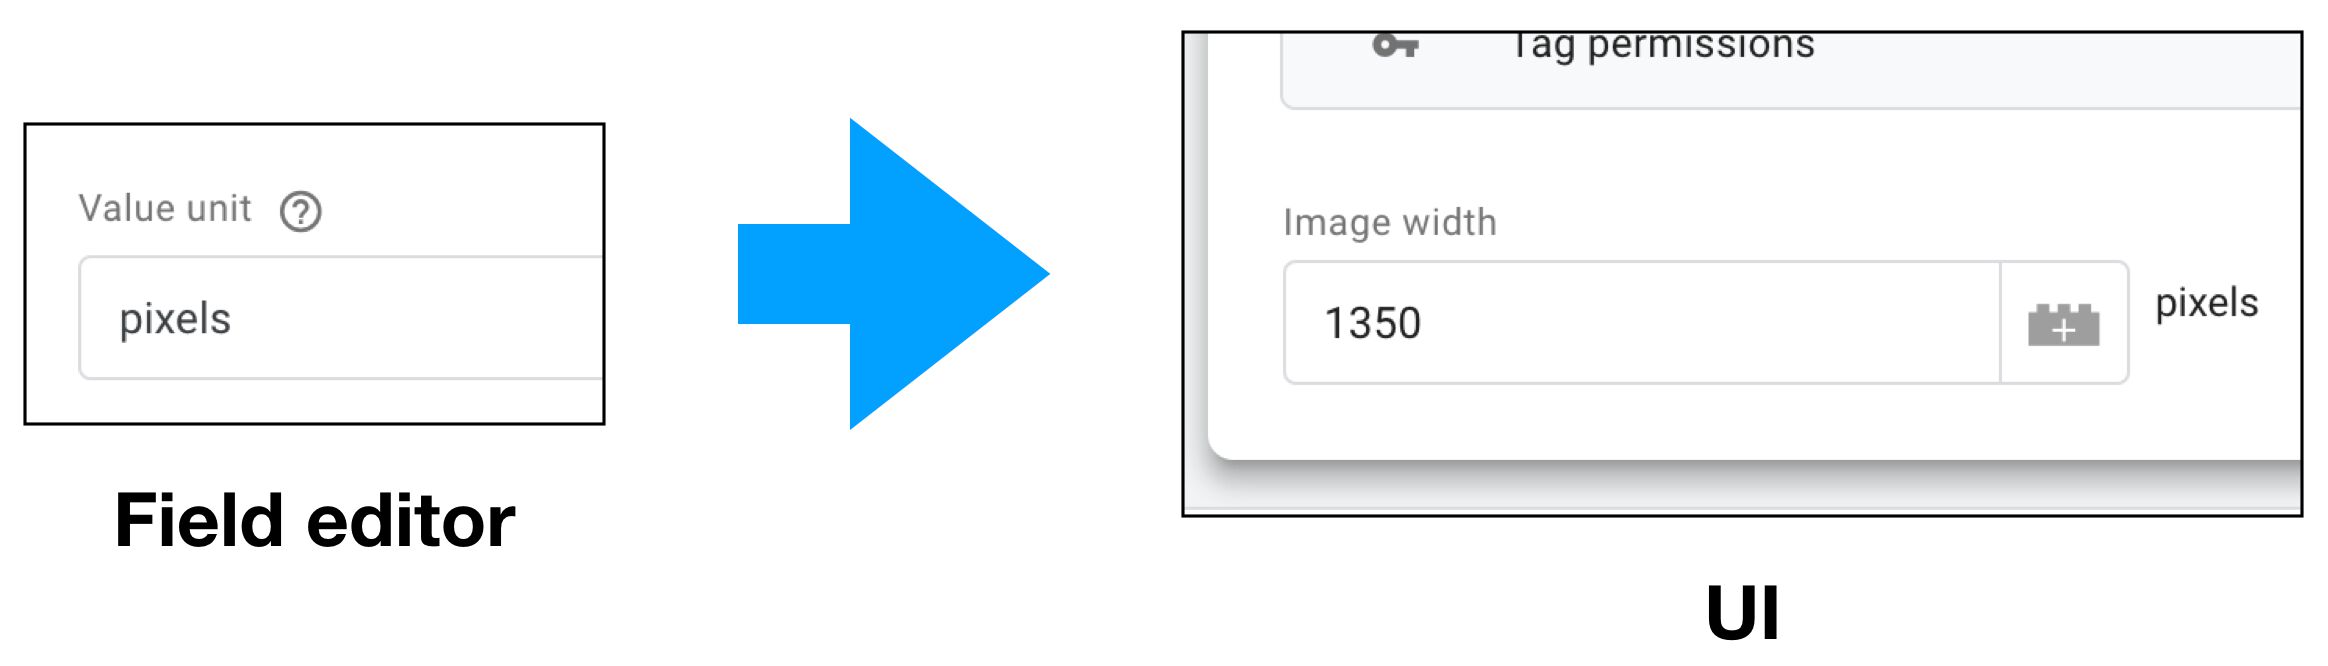
Description: Use this to guide the users on what type of value is expected in the field.
How it works: The text will be displayed to the right of the field, giving users indication what type of value is expected in the field. The text can be anything (i.e. isn’t restricted to e.g. JavaScript types).
Used in: Text input, Drop-down menu.
Policies reference
Policies are directives the site admin adds to the page template (or, if necessarily, dynamically with JavaScript), which dictate the type of API permissions each custom template can use.
They differ from Permissions in one critical detail: where permissions are built into the template, and specify a broader set of API configurations the template can run with, policies are implemented by the site where these templates are run.
In other words, template permissions come from the vendor, template policies come from the site owner. Both have the capability to delimit or restrict the types of templates that can run on any given page.
To provide a policy, you need to use some gtag.js code (note, you do not have to install the gtag.js snippet!) where you specify the permission requests your site will listen to.
For example, if you have a template that is trying to send a pixel to an endpoint whitelisted in the template’s permissions, you can use a policy to make sure that the template can actually only send the request to one specific endpoint. See the example below.
window.dataLayer = window.dataLayer || [];
function gtag(){dataLayer.push(arguments);}

gtag('policy', 'send_pixel', function(container, policy, data) {
  // Only restrict the policy to one specific container by returning true
  // for all other containers
  if (container !== 'GTM-ABCDE') {
    return true;
  }

  // Check if the URL of the pixel request is a specific endpoint,
  // and if it isn't throw an error and prevent the tag from working.
  if (data.url !== 'https://snowplow.simoahava.com/i') {
    throw('Invalid pixel endpoint!');
  } else {
    return true;
  }
});
Note: The policy must return true explicitly if you want the check to pass. The policy will always default to returning false and preventing the template from working.
You can add more than one policy to the page, each in its own gtag() command, or you can check against ALL permissions requests by setting the policy name to all as below:
window.dataLayer = window.dataLayer || [];
function gtag(){dataLayer.push(arguments);}

gtag('policy', 'all', function(container, policy, data) {
  // Prevent sending pixels and injecting iframes
  if (policy === 'send_pixel' || policy === 'inject_hidden_iframe') {
    throw 'Sending pixels and injecting hidden iframes blocked!';
  } else {
    return true;
  }
});
Please read the official policy documentation for more details on how policies work.
Below are listed all the policy names and what the data object comprises for each.
access_globals
Triggered by APIs:
aliasInWindow(once for thetoPathkey and once for thefromPathkey).
data object composition:
{
  "key": "some_global_var", // name of the key the permission tries to access
  "read": true || false, // does the key have read access
  "write": true || false, // does the key have write access
  "execute": true || false // does the key have execute access
}
get_cookies
Triggered by APIs:
data object composition:
{
  "name": "some_cookie_name" // name of the cookie being accessed
}
get_referrer
Triggered by APIs:
data object composition:
{
  "component": "query" // the component of the referrer URL being accessed
}
get_url
Triggered by APIs:
data object composition:
{
  "component": "protocol" // the URL component name being accessed
}
inject_hidden_iframe
Triggered by APIs:
data object composition:
{
  "url": "https://some-iframe.com/" // the URL of the iframe being injected
}
inject_script
Triggered by APIs:
data object composition:
{
  "url": "https://some-script.com/script.js" // the URL of the script being loaded
}
logging
Triggered by APIs:
There is no data object associated with this permission.
read_character_set
Triggered by APIs:
There is no data object associated with this permission.
read_data_layer
Triggered by APIs:
data object composition:
{
  "key": "some.variable.name" // name of the Data Layer Variable being accessed
}
read_event_metadata
Triggered by APIs:
There is no data object associated with this permission.
read_title
Triggered by APIs:
There is no data object associated with this permission.
send_pixel
Triggered by APIs:
data object composition:
{
  "url": "https://some-endpoint.com/endpoint" // the URL of the pixel request endpoint
}
set_cookies
Triggered by APIs:
data object composition:
{
  "name": "some_cookie_name", // the name of the cookie
  "options": {
    "domain": "somedomain.com", // the domain of the cookie
    "path": "/some-path/", // the path of the cookie
    "max-age": "15000", // the maximum age of the cookie (in seconds)
    "expires": "Sun, 11 Aug 2019 10:00:00 GMT", // UTC date string of the cookie's expiration
    "secure": true || false, // Secure cookie
    "sameSite": true || false // sameSite cookie
  }
}
Final thoughts
It’s difficult to compose any sort of summary to what I consider to be the most extensive and fundamental Google Tag Manager update since the programmatic API was released almost five years ago.
Custom templates are, for now, a completely optional feature. No one is forcing you to use them, and you can continue as a happy GTM user without having to bother about the new Templates menu.
However, I have a hunch that there is a huge incentive for the GTM team to get rid of the Custom HTML tag and the Custom JavaScript variable. When talking about governance and the existing prejudices towards GTM, especially from developers, it often boils down to being able to inject any arbitrary JavaScript code on the site, using the outdated and questionable eval() method, no less.
With custom templates, many of the problems around governance are presented with a solution:
The template code is compiled into JavaScript when the container is created, so
eval()is no longer used to run the code.Template-specific permissions (created by the template author) can delimit what the template does and what types of user input are valid and accepted.
Page-specific policies (created by the site admin) can be used to further restrict what any template can do on the site.
But these are mostly how templates address negative qualities of GTM - it would be foolish to ignore their net positive effect.
Google Tag Manager is a UI-driven tool. Brands can now use custom templates to encapsulate their complicated JavaScript activation mechanisms under a user interface, thus minimizing the possibility of human error, and demystifying how the vendor JavaScript runs. Thus, instead of sharing a JavaScript snippet the user has to copy-paste to a Custom HTML tag, the brand can share a template export that can be added to the container directly, with all the code in the correct place.
I can’t wait to see what the community comes up with, too! I’m waiting for a library of custom templates to emerge, hopefully sanctioned by Google but moderated by the community (with brands being able to add verified templates, too).
So now, brave traveller. You have reached the end, though I can only assume you skipped most of the above. What do you think about custom templates? Is my hyperbolic exuberance (yet again) unwarranted?
