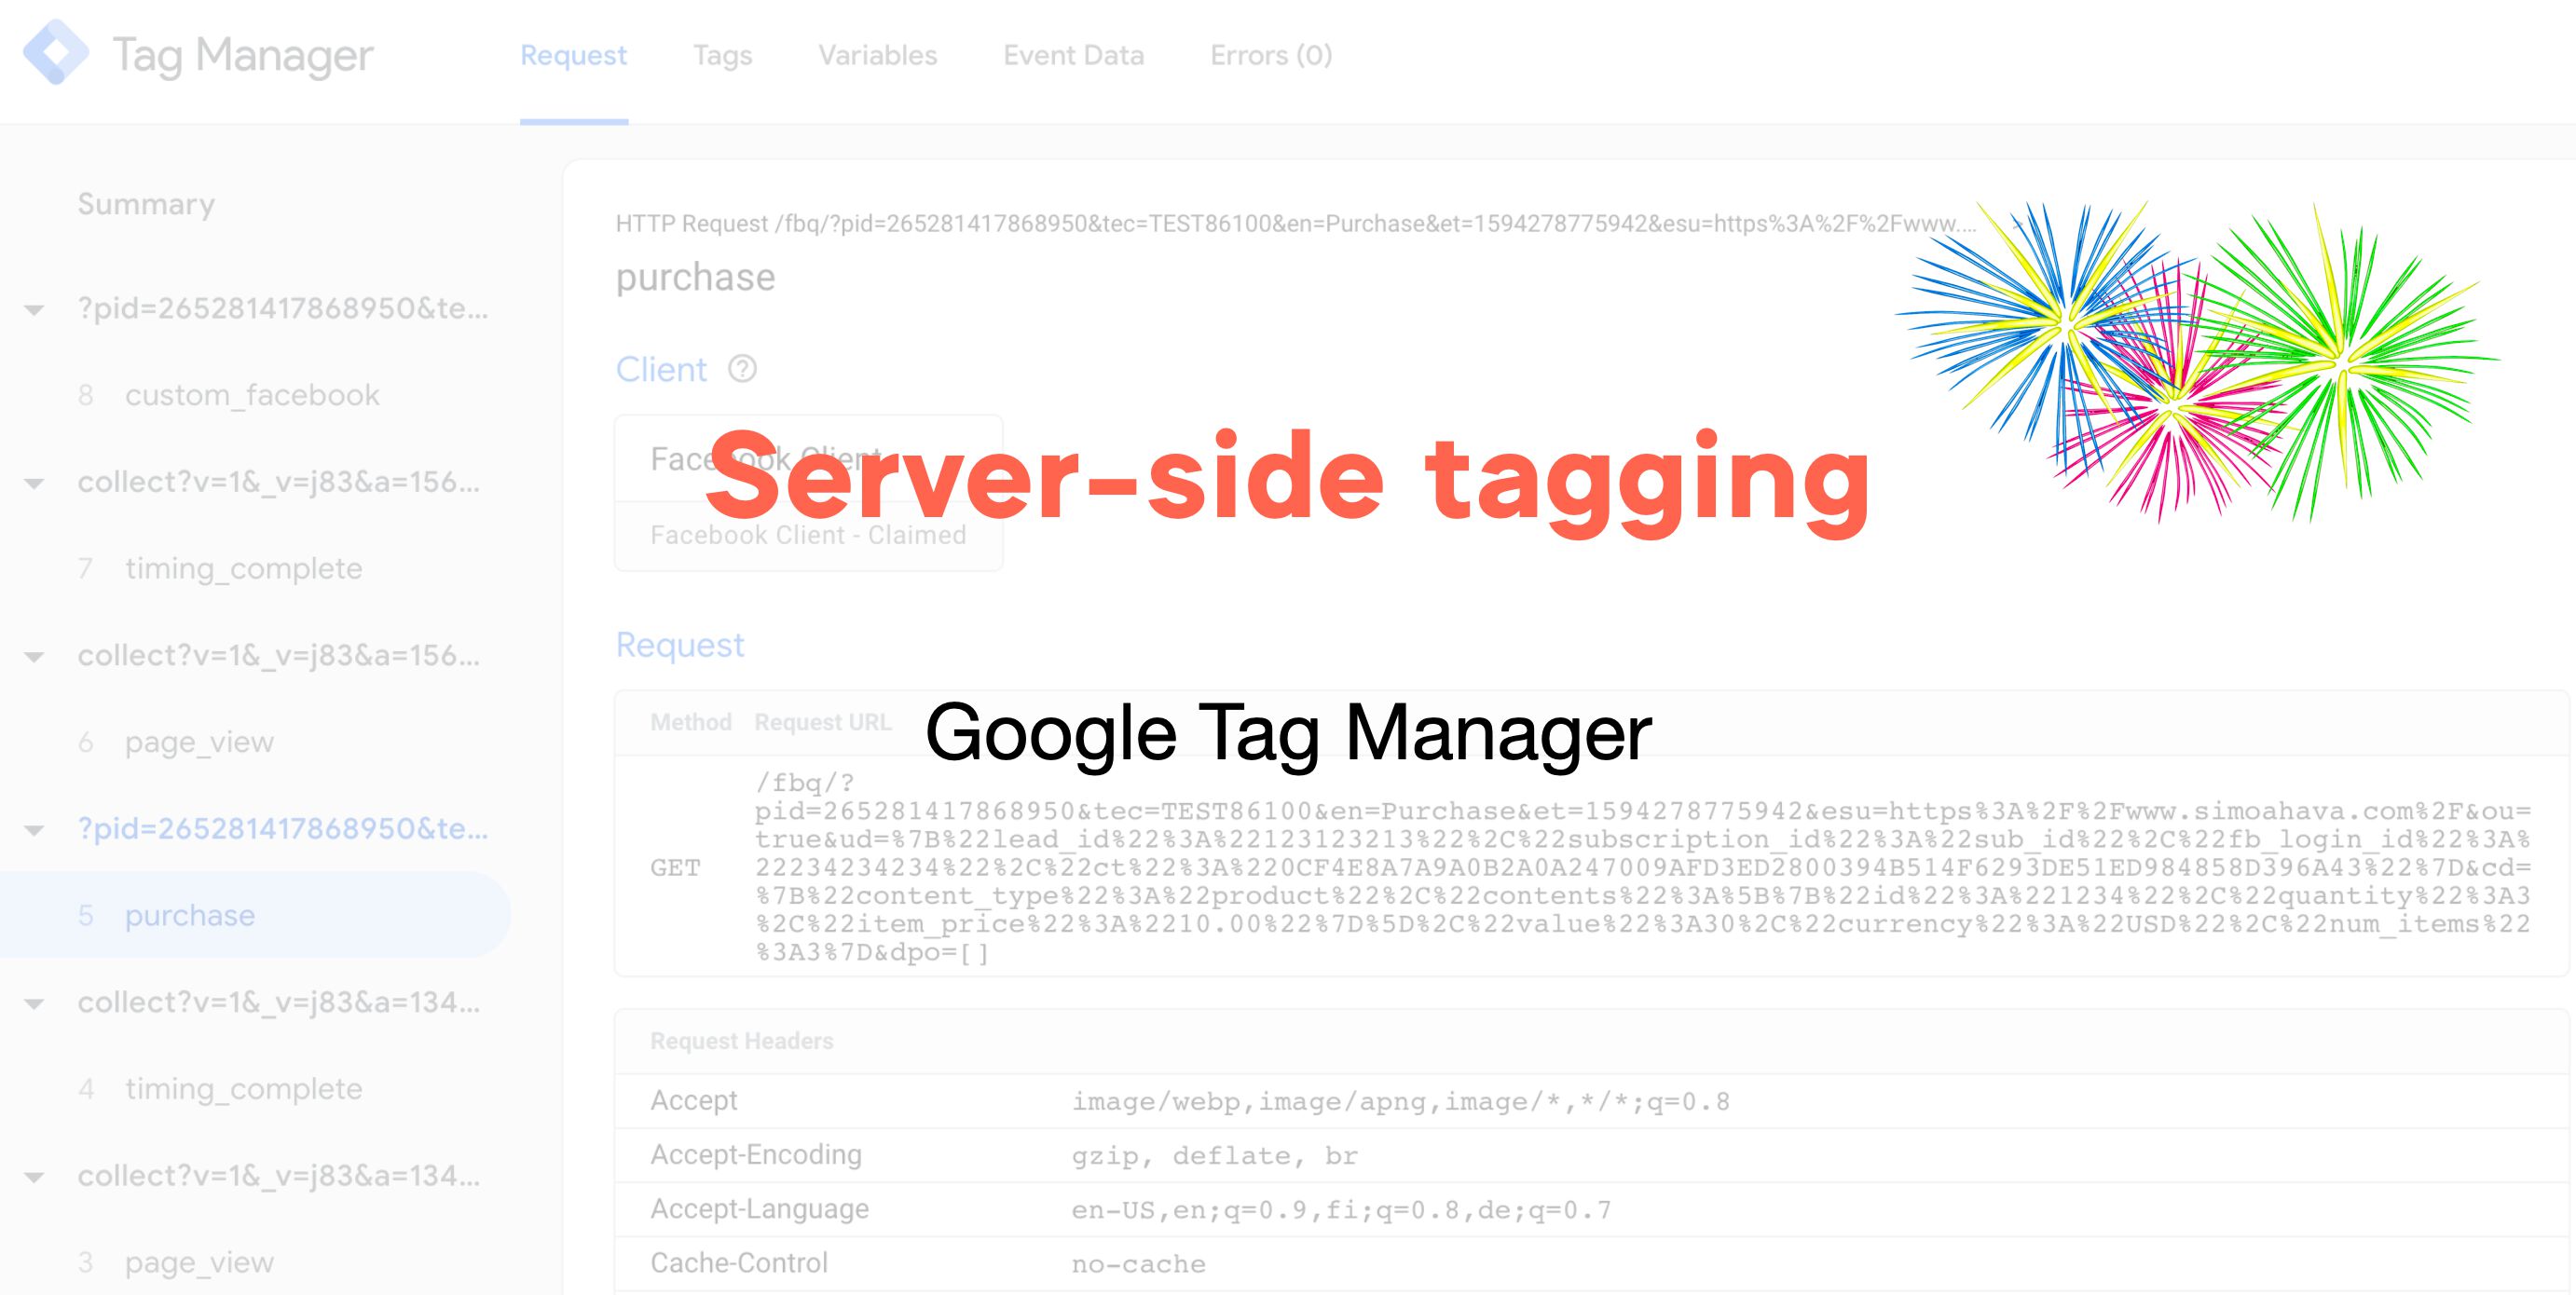
Server-side Tagging In Google Tag Manager
Ever since Server-side tagging was publicly announced at SUPERWEEK 2020, Google and the trusted tester community have been hard at work, building something that just might change the landscape of digital analytics for good.
Google Tag Manager has now released Server-side tagging into public beta. In this lengthy article, we’ll take a look at what Server-side tagging is, how it should (and should not) be used, and what its implications are on the broader digital analytics community.
In short, Server-side tagging means running a Google Tag Manager container in a server-side environment (at the time of writing, the only available environment is the Google Cloud Platform, though I’m certain more options will become available in good time).
Many of the benefits and concerns are tackled in their respective chapters. Even so, I want to emphasize that Server-side tagging has the potential to overturn the current dynamic of data collection and governance for an organization. You own and have full control over the server-side environment. You have access to tools and methods to thoroughly vet and validate the traffic between network sources and your advertising and analytics endpoints.
You can run a fully functional digital analytics and marketing setup without loading any third-party code in the user’s browser or device. With appropriate monitoring in place, you can say goodbye to PII and credential leaks, cross-site tracking traps, and bloated third-party JavaScript encumbering the client.
Server-side tagging utilizes many of the concepts familiar to Google Tag Manager users:
There are tags which fire on triggers and pull in data from variables.
New container versions can be previewed and published.
Users can create their own custom templates.
However, there are new, fundamentally different features that introduce something of a paradigm shift to the type of dynamic tagging that Google Tag Manager promotes.
The container itself is a new Server type; different from the web, app, and AMP containers that precede it.
Instead of trigger events, processes are initialized by incoming HTTP requests.
These requests are digested by a new type of GTM entity: a Client.
The Client parses the requests, generates an event data object, and feeds this into a virtual container, where tags can use this event object to map and send data to their endpoints.
This article will not be an exhaustive guide. I will walk you through the main concepts of Server-side tagging and there should be little you’ll be left wanting, but to complement this article, I do recommend you consult Google’s own, official documentation.
Table of Contents
The Simmer Newsletter
Subscribe to the Simmer newsletter to get the latest news and content from Simo Ahava into your email inbox!
How to follow this guide
While I hope everyone would devour every last word of this article, I’m aware that not all sections are relevant to all readers.
If you’re looking for an overview of Server-side tagging, perhaps for getting buy-in within your organization, I recommend reading these chapters:
- What is Server-side tagging
- Key benefits - Reduced client load
- Key benefits - Content Security Policy
- Key benefits - Full control and ownership of the data collected by the container
- Key concerns - All chapters
- Technical outline - Cost
- Technical outline - Custom domain
- Summary
If you’re a developer or working in IT, I’d recommend focusing on these chapters:
- What is Server-side tagging
- Key benefits - Reduced client load
- Key benefits - Keep keys and secrets safe
- Key benefits - More control over what endpoints collect
- Key benefits - Content Security Policy
- Key concerns - All chapters
- Technical outline - Server container
- Technical outline - Custom domain
- Technical outline - Clients and tags
- Technical outline - Custom templates
- Technical outline - Resources
- Summary
Everything else is still important, but I’ll forgive you if you gloss over them initially, only to return to them hungrily once you’re hooked into all the awesomeness that Server-side tagging brings in its wake.
I recommend you watch the following two videos regardless.
The first one is a general introduction to Server-side tagging, focusing on deployment and getting started with your first Client and tag.
The second is a deep-dive into building your own Client template. It’s a bit more specialized and can thus be skipped if you’re not interested in customizing the container.
Video: Introduction to Server-side tagging
If the video doesn’t work, you can watch it here.
Video: Create a Client template in a Server container
NOTE! The video below has one important omission. When creating the Client template, make sure to update the “Sends HTTP Requests” permission to include “Allow Google Domains”. Otherwise the proxying of analytics.js doesn’t work.
If the video doesn’t work, you can watch it here.
What is Server-side tagging?
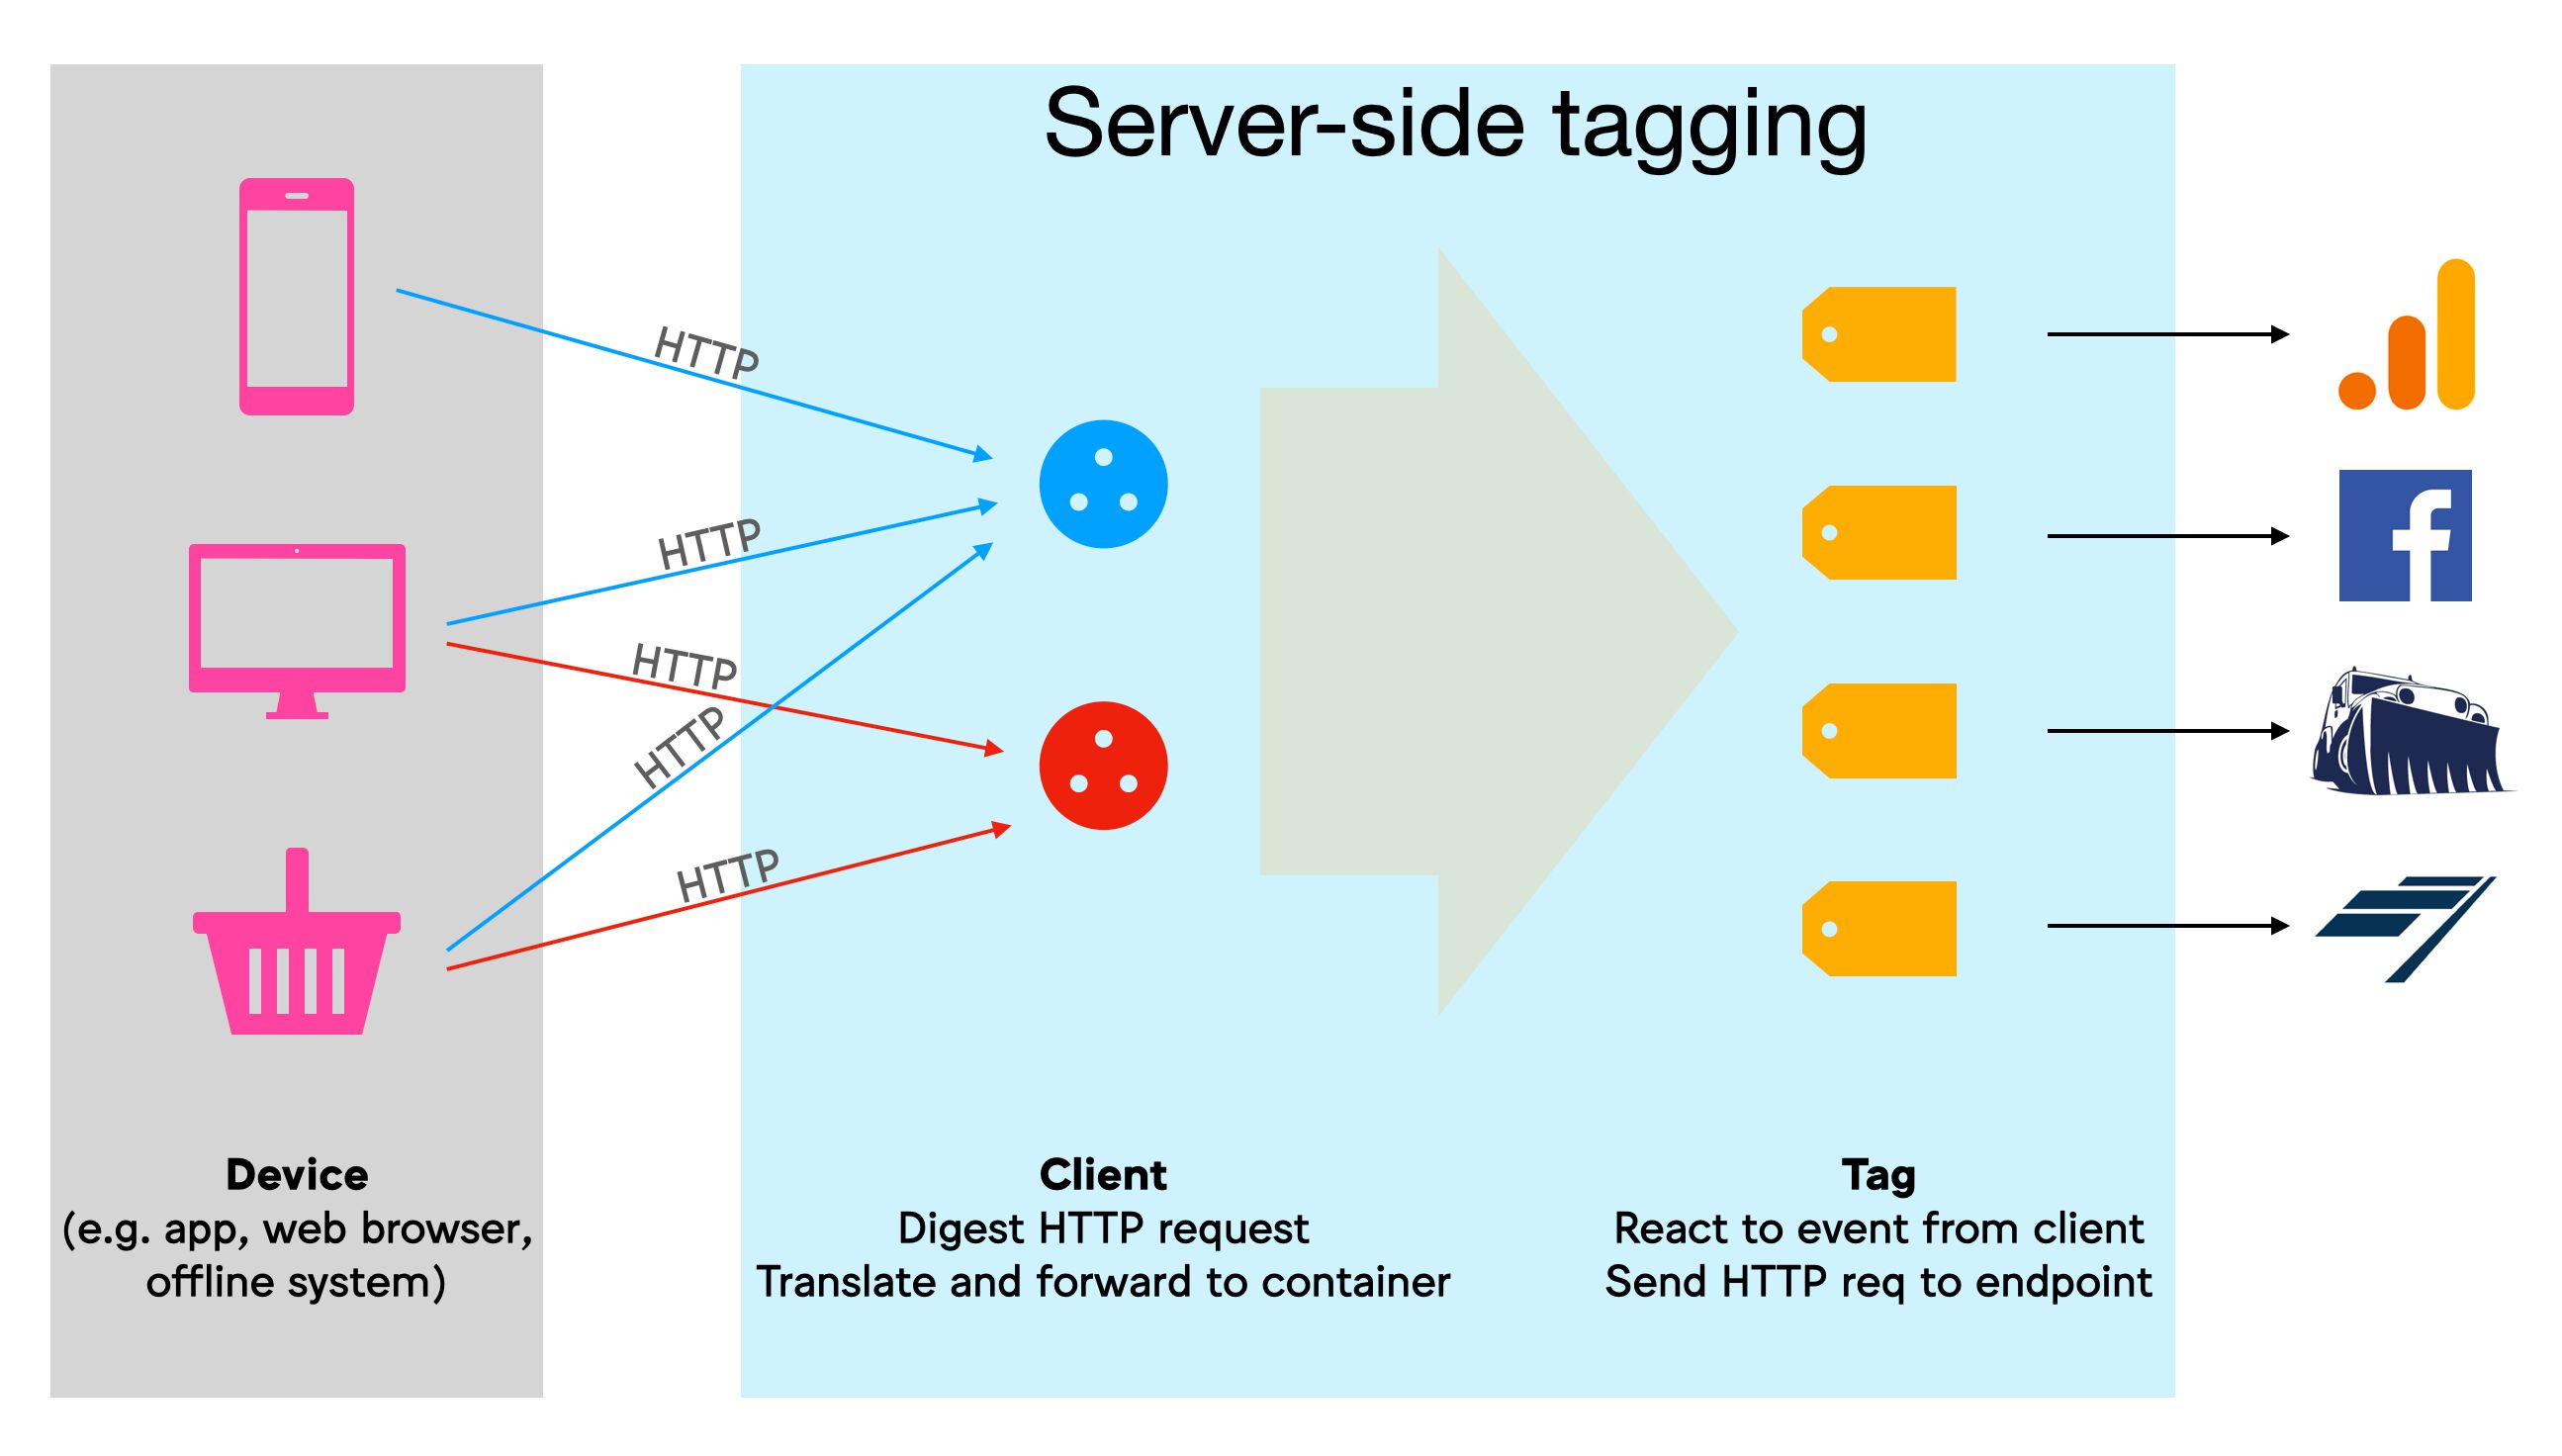
With Server-side tagging, Google Tag Manager has introduced a new Server container type, which resides in a Google Cloud environment.
In a nutshell, the purpose of this setup is to create an endpoint in a server environment that you own. It will act as a sort of a proxy between the hits sent from browsers and devices and the actual endpoints to which the hits are collected. See the next chapter for more details on what this type of proxy can do.
The container itself operates as an HTTP API endpoint, to which any browser, device, or other sources that support the HTTP protocol can send requests.
Ideally, this endpoint would be mapped with a custom subdomain in the same domain hierarchy as the website sending the requests. That way the requests are considered to happen in first-party context, which has a significant impact on how cookies can be read and written, for example.
Within the Server container, workers known as Clients are configured to listen for these incoming HTTP requests, which they then parse into a unified event format. The Clients then run a virtual container with the event data object, where tags, triggers, and variables react to the event push similar to how they would with “regular” Google Tag Manager.
Tags take the information in these event data objects and compile them into HTTP requests to their respective endpoints. Finally, the Client sends an HTTP response back to the source of the initial request.
 Example of a Universal Analytics client responding with a success status and setting the _ga cookie in the response.
All of the above happens within the confines of the Server-side tagging environment. The only way the browser or app sending the data can be made aware of what’s going on is if the Client adds information into the HTTP response, which is fully configurable.
Key benefits
Here are some of the key benefits of using Server-side tagging.
Reduced client load
By running the logic of building and dispatching hits to the vendor endpoint in your server-side environment, you have a golden opportunity to reduce the amount of (especially third-party) JavaScript run in the user’s browser.
Because you can configure the Server container to map any incoming HTTP request into the format required by the vendor, you can theoretically reduce your entire third-party pixel and JavaScript load to a single event stream directed into your Server container.
 Imagine if you could reduce the amount of JavaScript loaded and executed in the browser...
This stream can then be intercepted by a Client which proceeds to map the stream into the event model expected by the vendor tags, also running in the Server container.
This is the ultimate benefit of a Server-side tagging setup. Even if you don’t want to reduce everything to a single stream, you can build your own custom template in the web container, which builds the HTTP request to the Server container without having to load any third-party JavaScript at all (apart from the GTM library itself).
Keep keys and secrets safe
By transporting data processing logic away from the device, where it would be visible for anyone with debugging skills, you will also be able to run secured and credential-based transactions without having to worry about exposing sensitive information to the device.
For example, a plague on Google Analytics has been Measurement Protocol spam, where malicious parties crawl potential tracking IDs and then proceed to spam them with automated HTTP requests that masquerade as “regular” hits from the site. Alternatively, these hackers send spam hits to random tracking IDs, knowing that if they send enough hits, some of them will end up in real Universal Analytics accounts.
This type of spam is notoriously difficult to identify and prevent because it’s built to resemble actual hits that are sent from the website itself.
Now that you have the server endpoint handy, you can add a new Custom Dimension within the Server container, which is then sent to Google Analytics. In Google Analytics, you can then create a filter for this Custom Dimension, allowing only traffic that matches it.
event['x-ga-mp1-cd11'] = 'my_secret_key';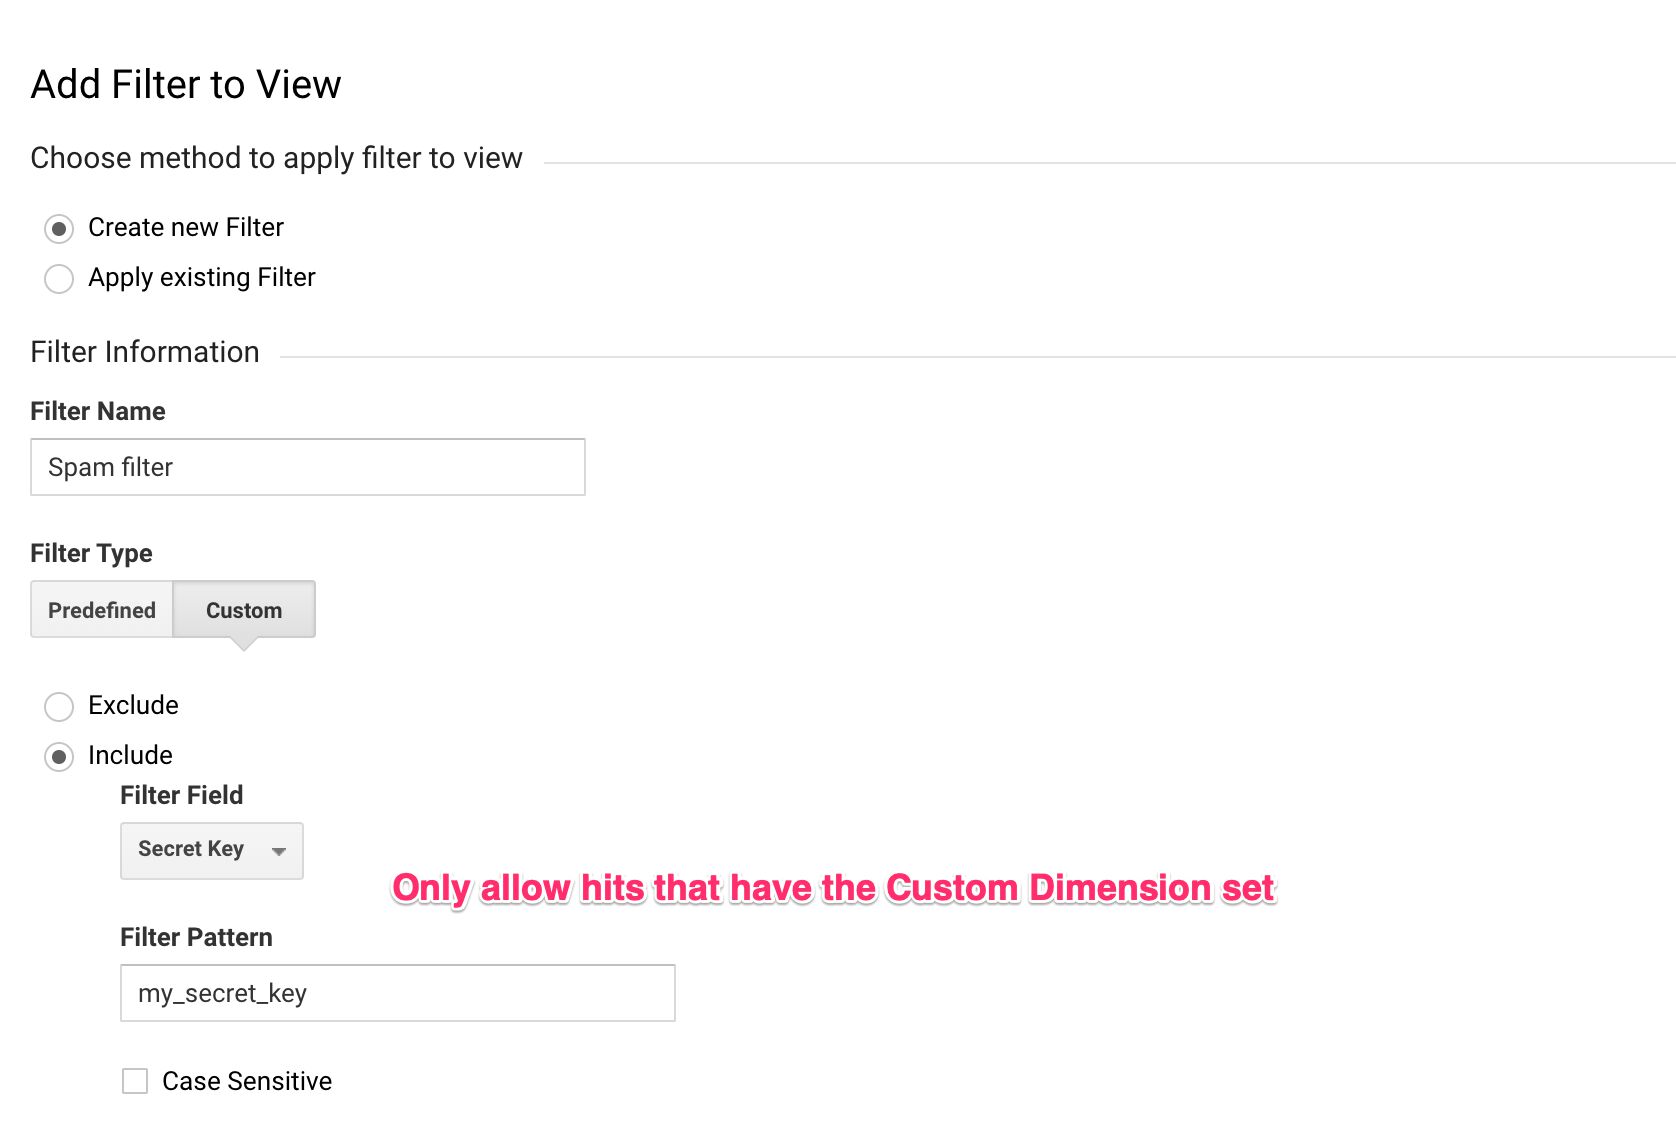
By adding this “secret key” in the Server container, there’s no way that a random Measurement Protocol spammer can know it’s there. Similarly, it won’t help if the spammer crawls your site, looking at the requests sent to Google Analytics, because there are no such requests! There are only requests to your own server-side endpoint, and it would be odd if Measurement Protocol spammers would utilize those to fuel their spam algorithms.
Naturally, this isn’t limited to just what you can do with Universal Analytics. Any third-party servers that identify your access with an API key or credential token can now be proxied through your Server container so that these keys are not exposed in the device!
More control over what endpoints collect
Because your proxy now resides between the user’s device and the endpoint, you are in full control over what is shipped to the vendor.
Unless the Client specifically overrides things like the IP address and User-Agent in the outgoing HTTP request from the Server container (this is what the built-in Universal Analytics client does by default), the IP and User-Agent string will be that of your Server container rather than the user. So this is a great way to concretely anonymize this aspect of the HTTP protocol that’s proven to be problematic in terms of end-user privacy.
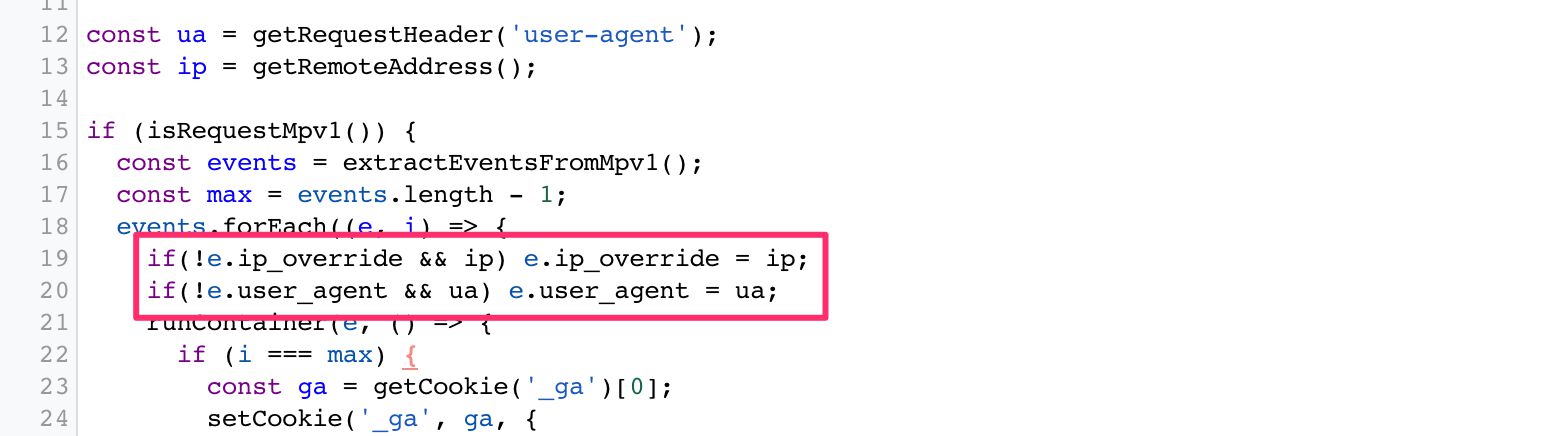 IP address and User-Agent string overridden in a Google Analytics request.
Server-side tagging introduces extra control over privacy simply by existing.
Without manual overrides, the requests sent to the vendors are mapped to the App Engine virtual machine instead of the user’s browser or device.
There are no data leaks with third-party cookies, there are no surprises with injected URL parameters, and the third-party service doesn’t have any connection with the user’s browser by default. They’ll be communicating just with the cloud machine.
More control over HTTP traffic
To expand the features mentioned above, you will also have full control over what HTTP traffic is passed through the Server container.
Typically, the browser loads the vendor’s JavaScript from their content distribution network (CDN).
This act already exposes the user’s browser or device to the third party and can lead to things like personally identifiable information (PII) leaks in case the URL of the page has sensitive information.
 It's better to leak this to your data store rather than a vendor's.
Because you now have a proxy between the device and the endpoint, the only place where this information is leaked is into your cloud environment.
Sure, it’s still not optimal - PII leaks should be eradicated.
But you have full control and ownership of all the data collected by the Server container, and you also have all the tools at your disposal to clean up and validate the payloads.
You can also cover your legal back by removing fingerprintable surfaces from the outgoing requests from the Server container. Similarly, you can use the APIs available to hash potentially sensitive data. You can also, of course, look for consent strings in the user’s cookies (assuming the Server container is in first-party context with the source of the traffic) and act accordingly.
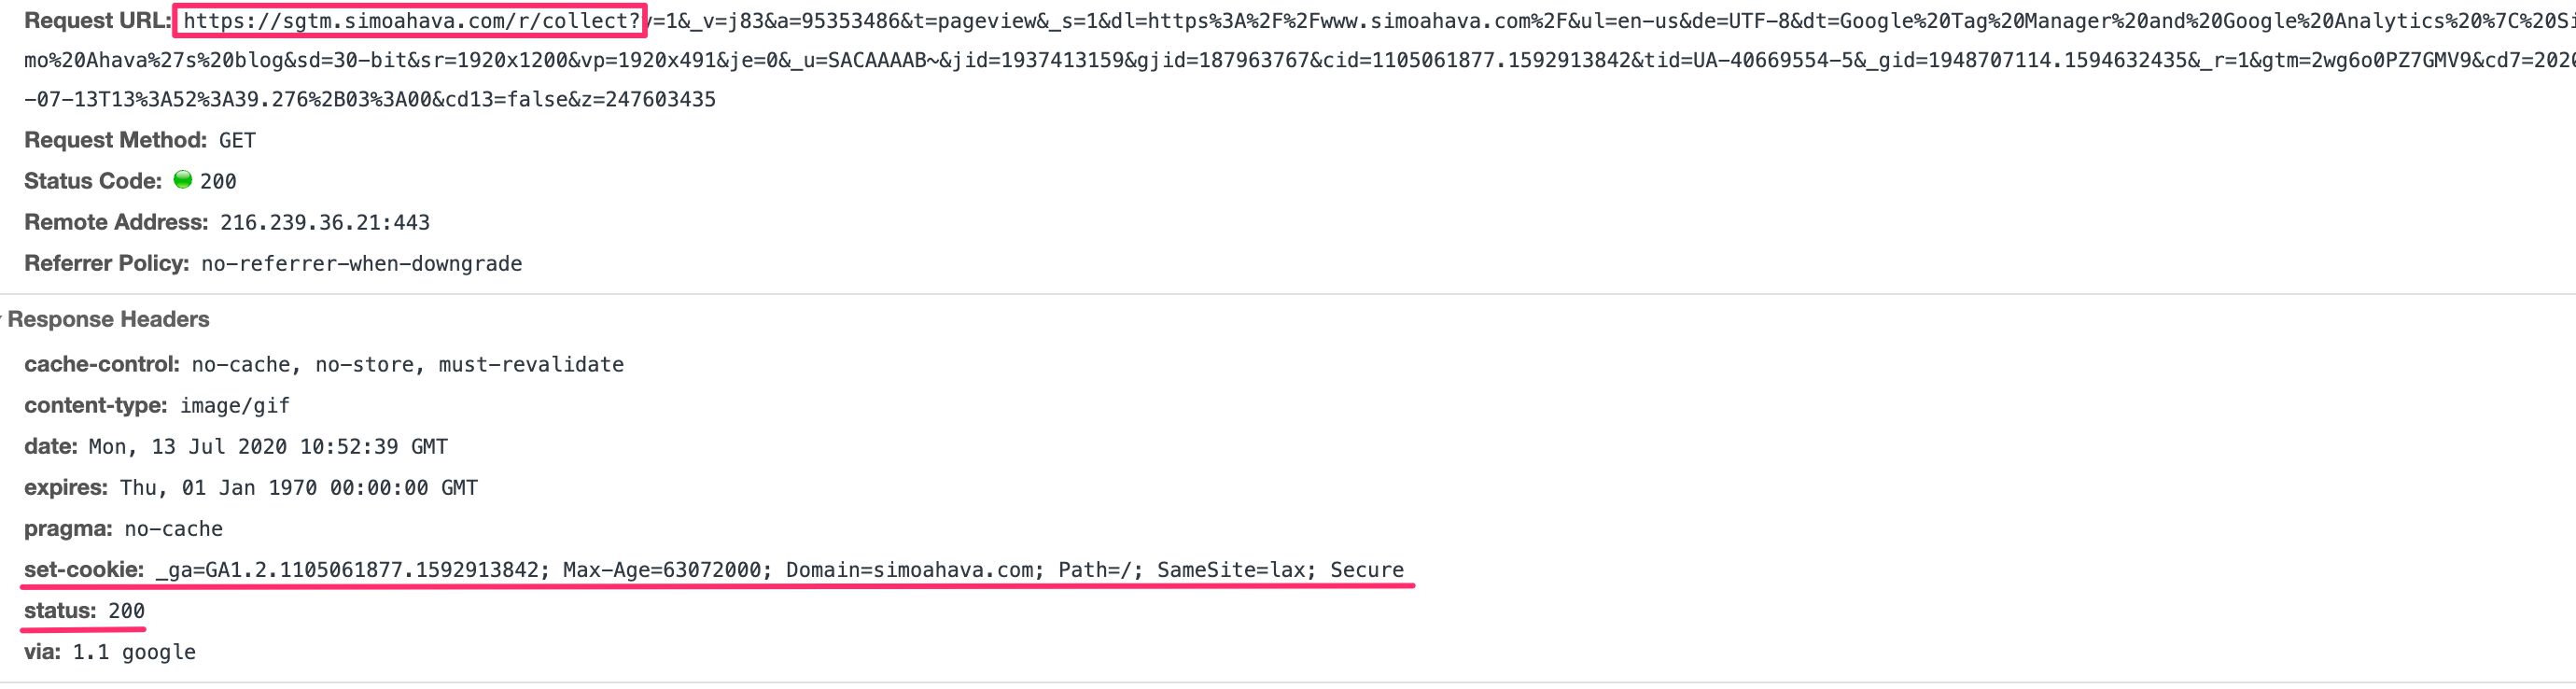
Finally, in the Client, you can modify the HTTP response back from the Server container to the browser or device. This is a pretty cool thing when considering Apple’s Intelligent Tracking Prevention, for example. You can convert cookies written with JavaScript, and thus subject to an expiration limit of 7 days, into HTTP cookies written with a Set-Cookie header, thus extending their lifetime to whatever you choose:
const getCookie = require('getCookieValues');
const setCookie = require('setCookie');

// Get cookie from the HTTP request
let ga = getCookie('_ga');

// If no cookie exists, generate a new Client ID
ga = ga && ga.length ? ga[0] : generateClientId();

// Write the _ga cookie in the HTTP response
setCookie('_ga', ga, {
  domain: 'auto',
  'max-age': 63072000,
  path: '/',
  secure: true,
  sameSite: 'lax'
});Ideally, you’ll want to set cookies with the HttpOnly flag. This prevents the web page from accessing the cookie with JavaScript (document.cookie). By allowing cookie access only for the webserver receiving the request, you’re introducing a decent redundancy measure for mitigating cross-site scripting attacks and preventing cookie values from leaking into cross-site tracking schemes.
The reason we’re not using HttpOnly in the example above is because cross-domain linking is something Universal Analytics still does client-side with JavaScript.
Note! You might want to read this article on FPID to see what Google is working on in terms of improving the security of the Google Analytics cookie.
In any case, using the Set-Cookie header like this removes the need for complicated APIs to do the cookie rewriting for you, as you can just piggy-back the cookie rewrite on the data collection itself.
Content Security Policy
Another benefit of reducing the number of HTTP endpoints with which the browser communicates concerns your site’s Content Security Policy (CSP). A CSP is what your site would use to restrict the HTTP traffic to and from the user’s browser.
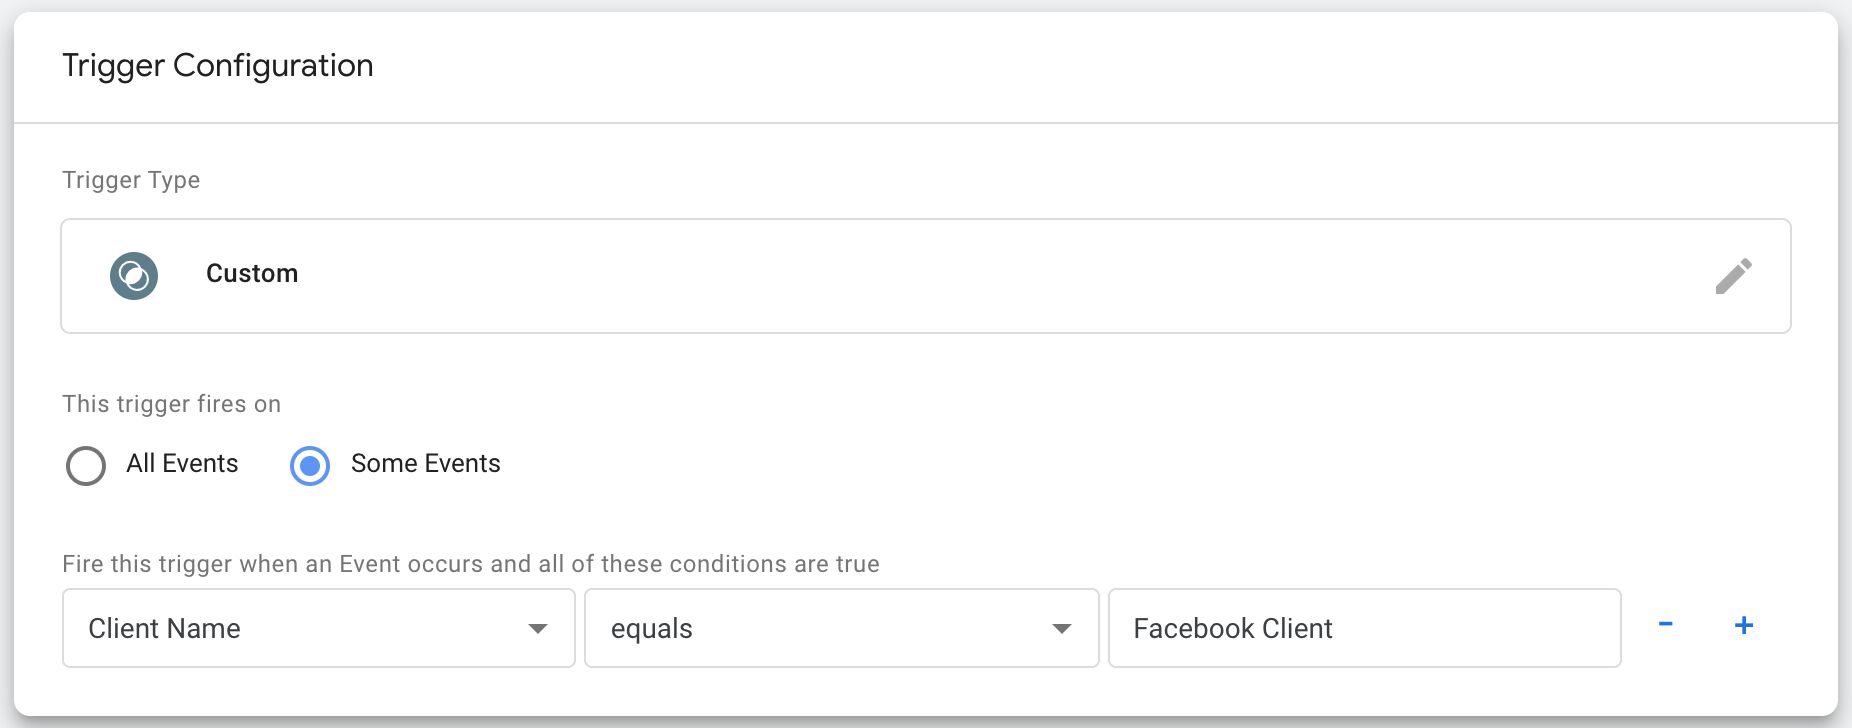
For example, if you add a JavaScript library that loads its content from Facebook to a site with a CSP, you’ll need to petition the developers to relax that CSP so that Facebook’s domains would be allowed to send and receive data from the user’s browser.
Naturally, the more you relax the CSP, the less efficient it becomes.
 CSPs tend to get really bloated and thus inefficient at doing what they're meant to do.
By reducing the number of HTTP endpoints the browser needs to communicate with (because you’ve replaced them with your own Server-side tagging endpoint), you’re making the CSP more robust as a result.
Clean up and validate payloads
Even if you’ve managed to clear the HTTP traffic itself of all potentially harmful information, you might still be left with URL parameters that the vendor requires you to populate. Sometimes, often even, these parameters contain PII, and you’ll want to figure out a way to get rid of it.
I’ve written a lot about PII purging, and my customTask solution should be useful if you’re sending data from the browser directly to Google Analytics.

But now with a Server container, you can build a Client which parses all the request headers and the body looking for PII (so not just those related to Universal Analytics) and then proceeds to clean it up or obfuscate it.
You can also use the Server container to validate and fix requests.
For example, if you send a non-numeric value as the Event Value of a Universal Analytics request, that event will be collected by Google Analytics but discarded at processing. There’s no warning in the browser - these hits just disappear.
You could fix this in a Client by looking specifically for a faulty Event Value and converting it into a number:
 Try to convert Event Value into a number, and default to 0 if conversion doesn't work.
You can see how this could dramatically improve your data quality once you start building Clients specifically designed for cleaning up your data streams.
Full control and ownership of the data collected by the container
This has already been mentioned earlier in this article, but a significant part of building a server-side environment is mapping a subdomain to the endpoint. When the HTTP endpoint is able to respond to requests using a subdomain that’s part of the same domain hierarchy as the website sending the requests, the website and the HTTP endpoint exist in same-site or first-party context. This has a significant impact on how browser tracking protections treat the traffic.
The custom domain should be mapped using A/AAAA DNS records rather than a CNAME alias. The latter is a less useful solution for cookie permanence due to browser tracking protections.
Other than the question of domain context, a very important aspect of ownership is what’s promised by the platform you subscribe to (Google Cloud Platform at the time of release).
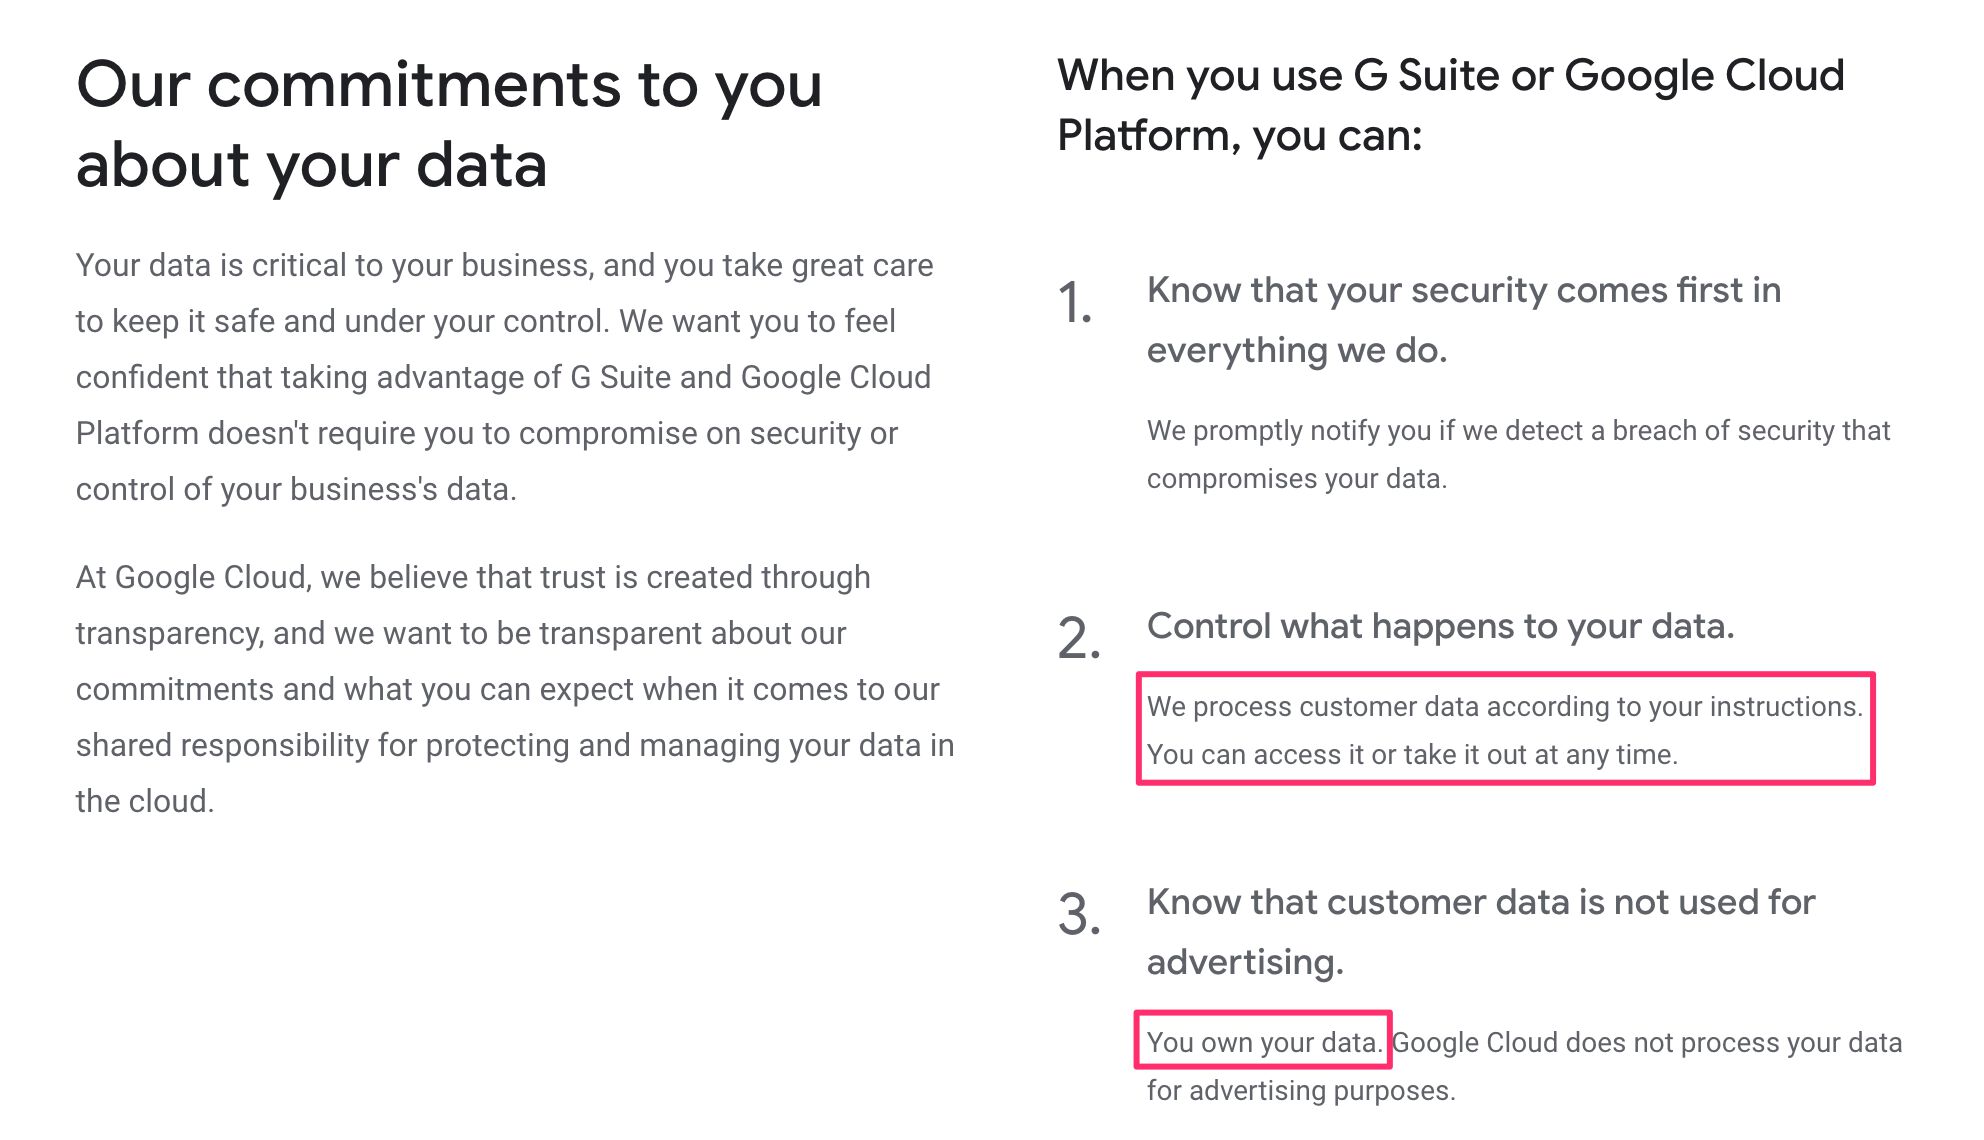
You have full control and ownership of the data in your Google Cloud project. Yes - you need to trust Google on this promise. Here’s what they guarantee in the relevant documentation:
Google Cloud only processes data that you instruct it to process.
You own your data. No data is processed by Google Cloud for advertising purposes.
You’ll always be aware of where your data is regionally located.
Your data is secured by independently certified and audited security standards.
This is pretty significant. Since you own and control the data collected by the Server container, its usage and data processing falls under the privacy policies, T&Cs, and contracts your organization has with its customers and end-users.
If a data leak were to happen, for example, the first place it would “leak” to would be a data store that you own, and you can mitigate the fallout by making sure these leaks do not extend to the third parties to which you send the data from the Server container.
Naturally, as soon as your Server container does fire tags that send the data to third parties, you introduce additional data processors and controllers to the mix, but having the “buffer” of a data store and processor that you own in between should help a great deal in mitigating security/privacy risks and liabilities.
Limitless possibilities
By shifting the processing of data to your Server-side endpoint you introduce a fairly inexpensive, scalable, and multi-functional proxy for processing data before it is wrapped up and sent to the vendors.
In addition to the benefits listed above, there are so many things you could do with a server-side setup like this:
Only collect the bare essentials from the browser: content ID for content, session ID for session, and user ID for user. In the Server container, use other APIs and services at your disposal to enrich the data using these IDs as the keys.
Run expensive code in the scalable environment of the server rather than as a burden on the user’s device. Things like IP lookups and cryptographic hashing could just as well be done in the Server container.
Maybe at some point we’ll see native integrations to other Google Cloud products.
Imagine being able to write directly to Google BigQuery from the Server container without having to worry about complicated authentication.
Imagine triggering Cloud Functions by using Pub/Sub rather than HTTP requests.
Imagine utilizing Cloud logging to build a real-time monitoring system for the integrity of your data pipeline.
Once the platform matures and once the library of available APIs and custom templates is extended, the reach of Server-side tagging is only limited by the imagination of its users.
Key concerns
Moving tracking away from the device to behind the veil of the server doesn’t come without its concerns.
The paradigm shift that we can envision with GTM’s Server-side tagging isn’t just one of improving data collection; it’s also one of obfuscating it.
Circumvent content blocking
One of the first knee-jerk reactions many probably have to Server-side tagging has to do with content blocking and browser tracking protections in general.
A typical approach for privacy-friendly browsers is to restrict or downright block communications between the browser and known trackers. The list of known trackers is usually based on a blocklist such as Disconnect.Me, but it could also be algorithmic and on-device, such as with Intelligent Tracking Prevention.
Indeed, an endpoint like google-analytics.com could well be targeted by the heuristics used in content blockers, but my-server-side.domain.com probably isn’t.
 Direct hit to GA is blocked, but hit proxied via the Server container isn't.
Can you use Server-side tagging to circumvent content blockers? Absolutely. Should you? Definitely not; at least if that’s your primary reason.
However, this does raise an interesting paradox.
It’s not your fault that content blockers do not target your domains.
You are not obliged to exhaustively test if all the actual endpoints are blocked by the browser. That would be a huge waste of resources and counter-productive to what Server-side tagging first and foremost does: reduce client load.
Once server-side proxies become the norm (with a popular tool like Google Tag Manager likely to spearhead the transition), content blockers will adapt their heuristics to not just look at domains but also the information that is being sent.
The right course of action is to be transparent at what data is being collected on your site, placing behind consent that which is required by law, and giving opt-out mechanisms for the rest.
And if it just so happens that your endpoint gets blocked by content blockers or its URL string is stripped of all useful information, don’t try to “fix” this.
Always err on the side of maximum privacy.
Always assume that the user knows exactly what they are doing when they choose to block your data collection. Don’t defy their wishes.
Opaque data collection
When there’s a data leak or a security breach in a company, the party uncovering this is often not related to the company at all.
The web is full of companies and individuals who exhaustively audit the HTTP traffic in and out of websites, and their work has been instrumental in uncovering things like Magecart attacks and domain takeovers.
Cookie leaks, cross-site scripting injections, CSP workarounds, and all manner of nasty JavaScript hacks can typically be audited directly in the browser, because the vendor scripts are running right there under the watchful eyes of the auditors.
When you move to Server-side tagging, you are reducing the amount of third-party JavaScript running on the site, which is good. It’s a great step to mitigating the issues listed above.
However, you are also removing all traces of what is actually done with the data bundled in the requests. Auditors will have a hard time deciphering just what the event stream to your endpoint actually does, and whether you are compromising the user’s right to privacy and security behind the veil of the server, where client-side tools can’t reach it.
This means that you must document carefully what type of data is being collected and processed on your site. You are already obliged to do so under legal frameworks like GDPR and CCPA/CPRAA, which require you to be upfront and transparent about data collection, storage, and processing.
Always err on the side of maximum privacy.
You should take preemptive and proactive measures to do transparency and compliance right in order to avoid litigation and potential brand damage when you get caught in the act.
Consent management is up to the admin
This isn’t that far removed from what the situation is currently with client-side scripts, but it’s still something you need to consider.
Consent management is a hot topic, and rightfully so. Many sites implement client-side consent management tools, which require opt-in input from the user with regard to what data they allow to be collected from them.
Typically the consent string is stored in a cookie or localStorage entry, and many vendors can actually proactively react to consent frameworks such as IAB’s Transparency & Consent Framework 2.0.
When you move to Server-side tagging, you might have just a single stream of events from the browser to the server. This single stream can be split into dozens and dozens of advertising, marketing, and analytics requests in the Server container.
The templates running in the Server container won’t be able to leverage client-side consent APIs such as those suggested by TCF. Instead, you need to build the mechanism of interpreting and parsing user consent manually in the container itself.
Possibly, and hopefully, Google will introduce tools that make this process easier. However, until then you need to make sure that when consent is collected in the browser or device, it is respected in the server as well.
Cost
The cost of running a Server-side tagging is large or small, depending on what you’re comparing it to.
It’s large compared to just running the scripts in the browser, thus accumulating zero extra cost.
It’s small compared to all the benefits you’ll get in return for setting up the container, at least I like to think so.
 Forecasted cost with a small throughput
Running a three-instance App Engine setup for my site of modest traffic puts me back about 120€ per month. For me, this is acceptable considering I get more control over the data collection on my site.
Poor availability of server-side endpoints
For the Server container to work as a replacement for your browser- or app-based tracking, the vendors you want to send data to need to be able to collect the HTTP requests sent by the Server container.
This isn’t necessarily a big issue - vendors always have an HTTP endpoint to which their JavaScript library sends data, and many support simple image pixels for collecting the GET requests.
However, many vendors also stuff the browser with super complicated and heavy JavaScript. If you want to work towards reducing the amount of third-party crap loaded in the browser, the vendor should provide a means to build the payload manually, without having to load their bloated JavaScript libraries.
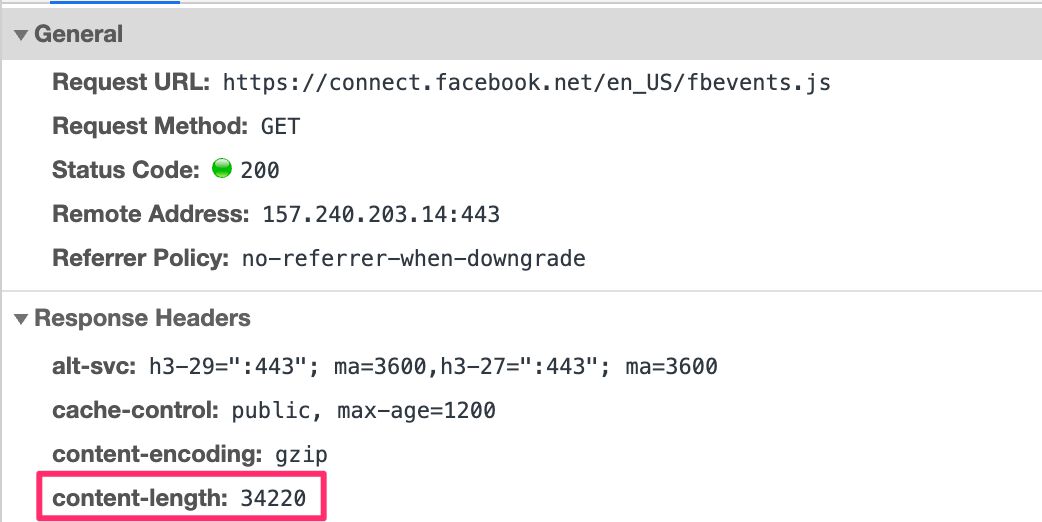
For example, Facebook has a large and very complex set of client-side libraries they want you to download when working with their pixel. The purpose of the library is to let you communicate with Facebook’s servers using the fbq() command queue.
Luckily, Facebook also offers the Conversions API, which specifies a format for the HTTP request with the conversion information. By deciphering the Conversions API documentation, anyone can build their own event stream from the device to the Server container to Facebook without having to load any Facebook JavaScript at all.
Then there are services like HotJar that are so tightly coupled with client-side interactions that it is unlikely you can ever run HotJar without having to download their JavaScript. It will be interesting to see how vendors like HotJar adapt to a tagging environment that is run completely in the server.
Technical outline
When you follow the instructions to provision a Google Tag Manager server-side environment, the scripts automatically create a single Standard App Engine instance.
NOTE! In early beta, there was also the option to load the Server container in a Kubernetes cluster of Compute Engine instances. This is a more advanced setup designed for users who already have a pipeline running in Google Cloud, and they want more control over it than what App Engine’s managed environments can offer.
App Engine is a managed virtual machine platform running in the Google Cloud. By using the Standard environment and a single instance, you can test-drive your Google Tag Manager setup most likely without even expending the free quota you have available.
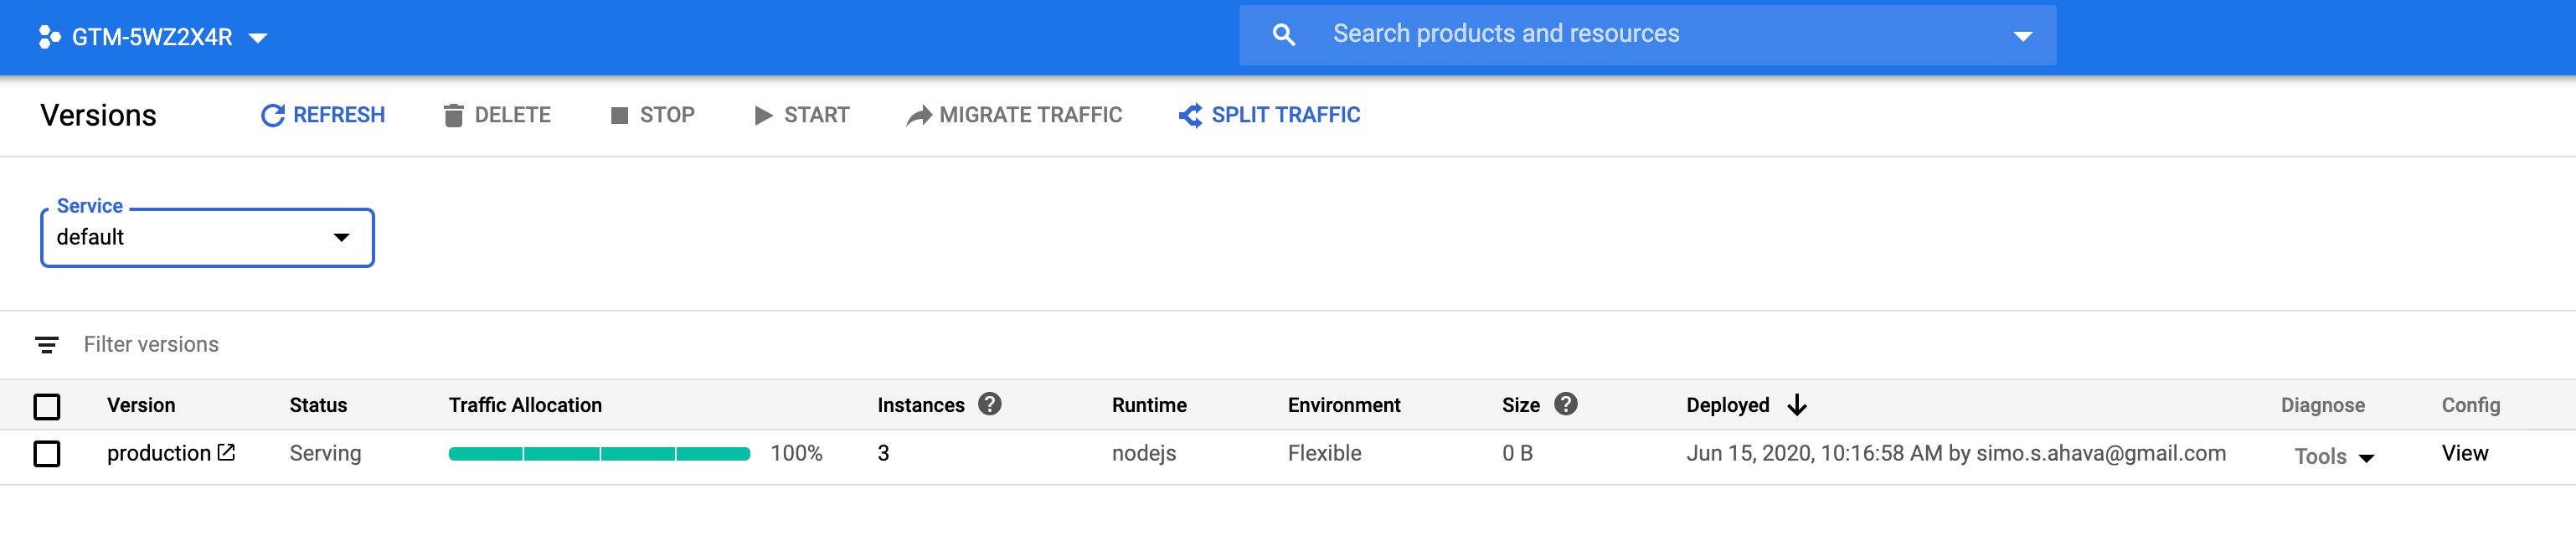
However, as soon as you’re ready to deploy the new Server container into a full production environment, you should guarantee best performance and uptime by transferring to a Flexible App Engine environment and increasing the number of instances to a minimum of three. By doing this, you increase the throughput and performance of your server-side endpoint, and you guarantee that it is able to shoulder the incoming load. Follow these instructions for more details.
In addition to provisioning extra instances, you should also map a custom domain to the endpoint, preferably one that is a subdomain of your main site.
Cost
It’s difficult to say what the exact cost for your setup will be, but rest assured that there will be costs associated with production usage.
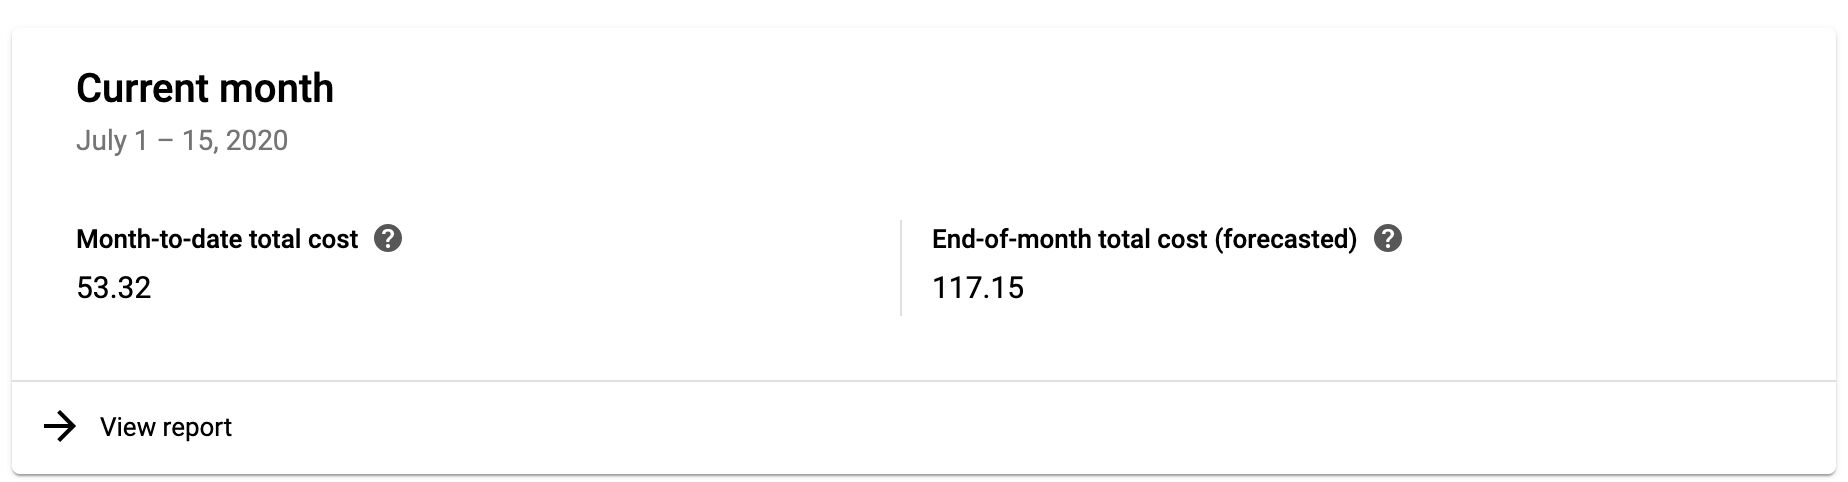
As an example, I’m running App Engine in a Flexible environment, using three instances (the minimum recommended setup for production use). The cost associated with this setup is around 4 euros per day.
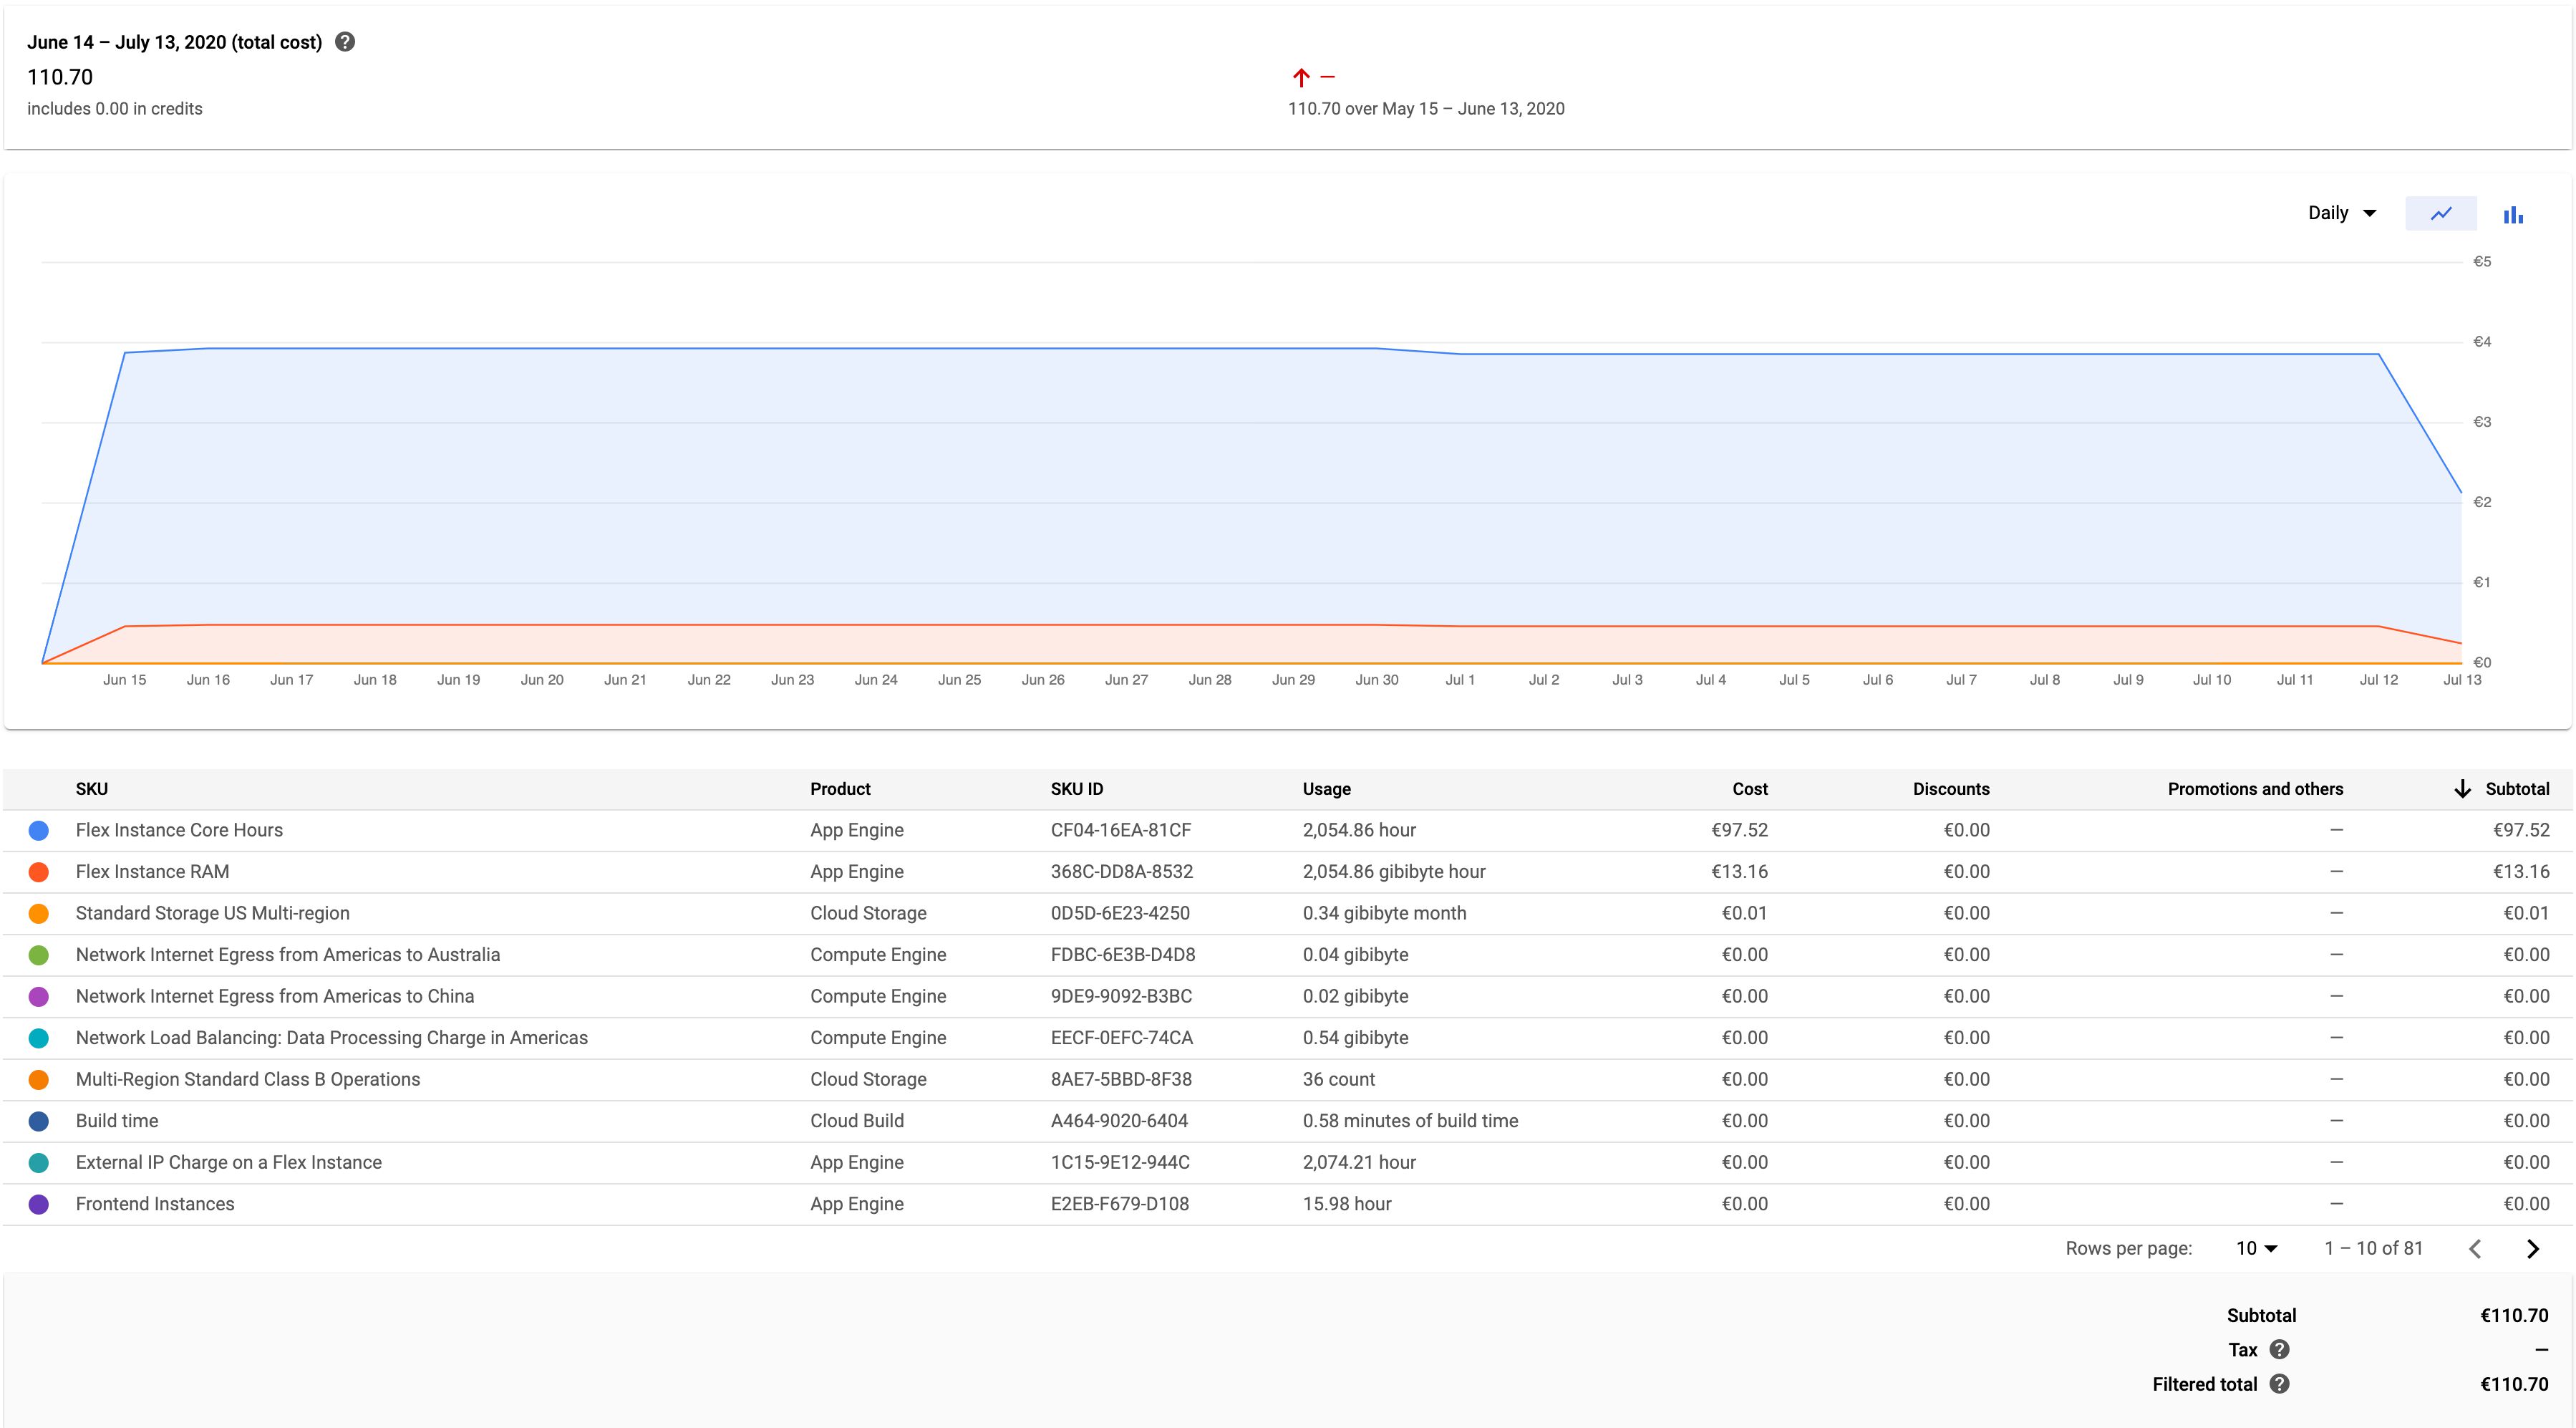
I’m only collecting Universal Analytics Page Views to this Server container. As you can see, the graph is pretty much steady regardless of the amount of hits coming in (my site averages just 0.2 requests per second).
My site has a visible dip in pageviews over weekends, with around 8,000 pageviews sent over a typical weekday and just one fourth of that over a Saturday or a Sunday. However, these dips don’t reflect in the cost of running my current Server container, which means I could probably scale the setup down a little, but on the other hand I fully intend to add additional measurements, so I’d have to scale back up anyway.
When you compare the cost forecast above with a Server-side tagging setup that collects around 60 requests per second, we’re talking at around 250€ per month instead.
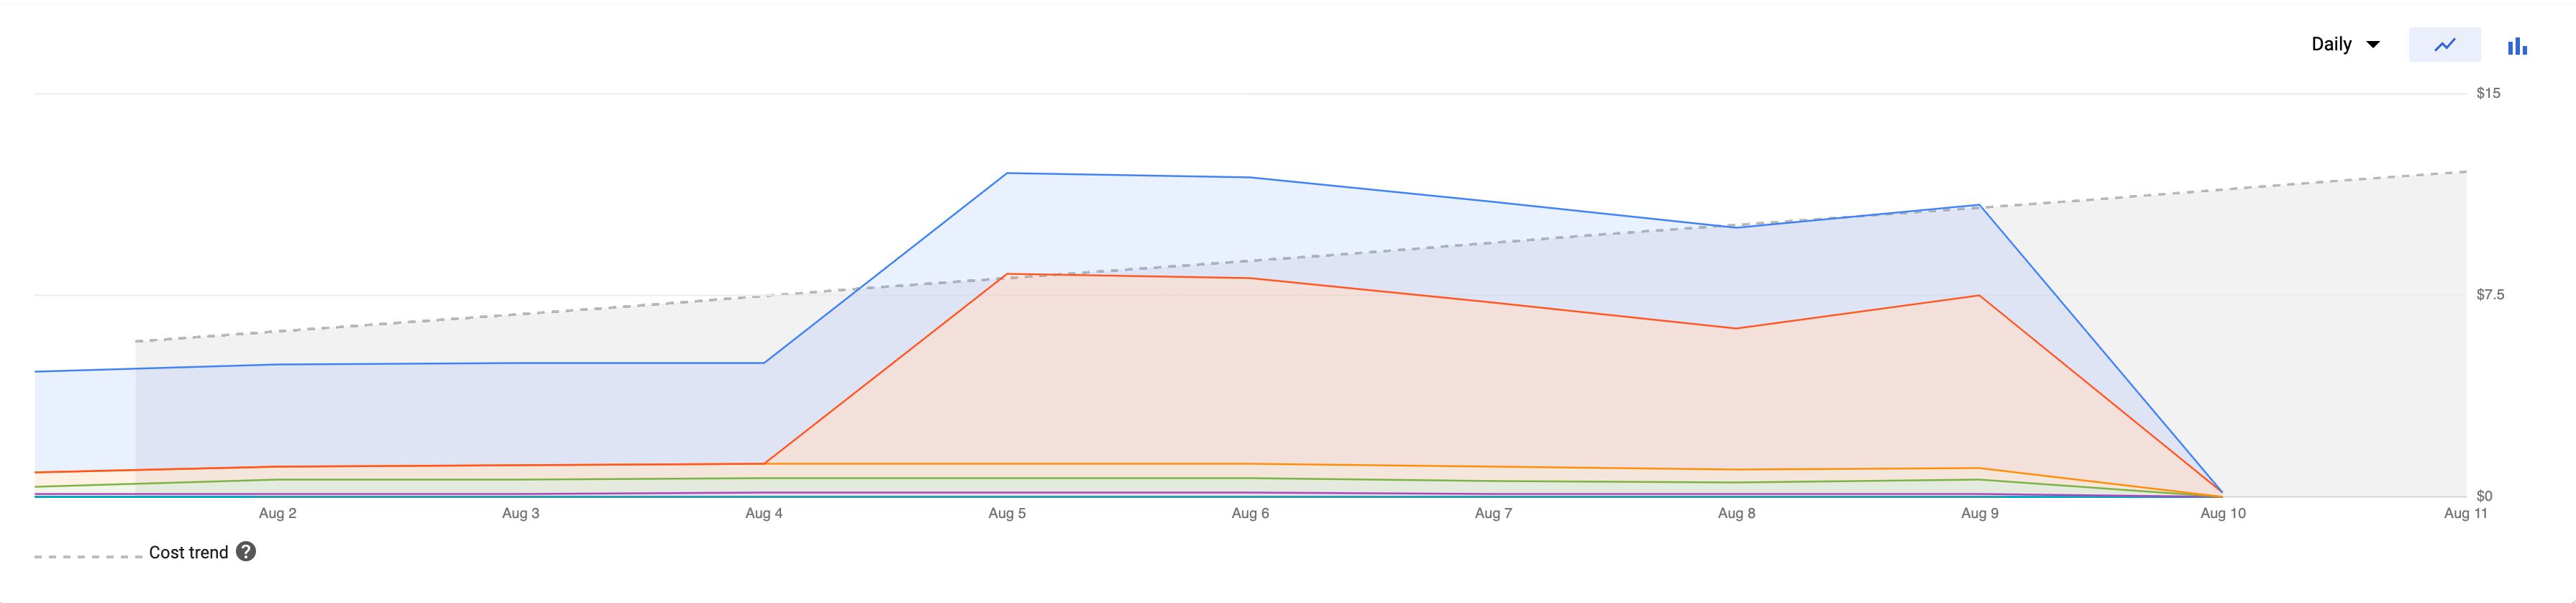 Forecasted cost with a larger throughput
I hope at some point Google releases case studies and statistics, or even a tool, which allow you to estimate the cost and scale up or down accordingly.
Server container
The Server container itself is visually reminiscent of any Google Tag Manager container.
The main difference is the new Client asset type you can see in the left-hand menu. I’ll explain more about clients in the associated chapter.
When using the term incoming HTTP request, I’m referring to the HTTP request that is sent from a device or browser to the Server container. When using the term outgoing HTTP request, I’m referring to the HTTP request built and dispatched by tags firing in the container.
Tags
Tag-wise there’s not much there, yet.
There’s the native Universal Analytics and App + Web templates, both configured to digest data pushed by their respective Clients. The HTTP Request tag lets you create an outgoing HTTP request to any destination.
Then there are all the custom tag templates people can imagine creating. Almost any service that accepts HTTP requests can be configured into a custom tag template in the Server container.
Triggers
There’s a noticeable lack of available triggers. In fact, there’s just a single Custom trigger type.
The fact is that a Server container would not be associated with arbitrary triggers such as “Page View”, “Click”, or “Video”. Instead, any tags triggering in a Server container would only trigger if a Client instructed them to do so.
A Server container is also unrelated to client-side labels such as a “page load” or a “container load”. It’s running all the time - it’s not reset when the page is refreshed. Thus there are no triggers related to the lifecycle of a Server container, though that doesn’t mean there won’t be at some point.
Variables
The available Built-in variables are:
| Variable name | Description | Example |
|---|---|---|
| Query String | Returns the query string of the incoming HTTP request. | v=1&t=pageview&tid=UA-12345-1... |
| Request Method | Returns the method of the incoming HTTP request. | GET |
| Request Path | Returns the path of the incoming HTTP request. | /collect |
| Client Name | Returns the name of the Client currently processing the request. | Facebook Client |
| Container ID | Returns the ID of your Server container. | GTM-XXXXXX |
| Container Version | Returns the current version of your Server container. | QUICK_PREVIEW |
| Debug Mode | Whether the container is in Preview mode or not. | true |
| Random Number | Returns a random positive integer. | 12345 |
| Event Name | Returns the value of the event_name field in the event data object that was passed to the container. | page_view |
These can be used to parse information about the incoming request and to retrieve metadata about the event that fired and the container itself.
Available User-defined variables are:
| Variable name | Description | Example |
|---|---|---|
| Cookie Value | Set to the value of the first cookie that matches the name. | GA1.2.12345.12345 |
| Query Parameter | Set to the value of the first query parameter in the incoming HTTP request that matches the name. | UA-12345-1 |
| Query String | Returns the query string of the incoming HTTP request. Note! Use the Built-in variable instead. | v=1&tid=UA-12345-1&t=pageview... |
| Request Header | Returns the value(s) of the header name from the incoming HTTP request. | https://referrer-page.com/ |
| Request Method | Returns the method of the incoming HTTP request. Note! Use the Built-in variable instead. | POST |
| Request Path | Returns the path of the incoming HTTP request. Note! Use the Built-in variable instead. | /j/collect |
| Client Name | Returns the name of the Client currently processing the request. Note! Use the Built-in variable instead. | Universal Analytics |
| Constant | Returns whatever string you type into the variable. | UA-12345-1 |
| Event Data | Returns the value of the key in the event data object. | 123.123.123.123 |
| Event Name | Returns the value of the event_name field in the event data object that was passed to the container. Note! Use the Built-in variable instead. | page_view |
| Random Number | Returns a random positive integer. Note! Use the Built-in variable instead. | 123123 |
| Container ID | Returns the ID of your Server container. Note! Use the Built-in variable instead. | GTM-ABCDE |
| Container Version Number | Returns the current version of your Server container. Note! Use the Built-in variable instead. | 13 |
| Debug Mode | Whether the container is in Preview mode or not. Note! Use the Built-in variable instead. | false |
You can, and should, utilize custom templates to build your own variable types.
Custom domain
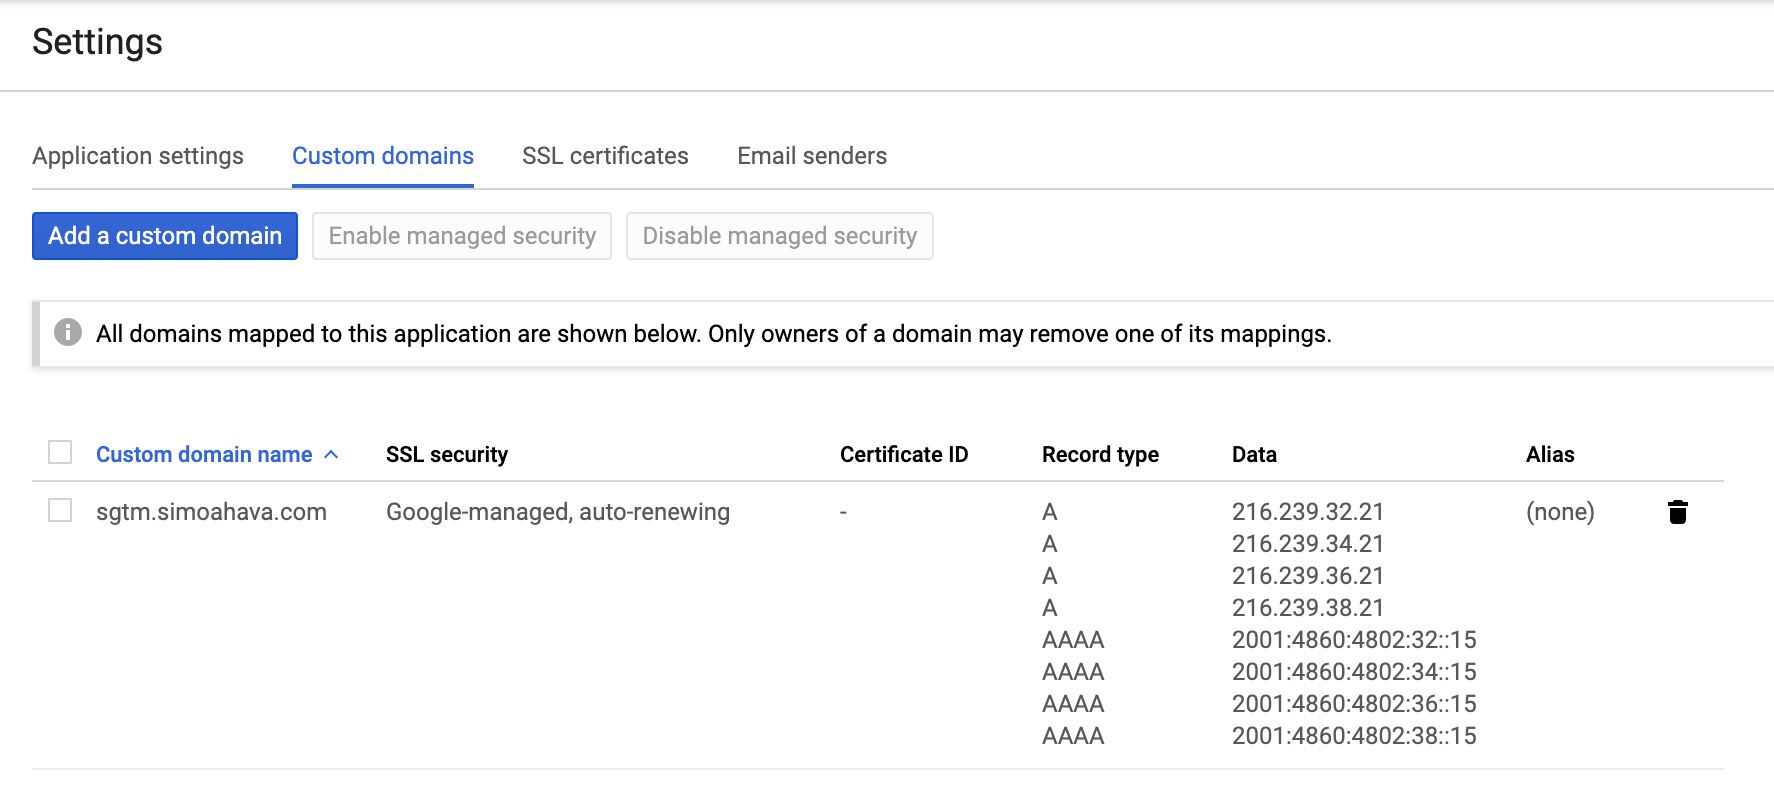
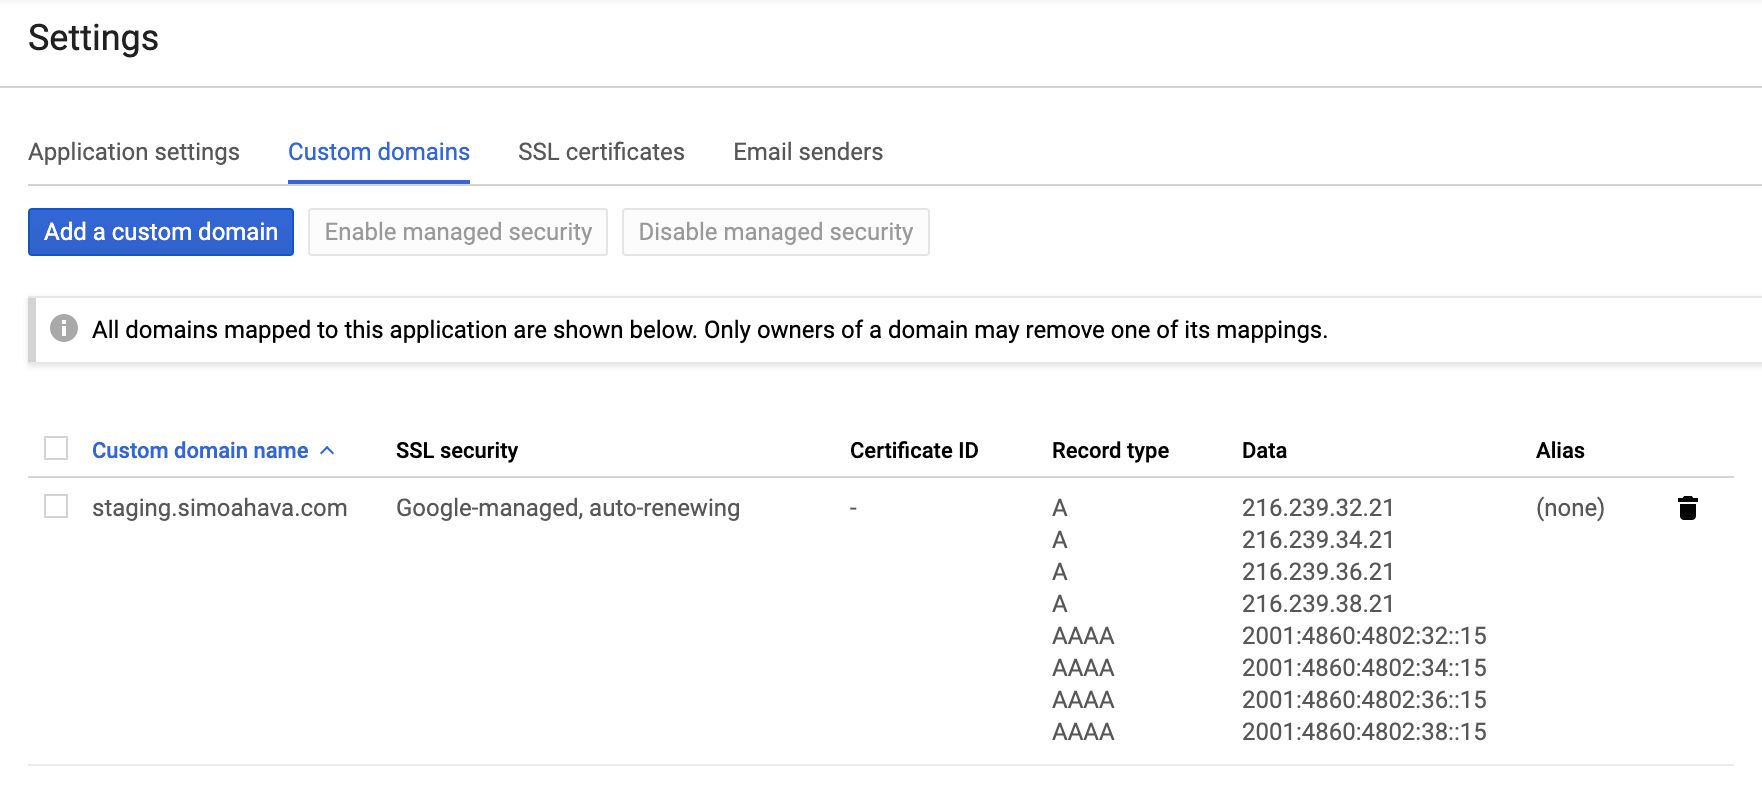
You are strongly encouraged to map a custom domain to your Server container endpoint.
The main reason is that this way you can incorporate the server-side data collection endpoint that you own in your first-party domain namespace. For example, I’m using sgtm.simoahava.com as the host of the Server container.
This becomes significant when you consider things like Intelligent Tracking Prevention. You might want to make use of cookies in the incoming requests, but if the Server container is hosted on a domain that is different from where the requests are sent (such as your site), these cookies will be considered third-party cookies and thus dropped by many browsers.
NOTE! Due to upcoming changes in ITP, you should map the domain as a newly verified subdomain. This way you’ll be instructed to use A/AAAA DNS records rather than the vulnerable CNAME alias.
Similarly, having the endpoint in your first-party domain namespace means you can do things like set first-party cookies with Set-Cookie headers and thus avoid Safari expiring them within 7 days of being set.
Note that technically you can have more than one domain pointing to your App Engine deployment. This is helpful in case you have a single server-side container responding to requests from multiple domains. The only “catch” is that some features of the Server container, such as for which domain the Preview mode is shown, are restricted to just one domain. It won’t hamper the actual data collection, but it might make it difficult to use some of these features.
Requests and responses
Server-side tagging revolves around incoming HTTP requests to the server container being mapped by a Client, passed to a tag, and then dispatched as an outgoing HTTP request to the tag vendor. Once all the tags have fired for a given Client, the Client sends an HTTP response back to the origin of the request, such as a browser, an app, or some other connected service.
This flow is absolutely fundamental to understanding how Server-side tagging works. A “perfect” end-to-end pipeline would be one where the requests are carefully sculpted to make use of as little client-side code as possible; The Clients are designed to handle both vendor-specific and vendor-agnostic requests; The tags are built to trigger off specific clients’ event data payloads, finally responding to the Client whether the outgoing HTTP request was a success or not.
The easiest way to map a Client to an incoming request is to observe the Request Path. The built-in Universal Analytics Client, for example, is primed to listen to requests that have the /collect path or any of its permutations (such as /j/collect or /r/collect). You could create a Facebook Client that listens for a custom path of /fbook, and a HotJar Client that listens for requests with the path of /hotjar.
 Client looks for a request to /fbq and if one is found, claims the request.
Alternatively, you could approach a single event stream model, where all requests are sent to the same Client. In this case, they would have just a single path, such as /events, and you would configure the Client to parse the request body and turn it into event data objects that are passed to the container.
Whatever you choose, you need to remember that whatever origin sent the request is actually waiting for a response back from the Server container.
By default, the response is a fairly nondescript text/html response, but you can jazz things up using the following APIs.
setCookielets you write cookies in the Set-Cookie header of the HTTP response.setPixelResponseautomatically configures the response to mimic a 1x1 GIF pixel with headers that prevent caching.setResponseHeadercan be used to add any custom HTTP headers to the response. Consider headers likeAccess-Control-Allow-OriginandAccess-Control-Allow-Credentials, which are useful for preflight requests, for example.
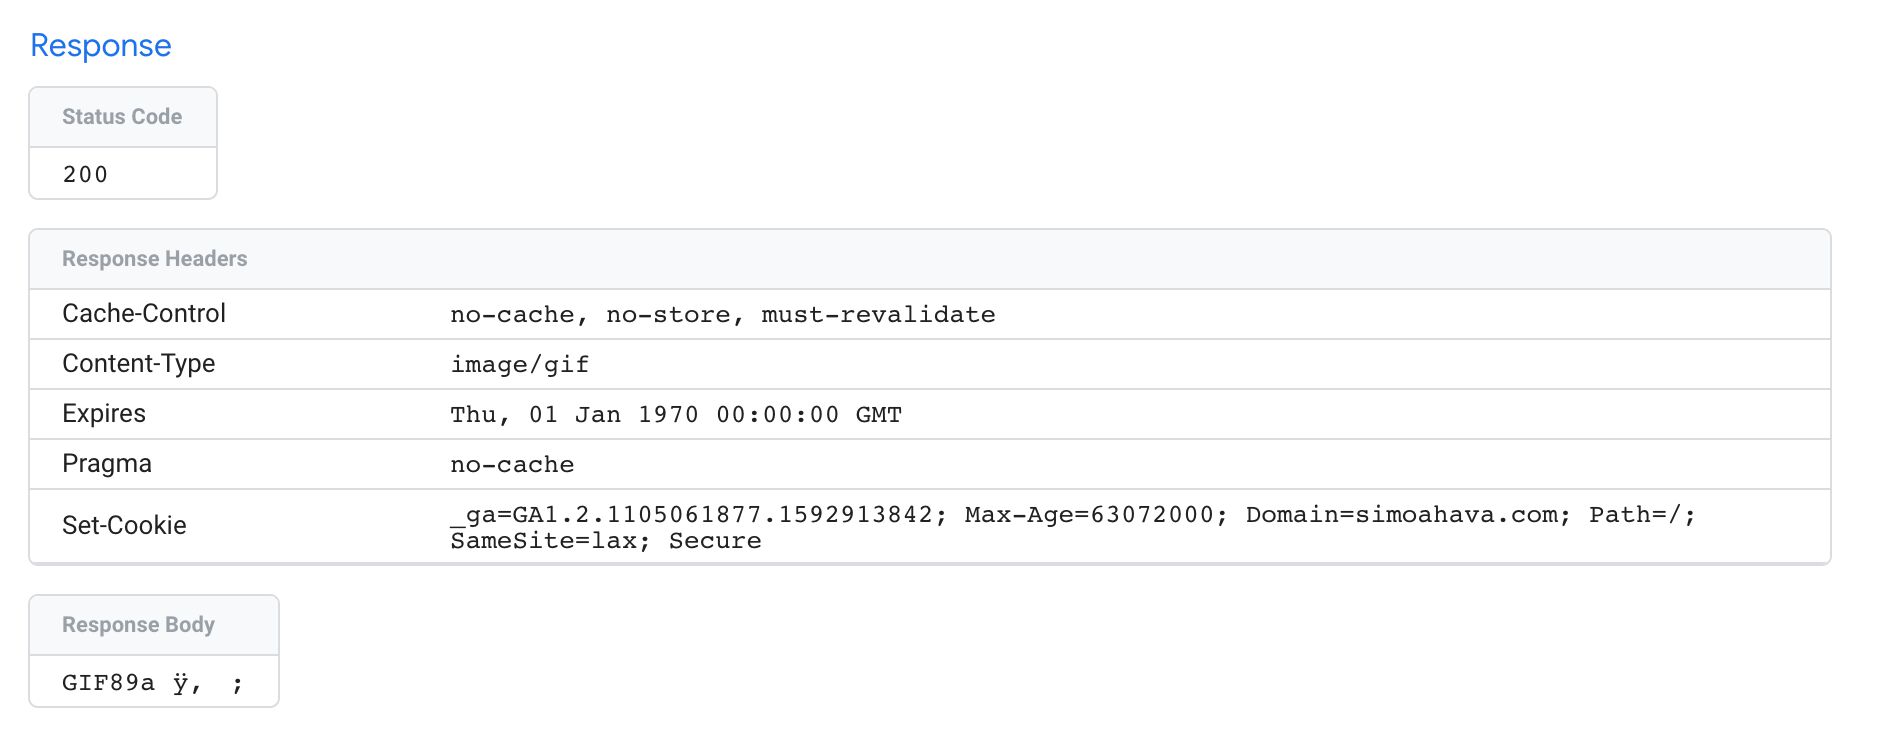 Request with setPixelResponse() and setCookie() APIs.
Hopefully at some point we’ll see more options for manipulating the request as well. We could envision Clients whose only purpose is to purge the incoming request from PII, before passing the request on to the next client that actually builds the event object for tags to dispatch, now cleared of all PII.
Clients and tags
We’ve already talked a lot about Clients and tags, but it’s good to reiterate as the concept might be a bit alien - especially if you’re used to how GTM for the web works.
The purpose of a Client is to listen for incoming HTTP requests, parse them into a unified event model, and then run a virtual container with the event model, so that tags can use the details in these event objects to compile the requests to their endpoints.
Because Clients do all the legwork, you can start streamlining the event stream itself, moving away from vendor-specific request parsing (which might require vendor-specific JavaScript to run in the user’s browser, for example), and leaning towards a more agnostic approach, where a single event stream can be distributed into multiple unrelated endpoints.
Clients operate on a Priority order. The higher the priority of a Client, the sooner it gets to check if the request is its to claim. To claim a request means calling the claimRequest API. This, in turn, means that the current Client tells all the other Clients that this request is MINE! and doesn’t allow any other Client to parse the request anymore.
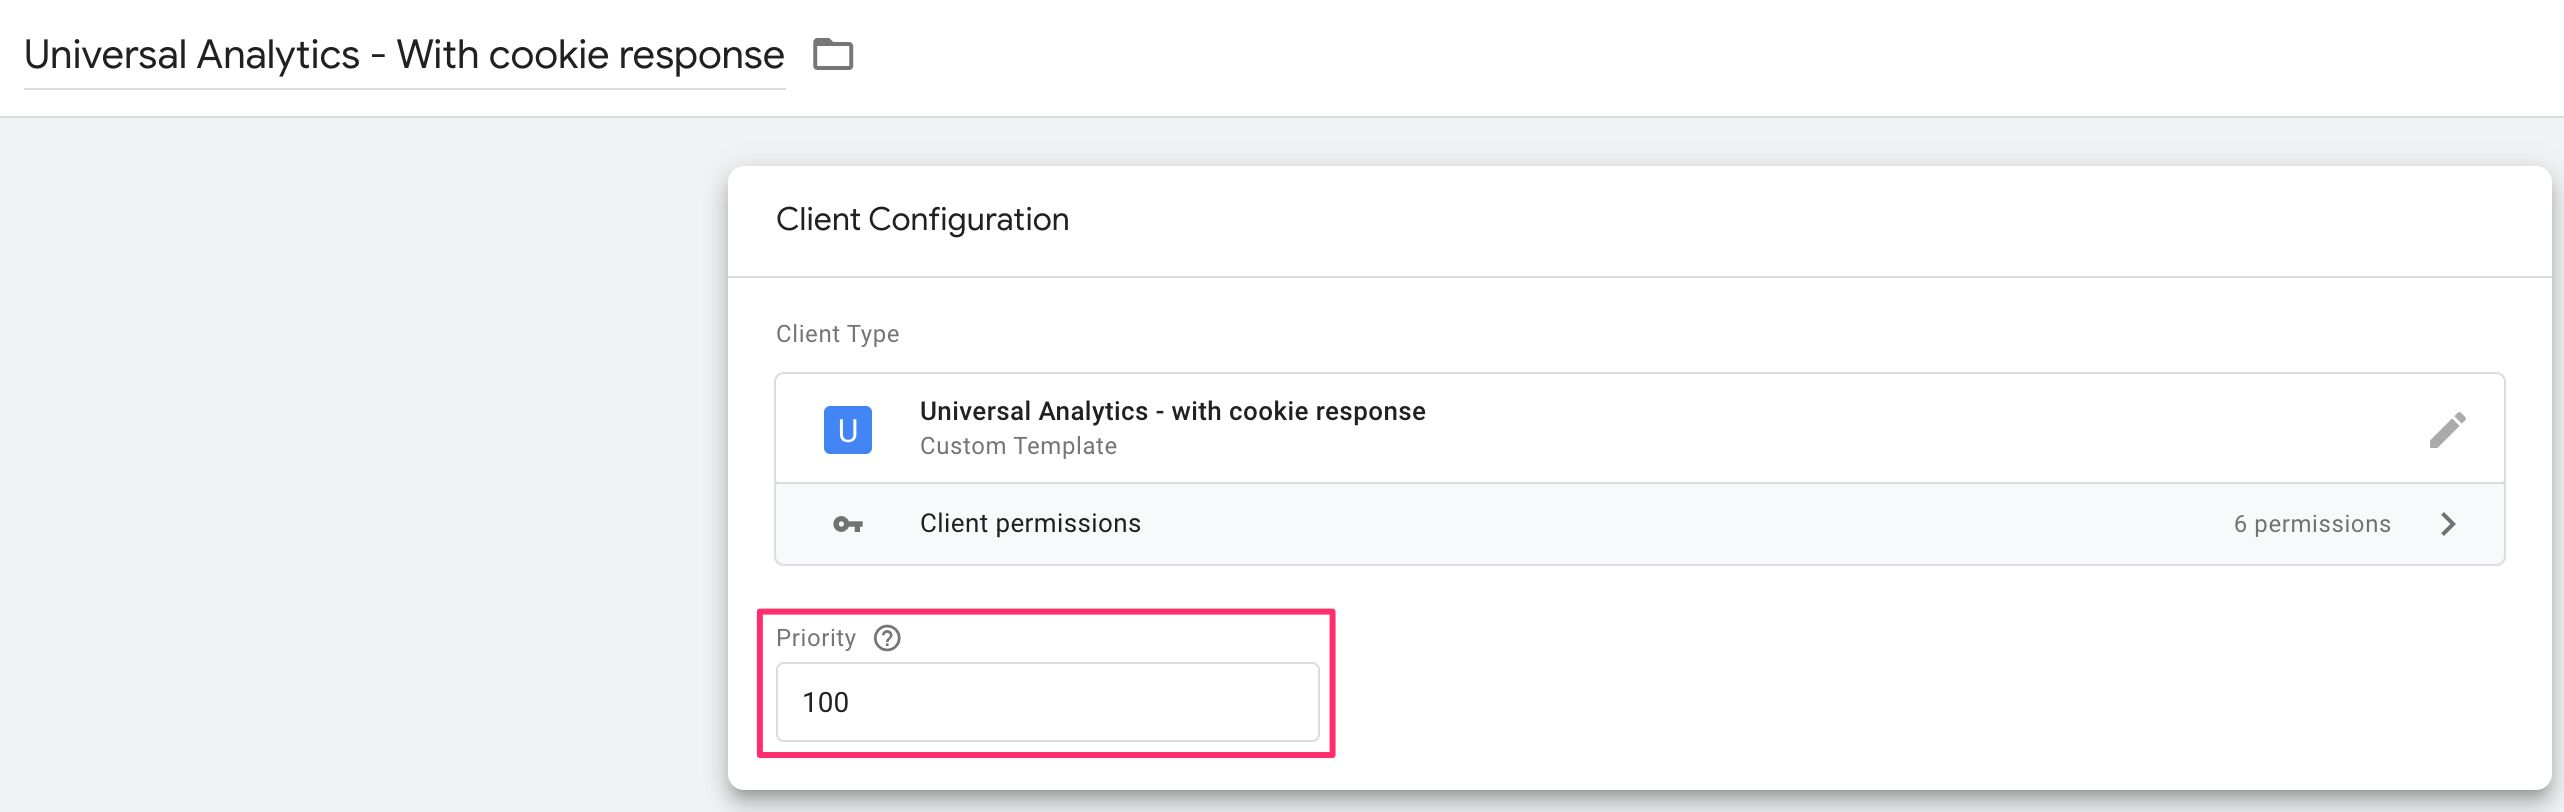 The Client with Priority 100 always has first dibs on the request.
Once the Client has parsed the request and built an event object out of it, the event is passed to the runContainer API. With this API, the event is passed to the tags to evaluate and potentially trigger with.
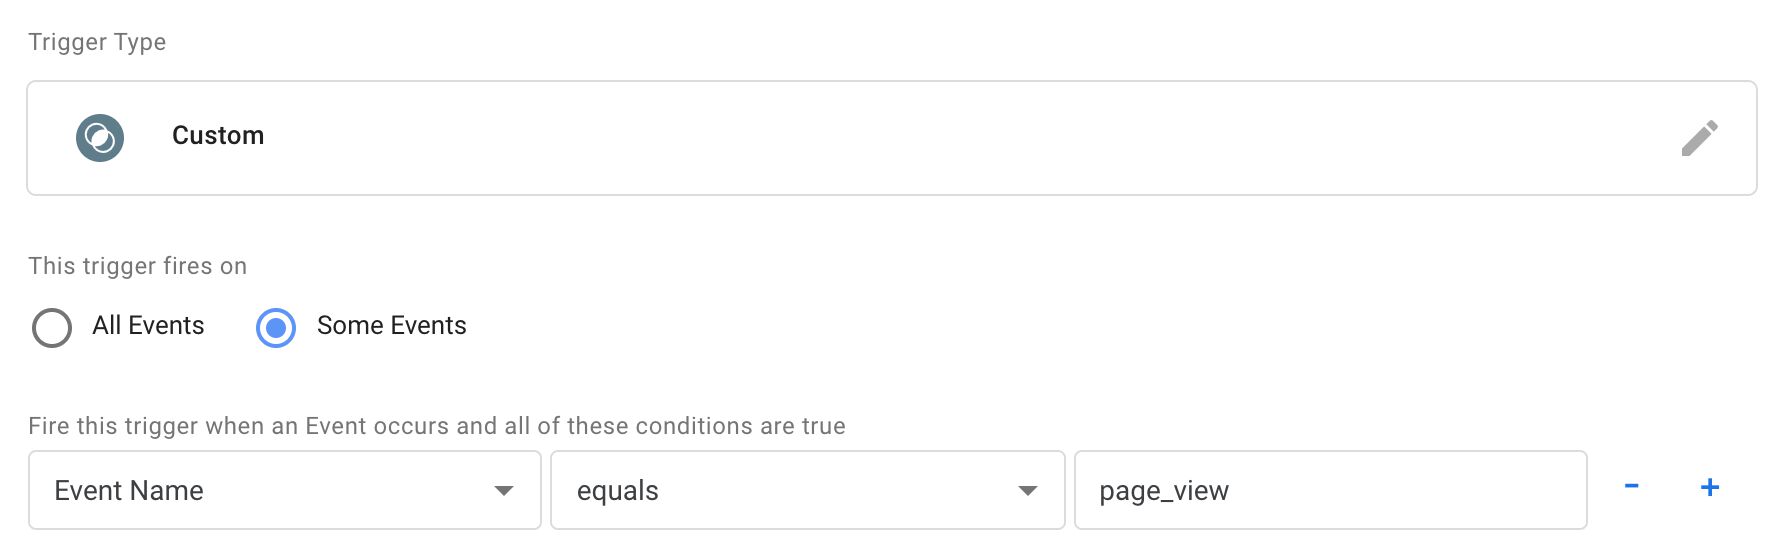
Tags can be set to trigger on numerous different things, but most likely you will end up using a combination of Event Name and/or Client Name.
The Event Name is something that gtag.js, Firebase Analytics, and more recently App + Web iterated and introduced to the world of web analytics.
Basically, there’s an inventory of suggested or quasi-standardized Event Names, such as page_view, search, and login. Then there is always the opportunity to use a custom Event Name such as new_level_achieved.
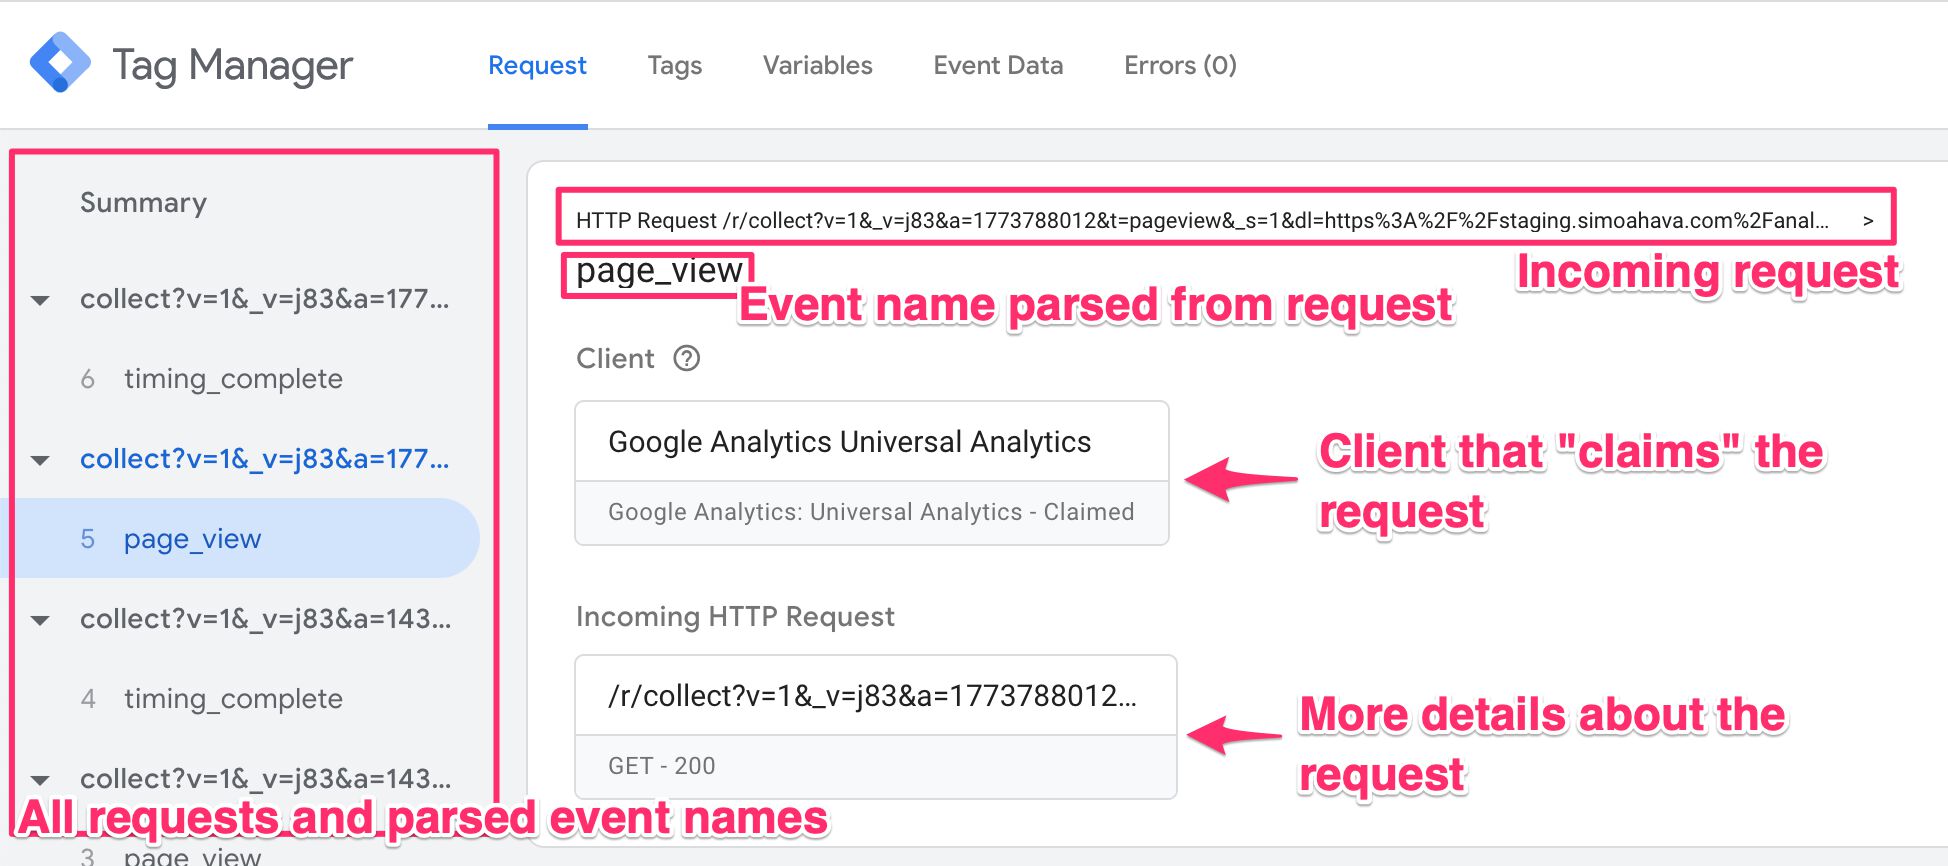
When the Client builds the event model, it has to provide an Event Name. This is what ends up showing up in the Preview screen when the request is claimed and mapped by a Client:
So if you wanted to fire a bunch of tags whenever a page_view is collected, regardless of Client, you’d simply use a trigger that checks the Event Name. You’d then just need to assume that the Client has correctly intercepted the incoming HTTP request, and has managed to parse and map it into an event object that can be understood by your tag (you can use Preview mode to analyze what the event data object contained).
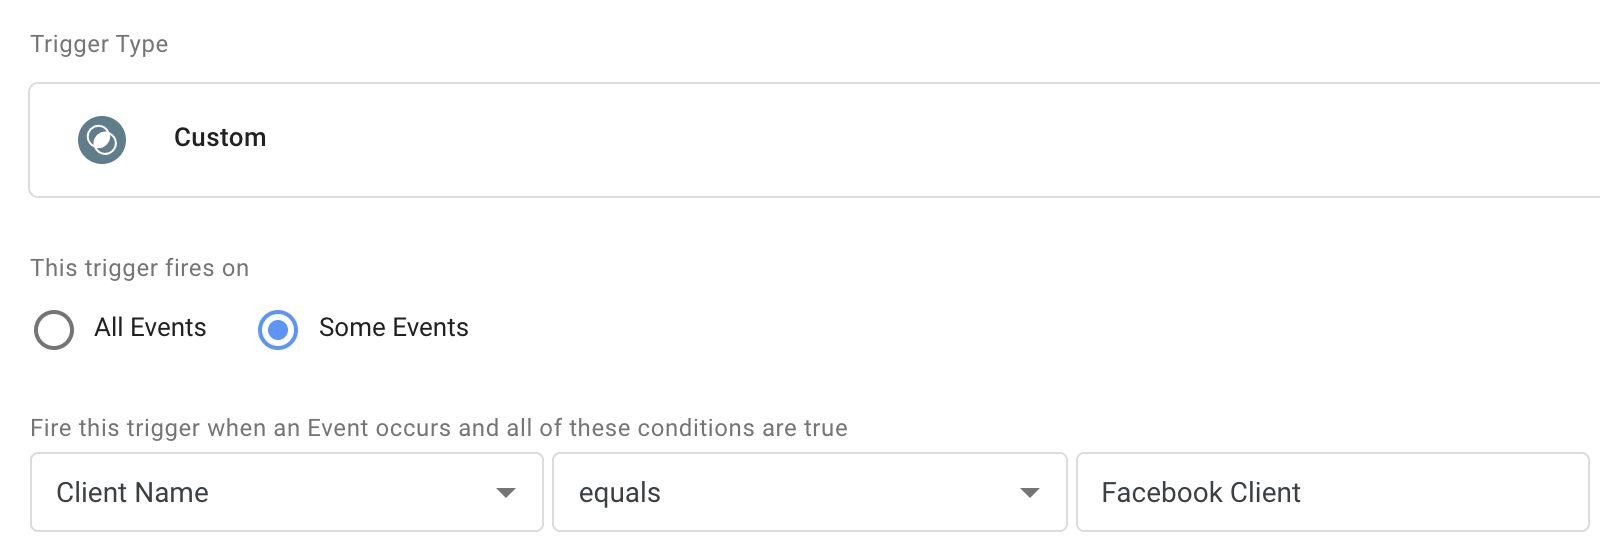
Alternatively, perhaps you want your tag to fire only when the Facebook Client generated the event object. This is useful in case the tag requires a lot of custom information not available as standard parameters in the event object.
By referencing the Client Name, you can ensure that the tag only fires if the correct Client has claimed the incoming HTTP request, assuming the Client that executed runContainer also claimed the request (there might be some edge cases where this is not the case).
It might be difficult to wrap your head around Clients and tags, but once the inventory of templates for both multiplies in the community gallery, it will become easier to just use the community templates rather than having to worry about how to build your own.
Event model
When the Client parses an incoming HTTP request it has claimed, it needs to map values in the request body (typically in a query string) and produce an event data object, which looks something like this:
{
  event_name: "page_view",
  event_parameter: "some value",
  event_parameter_object: {
    nested_event_parameter: "some other value"
  }
}
This object is what gets passed to the container with the runContainer API. Tags will then be able to use these values in the trigger, e.g. firing a tag only when event_name is page_view, and they’ll be able to map values in the event object to the outgoing HTTP request they dispatch to the vendor endpoint.
To keep things streamlined, Google suggests a set of standard event names and parameters that you should try to follow to make sure that the event data object passed to the container can be used with as little friction as possible. If the tags require parameters that are not available in the list of standard parameters, they should be prefixed with x-vendor-. Thus, for example, Facebook’s Subscription ID becomes x-fb-subscription_id.
Note also the preference of snake_case vs. camelCase. It’s a syntactical format you should get accustomed to using when working with Server-side tagging.
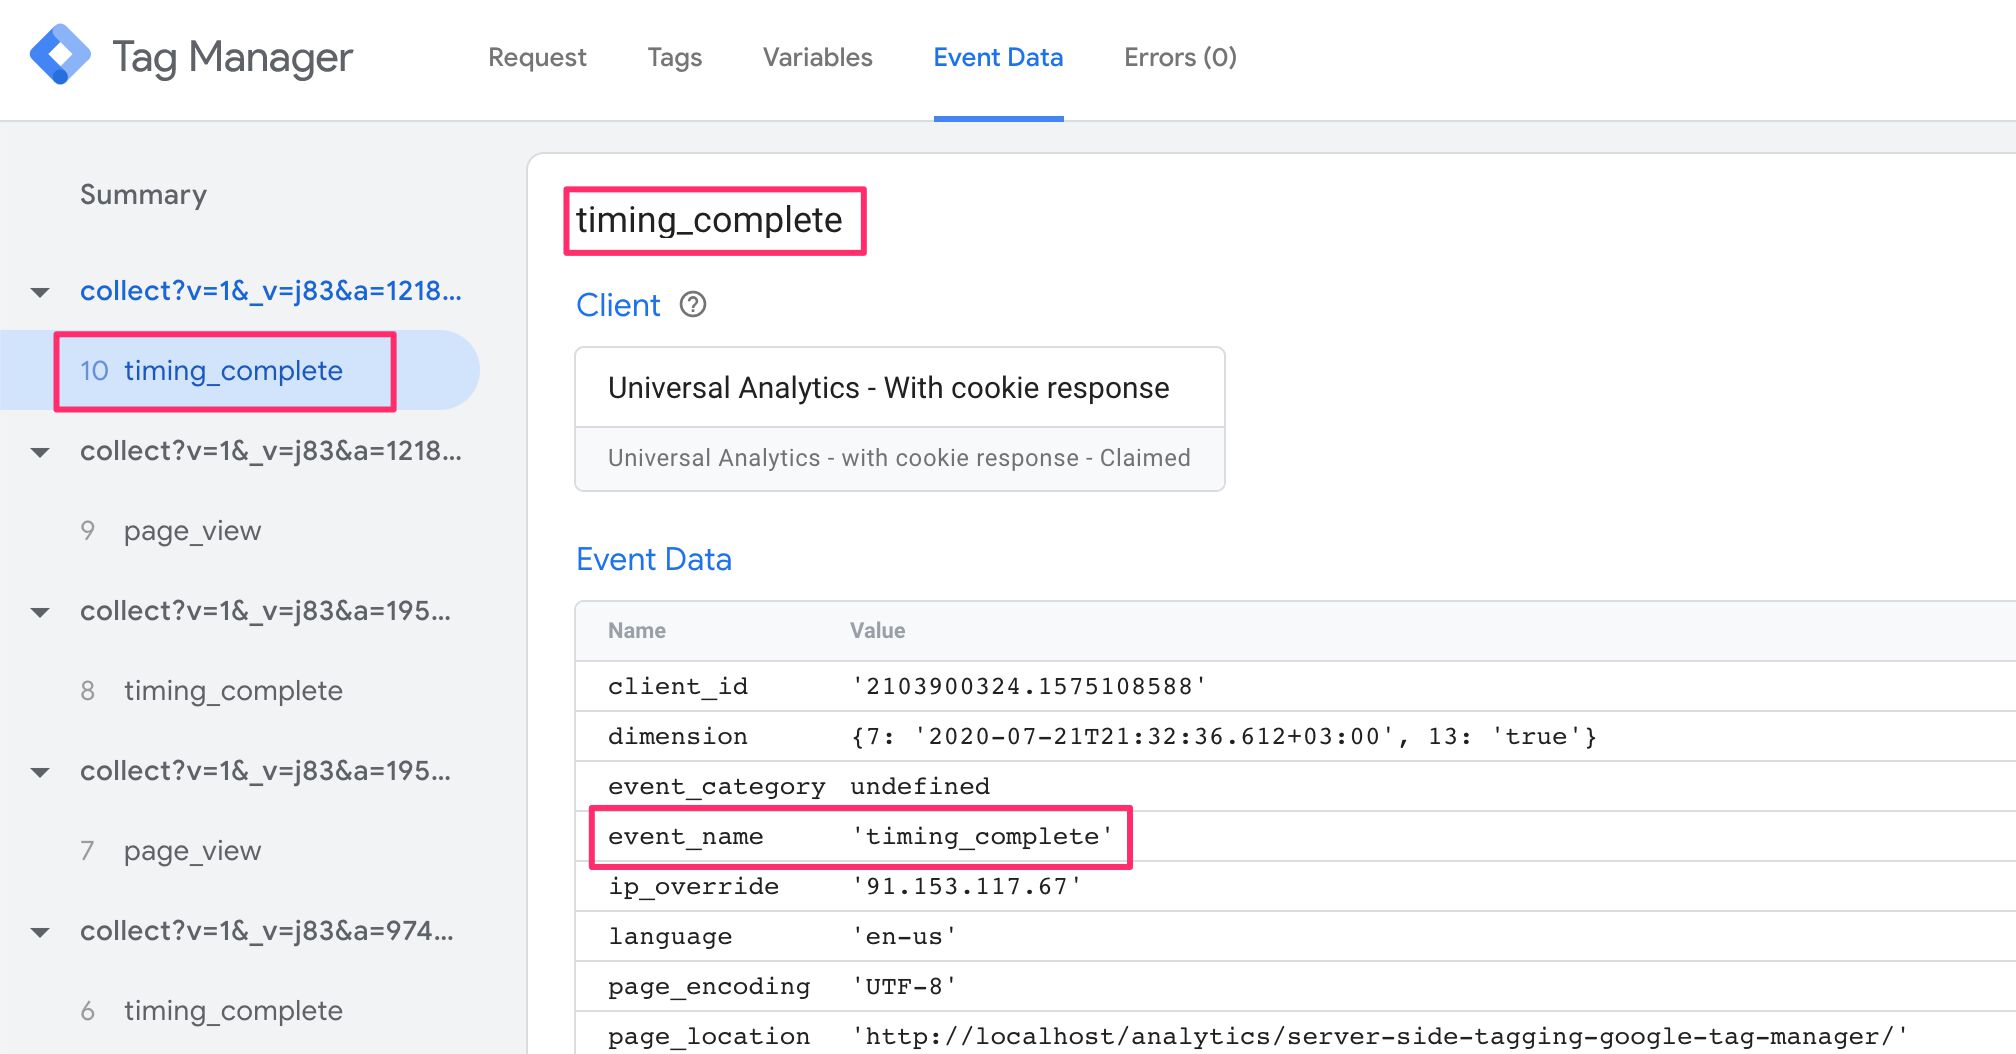
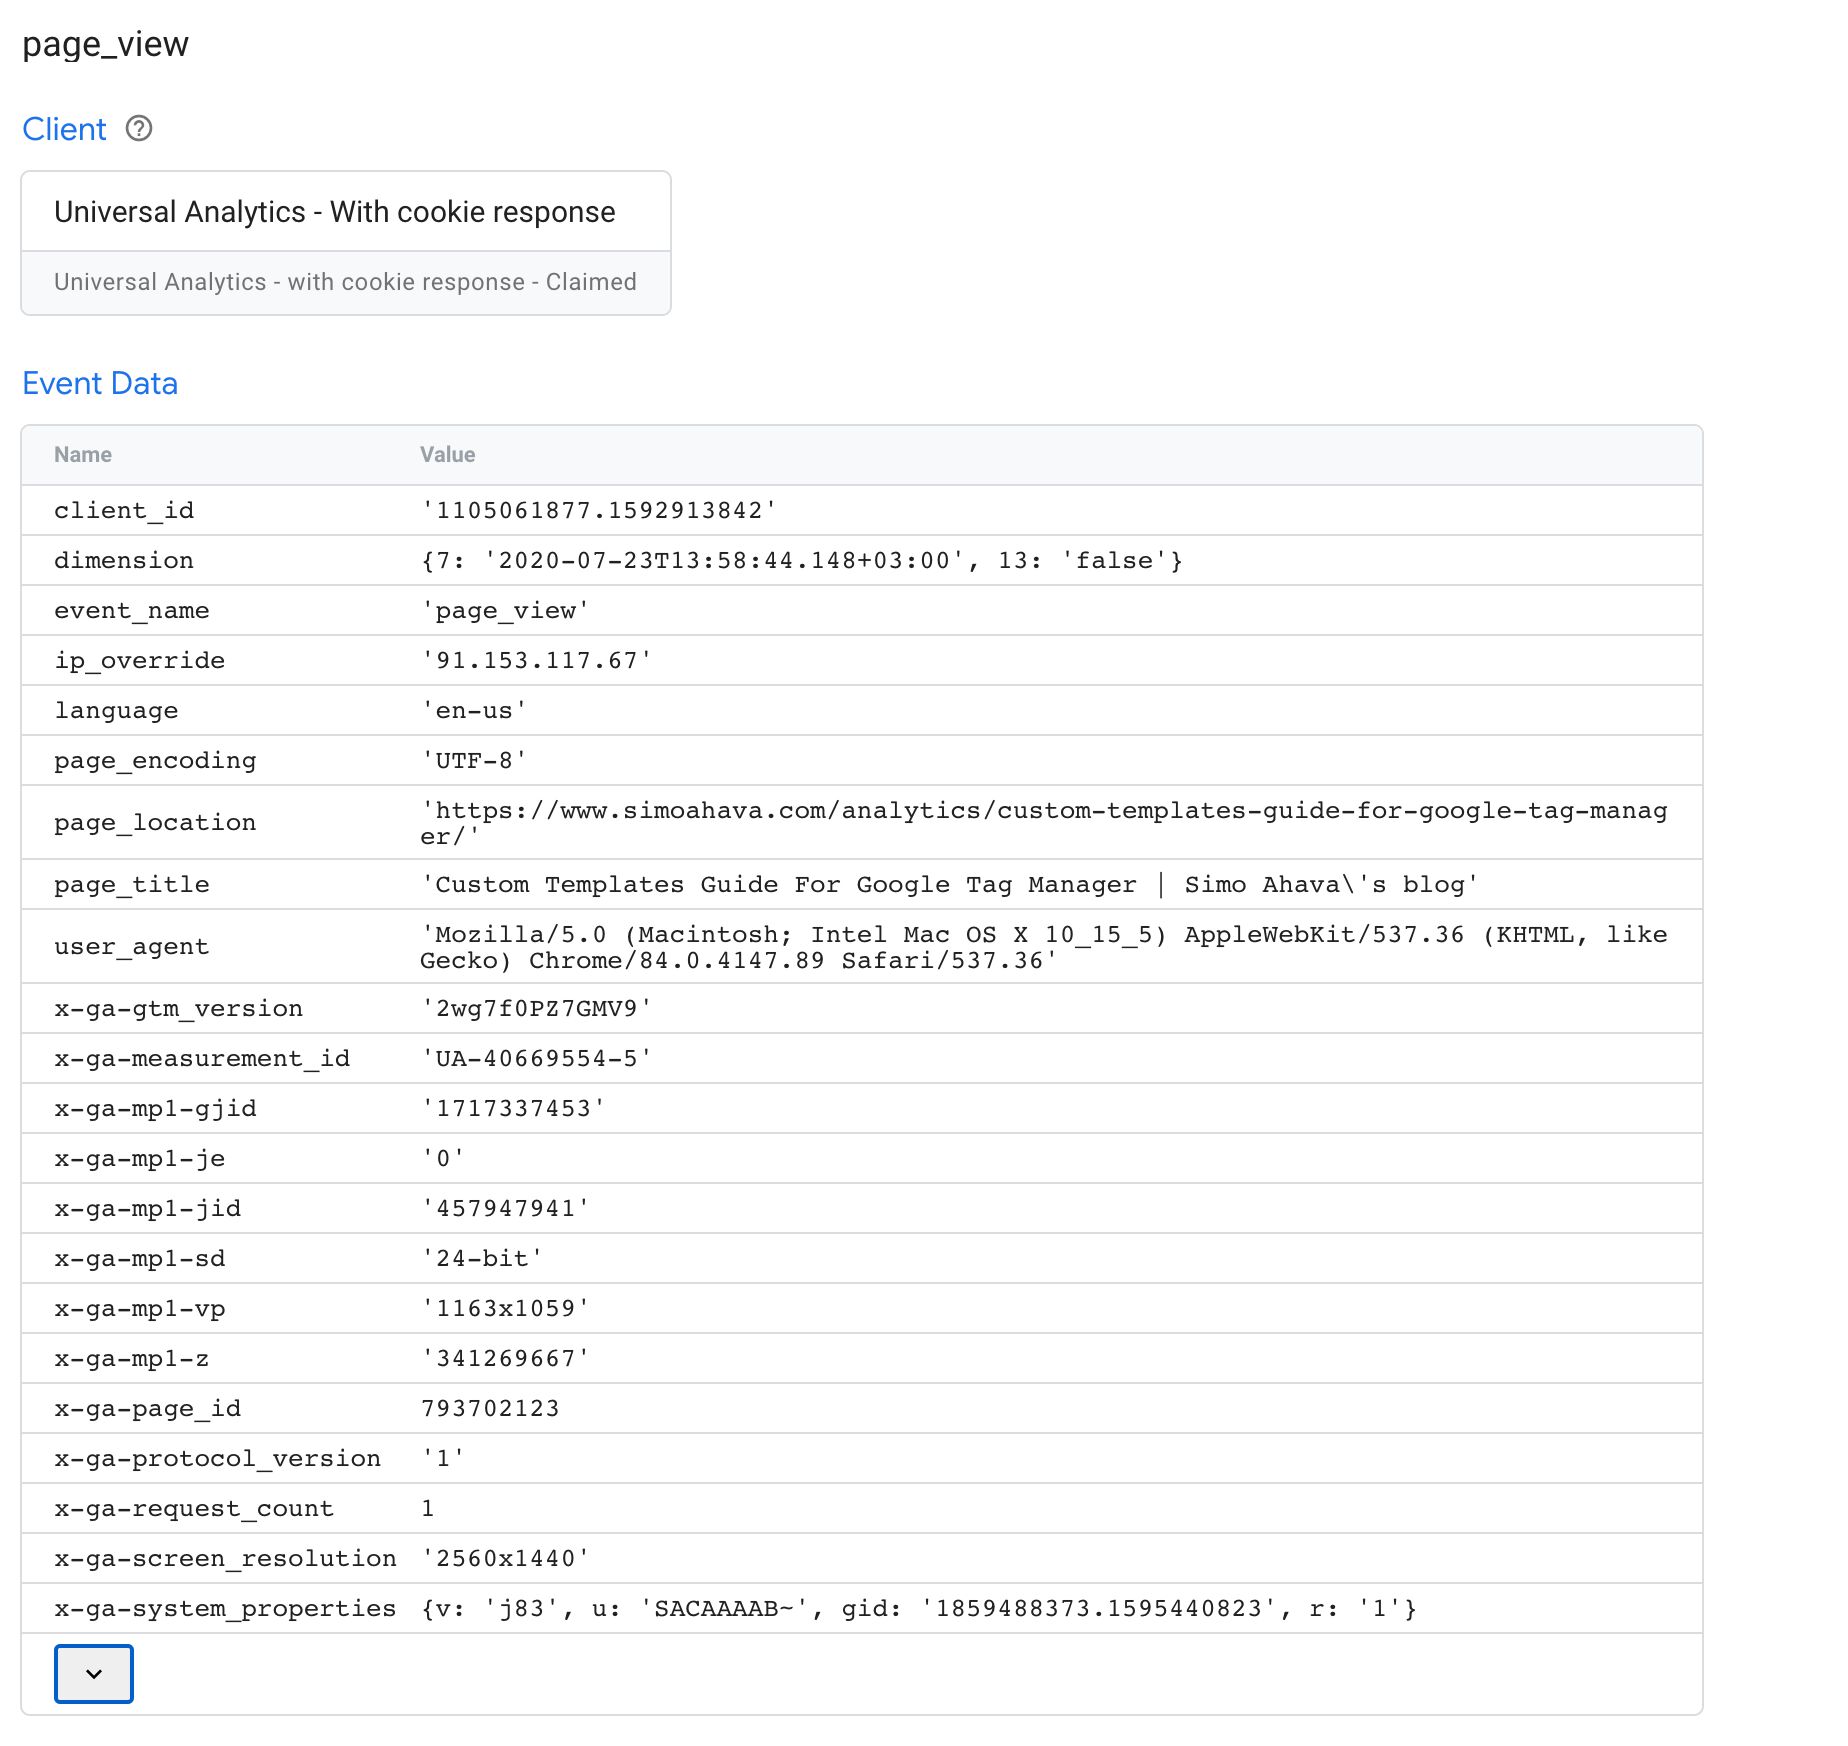
You can always use the Server container’s Preview mode to audit what’s passed in the event data object by any given client. For example, when collecting a Universal Analytics Measurement Protocol hit, this is what you might see:
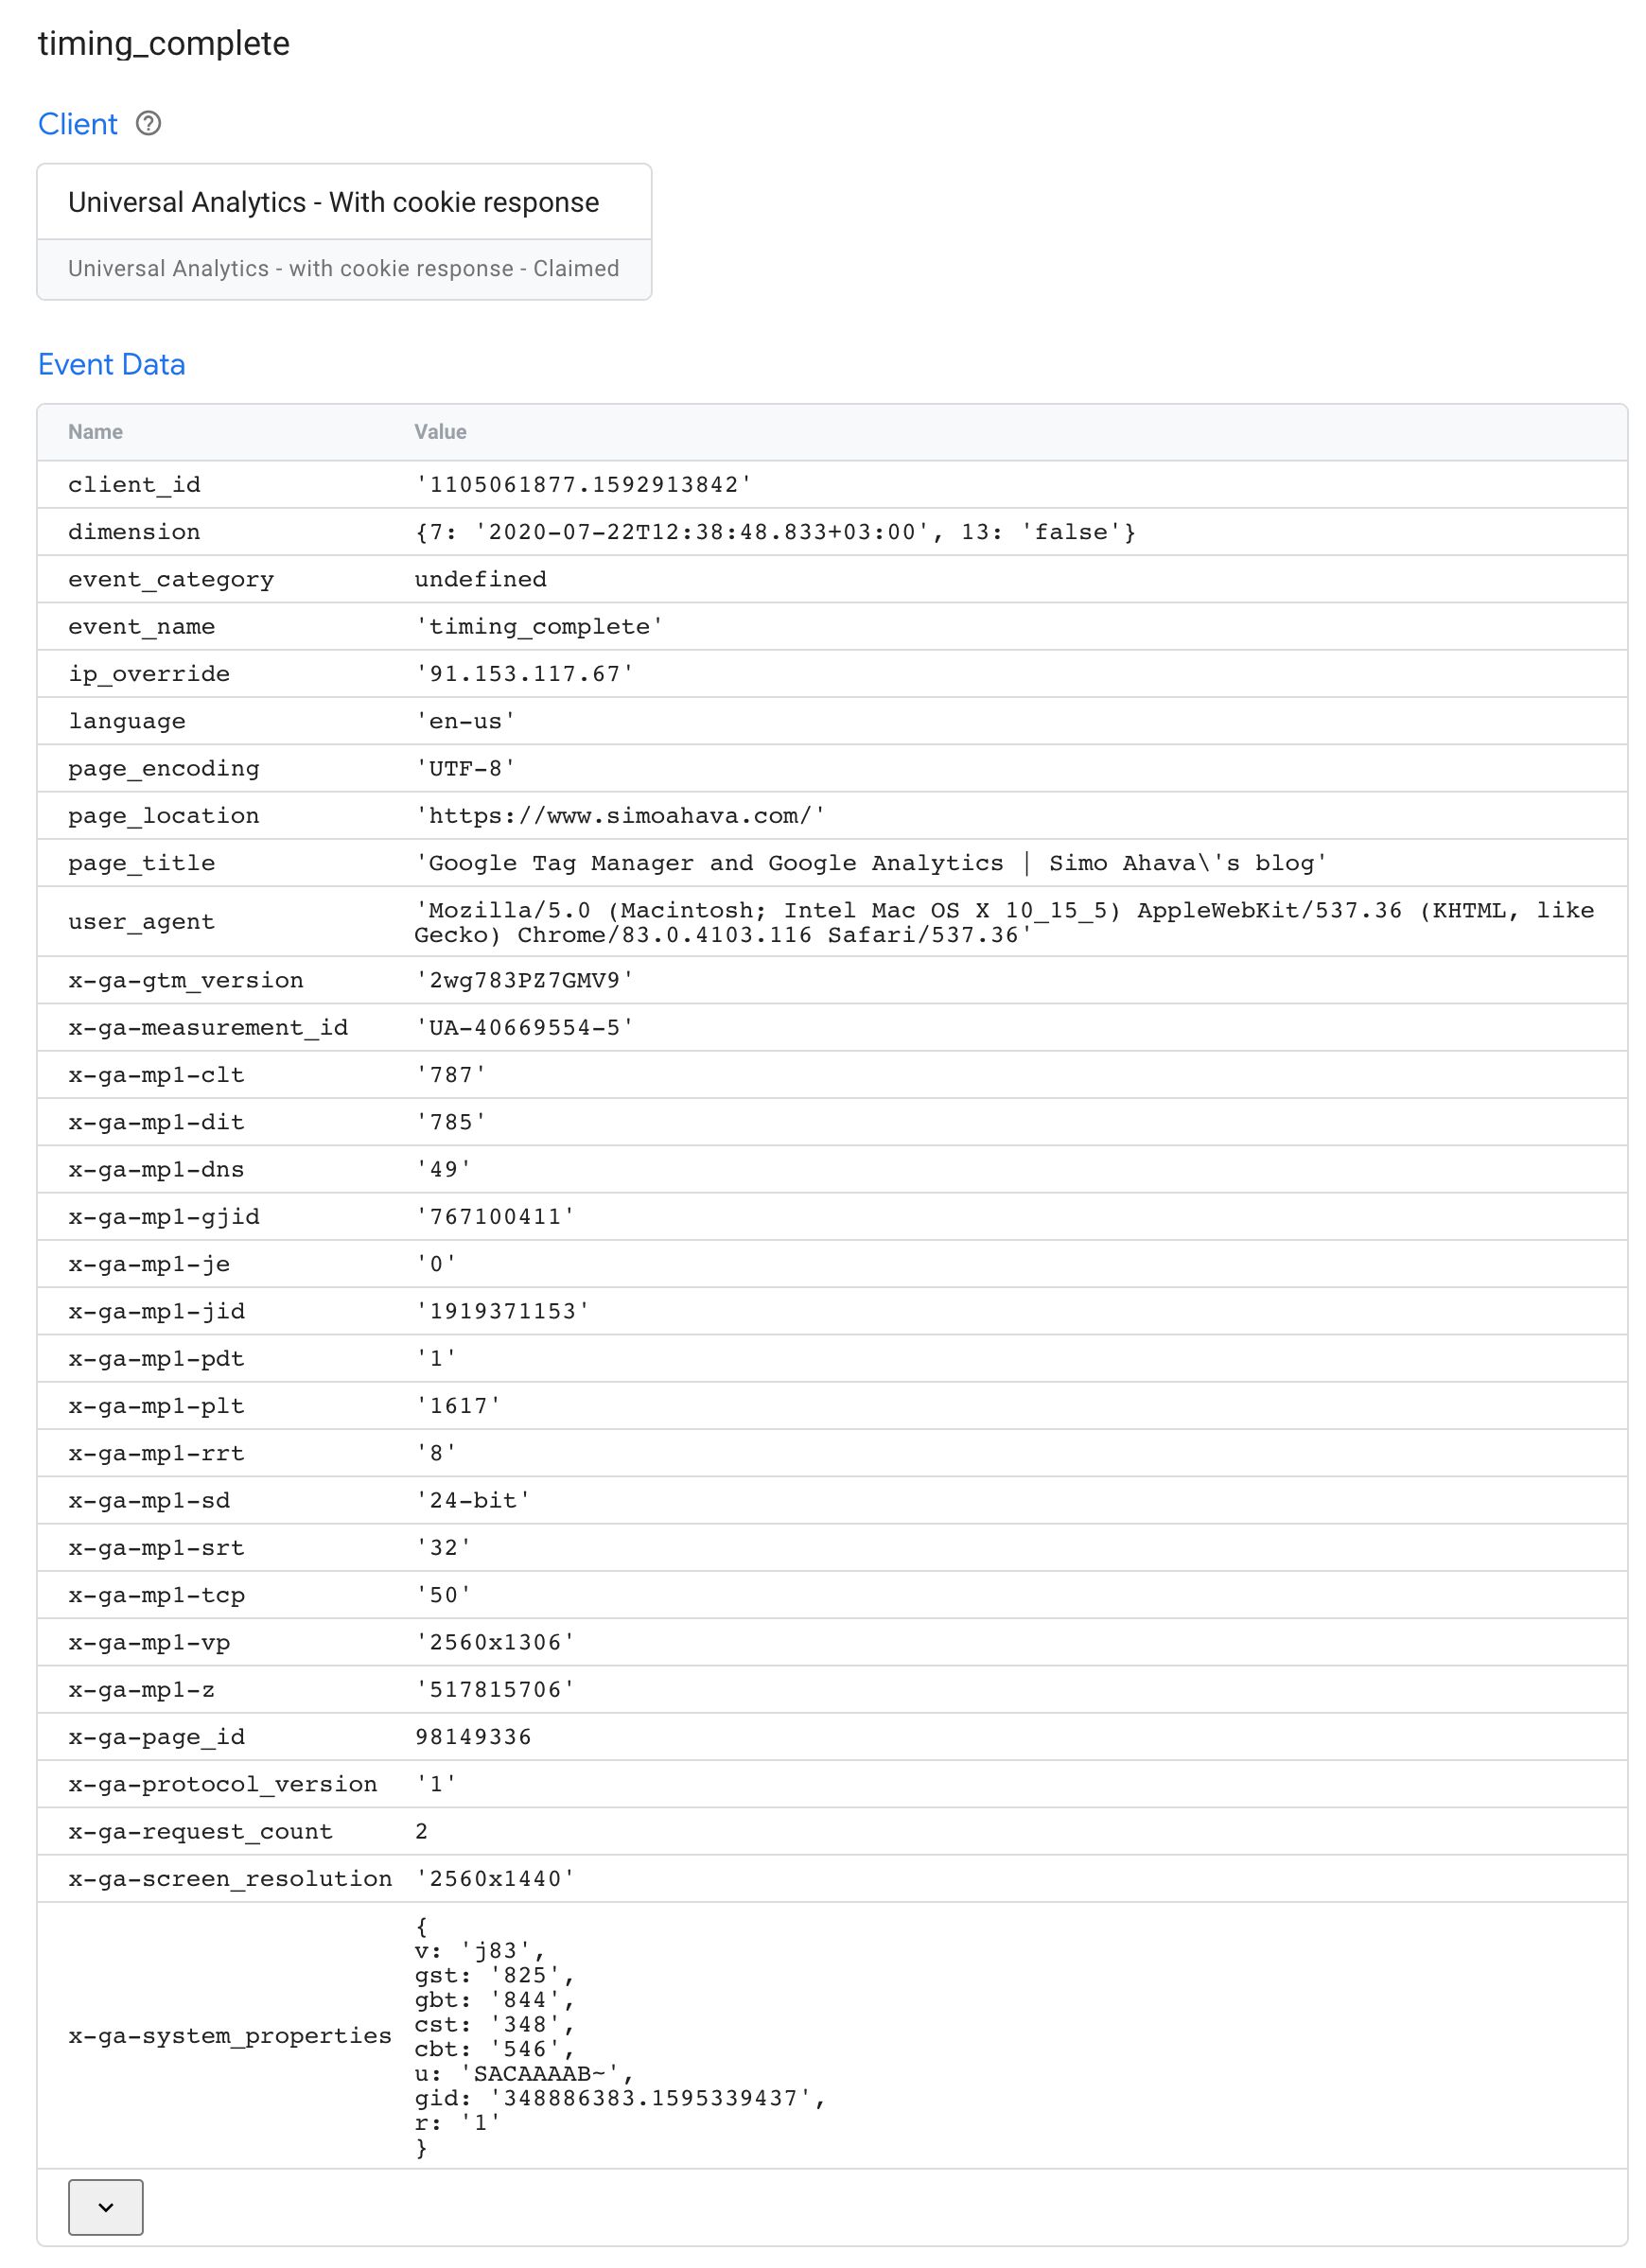
In the example above, many standard parameters are populated, such as client_id, ip_override, page_location, and user_agent.
Additionally, Measurement Protocol uses a number of custom parameters that are (more or less) unique to Google Analytics, such as x-ga-mp1-vp (viewport size), x-ga-measurement_id (web property ID with Universal Analytics), and x-ga-mp1-plt (page load time).
This event object is then digested by the Universal Analytics tag, which will be able to take these items and compile the outgoing Measurement Protocol request to Google Analytics. If the event object is correctly compiled, the tag can even utilize the shorthand API sendEventToGoogleAnalytics.
Custom templates
Server-side tagging relies heavily on custom templates. In addition to tag and variable templates, which are available in web containers as well, power users now have the opportunity to create Client templates as well.
The available APIs for these are listed in the documentation. Many APIs, such as runContainer have a footnote saying:
It is recommended that this API be used from a client template.
Roughly, Clients should typically utilize APIs that claim, validate, and parse the incoming HTTP requests, run the container with the event data object, listen for messages from the tags fired in the container, and finally modify and return a response back to the source of the incoming request.
Here are some APIs that you’d typically run exclusively from a Client:
| Client API | Description |
|---|---|
claimRequest | Claim the request for the Client. |
extractEventsFromMpv1 | Parse an incoming Measurement Protocol v1 request, and extract event data objects from it. |
extractEventsFromMpv2 | Parse an incoming Measurement Protocol v2 request, and extract event data objects from it. |
getCookieValues | Get the values of all cookies with the given name in the incoming HTTP request. |
getRemoteAddress | Best-effort attempt to get the IP address of the incoming request. |
getRequest* | All the getRequest... APIs are designed to parse some aspect of the incoming HTTP request. |
isRequestMpv1 | Check if the incoming HTTP request is in Measurement Protocol v1 format. |
isRequestMpv2 | Check if the incoming HTTP request is in Measurement Protocol v2 format. |
returnResponse | Return the HTTP response with all the set headers back to the source of the incoming request. |
runContainer | Run the container with the event data object. |
setCookie | Populate a Set-Cookie header in the response. |
setPixelResponse | Automatically set response headers to mimic a 1x1 GIF pixel. |
setResponse* | All the setResponse... headers modify some aspect of the HTTP response finally flushed by the returnResponse API. |
Note that you certainly can use some of these APIs in tags. For example, you could set aspects of the response directly in the tag itself. However, it might make sense to have tags communicate their status back to the Client with the
sendMessageAPI, and use the Client to manage all aspects of the request-response flow.
Tags should typically utilize APIs that parse the event data object, build an HTTP request to the tag endpoint, and message back to the container whatever metadata the outgoing request produced (such as a failed status code or success message).
Here are some APIs that you’d typically run exclusively from a Tag:
| Tag API | Description |
|---|---|
getAllEventData | Get the event data object passed to the container. |
getClientName | Get the name of the current Client. |
getEventData | Get the value of a single key in the event data object. |
sendEventToGoogleAnalytics | Automatically build and dispatch an outgoing Measurement Protocol request from an event data object formatted correctly. |
sendHttpGet | Send an HTTP GET request. |
sendHttpRequest | Send a fully customizable HTTP request. |
Note that you could run a Server container without a single tag. All the APIs designed to be used in tags could be run through a Client. But this is orthogonal to how Server-side tagging has been designed to work.
Here’s an example of a Client running some of the recommended APIs:
const addMessageListener = require('addMessageListener');
const claimRequest = require('claimRequest');
const extractEventsFromMpv1 = require('extractEventsFromMpv1');
const isRequestMpv1 = require('isRequestMpv1');
const returnResponse = require('returnResponse');
const runContainer = require('runContainer');
const setResponseBody = require('setResponseBody');
const setResponseHeader = require('setResponseHeader');
const setResponseStatus = require('setResponseStatus');
const setPixelResponse = require('setPixelResponse');

// If Measurement Protocol request, claim and parse
if (isRequestMpv1()) {
  claimRequest();
  const events = extractEventsFromMpv1();

  // Listen for message from tag signalling completion,
  // set response headers accordingly.
  addMessageListener('ga_complete', (messageType, message) => {
    if (message.status === 'error') {
      setResponseStatus(500);
      setResponseBody(message.body);
    } else if (message.status === 'redirect') {
      setResponseStatus(302);
      setResponseHeader('location', message.location);
    } else {
      setPixelResponse();
    }
  });

  // Run the container with the parsed event object
  let eventsCompleted = 0;
  events.forEach(event => {
    runContainer(event, () => {
      // If all the events in the incoming HTTP request have been completed
      if (events.length === ++eventsCompleted) {
        returnResponse();
      }
    });
  });
}
And here’s what the corresponding tag might do:
const getAllEventData = require('getAllEventData');
const sendEventToGoogleAnalytics = require('sendEventToGoogleAnalytics');
const sendMessage = require('sendMessage');

// Access the event data object
const event = getAllEventData();

// Send the event to Google Analytics and parse the response
sendEventToGoogleAnalytics(event, response => {
  if (!response.success) {
    sendMessage('ga_complete', {
      status: 'error',
      body: 'Request to Google Analytics failed'
    });
    return data.gtmOnFailure();
  }
  if (response.location) {
    sendMessage('ga_complete', {
      status: 'redirect',
      location: response.location
    });
  } else {
    sendMessage('ga_complete', {
      status: 'success'
    });
  }
  data.gtmOnSuccess();
});
As you can see, the Client parses the incoming request and sends it as an event data object to the container. The container then triggers the tag(s), which map the event data object to a Measurement Protocol request.
Google Analytics is a bit special in this case, because both the incoming request parser (extractEventsFromMpv1) and the outgoing request dispatcher (sendEventToGoogleAnalytics) have their own, dedicated APIs built. If you use a custom vendor endpoint, you need to actually manually write the code that turns an incoming request query string into the event data object, and which takes the event data object and maps it to an outgoing HTTP request.
The addMessageListener and sendMessage APIs are very useful, as they allow tags and Clients to communicate with each other. This is very helpful, in case you want the Client to encode information about tag execution in the response back to the request source.
Note! The sample code above is a bit unwieldy, because it assumes
runContainerto only trigger one tag. If there’s more than one tag firing, theaddMessageListenercallback would react to each tag messaging back, which means only the message from the last tag that fired would be considered for the response the Client sends back to the source of the incoming request.
Preview and debug
The Server container, just like a web container, has its own Preview and Debug mode. When you click the Preview button in the user interface, a new tab opens with the Preview interface.
Just like with a web container, the Preview tab only shows hits that originate from your browser - and it has to be the same browser instance that started Preview mode.
If you want to manually force hits to appear in Preview mode (for example when dispatching them server-to-server or when testing with
curl), you need to add a custom header to those requests. You can find instructions on how to add the custom header in this article.
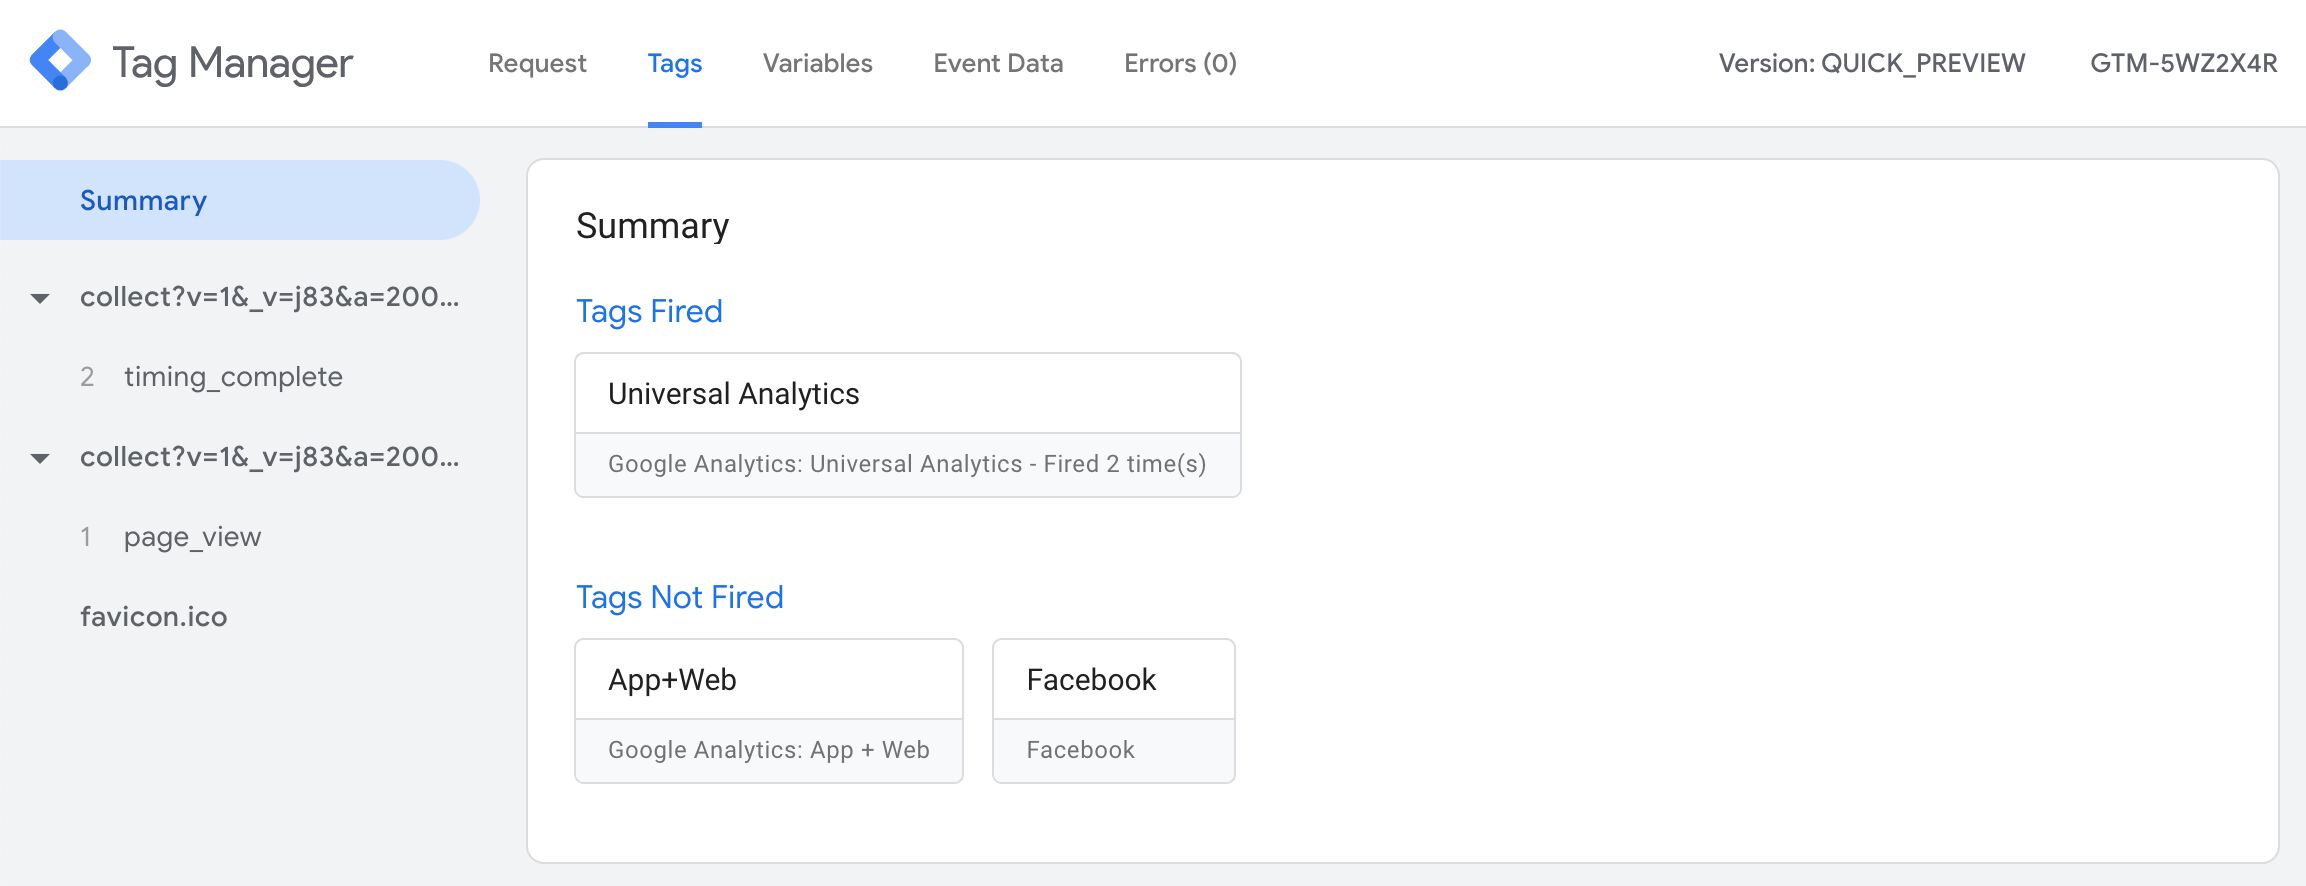
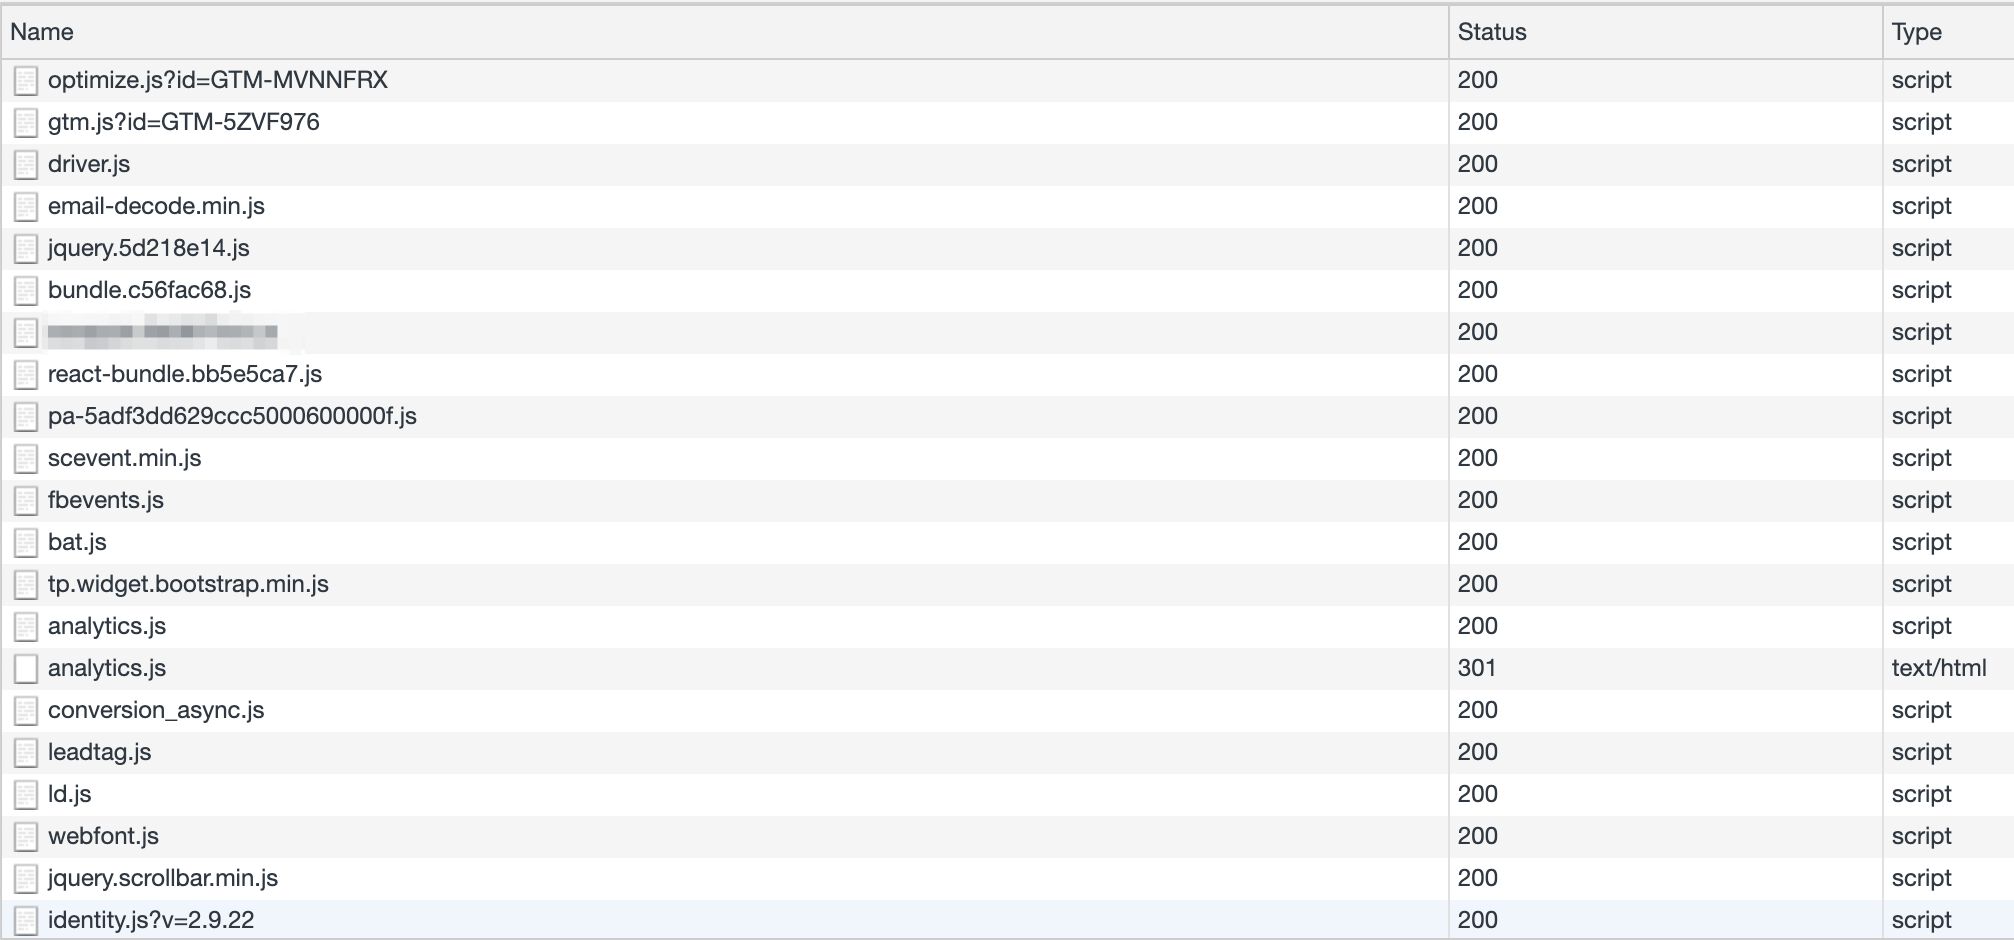
In the left-hand side navigation, you see all the incoming HTTP requests and whether or not a Client has claimed and created an event data object from the request. In the screenshot, no event data object was created for the favicon.ico request, but both collect requests were claimed by a Client and turned into event data objects.
If you select a request, all the tabs in Preview mode will behave as if you’d selected Summary. In other words, you’ll be able to see how many times a tag would have fired for the request, but you wouldn’t be able to look into Variables or Event Data.
For this reason, whenever you debug, you should choose the event data object (e.g. page_view in the example) if available.
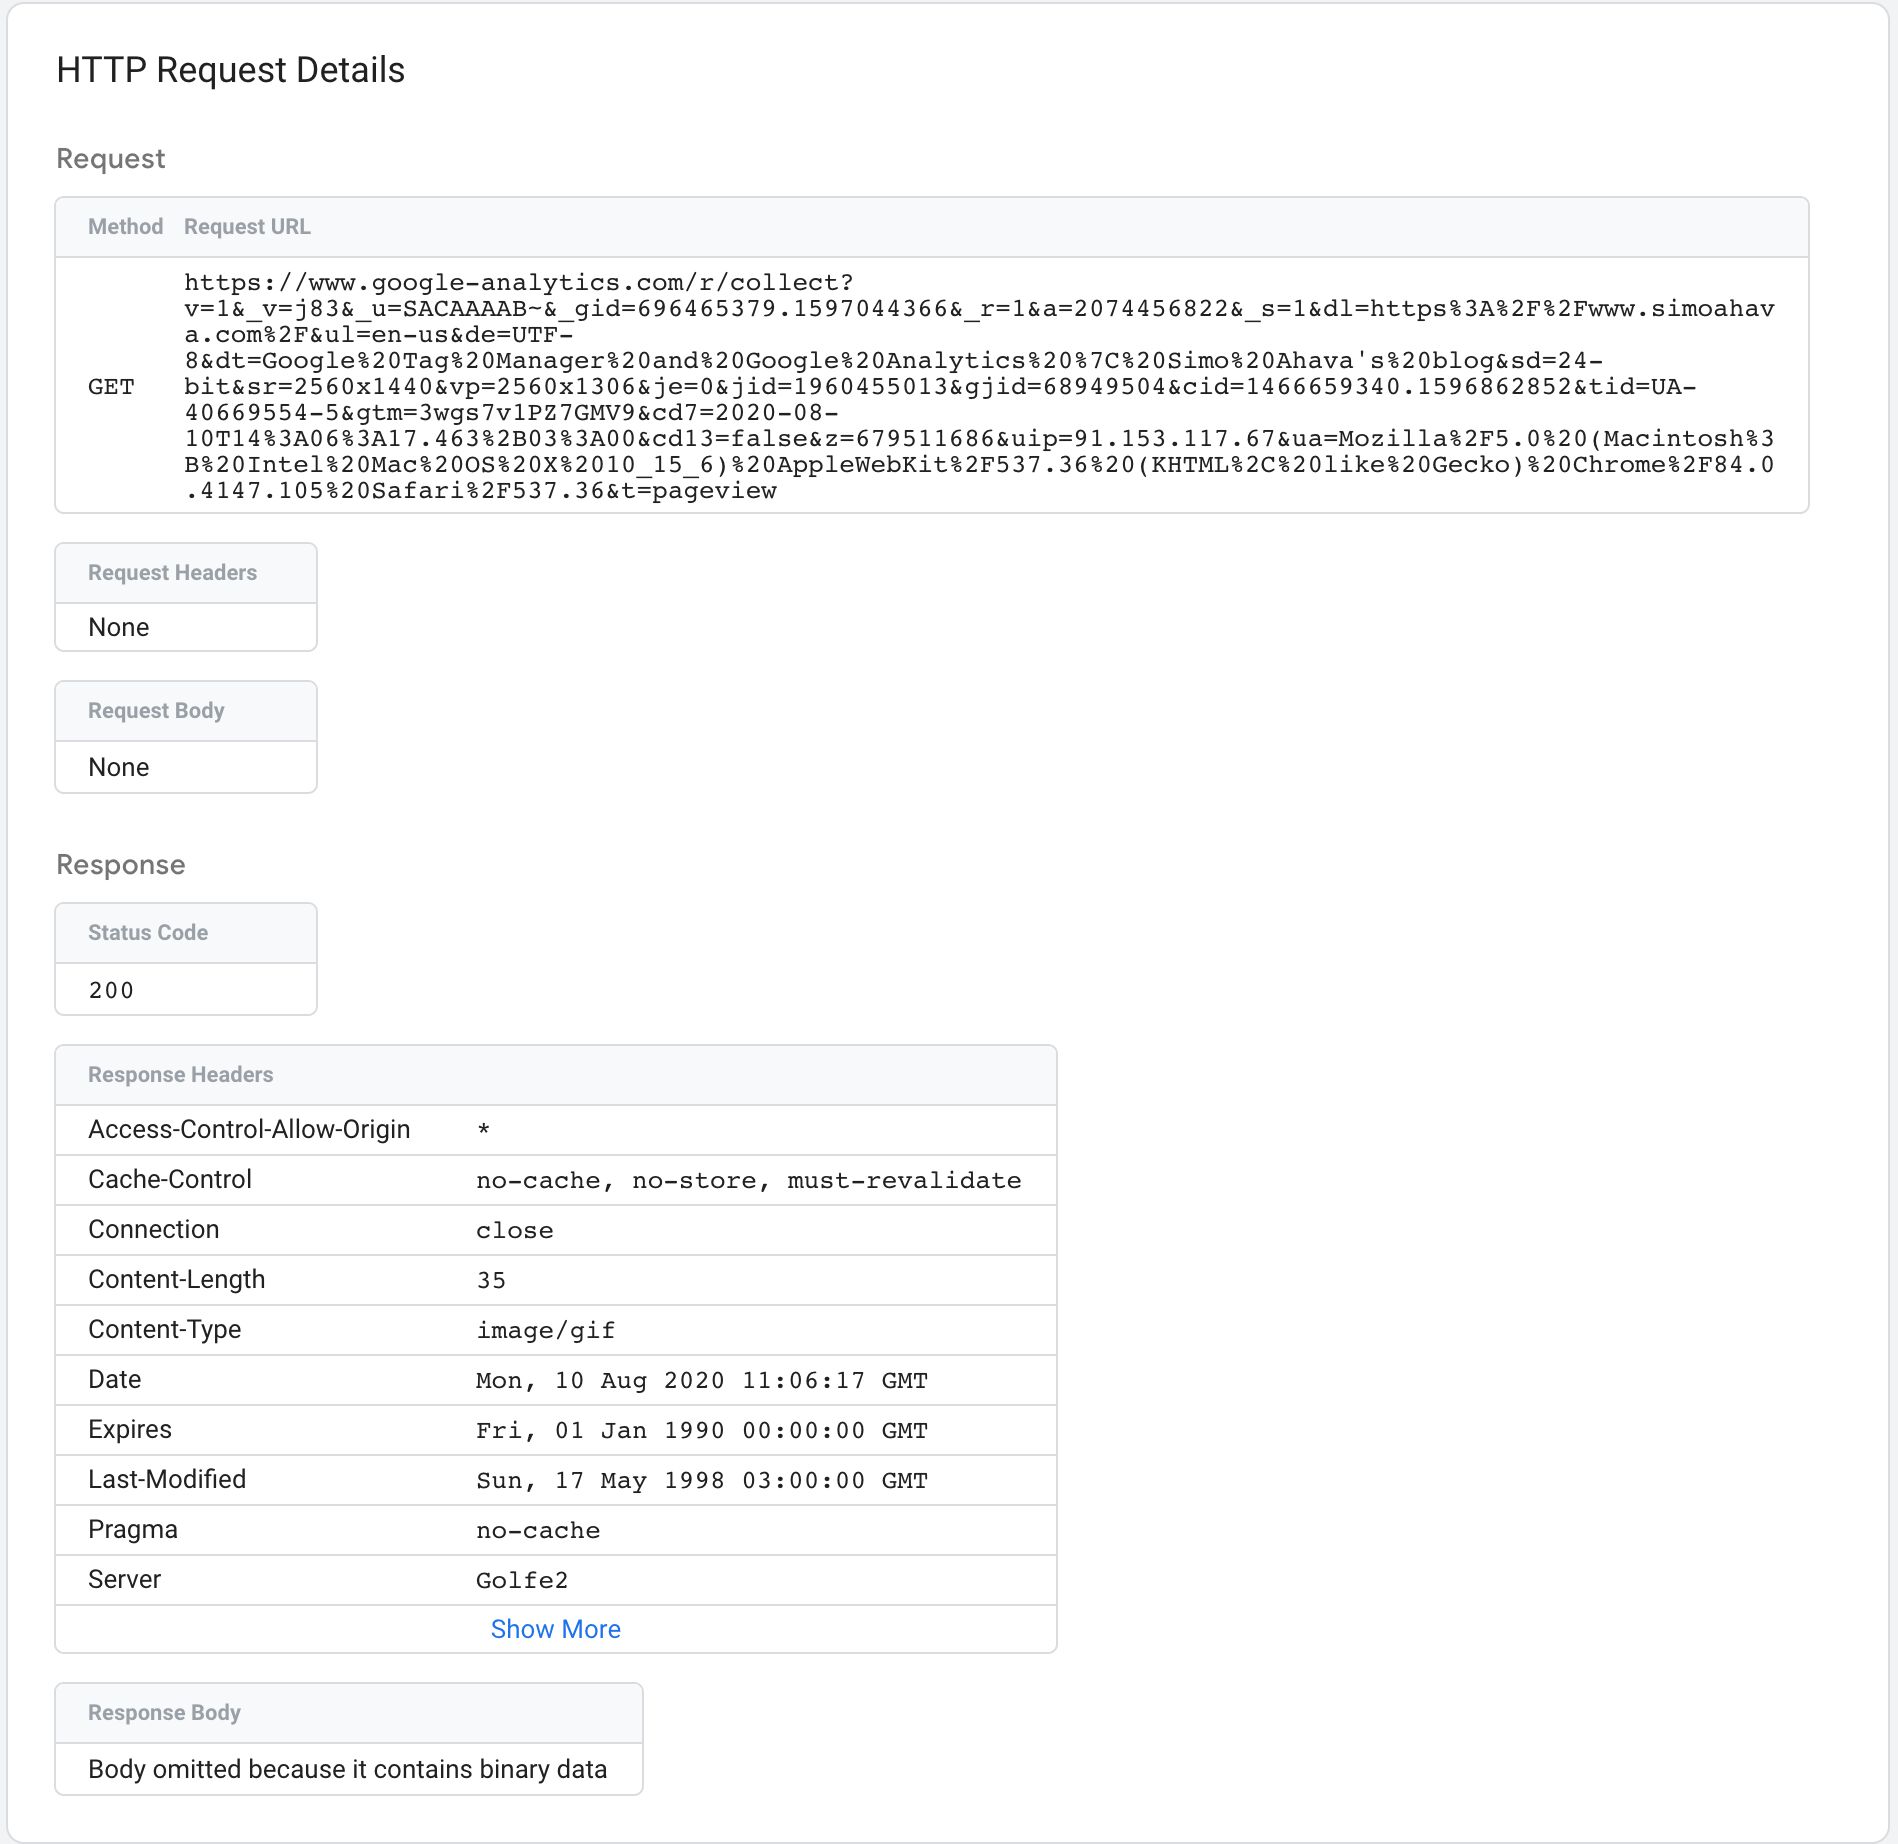
Request tab
The Request tab contains information about the incoming HTTP request and the response sent back by the Server container. It will also show you if a Client claimed the request.
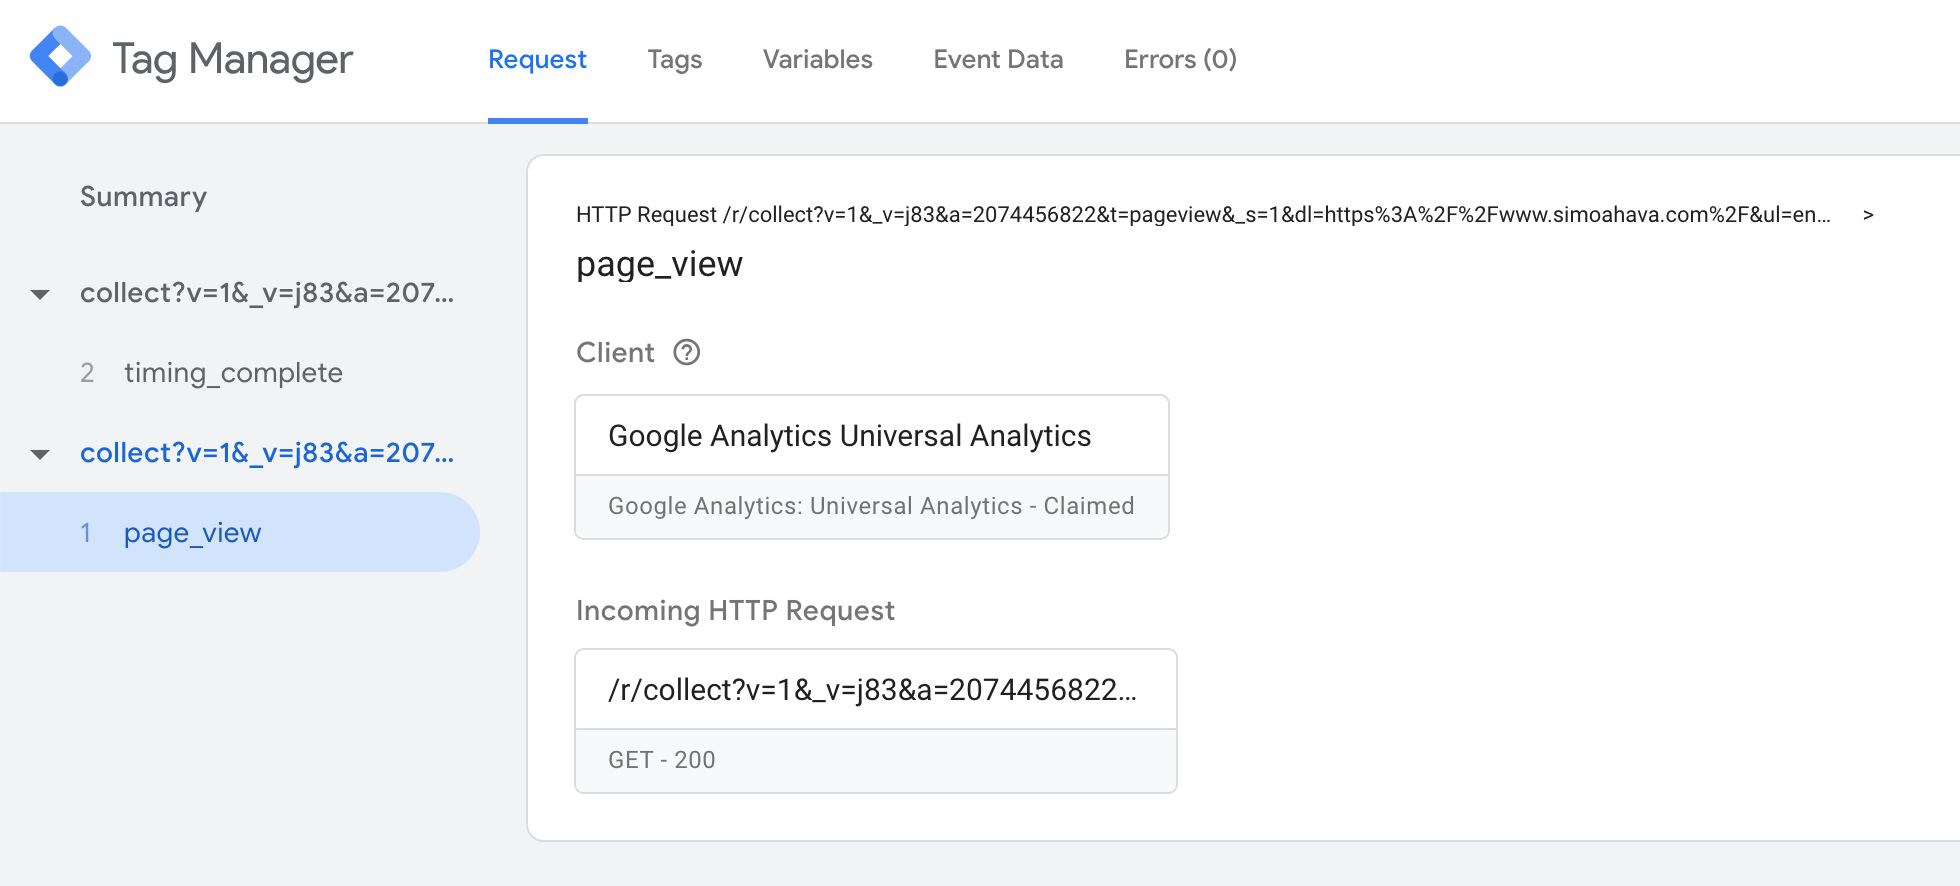
The very first line contains a summary of the HTTP request itself. After that is the value of the event_name field, parsed by the Client from the incoming HTTP request.
The Client box tells you which Client claimed the request.
The Incoming HTTP Request box opens up a new overlay when clicked, with details about the request.
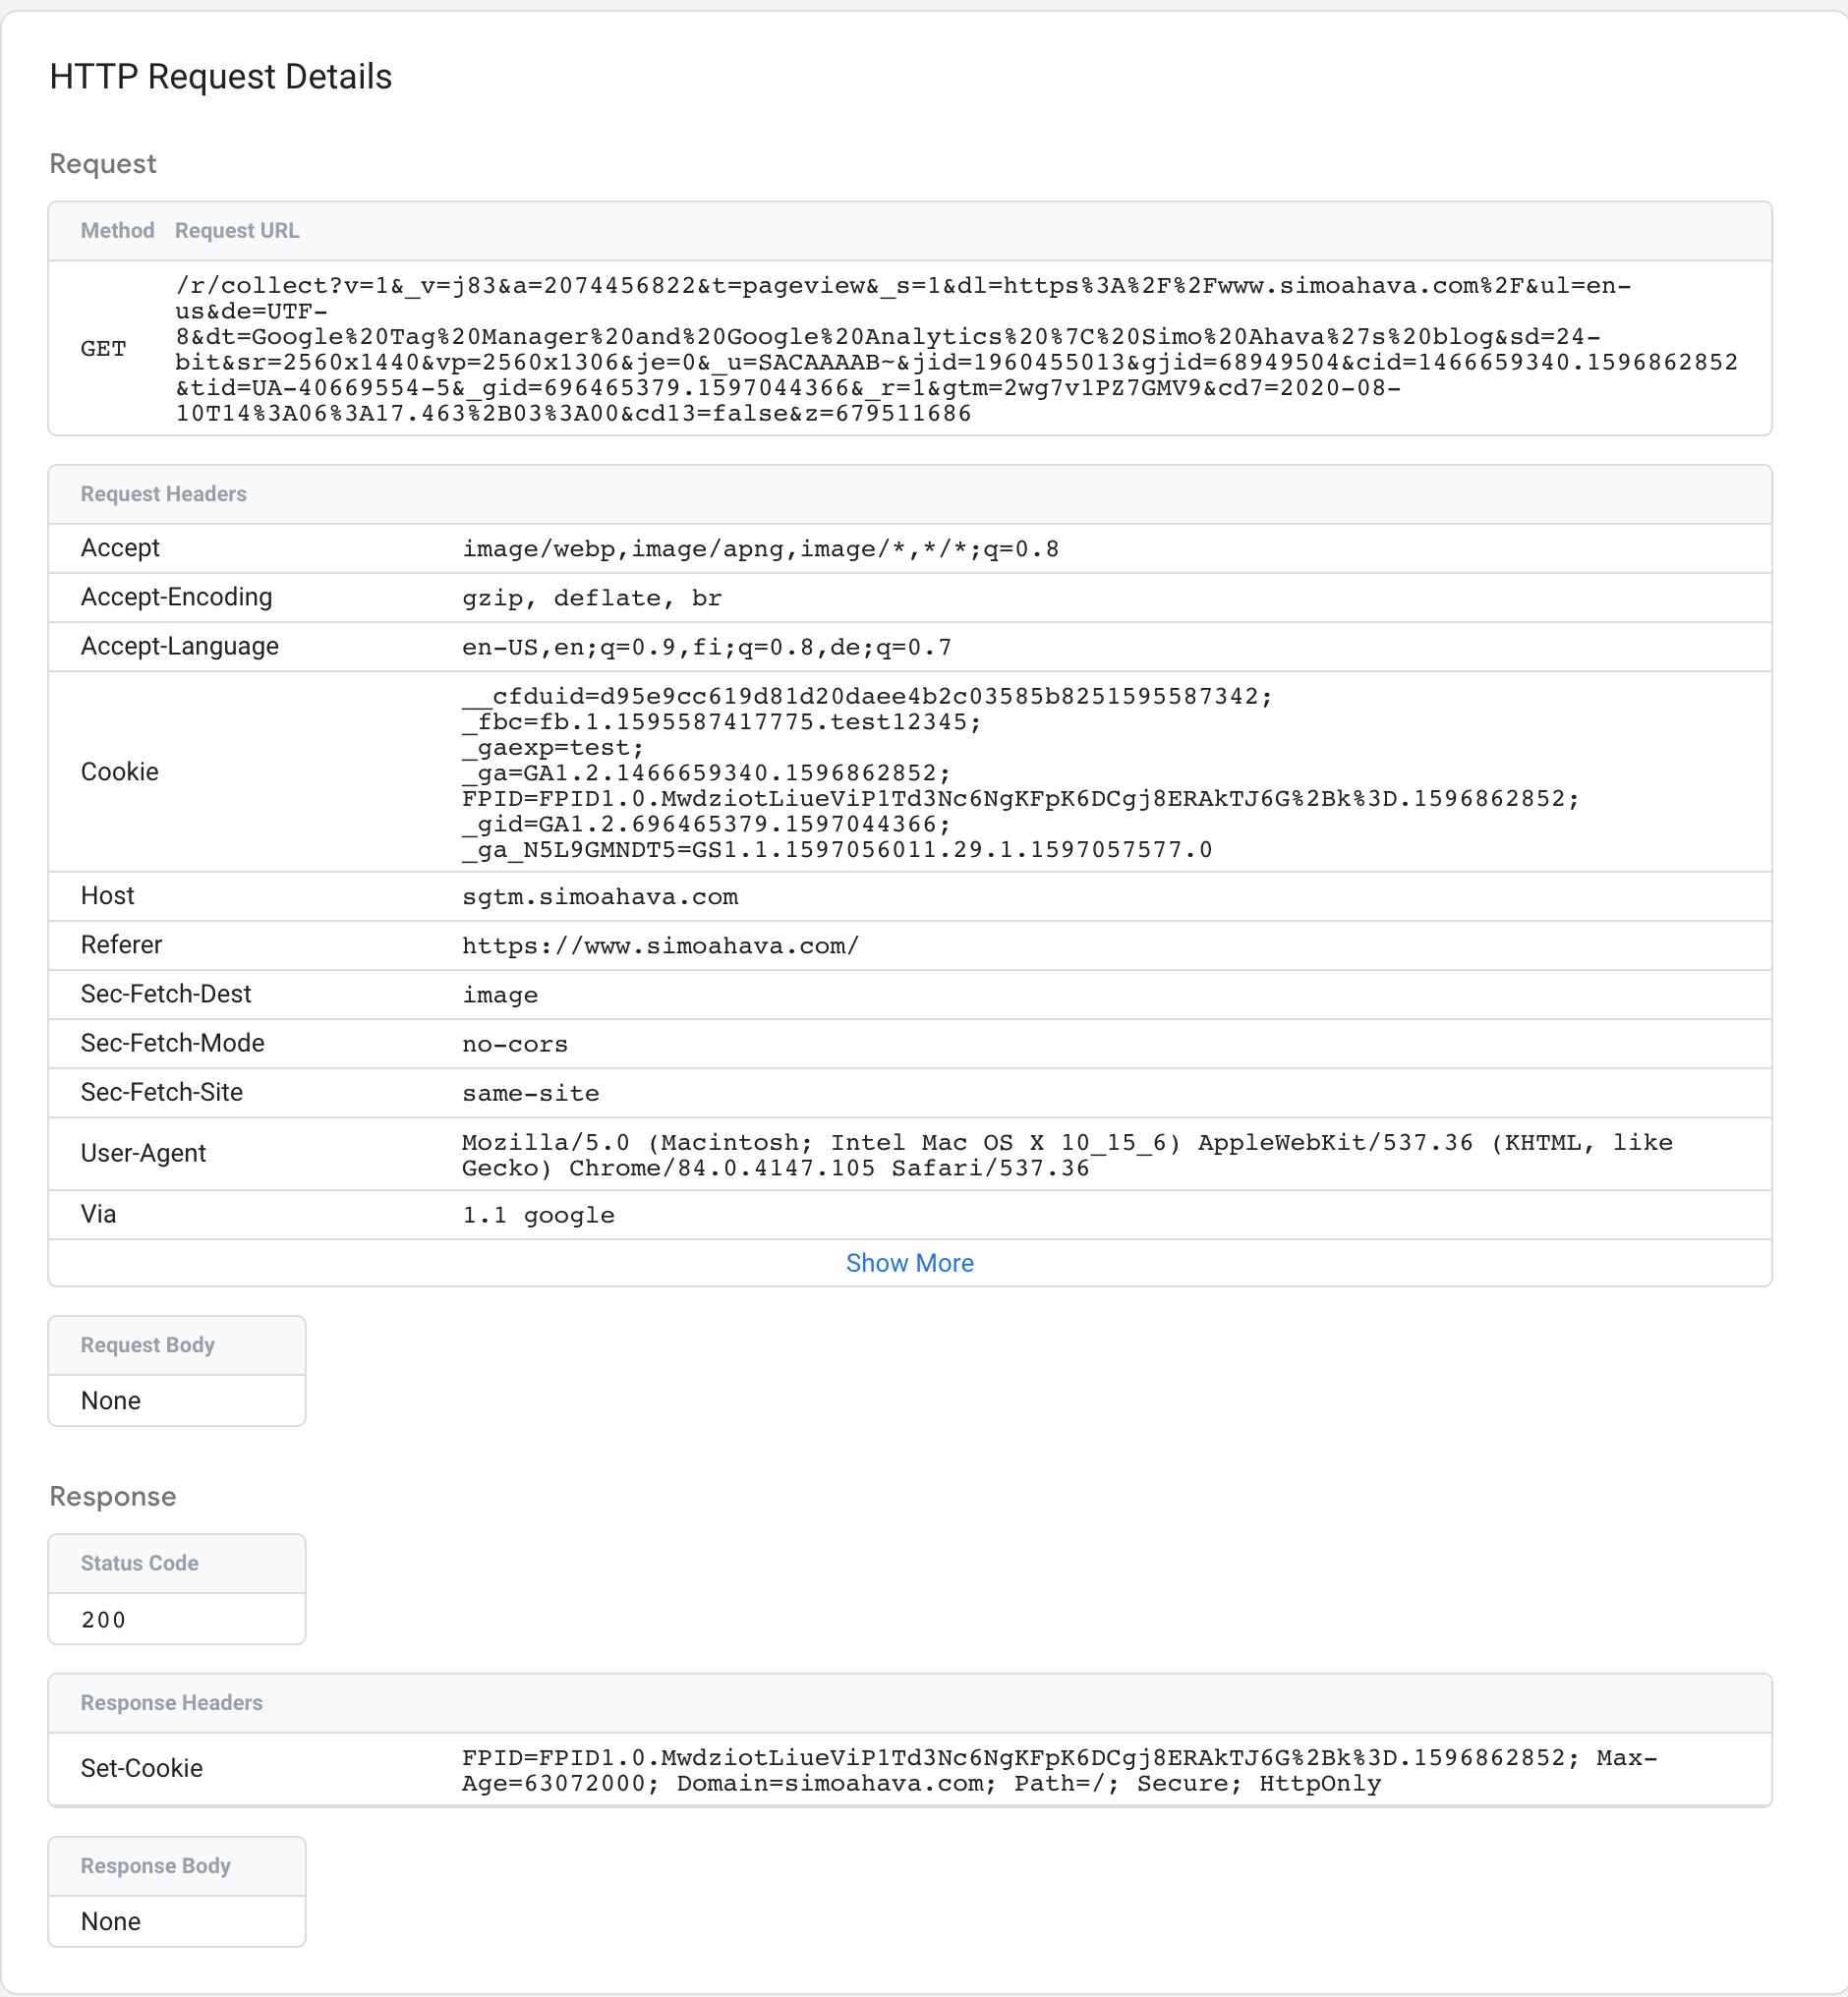
The Request overview shows you the Request method (e.g. GET or POST), and the URL to which the request was sent.
Request Headers list all the HTTP headers present in the request, and the Request Body card shows what was sent as the body of the request (typically just in POST requests).

The Response overview has details about what the Server container responded with back to whatever source sent the incoming HTTP request in the first place.
Status Code indicates whether or not the request was a success (200).
Response Headers typically include things like cache headers for preventing the browser from caching the request, and Set-Cookie headers which write a cookie on the domain running the Server container.
If the response has a body, it’s displayed in the Response Body card.
Tags tab
The Tags tab is pretty self-explanatory. You’ll see all the tags that fired (or did not fire) with this event data object. Similar to a web container, you can click open a tag to see what values it sent, and you can scroll down to its triggers to see why it didn’t fire.
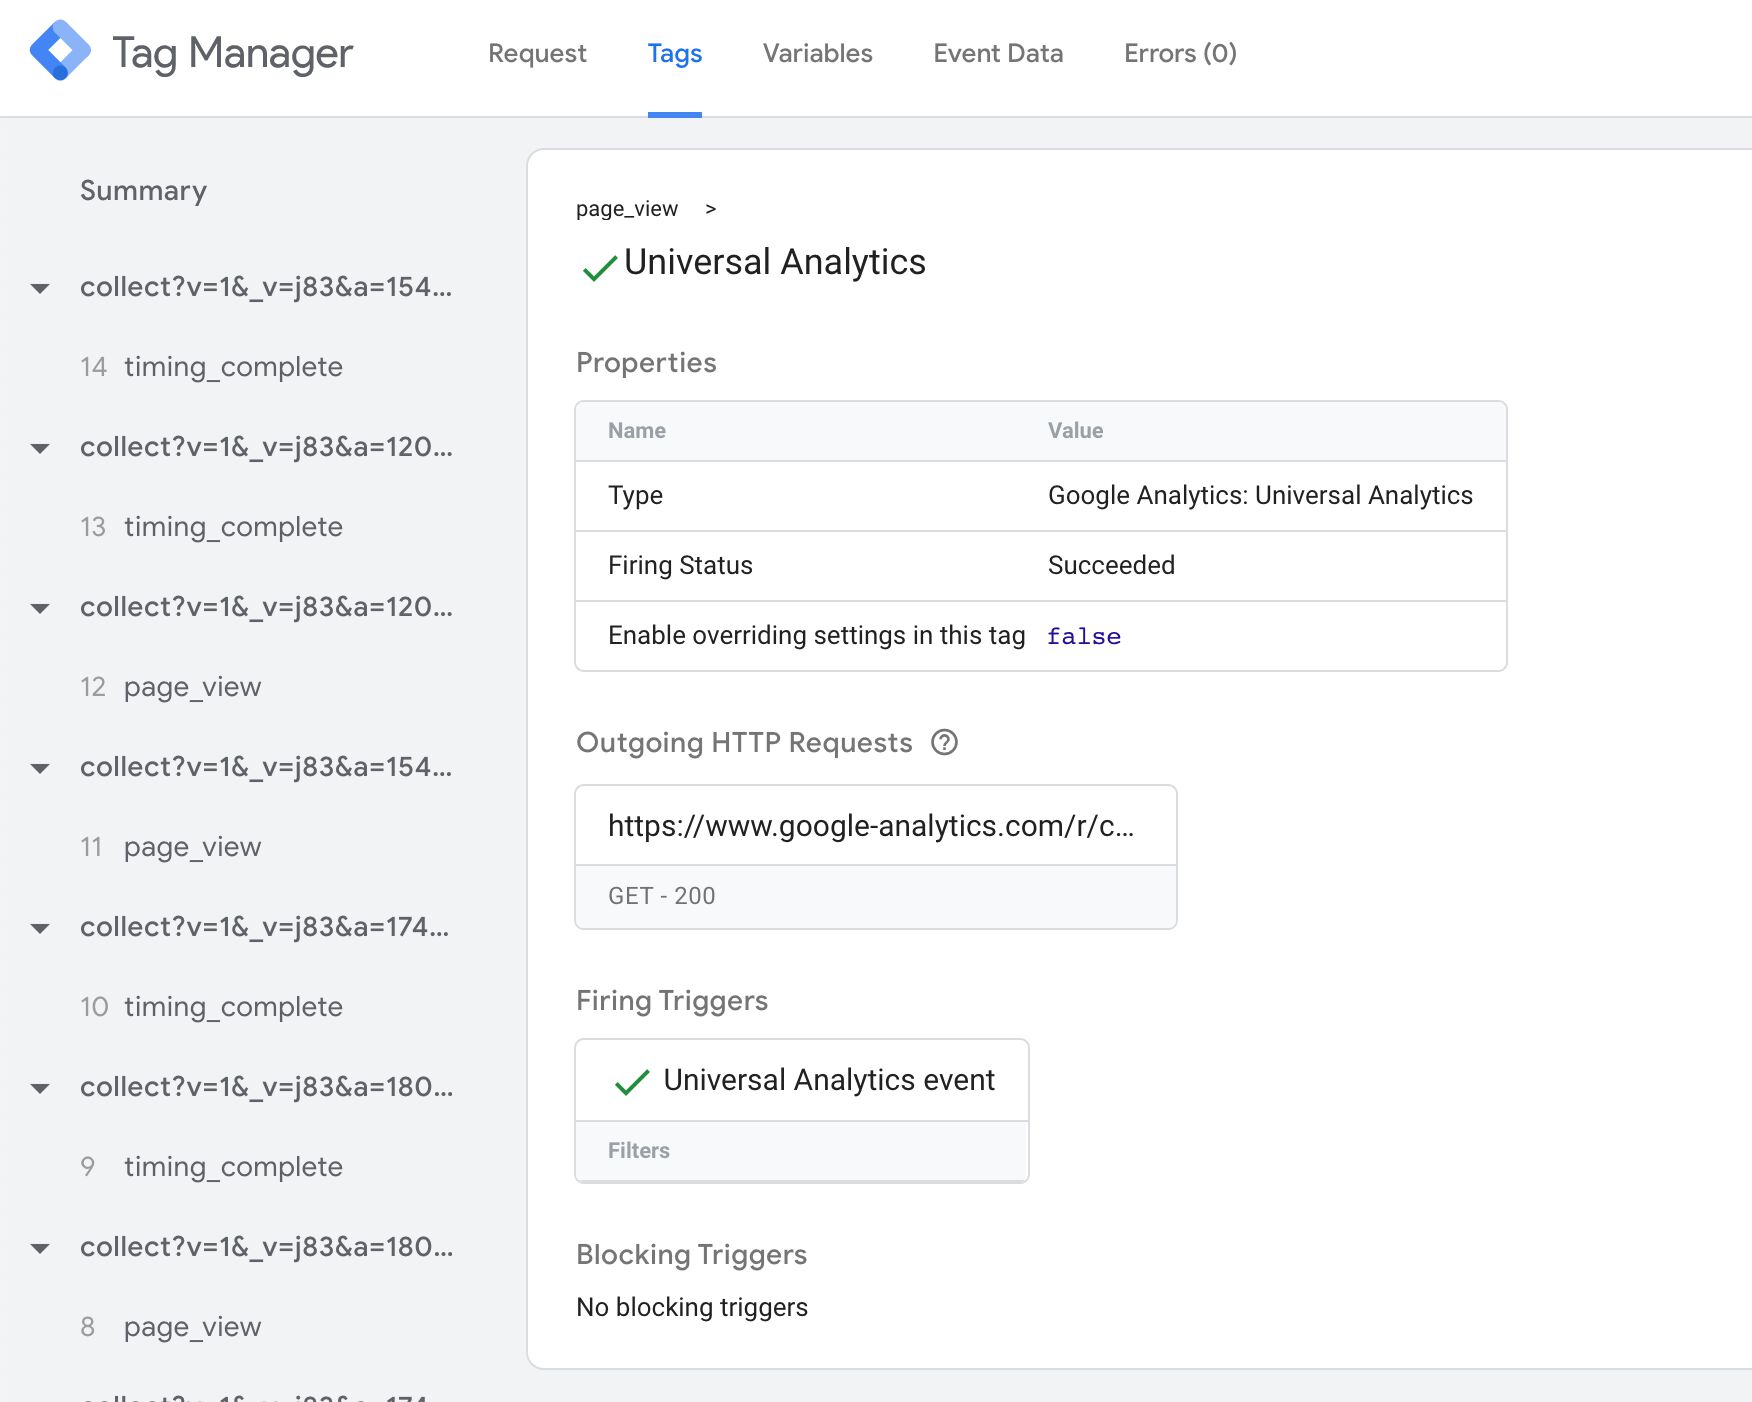
One cool addition is the Outgoing HTTP Requests box. When you click it, a new overlay opens with details about the HTTP requests sent by the tag.
You can use this information to debug whether or not the hit to the vendor was dispatched correctly.
Variables tab
The Variables tab, similarly, tells you what the value of each configured variable in the container was when the container was executed with the event data object.

This is a useful list of information, as you can use it to debug why a tag might not have sent the correct values to the endpoint.
Event Data tab
This is a very important tab to familiarize yourself with because it shows you all the values parsed from the incoming HTTP request into an event data object. You can use this with the Request tab to see which parameters might be missing or which were parsed incorrectly.
Errors tab
If any tag throws an error, this tab would have more information about it. You can read more about the errors tab.
Resources
Hopefully, this article will serve as a solid resource for you, especially when you’re getting your feet wet with Server-side tagging.
In addition to this, I’d like to direct you to the official documentation:
- Overview and deployment instructions
- Provision additional servers (minimum of three is recommended for production)
- Setup a custom domain
- API documentation for templates
- Suggested
event_namevalues and parameters in the event data object
Summary
I fully expect Google Tag Manager’s Server-side tagging to change the landscape of digital analytics. They’re not the first vendor to introduce a handy way of building server-side proxies, but they’re Google, and this service doesn’t come with a license cost.
There are obviously many concerns about Server-side tagging. Moving tracking behind the veil of the server will most certainly bristle some hairs. For this reason, I recommend you strive for absolute transparency when disclosing details about what tracking is going on either directly or indirectly in your digital assets and properties.
I’m certain we’ll see a proliferation of new custom templates introduced specifically for the Server container, and I also expect most vendors in the adtech and martech space to facilitate server-to-server communication for their pixels and data collection endpoints.
Please let me and other readers know in the comments what you think of Server-side tagging. Do let me know if there are things in this article that require clarification.
