#GTMTips: Create Facebook Pixel Custom Tag Template
After the recent release of Custom Templates for Google Tag Manager, my mind has been occupied by very little else. However, I have a nagging feeling that due to how involved the feature set is, there’s still a lot of demystifying that needs to take place before templates are fully embraced by the GTM user base.
In this article, I want to show you a concrete example of template creation. It’s going to be much more ambitious than the simple walkthrough I explored in the main guide. This time, we’ll step through creating an actual, functional template that caters to a very specific use case: the Facebook Pixel.
This article is not endorsed by Facebook or supported by them in any capacity, official or unofficial.
We’ll stop short of having a perfect representation of the Facebook pixel. However, you’ll have all the tools necessary to extend the template to cover all the features you might need and to replicate it with some other third-party vendor code.
To sweeten the deal, I’ve also created a video that goes through the motions, in case it’s easier to follow the steps that way.
I want to give special thanks Eric Burley from Google for walking me through some of the intricacies of template APIs.
XOK, OK, I have actually created the full, feature-ready Facebook Pixel Template for you to enjoy. You can find it in this GitHub repository.
The Simmer Newsletter
Subscribe to the Simmer newsletter to get the latest news and content from Simo Ahava into your email inbox!
Tip 99: Create a Facebook Pixel template
You can download the template export file here. Read this to find out how to import it into your custom templates. You don’t have to use the export file, but it might make it easier to walk through the rest of the article.
What you’ll end up with
The template has the following features:
Ability to add multiple Pixel IDs, comma-separated. The tag hit will be sent to all the Pixel IDs you specify in the list.
Support for four events: PageView, Lead, CompleteRegistration, and Custom (the Custom event will let you specify the event name in a text field that appears).
Possibility to add any Object Properties to the hit.
You can check a box to disable the Automatic Configuration of the pixel.
Step 1: Add template information
After creating a new template, this is what the Info screen looks like. Remember to enable Advanced Settings for the editor so that you can edit the Brand Name field.

Step 2: Add fields
The template will have four fields.
Field 1: Text Input named pixelId
Make sure the following field configurations are enabled for the Text Input field:
Always in summary: Checked
Display name:
Facebook Pixel ID(s)Validation rules: (see below)
Value hint:
e.g. 12345678910
For the validation rules, add two different rules:
This value cannot be empty, with Error message
You must provide a Pixel ID.This value must match a regular expression, with value
^[0-9,]+$, and Error messageInvalid Pixel ID format.
You can find the Error message by clicking to show Advanced Settings for each Validation rule.
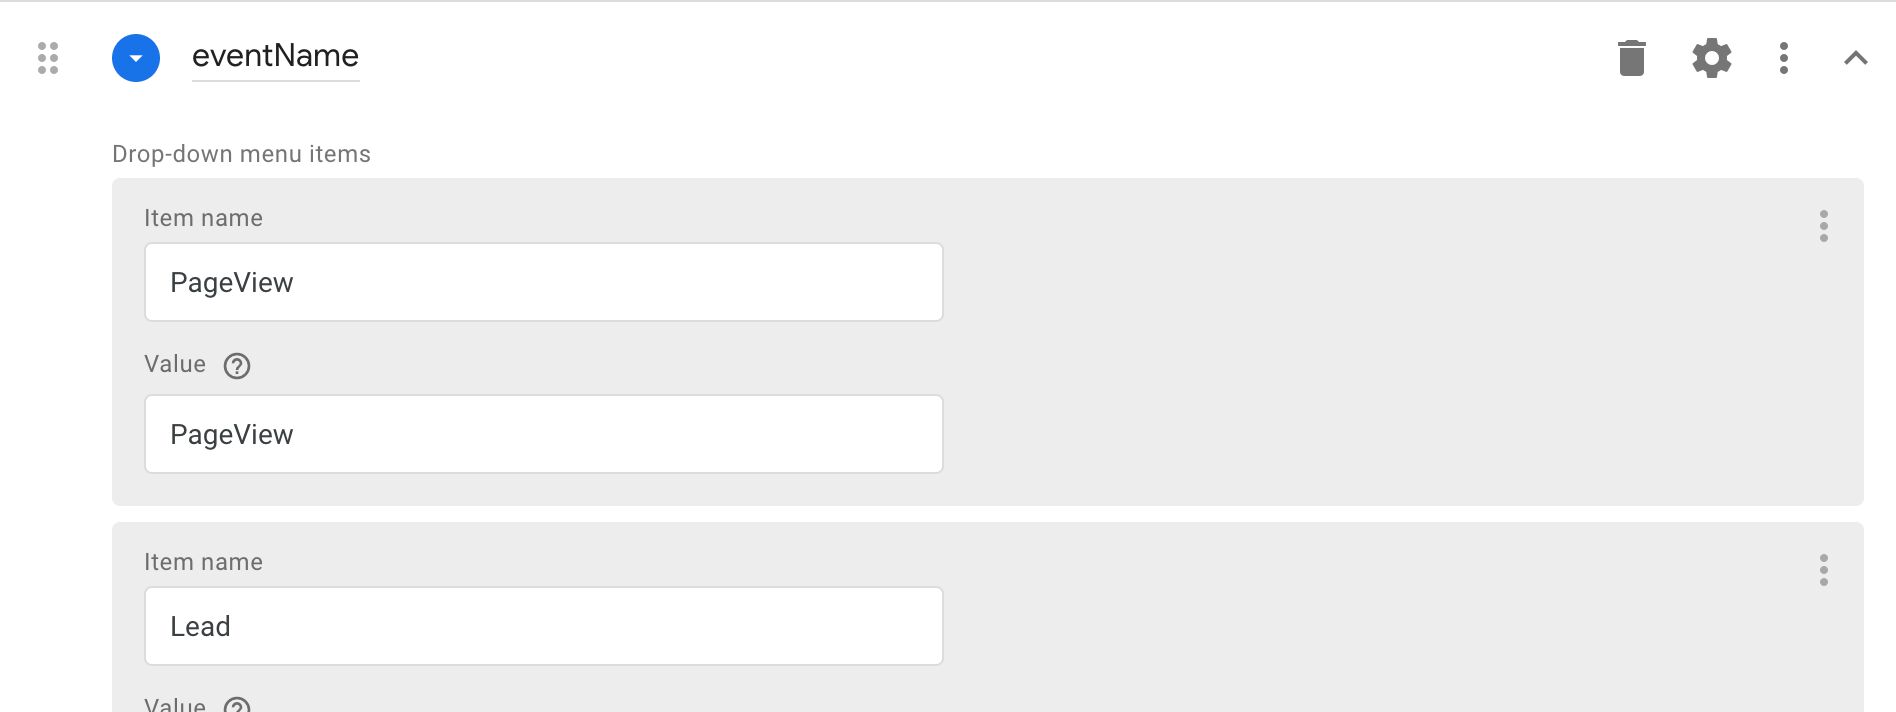
Field 2: Drop-down Menu named eventName
Make sure the following field configurations are enabled for the Text Input field:
Always in summary: Checked
Display name:
Event NameNested fields: (see below)
Add the following menu items:
Item name: PageView, Value: PageView
Item name: Lead, Value: Lead
Item name: CompleteRegistration, Value: CompleteRegistration
Item name: Custom, Value: Custom
Click Add field under Nested fields, and choose a Text Input field. Name the field customEventName, and choose the Display name and Enabling conditions field configurations for it.
Display name: Custom Event Name
Enabling conditions:
eventNameequalsCustom
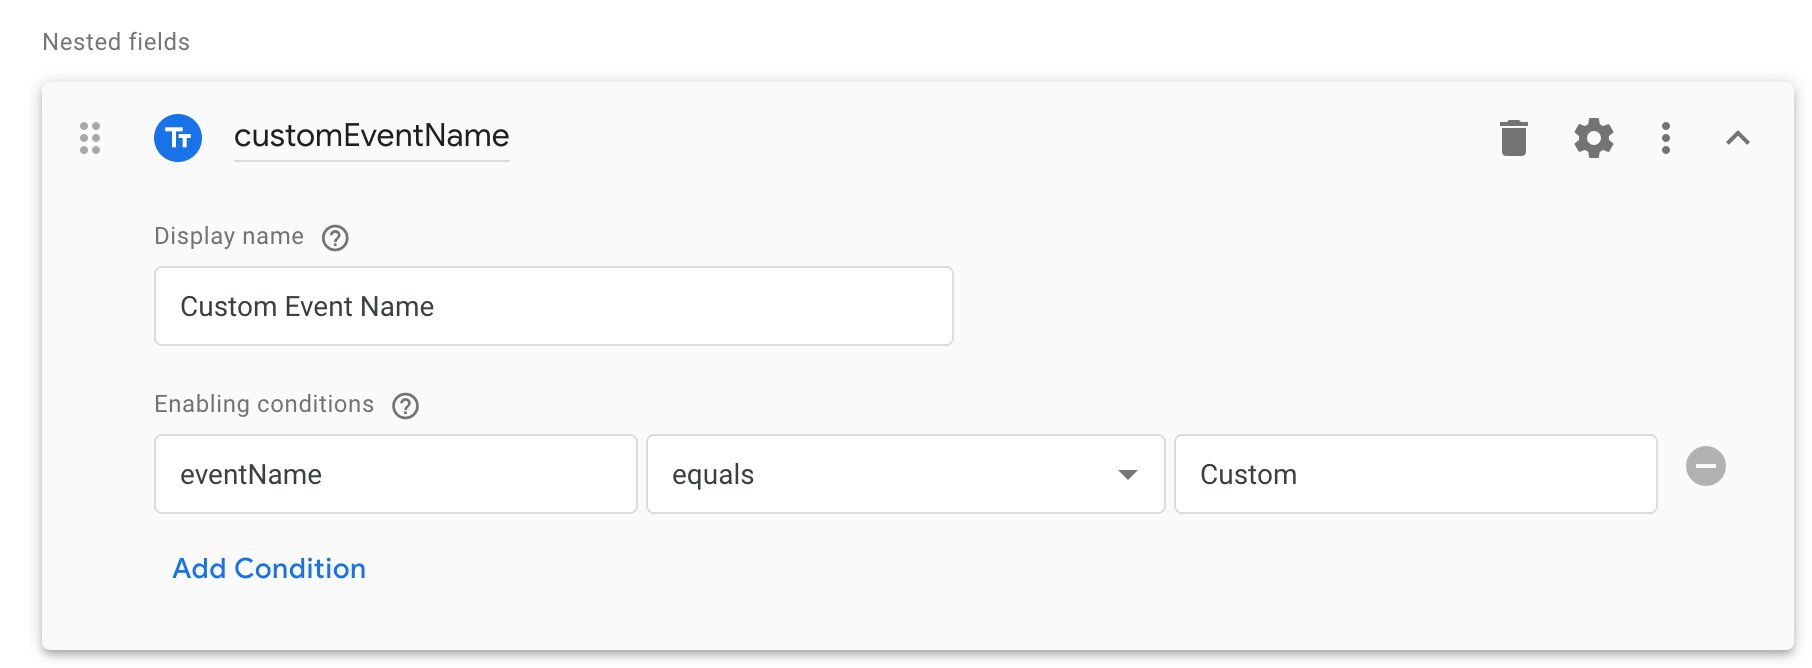
The enabling condition ensures the Custom Event Name is only shown in case “Custom” is chosen from the drop-down menu. Cool, huh?
Field 3: Group named objectProperties
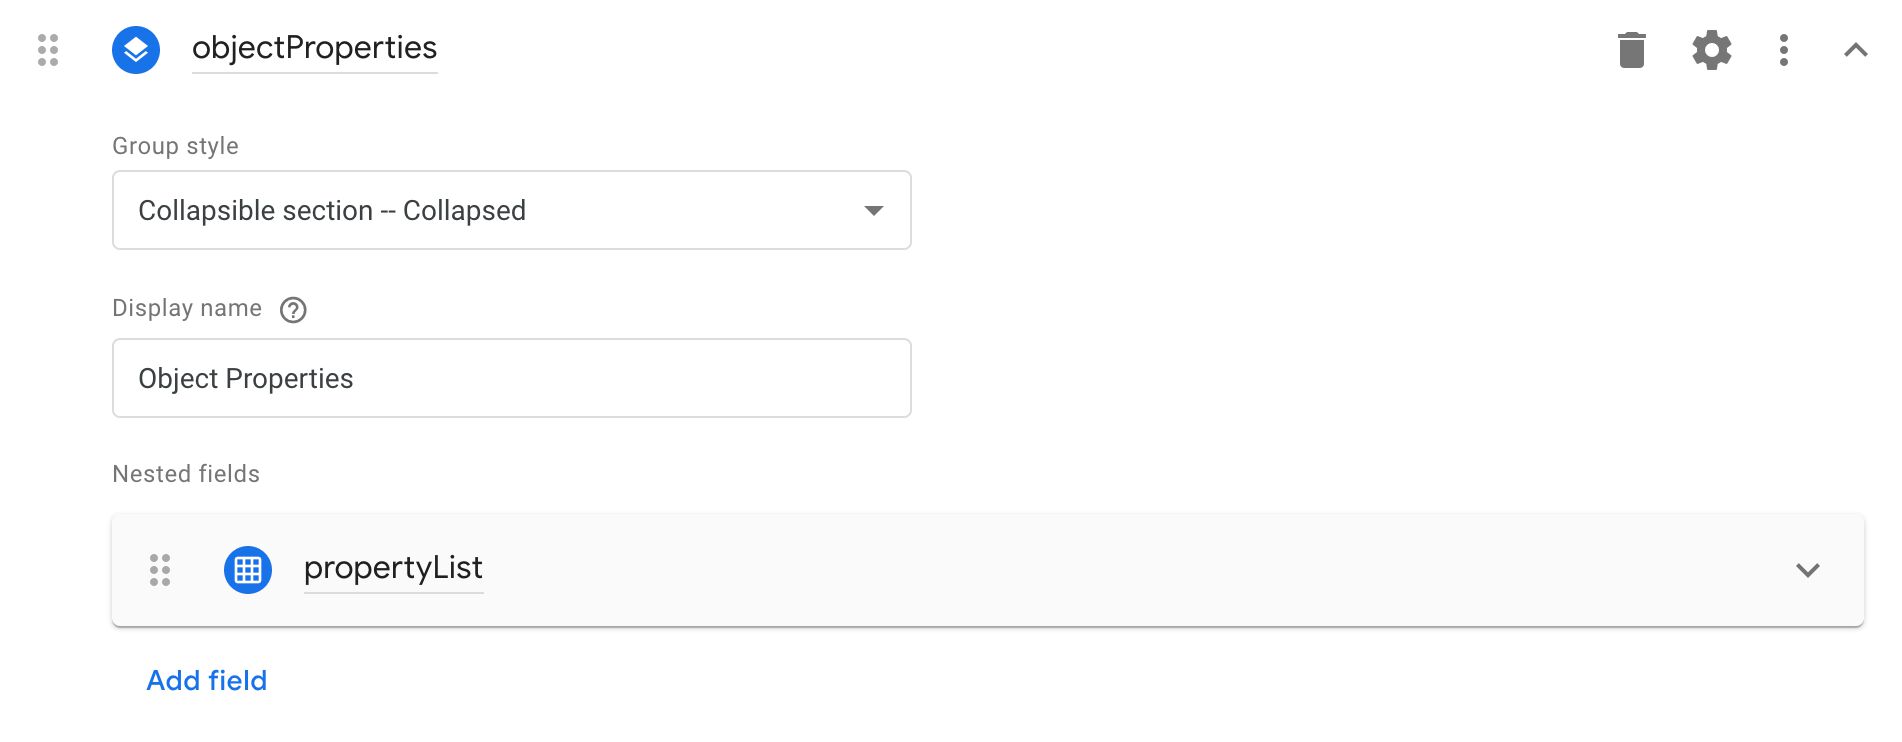
The default field configurations should be all you need for this Group field.
Group style: Collapsible section - Collapsed
Display name: Object Properties
Nested fields: (see below)
Click Add field under Nested fields, and choose a Simple Table field. Name the field propertyList and make sure the “New row” button text field configuration is toggled on.
Add two columns to the table. Both should be Text field columns.
The first column should have the following settings:
Column name:
Property NameInternal name:
nameRequire column values to be unique: Checked (this option becomes available when you choose to show Advanced Settings for this column)
The second column should have the following settings:
Column name:
Property ValueInternal name:
value
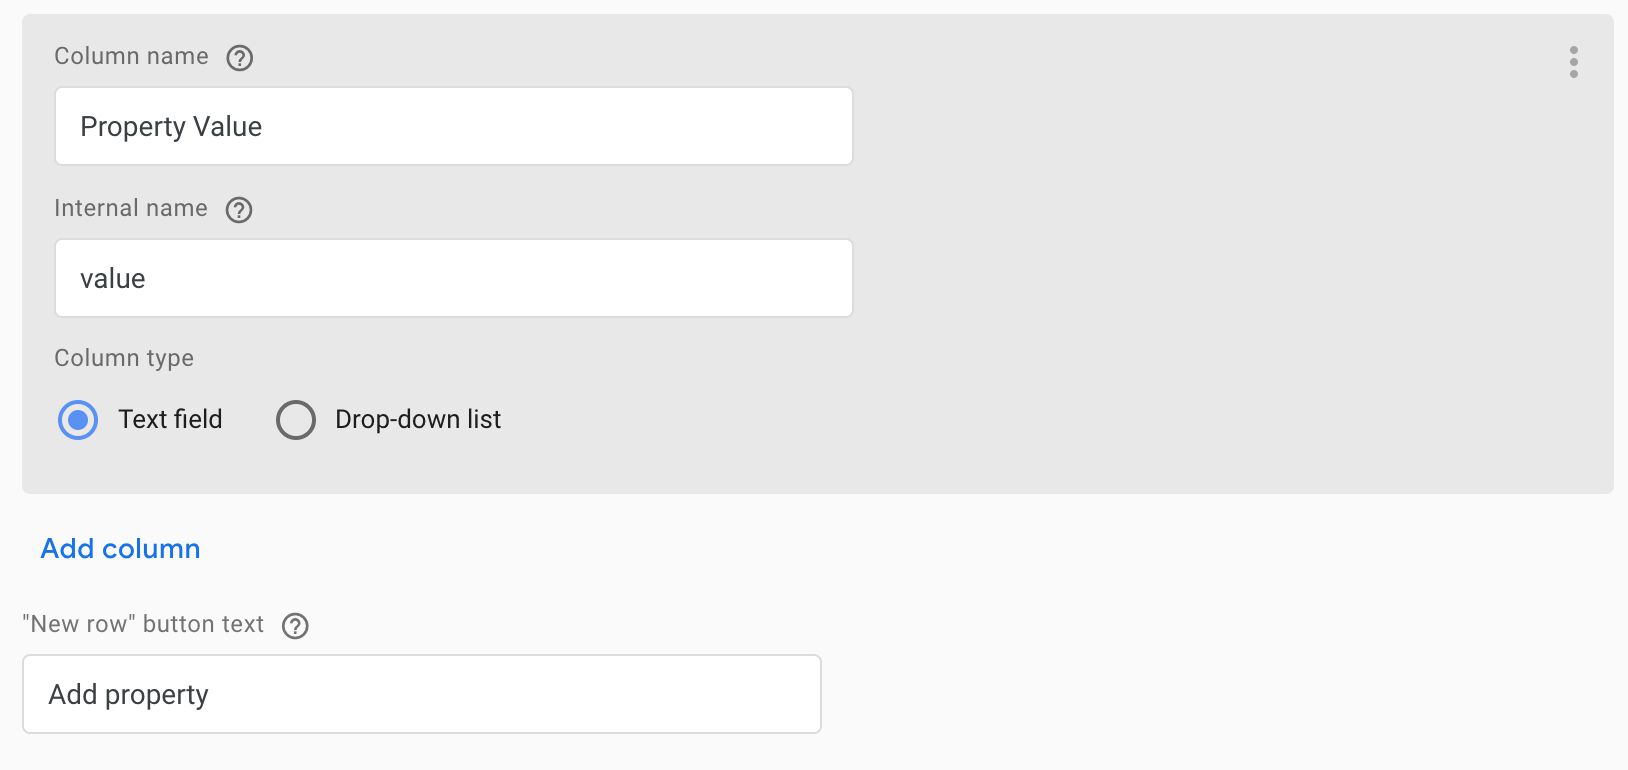
Finally, set the “New row” button text option to Add property, and leave the Display name setting blank.
Field 4: Group named moreSettings
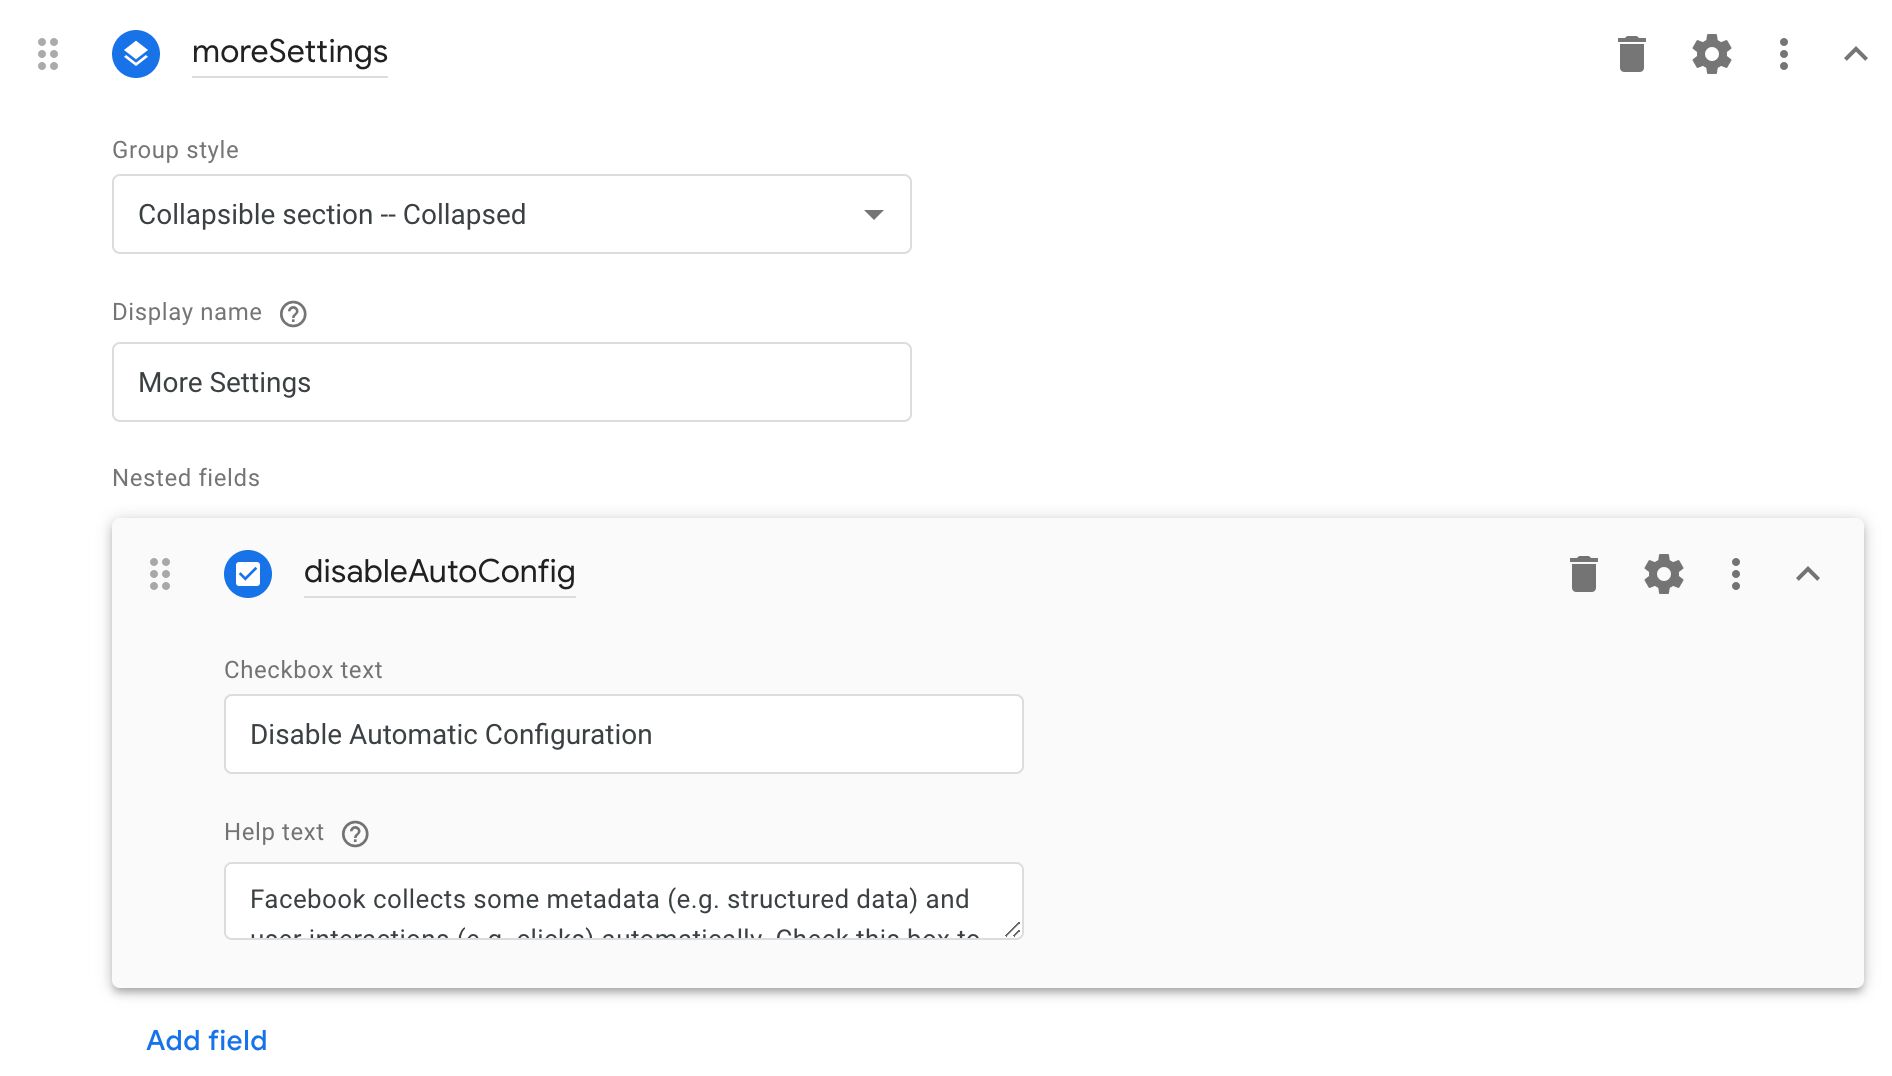
Set the following settings for the group:
Group style: Collapsible section - Collapsed
Display name:
More SettingsNested fields: (see below)
Click Add field under Nested fields, and choose a Checkbox field. Name the field disableAutoConfig and make sure the Help text field configuration is toggled on.
Checkbox text:
Disable Automatic ConfigurationHelp text: Facebook collects some metadata (e.g. structured data) and user interactions (e.g. clicks) automatically. Check this box to disable this automatic configuration of the pixel.
Step 3: Edit code
Step on over to the Code editor tab, and replace the contents with the following JavaScript:
const createQueue = require('createQueue');
const callInWindow = require('callInWindow');
const aliasInWindow = require('aliasInWindow');
const copyFromWindow = require('copyFromWindow');
const setInWindow = require('setInWindow');
const injectScript = require('injectScript');
const makeTableMap = require('makeTableMap');

const initIds = copyFromWindow('_fbq_gtm_ids') || [];
const pixelIds = data.pixelId;

// Utility function to use either fbq.queue[]
// (if the FB SDK hasn't loaded yet), or fbq.callMethod()
// if the SDK has loaded.
const getFbq = () => {
  // Return the existing 'fbq' global method if available
  const fbq = copyFromWindow('fbq');
  if (fbq) {
    return fbq;
  }

  // Initialize the 'fbq' global method to either use
  // fbq.callMethod or fbq.queue)
  setInWindow('fbq', function() {
    const callMethod = copyFromWindow('fbq.callMethod.apply');
    if (callMethod) {
      callInWindow('fbq.callMethod.apply', null, arguments);
    } else {
      callInWindow('fbq.queue.push', arguments);
    }
  });
  aliasInWindow('_fbq', 'fbq');

  // Create the fbq.queue
  createQueue('fbq.queue');

  // Return the global 'fbq' method, created above
  return copyFromWindow('fbq');
};

// Get reference to the global method
const fbq = getFbq();

// Build the fbq() command arguments
const props = data.propertyList ? makeTableMap(data.propertyList, 'name', 'value') : {};
const command = data.eventName !== 'Custom' ? 'trackSingle' : 'trackSingleCustom';
const eventName = data.eventName !== 'Custom' ? data.eventName : data.customEventName;

// Handle multiple, comma-separated pixel IDs,
// and initialize each ID if not done already.
pixelIds.split(',').forEach(pixelId => {
  if (initIds.indexOf(pixelId) === -1) {

    // If the user has chosen to disable automatic configuration
    if (data.disableAutoConfig) {
      fbq('set', 'autoConfig', false, pixelId);
    }

    // Initialize pixel and store in global array
    fbq('init', pixelId);
    initIds.push(pixelId);
    setInWindow('_fbq_gtm_ids', initIds, true);

  }

  // Call the fbq() method with the parameters defined earlier
  fbq(command, pixelId, eventName, props);
});

injectScript('https://connect.facebook.net/en_US/fbevents.js', data.gtmOnSuccess, data.gtmOnFailure, 'fbPixel');
At this point, it’s a good idea to take a short breather.
If you take a close look at the code, you’ll see that it’s far more complex than what the Facebook pixel snippet is. The reason for this is the sandboxed JavaScript that custom templates use. For example, the Facebook snippet creates the global fbq() method with something like:
window.fbq = function() {
  window.fbq.callMethod ?
    window.fbq.callMethod.apply(window.fbq, arguments) :
    window.fbq.queue.push(arguments);
}
It’s a very simple piece of code, which simply passes the arguments you provide to fbq() (e.g. 'track', 'PageView') to one of two places, depending on whether the SDK has loaded yet or not.
To do this in a custom template is far more complicated. You can’t just set a global variable, you need to use an API for that. You can’t just check if a global method exists, you need an API for that. And you can’t just create the queue property for the fbq() method, you need an API for that.
So, let’s go over block by block to understand what the code does.
Initialize the necessary APIs
This script needs a handful of APIs, which are initialized with the require() API:
const createQueue = require('createQueue');
const callInWindow = require('callInWindow');
const aliasInWindow = require('aliasInWindow');
const copyFromWindow = require('copyFromWindow');
const setInWindow = require('setInWindow');
const injectScript = require('injectScript');
const makeTableMap = require('makeTableMap');
I’ll explain how they function when we encounter them in the code.
Fetch list of initialized IDs
const initIds = copyFromWindow('_fbq_gtm_ids') || [];
const pixelIds = data.pixelId;
Here we fetch the list of initialized IDs (stored in a custom _fbq_gtm_ids global array), and we also pull in the value, input by the user, of the pixelId field from the template itself.
Utility to fetch the proper global fbq method
const getFbq = () => {
  // Return the existing 'fbq' global method if available
  const fbq = copyFromWindow('fbq');
  if (fbq) {
    return fbq;
  }
  ...
NOTE! The arrow function is a feature of ES6 supported by Custom Templates.
const getFbq = () => {translates tovar getFbq = function() {in the older flavor of JavaScript.
The purpose of getFbq is to return a representation of the global fbq method, which passes the arguments to the correct place, similar to how the regular Facebook snippet works.
The first lines check if fbq has already been created globally, and returns the global method in that case.
In case the global method does not exist, it needs to be created.
  ...
  setInWindow('fbq', function() {
    const callMethod = copyFromWindow('fbq.callMethod.apply');
    if (callMethod) {
      callInWindow('fbq.callMethod.apply', null, arguments);
    } else {
      callInWindow('fbq.queue.push', arguments);
    }
  });
  aliasInWindow('_fbq', 'fbq');
  ...
Here, the global fbq method is initialized as a new function. This function first checks if the fbq.callMethod method already exists (which means the FB SDK has loaded), and if it does, it passes the arguments sent to the fbq method (e.g. 'track', 'PageView') to this built-in method.
If the callMethod method has not been created yet, then the method passes its arguments to fbq.queue as an array push. The queue is basically a waiting list for pixel request, queued up for the Facebook SDK as it loads over the network. Once the SDK has loaded, it processes the messages in this queue and dispatches them to Facebook.
The last line makes an alias of the fbq method in another global variable, _fbq. I’m not certain why this is necessary, but it is what the Facebook snippet does as well.
  ...
  createQueue('fbq.queue');

  return copyFromWindow('fbq');
};
The last lines of the setInWindow API call create the fbq.queue global array, before finally returning the current content of the global fbq variable, which is the function you created above.
Prepare the fbq command
const fbq = getFbq();

const props = data.propertyList ? makeTableMap(data.propertyList, 'name', 'value') : {};
const command = data.eventName !== 'Custom' ? 'trackSingle' : 'trackSingleCustom';
const eventName = data.eventName !== 'Custom' ? data.eventName : data.customEventName;
These lines first fetch the latest representation of the fbq global method by invoking the getFbq function you just created.
Next, the contents of the fbq command are built. The makeTableMap API takes your propertyList Simple Table field, and converts each row to a key-value pair, where the key is the first column value (e.g. content_ids), and the value is the second column value (e.g. 123456). It’s a really handy API for converting the template table format into what many JavaScript libraries expect.
The command variable depends on whether you’re using a standard event (e.g. PageView or Lead), in which case it is set to trackSingle, or whether you’re using the Custom event, in which case it’s set to trackSingleCustom.
The eventName takes either the value of the drop-down menu selection if a standard event is selected, or the value of the customEventName text input field if a Custom event is selected.
Cycle through all Pixel IDs defined in tag, and dispatch the commands
pixelIds.split(',').forEach(pixelId => {
  if (initIds.indexOf(pixelId) === -1) {
    if (data.disableAutoConfig) {
      fbq('set', 'autoConfig', false, pixelId);
    }
    fbq('init', pixelId);
    initIds.push(pixelId);
    setInWindow('_fbq_gtm_ids', initIds, true);
  }

  fbq(command, pixelId, eventName, props);
});
The whole command process is wrapped in an iterator, which loops through all the Pixel IDs the user has added to the tag. The commands are run identically for every single Pixel ID in the tag.
First, the code checks if the Pixel ID has already been initialized by looking at the contents of the initIds array you created at the very beginning of the code. You don’t want to initialize any Pixel ID more than once, or you’ll risk running into problems with Facebook’s SDK.
If the pixel hasn’t been initialized, then first the autoConfig parameter is set to false, if the user has checked the respective checkbox in the template.
Next, the fbq('init', pixelId) command is run, after which the Pixel ID is pushed into the array of initialized pixels.
Finally, the fbq() command is run with the parameters you created previously.
Load the Facebook SDK
The very last line in the code editor loads the Facebook SDK, and signals either data.gtmOnSuccess() or data.gtmOnFailure, depending on whether the SDK load was successful or not.
injectScript('https://connect.facebook.net/en_US/fbevents.js', data.gtmOnSuccess, data.gtmOnFailure, 'fbPixel');Step 4: Permissions
Because you use all these APIs and mess so much with the global namespace, you’ll need to add some permissions if you want the template code to run.
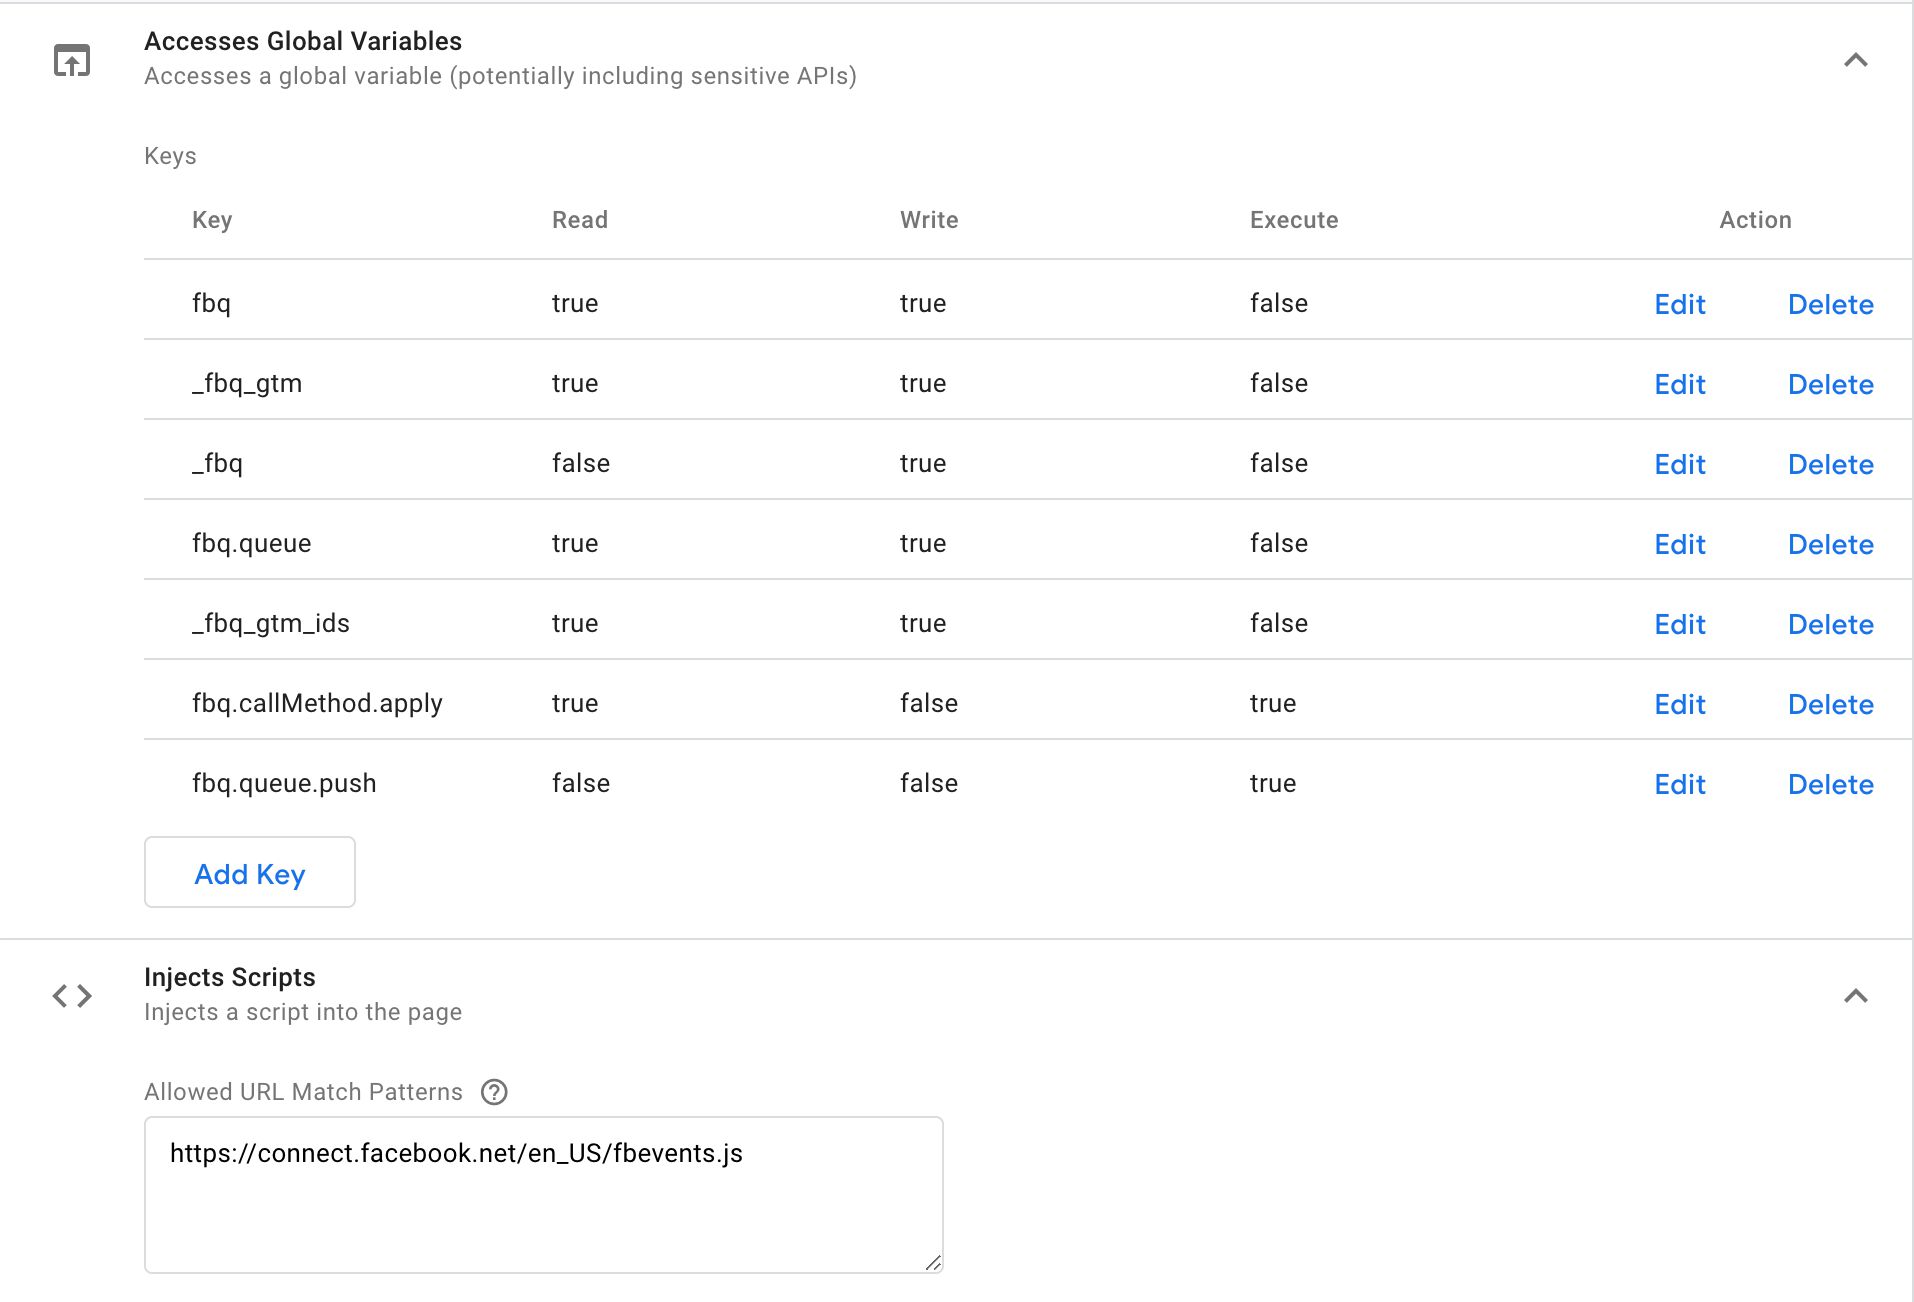
As you can see, every single global variable you interact with, either directly (via copyFromWindow, callInWindow, etc.) or indirectly (via aliasFromWindow) must be specified in the Permissions list.
Similarly, the script injection of the SDK itself must be allowed using the appropriate permission.
Test it!
To test it, save the template, then browse to your container’s tags, and create a new tag. You should see the Facebook Pixel in the tag menu.
Next, fill in the fields. Try a couple of different things, such as passing various object properties, using custom events, and adding more than one Pixel ID.
Try also creating more than one tag with the same Pixel ID, to make sure the initialization is done just once per ID.
Using GTM Preview mode and Facebook’s Pixel Helper, you should be able to verify that everything is working as it should.
Final thoughts
I hope this article has helped demystify custom templates.
As you can see, working with the sandboxed JavaScript isn’t just a question of copy-pasting some original code and rewriting some method calls. It calls for a different approach completely, especially when working with global variables.
There are some things I think custom templates should do to improve flexibility. For example, the function wrapper that GTM automatically adds whenever you create a global function is problematic, since there are use cases where you might want to be able to add properties to the global function itself. In its current format, custom templates do not permit this, so you need to use an API like createQueue to establish fbq.queue as an array.
It would be better if I could just run something like setInWindow('fbq.queue', []), but right now, setInWindow only allows you to set the variable and not its individual properties.
Other than that, the benefit of using this over a Custom HTML tag is huge: you’re minimizing the risk of code errors due to operating through the template, and you don’t need the problematic unsafe-eval directive in your Content Security Policy.
Thanks for reading, and perhaps watching! Let me know in the comments if you have questions about how this whole thing works.
