
Track Core Web Vitals In GA4 With Google Tag Manager
Updated 3 March 2023: Added a checkbox to the template to enable collecting FCP, INP, and TTFB metrics, too..
Core Web Vitals is described on the dedicated web.dev resource as (emphasis mine):
“Core Web Vitals are the subset of Web Vitals that apply to all pages, should be measured by all site owners, and will be surfaced across all Google tools.”
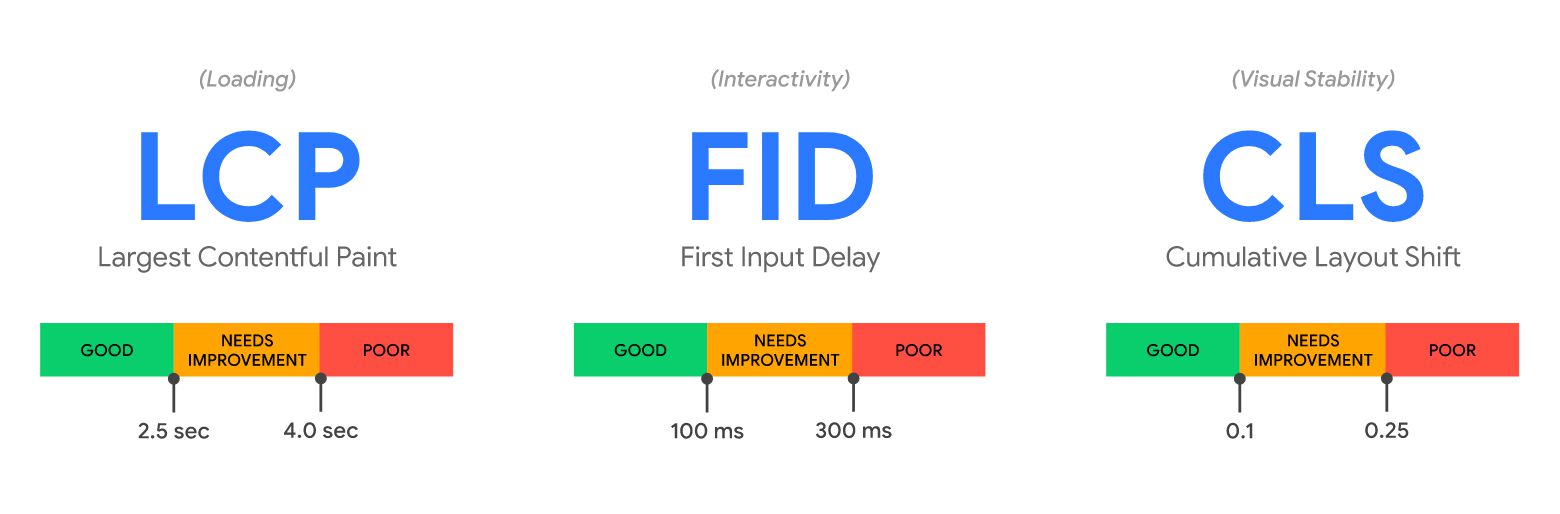 Recommended Core Web Vitals thresholds - from https://web.dev/vitals/
The Core Web Vitals measurement as suggested by Google are:
- Largest Contentful Paint (LCP), which measures the time it took to load the largest image or text block in the viewport. This should optimally be below 2500 milliseconds.
- First Input Delay (FID), which measures the time it took for the browser to react to user interaction (e.g. click or tap). This should optimally be below 100 milliseconds.
- Cumulative Layout Shift (CLS), which measures the extent of unexpected shifts in layout during the lifetime of the page. This should optimally have a score of less than 0.1.
There are also other metrics available through the Web Vitals library (FCP, INP, and TTFB).
Tracking Core Web Vitals has already been explored quite thoroughly in articles such as this TagManagerItalia piece, but I wanted to contribute to the discussion with something unique.
Table of Contents
In this article, I’ll show you how to use a new custom template to set up the Core Web Vitals tracking without having to use Custom HTML tags. I’ll also show how to use this template’s output to send the data to Google Analytics 4.
XHuge thanks to Philip Walton of Google for clarifying many of the things in this article. Philip is the author behind the Web Vitals content on web.dev among other things, so do yourself a favor and subscribe to his content on Twitter, GitHub, and on his blog.
The Simmer Newsletter
Subscribe to the Simmer newsletter to get the latest news and content from Simo Ahava into your email inbox!
Get the template
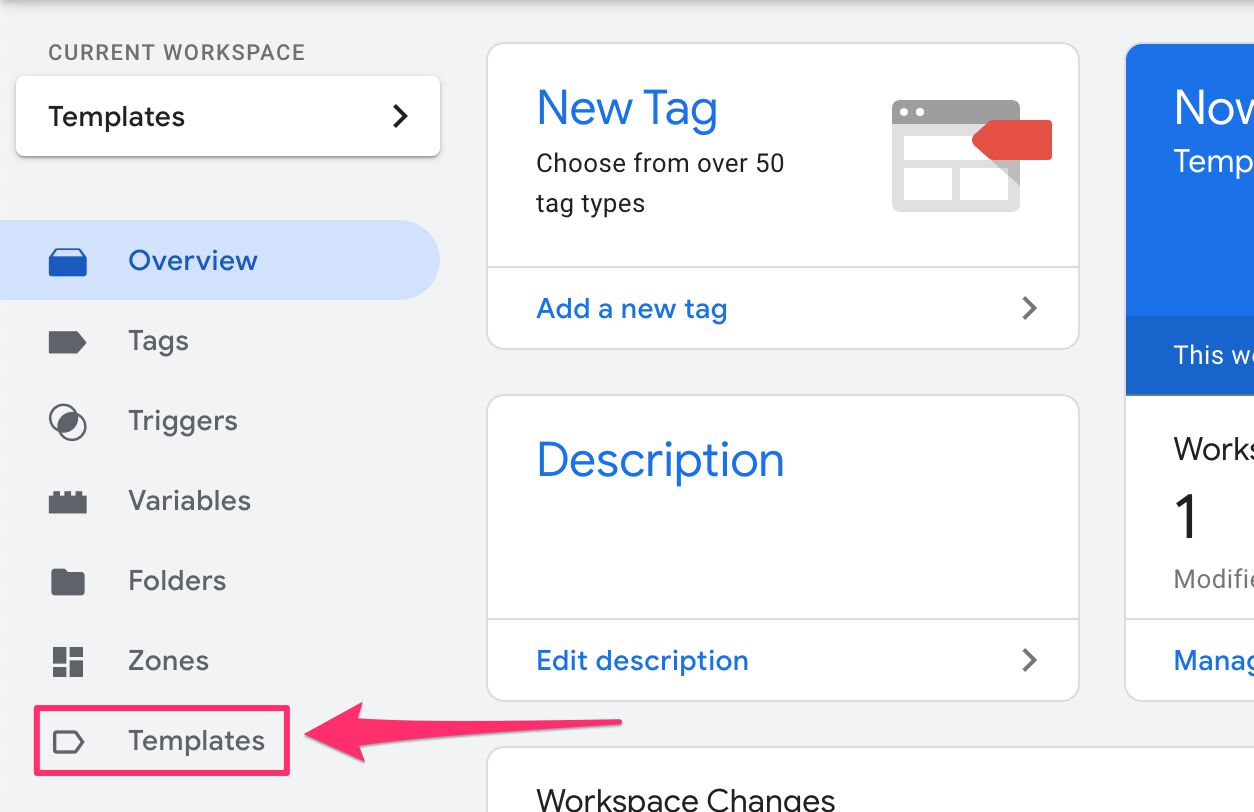
To load the template, go to the Google Tag Manager UI, and click the Templates navigation.
Next, click the Search Gallery button in the Tag Templates area.

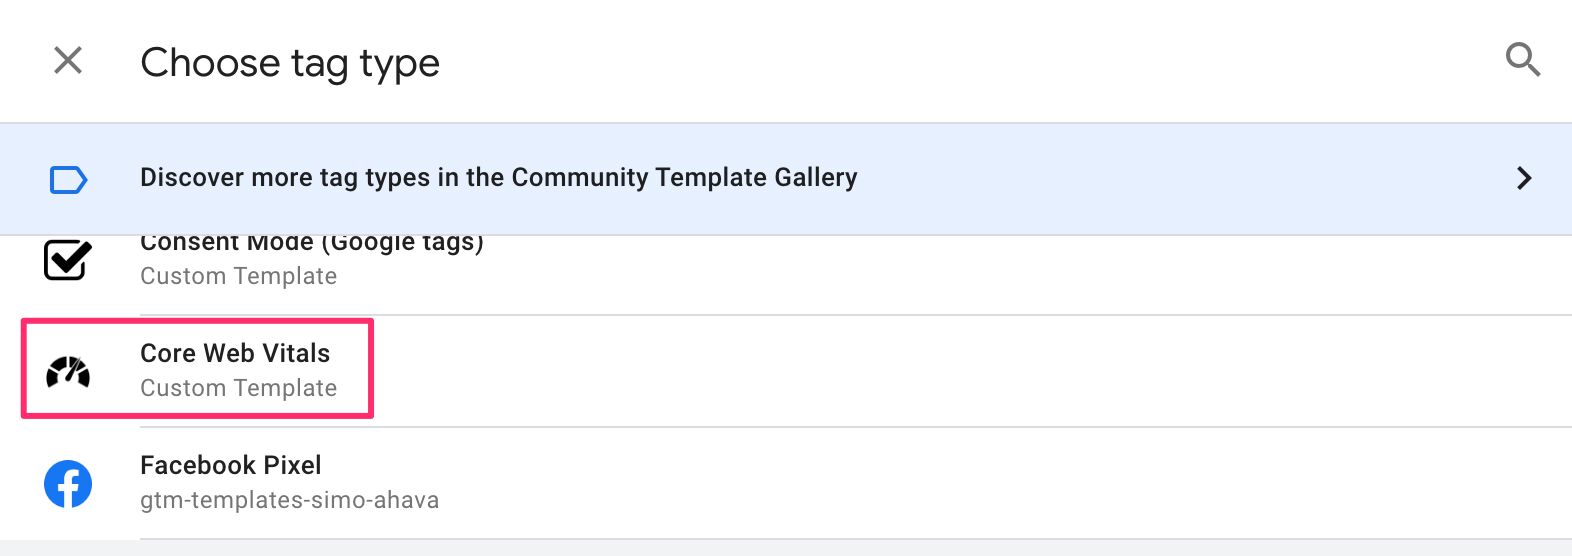
In the overlay, search for the template titled Core Web Vitals, select it, and click the Add to workspace button, following any prompts to get the job done.

Once the template has been added to your workspace, you can open the Tags view from the navigation and click to create a new tag.

Choose the new Core Web Vitals custom template for the tag.
The first configuration in the tag is the Namespace Objects setting, which is off by default. If you check the box, then the object pushed into dataLayer will store each measurement type (LCP, CLS, FID) in its own namespace under the webVitalsMeasurement top-level Data Layer key. See below for an example.
You can also check the box labelled Collect all (available) web vitals metrics to also collect measurements of FCP, INP, and TTFB.
Add the All Pages trigger to it. If you only want it to work on certain pages, use a Page View trigger with a suitable trigger condition instead.
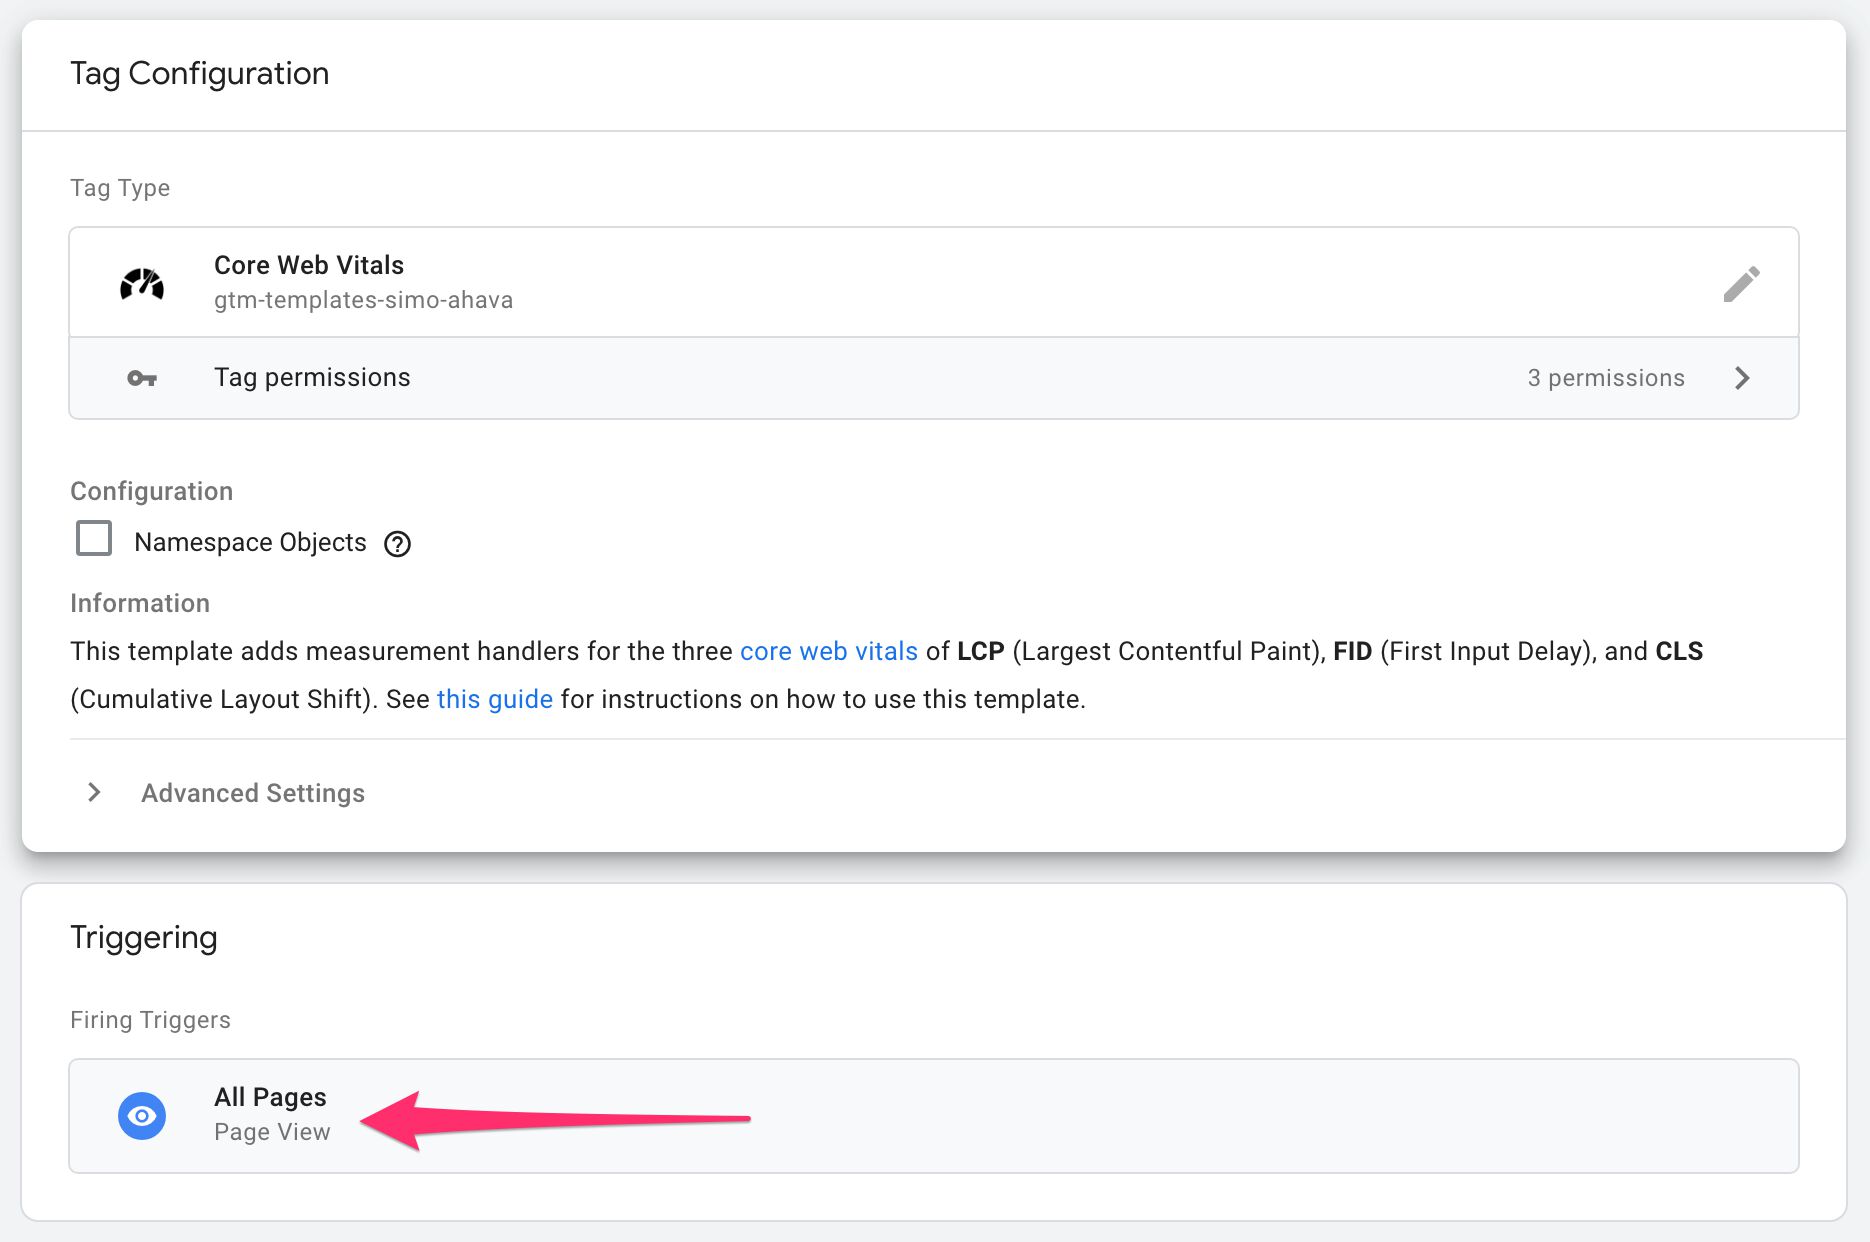
Save the tag when ready.
Test it
Next, go to preview mode by clicking the Preview button in the user interface.
Once browsing your site in preview mode, reload the page and wait for it to completely load (some Core Web Vitals do not function if the page loads in the background). Click around a bit for good measure.
In fact, if you want to collect FID there must be a user interaction registered on the page. Interacting with the page will also have the effect of finalizing the LCP report, as the resolving of the largest element in the viewport stops as soon as a user interaction is received.
When you switch to the preview mode tab, you should ideally see three coreWebVitals events in the list. Sometimes you’ll only see two, for example if FID didn’t register. Sometimes you’ll see more than three, for example if the metrics are re-evaluated before a user interaction is received or the tab/browser is backgrounded.
The best way to ensure all three core web vitals are reported is to allow the page to load completely in the foreground, click around a bit, and then change the tab to Preview mode.

Select one of the events and expand the API Call view. You should see something like this:
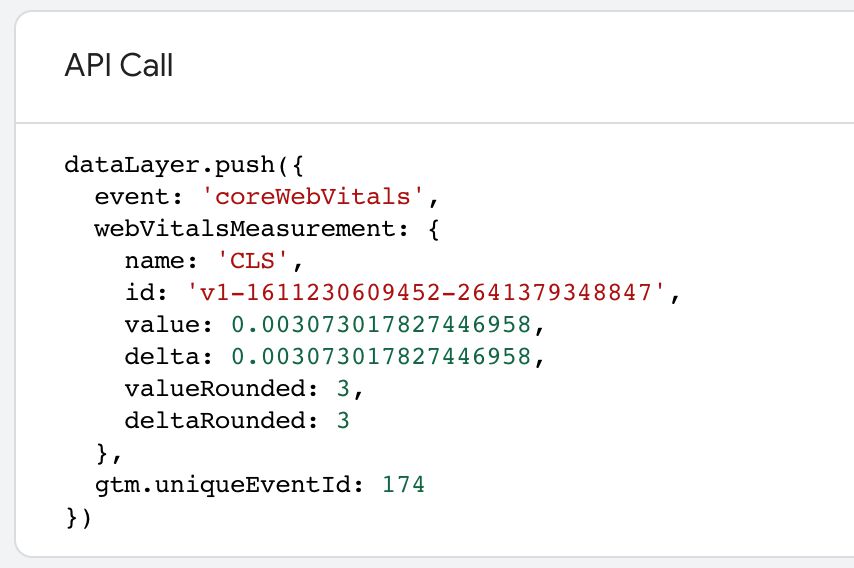
The dataLayer object
This is what the dataLayer object contains:
| Key | Sample value | Description |
|---|---|---|
event | 'coreWebVitals' | The event name – always coreWebVitals. |
webVitalsMeasurement.name | 'FID' | One of LCP, FID, CLS, FCP, INP, and TTFB. |
webVitalsMeasurement.id | 'v1-123123123-234234234' | A unique ID per measurement per page. Can be used to associate multiple CLS measurements with a single page load. |
webVitalsMeasurement.value | 123.55 | Value in milliseconds (for LCP and FID), or the score for CLS. |
webVitalsMeasurement.delta | 17.77 | Delta to the previous measurement on the same page (relevant for CLS). |
webVitalsMeasurement.valueRounded | 124 | Value rounded to the nearest integer. CLS score is first multiplied by 1000 to get a meaningful number. |
webVitalsMeasurement.deltaRounded | 18 | Delta rounded to the nearest integer. CLS score is first multiplied by 1000 to get a meaningful number. |
If you have Namespace Objects selected, the measurement keys themselves (name, id, value, etc.) will be nested under the measurement name. So instead of webVitalsMeasurement.id, the key path would be webVitalsMeasurement.FID.id, if the measurement was for First Input Delay.
One use case for checking Namespace Objects is if you want to send all CWV measurements with a single event. If you don’t have Namespace Objects checked, each CWV measurement will overwrite the previous measurement in the Data Layer, meaning you’ll only ever be able to access the most recent measurement, regardless of type.
Create the Google Tag Manager trigger and variables
To use these values in Google Tag Manager, you’ll first need to create a Custom Event trigger and one Data Layer variable for each of the webVitalsMeasurement keys you want to measure.
The Custom Event trigger
The Custom Event trigger should look like this:
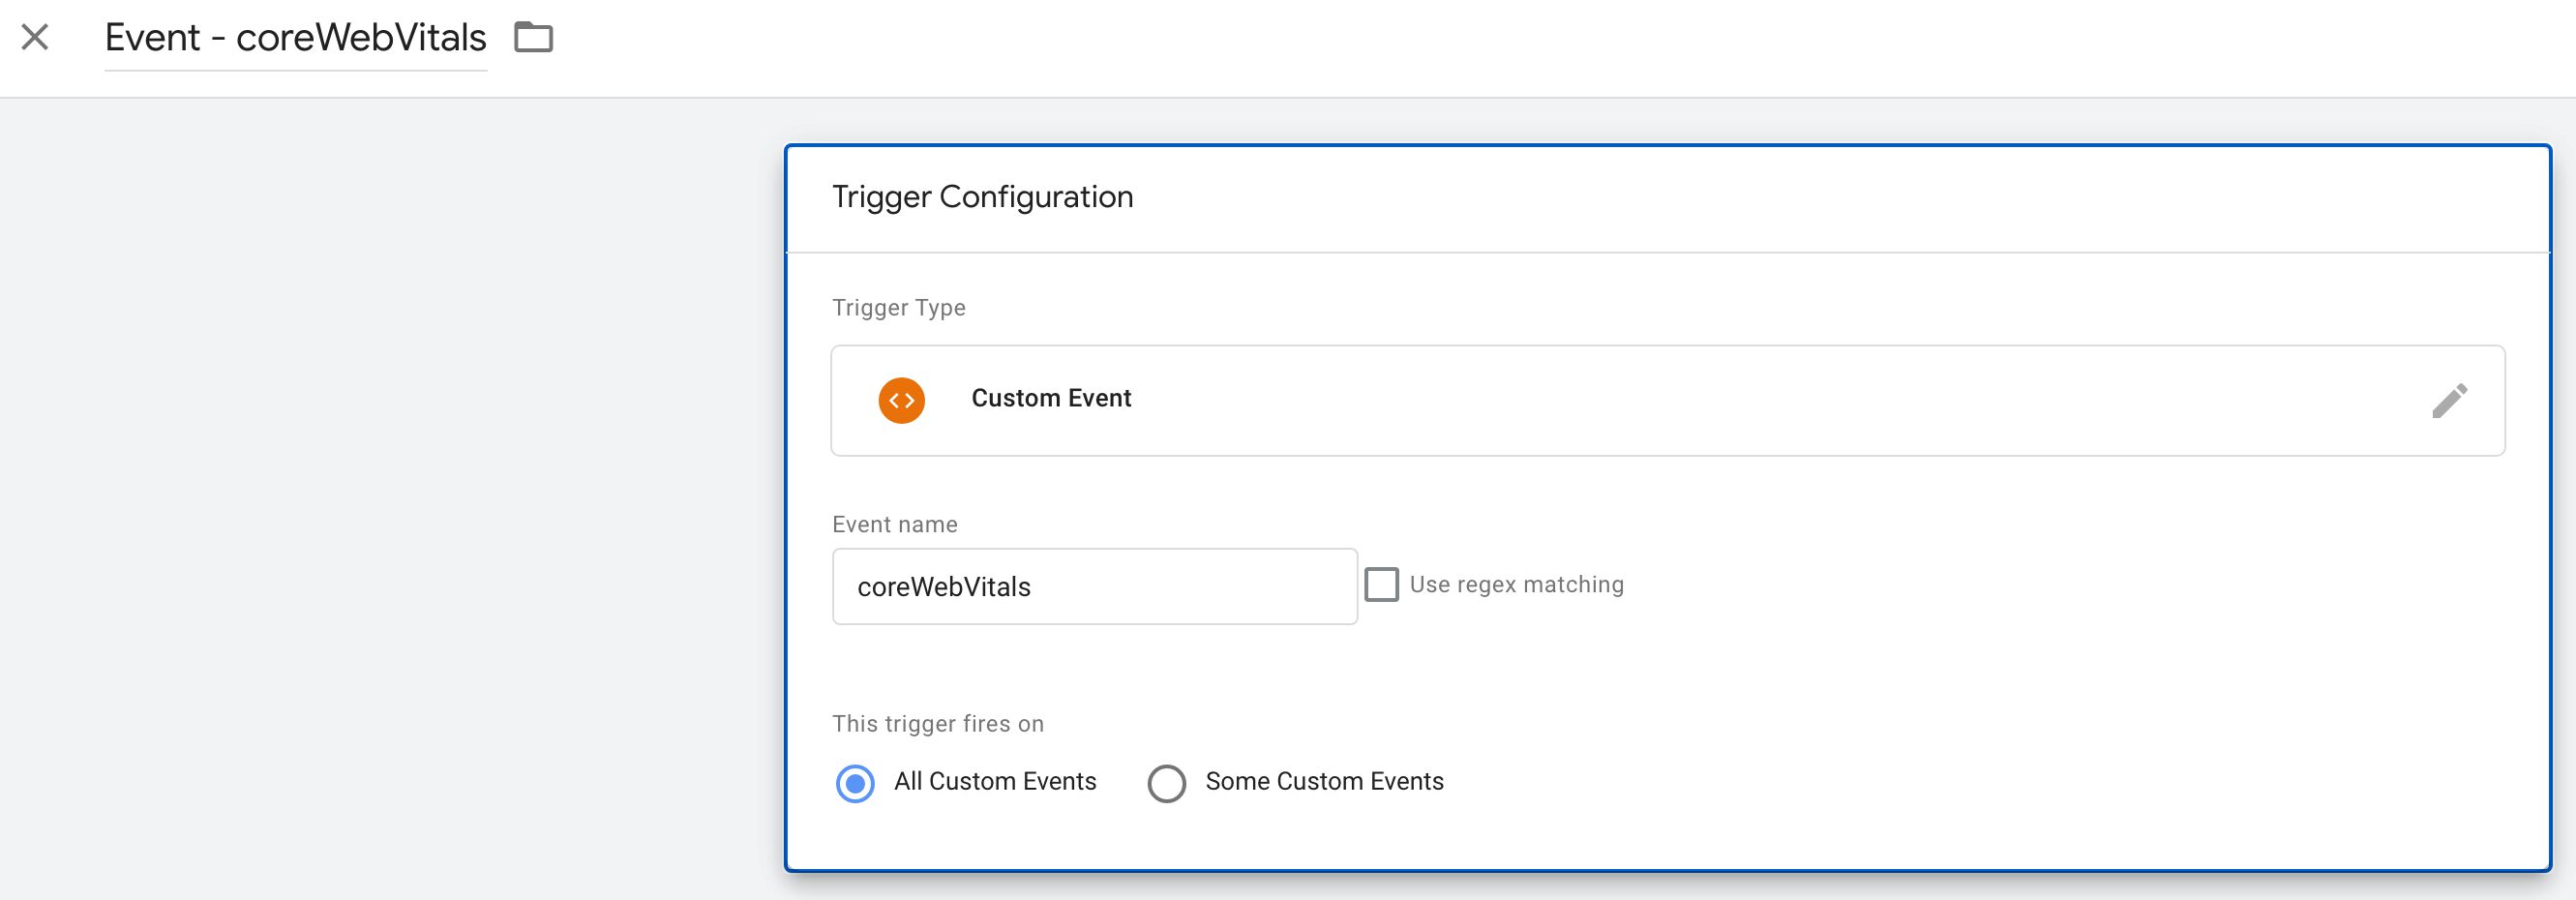
Make sure you set coreWebVitals as the value of the Event Name field.
The Data Layer variables
Next, create these six Data Layer variables, using the image below as a model.
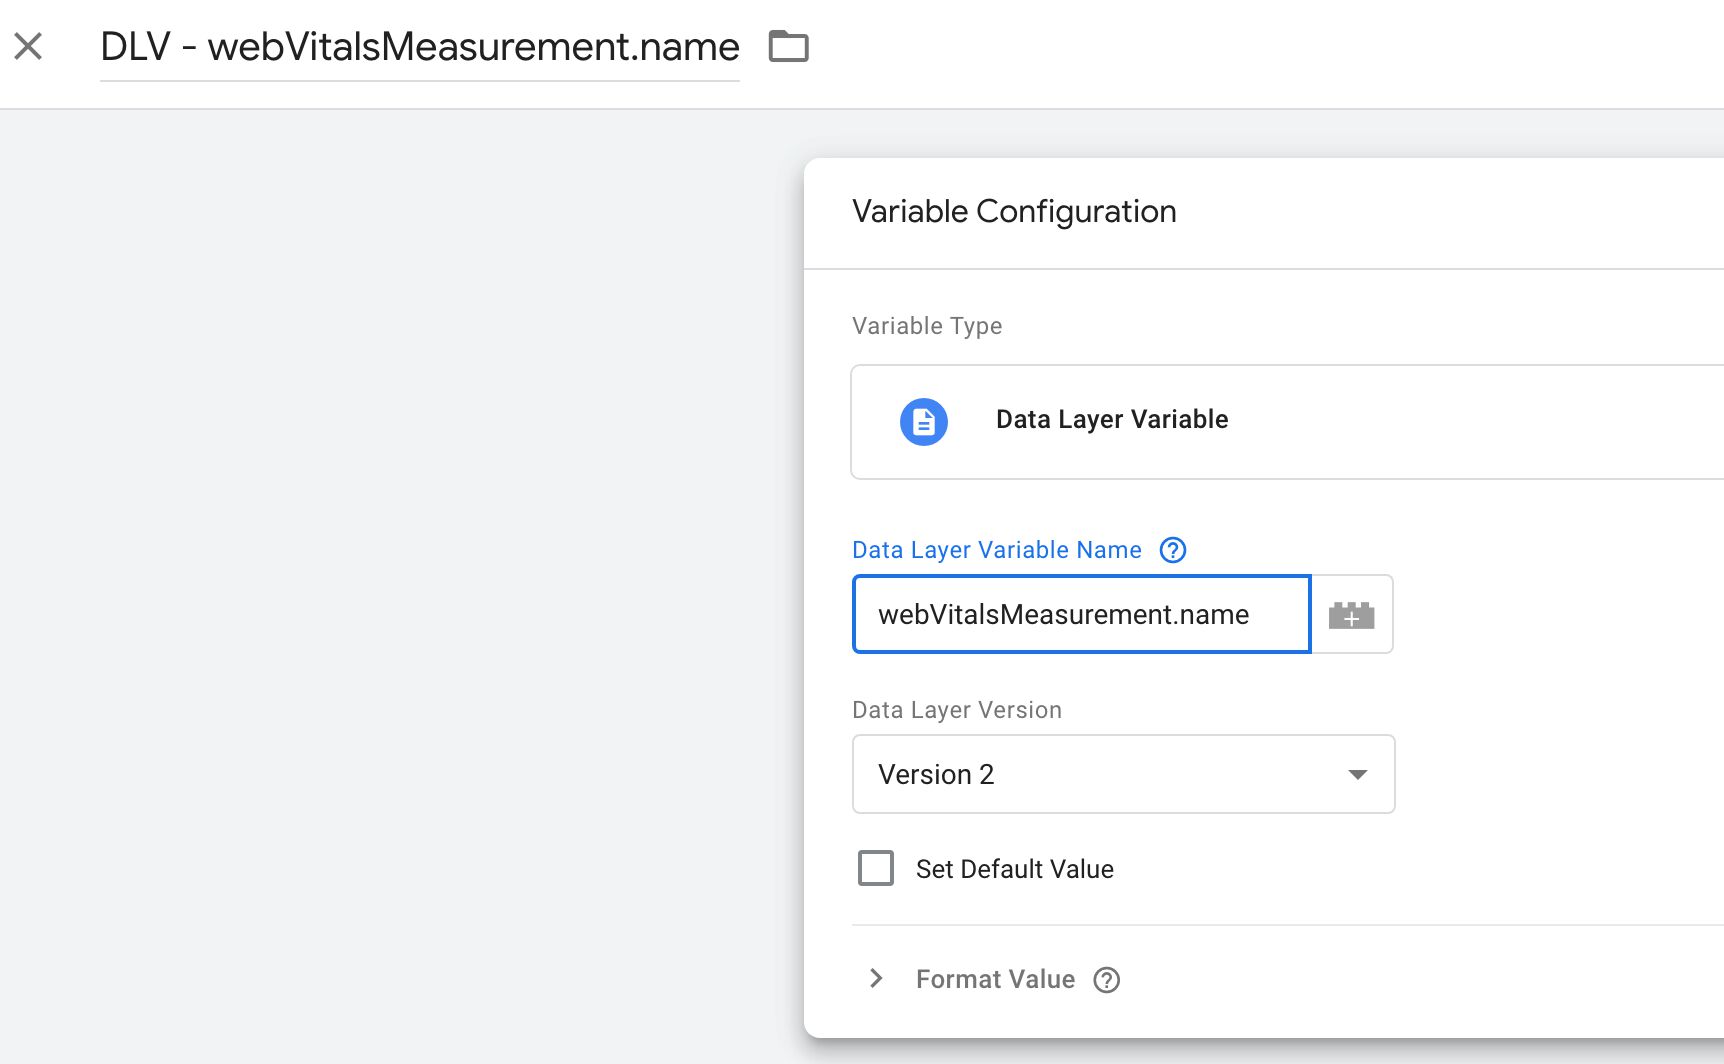
| Variable name | Data Layer Variable Name |
|---|---|
| DLV - webVitalsMeasurement.name | webVitalsMeasurement.name |
| DLV - webVitalsMeasurement.id | webVitalsMeasurement.id |
| DLV - webVitalsMeasurement.value | webVitalsMeasurement.value |
| DLV - webVitalsMeasurement.delta | webVitalsMeasurement.delta |
| DLV - webVitalsMeasurement.valueRounded | webVitalsMeasurement.valueRounded |
| DLV - webVitalsMeasurement.deltaRounded | webVitalsMeasurement.deltaRounded |
Remember, if you have Namespace Objects selected, the variable names are different. Here’s what you’d need to create for FID, for example:
| Variable name | Data Layer Variable Name |
|---|---|
| DLV - webVitalsMeasurement.FID.name | webVitalsMeasurement.FID.name |
| DLV - webVitalsMeasurement.FID.id | webVitalsMeasurement.FID.id |
| DLV - webVitalsMeasurement.FID.value | webVitalsMeasurement.FID.value |
| DLV - webVitalsMeasurement.FID.delta | webVitalsMeasurement.FID.delta |
| DLV - webVitalsMeasurement.FID.valueRounded | webVitalsMeasurement.FID.valueRounded |
| DLV - webVitalsMeasurement.FID.deltaRounded | webVitalsMeasurement.FID.deltaRounded |
Send the data to Universal Analytics
To send the data to Universal Analytics, I recommend you follow this excellent guide on Tag Manager Italia: How To Track Core Web Vitals With Google Tag Manager.
NOTE! One thing you’ll need to do is set the transport field in your Universal Analytics tag to beacon:
The beacon field ensures that the tag uses the Beacon API. The Beacon API is designed to “protect” asynchronous requests so that they complete even if the page has unloaded in the process. This is important for some of the Core Web Vitals measurements, which might not report a value until the user is about to leave the page.
Note that GA4 does not require you to explicitly set anything for the hits to be sent with the Beacon API. It defaults to using
navigator.sendBeacon()in all request.
One other thing to keep in mind is that Universal Analytics only accepts integers into Event value and Custom Metric fields. For this reason, you’ll need to use the DLV - webVitalsMeasurement.valueRounded and DLV - webVitalsMeasurement.deltaRounded variables instead of the raw values.
Send the data to Google Analytics 4
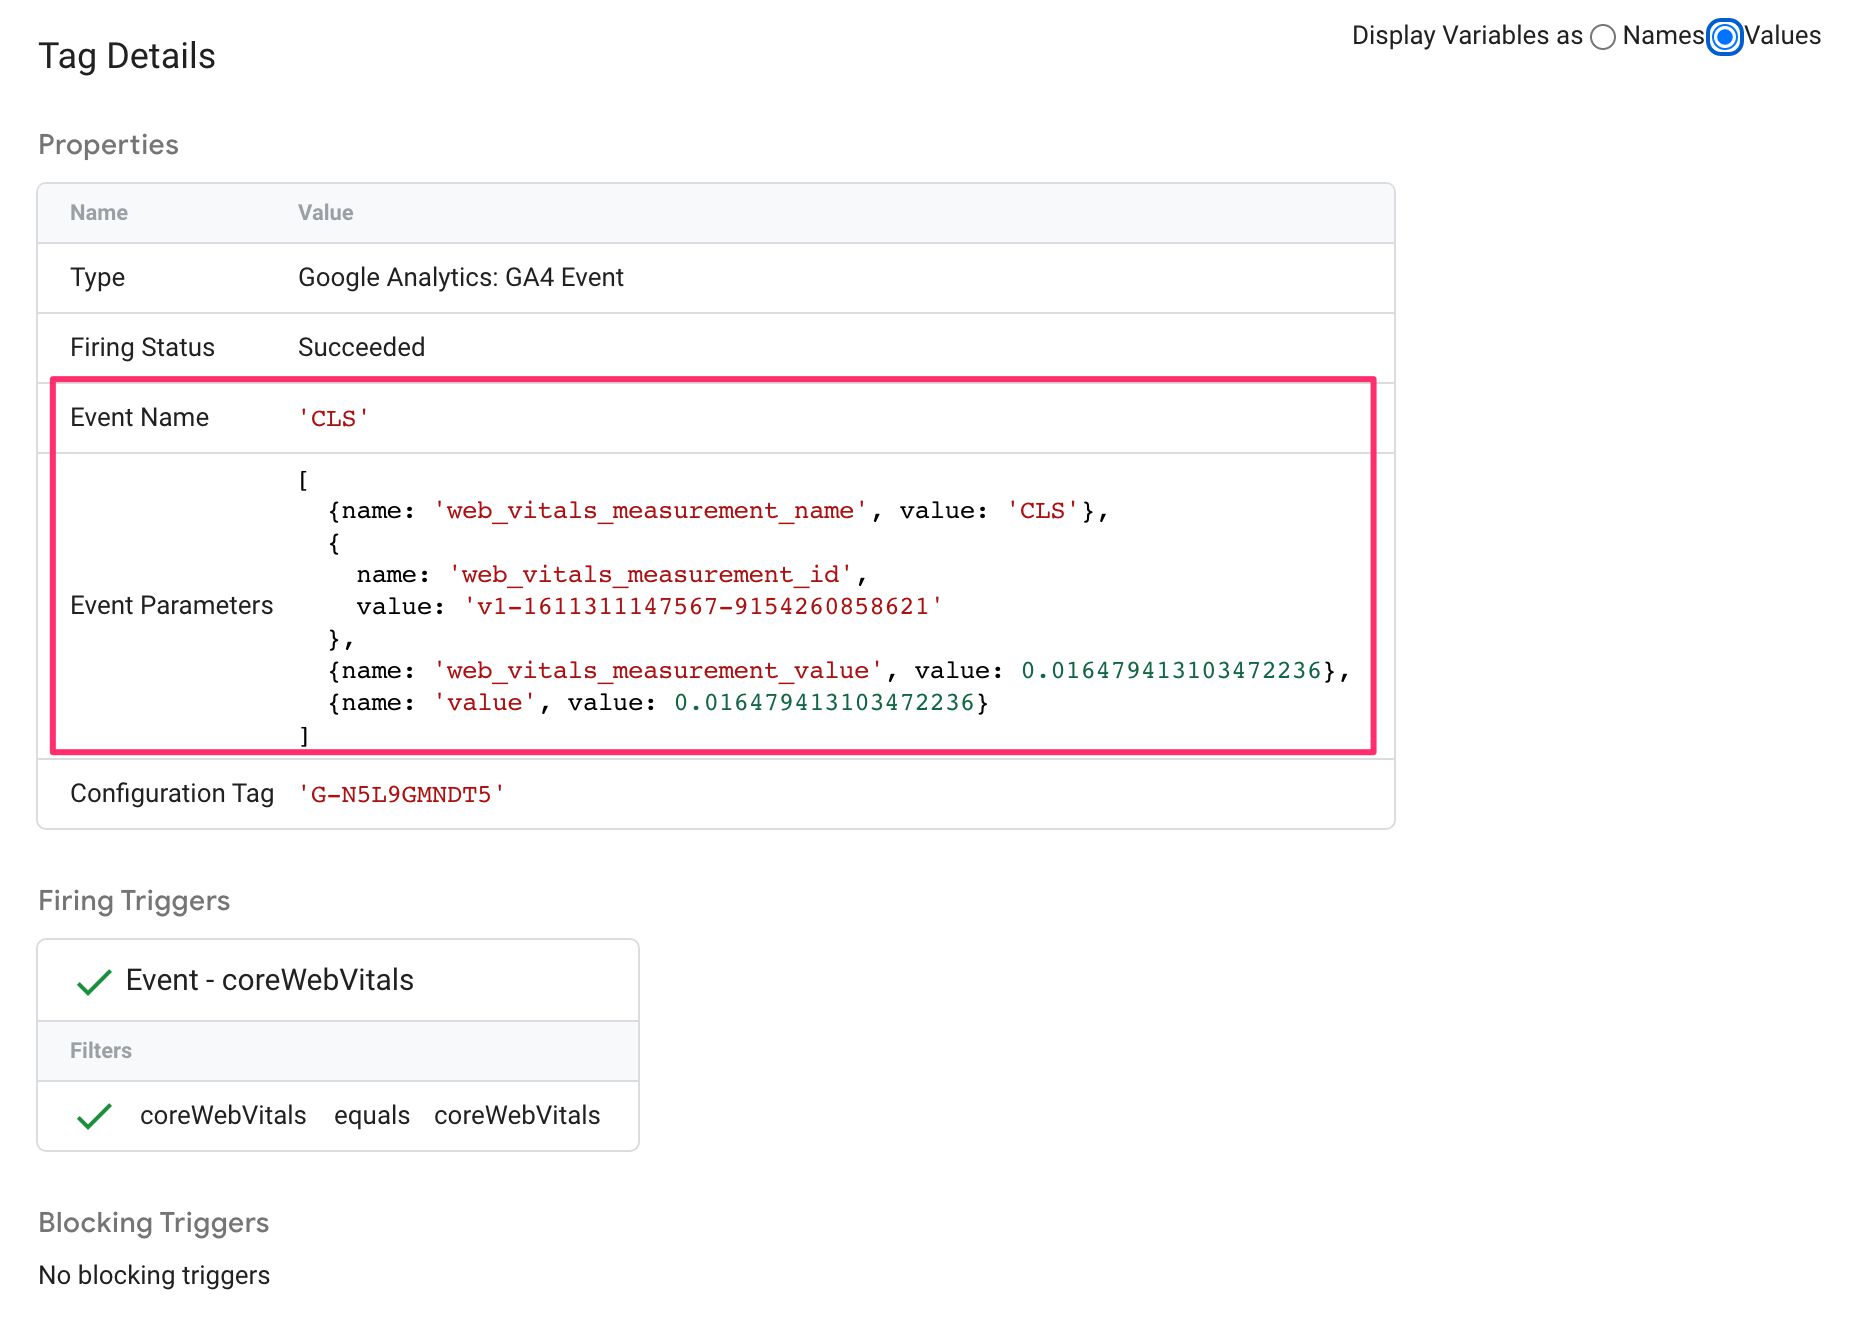
To send the data to Google Analytics 4, you’ll need to use an Event tag, so go ahead and create one.
How you set the event name and properties is completely up to you, but this is how I built my event tag:

I set the Event Name to the metric name that is collected (LCP, FID, or CLS). Remember that GA4 is moving to a more semantic approach in event naming, where the event name should reflect what happened rather than a generic label such as what Event Category used to be in Universal Analytics.
I chose to send the four “raw” parameters only, as GA4 can process floating-point values where Universal Analytics couldn’t. The four parameter names I chose are:
web_vitals_measurement_namefor the metric name.web_vitals_measurement_idfor the metric ID.web_vitals_measurement_valuefor the raw metric value.valuefor the raw metric delta.
I’m setting
valueto the metric delta becausevalueis a recommended parameter for the main value of the event. I opted to usedeltasimply because it makes sense for CLS measurement. If the metric value was sent as the eventvalueinstead, then an aggregate of CLS would report inflated values as it would sum the totals rather than the deltas.
Make sure the tag fires on the Custom Event trigger you created before.
Once you’ve saved the tag, you can test the setup again. Reset preview mode by clicking the Preview button, and load a page on the site. You should see your GA4 tag being fired, and if you open its contents you should see valid values being sent to GA4.
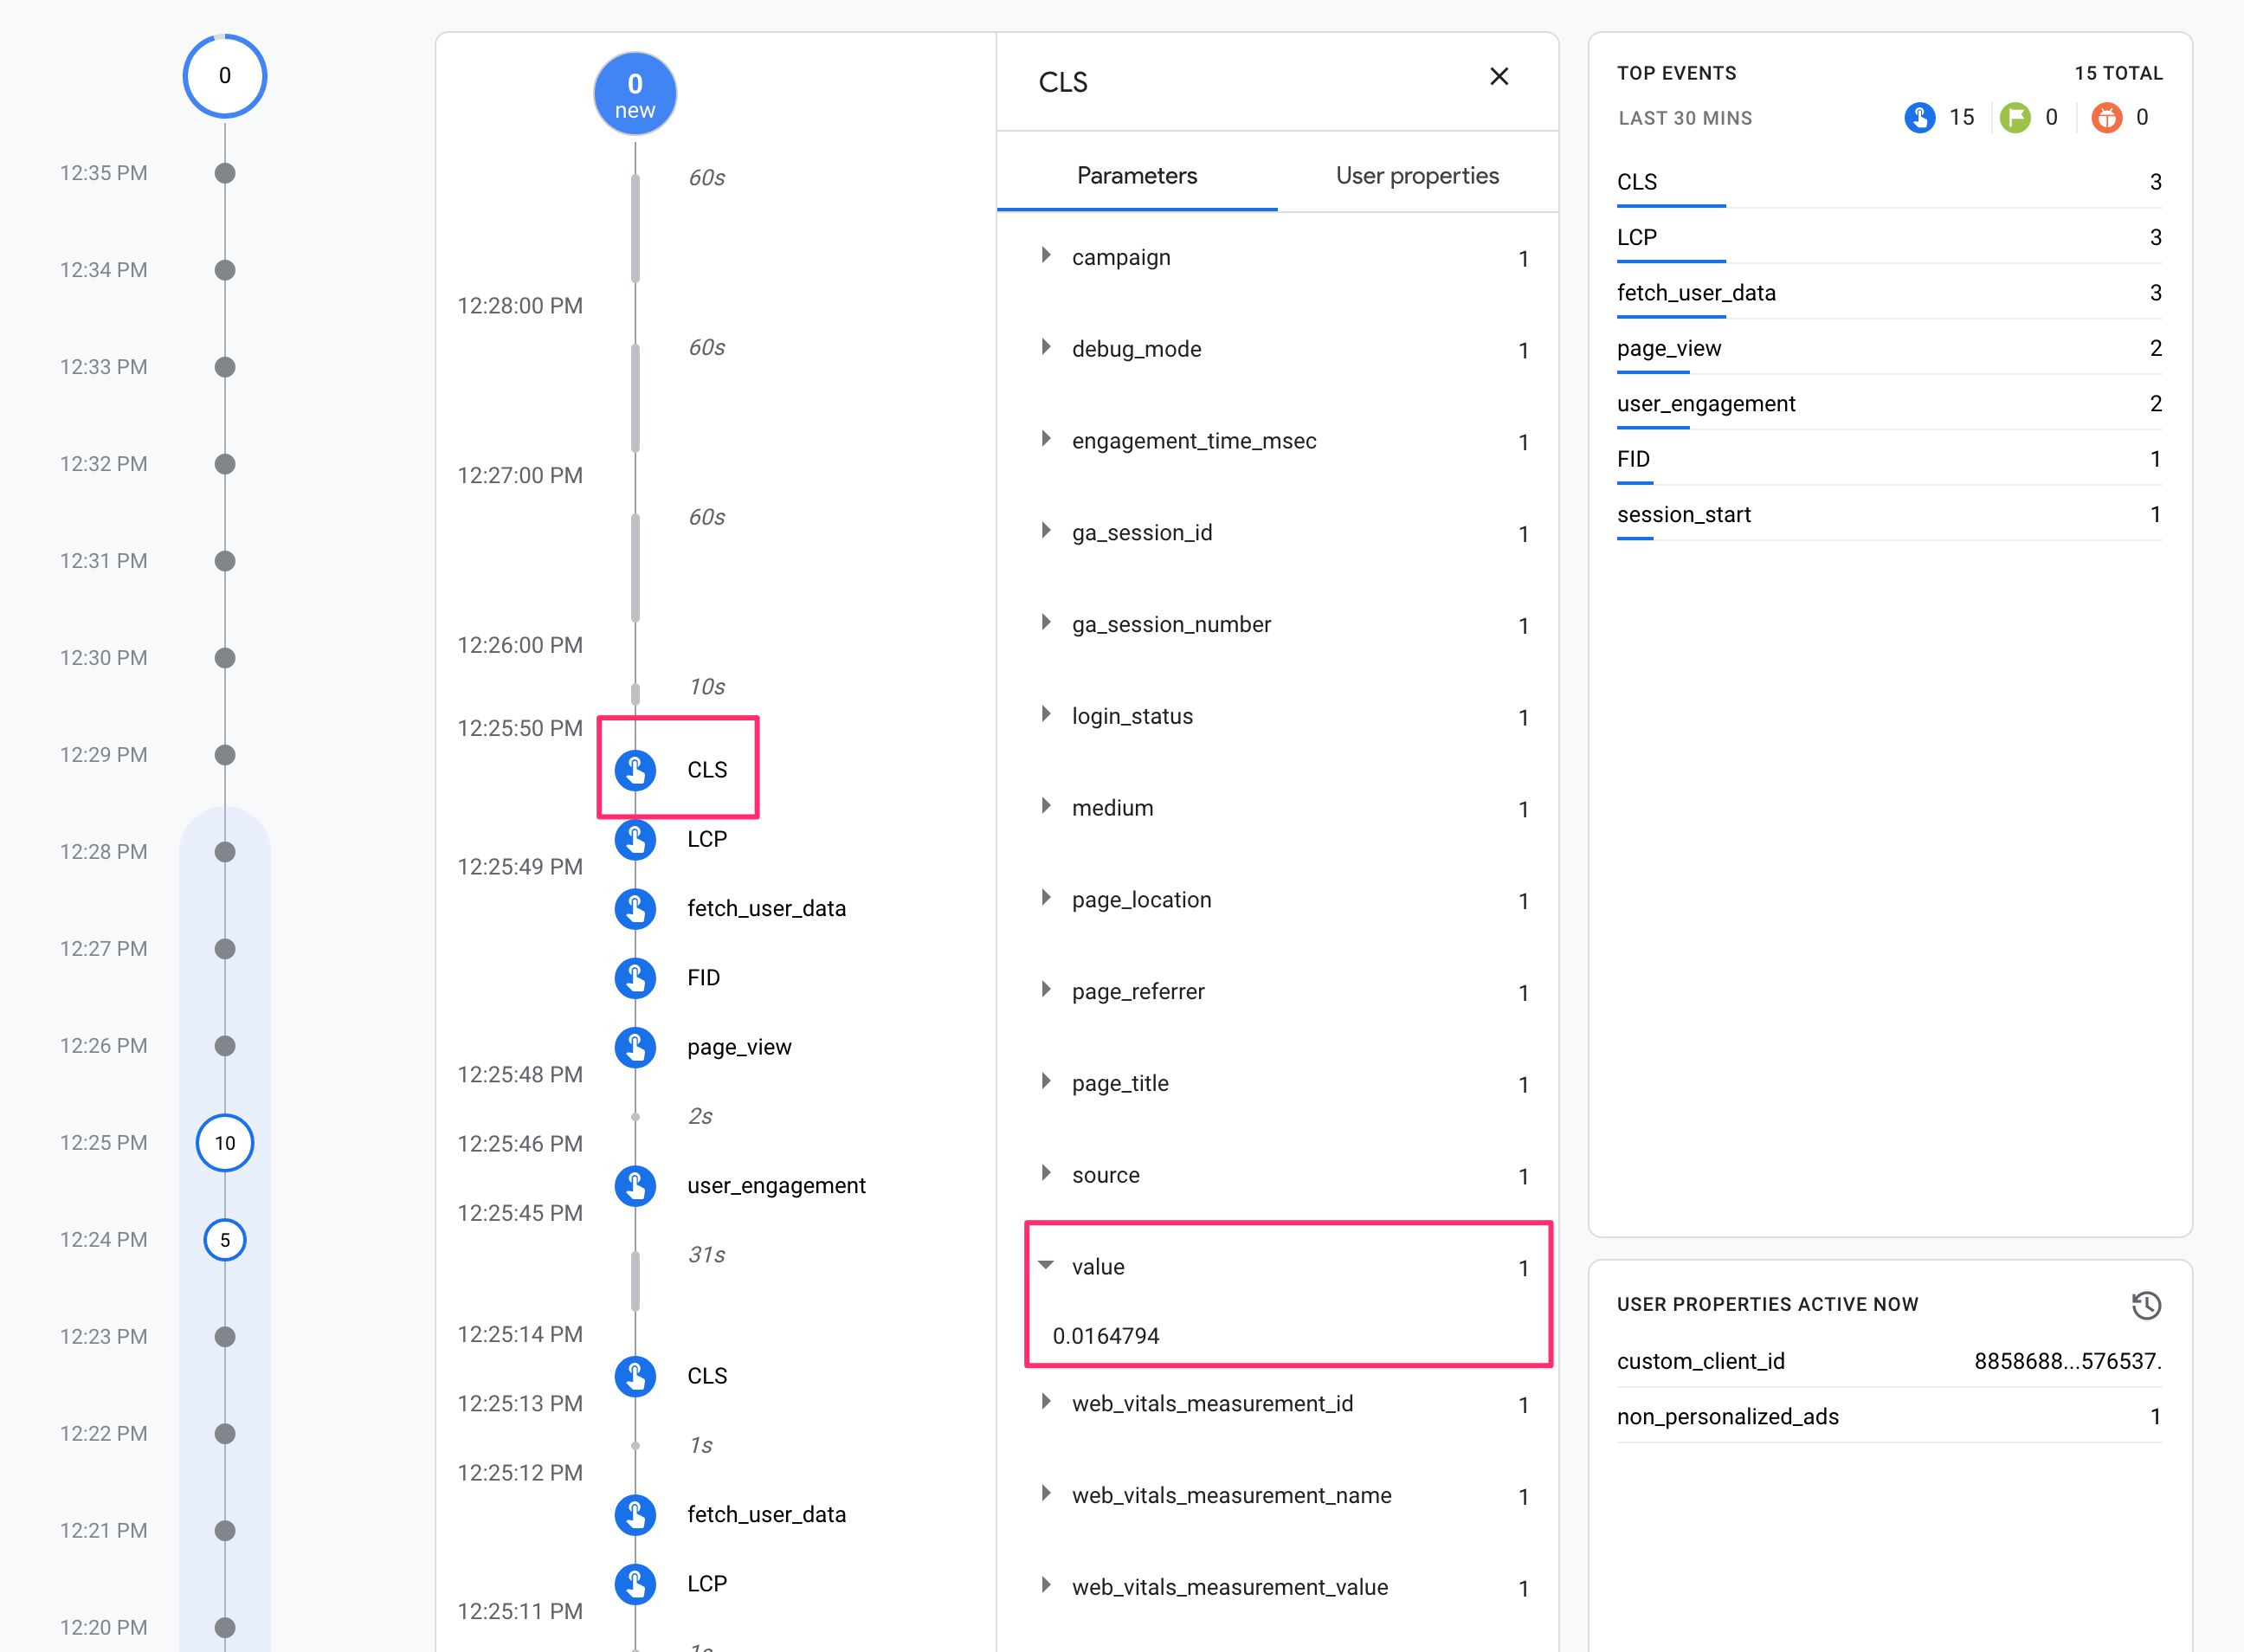
Remember that GA4 can be debugged in its own preview mode interface by clicking the respective measurement ID in the top bar of the preview mode interface. Here you can select one of the events, such as CLS, to see exactly what was sent to GA4 in the HTTP request!
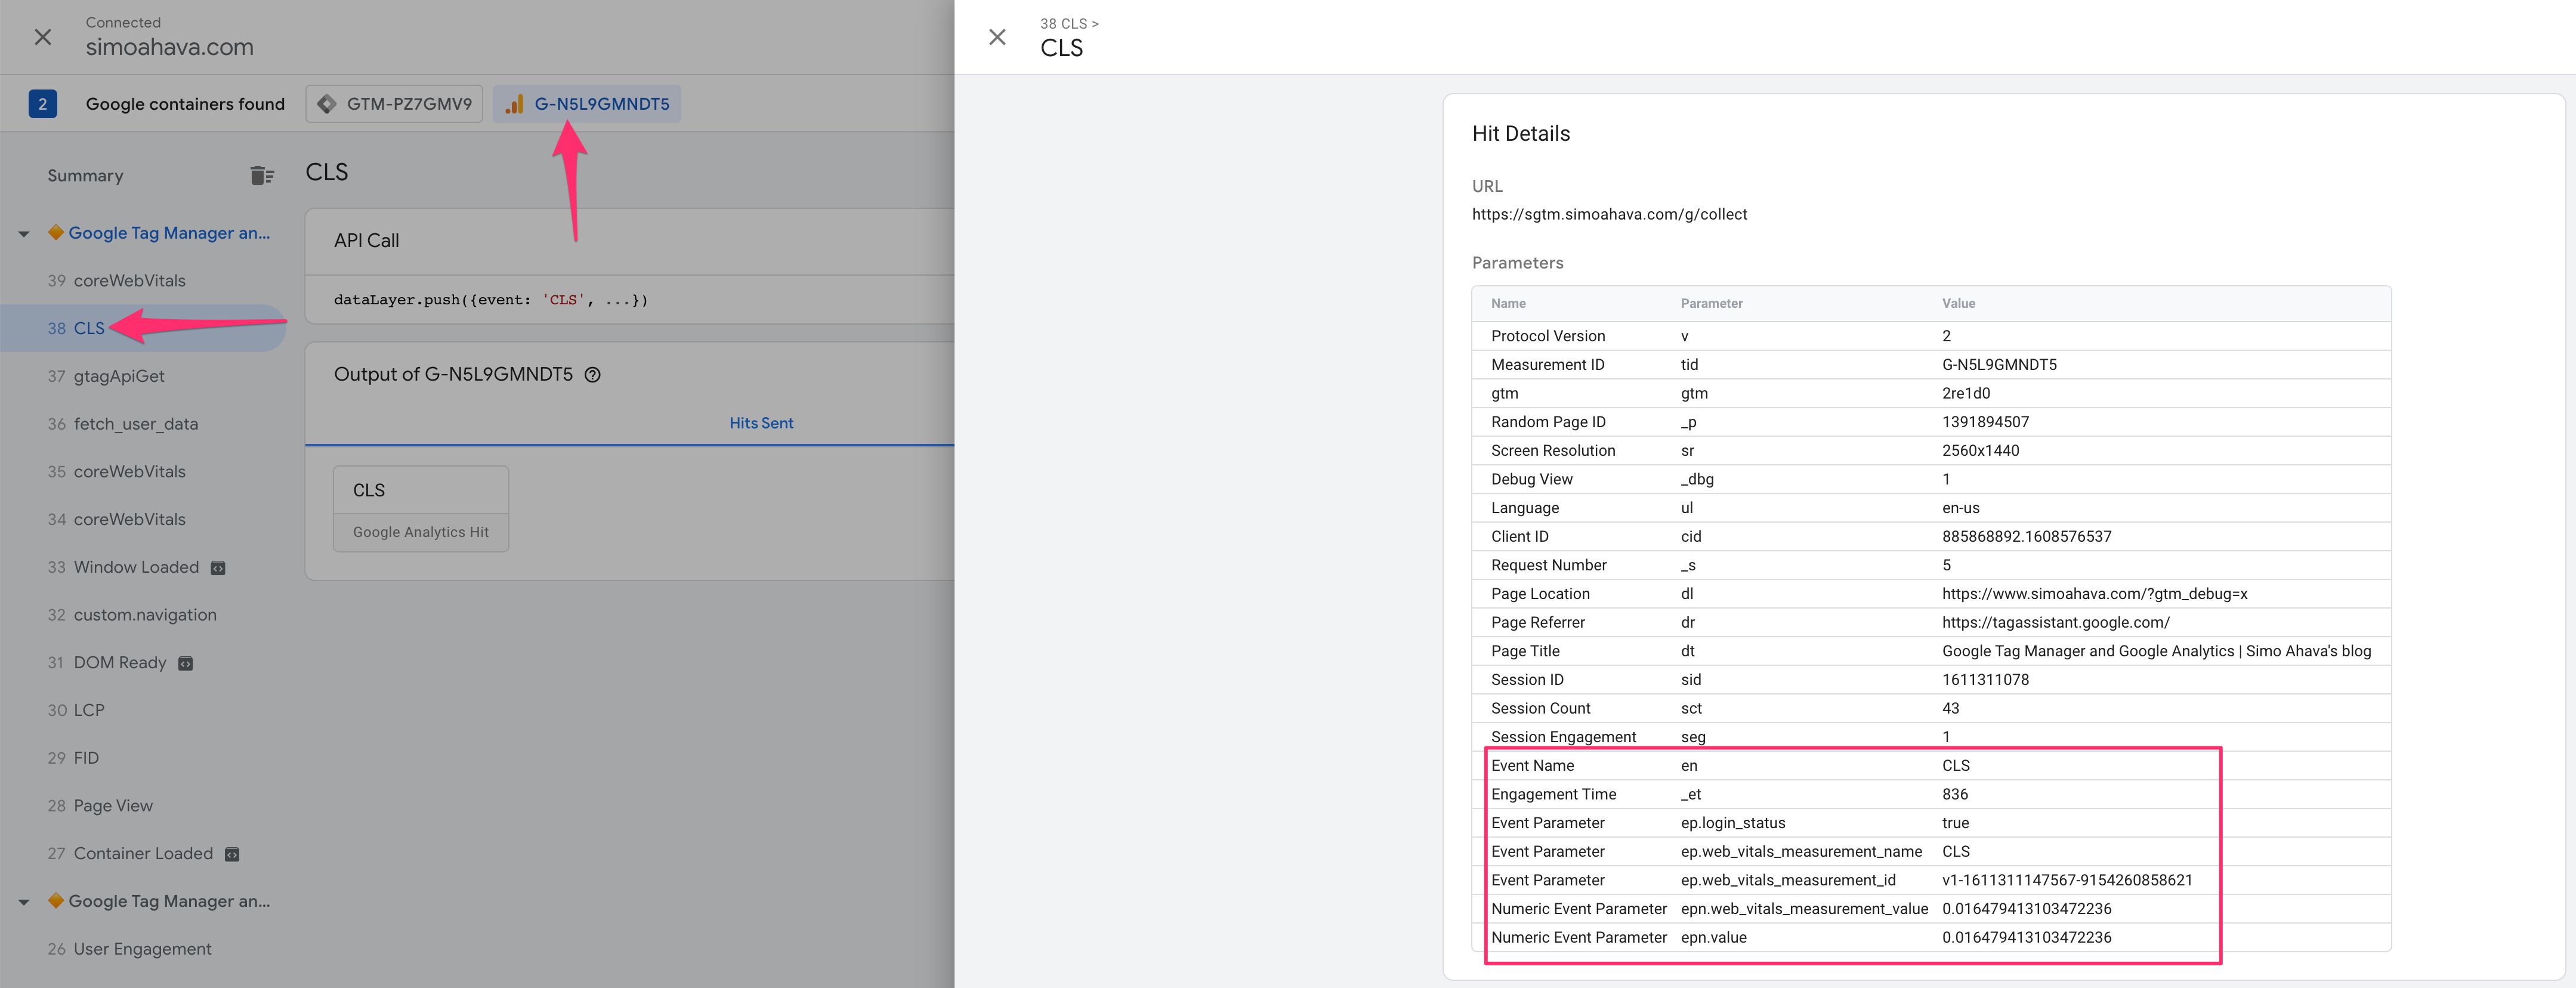
Don’t forget to check DebugView in the Google Analytics 4 interface as well!
Finally, there’s nothing as satisfying as watching the data flow into Google BigQuery.

Summary
I hope this article has been useful to you!
I particularly hope that the custom template introduced here will help you deploy Core Web Vitals tracking, as you can avoid working with pesky Custom HTML tags.
The template always fetches the latest version of the web-vitals library, which means that if a breaking change is introduced the template will break as well. I don’t think this is very realistic, but even if it does happen, I’ll be sure to fix the template as soon as this problem emerges.
Tracking Core Web Vitals makes a lot of sense, especially in Google Analytics 4 with its more liberal quotas and value type restrictions. Being on top of things when it comes to site performance is just so very important in this day and age, and everything starts with good data.
Please let me know in the comments if you have questions about this solution!
