
Track And Categorize All Link Clicks On The Site With Google Analytics 4
This is a guest post by Sebastian Pospischil, Evangelist Digital Analytics at TRKKN. All credit for the solution goes to him. The Summary section is the only one authored by Simo Ahava.
You know the deal.
Each and every day, clients reach out to you asking for custom click tracking for this call-to-action on that slider, or that button in this section of a page. They reach out to you because such things cannot be answered out of the box in Google Analytics 4.
Then you roll up your sleeves, create new tags, triggers, and variables, and ultimately the Google Tag Manager container will look like a mess. Somehow you’ve reached a point where almost each and every page view is also tracked with a click event. That makes no sense.
Would you like to overcome this? Do you want to help your clients without messing up their containers? Take a look at what this solution promises to report:
- In which sections did a click happen?
- On what page did the click happen?
- To which page did the link redirect?
- Which sections were clicked the most in total, per template, or per page?
- Which events are generated on which sections of a page or a template?
Yes, you read that last bullet correctly – this works for each and every event, too, and not just page views!
All you need is one tag and three little variables.
Unfortunately, due to restrictions of the Custom Template Sandboxed JavaScript, you’ll need to implement this solution with custom JavaScript.
You can download a workspace with the tag and variables by clicking this link.
Table of Contents
The Simmer Newsletter
Subscribe to the Simmer newsletter to get the latest news and content from Simo Ahava into your email inbox!
Technical walkthrough
You need to divide your website template into sections, so that the script returns the correct link_id. You’ll also need to define what a link is to get accurate results.
The tag will then set a cookie with the link_id of each click OR when pressing Enter on the keyboard on a defined link. When reaching the next page, the information will be read out and passed into Google Analytics 4 with the page_view event. This helps to prevent event spam in your analytics data.
There will also be a link_id_events_cJS variable which can be used to attach the corresponding link_id to any event you want to include in this tracking setup. There’s no cookie involved with this approach, because the events take place on the page itself and the information doesn’t need to be persisted to the following page.
NOTE! This is not a solution for total GTM / web development newbies. You’re expected to know how GTM works and what HTML elements and CSS selectors are. Furthermore, this article does not cover how to use
link_idfor single-page applications (SPAs) specifically.
How do I set it up?
The steps you need to take are these:
- Download and import the workspace into your container.
- Configure the tag and variables – the code is commented with instructions but there are additional tips below. Set the tag to fire on the All Pages trigger, for example.
- Add
link_id_page_cJS(name the event parameter justlink_id) andlink_id_page_template_var(name the event parameterlink_id_page_template) to yourpage_viewtag. - Add
link_id_events_cJSto your event tag(s) (name the parameterlink_idagain – it’s easier to have everything under the same parameter name). - Create the dimensions accordingly in the GA4 UI (
link_idandlink_id_page_template).
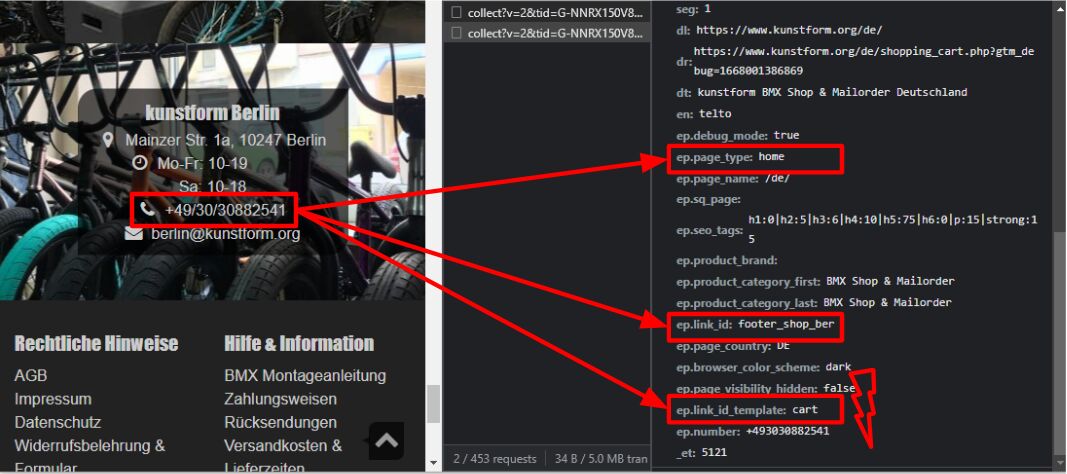
NOTE! This solution has to set a first-party cookie. You can name it however you wish, but you need to add it to your privacy policy / cookie notice / other relevant documentation to be compliant with whatever legal regulation applies to accessing device storage. The value doesn’t contain personal data – it just encodes details about the page and section that was clicked. The cookie will be deleted as soon as its value is accessed on the following page.
How to configure the script
If you’re not familiar with HTML and CSS selectors, you may struggle with these initially. But I’ll help you, don’t worry!
As an example, I’ll provide you with a walkthrough of my own project. If you want to see this in action, you can visit the site where the setup is running: https://www.kunstform.org/.
Divide the website HTML template into sections
To add information about which section of the page the click happened in, you need to define these sections in the clickIdentifier configuration.
In Google Tag Manager, open the Custom HTML tag that contains the script.
Under the gtm_link_id variable initialization, you’ll see a property called clickIdentifier. This is an object where you provide the site section details using a special syntax:
"[CSS SELECTOR]": "[DYNAMIC VALUE]#[FIXED VALUE]"
For the CSS selector, add a selector that matches that particular section of the page.
The fixed value is what the section will always be called in the parameter value.
If you specify a dynamic value, it attempts to pull in the value from the attribute name(s) you provide.
When a click lands on the element specified by the CSS selector, the tag creates the link_id parameter by concatenating the fixed value first (if available), followed by the > separator and the dynamic value.
For example:
| Rule | Target element | Label |
|---|---|---|
"div#myhome": "id#main_section" | <div id="myhome"> | main_section > myhome |
"nav": "#navigation" | <nav> | navigation |
"span[data-gtm]": "data-gtm#tagged_element" | <span data-gtm="..."> | tagged_element > ... |
To build this list of sections, you need to refer to the HTML of your page templates. Not all template engines generate useful HTML, so it’s possible you’ll need to talk to your developers to get their help in rewiring the HTML structure of your site to be more tracking-friendly.
Here’s how I set this up on https://www.kunstform.org/:
Open the website, right-click anywhere on the page, and select Inspect (or similar) from the context menu.
You should now see something like this. When hovering over the HTML code, you’ll notice how the different sections get highlighted. Click these tiny grey arrows in order to only show the main sections. This will be our starting point.
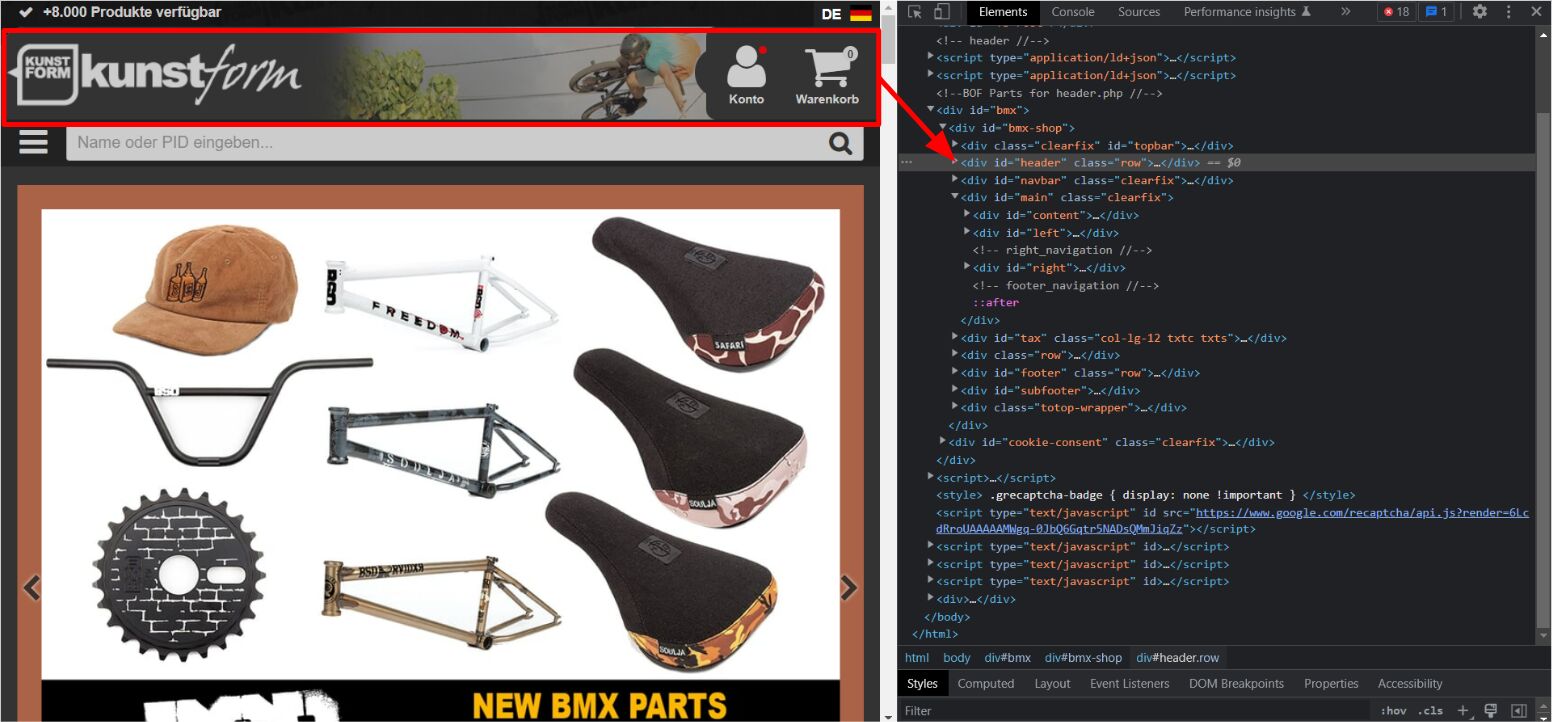
- Following this example, we would divide the template into the following sections (by ID):
headernavbarcontentleftrightfootersubfootercookie_consent
Because this site only has the id attribute on <div> tags, we can set up this tracking with a very simple clickIdentifier rule:
clickIdentifer: {
  "div[id]": "id"
}
If you recall from above, this means that the script tracks clicks within all <div> elements that have the id attribute. The label of the section is dynamically pulled from the id attribute.
As an example of something different, this is what I would set up on the https://www.trkkn.com/ website:
clickIdentifier: {
  "nav": "#navigation", // Fixed value: "navigation"
  "footer": "#footer", // Fixed value: "footer"
  "header": "#header", // Fixed value "header"
  "main section": "class", // Dynamic value from the [class] attribute
  "div[id]": "id" // Fallback, passes the dynamic value of the [id] attribute of the clicked <div> element
}
Hopefully that’s clear now. After specifying the basic sections of the template, we can drill deeper into the content section of the page.
For example, we want to track this slider and this sale section:
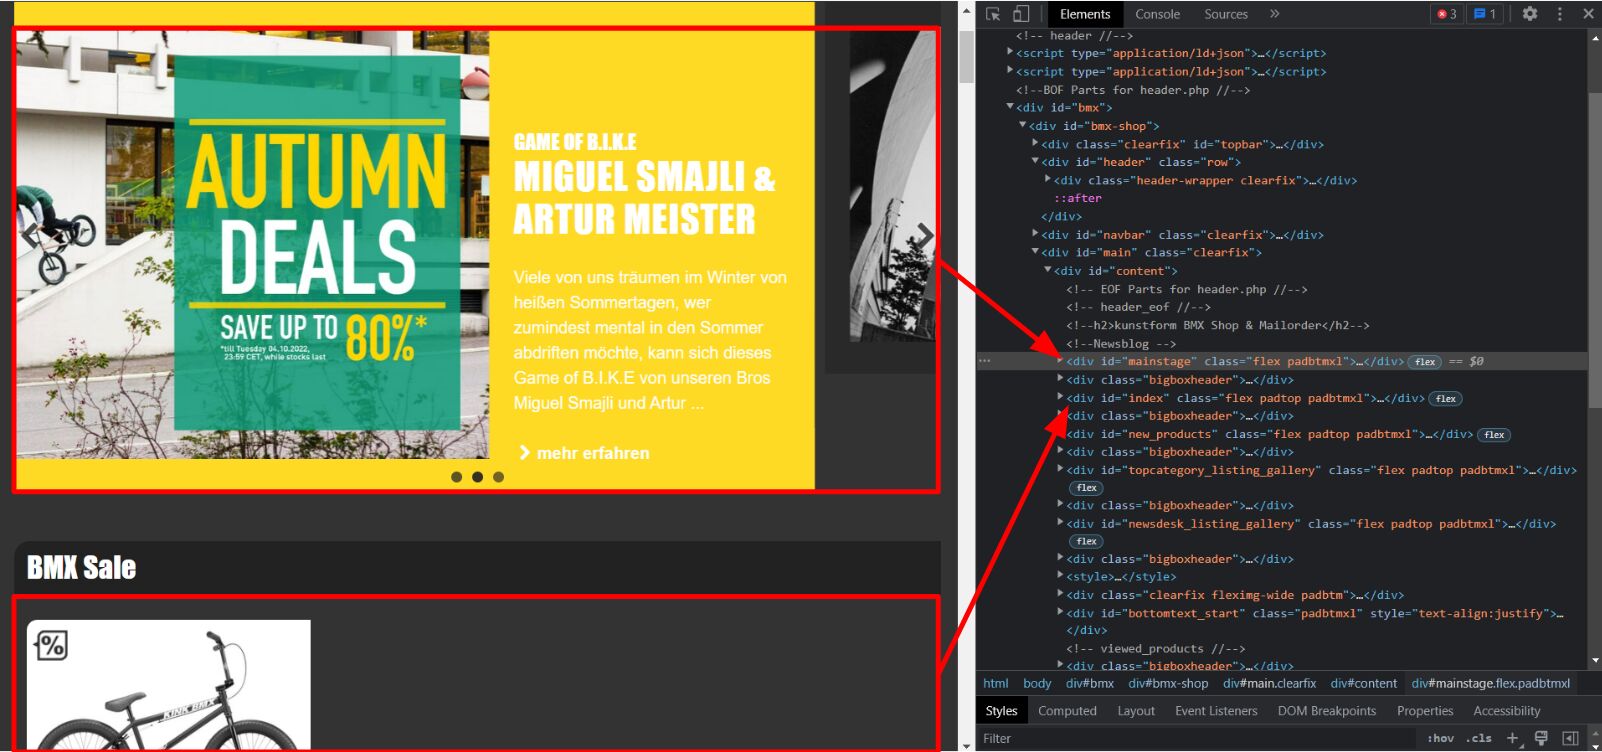
Here’s what the updated clickIdentifier would look like:
clickIdentifier: {
  "div#mainstage": "#slider_main",
  "div#index": "#sale",
  "div[id]": "id"
}
We added these to the top of the list, because the script evaluates the selectors in order from first to last and uses the first match to generate the label.
You can use the technique to divide your template even more, if you wish.
I recommend you start easy at first. Specify the basic sections first and perhaps sprinkle in some detailed sections on the home page. You can then collect data for a while before adding additional content sections on other pages, too.
Define which interactions constitute a click
For this solution to be accurate, we’ll need to specify what we consider to be a “link click”. For example, in addition to <a> link elements, some form submissions and some button clicks can generate a redirect, too.
To specify the selectors for what you want to be treated as a link when targeted with a click, edit the clickSelector property in the gtm_link_id initialization object.
Set its value to a comma-separated list of selectors that match elements upon which a click should be considered a “link click”. For example, this is a good starting point:
clickSelector: ‘a,input[type=“submit”],button’`
On the https://www.kunstform.org site, we need to also add the search field, because pressing enter there will lead to a redirect to the search results page.
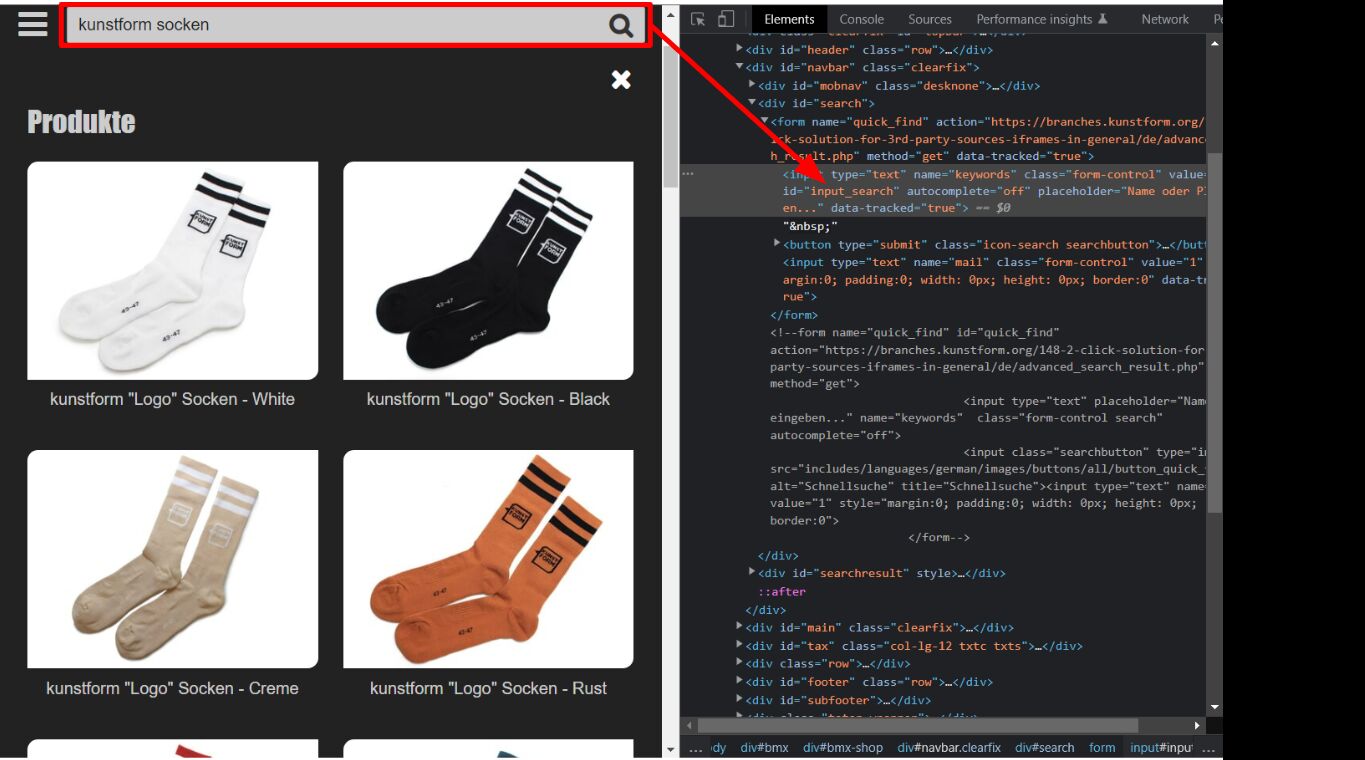
Here’s what the updated clickSelector looks like:
clickSelector: 'a,input[type="submit"],button,#input_search'
At this point you might be wondering just how much you need to configure for this to work. Do you need to crawl all the pages of the website to see if you’ve missed something?
It might be a good idea to take a look at the reports at this point to help soothe your mind.
Reports in Google Analytics 4
Here are some sample report configurations you can use once you’ve created the required Custom Dimensions (link_id and link_id_page_template).
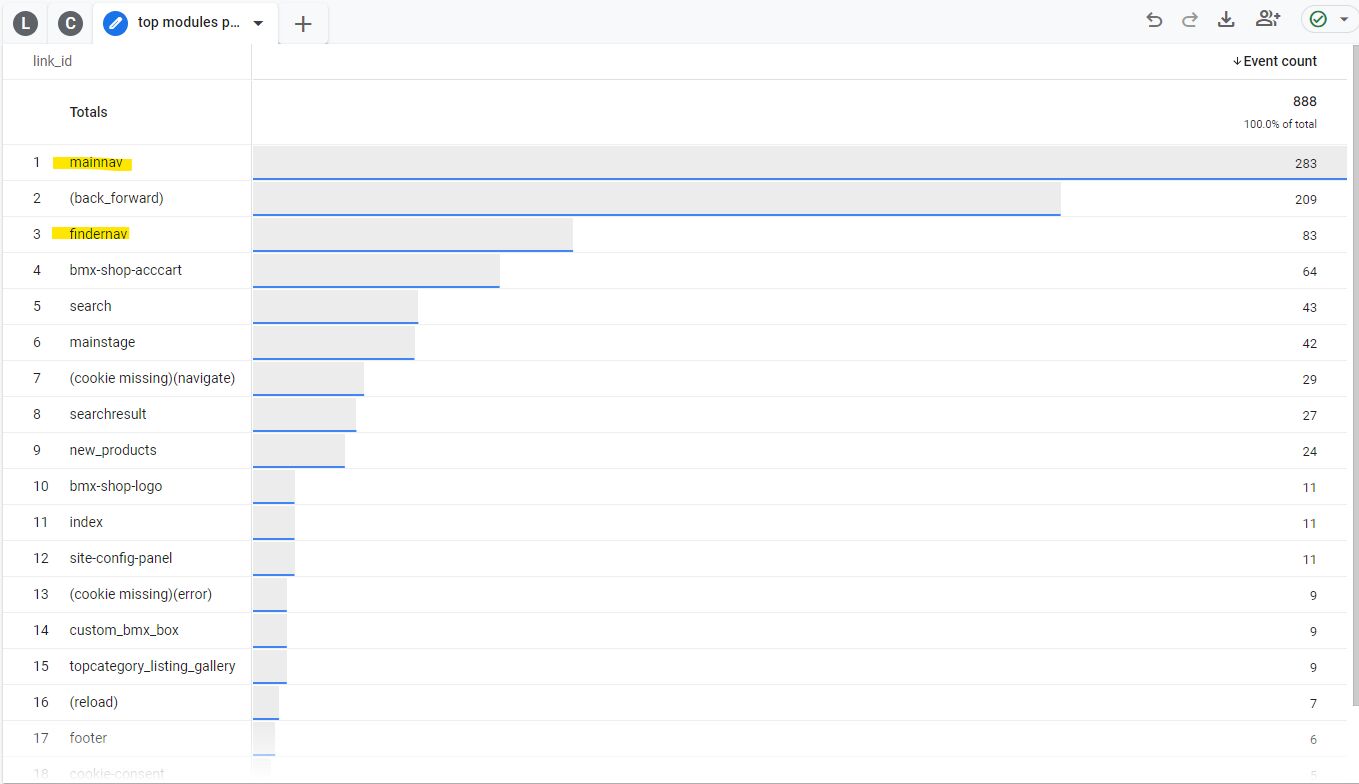
Which sections are clicked the most overall?
- Dimension:
link_id - Filter:
event equals page_view
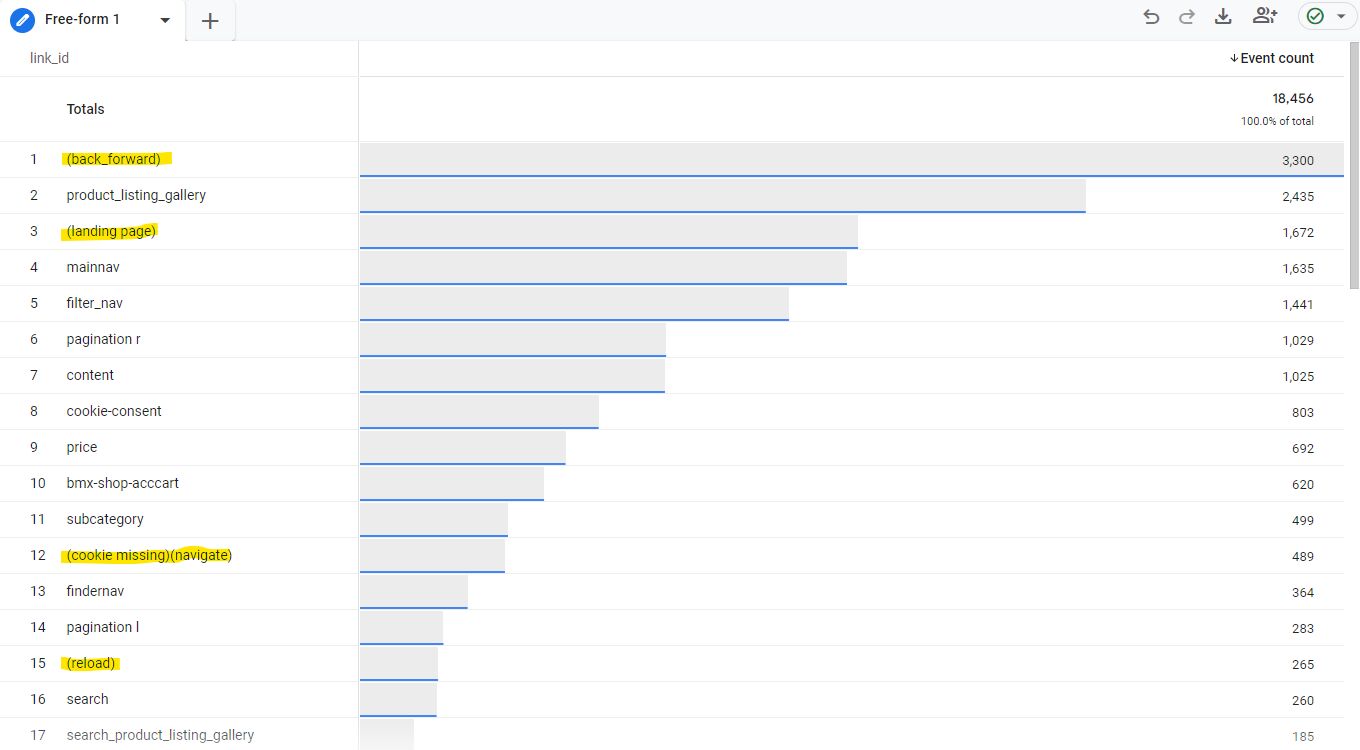
Notice the entries marked in yellow? When this solution was deployed on the site, there were some gaps in the data collection. These special entries are used to provide more details.
- (back_forward): The user navigated with the browser’s back or forward button.
- (reload): The user reloaded the page.
- (landing page): The user landed on the site via this page, because the
document.referreris a different site than yours. - (cookie missing)(navigate): There is no cookie but the user definitely navigated. This means that there are still sections that you haven’t tracked as potential navigation sources in
clickSelector. - (error): There was an error with the
PerformanceNavigationTimingAPI
How do I fix (cookie missing)(navigate)?
- Dimensions:
link_id,Page referrer,Page path and screen class - Filter:
event equals page_view,link_id equals (cookie missing)(navigate)
This report tells us on which page the user was (Page referrer) and which page they navigated to (Page path and screen class).
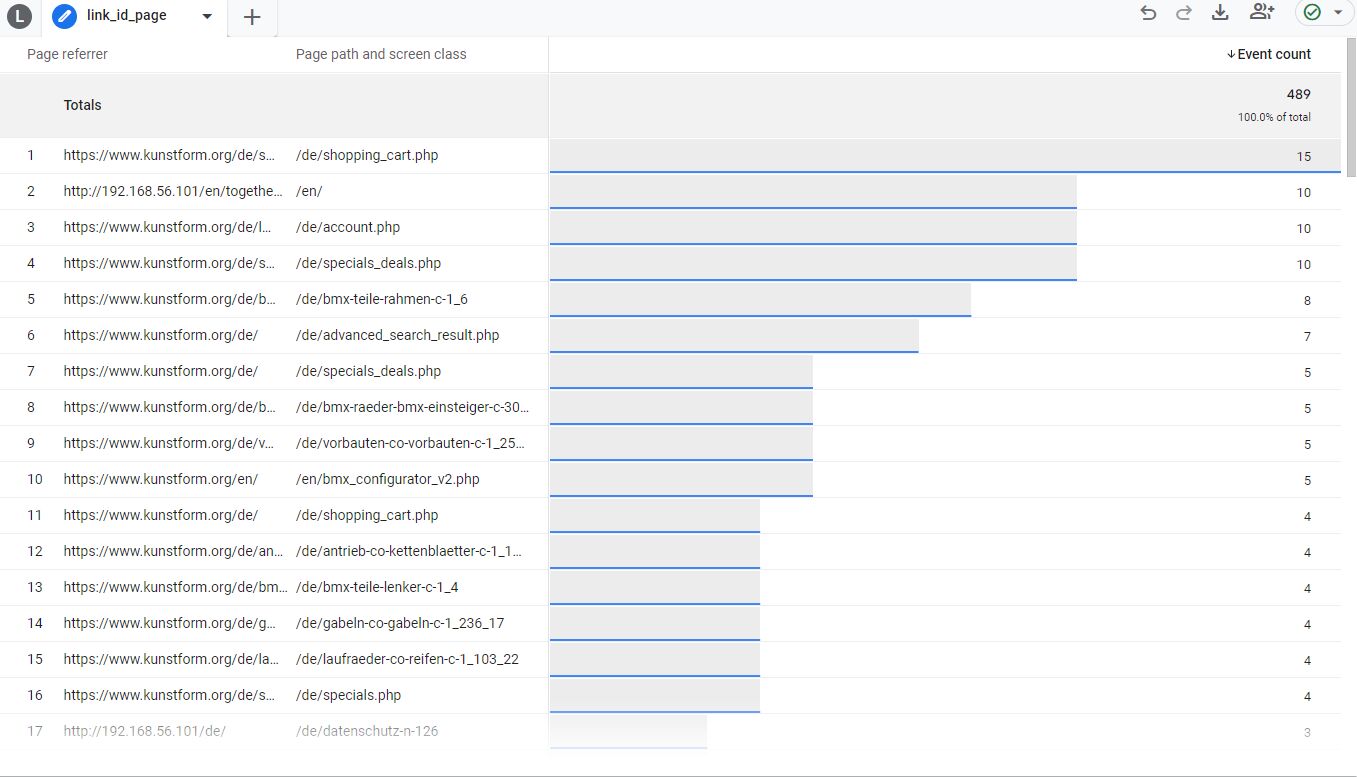
In the first entry, when we hover over the Page referrer value, we can see that the user navigated from /shopping_cart to /shopping_cart. Huh?
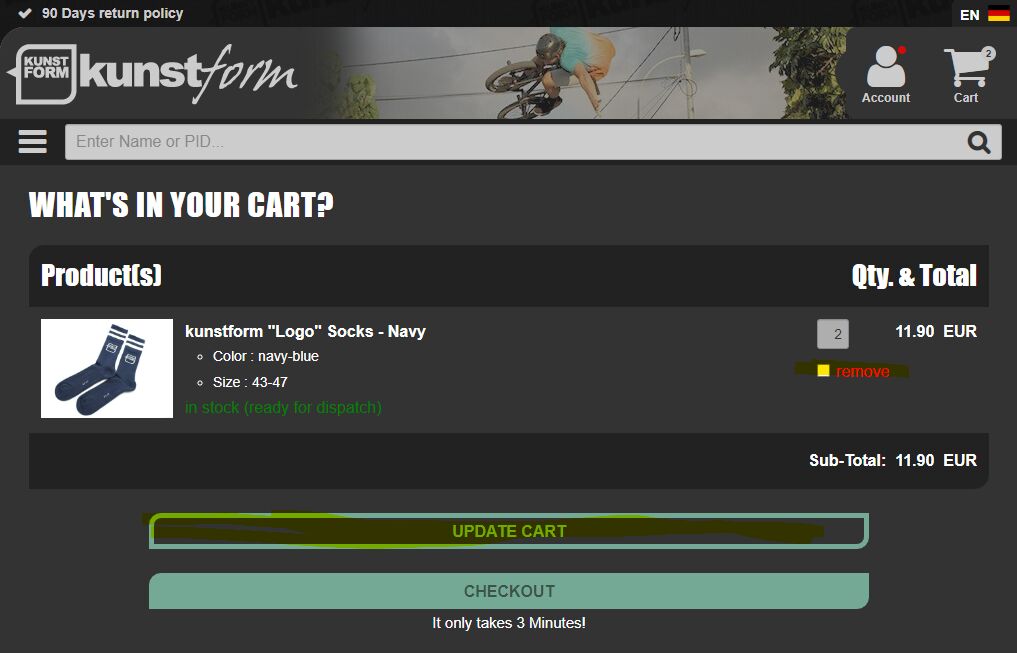
There are only two interactions that generate a new page load: UPDATE CART and REMOVE. Let’s click these two buttons to find out how our solution reacts:
- When I click UPDATE CART, the label for the link is set to
content, so it works nicely. - When I click REMOVE, nothing happens. You need to click UPDATE CART anyway.
So it’s neither of these. What could it be?
Well, if I change the quantity of an item in the respective input field and press Enter, an event with (cookie missing)(navigate) is dispatched as the event parameter value. Found it!
If we inspect this field, we can see how we should update clickSelector.

This <input> element is not on our list of valid clickSelector options. So, we need to update it. Here’s what the new clickSelector looks like:
clickSelector: 'a,input[type="submit"],button,#input_search,input[name="cart_quantity[]"]'
Now when I change the quantity and press Enter, the solution tracks it correctly.
You can now do the same run-through with all the obscure entries in the list. If you do your work carefully, the number of (cookie missing)(navigate) entries will reduce over time.
Do people click my slider on the start page?
- Dimension:
Page path and screen class - Filter:
event equals page_view,Page referrer equals https://www.kunstform.org/de/,link_id equals mainstage
There are three cards on the home page slider. Which one gets the most clicks?
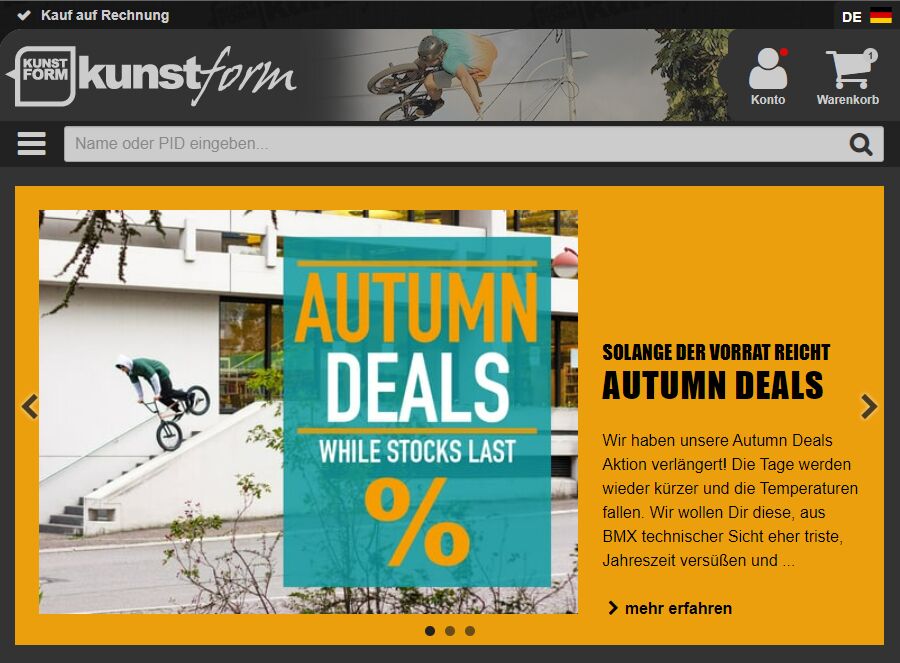
Here’s what the report tells us:
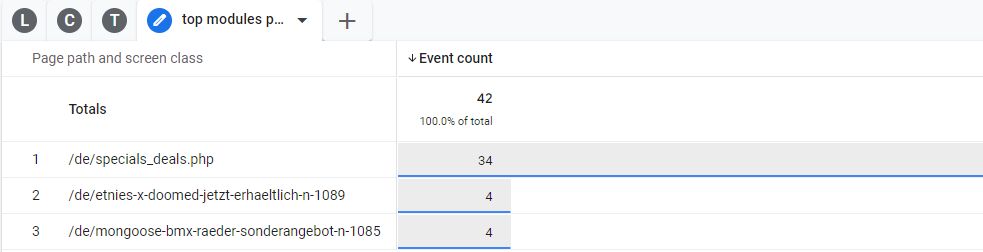
In this case, the first slide gets the most clicks. No extra event tracking was needed – our solution took care of it for us! We can use this information to run A/B tests, for example, to make sure that our slider attracts users in the best way possible.
Which sections are clicked the most on a given page?
- Dimension:
link_id,Page referrer - Filter:
event equals page_view,Page referrer contains [PAGE_TO_BE_ANALYZED]
In this case, I filtered specifically for clicks on the home page. I wanted to know if users tend to use our parts finder more than the main navigation.
Based on the report, it certainly looks like the findernav is very popular.
Which modules get clicked most per page template?
- Dimension:
link_id - Filter:
event equals page_view,link_id_page_template equals product_detail
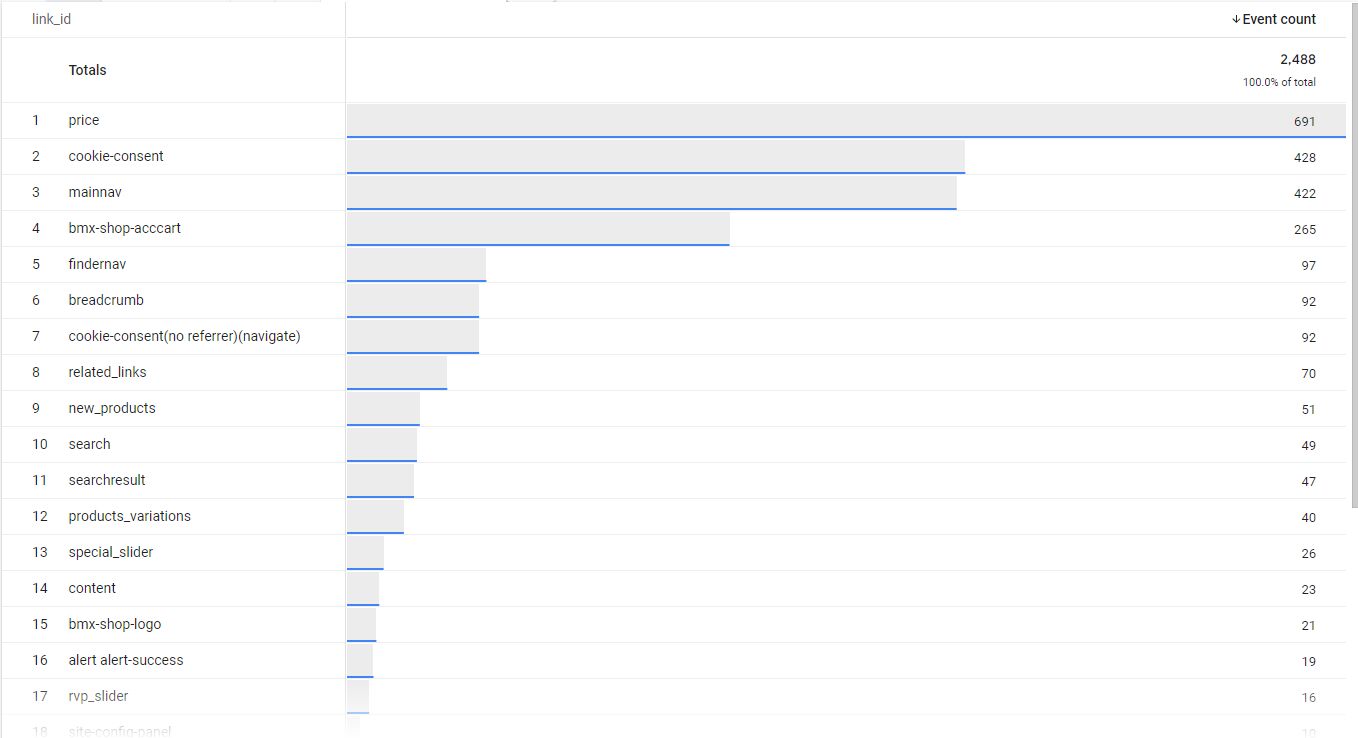
On product detail pages, users tend to interact with the price panel first. And that’s good news!
What about all the other events besides page_view?
The Google Tag Manager variable link_id_events_cJS will attach the link_id to whatever tag the variable is added to. No cookie needs to be set, because the event happens on the page without a redirect taking place.
Be aware that link_id_page_template will contain the value from the previous page_view event. If we want to analyze the events per page template, we should use page_type in our example below instead.
Other than that, you can do the same analysis with other events as you’ve done with page_view. Just remember that event analysis happens on the same page where the event was collected, so when you build the reports, you can use Page path and screen class as the dimension rather than Page referrer. This is relevant when you work with single-page applications (SPAs), too.
Summary (by Simo)
Thank you, Sebastian!
This might seem like a complicated thing to get working, but once you figure out the appropriate CSS selectors for your site sections, and once you figure out which element interactions should be classified as “link clicks”, the actual script will do the rest of the work for you.
The end result is a fairly self-sufficient way of tracking clicks that lead to navigation / redirect events.
You can use this information to build navigation pathing reports for sure, but you can also use it for building heatmaps and for validating which sections of your page templates receive the most attention.
If you have questions about how to set this up or about the implementation itself, feel free to add them to the blog comments!
