
Join Google Ads And GA4 Data In Google BigQuery
I am fortunate to share another guest post by Arben Kqiku, Digital Analyst at Assura.
Last time, Arben graced this blog with a comprehensive love letter to R as an example of the power of this programming language.
This time, he’ll add even more fancy tools to the toolkit to help you build a data pipeline in the Google Cloud Platform to join your Google Ads and Google Analytics 4 data together.
Table of Contents
The Simmer Newsletter
Subscribe to the Simmer newsletter to get the latest news and content from Simo Ahava into your email inbox!
Goal of this article
My goal for this article is twofold; first, I want to show my fellow R users that it is possible and fun to use R in a production environment! R is sometimes seen as a second-class citizen compared to Python, but in my experience, R has consistently proven effective in addressing all my data challenges at work.
Second, I want to show my fellow digital analysts the power of complementing GTM and GA4 with additional tools.
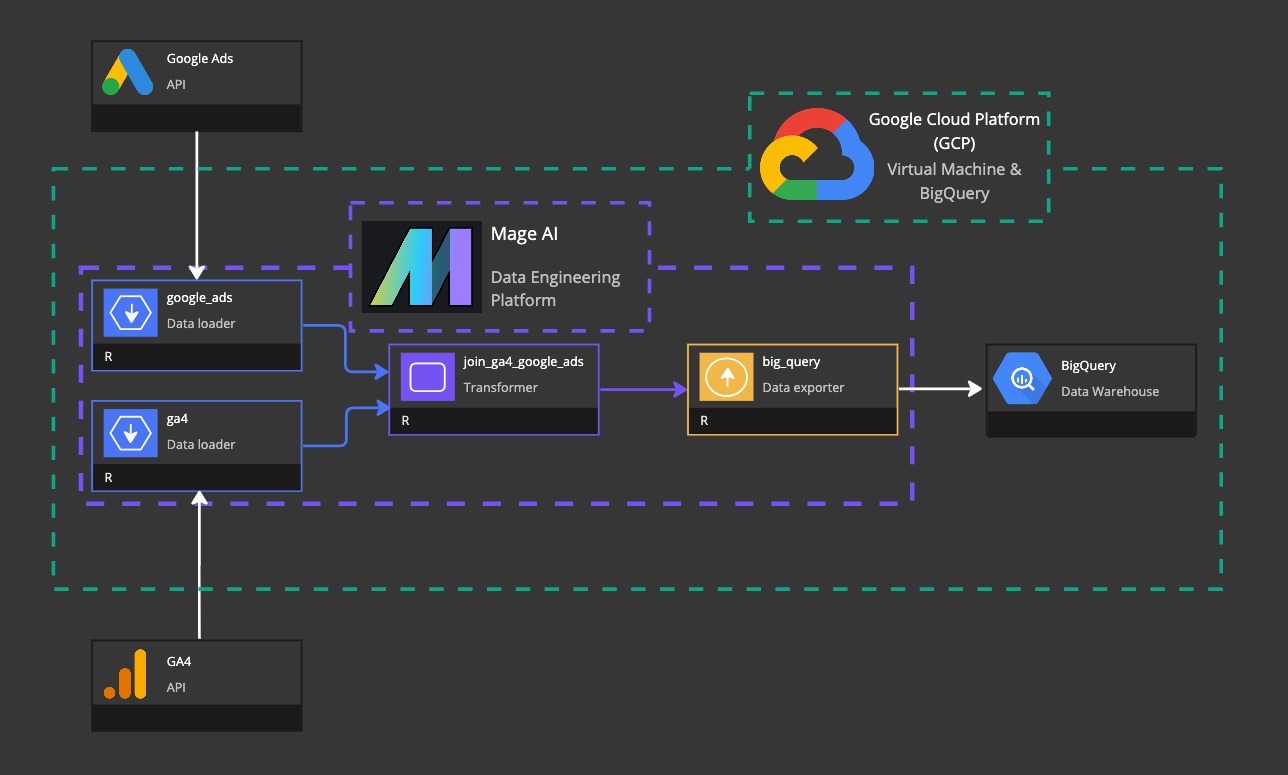
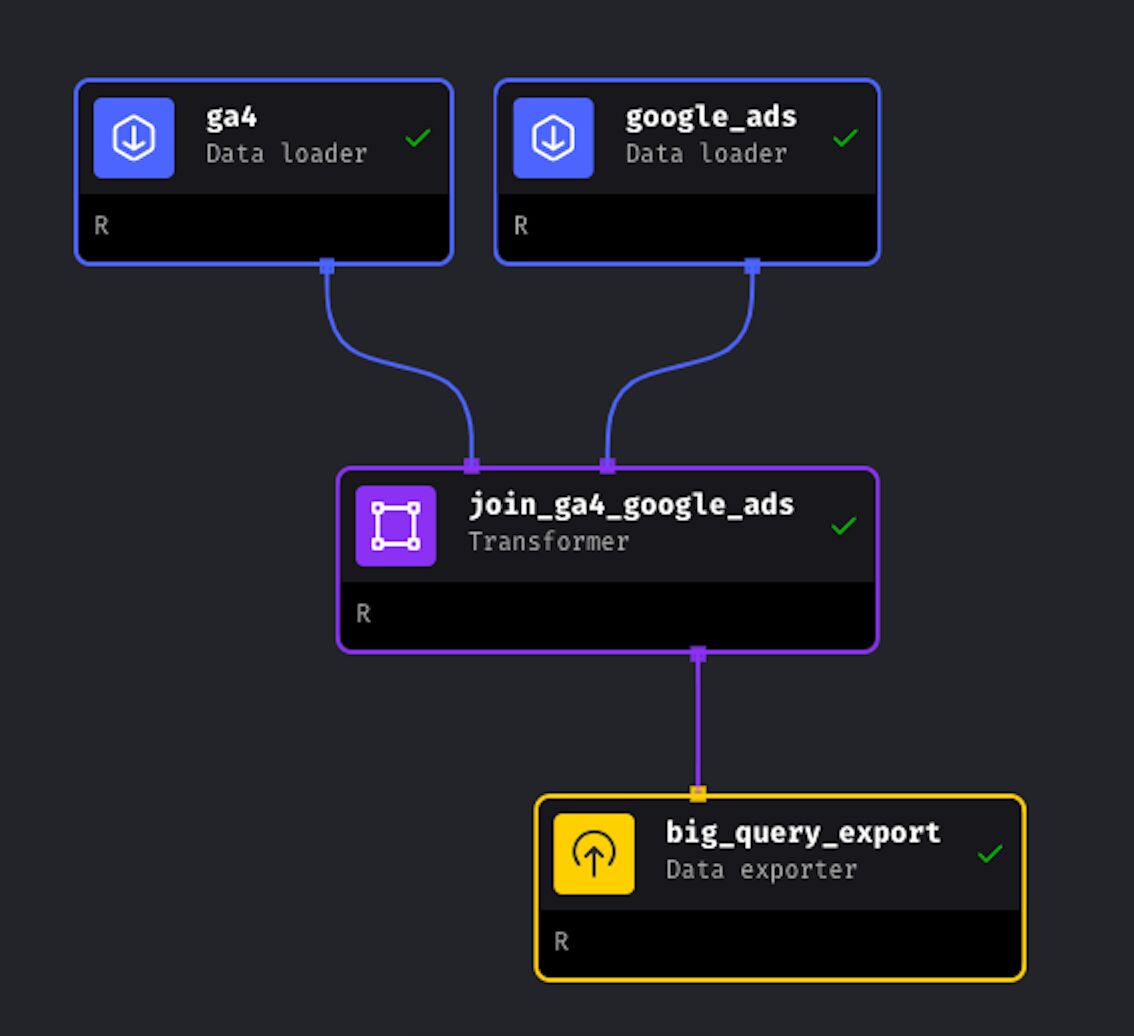
Above you can see an architectural overview of what we’ll build today.
What am I trying to solve?
As a digital analyst, I often need to combine data from different sources and display it in a dashboard.
For instance, clients run campaigns on platforms like Google Ads and Meta Ads, and they want to understand the impact of each channel or even individual campaigns.
The challenge is that each channel tends to attribute conversions mostly to itself. This isn’t intentional; it’s just that each channel operates independently and can’t see the contributions of others.
To address this, we usually use conversion data from a third-party source, like Google Analytics, and combine it with other data such as impressions, clicks, and cost from the advertising channels. This helps us calculate the cost per conversion for each channel more accurately.
I know multi-touch attribution isn’t perfect because it often doesn’t consider view-through conversions. However, it’s the best method we have for day-to-day operations. While Marketing Mix Modeling is an option, it requires a lot of data over a long period. So, for practical purposes, multi-touch attribution remains our best tool. As the saying goes, all models are wrong, but some models are useful.
What are the requirements of the solution we’ll build?
The pipeline we’ll build today needs to address the following things:
Accessibility: Make sure we can easily get data from different sources, such as Google Ads, Meta Ads, and GA4.
Data integration: Combine data from different sources accurately.
Storage: Create a data warehouse in Google BigQuery for the joined data and make it accessible to data visualization tools.
Maintenance: Find a way to automate these steps without needing manual intervention. That way stakeholders will have access to almost real-time data.
The awesome things you’ll learn
- How to create a Google Cloud project.
- How to set up a virtual machine.
- How to access your virtual machine remotely.
- How to install Mage.ai on the virtual machine to handle the automation.
- How to retrieve data from the GA4 API in a production environment.
- How to retrieve data from the Google Ads API in a production environment.
- How to export data to Google BigQuery in a production environment.
- How to schedule a data pipeline that automatically updates every 5 minutes.
Tools
Mage.ai and R
In my previous company, comtogether, Casper Crause took care of our data engineering needs, and he often did so with Python.
Recently, I needed to automate multiple data pipelines and I had no idea how to do that in R. I thought, well, might as well learn Python. But then, before giving up, I googled one last time Data Engineering in R, and that’s when I stumbled on Mage.ai!
The screenshot below comes from Mage. Mage is a data engineering tool that allows you to build your ETL (extract, transform, and load) pipelines. What I love about Mage is that it is easy to use, you can visualize your data pipelines and it supports multiple programming languages: SQL, Python.. and R!
I love R and I am so thankful that Tommy Dang and his team included it in Mage.
Many tools prefer Python since it is more widely adopted for data engineering tasks. Moreover, in a recent workshop on Andreas Kretz’s YouTube channel, Tommy mentioned that they are going to include even more programming languages!
In addition to building our pipeline, we’ll use Mage to schedule it, as you can see in the example below.
Google Cloud Platform (GCP) and Visual Studio Code
You can run Mage on your local machine or in the cloud.
Obviously, if you run it locally, your computer needs to be on all the time, which is not ideal. Therefore, we’ll create a virtual machine (VM) on the Google Cloud Platform and run Mage from there.
A virtual machine (VM) on GCP is like a computer in the cloud. It’s not a physical machine you can touch; instead, it’s a powerful, remote computer that you can use to run your software and store your data.
To access the virtual machine from our computer, we’ll use Visual Studio Code, which is a lovely, free code editor that supports many programming languages.
Walkthrough
Configure the Google Cloud Platform
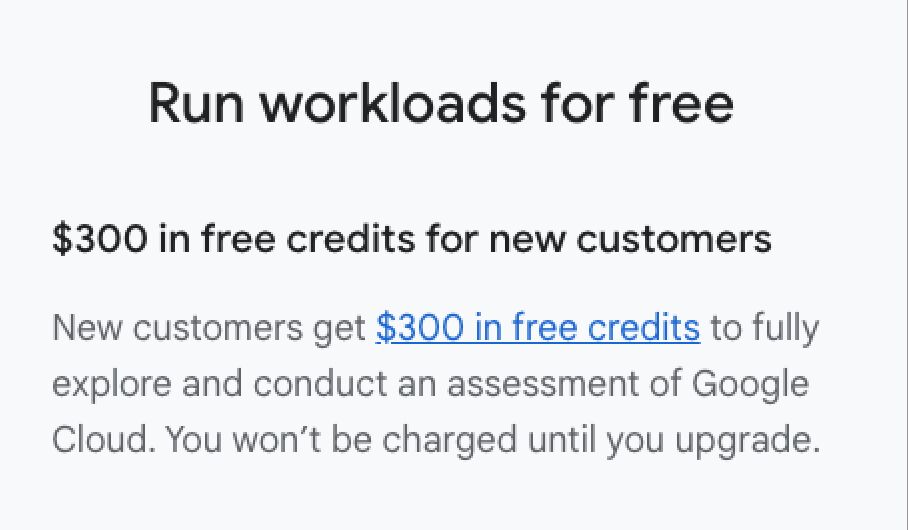
Billing and costs
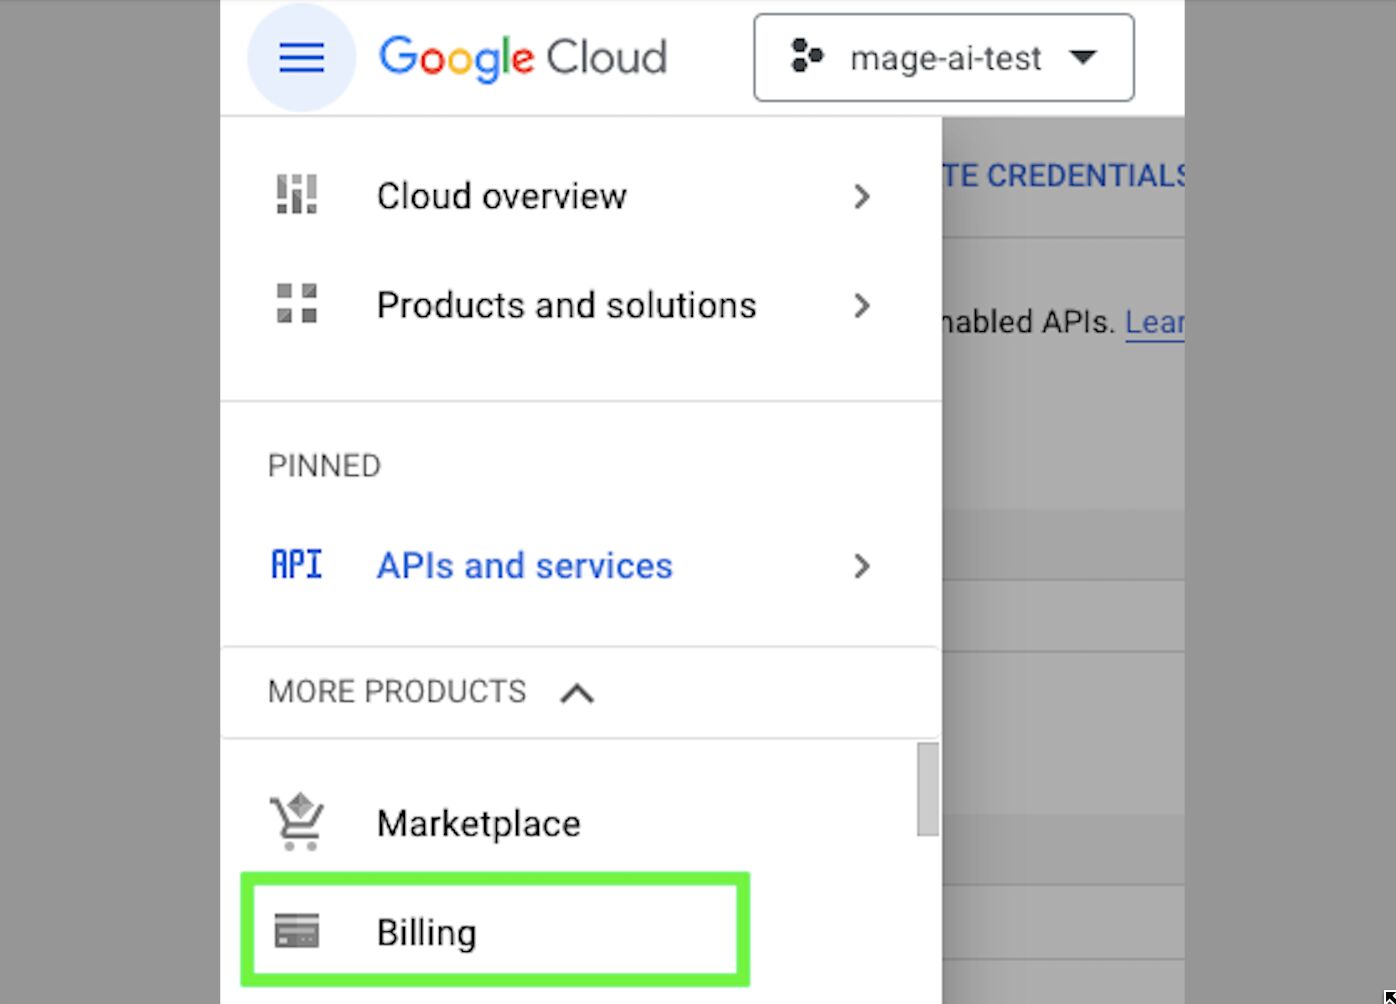
To use GCP, you need a payment method. But worry not, as of today, If you have never used GCP, you get a credit of $300. So, go to the Google Cloud Console and create an account: https://console.cloud.google.com/welcome.
Once you have used your free credits, you need to add a credit card to your account, by going under “BILLING”:
Create a Google Cloud Project
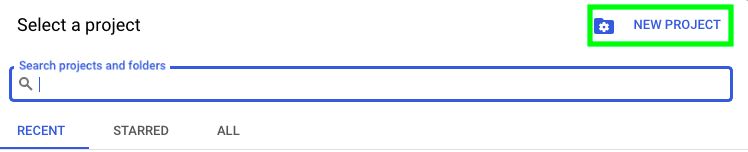
In order to use GCP, we need a project. Later, everything that we’ll do will be within this project. So, go back to https://console.cloud.google.com/welcome and create a new project by first clicking on the project selector in the top left.
Then, click on “NEW PROJECT”.
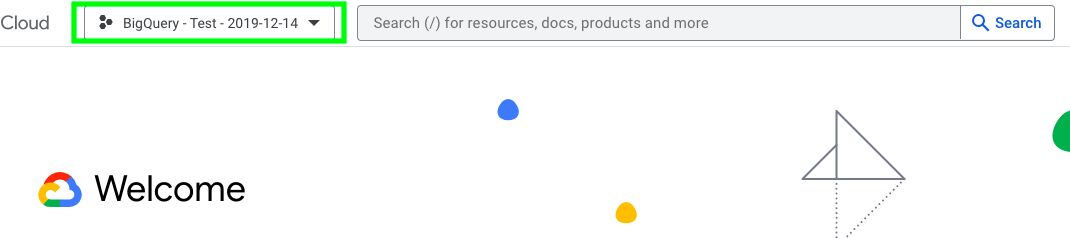
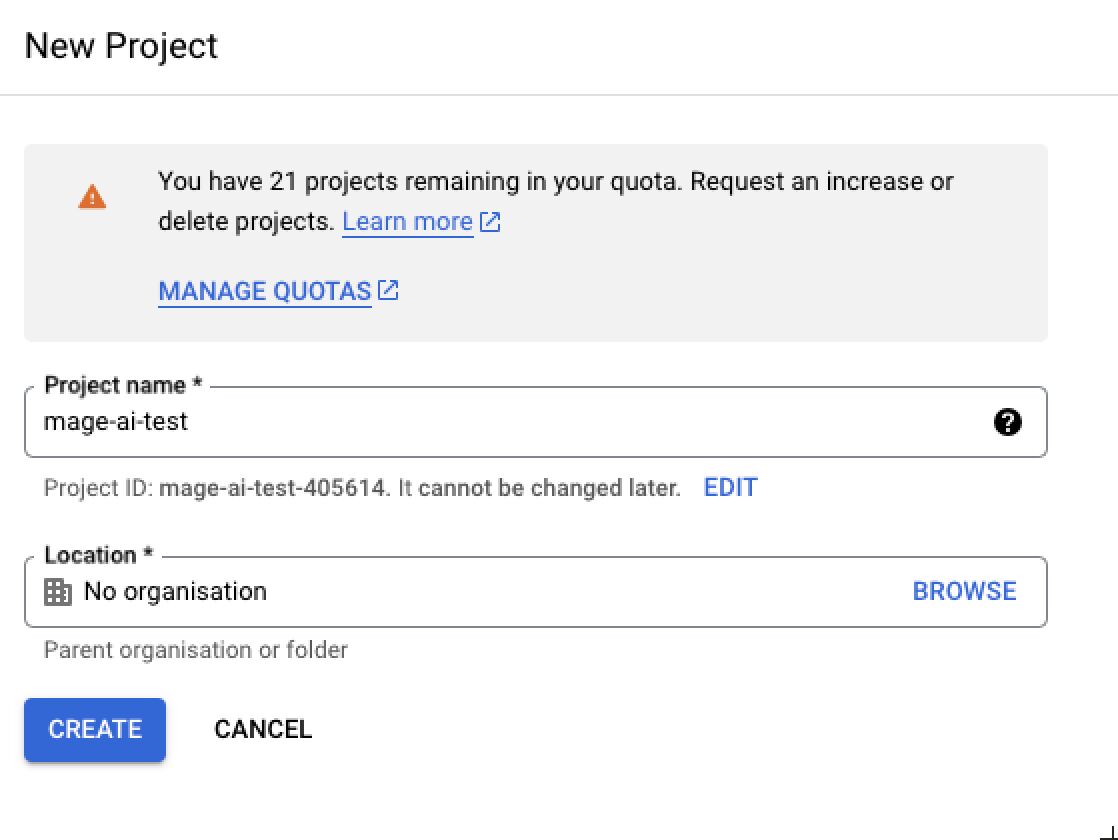
Next, name your project. I called my project mage-ai-test.
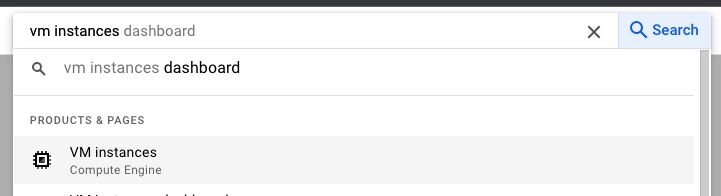
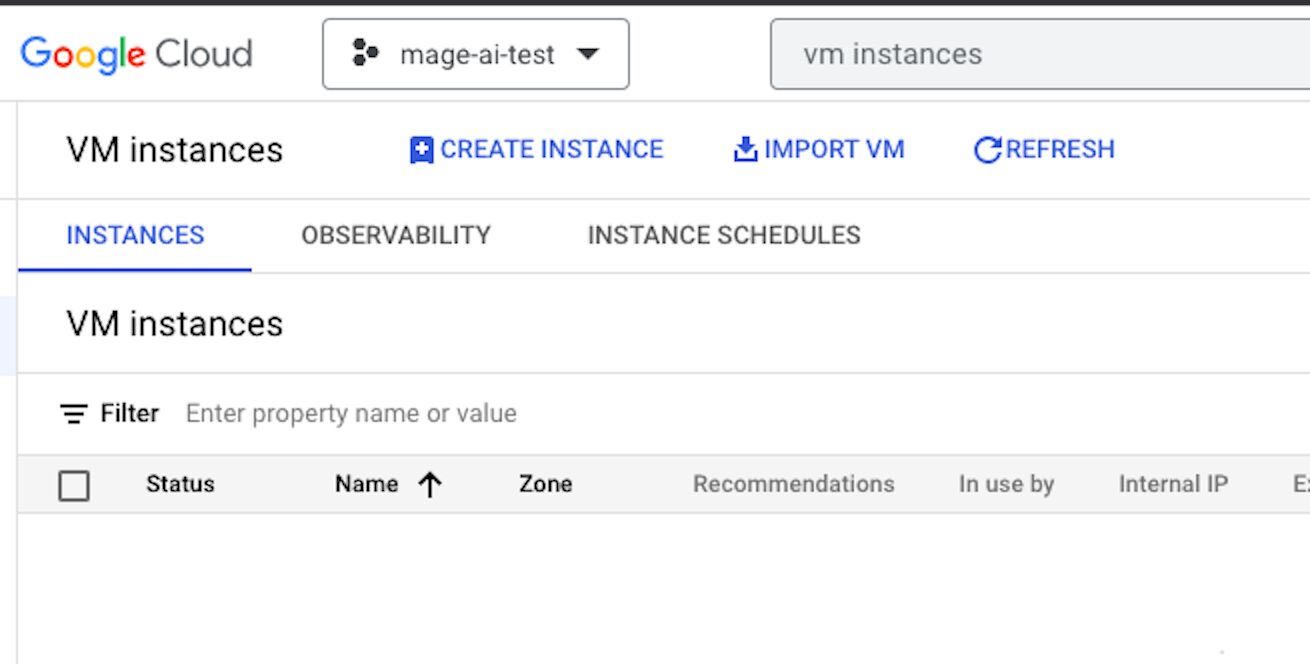
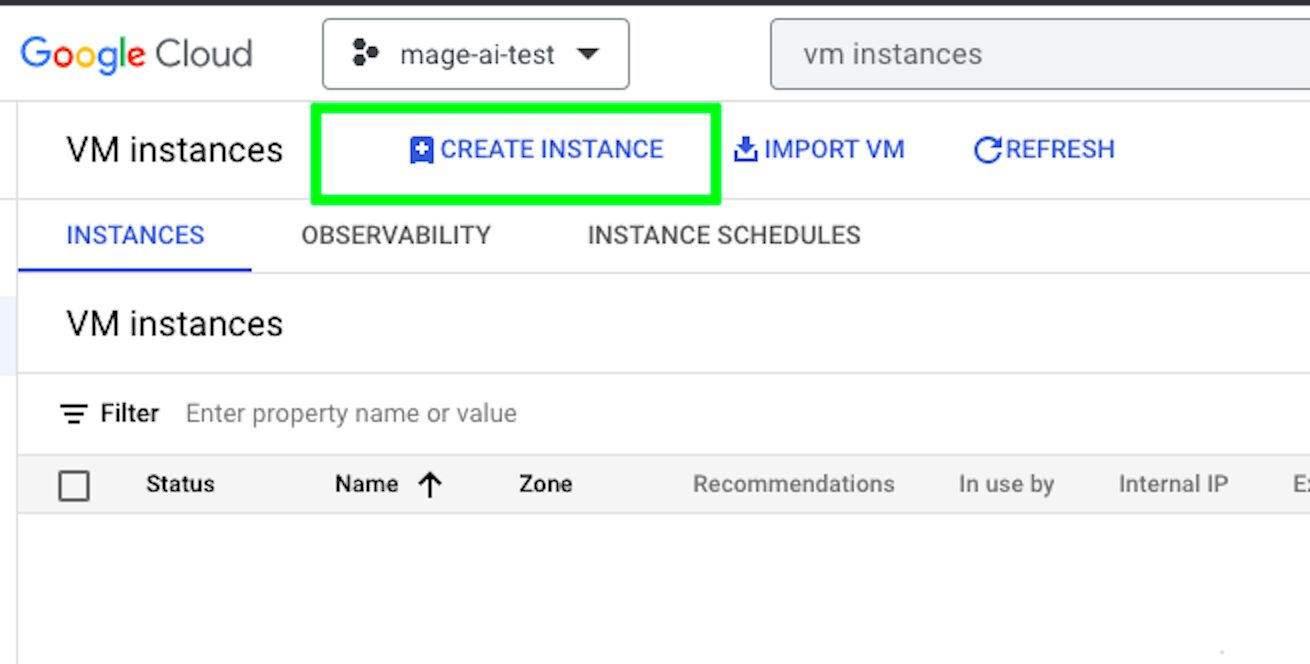
Then simply wait until your project is created. Once you have selected your project, type “vm instances” in the search bar, and select “VM instances”.
This will lead to the following screen:
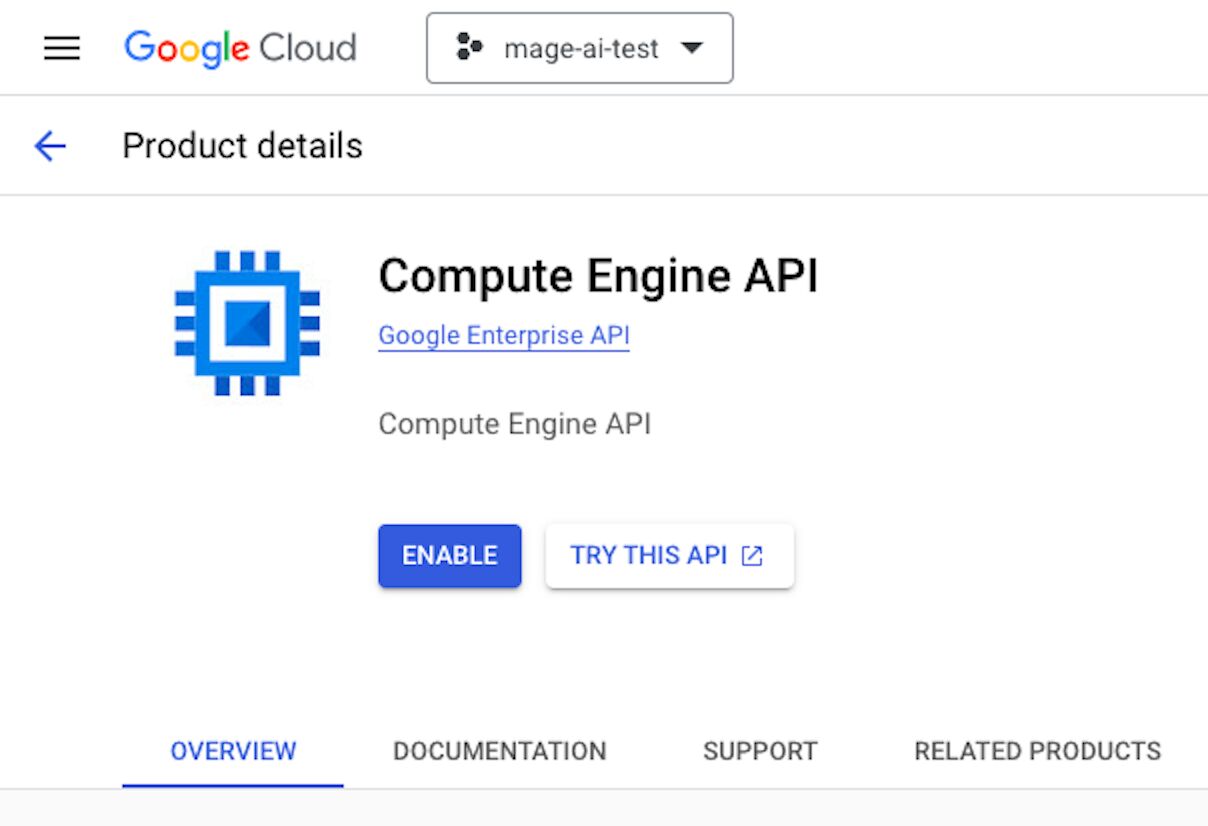
On GCP, to use specific features, you must activate the corresponding APIs. For example, we’ll enable the Google Analytics API later to get data from GA4. To make a virtual machine, we need to enable the Compute Engine API. Afterward, you’ll see this screen, but we won’t create a VM instance just yet…
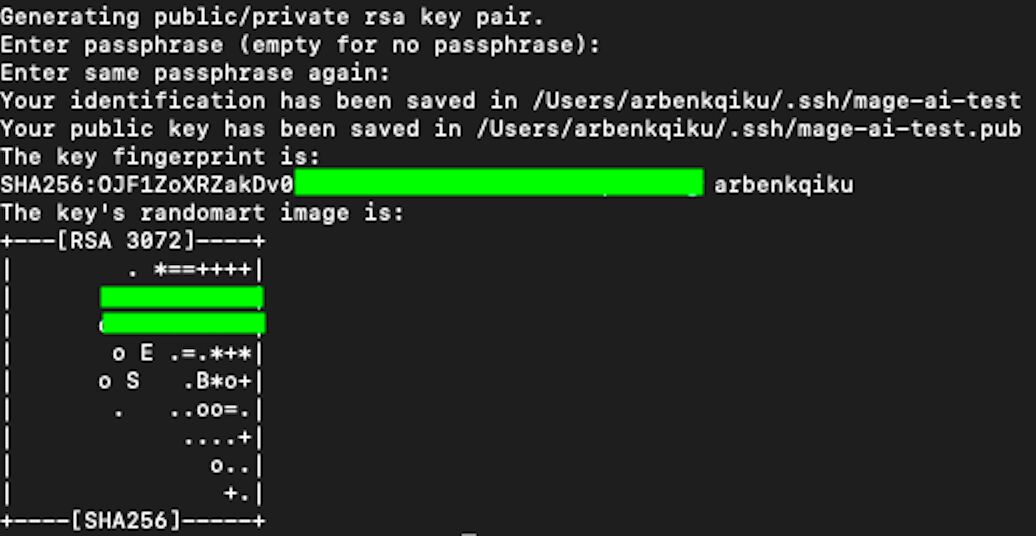
First, we need to create SSH keys that will allow us to access our virtual machine from our computer.
SSH keys are like special keys that help your computer talk securely to another computer, such as a virtual machine.
It’s a way for your computer to prove it’s really you when connecting to the virtual machine. It’s like having a secret handshake between your computer and the virtual machine, making sure they can trust each other without needing to type in a password every time.
Create SSH and public keys
We need to create two SSH keys, a private and a public key. Think of SSH keys like a pair of magic keys for your online accounts. You have one key that you keep secret (the private key) and another key that you share with others (the public key).
- Private Key (Secret Key): This is like the key to your front door that only you have. You keep it safe on your computer, and it’s a secret. It’s used to unlock and access your accounts securely.
- Public Key (Shared Key): This is like a lock that matches your private key.
When you connect to a server or service, you use your private key to prove you are who you say you are. The server then checks this with your public key to make sure it’s really you. This way, even if someone gets your public key, they can’t do anything without the private key, which stays safe on your computer. It’s a bit like having a special lock and key where only your key can open it.
To create your keys, hop to the terminal in your local machine and type the following code:
ssh-keygen -t rsa -f ~/.ssh/mage-ai-test -C arbenkqikuThe end of the code should be your username, in my case arbenkqiku. If you don’t know your user name, type whoami in the terminal and press enter. This will output your username.
Once you enter the code mentioned above, you’ll be prompted to insert your computer’s password, if you have any. Once you add your password, your SSH keys will be created.
Now, go to the directory where your SSH keys can be found. cd stands for “change directory”:
cd ~/.ssh/This is where your public private and public SSH keys are located.
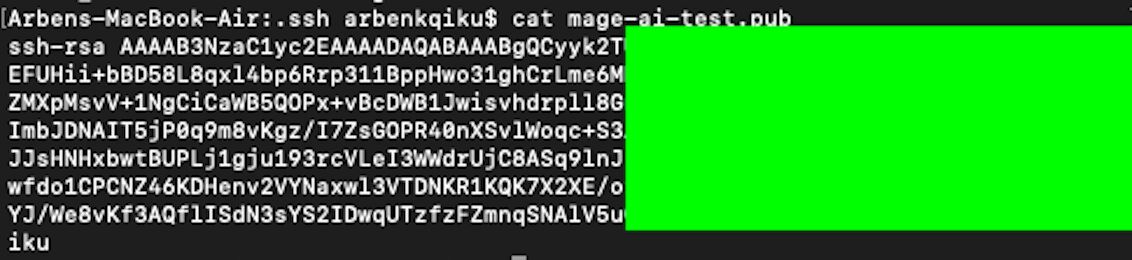
Now, type the following code to display the content of your public SSH key in the terminal.
cat mage-ai-test.pubThis will show the content of your public SSH key that we will later paste into our VM.
Create a VM instance and connect to it by using our SSH keys
Now, let’s go back to Google Cloud Platform and click on “CREATE INSTANCE” in the VM instances overview.
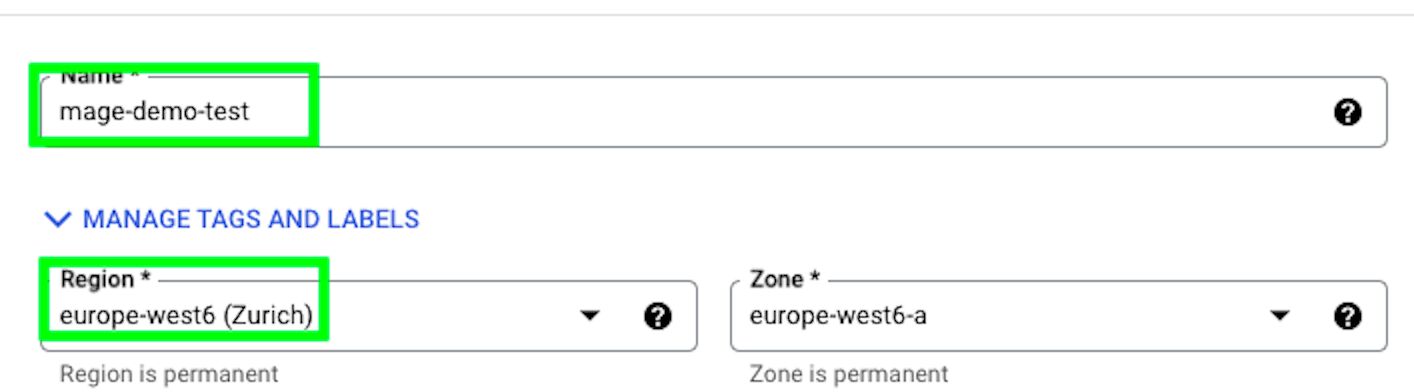
Give a name to the VM instance and select the region closest to you:
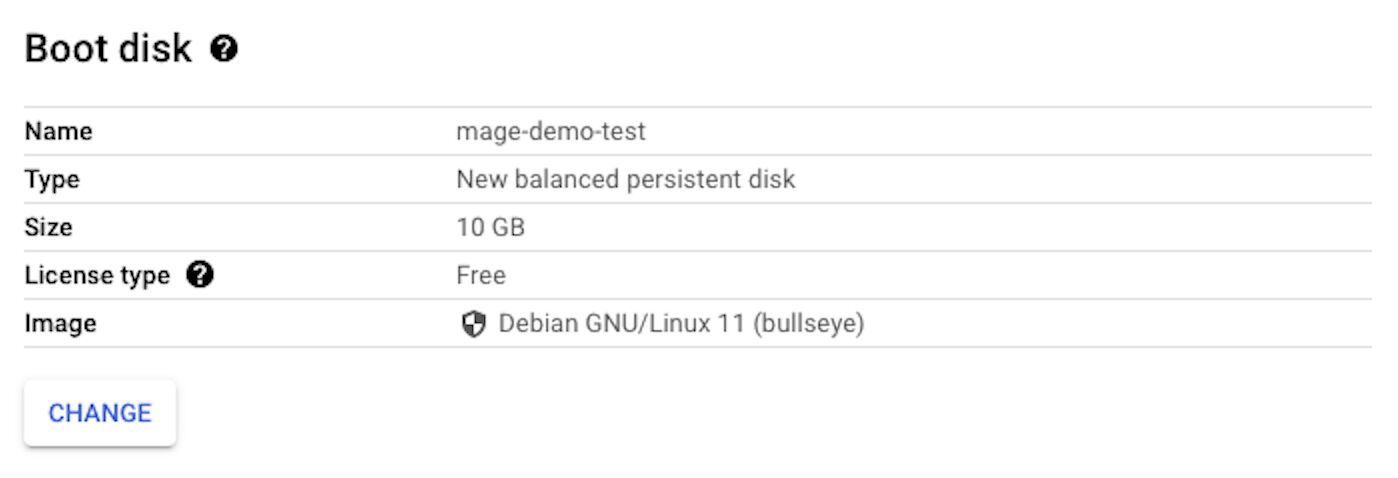
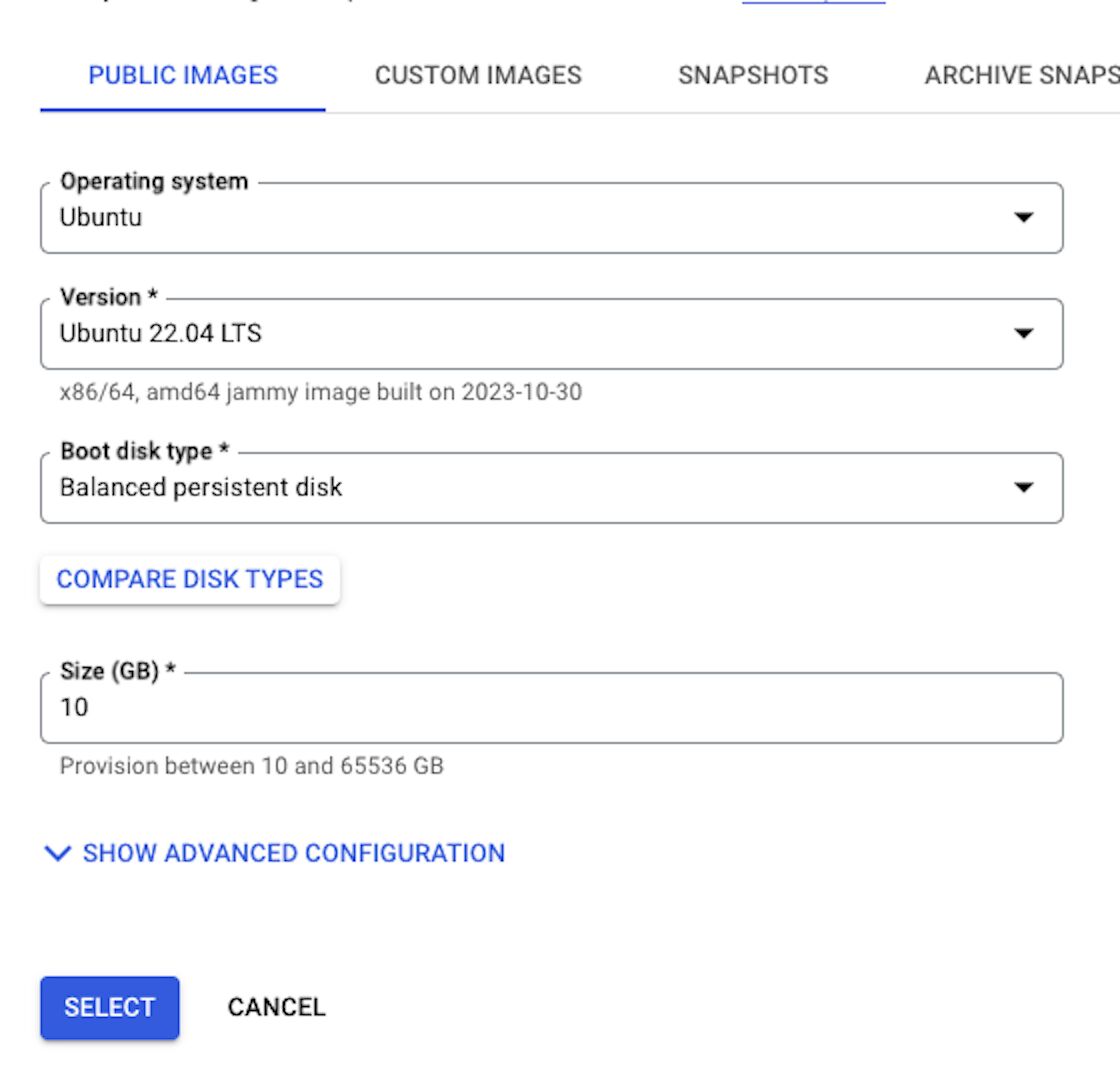
Go to the “Boot disk” section and click on “CHANGE”:
Select the following options.
Under Firewall, select the following options:
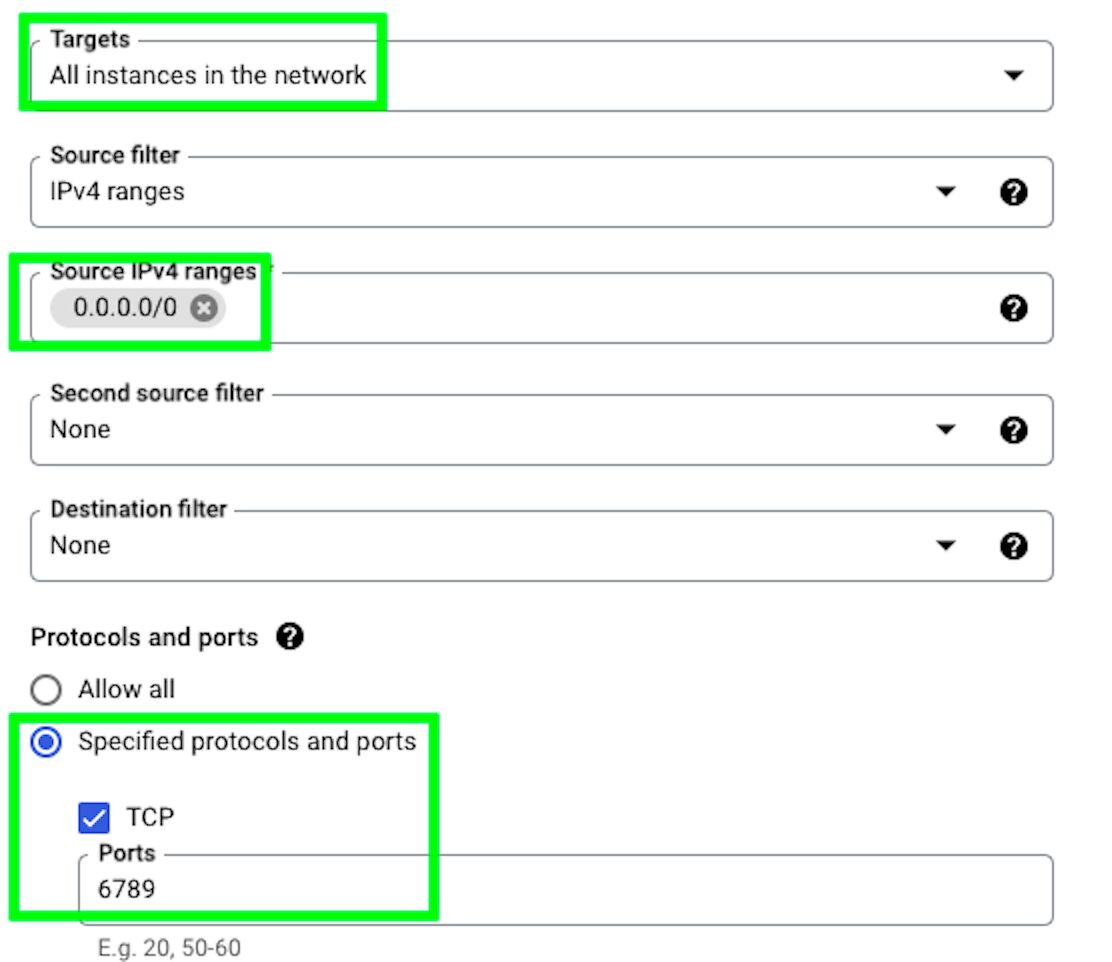
This is important, as otherwise we won’t be able to access Mage by using the IP address of our VM, you’ll understand later what I mean by this.
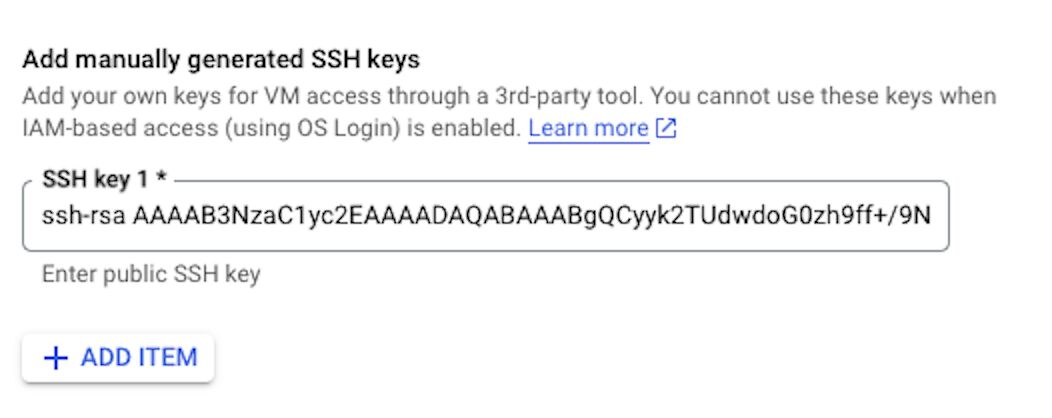
Under Advanced Options > Security, click on “ADD ITEM”. Here is where we’ll add our public SSH key.
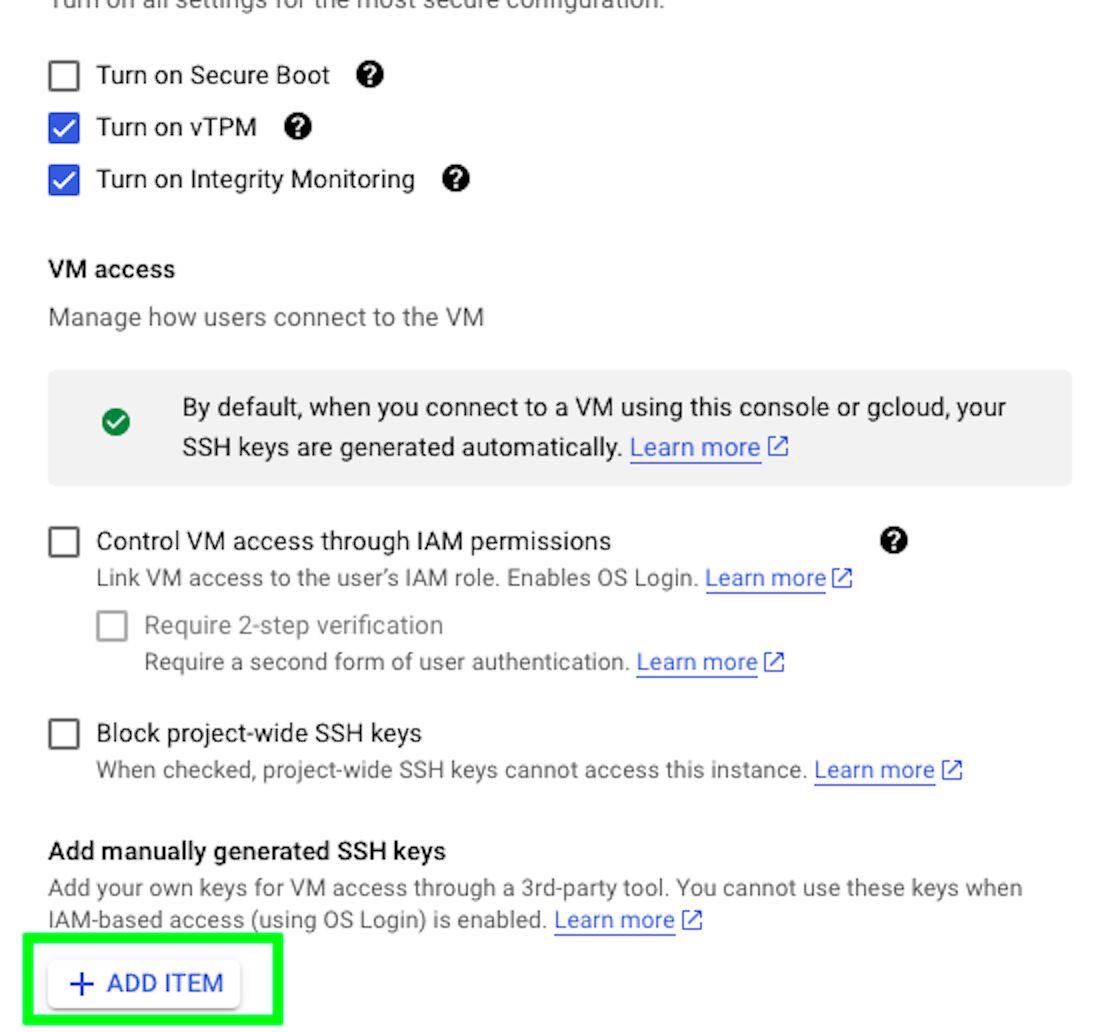
Copy the entire SSH public key and paste it.
Finally, click on “CREATE”. It may take some time to create the VM.
Once done, your new VM will appear here. Also, you’ll see that your VM will have an “External IP”.
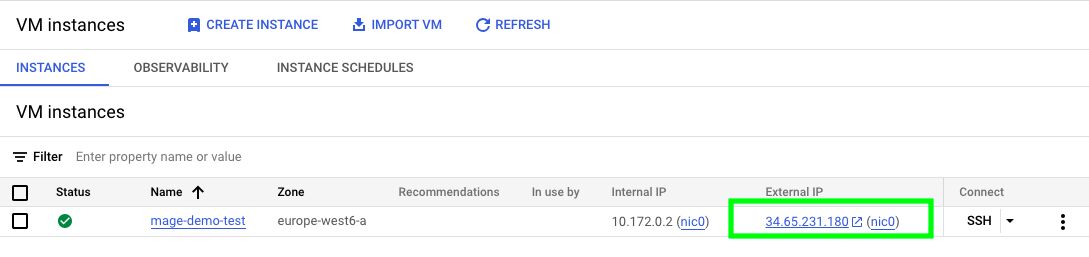
You can use this “External IP” and your SSH private key to connect to this VM. Let’s do this!
Go back to the terminal in your local machine and go to the directory where the SSH keys are located:
cd ~/.ssh/Next, type this command:
ssh -i mage-ai-test [email protected]I’ll break it down to you so you know what to replace:
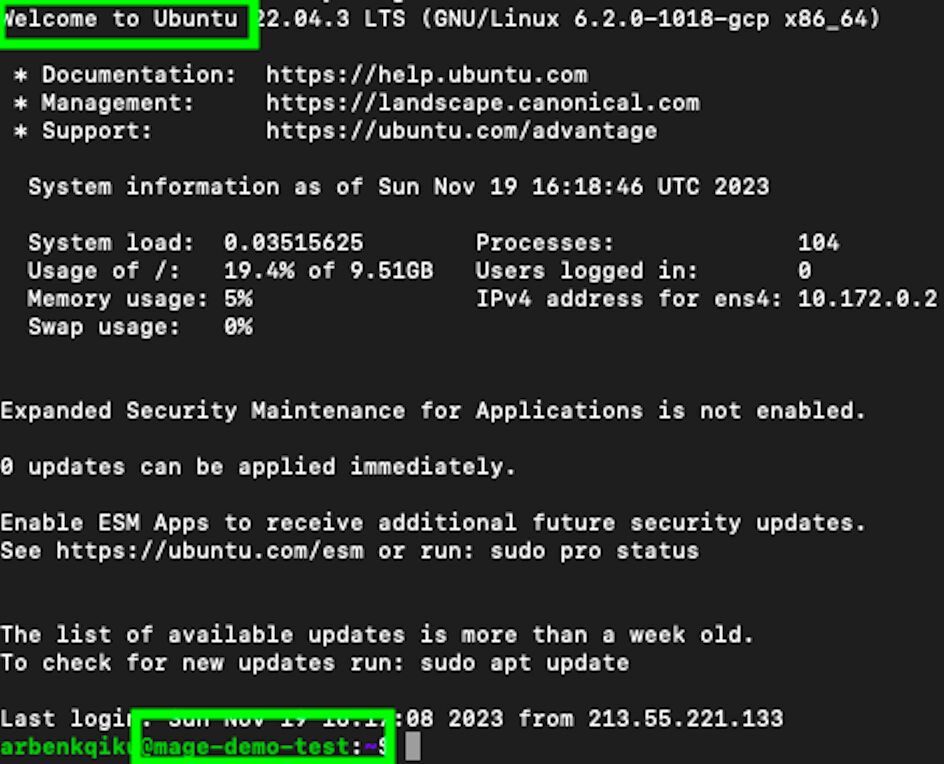
ssh -i name_of_private_key user_name@gcp_vm_instance_external_ipYou’ll likely will be prompted to enter your password again, and also to add the “External IP” as a host. Just follow the instructions and you should be able to connect to your VM.
As you can see from the image below, we connected to the VM named mage-demo-test. And if you recall, in “Boot disk” options, we selected Ubuntu as our operating system!
Install Visual Studio Code and access the VM
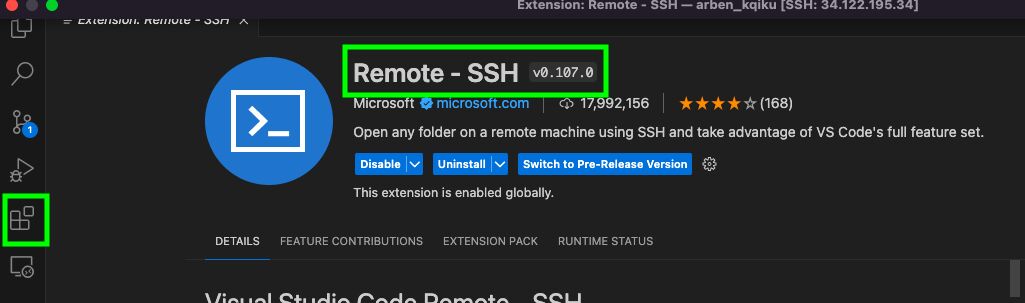
We could do this whole process through the terminal, but it is much more user-friendly to do it through Visual Studio Code. Visual Studio Code is a very powerful code editor. Go to this link: https://code.visualstudio.com/download, and download Visual Studio Code.
Once you have installed it, go to “Extensions” and install “Remote - SSH”.
In Visual Studio Code, go the the search bar and type >, and then select the following option:

In the configuration file that will open, you need to enter your details. Essentially, we’re providing the details to connect to our VM.
Host mage-demo-test # Give a name to your host
  HostName 34.65.231.180 # Replace with the External IP address in GCP
  User arbenkqiku # Replace this with your user name
  IdentityFile /Users/arbenkqiku/.ssh/mage-ai-test # Path to private SSH key
Now, we still have to go back to the terminal one last time and type this:
eval $(ssh-agent)
ssh-add /Users/arbenkqiku/.ssh/mage-ai-test # Path to private SSH key
Then, type your password when prompted. This basically means that you can use your password when you try to access the VM through Visual Studio Code.

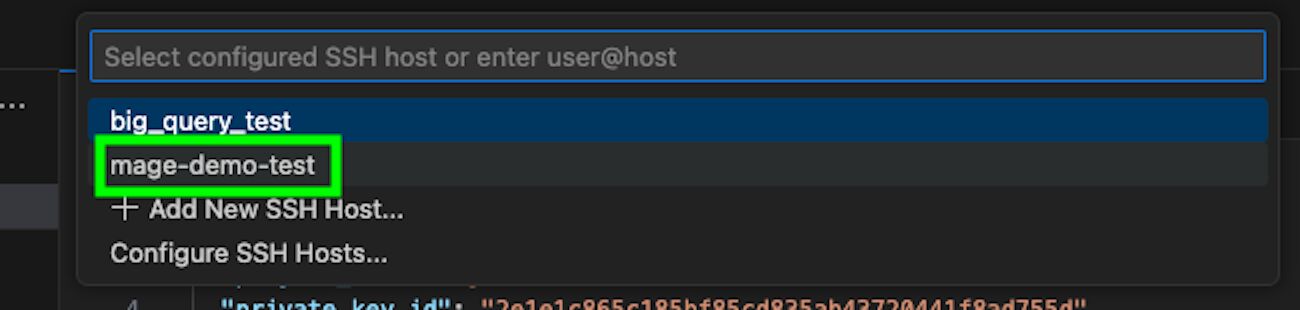
Now, go back to the search bar of Visual Studio Code, type > and select the following option:

Among others, it should suggest the host that you just created, click on that host:

A new window will open. In the search bar, type your password:

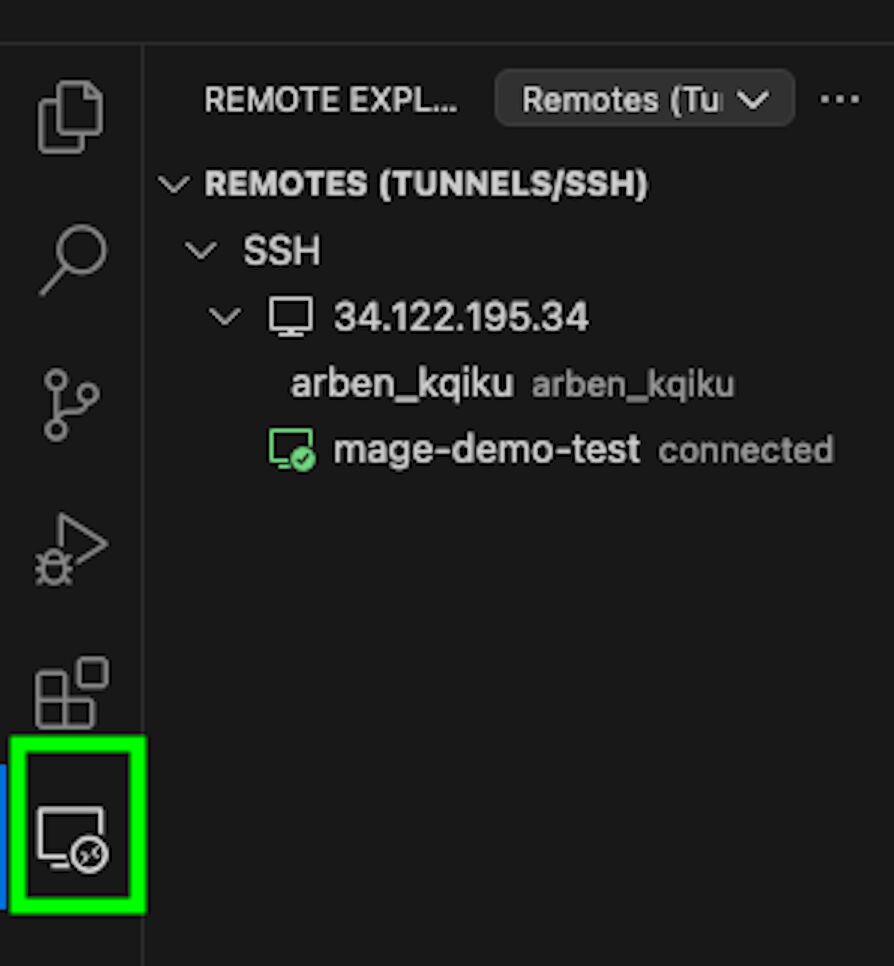
Now, click on the “Remote Explorer” icon, and it should show that you connected to your VM:
On the top right, click this icon to display the terminal below:
Now click on “TERMINAL”. Congratulations, you have accessed your VM through Visual Studio Code!
Install Mage
To install mage on GCP, I largely followed this tutorial, but I will also explain every step here. First of all, let’s create a directory in our VM for mage:
mkdir mage-demoNow, if you type the following code, you should be able to see the newly created folder:
lsThen, let’s access the folder:
cd mage-demoNow, to install mage, we need to first install Docker.
Docker is a platform for developing, shipping, and running applications. It uses containerization technology to package an application and its dependencies together into a single unit called a “container”.
In the mage-demo folder, let’s download a GitHub repo that contains the installation for Docker:
git clone https://github.com/MichaelShoemaker/DockerComposeInstall.gitLet’s access the folder that contains the Docker installation:
cd DockerComposeInstallLet’s modify the file to make it executable:
chmod +x InstallDockerThen, let’s run it:
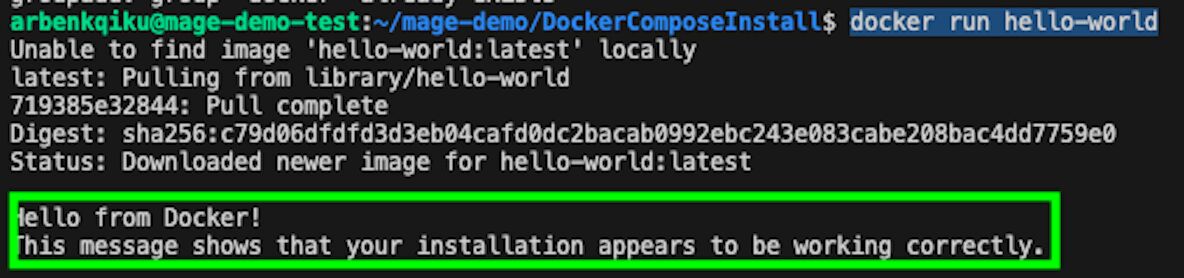
./InstallDockerType this to verify that Docker has been installed correctly:
docker run hello-worldThis should show the following message:
Now, let’s go back to the initial directory:
cd mage-demoNow, we can finally install mage with this command:
docker run -it -p 6789:6789 -v $(pwd):/home/src --restart always mageai/mageai /app/run_app.sh mage start mage-ai-testwith the command --restart always, we’re asking the VM to always restart mage whenever the VM is shut down and later restarted.
At the end, mage-ai-test represents the name of our project.
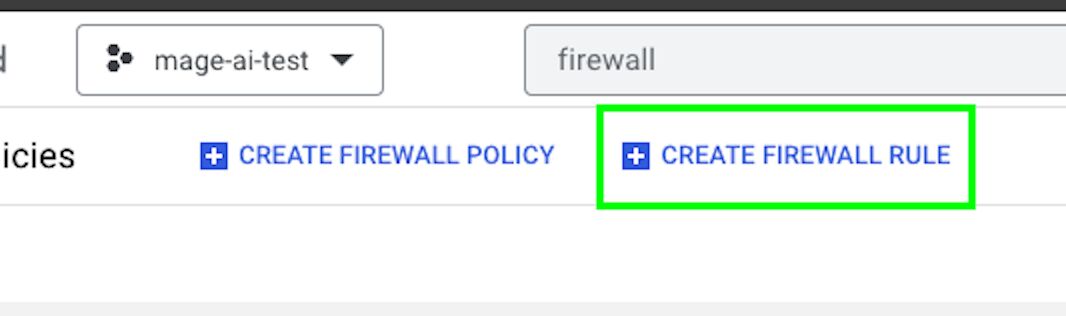
Now, to access mage through our External IP from GCP, we need to hop back on GCP first, as we need to create a firewall rule.
This is necessary to control and regulate incoming and outgoing traffic to and from your VM on Google Cloud Platform. When you want to access mage through your External IP from GCP, a firewall rule is needed to explicitly allow the traffic to reach your VM.
Browse to Firewall in the Google Cloud Platform.
Click on “CREATE FIREWALL RULE”:
Select the following options and click on “CREATE”:
Basically, with this firewall rule in place, it means we can access mage via the external IP address by using port number 6789.
Now, if you type your VM external IP followed by :6789 in your web browser you should be able to access mage.
For example, this is the URL I would use with my configuration: http://34.65.231.180:6789.
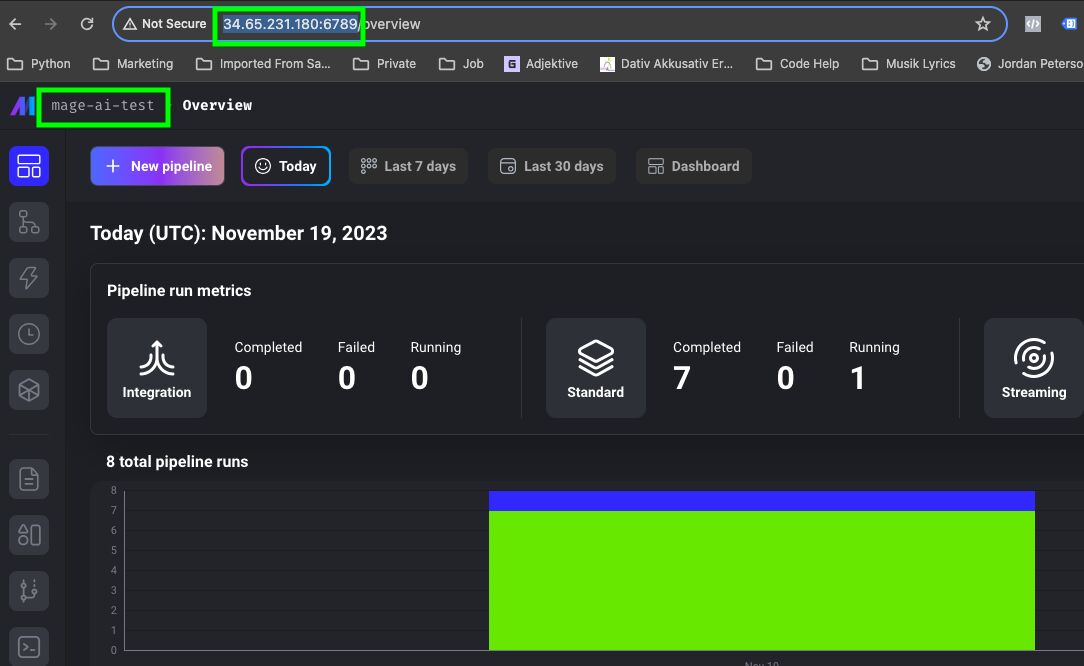
As you can see, mage-ai-test was the name of our project in a previous command.
Congrats, now you can create data pipelines that will run in the cloud!
Create the data pipeline
Now, we can finally create the pipeline. Here are the four parts that will compose our data pipeline:
- Retrieve data from GA4
- Retrieve data from Google Ads
- Join the data
- Export the data to BigQuery
Load data from the GA4 API
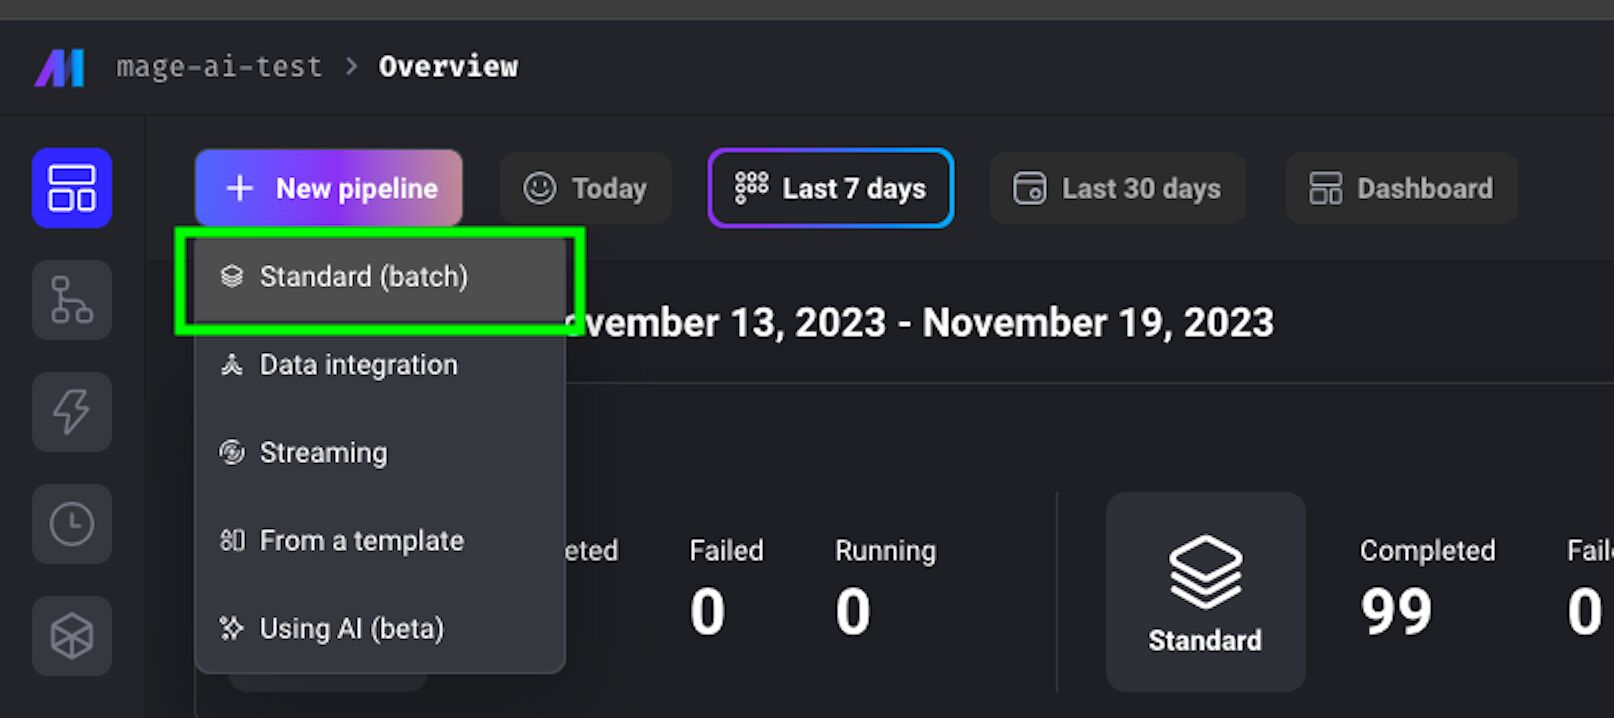
To start, click on New pipeline > Standard (batch):
On the left side, you can see all your files, even the pipeline that we have just created.
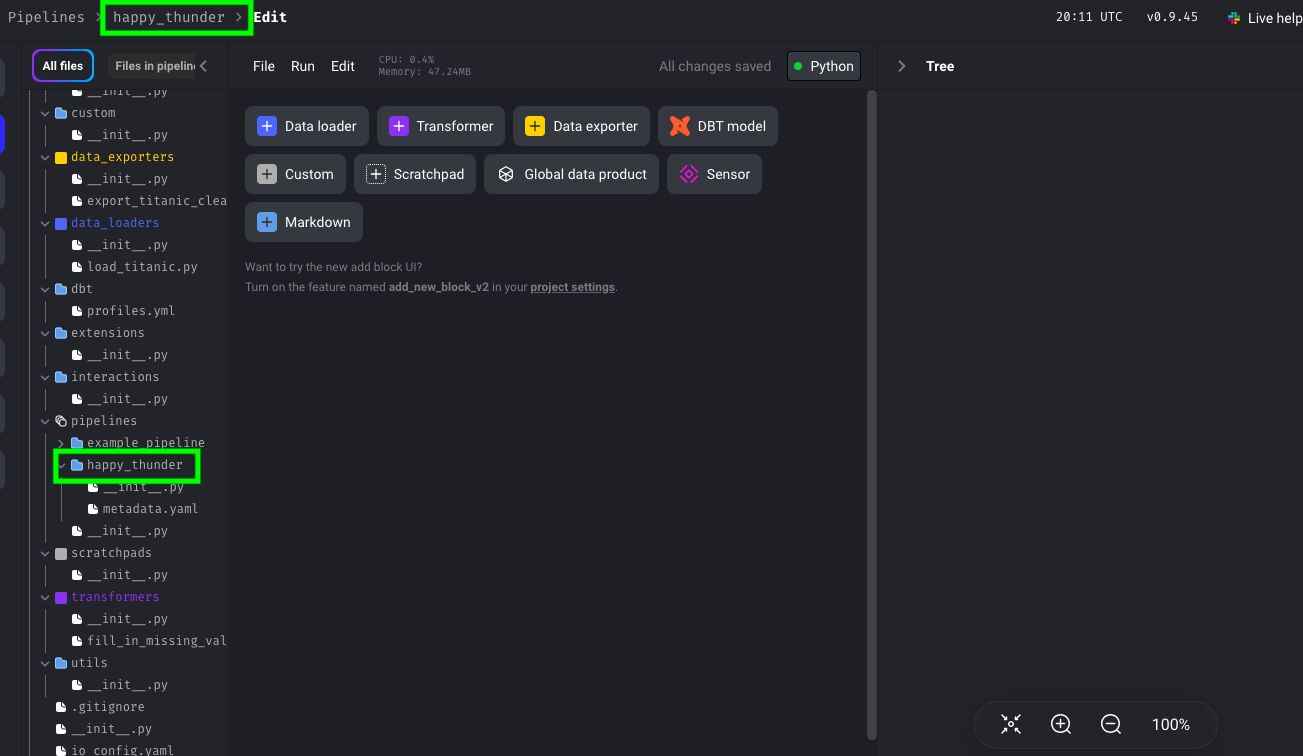
In the middle, you can see the blocks that you can use to build your pipelines. In this guide, we’ll use Data loader, Transformer, and Data exporter blocks:
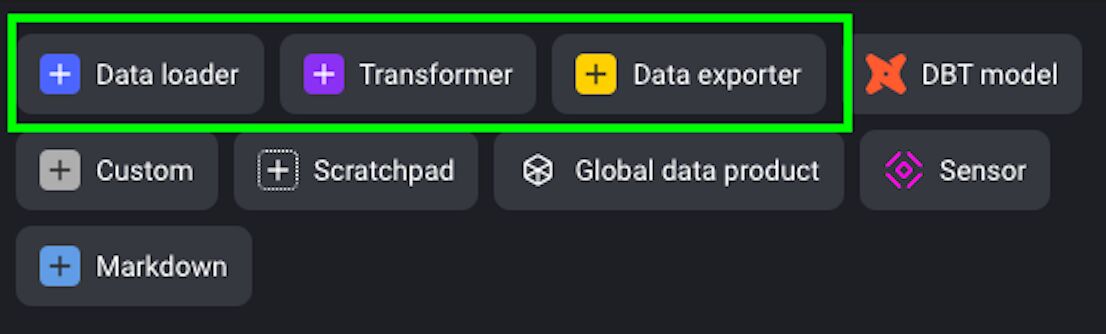
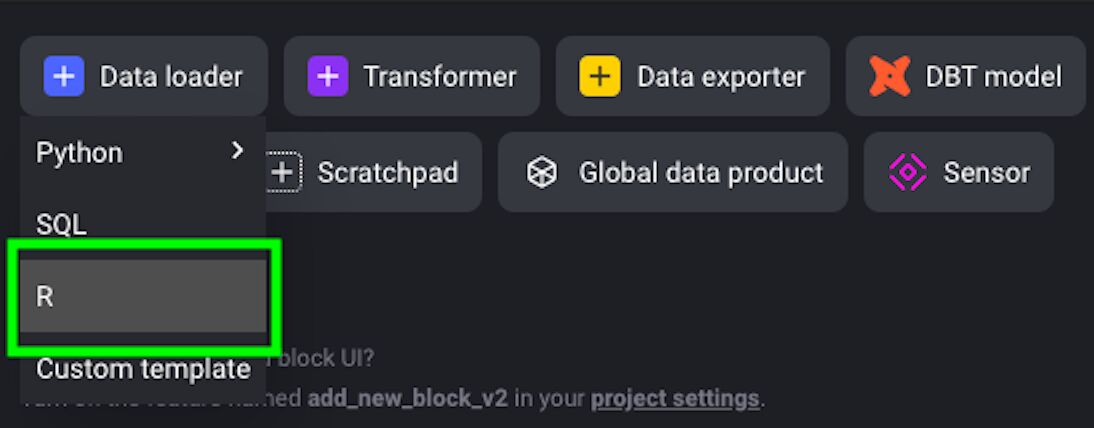
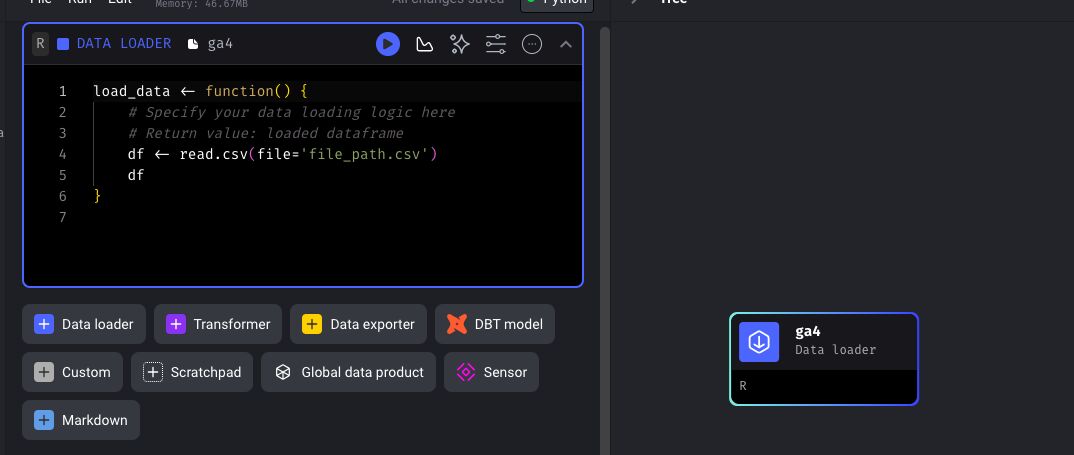
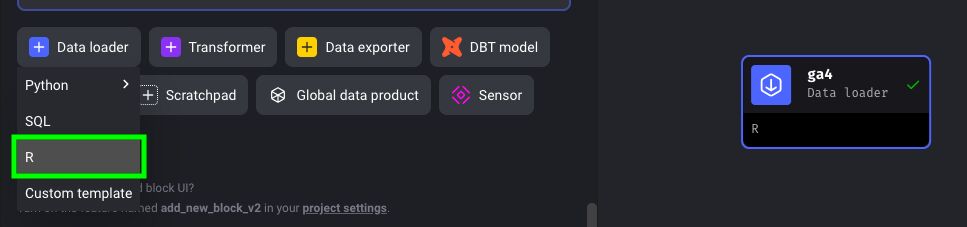
As mentioned previously, you can use Python, SQL, and R in each block. In our case, we’ll use R. So, click on Data Loader and select R:
Name the block ga4, then click Save and add block.
You should now see the block on the right, together with a sample R code.
To install and load packages, mage uses the pacman package. Once you load pacman, you can install packages by using:
pacman::p_load(package1, package2, package3)p_load() function, it will install a package, and then it will simply load it. For this block, we’ll install three packages:library("pacman")
pacman::p_load(dplyr, purrr, googleAnalyticsR)
load_data <- function() {
}googleAnalyticsR package, developed by Mark Edmondson, you need an access token.An access token is like your digital ID card; it confirms your identity and verifies that you truly have permission to access the GA4 properties you’re attempting to retrieve data from.
To get an access token, you can run the following function in the RStudio console in your local machine: ga_auth().
Once you run this function, you’ll be redirected to a browser window where you’ll select your account:
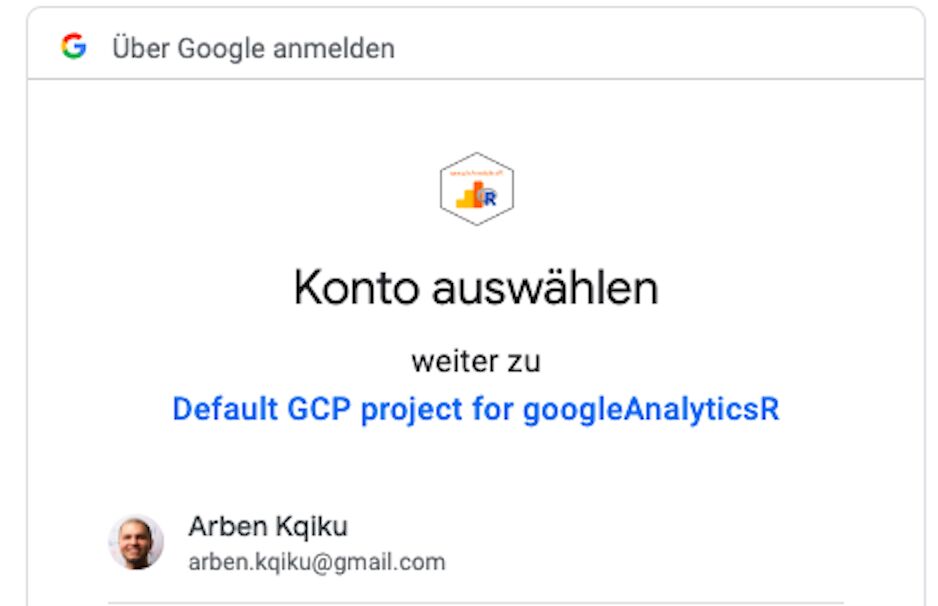
With this, you are basically giving permission to the googleAnalyticsR package to access your GA4 properties.
However, the problem is that we’ll run our data pipeline in a production environment where you cannot interact with the browser.
So, we need to find another way to solve this problem.
In fact, if I try to run the function ga_auth() on Mage, it throws an error:
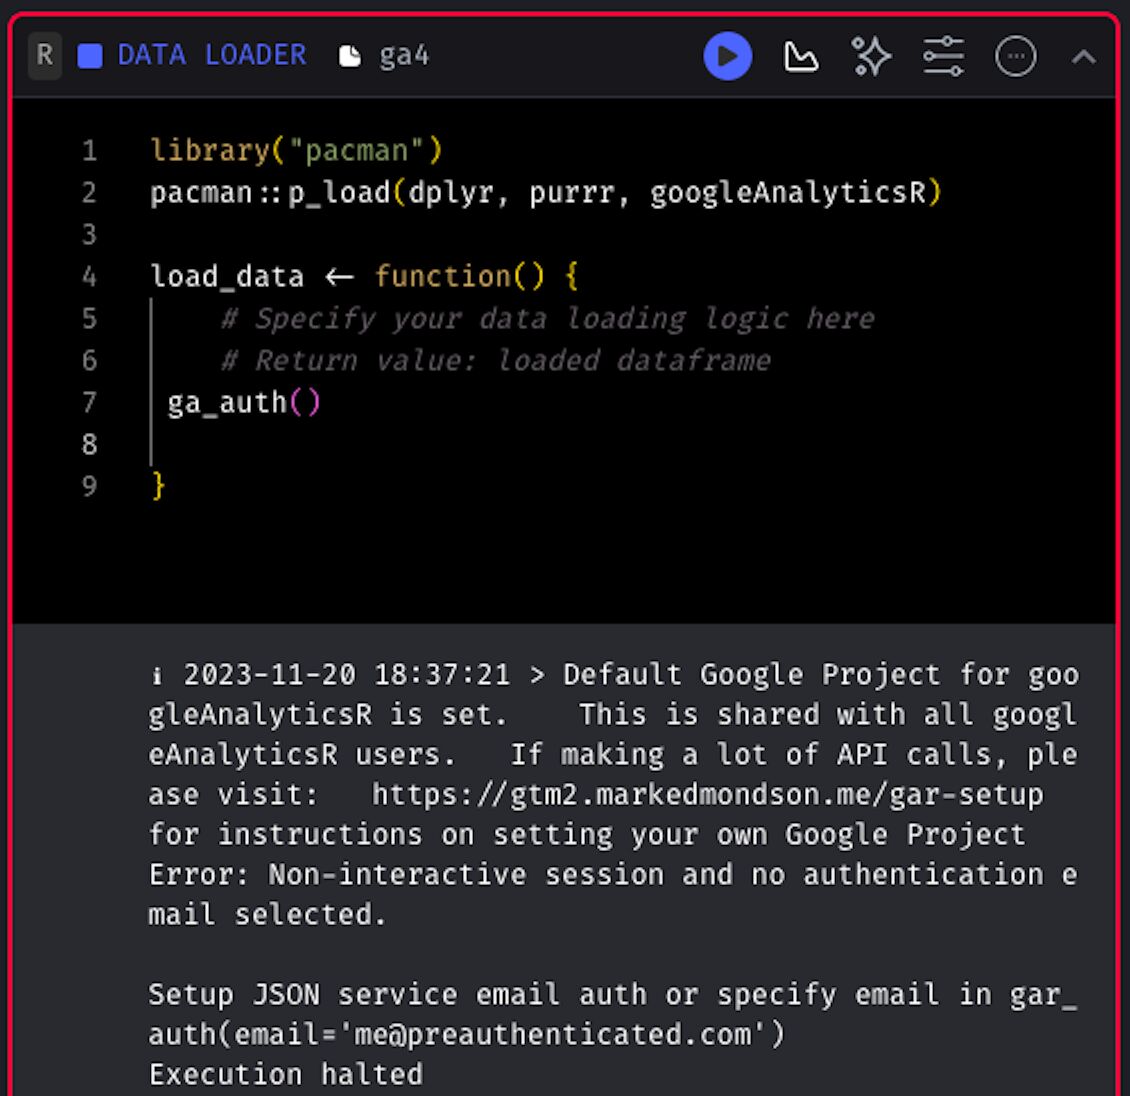
So, we need to generate a Google Analytics token that we can use in a production environment.
First, let’s go back to GCP and browse to Enabled APIs & services.
Click on “ENABLE APIS AND SERVICES”.
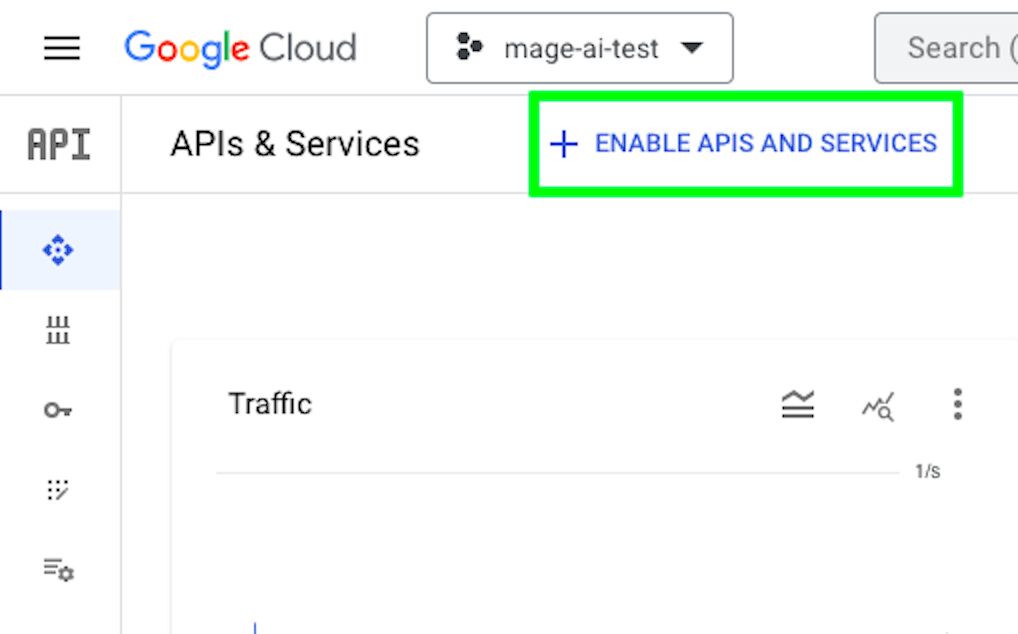
Search for Google Analytics, click the Google Analytics Reporting API result, and then choose ENABLE.
This means that our project is now eligible to use the Google Analytics Reporting API.
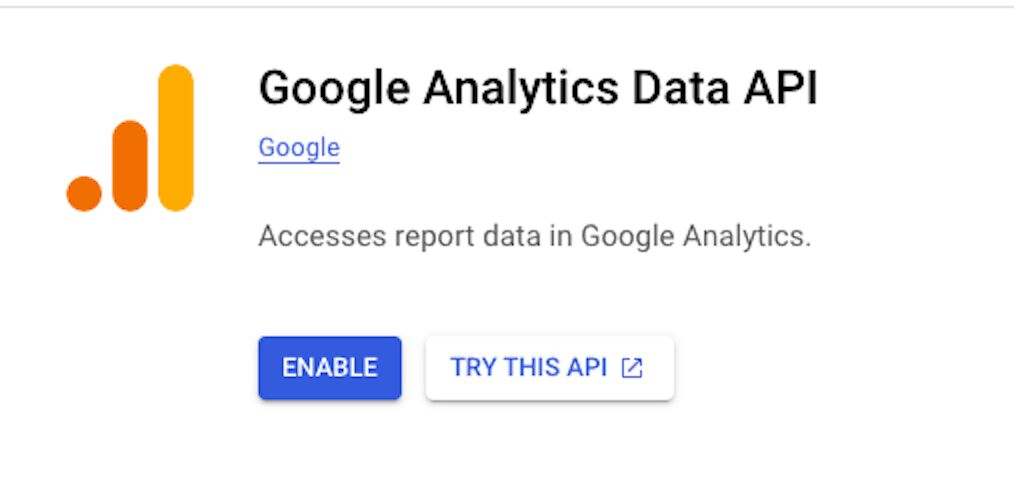
Next, repeat these API-enabling steps for the Google Analytics Data API.
Once done, we have the APIs enabled but we still haven’t created the required token.
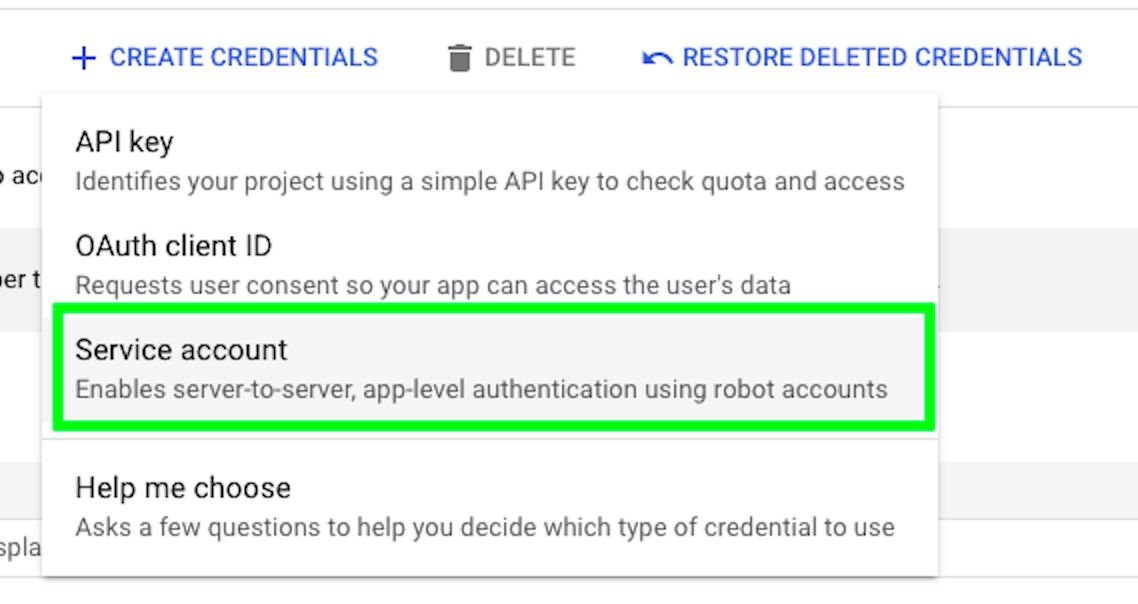
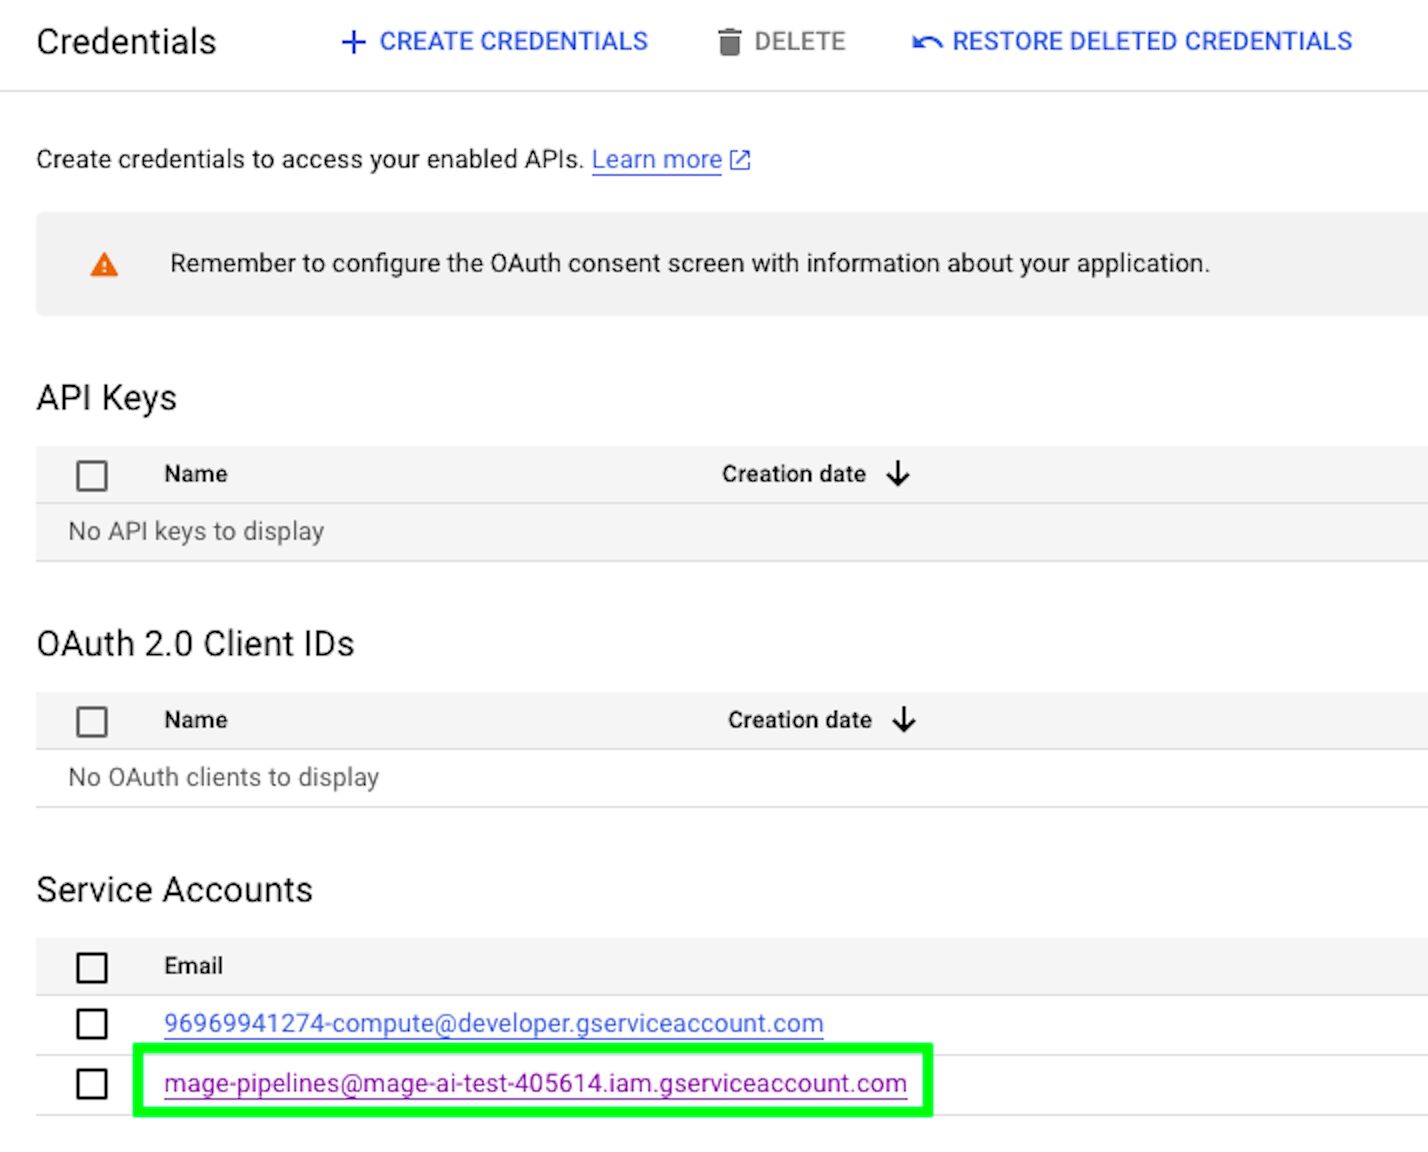
Browse to Credentials in the Google Cloud console.
Hover over “CREATE CREDENTIALS” and click on Service account.
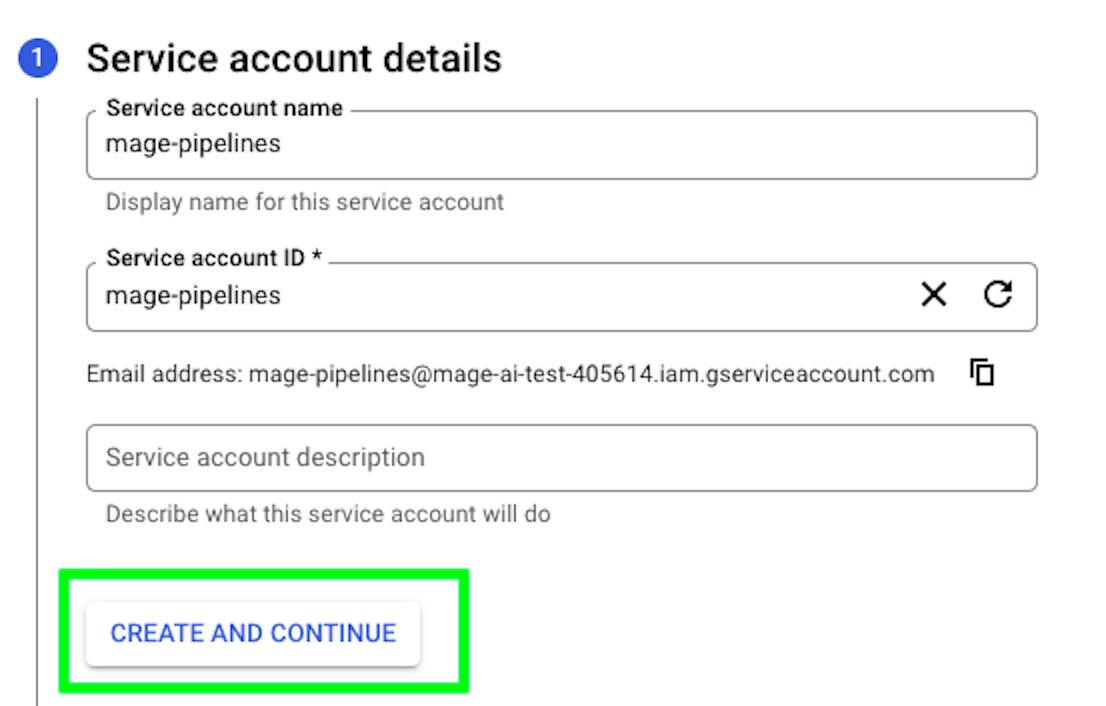
Give the service account a name and then click CREATE AND CONTINUE.
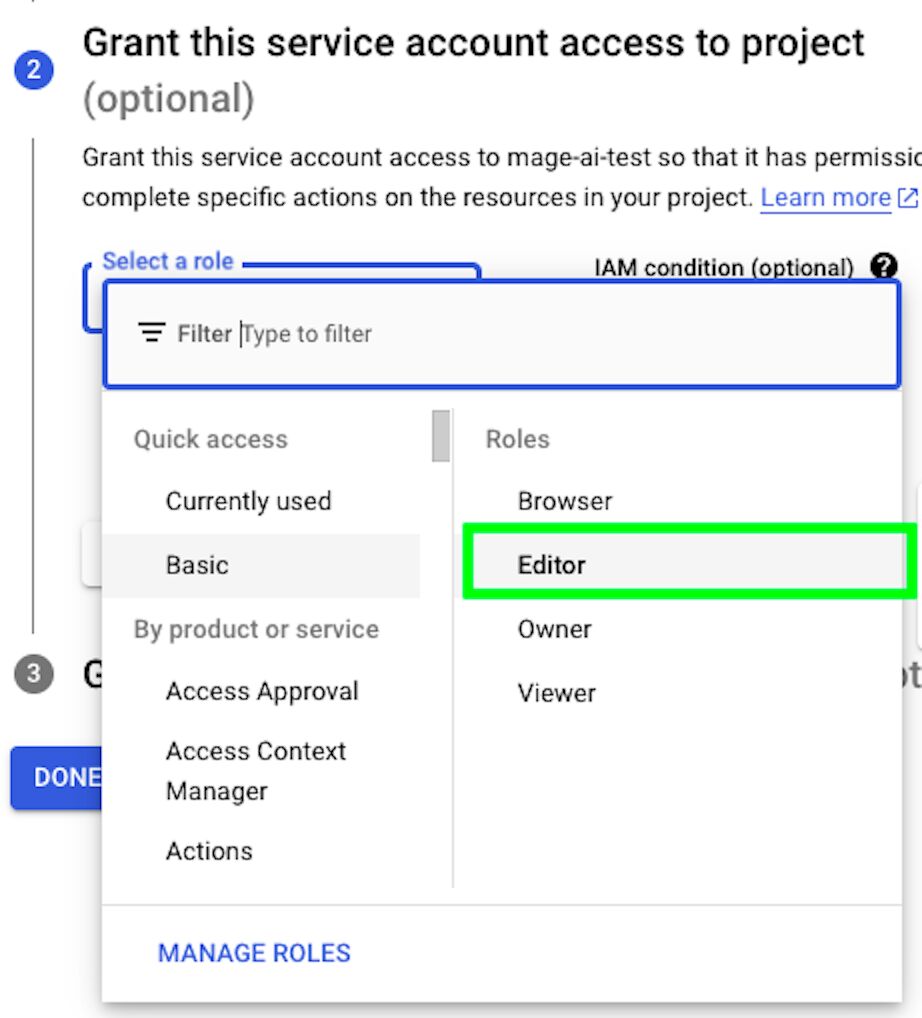
Give the service account the Editor role and then click on Continue.
Finally, click on DONE.
Now that the service account has been created, go back to the Credentials view and you’ll see the account that you just created. Click on it.
Then, click the KEYS tab and choose to Create new key.
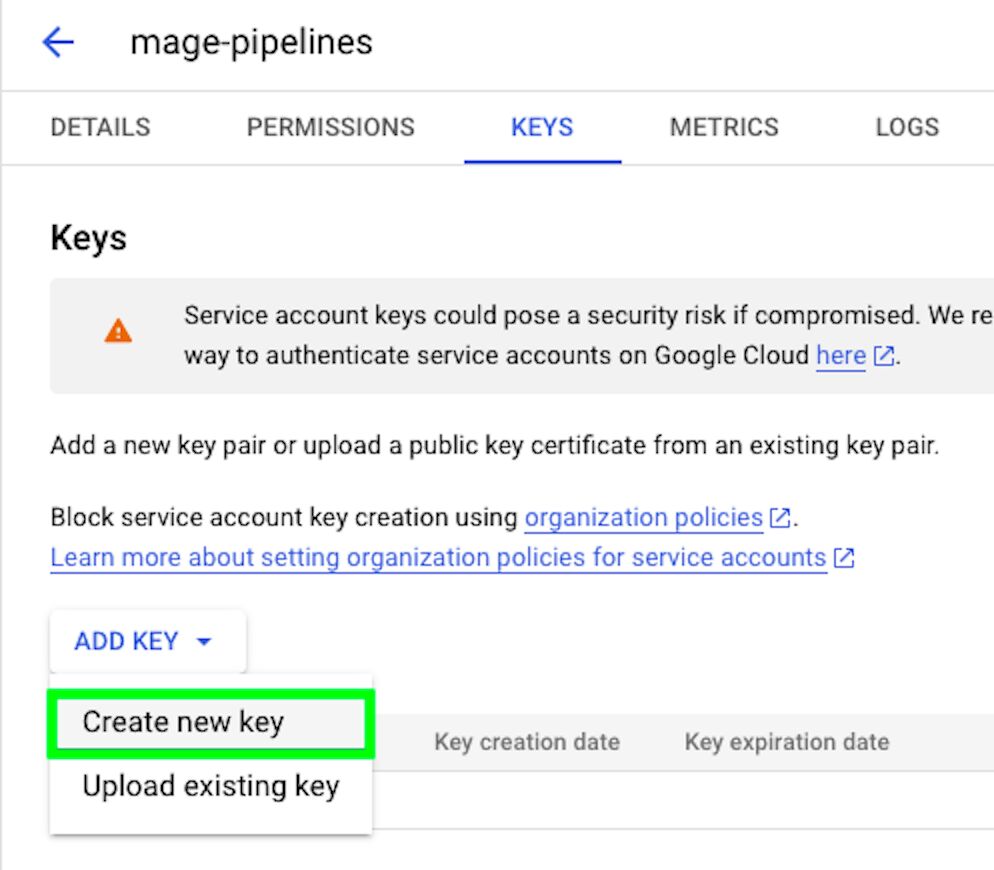
Select JSON as the key type and click Create.
This should download your key as a JSON file.
Store it in a safe place. Basically, the service account is like an account that has permission to act on your behalf. When you want your application or service to communicate with the GA4 API, it needs to prove its identity. Instead of using a user’s personal Google account, which may not be appropriate for server-to-server communication, you can use a service account.
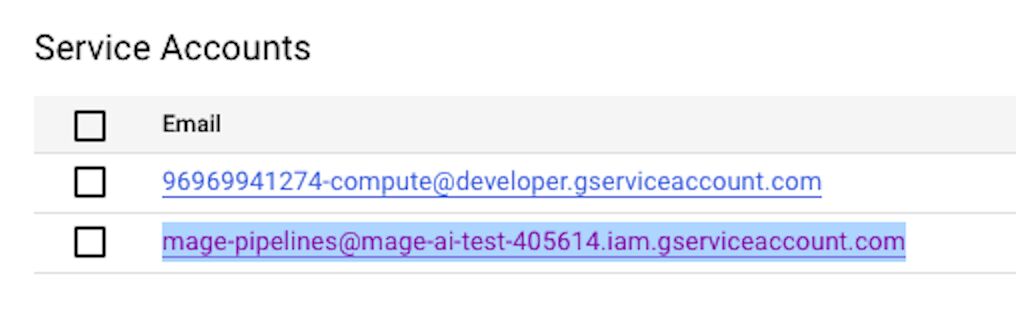
Now, as if it were a real user, we need to go to the GA4 property and add our service account email. So, go back to Credentials and copy your service account’s email address:
Next, open Google Analytics 4, go to your property, and click on Property access management in Admin:
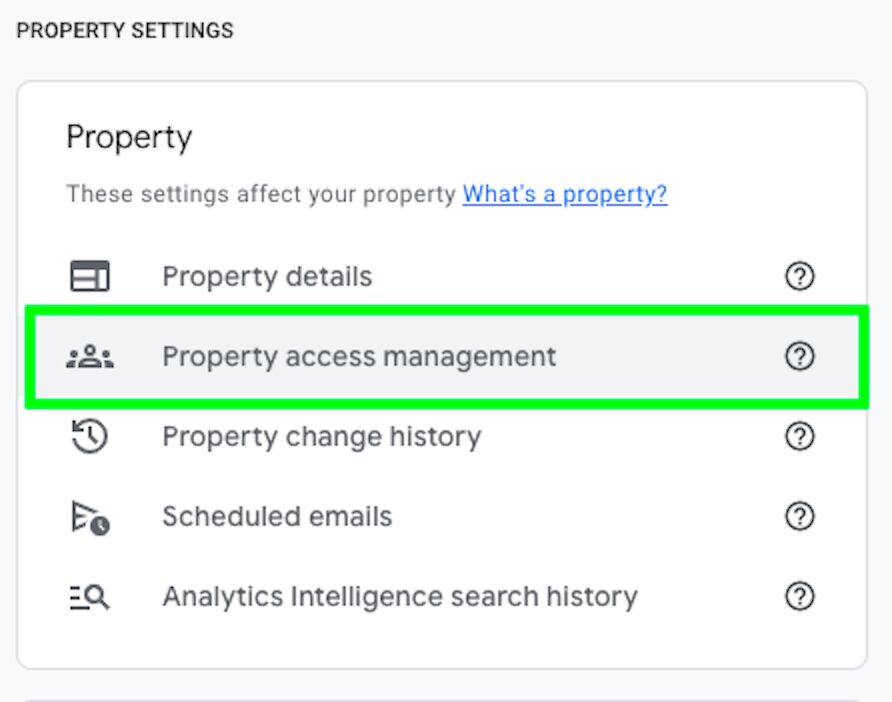
Add your service account email address to the list of users, give it Viewer permissions, and click on Add to add the service account as a user to the GA4 property.
Now, before adding code to Mage, I like to test it on my local machine to make sure that everything works properly.
So, on your local machine, open a new R script and try the following code:
# Packages ----
library(purrr)
library(dplyr)
library(googleAnalyticsR)

# Authenticate ----

# path to your JSON service account that we saved earlier
ga_auth(json_file = "/Users/arbenkqiku/Desktop/mage-ai/mage-ai-test-405614-2e1e1c865c18.json") That means that your pipeline can now communicate with the GA4 Reporting API without any extra authentication flows.
Now, what I want to retrieve from GA4 are the sessions where a lead generation conversion event happened.
In the case of this client of mine, either someone submitted a form, clicked on the WhatsApp icon to talk to them privately, or clicked on the phone icon to call them.
So, in the the next piece of code I want to create a filter with all the event names I am interested in, namely the event names equal to form_submit_lead or whatsapp_click or phone_click.
# GA4 property ID
property_id = "1234567"

# Create filter
goals_filter = ga_data_filter("eventName" == "form_submit_lead" | "eventName" == "whatsapp_click" | "eventName" == "phone_click")
In the next piece of code, we have the actual query to GA4:
# Get conversions from GA4
goals_data = ga_data(propertyId = property_id,
date_range = c("2023-10-01", "2023-11-08"),
dimensions = c("date"),
metrics = c("sessions"),
dim_filter = goals_filter) %>%
# rename sessions to goals
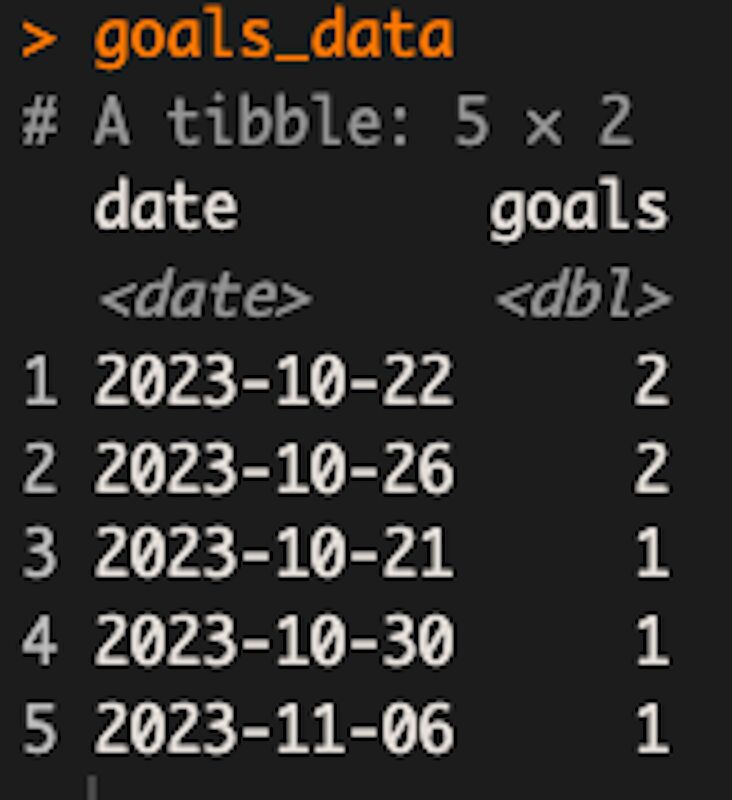
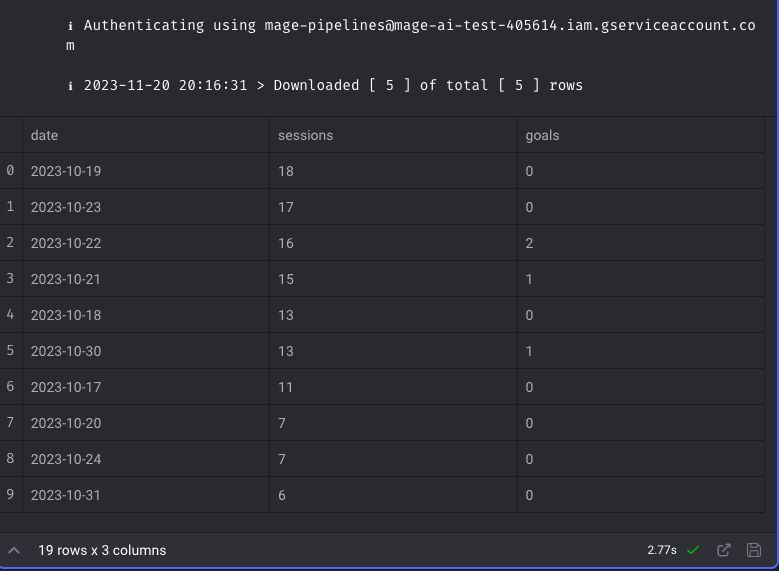
set_names(c("date", "goals"))Basically, we’re getting the sessions from 1st October 2023 until 8th November 2023, segmented by date, and only when one of the events mentioned earlier occurred. This is what the final table looks like in my case:
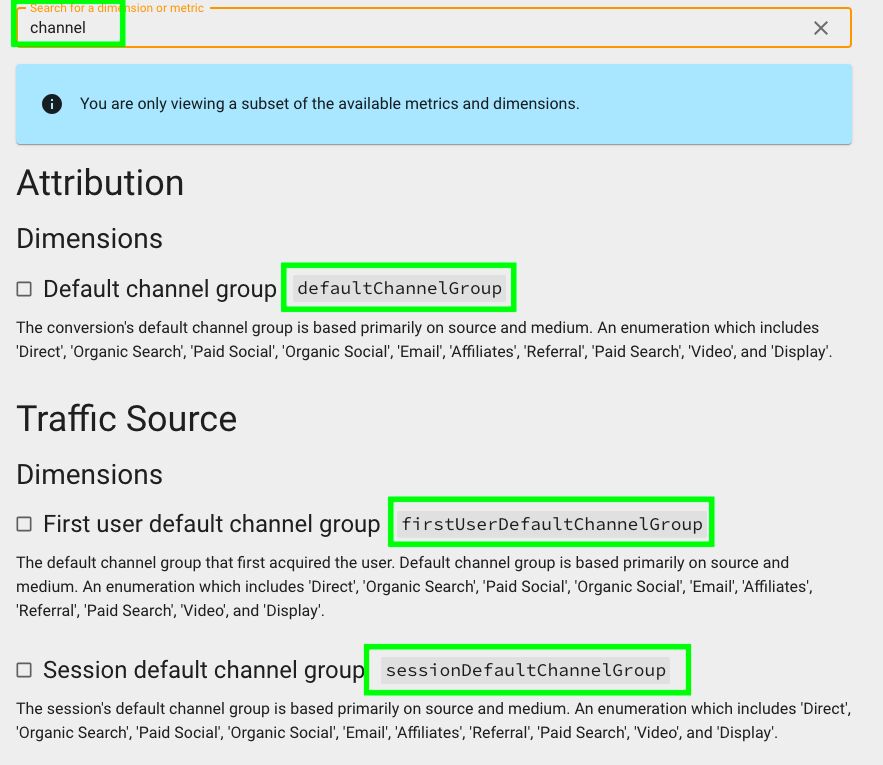
It is not always easy to know what certain fields are called in the GA4 API. You can go to this website and look for a specific field. For example, if we look for “channel”, you can see all the different fields that contain “channel” and what they are called in the GA4 API.
Now, in addition to retrieving the sessions where a conversion event occurred, I also want to retrieve the sessions segmented by day, so I’ll use this query:
# Get sessions from GA4
sessions_data = ga_data(propertyId = property_id,
                        date_range = c("2023-10-01", "2023-11-08"),
                        dimensions = c("date"),
                        metrics = c("sessions"))
This returns a table of sessions segmented by date.
Now, to join the sessions with the conversions:
# Merge GA4 goals and sessions
sessions_goals_ga4 = sessions_data %>%
# join sessions with goals
full_join(goals_data) %>%
# replace all NAs with 0
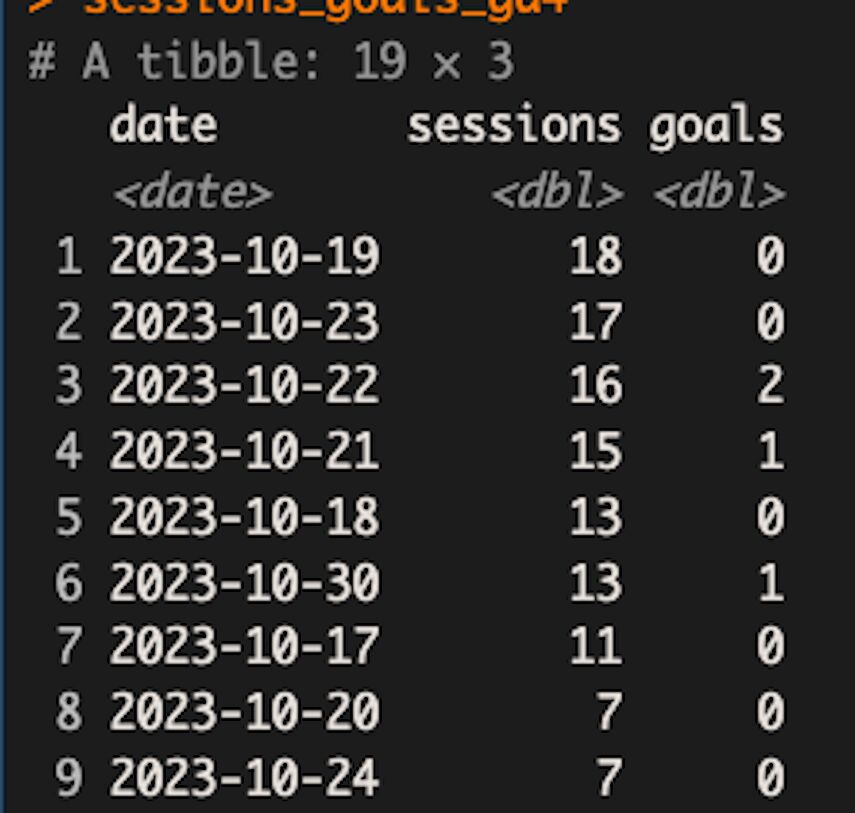
replace(is.na(.), 0)This is the final result:
Here is the complete code.
At the end of the script, I added the sessions_goals_ga4 dataframe. This is because in Mage, we’re using this code within a Data Loader block. We need to return a dataframe for the next block, otherwise the next block doesn’t have any data to play with.
# Packages ----
library(purrr)
library(dplyr)
library(googleAnalyticsR)

# Authenticate ----
	# path to your JSON service account that we save earlier
ga_auth(json_file = "/Users/arbenkqiku/Desktop/mage-ai/mage-ai-test-405614-2e1e1c865c18.json")

# GA4 property ID
property_id = "1234567"

# Create filter
goals_filter = ga_data_filter("eventName" == "form_submit_lead" | "eventName" == "whatsapp_click" | "eventName" == "phone_click")

# Get conversions from GA4
goals_data = ga_data(propertyId = property_id,
                     date_range = c("2023-10-01", "2023-11-08"),
                     dimensions = c("date"),
                     metrics = c("sessions"),
                     dim_filter = goals_filter) %>%

	# rename sessions to goals
set_names(c("date", "goals"))

# Get sessions from GA4
sessions_data = ga_data(propertyId = property_id,
                        date_range = c("2023-10-01", "2023-11-08"),
                        dimensions = c("date"),
                        metrics = c("sessions"))

# Merge GA4 goals and sessions
sessions_goals_ga4 = sessions_data %>%
	# join sessions with goals
full_join(goals_data) %>%
	# replace all NAs with 0
replace(is.na(.), 0)

# Final data frame for next block in mage.ai
sessions_goals_ga4
Now, before we copy this code to Mage, we need to make our JSON service account key accessible to Mage, as for now it is only available on our local machine.
Remember, Mage is installed on our virtual machine. We need to paste the JSON service account key there.
Open Visual Studio Code and click on “Open”.
Go to the path where your JSON service account key is located in your local machine. You should be able to see your service account key in the left panel.
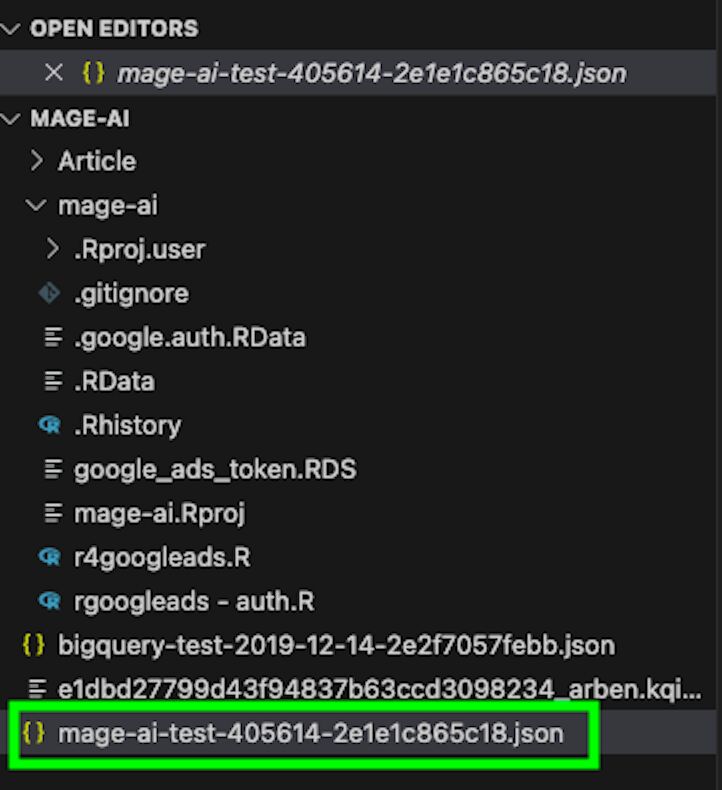
Right-click and copy it.
Next, go to the search bar, type > and connect to your virtual machine.
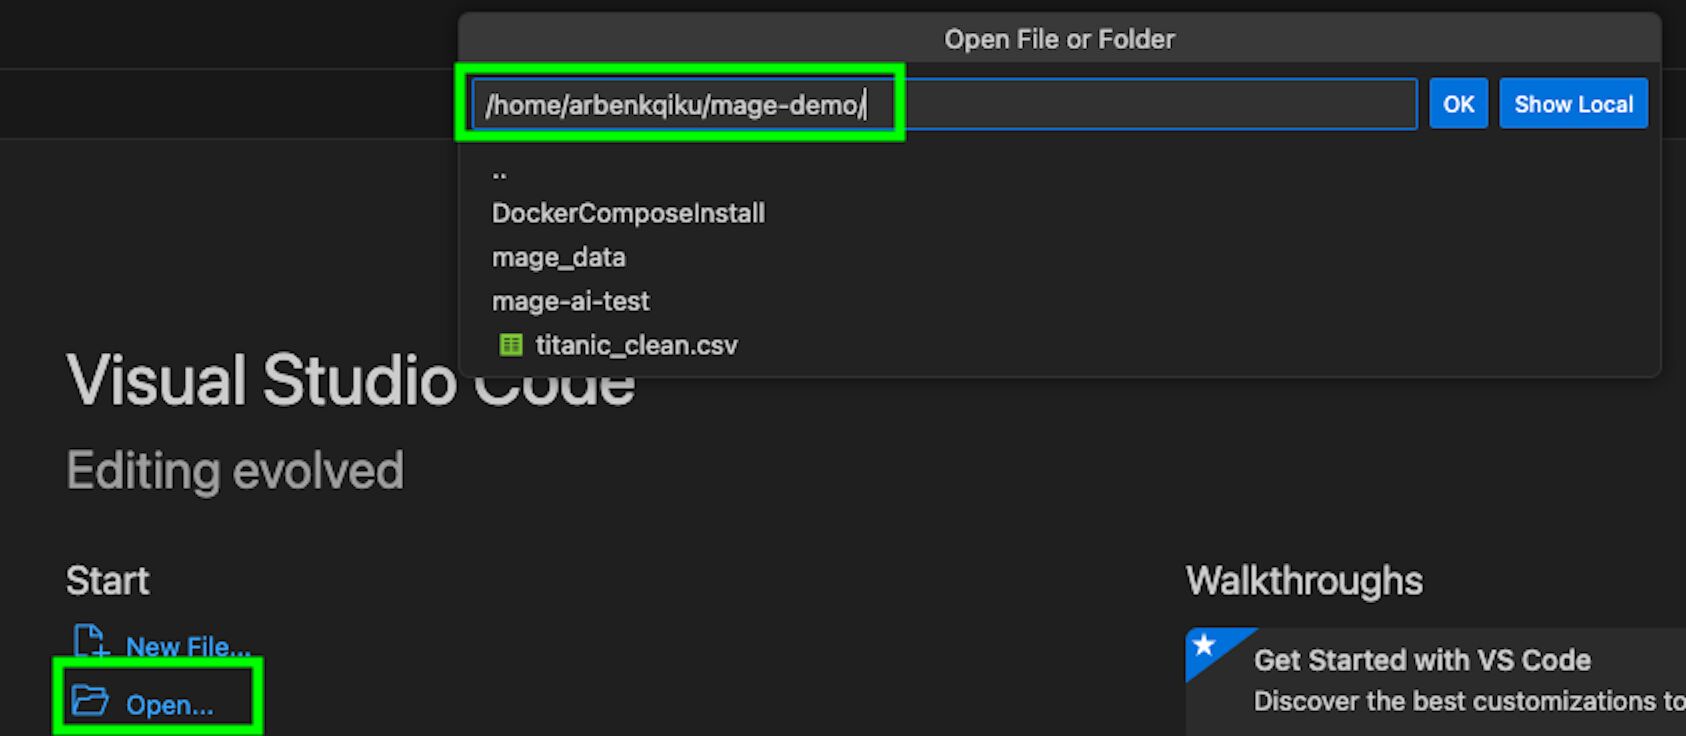
Once you are in the VM, click on “Open…” and access the folder where Mage is installed. Click on “OK”.
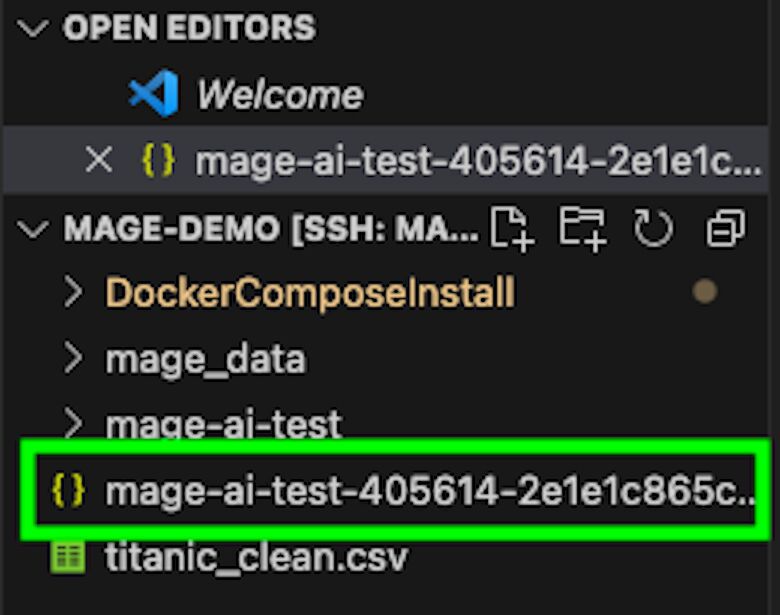
On the left side you should now see the files contained in that folder.
Right-click in that area and choose Paste to paste your service account JSON file into the project.
You should see your service account file now successfully added to the files in your VM.
In Mage, you can use the function list.files() to see that the service account key is available.
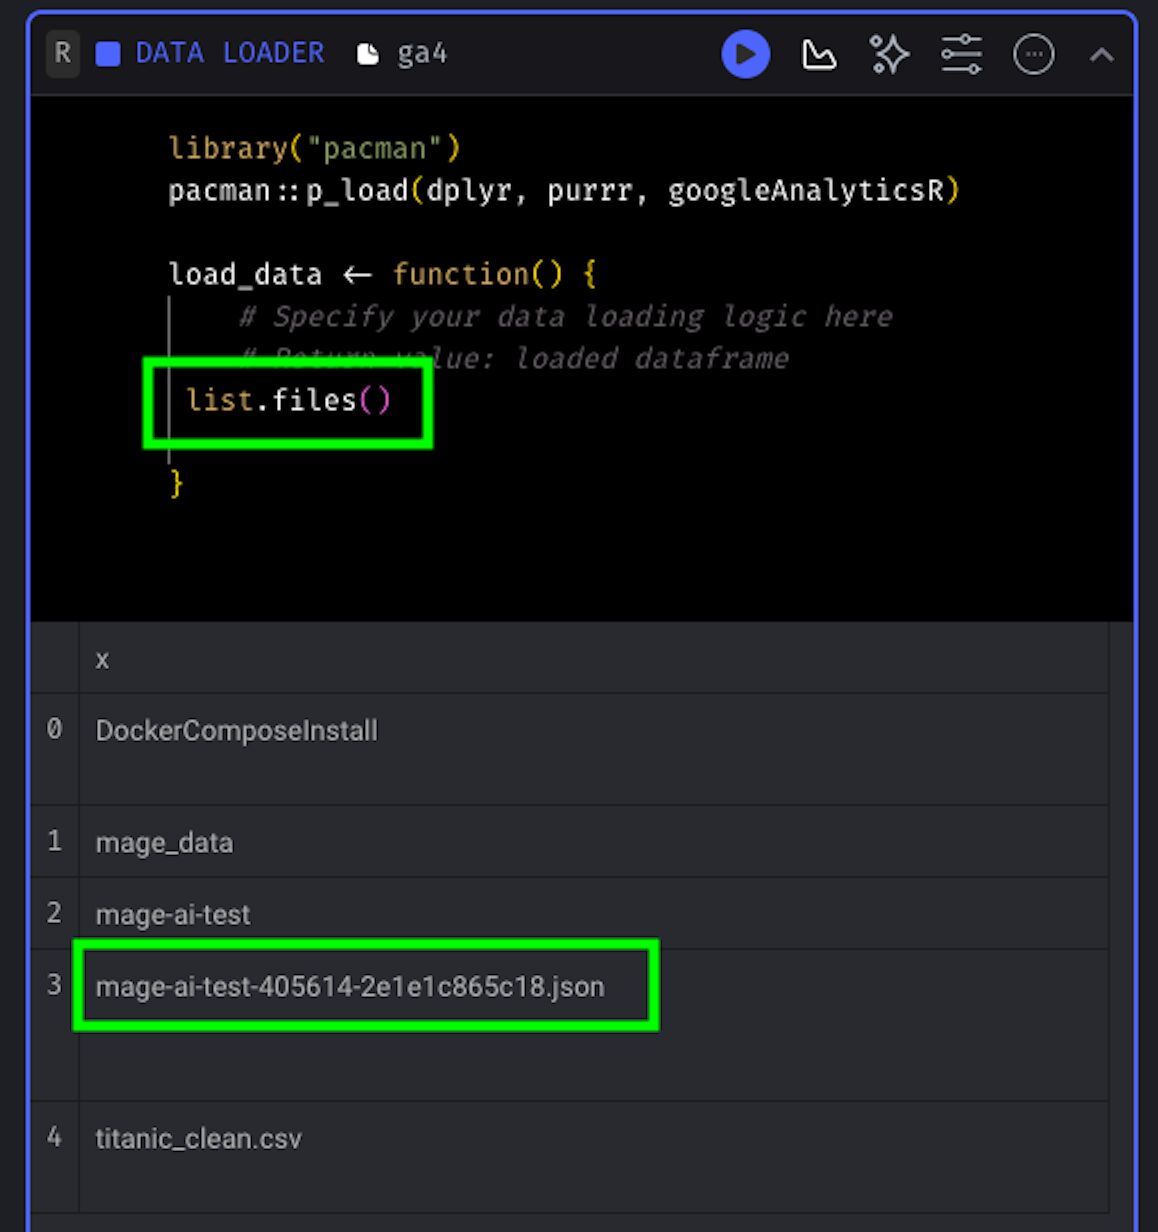
Now, take the code that we previously played with in RStudio and paste it into Mage. You need to make some adjustments, though.
The main change is that the bulk of the code is now within the load_data() function. The only code that’s run outside that function are the library loads.
Another thing that changes is the path to the service account key. This now needs to reference the path to the file in your VM. As it should be in the root of your project, you just need to add the filename.
library("pacman")
pacman::p_load(dplyr, purrr, googleAnalyticsR)
load_data <- function() {
# Specify your data loading logic here
# Return value: loaded dataframe
# Retrieve data ----
# path to your JSON service account
ga_auth(json_file = "mage-ai-test-405614-2e1e1c865c18.json")
# GA4 property ID
property_id = "1234567"
# Create filter
goals_filter = ga_data_filter("eventName" == "form_submit_lead" | "eventName" == "whatsapp_click" | "eventName" == "phone_click")
# Get conversions from GA4
goals_data = ga_data(propertyId = property_id,
date_range = c("2023-10-01", "2023-11-08"),
dimensions = c("date"),
metrics = c("sessions"),
dim_filter = goals_filter,
) %>%
set_names(c("date", "goals"))
# Get sessions from GA4
sessions_data = ga_data(propertyId = property_id,
date_range = c("2023-10-01", "2023-11-08"),
dimensions = c("date"),
metrics = c("sessions"))
# Merge GA4 goals and sessions
sessions_goals_ga4 = sessions_data %>%
# join sessions with goals
full_join(goals_data) %>%
# replace all NAs with 0
replace(is.na(.), 0)
# Final data frame
sessions_goals_ga4
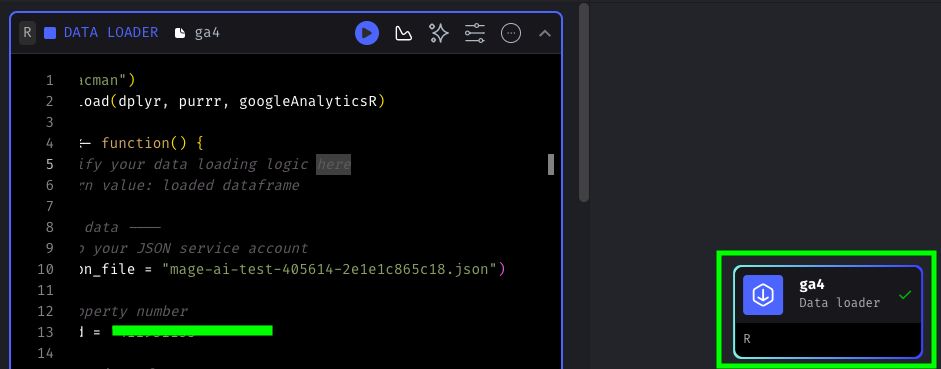
}If everything worked properly, Mage will provide a preview of the data retrieved:
As you can see, our Data loader block has a green tick next to it, which means that it was able to run successfully.
Later, we can use this data that we retrieved from GA4 for whatever purpose we want. However, before playing around with it, let’s download some data from Google Ads!
Load data from the Google Ads API
To retrieve data from the Google Ads API, we’ll use the R package rgoogleads, developed by Alexey Seleznev. Unfortunately, with this package it is not possible to use a service account key. Instead, we’ll have to generate an access token by using the gargle package. The goal of gargle, as explained on their website, is to “take some of the agonizing pain out of working with Google APIs”.
First of all, you need to browse to the Google Ads API in Google Cloud Platform and click to Enable it.
To access Google Ads data, we need to create the credentials for an application, because when we use the rgoogleads package to get data, Google sees it as an external app trying to access our ads info.
So, when we attempt to fetch our Google Ads data, Google asks for our permission to let this app access our ads data. If we say yes, Google gives us an access token. This token then lets our computer talk to the Google Ads API without having to interact each time.
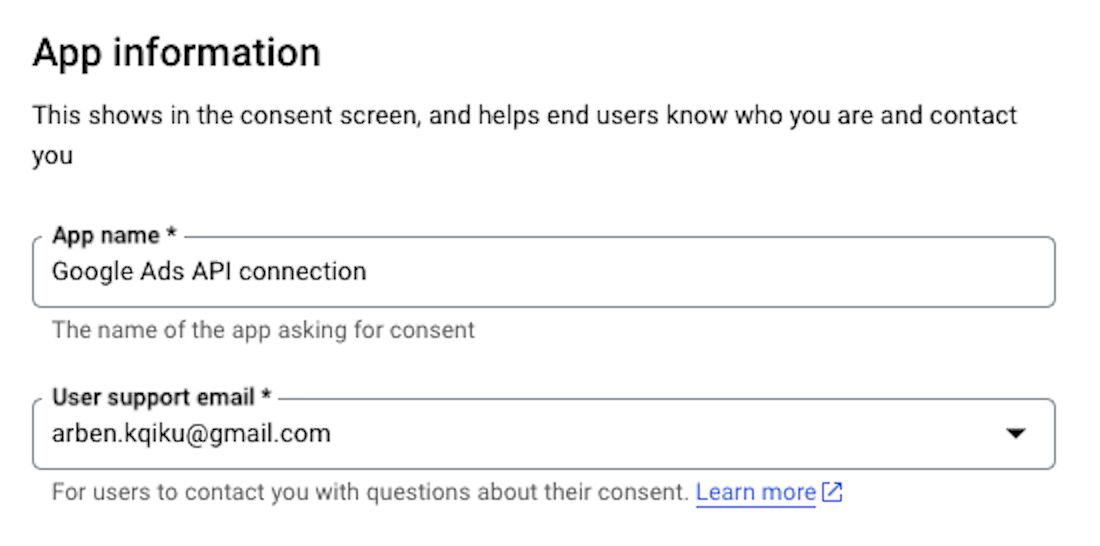
Before doing anything, GCP will ask you to set up a “consent screen”. This screen is like a friendly message to users, letting them know that our app wants to look at their Google Ads data.
It’s a way to make sure users are aware and agree to let our app access their information. To get started, browse to the OAuth consent screen section of your GCP project.
Here, click on “CONFIGURE CONSENT SCREEN”.

Select External as the User Type and then click “CREATE”.
Give your app a name and add your email address.
Add your email to the Developer email address, too, and then click “SAVE AND CONTINUE”.
In the next screen, click on “ADD OR REMOVE SCOPES”. Scopes govern what your app is allowed to do with the APIs.
Search for google ads and select the Google Ads API. Click UPDATE when done.

Then, click “SAVE AND CONTINUE” to proceed to the “Test users” step.
Here, click “ADD USERS”. Add your email address and click “ADD”.
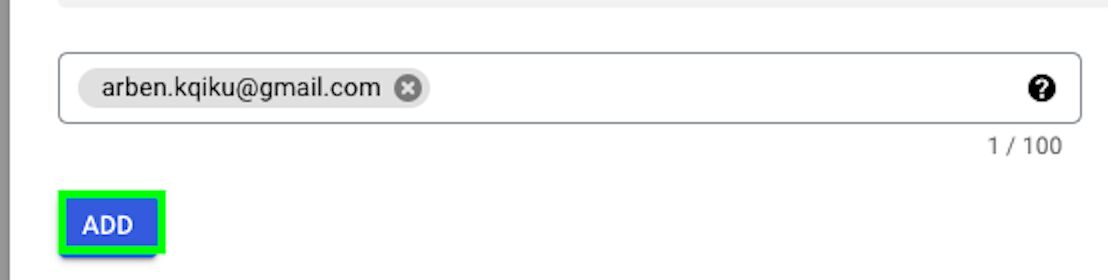
Make sure to include your email because our app is currently in the “Testing” phase. During this phase, only the emails that are added can be used by the app. So, adding your email is crucial to get your Google Ads data.
Click on “SAVE AND CONTINUE” to proceed to the Summary step, and then “BACK TO DASHBOARD” when done with configuring the consent screen.
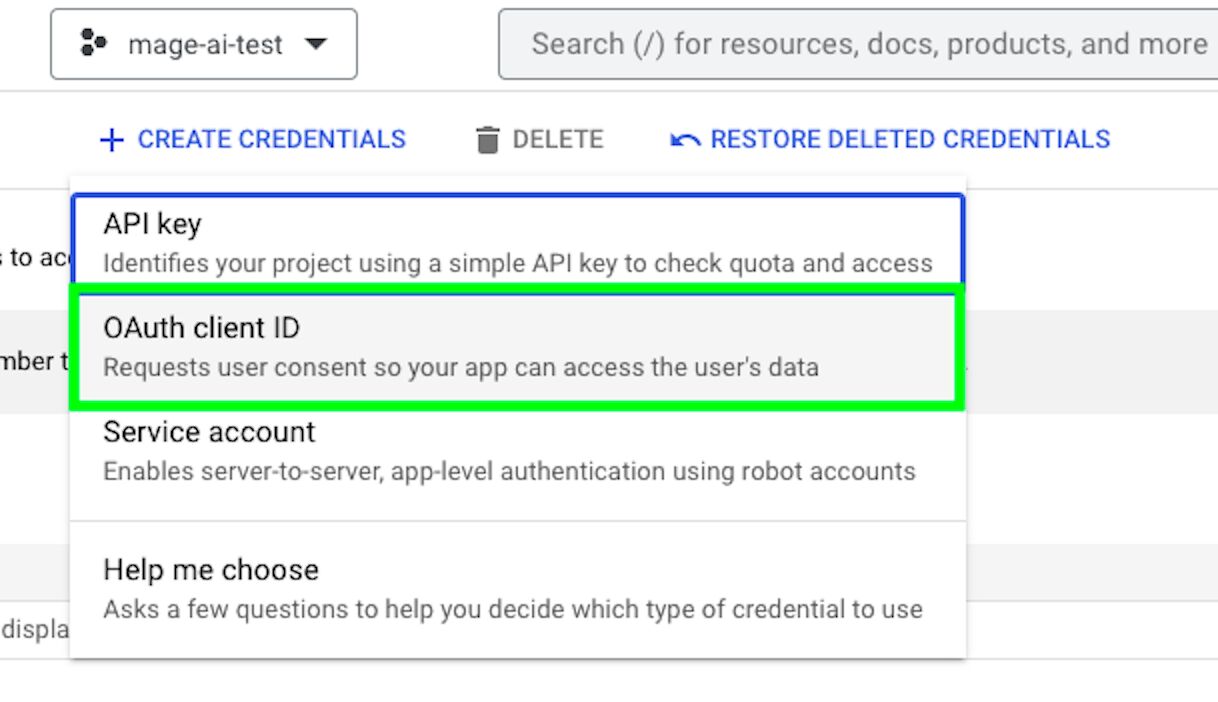
Now that the consent screen has been configured, you can browse to Credentials again.
Here, click on “CREATE CREDENTIALS” and this time choose OAuth client ID.
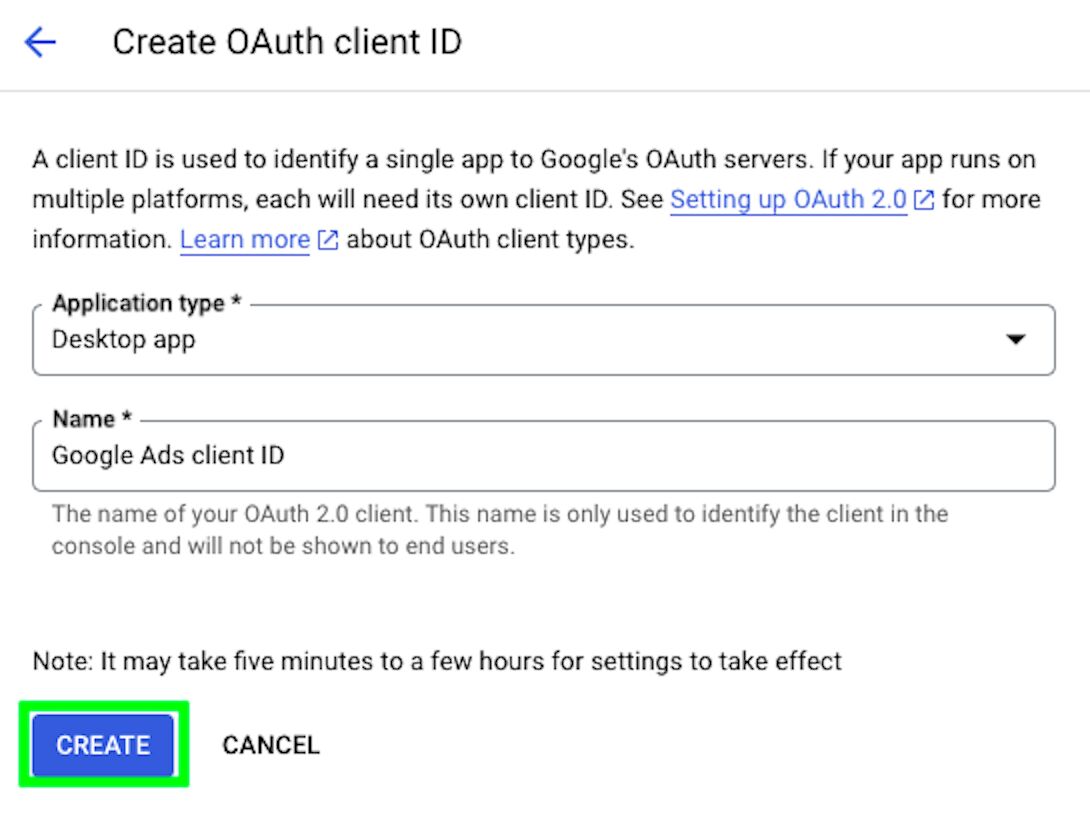
Under Application type, select Desktop app, give a name to your OAuth client ID, and click on “CREATE”:
Download your client ID as a JSON file and click on OK.
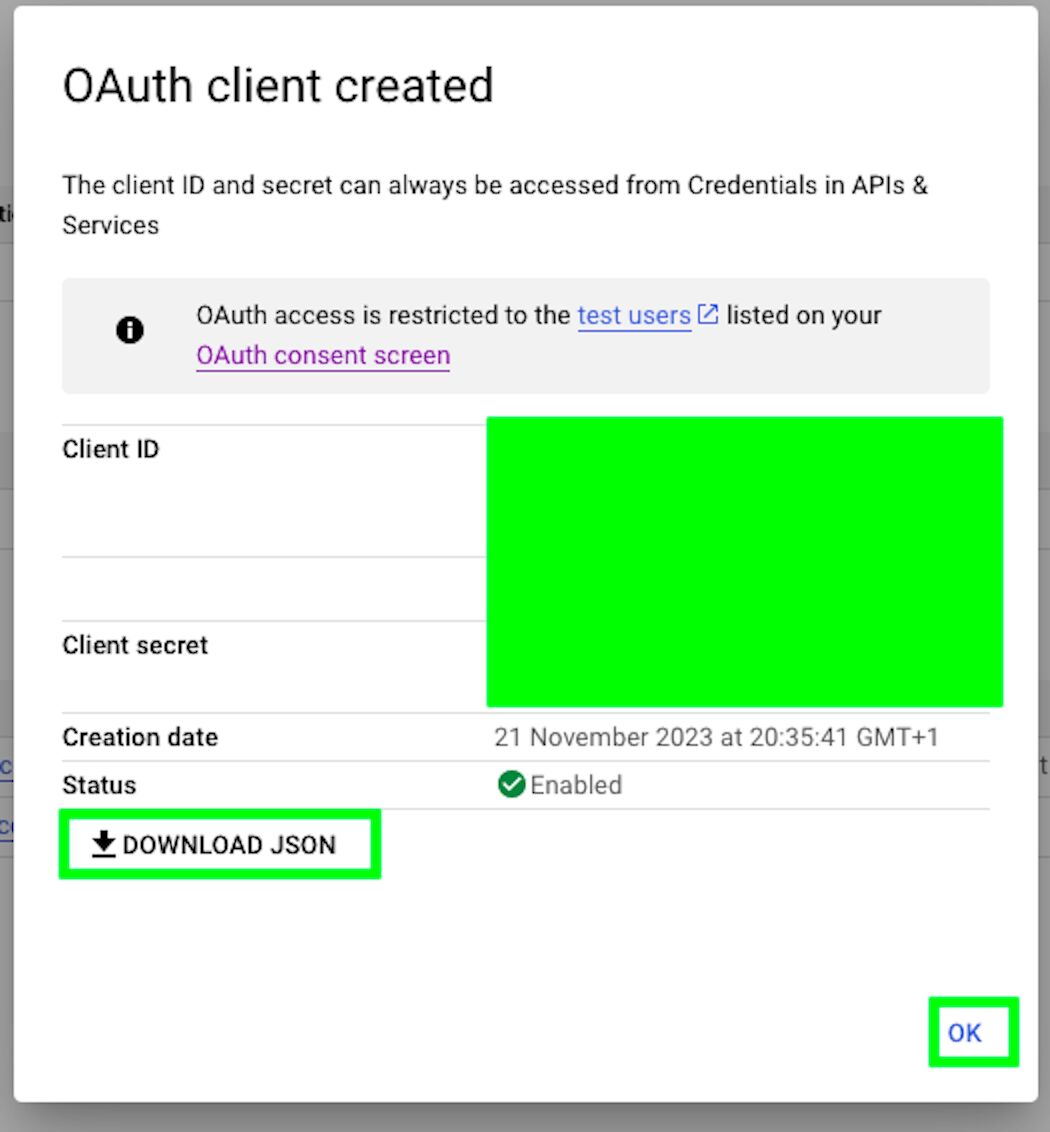
Save it in a secure location. Now, let’s go back to RStudio on our local machine. Open a new script and load these packages:
# Packages
library(gargle)
library(rgoogleads)Then, we’ll import the OAuth Client ID credentials that we just created by using the function gargle_oauth_client_from_json(). The name of your client can be whatever you prefer:
# Create gargle client
my_client = gargle_oauth_client_from_json(path = "/Users/arbenkqiku/Desktop/mage-ai/mage-demo-client-id.json",
name = "Google Ads App")Then, we can add the following scope and email to our token request:
scopes = "https://www.googleapis.com/auth/adwords"
email = "[email protected]"# Create a token by using Gargle
my_token = gargle2.0_token(email = email,
package = "rgoogleads",
scope = scopes,
client = my_client)This will open a browser window.
Do you recognize the name of the App? That’s the name of our application! We’re now going through the process of authorizing our app to access our Google Ads data. Now, select your email.
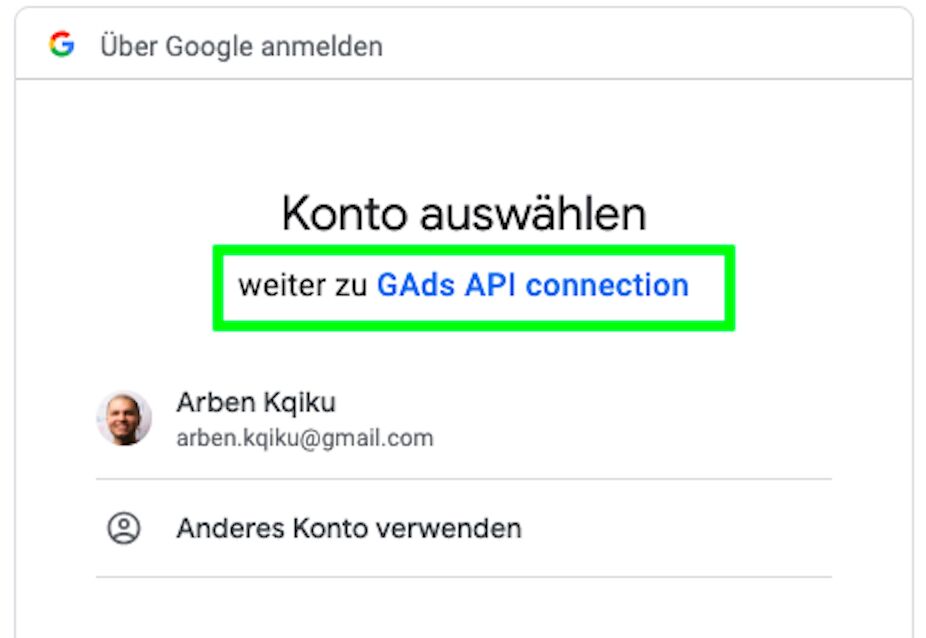
Google will tell you that this app isn’t verified, as its status is still “testing”.
However, it is our own app, so we can safely click on “Continue”.
Authorize the app to “See, edit, create and delete your Google Ads accounts and data…” and click on “Continue”.
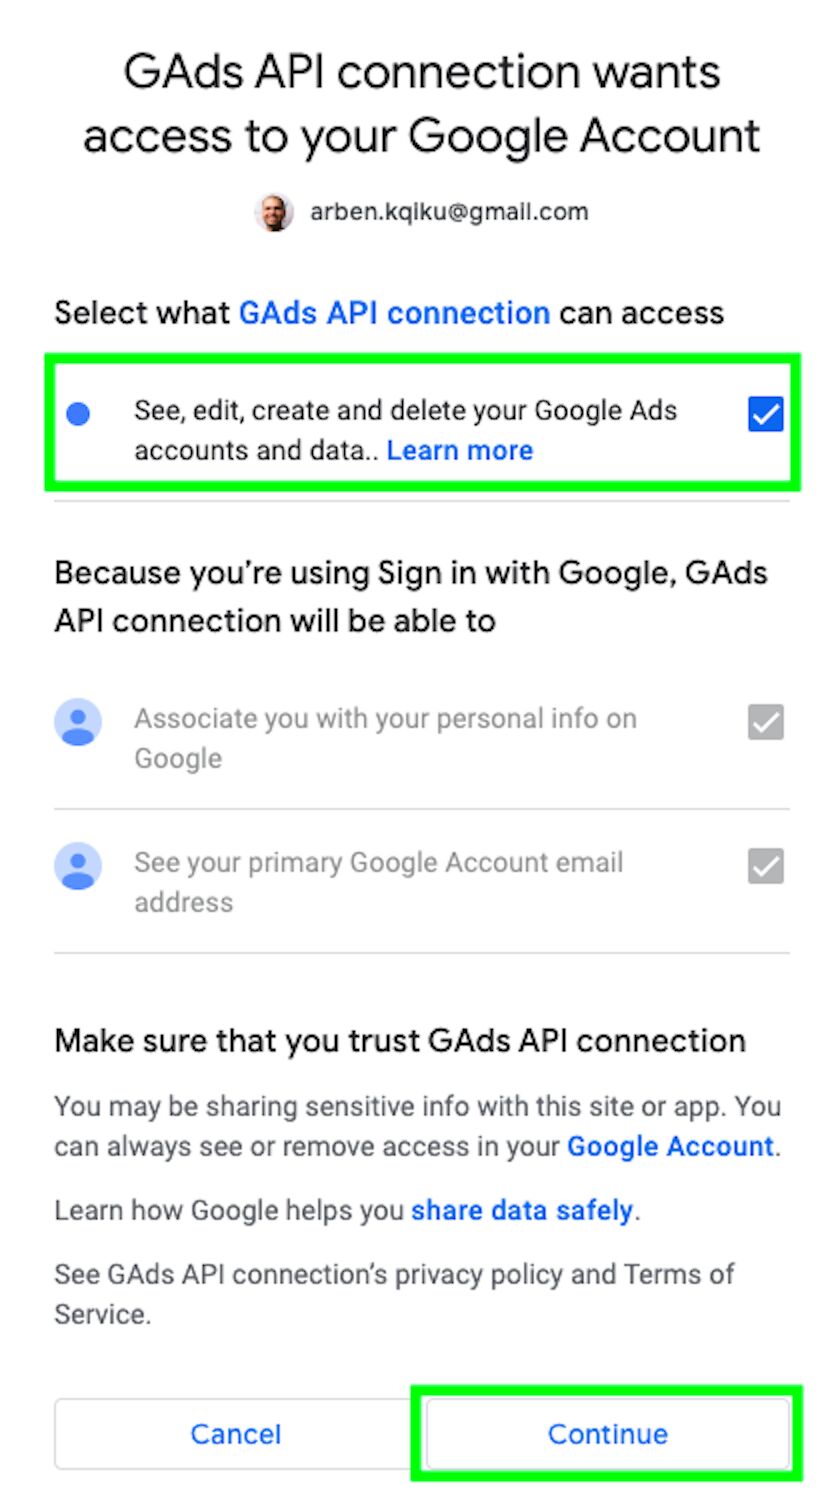
If everything worked correctly, you should see a message saying that Authentication complete. Please close this page and return to R.
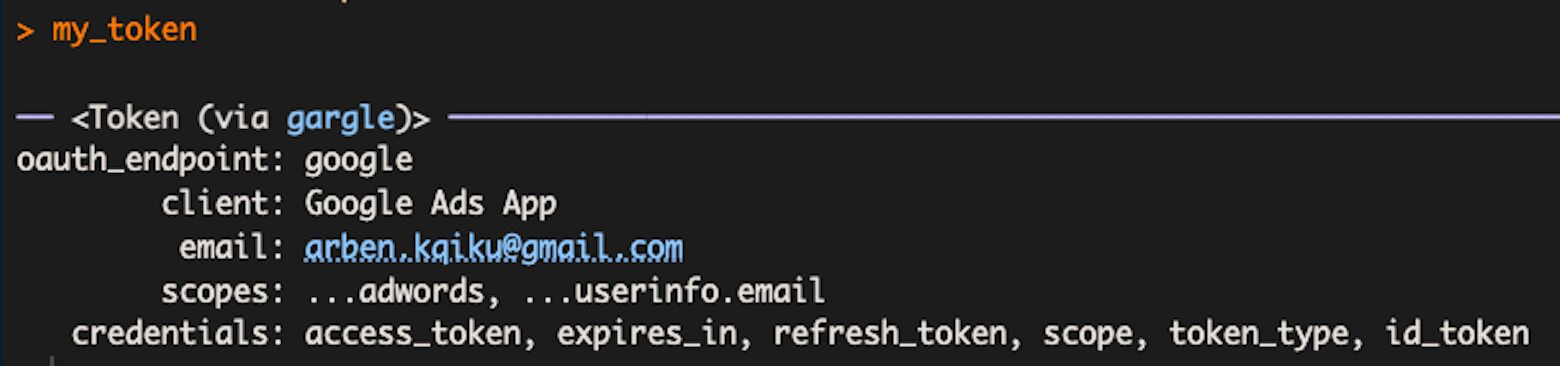
Now, if we review the content of the variable my_token, which contains our access token, we can review the information again, for example the email associated with the token, the scopes, and so forth.
We can now test if the token works properly by running the gads_auth() function. Nothing should really happen here, as with the token we can authenticate non-interactively.
# Authenticate by using the previously created token
gads_auth(token = my_token)Let’s run a simple function of the rgoogleads package to see if we can access our data:
# get list of accessible accounts
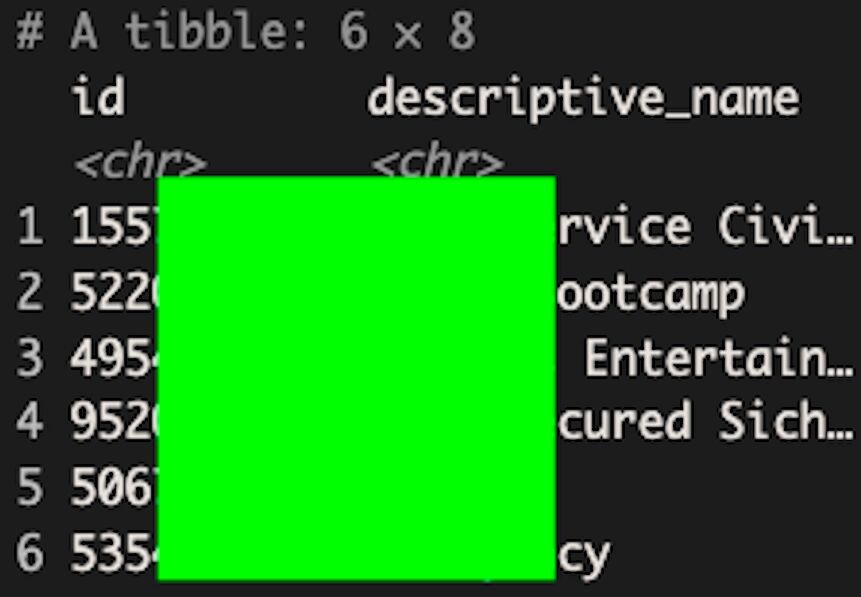
gads_get_accessible_customers()Yes, I am able to retrieve the accounts that I have access to!
However, we are not ready for production yet. In fact, if we type this code:
# where is the cache of the token located
my_token$cache_pathWe’ll get the result that the token is cached in a local directory, such as ~/Library/Caches/gargle.
This means that when we try to load my_token in production, it will look for the local path instead of a path on the VM.
So, we need to change the cache path to our Mage directory on the VM. This is how you’d do it:
# change path of cache to mage main directory
my_token$cache_path = "/home/src"
# save token again with changed directory
saveRDS(my_token, file = "google_ads_token_mage_demo.RDS")Here is the full code to generate, test, and save the token:
# Packages
library(gargle)
library(rgoogleads)
# Create gargle client
my_client = gargle_oauth_client_from_json(path = "/Users/arbenkqiku/Desktop/mage-ai/mage-demo-client-id.json",
name = "Google Ads App")
# Define scope and email
scopes = "https://www.googleapis.com/auth/adwords"
email = "[email protected]"
# Create a token by using Gargle
my_token = gargle2.0_token(email = email,
                           package = "rgoogleads",
                           scope = scopes,
                           client = my_client)
# Authenticate by using the previously created token
gads_auth(token = my_token)
# Test token by getting the list of accessible accounts
gads_get_accessible_customers()
# Change path of cache to mage main directory, so you can use the token in production
my_token$cache_path = "/home/src"
# Save token with changed directory
saveRDS(my_token, file = "google_ads_token_mage_demo.RDS")Now that we have generated the access token, you can copy-paste the JSON file from your local machine to the VM directory by using Visual Studio Code. Follow the exact steps you took to copy-paste the service account JSON file before.
Next, we can go back to Mage, add a Data loader block, and select R as the programming language.
Name the block google_ads and click on “Save and add block”.
In the block code, we need to first load the necessary packages.
library("pacman")
p_load(rgoogleads)
p_load(dplyr)
p_load(purrr)

load_data <- function() {

}
Then, we need to load our access token, authenticate with it, and set the Google Ads account ID we want to get the data from.
# load Google Ads access token
my_token = readRDS(file = "google_ads_token_mage_demo.RDS")
# Authenticate with the token
gads_auth(token = my_token)
# Set the Google Ads account id you want to get data from
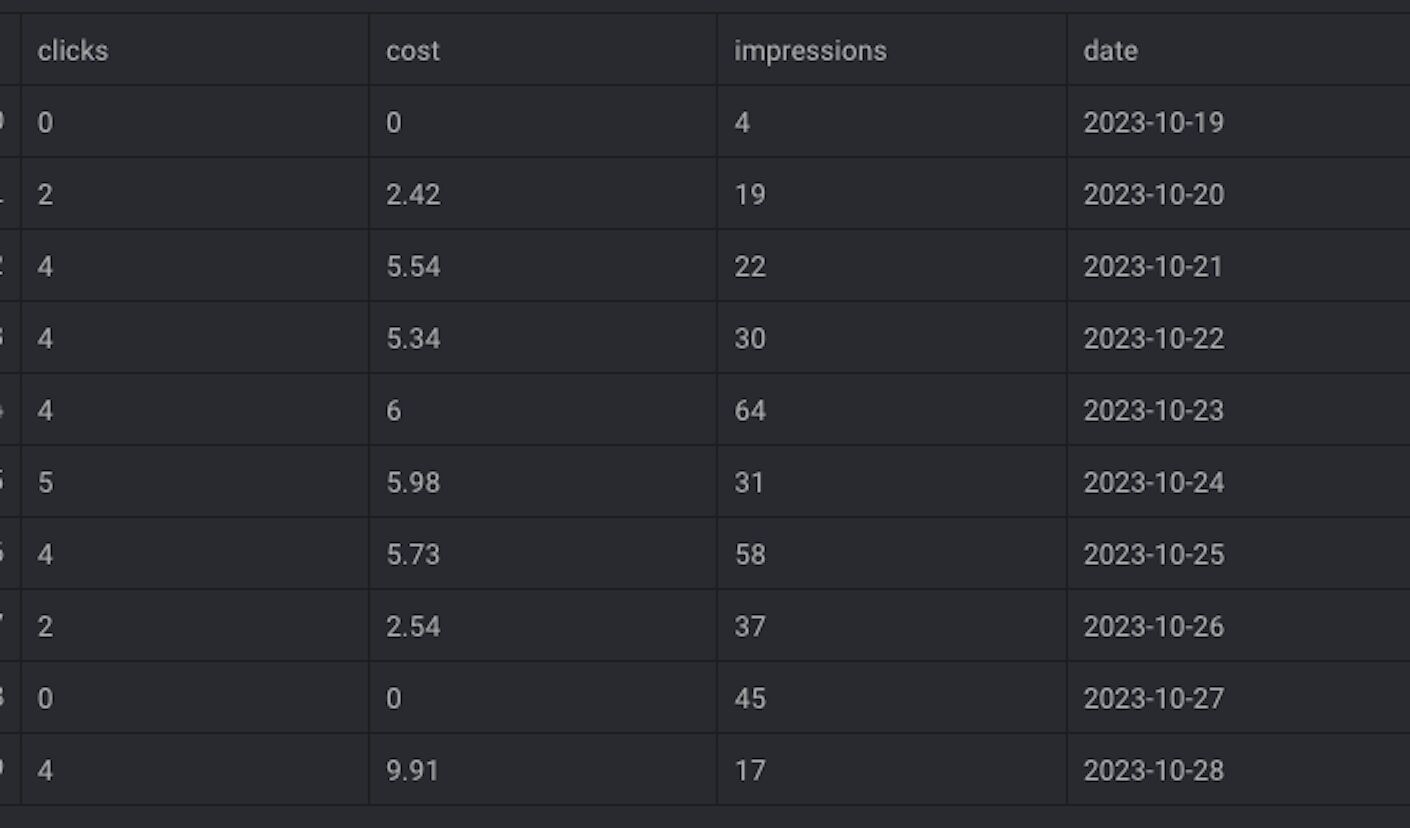
gads_set_customer_id('123-123-1234')Here is the query that we’re using to retrieve our data. We’ll retrieve impressions, clicks, and cost segmented by date, from “2023-10-19” until “2023-11-01”.
# run query
google_ads_account_data = gads_get_report(
  resource    = "customer",
  fields      = c("segments.date",
                  "metrics.impressions",
                  "metrics.clicks",
                  "metrics.cost_micros"),
  date_from   = "2023-10-19",
  date_to     = "2023-11-01"
)
The first argument you need to define is the resource you are getting the data from, in our case customer.
You can find here the list of all available resources.
For example, if you would like to retrieve data at the ad group level, you should define the resource as ad_group.
To build our query, we can use the Google Ads query builder, which can be used for any resource, in our case customer.

Below you can select attributes, segments, or metrics:
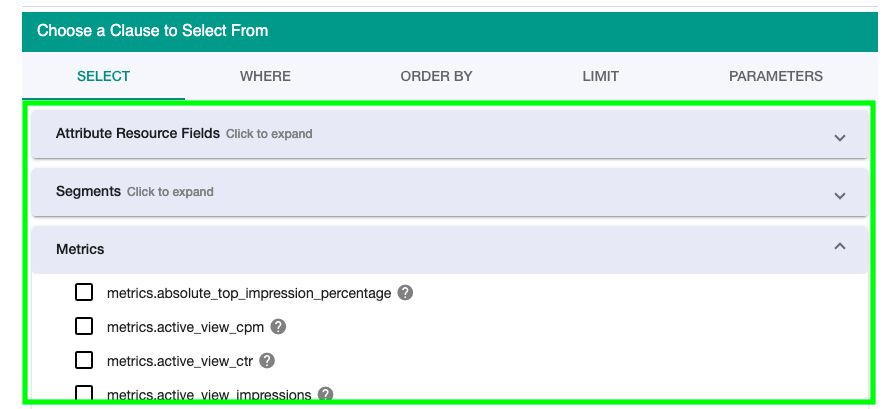
When you select fields, it will start populating the query in the user interface of the builder.
This is very useful to know what the metrics and dimensions are called in the Google Ads API.
Here is the final part of our Data loader block, which should always be a variable containing data, as we have to pass something to the next block.
# return data
google_ads_account_data
Here is the complete code block we’re working with:
library("pacman")
p_load(rgoogleads)
p_load(dplyr)
p_load(purrr)

load_data <- function() {
    # Specify your data loading logic here
    # Return value: loaded dataframe

    # load Google Ads access token
    my_token = readRDS(file = "google_ads_token_mage_demo.RDS")

    # Authenticate with the token
    gads_auth(token = my_token)

    # Set the Google Ads account id you want to get data from
    gads_set_customer_id('123-123-1234')

    # run query
    google_ads_account_data = gads_get_report(
      resource    = "customer",
      fields      = c("segments.date",
                      "metrics.impressions",
                      "metrics.clicks",
                      "metrics.cost_micros"),
      date_from   = "2023-10-19",
      date_to     = "2023-11-01"
    )

# return data for next block
google_ads_account_data
}
If you run this code, you should be able to see clicks, cost, and impressions segmented by date.
We’re now done with this Data Loader block. Next, let’s move on to transformers.
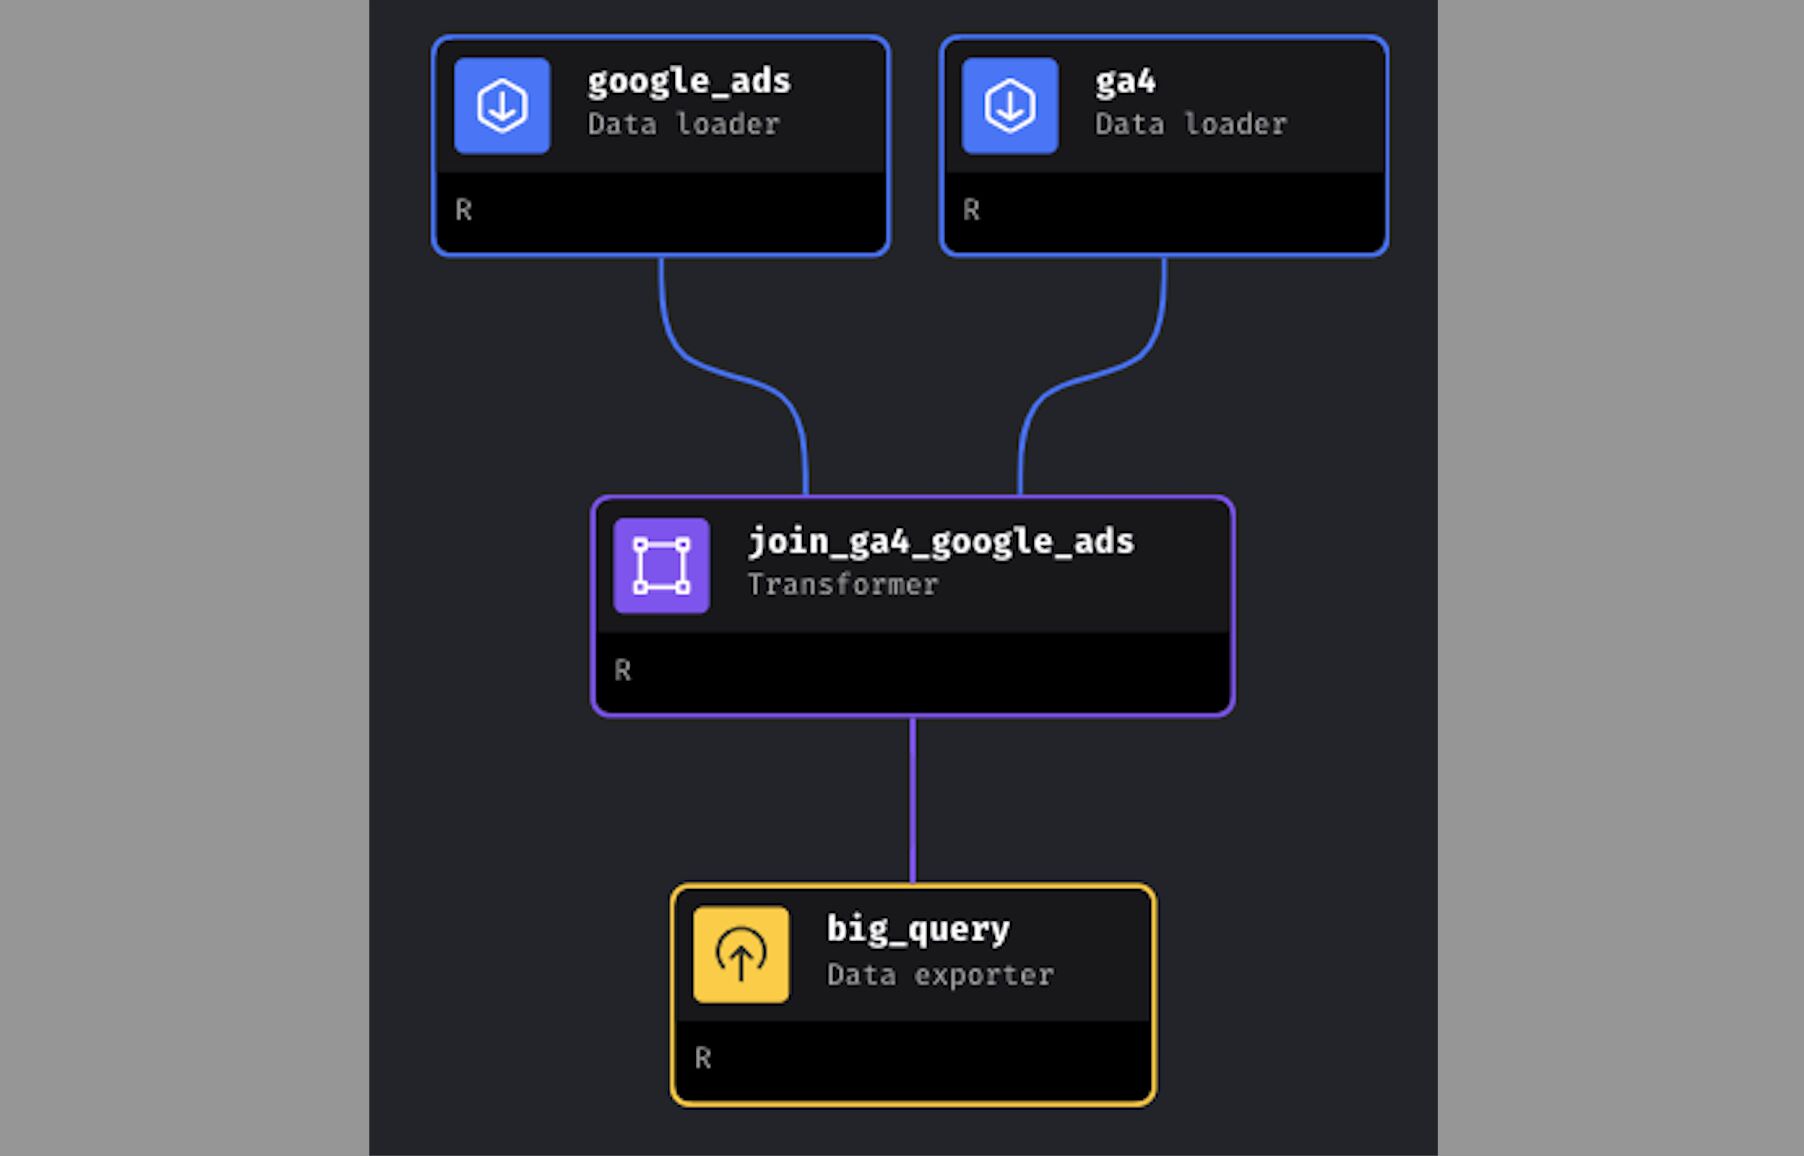
Join GA4 and Google Ads data
In Mage, add a new Transformer block and select R as the programming language.
Give the block a name like join_ga4_google_ads and click on “Save and add block”.
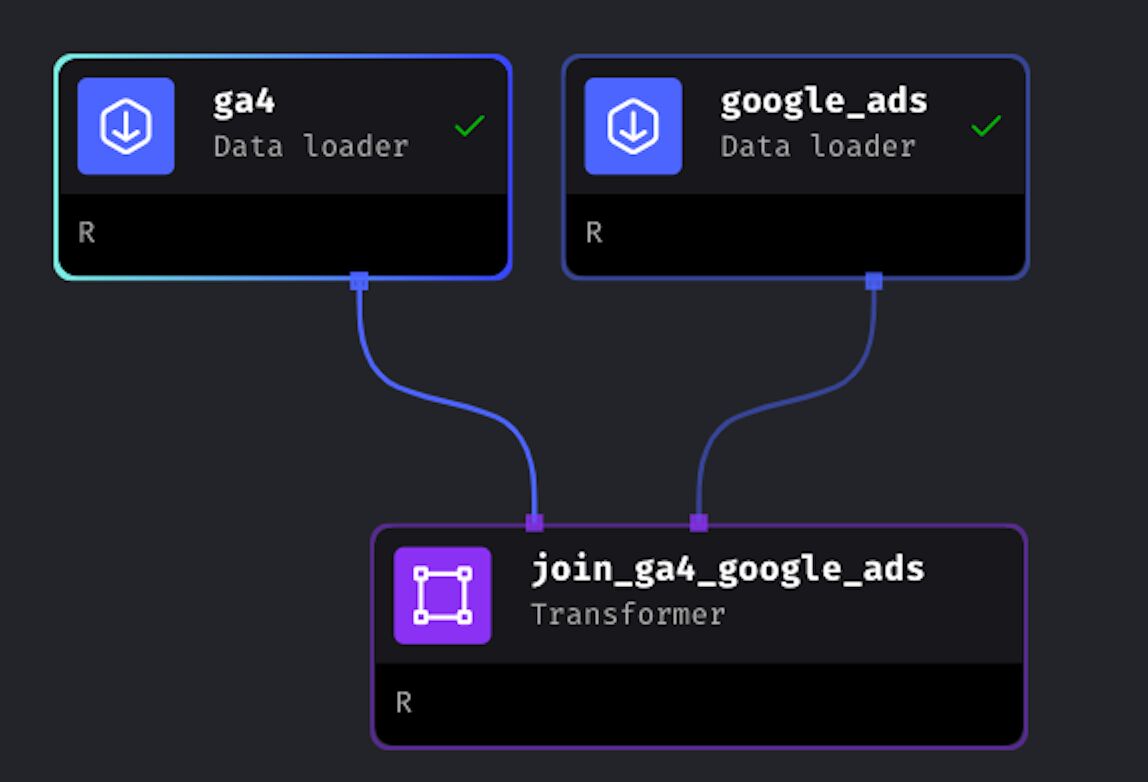
In the Tree, we can now see that the Transformer block named join_ga4_google_ads only receives data from the Data Loader block google_ads. We need to also link the Data Loader ga4 with the Transformer.
To do this, you simply need to drag and drop the arrow from the ga4 block to the join_ga4_google_ads Transformer.
The first thing that we’ll do in the Transformer block is to add the final variables from the previous Data loader blocks to the transform() function.
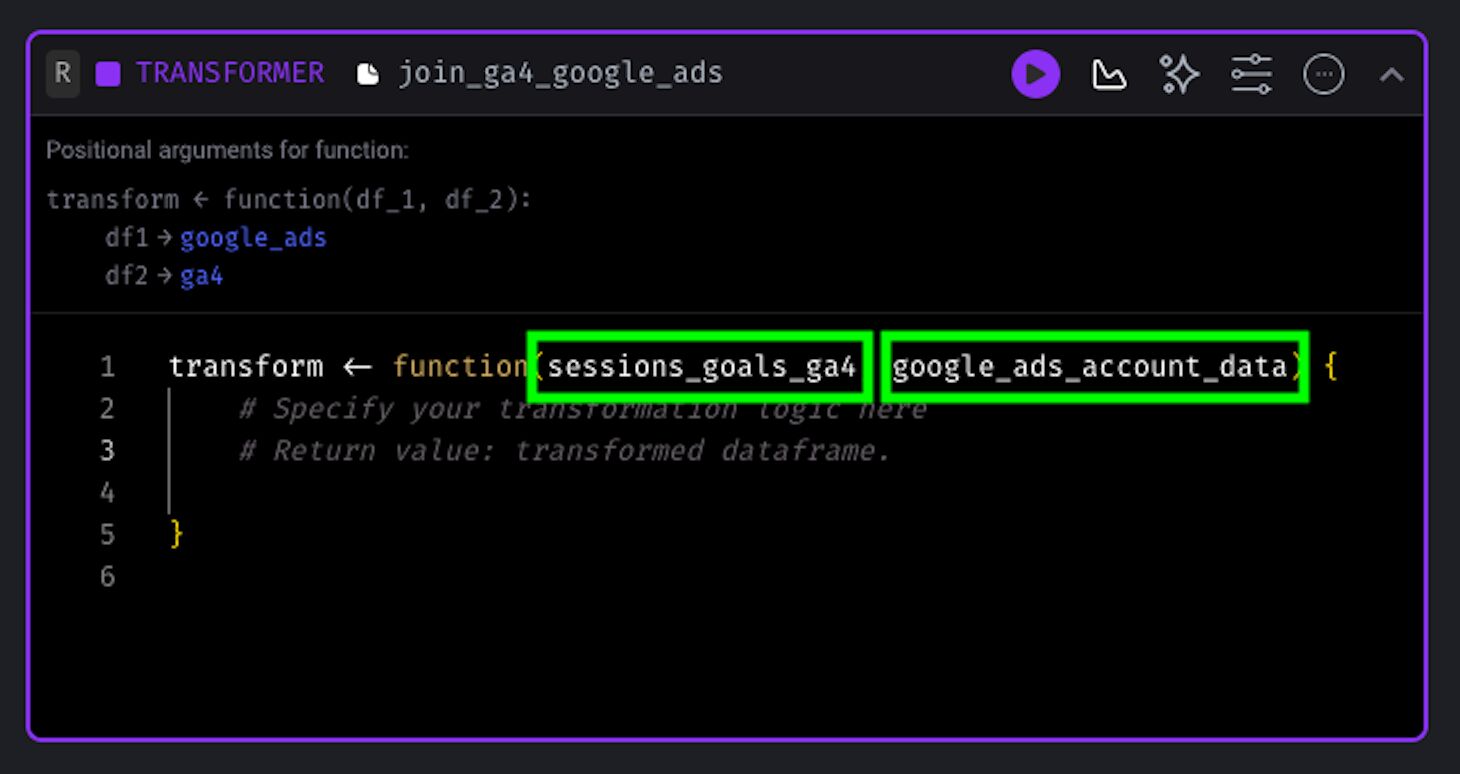
Next, we can add the following packages on top of the transform() function:
library("pacman")
p_load(tibble, dplyr, purrr, stringr, lubridate)
The first piece of code that we’re adding is this:
# Build a row with the exact time
check_time = tibble(Date = Sys.time(),
                    Impressions = 0,
                    Sessions = 0,
                    Clicks = 0,
                    Cost = 0,
                    Goals = 0)
I am creating this tibble called check_time only so that later in BigQuery we can verify whether our schedule from Mage is working correctly.
Then, we can finally join the Google Ads data with the GA4 data, and also return the merged_data variable for the next block:
# Merge Google Ads with GA4 Data
merged_data = google_ads_account_data %>%
left_join(sessions_goals_ga4, by = c("date" = "date")) %>%
# reorder and capitalise columns
select(date, impressions, sessions, clicks, cost, goals) %>%
set_names(names(.) %>% str_to_title()) %>%
# add check_time variable to verify schedule
mutate(Date = Date %>% as_datetime()) %>%
bind_rows(check_time) %>%
# replace NAs with 0
replace(is.na(.), 0) %>%
arrange(desc(Date))
# Return merged_data variable for next block
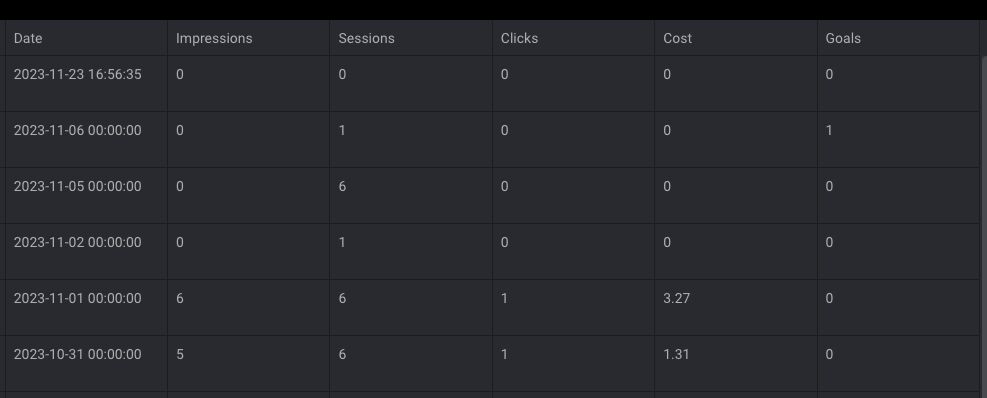
merged_dataIf everything worked properly, you should get something similar to this:
I am aware that we’re joining Google Ads data with GA4 data from all sources, and we should actually only join GA4 data coming from Google Ads. However, the goal of this guide is simply to show how to perform data engineering tasks with digital data.
Export data to BigQuery
Now that we joined data successfully from Google Ads and GA4, we’re ready to export the data to BigQuery.
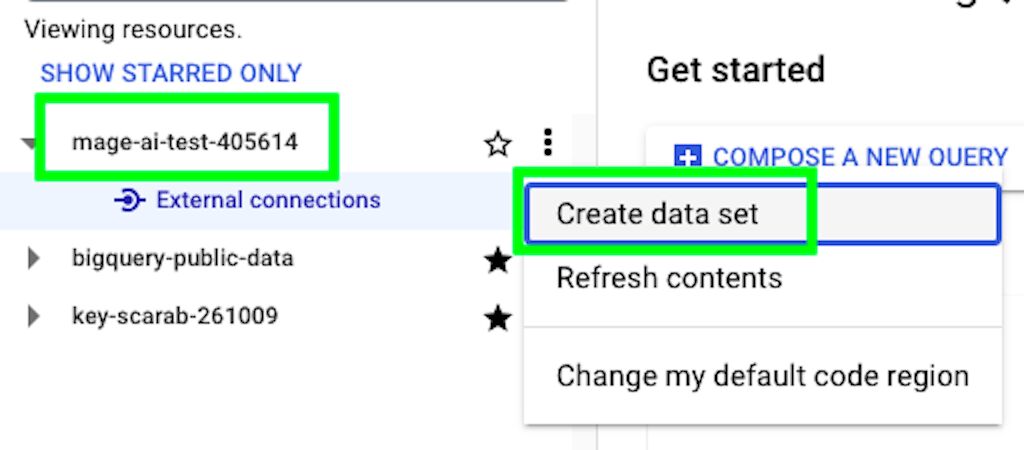
Browse to the BigQuery console in your Google Cloud Platform project.
BigQuery has the following data hierarchy: project -> dataset -> table.
We already have a project, so now we need to create a dataset where our tables will reside. Click on the three dots on the right of your project, and then on “Create data set”:
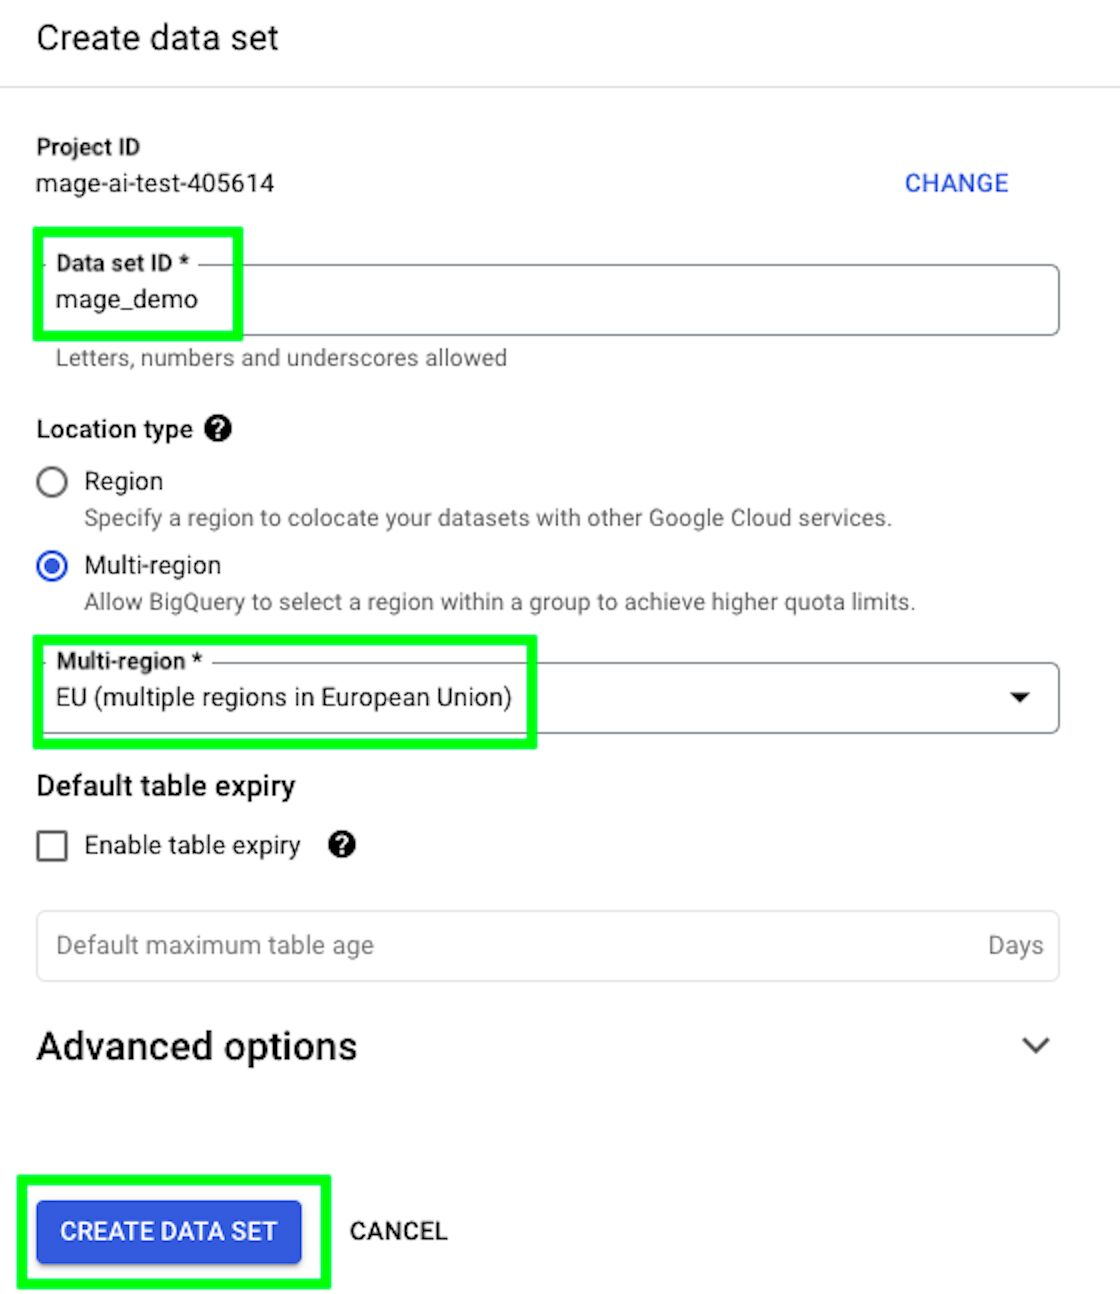
Give a name to your data set, select a region, and click on “CREATE DATA SET”:
Back in Mage, add a Data Exporter block and choose R as the programming language again.
Name the block biq_query_export and click on “Save and add block”.
This is what your data tree should look like.

Go the the big_query_export block, and add merged_data as the argument of the function export_data(). Also, let’s load the bigrquery package.
library("pacman")
p_load(bigrquery)

export_data <- function(merged_data) {
    # Specify your data exporting logic here
    # Return value: exported dataframe

}
To authenticate with BigQuery, we can actually use the service account key that we previously created for GA4.
The only thing that changes is the function bq_auth() instead of ga_auth().
This is great news as it means we don’t have to go through yet another cumbersome authentication process:
# Authenticate
bq_auth(path = "mage-ai-test-405614-2e1e1c865c18.json")
In fact, you can use the same service account key to authenticate with multiple Google services such as Google Drive or Google Sheets.
There are different R packages for these services, such as googledrive and googlesheets4.
Granted, you need to authorize the respective APIs in the Google Cloud Platform as shown previously, but this is a great time saver!
The next thing to do is to create a table reference for BigQuery.
As you may remember, we previously created only a data set, so we now need to create a placeholder for our table.
To do so, we need to define our project name, data set, and table. The project name and data set are already defined and we can retrieve these from BigQuery. The table name is up to you.
# Define Big Query Project data
project = "mage-ai-test-405614"
data_set = "mage_demo"
table = "merged_data"
# Define table
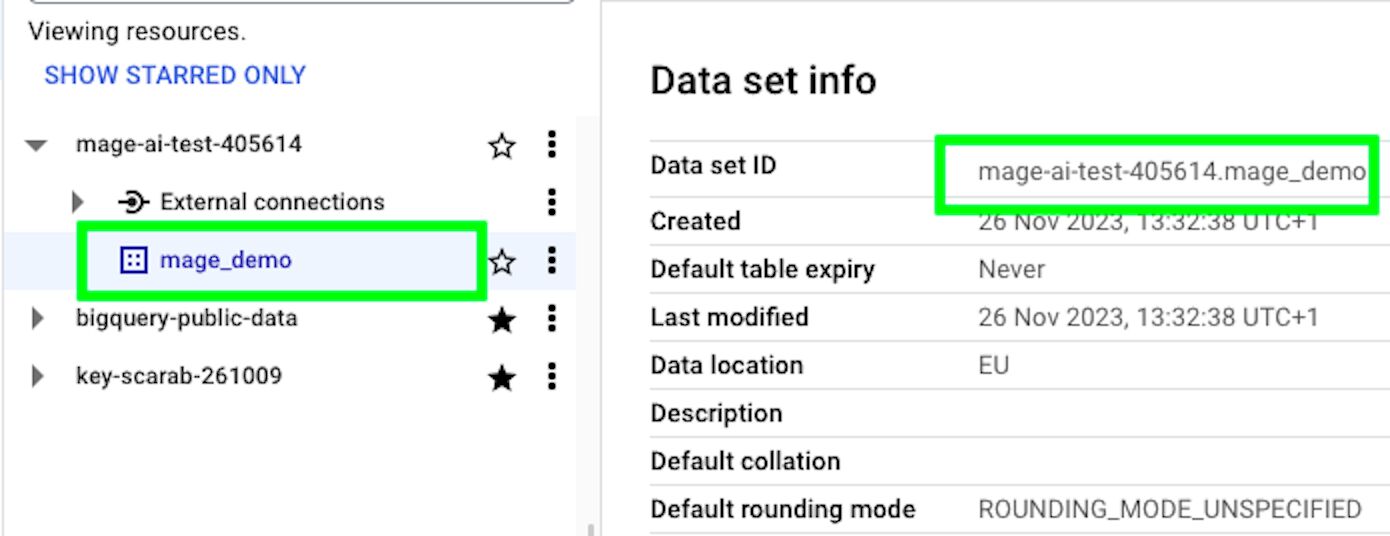
table = bq_table(project = project, dataset = data_set, table = table)To find the right project and data set name, go to BigQuery and click on the data set you created.
To the right, you should see the Data set ID, which comprises project_name.data_set_name. You can separate and copy those values to insert them into the code above.
In the following code, if the table exists, we delete and recreate it before uploading data.
I’m doing this every 5 minutes for demonstration, but in real production, I’d likely run it less frequently, adding only the new data instead of recreating the whole table.
if(bq_table_exists(table)){
  # if table already exists, delete it
  bq_table_delete(table)

	# recreate table so that we can fill it out
  bq_table_create(table, merged_data)

	# fill out table
  bq_table_upload(table, merged_data)
}else{
  bq_table_create(table, merged_data)
  bq_table_upload(table, merged_data)
}
Here is the final code:
library("pacman")
p_load(bigrquery)
export_data <- function(merged_data) {
# Specify your data exporting logic here
# Return value: exported dataframe
# Authenticate
bq_auth(path = "mage-ai-test-405614-2e1e1c865c18.json")
# Define Big Query Project data
project = "mage-ai-test-405614"
data_set = "mage_demo"
table = "merged_data"
# Create table reference
table = bq_table(project = project, dataset = data_set, table = table)
if(bq_table_exists(table)){
# if table already exists, delete it
bq_table_delete(table)
# recreate table so that we can fill it out
bq_table_create(table, merged_data)
# fill out table
bq_table_upload(table, merged_data)
}else{
bq_table_create(table, merged_data)
bq_table_upload(table, merged_data)
}
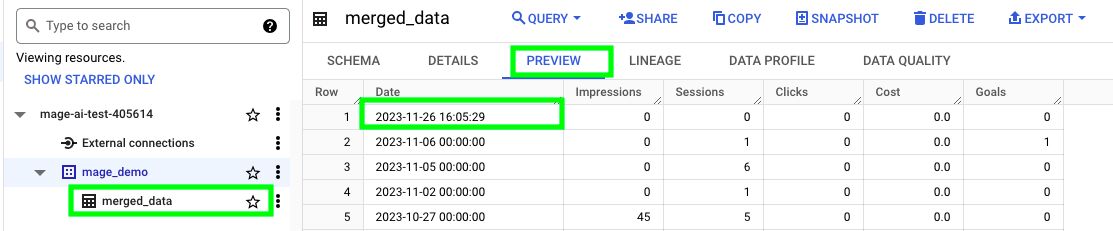
}If you run the code, you should have a new table called merged_data in BigQuery. If you click PREVIEW, you should be able to see data within.
Our pipeline is complete, as you can see all the blocks have a green tick:
Test the entire pipeline
Only because each block ran successfully, there is no guarantee that the entire pipeline will run smoothly. So, we have to run the entire pipeline before creating a schedule.
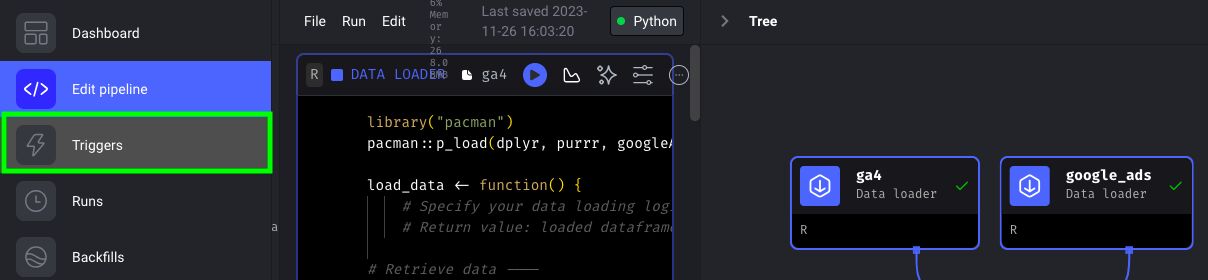
In Mage, click on “Triggers”:
At the top, click on Run @once.
This will produce a trigger, and you’ll see that its status will change to running:

When done, it should say completed and switch to inactive state.
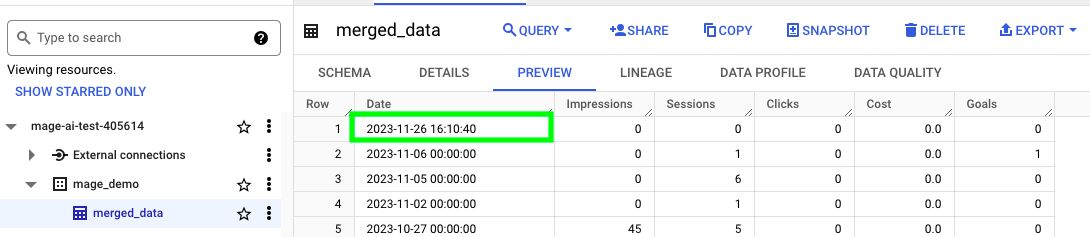
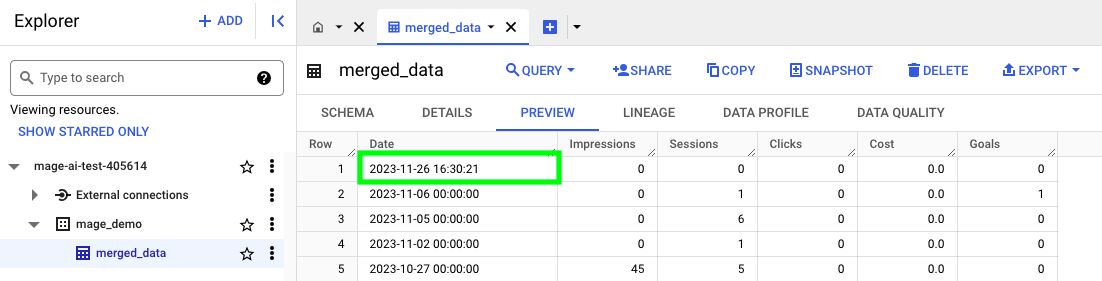
If we now refresh the BigQuery table, we can see that it has an updated date/time for the rows. This means that our pipeline ran successfully!
Create a schedule
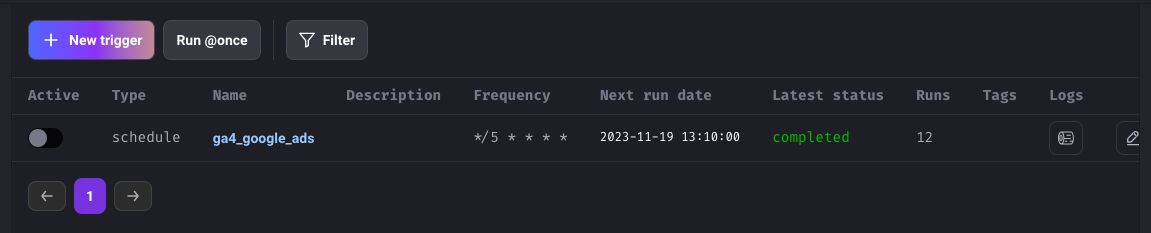
Now that we know that our pipeline works properly, let’s create a trigger that runs every 5 minutes.
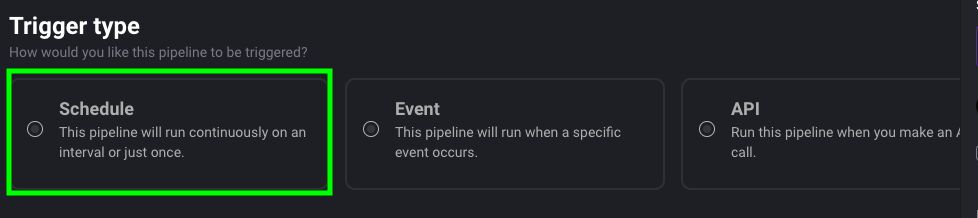
In Mage’s Triggers view, click on New trigger.
Select Schedule as the trigger type.
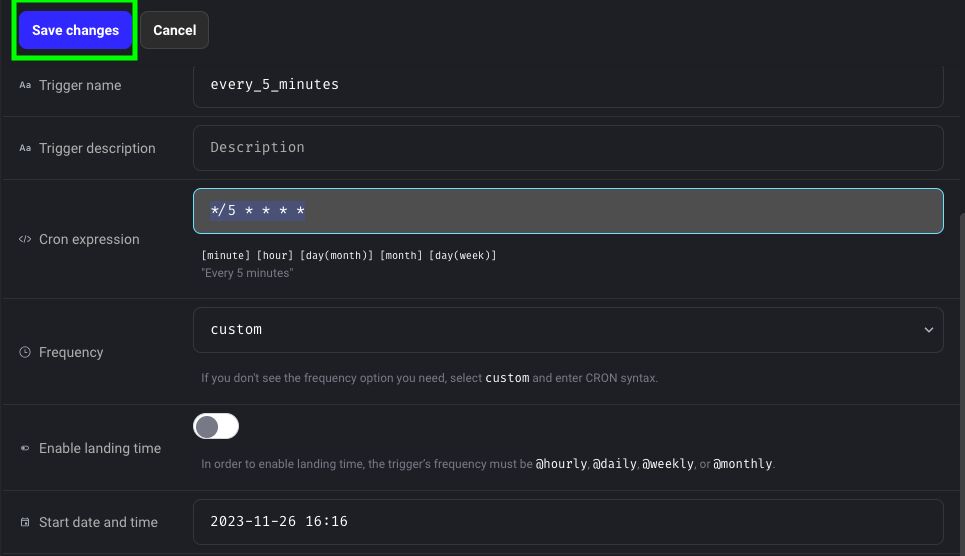
Given that the trigger will run every 5 minutes, let’s name it every_5_minutes.
Select custom as frequency and give the following cron expression: */5 * * * *

A cron expression is like a schedule for your computer tasks.
It’s a simple set of instructions that tells your system when to run a specific job.
The expression consists of five parts, representing minutes, hours, days, months, and days of the week. For example, */15 * * * * means “every 15 minutes, every hour, every day, every month, every day of the week”.
When ready with the trigger, click on Save changes.
Now you have created your trigger, but as you can see its status is inactive. To start it, click on Start trigger.
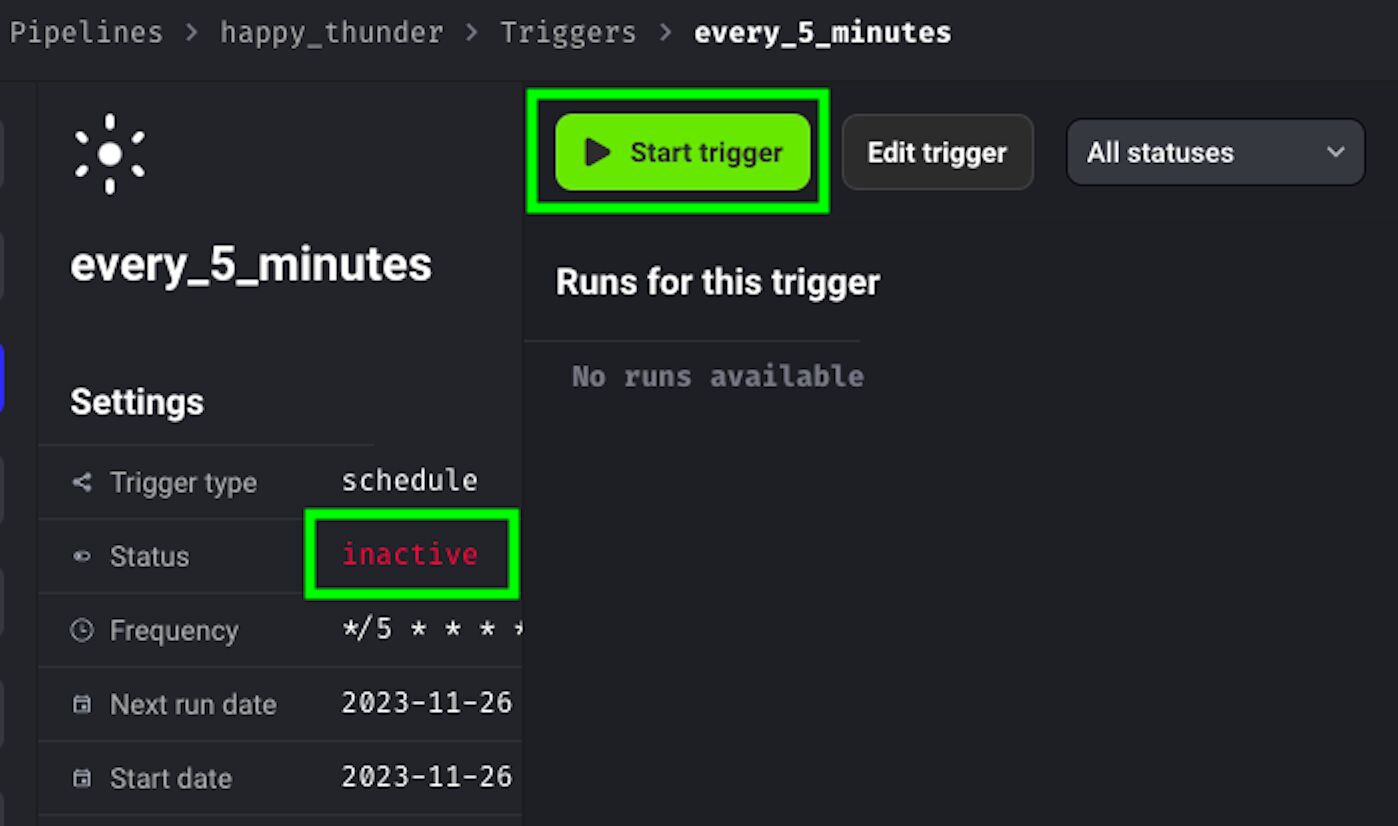
The status switches to active. If you browse back to the Triggers view, it will show you when it’s set to trigger next.
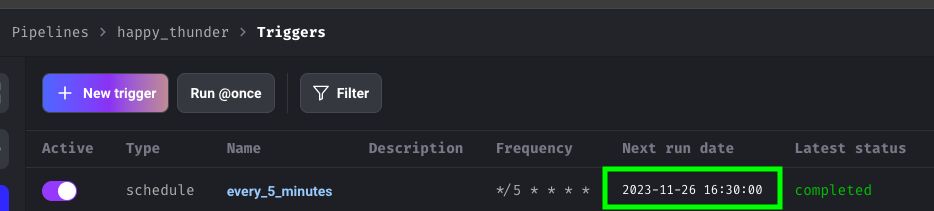
Be mindful of the fact that the time zone in Mage is in UTC.
Once the timer is set to go off, its status should change to running.
After it’s run, you can now refresh the BigQuery table and see that the data has now been updated again.
Congratulations! Our journey is complete. I hope you had fun and learned something useful.
If you have any comments, please post them below. If you want to connect with me, Arben, here is my LinkedIn!
Summary (by Simo)
Thank you so much, Arben!
There’s something just magical about automation platforms like Mage.ai.
Being able to plug different components and services into a directed graph is such a powerful asset in today’s data engineering world.
Even though this guide was long and comprehensive, hopefully you got the idea that data engineering on this level is not beyond the reach of anyone.
Arben was using some very basic building blocks: API connectors, service accounts, and queries, all wrapped up with the R programming language.
Even if you didn’t understand all the individual parts of this machine, hopefully you can appreciate how they all work together to generate the joined data export in your data warehouse (BigQuery in this case) as a result.
As always, please share your thoughts in the comments below. Don’t hesitate to contact Arben if you want to shower him with praise for this excellent guide!
