Cloud Run With Server-side Tagging In Google Tag Manager
In a recent update to server-side tagging in Google Tag Manager, Google switched the default deployment of a server-side tagging backend from Google App Engine to Google Cloud Run.
Now, when you create a new container and choose the automatically provisioned tagging server option, this service will be created in Google Cloud Run instead of in Google App Engine.
While I’ve written about Cloud Run before, this update gives me an opportunity to review what actually happens when you provision a Cloud Run environment, how you can upgrade it, and how you can add enhancements such as multi-region load balancing to it (with ease, I might add!).
If you’re a student of Simmer’s Server-side Tagging In Google Tag Manager online course, you’ll be happy to know that the course content has a lot of updated content regarding the Cloud Run setup. I recommend enrolling in case you haven’t yet – the course walks you through the nuts and bolts of server-side tagging in a way that a blog post could never replicate.
For an overview of what’s different between Cloud Run and App Engine, I recommend you read through my original post on the topic.
Table of Contents
The Simmer Newsletter
Subscribe to the Simmer newsletter to get the latest news and content from Simo Ahava into your email inbox!
Automatic provisioning of the tagging server
When you follow the automatic provisioning steps, the process is very similar to what happened with App Engine.
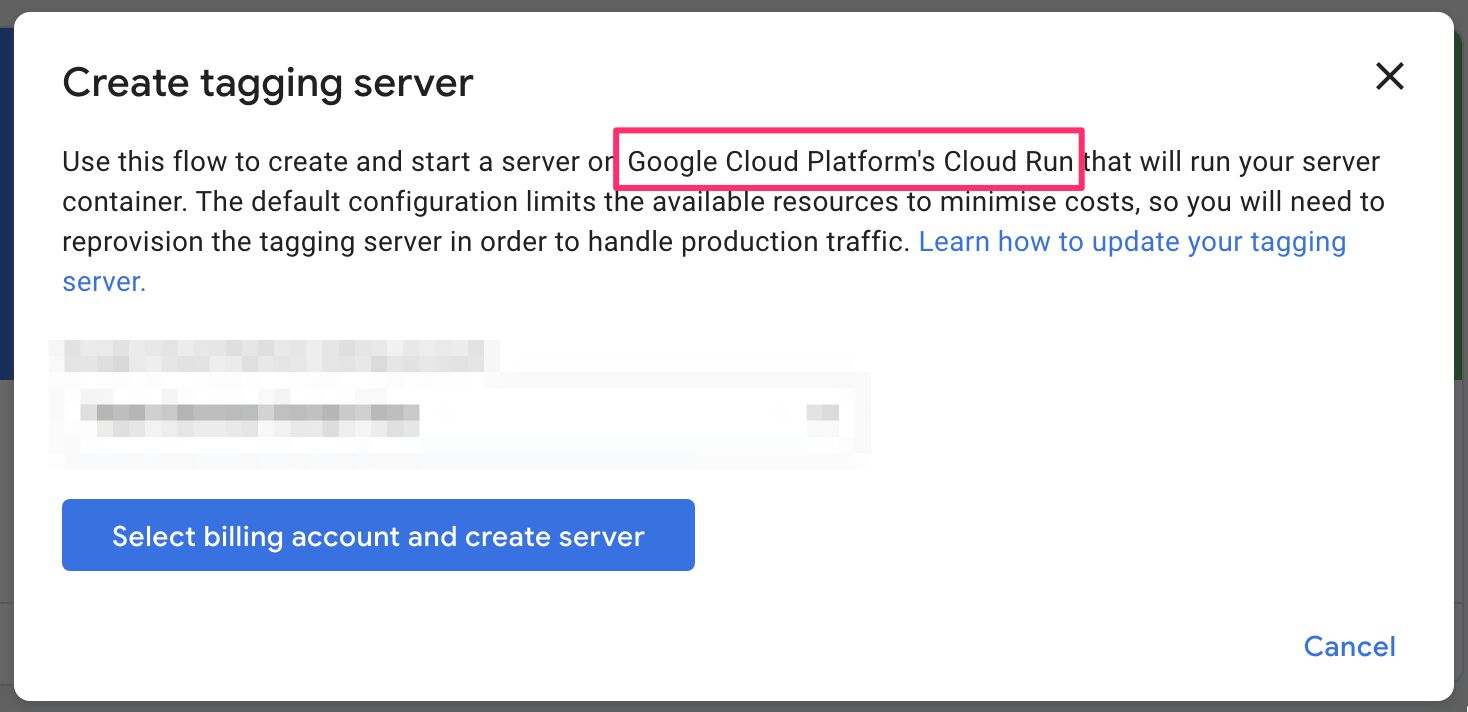
You’ll first need to choose (or create) a Google Cloud Billing account, after which Google Tag Manager will automatically run through all the build scripts in the background.
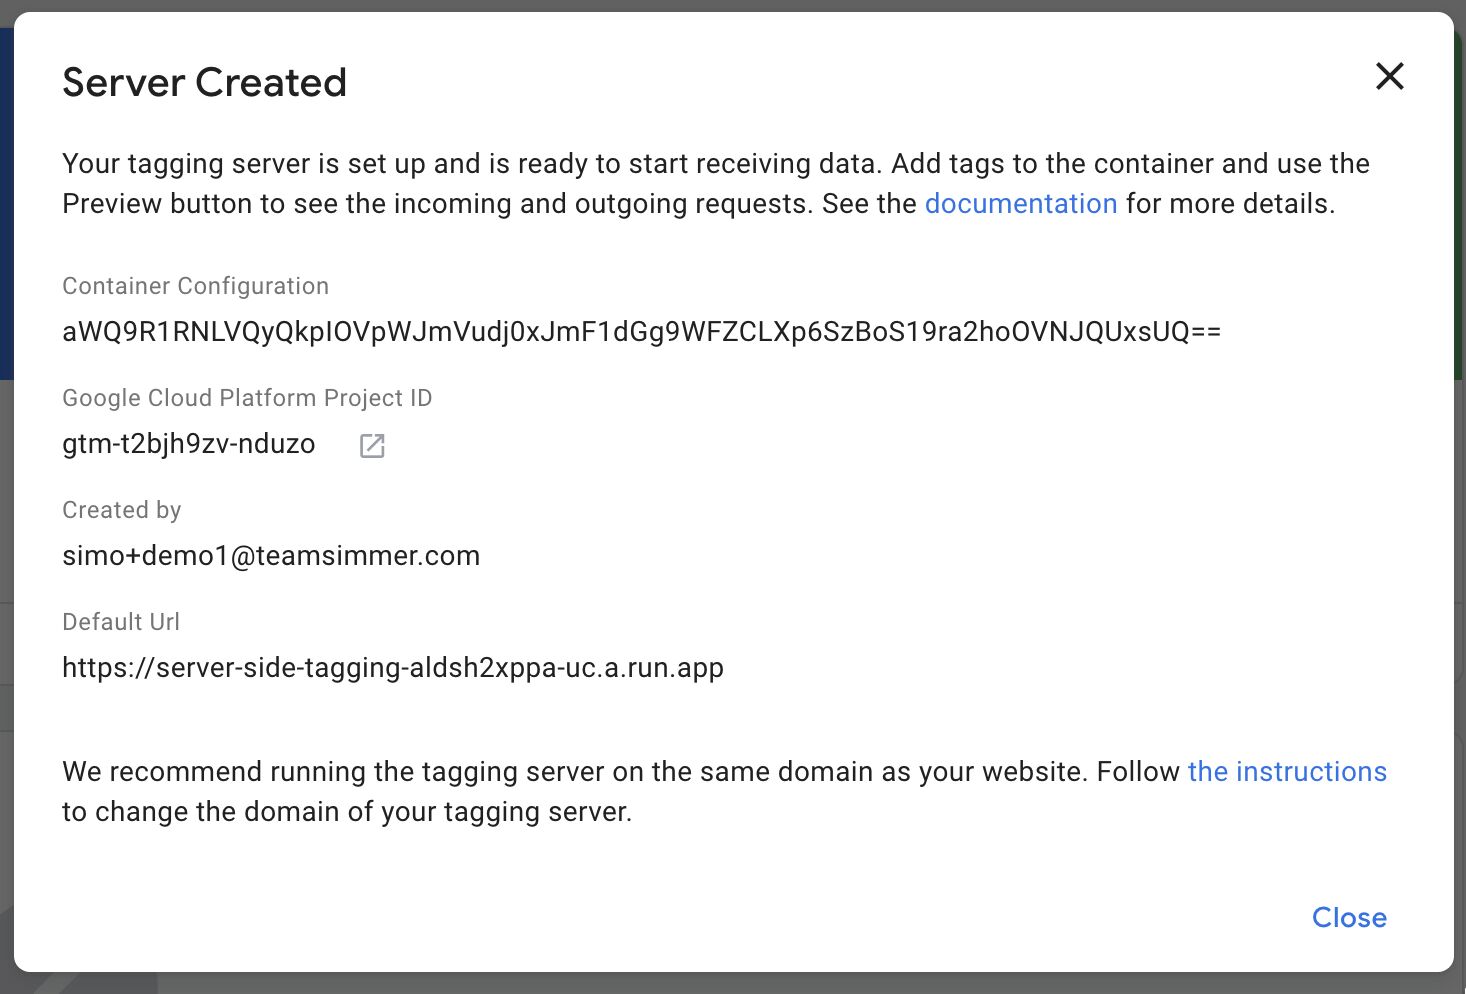
After a short(ish) wait, you’ll be informed that a server environment has been created for you, and your server-side container has been updated with all the relevant information to immediately start working with server-side Google Tag Manager.
If you now follow the link to your cloud project and browse to the Cloud Run page, this is what you’ll see:

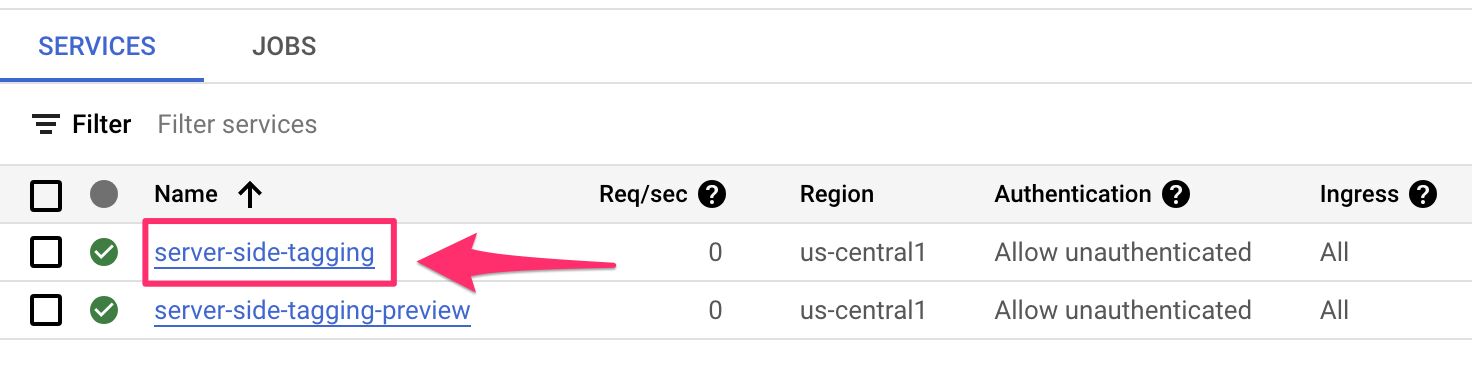
Two services have been created for you in the us-central1 (that’s in the United States) cloud region:
server-side-tagging– this is the tagging server, which collects all the traffic to your server-side endpoint.server-side-tagging-preview– this is the preview server to which the tagging server forwards the requests that were collected while you were previewing the server container.
Both of these services are running a minimal setup:
- 512 MiB memory
- 1 vCPU (virtual CPU)
- 0 minimum instances
- 1 maximum instance
This is fine for the Preview server – you’ll never need to upgrade it to something more powerful. But if you want to run the tagging server in a production-ready capacity, you’ll want to edit it and deploy a new revision with more instances in use (more about this below).
The memory and CPU should be fine with the default values – server-side GTM will never really require more power from the individual instances.
Importantly, the services are set in us-central1, but unlike App Engine, you can simply copy and create new services in a different region, subsequently deleting these original services once the new ones are up and running (more on this below, too).
This is one of the biggest benefits of Cloud Run vs. App Engine: you can add as many tagging servers as you like, all in different regions. You can then put all of them behind an external application load balancer to have the traffic automatically distributed to the tagging server closest to the visitor geographically. Yes, more on this below, too!
My recommendation is thus to always run the automatic provisioning setup even if you don’t want to actually run the server in
us-central1. The automatic setup generates a server template you can then copy when you want to create the server(s) with different settings. However, I’ve also added instructions below on how to manually generate the servers if you don’t want to or can’t run through the automatic provisioning steps.
Upgrade the tagging server
Let’s start with a simple step. How do you upgrade the tagging server to production-ready capacity?
You need to click the tagging server in the list of services:
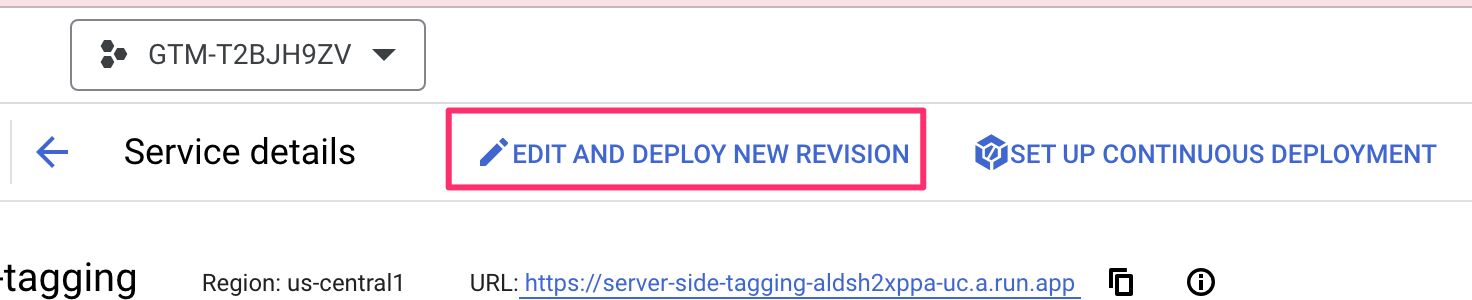
Next, click Edit and deploy new revision to edit the service.
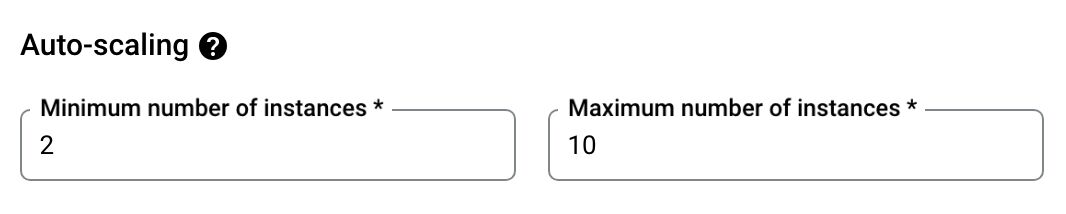
Now, scroll down to the Auto-scaling options. If you want to follow Google’s recommendations, set the minimum instances to 2 and maximum to 10.
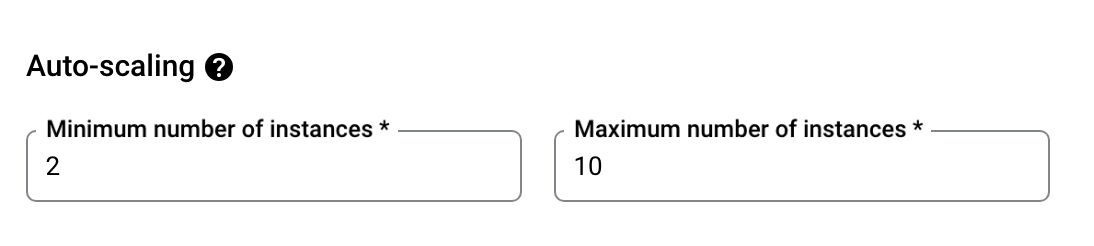
Having a minimum of 2 is just plain common sense to avoid things like resource exhaustion problems denying you of any active instances, or cold boot times increasing your latency unbearably. A maximum of 10 means that that’s the upper limit of what your setup might scale to if enough traffic comes in. You’ll only pay for the instances that are actually in use.
Once ready, scroll all the way down and click the Deploy button to create a new revision and update the deployment.
The deployment is done so that traffic is diverted to the new revision only after it’s up and running. This means that there should be no downtime at all for your server endpoint.
Update the tagging server version
If you ever see a notice in the Google Tag Manager user interface that there’s a new version of the tagging server and you need to upgrade your deployment, all you need to do is go through the steps above and click Deploy to deploy a new revision.
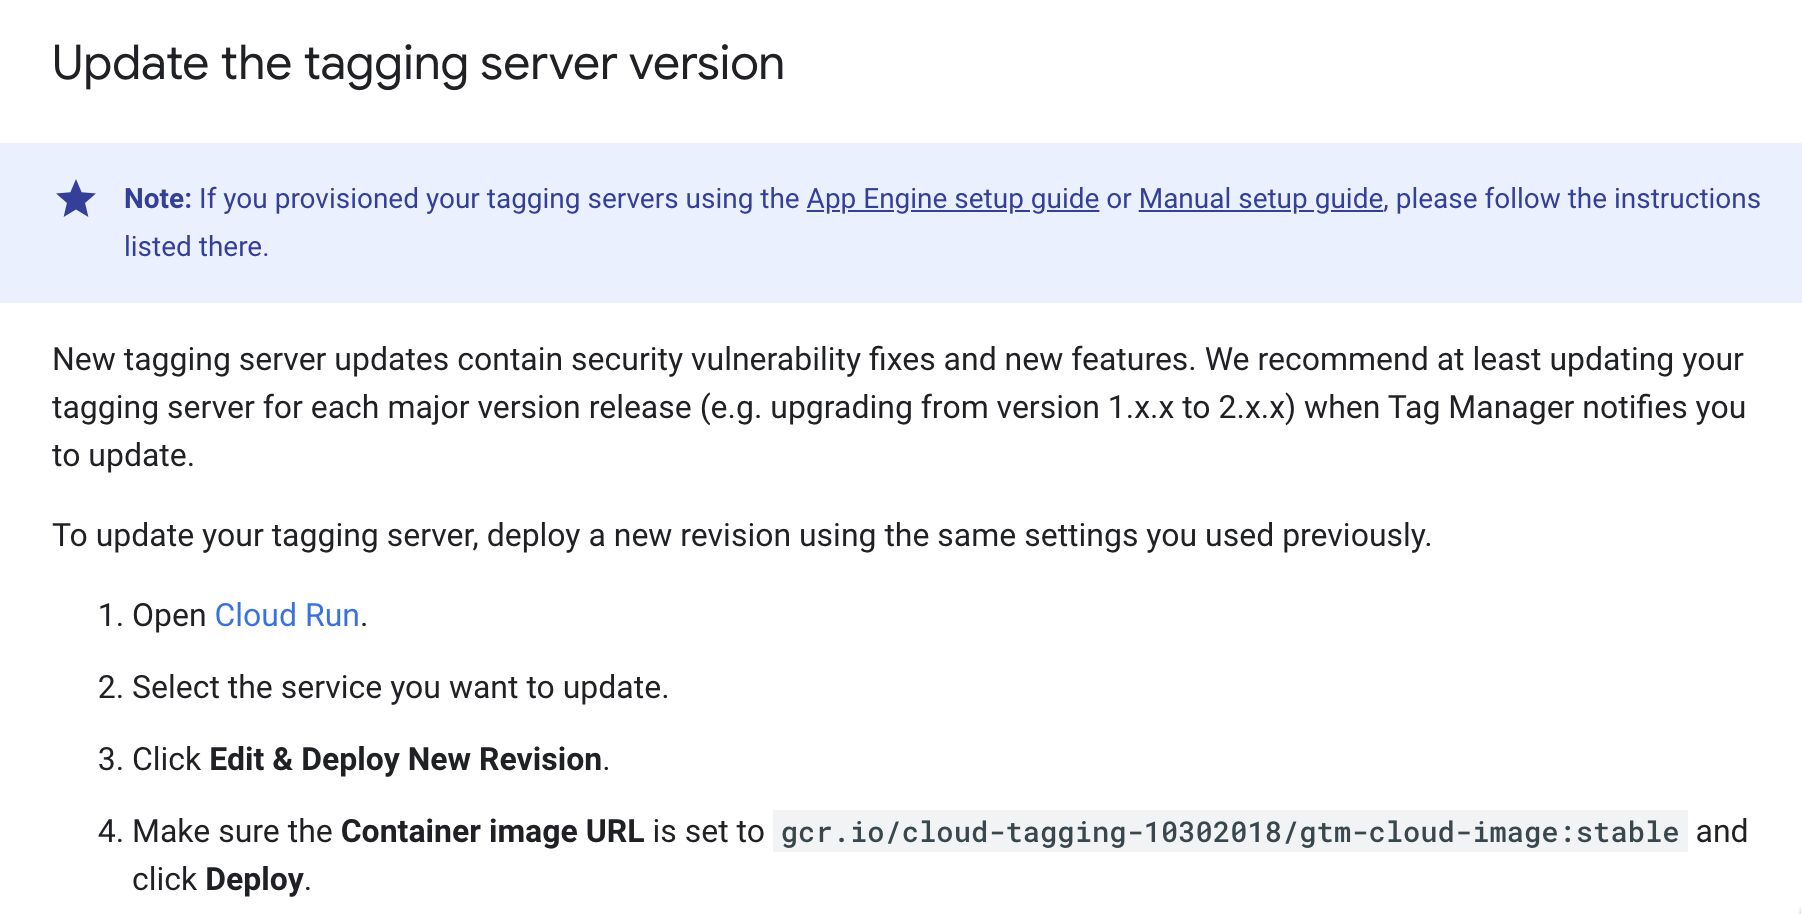
You don’t have to make any changes, the redeployment will fetch the latest server container image version from Google’s repository and update your servers with it. You need to do this for all the tagging servers in your setup (if you’re running everything behind a load balancer).
Copy and create a new service
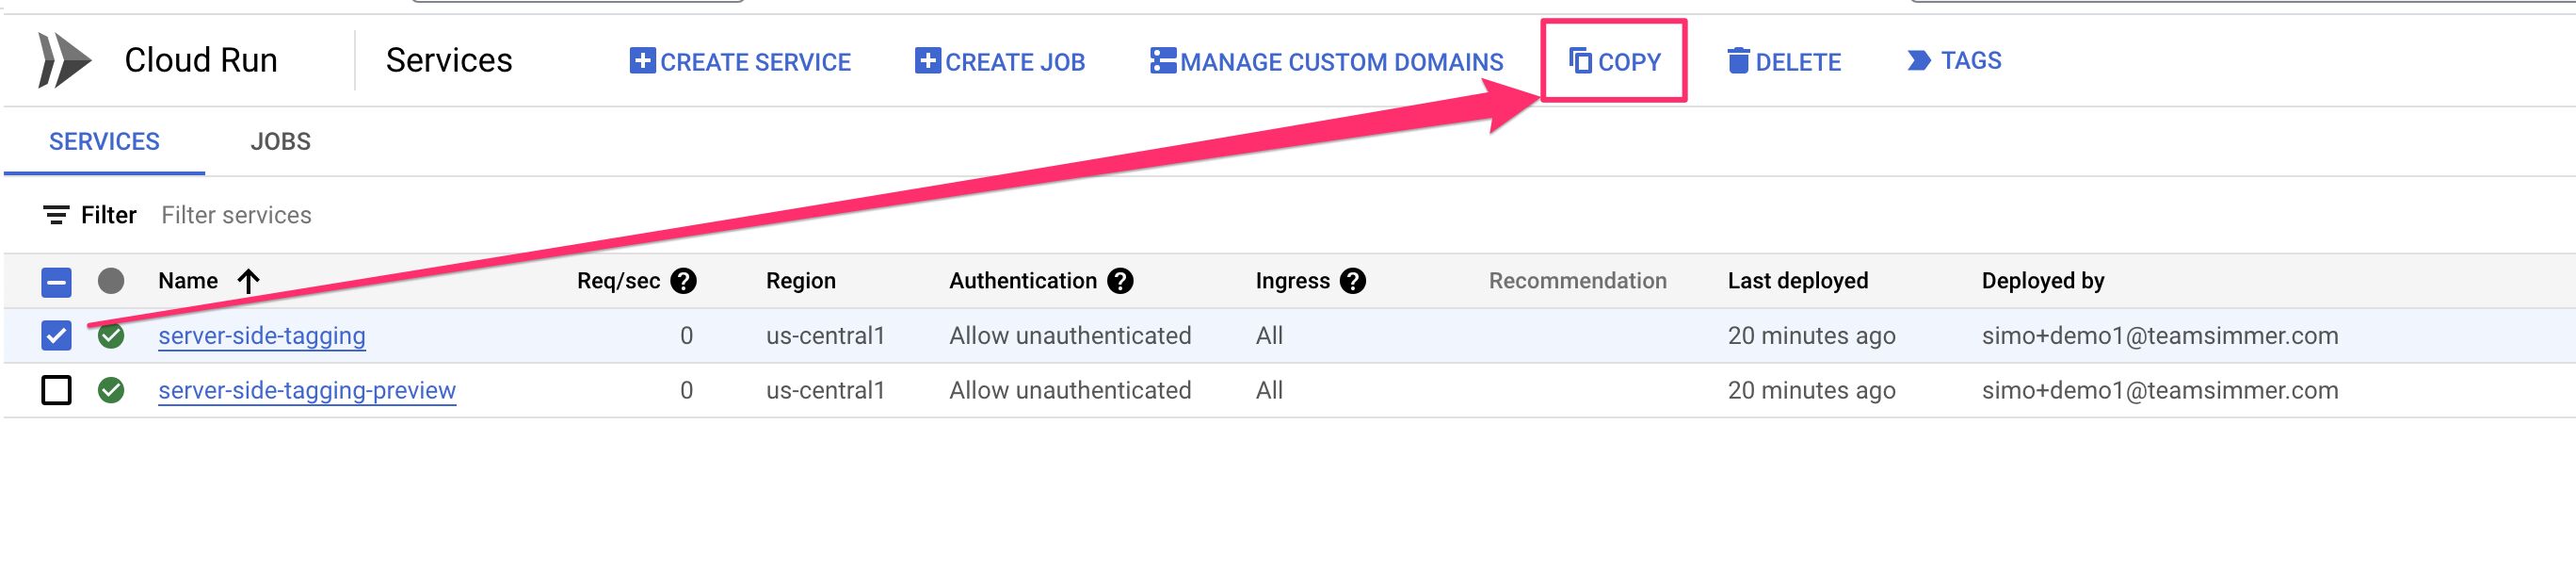
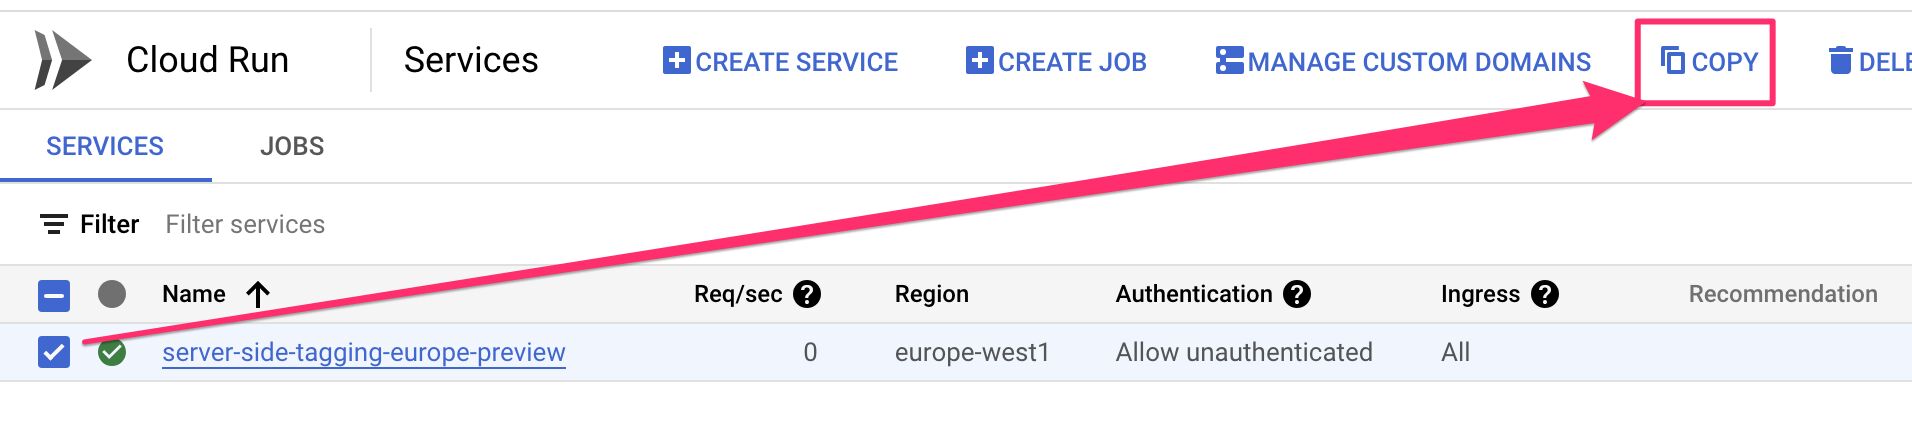
In case you want to quickly create a new tagging server or preview server, the absolutely easiest way to do so is to take an existing server (such as the one created by the automatic provisioning setup), copy it, and deploy it as a new service.
To do this, select the server you want to copy from the list of Cloud Run services and hit the Copy button in the top bar.
Here, make sure you update the following:
- Service name: set this to a name that you haven’t already used
- Region: choose a cloud region for this server
- Auto-scaling: choose the appropriate minimum and maximum instances for the server
- Authentication: check Allow unauthenticated invocations
You can keep everything else with the default values. If you do want to make some changes, here are the ones you are probably most interested in:
Update the container configuration string
Under Environment variables, you can change the value of CONTAINER_CONFIG to point to a different Server container. To find the container configuration string for any given Server container, you need to click the container ID in the top bar of the Server container.
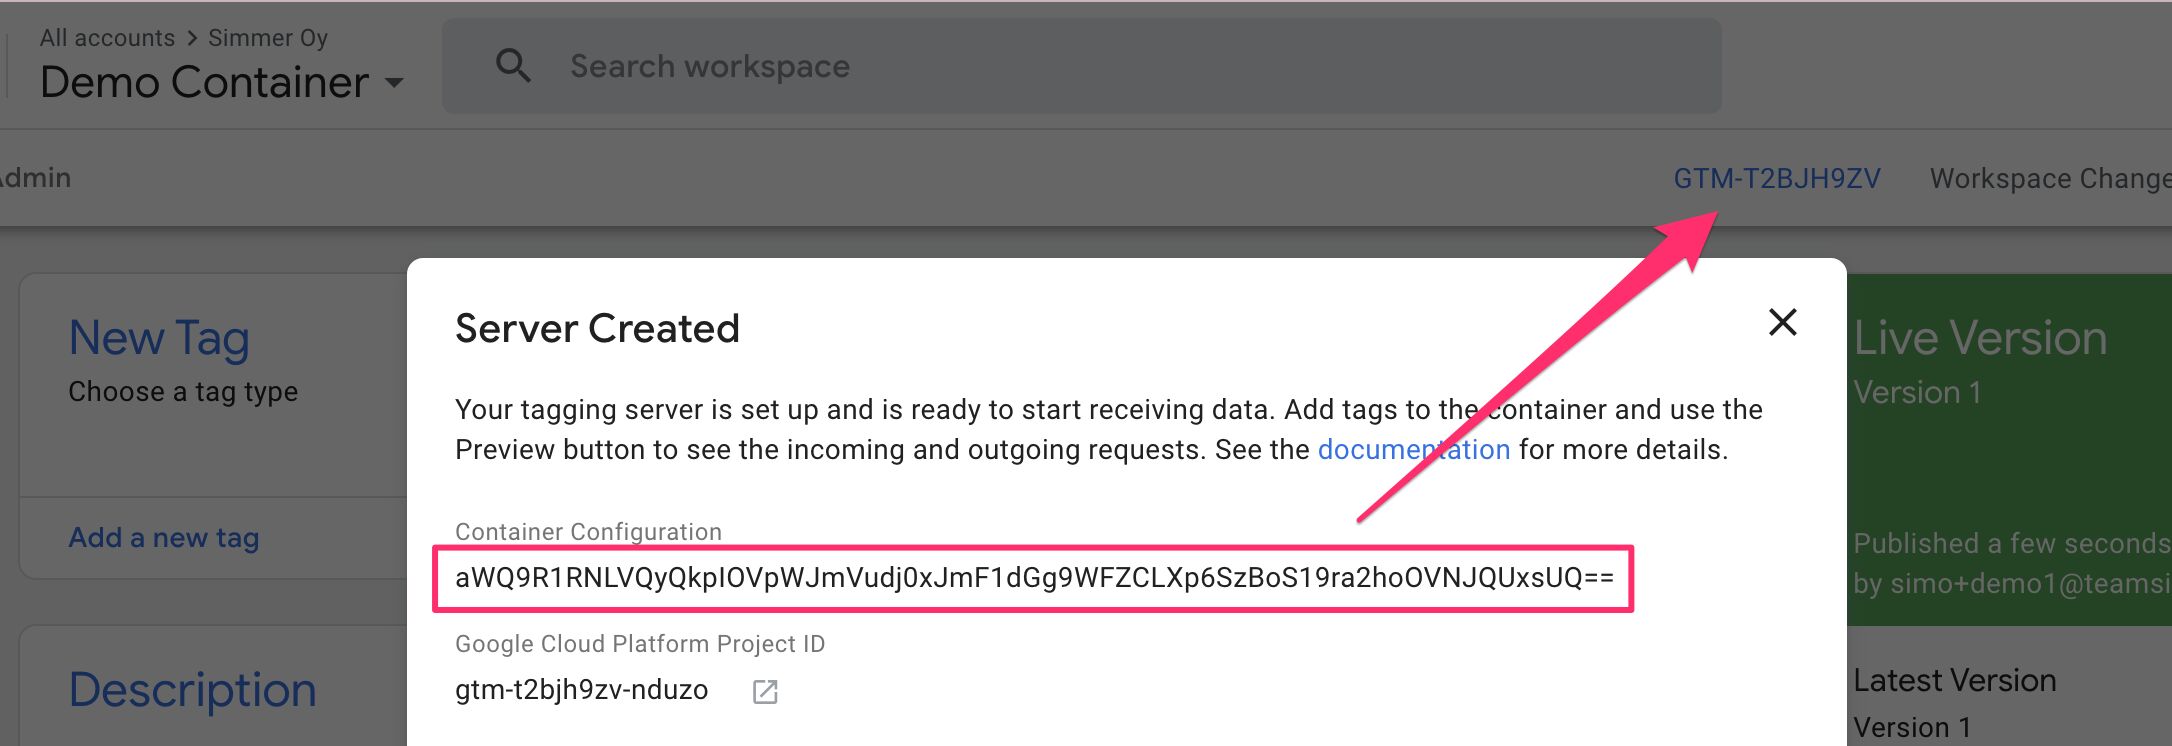
Set this as the value of the CONTAINER_CONFIG environment variable to have the Cloud Run server point to the correct Server container.
Tagging server vs. Preview server
If you want to change a tagging server to a preview server or vice versa, you need to update the environment variables again.
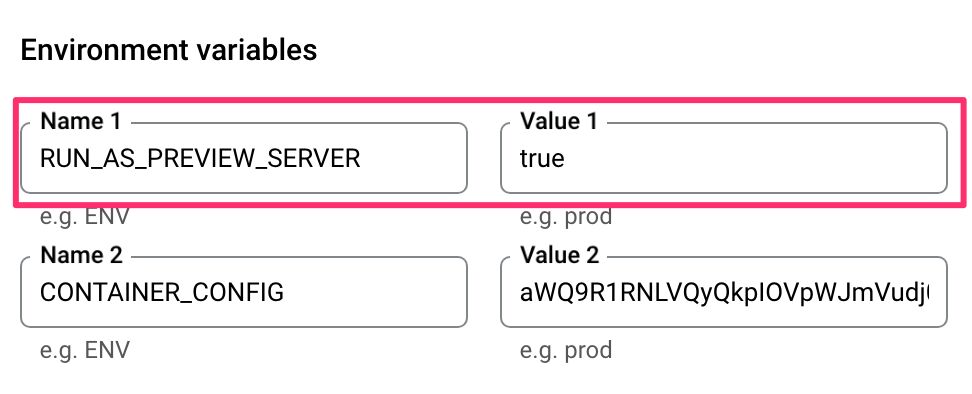
A Preview server needs the variable RUN_AS_PREVIEW_SERVER set to the value true. It should not have the PREVIEW_SERVER_URL variable set. This is what a Preview server configuration looks like:
A Tagging server needs the variable PREVIEW_SERVER_URL set to the Cloud Run URL of the preview server. You can find this URL by opening the Cloud Run service for the preview server, and the URL right at the top of the dashboard:

Set this URL as the value of the environment variable, and make sure that RUN_AS_PREVIEW_SERVER is not set. This is what the environment variables for the tagging server should look like:

Manually create the servers
If you didn’t run through the automatic provisioning steps, you’ll need to manually create the preview server and any tagging servers you want to associate with it.
To do this, you need to start with the preview server.
Create the preview server
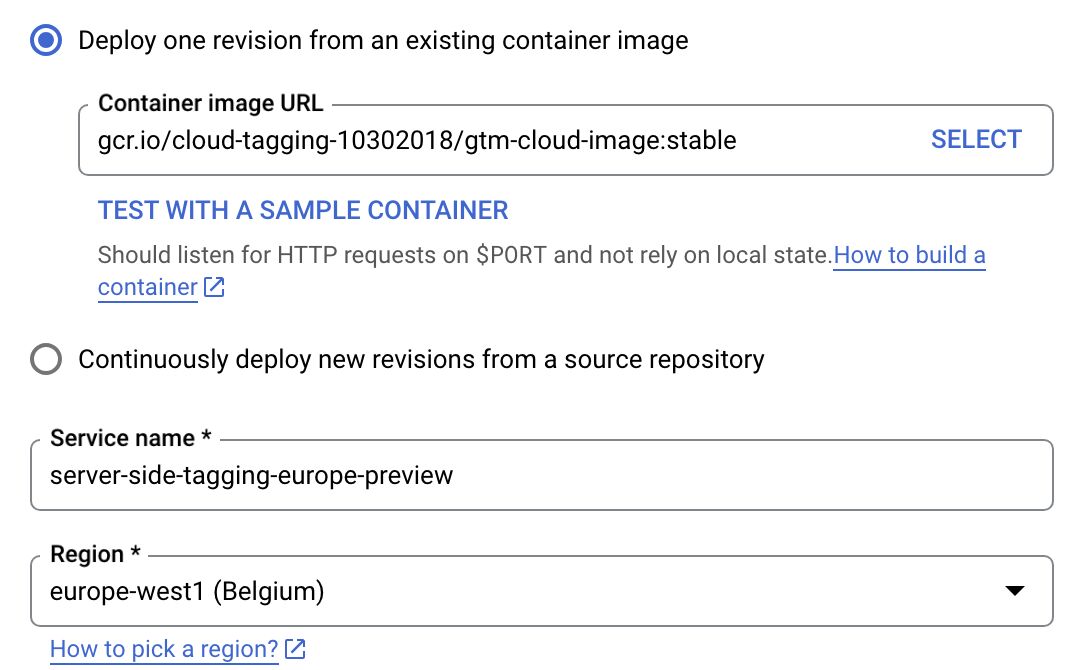
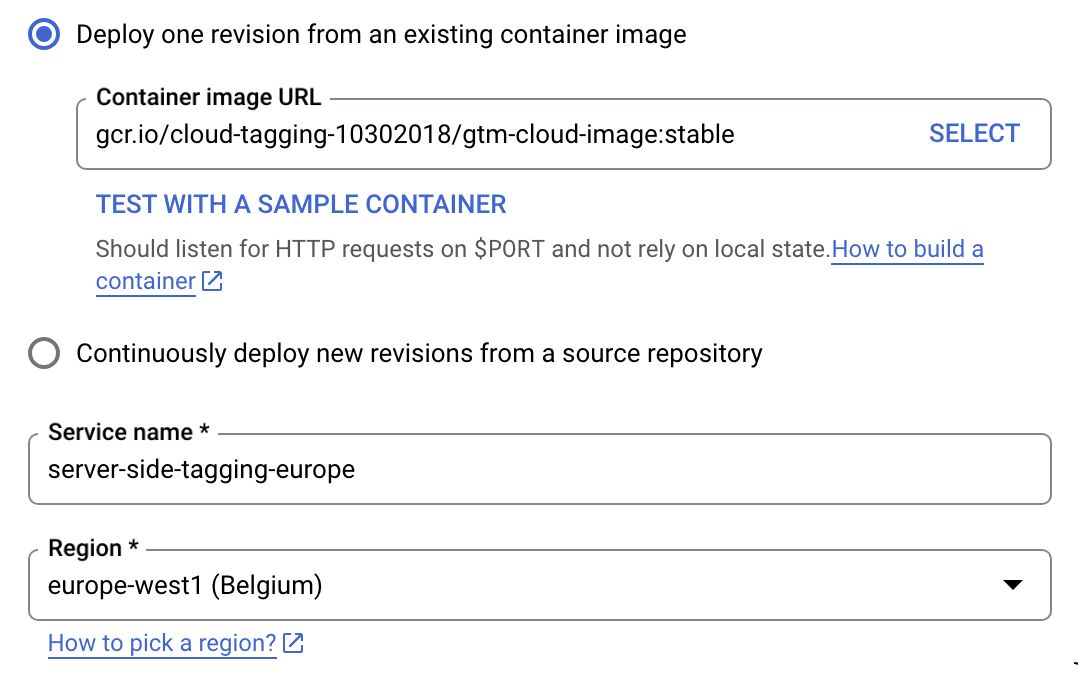
Go to Cloud Run and click CREATE SERVICE.
Set the Container image URL to gcr.io/cloud-tagging-10302018/gtm-cloud-image:stable and give the server a name. I recommend the following syntax:
server-side-tagging-<geo>-preview where geo is the geographic region.
On that note, choose the Cloud Region accordingly, too.
This is just for the Preview server so not that significant. But choose whatever region makes most sense to you.
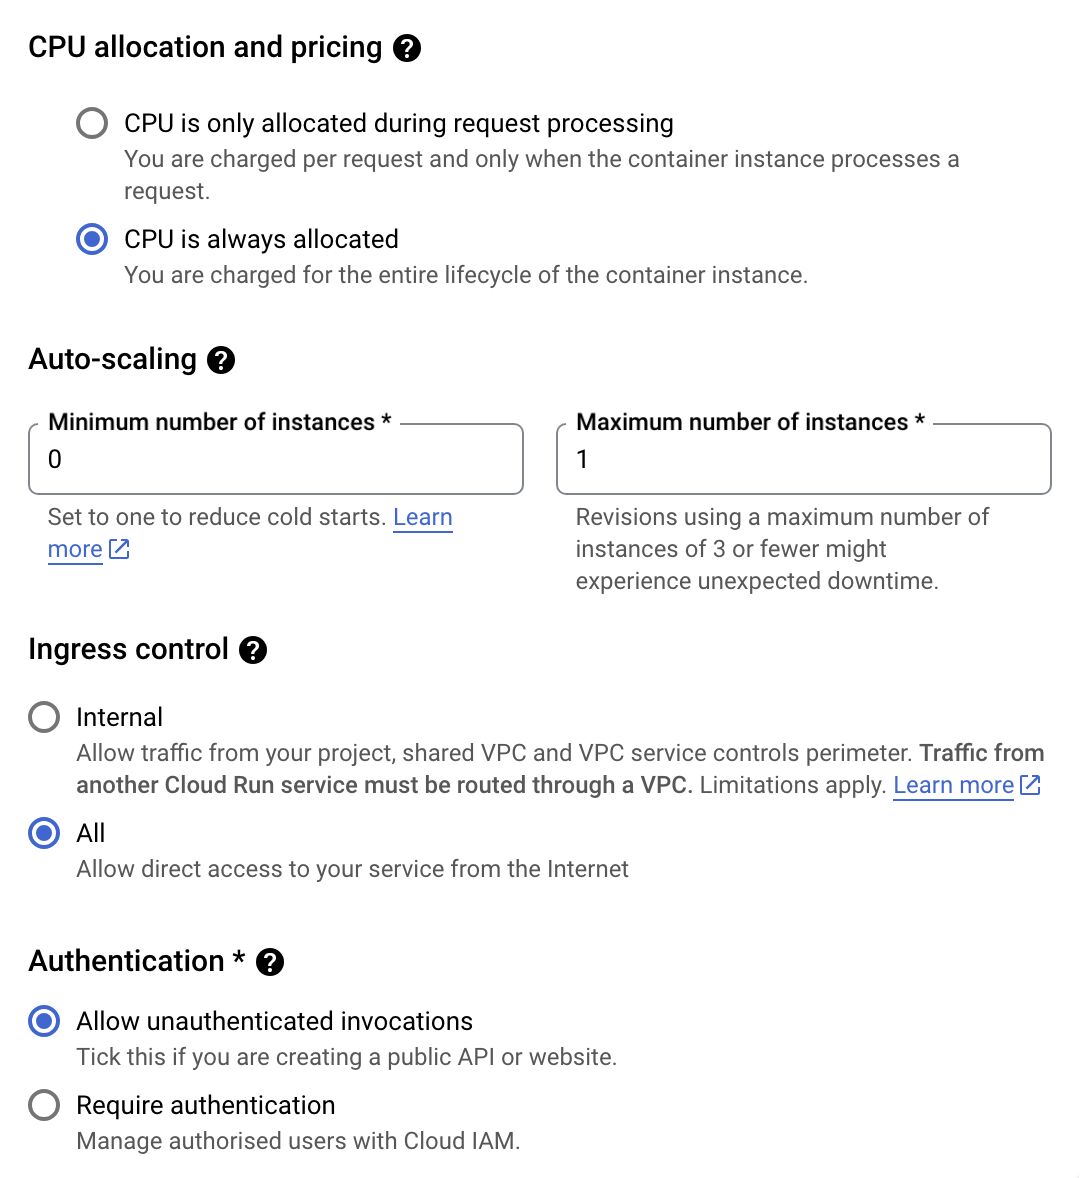
Set CPU allocation to CPU is always allocated.
Set Auto-scaling to 0 minimum instances and 1 maximum instances. Do not stray from these values for the Preview server or it might not work correctly!
Keep Ingress control with All, and tick Allow unauthenticated invocations for Authentication.
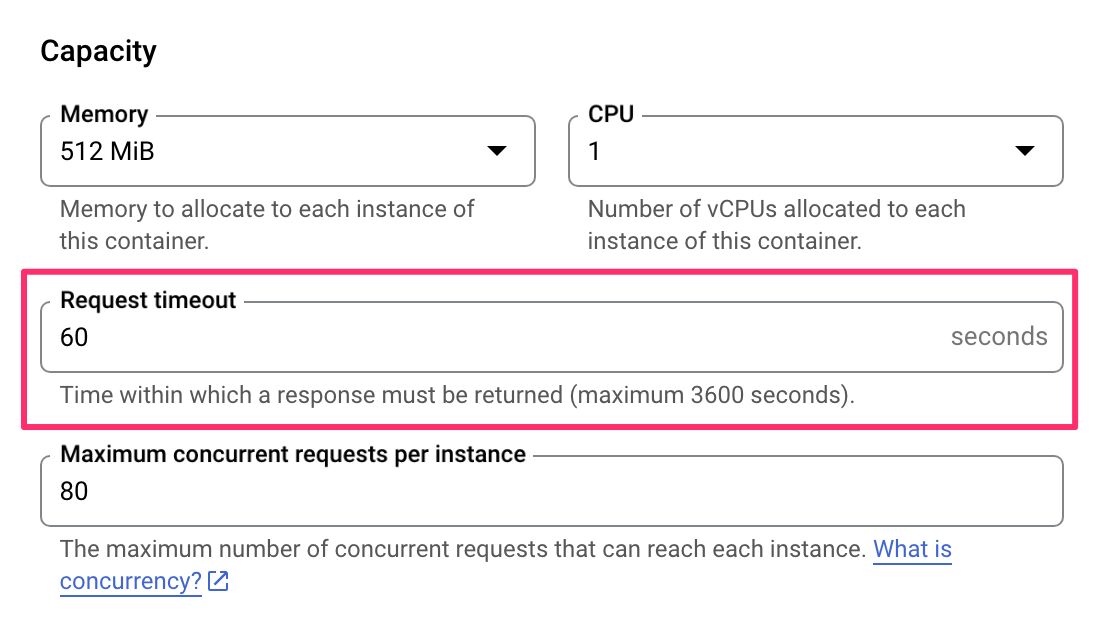
Expand Container, Networking, Security, and set the Request timeout to 60 seconds.
Under Environment variables, set these two variables:
RUN_AS_PREVIEW_SERVERset to the valuetrueCONTAINER_CONFIGset to the value of the container configuration string from your Server container (see above)
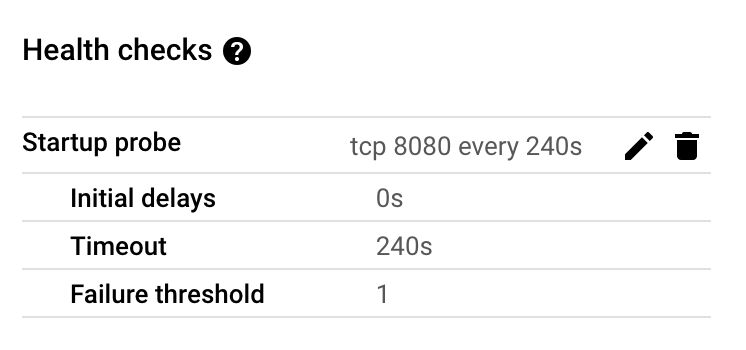
Under Health checks, click to Add health check, and set it with these settings:
- Health check type: Start-up check
- Probe type: TCP
- Port: 8080
- Initial delay: 0 seconds
- Period: 240 seconds
- Failure threshold: 1
- Timeout: 240 seconds
Click UPDATE to save the health check.
Once done, click DEPLOY to deploy the service.
Create the tagging server
To create the tagging server, it’s really easy to do once you have the preview server in place.
First, open the preview server and copy the preview server URL to someplace where you have it handy (or just have the preview server open in a different tab).
Next, choose the preview server from the list of services and click Copy in the Cloud Run top bar.
Here, update the Service name – again, this is my recommendation:
server-side-tagging-<geo>, where geo is the geographic region.
Next, choose the cloud region for the server.
Update Auto-scaling – if you want to just run a test deployment, keep minimum and maximum as 0 and 1 respectively, but if you want to move straight to a production-ready setup, switch to a minimum of 2 and a maximum of 10.
Check Allow unauthenticated invocations and then expand Container, Networking, Security.
Here, update the Environment variables to have the following (and nothing else):
PREVIEW_SERVER_URL: point this to the URL of the preview serverCONTAINER_CONFIG: point this to the Server container (it should already do so because you copied the preview server)
Click CREATE to create the deployment.
Map a custom domain
IMPORTANT! Cloud Run Integrations have been deprecated and the instructions in this topic no longer apply. To map a custom domain, the best option is to use an external application load balancer by following this guide. You can also enroll in the Simmer Course, where we cover this topic extensively.
To map a custom domain and to make life easier when you want to start adding additional services behind a Load Balancer, you should use the new Custom Domains Integration available in Cloud Run.
Note, at the time of writing the integration is still in “Preview” stage, which might mean that it can change a bit when it’s released as a stable feature.
You only need to create this integration once per service cluster you intend to use. So if you’ve already created tagging servers for different geographic regions, choose just one of them to add this integration to.
This integration automatically creates an external application load balancer for you, which you can then map your custom domain to using a single DNS A record. It’s much simpler than the awkward TXT/CNAME/A setup you used to have to do with App Engine!
To create the integration, open a tagging server of your choice and click the Integrations tab.

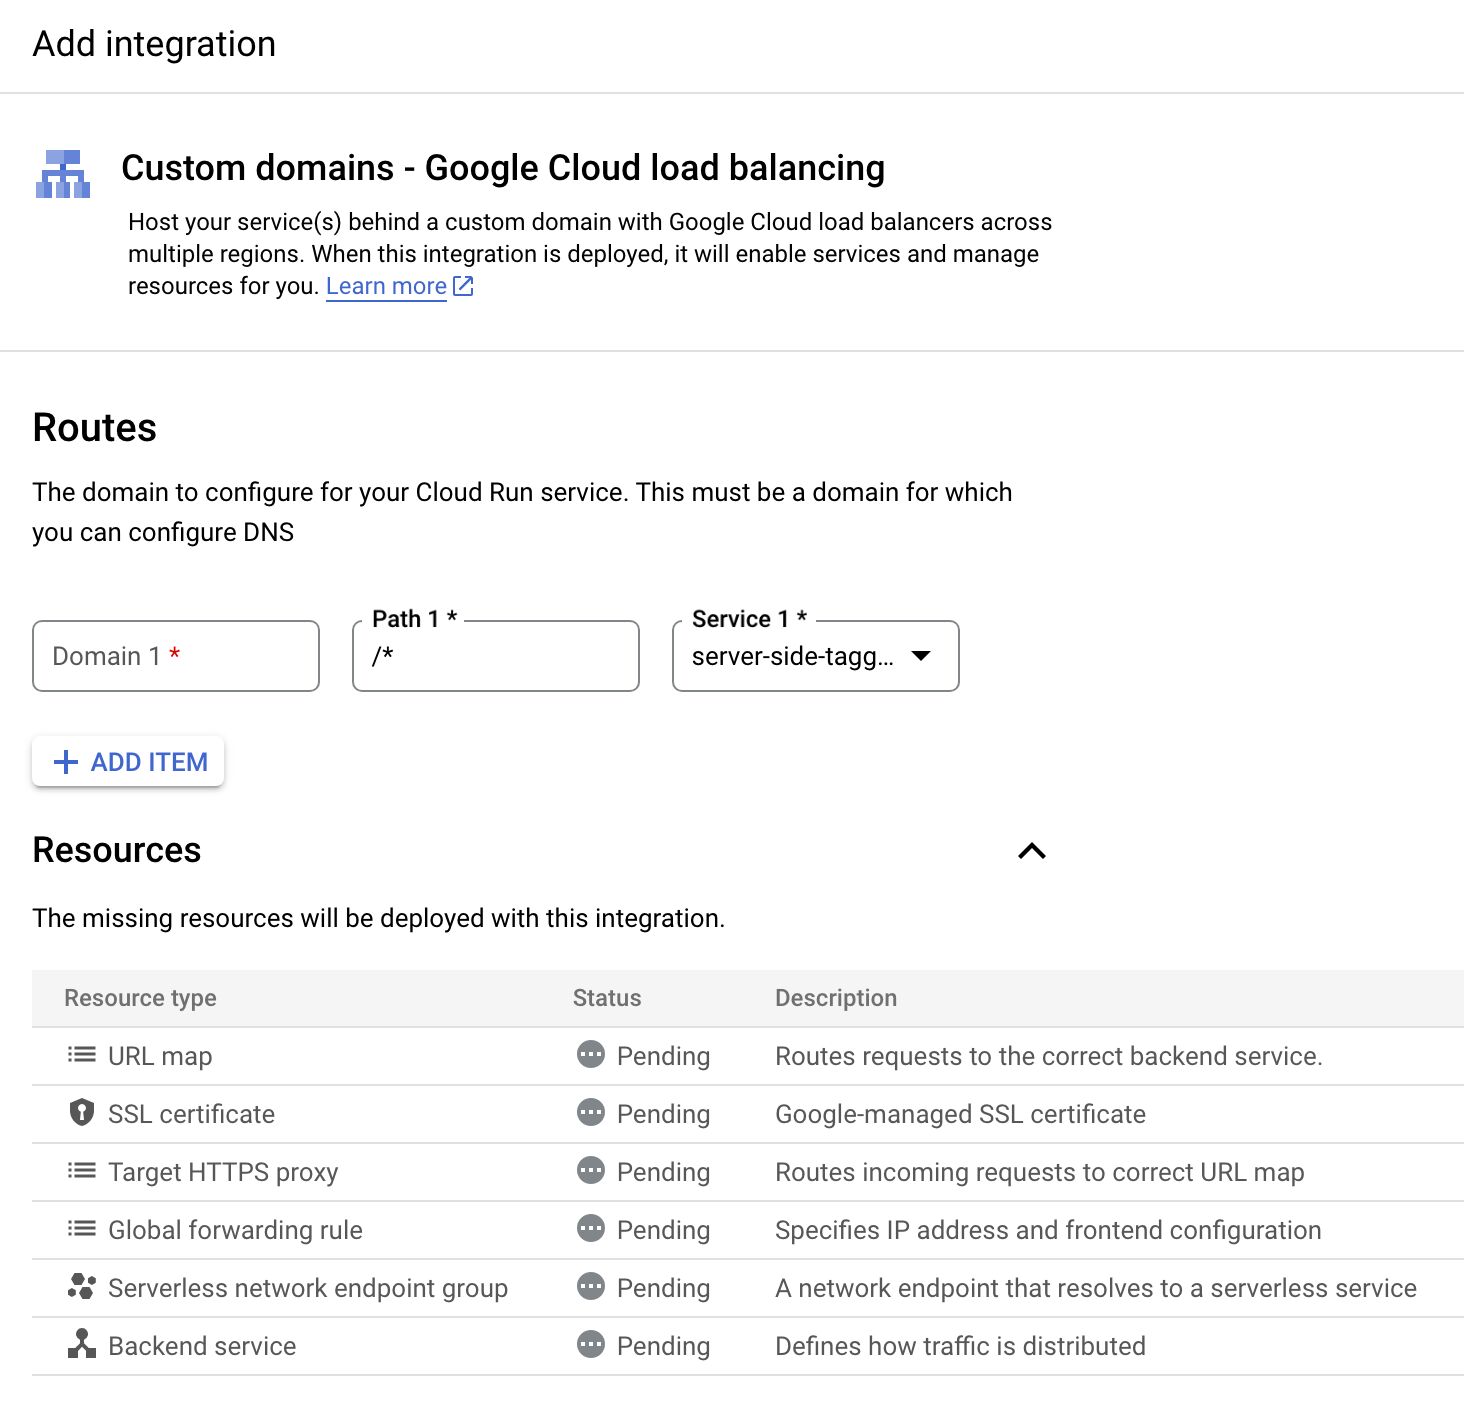
Click Add integration, and then choose Custom domains - Google Cloud load balancing.
If prompted to do so, make sure you enable any APIs that the integration requires you to enable.
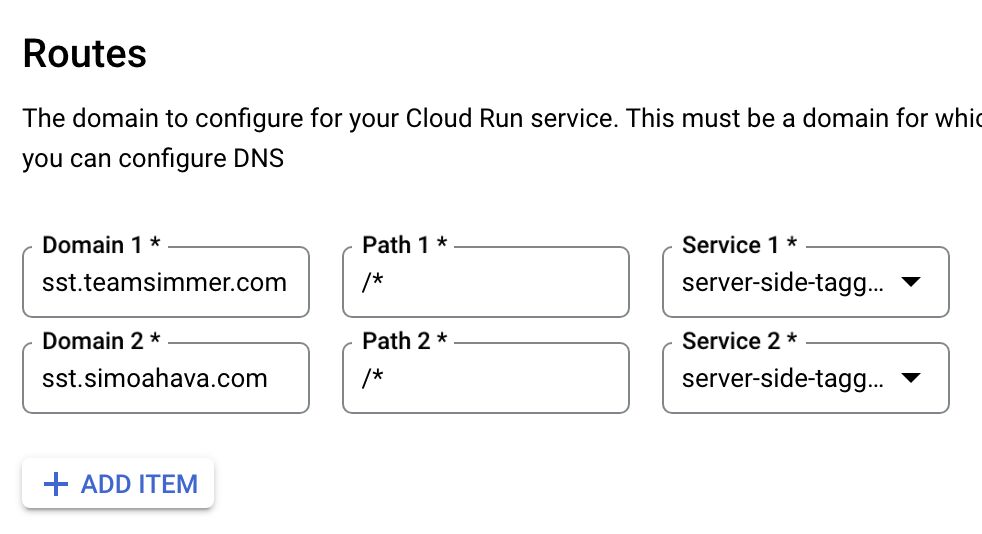
Here, you can now map one or more subdomains to your Cloud Run services. Choose subdomains that share the main domain name with the website(s) that will be sending traffic to the server.
Once ready, click Submit to start the process. You can see the list of resources that will be automatically created for you when the process is completed.
Shortly into the process, you should see a new box titled Connect to custom domain with one DNS record per domain you’ve mapped to the endpoint.
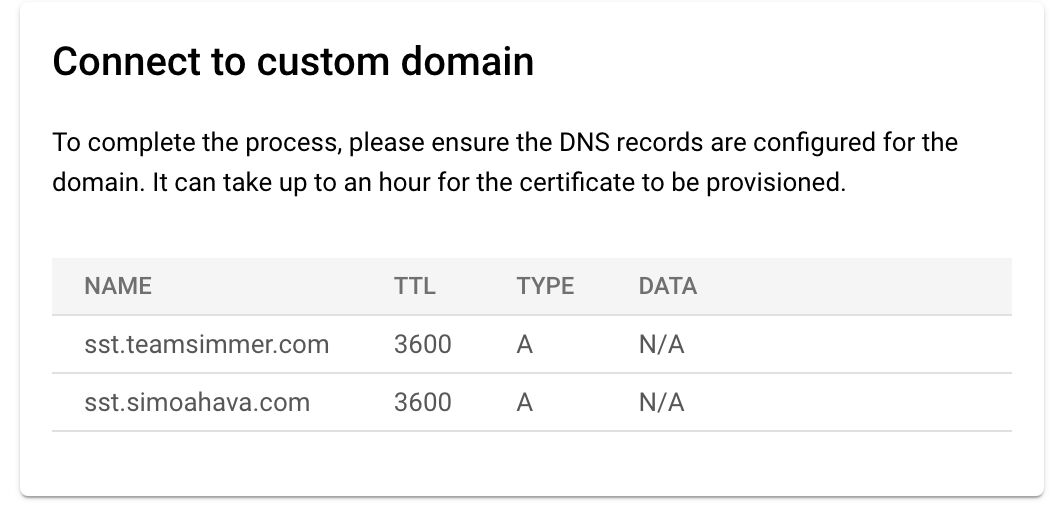
Add these domain records to your DNS registrar as soon as possible. The integration will attempt to provision an SSL certificate for your domains, and it won’t be able to do so until the mappings are complete.
Once you’ve added the DNS records, you’ll need to wait anywhere from minutes to hours to finally have the SSL certificate provisioned for your custom domain(s).
When the DNS changes have propagated and the SSL certificate has been provisioned, you’ll see this:
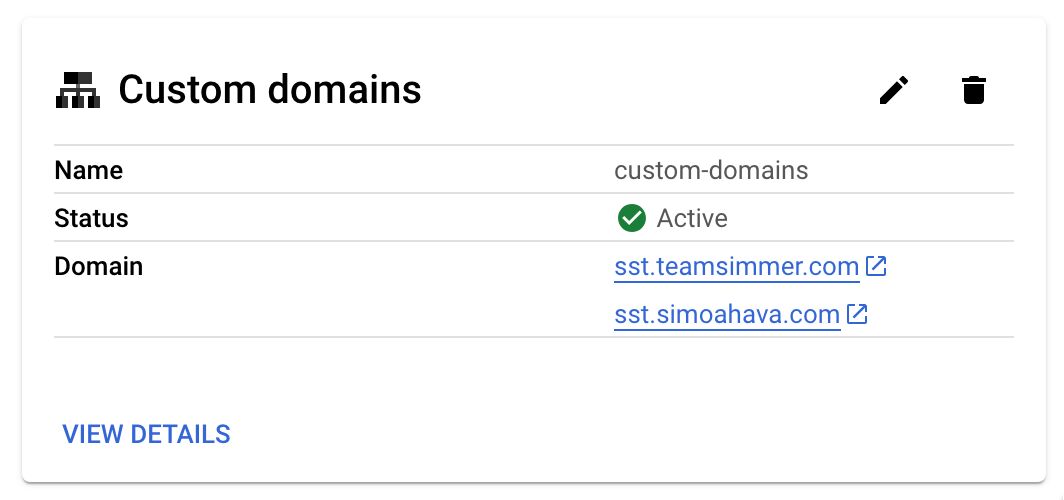
Congratulations – you have now mapped your custom domains(s) to point to your tagging server. You can now update the server container URL in your Google Tag Manager Server container settings as well as in any tags and scripts that send data to your server-side endpoint.
Next step is to expand the load balancer to include your other backends, too!
Edit the load balancer to include more tagging servers
Once you have the load balancer in place for your custom domain, you can expand its purpose to be an actual load balancer for your tagging services.
For example, here’s an example setup of mine:
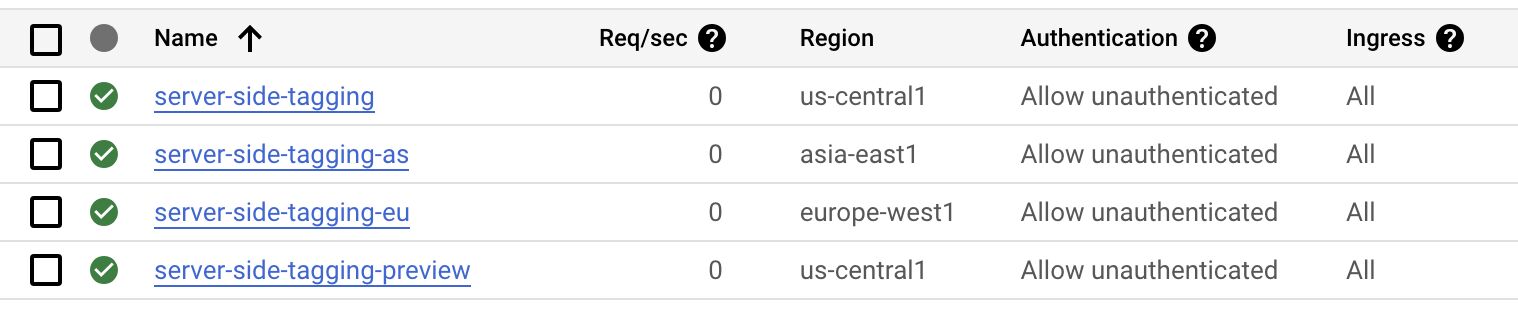
I have three tagging servers: one for the US (server-side-tagging), one for Asia (server-side-tagging-as), and one for Europe (server-side-tagging-eu).
All three of these are mapped to a single preview server running in the US (server-side-tagging-preview).
I’ve created a custom domain integration for the server-side-tagging server, to which my custom domain of sgtm.teamsimmer.com is now pointing.
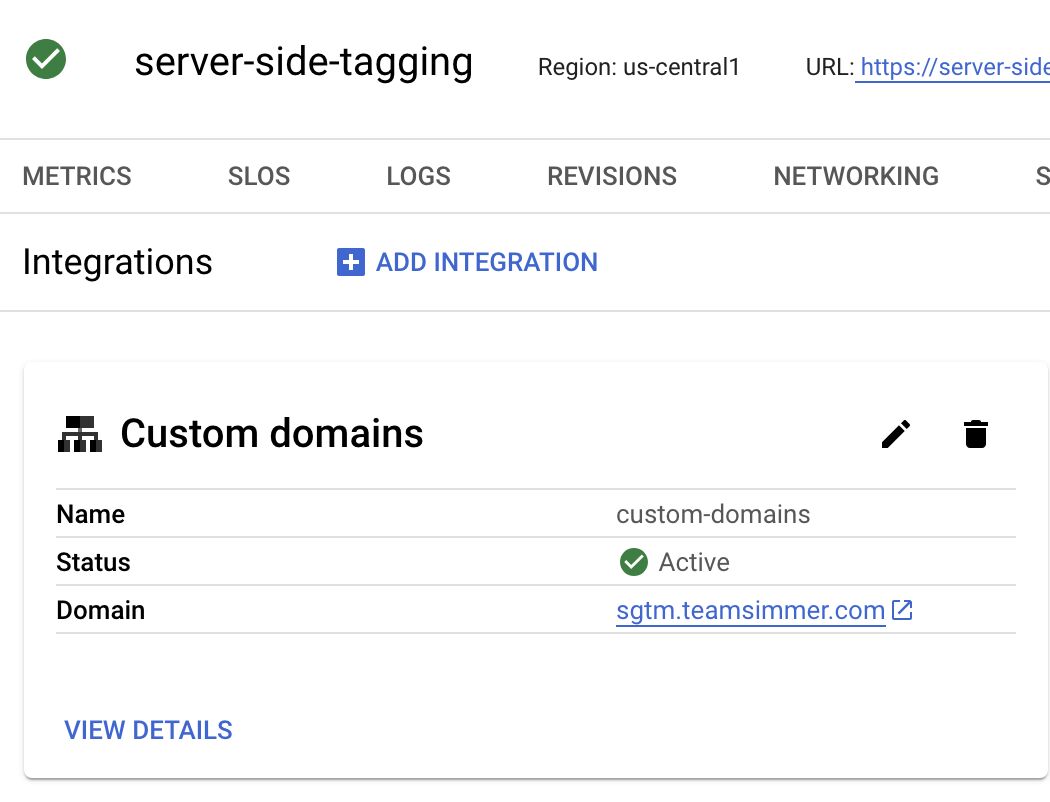
But because the load balancer is only added to the server-side-tagging service, it means that 100% of the traffic to sgtm.teamsimmer.com domain is routed to the us-central1 server.
I now want to include my Asia and Europe servers in the mix, too, so that visitors closer to those regions would have their traffic routed to the tagging servers geographically closer to them.
To do that, go to Load Balancing in the Google Cloud console.
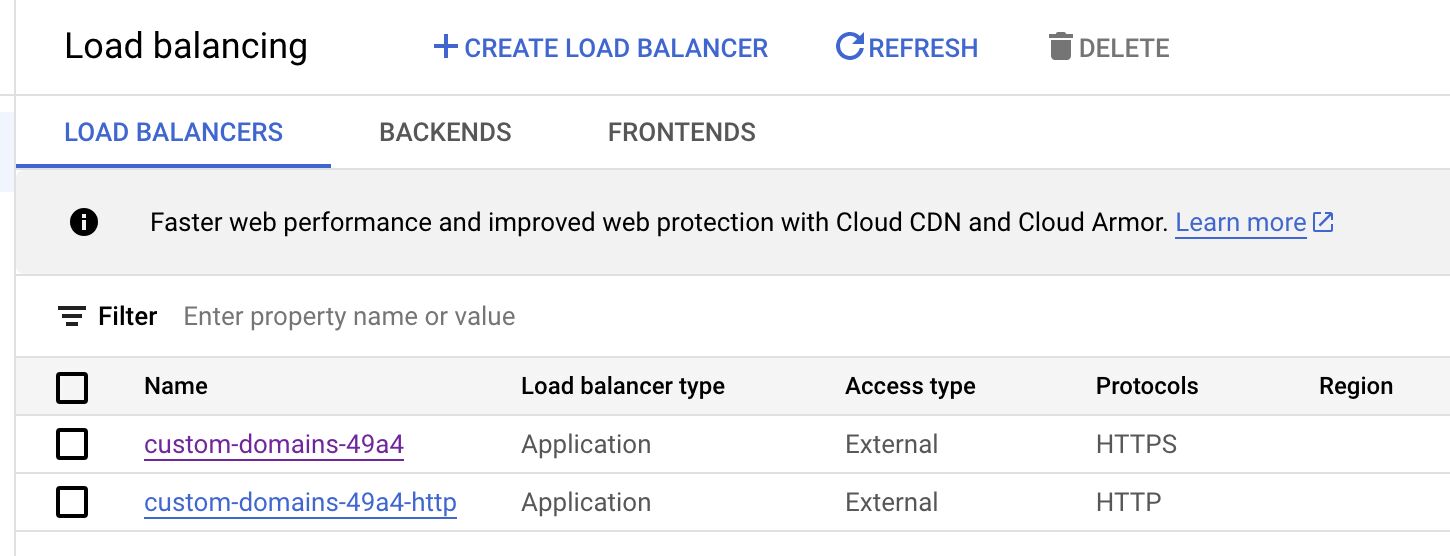
Your load balancer comprises a Frontend (the IP address your custom domain is pointing to) and a Backend that maps the services the load balancer should forward traffic to.
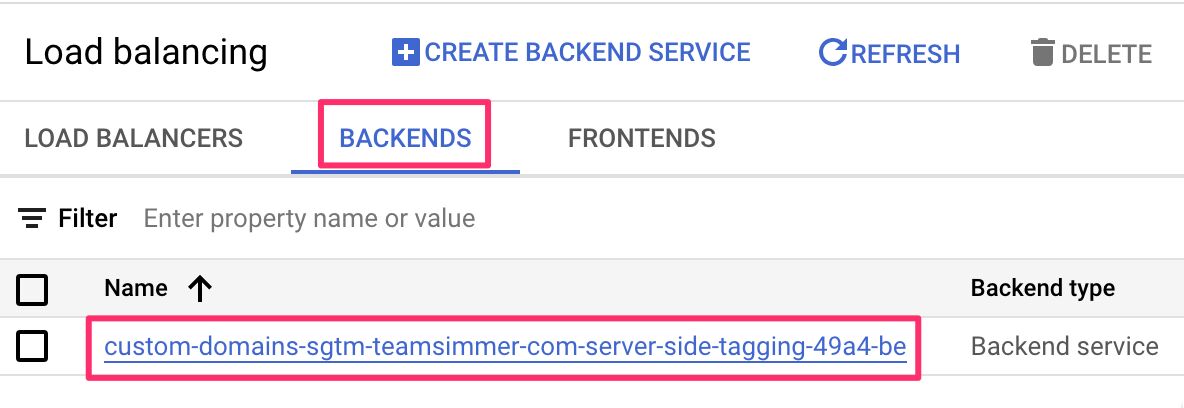
Here, navigate to the Backends tab, because we’ll need to update the existing Backend service to also include our two additional tagging servers.
Click the backend service that was created by the custom domains integration.
Next, click Edit in the top bar to edit the backend service.
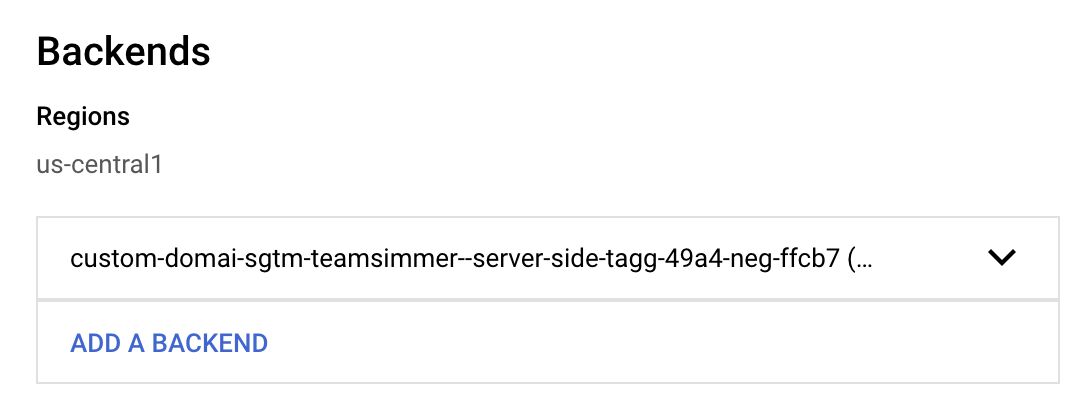
Here, you’ll see a list of all the backends added to this service. There should be just one – a serverless network endpoint group pointing to the tagging server in Cloud Run where you added the custom domains integration.
You need to add new backends – one per tagging server that you want to also include in the load balancer (you do not need to create a backend for the Preview server!).
Click Add a backend, and in the list of Serverless network endpoint groups choose Create serverless network endpoint group.
Give a name for the NEG, and set its Region to the exact same region as the Cloud Run tagging server you want to add to the balancer.
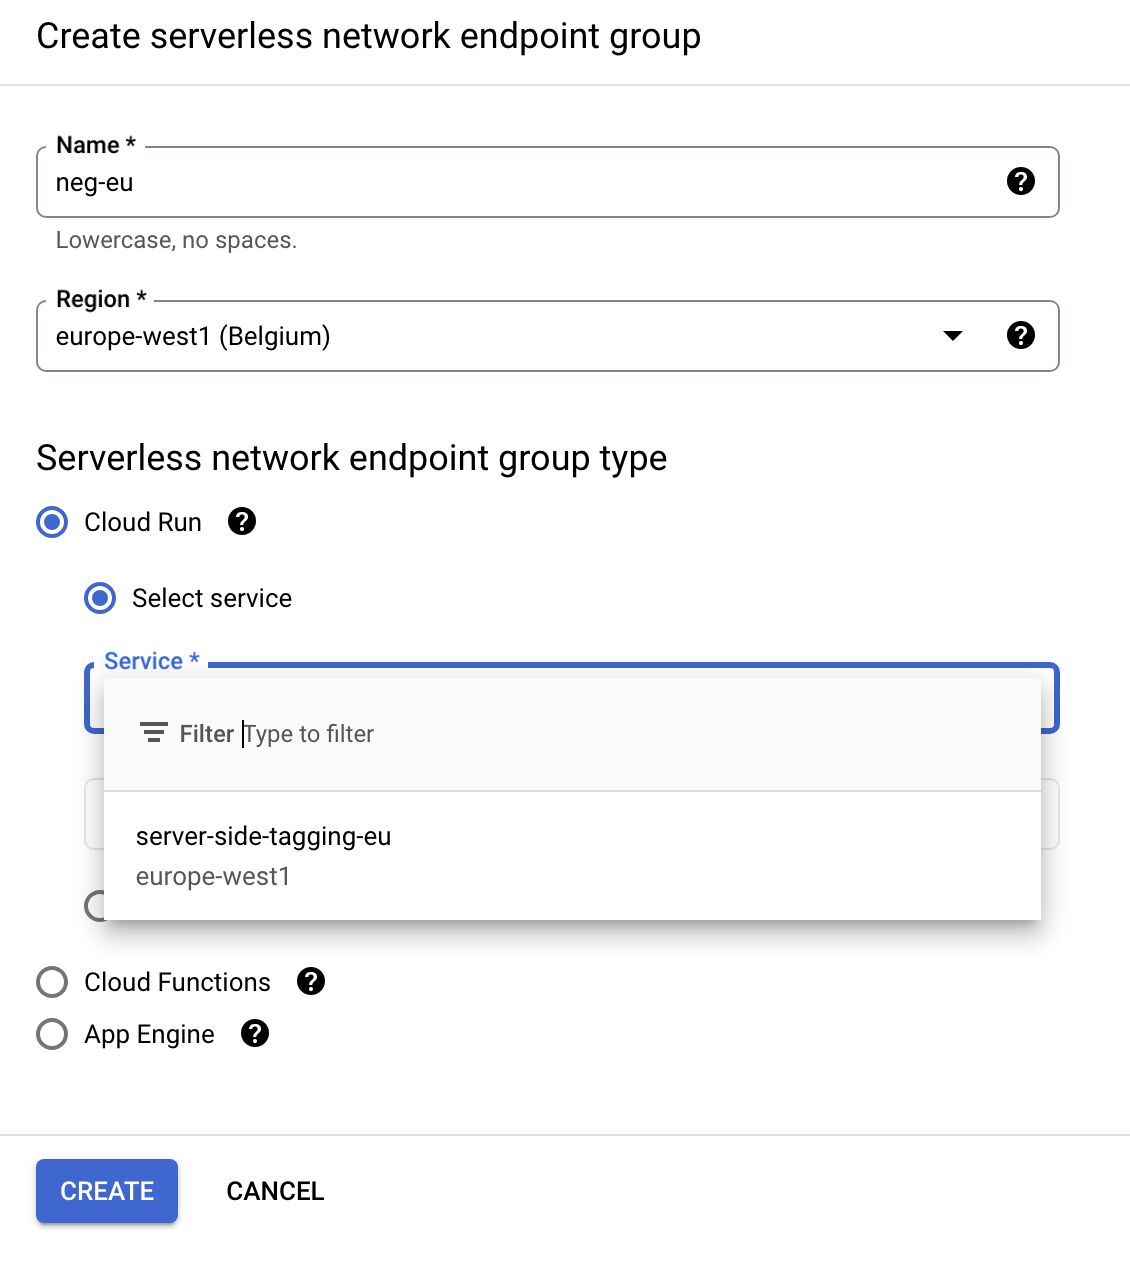
Once you’ve chosen the region, choose Cloud Run as the NEG type, and then select the tagging server from the list of available Cloud Run services. Click Create when ready.
Do this for all the tagging servers you want to add to the load balancer. Once ready, you should see something like this:
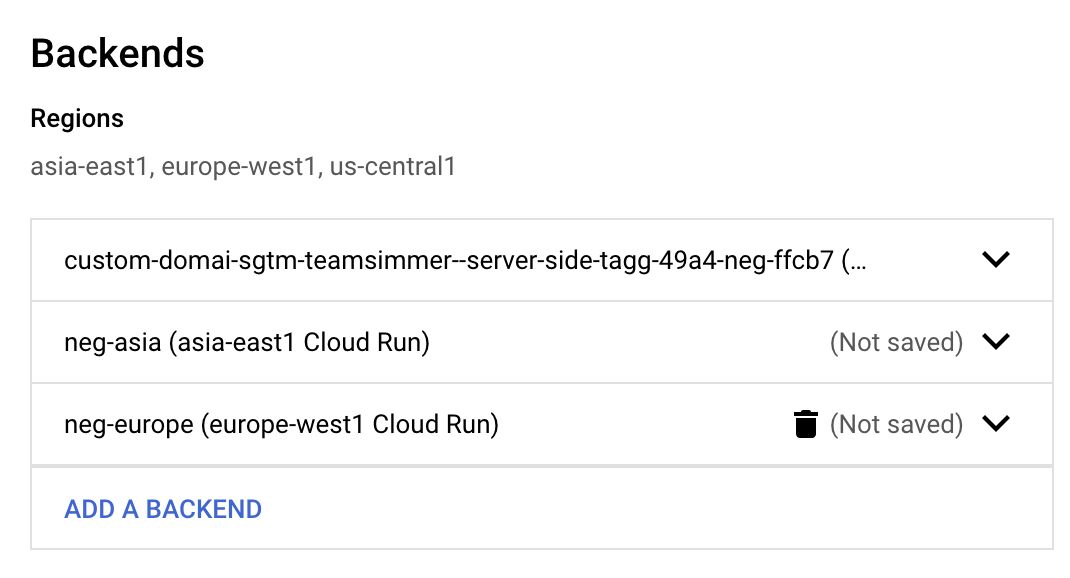
Now, scroll down and check Enable logging. It’s a good idea to have the load balancer log requests. It’s a useful feature, because it lets you monitor traffic through the backends.
Add geolocation headers to the traffic
If you wish, you can also have the load balancer automatically geolocate the user and add this information as custom request headers to all HTTP requests that go through the load balancer. This would mimic how App Engine automatically geolocates the user, too.
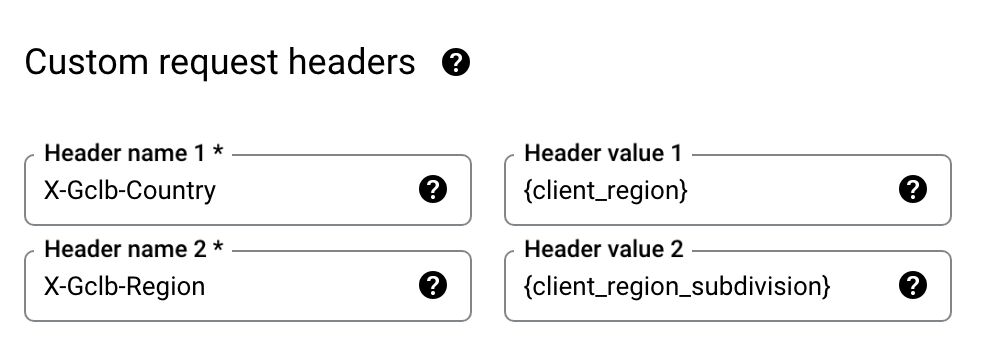
To do this, scroll down the backend service settings, expand Advanced configurations, and find Custom request headers. Add at least these two:
X-Gclb-Country: {client_region}
X-Gclb-Region: {client_region_subdivision}
These headers are required if you want to support region-specific behavior in your Server container for Google tags.
For additional request headers you might find useful, check out this list.
Once you are ready, click Update to update the backend.
If you now go back to the Load balancers tab, you should see your load balancer pointing to 3 network endpoint groups (or however many tagging servers you added to the backend service).

Test that everything works
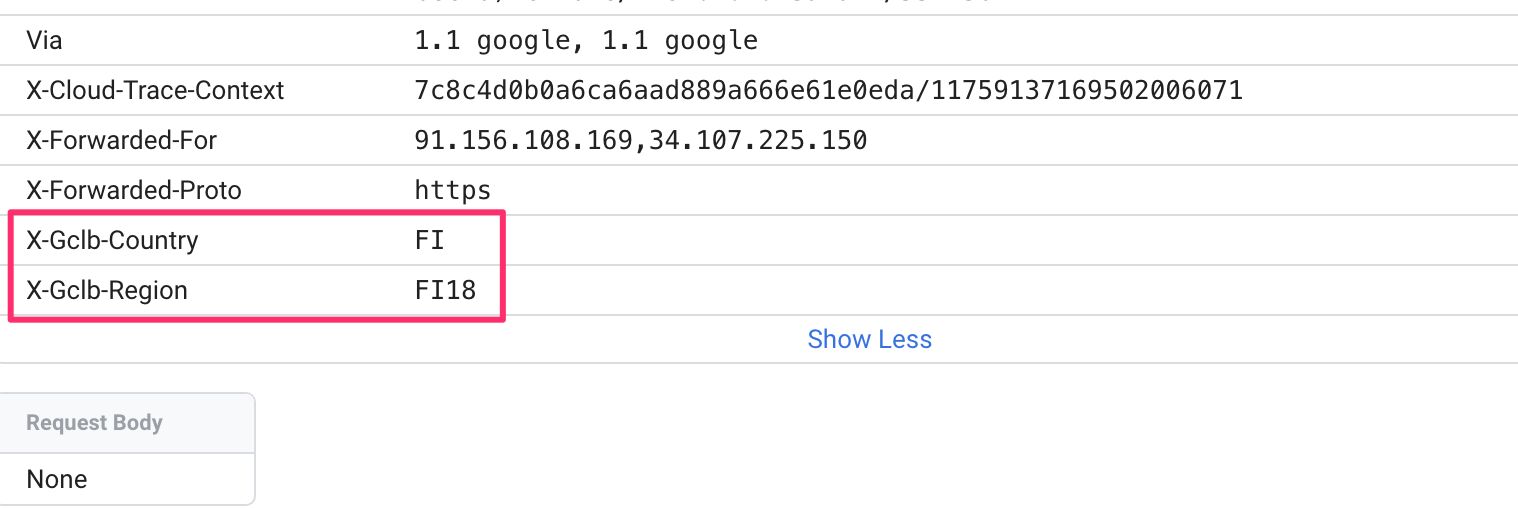
If you now open the Server container Preview mode and check any incoming requests, you should see the custom request headers added automatically:
Furthermore, if you go to Logs Explorer in Google Cloud, you can expand an incoming HTTP request log to see which backend it was sent to:
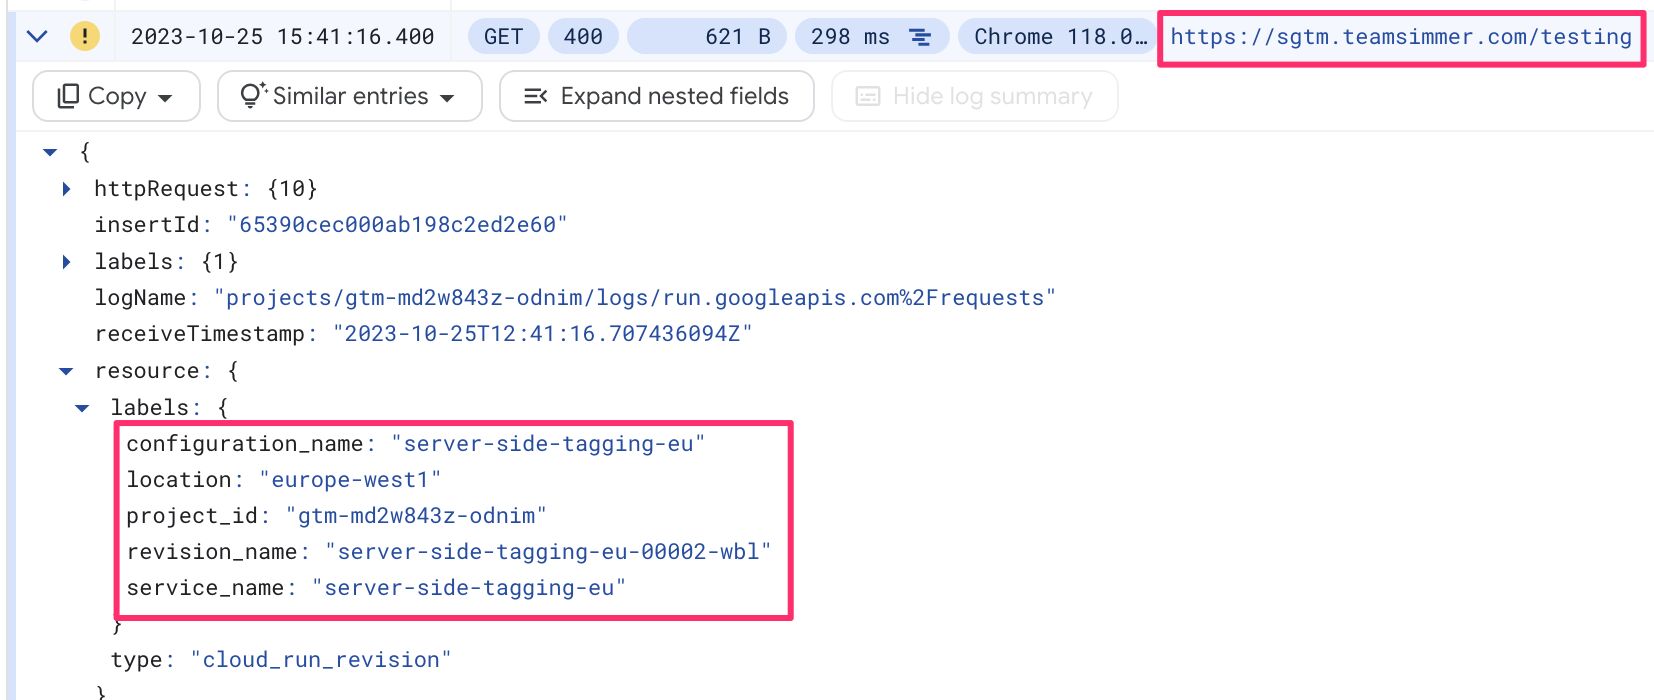
In the example above, I sent the request from Finland, so it was routed to the server-side-tagging-eu service to keep the geographical distance between myself and the server as short as possible.
Migrate from App Engine
Migrating from App Engine to Cloud Run is very easy.
First, build your Cloud Run setup to completion following the steps in this article.
Then, once you’re ready, you can disable the App Engine application.
Note! If you want to migrate the subdomain from App Engine to your new Cloud Run load balancer, there might be downtime as the load balancer provisions the SSL certificate for your setup. So do this at your own risk. If you want everything to go smoothly, you can reserve a new domain name for the Cloud Run setup.
Remember – do not disable the App Engine application until everything is working as intended in Cloud Run. Even after that, it’s a good idea to have the App Engine application running for a day or two to catch any cached traffic that might still be flowing in.
Summary
This article has been a walkthrough of what to expect when moving to the new, recommended deployment of server-side tagging in Google Tag Manager, using Google Cloud Run as the new backend.
I didn’t discuss costs – you can check out Google’s own documentation for that, but because Cloud Run is computation-as-needed, the costs might be more difficult to guesstimate in advance than it was with App Engine.
So is there still a reason to use App Engine? Sure! If you want automatic compression, automatic geolocation, and in many ways a more hassle-free experience, you can stick with App Engine. It’s not going away (hopefully anytime soon).
But Cloud Run has lots of advantages:
- You can create multiple services, all in different regions.
- Mapping custom domains and creating load balancers is very easy with the new integration.
- You have more flexibility over instances, and you only pay for requests that are actually processed.
- It’s “the future” of Google Cloud’s serverless application stack.
I recommend creating a Cloud Run setup with the minimum loadout. That way you can test to see how complicated the process actually is, and you can scale up slowly and with control to not introduce any surprise costs.
If you want a more guided walkthrough of how to work with Cloud Run, consider enrolling in Simmer’s Server-side Tagging In Google Tag Manager online course.
What are your thoughts on this, recommended deployment? Have you given Cloud Run a spin yet?
