Facebook Conversions API Using GA4 Web Tags And A GTM Server
Facebook has now officially released their Conversions API tag template for server-side tagging in Google Tag Manager.
With this tag template, you can create a server-side tag that fires with any Client designed to parse requests into a unified event model.
One such Client already exists, and every single Server container has it built-in: the GA4 Client.
If you haven’t yet deployed a Server container, check out this video walkthrough for more details on how to do it.
In this guide, I will walk you through the steps you need to take to get Facebook’s Conversions API working in unison with a GA4 Client.
This means one simple but powerful thing:
You don’t need to run any Facebook JavaScript in the web browser. The Facebook server-side tag will be able to utilize your existing GA4 data streams, albeit with some small modifications to cater to Facebook’s unique requirements for the payload.
Table of Contents
If you want to use the Facebook web pixel to handle both the web stream and the server-side data dispatch, you will have to wait a while until Facebook officially releases their solution for splitting the web pixel stream into both a Facebook server request and a custom endpoint request (e.g. your server-side endpoint).
XThe Simmer Newsletter
Subscribe to the Simmer newsletter to get the latest news and content from Simo Ahava into your email inbox!
How it works
Here’s a brief overview of how the process works.
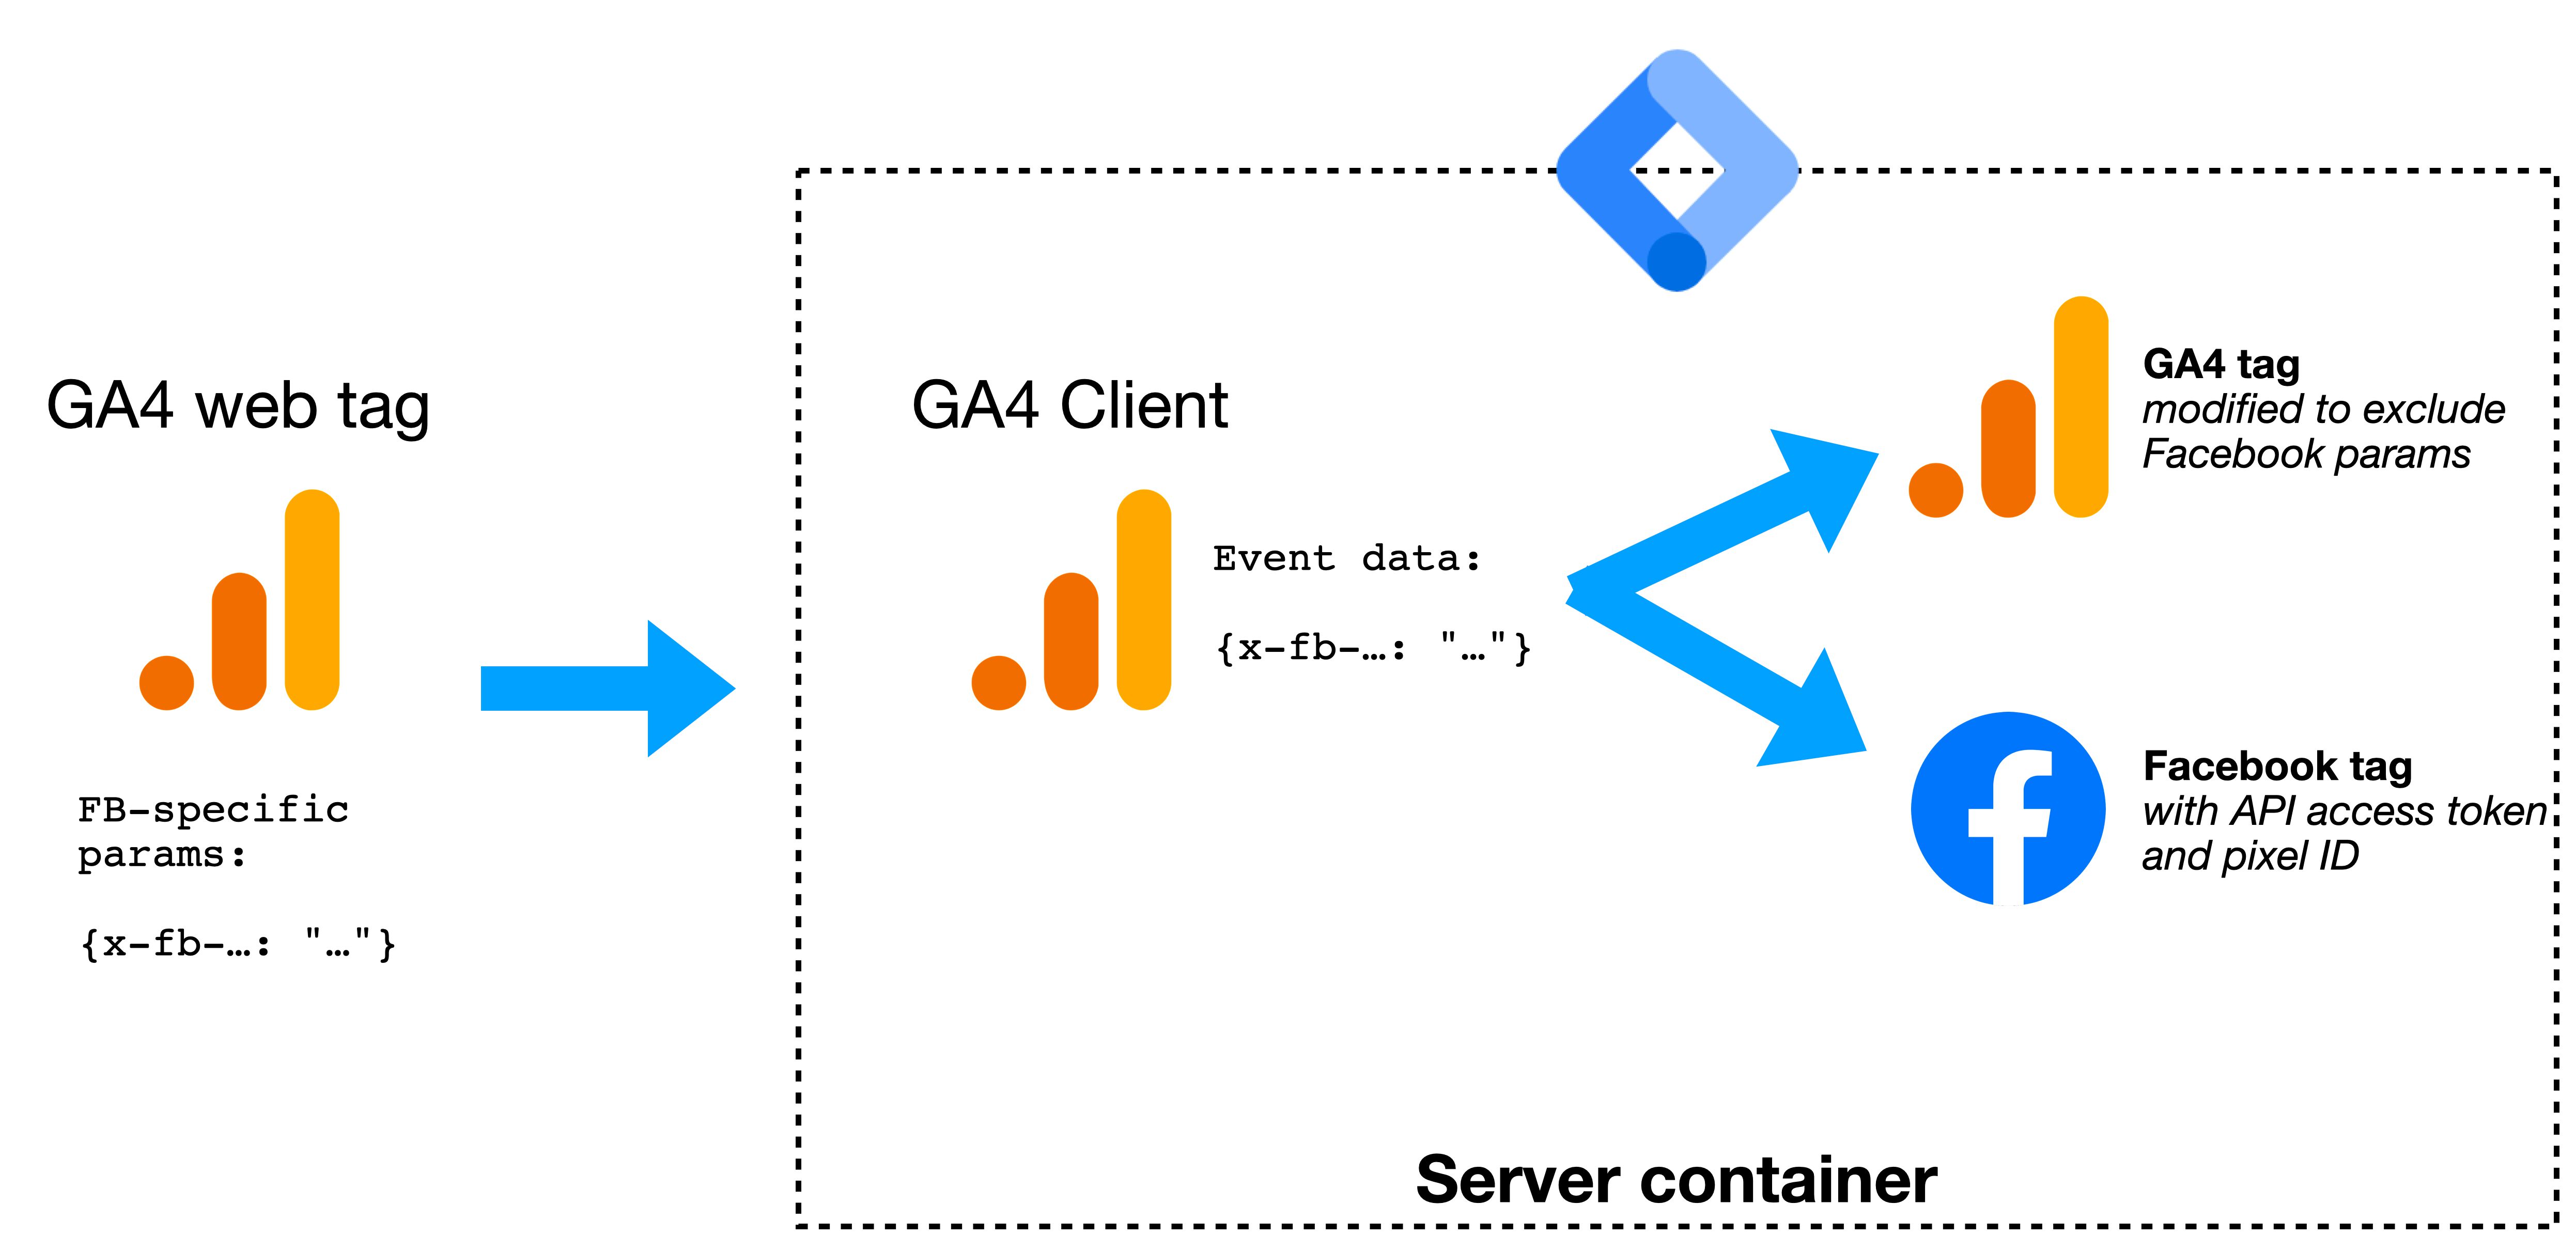
Almost 10 years of blogging and this is still the quality of my process diagrams…
The GA4 web tag records the event
Your GA4 tags running in the web browser will collect events as they have done until now.
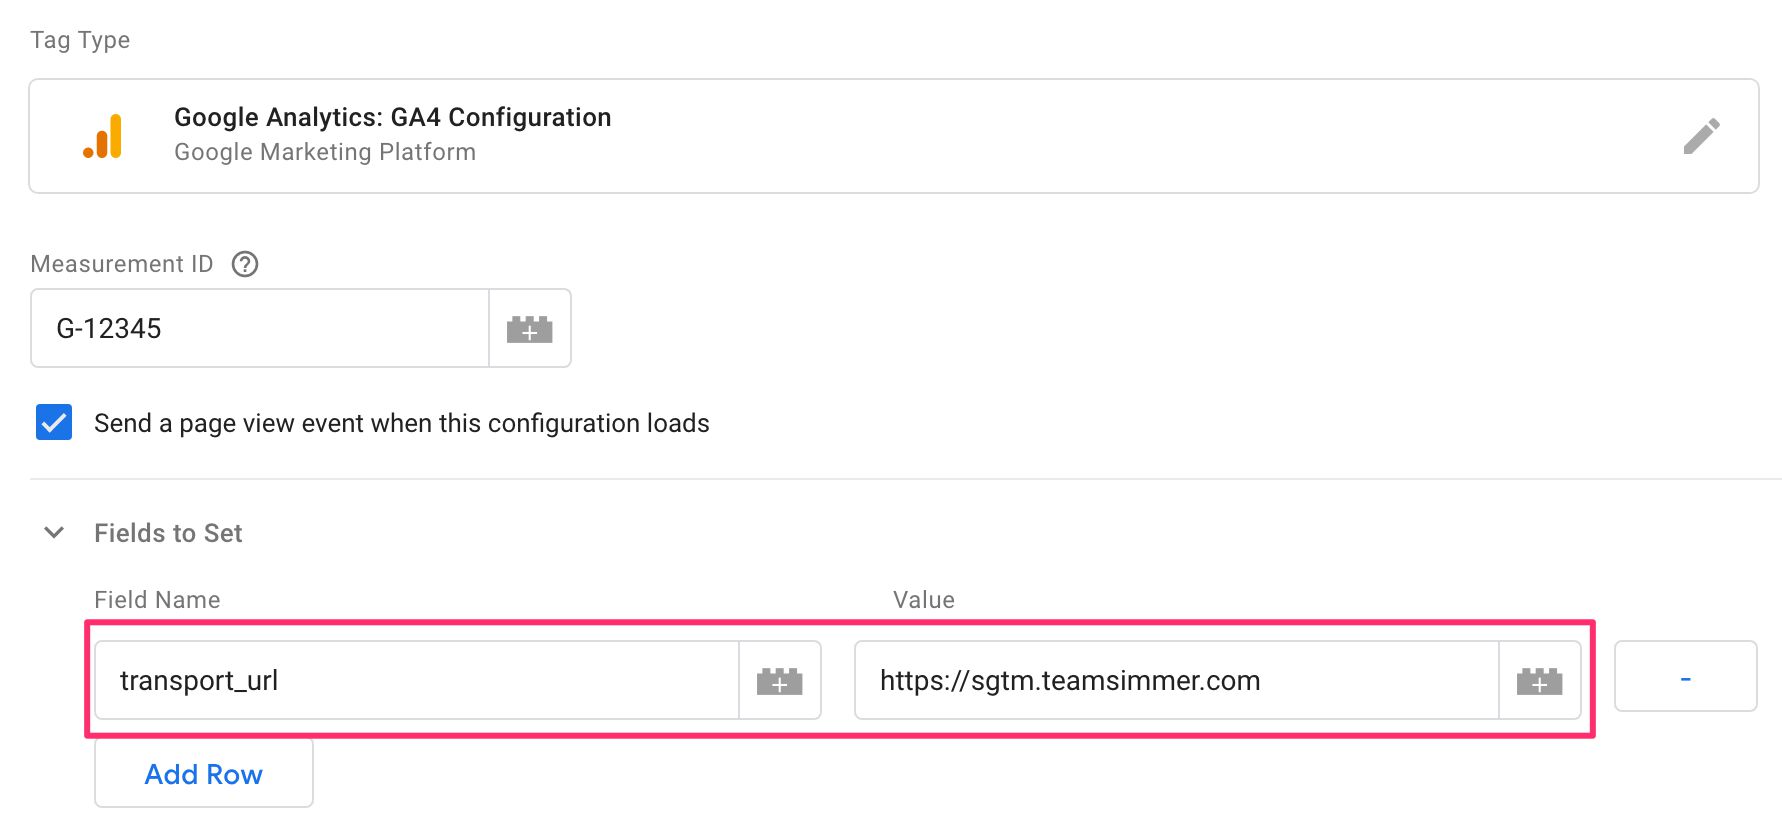
However, instead of sending the events directly to Google Analytics servers, you’ll configure the transport_url field in the GA4 Config tag (preferably) to dispatch the requests to your Server container instead.
In addition to this, you’ll need to add some new fields to the GA4 requests, so that the Facebook tag template will be able to access this information. This includes things like User Data parameters (used for user matching), and certain Facebook custom data parameters you want the server-side tag to collect as well.
You don’t have to worry about sending any of this Facebook-specific information to GA4! We’ll clean up the payload in the Server container.
The GA4 Client captures the request
Once you configure the transport_url in your GA4 Config tag, it will be sent to your Server container.
In the Server container, you need a GA4 Client with Default GA4 paths selected.
You can also proxy the gtag.js container by checking the Default gtag.js paths for specific IDs, and you can also utilize the Server container’s cookie capabilities by expanding More Settings and exploring the FPID option.
The Facebook tag takes the data and forwards it to Facebook
In the Server container, the GA4 Client parses the incoming HTTP request sent by the GA4 web tag and converts it into an event data object.
This object triggers the Facebook server-side tag (the template for which you can find in the Community Template Gallery), which reads the event data and finally sends the payload to Facebook.
If you have (as you should) a GA4 tag running in the Server container, dispatching the GA4 Client’s output to GA4 servers as well, you might want to clean up some of the parameters reserved for Facebook to prevent them from “leaking” into your GA4 data.
And that’s it for the overview! Let’s jump into each part in more detail.
Update the GA4 web tag
Let’s start with modifying the GA4 web tag.
If you’re just starting to work with Server containers, it might be wise to copy your existing GA4 web tags rather than replace their functionality with the transport_url field.
That way you can “parallel track” via the web tag AND the Server container. You might want to create a new data stream in GA4 just for your server-side hits.
But this isn’t a guide on how to create a GA4 server-side setup. Instead, we’ll focus on utilizing the GA4 web tag for Facebook’s purposes.
The Facebook server-side tag has a limited inventory of parameters it can make use of.
Event Name
First, there’s the Event Name field in the GA4 web tag itself. You can set anything you like into this and it will work with Facebook’s endpoint. However, some event names have special functionality, and they are automatically converted to Facebook’s standard event name format. Here’s the list:
| Event name in GA4 tag | Event name converted by Facebook’s tag |
|---|---|
add_payment_info | AddPaymentInfo |
add_to_cart | AddToCart |
add_to_wishlist | AddToWishlist |
begin_checkout | InitiateCheckout |
generate_lead | Lead |
page_view | PageView |
purchase | Purchase |
search | Search |
sign_up | CompleteRegistration |
view_item | ViewContent |
So if you use any of the event name values in the left column, Facebook will convert them to the corresponding values in the right column when collecting the data.
Any other event names will be used as-is without modifications when collecting the data to Facebook.
General parameters
There are a handful of utility parameters that you can set as GA4 event parameters, and they will be handled in a special way by the Facebook tag.
event_time
 event_time in the GA4 web tag
The event_time parameter should be set to the moment when the data was collected on the website. The format is UNIX (epoch) time in seconds. In other words, to get the current timestamp with a Custom JavaScript variable, for example, you could use this:
function() {
  return Math.round(new Date().getTime() / 1000);
}
Note that you don’t have to send this. If it’s not part of the GA4 hit, then the Facebook tag will simply set the timestamp to the moment the server-side tag was executed.
event_id
 event_id in the GA4 web tag
event_id is used for deduplicating identical events collected from more than one source (e.g. web site and Server container).
This is only relevant if you are duplicating data collection between the web pixel and the Server container, for example. If you are only collecting events using one or the other, you do not have to use event_id!
The event_id must be unique for all the events that should be deduplicated. Each set of events that needs to be deduplicated must have its own unique event ID, otherwise Facebook will not be able to consistently deduplicate the data.
With Google Tag Manager, creating a consistently unique event ID is a bit difficult, as variables are resolved each time they are invoked. So if you have, for example, the {{Random Number}} variable used as Event ID in a web pixel and a server-side call, then it will return a different number for both times the variable is called.
A fairly simple way to create the Event ID would be to generate a random Page ID for every page load, and then concatenate this with a sequence number that is increased by one for each set of Facebook events that needs to be deduplicated. Another option is to push an event to dataLayer for each set of Facebook tags that needs to be deduplicated, and with that event also push the random, unique Event ID. That way all the Facebook hits (that require deduplication) can fire on the event and use the Event ID in the pushed object.
page_location
 page_location in the GA4 web tag
Even though page_location is automatically collected from the URL of the page when the GA4 tag fires, you can also override it with a custom value as in the screenshot above.
This is collected as the event_source_url by the Facebook server-side tag.
action_source
 action_source in the GA4 web tag
You can set action_source to one of:
emailwebsiteappphone_callchatphysical_storesystem_generatedother
This field is optional, and it specifies the context of the hit: where did the conversion happen.
You can also configure the Action Source in the server-side Facebook tag. However, if you do send the action_source in the GA4 hit, it overrides the server-side tag setting.
User data parameters
With appropriate consent and/or other legal premise checked, you can also send user data parameters to Facebook to help match the conversion with the user who performed the action.
Please, please, please make sure that you have the legal right to send end users’ personal data to Facebook. Don’t follow the instructions below blindly – make sure you are not breaching the users’ right to privacy.
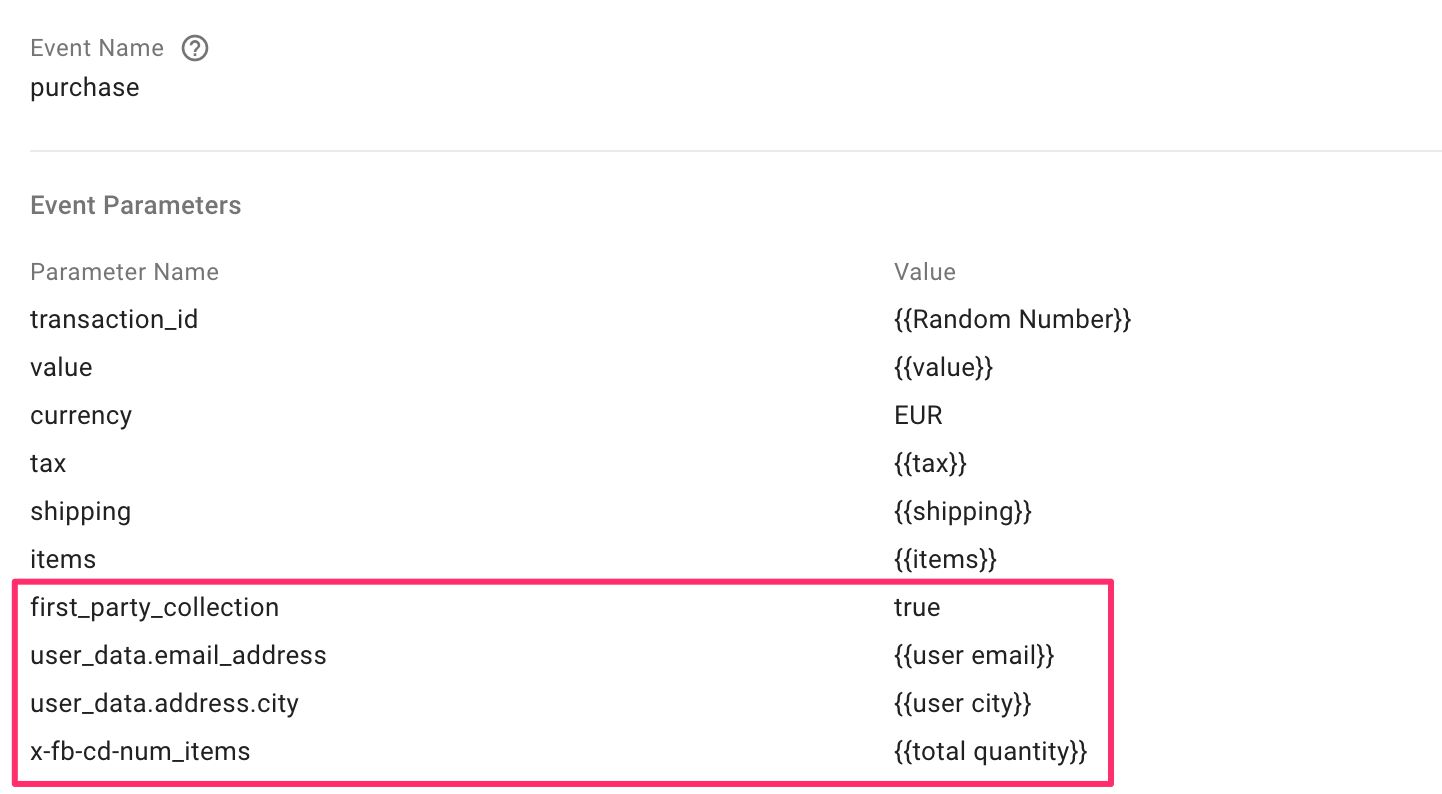
For user data parameters to work in the server-side setup, you must add the following field to the event parameters of the GA4 tag sending the user data:

Set the field name to first_party_collection and value to true.
User IP address and User-Agent string
If you want, you can override the IP address and User-Agent string sent to Facebook using the GA4 web tag as well. This is a nice way of anonymizing the request if you don’t want Facebook to use the user’s actual IP and User-Agent.
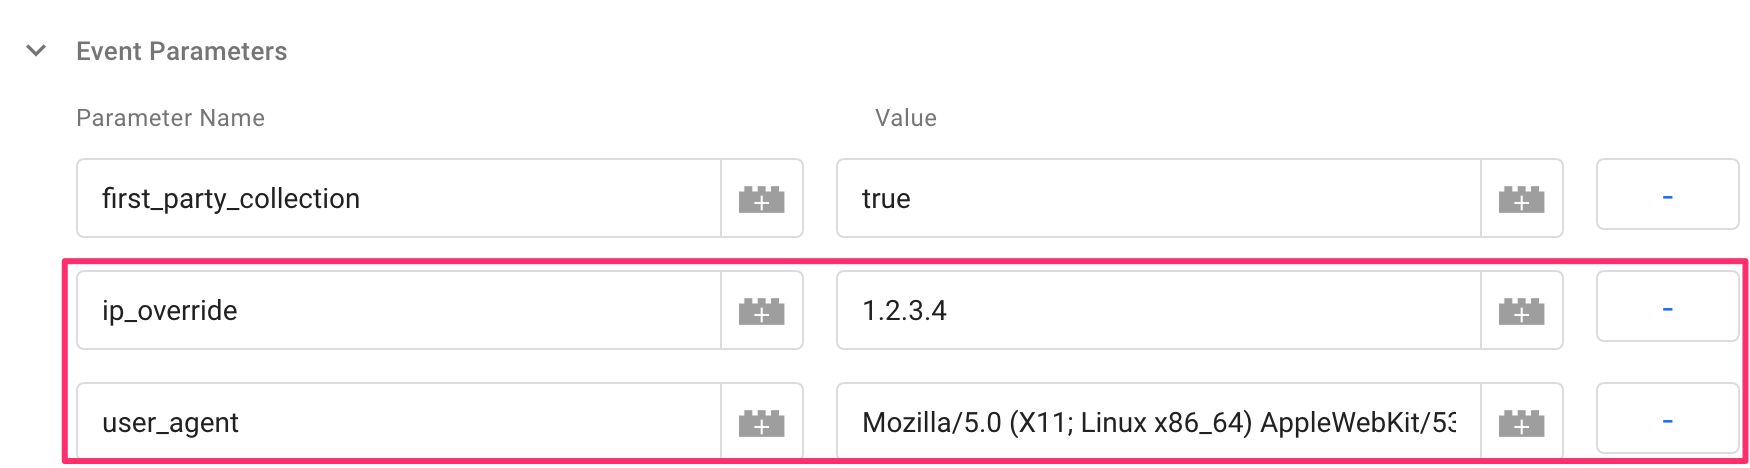
To override the IP address, set the field ip_override, and to override the User-Agent string, set the field user_agent.
If you don’t override these fields, the server-side tag will forward the user’s actual IP address and User-Agent to Facebook to help with user matching.
User data parameters in the common event schema
You can also explicitly send personal data about the user to Facebook. The server-side tag will hash the data, so Facebook will never receive the data in a readable format.
If the data is already hashed when sent with the GA4 tag, the Facebook tag won’t hash it again.
Here are the parameters you can set:
user_data.email_addressuser_data.phone_numberuser_data.address.first_nameuser_data.address.last_nameuser_data.address.cityuser_data.address.regionuser_data.address.postal_codeuser_data.address.country
This is what it might look in the GA4 web tag:
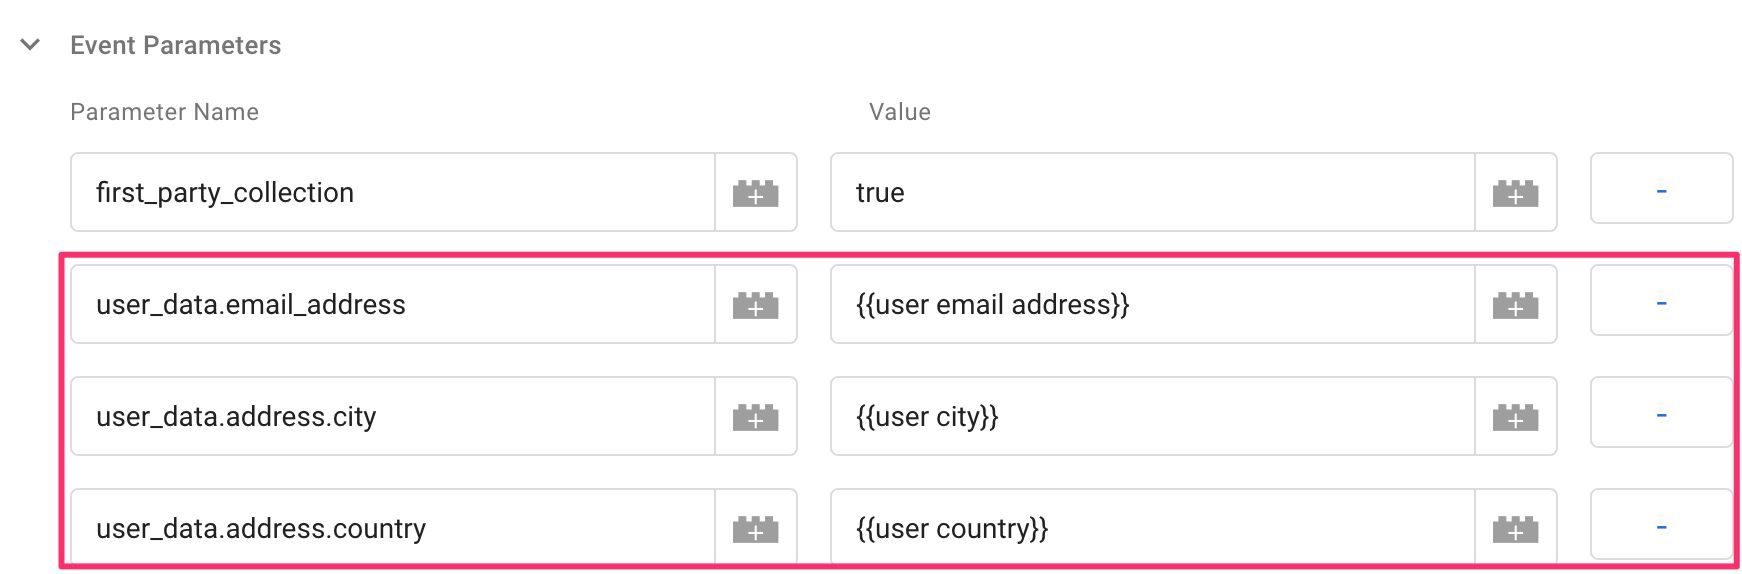 User Data parameters following the common event schema
Facebook-specific parameters
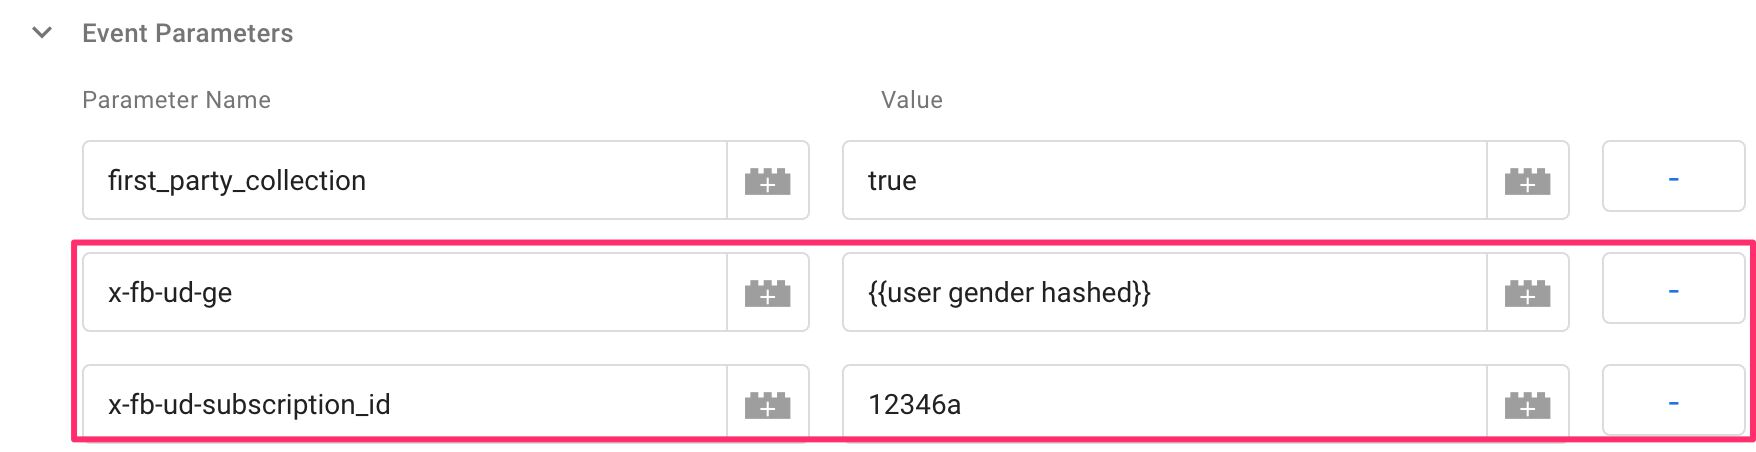
There are also a handful of Facebook-specific parameters you can set. These are not hashed automatically.
| Parameter name | Description |
|---|---|
x-fb-ud-ge | User gender. Hashing is needed. |
x-fb-ud-db | User date of birth. Hashing is needed. |
x-fb-ud-external_id | External ID, e.g. advertiser loyalty ID. Hashing is recommended. |
x-fb-ud-subscription_id | Subscription ID, e.g. a subscription ID for the user in the transaction. This should not be hashed. |
x-fb-ck-fbp | The _fbp cookie value. See below. |
x-fb-ck-fbc | The _fbc cookie value. See below. |
You can send the _fbp and _fbc cookie values with the parameters listed above. If you don’t explicitly set them, and the user has those cookies in their browser, and the server-side tagging endpoint is first-party, then the Facebook tag will automatically read the cookie values from the user’s cookies.
Note that currently, the Facebook tag does not set the cookies in the response. I’ve submitted an Issue about this to Facebook, as I think it would make a lot of sense to have the tag add the
Set-Cookieheaders in the HTTP response back from the Server container.
Here’s what some of these parameters might look like in the GA4 event tag:
Custom data parameters
You can also send custom data parameters to Facebook by setting them as fields in the GA4 web tag.
General parameters
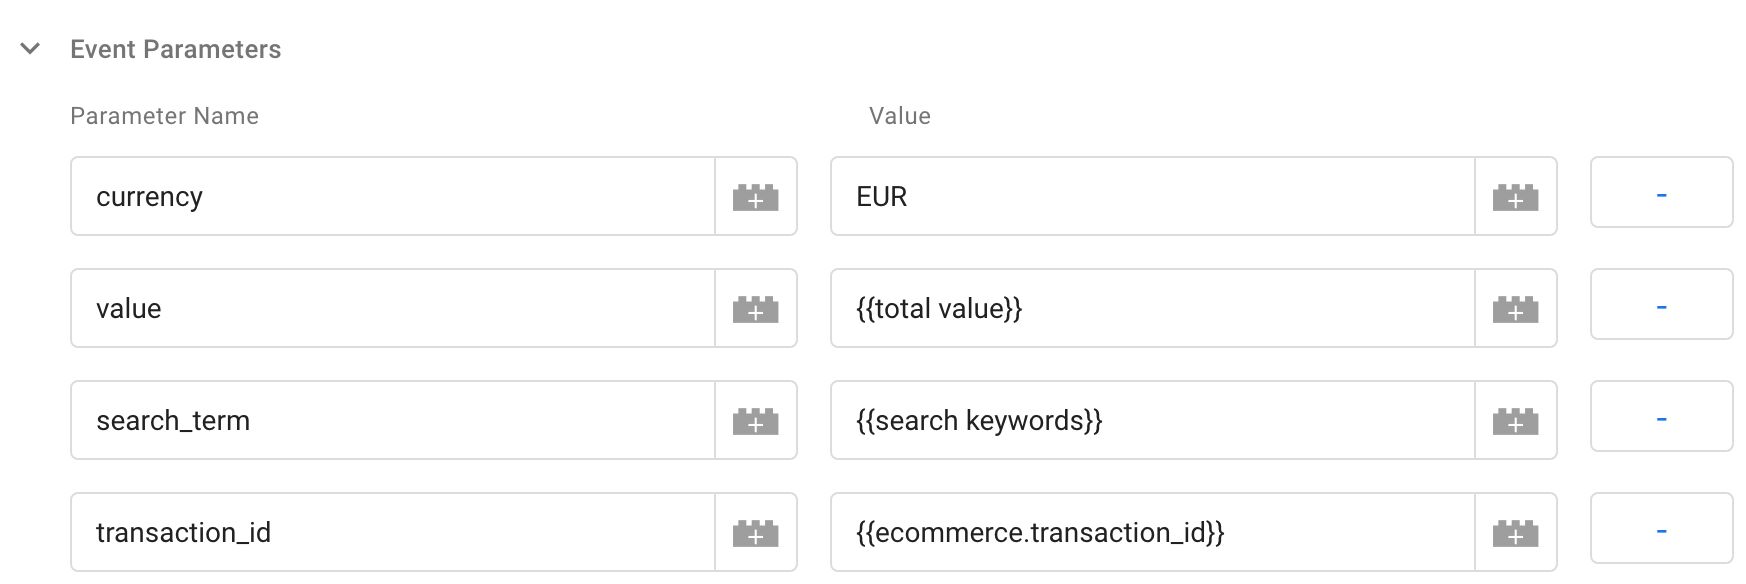
There are a handful of general parameters that can be set in the GA4 web tag. The Facebook server-side tag will be able to read these and send them to Facebook.
| GA4 parameter name | Converted by the Facebook tag | Description |
|---|---|---|
currency | currency | Currency code of the transaction (or other event with a monetary value). |
value | value | Total value of the transaction (or other event with a monetary value). |
search_term | search_string | What the user searched for with the site search. |
transaction_id | order_id | Unique order / transaction ID. |
This is what these parameters would look like in the GA4 event tag:
Items
If you’re collecting Ecommerce to GA4, you might already have an items array in place.
Well, the server-side Facebook tag can automatically take the contents of this items array and turn it into a contents array!
This is how the mapping is done:
Key in items | Mapped to in contents | Description |
|---|---|---|
item_id | id | Item ID (e.g. SKU). |
item_name | title | Item title or name. |
price | item_price | Item price. |
item_brand | brand | Item brand label. |
quantity | quantity | Number of items in the event. |
item_category | category | Item category label. |
This is by far the easiest way to build the contents array.
Naturally, you can also send the contents array with a custom parameter named x-fb-cd-contents.
 x-fb-cd-contents in the GA4 web tag
Facebook-specific custom data parameters
You can also send a number of Facebook-specific custom data parameters. These are:
| Parameter name | Description |
|---|---|
x-fb-cd-content_category | Content category. |
x-fb-cd-content_ids | Content IDs. |
x-fb-cd-content_name | Content name. |
x-fb-cd-content_type | Content type. |
x-fb-cd-contents | Contents array. |
x-fb-cd-num_items | Number of items. |
x-fb-cd-predicted_ltv | Predicted lifetime value. |
x-fb-cd-status | Status. |
x-fb-cd-delivery_category | Delivery category. |
You can read more about these parameters as well as about their expected formats behind this link.
Here’s an example of what these might look like in the GA4 event tag:
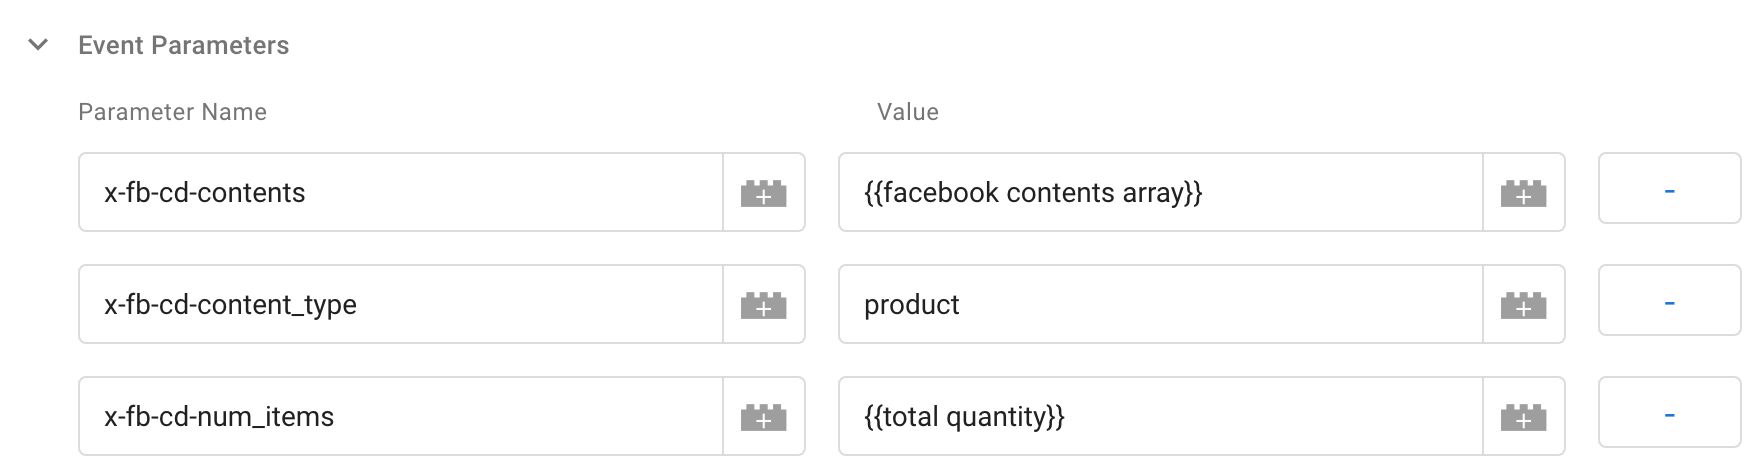 Custom data parameters in the event tag
Test event code
If you’re testing the Conversions API endpoint, you can use the test event code to collect hits to your Facebook account with additional debug information included.
You can set the test event code in the GA4 web tag if you wish. All you need to do is set the event parameter test_event_code like this:
 test_event_code in the GA4 web tag
However, it might be easier to configure the test event code in the Facebook server-side tag (see below).
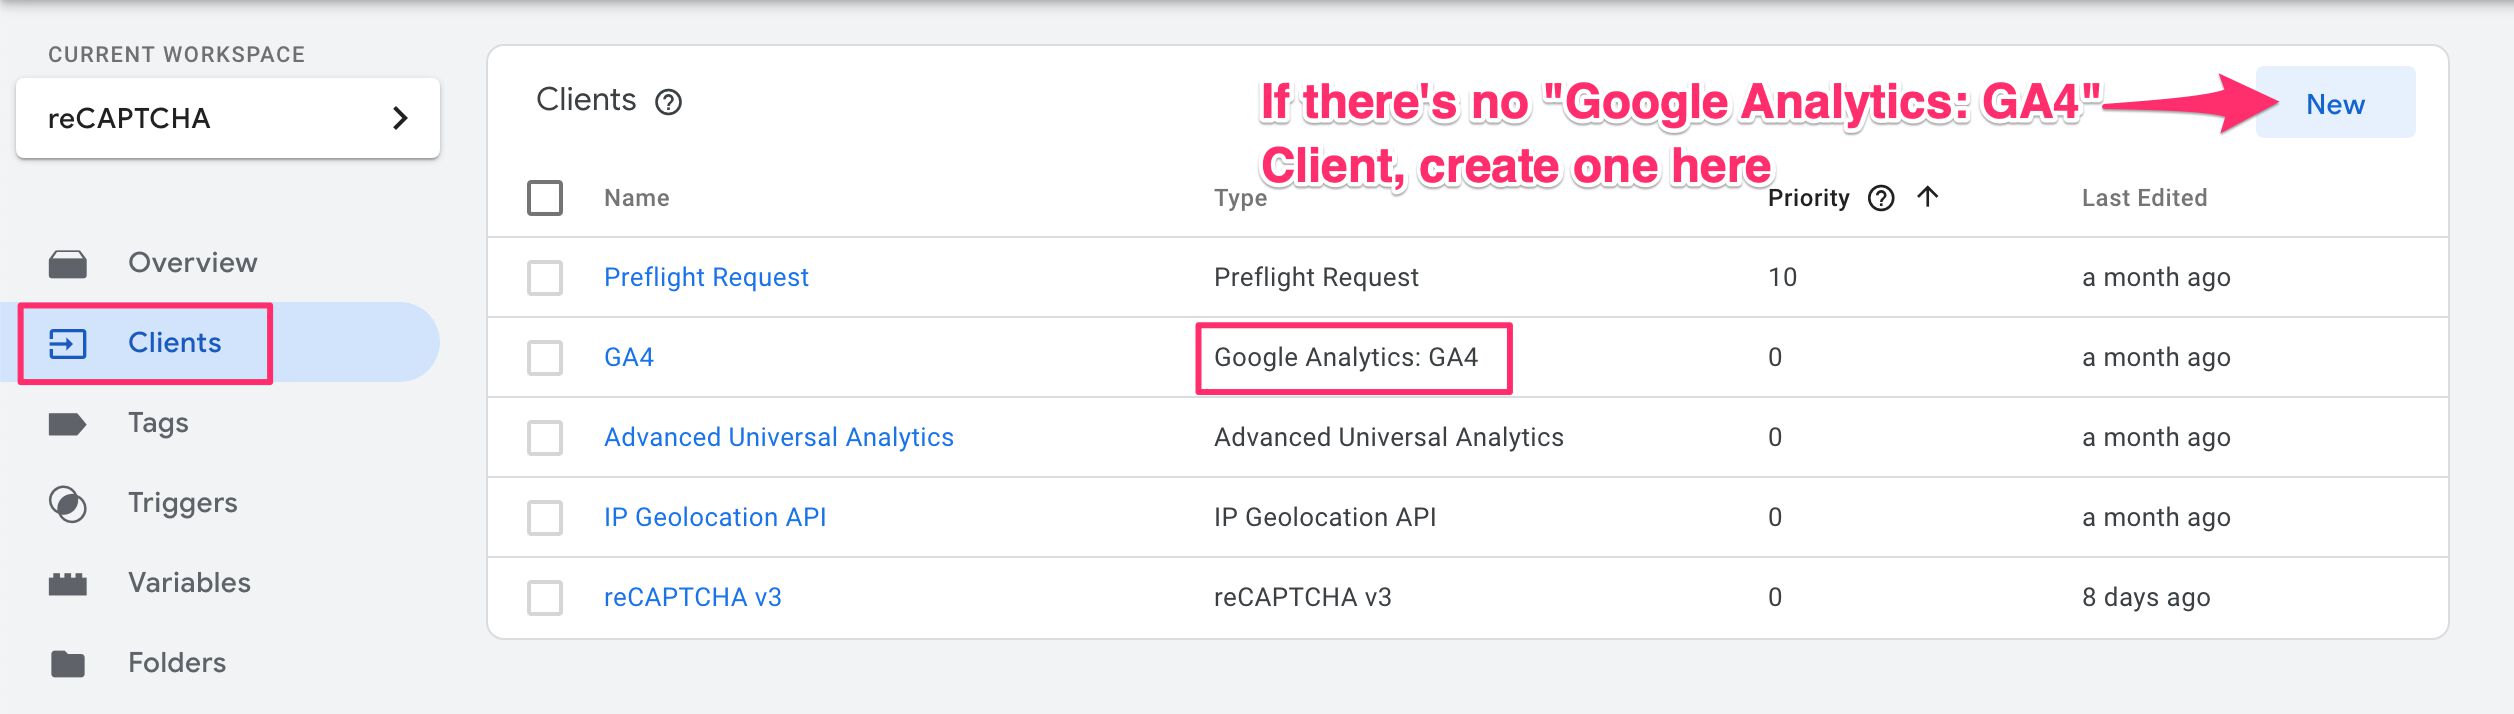
Make sure the GA4 Client is running in the server container
When the GA4 web tag has the transport_url field set to point at your server-side endpoint, the endpoint will receive a GA4 request whenever such a tag fires in the website.
If the server-side endpoint doesn’t have a GA4 Client configured, the request will fail with a 400 error.
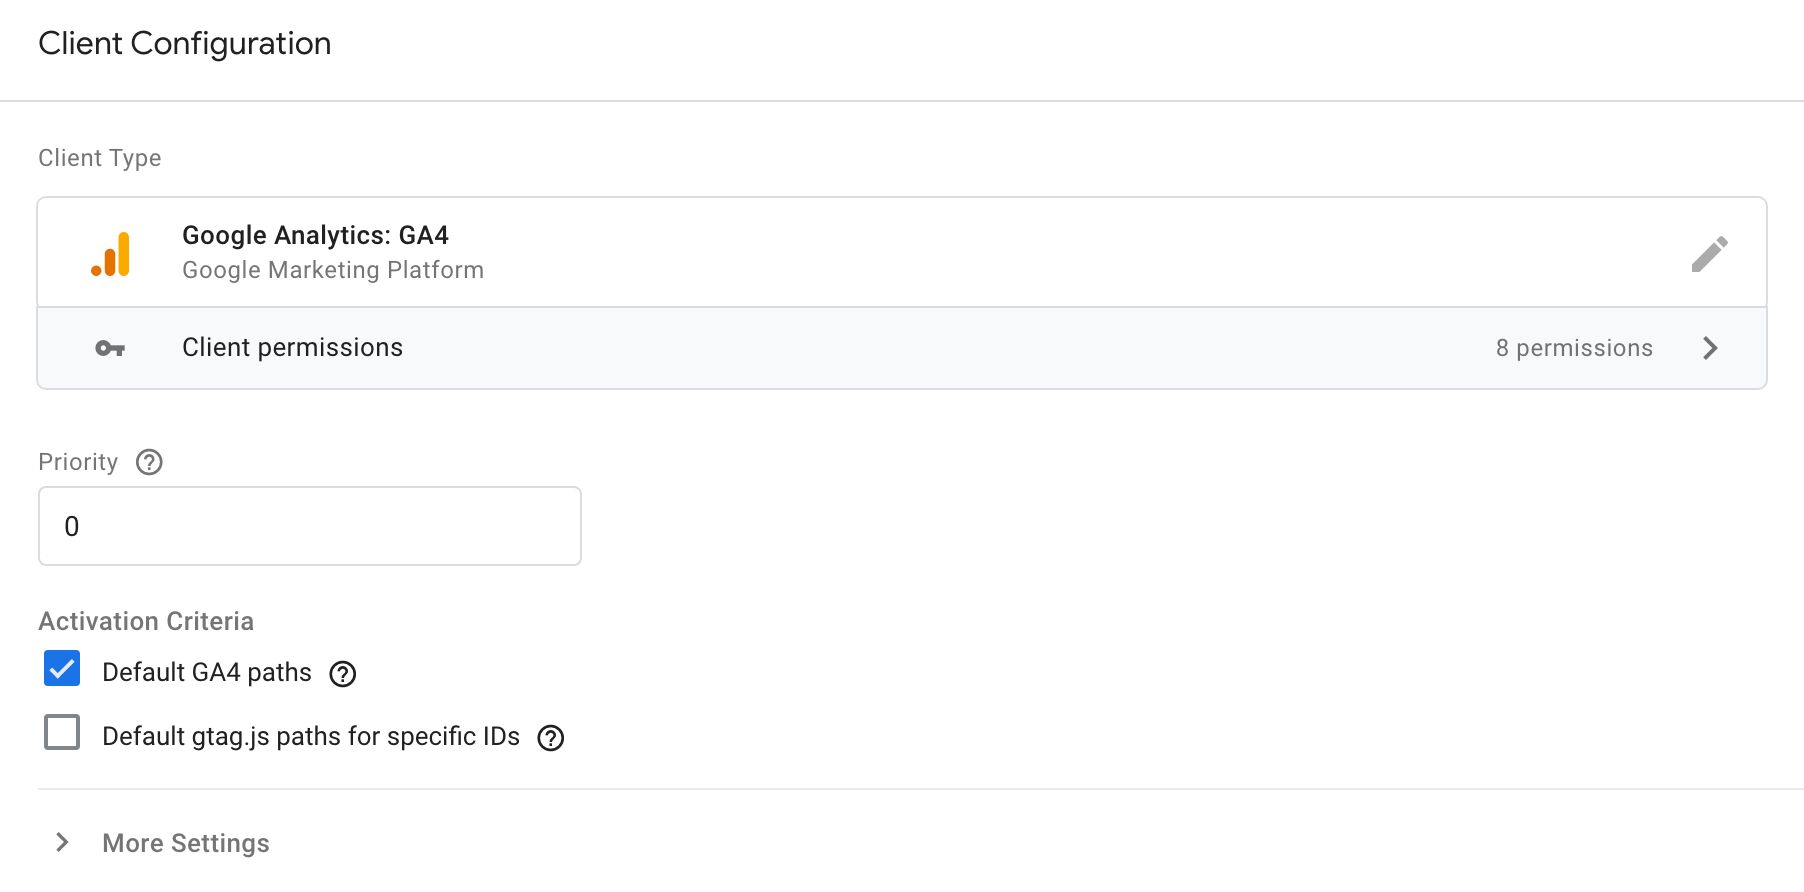
Make sure that you have a GA4 Client running in the Server container. If not, create one by choosing the New.
Next, open the Client and make sure the Default GA4 paths option is checked.
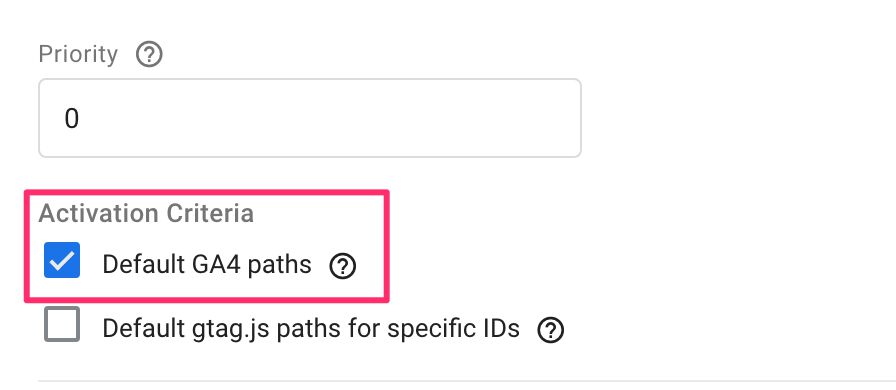
This should be enough to make your endpoint claim the incoming GA4 requests and parse them into the format required by the Facebook tag.
Load the Facebook Conversions API Tag template from the template gallery
Next, head on to Templates in the Server container.
In the Tag Templates box, click the Search Gallery button.

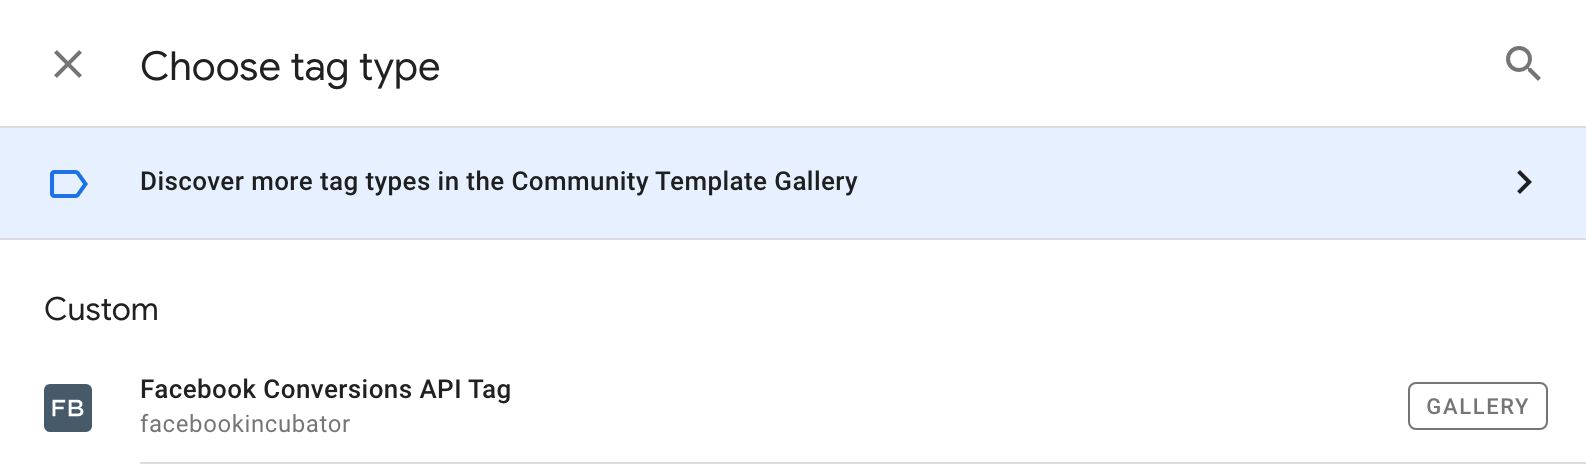
Search for the Facebook Conversions API Tag template, select it, and click Add to workspace.
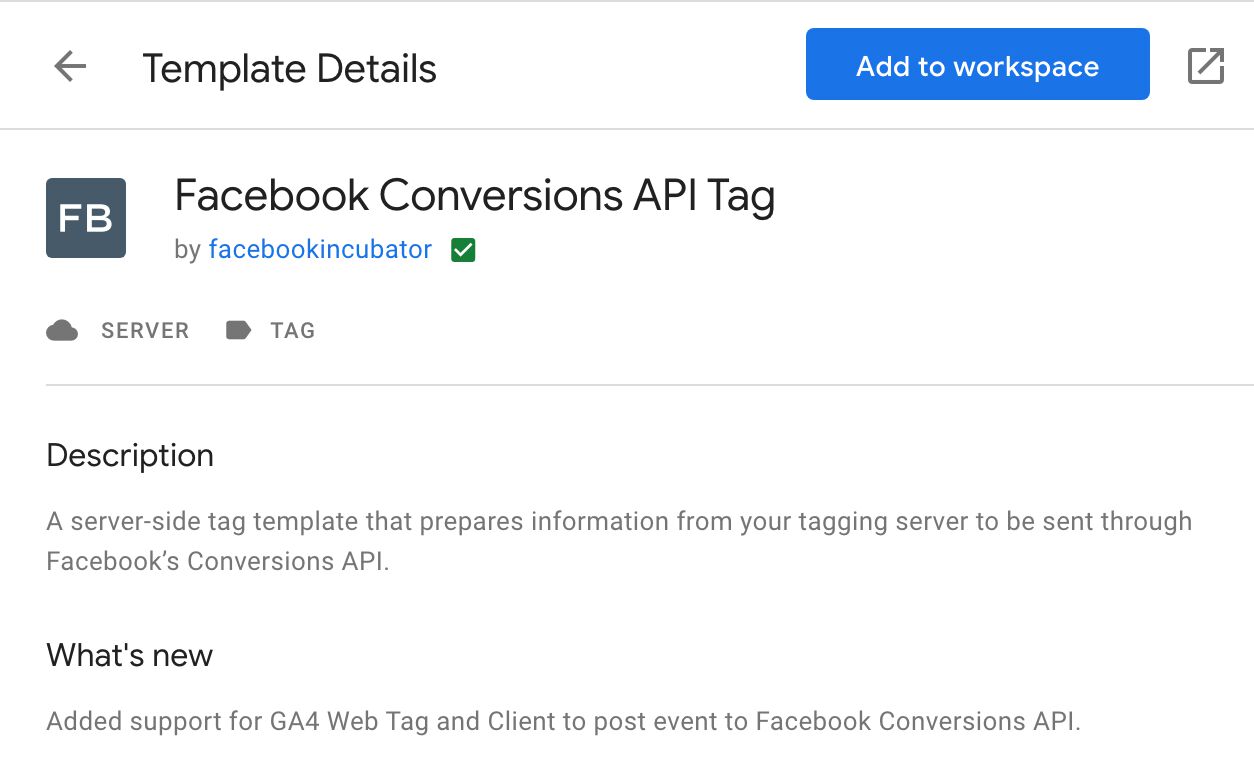 Facebook tag in the gallery
Create and configure the Facebook Conversions API Tag
In the Server container, go to Tags and create a new tag.
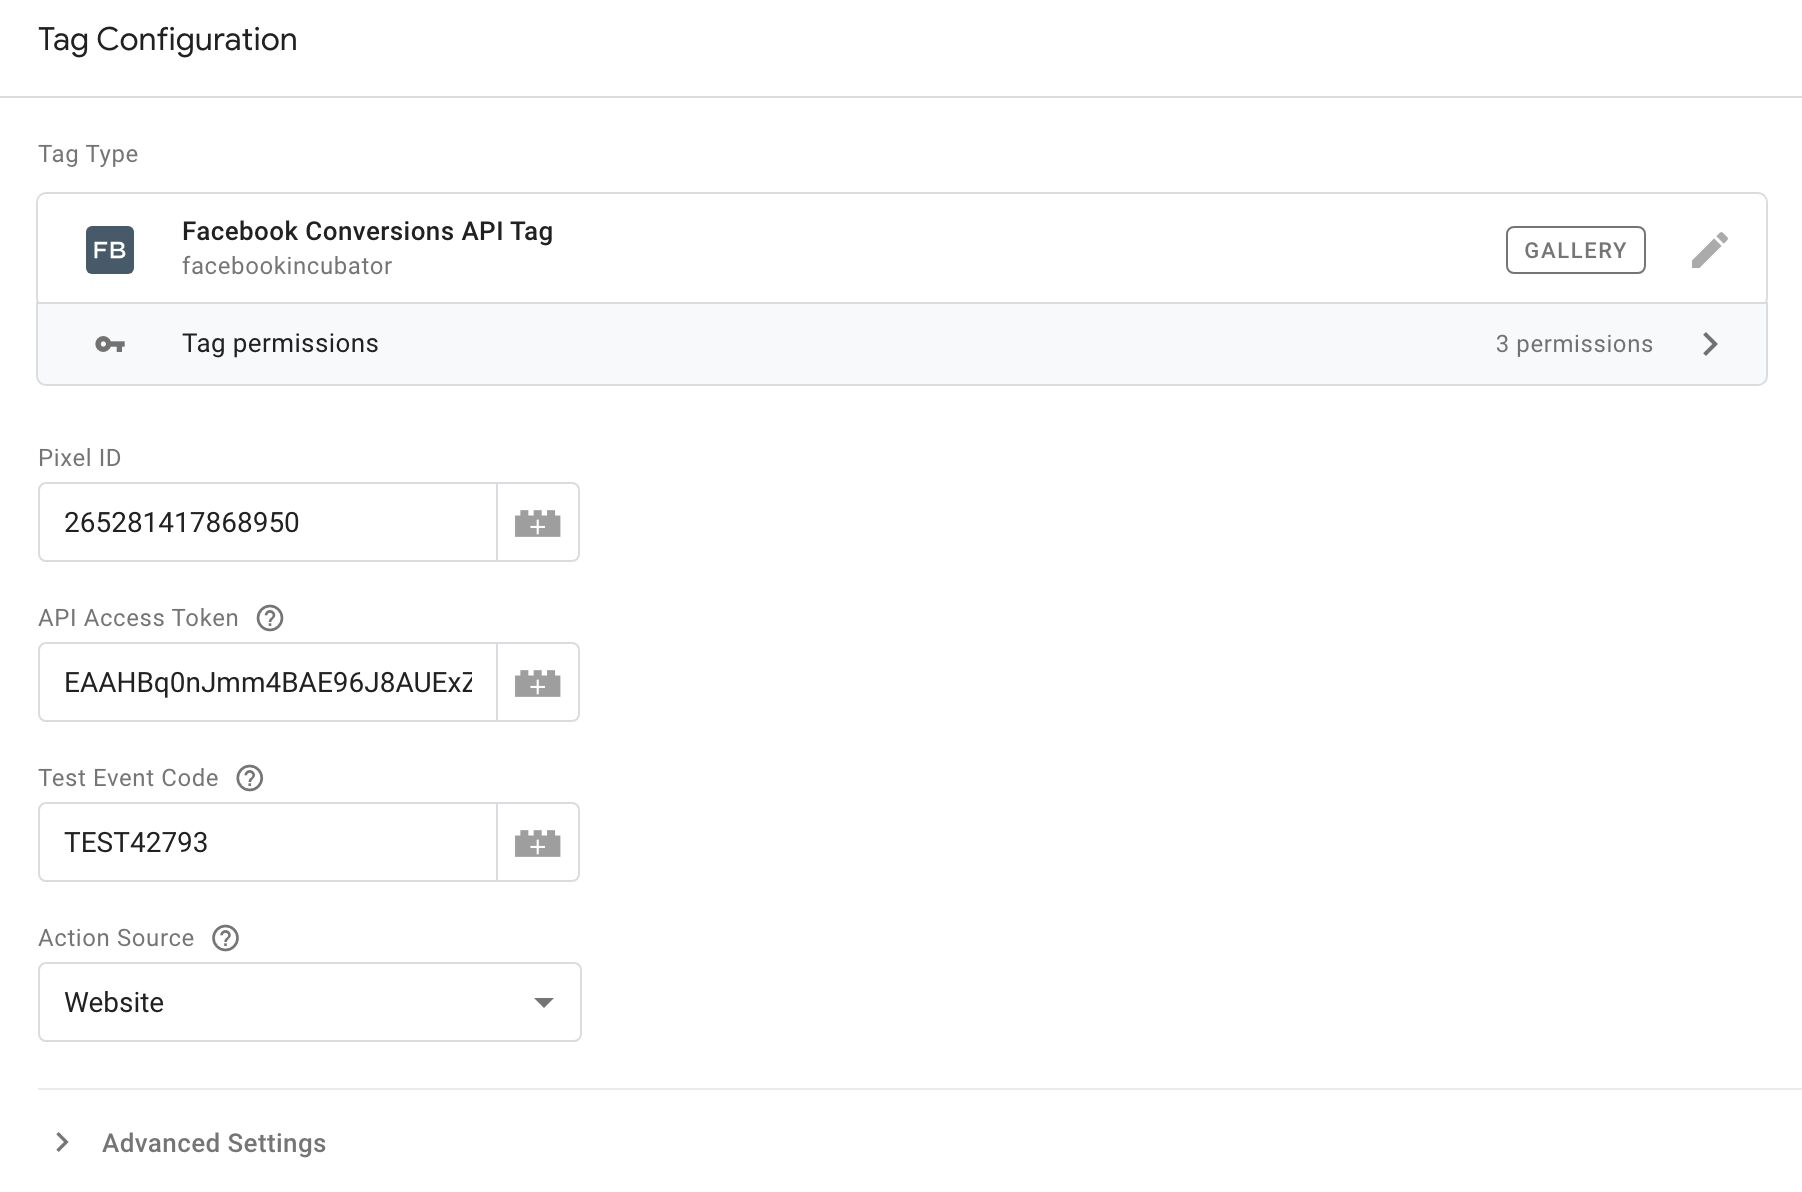
Choose the Facebook Conversions API Tag as the type.
To send data to the Conversions API, you will need the following information:
- The Pixel ID to which the data is sent.
- An API Access Token for interacting with the Conversions API.
- (Optionally) a Test Event Code with which to test the Conversions API without actually causing data to be collected against your pixel.
You can also set the Action Source explicitly here, if you wish.
For more information on how to get the required values, consult Facebook’s documentation.
Finally, you’ll want to trigger the tag when the GA4 Client fires.
Trigger when any GA4 request is received
The simplest way to work with the Facebook tag is to trigger it whenever any GA4 request is processed by the GA4 Client.
You’d need to create a new Custom trigger, where the condition is:
Client Name equals <your GA4 Client name>
For example, I’ve created a GA4 Client named GA4. Thus, my trigger looks like this:
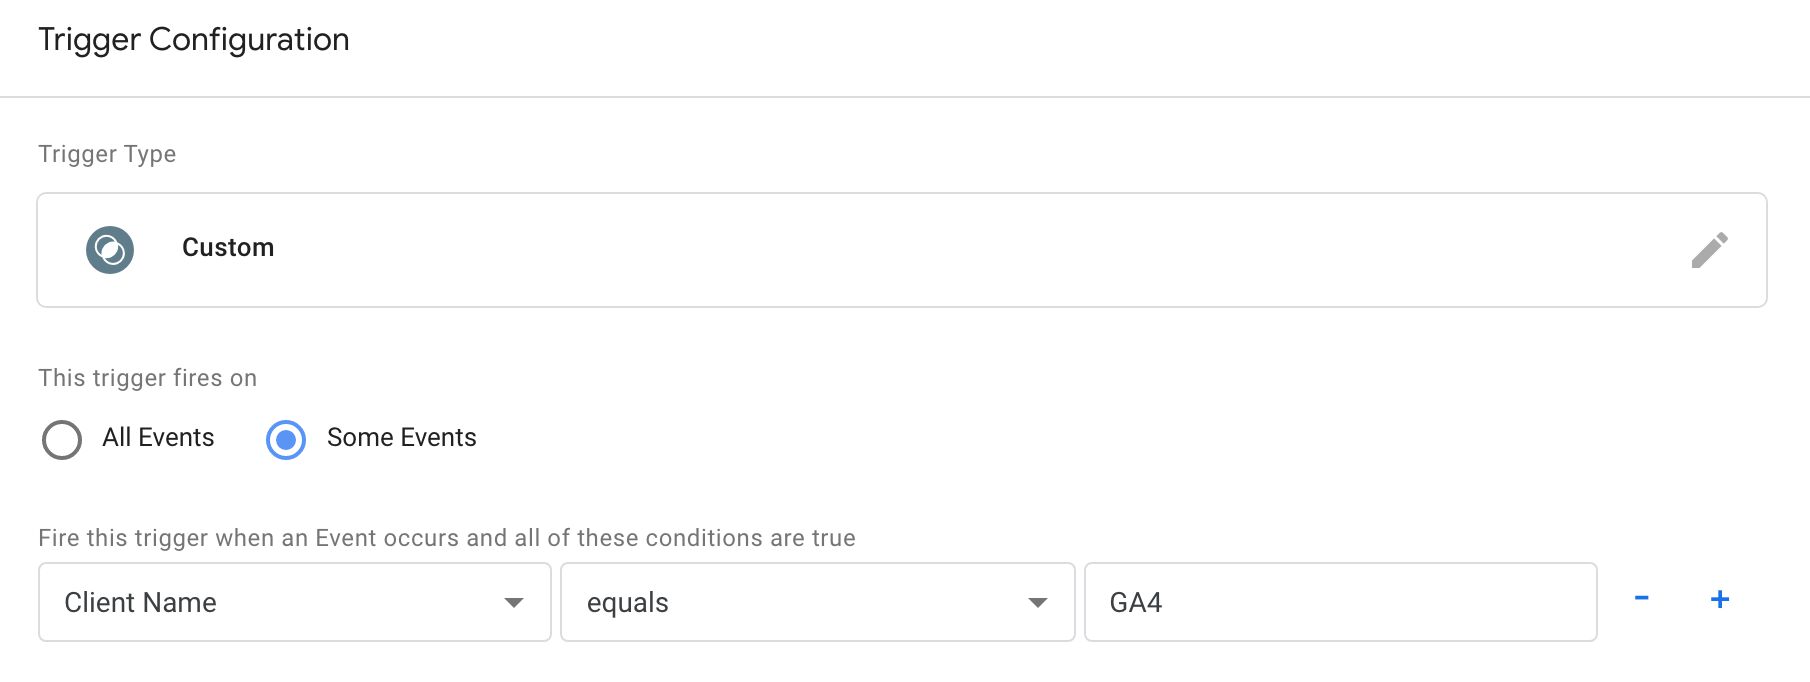
When you add this trigger to the Facebook tag, it will (try to) send data to Facebook when any GA4 event is retrieved.
Trigger conditionally
However, you might want to fire the tag only when some GA4 requests are received by the GA4 Client. For example, perhaps you only want to fire the tag when it has one of those Facebook-specific parameters included. Or perhaps you want to fire the tag only for a given event name.
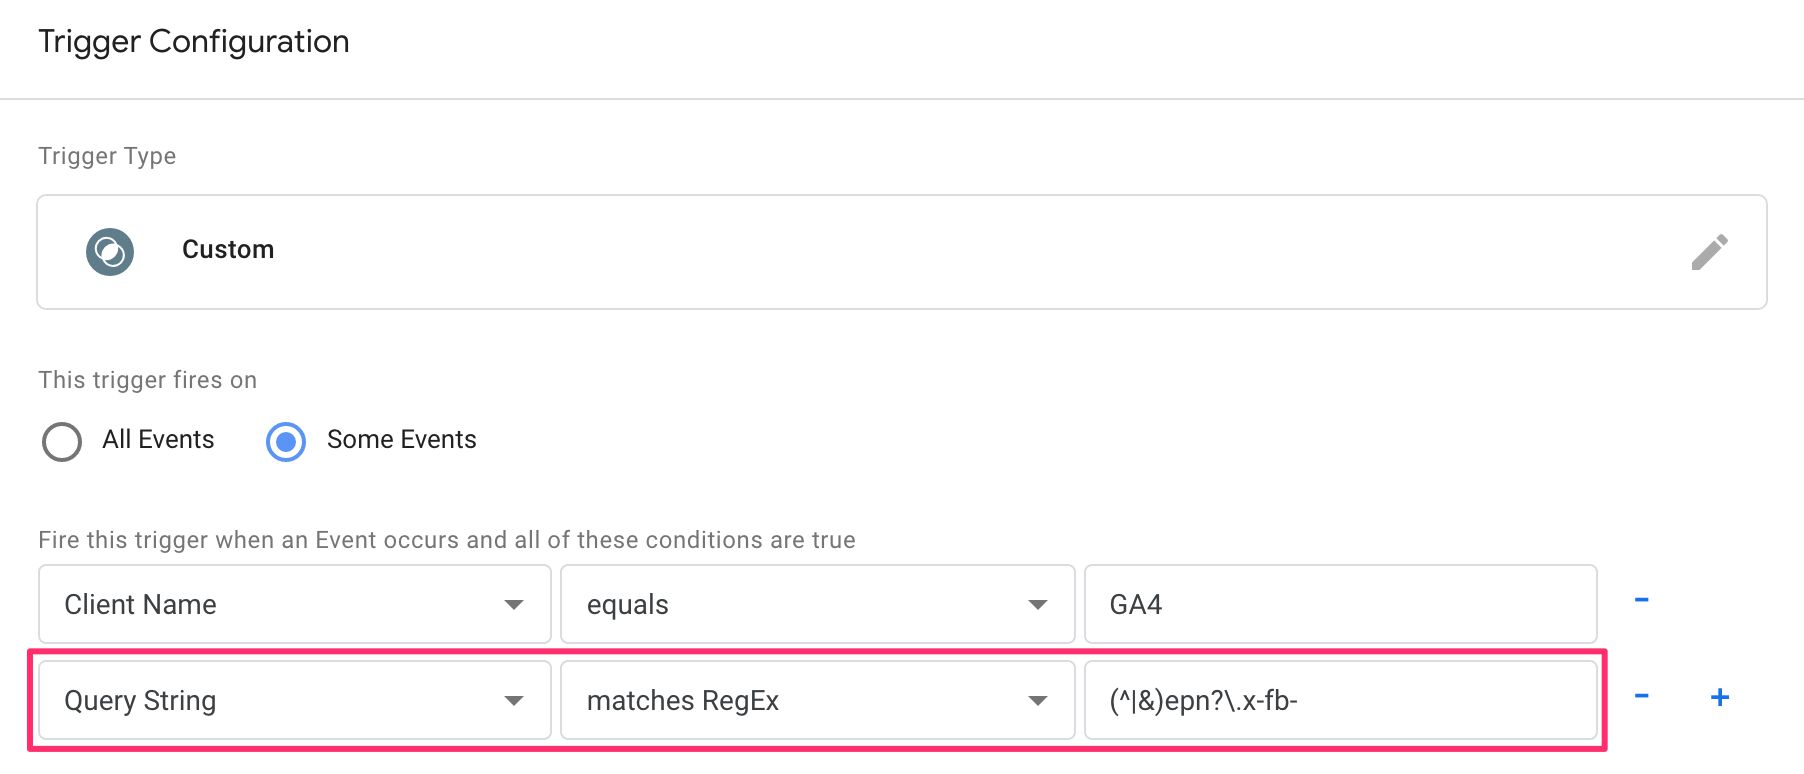
The trigger above will fire only when the GA4 Client receives a request and when the request’s query string has a query parameter that begins with either ep.x-fb- or epn.x-fb-. The first is for custom text parameters sent with the GA4 tag, and the second is for custom number parameters.
Query String is a built-in variable you can enable in the Variables section of the Server container.
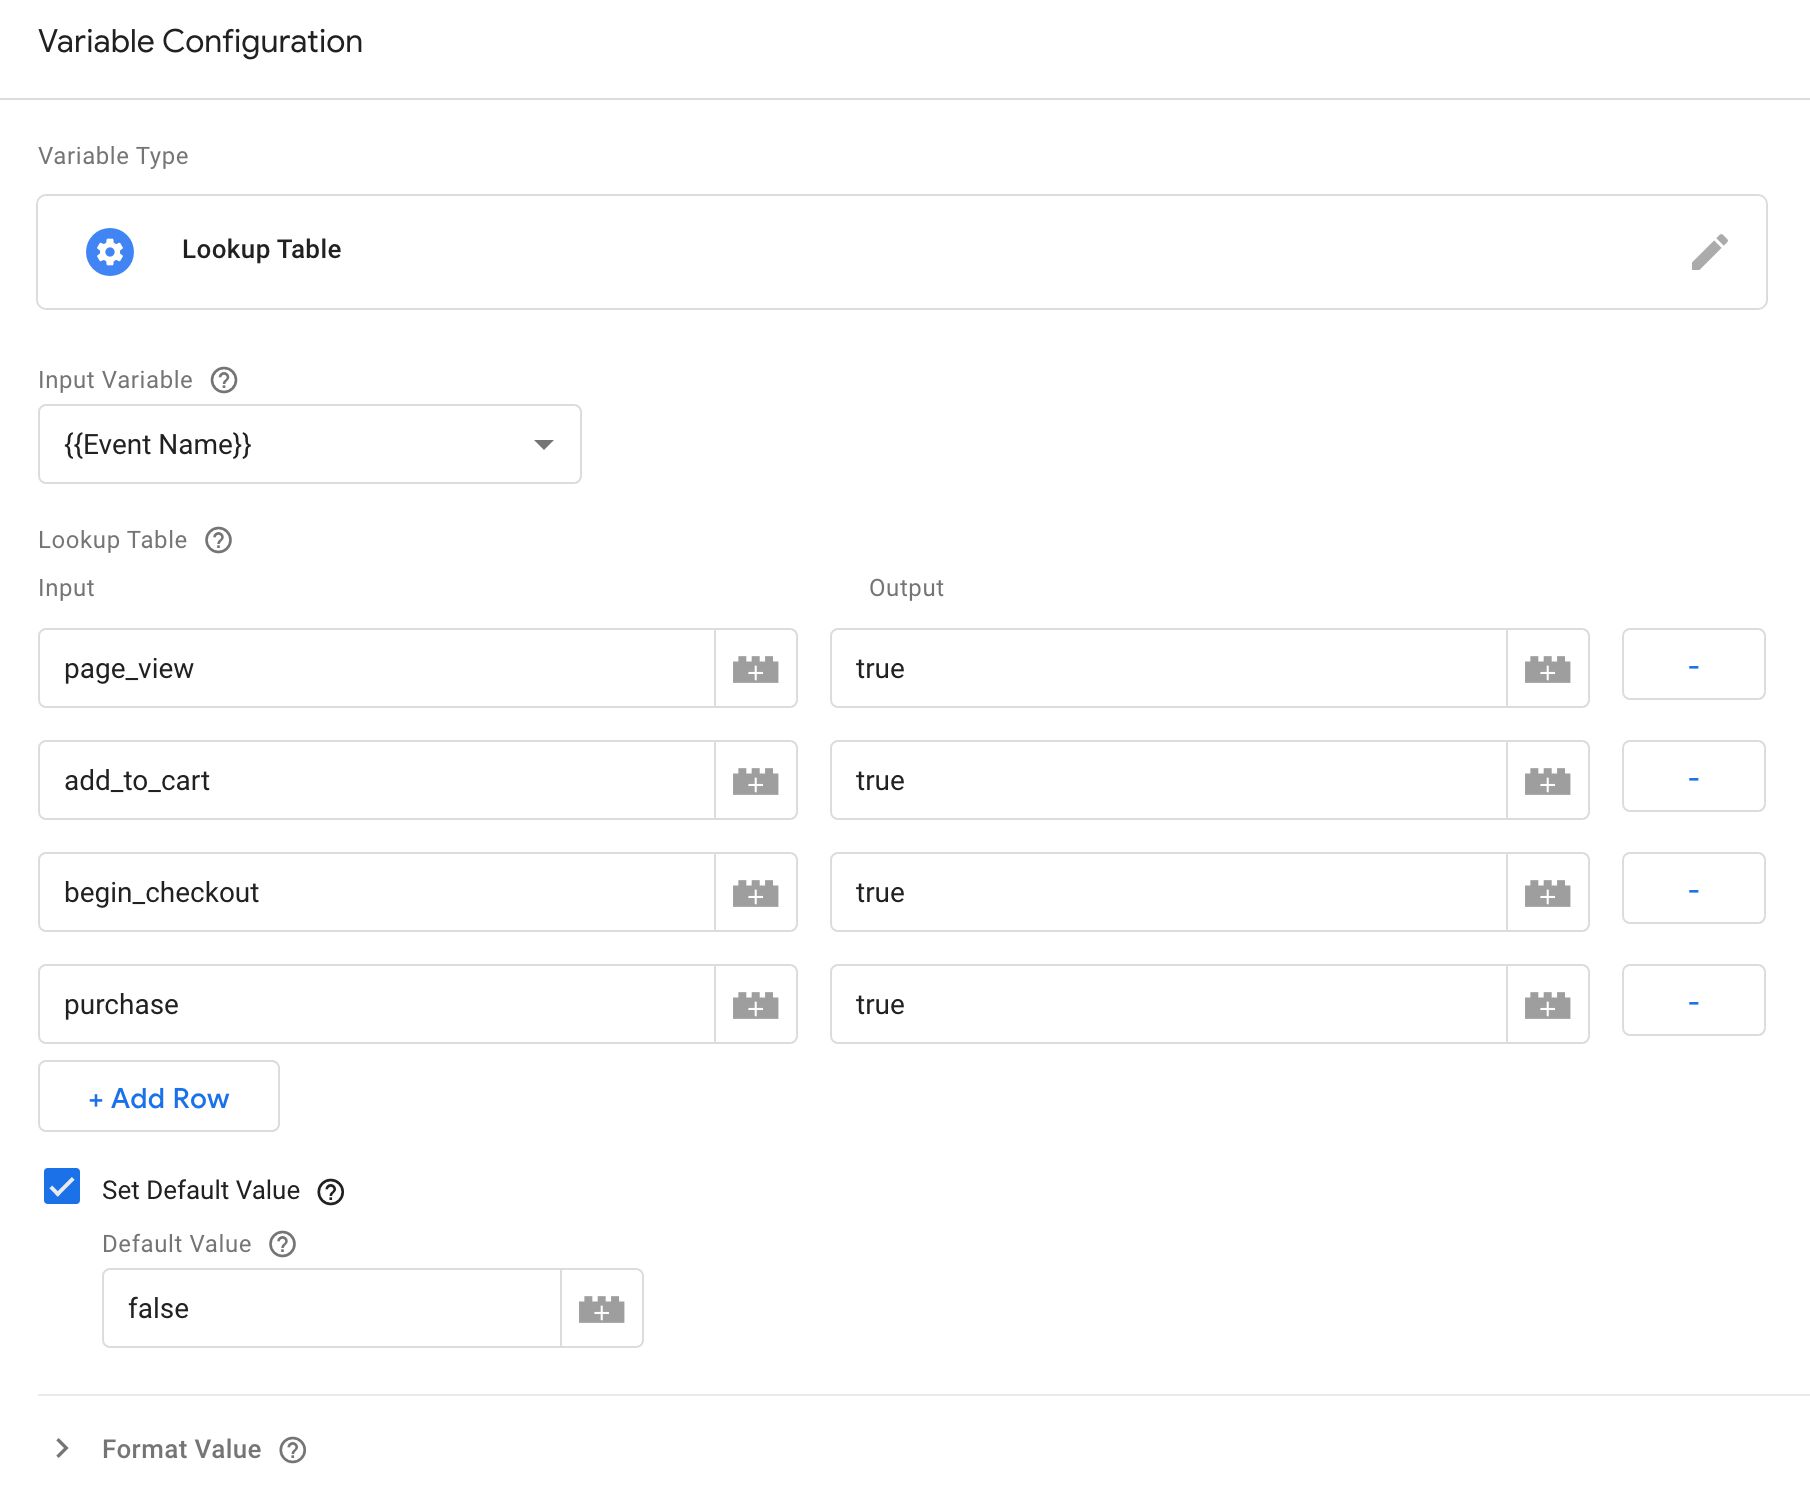
The Lookup Table variable above could be used to set the tag to fire for only a specific set of event names. In the Facebook tag’s trigger, you would add the condition that this Lookup Table variable needs to resolve to the true value for the tag to fire.
Note that the event names need to match those set in the GA4 web tag. So if you want a page_view GA4 web event to fire the Facebook server-side tag, you would need to add page_view to the list of allowed events.
There are many ways to tackle this, and you need to consider how and when you want Facebook to receive data from the Server container. There are similarly many ways to add Facebook-specific parameters to the GA4 web tag so that you can “flag” certain requests to be intended only for Facebook.
Modify any possible GA4 server-side tags
Because you’re adding all these new parameters to the GA4 web tag, it’s possible you don’t want to send them to GA4 as well. This is particularly true for all those x-fb- prefixed parameters.
First, calm yourself. The GA4 server-side tag will NOT send any User Data parameters, meaning those prefixed with user_data. So if you send an email address unhashed to your Server container as the user_data.email_address parameter (following this), those will not be processed by the server-side GA4 tag!
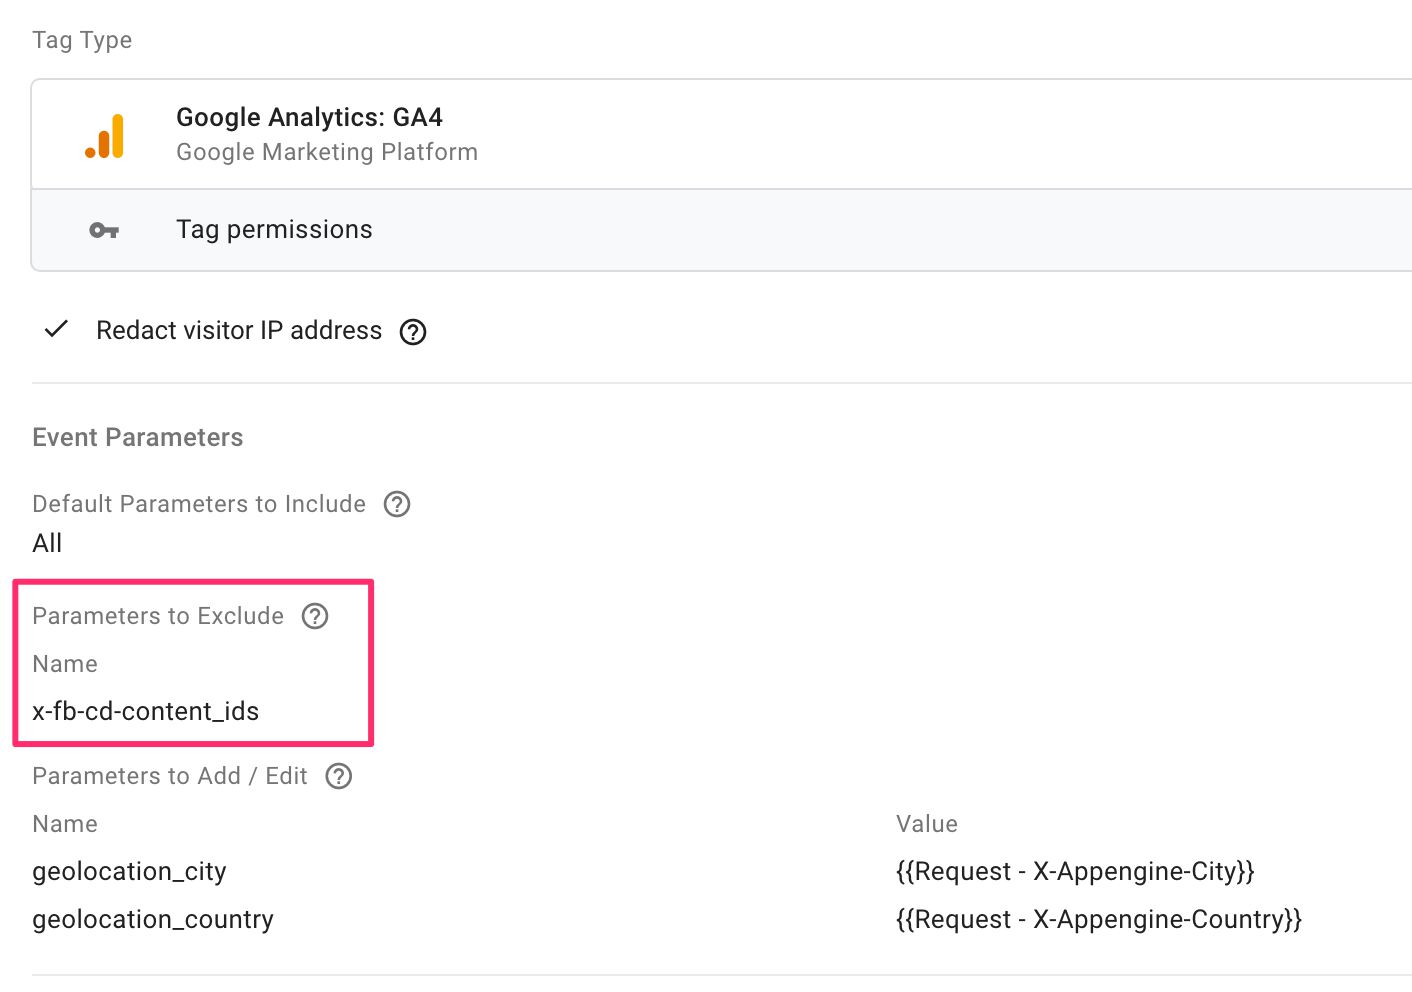
But for all the others, you’ll need to add the parameters you want to exclude into the respective setting of your GA4 server-side tag(s). For example, here I’m making sure that the x-fb-cd-ge (for Gender), x-fb-cd-db (for Date Of Birth), and x-fb-cd-content_type (for Content Type) are not sent to GA4:
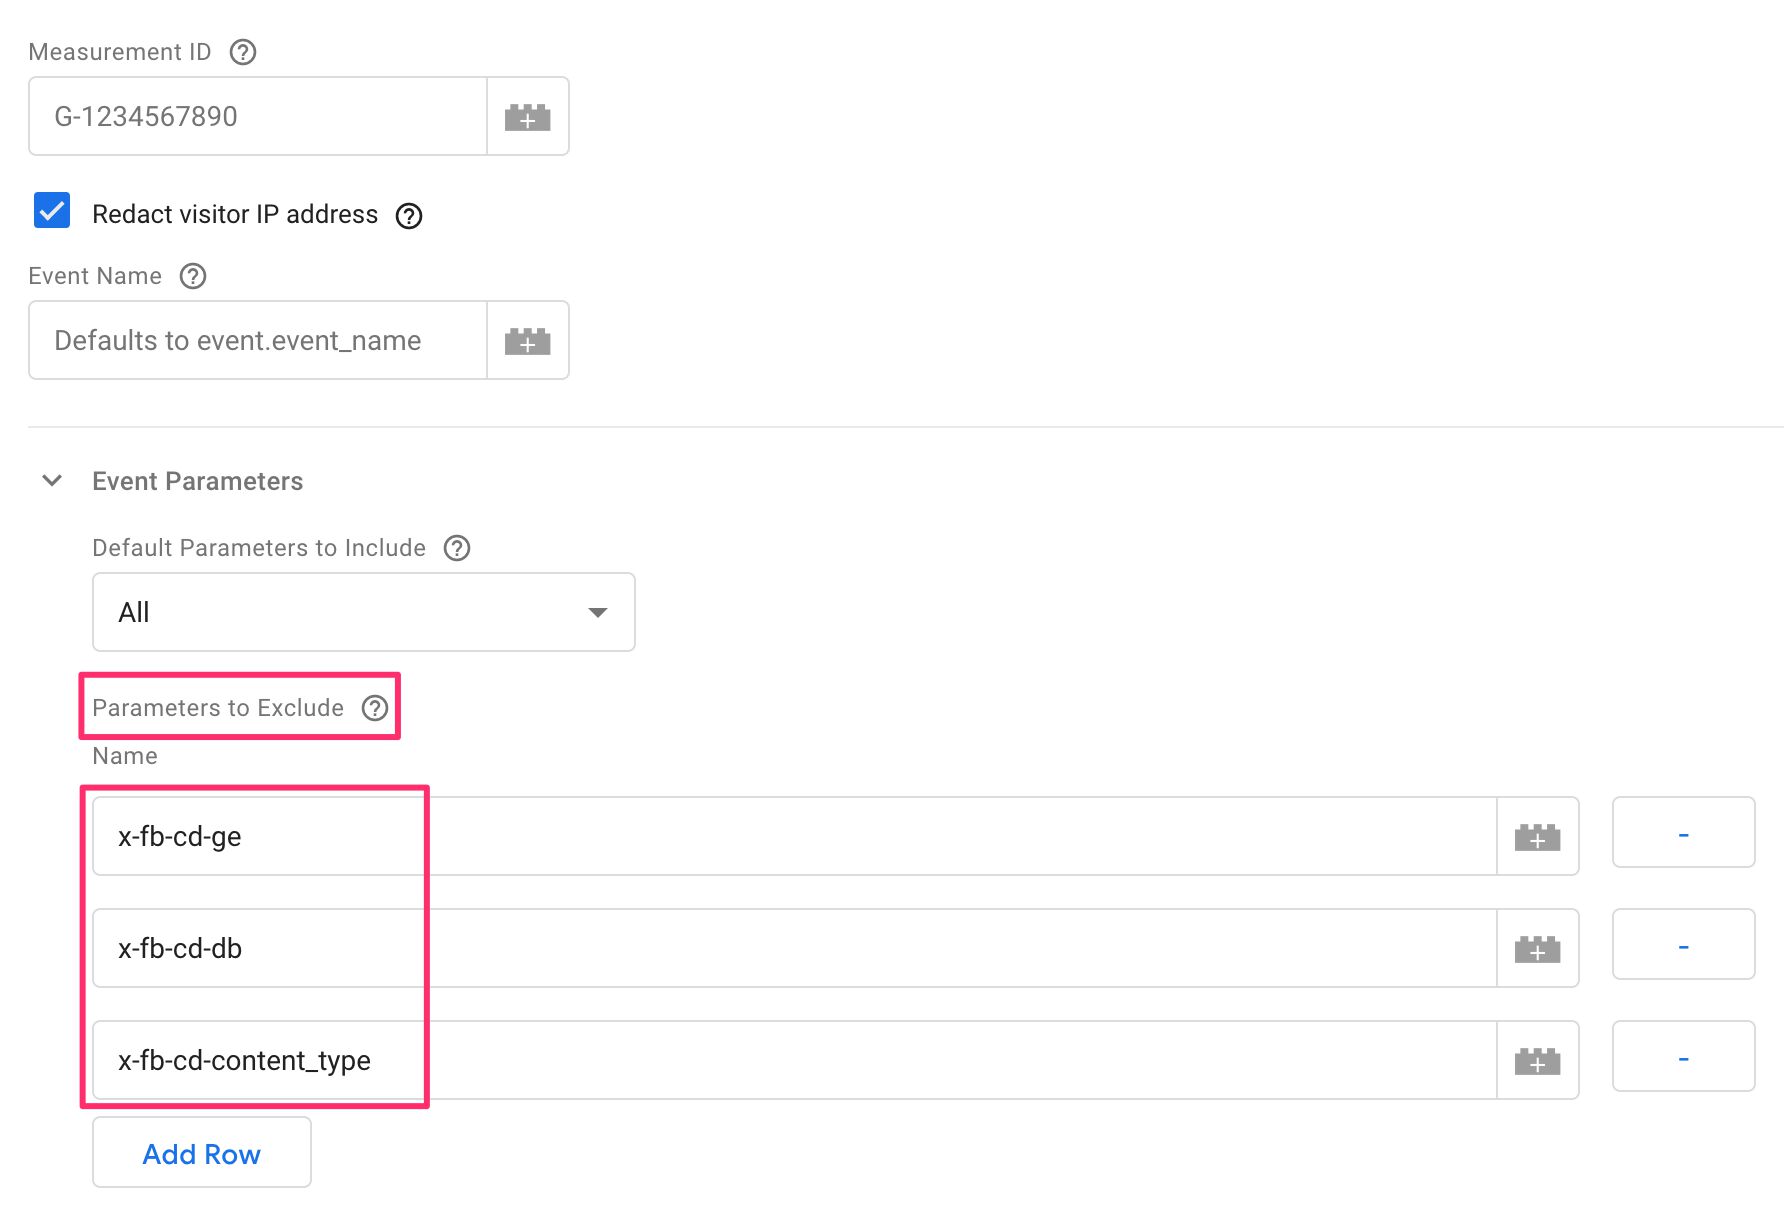
I wish there was a way to specify a regular expression match, for example, but for now you just need to explicitly list the parameters you want to exclude.
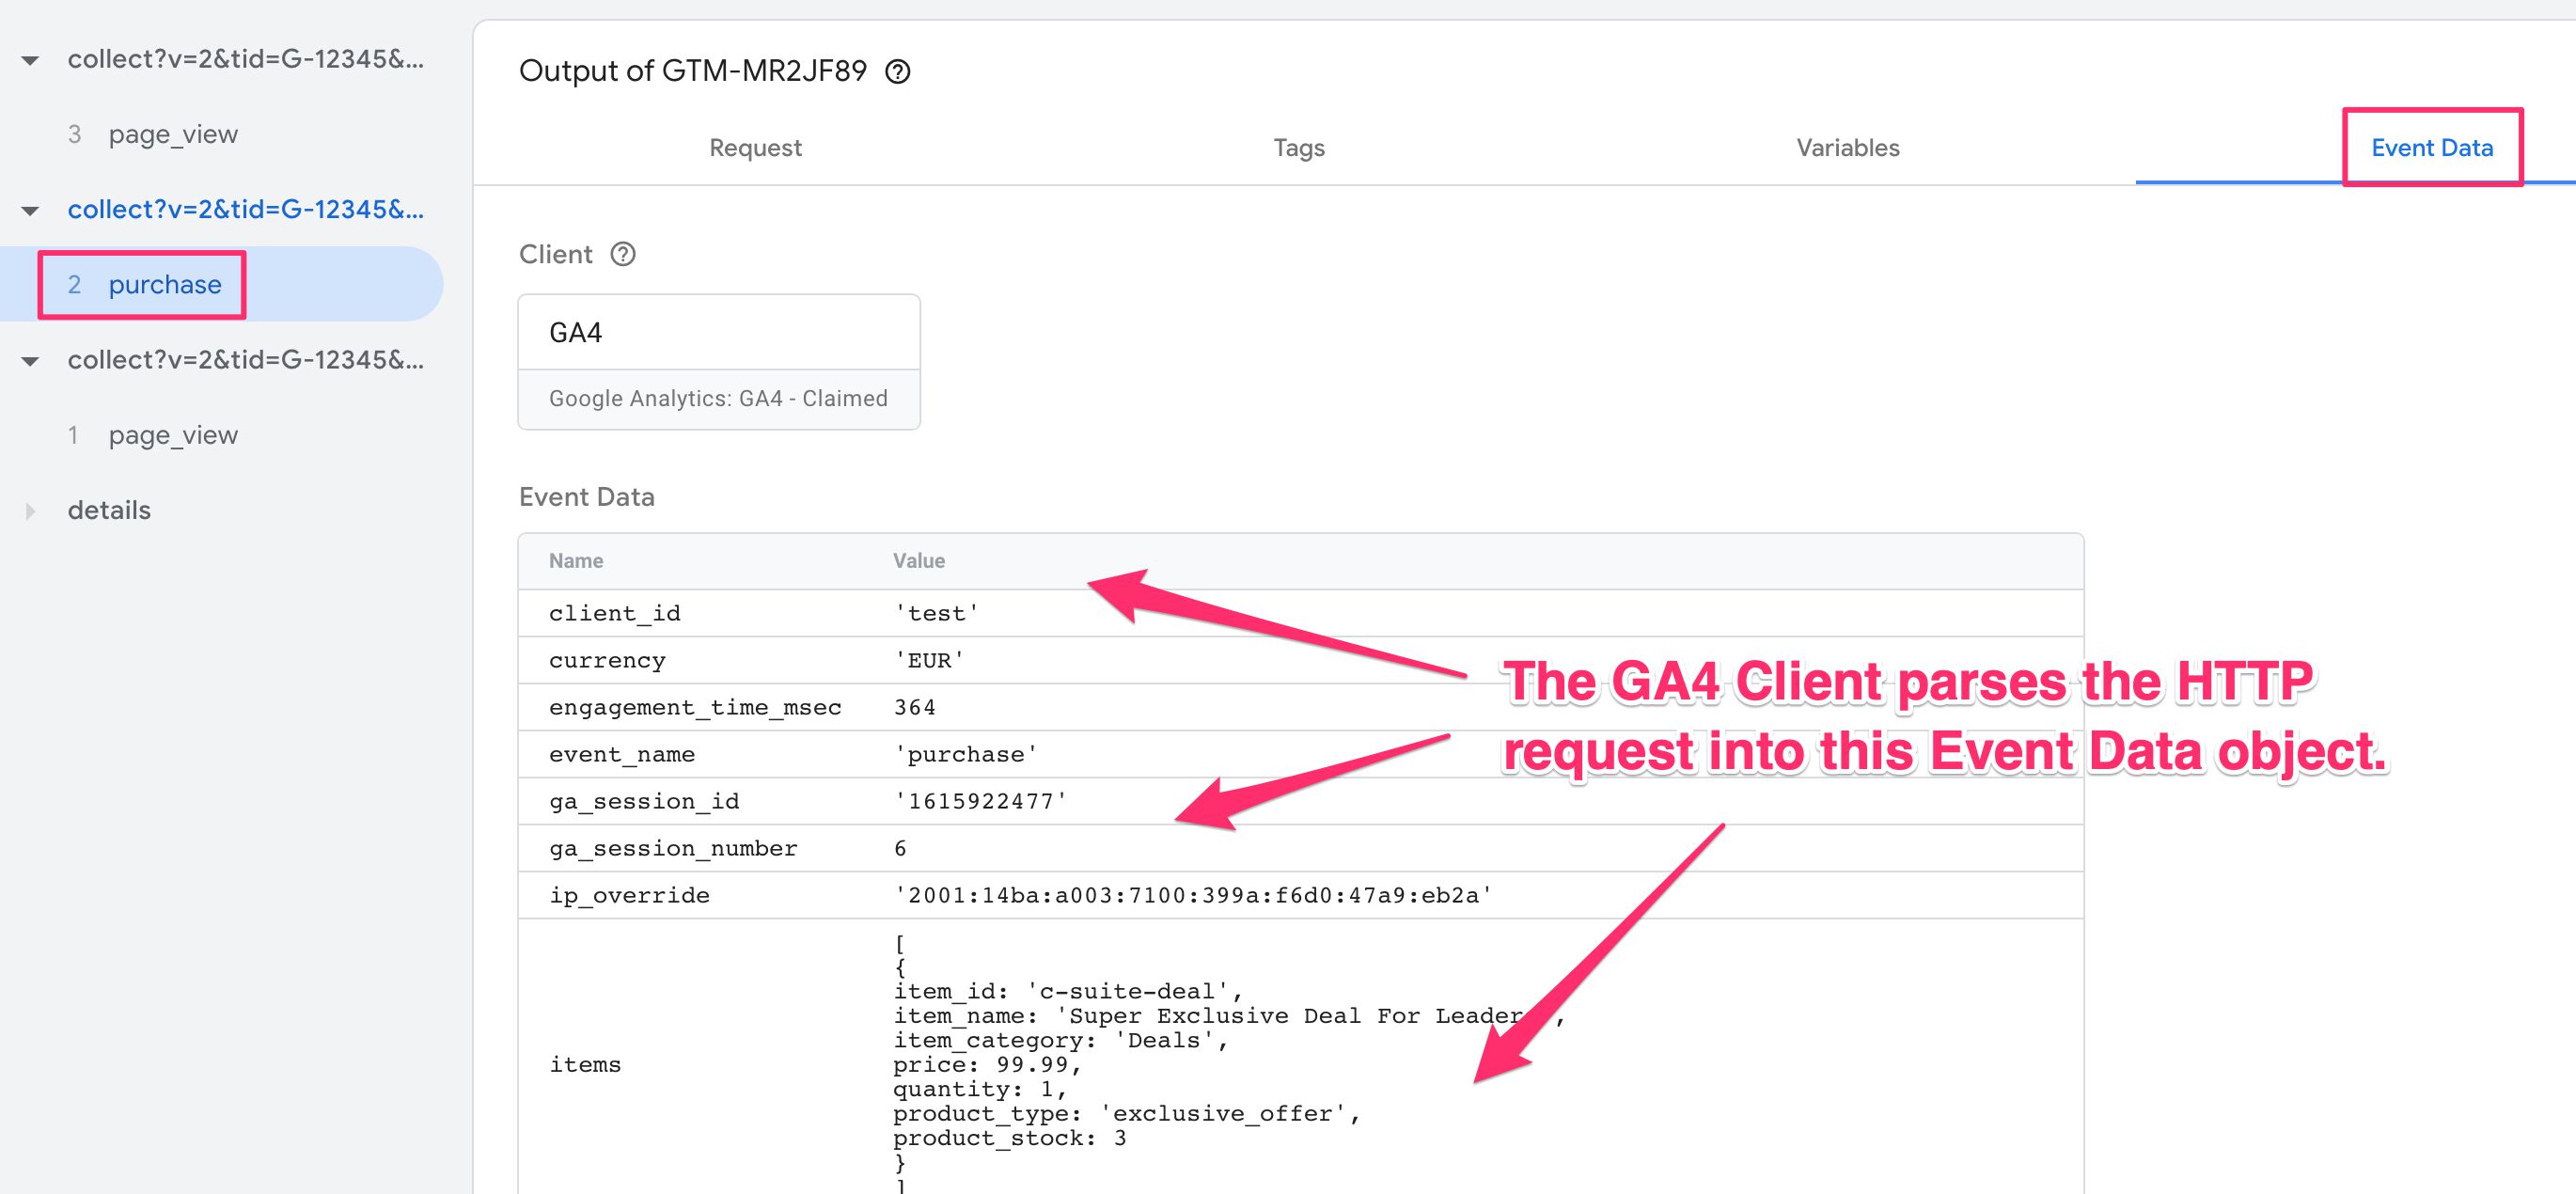
The best way to get a list of parameters that are processed by the GA4 Client is to take a look at the Server container’s Preview mode and specifically the Event Data tab for any given event that fires the GA4 tag.
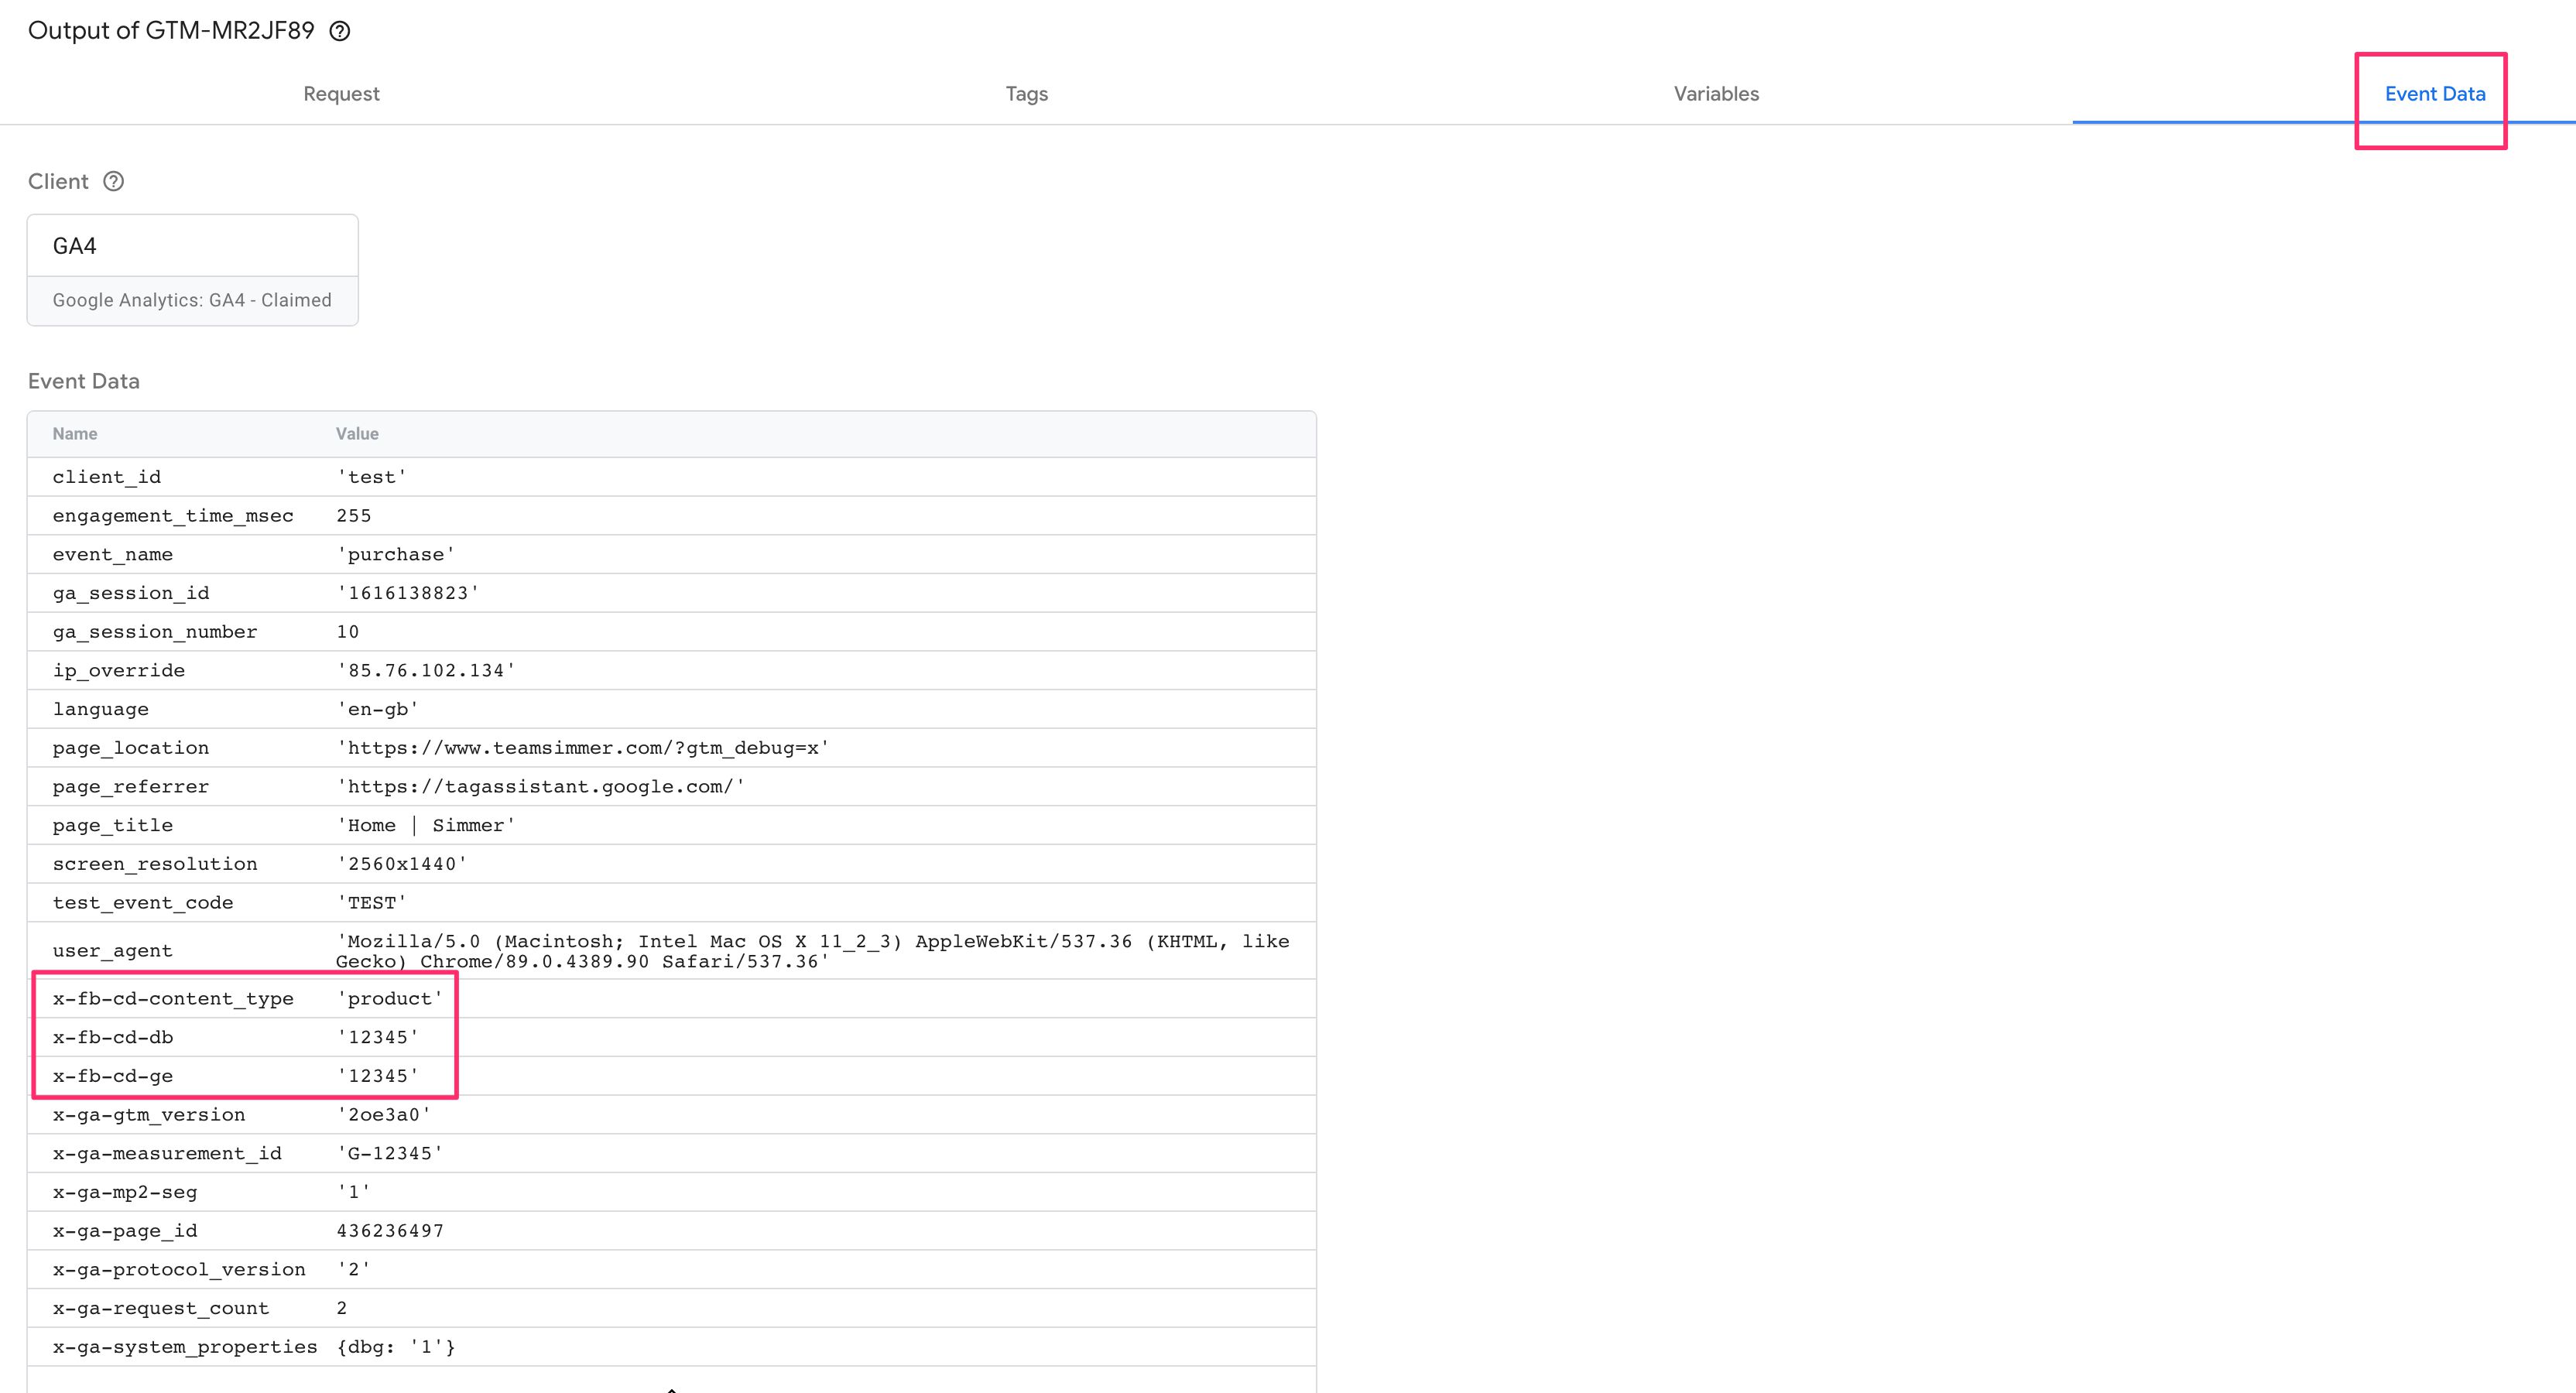
Here you can see how I have the three x-fb-... parameters generated by the GA4 Client, so I need to add those to the exclusion list in the GA4 server-side tag.
There’s one more Facebook-specific parameter in the screenshot above which I should probably also exclude. Can you spot which one it is?
Test the setup
Once you have the GA4 web tag configured, the GA4 server-side Client set up, the Facebook server-side tag ready to go, and the GA4 server-side tag updated, you’re ready to test everything.
Take both the Server container and the web container to Preview mode, and do something that causes a GA4 event designed for Facebook’s data collection to fire in the web container.
In the web container’s preview mode, you should see a GA4 request to the Server container. To see this, make sure you have the GA4 Measurement ID selected in the Preview filters rather than the GTM container ID (see how it’s done in the screenshot below).
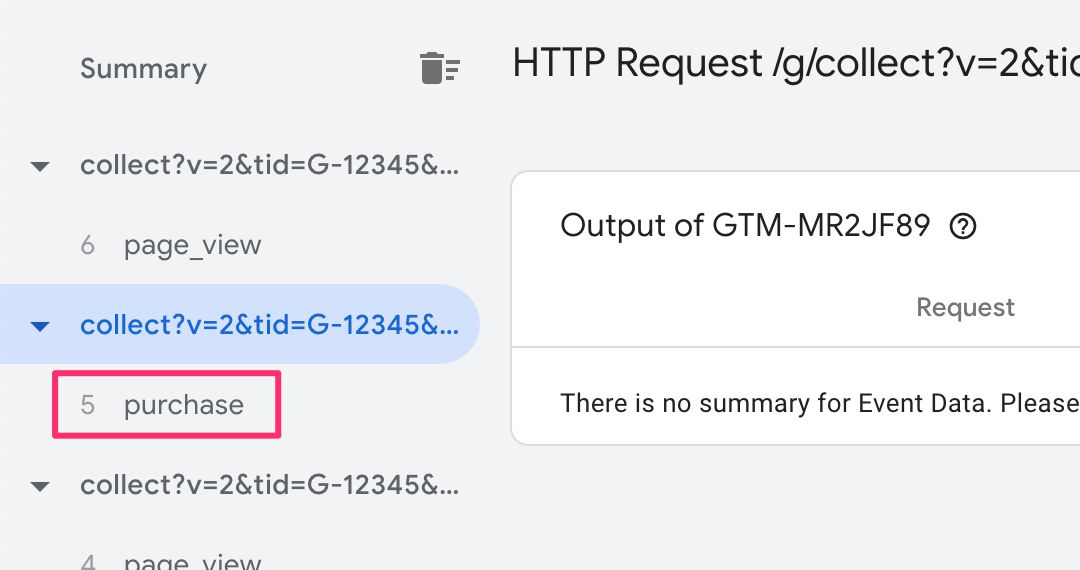
In the Server container’s preview mode, you should see an incoming HTTP request, where the Event Name you configured in the GA4 web tag is shown beneath the request.
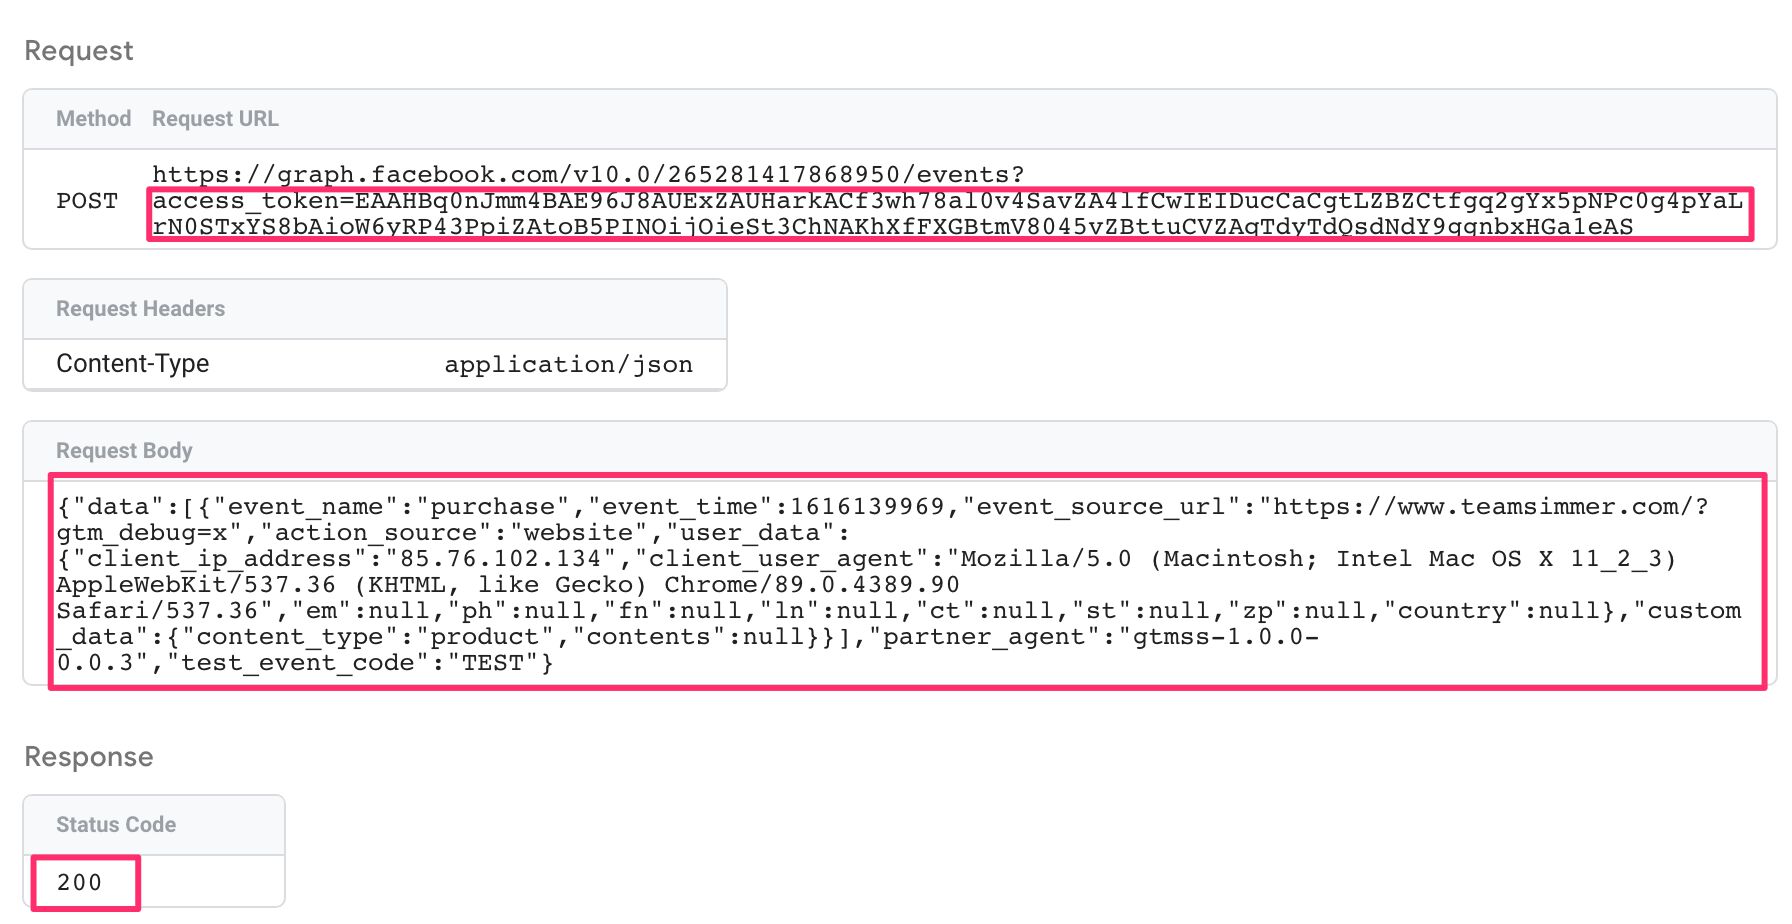
When you select the request, you should see an outgoing request to Facebook (and possibly to GA4 as well):
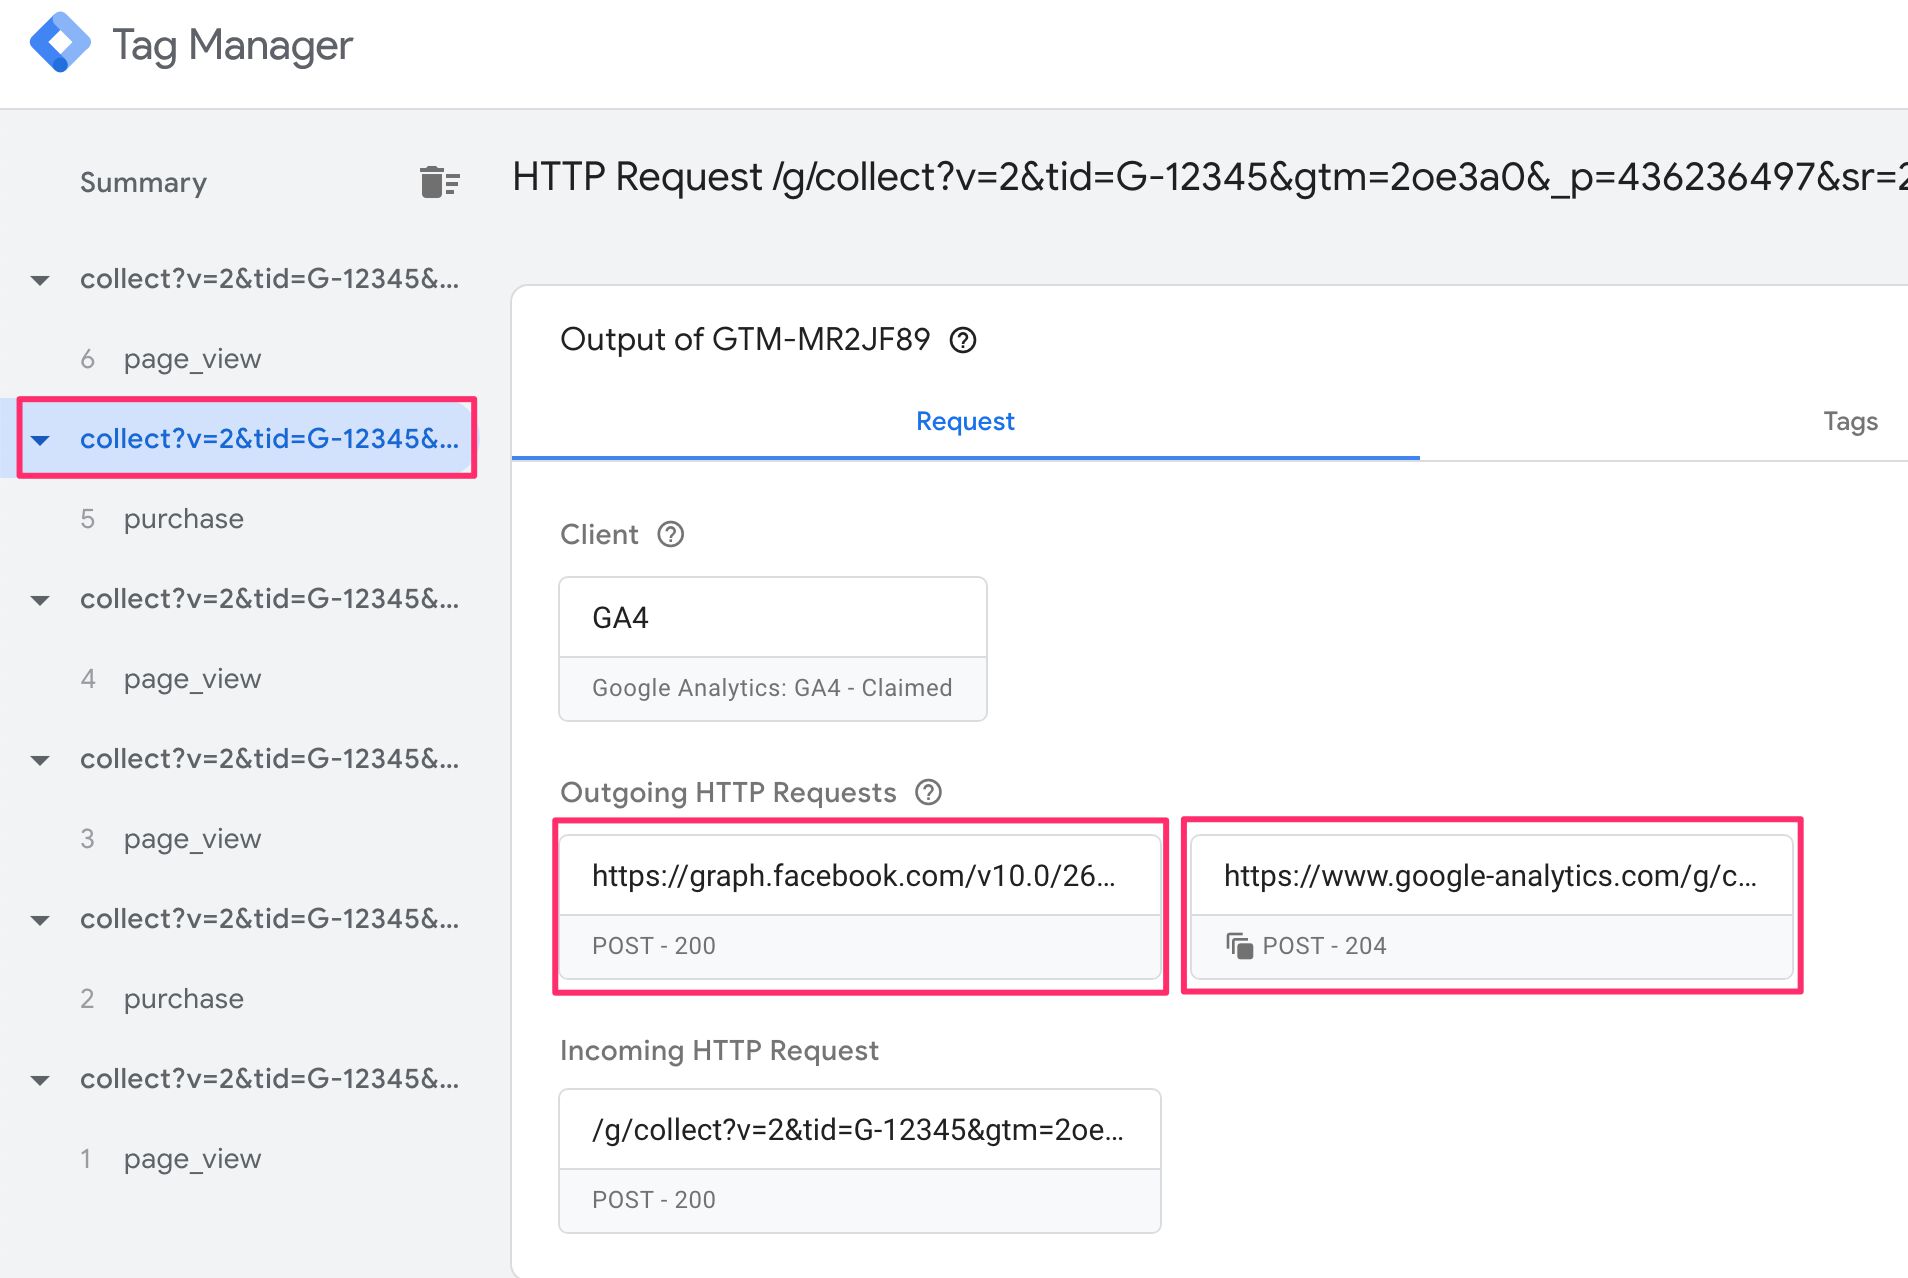
When you select the Facebook request, you should see the correct access token in the URL, a nicely formed request body with all the parameters you included (user data parameters being hashed), and finally a status code of 200 to indicate a successful request.
You should also check the outgoing request to GA4 to make sure all the parameters you wanted to exclude are, indeed, excluded.
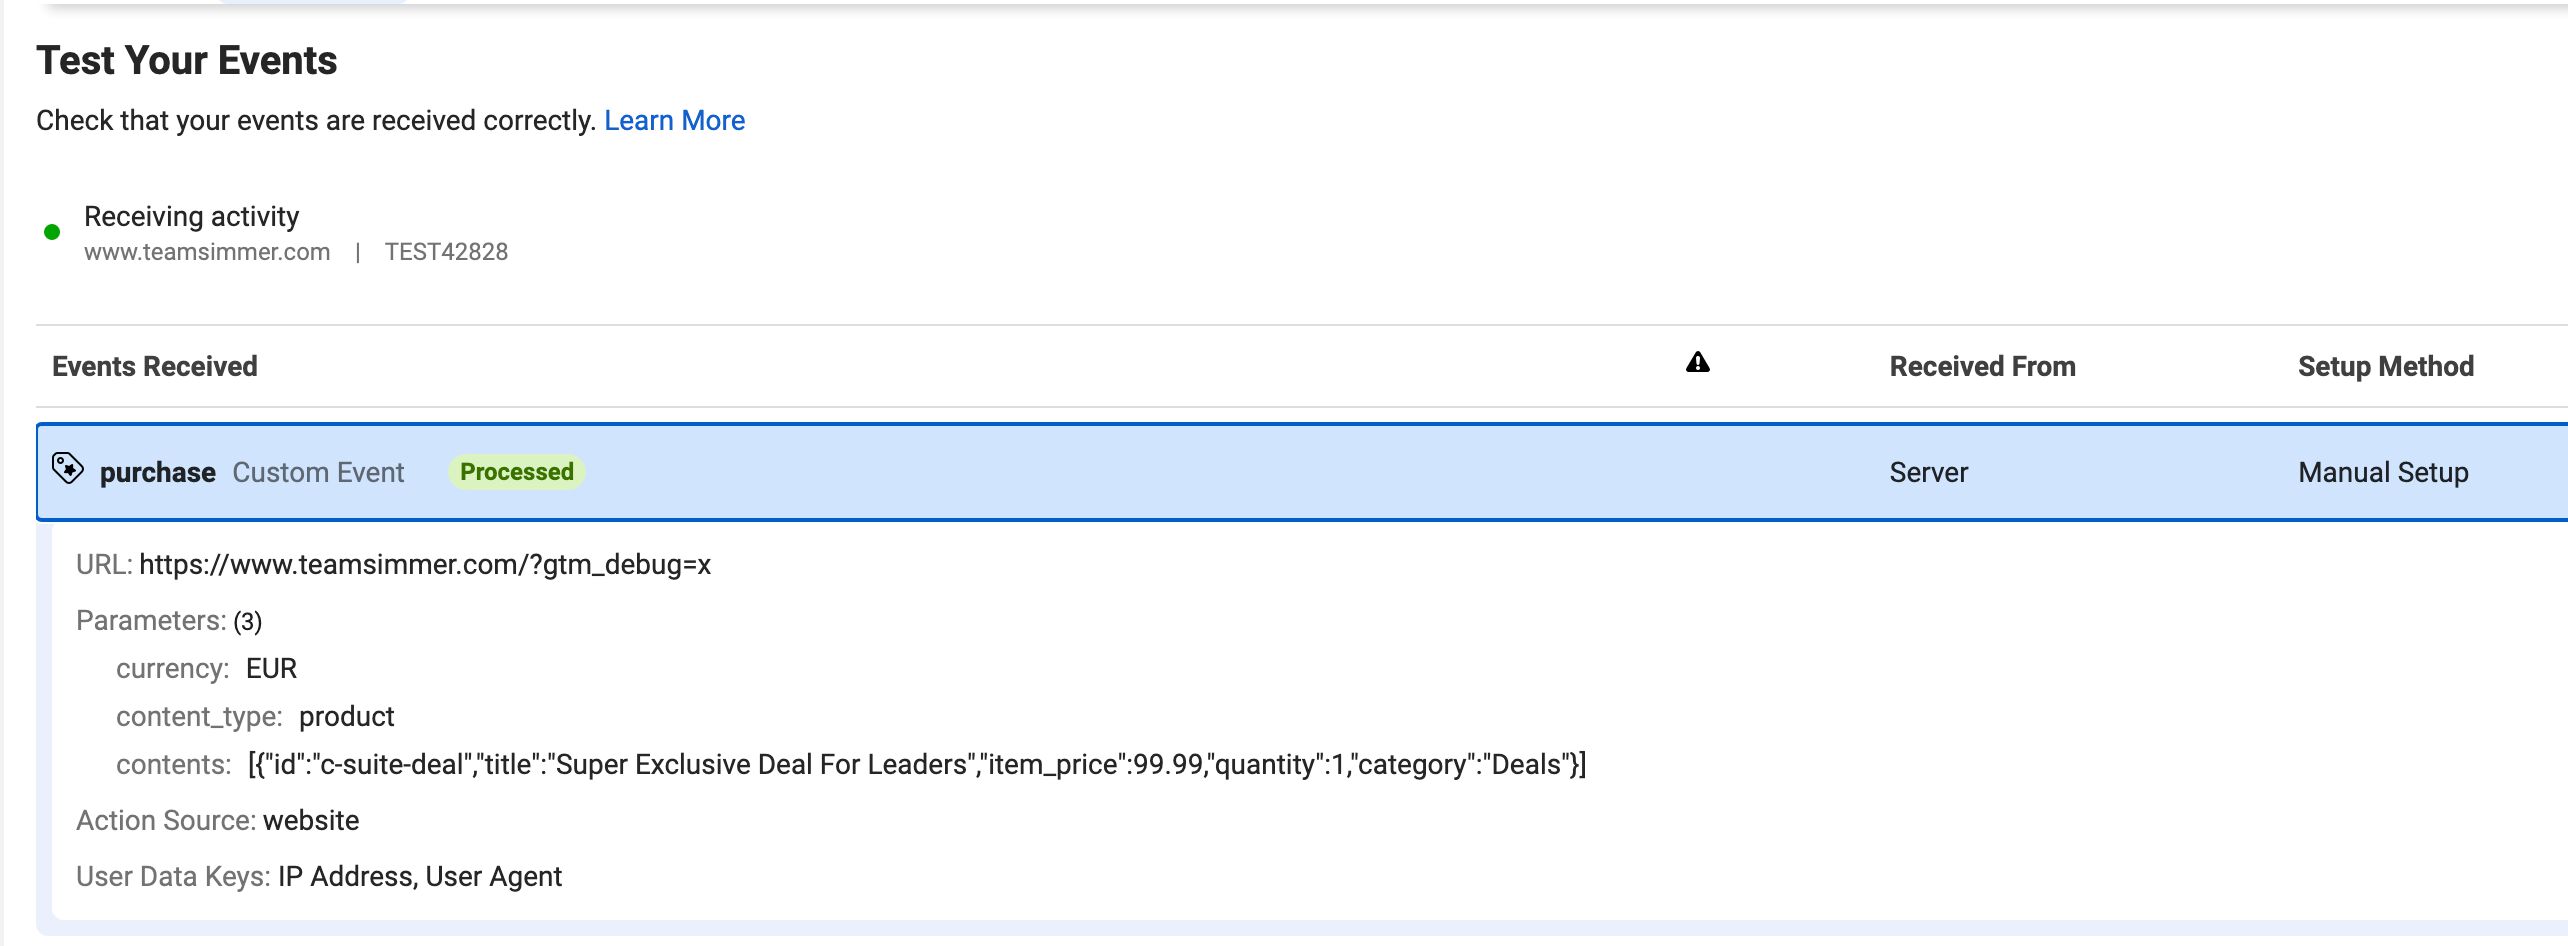
Finally, in Facebook you should see your event come in to the test event tool (assuming you were using the Test Event Code).
If it doesn’t work, be sure to check for possible error responses from Facebook by opening the request details in the Server container’s Preview mode.
Summary
Setting up Facebook data collection using a GA4 data stream from the web to the Server container has its perks.
The biggest one, by far, is that you won’t be loading any Facebook JavaScript in the browser. This alone should make this convoluted data collection scheme worth the effort to set it up.
You’ll also be able to build a consolidated data collection model where redundancy is minimized. After all, the semantic content of conversion data whether to Facebook or to GA4 is always roughly the same – the keys and labels just have different names.
It’s still a fairly new and rough solution, though. For one, the Facebook server-side tag does not currently write the _fbc and _fbp cookies, so if you are not running Facebook JavaScript in the browser, it’s possible these identifiers are lost. I’ve submitted an issue about this to Facebook’s GitHub project, so hopefully it will be sorted out at some point.
It’s also a bit of a chore to first allowlist the parameters for Facebook and then to blocklist them in GA4. But that’s unavoidable for now. Perhaps at some point the Server container will give more tools for building parameter maps between Clients and tags, rather than having to add them one-by-one into all the tags separately.
I hope you enjoyed this article. Once Facebook releases a way to leverage the Facebook web pixel to send data to the Server container, I will follow-up with another guide about this method, too. But personally I’m a huge fan of piggy-backing off the GA4 tag due to the perks listed at the beginning of this chapter.
What do you think about Facebook’s entry into the Google Tag Manager Server container? What features are you missing?
