Deploy Server-side Google Tag Manager In AWS
Since Google Tag Manager released the manual setup guide for server-side tagging, my mind has been spinning with the idea of walking through the deployment into Amazon’s AWS.
I personally prefer Google Cloud Platform over AWS, because I think it’s so much more user-friendly. Even though in this guide we’ll be utilizing one of the simplest AWS services, Elastic Beanstalk, the deployment is still much more complex than if you were to use GCP’s App Engine.
In this guide, I’ll show you how to deploy the server-side tagging application into AWS.
It won’t be a complete approach, as I won’t go into the weeds of showing you how to add the credentials to get the BigQuery API to work (there’s going to be other guides for this).
We’ll use Elastic Beanstalk, which is the closest analogy to Google App Engine that AWS has to offer. It’s a very simple, almost turnkey way of deploying web applications, and it’s perfect for our needs. If you want to get down and dirty with the setup, you can use the Elastic Container Service, but we will not be covering ECS in this guide.
You’ll be able to do everything through the AWS console, so there’s no need to install any new software on your computer.
Thank you to Google’s Andrew Lee for helping me out with some of the particulars in the manual setup.
Table of Contents
This will not be an AWS guide. I’m only going to show you how to get things running, and hopefully you’ll understand how the server container application works. But tweaking the instances and making it work in your overall AWS infrastructure is up to you.
XThe Simmer Newsletter
Subscribe to the Simmer newsletter to get the latest news and content from Simo Ahava into your email inbox!
What you will need
If you don’t already have an AWS account, go ahead and create one. You’ll need to provide a credit card for billing as well.
Once you’ve created the account (or signed in), make sure you select a region you want to work in. All the services you enable should run within the same region for the purposes of this exercise. If you are unsure which region to select, choose one that is geographically closest to you.
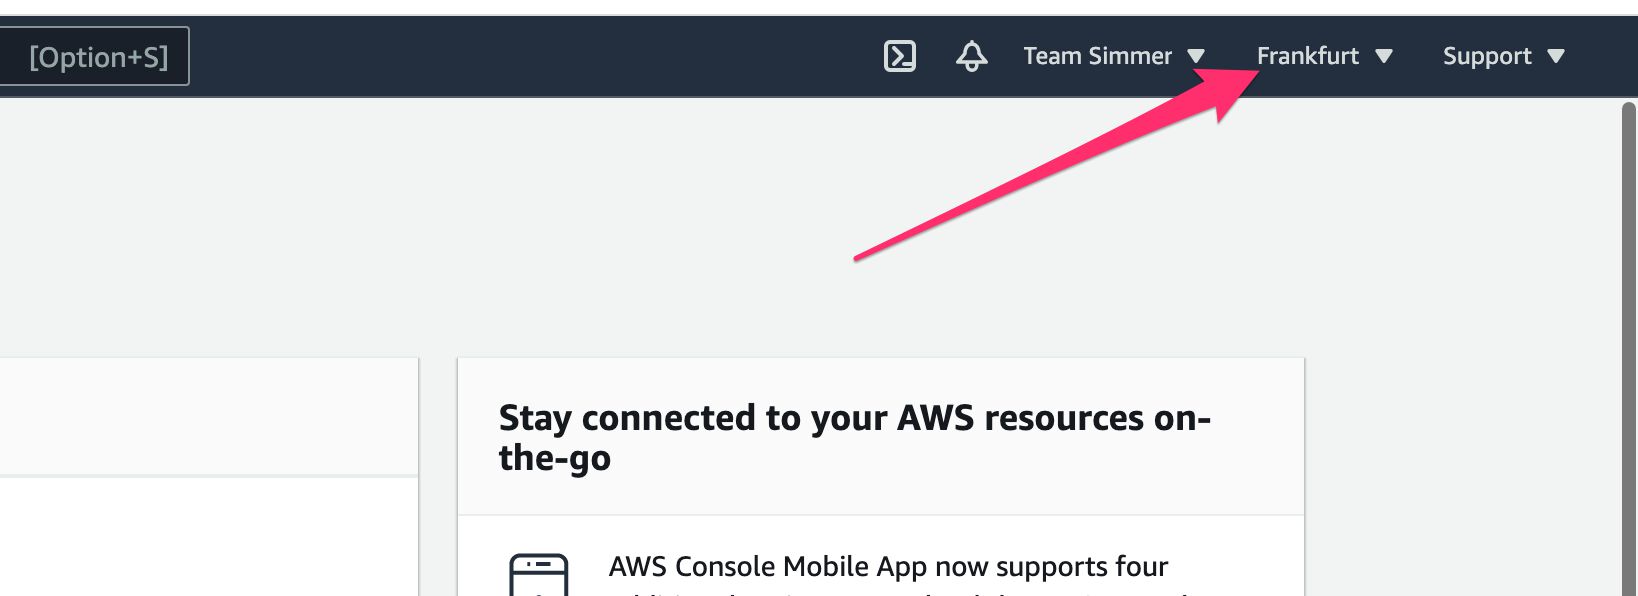 I'm working in the eu-central-1 region (Frankfurt)
The final mandatory thing you’ll need is access to a custom domain and the rights to modify its DNS records. In this exercise, you’ll be mapping two domains:
- The main tagging server domain (e.g.
tagging.domain.com) - The preview server domain, which should be a subdomain of the main tagging server domain (e.g.
debug.tagging.domain.com)
Important! If you don’t know how to update DNS records, work with someone who does. Also, make sure you are working with a domain namespace that is not being used for something else. In the example above, I might be using
domain.comfor my main site, so that’s why I’ve reserved thetagging.domain.comfor my tagging server. The tagging server and the website sending data to the tagging server should share the main (naked) domain name, though.
Unlike with GCP App Engine, it’s not possible to setup the server container application without HTTPS-protected custom domains.
The outline
You are going to create an Elastic Beanstalk application, which runs on two environments. One environment will be for your auto-scaling tagging server, and one for your single-instance preview server.
Both environments are created with a Docker container image provided by Google. This Docker container is configured with some environment variables – mainly the link to your actual Google Tag Manager container and details about the preview server setup.
Once everything is done, your tagging server will be able to process incoming HTTP requests just like a regular Google Tag Manager server container. Requests sent while in preview mode will be automatically processed by the preview server (this logic is handled by the servers themselves – you don’t have to write any routing rules).
The actual steps we’ll take are:
- Create the SSL certificates for the domains you’ll need using Certificate Manager (you’ll need to make DNS changes)
- Create a hosted zone for the custom domains using Route53 (you’ll need to make DNS changes)
- Create the Elastic Beanstalk application
- Create the environment for the preview server
- Map a custom domain to the preview server
- Create the environment for the tagging server
- Map a custom domain to the tagging server
- Finish up with some configuring
Yes, it’s a lot to cover, and yes, it’s somewhat complicated. However, the steps to create the two servers are almost identical. Once you actually start working through the process, it should all make some sense.
1. Create the SSL certificates
The first thing you’ll need to do is request an SSL certificate from Amazon so that the traffic to both your tagging server and your preview server will be behind HTTPS.
While this is optional (but highly recommended) for the tagging server, it’s required for the preview server. If the preview server is not behind HTTPS, the deployment will not work.
Unlike App Engine, the default URL provided by Elastic Beanstalk can not be protected by HTTPS, which is why we need to map the custom domains before we can even test our setup properly.
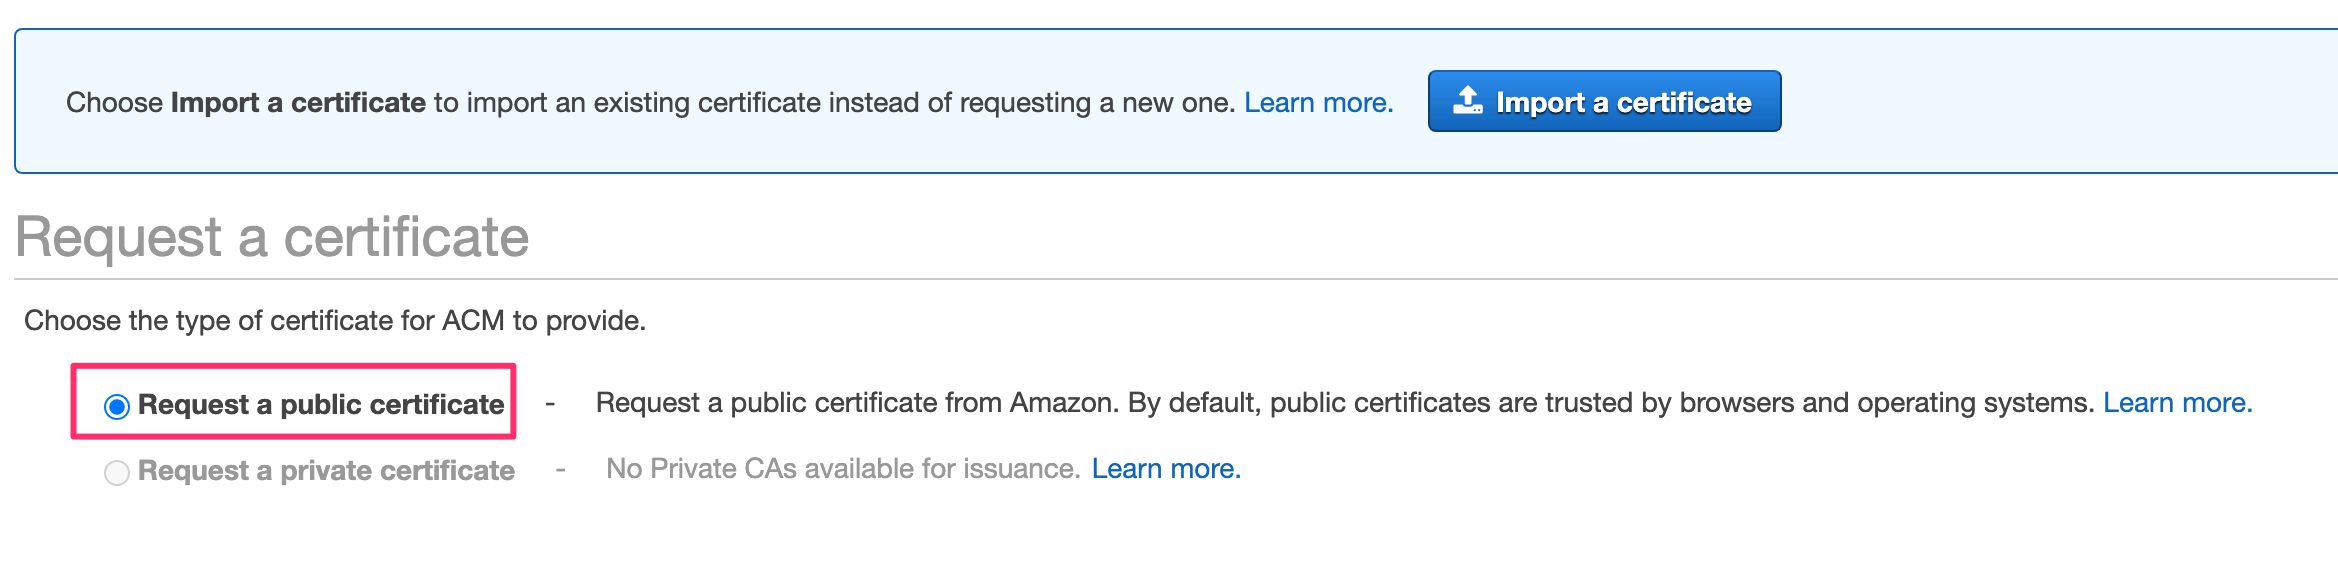
To get started, go to AWS Certificate Manager and choose to provision / request a new certificate. Select the public certificate option.
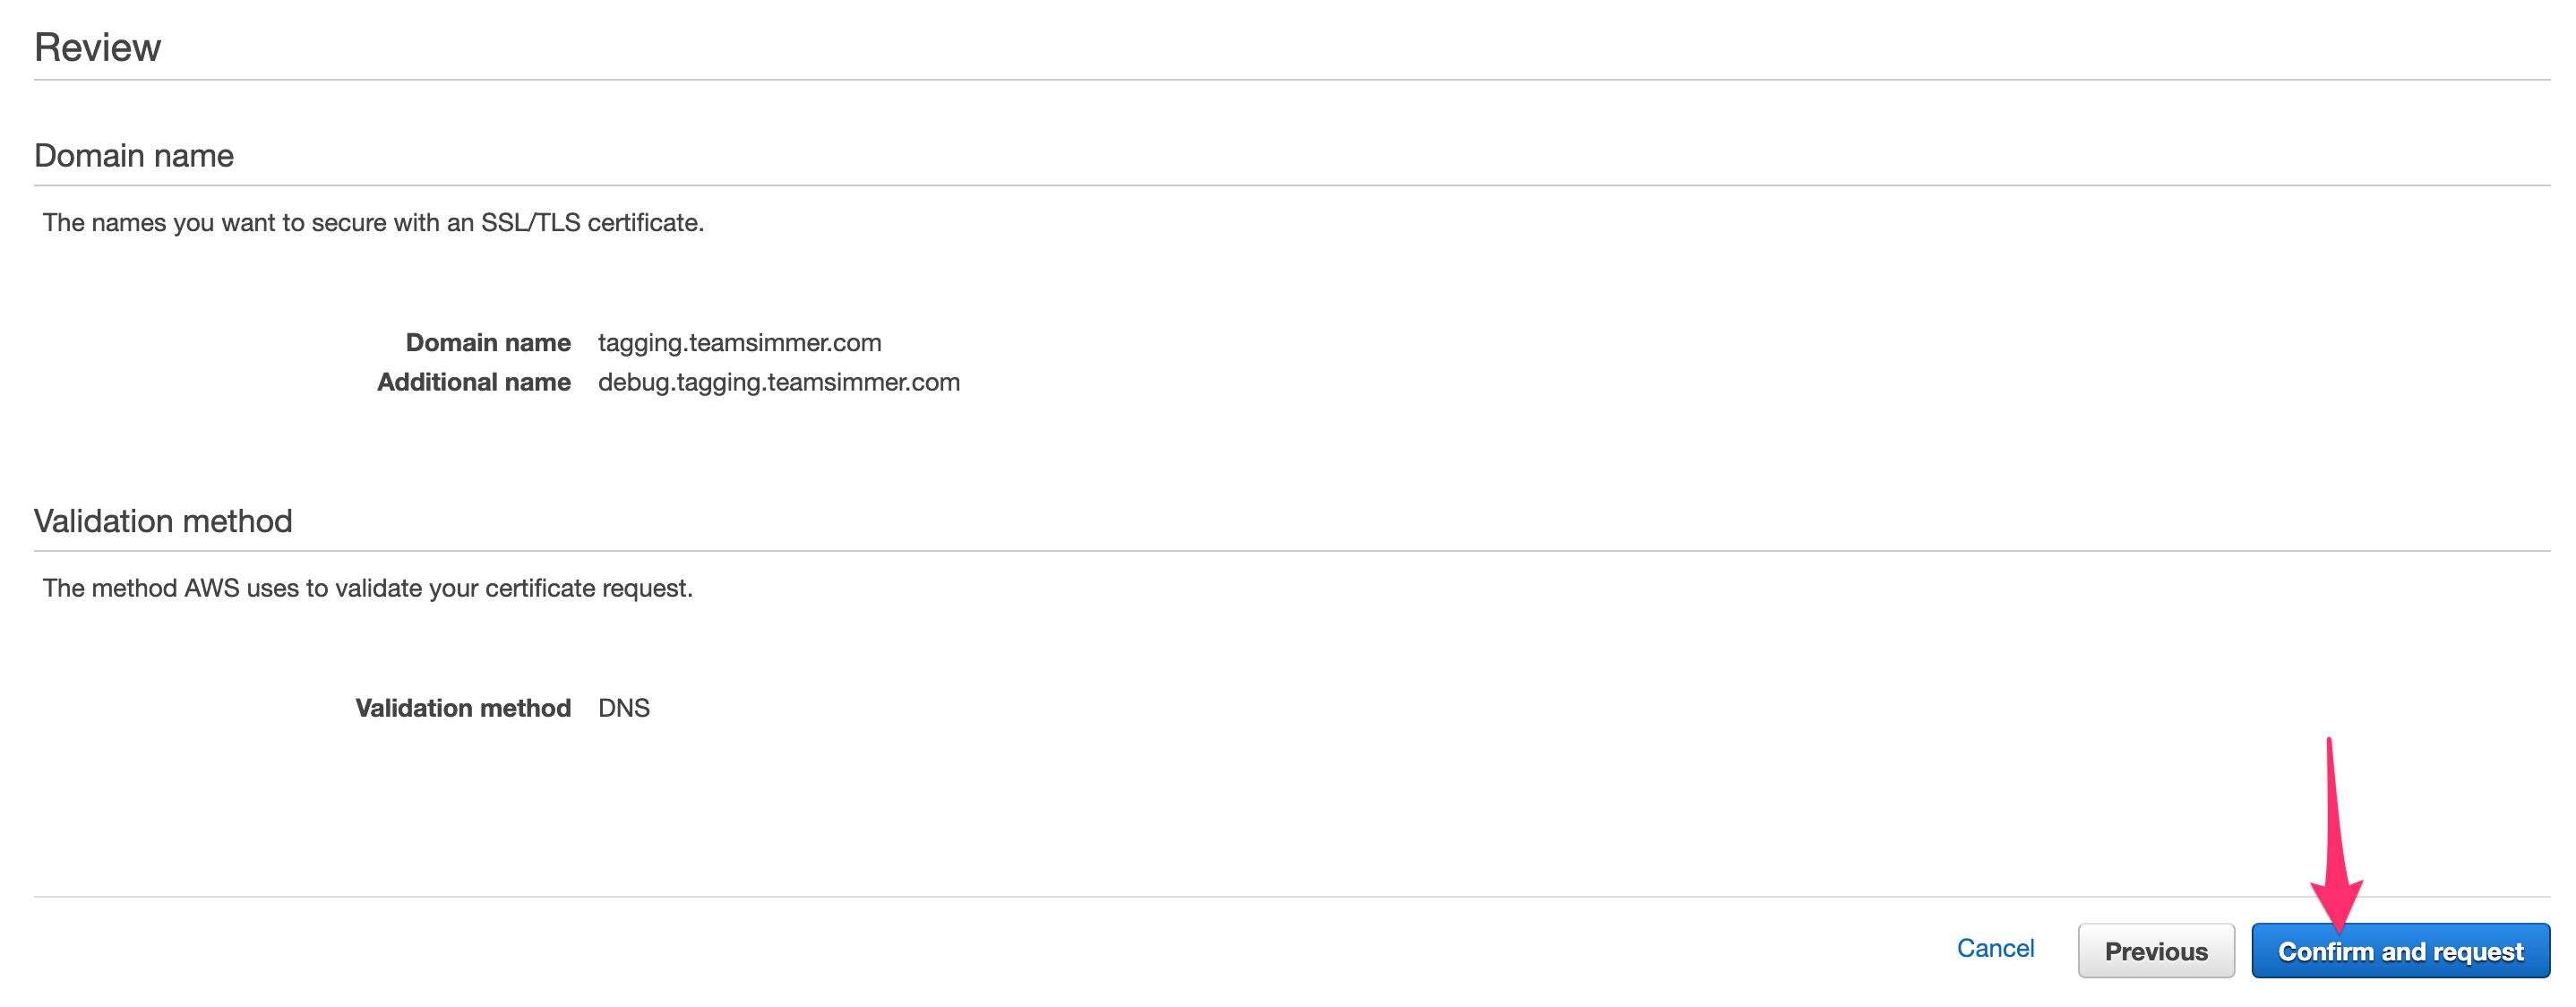
In the next screen, add both of the domains you want to register for your servers. As mentioned before, make sure the preview server is a subdomain of the tagging server. For example, this is the configuration I chose for this demo:
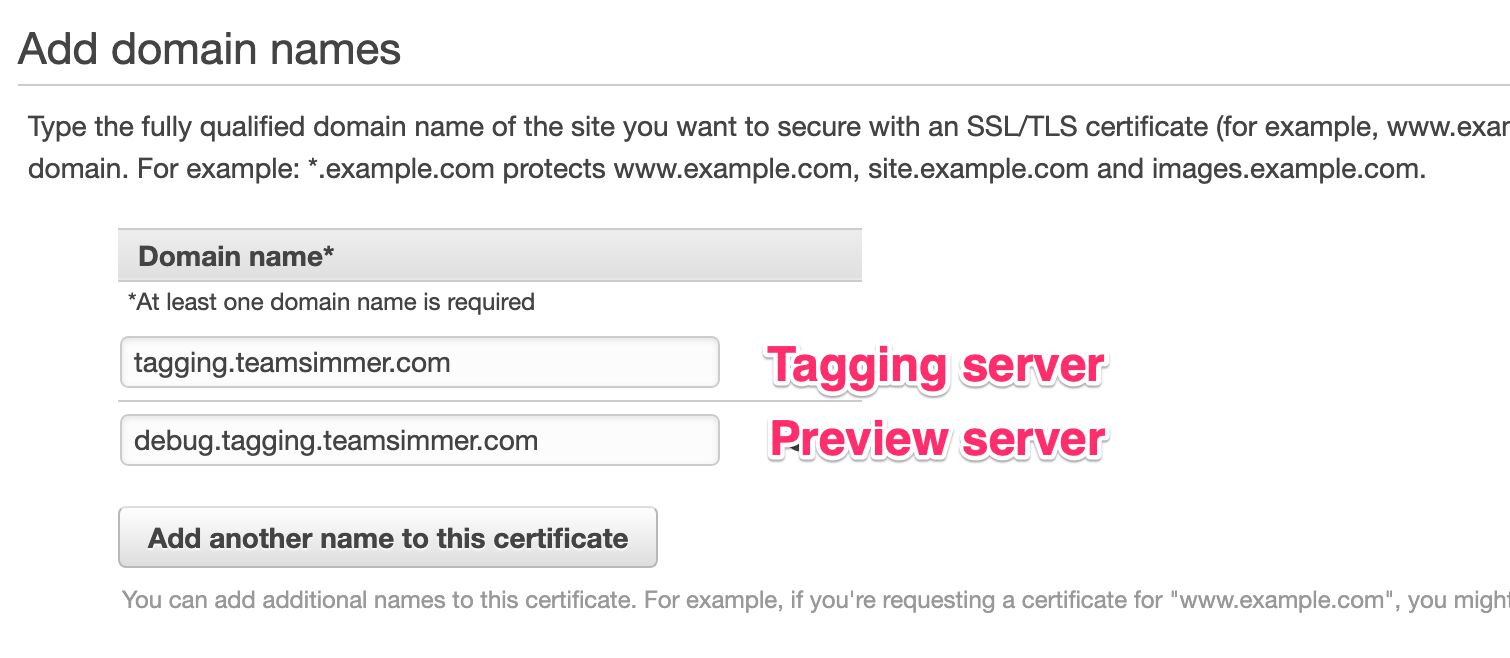
In the next view, select the DNS validation option and proceed.
Skip through the Add tags and Review screens, and click Confirm and request to start the process.
In the Validation view, expand both of the domains.
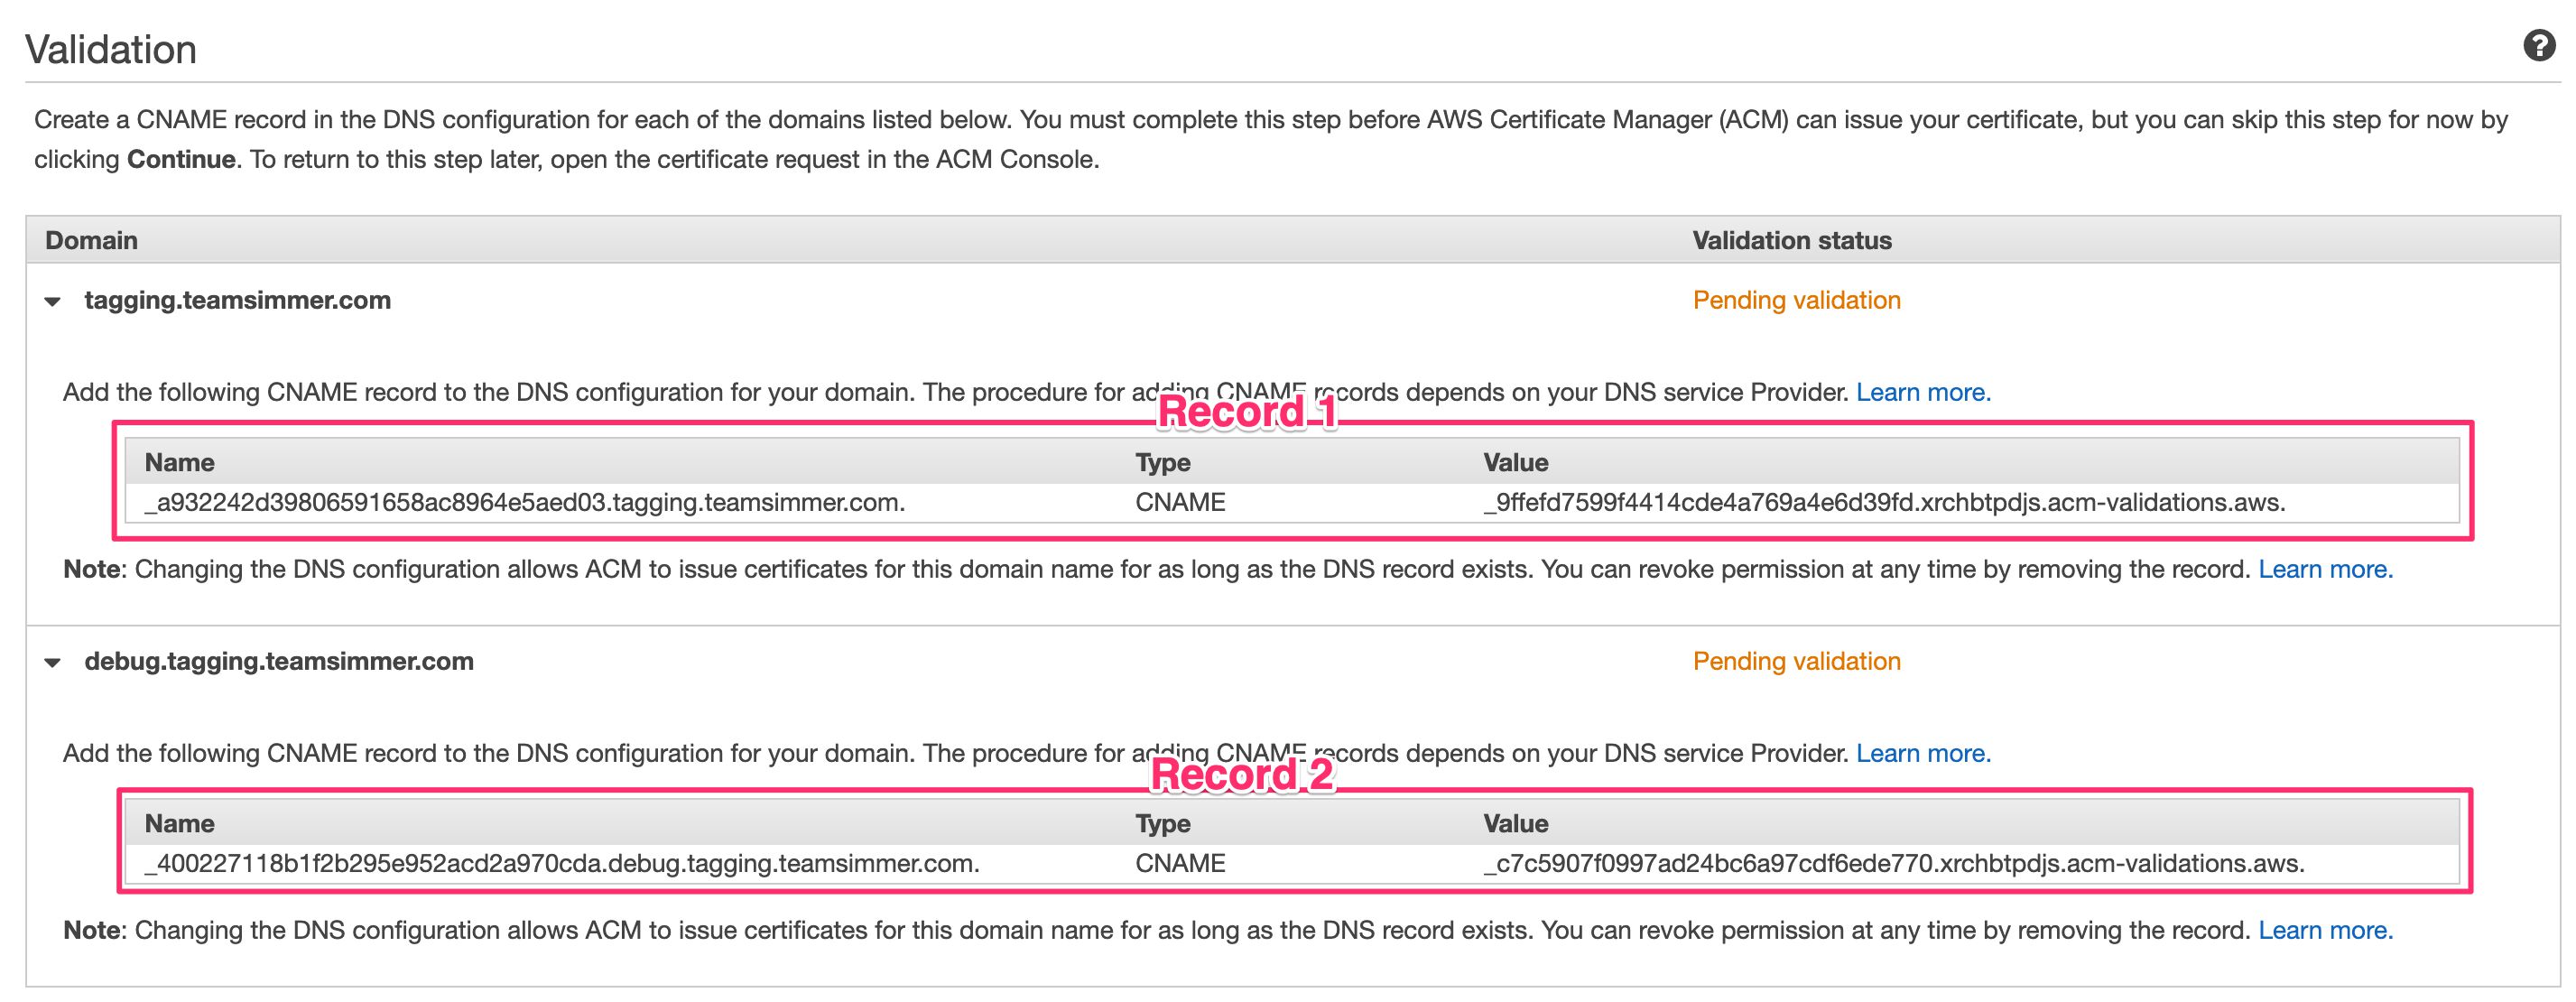
You’ll need to create CNAME records for both of these domains in your DNS settings. For example, as the DNS records for my teamsimmer.com domain are managed through GoDaddy, I need to create the two records like this:

Once done, you can click Continue to complete the certificate request in AWS Certificate Manager.
If your certificates aren’t immediately validated, it means that the DNS changes haven’t propagated yet. It might take anything from a few seconds to some hours, depending on if the domain names are being reused. You can click the refresh button to update the validation status.
However, you can actually continue with the setup even if the validation isn’t complete, so proceed to the next step when ready!
2. Create a hosted zone for the custom domains
The final DNS update you need to do is to register a hosted zone in AWS Route53.
A hosted zone is where you basically point the name servers of your custom domains to AWS. This way you delegate AWS with full control over the DNS of these domains. This is pretty much mandatory if you want to map custom domains to the Beanstalk environments you’ll be creating soon.
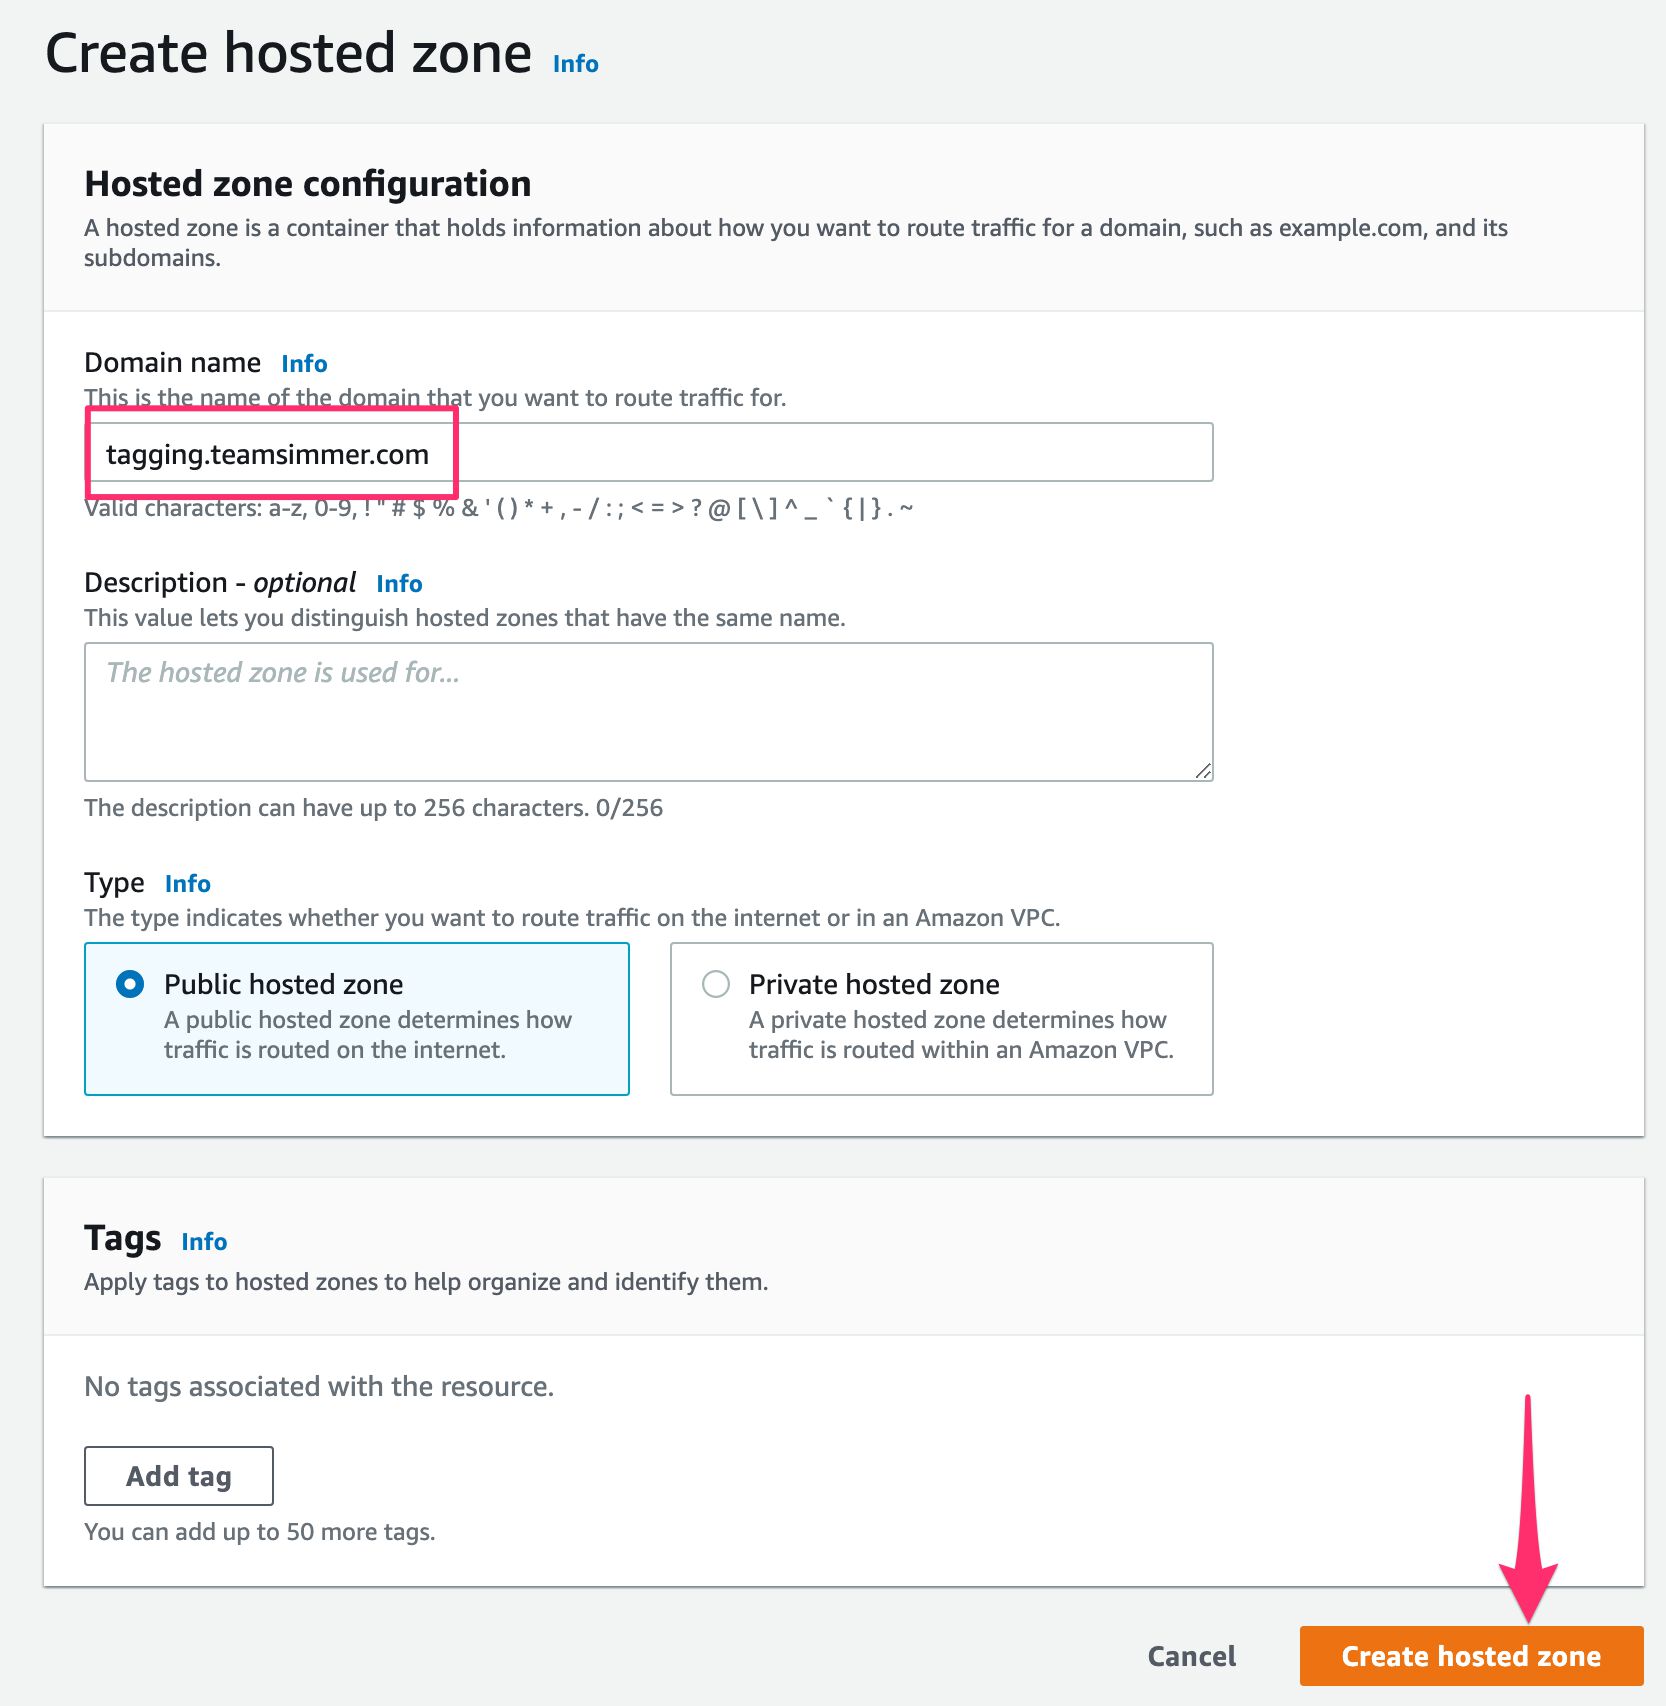
Head on over to Route53 and click Create hosted zone.
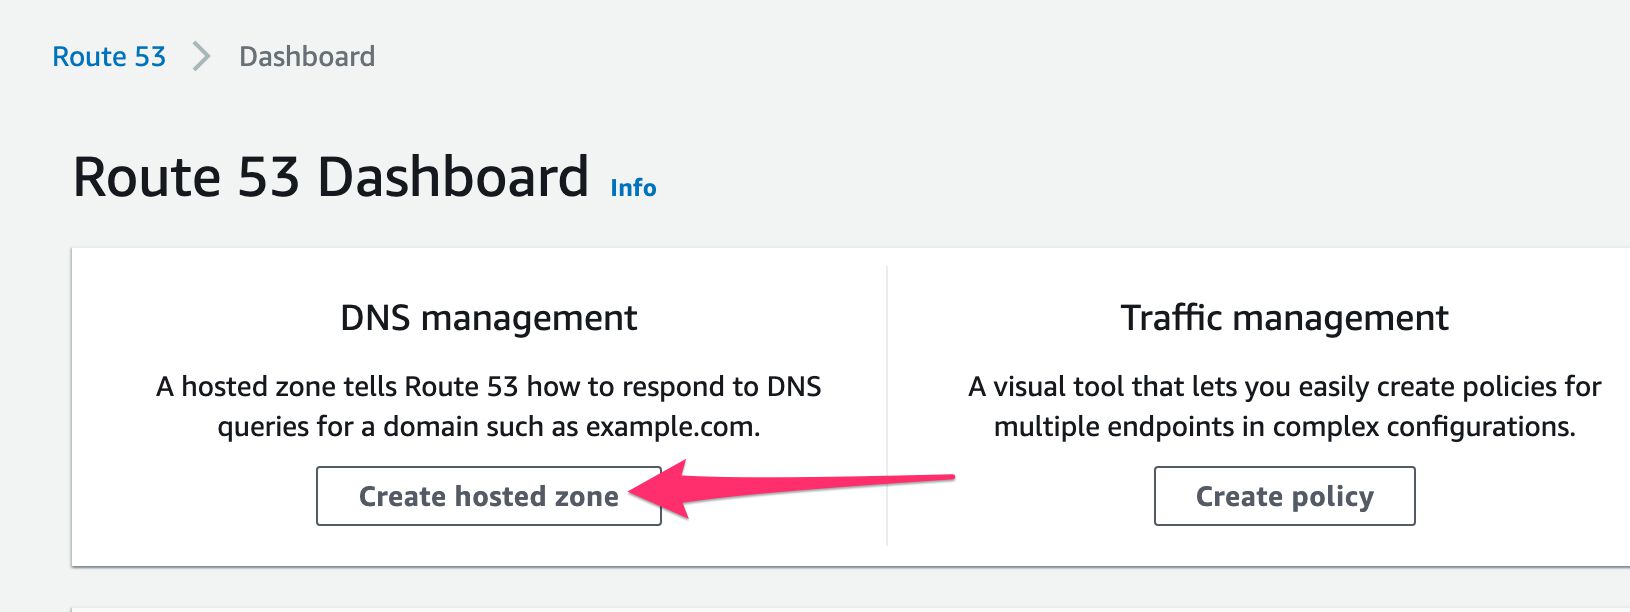
In the Hosted zone configuration, add the domain of your tagging server (e.g. tagging.teamsimmer.com) into the Domain name field, keep the default settings, and click Create hosted zone.
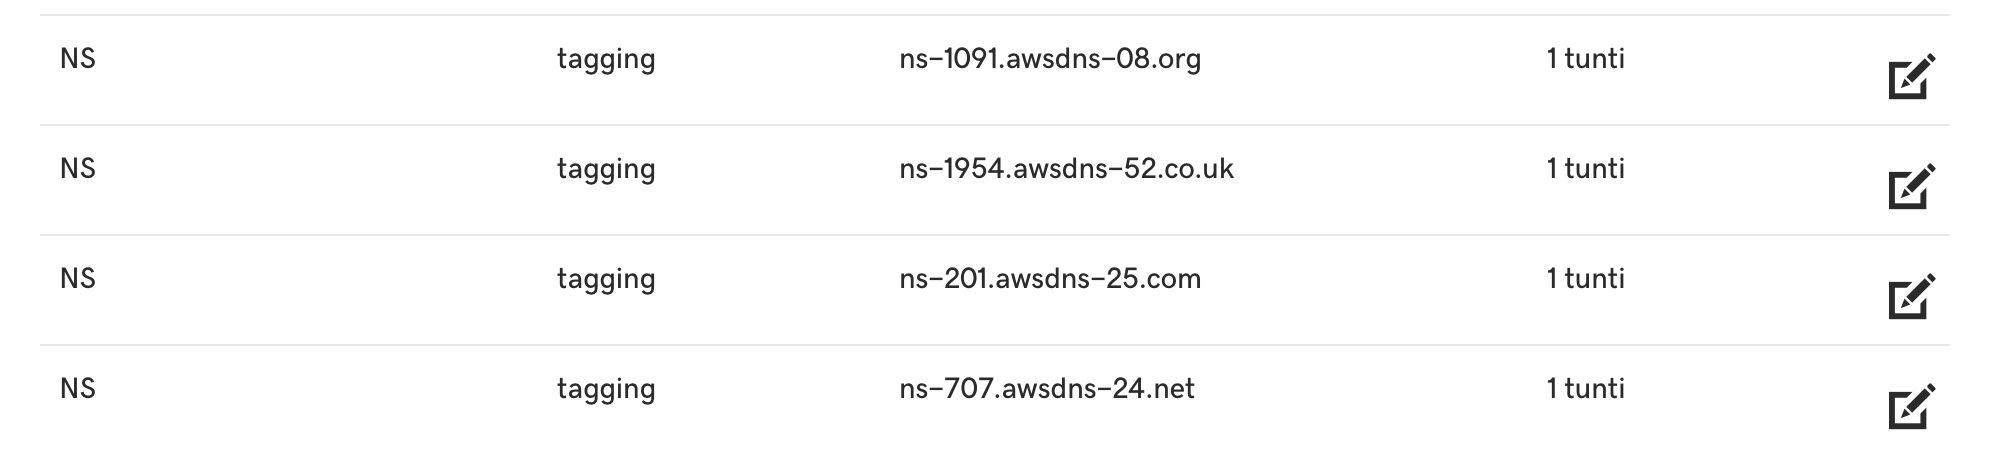
Once done, you need to make some DNS record updates again. In your DNS provider, add the four NS records to your tagging server domain.
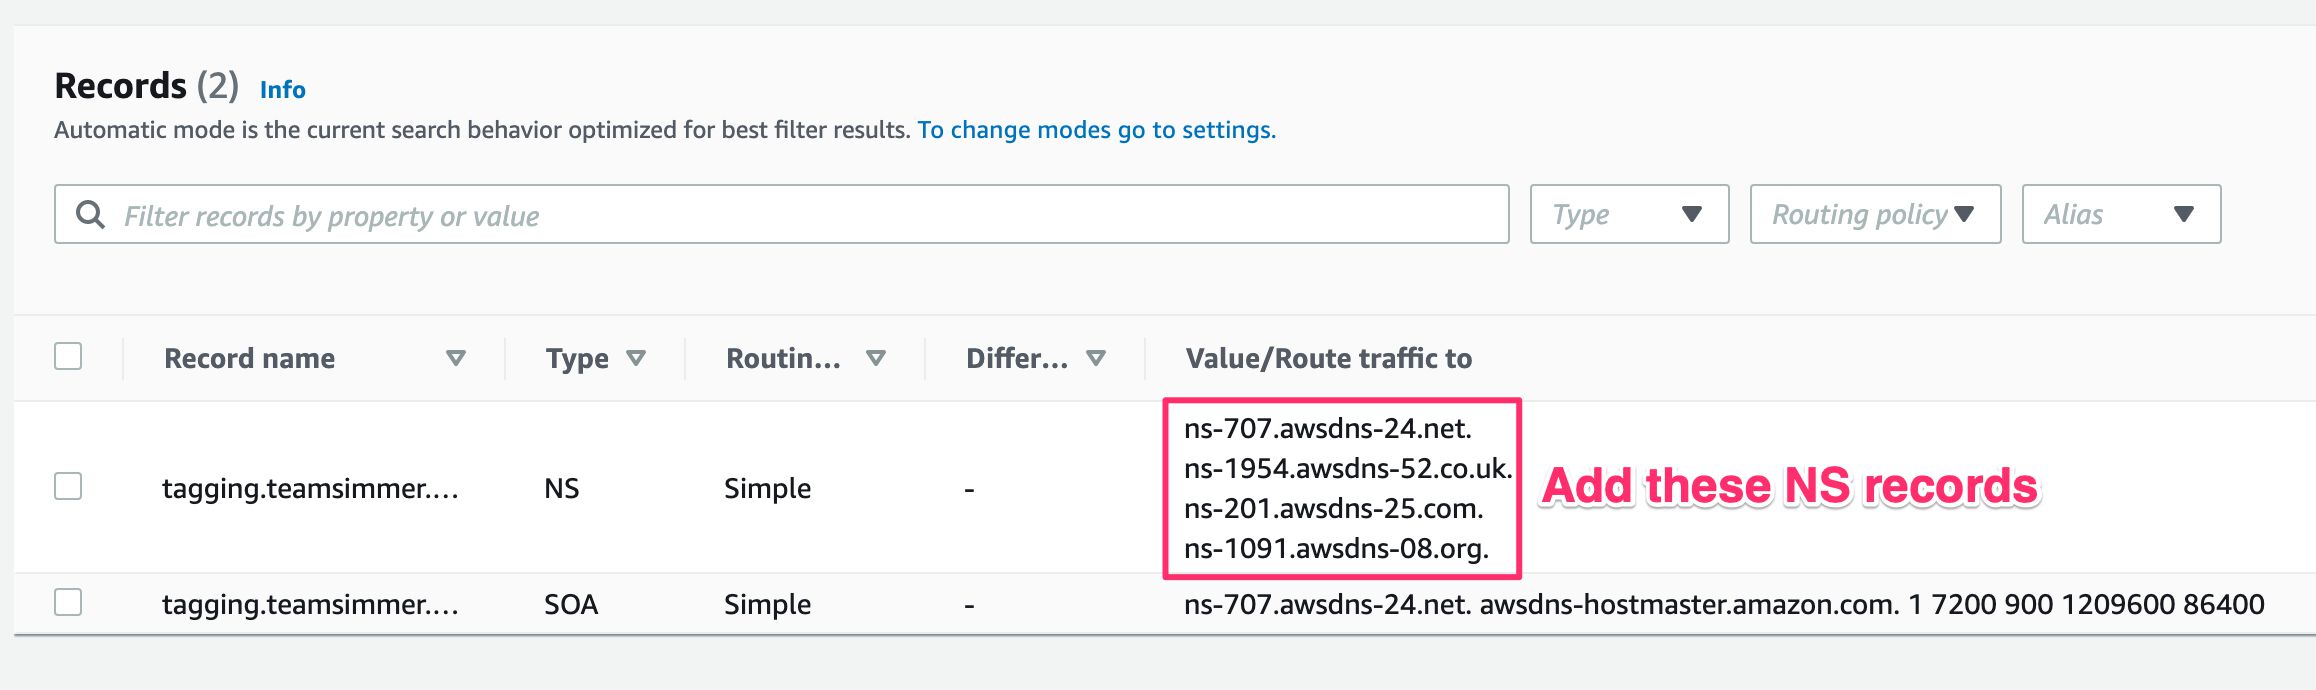
In GoDaddy, this is what the records from the example above look like:
Once you’ve done these changes, we’re ready to create the Beanstalk environments. We’ll return to Route53 once we need to make the actual tagging and preview server domain mappings, but these can be done through Route53 and you won’t need to make any more DNS changes outside AWS.
3. Create the Elastic Beanstalk application
Our setup will be a single Elastic Beanstalk application running an environment for the preview server and another environment for the tagging server.
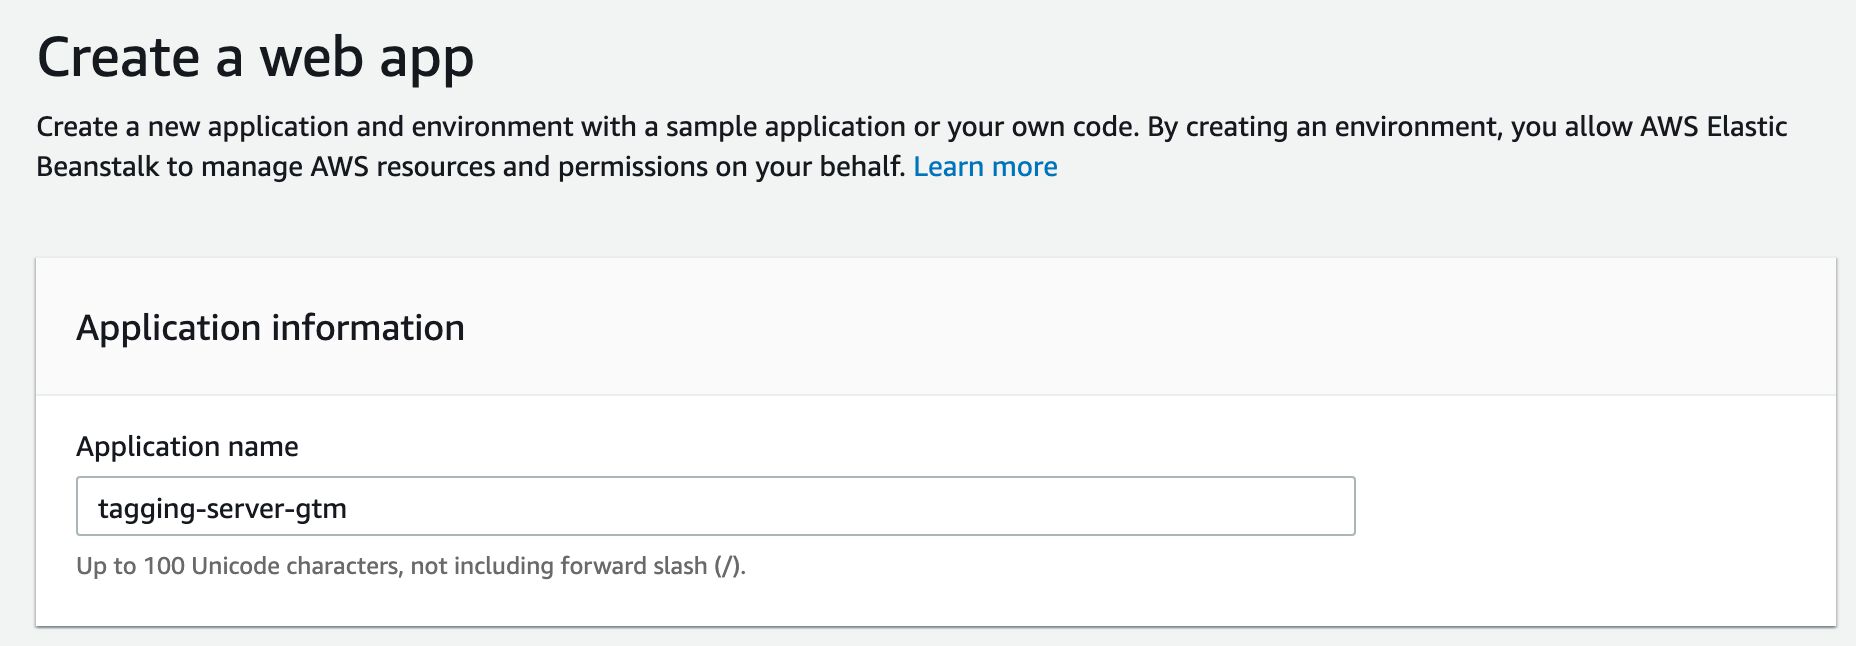
So the first thing you’ll need to do is head on over to Elastic Beanstalk and create a new application.
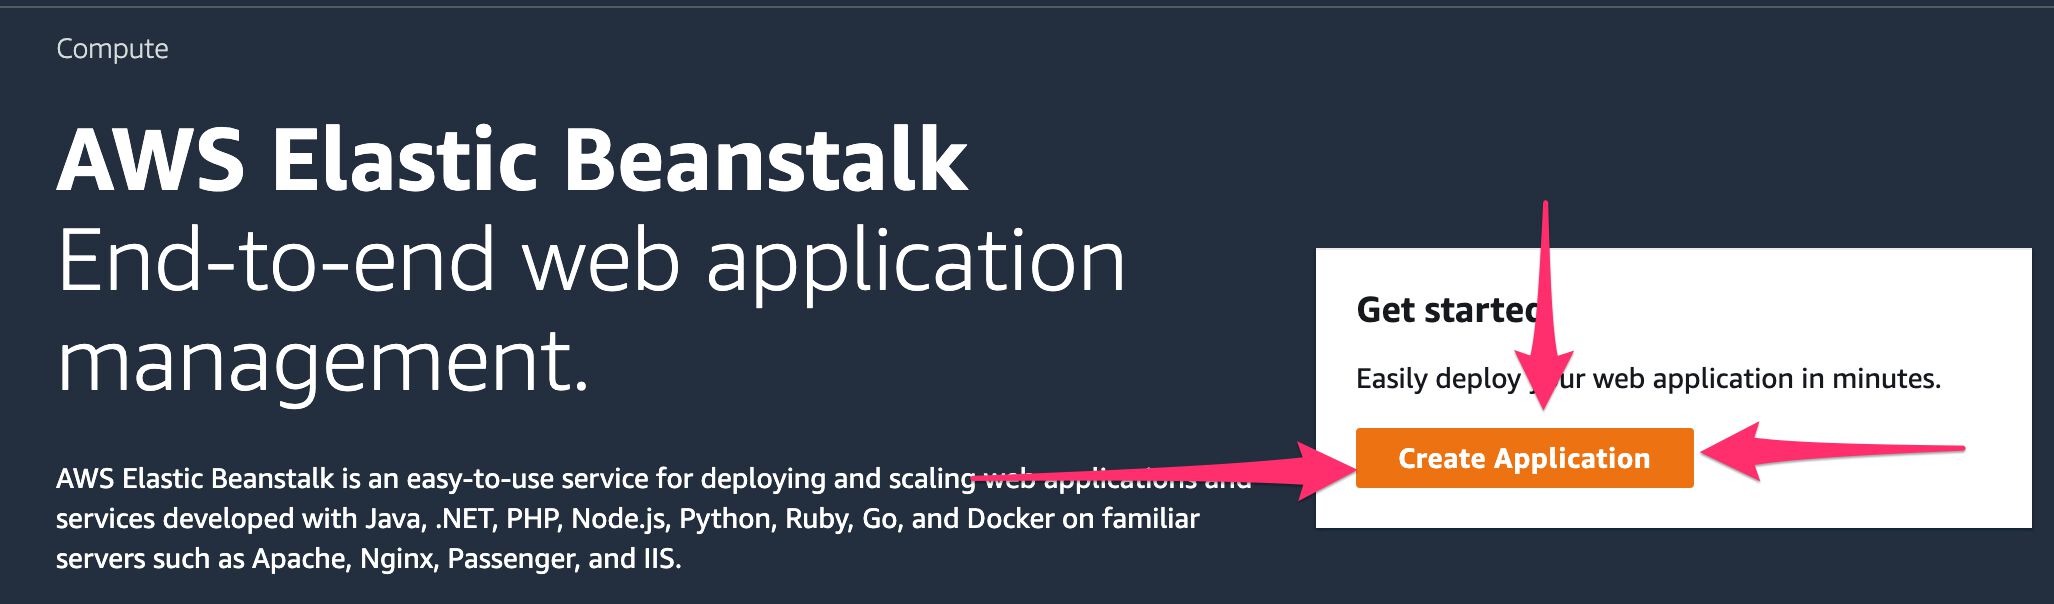
Give the application a name.
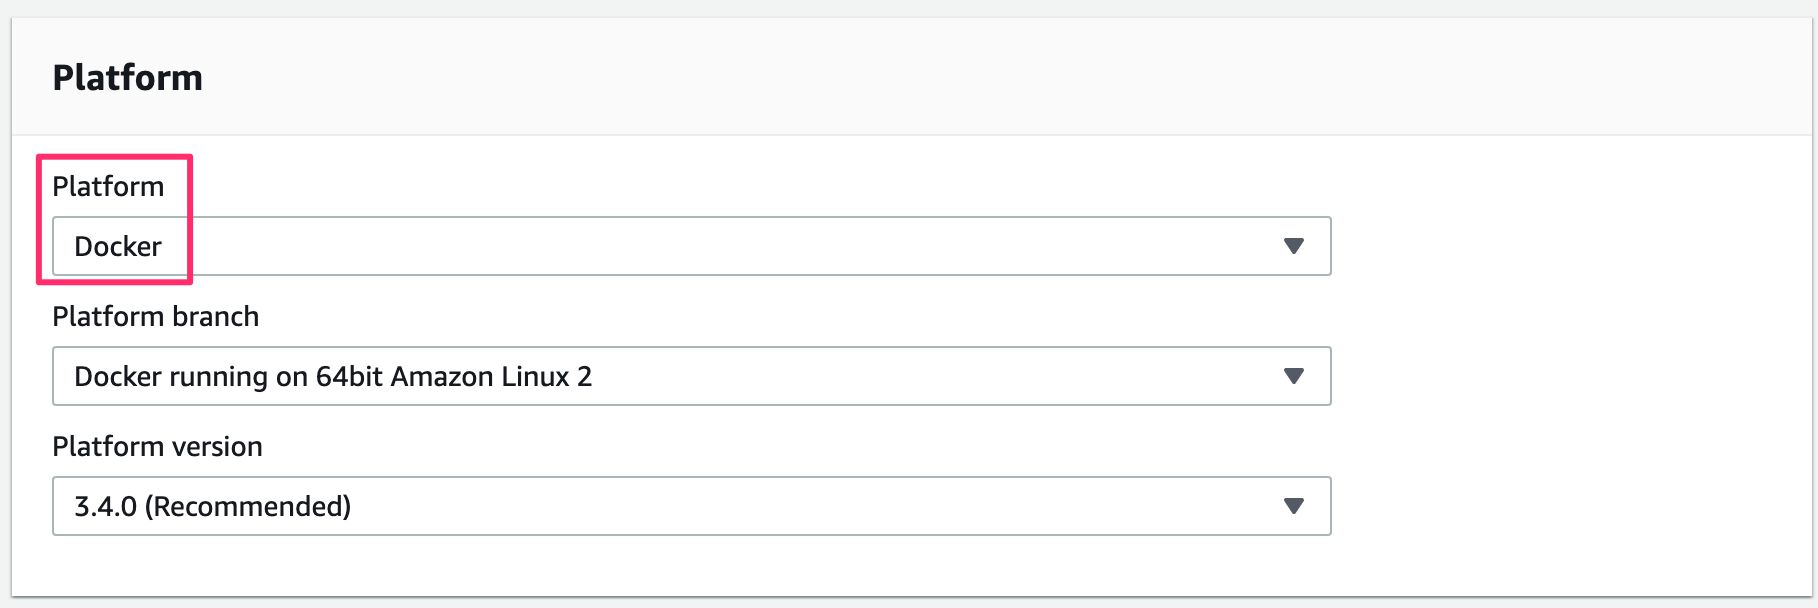
Under Platform, choose Docker and keep the default settings.
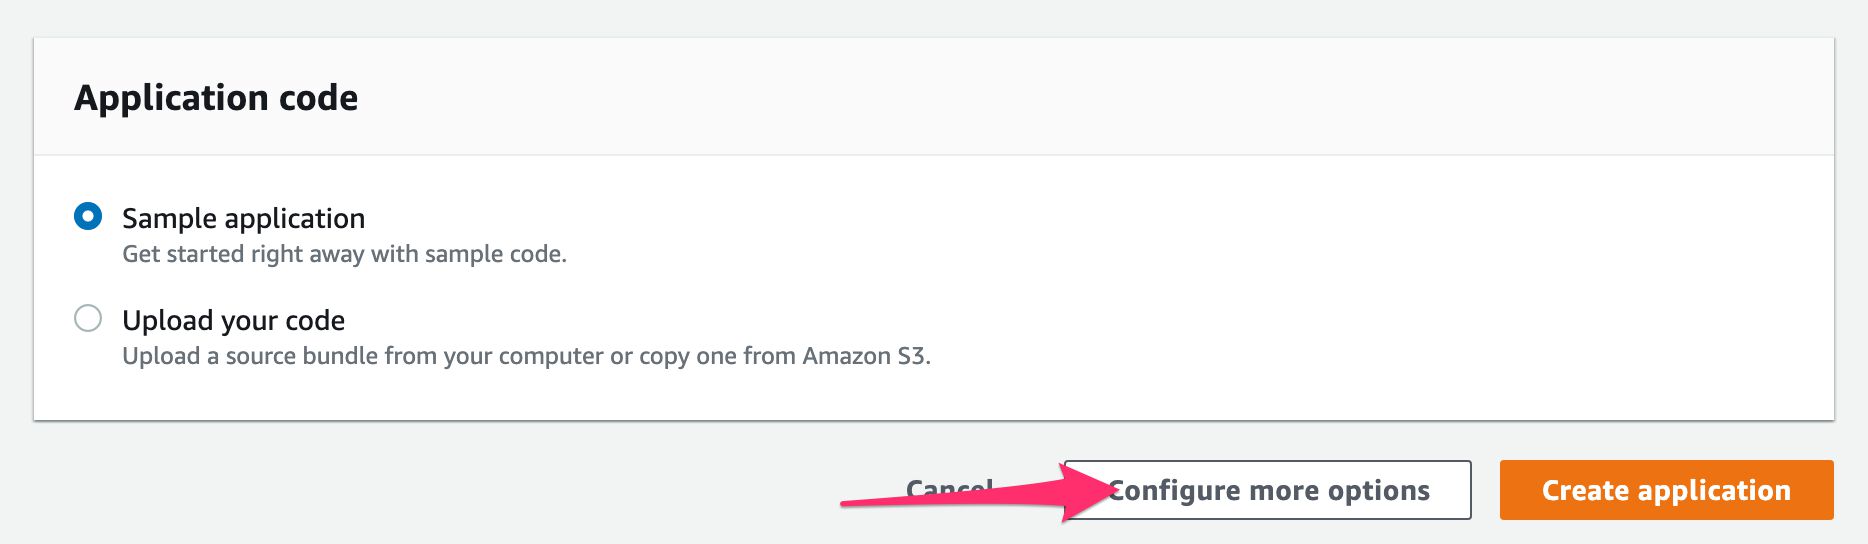
At this point, we’ll just want to create the application and not worry about the environments, so scroll all the way down and click Configure more options. This creates the application.
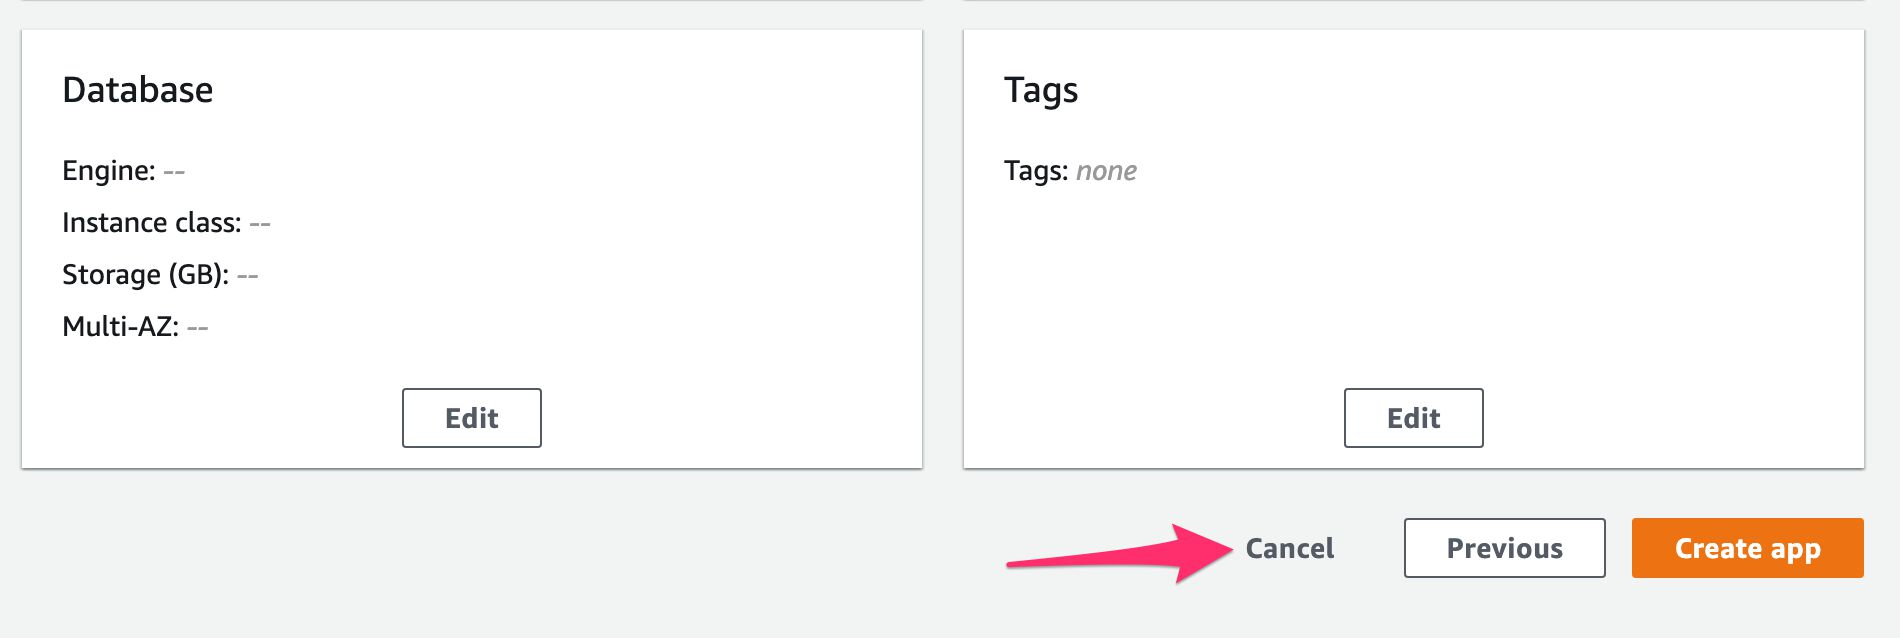
In this next screen, scroll all the way down and click Cancel – we want to create the environment manually.
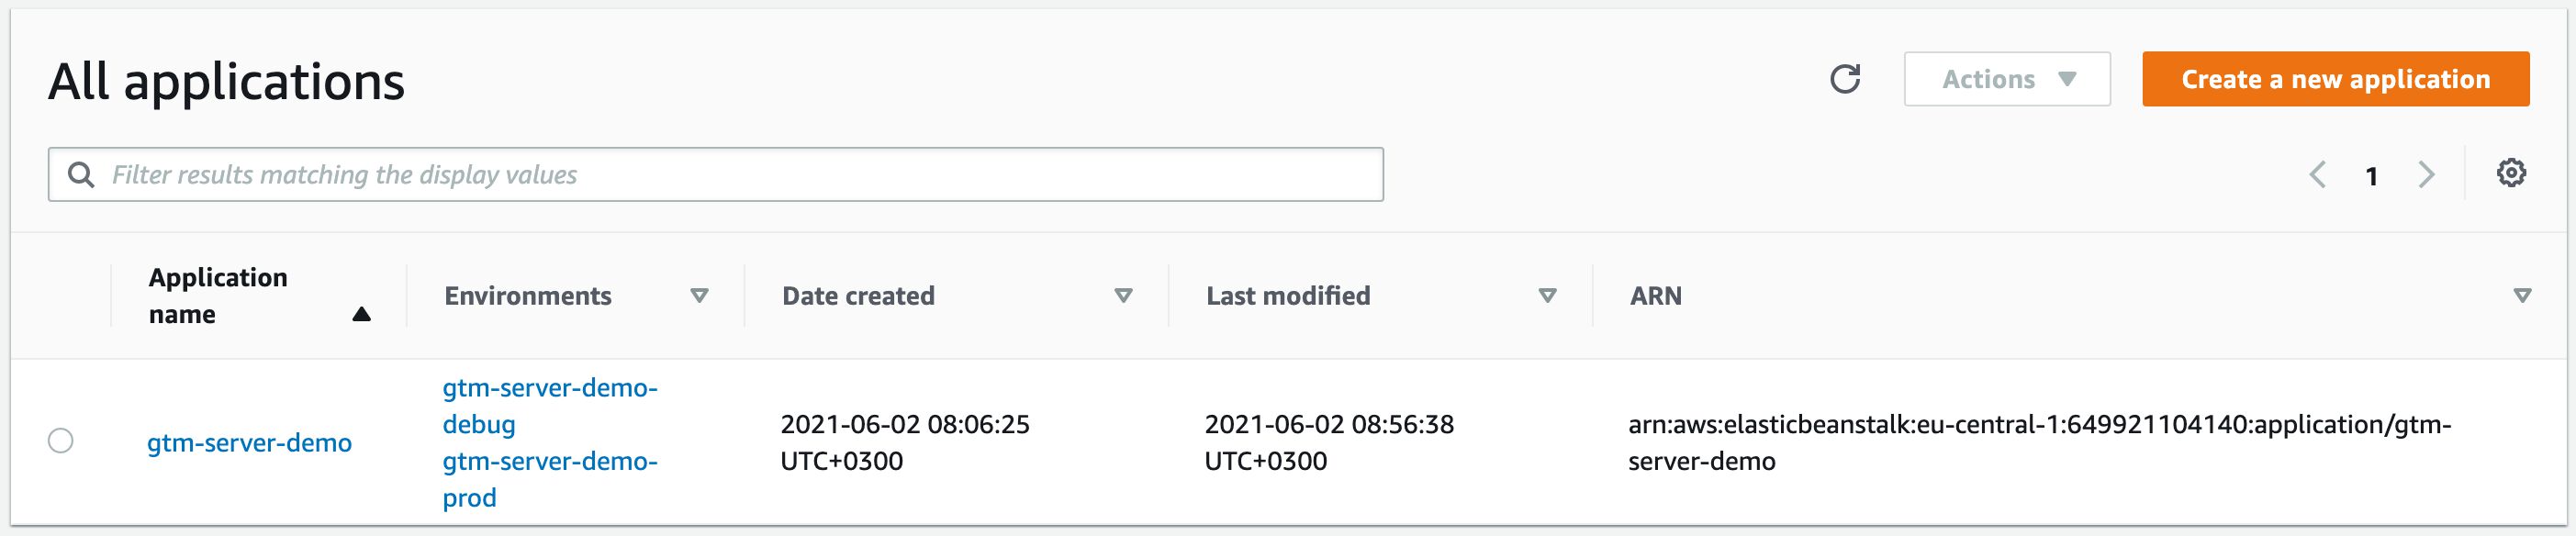
If you now go to Applications, you should see your new Beanstalk application. Nice work!

It might take some time for the application to appear, so be patient.
4. Create the Preview server environment
The first thing we’ll do is create an environment for the Preview server.
It has just a single gotcha: it needs a Load Balancer (so that you can map a custom domain to it), but it must not scale beyond one instance.
Click your application name in the list of Beanstalk applications to enter the application’s environment list. The list should be empty, so click Create a new environment.

Choose Web server environment and click Select.
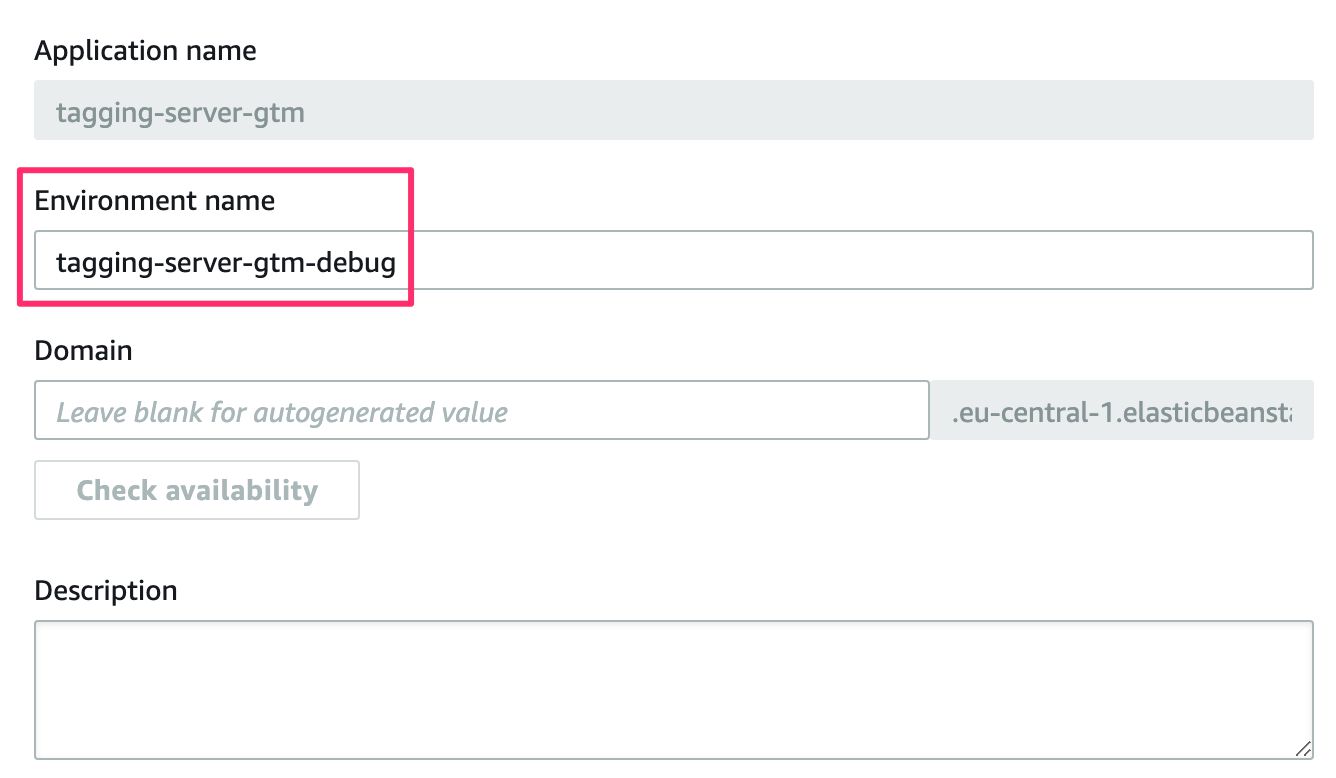
Set the Environment name to something useful, such as tagging-server-gtm-debug. You don’t need to change the Domain setting as we’ll be using a custom domain anyway.
Under Platform, choose Docker and keep the default settings.
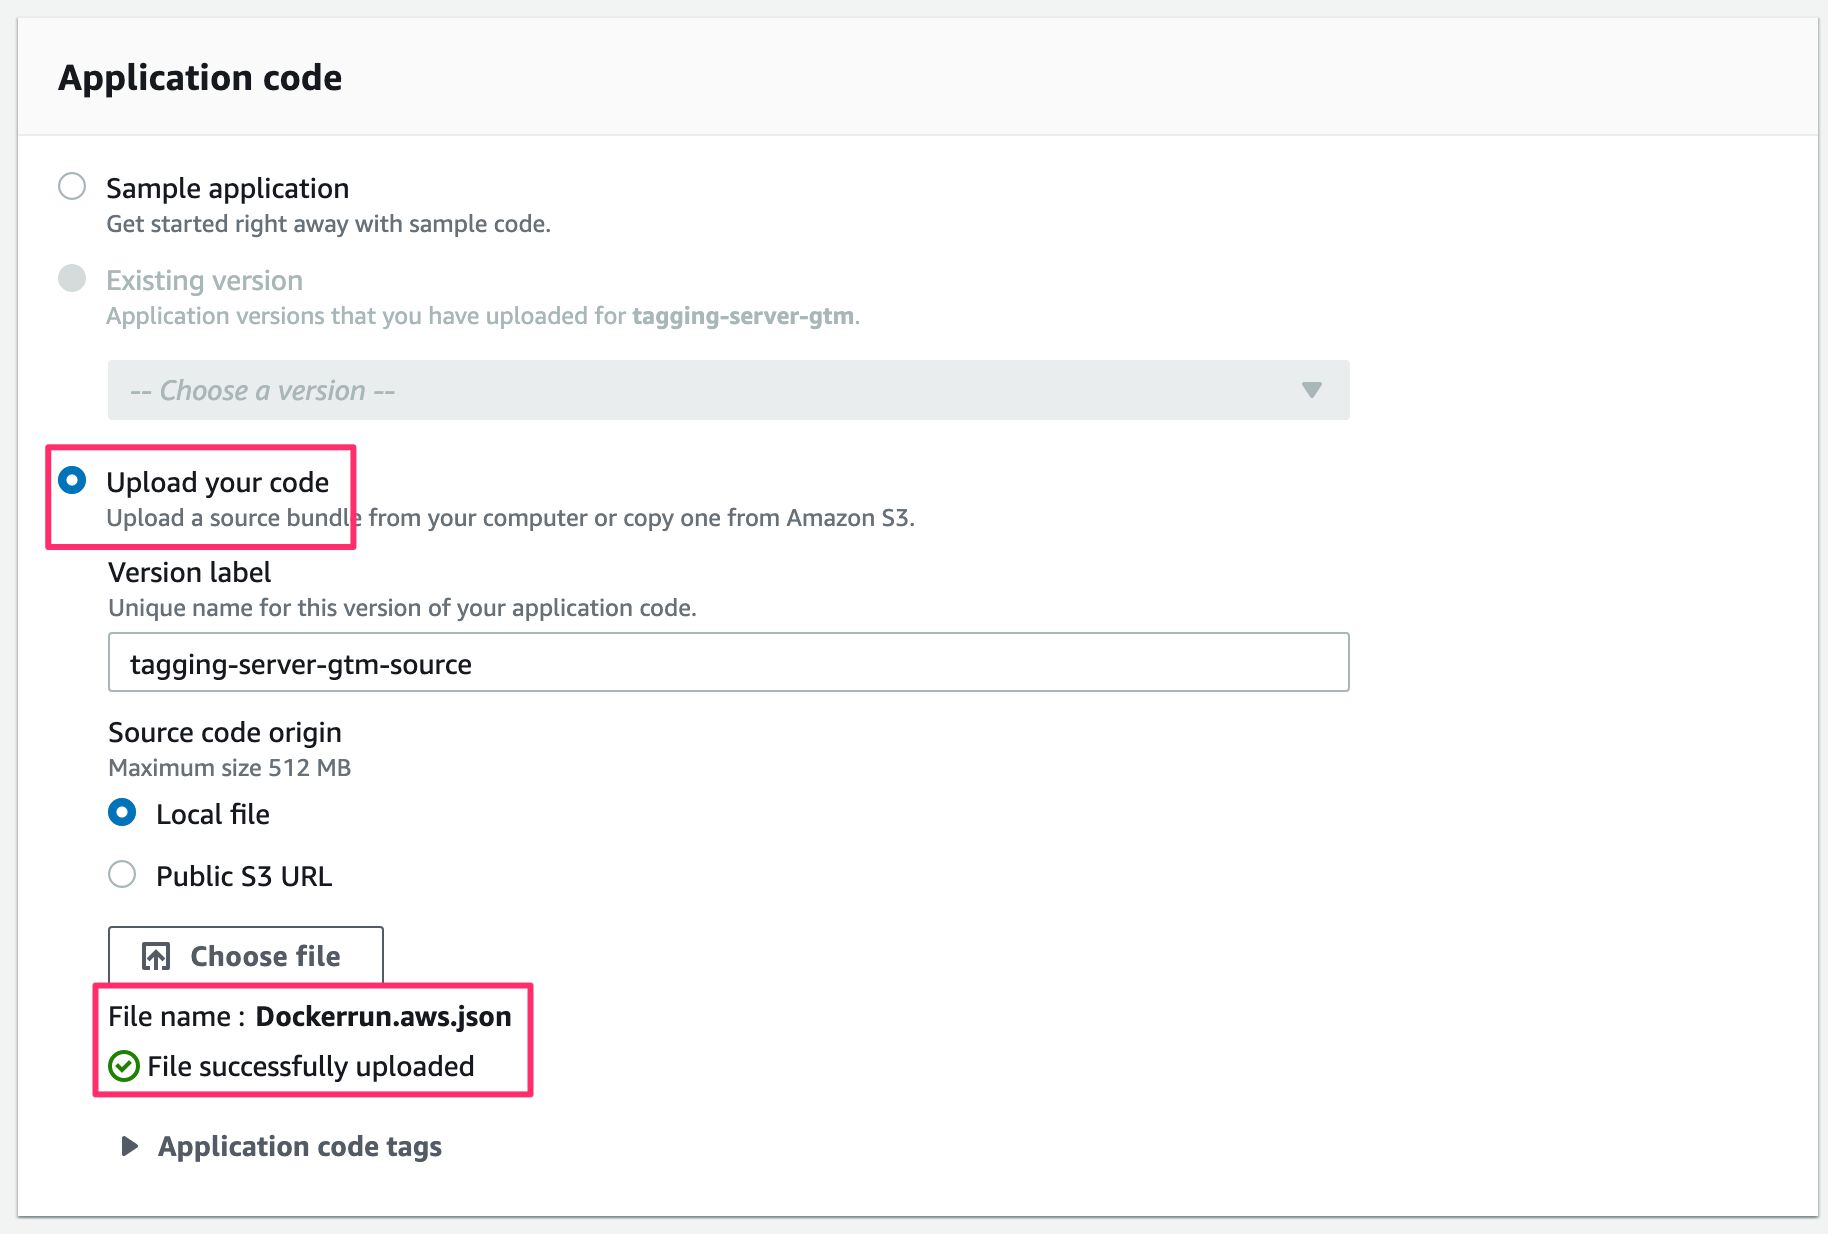
Download the Dockerrun.aws.json file
Before proceeding, follow this link and download the file as Dockerrun.aws.json somewhere on your computer.
This file describes the Docker container for the GTM tagging server and how to fetch it from Google’s public Docker repository. We’ll be using this file to actually deploy the Google Tag Manager container into the environment.
Upload the JSON
Once downloaded, back in the AWS Console, select Upload your code in the Application Code Settings. Click Choose file and locate the Dockerrun.aws.json to upload it to the environment.
Next, click Configure more options.

Modify Software settings
Click Edit in the Software box.
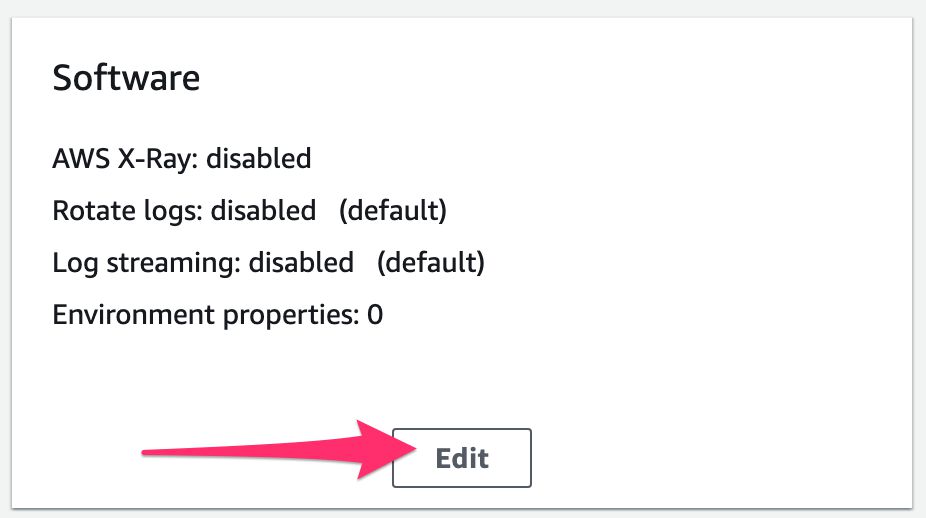
Scroll down to Environment properties. These are environment variables passed to the Docker deployment.
You need to set two properties:
| Property name | Value |
|---|---|
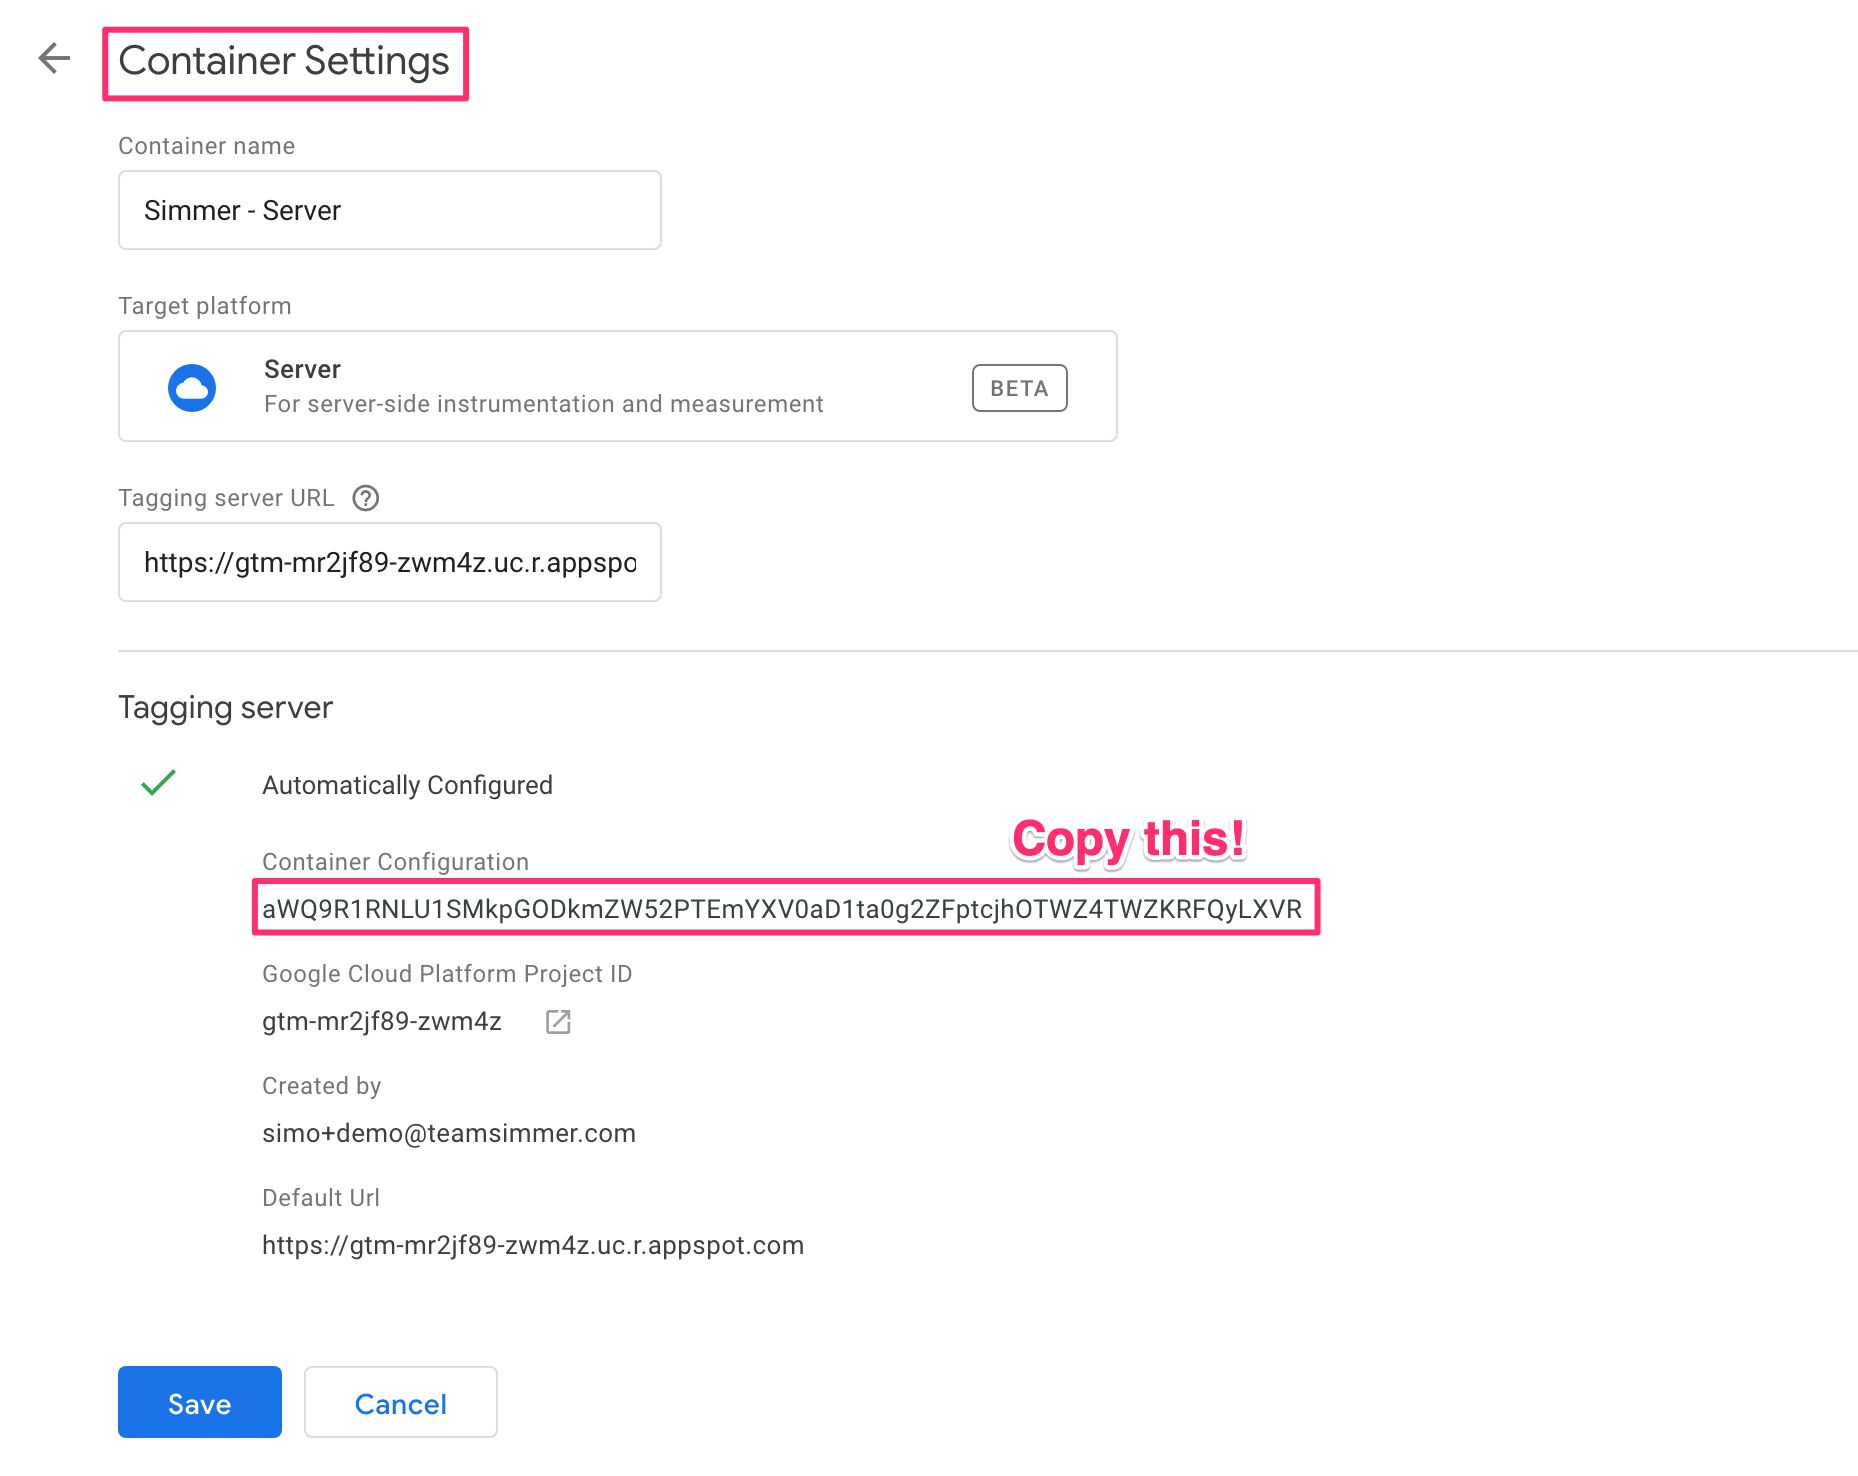
RUN_AS_PREVIEW_SERVER | true |
CONTAINER_CONFIG | The container configuration string from Google Tag Manager Container Settings. |
The first is easy enough to set, but for the CONTAINER_CONFIG you need to head on over to the Google Tag Manager Server container (or create one if you haven’t yet done so), and then copy the Container Configuration string from the container settings (Admin -> Container Settings).
This is what my Software settings look like:

Click Save when done.
Modify Capacity settings
Next, click Edit in the Capacity box.
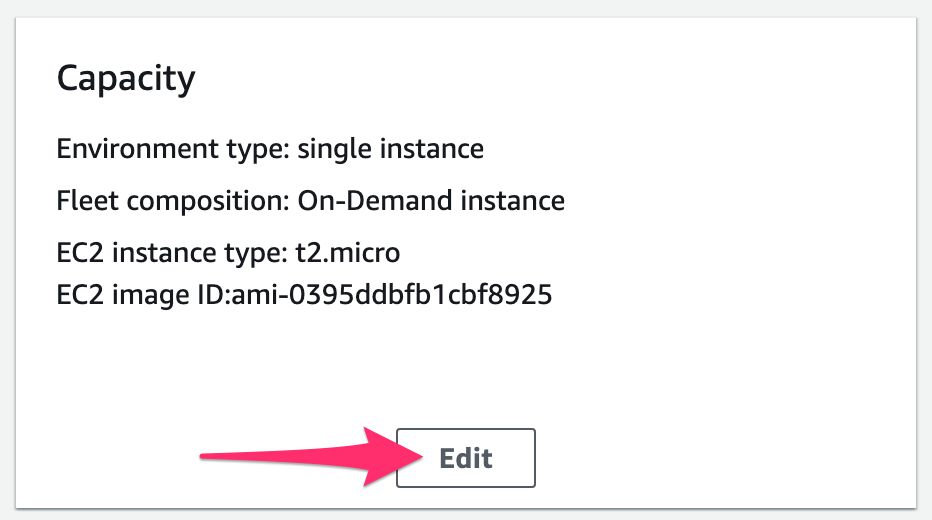
Choose Load balanced as the Environment type, and set both Min and Max instances to 1.
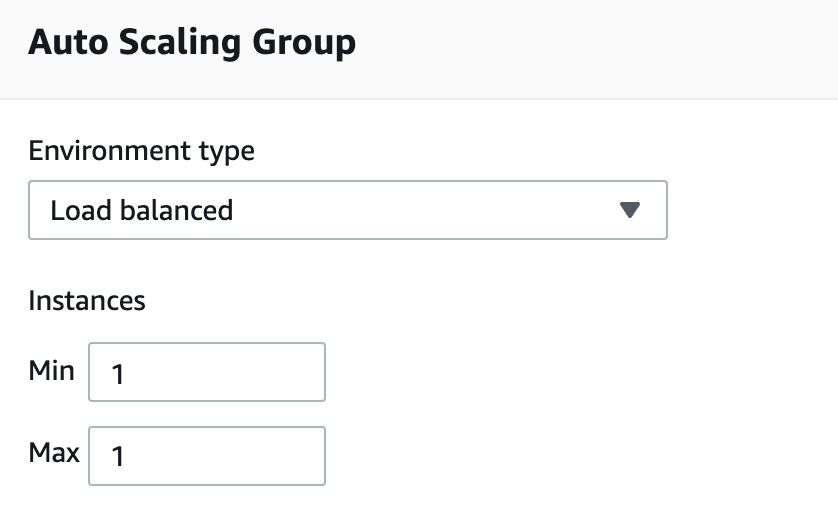
Scroll all the way down and click Save.
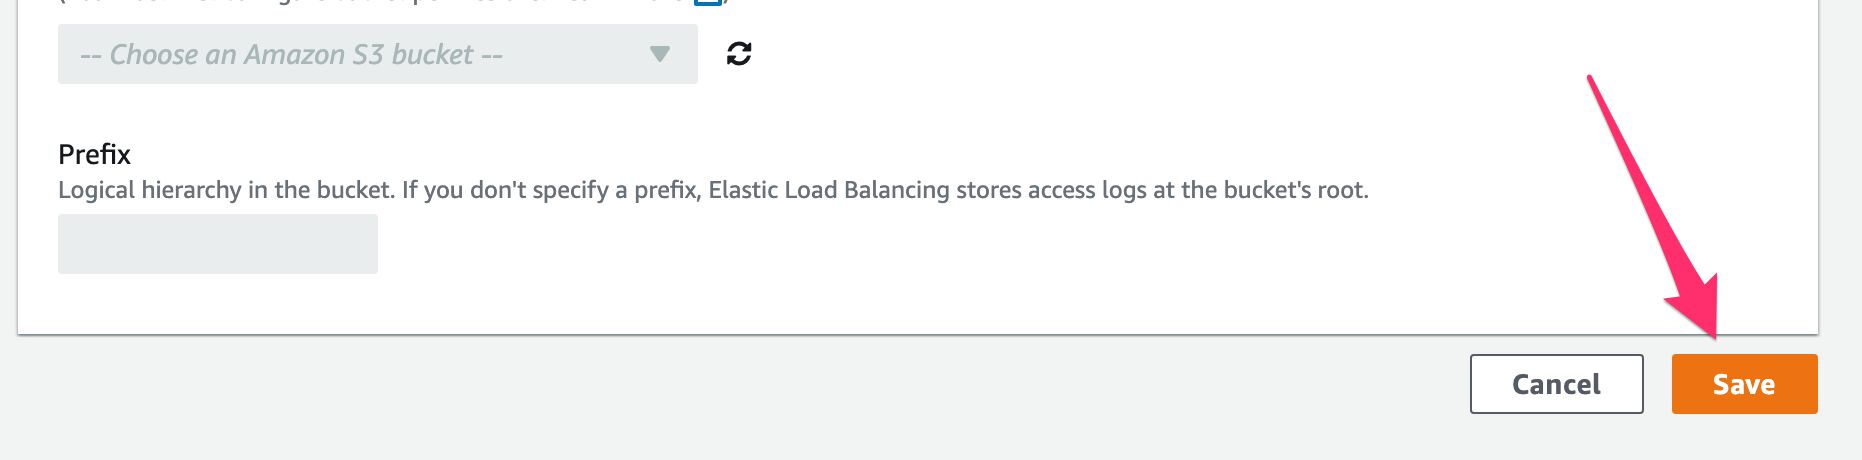
Modify Load balancer settings
Now, click Edit in the Load balancer box.
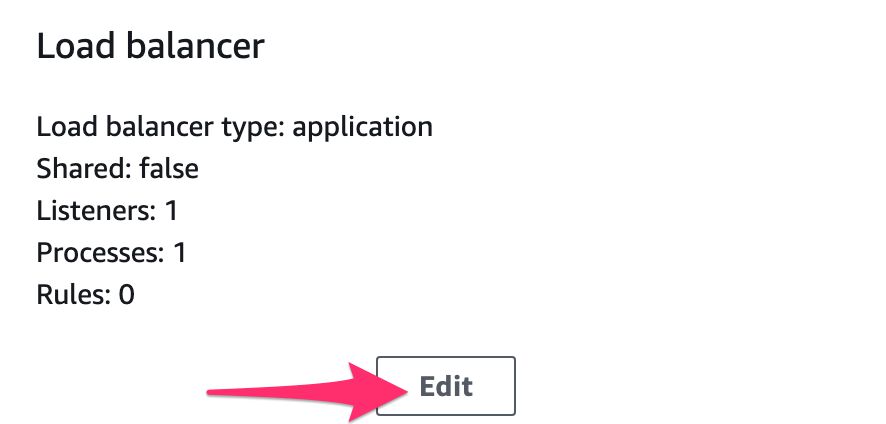
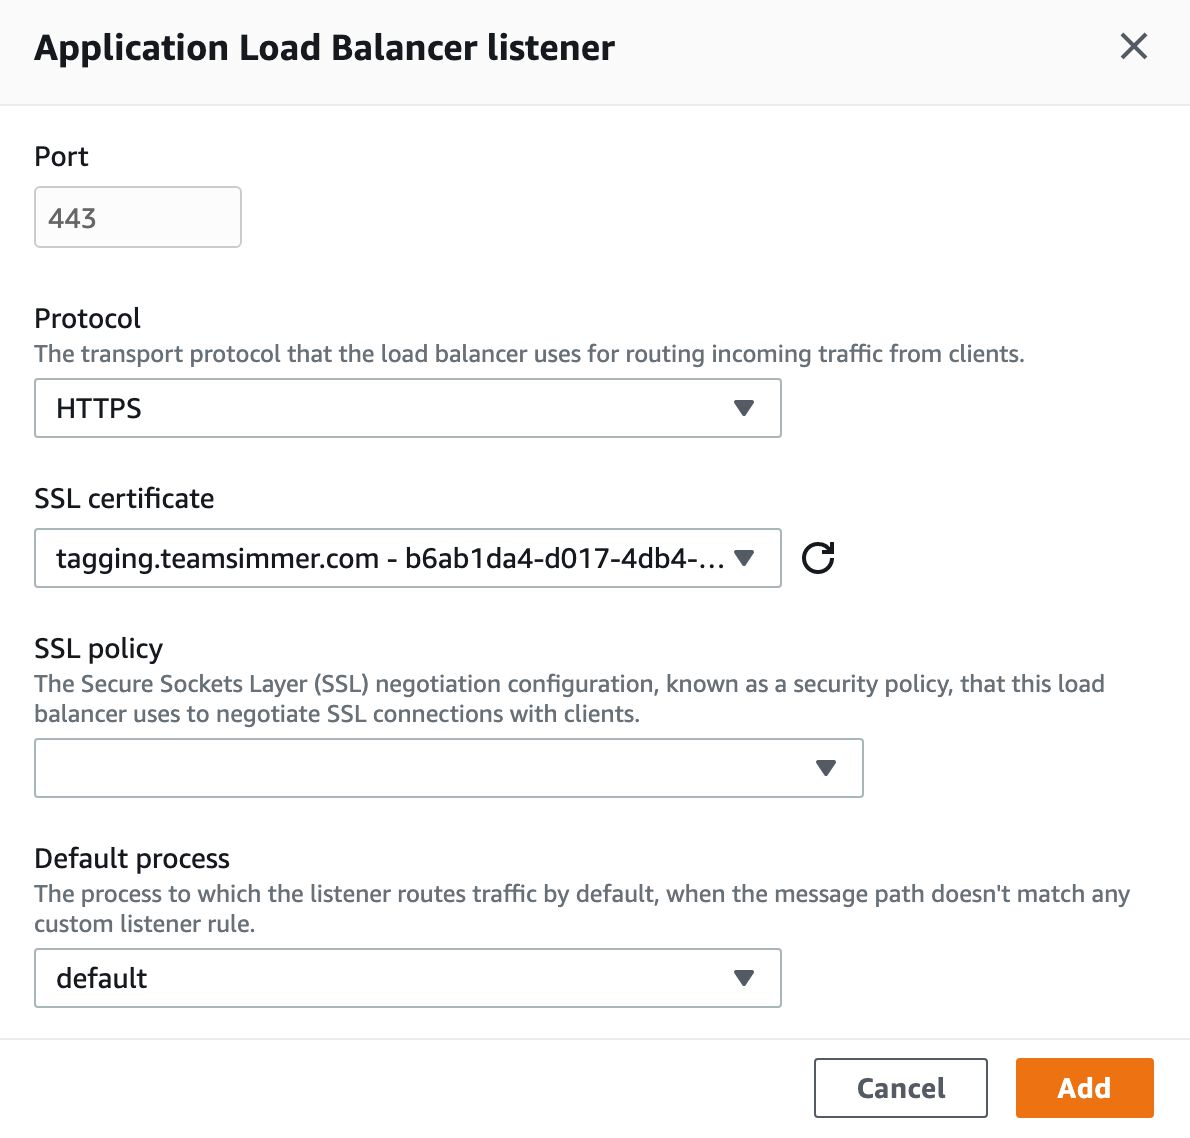
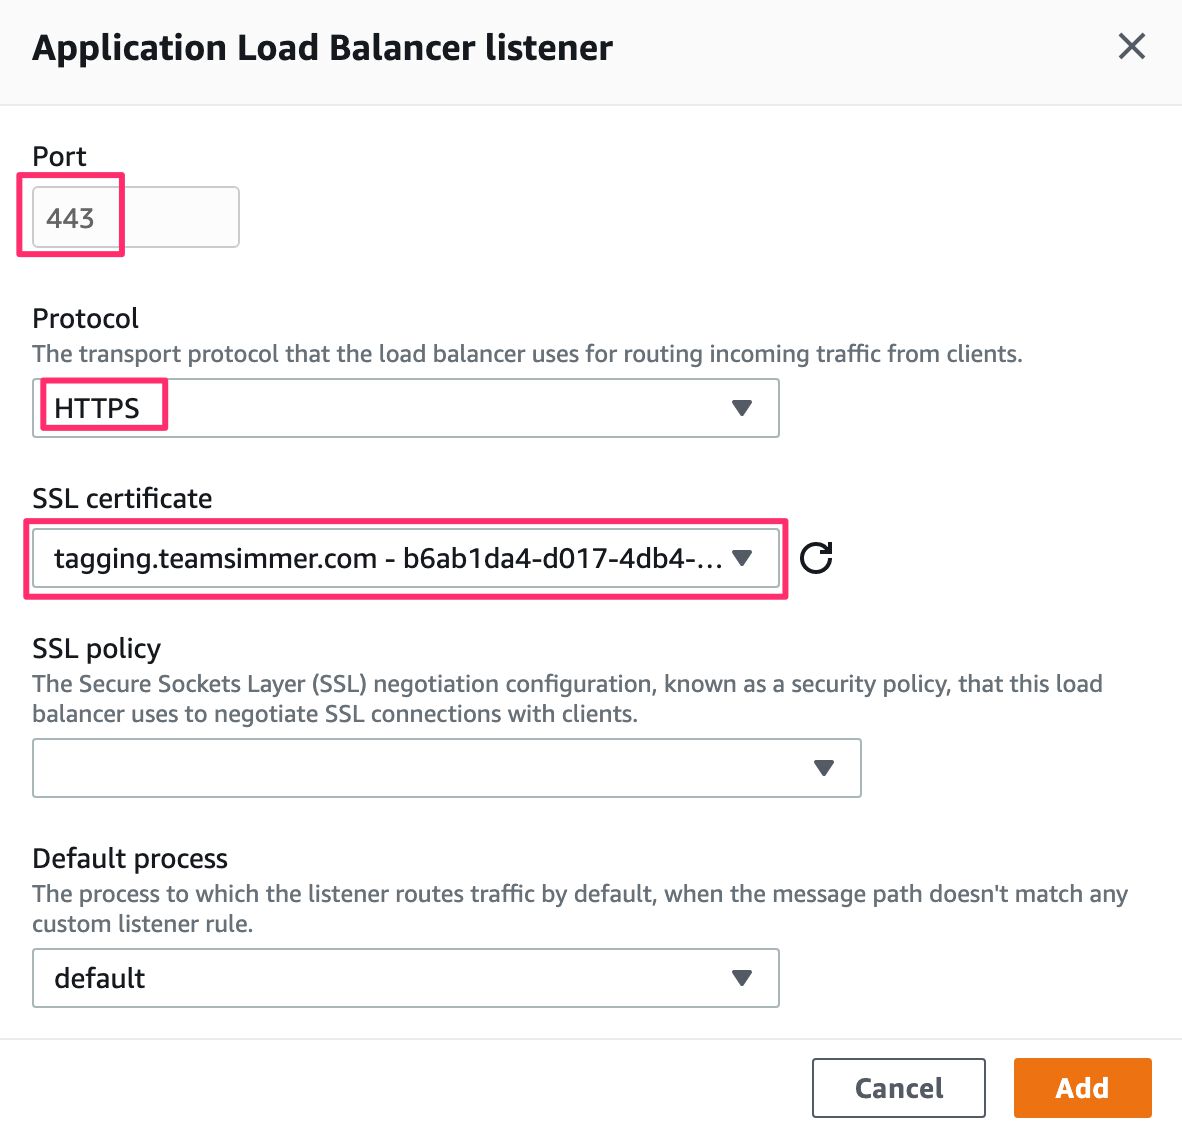
In the Listeners section click + Add Listener.
Set Port to 443, Protocol to HTTPS, and choose the SSL certificate you provisioned earlier from the respective menu. Click Add when done.
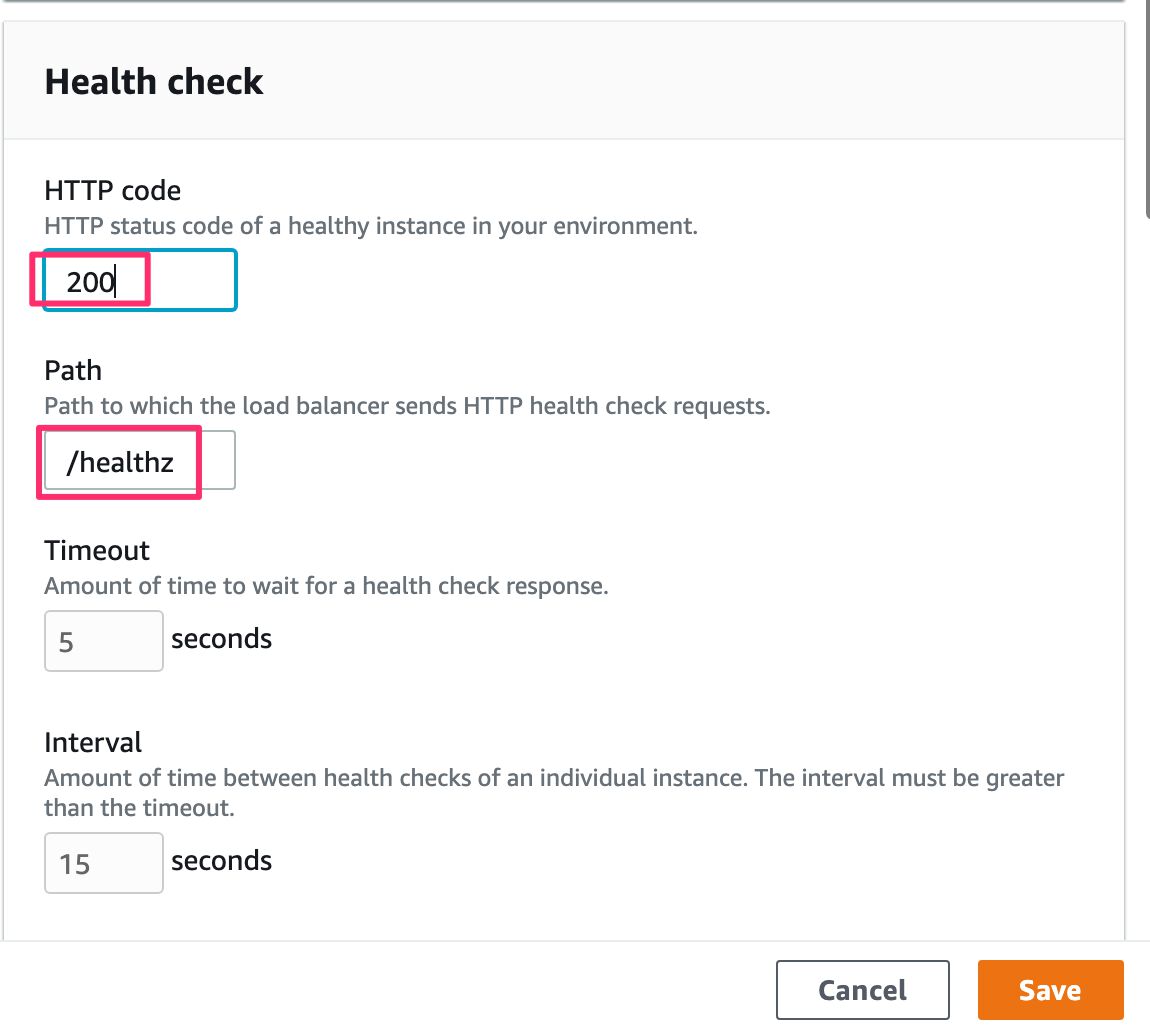
Under Processes, select the default process and click Edit in the Actions menu.
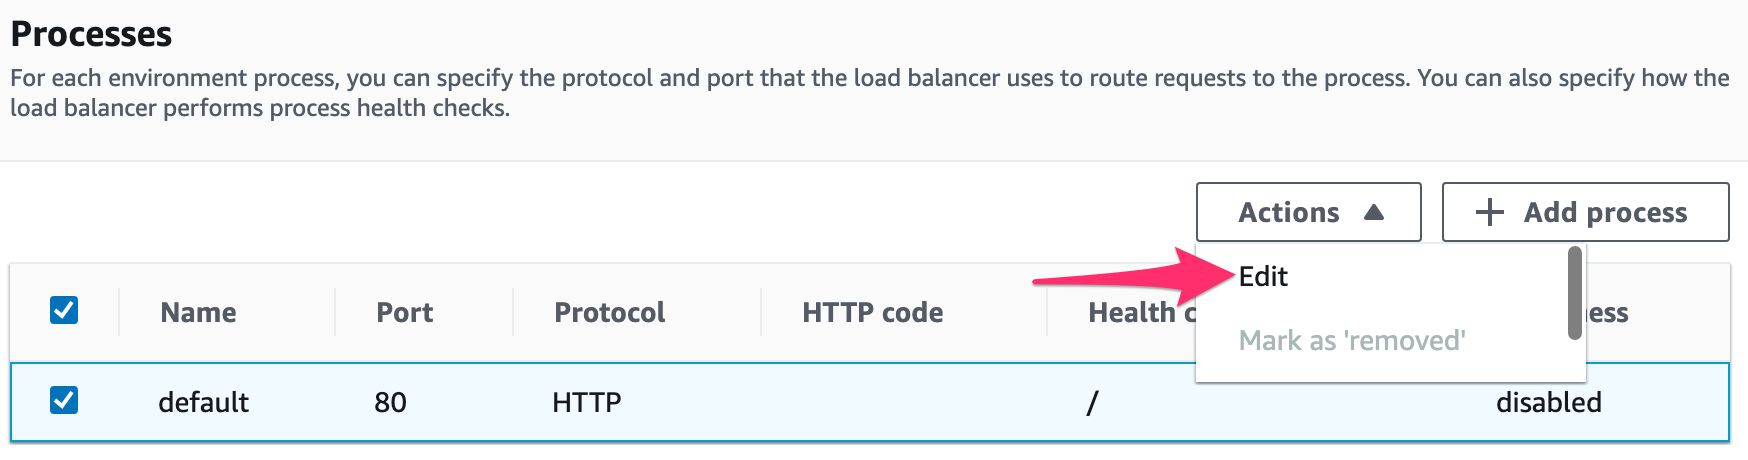
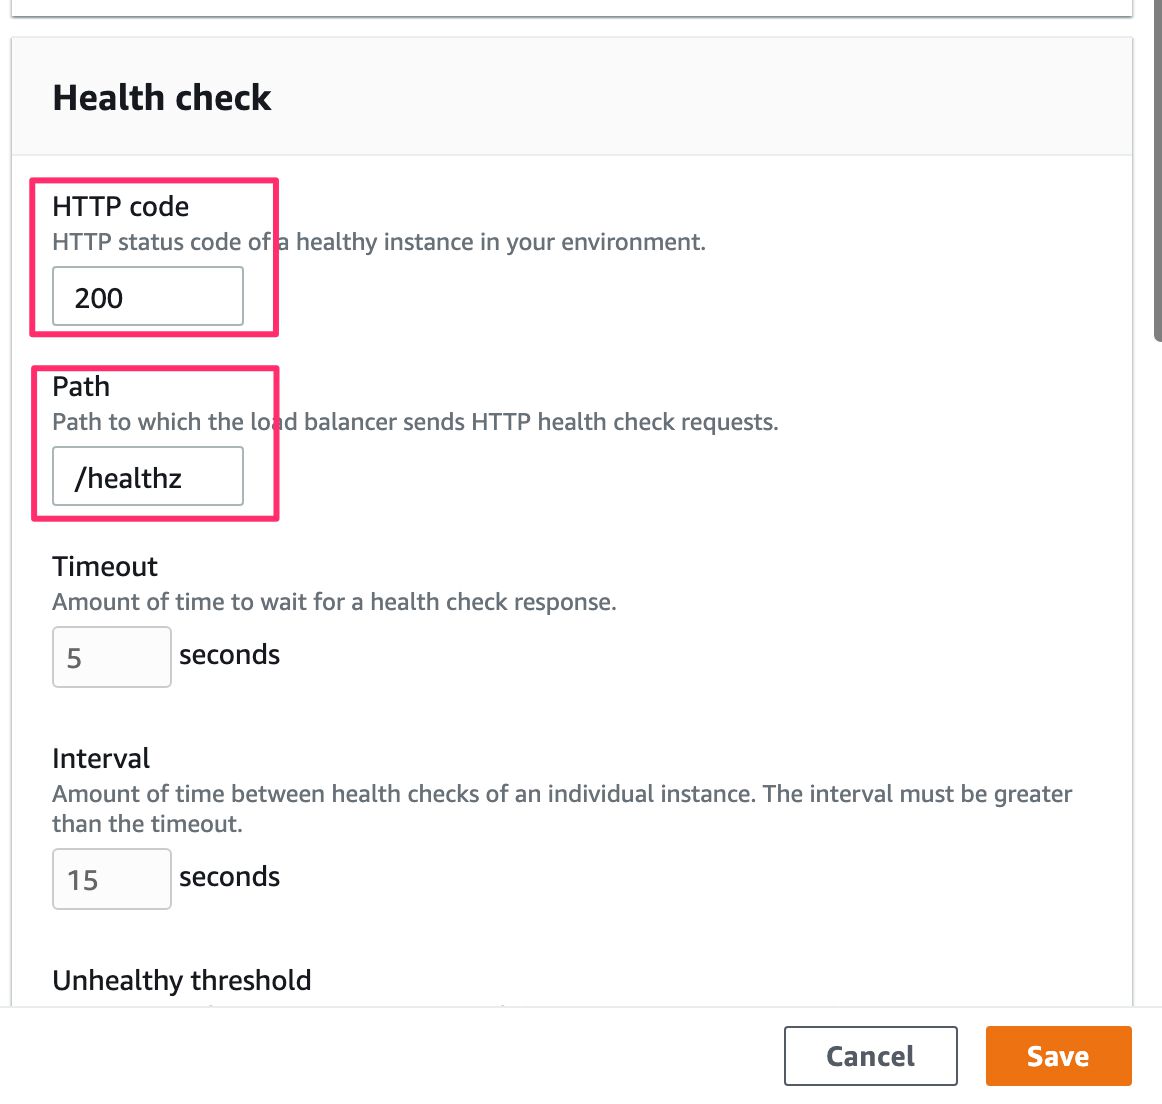
Set 200 as the value of the HTTP code for the health check, and set the path to /healthz. Click Save.
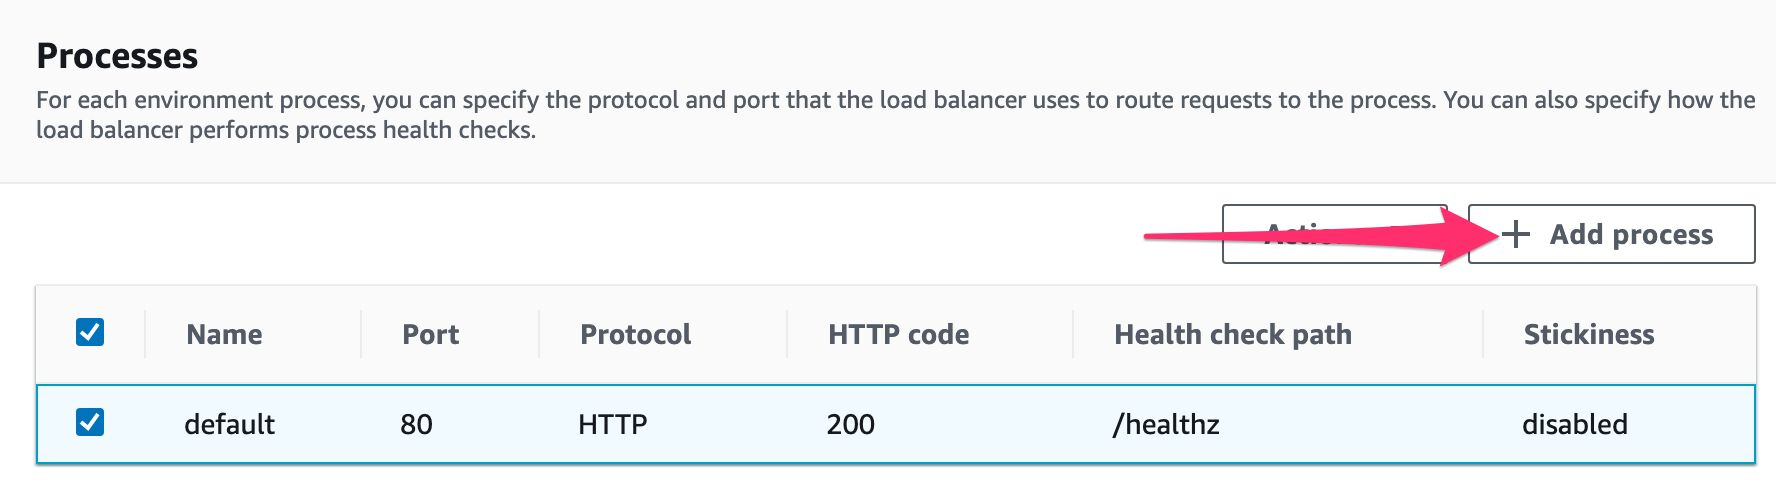
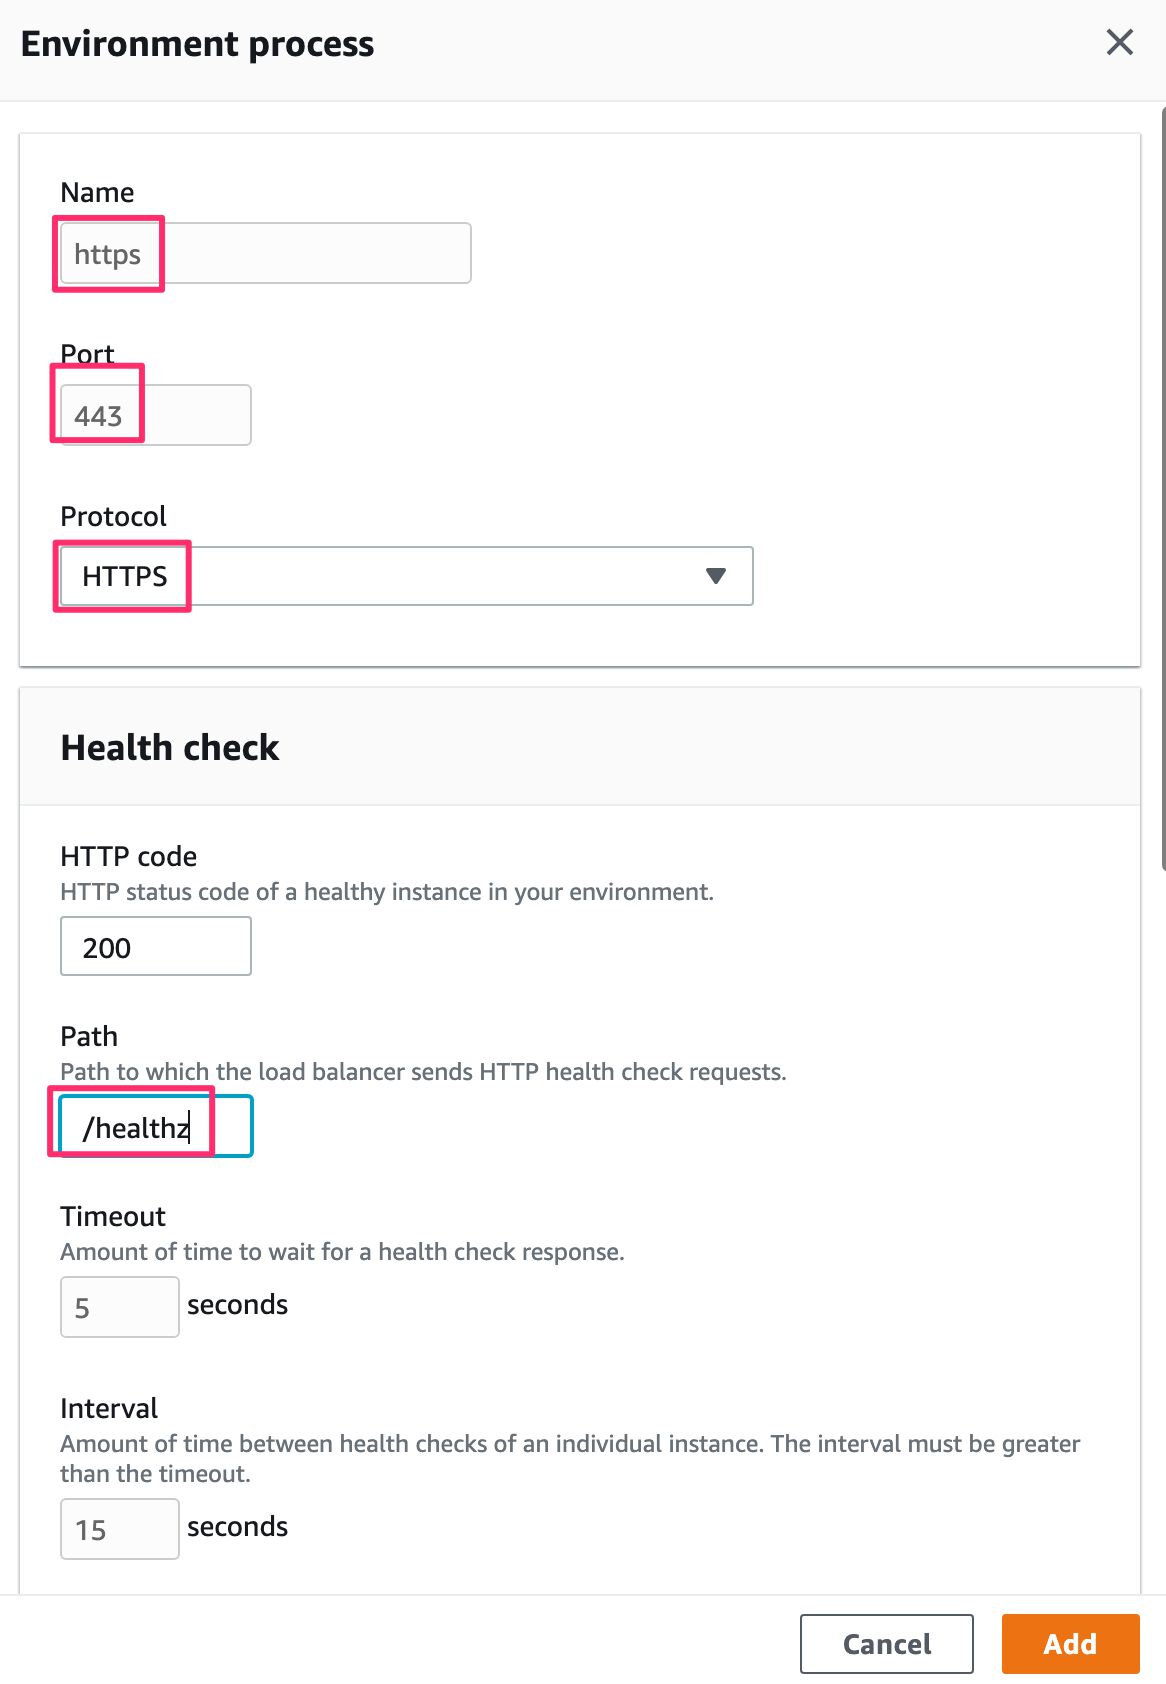
Next, click + Add process to add a new process.
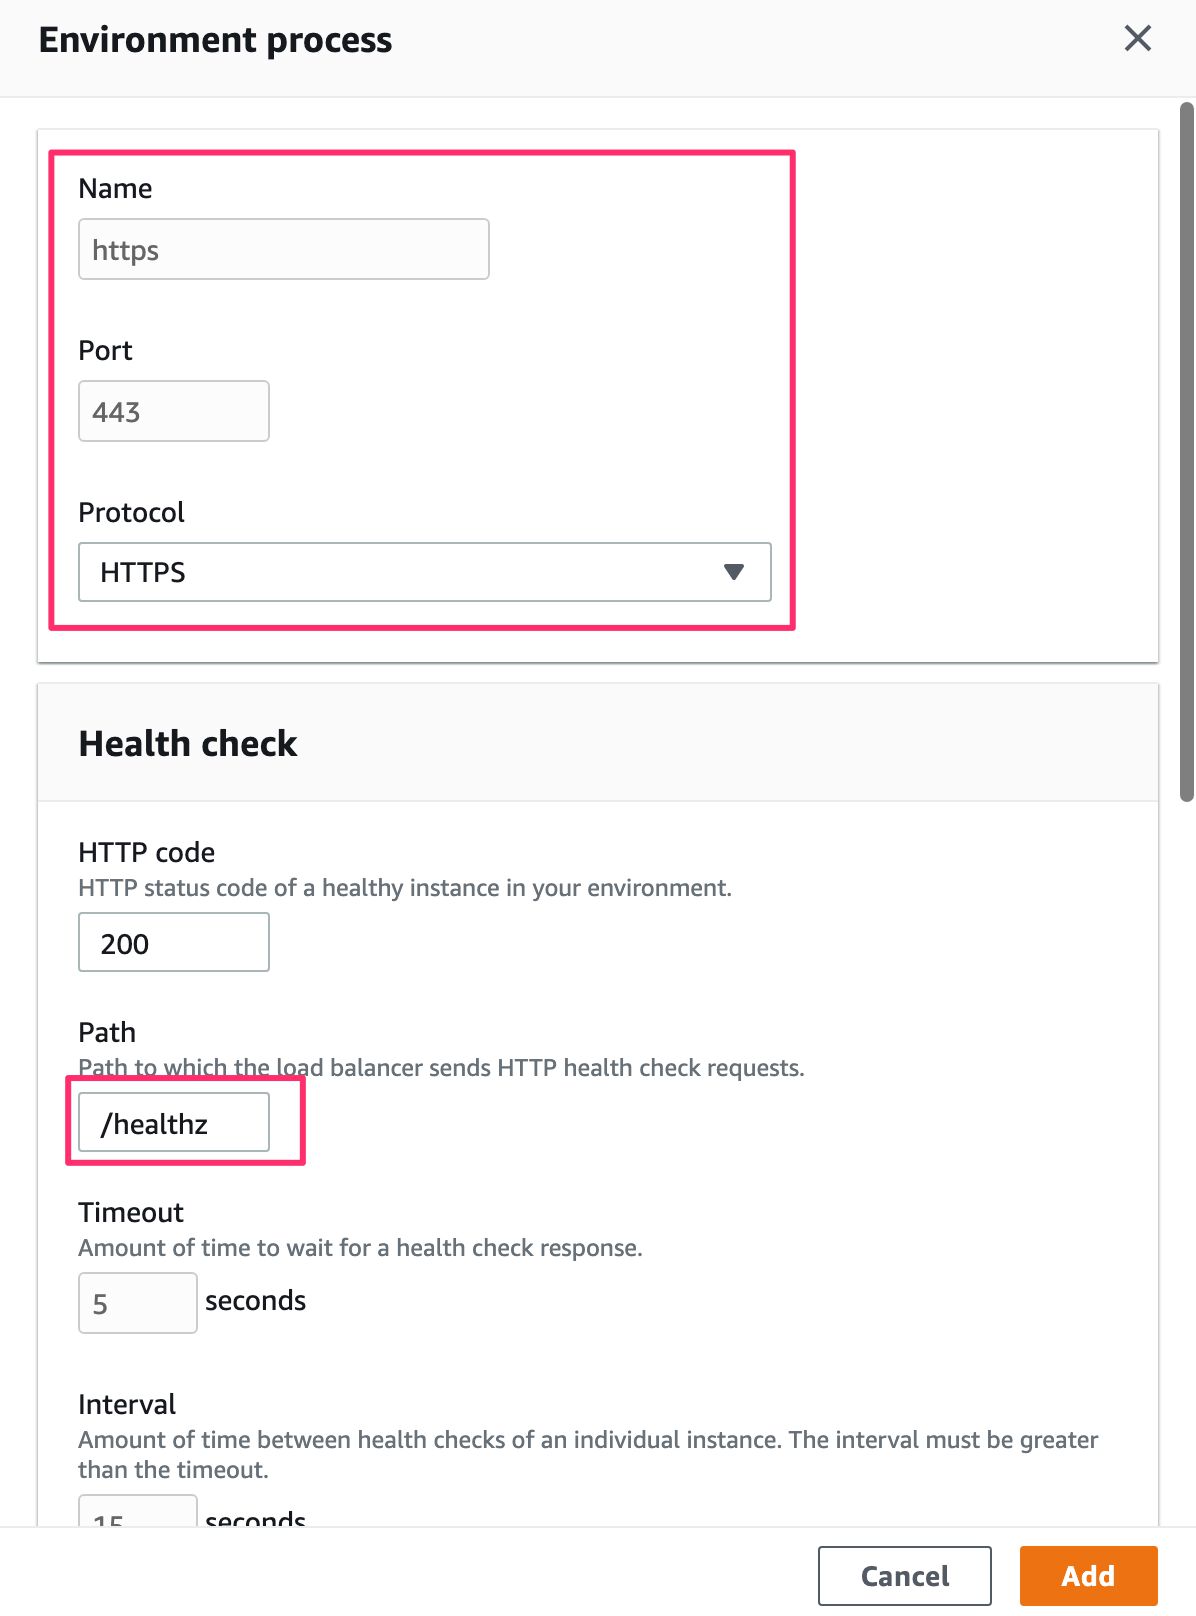
Set Name to https. Set Port to 443. Set Protocol to HTTPS.
Then, set Path to /healthz (under Health check), and click Add.
Finally, click Save at the bottom of the Modify load balancer page.
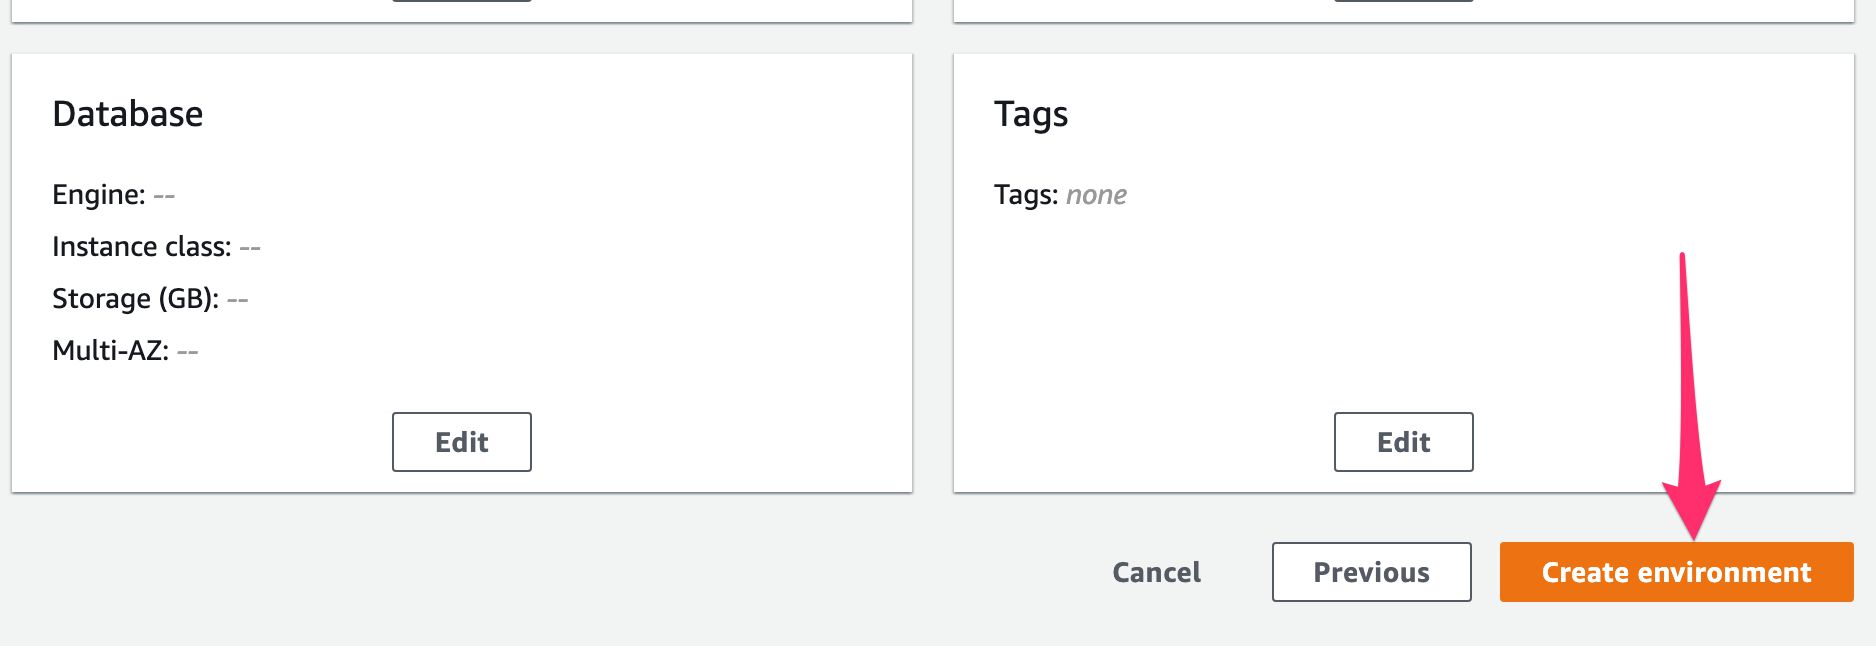
Create the environment
Once you’ve modified the Software, Capacity, and Load balancer settings, you are ready to create the environment, so click the Create environment button in the bottom right corner.
You’ll end up on a screen that shows a running log of the environment creation process. You’ll need to wait some minutes for the environment to start. When finished, this is what you should see:
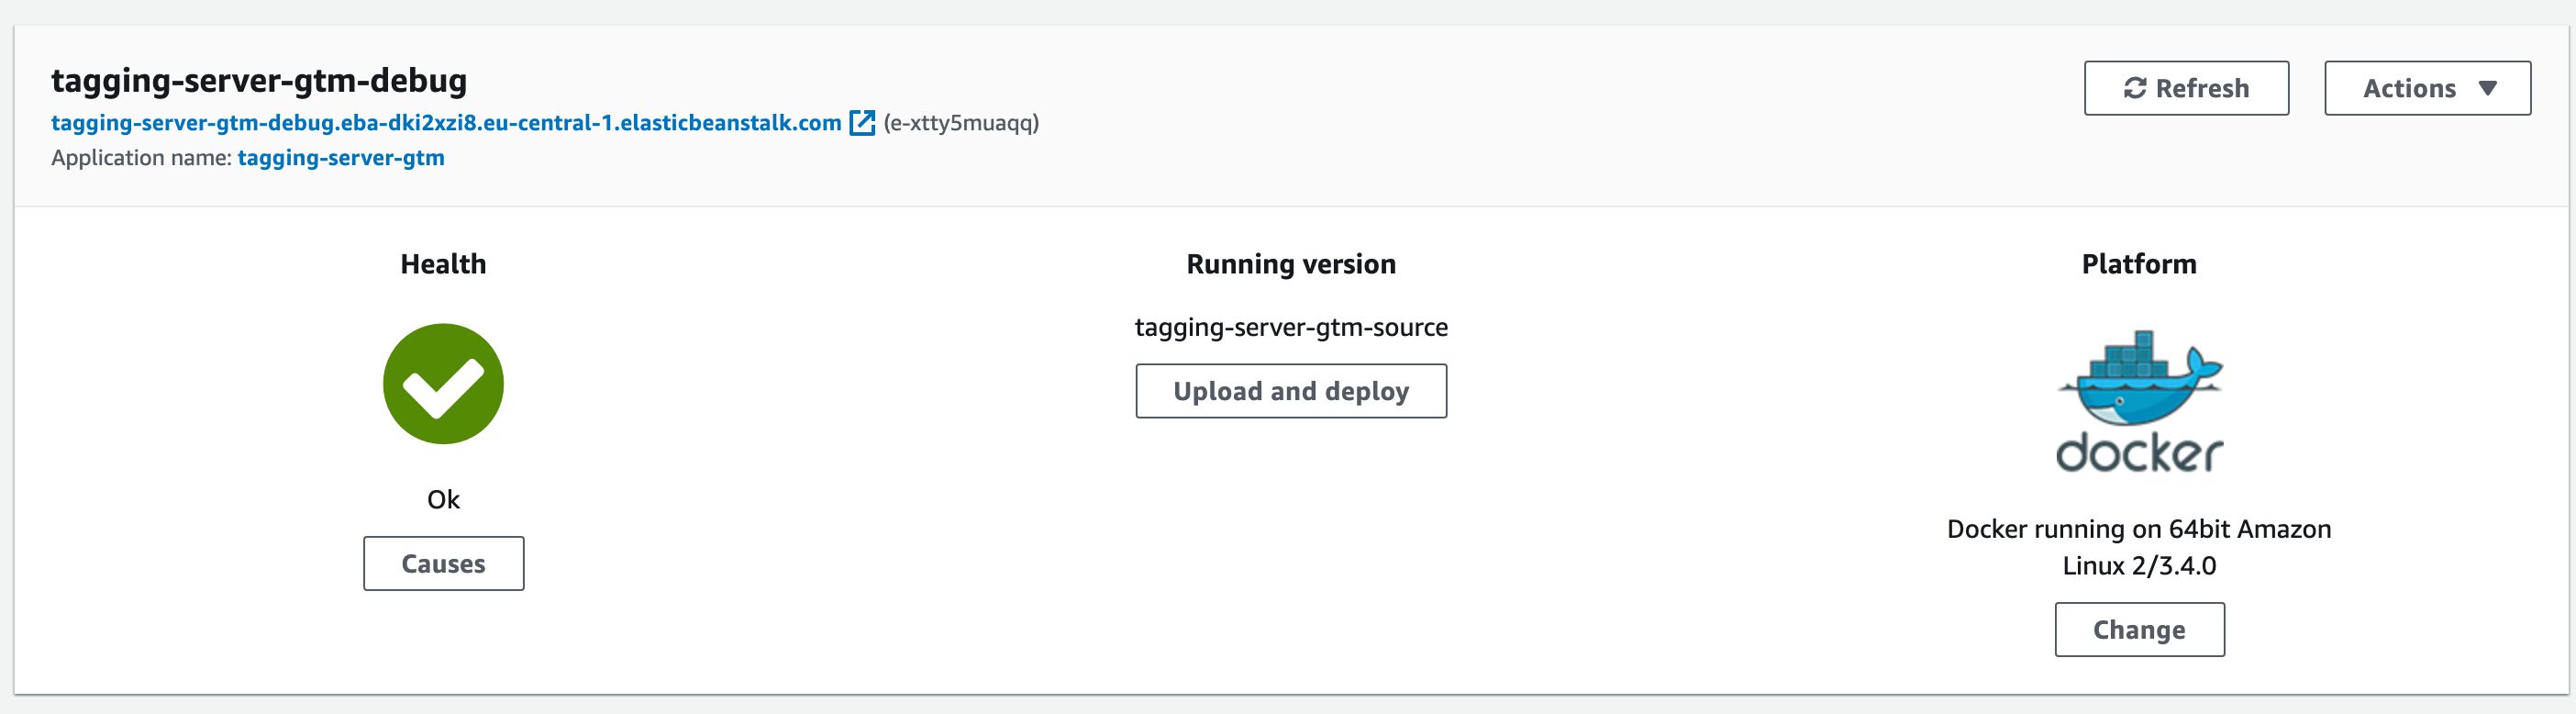
Test the environment
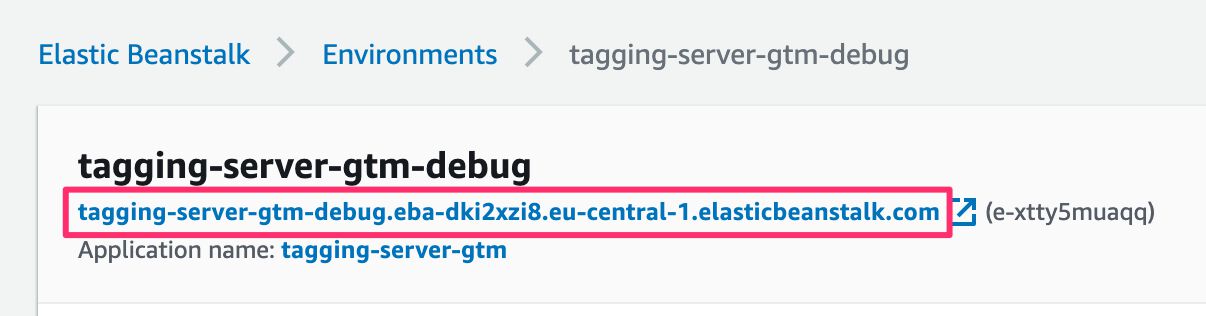
Once the debug environment is created, you can visit the environment URL (the one automatically generated by Elastic Beanstalk) and add the path /healthz.
By visiting the path /healthz, you should see a response ok in the page body.

You can also test the https URL, but as the endpoint is not secured by an SSL certificate, you’ll need to click through the warnings that appear.
Well done, the debug server has been created! Now you just need to map a custom domain to it.
5. Map a domain to the preview server
Luckily, once the Hosted Zone has been created (see chapter 2), mapping a custom domain to the preview server is very easy to do.
Head on over to Route53 and select the Hosted Zone you created earlier.
Here, click to Create a new record.
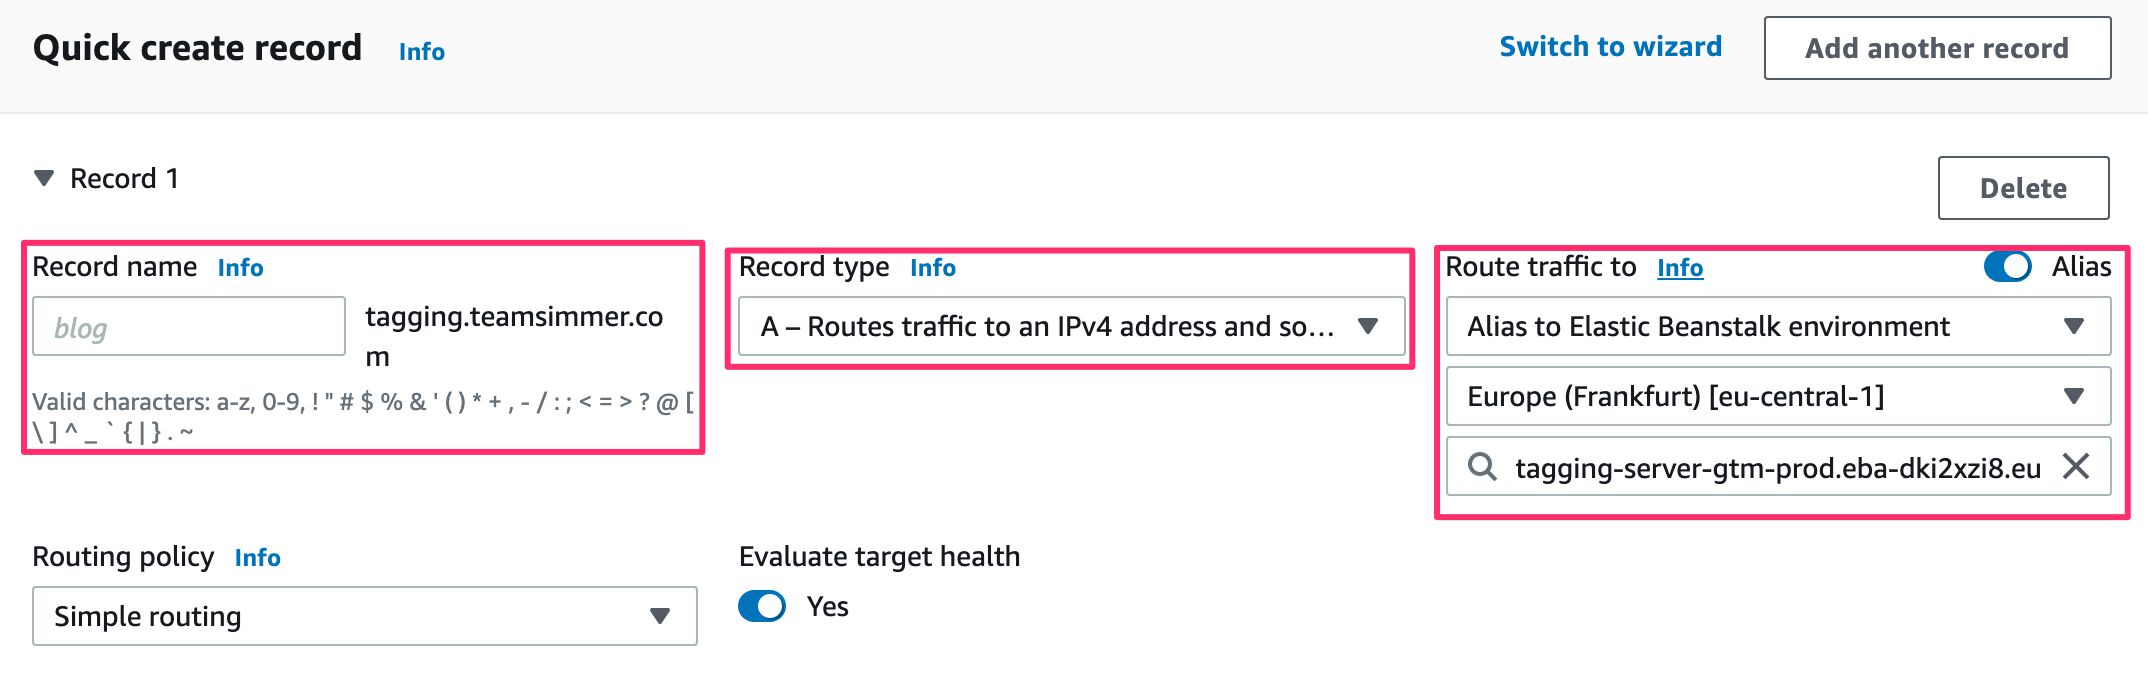
Set the Record name to the subdomain name of the preview server. In my example, this would be debug, as the hosted zone has been created for tagging.teamsimmer.com. This means that the fully qualified domain name of the preview server becomes debug.tagging.teamsimmer.com.
Keep Record type as A, and toggle the Alias toggle on.
In the Route traffic to drop-down that appears, select Alias to Elastic Beanstalk environment.
In the Choose Region drop-down, select the region where the Elastic Beanstalk application was created (eu-central-1 in my case).
Finally, in the Choose Environment field, select the preview server environment you created in the previous chapter.

Click Create records when done.
Test the domain
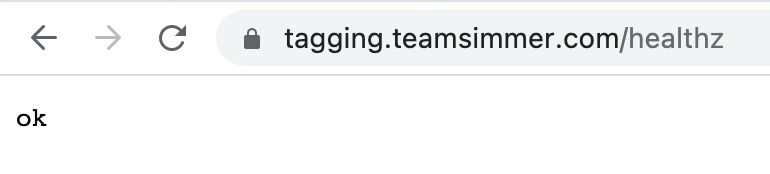
Now browse to the HTTPS URL of the domain whose name you just registered in the DNS record, and add the path /healthz. You should be able to visit this domain without an SSL warning (because the certificate was applied to the load balancer of the environment).
This is what I see when I visit https://debug.tagging.teamsimmer.com/healthz:

Congratulations, you have now created the preview server for your server-side tagging environment!
It’s time to create the actual tagging server. Luckily the steps are almost exactly the same, with just a few modifications here and there.
6. Create the tagging server environment
Go to the Applications page of Elastic Beanstalk, and select the GTM server application.
Here, click Create a new environment.
Keep Web server environment selected and click Select.
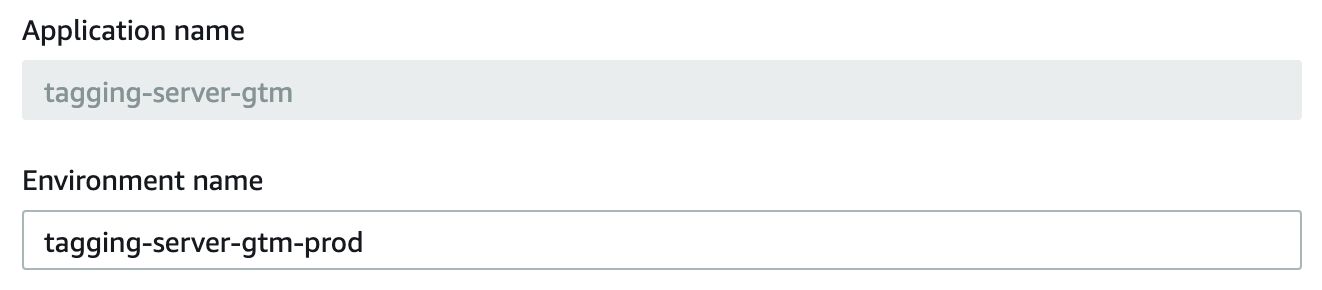
Give the environment a name. I followed the naming schema of the preview server and ended up with tagging-server-gtm-prod.
For Platform, choose Docker and keep the other platform settings with their default values.
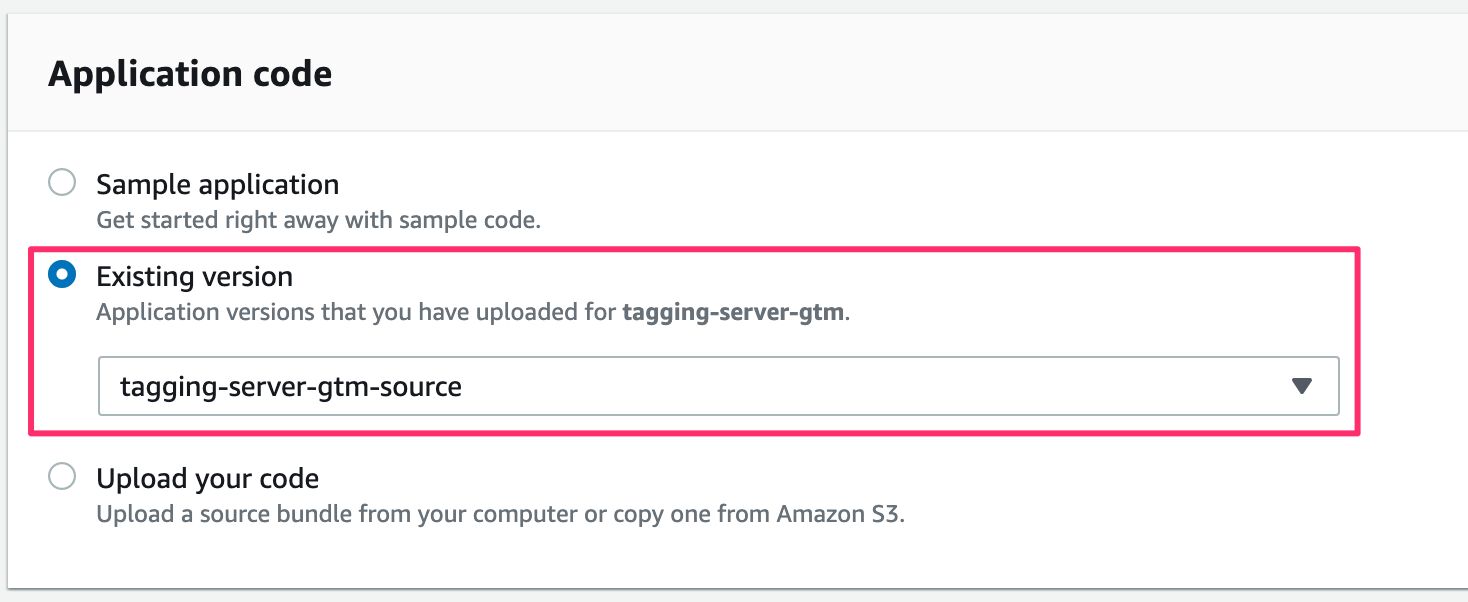
Under Application code, Select Existing version and choose the source file you used for the preview server. You can reuse this because the container image is exactly the same for both the preview server and the tagging server.
Next, click Configure more options.
Configure Software settings
In the Software box, click Edit.
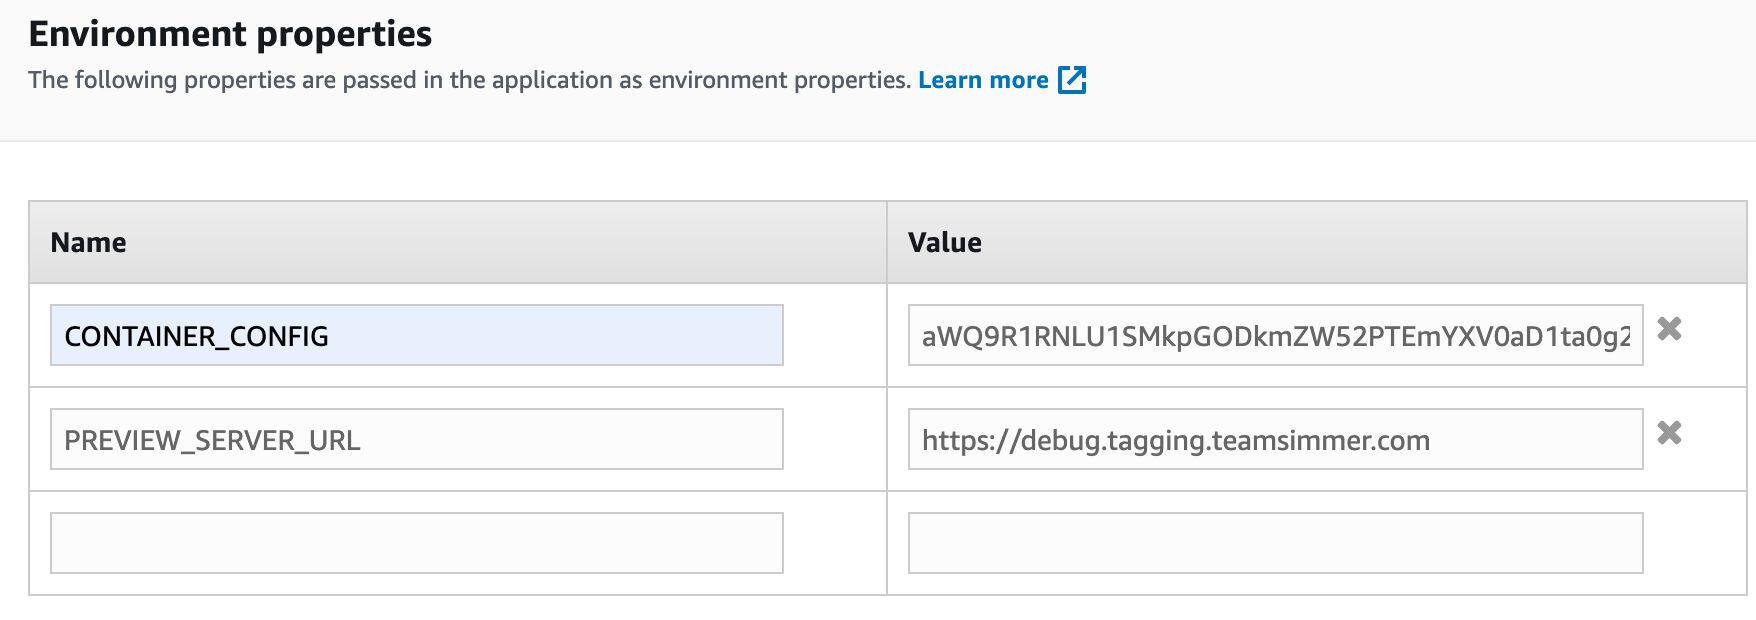
You need to add two Environment properties.
| Property | Value |
|---|---|
CONTAINER_CONFIG | Set to the container configuration string from the Google Tag Manager Container settings. |
PREVIEW_SERVER_URL | Set to the HTTPS URL to the preview server. |
The CONTAINER_CONFIG is retrieved the same way you fetched it for the preview server. Go to the Container Settings in your Google Tag Manager Server container, and copy the Container Configuration string from there.
The PREVIEW_SERVER_URL needs to be set to the origin of your preview server, which is the protocol (https) and the full hostname. As my preview server runs on debug.tagging.teamsimmer.com, the value of PREVIEW_SERVER_URL would be https://debug.tagging.teamsimmer.com.
Click Save when done.
Configure Capacity settings
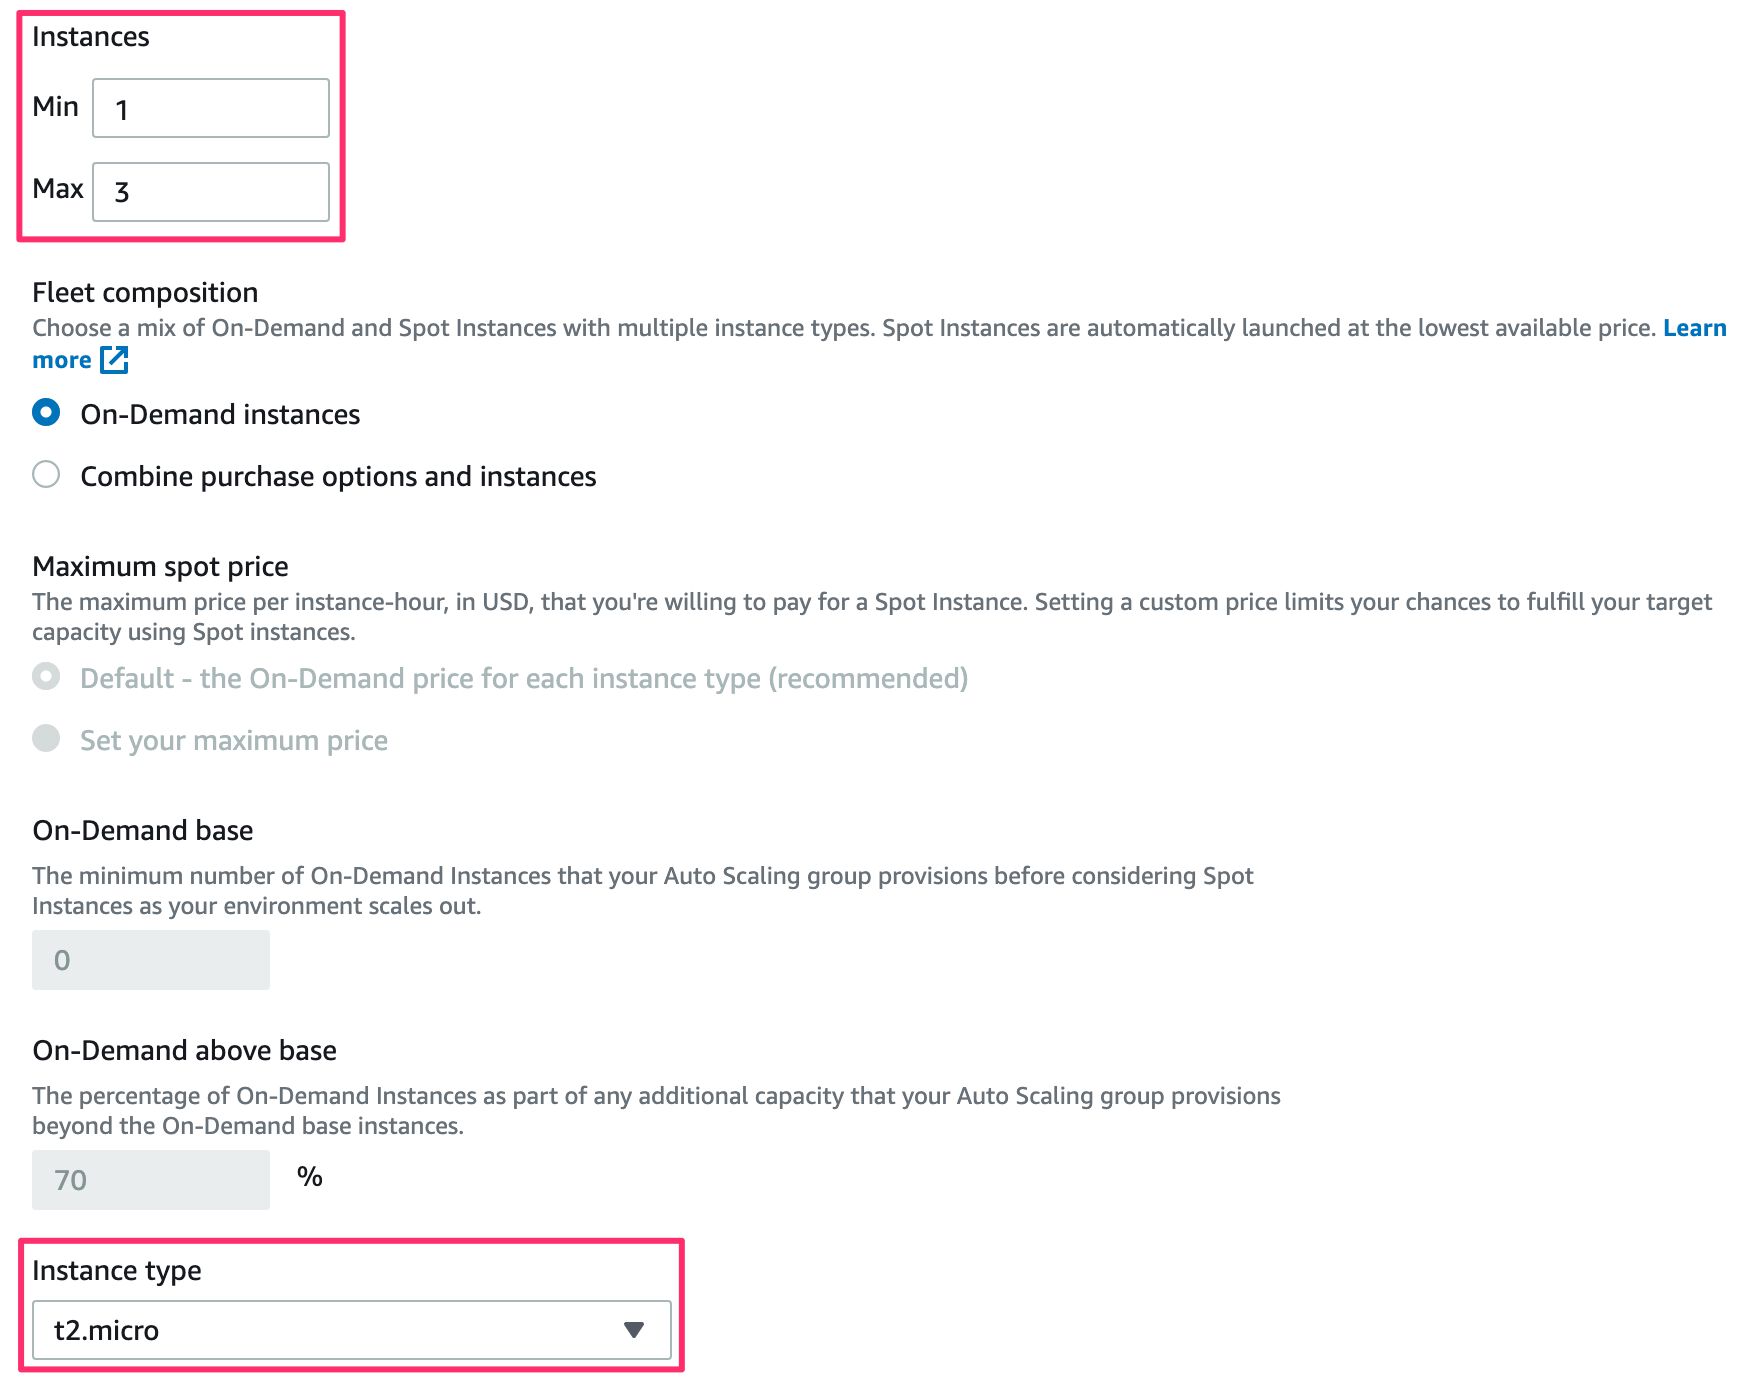
Next, click Edit in the Capacity box.
Choose Load balancing from the Environment type.
The rest is really up to you! You can choose how the environment should auto-scale by setting the minimum and maximum number of instances.
You can also choose how much “firepower” the environment has by selecting the instance type from the list.
I wanted to go with a very simple, quite flimsy setup for demo purposes, and chose a min-max of 1–3 instances, and kept the default instance type of t2.micro.
Once you’ve decided what to go with (you can always update the environment configuration later), click Save.
Configure Load balancer settings
Now, click Edit in the Load balancer box.
First, click + Add listener in the Listeners section.
Set Port to 443, Protocol to HTTPS, and choose the SSL Certificate you provisioned earlier from the drop-down list. Click Add.
Next, in Processes, select the default process, and click Edit from the Actions menu.
Set the Health Check HTTP code to 200 and the Path to /healthz. Click Save.
Click + Add process to add a new process.
Set Name to https, Port to 443, and Protocol to HTTPS. Change Path to /healthz and click Add.
Finally, click Save to close the Load balancer settings.
Create the environment
Click Create environment to have AWS deploy the Docker container to your new tagging server environment. Again, this will take some minutes to complete. Once it’s done, you should find yourself in the Environment dashboard with a healthy environment created for you.

Test the environment
Test the tagging server the same way you tested the preview server. Copy the automatically generated *.elasticbeanstalk.com URL and add /healthz as the path. You should see the ok message.
You can also test with HTTPS, but you need to click through the SSL warnings.
If everything works, you’re ready to map the tagging server domain to this environment.
7. Map a domain to the tagging server
Go to your Hosted Zones in Route53 and click the domain name you’ve created the Hosted Zone for.
Click Create record.
Assuming the tagging server will be the same domain you configured the zone for, leave the Record name field empty. In my case, this means that the mapped domain will be tagging.teamsimmer.com.
Keep A as the Record type, and toggle the Alias switch on.
Set the endpoint to Alias to Elastic Beanstalk environment.
Set the region to the region where your Elastic Beanstalk application is running.
Select the tagging server as the target environment.
Click Create records.
Test the domain
Now, browse to your tagging server domain using HTTPS, and add the path /healthz. Do you see the ok message? If so, well done!
8. Final steps
There are some final steps you need to do before everything starts working together.
Update auto-scaling groups’ health checks
First, you need to go to the Auto-scaling Groups configuration in EC2.
Elastic Beanstalk actually uses EC2 virtual machines to run the instances. These auto-scaling groups need to be updated so that unhealthy servers are redeployed with the latest changes in the server runtime.
One after the other, click open the two groups assigned to your server-side GTM application (one group for the preview server and one for the tagging server). If you have more groups here than just the two, you’ll need to do some digging to identify the ones that correspond with your setup.
In the Health checks box of both groups, click Edit.
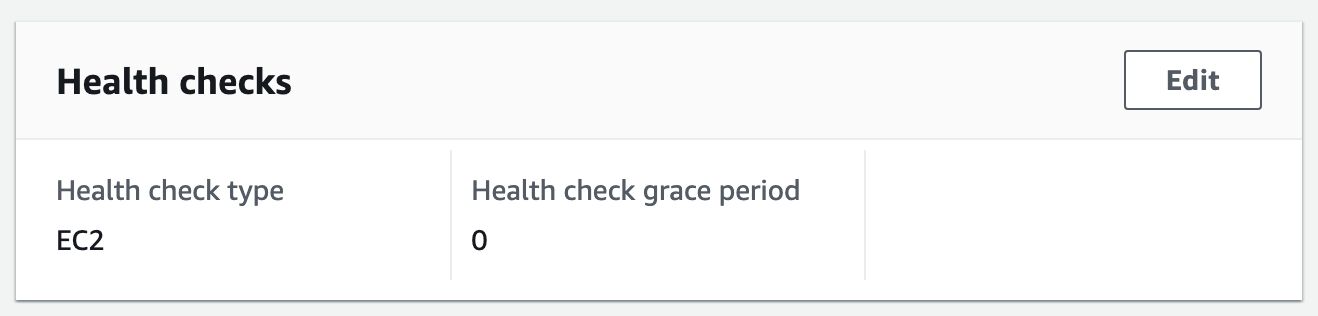
Check the ELB checkbox and click Update.
Remember, this needs to be done for both groups used by your application.
Update Google Tag Manager container settings
Finally, you can edit the Server container settings for your Google Tag Manager container, and add your new tagging server URL.
Go to Container Settings in the Admin section of your Server container in the Google Tag Manager UI, and add the URL to your tagging server in the respective field.
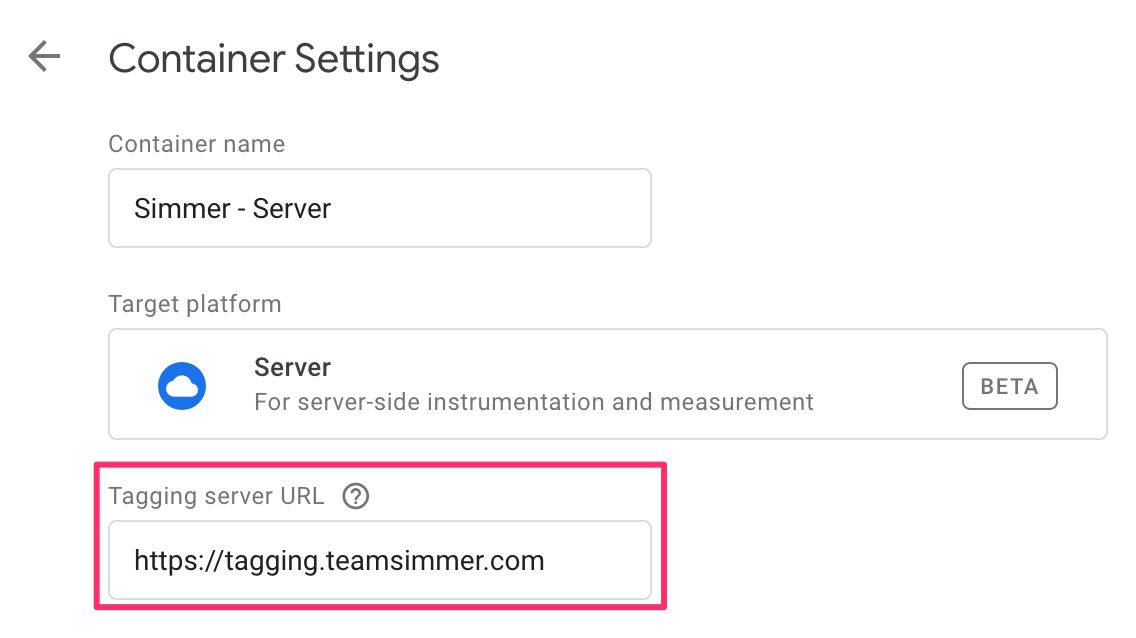
You can test that everything works by clicking the Preview button.
Debug mode should open, and you should see your tagging server URL in the address bar.

Summary
If you’re an AWS pro, setting up the server application in Elastic Beanstalk should be quite easy to do. After all, it runs on a very straightforward Docker container image with hardly any customizations necessary.
If you’re an AWS novice, then hopefully after this guide you’ll understand a bit better how the different components play together. It’s quite a world apart from the user experience of the Google Cloud Platform, isn’t it?
In any case, this guide should have given you enough information to keep configuring the setup by yourself. You might want to tweak the environment configuration for your tagging server, in case you need more instances or more computation power.
You might also want to setup some request logging (you can configure this in the environment settings, too).
To get the BigQuery API to work, you’ll basically need to add two new environment variables: GOOGLE_APPLICATION_CREDENTIALS, which needs to point to a file in the environment file system, and GOOGLE_CLOUD_PROJECT which is set to the project ID of the Google Cloud project where BigQuery is running.
The easiest way to do this is to create a new Dockerfile with the service account credentials added to the image, and then deploy both the credentials and the image from the command-line into the Elastic Beanstalk environment. This will be the subject of a new guide, or if someone else does the documentation for how to deploy the GTM server using the command-line interface, I’ll link to it here.
Hopefully we’ll see more guides for deploying the GTM server to other environments than Google’s App Engine. Mark Edmondson has already released a walkthrough for deploying to Google Cloud Run, so that’s something you might want to take a look at as well!
