Send Mail Upon Google Tag Manager Event
Let’s say you want to set up a rudimentary email alert system in your Google Tag Manager implementation. Say, for example, you want to receive an email every time an uncaught error occurs on your website. It’s not a very good use case, since a large website can spawn hundreds of uncaught exceptions in a short period of time, but let’s just pretend for now.
If you know your JavaScript, you’ll know that you can’t send mail using client-side code. That’s a browser security thing, and I completely understand it. However, a vast majority of websites are created using a CMS which might provide some mail function or hook for you to use. And even if you don’t have a cooperative web server (or there’s no way you can persuade your developers to help), you could use any one of the online email APIs that are out there.
In this post, I’ll show two easy ways of getting your mail sent: using the mail() function in PHP, and using Mandrill’s API. My use case will be simple: every time an uncaught exception occurs on the website, an email is sent to my address with details about the error. I’ll be using the JavaScript Error Listener to catch the error and push it into the mailer.
Word of warning: The examples in this post are very rudimentary and serve simply to show you what the basics are of sending your emails using GTM. Before you start coding a mailer system of your own, make sure you familiarize yourself with the documentation so that you don’t accidentally or unintentionally open a door for mail spammers.
XThe Simmer Newsletter
Subscribe to the Simmer newsletter to get the latest news and content from Simo Ahava into your email inbox!
Before you start
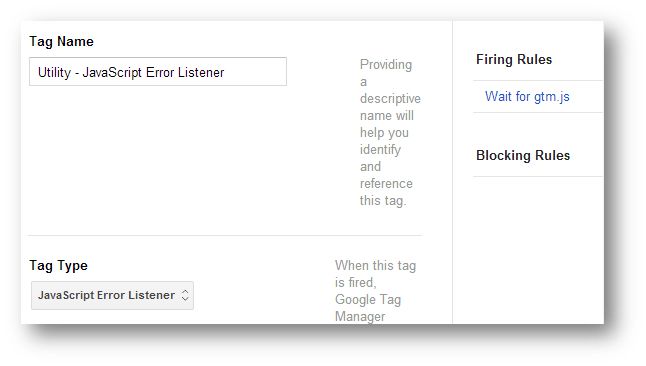
For this to work, you’ll need the GTM JavaScript Error Listener up and running, with a couple of macros ready to collect data on the uncaught errors.
So first, set up the error listener with a firing rule of your choice. I have it running on all pages, but if you want to monitor just a specific page, feel free to change the rule.
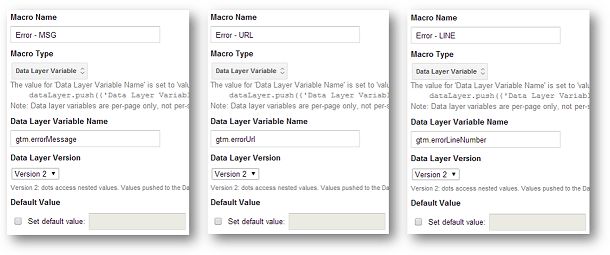
Next, you’ll need three macros: one for the error message, one for the faulty URL, and one for the line number where the faulty code was found.
{{Error - MSG}}
Macro Type: Data Layer Variable
Data Layer Variable Name: gtm.errorMessage
{{Error - URL}}
Macro Type: Data Layer Variable
Data Layer Variable Name: gtm.errorUrl
(NOTE: At the time of writing, this macro will return an empty string. However, I’m sure it will be fixed soon. Until then, you can use the default {{url}} macro instead.)
{{Error - LINE}}
Macro Type: Data Layer Variable
Data Layer Variable Name: gtm.errorLineNumber
And then you’re good to go.
Send mail with PHP
If your site has been built with PHP, you can use the built-in mail() function to send your emails. (If your site runs on WordPress, you should also take a look at the wp_mail() function which is a bit more robust!)
For this method to work, you’ll need two things:
A Custom HTML Tag in your GTM setup to send the data payload to the PHP script
A PHP script which processes the data and sends it
The Custom HTML Tag below uses jQuery to send the POST request, so you’ll need to make sure that jQuery is loaded before the Custom HTML is run. I’m not a huge fan of jQuery or really any JS framework stacked on top of GTM, but for making POST requests using AJAX, it’s a huge help.
So anyway, here’s what the Custom HTML Tag looks like:
<script>
  var data = {
    errorUrl: {{Error - URL}},
    errorLine: {{Error - LINE}},
    errorMsg: {{Error - MSG}}
  };
  jQuery.ajax({
    type: "POST",
    url: "/wp-content/uploads/email.php",
    data: data
  });
</script>
Like I said, it’s really bare-bones. You should add some validation code, maybe utilize the success, error and complete callbacks and so forth.
The first bit is about building the payload. I’m doing that by creating an object literal, which is populated by the values retrieved by the error macros created earlier. So when an error occurs, the object data might have the following key-value pairs:
errorUrl: https://www.simoahava.com/
errorLine: “3”
errorMsg: “Uncaught ReferenceError: myFunction is not defined”
The next bit is about using jQuery’s ajax() function to send the data with a POST request to the custom PHP script. You’ll need to specify the location of the script for this to work.
I wrote a very simple mail script, which you can find below. Save this as email.php and store it in a location you can refer to in the POST request.
<?php
if($_POST){
  $message = 'Uncaught exception on page ' . $_POST['errorUrl'] .
             ', line ' . $_POST['errorLine'] .
             ': ' . $_POST['errorMsg'];
  mail("[email protected]", "[GTM simoahava.com] Uncaught error", $message);
}
?>
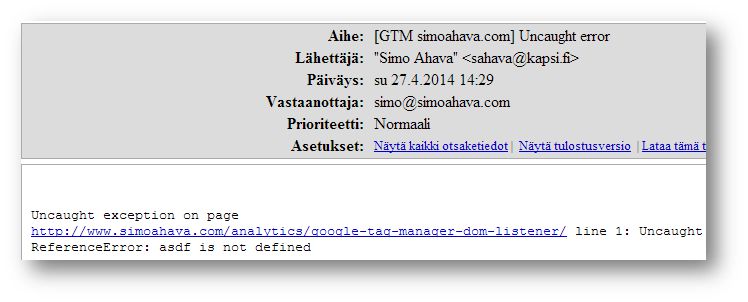
Again, very simple. The PHP basically waits for a POST request, after which it populates a variable $message with the payload data. Next, it utilizes the mail() function to send mail to my email with the subject [GTM simoahava.com] Uncaught error, and the error data in the message body.
Ta-da! You’ve just created your email alert system using some simple jQuery and PHP. Here’s what a sample email looks like:
Send mail with the Mandrill API
Mandrill is an online mailing system, which provides a pretty flexible framework for sending mail using their JSON API. I chose it simply because it’s free (you have to pay if you send more than 12,000 mails per month using Mandrill), and because it looks pretty simple to set up.
To get things up and running, you’ll need two things:
Mandrill API key
A Custom HTML Tag to send the payload data to the API
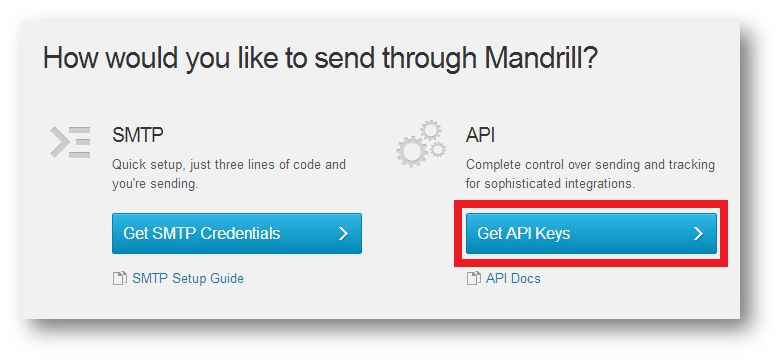
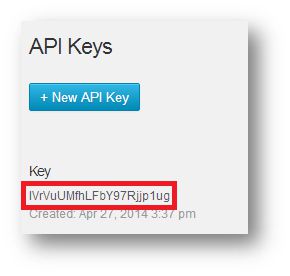
To get the API key, browse to http://mandrill.com/signup/, and sign up for access. Once you log in for the first time, you should click on the “Get API Keys” button.
In the next screen, choose the “+ New API Key” to generate a new API key for you. You should immediately see your newly generated key in the list below.
And that’s it for setting up your Mandrill account. What you need to do next is create the Custom HTML Tag which negotiates with the Mandrill API to send your mail. Here’s what this tag should look like:
<script>
    var data = {
    "key": "IVrVuUMfhLFbY97Rjjp1ug",
    "message": {
      "text": "Uncaught exception on page " + {{Error - URL}} +
            ", line " + {{Error - LINE}} +
            ": " + {{Error - MSG}},
      "subject": "[GTM simoahava.com] Uncaught error",
      "from_email": "[email protected]"OB,
      "from_name": "GTM Simo",
      "to": [
        {
          "email": "[email protected]",
          "name": "Simo Ahava",
          "type": "to"
        }
      ]
    },
    "async": true
  };
  jQuery.ajax({
    type: "POST",
    url: "https://mandrillapp.com/api/1.0/messages/send.json",
    dataType: "json",
    data: data
  });
</script>
As you can see, you need to add a bit more information into the payload object to satisfy the requirements of the Mandrill API.
The code itself is pretty similar to when we sent the POST request to the PHP script, with the notable exception of having to declare the dataType parameter explicitly as “json”.
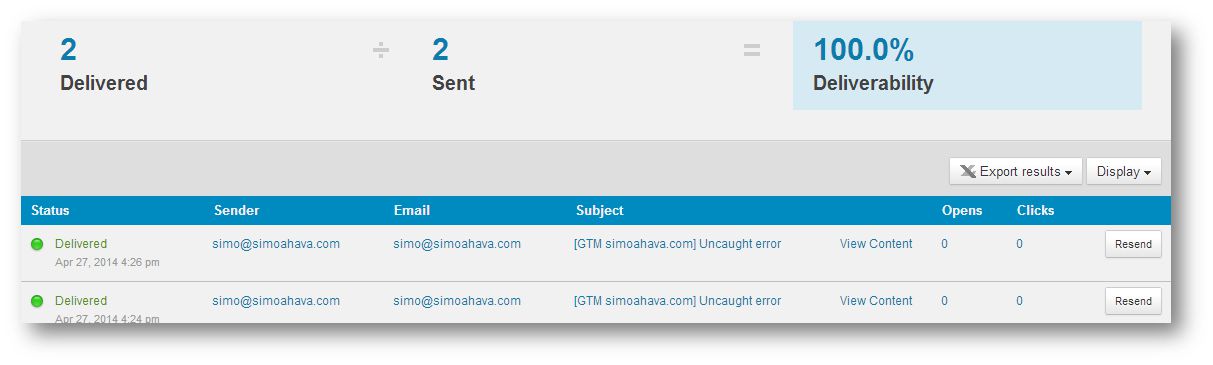
When the mail is sent successfully, you should again see a pretty hideous email in your inbox. By the way, take a look at Mandrill’s reports. You’ll see some pretty interesting data on your API use, so if you want to build this into a whole email-system-thing, you can use Mandrill’s powerful features to diagnose your mail traffic.
Conclusions
Sending mail via Google Tag Manager doesn’t happen with just a click of a button. Because browser security prevents you from sending email directly with JavaScript (i.e. GTM), you’ll need to access either server-side methods or some external API. This post provided very rudimentary examples of both scenarios.
If you want to build on this idea, be sure to make your code as waterproof as possible. Hijacking someone’s mail script is a really easy way to cause a lot of damage in the form of spam. Also, I don’t like the fact that you have to provide the Mandrill API key “in the open”, so you might want to look at Mandrill’s PHP client as a way to use Mandrill’s API to send the mail server-side.
And before you try anything, the API key I created was just for testing purposes, it no longer exists.
Anyway, perhaps at some point GTM will support sending mail via GTM’s own protocols, which will make this post nice and obsolete, but until then: have fun!
