Advanced Form Tracking In Google Tag Manager
There is a new, updated version of this article for the new version of Google Tag Manager. I strongly suggest you read that as well!
I really enjoy the ad hoc Q&A sessions my blog posts have inspired. I haven’t said this enough, but I am really, REALLY grateful to people who take their time to comment on my posts, even if it’s just say a quick “Hi!”. The main reason I enjoy getting blog comments is because they often turn into blog posts. Seriously, if you’re a blogger suffering from writer’s block, take a look at your comments. There’s a wealth of content ideas right there.
I’m often asked about form tracking and Google Tag Manager. This is a recurring theme in the Google+ GTM community as well. Part of me (the pretentious part) wants to credit this to the fact that I neglected to add a section for the Form Submit Listener tag in my auto-event tracking post. This is when the rational me kicks in and says that it’s actually because tracking forms is pretty darn difficult. There are so many things that can go wrong, so many variables to look at, so many different things to track, so many different forms on a single page, so many different technologies creating the forms, so many… you get the drift.
So this guide is meant to cover some of the more advanced use cases for form tracking in GTM, while still providing relevant examples of GTM macros and rules to make the tips actionable.
XThe Simmer Newsletter
Subscribe to the Simmer newsletter to get the latest news and content from Simo Ahava into your email inbox!
1. Form tracking: the basics
To track a form in Google Tag Manager, your best bet is to create a Form Submit Listener tag. This will then listen for form submit events (provided that they aren’t prevented by conflicting scripts), and push an {{event}} equals gtm.formSubmit event into the data layer for you to work with.
If you’re feeling a little confused, you should first read up on the basics: auto-event tracking, macros, and rules. Justin Cutroni has an excellent post on auto-event tracking, and it covers form tracking basics as well.
So let’s get started. Before we do anything, let’s create the Form Submit Listener tag.
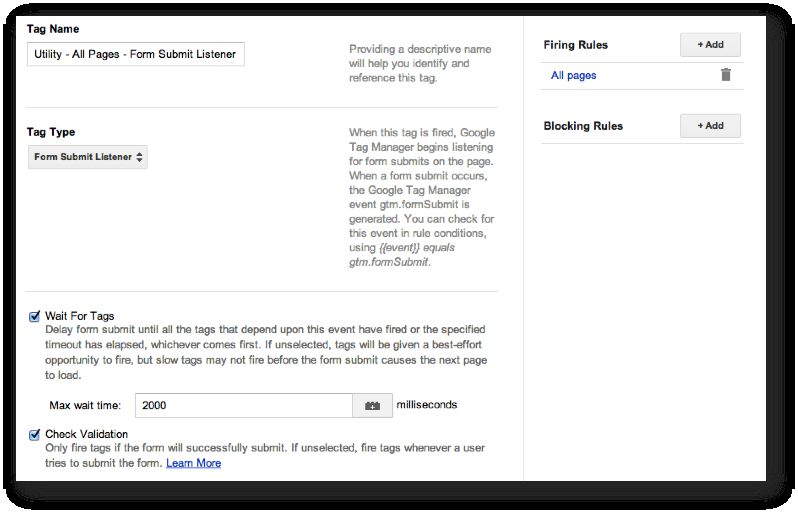
Create a new tag of type Form Submit Listener
Set the firing rule to fire on all pages
Now, you have some room to improvise here. First of all, it isn’t at all necessary to have the tag fire on all pages. If you want to optimize things, you could only have it fire on pages with forms.
Also, as you can see there are two checkboxes that you can check, if you so choose:
Wait for tags - This introduces a timeout of X milliseconds (2000 by default) to the submit event. This is to allow all tags that use the form submit event as a trigger to fire. If the timeout elapses before the dependent tags have fired, the form submit event will complete, and there’s a risk that you’ll miss some hits. Still, I do not recommend that you increase this timeout, because if your dependent tags don’t fire within 2 seconds, the fault is with them, not with GTM or your form.
Check for validation - Basically, if the form doesn’t validate (i.e. the submission event is interrupted by a validation function), the tag will not fire. This would be smart to check, unless you know there are event propagation issues involved, such as when a custom submit handler is used.
The Form Submit Listener waits for a form submit event on the page. Once a form is successfully submitted, a GTM data layer event gtm.formSubmit is pushed into the data layer. If you have the “Wait for tags” option checked, any tags using this event as a trigger will be first fired (if they fire within the delay time specified), and only then will the submission be completed. After this, you can use the rule {{event}} equals gtm.formSubmit for any tags that should be fired when a form is submitted.
So this is the starting point for our journey. A lonely form submit listener, its meager existence reduced to waiting for a form to submit, ready to fulfill the duties it was assigned by a sadistic GTM admin.
2. Useful macros
As always, a sleek and functional GTM setup is dependent on how you use macros. For the purposes of this post, here’s a bunch of macros you’ll find useful.
{{element}}
Macro Type: Auto-Event Variable
Variable Type: Element
Description: Captures the submitted form object
{{element id}}
Macro Type: Auto-Event Variable
Variable Type: Element ID
Description: Captures the ID attribute value of the submitted from
{{element url}}
Macro Type: Auto-Event Variable
Variable Type: Element URL
Description: Captures the ACTION attribute value of the submitted form
{{field value}}
Macro Type: Custom JavaScript
JavaScript:
function() {
  var inputField = document.getElementById("myFormField");
  return inputField.value || "";
}Description: Returns the value of the element whose ID is myFormField (change this to your liking)
{{selected item}}
Macro Type: Custom JavaScript
JavaScript:
function() {
  var selectId = document.getElementById("mySelectList");
  try {
    var options = selectId.options;
    for (var i = 0;i < options.length;i++){
      if(options[i].selected) {
        return options[i].value;
      }
    }
  } catch(e) {}
  return "";
}Description: Returns the VALUE of the selected item in the select list whose ID you specify with the variable selectId
{{checked button}}
Macro Type: Custom JavaScript
JavaScript:
function() {
  var radioName = "myRadioButtons";
  try {
    var buttons = document.getElementsByName(radioName);
    for (var i = 0;i < buttons.length;i++){
      if(buttons[i].checked) {
        return buttons[i].value;
      }
    }
  } catch(e) {}
  return "";
}Description: Returns the VALUE of the checked element out of the radio buttons whose NAME attribute is specified in the variable radioName
{{string of checked buttons}}
Macro Type: Custom JavaScript
JavaScript:
function() {
  var inputs = document.getElementsByTagName("input"),
      selectedRadios = "";
  for (var i = 0;i < inputs.length;i++) {
    if(inputs[i].type==="radio" && inputs[i].checked) {
      selectedRadios += inputs[i].value +" ";
    }
  }
  return selectedRadios.replace(/\s$/,"");
}Description: Returns a concatenated string of all the values of checked radio buttons on the page
{{array of checked buttons}}
Macro Type: Custom JavaScript
JavaScript:
function() {
  var inputs = document.getElementsByTagName("input"),
      selectedRadios = [];
  for (var i = 0;i < inputs.length;i++) {
    if(inputs[i].type==="radio" && inputs[i].checked) {
      selectedRadios.push(inputs[i].value);
    }
  }
  return selectedRadios;
}Description: Returns an array of all the values of checked radio buttons on the page
You can apply the previous two macros to checkboxes as well by changing inputs[i].type===“radio” to inputs[i].type===“checkbox”.
3. Capture field value
Often you have a situation where you want to send the value of some field with your Google Analytics hit. Perhaps you want to segment your events between people who submitted value1 and those who submitted value2. Or you might want to use a specific field value as a firing or blocking rule for your other tags.
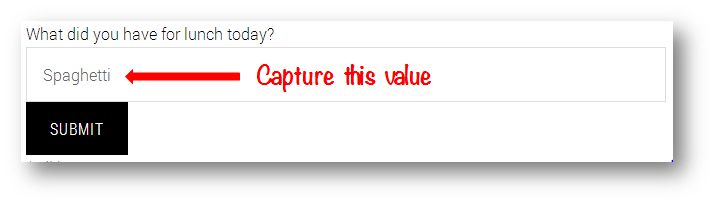
Whatever the case, here’s how you retrieve the value from a specific field in your form. Remember, you are not allowed to send personally identifiable information such as names, e-mail addresses or phone numbers to Google Analytics!.
The easy method:
The easy way to do it is to create the {{field value}} macro I introduced in the previous chapter. This requires that the field for which you want to retrieve the value has an ID attribute, e.g. <input type="text" id="lunch">.
You’d then add this macro to your Event tag (or rule or pageview tag or similar), and when the tag fires upon {{event}} equals gtm.formSubmit, the macro will return the value of the form element whose ID you specified earlier.
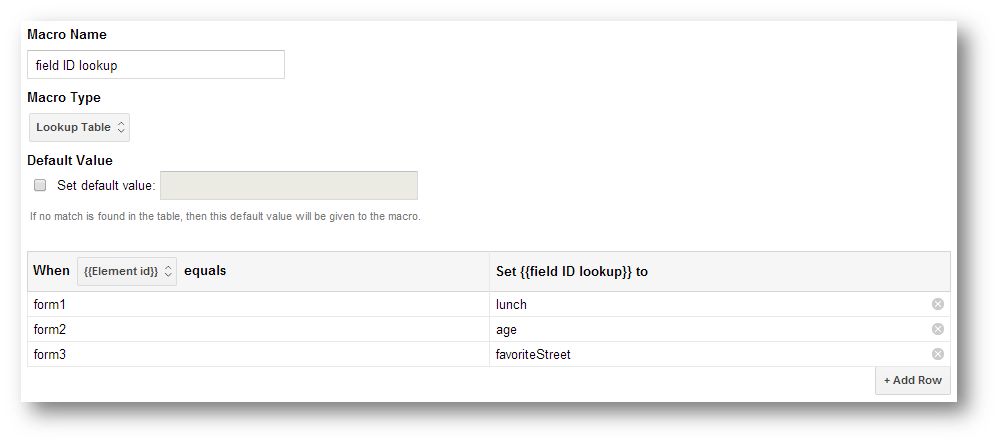
The PRO method:
If you have many forms, each with a unique field (with a unique ID) that you want to track, you don’t need to create a separate macro for each form. Just change the variable declaration in the macro to var inputField = document.getElementById({{field ID lookup}});. Next, create a new Lookup Table macro, where you return the ID of the field whose value you want to retrieve, depending on if the user is on a specific page, if the form has a specific ID or something similar. Here’s an example, where the field ID depends on the form element ID:
If you don’t have an ID attribute to access, you’ll need to get creative. Usually this also means that you’ll need to resort to error-prone scripts, so I really suggest that you get your developers to introduce ID attributes to your fields. However, here are some ideas (these replace the variable declaration in the original {{field value}} macro). Note that the [0] after the functions refers to the first index of the array. So if you want the second input element, you’d use [1], for the third you’d use [2] and so on.
Get first input element of submitted form:
var inputField = {{element}}.getElementsByTagName("input")[0];
Get first input element with “myInput” as the NAME attribute (<input type="text" name="myInput">):
var inputField = document.getElementsByName("myInput")[0];
Get first input element with “myInput” as the CLASS attribute (<input type="text" class="myInput">):
var inputField = document.getElementsByClassName("myInput")[0];
And so on. Feel free to get creative with JavaScript.
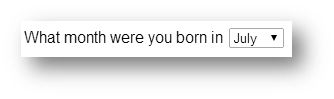
4. Capture drop-down list value
To get the selected value of a drop-down list (SELECT element), you’ll need to use a macro which goes through all the OPTION elements in your SELECT list, and returns the one that is selected. The macro used here was introduced earlier in this post ({{selected item}}).
The easy method:
The easy method, again, utilizes the ID attribute of the SELECT element. For example, you might have a list such as:
<select id="myList">
  <option value="home">Home</option>
  <option value="work">Work</option>
</select>
You’d change the variable declaration in the {{selected item}} macro to var selectId = document.getElementById(“myList”);. Next, the script goes through all the OPTION elements within this SELECT structure, and it returns the value of the option that was selected.
The PRO method:
Naturally, you can apply the same Lookup Table magic as with the field value method above. If your SELECT element doesn’t have an ID attribute, you’ll need to get creative. Here are some ideas for the variable declaration.
Access the first SELECT list on the page:
var selectId = document.getElementsByTagName("select")[0];
Access the first SELECT list of the submitted form:
var selectId = {{element}}.getElementsByTagName("select")[0];
5. Capture selected radio button value(s)
A very solid case for value retrieval is when you have a choice of radio buttons. For example, in the example below, you might want to fire a different tag (with different custom dimensions) depending on whether the user chose Home or Health insurance.
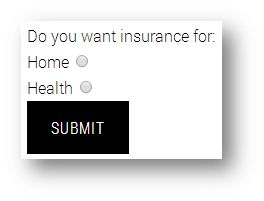
The trick with the radio button element is a consistent (and unique) use of the NAME attribute. If you specify each group of radio buttons with their own, unique NAME attribute, this script will work beautifully.
The easy method:
Use the {{checked button}} from before, and substitute “myRadioButtons” with the NAME attribute value of the group of radio buttons you want to analyze.
This script goes through all the radio buttons with the given NAME attribute and returns the value of the button that is checked. As you can see, this will only work if your button groups have unique NAME attributes.
The PRO method:
Sometimes you have several radio button groups on your form, and you want to send or process the selected buttons from each of these in a single tag. Here’s how:
Concatenate a string of all the selected radio button values (Custom JavaScript macro)
function() {
  var inputs = document.getElementsByTagName("input"),
      selectedRadios = "";
  for (var i = 0;i < inputs.length;i++) {
    if(inputs[i].type==="radio" && inputs[i].checked) {
      selectedRadios += inputs[i].value +" ";
    }
  }
  return selectedRadios.replace(/\s$/,"");
}
This script goes through ALL the radio buttons on the form, and returns a concatenated string of the checked button values, e.g. “male 30 home” for three radio button groups.
Save the values in an object for later processing (Custom JavaScript macro)
function() {
  var inputs = document.getElementsByTagName("input"),
      selectedRadios = [];
  for (var i = 0;i < inputs.length;i++) {
    if(inputs[i].type==="radio" && inputs[i].checked) {
      selectedRadios.push(inputs[i].value);
    }
  }
  return selectedRadios;
}
This returns an array of values, grabbed from each checked radio button found on the page. You can then process this array in another macro (or this same one), or do other magic to it. I prefer this over the concatenated string method, because you have more to work with when you utilize JavaScript array structures.
6. Capture selected checkbox value(s)
The trick with checkboxes is that you almost always have multiple, checked values. This means that if you want to send information in your event on what boxes were checked, you’ll always have to resort to methods such as those introduced above for the radio button (the PRO method). So to retrieve the values of your checked checkboxes, use the script(s) from above, but instead of
if(inputs[i].type==="radio"...)
you’ll need to use
if(inputs[i].type==="checkbox"...)
to access your checkboxes.
The other method:
How about if you just want to make a value lookup? For example, if you wanted to fire a tag if the form includes the opt-in for spam… I mean the occasional promotional e-mail?
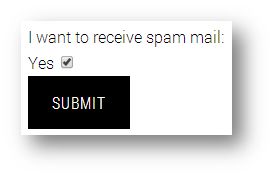
In this case, you’d create a Custom JavaScript macro that looks like this:
function() {
  var checkbox = document.getElementById("spamReq");
  return checkbox.checked || false;
}
This macro returns “true” if the checkbox is checked, and “false” if it isn’t or if the script encounters an error.
The PRO other method:
What about if you don’t have an ID attribute to access (you fool)? Well, there are many ways you can identify the correct checkbox. You can look for the nth input element on a form (e.g. 15th element of the submitted form is the checkbox) with something like:
var checkbox = {{element}}.getElementsByTagName("input")[14];If it’s the ONLY checkbox on the form, you could get its check status (true/false) with something like this:
function() {
  var inputs = {{element}}.getElementsByTagName("input");
  for(var i = 0;i < inputs.length;i++) {
    if(inputs[i].type==="checkbox") { return inputs[i].checked; }
  }
  return false;
}
Note that you can also leverage the querySelector() method like this (browser support isn’t as good as with getElementsByTagName()):
function() {
  var check = document.querySelector('input[type="checkbox"]');
  return check ? check.checked : undefined;
}
The ultimate desperation method would be to use the more flimsy properties of the DOM element, such as previousSibling.innerText || previousSibling.textContent to see what text directly preceded the checkbox (such as “Yes” in the example from before). However, I won’t tell you how to do that here because I don’t think it’s a very clean or robust method. You’ll run into a lot of trouble if you try to latch onto something as frail as text content.
7. One form element - multiple forms (ASP.NET)
Oh man, oh MAN, do I hate working with ASPX pages. Microsoft’s technology stack makes it often very frustrating to work with HTML pages, since the dynamically created pages depend largely on the quality of the master page template.
Often you’ll come across a situation where the entire page is wrapped in a FORM element. This is the form wrapper of an ASPX page, and it’s used to create the dynamic content you see fully rendered in your browser. However, for GTM this is problematic. If there’s more than one form on the page, which is very often the case, you’ll find it hard to determine just which form was sent when a submit button is clicked. You see, gtm.formSubmit is fired when the form wrapper is sent, and the submissions could have been initiated from any one of the actual forms on the page. How will you ever know if the submission originated from the site search box, the contact form, or the newsletter subscription field?

The workarounds aren’t ideal, but they’ll have to do for now. At some point I’d like to have the option of going through the {{event}} macro’s history. Heck, I want to access historical versions of ALL data layer variables! Until then, I’ll have to resort to the methods outlined below.
Identify correct form using a click listener:
This method uses the click listener to identify which submit button was clicked, and then uses this information as a firing / blocking rule in the tag which reacts to the form submission. To help me here, I’m using information I collected in my GTM listener firing order test. There I noticed that in the event of race conditions, gtm.click is always activated before gtm.formSubmit.
In this example, I have two forms on the page: a site search box with submit button ID siteSearchButton, and a contact form with submit button ID contactSubmitButton.
First, you’ll need to create a Custom HTML tag which is set to fire upon {{event}} equals gtm.click. Yes, you’ll need an active click listener. Add the following code within:
<script>
  dataLayer.push({'clickedButton': {{element id}}});
</script>
This pushes the ID of the clicked button into the data layer. So if someone does a site search, the pushed value would be siteSearchButton, and if someone sends a contact form, the pushed value would be contactSubmitButton.
Next, I’ll need a Data Layer Variable macro to access this value. So create one:
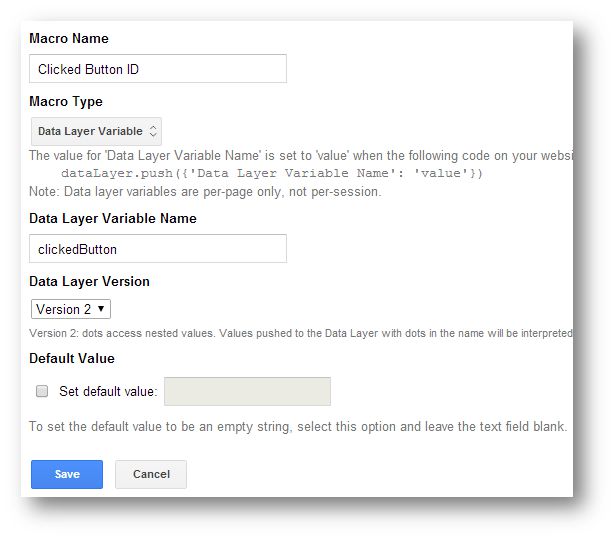
Finally, in your event tag for the site search submission, you’ll need the following rule:
{{event}} equals gtm.formSubmit
{{Clicked Button ID}} equals siteSearchButton
Conversely, in your event tag for the contact form submission, you’ll need a rule like:
{{event}} equals gtm.formSubmit
{{Clicked Button ID}} equals contactSubmitButton
This works, but I’m not sure how reliable it is. There’s always the possibility that only the gtm.click tag fires or only the form submission tag fires (due to lag or whatever), but so far I haven’t really had trouble with this solution. The major downside is that it’s really ugly. You need an intermediate tag to handle your main tag firing, and that really sucks. I’d want to operate this whole event taxonomy using just the main tags, without having to resort to “helpers”.
Identify correct form using {{field value}}:
Another method I’ve used to circumvent the form wrapper problem is to check if a form field has text within. If it does, I can assume that the form that was submitted was the one with the text. I mean, you wouldn’t start filling one form, and then jump to another and send that one, would you? WOULD YOU? (Please say no.)
So here’s a situation where I have two forms on the page (with just one form wrapper). The first form is the site search box, and the search field has an ID of siteSearch. I also have a contact form on the page, and one of its fields requires an e-mail address, and its ID is email.
I then have a Custom JavaScript macro (named {{submitted form}}) that looks like this:
function() {
  var search = document.getElementById("siteSearch"),
      contactEmail = document.getElementById("email");
  if(search && search.value != "") { return "search"; }
  else if (contactEmail && contactEmail.value != "") { return "contact"; }
  return "";
}
If there’s a value in the site search field, this script returns the string “search”. If there’s a value in the e-mail field of the contact form, this script returns the string “contact”. If neither is found, the script returns an empty string.
Finally, I can create two rules. This rule fires a tag when the site search field has text:
{{event}} equals gtm.formSubmit
{{submitted form}} equals search
This rule fires a tag when the contact form e-mail address field has text:
{{event}} equals gtm.formSubmit
{{submitted form}} equals contact
I don’t really like this method, since its pretty difficult to keep up-to-date, and there’s not a shred of robustness left in the implementation.
To conclude, let’s just say that for ASPX pages, it’s still pretty difficult to get reliable results with GTM’s form submit listener. “Luckily”, whenever I have to work with an ASPX website, the form handlers are the least of my problems.
8. Conclusions
In this post I outlined some advanced ways to use GTM’s form submit listener. Value retrieval is something that’s been asked around a lot, so I focused mainly on that aspect of data collection.
I didn’t wander into the murky woods of custom submit handlers, jQuery validators, event propagation problems and such, because these problems are usually pretty restricted to a certain script, implementation, or page. Suffice to say, if you do use custom submit handlers, for example, you’ll probably have to get your developers to edit these scripts so that the form submit event has a chance to reach GTM’s listeners (see my post on event delegation problems).
Sometimes the form on your page isn’t a form at all (in its HTML sense), and it’s been created entirely with some JavaScript framework (or, gasp, Flash). In these situations, just having the form submit listener won’t work, because no actual submit event is every fired. In these cases you might have to talk to your developers about manually creating the gtm.formSubmit event push. For information on how to do this, check out Doug Hall’s excellent post on extending GTM’s auto-event tracking.
Did you miss something in this post? Is there some aspect of form tracking that you’d want more information on? Drop me a line in the comments, and let’s see what we can come up with!
