CSS Selector Guide For Google Tag Manager
Some four years ago, Google Tag Manager released a new trigger predicate named matches CSS selector. Slowly but surely, it has evolved into one of the most useful little features in GTM.
Even though I’ve written about CSS selectors many times before, I wanted to compile all the relevant information into a single guide. For an external resource, I recommend bookmarking the w3schools.com CSS Selector Reference. But for your day-to-day use of CSS selectors in GTM, this guide will hopefully prove useful.
Table of Contents
Remember to read my article on the 10 selectors I consider most useful in GTM - that list has more concrete use cases for you to use. If you want a concrete way to test CSS selectors with (outside GTM), check out the w3schools.com CSS selector tester.
XThe Simmer Newsletter
Subscribe to the Simmer newsletter to get the latest news and content from Simo Ahava into your email inbox!
What are CSS selectors?
You can use CSS selectors to target any element on a web page. Every single element is uniquely positioned in the document object model (DOM), and thus selectors can be used to find even the most generic elements.
Sometimes selectors are very simple while being extremely robust. For example, when using a selector like div#author, you’re selecting an element that looks like <div id="author">. Since it has the id attribute, it’s a reasonable expectation that it’s the only such element on the page, thus even that short selector is very powerful.
On the other hand, sometimes all you can do is use a really long, complex chain, because there are so few uniquely identifying features in the element itself or its closest ancestors. Thus, the selector might end up looking like this:
#main > article > div.post-content.markdown > div > p:nth-child(12) > a:nth-child(2)
It’s not pretty, and it carries the additional weight that the longer and more complex the CSS selector is, the more fragile it becomes. The selector above will be invalidated when any one of the elements in the chain changes position or form.
In other words, always strive to create a selector that is as simple as possible without compromising its accuracy to target the exact element you want.
CSS selectors originated, surprise surprise, in Cascading Style Sheets (CSS). Style sheets are sets of rules and declarations that govern how HTML elements are displayed (and sometimes interacted with) on a web page. Here’s what a typical style declaration might look like:
a:hover, a:active {
    text-decoration: none;
    font-weight: bold
}
The two items preceding the { and separated by a comma are the selectors, and the two rows contained within the curly braces are the declarations. This is how you would read the rule:
- Select all links (
a) that are currently being hovered over by the mouse (:hover) - AND select all links (
a) that are currently being clicked by the mouse (:active) - THEN remove all text decorations (e.g underline) from them
- AND set their font weight to bold
CSS is its own, wonderfully complex discipline in web design and development. There are so many weird and magnificent things you can do with it, from replacing JavaScript functionality to running complex transitions using hardware acceleration.
Well, in this guide we’ll try to be a bit more modest and focus on how CSS selectors can be used with Google Tag Manager’s JavaScript to make the most out of triggers, tags, and variables, where selecting, querying, or parsing the correct element is of utmost importance.
CSS selectors in JavaScript
In JavaScript, you’ll often run into CSS selectors in two scenarios:
-
You need to retrieve a specific element or elements from the page.
-
You need to check if a given element matches a CSS selector.
Both of these scenarios are very relevant in Google Tag Manager. Before we jump into how they work in GTM, let’s take a look at JavaScript’s handling of CSS selectors.
Using document.querySelector and document.querySelectorAll
The two JavaScript methods you’ll most often use with CSS selectors are document.querySelector(selector) and document.querySelectorAll(selector).
The first returns the first element on the page that matches the given selector.
The second returns a list of all the elements on the page that match the given selector.
// Get the first outbound link element on the page
var firstOutbound = document.querySelector('a:not([href="mydomain.com"])');

// Get all the checked checkbox and radio button elements on the page
var allChecked = document.querySelectorAll('input[type="checkbox"]:checked,input[type="radio"]:checked');
As you can see, the selector is passed as a string argument to the method.
Remember that HTML elements are essentially objects, and just capturing them makes often little sense. Instead, you’ll want to do something with those objects, such as parse some property from them.
// Get the first outbound link element on the page
var firstOutbound = document.querySelector('a:not([href="mydomain.com"])');

// Push the URL of this outbound link into dataLayer
window.dataLayer.push({
  firstOutboundLinkURL: firstOutbound.getAttribute('href')
});
In the example above, we use document.querySelector to fetch the first outbound link (i.e. link that does NOT have mydomain.com in its href), and then we push it into dataLayer.
One thing to remember is that document.querySelectorAll doesn’t return an array but rather a NodeList. This means that you can’t use regular array methods with whatever the method returns. You’ll have to resort to some workarounds if you, for example, want to map() all elements in the list to get a modified array as a result.
// Get ALL outbound links on the page
var allOutbound = document.querySelectorAll('a:not([href="mydomain.com"])');

// Create an array of all their href values
var allHrefValues = Array.prototype.map.call(allOutbound, function(link) { return link.href; });

// Remove all duplicates
var uniqueHrefValues = allHrefValues.filter(function(href, index) { return allHrefValues.indexOf(href) === index; });
As you can see, in order to run the map() method against the list returned by document.querySelectorAll, you need to invoke the method from the array prototype. It’s a good thing to keep in mind if you ever find yourself working with document.querySelectorAll.
Using element.matches
If you want to check if any given element matches a specific CSS selector, you can use the matches() method like this:
// Check if the clicked element is an outbound link
function checkIfClickedElementIsOutbound() {
  var element = {{Click Element}};
  if (element.matches('a:not([href="mydomain.com"])') {
    return true;
  } else {
    return false;
  }
}
You invoke the matches() method on the element itself (the element has to be an HTML element), and like querySelector / querySelectorAll, you pass the selector as a string argument. The method returns true for a match, and false otherwise.
The thing about matches() is that it didn’t use to have stellar browser support, so if you want to use these methods with Internet Explorer in mind, you might need to implement a polyfill to extend the support (see here for inspiration).
Luckily, the matches() method is abstracted in Google Tag Manager when using triggers, which is by far the most common use case. So let’s dive right in!
CSS selectors in Google Tag Manager
In Google Tag Manager, you’ll find CSS selectors in a number of places.
You can use them as the selection method in the DOM Element variable:
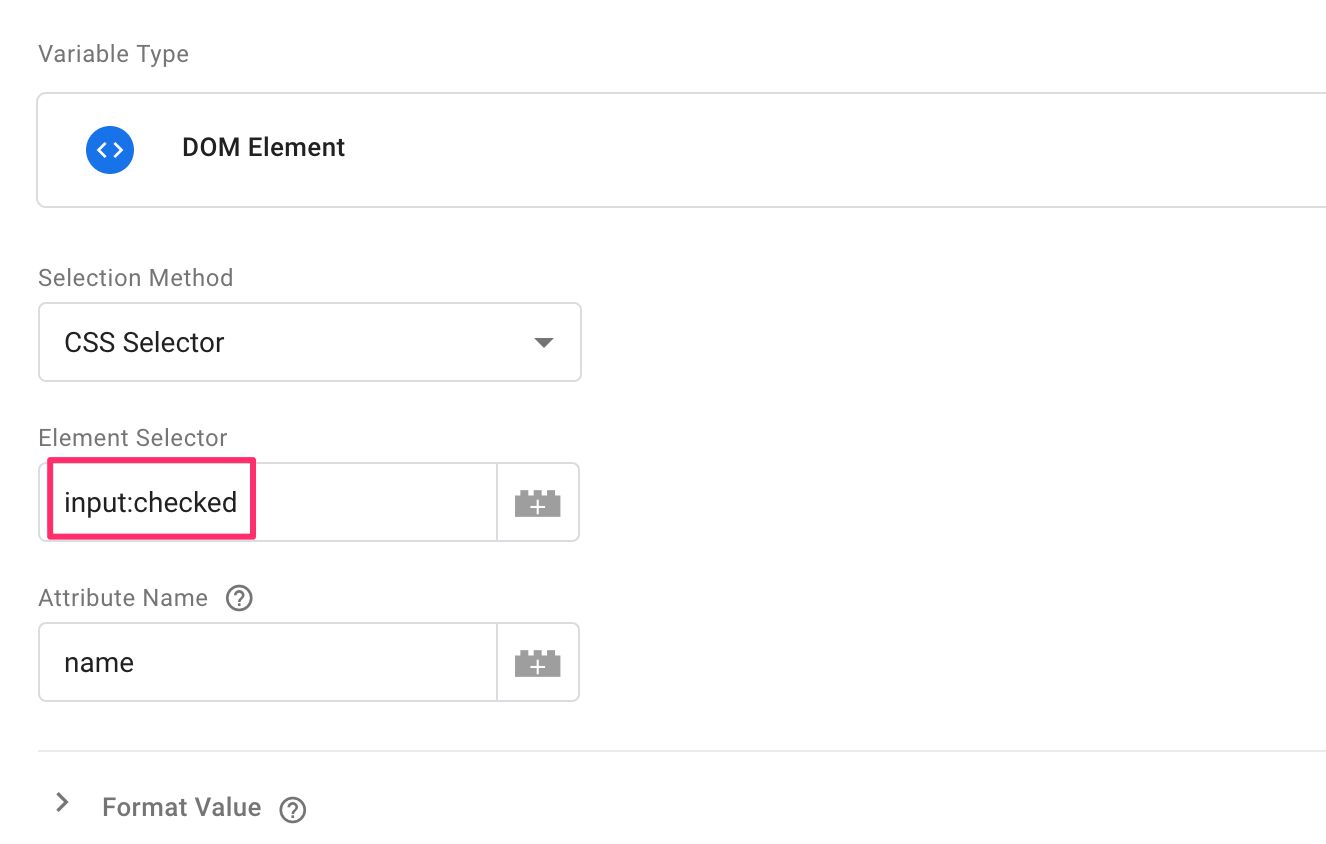
Using a CSS selector here lets you target specific elements that might not have the ID attribute (the only other selection method provided).
You can also find the same option in the Element Visibility trigger:
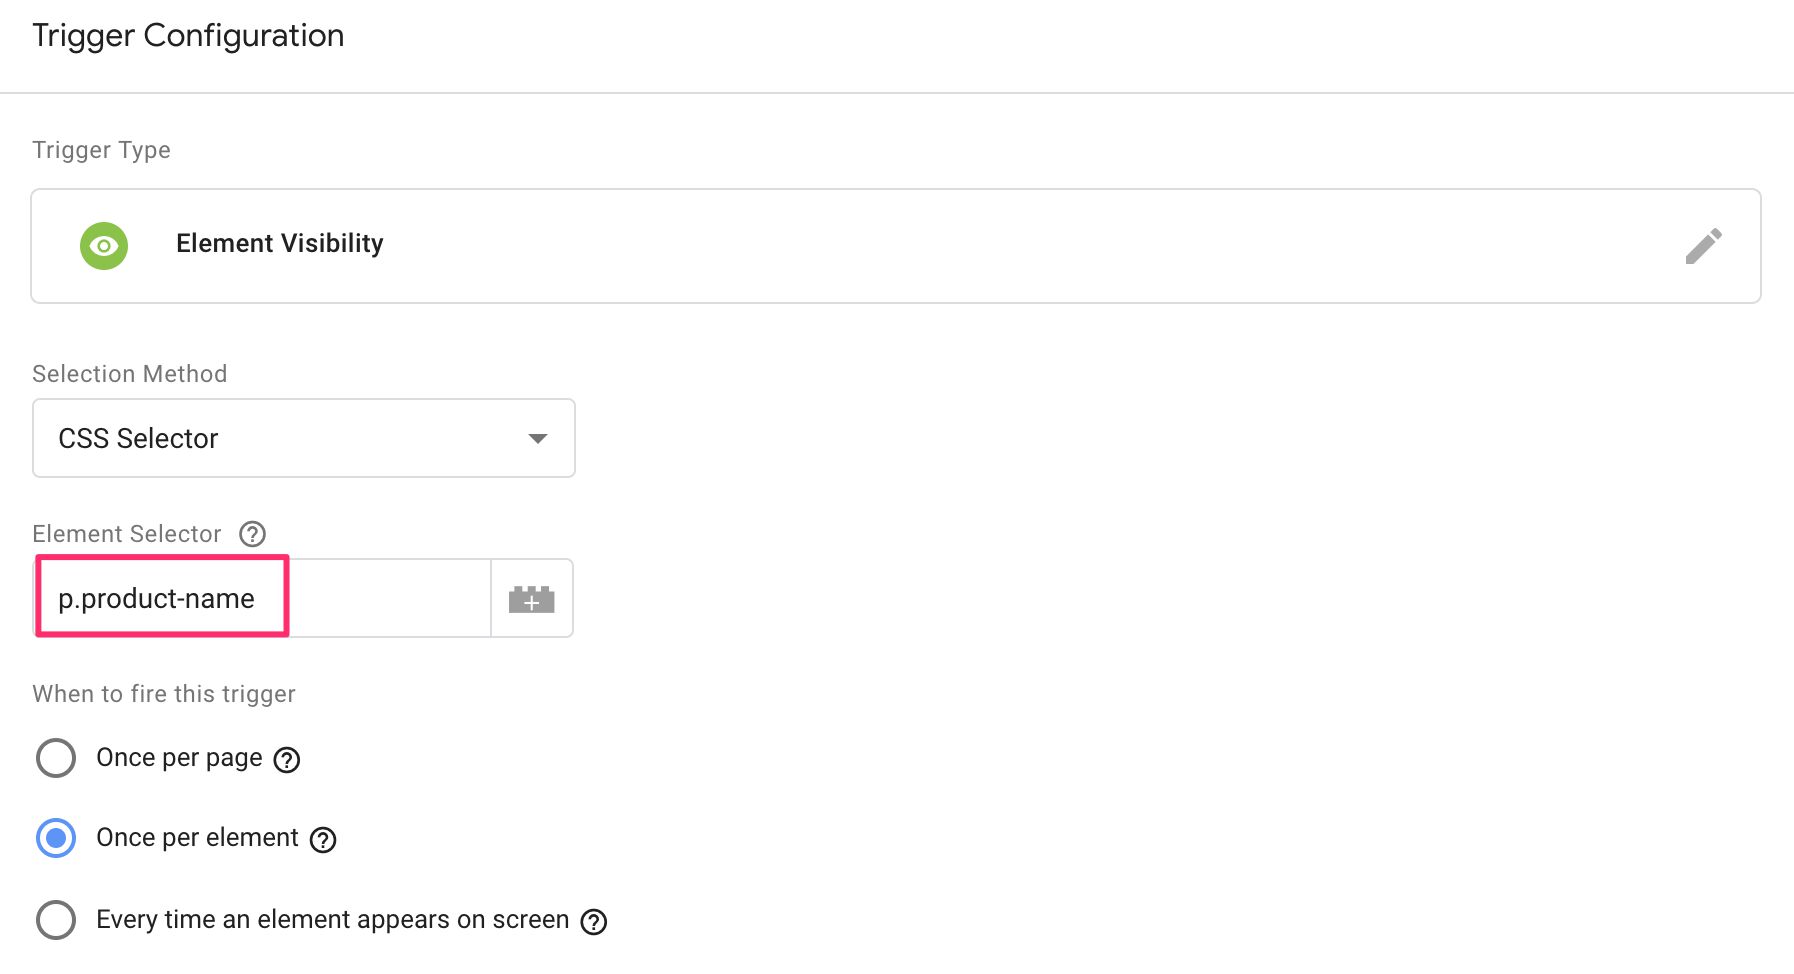
Whereas the DOM Element variable only returns the first matching element (thus being similar to document.querySelector), the Element Visibility trigger can be set to target all the matching elements, making CSS selectors super powerful in this particular trigger type.
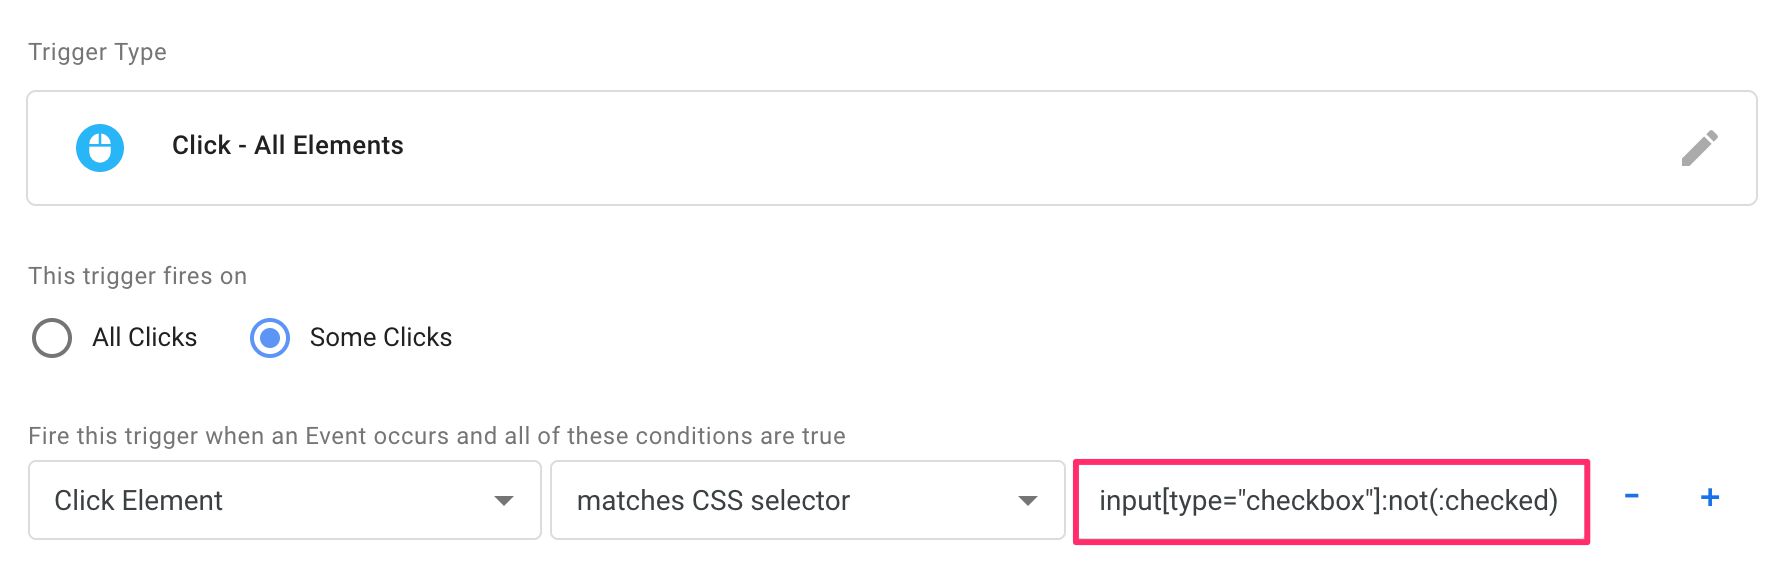
The third, and by far the most useful scenario for CSS selectors in Google Tag Manager is the matches CSS selector predicate when used together with the {{Click Element}} built-in variable.
The Click Element variable
The Click Element variable is a Built-in variable that you need to enable before you can use. The easiest way to enable it is to go to Variables via GTM’s main navigation, and click the blue Configure button in the top corner of the content.
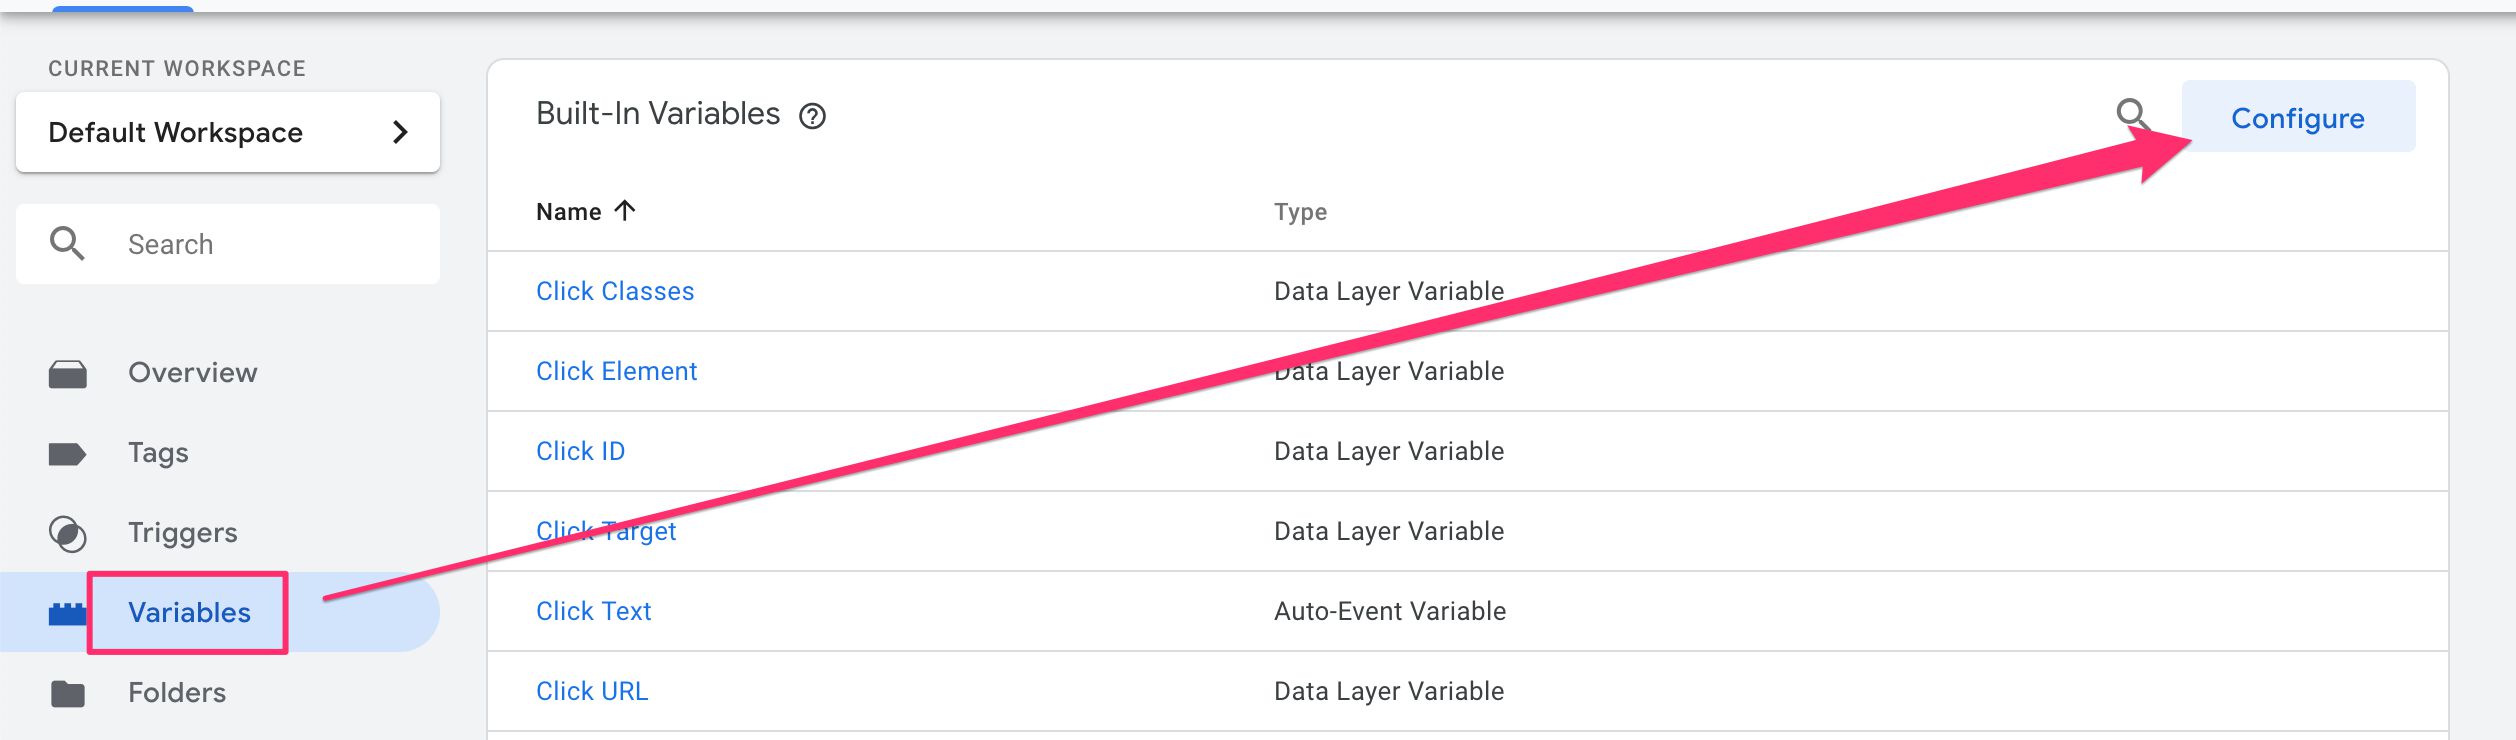
In the overlay that opens, check the box next to Click Element and you’re done. Now you can choose the Click Element variable in all the variable drop-downs of GTM.
Click Element returns the HTML element that was the target of the auto-event trigger action. In other words:
-
It returns the clicked element when using the Click / All Elements and Click / Just Links triggers.
-
It returns the submitted form element when using the Form Submission trigger.
-
It returns the matched element that became visible when using the Element Visibility trigger.
Because it returns an HTML element, you can use it in your Custom HTML tags and Custom JavaScript variables together with typical HTML element methods such as getAttribute, appendChild, and yes, matches.
In GTM, you’ll use it most often, I’m confident enough to say, with the matches CSS selector predicate in your Click and Form triggers. It’s not that useful with the Element Visibility trigger, since you already specify the set of matching elements with the CSS selector setting in the trigger.
The Matches CSS Selector predicate
You can use the matches CSS selector trigger predicate together with the Click Element variable to check if the element matches a specific selector (d’oh).
This is particularly useful with the All Elements trigger, since it truly fires when anything on the page is clicked, and you can use CSS selectors to delimit the tag to which the trigger is attached from firing all too often.
To make it work, you need to first check the This trigger fires on…Some Clicks/Some Link Clicks/Some Forms option, then select the Click Element variable from the variable selector, the matches CSS selector predicate from the predicate selector, and then type the selector in the field to the right, like so:
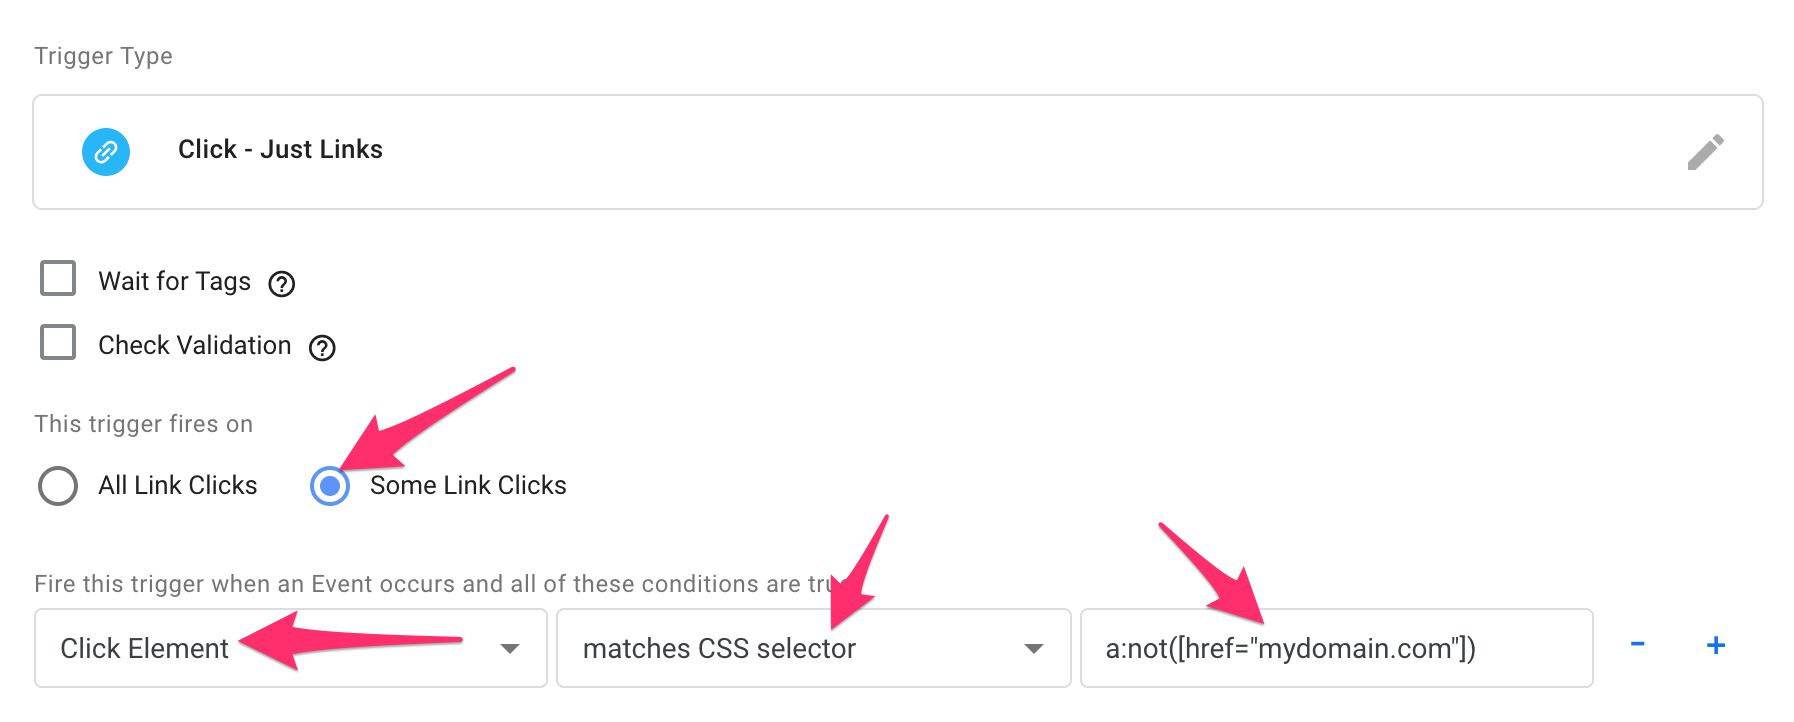
One thing to keep in mind is that the All Elements truly captures the exact element the user clicked. Thus it might be something nested within the element you actually drafted the selector for. With the All Elements trigger, you should make liberal use of the wildcard (*) selector. Read this article for more information.
In the reference chapter below, I have included what a Click trigger would look like for all the selectors listed in the reference.
CSS selector reference for Google Tag Manager
The reference below is a modified (slimmed down) version of the w3schools’ excellent resource. I’ve tailored the different selectors with imaginary Google Tag Manager use cases in mind.
Remember that you can combine selectors to identify different aspects of the element. When combining selectors, put them one after the other with no whitespace in between. For example, to target all <a> elements that have the author class, simo as the ID, and that are also outbound links, use something like this:
a.author#simo:not([href="mydomain.com"])
The order is inconsequential, but it’s customary to add pseudo-classes (e.g. :checked, :not) to the end for readability.
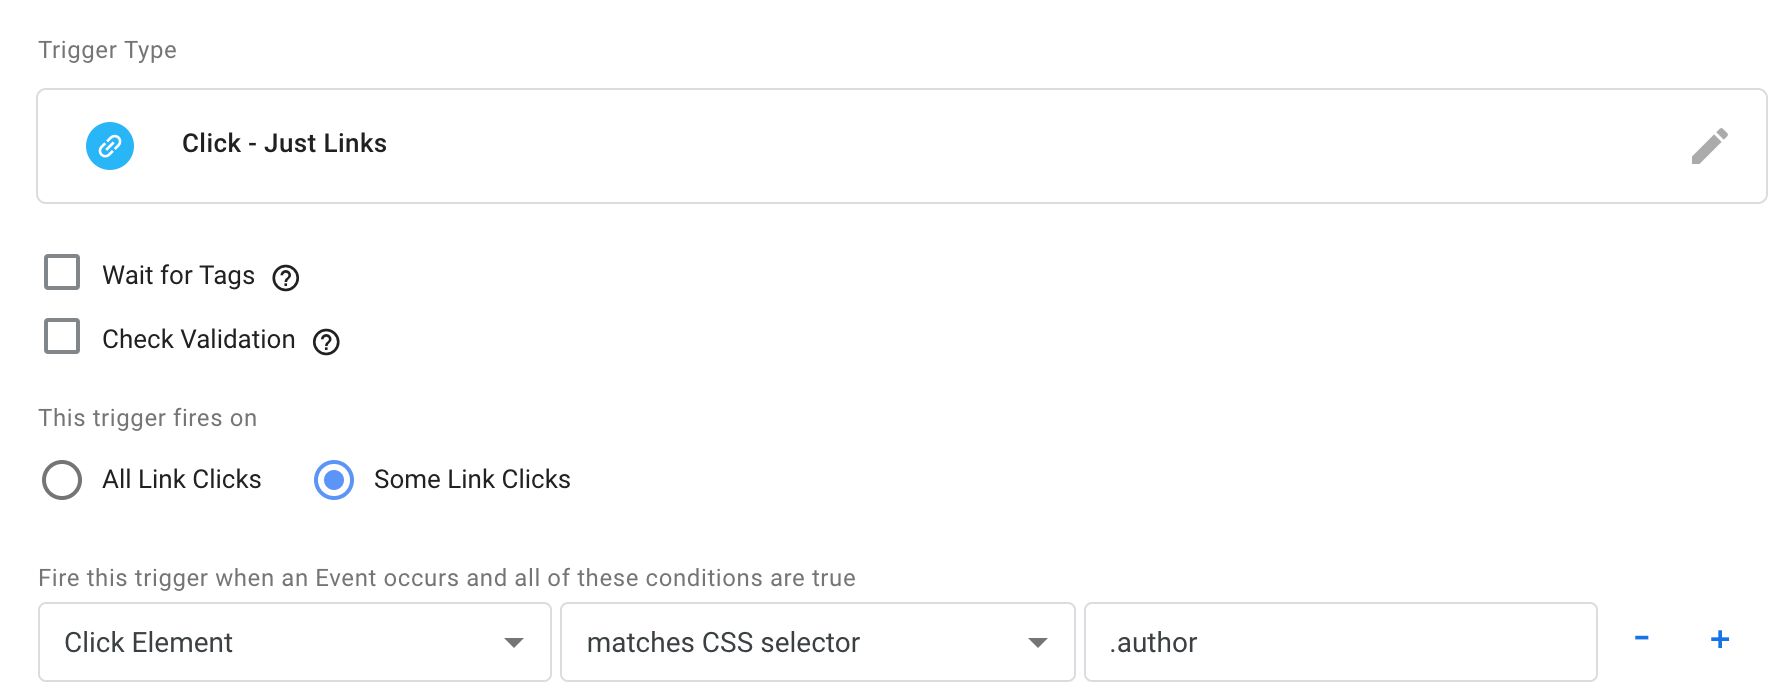
.class
Matches elements that have the given class as one of the class names in their class attribute.
Sample HTML structure
<a class="highlight author" href="/author-page/">
  <span>Simo Ahava</span>
</a>
Sample trigger
Selector
.author
Outcome
The trigger fires if the link is clicked. Clicks on the <span> work too, since the Just Links trigger automatically retrieves the closes wrapping <a> element of whatever was actually clicked.
#id
Matches elements that have the given ID as the value of their id attribute.
Sample HTML structure
<div class="date">
  <a href="/archives">
    <span id="date">2019-04-09</span>
  </a>
</div>
Sample trigger

Selector
#date
Outcome
The trigger fires if the <span id="date">...</span> element is clicked.
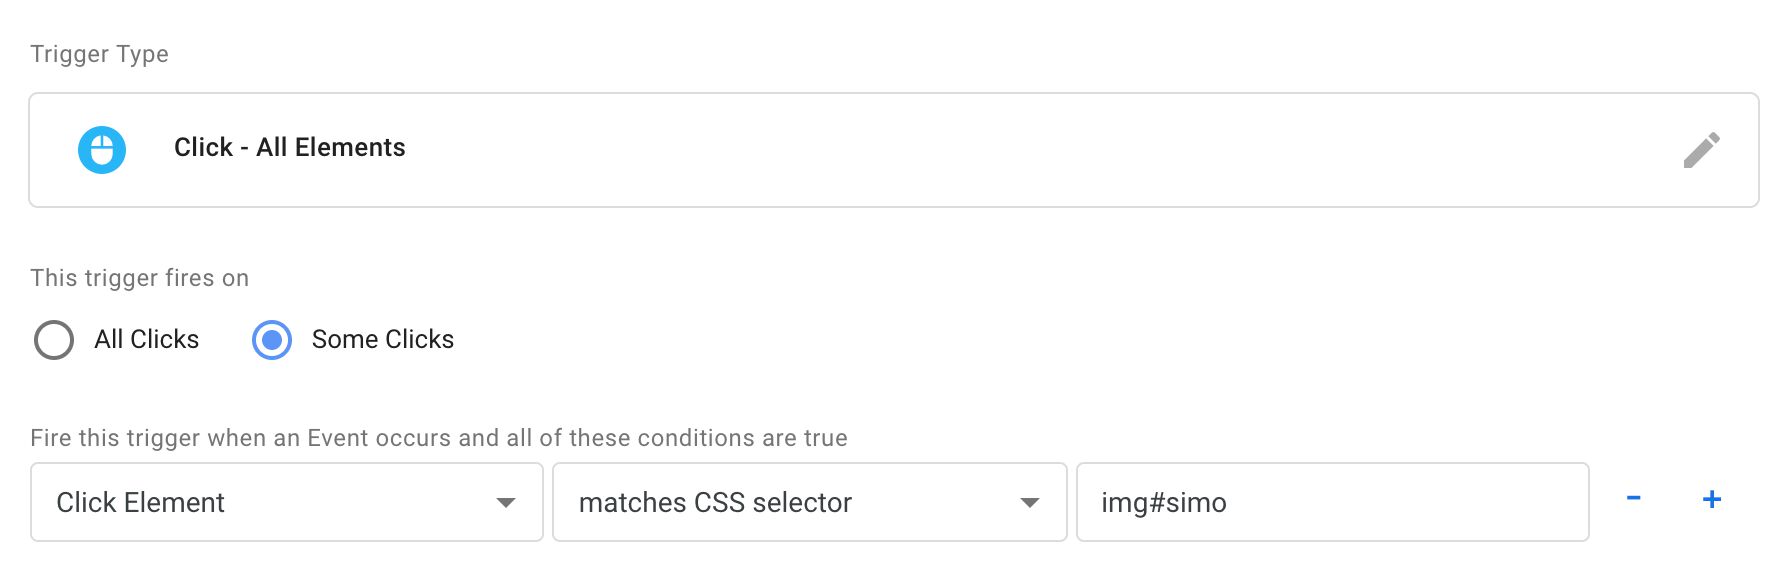
element
Matches elements that are the given element (e.g. a for links, img for images).
Sample HTML structure
<a class="author" href="/author-page">
  <img id="simo" src="simo.jpg"/>
</a>
Selector
img#simo
Sample trigger
Outcome
The trigger fires if the clicked element is the <img id="simo".../>. As you can see, the selector combines both element and id, meaning the matched element must be both an image and have the ID simo.
element,element
Matches elements that can be selected with ANY of the selectors separated by a comma (you can add multiple selectors, each separated by a comma).
Sample HTML structure
<a class="author" href="/author-page">
  <img id="simo_img" src="simo.jpg"/>
  <p id="simo_name">Name: Simo Ahava</p>
</a>
Sample trigger

Selector
img#simo_img, p#simo_name
Outcome
The trigger fires if the click lands on EITHER <img id="simo_img".../> OR <p id="simo_name">...</p>.
element element
Matches the rightmost element when it is within the leftmost element in the DOM tree. The relationship does not have to be parent-child - it’s enough that the left element wraps the right element at some point.
Sample HTML structure
<section id="main">
  <div id="article">
    <a href="/archives">
      <h1>Hello world!</h1>
    </a>
  </div>
</section>
Sample trigger
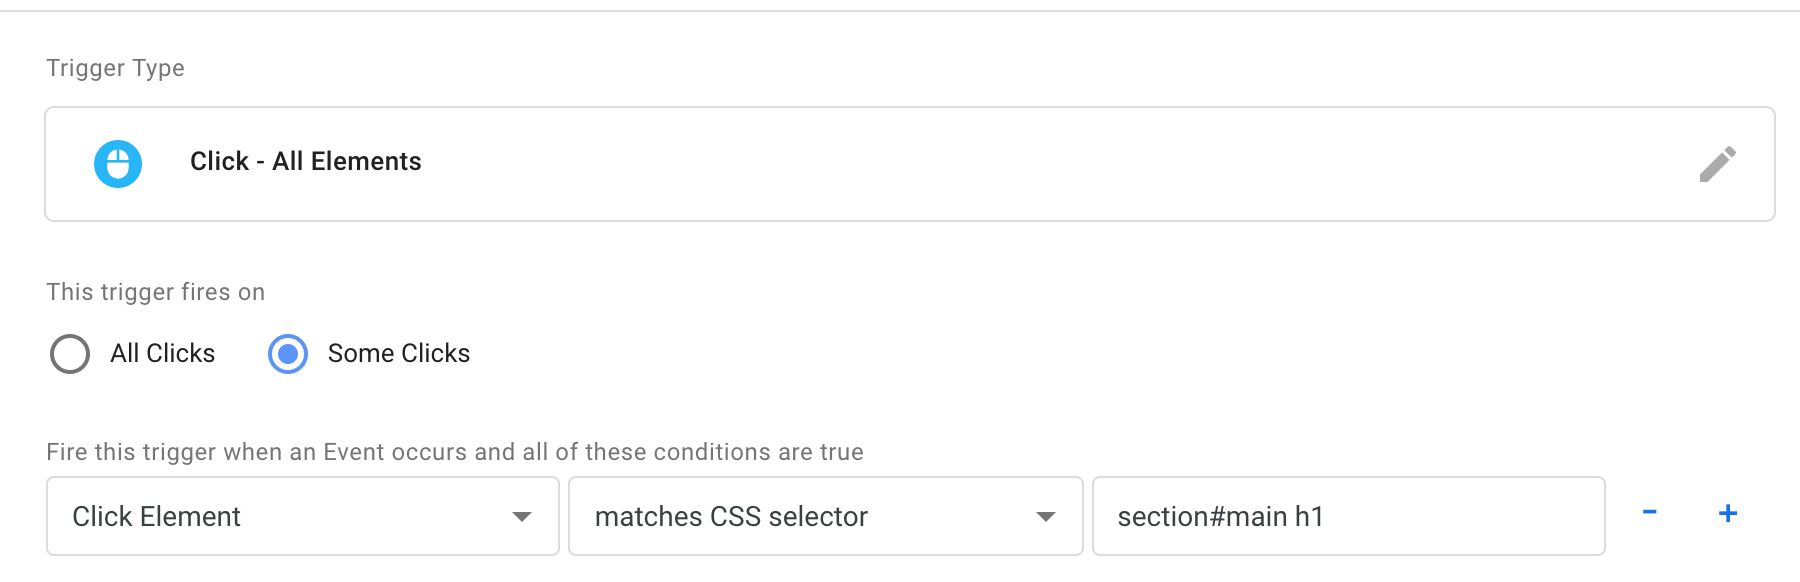
Selector
section#main h1
Outcome
The trigger fires if the click lands on <h1>Hello world!</h1> because one of its wrapping elements matches the first selector (section#main).
* (wildcard)
Matches any element. Extremely useful when used with the Click / All Elements trigger.
Sample HTML structure
<div id="navi">
  <ul>
    <li><a href="/home">Home</a></li>
    <li><a href="/products">Products</a></li>
    <li><a href="/contact">Contact us</a></li>
  </ul>
</div>
Sample trigger
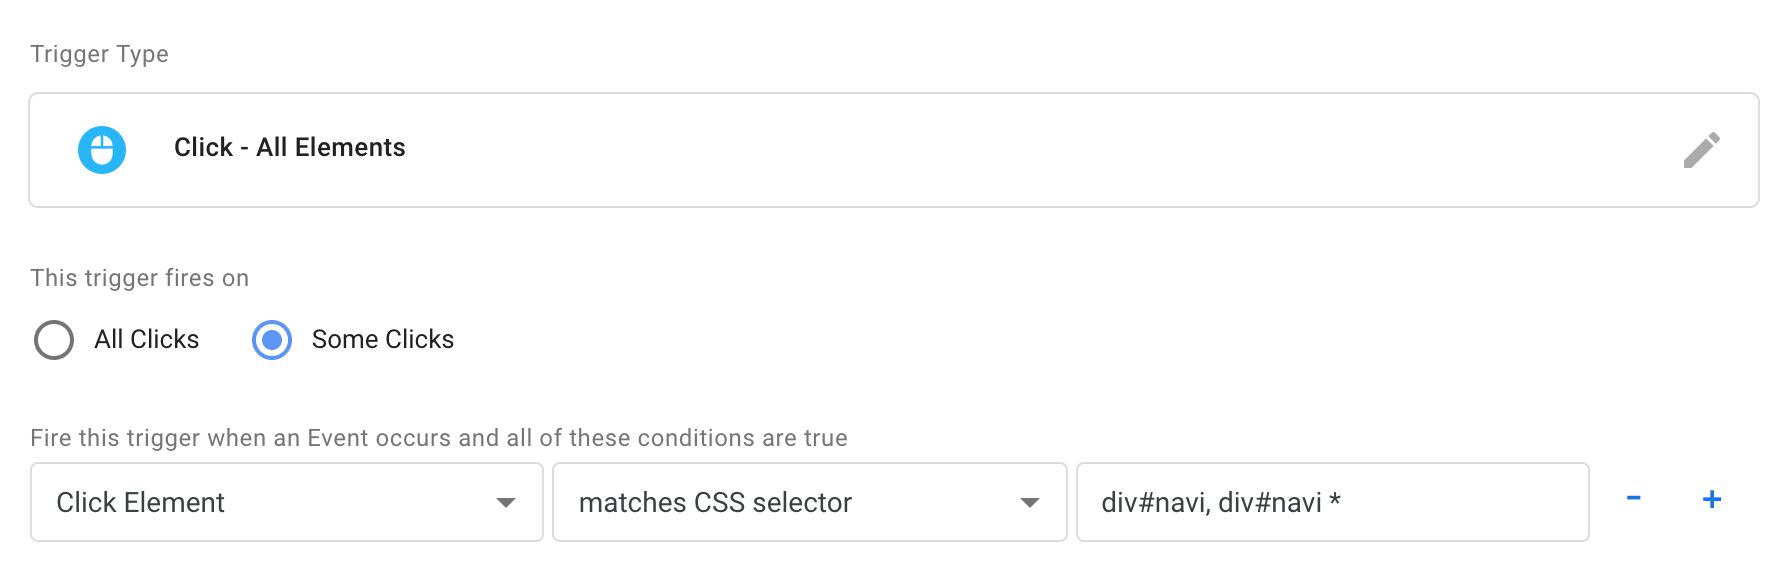
Selector
div#navi, div#navi *
Outcome
The trigger fires when the <div id="navi"> element or any of its nested elements (<ul>, <li> and <a>) are clicked.
The selector is div#navi, div#navi *. Based on what you have learned above, this is actually two selectors, div#navi and div#navi *, and the trigger will fire if either is clicked.
The first selector matches clicks directly on the <div id="navi"> element. The second selector matches clicks on any element that is wrapped by <div id="navi">. The whitespace is important here. If the second selector were div#navi > *, it would only match clicks on the <ul>, as it’s the only direct child of <div id="navi">.
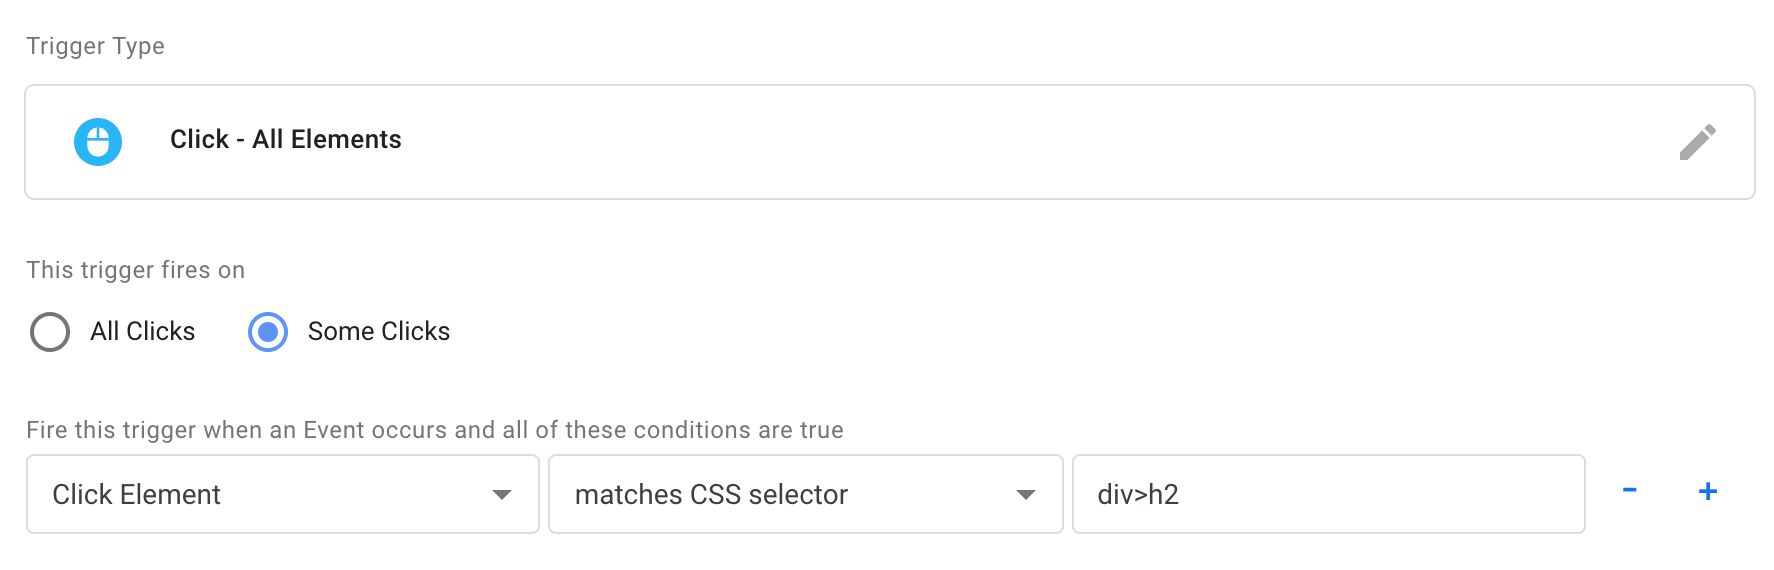
element>element
Matches the rightmost element when its direct parent is the element to the left.
Sample HTML structure
<section id="main">
  <div id="article">
    <a href="/archives">
      <h2>Hello world!</h2>
    </a>
  </div>
</section>
<section id="end">
  <div id="footer">
    <h2>Goodbye world!</h2>
  </div>
</section>
Sample trigger
Selector
div>h2
Outcome
The trigger fires if the click lands on <h2>Goodbye world!</h1> because its direct parent is <div>. It will not fire on <h2>Hello world!</h2> because that element’s direct parent is <a>.
element+element
Matches the rightmost element if it comes directly after the leftmost element. They must share the same parent.
Sample HTML structure
<div id="author">
  <img src="/author.jpg" id="author_image"/>
  <p>Author name</p>
</div>
Sample trigger

Selector
img#author_image+p
Outcome
The trigger fires if the click lands on the <p>, because it is right after the <img id="author_image"/>.
element1~element2
Matches the rightmost element if it is preceded by the leftmost element. They must share the same parent. In other words, it’s slightly less strict than the previous selector, in that the preceding element does not have to be immediately next to the targeted element.
Sample HTML structure
<div id="author">
  <img src="/author.jpg" id="author_image"/>
  <span>Author name</span>
  <a href="https://www.simoahava.com">Author home page</a>
</div>
Sample trigger

Selector
img#author_image~a
Outcome
The trigger fires if the click lands on the <a>, because it is preceded by <img id="author_image"/>.
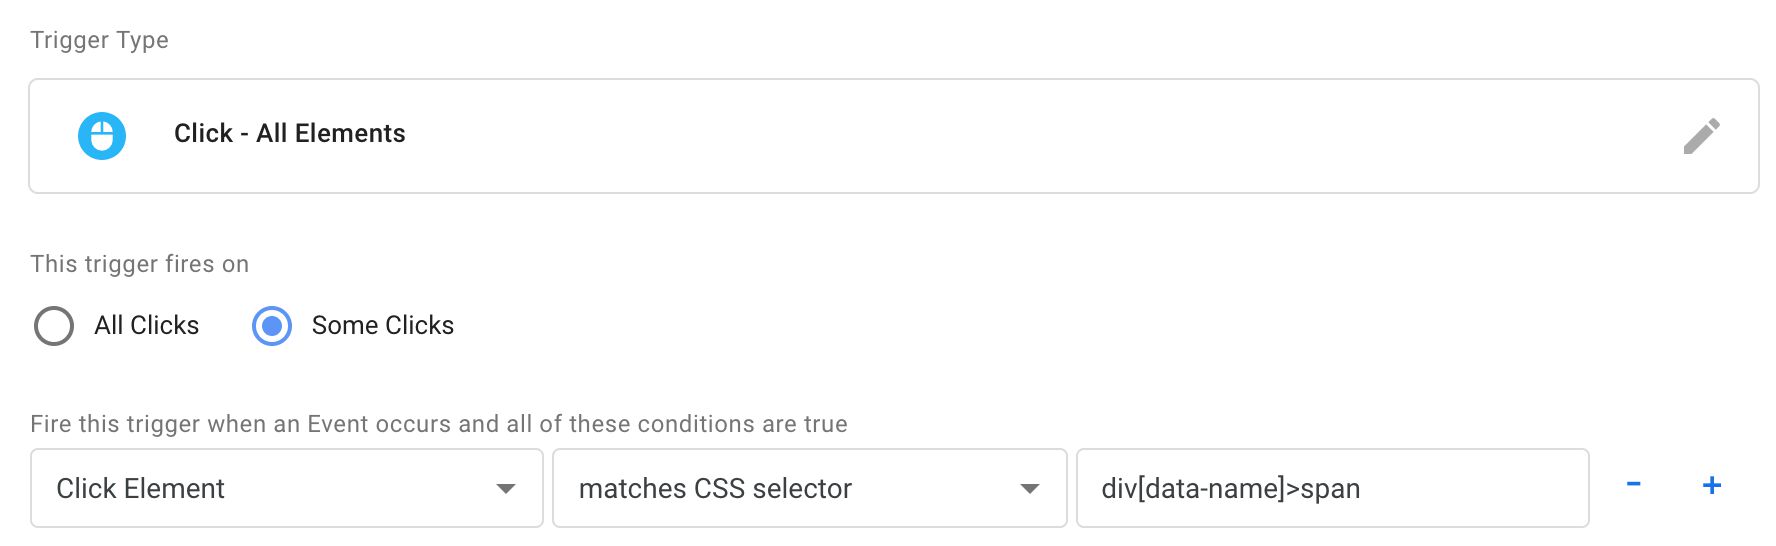
[attribute]
Matches if the element has the given attribute.
Sample HTML structure
<div id="main_content">
  <div data-name="gtm_example">
    <span>GTM examples</span>
  </div>
</div>
Sample trigger
Selector
div[data-name]>span
Outcome
The trigger fires if the click lands on the <span>, because its direct parent is a <div> with the data-name attribute.
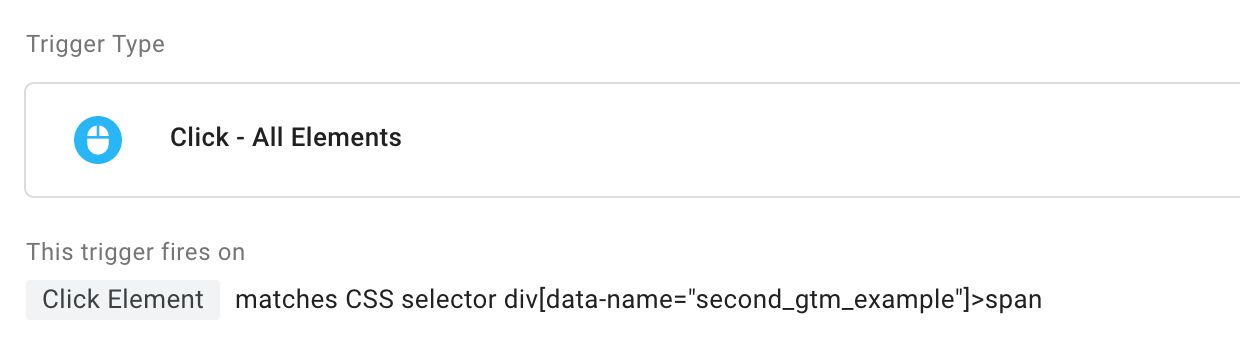
[attribute=value]
Matches if the element has the given attribute with the exact value.
Sample HTML structure
<div id="main_content">
  <div data-name="gtm_example">
    <span>GTM example</span>
  </div>
  <div data-name="second_gtm_example">
    <span>Another GTM example</span>
  </div>
</div>
Sample trigger
Selector
div[data-name="second_gtm_example"]>span
Outcome
The trigger fires if the click lands on the second <span>, because only it has a direct parent whose data-name attribute has the value second_gtm_example.
[attribute^=value]
Matches if the element has the given attribute whose value starts with the provided string.
Sample HTML structure
<div id="main_content">
  <span id="product_12345">
    Product 12345
  </span>
  <span id="product_23456">
    Product 23456
  </span>
  <span id="attachment_12345">
    Attachment 12345
  </span>
</div>
Sample trigger

Selector
span[id^="product"]
Outcome
The trigger fires if the click lands on either of the two <span> elements whose ID starts with product. It will not fire if the click lands on the third span, because that element ID starts with attachment.
[attribute$=value]
Matches if the element has the given attribute whose value ends with the provided string.
Sample HTML structure
<div id="main_content">
  <span id="product_12345">
    Product 12345
  </span>
  <span id="product_23456">
    Product 23456
  </span>
  <span id="attachment_12345">
    Attachment 12345
  </span>
</div>
Sample trigger
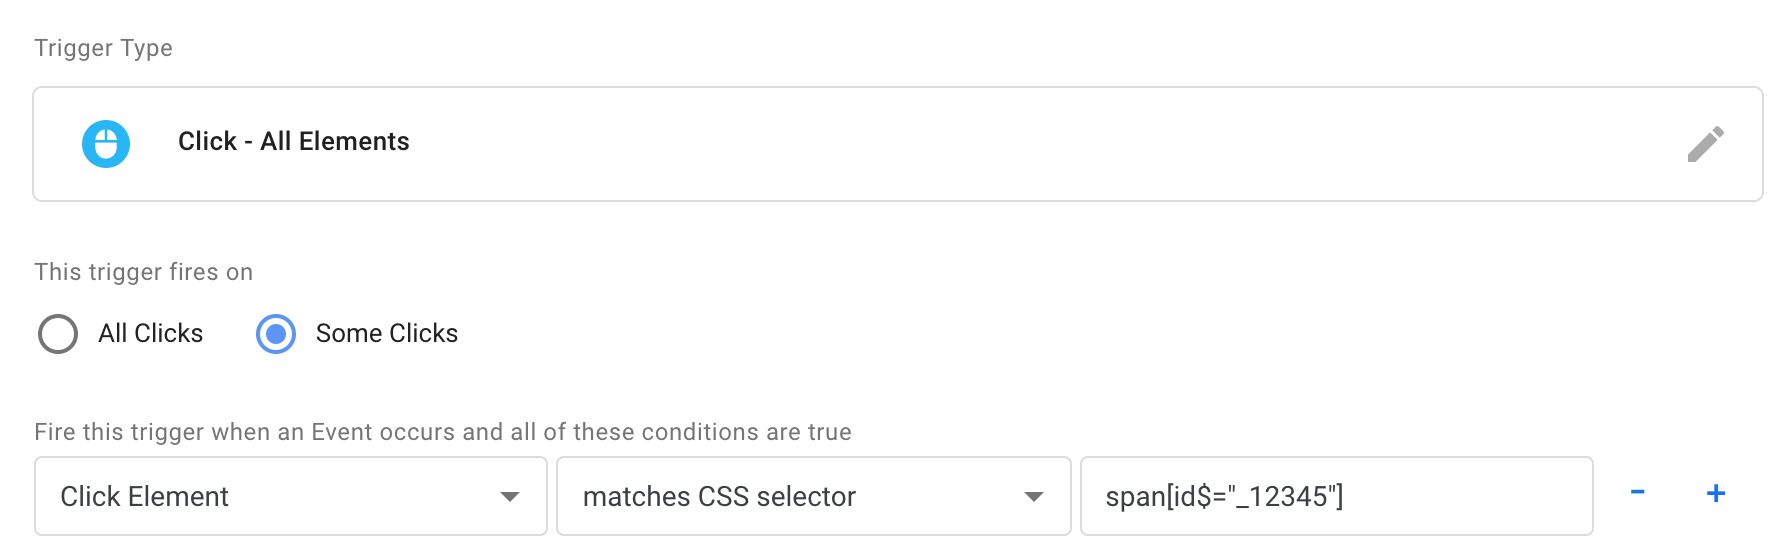
Selector
span[id$="_12345"]
Outcome
The trigger fires if the click lands on either the first <span> or the last <span>, since both elements’ ID attributes end with _12345. It will not fire if the click lands on <span id="product_23456">, since that ID does not end with _12345.
[attribute*=value]
Matches if the element has the given attribute whose value contains the provided string.
Sample HTML structure
<div id="author">
  <span id="simo_ahava_profile">Simo's profile</span>
  <span id="profile_benjamin_ahava">Benjamin's profile</span>
  <span id="derek_anderson">Derek's profile</span>
</div>
Sample trigger
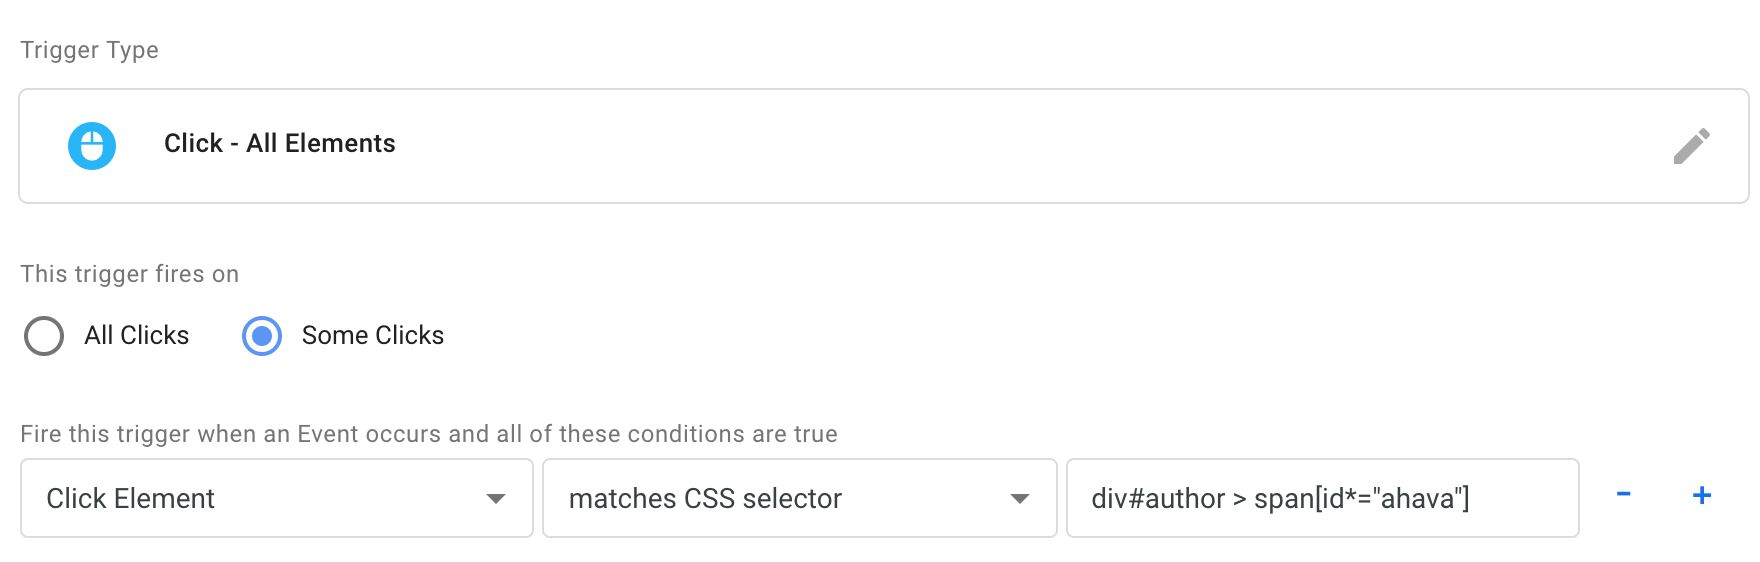
Selector
div#author > span[id*="ahava"]
Outcome
The trigger fires if the click lands on either of the first two <span> elements, since they have IDs that contain the string ahava. It will not fire for the third <span> because that element’s ID attribute does not contain the string ahava.
:checked
Matches if the given element is checked (radio buttons, checkboxes, and <option> elements within select menus).
Sample HTML structure
<form id="contact-us">
  My name: <input type="text" name="name" /><br />
  I consent to everything <input type="checkbox" name="consent" /><br />
  <input type="submit" />
</form>
Sample trigger

Selector
input[name="consent"]:checked
Outcome
The trigger fires if the click lands on the checkbox when it is checked (i.e. the user unchecks it).
:first-child
Matches if the given element is the first child of its parent.
Sample HTML structure
<ul id="main_navigation">
  <li>Home</li>
  <li><a href="/products">Products</a></li>
  <li><a href="/contact">Contact</a></li>
</ul>
Sample trigger

Selector
ul#main_navigation > li:first-child
Outcome
The trigger fires if the click lands on <li>Home</li> since it is the first child element of its direct parent.
:first-of-type
Matches if the given element is the first element of its type (e.g. p, img, span) of its parent.
Sample HTML structure
<div id="author_info">
  <a href="/author">Simo Ahava</a>
  <p>Web Analytics Developer</p>
  <p>Ukulele and death metal enthusiast</p>
</div>
Sample trigger
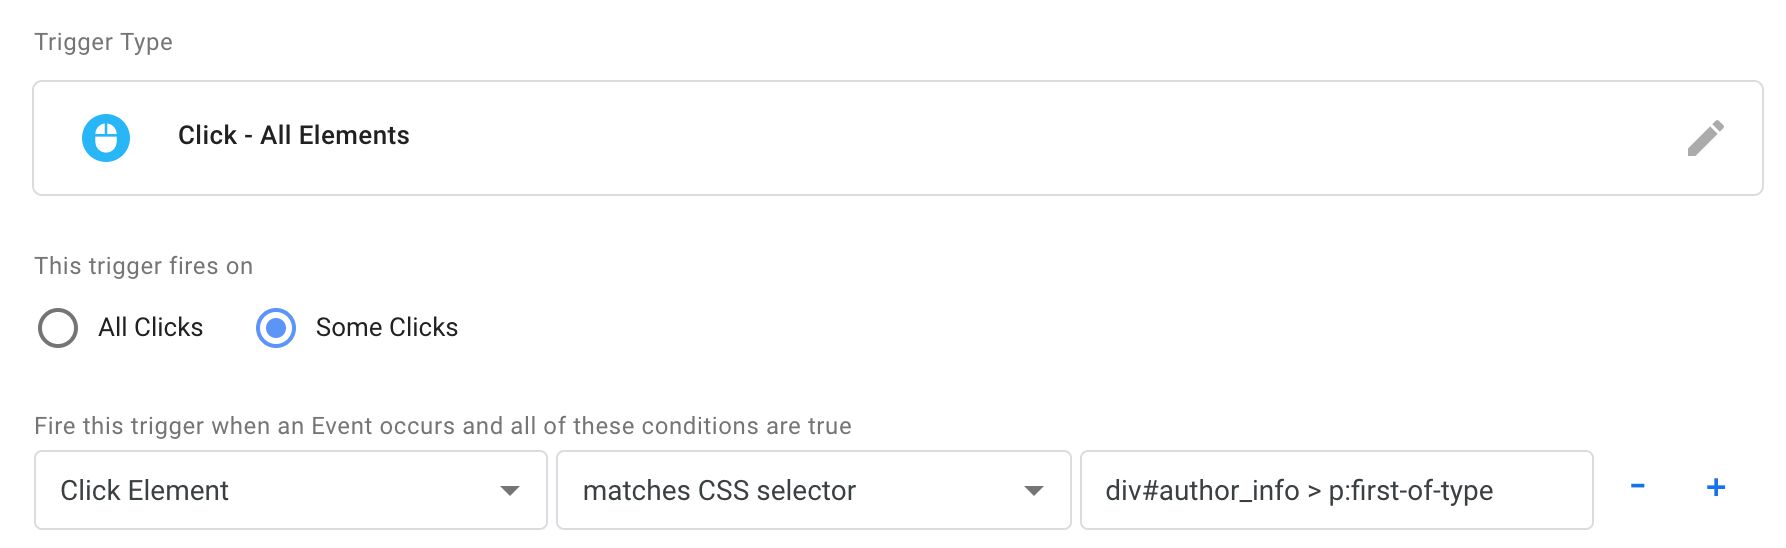
Selector
div#author_info > p:first-of-type
Outcome
The trigger fires if the click lands on the <p>Web Analytics Developer</p> since it is the first <p> under its parent.
:last-child
Matches if the given element is the last child element of its parent (the reverse of :first-child).
Sample HTML structure
<ul id="main_navigation">
  <li>GTM</li>
  <li>Ukulele</li>
  <li>Death metal</li>
</ul>
Sample trigger

Selector
ul#main_navigation > li:last-child
Outcome
The trigger fires if the click lands on <li>Death metal</li> since it is the last child element of its parent.
:last-of-type
Matches if the given element is the last element of its type of its parent.
Sample HTML structure
<div id="author_info">
  <a href="/author">Simo Ahava</a>
  <p>Web Analytics Developer</p>
  <p>Ukulele and death metal enthusiast</p>
</div>
Sample trigger
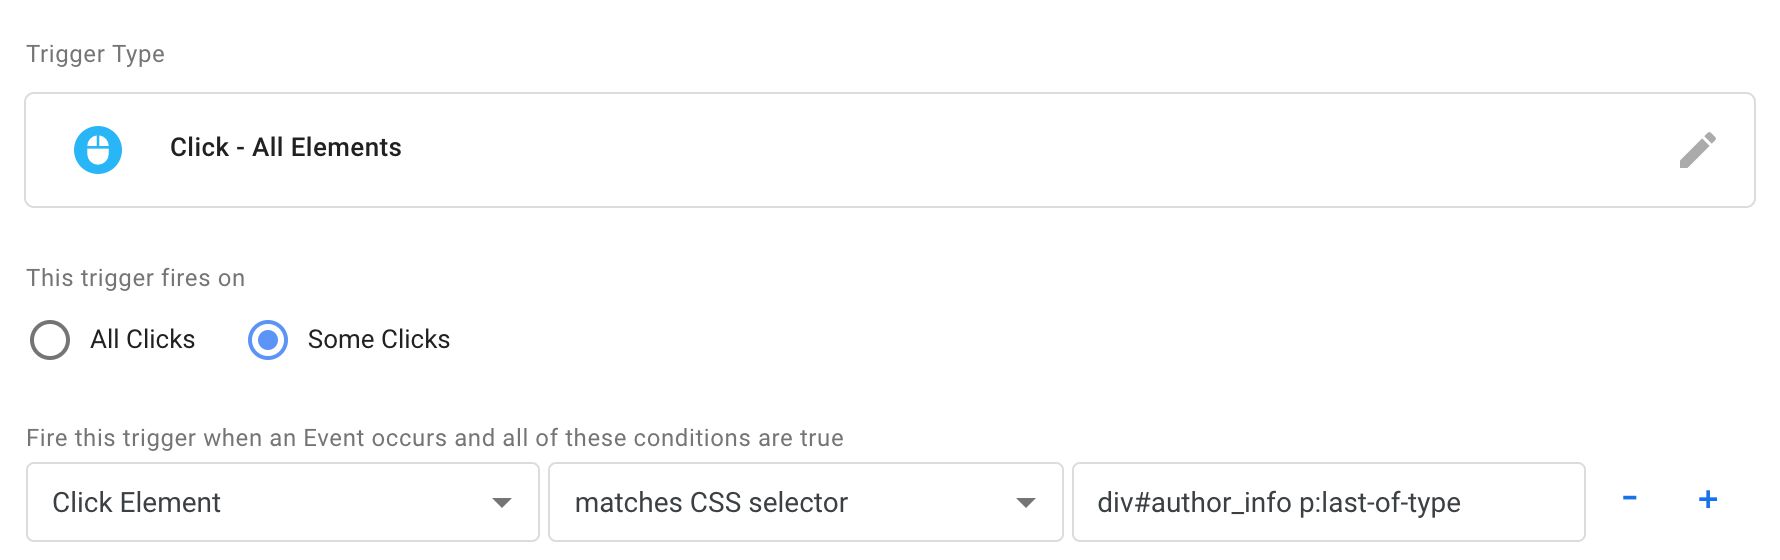
Selector
div#author_info p:last-of-type
Outcome
The trigger fires if the click lands on <p>Ukulele and death metal enthusiast</p> since it is the last <p> under its parent.
:not(selector)
Matches if the given element does not match the selector within the parentheses.
Sample HTML structure
<div id="author">
  <p>
    <a href="https://www.simoahava.com/">Home page</a>
  </p>
  <p>
    <a href="https://tagmanager.google.com/">Favorite hobby</a>
  </p>
</div>
Sample trigger
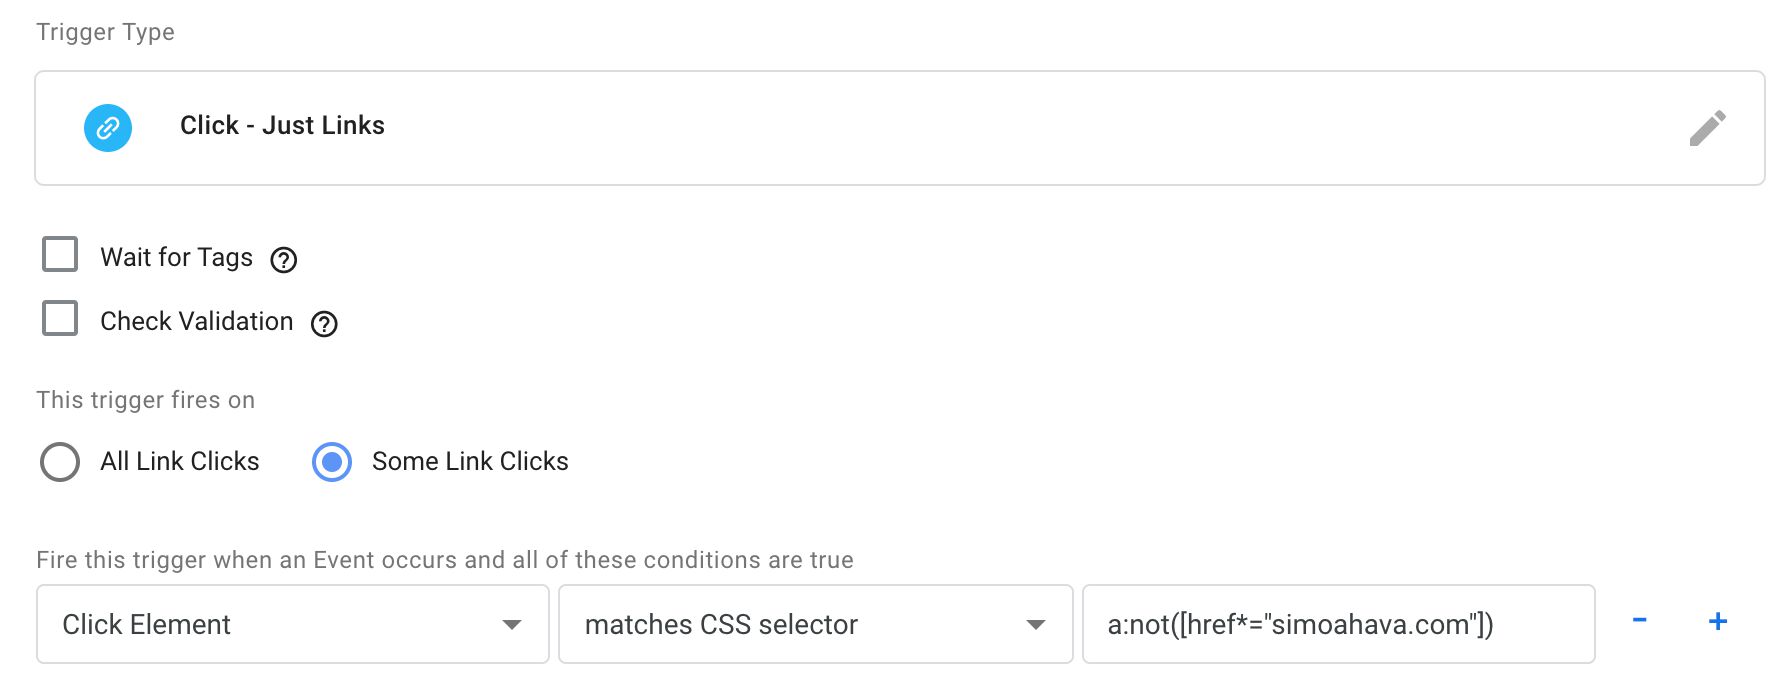
Selector
a:not([href*="simoahava.com])
Outcome
The trigger fires when the click lands on the second link (<a href="https://tagmanager.google.com/">Favorite hobby</a>). This is because the CSS selector targets all link elements (<a>) that do not match the CSS selector [href*="simoahava.com"]. In other words the link must not have a href attribute containing the string simoahava.com.
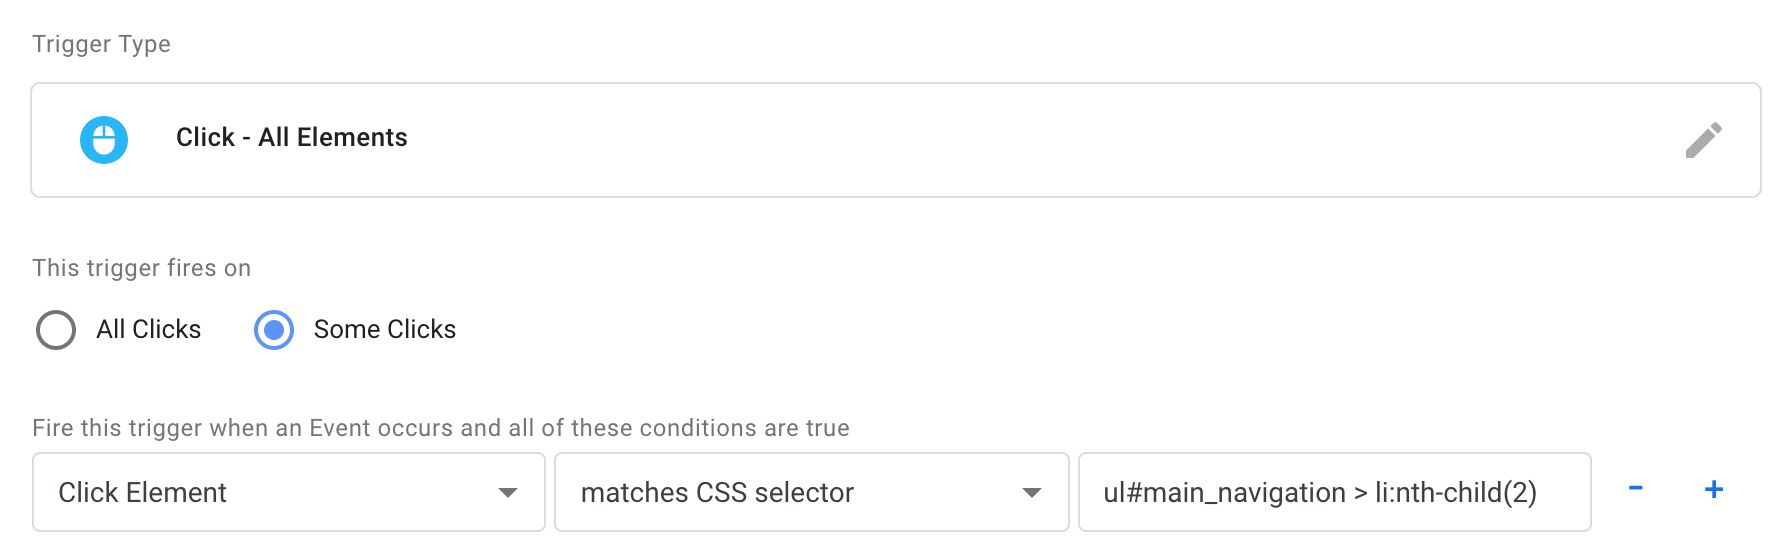
:nth-child(n)
Matches if the given element is the nth child of its parent, where n is the number passed in the parentheses.
Sample HTML structure
<ul id="main_navigation">
  <li>GTM</li>
  <li>Ukulele</li>
  <li>Death metal</li>
</ul>
Sample trigger
Selector
ul#main_navigation > li:nth-child(2)
Outcome
The trigger fires if the click lands on <li>Ukulele</li> since it is the second child (nth-child(2)) of its parent.
Summary
I’ve said it many times, but I seriously think CSS selectors are high up there with JavaScript and regular expressions in the list of things you must learn if you want to master Google Tag Manager.
Much of browser-based web analytics, especially when tracking interactions, is rooted in the ability to track interactions with specific elements. Often, we’re recommended to use the id and class attributes these elements have, but it’s very common that they don’t actually have these attributes.
It’s in these situations that CSS selectors shine. They allow you to pinpoint every single and any element on any given page, since every element always has a unique position that can be targeted with some selector.
Just remember my tip from earlier - always strive for a selector that is a simple as possible without compromising its ability to target the specific elements you want it to.
