Basic Consent Mode: The Guide
Google’s Consent Mode is a way to control how tags react to the user’s consent for different tracking purposes. It is specifically designed to work with Google’s tags, but especially through Google Tag Manager, you can use Consent Mode’s features and APIs to control other tags, too.
Consent Mode comes in two “flavors”:
Advanced Consent Mode is specifically designed for Google’s products. Tags for GA4, Ads, and Floodlight are sensitive to the user’s consent choices and change their behavior accordingly. Advanced Consent Mode is very easy to implement because it basically requires no changes to tags’ existing triggering mechanisms.
Basic Consent Mode means that tags wait until appropriate consent has been granted. This means that they need to be manually blocked from firing until the user signals that they consent to tracking for whatever purpose each tag has. Basic Consent Mode is very difficult to implement because the triggering mechanisms are very awkward to implement.
In this guide, I will walk you through the latter. Basic Consent Mode is a total headache, because unlike Advanced Consent Mode, there’s nothing automated about it at all. Basic Consent Mode basically means that tags should only ever fire when relevant consent has been granted. If consent has not been granted or if it’s unclear if there is consent, the tags should not fire.
The first part of the guide will discuss how to implement Consent Mode itself, either through a Consent Management Platform (CMP), manually with a custom template, or with a hybrid of the two. The second part of the guide covers how to adjust your tags to fire only when appropriate consent is granted.
Table of Contents
This article will focus on a Google Tag Manager implementation first and foremost. If you’re using just Google Tag, go ahead and read this guide as much of it is still very relevant. However, you should also consult the official guide.
XThe Simmer Newsletter
Subscribe to the Simmer newsletter to get the latest news and content from Simo Ahava into your email inbox!
Basic Consent Mode: the basics
Basic Consent Mode (BCM) isn’t really a feature. It’s an implementation approach that specifies that tags which require consent should never fire until the consent that they require has been granted.
It’s basically business as usual. This is how you probably orchestrated your tags anyway due to legislation like GDPR and ePrivacy dictating legal bases for processing user data.
However, with BCM, you need to link your tags to how Consent Mode itself has been activated on the page. This means that your Consent Management Platform (CMP) needs to be integrated with Consent Mode. If it isn’t, you need to engineer the cooperation between your CMP and Consent Mode yourself.
The Consent Mode calls
Consent Mode has two different types of calls.
- Default is invoked as early as possible. You should use the Consent Initialization - All Pages trigger for this. It’s best to set all consent states to
deniedby default, even if you already know the user’s consent choices by the time the default call is made (more on this below). - Update is invoked as soon as the user makes a choice or their choice is known otherwise. While Default should be executed just once per page load, Update can be called multiple times – basically whenever the user makes a new choice.
Both calls take an object as one of the arguments. This object includes the different consent signals and their states. If consent for a specific signal is denied, the value should be "denied". If consent has been granted, the value should be "granted". Here’s an example where consent is denied by default:
{
  ad_storage: "denied",
  analytics_storage: "denied",
  ad_user_data: "denied",
  ad_personalization: "denied"
}
We will be ignoring all the custom consent signals (
funcionality_storage,security_storageetc.) as they are not officially part of Consent Mode.
When consent is then granted for analytics, for example, the Update call would be sent with this object:
{
  ad_storage: "denied",
  analytics_storage: "granted", // Consent granted for analytics
  ad_user_data: "denied",
  ad_personalization: "denied"
}
The ideal approach
Here is what I consider the ideal approach. We will be covering this in more detail in subsequent steps of the guide. It’s important to understand that this approach requires a cooperative CMP. If the Consent Management Platform has a quirky integration with Consent Mode, it’s possible you’ll need to pick up the slack and control Consent Mode calls yourself using the appropriate template.
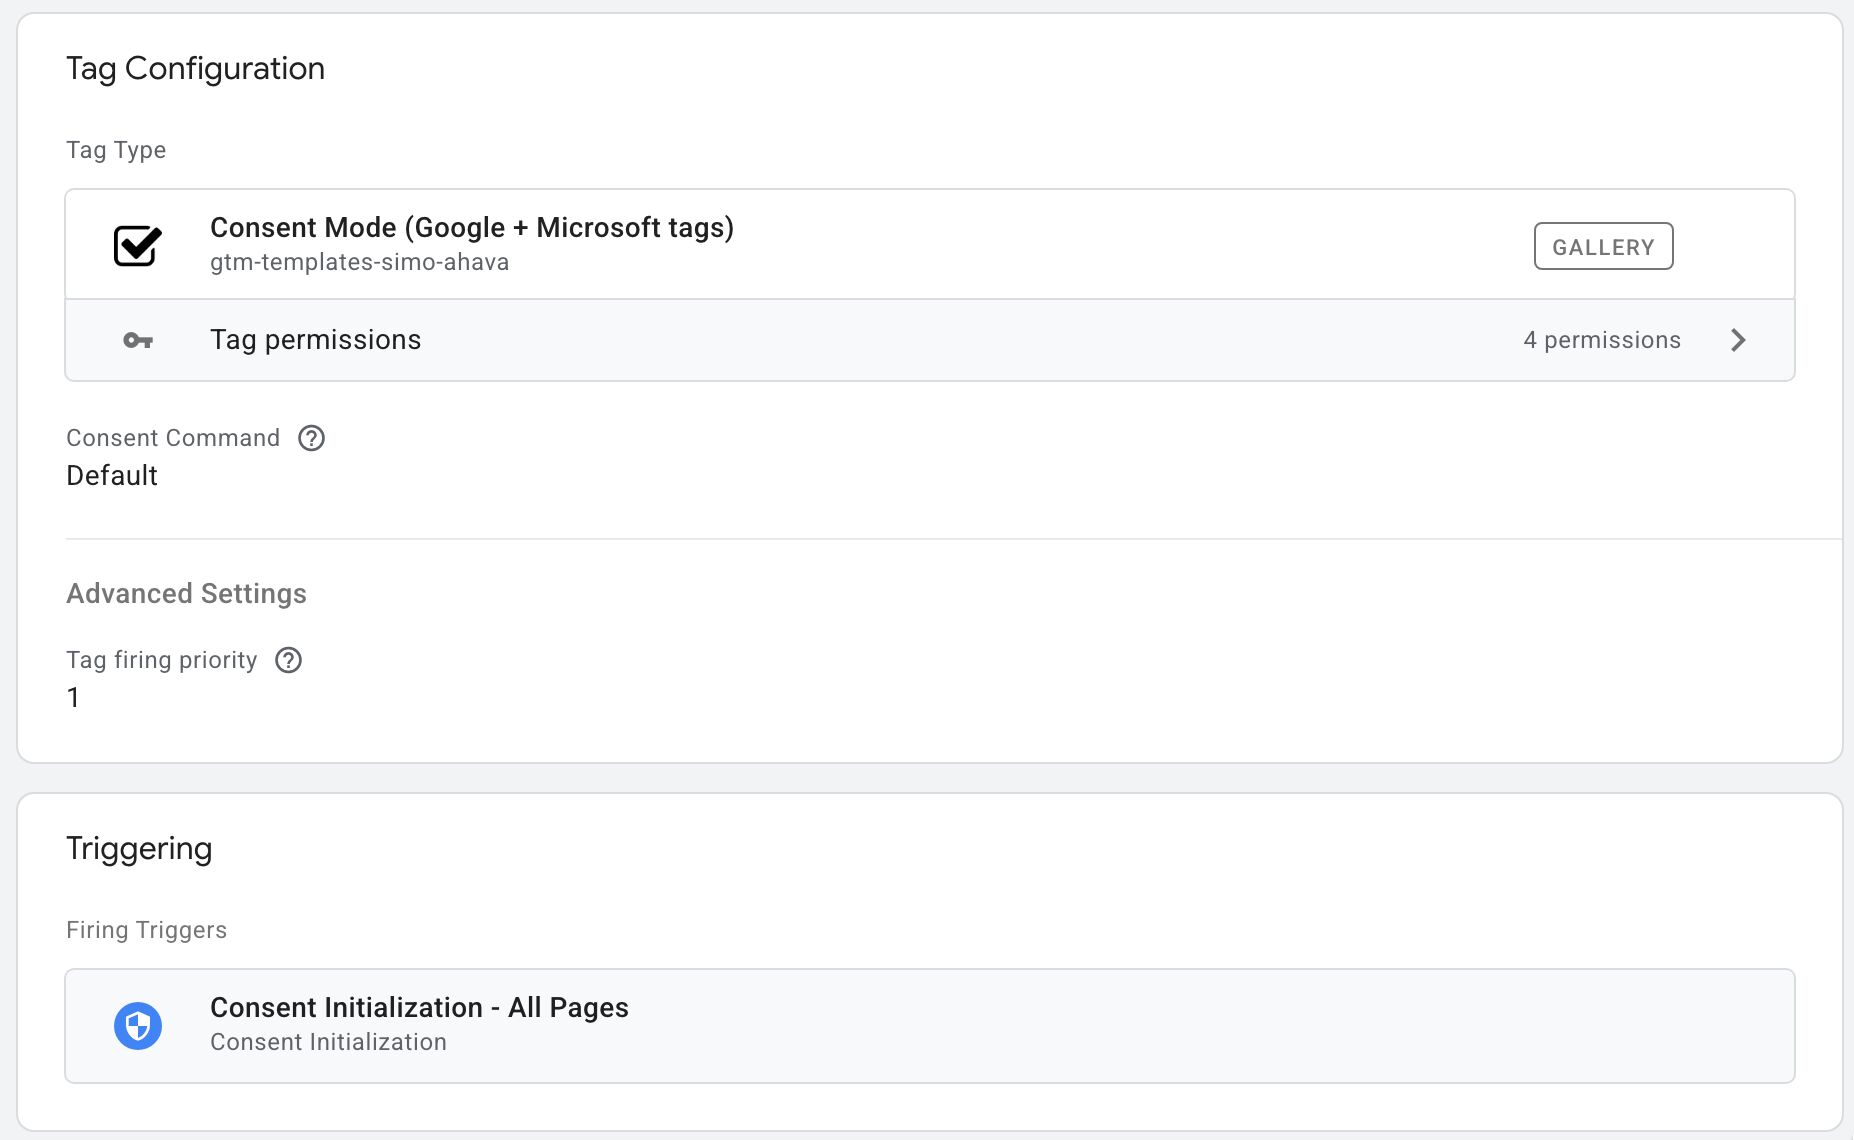
The Default call should always happen on the Consent Initialization - All Pages trigger, and it should set all consent signals to
"denied".
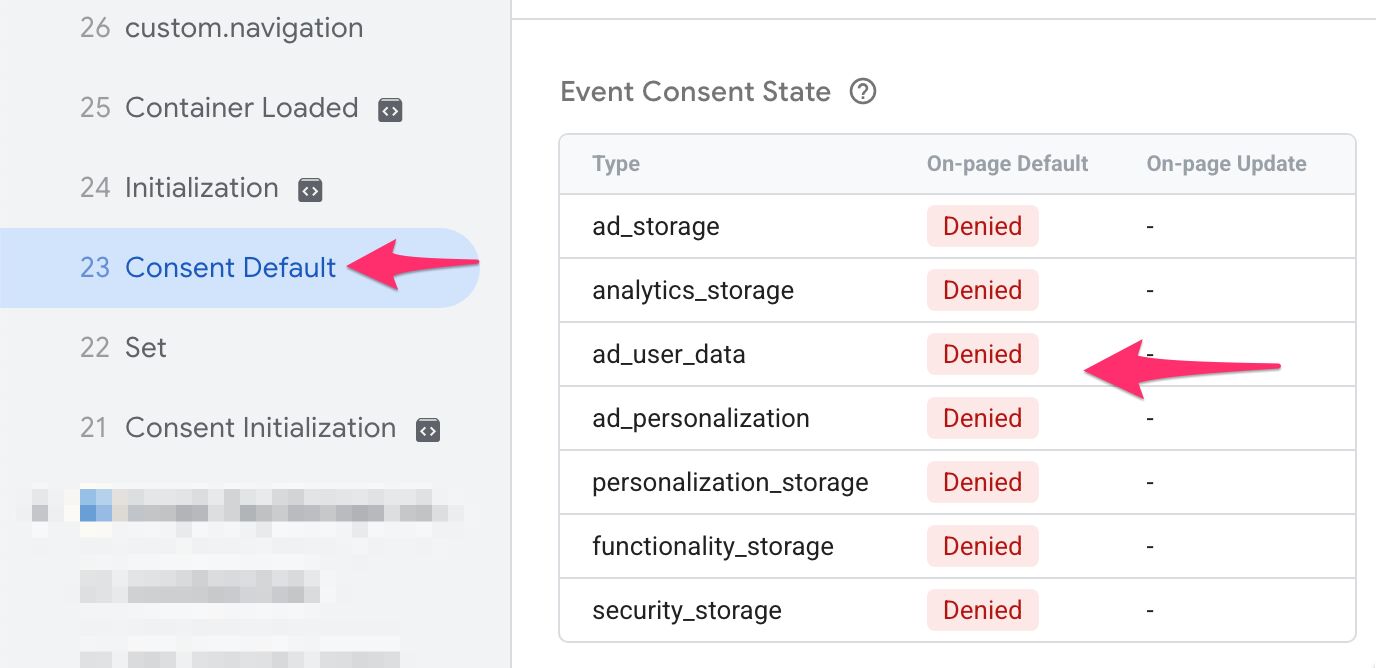
You might ask why not set the consent signals to "granted" already in the Default call, in case that information is available in the cookies (or other browser storage) the CMP sets. Setting defaults to "denied", in my opinion, is the most elegant and most consistent approach. By relying solely on Update calls, you eliminate possible race conditions that emerge from the consent information not being available at Default time.
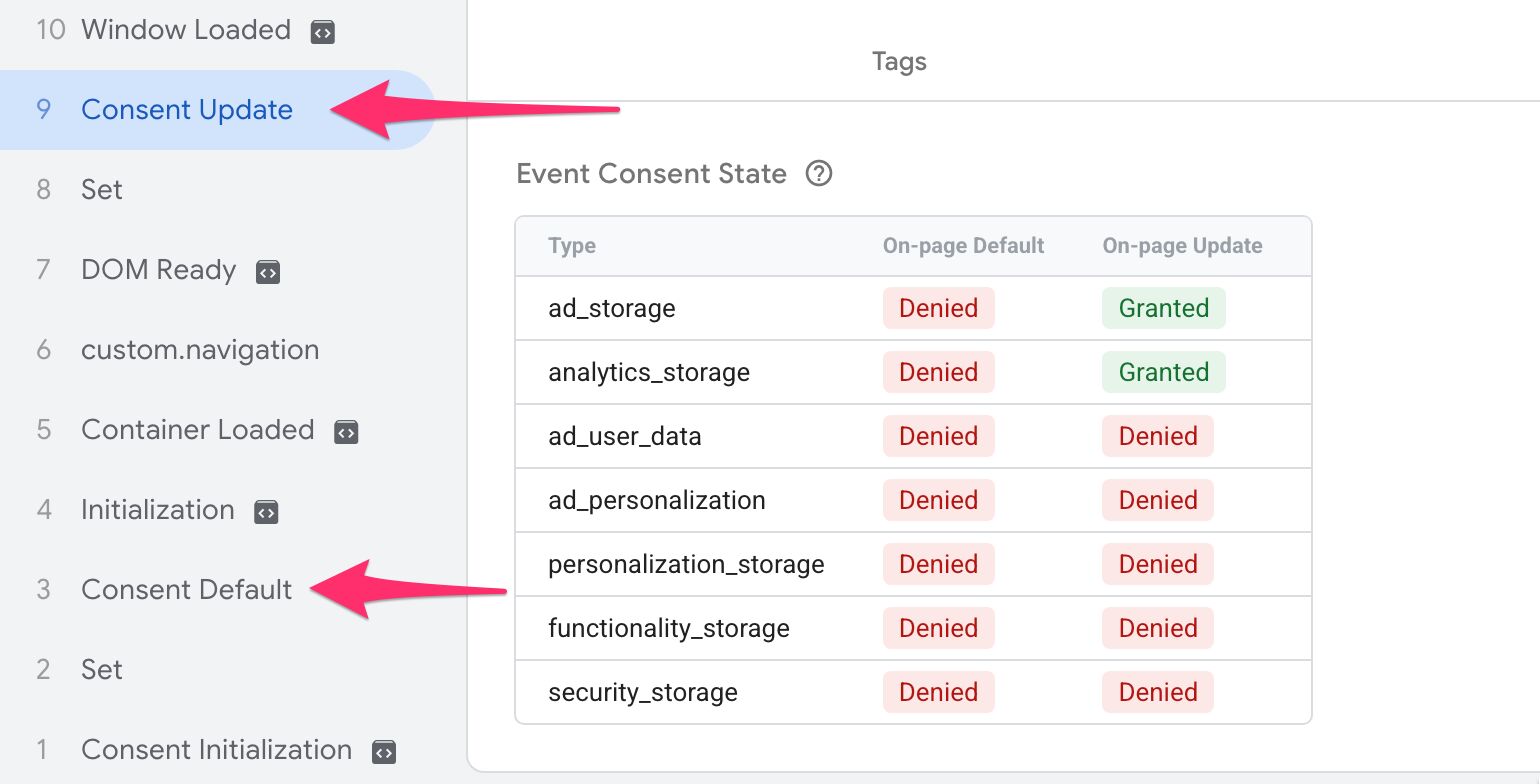
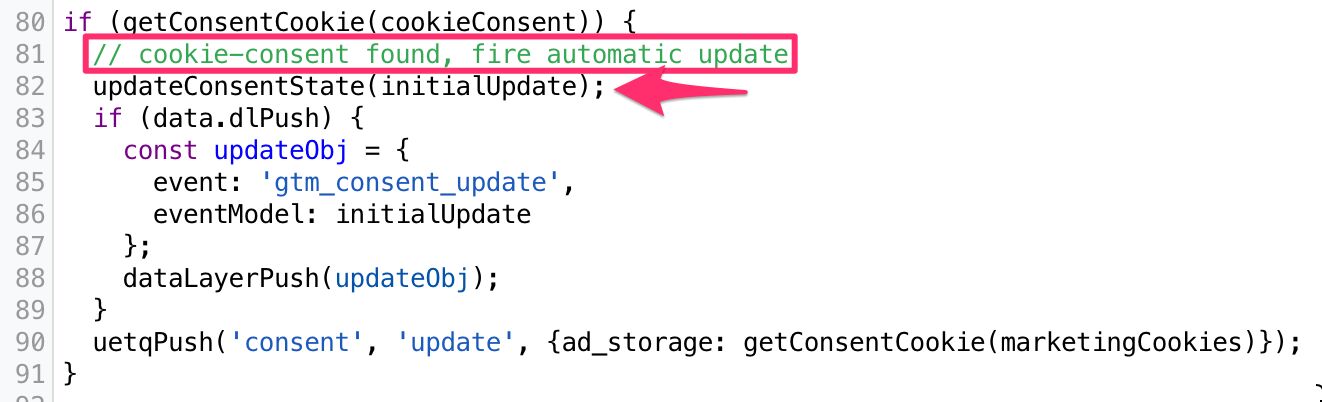
If consent is known already when the GTM container loads, the Update call should happen immediately after the Default call, also on the Consent Initialization trigger. The Update call should be immediately followed by a
dataLayer.pushcall with a custom event (e.g.gtm_consent_update) and details about the consent states. This event is used for triggering tags that need consent.

By running the Default and Update calls with the latter coming immediate after the former, you ensure that all GTM tags can make use of the most current consent states as soon as they are set to fire.
If consent is set or changed by the user later, or if the consent state is only known once the CMP has loaded, for example, the Update call should happen immediately when the state of these consent signals is known. Again, this Update call should be immediately followed by a
dataLayer.pushas explained above.
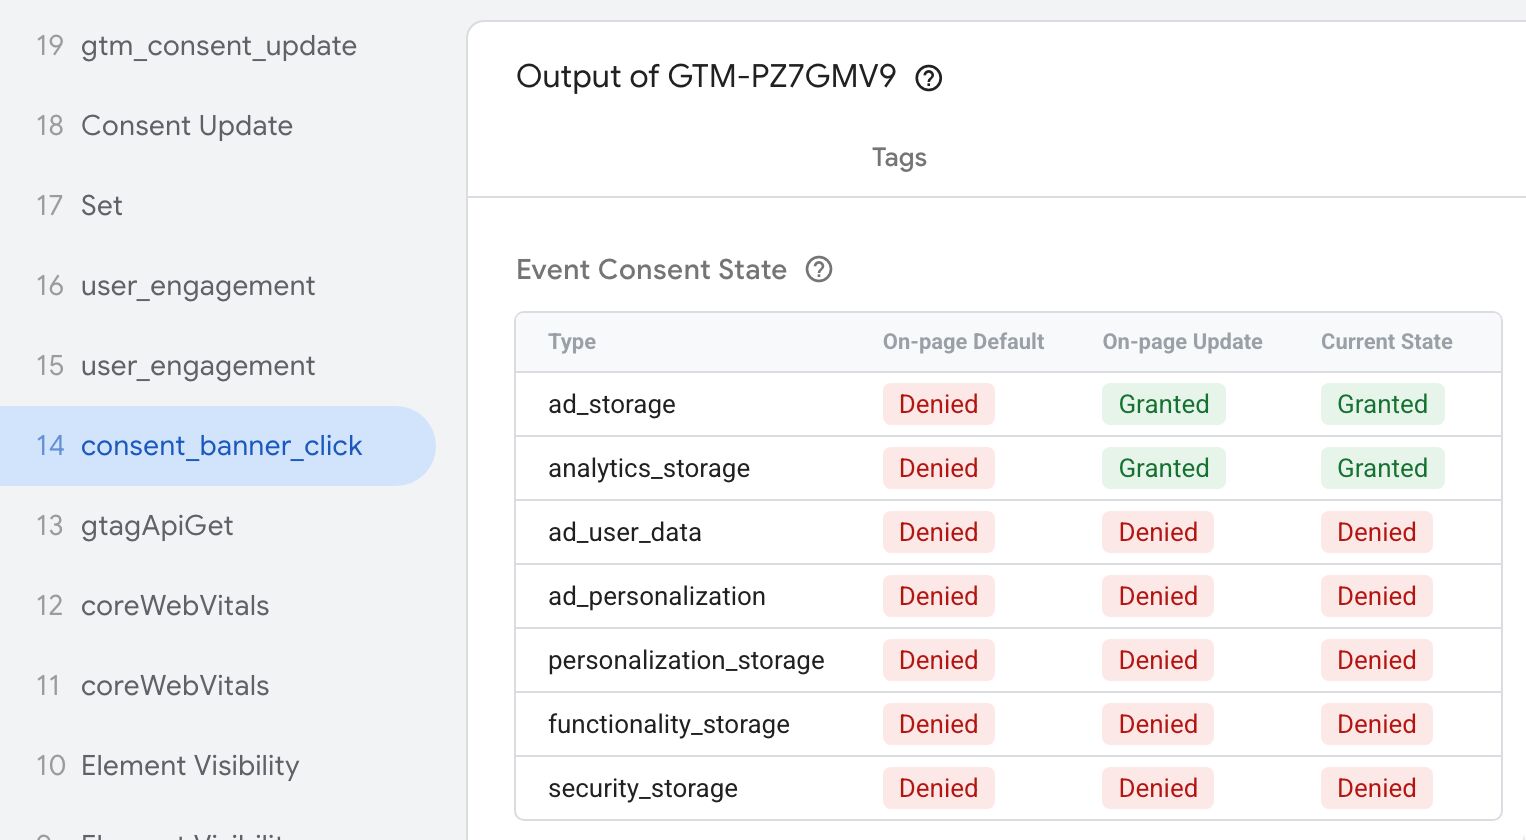
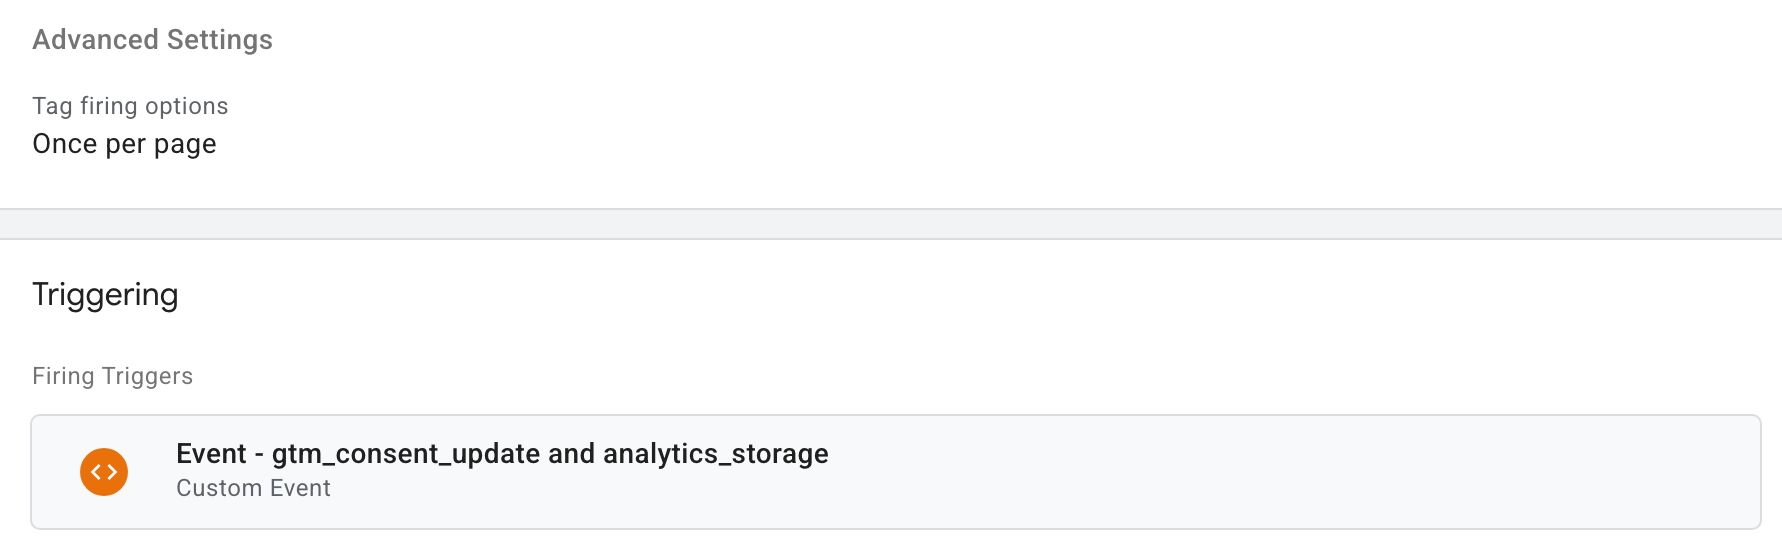
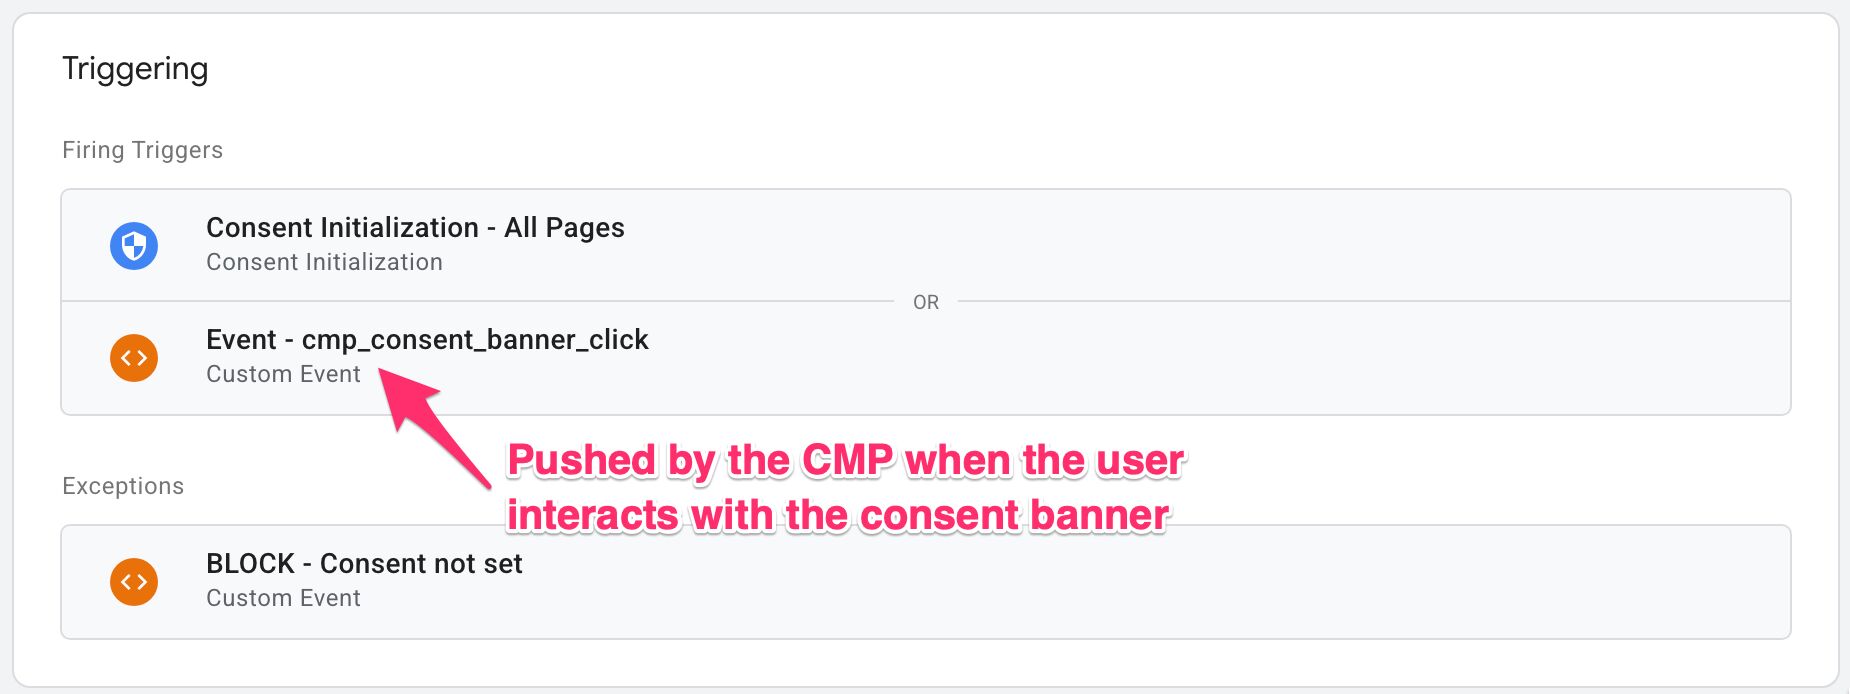
In the screenshot above, the Consent Update call is done by a GTM custom template (see below) that fires on the consent_banner_click event.
As you can see, the consent update happens already on the
consent_banner_clickevent. This is because GTM is specially engineered to immediately apply changes to consent states if the custom template uses the dedicated template APIs (setDefaultConsentStateandupdateConsentState).
The ideal approach thus makes use of GTM’s templates to engineer consent. Relying on gtag alone does work, but it introduces potential race conditions where the consent state takes longer than anticipated to be set.
In the rest of the guide, we’ll deconstruct this ideal approach and look at it from the viewpoint of how most CMPs work.
The Consent Management Platform
I cannot recommend any CMPs over others. I’ve always preferred to orchestrate interactions with Consent Mode manually, using a custom template (see below), but there are many CMPs that have their own custom templates that do the job, more or less.
Generally, I’d recommend loading the CMP outside GTM, before Google Tag Manager loads. This is because in some cases GTM is blocked by ad and content blockers, which means your CMP is never loaded at all. This poses a risk in case you have data collection subject to user consent happening outside GTM.
In any case, when working with a CMP, you need to be careful how much of Consent Mode logic you delegate to the CMP library itself, as it’s often loaded asynchronously. Asynchronous loading means that the browser initiates the load but then proceeds to execute other tasks in the queue. In other words, there’s no guarantee when the CMP has actually loaded and is ready to implement Consent Mode.
Regardless of how the CMP works, here is how I recommend engineering Consent Mode:
Use a GTM custom template to set the Default to
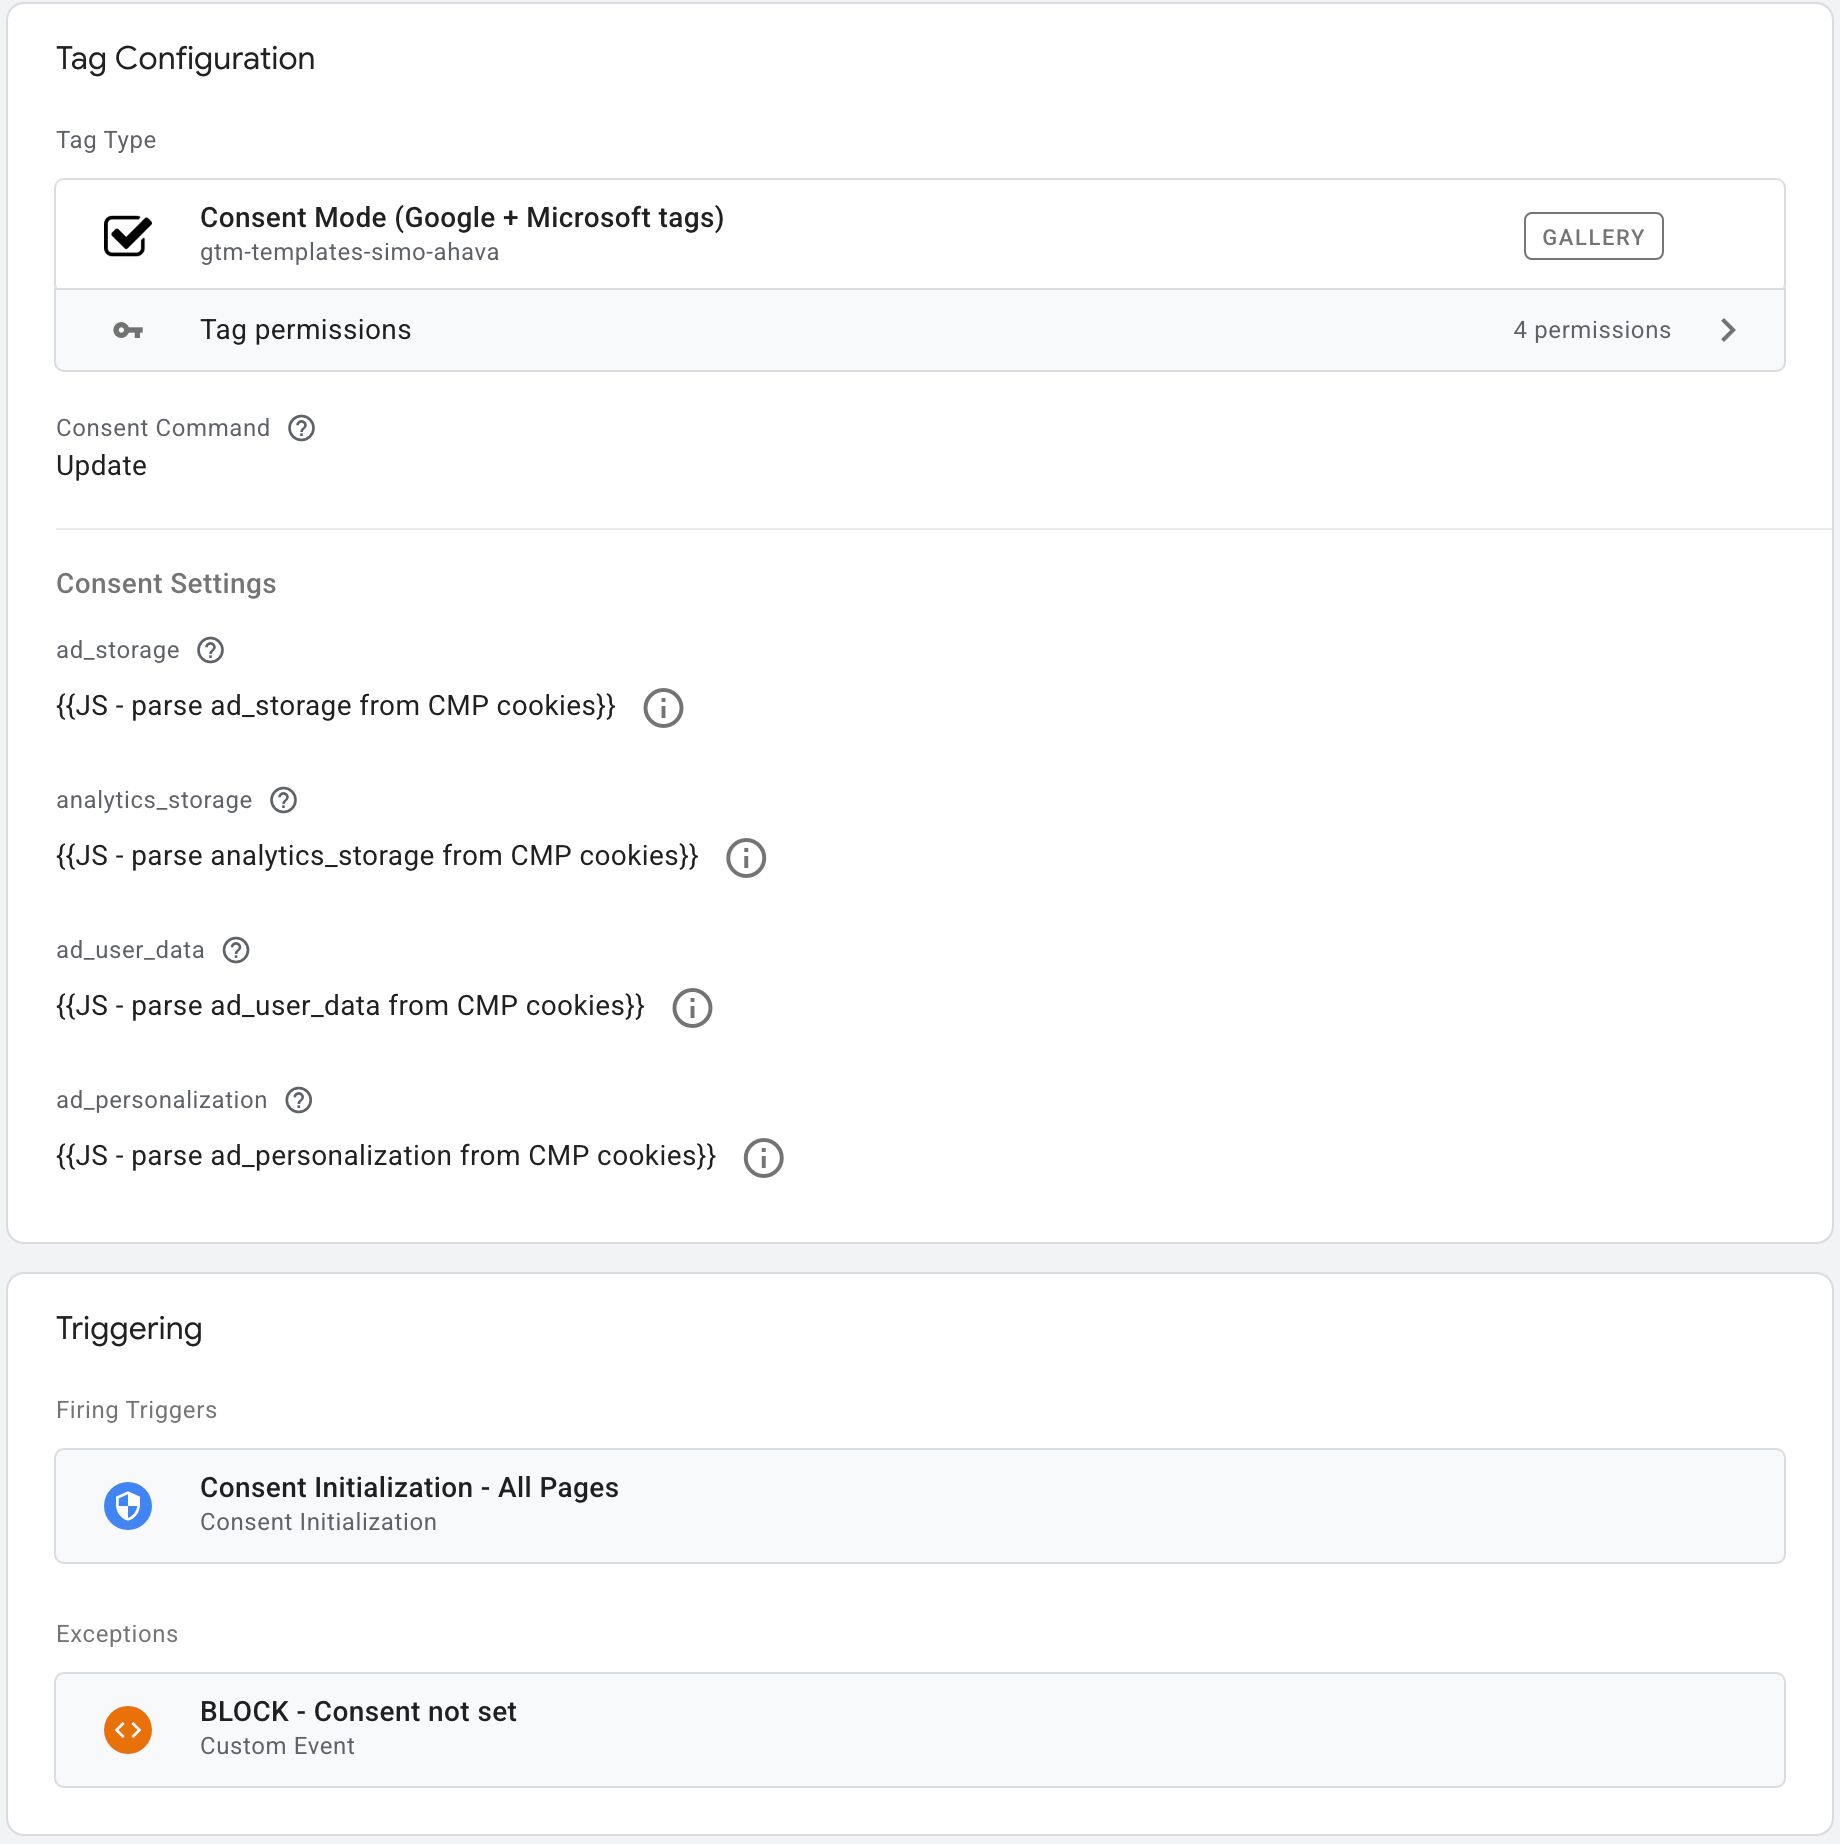
"denied"across the board, and have it fire on the Consent Initialization - All Pages trigger. Set the Tag Priority of this tag to10, for example.Use a GTM custom template to fire an Update call on Consent Initialization - All Pages trigger if the user has already established consent previously and this is available in browser cookies or
localStorage. Adjust the states from"denied"to"granted"for all signals whose consent has been granted (you might need to use variables to pull in the consent state from cookies orlocalStorageor the globalwindowobject).Use a GTM custom template to fire an Update call whenever the user adjusts their consent choices.
Now, ideally, it would be the CMP’s own custom template that handles all of the above. However, CMPs often lack a proper GTM template, or they opt to use gtag instead of using the dedicated template APIs. In this case, it might be best to orchestrate Consent Mode manually.
As a positive example, the Cookiebanners.nl template handles this nicely. You need to set a tag created with this template to fire on the Consent Initialization - All pages trigger. The tag will then automatically run the Default call when it first fires, followed by an Update call if the Cookiebanners.nl consent states are available in a browser cookie. Later, if the user adjusts their consent choices, the Cookiebanners.nl JavaScript library runs a gtag('consent', 'update', ...) call to update consent states, followed by a dataLayer.push() with an event that can be used to trigger tags with.
Instructions for CMP designers on how to implement Consent Mode
If you are working for a CMP or shopping around for a CMP that works ideally with Consent Mode, here are the features it should have:
It needs a dedicated GTM Custom Template that utilizes the custom template consent APIs:
setDefaultConsentStateandupdateConsentState. The first should be called immediately when a tag built with the template fires (call it just once per page load, though!), and the second should be called immediately after this, if consent is already known. If the user changes their consent settings,updateConsentStateshould be called again. These APIs are special in that they immediately toggle the consent states in Google Tag Manager instead of having to wait for the container to process agtag()call.The custom template needs to push a Data Layer event as soon as any Update call is made. This is because the Consent Update call itself cannot be used as a GTM trigger!. If you want to trigger tags when the user’s consent choices are known or when they change, the CMP must push an event to
dataLayerthat can then be used as the trigger event. ThedataLayer.push()call could look like this, for example:
window.dataLayer.push({
  event: 'gtm_consent_update',
  analytics_storage: 'granted',
  ad_storage: 'denied',
  ad_user_data: 'denied',
  ad_personalization: 'denied'
});- The CMP should ideally have an option to suppress the initial Default and Update calls, in case the site admin wants to take full control over these vital flows by using their own custom template.
For inspiration, see how the Cookiebanners.nl template has been created. Full disclosure, I helped build it.
Patching the CMP manually with a custom template
If you want to take control over at least the crucial initialization flow, you can use my Consent Mode (Google + Microsoft Tags) template available in the Community Template Gallery.
If you do this, it’s important that the CMP doesn’t interact with Consent Mode itself, otherwise you might have a situation where multiple, often conflicting Update or Default calls happen. The CMP’s job is to write the user’s consent choices into browser storage (cookies or
localStoragefor example), and then push an event todataLayerthat can be used to trigger the custom template tag with.
Here’s an example of an ideal setup:
- Create a new Default tag with my template.
- Set the trigger as Consent Initialization - All Pages.
- Set all consent signals to
"denied". - Set the Tag Priority to
10.
- Next, create a new Update tag with it.
- Set it to fire on the Consent Initialization - All Pages trigger.
- Block this tag from firing in case the user’s consent choice is not yet known.
- Set the consent signals to
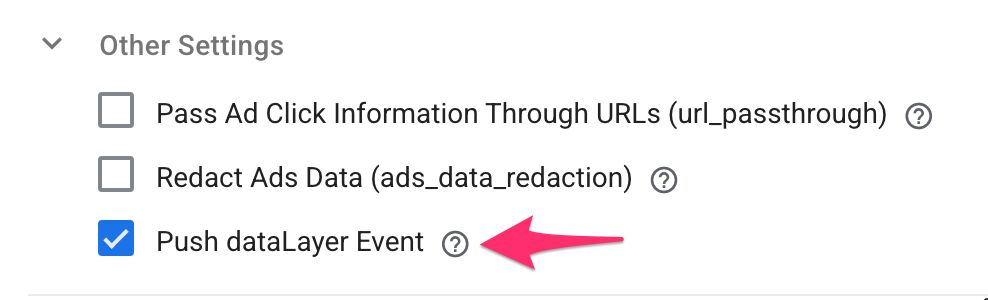
"denied"or"granted"dynamically using variables. Typically this information is stored in a browser cookie orlocalStorage(read the CMP documentation to know for sure). - Toggle the Push dataLayer event option ON, so that the tag generates an event that you can use to fire your marketing tags.
With these two tags in place, you are handling the critical initial load and configuration of Consent Mode.
When the user then interacts with the consent banner, the CMP should push an event to dataLayer that signals a change in the stored consent states. This push should happen after it is guaranteed that the stored consent choices have been updated.
You can then simply configure the Update tag that you created earlier to fire with this dataLayer event, too. The Update call will happen again, and Consent Mode will be updated with the new consent states.
A setup like this is pretty much foolproof, guaranteed to work as fast as possible, and you have full control over how Consent Mode is implemented on the site.
Adjusting tags to work with BCM
Now that you’re using a CMP that works nicely with Consent Mode, or you’re working with a custom template that handles all the logic, you’re left with the difficult part.
With BCM, you need to block tags from firing until relevant consent has been granted. This sounds straightforward but it isn’t. Unfortunately, Google has made it extremely difficult to implement BCM vs. the relative ease of working with Advanced Consent Mode.
Before diving into tag-specific configurations, it’s important to be aware of a critical bug that may affect your implementation.
Bug with “Additional Consent Checks”
There is a very, very annoying bug with Additional Consent Checks that makes it unusable for tags that have the Once per page setting toggled on:
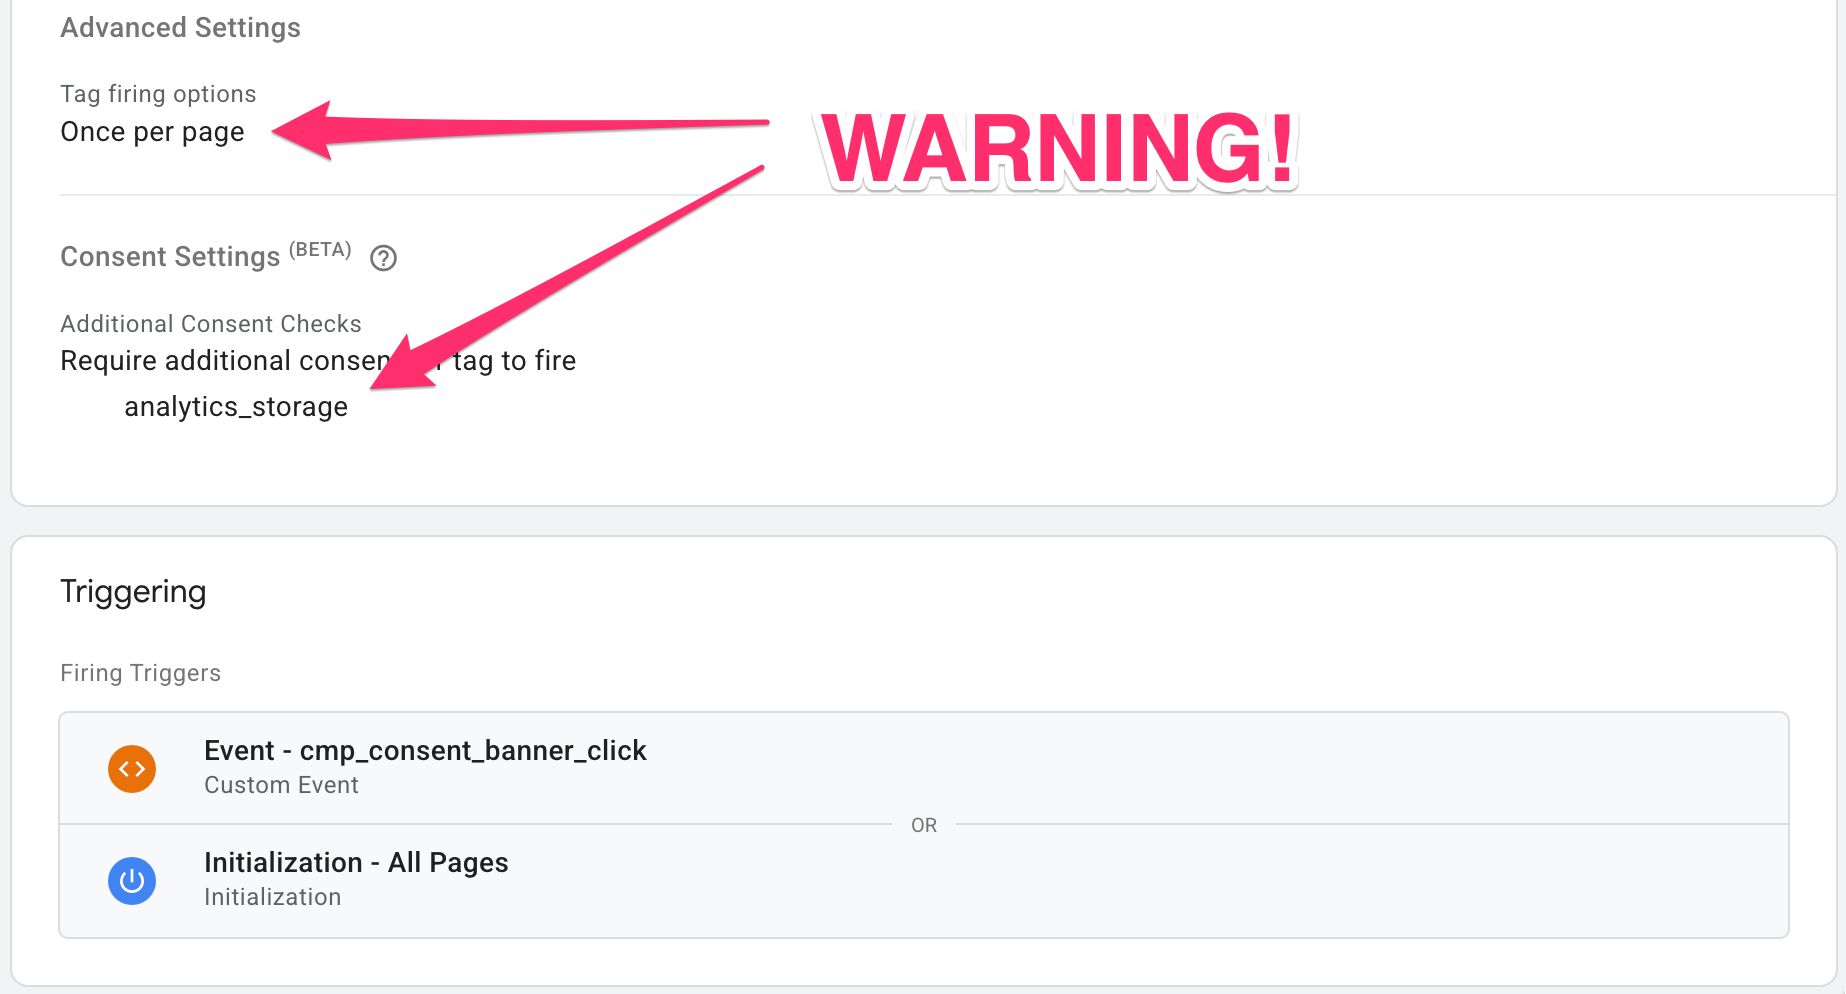
With this bug, if your tag first tries to fire when consent is not granted (e.g. at the Initialization - All Pages trigger above), it will be rightly blocked by Additional Consent Checks not detecting consent for analytics_storage.
However, when the tag then fires on the cmp_consent_banner_click and consent is granted, it will not fire.
The bug is that Additional Consent Checks consumes the “Once per page” setting. From GTM’s point of view, the tag has already “fired” on that page, even though it was blocked by Additional Consent Checks.
This sucks, and it means that for Once per page tags you need to use trigger logic to control the tag firing instead.
Initialization tags that need to fire just once per page load
These are tags like the Meta pixel or Google Tag that need to fire as early as possible and that don’t need to access any information that might be available in GTM with a delay.
If you didn’t have Consent Mode in place, you would fire these tags on the Initialization - All Pages trigger.
With BCM, the earliest possible moment when it’s certain that consent has been granted would be a dataLayer event pushed by the CMP or by a custom template immediately after consent has been updated with a "granted" state.
For example, if using my custom template, the trigger would look like this for tags that need analytics_storage:
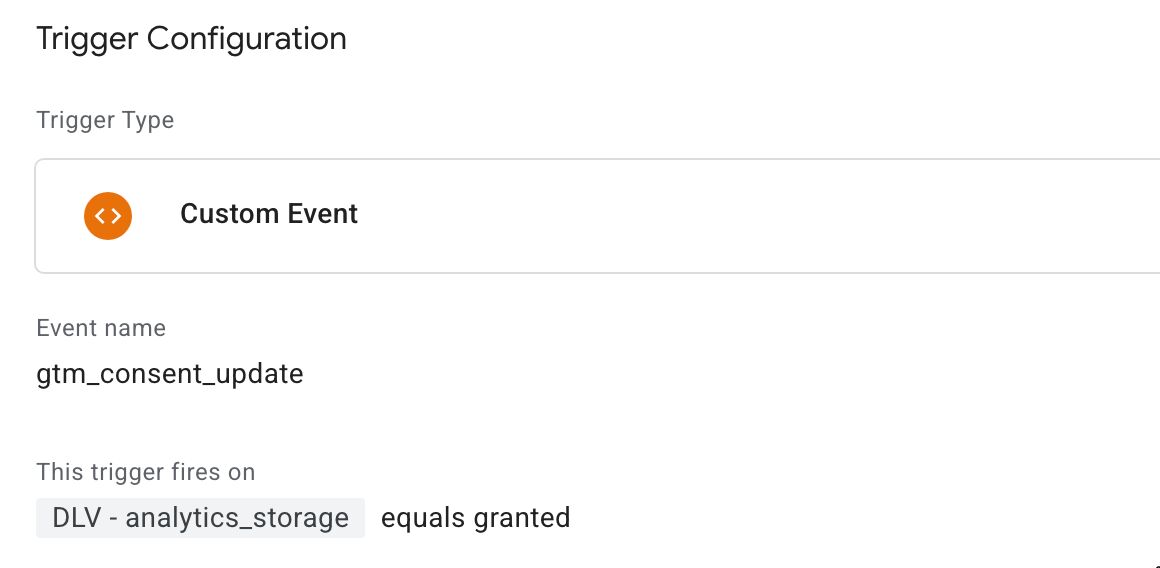
{{DLV - analytics_storage}}is a Data Layer variable that points to the nameanalytics_storage, because that’s what the custom template uses to reference consent states.
If you add this trigger to your Once per page tags, they will only fire when consent is granted for analytics_storage. For tags that need ad_storage, create a new trigger and adjust accordingly.
You do not need to add Additional Consent Checks, and you do not need to add a blocking trigger to these tags. They will only fire when appropriate consent is granted – your trigger takes care of that.
Initialization tags that might need to fire multiple times
This is also relatively easy. Let’s say you have an initialization tag that needs to fire when consent is granted and on virtual page views or when the user logs in, for example.
In that case, the tag’s firing setting should be set to Once per event.
The trigger should be the same trigger as above for cases where the user’s consent state is updated to "granted".
Additionally, the tag should have all the other triggers that you want to add to it.
Finally, set the Additional Consent Checks setting to the consent state that the tag needs – analytics_storage if following the example above.
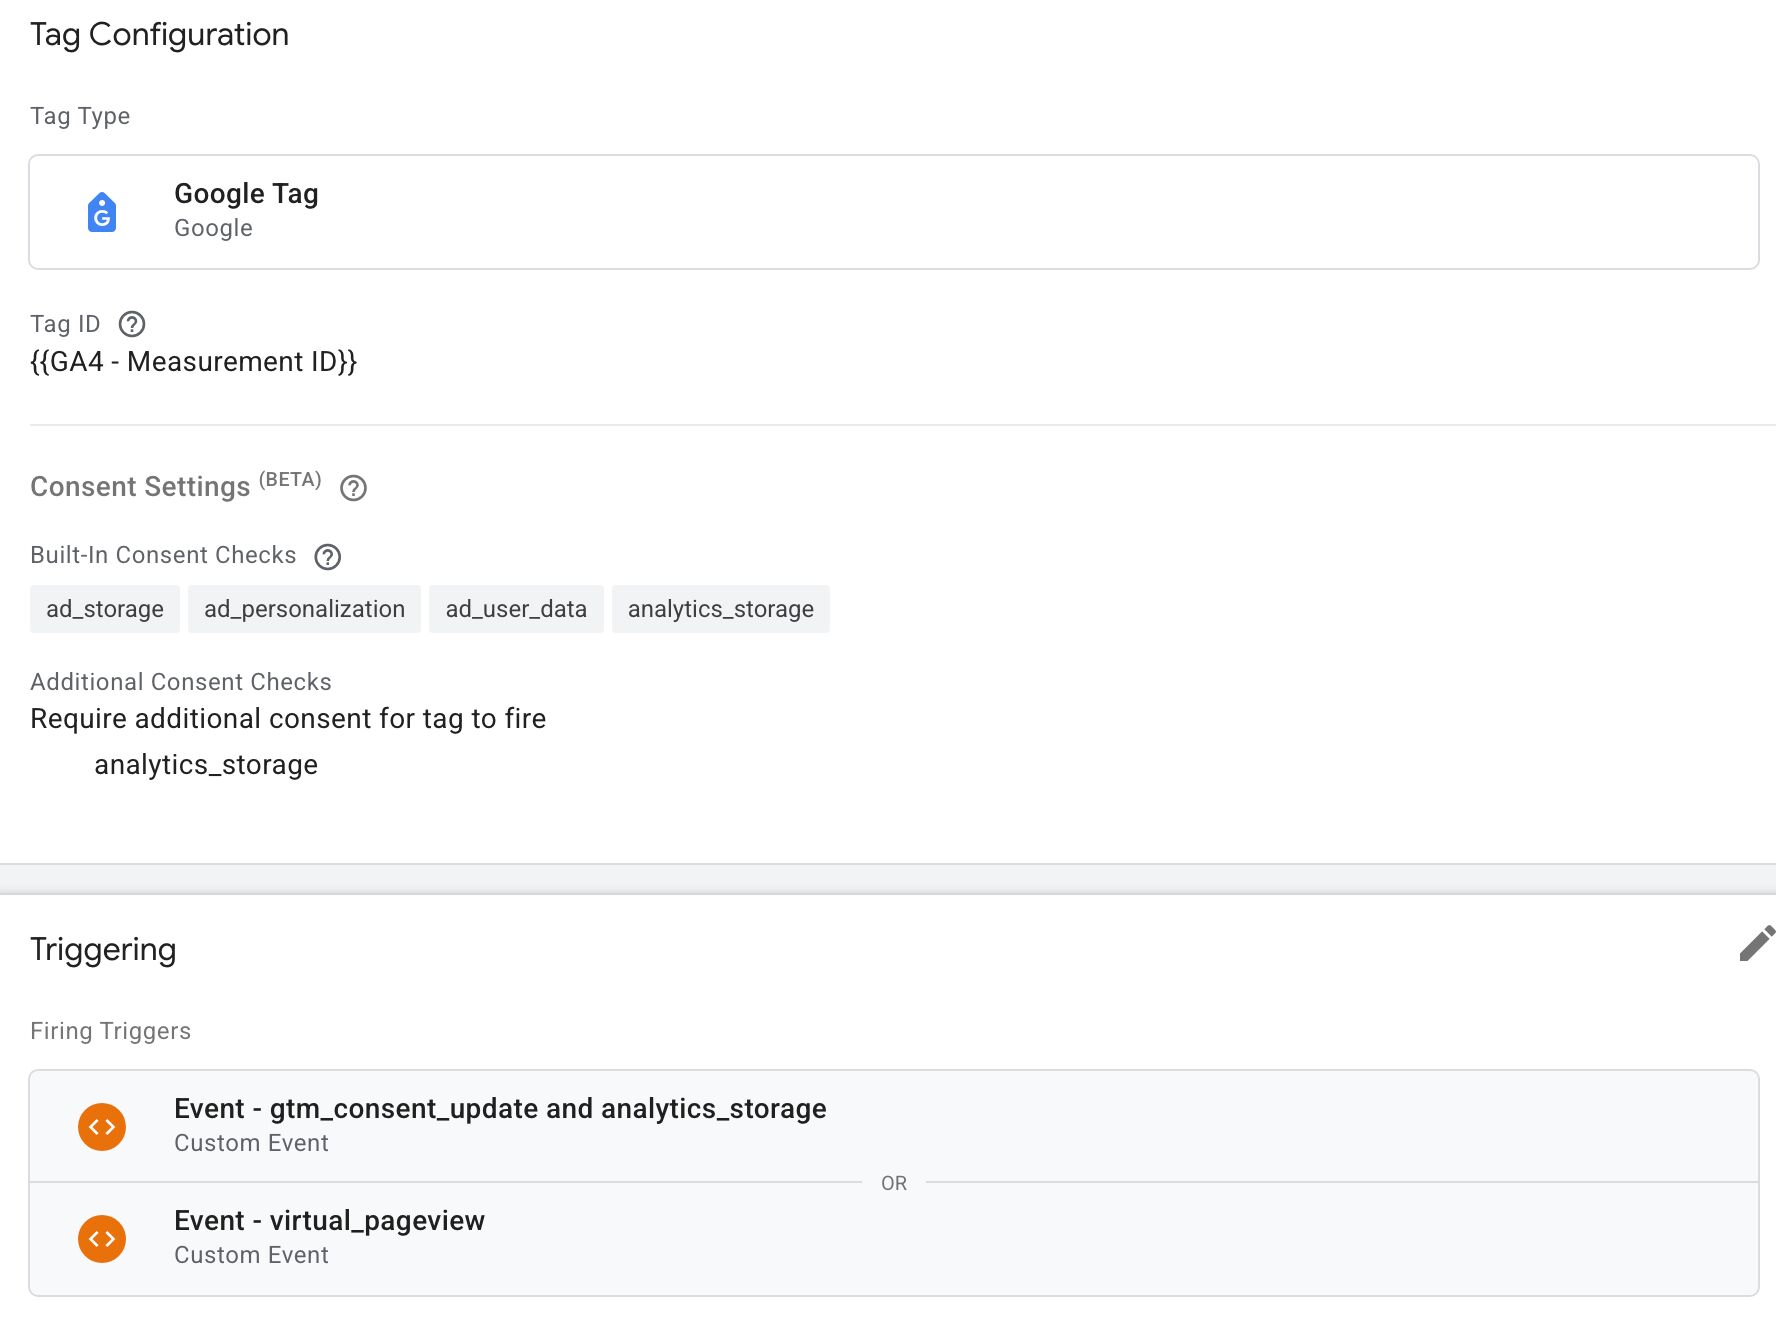
In this case, the tag will fire whenever consent is granted for analytics_storage. The tag will also fire for all virtual_pageview events as long as analytics_storage consent has been granted.
Tags that must fire when consent is granted but only under special circumstances
If you use Additional Consent Checks, tags will be blocked if consent is not granted. However, they will not be automatically fired again when consent is granted at a later stage. You need to engineer this logic yourself.
Some tags need to wait for specific circumstances before they fire. A typical example is an ecommerce purchase tag, which needs to fire as soon as a purchase event is pushed to dataLayer.
With tags that need to fire just once, the easiest approach is with a Trigger Group.
A Trigger Group can take one or more triggers, and it will only activate as soon as all the triggers added to the group have fired.
So, if you have a GA4 Purchase tag, for example, the Trigger Group would look like this:
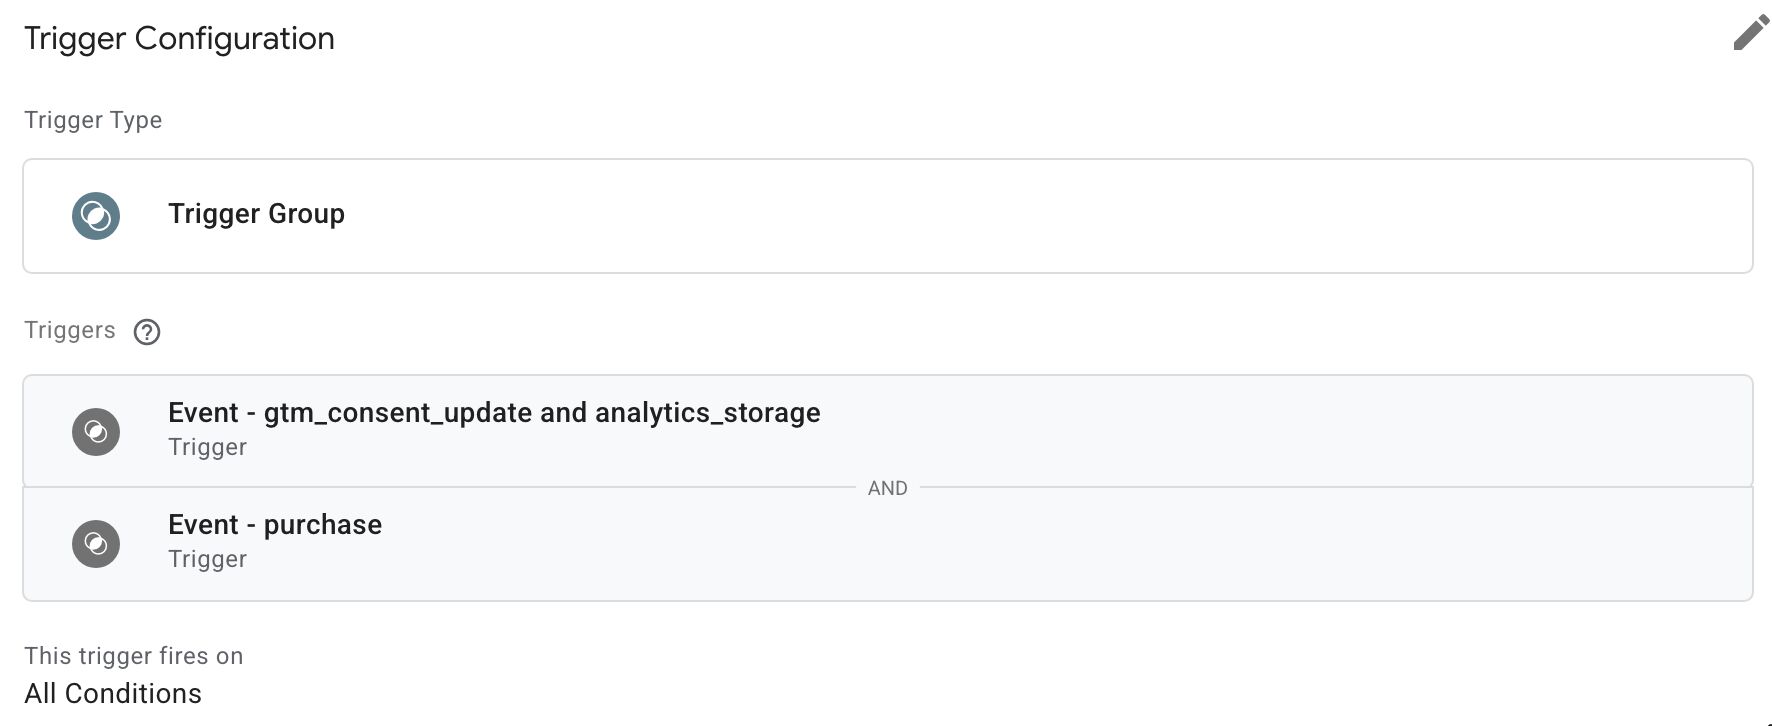
A tag with this trigger will fire only once consent is "granted" for analytics_storage and a purchase event has been pushed into dataLayer.
A tag like this doesn’t need Additional Consent Checks or blocking triggers, because one of the conditions of it firing is the presence of analytics_storage with "granted" state.
Tags that might fire multiple times
Your generic event tags such as Add to cart, Scroll, Login, and Timer might fire multiple times on the page.
The easiest approach here is to simply use Additional Consent Checks to block these tags from firing if appropriate consent hasn’t been granted.
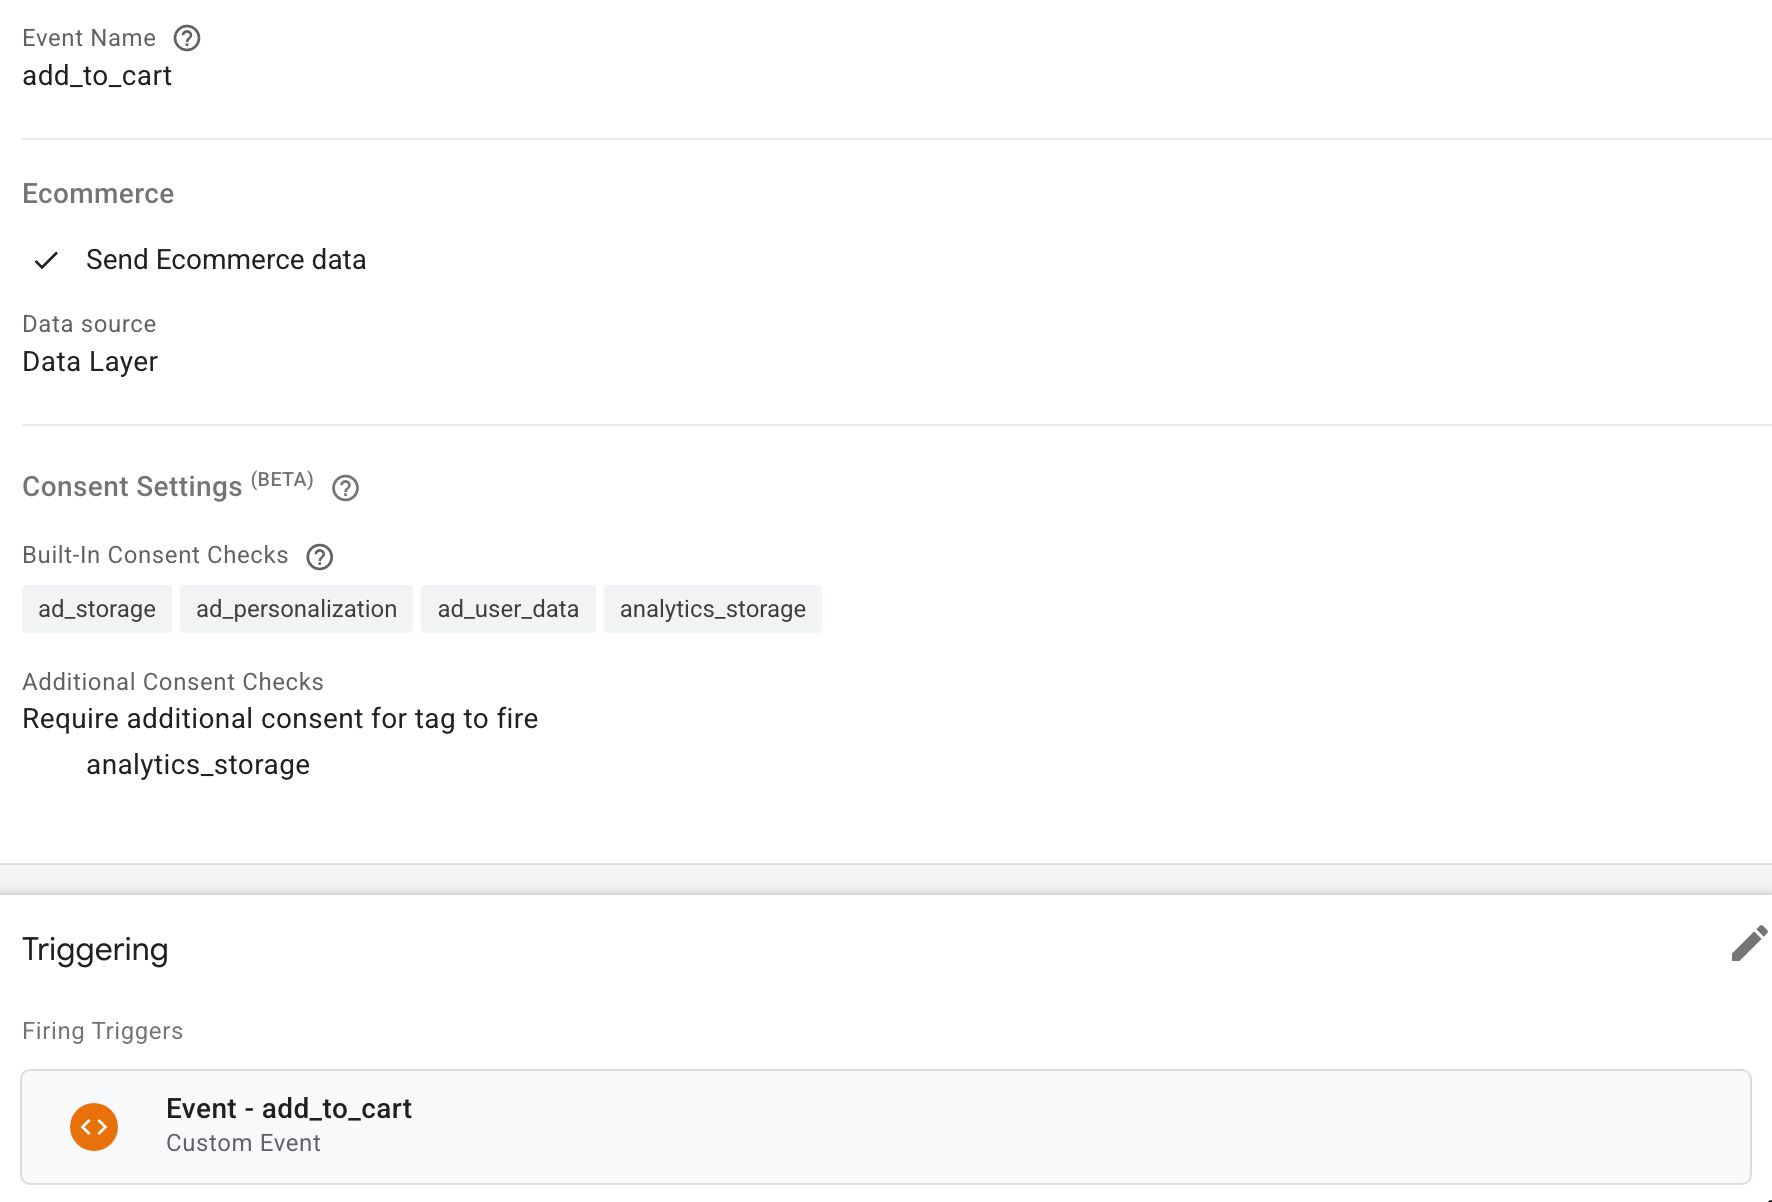
This configuration means that if consent is not granted, the tag is blocked. When consent is granted, the tag will not automatically fire again. Trigger Groups will not work here as they can only be activated once per page load.
If you need these tags to automatically fire if consent is granted after the trigger fires, you would need to implement a queue system manually, and that is beyond the scope of this guide. I also don’t think it’s worth the effort – sometimes it’s OK to have a little data loss in favor of keeping things simple.
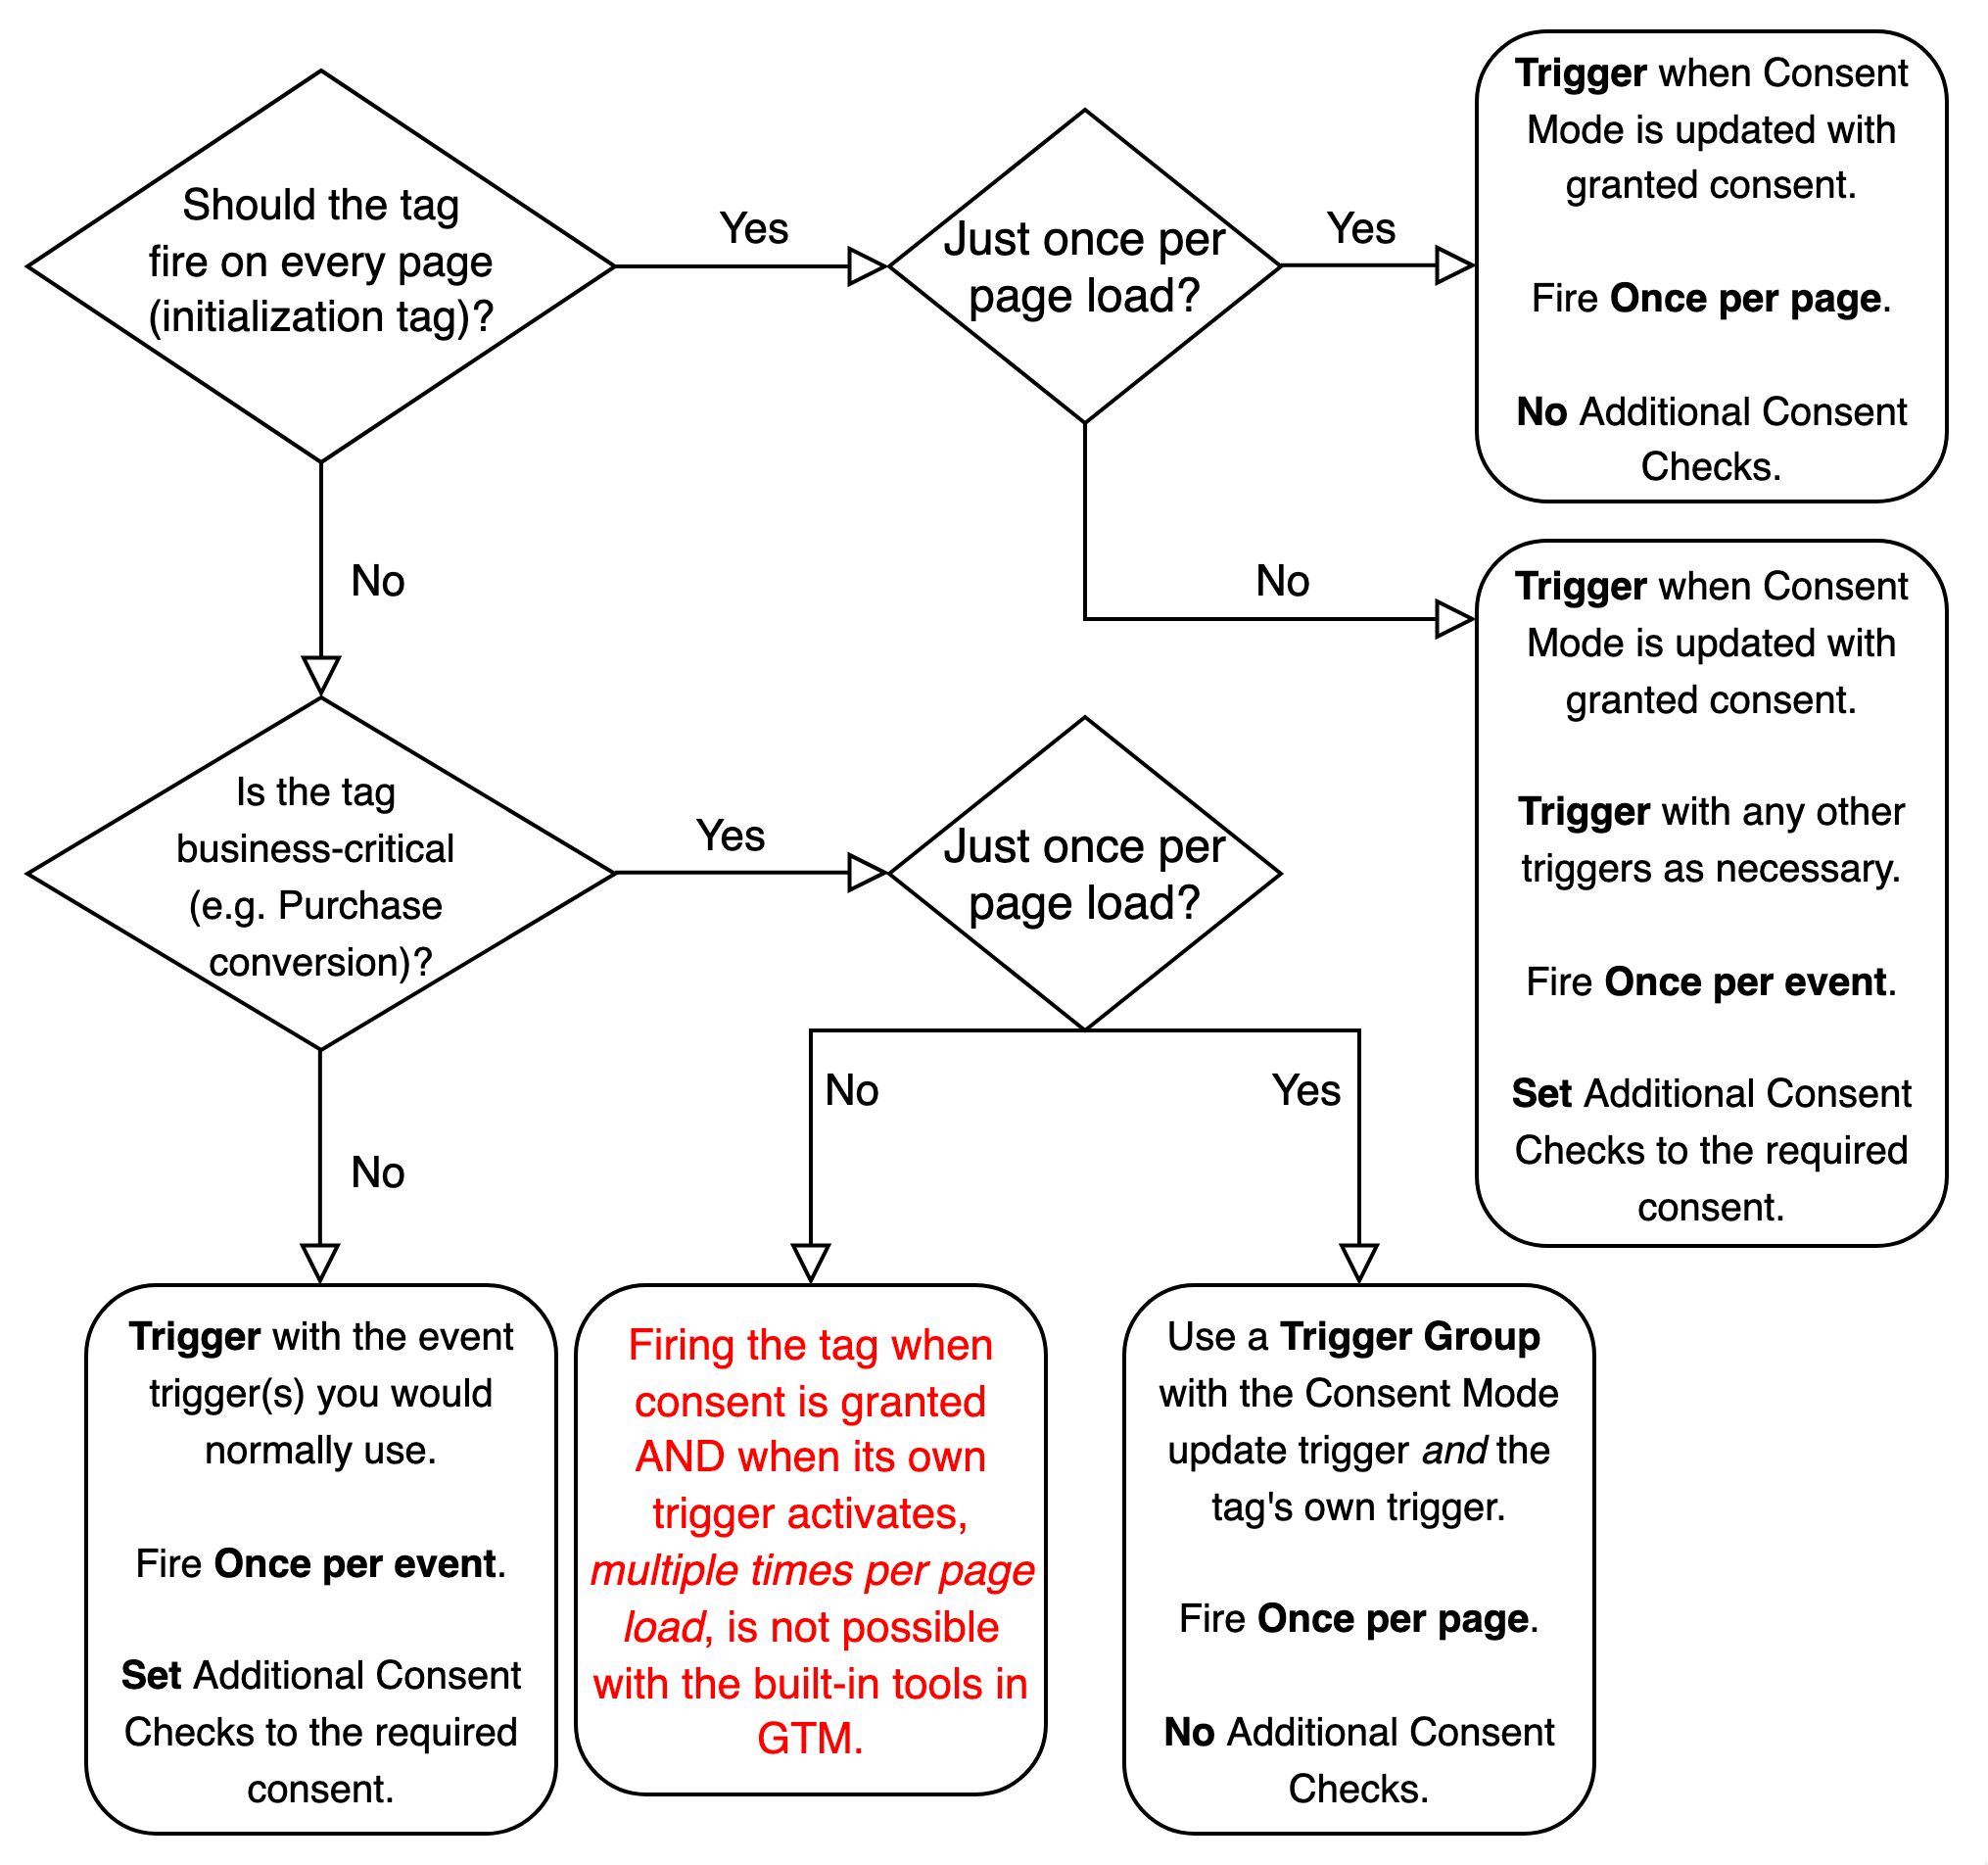
Flowchart
Here’s a flowchart of the instructions from the previous section.
Edge cases
There are many edge cases to this. The examples above rely on a BCM implementation that mirrors my ideal approach.
Sometimes the gtm_consent_update event cannot be pushed at Consent Initialization time because the information about the user’s consent choices is simply not available. This is very poor CMP design, but it happens.
Sometimes a virtual_pageview event happens already on the initial page load, making it difficult to avoid duplicate page views (one for the gtm_consent_update event and one for the virtual_pageview event).
Sometimes the CMP refuses to cooperate and pushes a faulty Default or Update call, messing things up.
You can share your questions in the comments, but in most of the cases toggling the CMP’s settings will help fix issues in the CMP’s end. Otherwise, careful trigger design in GTM will ensure that your tags fire only when they should.
Summary
Implementing Basic Consent Mode is as taxing as reading this guide from top to bottom.
The biggest difficulty is in managing the anticipation flow, where tags need to wait for granted consent before proceeding with their triggering mechanisms.
Many CMPs load asynchronously, and they use gtag() calls instead of custom Google Tag Manager templates to orchestrate Consent Mode interactions. This leads to unnecessary delays, where the tag could have fired a long time ago but now has to wait for a slow CMP to instruct it with the latest Consent Mode states.
For this reason, I’m a huge fan of the DIY approach using custom templates. The CMP’s only role in this is to tell GTM when the user has made a change in their consent choices. The custom template can read the user’s consent choices from browser storage and activate Consent Mode immediately.
If you manage to build your Consent Mode setup like this, then modifying your tags to wait for appropriate consent is quite easy.
If, however, you can’t build the perfect Consent Mode setup and switching to a more cooperative CMP is out of the question, you’ll need to get inventive with triggers and variables.
Please write a comment below if you need clarification about any of the above, or if you have one of those dreaded edge cases to share and inquire about.
