#GTMTips: The Timer Trigger
Google Tag Manager has a Trigger type which fires after a certain duration of time has passed on the web page: the Timer Trigger. The most common uses for the Timer Trigger seem to be either to send an event to Google Analytics after X seconds of dwell time (to kill the Bounce), or to defer a Tag from firing until some asynchronous request has completed with certainty.
In the previous version of Google Tag Manager, the Timer was a separate listener Tag, which meant that you could start a timer based on a user interaction such as a click. In the current version of GTM, this is no longer possible, as the Timer Trigger will only start when GTM is first loaded on the page. So, one of the tips in this article will be how create your own Timer, in case you want to start one based on some other stimulus than the Page View.
XThe Simmer Newsletter
Subscribe to the Simmer newsletter to get the latest news and content from Simo Ahava into your email inbox!
Tip 45: The Timer Trigger
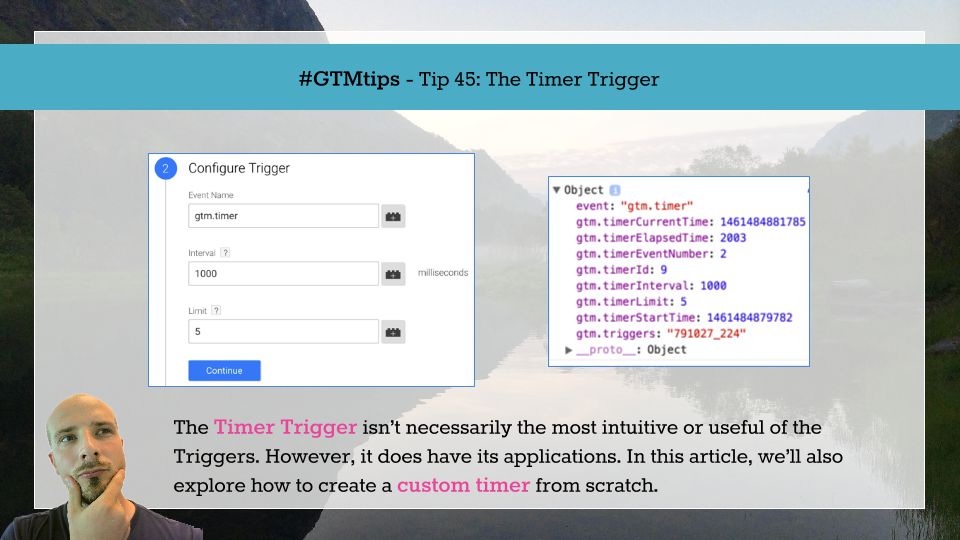
The Timer Trigger itself has a simple operation mechanism. You specify three different fields when creating the Trigger:
-
Event Name: This lets you customize the event name that GTM pushes to
dataLayer. It’s most useful in the case where you want to fire multiple timers on the page. -
Interval: Here you specify how many milliseconds should pass between each activation of this Trigger.
-
Limit: This option lets you choose how many times the Trigger fires before it is stopped.
Furthermore, you can delimit the Timer to only fire on specific pages using the Enable When option. You’ll need to provide some condition which is already present when GTM is first loaded, such as Page Path equals /home-page/, or something similar.
In Fire On you can fire a Tag based on some parameters of the Timer that fired. You might want to create a new Data Layer Variable for all of the following parameters:
-
gtm.timerCurrentTime - The timestamp of the most recent Timer activation.
-
gtm.timerElapsedTime - The time in milliseconds since the Timer started.
-
gtm.timerEventNumber - The number of Timers that have activated on the current page (whatever you have in the Limit option is the maximum).
-
gtm.timerId - A unique identifier number for the Timer. Each Timer you have on the page has a different ID.
-
gtm.timerInterval - The value you set in the Interval option when creating the Timer.
-
gtm.timerStartTime - The timestamp of when the Timer first started.
The gtm.timerId Data Layer Variable is definitely the most useful one. With that, you can stop a Timer even before it’s Limit is reached.
To do this, you need to run the following JavaScript command:
var timerId = {{DLV - gtm.timerId}};
window.clearInterval(timerId);
So executing window.clearInterval on the Data Layer Variable that points to gtm.timerId lets you halt the Timer. There’s no way to restart it once it’s halted on the page, though. The only way it starts again is with a page reload.
This is very useful on single-page apps, for example, where you might want to stop the Timer when a new page is loaded, but there’s no actual page refresh.
Now, in case you DO want a timer to fire when the user does something (e.g. click), you’ll need to use a Custom HTML Tag with custom code. Here’s one way to do it:
<script>
  (function() {
    // CHANGE THESE THREE:
    var eventName = 'custom.timer'; // The event name that is pushed into dataLayer
    var interval = 5000; // The interval in milliseconds
    var limit = 1; // The number of times the timer fires

    // OTHER SETTINGS:
    var timerNumber = 1;
    var startTime = new Date().getTime();

    var fireTimer = function() {
      var timeNow = new Date().getTime();
      window.dataLayer.push({
        'event' : eventName,
        'custom.timerCurrentTime' : timeNow,
        'custom.timerElapsedTime' : timeNow - startTime,
        'custom.timerStartTime' : startTime,
        'custom.timerEventNumber' : timerNumber,
        'custom.timerId' : timerId,
        'custom.timerInterval' : interval,
        'custom.timerLimit' : limit
      });
      timerNumber += 1;
      if (limit < timerNumber) {
        window.clearInterval(timerId);
      }
    };

    var timerId = window.setInterval(fireTimer, interval);
  })();
</script>
It’s a very simple script, and it does pretty much exactly the same thing as the Timer Trigger. The difference is that you can use any Trigger you want to fire this custom Trigger. Also, the keys pushed into dataLayer differ in that the prefix is not gtm. but custom.. So gtm.timerId becomes custom.timerId and so forth.
That’s all for the Timer tips. I hope they were useful! Remember to test thoroughly whenever using custom scripts on your page. Accidentally setting the interval to 1 millisecond and the limit to 10000 can quickly destroy your page performance. Yes, this is something that happened to me…sorry, my anonymous friend.
