#GTMtips: Migrate Containers To New UI
If you haven’t lived in a barrel, you should know by now that a new version of Google Tag Manager has been released. You can find the new version at http://tagmanager.google.com/, and there’s already a bunch of good articles about the new UI out there. I want to point out two: “Setting up GA via GTM’s new UX” by Krista Seiden, and “Google Tag Manager Refresh – 6 Things You Need to Know” by Jonathan Weber from Bounteous. Both are wonderful run-throughs of the new features, and should get you up-to-date with what’s changed.
OK, I’ve written something as well, namely a guide for using GTM’s event listeners in the new UI. This guide was warranted, as the whole approach to automatic event handling has changed quite a bit in the transition from the old version to the new.
Let’s get back on track. This tip is all about migration. Officially, all old accounts will be migrated to the new UI sometime in the beginning of 2015, but if you want to take a head start, you can do the migration yourself!
XThe Simmer Newsletter
Subscribe to the Simmer newsletter to get the latest news and content from Simo Ahava into your email inbox!
Tip 9: Migrate a container to the new UI
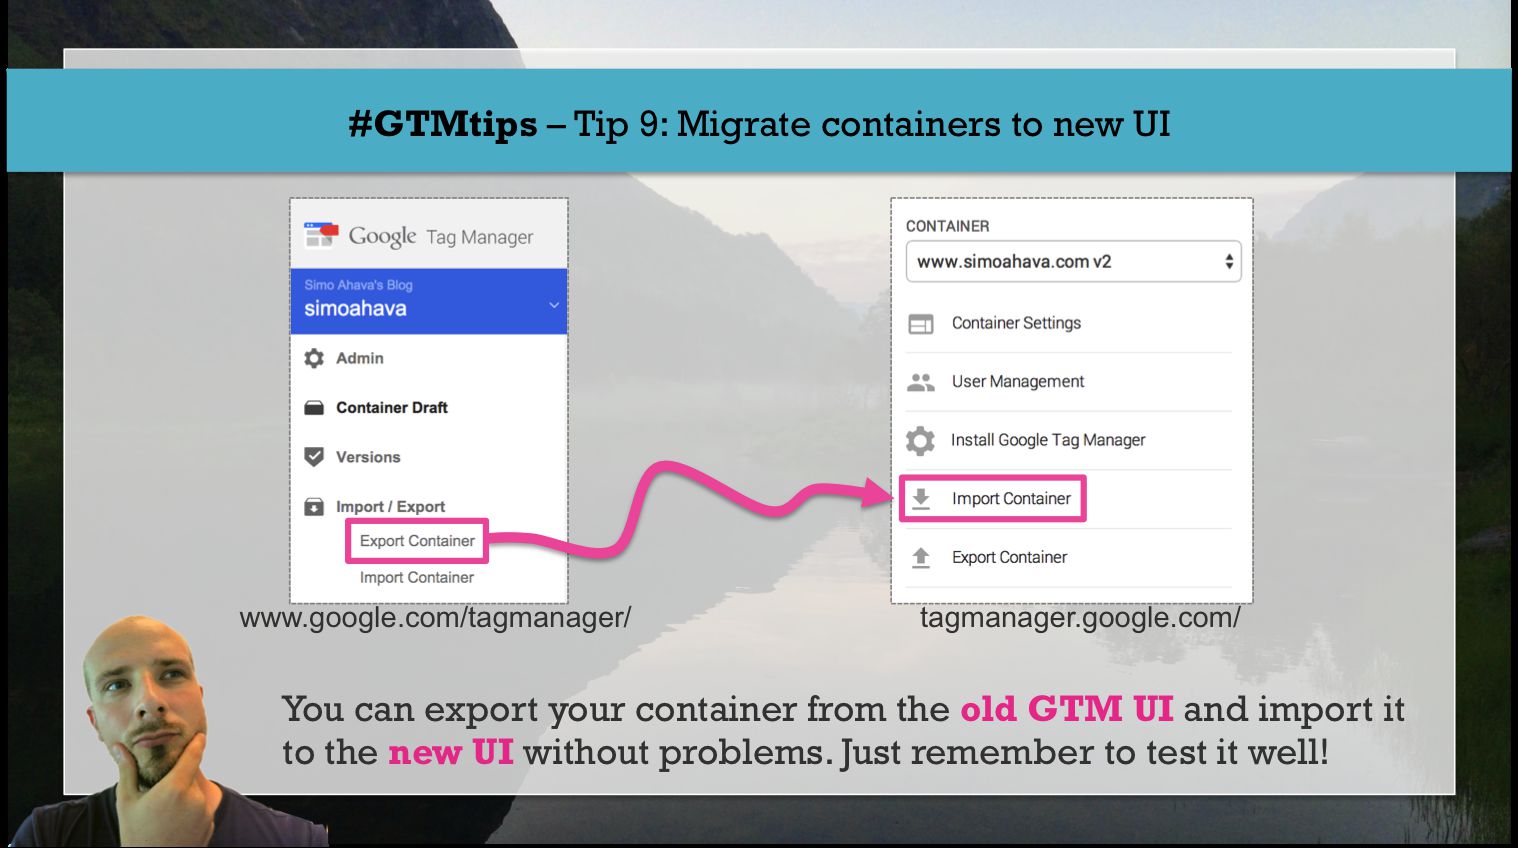
To migrate a container, you need to export a container file in the old UI, and then you need to import this as a new version in an existing container in the new UI.
Note! Since you’re using a new container in the new UI to import the old container into, the container ID (GTM-XXXXX) will change. This means that if you want to use this new container on your site, you will need to edit the container snippet accordingly!
So here’s the process in easy-to-follow steps.
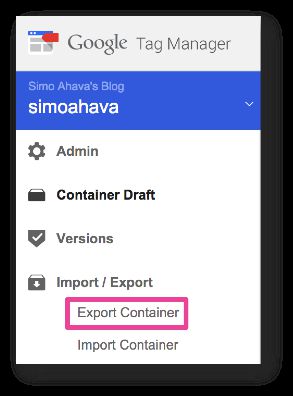
1) Export container
In the old account, go to the container you want to export. Technically, you’re not going to export a container, since that’s just a chassis for all the assets within. Instead, you’re going to export a container version. This means that after you click Export Container, you will need to select the version you’ll be exporting.
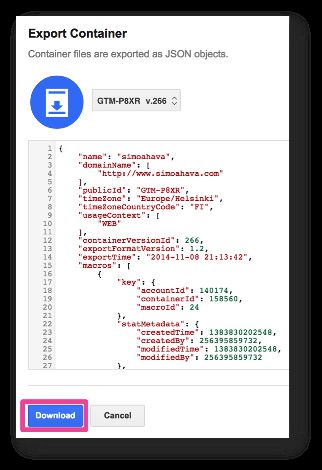
After you select the version, you’ll have a chance to preview the JSON (JavaScript Object Notation) file you’ll be downloading. Unless you’re really into debugging the nuts and bolts of a container file, you can just divert your attention to the Download button under the text field. Yes, click it now.
2) Import container
This next step requires two things:
First, you need to have an account created in the new UI, and a container within that account that you can access. If you have neither, just browse to http://tagmanager.google.com/ and follow the instructions. Honestly, it’s really easy.
Second, you need to navigate to the container in the new UI, and you need to import the file you just downloaded in the old UI. So, go to the container, and specifically the Admin section.
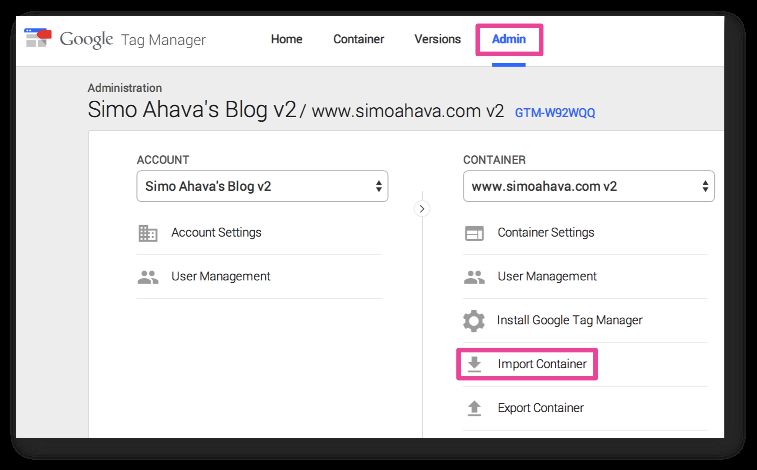
Once you click Import Container, you will first need to choose the container file you just downloaded. So do that.
Next, you have two options. Either Overwrite or Merge. Both create a new version of the container using your imported file, but the difference is that Overwrite is a clean refresh, where only the assets you import will exist in the new version. Merge will do what it says, and merge the assets you import with anything that existed in the latest version of the target container.
I’m a purist when it comes to migrations. A migration needs to be clean and simple, with as little interference in the process as possible. This means that I recommend choosing Overwrite, since you’re probably working with a new account or at least a new container anyway.
So, after choosing the file, checking Overwrite, and clicking Continue, you should see something like this:
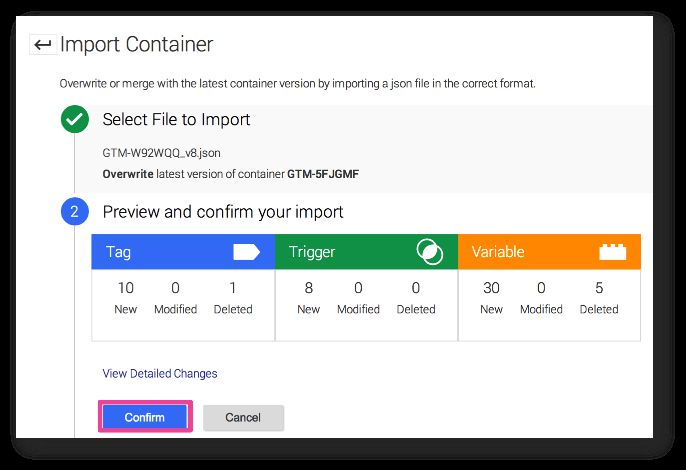
Feel free to doubt yourself at this point, it’s normal. Just click Confirm and you can fix any problems in the container version.
If it’s a new container you created in the new UI, you’ll most probably see the five variables in the deleted column. No need to panic. This is just because the container you’re migrating does not utilize built-in variables, as they were only introduced in the new UI. Thus, the built-in variables are deactivated upon migration, and they are also confusingly reported as being deleted.
Possible issues
First of all, double-check all your tags, triggers and variables. No, triple-check, quadruple-check, and then check again.
If you find problems, I mean real problems like triggers looking completely different than what they used to (variables changing place, etc.), take a screenshot, report it in the Google Tag Manager community in Google+, and then fix the discrepancies manually.
One thing I do suggest you do is start activating the built-in variables, and using them in your triggers and tags. Also, make sure you do the transition to the new, trigger-based auto-event tracking in your event tracking tags!
Migrations are never easy. They’re not supposed to be. But feature parity between the old version of GTM and the new version is almost 1:1, so just by importing your container, it should work pretty nicely out of the box.
