Variable Guide For Google Tag Manager
(Updated 21 February 2019)
The current version of Google Tag Manager was released in October 2014. With the release, we saw a brand-spanking new UI, a lot of new functionalities (revamped auto-event tracking, for example), plus a new terminology to cope with. We moved away from the programming-centric concepts of Macros and Rules to the more tactile variables and triggers.
It’s difficult to rank the changes. The new Auto-Event Tracking is perhaps most impactful, but the improvements done to triggers and variables, when compared to the previous version of GTM, require attention as well.
Thus, I give you my variable Guide for Google Tag Manager. For reference, feel free to take a look at the old macro guide, since especially the different variable types have been left largely untouched.
Table of Contents
The Simmer Newsletter
Subscribe to the Simmer newsletter to get the latest news and content from Simo Ahava into your email inbox!
Introduction to Variables
In computing terms, variables denote compartments in computer memory, which are reserved for storing values. This is a significant achievement in efficiency, because it means that values can be reused across functions, procedures, and environments. The alternative would be to treat each representation of the same value as unique, temporary, and disposable, creating a mass of redundancy and inefficiency, and making the current computing landscape a whole lot different.
In Google Tag Manager, the term variable is used to denote a helper function that your tags, triggers, and other variables can invoke to retrieve values from. Thus, the idea is very similar to the broader concept of computing variables explored in the previous paragraph.
In GTM, invoking the variable function is done with a specific syntax:
{{variable name}}
As we’ll learn later on, you can’t invoke variables wherever you’d want to. But in an approved context, the syntax {{variable name}} would run the underlying function of the variable with the name “variable name”, and pass the value returned by that function to its execution context (the tag, trigger, or variable where the syntax was used).
One of the first things all Google Tag Manager containers which run Google Analytics tags should do is this:
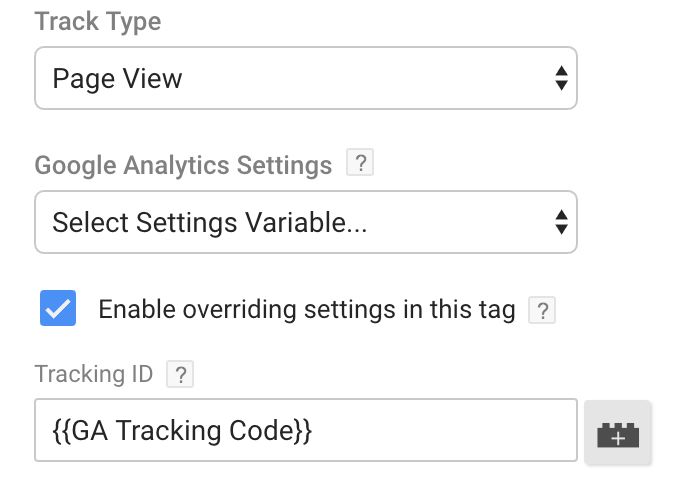
Here, instead of always typing the tracking code for your web property (UA-XXXXXX-X) into each GA tag, you can create a Constant variable, which stores the value. Thus, whenever the variable name is invoked using the correct syntax, the tracking code returned by the Constant variable will be included in the appropriate tag field. This is something I’ve actually written a #GTMtips post about this.
I will go so far as to say that variables can make or break GTM. When skeptics ask me what is the main benefit of having GTM on the site, I always end up talking about variables. They add a level of flexibility and customization that can really make your tagging lean, efficient, performance-driven, and time-saving.
At the same time, variables can be difficult to fathom, especially when we get to the technical details (see below), or when we try to tackle the amazingly multi-faceted and deviously difficult Custom JavaScript variable. I hope this guide will help you get to the bottom of variables, and encourage you to find your own ways of performing magic tricks with your GTM container.
Technical details and how-to
For you to be able to invoke a GTM variable, you need to be working in a script context, or the template field needs to support variable references.
A supported template field can be uncovered by looking for the little variable symbol next to a field:
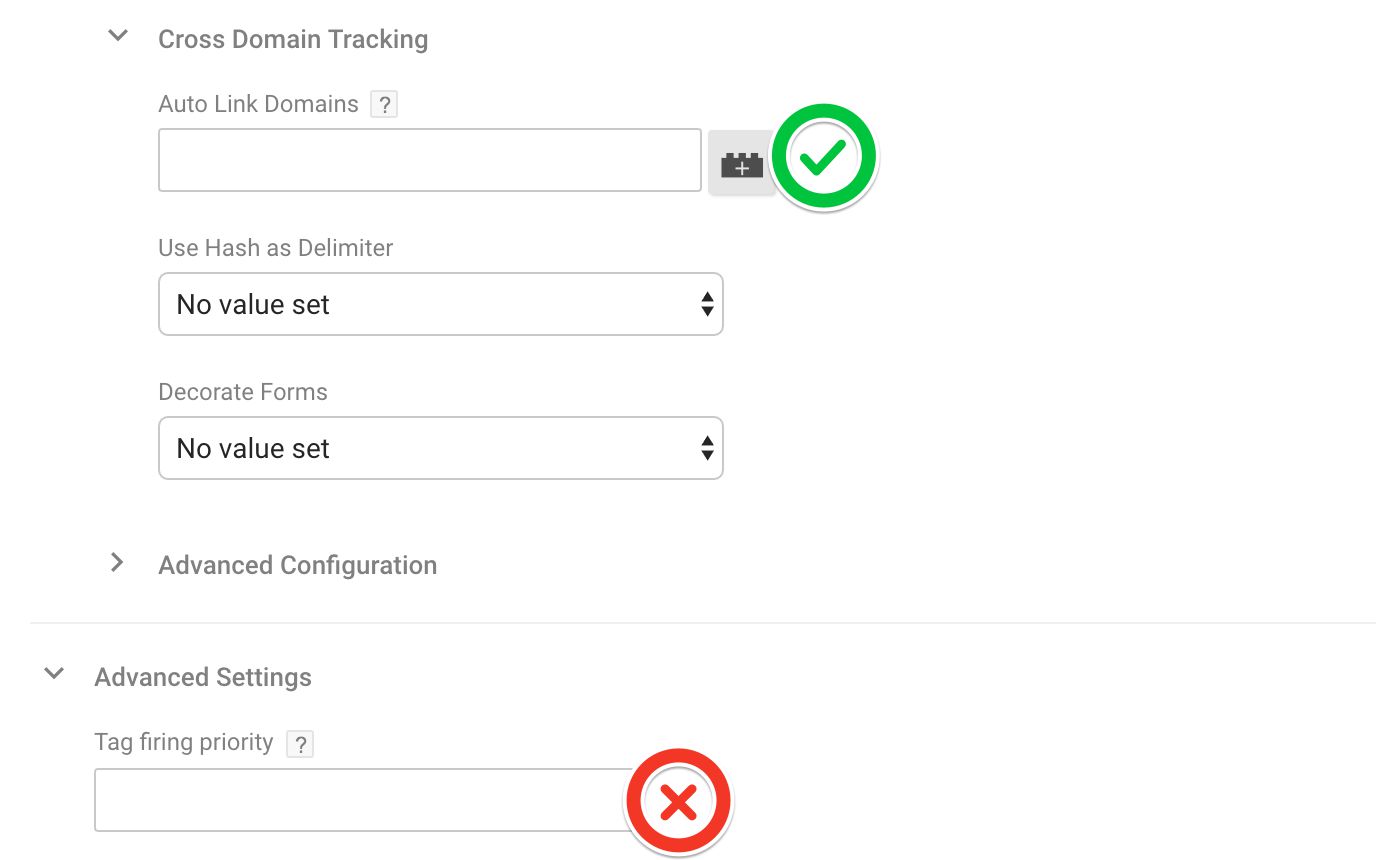
As you can see, the “Tag firing priority” field will not be able to invoke a variable, but the “Auto Link Domains” will. In fact, if you click the little variable icon, you will see a drop-down list from which you can pick the variable you want to use. This way you don’t have to worry about correct syntax, as GTM will do it for you.
The other places where you’ll frequently run into variables are:
-
Triggers
-
Custom HTML tags
-
Custom JavaScript variables
With triggers (remember to read my Trigger guide as well!), you will always need to specify a variable as the target of the trigger condition. Every single trigger condition needs a variable that is evaluated against some value. In fact, the condition builder is created so that you can’t possibly not choose a variable. It’s obligatory!
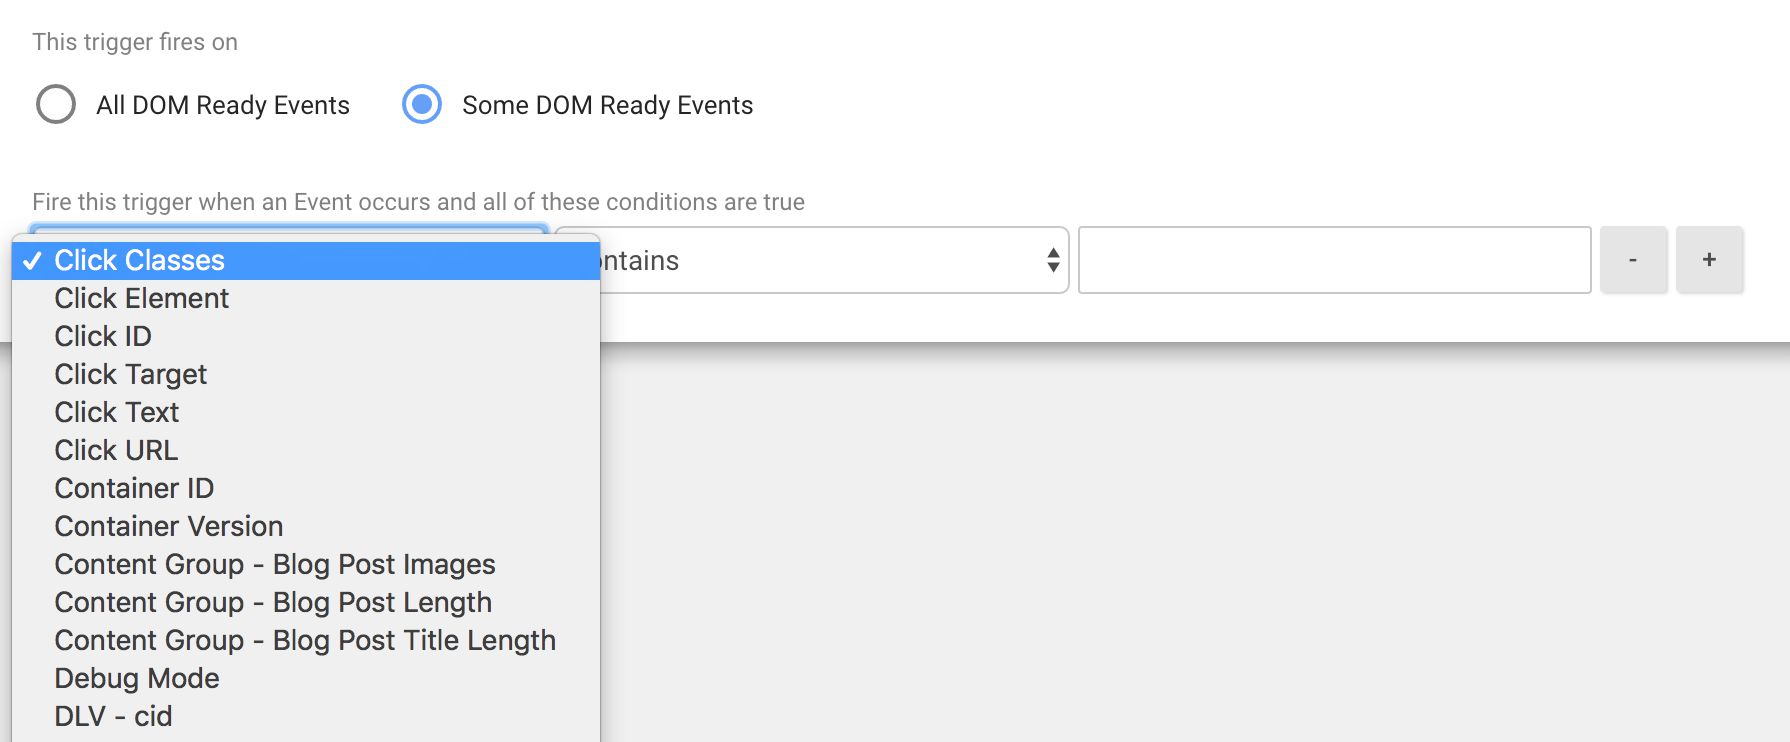
Note that the value (right-hand) field of the trigger condition is NOT a variable context!
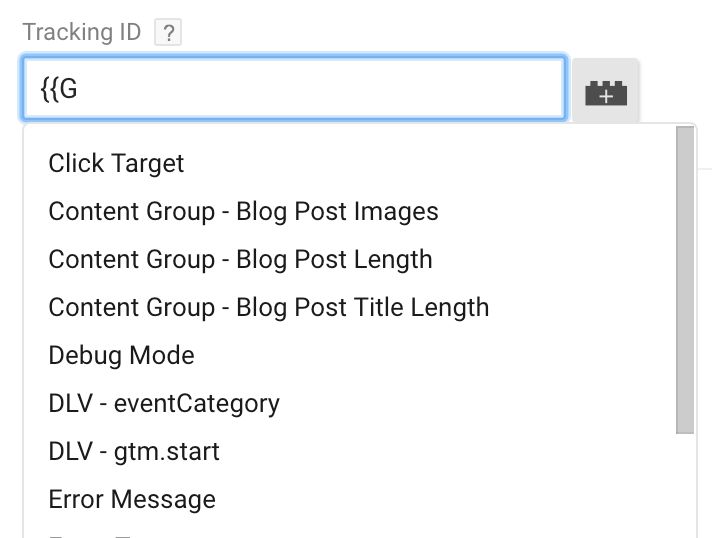
As for Custom HTML tags and Custom JavaScript variables, you can call variables from the scripts within, but you won’t have the helpful drop-down menu to assist you. You will need to manually type the call, using the correct syntax and the correct (case-sensitive) variable name:
<!-- Sample Variable call in a Custom HTML Tag -->
<script>
  (function() {
    alert({{custom alert string}});
  })();
</script>
The code above will pop-up a browser alert, where the content will be the string returned by the variable named custom alert string. Note! If the variable doesn’t return a string, you might run into problems with the alert method, so you need to be well aware of return types and values at all times.
If you try to use a variable that doesn’t exist (or whose name you mistyped), you won’t be able to perform any operations on the container version (create, publish, etc.). You’ll run into an error message that looks like this:
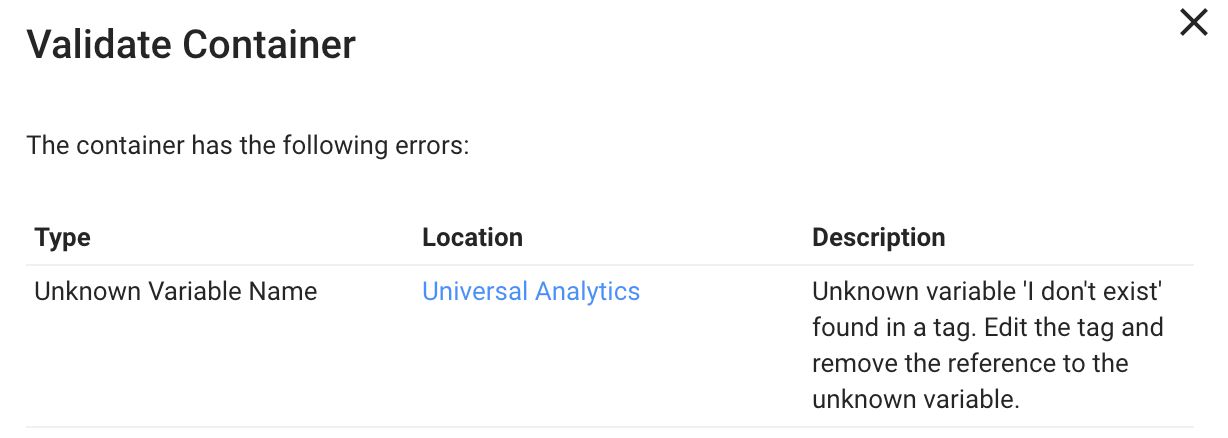
So remember to check all the places where you’ve manually typed a variable call. It’s also possible that you’ve jumped the gun and called a variable, but then you forgot to create the variable itself. Retrace your steps and fix any broken links.
One cool thing that GTM does for you is this: when you change a variable name, all references to the variable are automatically updated. Even the ones you’ve typed in manually into Custom HTML tags and Custom JavaScript variables! This is incredibly time-saving, since you don’t have to go through every single reference, rewriting the code to match the new name.
Variables are resolved according to the following process:
-
If the variable is not attached to a trigger or a tag, the variable is never resolved (unless, of course, the variable is referenced from some other variable that is resolved).
-
If the variable is referenced in a trigger that is not attached to any tags, the variable is never resolved.
-
If the variable is referenced in a trigger that is attached to a tag, the variable is resolved every single time an
eventkey is pushed intodataLayer. -
If the variable is referenced in a tag, the variable is resolved every single time the tag fires.
The last one is interesting. When a trigger causes a tag to “fire”, the process is actually this:
-
Variable calls are transformed into the actual function calls (
google_tag_manager['containerId'].macro('gtm10')) -
The tag code is injected on the site
-
The tag code is executed, and all variable functions within are resolved
As you can see, a variable is actually a method of the google_tag_manager object. The parameter that is given to the macro() method is basically ‘gtm’ plus a unique sequential number. This means that it’s very difficult to identify which macro() parameter is associated with which variable, which is why debugging has become an all-important tool in understanding how variables work.
The other, common case of variable resolution has to do with trigger conditions. When an ‘event’ key is pushed into dataLayer, every single trigger that is attached to a tag in your container is evaluated for the ‘event’ condition. In addition to checking the event value, all variables referenced in the trigger are evaluated, too.
You might want to re-read the previous paragraphs to grasp the idea, but this has very severe repercussions on how variables should (and should not be used):
Variables must never have side effects
Remember how variables should only be used to return values? Well, sometimes you might be tempted to use a variable to change the state of the global object or to set or push stuff into dataLayer. Don’t do it! Because variables can be resolved in multiple ways, and not just in tags as you’d expect, you might find yourself creating infinite loops, pushing stuff into dataLayer multiple times, or severely hurting page performance.
function() {
  // DON'T DO THIS:
  window.dataLayer.push({
    ...
  });
  // OR THIS:
  alert("test");
  // OR THIS:
  window.temp = getTempValue();
  // DO THIS:
  var a = window.thisValue;
  var b = getSomeOtherValue();
  return a + ': ' + b;
}
If you’ve made it this far, congratulations. As a developer, I think it’s all-important to understand how variables work beyond the obvious, if only to realize the potential that variables have in improving the efficiency of your work with GTM.
Built-in Variables
The new version of Google Tag Manager introduced Built-in variables. These are helpful, most commonly used variables, whose existence is based on binary logic: active / inactive. If the Built-in variable is activated, it can be used as any other variable, and if it’s not activated, it can’t.
Built-in variables are thus no more than a shorthand for exploiting some of the most frequently used variable types in Google Tag Manager. I find it a bit odd that they’re not all activated by default, since there’s absolutely no harm in them being available for use.
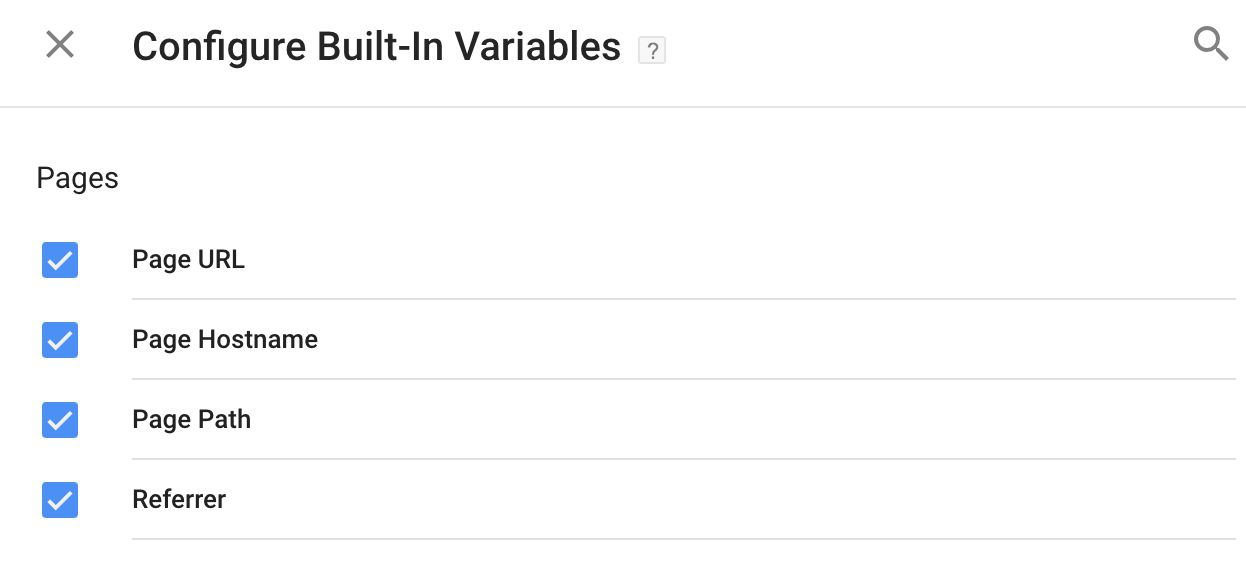
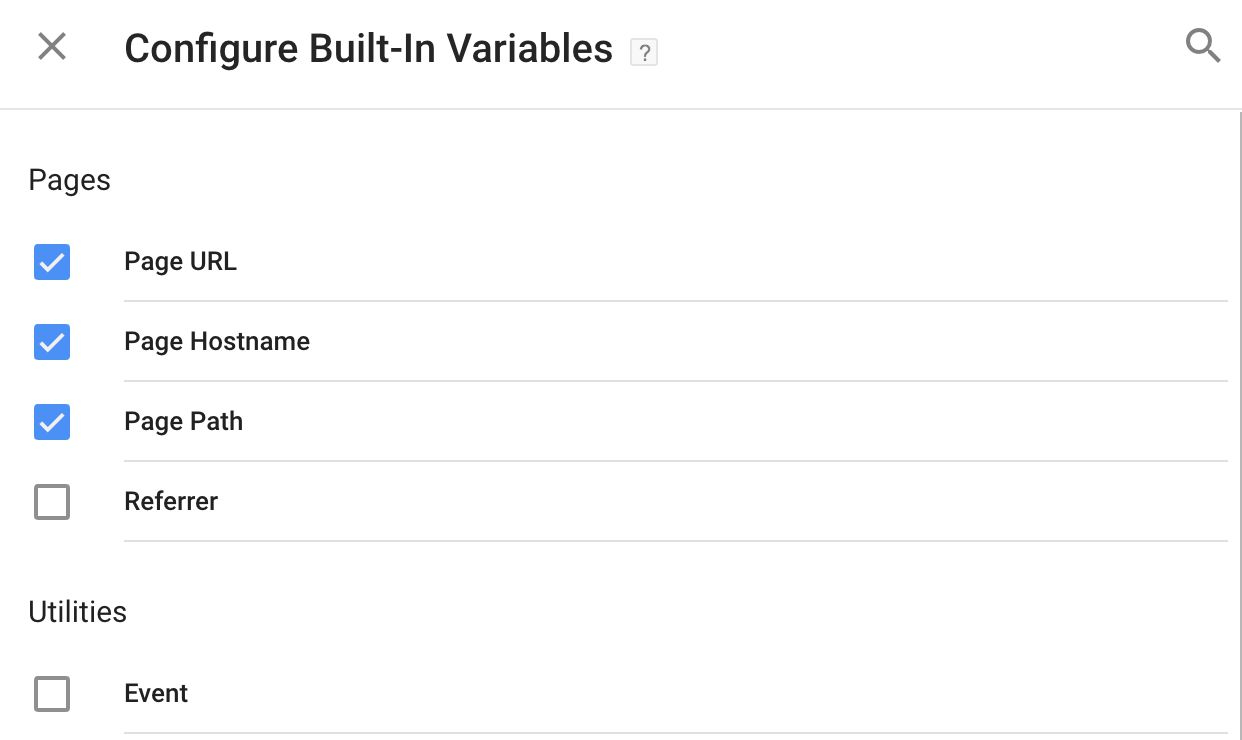
You will find the Built-in variables displayed prominently in the top of the variables screen of your Google Tag Manager Container:
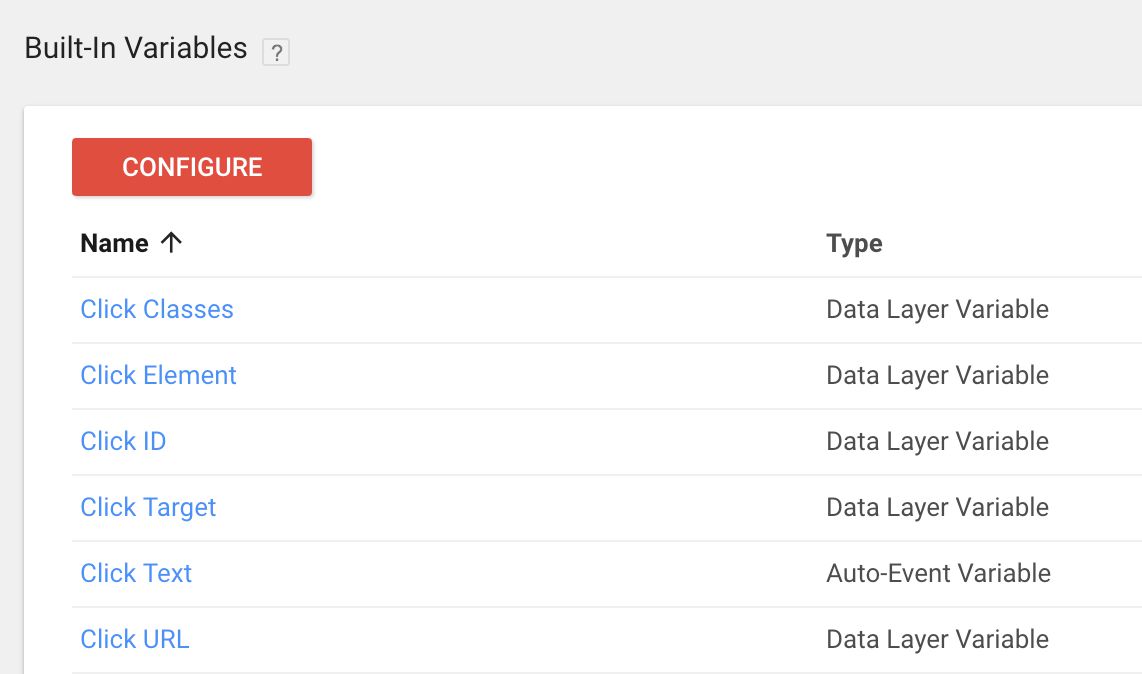
If the Built-in variable is listed here, it is active in the container. To add new Built-in variables, click the red CONFIGURE button, and check the box next to each variable you want to add to the container.
As with all variables, if the Built-in variable cannot be resolved (e.g. there was no Click action and you want to use Click ID), the variable returns the JavaScript undefined type.
Here are the Built-in variables with a brief description of what they return:
Pages
-
Page URL - returns a string containing the full URL of the current page without hash fragment (
https://www.simoahava.com/article?parameter=true) -
Page Hostname - returns a string containing the the hostname of the current page (
www.simoahava.com) -
Page Path - returns a string containing the relative path of the current page (
/article) -
Referrer - returns a string containing the URL of the page which brought the visitor to the current page (
https://www.simoahava.com/home/), fromdocument.referrer
Utilities
-
Event - returns a string containing the value stored in the ‘event’
dataLayerkey -
Environment Name - returns the name of the environment currently being previewed (either via the Share Preview link or the environment’s container snippet)
-
Container ID - returns a string containing the container ID (GTM-XXXXXX)
-
Container Version - returns a string containing the current container version
-
Random Number - returns a number, randomized between 0 and 2147483647
-
HTML ID - returns the identifier of the Custom HTML tag. Used with tag sequencing.
Errors
-
Error Message - returns a string containing the error message dispatched by a JavaScript Error trigger
-
Error Line - returns a string containing the line number where the error was thrown
-
Error URL - returns a string containing the URL of the script where the error was thrown
-
Debug Mode - returns a Boolean (true/false) depending on if the user is in GTM debug mode or not
Clicks
-
Click Element - returns an HTML element that was the target of an auto-event action; this object is retrieved from the
gtm.elementkey indataLayer -
Click Classes - returns a string contained in the
classNameattribute value of the auto-event element -
Click ID - returns a string contained in the
idattribute value of the auto-event element -
Click Target - returns a string contained in the
targetattribute value of the auto-event element -
Click URL - returns a string contained in the
hreforactionattribute value of the auto-event element -
Click Text - returns a string contained in the
textContent / innerTextattribute value of the auto-event element
Forms
These are exactly the same as the Click variables. I’m not sure why we need two sets of variables, when one generic “Auto-Event” type would suffice.
History
-
New History Fragment - returns a string containing the new URL fragment after a page history change auto-event action is registered
-
Old History Fragment - returns a string containing the previous URL fragment
-
New History State - returns an object containing the new history state after a
pushState()has been registered -
Old History State - returns an object containing the old history state
-
History Source - returns a string describing the event that initiated the history change (e.g.
popstateorpushState)
Videos
-
Video Provider - returns a string containing the video service being tracked (currently YouTube only supported).
-
Video Status - returns a string with the status of the video that caused the trigger to fire. Could be one of
'start','pause','buffering','progress', or'complete'. -
Video URL - returns a string with the URL of the embedded video.
-
Video Title - returns a string with the title of the embedded video.
-
Video Duration - returns a number with the total length of the video in seconds.
-
Video Current Time - returns a number with the time mark where the user currently is (i.e. when the event was triggered).
-
Video Percent - returns a number with the percentage mark where the user currently is.
-
Video Visible - returns
trueorfalse, depending on if the video was visible in the browser viewport when the event was triggered.
Scrolling
-
Scroll Depth Threshold - returns a number with the value of the scroll tracking threshold that was crossed (e.g.
25for 25 percent or 25 pixels, depending on which the trigger is configured with). -
Scroll Depth Units - returns a string with
'percent'or'pixels', depending on which threshold type the trigger is tracking. -
Scroll Direction - returns a string with
'vertical'or'horizontal', depending on which direction is being tracked with the trigger.
Visibility
-
Percent Visible - returns a number with the percentage of visibility for the element whose visibility is being tracked (e.g.
50if half of the element is in the viewport). -
On-Screen Duration - returns a number with the total cumulative time (in milliseconds) that the element has been in the viewport when the trigger fires.
As you can see, the Built-in variables are just a quicker way to access some of the most common variable types. Read on, and check especially the chapter on variable types, as that will help you understand Built-in variables better as well.
Debugging Variables
In the amazingly wonderful Debug Mode, there’s a tab for variables:
By clicking that tab, you can explore the state of each variable upon every single dataLayer interaction. As you probably know, every single push to the dataLayer has the potential to change the state of the data used by GTM, which is why you must be able to observe this state with every interaction. And this is what the variables section of the Debug pane enables you to do.
For example, here are two different states of dataLayer. The first state is when the Container snippet is first loaded, and the ‘event’ key is pushed with the value ‘gtm.js’:
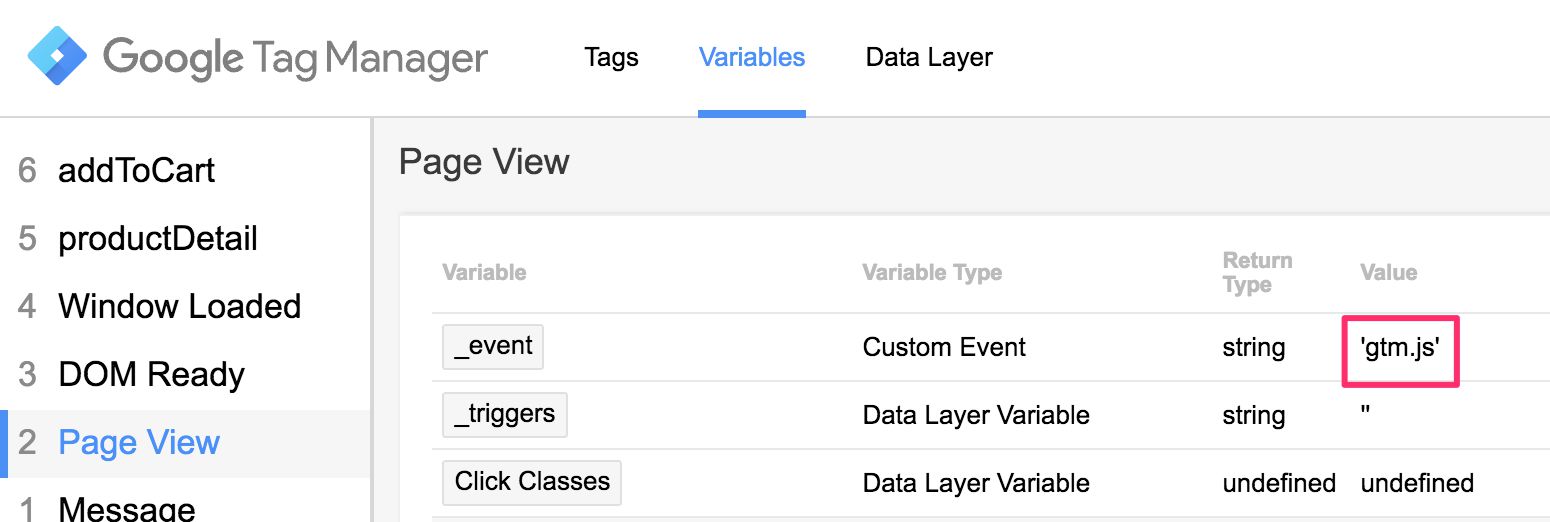
As you can see, I’ve selected the “Page View” event in the left-hand-side navigation of the Debug pane. This corresponds to a dataLayer.push(), where the ‘event’ key was populated with ‘gtm.js’.
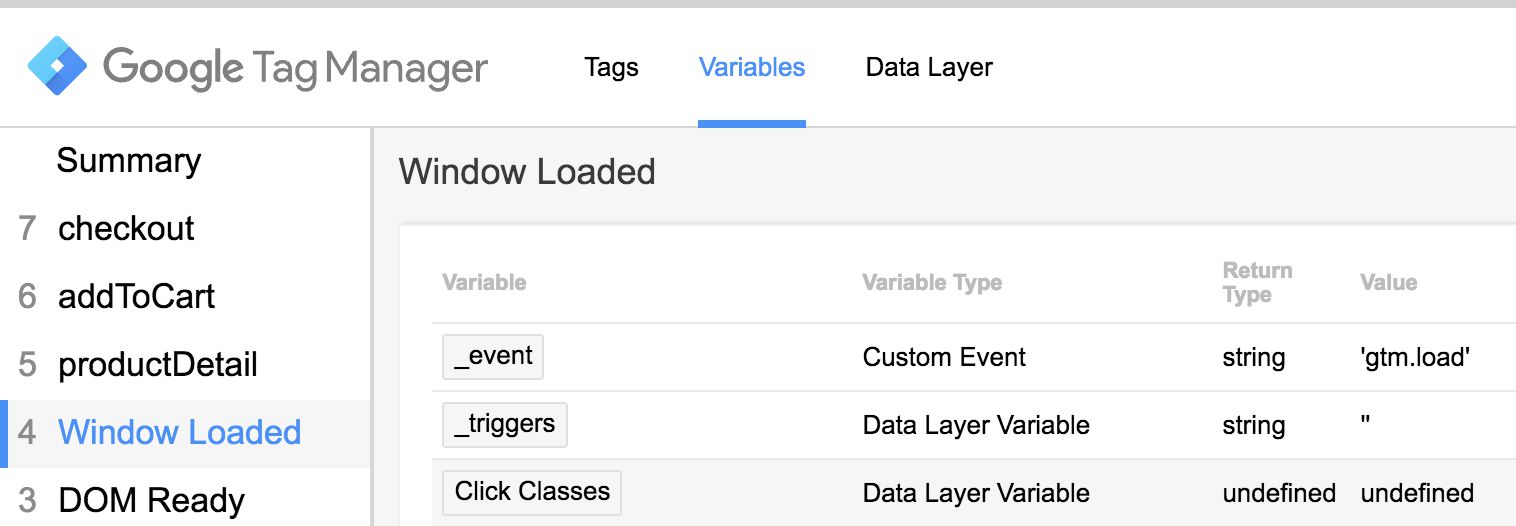
Next, I select the “Window Loaded” event from the navigation. Here’s what the ‘event’ key looks like in this particular state:
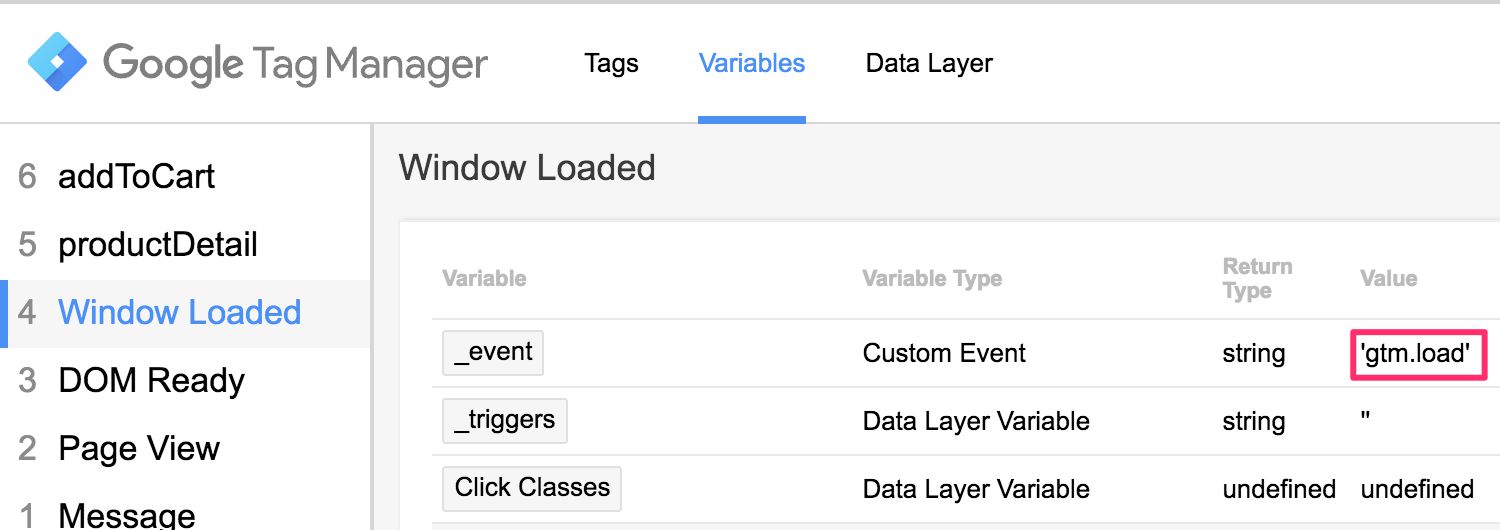
As you can see, the value of the ‘event’ key has changed. So with the debug pane, you can explore the values stored in each variable at any given dataLayer interaction.
If a variable has the value undefined, it means that the variable did not resolve. If you see this value in a state where you are certain the variable should have a proper value, it means there’s something wrong with your variables, tags, or triggers, and you need to look into it more carefully.
By clicking the Tags tab, you can examine what your variables returned in any tag that has fired (or not):

You can also look at tags which didn’t fire, and focus on the trigger. The visual display will tell you which variable condition did not pass the check, and you’ll know there’s something for you to debug again:

The Debug tool is incredibly useful, as it allows you to double-check how variables work in your current setup.
Variable Types
There are a number of useful variable types for you to choose from, and you can use the Custom JavaScript variable to create custom variables of your own. Many of the variable types have some cool customization options as well, so you should take the time to study their many uses.
1. HTTP Referrer
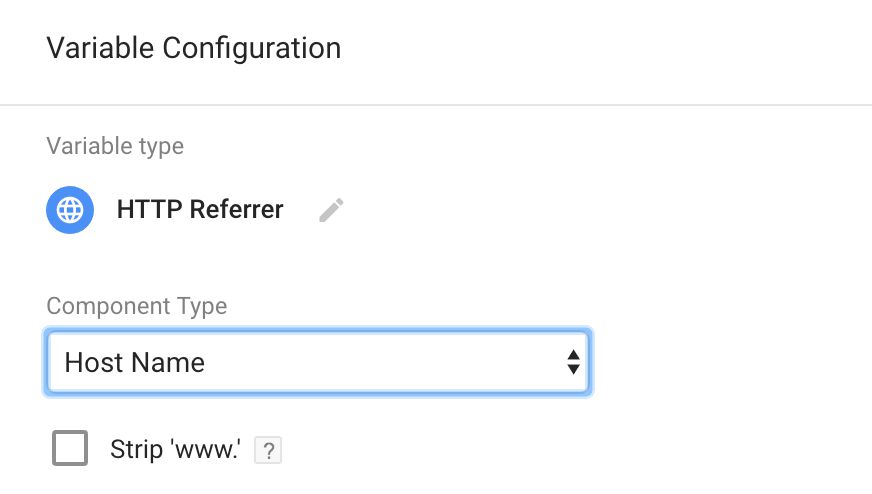
Use the HTTP Referrer variable to identify details about the page that brought the visitor to the current one. The value is retrieved from the document.referrer property. Note: There is a Built-In variable for this (Referrer).
RETURNS
String with the URL of the referring page. You can specify a URL component if you wish (see the URL variable for more information about the various component types).
USE CASE(S)
You could create a trigger which fires when HTTP Referrer does not contain your own domain. This would mean that the user arrived from outside your site to the current page.
2. URL
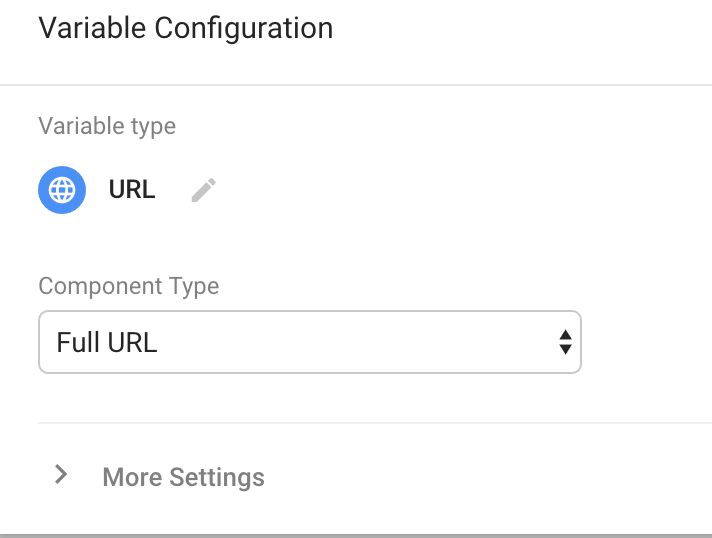
The URL variable can be used to access components of the current page URL (default) or of any URL string returned by a variable. This is a very versatile variable type, and is especially useful for traversing query parameters and hash fragments in your URLs. Note: There are Built-In variables for this (Page URL, Page Hostname, Page Path).
The Component Types you can choose are:
Full URL - returns the full URL without the hash fragment, e.g. ‘https://www.simoahava.com/?home=true'.
Protocol - returns the protocol of the URL, e.g. ‘https’.
Host Name - returns the hostname of the URL without the port number, e.g. www.simoahava.com. You can choose to Strip ‘www.' to strip the ‘www’ subdomain from the hostname.
Port - returns the port number used in the URL, or ‘80’ for HTTP / ‘443’ for HTTPS, if the URL has no port number.
Path - returns only the pathname in the URL. You can also specify Default Pages to strip pages with names like ‘index.html’ or ‘index.php’ from the return string.
Query - returns the entire query parameter string (without leading ‘?'), if you don’t specify a query key. If you do specify a query key, only the value of this key is returned, or undefined if no such key is found in the URL.
Fragment - returns the value of the URL’s fragment without the leading ‘#’, e.g. ‘anchor1’.
You can expand the More Settings tab to find a source selector. In this selector, you can choose the variable whose return value the URL variable will access.
RETURNS
The return value for the URL type you specified in the Component Type selection, or undefined if no such component is found in the URL variable. By default, the URL variable that is accessed is the page URL, but you can choose any variable which returns a string with a URL in it.
USE CASE(S)
This is, again, a very versatile variable. For example, check the following article for an example of how to use the URL variable to fix your site’s internal search tracking:
3. First Party Cookie
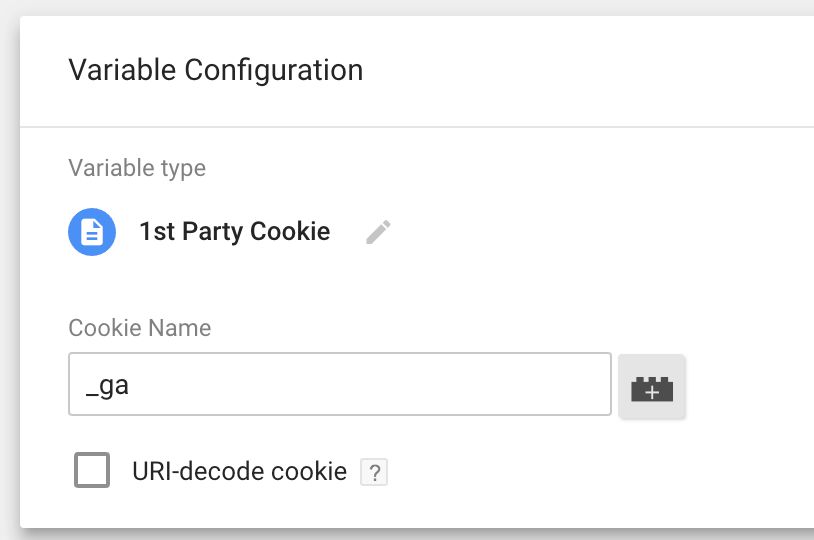
The 1st Party Cookie variable returns the value for the first browser cookie with the name you specify in the Cookie Name field. For example, if you have a cookie called “session”, you can use the 1st Party Cookie variable to retrieve the value for this particular cookie.
RETURNS
String containing the value stored in the cookie, or undefined, if no such cookie exists.
USE CASE(S)
I’ve used cookies a lot in my guides. Here are two examples for using cookies:
4. Custom JavaScript
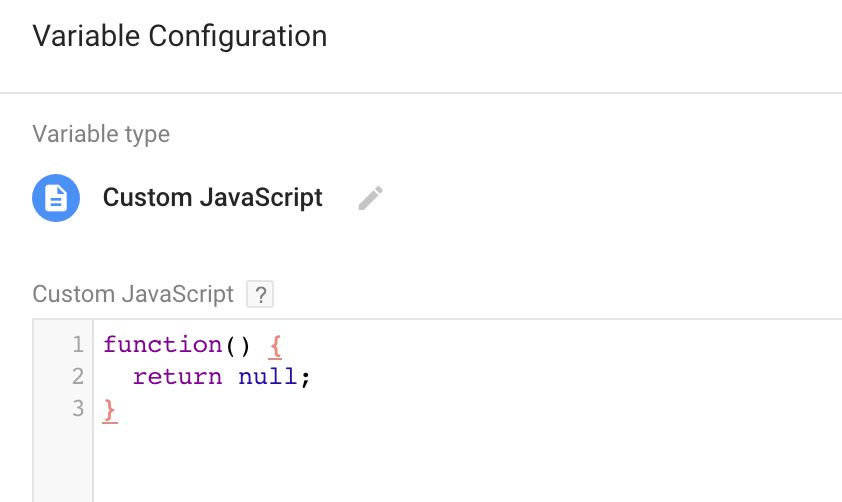
The Custom JavaScript variable is surely the most versatile variable in the set. You can use it to run arbitrary JavaScript on the page. It creates a script context, meaning you can also call other variables from within using the appropriate syntax.
The Custom JavaScript variable needs to follow two simple rules. First, the script must be wrapped in an anonymous function block (function() { ... }). Second, the function must have a return statement (return somevalue;).
The third, unwritten rule is that the function should only return a value. You shouldn’t use a Custom JavaScript variable to modify the global namescape by pushing values to dataLayer for example. If you want to tamper with global variables from a function, it’s better to create a Custom HTML tag for this purpose.
RETURNS
Depends on what you have in the return statement. You can return any variable or value, even other functions, other GTM variables, or nothing (a simple return; is the equivalent of returning the undefined value).
USE CASE(S)
Many of my articles use the Custom JavaScript variable to some extent. Take a look at these to get started:
5. Data Layer Variable
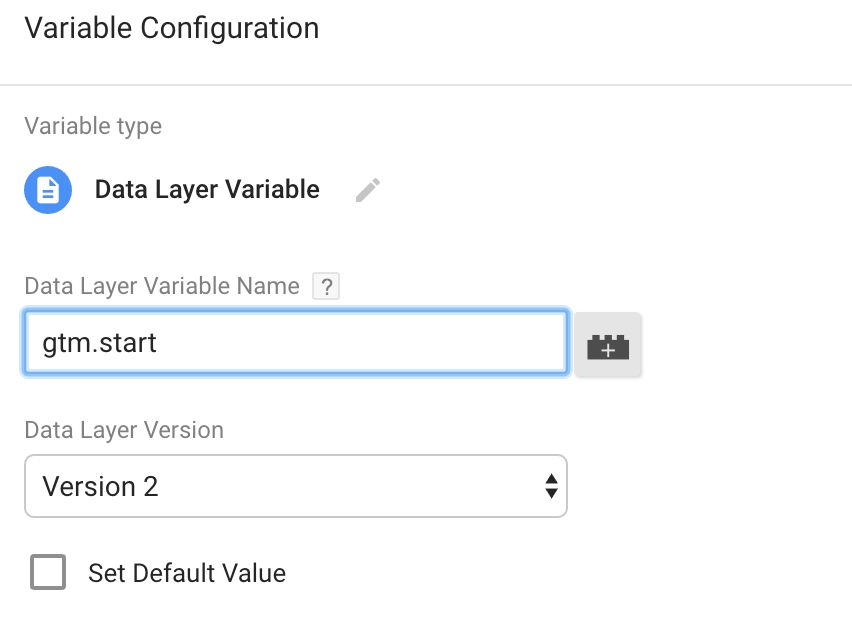
The Data Layer variable is extremely versatile as well. When you create a Data Layer variable, you specify the Data Layer key whose value you want to retrieve. When the variable is resolved, GTM will look for the most recent value for the key in the internal data model. For primitive values (Strings, numbers, Booleans, functions), the variable will return whatever was most recently pushed into the key. For plain objects and Arrays, the variable will return the result of a recursive merge, where only shared keys are replaced.
You can use dot notation to access both Data Layer variable keys which have a dot in their name (e.g. gtm.element), or to access properties of DOM element objects (e.g. gtm.element.dataset.name).
You can use dot notation to access Array members as well. Square notation won’t work, so replace the square notation with dots: products[0].name becomes products.0.name.
RETURNS
The value stored in the Data Layer variable whose name you point out in the Data Layer variable Name field. You can also retrieve the value of an object property, if you are sure that the variable holds an object. To access Array members, use dot notation instead of square notation. You can also specify a Default Value which will be returned if no variable with the given name can be found from the Data Layer when the variable is resolved. If you don’t give a default value, the Data Layer variable will return undefined in case no variable with the given name is found.
USE CASE(S)
The Data Layer variable is your best friend when you want to make the most of Auto-Event Tracking. The Built-In variables and the Auto-Event variable types only give you a handful of DOM properties to choose from in the auto-event element. Use the Data Layer variable to traverse the gtm.element object as you wish.
Remember to read my two earlier, in-depth articles about the Data Layer:
6. JavaScript Variable
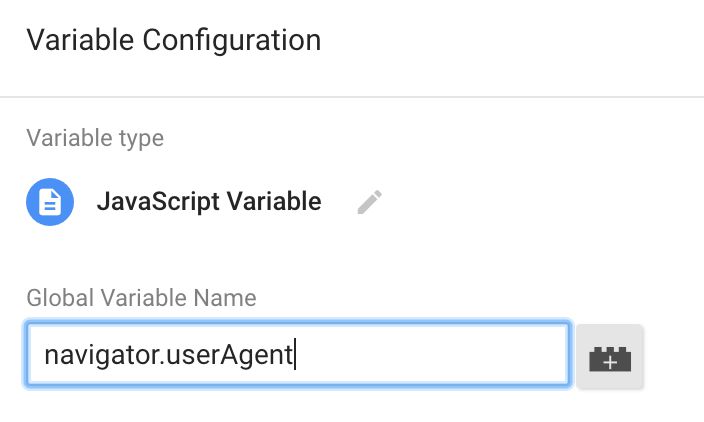
The JavaScript variable returns the value stored in the global JavaScript variable you specify. Note, this is NOT the same as the Custom JavaScript variable, which is a function declaration.
RETURNS
The value stored in the global JavaScript variable that you specify. If no such global variable exists, the undefined value is returned instead.
USE CASE(S)
Here’s an example of using the JavaScript variable with a custom tag. In this example, I show you how to fire a single tag multiple times by increasing a global JavaScript variable counter with each iteration, and then fetching the value of this variable in linked tags and variables.
7. Undefined Value
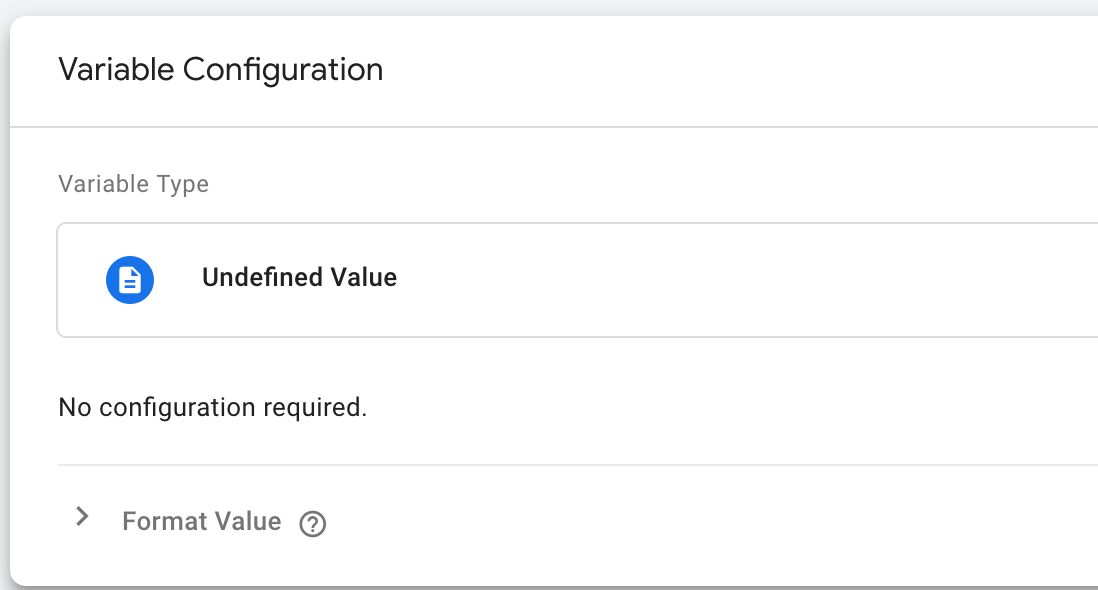
The Undefined Value variable is extremely simple (so simple, in fact, that I’m wondering why it’s not a Built-in variable). Its sole purpose is to return the JavaScript undefined value. So it’s essentially the same as a Custom JavaScript variable with:
function() {
  return;
}
RETURNS
The variable returns the undefined JavaScript value.
USE CASE(S)
Use it whenever you might want to use the undefined value effectively. For example, you might want to use it in a Lookup Table or a RegEx Table, returning undefined when you want to ignore the value of the table in some cases (such as if you want to drop a Custom Dimension from a hit.
8. Auto-Event Variable
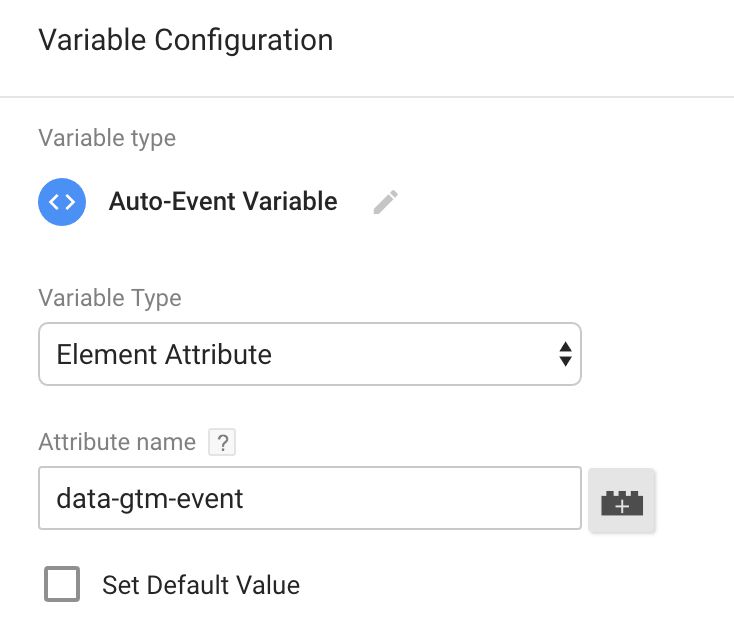
Auto-Event variables are used to access the target element of an auto-event action (e.g. Click, Error, Form Submit). When you create a new Auto-Event variable, you need to specify just which component of the target element you want to access.
Element - Accesses the DOM Element itself that was the target of the auto-event action. This element is stored under the key gtm.element in the Data Layer, and you can create your own, customized auto-event variables using the Data Layer variable, and traversing the gtm.element object as you would any other DOM element. For example, to get the value stored in the ID attribute of the auto-event element’s parent, you’d create a Data Layer variable which points to gtm.element.parentElement.id. Note: There are Built-In variables for this (Click Element and Form Element).
Element Classes - Returns the value of the class attribute of the auto-event element. Stored in the Data Layer under the key gtm.elementClasses. Note: There are Built-In variables for this (Click Class and Form Class).
Element ID - Returns the value of the id attribute of the auto-event element. Stored in the Data Layer under the key gtm.elementId. Note: There are Built-In variables for this (Click ID and Form ID).
Element Target - Returns the value of the target attribute of the auto-event element. Stored in the Data Layer under the key gtm.elementTarget. Note: There are Built-In variables for this (Click Target and Form Target).
Element Text - Returns the value of either the textContent or innerText property of the auto-event element. The return value is trimmed of whitespace and normalized to account for differences in how browsers interpret element text. Note: There are Built-In variables for this (Click Text and Form Text).
Element URL - Returns the value of either the href or the action attribute of the auto-event element. You can further specify just which URL component you want to access (see the section for the URL variable type for more information). Stored in the Data Layer under the key gtm.elementUrl. Note: There are Built-In variables for this (Click URL and Form URL).
History New URL Fragment - Returns the new URL fragment set with a browser history event. Stored in Data Layer under the key gtm.newUrlFragment. Note: There is a Built-In variable for this (New History Fragment).
History Old URL Fragment - Returns the old URL fragment replaced in the browser history event. Stored in Data Layer under the key gtm.oldUrlFragment. Note: There is a Built-In variable for this (Old History Fragment).
History New State - Returns the new state object set with a browser history event. Stored in Data Layer under the key gtm.newHistoryState. Note: There is a Built-In variable for this (New History State).
History Old State - Returns the old state object replaced in the browser history event. Stored in Data Layer under the key gtm.oldHistoryState. Note: There is a Built-In variable for this (Old History State).
History Change Source - Returns a string denoting the event that triggered the history change event (popstate, pushState, replaceState, or polling). Stored in Data Layer under the key gtm.historyChangeSource. Note: There is a Built-In variable for this (History Source).
RETURNS
The Auto-Event variable returns the value appropriate for the selected element type. If no relevant auto-event has been registered, the variable returns the Default Value (if set), or undefined.
USE CASE(S)
There are many use cases for the Auto-Event variable. To get you started, I suggest you take a look at the following articles:
9. DOM Element
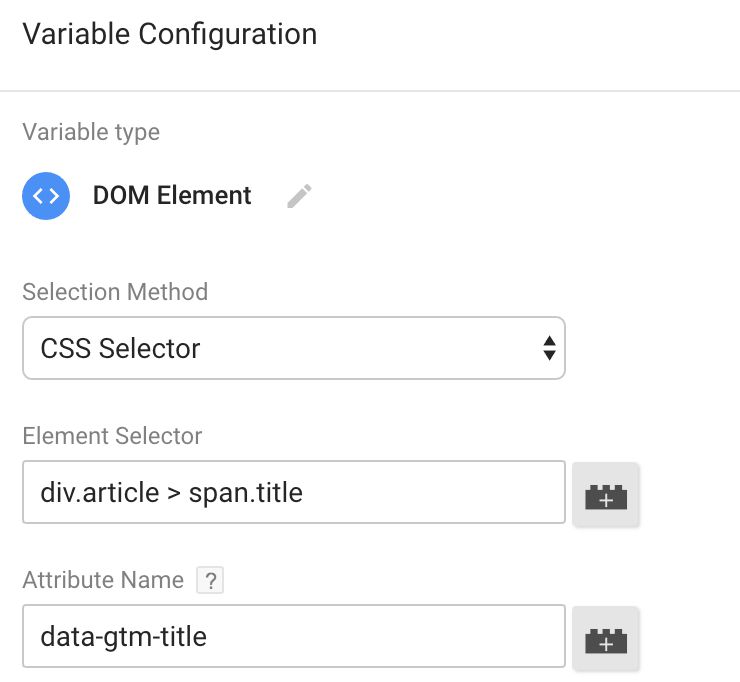
You can use the DOM Element variable to retrieve the text content of any given DOM Element. You can also use it to retrieve the value of any attribute of the DOM Element.
RETURNS
The text content of the given DOM Element, or the value of the given attribute (optional). If no DOM Element with the given ID or CSS selector is found, the variable returns the null value.
USE CASE(S)
You can use this to access any arbitrary DOM Element on the page. This becomes useful if you want to fire an event only if a certain element is on the page.
10. Element Visibility
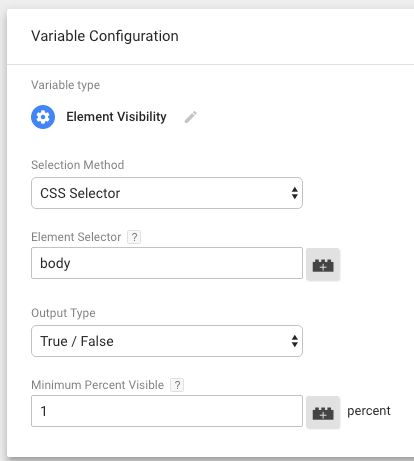
The Element Visibility variable lets you know if any particular element was visible in the browser viewport when the trigger fired. Visibility requires that the element be positioned above the fold of the page in the active browser tab. In other words, the element must actually be in sight of the user. The only exception is if there is some other window in front of the browser window where the element is otherwise visible. In this case, GTM would consider the element to still be visible, even though it’s not technically viewable by the user.
RETURNS
The variable returns either True / False indicating if the element was visible or not, respectively, or a percentage of how much of the element was visible when the variable was resolved. You can choose which output type to use in the settings of the variable.
USE CASE(S)
You can set the visibility variable to check an element with CSS selector body, and minimum 1 percent visible. This variable would then tell you if the page was visible in the viewport when the variable was called.
11. Constant
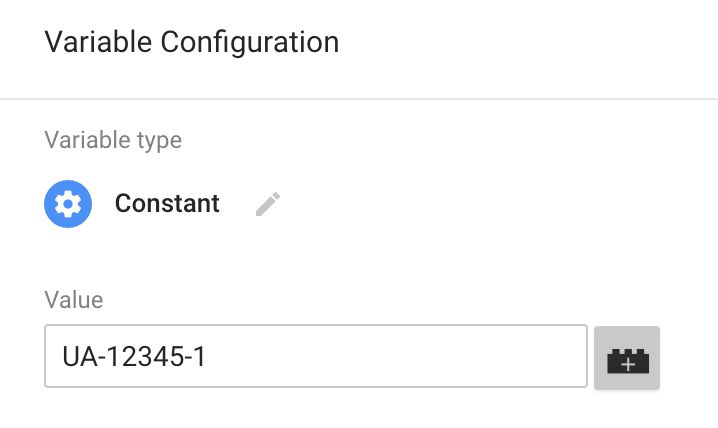
The Constant variable is a prime example of how variables are reusable. If you have any string of characters that you need to use often, or which you might need to update in the future, it’s best to store it as a Constant variable instead.
RETURNS
The Constant variable returns the string you choose to type in the Value field.
USE CASE(S)
The obvious use case is your Google Analytics web property ID. By storing the UA-XXXXX-X code in the Constant variable, you won’t need to look it up every single time you create a new GA tag.
12. Custom Event
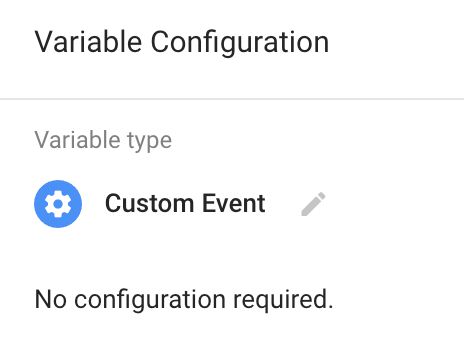
The Custom Event variable returns the value of the ‘event’ key in the Data Layer. For example, if you run the following code: dataLayer.push({'event' : 'thisEvent'});, then the Custom Event variable would hold the value ‘thisEvent’ after the push. Note: There is a Built-In variable for this (Event).
RETURNS
The value stored in the ‘event’ key in the Data Layer.
USE CASE(S)
Honestly, I can’t figure out what this variable is for. If I had to guess, it’s a remnant of the old GTM, where you could accidentally delete the {{event}} macro and then use the Custom Event macro to bring it back. In the new UI, there’s a Built-In variable for Event, and at the time of writing there’s also the internal variable _event which you can’t delete or deactivate. So there really is no need to create a new Custom Event variable.
13. Environment Name
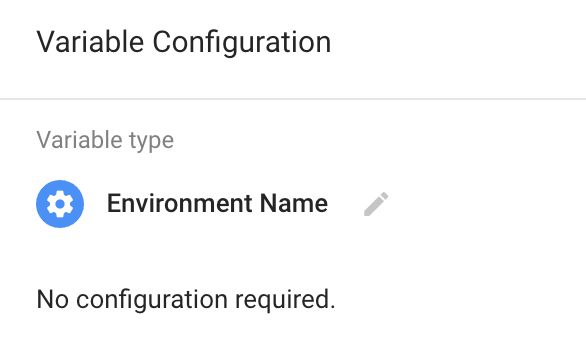
The Environment Name variable is similar to Custom Event in that it doesn’t really add anything to GTM. There already is a Built-In variable for “Environment Name”, which you should use instead of creating this User-Defined variable.
RETURNS
String with the current environment name if using an environment snippet, or the draft version identifier if in Preview mode. It won’t return anything for Live or Latest versions.
USE CASE(S)
Use it to fire tags only if in a certain environment. Remember to read my Environment Guide while you’re at it!
14. Google Analytics Settings
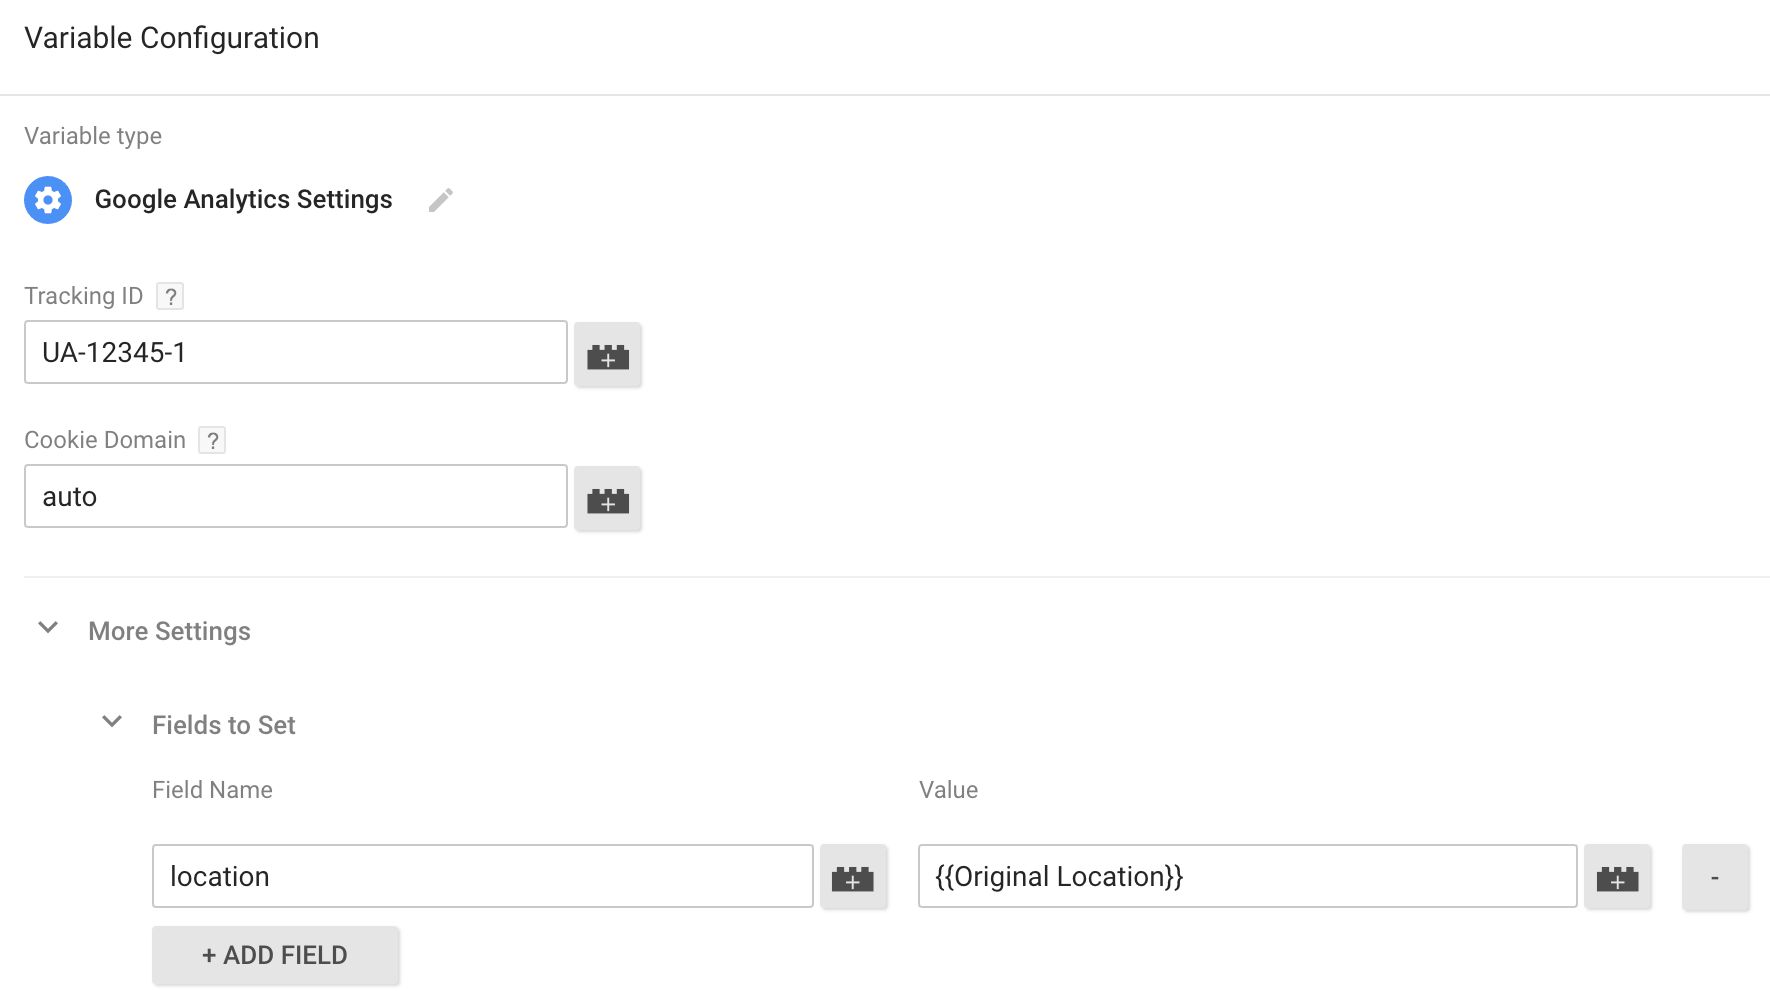
The Google Analytics Settings variable returns a set of Universal Analytics tag settings. This can be used to configure multiple tags at once, consolidating their Custom Dimensions and Fields to set, for example.
Note that the Google Analytics Settings variable can only be used in a Universal Analytics tag. You can’t invoke the variable in other contexts.
RETURNS
A configuration of Google Analytics Settings to be used in a Universal Analytics tag.
USE CASE(S)
Use the Google Analytics Settings variable to consolidate tag settings across your Universal Analytics tags. For inspiration, read this article.
15. Lookup Table
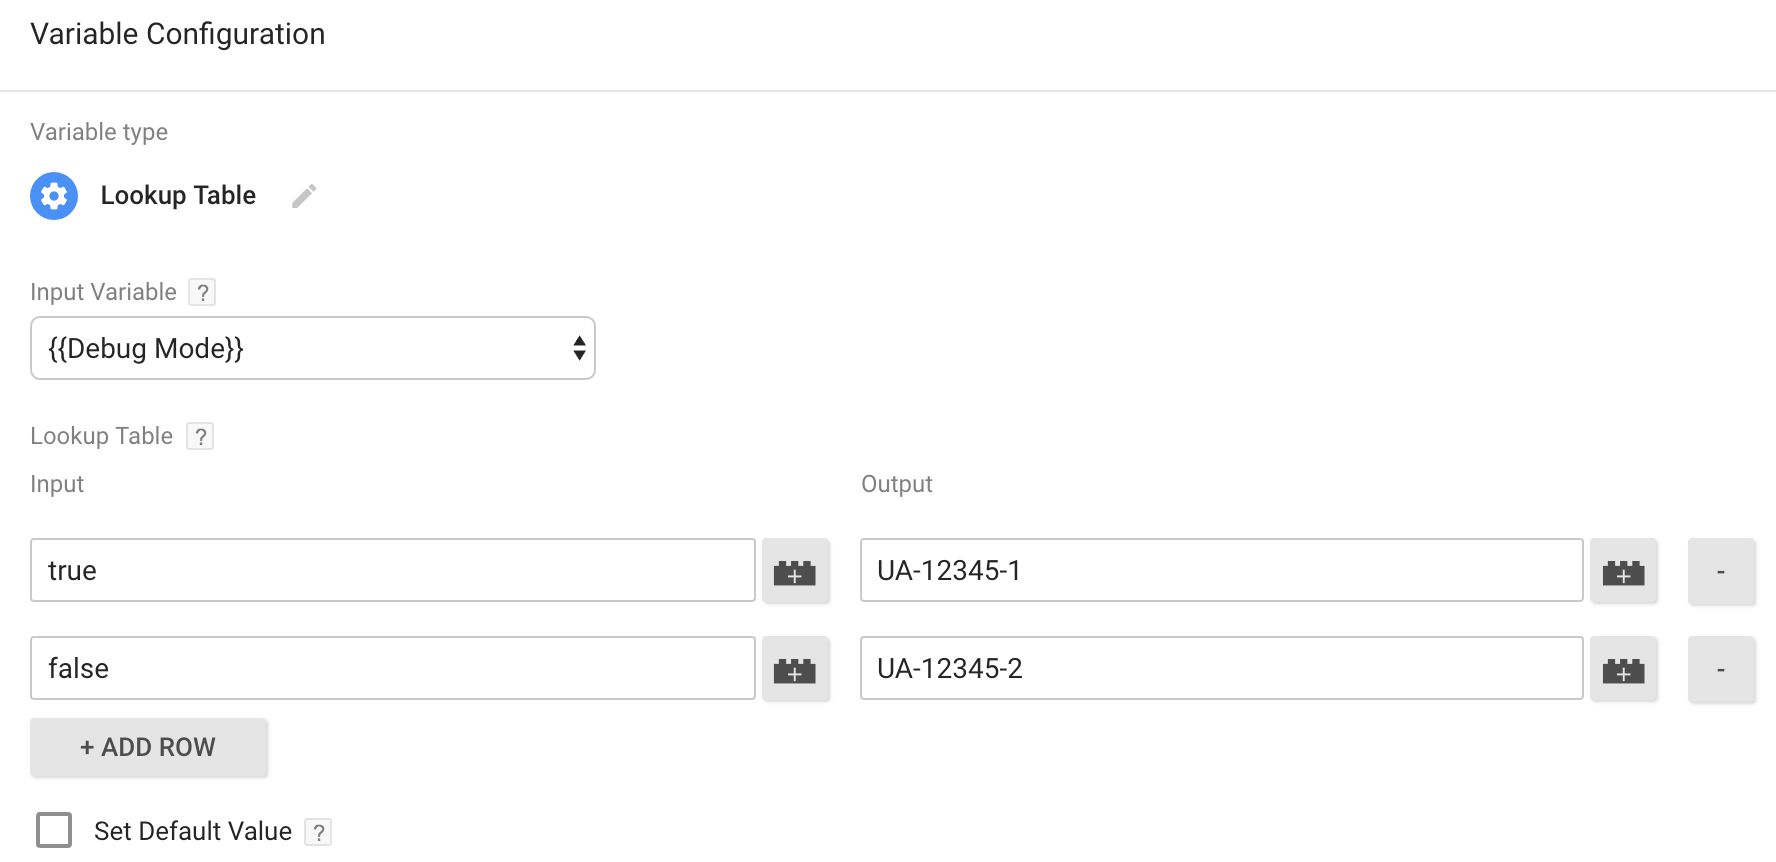
The Lookup Table variable performs any number of lookups that you specify, returning the value of the first match. Since this is a Lookup Table, the value lookup is always exact match and case-sensitive. You can create your own, custom Lookup Table if this is too strict for you.
The Input variable specifies the variable which will be used as the input in the lookups. On each row that you add to the table, you give an output value to be returned by the variable, if the input variable is matched with the Input field value of the row. You can chain Lookup Tables together, creating a powerful, efficient, and flexible value lookup for your tags and variables.
RETURNS
The value in the Output field of the first row that is matched against the Input variable. You can also give a Default Value which will be returned if no match is made. If you don’t specify a Default Value, the variable will return the undefined value if no match is made.
USE CASE(S)
Take a look at my original article for some ideas:
Bounteous has also a really interesting guide on automating the Lookup Table variable creation process.
16. Random Number
The Random Number variable returns a random number between 0 and 2147483647. Note: There is a Built-In variable for this (Random Number).
RETURNS
A number, randomized between 0 and 2147483647.
USE CASE(S)
You can use the Random Number variable to sample your visitors.
17. RegEx Table
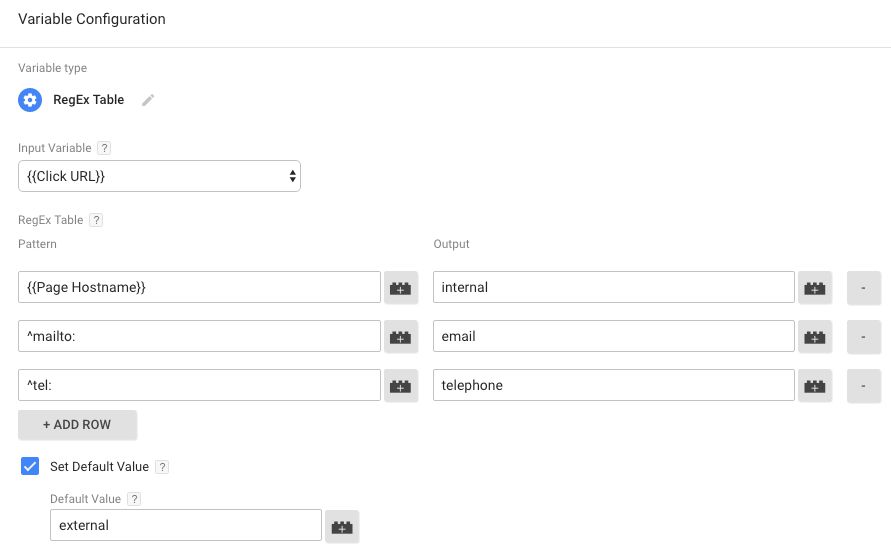
The RegEx Table variable lets you create a pattern-matching table. It functions similarly to the Lookup Table, with the obvious difference that lookups are exact match only, whereas regular expressions are far more flexible in what you can match against. There are some other additional features in the RegEx Table, which you can read about here.
RETURNS
Whatever you have defined in each individual Output field, and the Default Value field.
USE CASE(S)
You can use the RegEx Table with a Just Links trigger to determine what type of link was clicked. See the screenshot above for hints how to do this.
18. Container ID
This is also a Built-In variable, so use that instead of creating a new User-Defined variable.
RETURNS
The public ID (GTM-XXXXXX) of the Container.
USE CASE(S)
This is important in tag sequencing, as it’s used to signal when a Custom HTML tag has finished completion. You should also send the Container ID as a Custom Dimension in your GTM hits - that way you can see in Google Analytics which hits were sent from which container.
19. Container Version Number
This is pretty self-explanatory. The Container Version Number returns the version number of the container that is implemented on the site, or QUICK_PREVIEW if you are previewing the workspace draft. Note: There is a Built-In variable for this (Container Version).
RETURNS
String with the current GTM Container version number, or QUICK_PREVIEW, if the workspace draft is in preview mode.
USE CASE(S)
Assign a Google Analytics Custom Dimension for the container version ID, which will help you analyze the impact of changes various versions of the GTM container have had. This is a great way to debug your GTM and GA implementations.
20. Debug Mode
The Debug Mode variable returns true if the user is viewing the container in Preview mode, and false if not. Note: There is a Built-In variable for this (Debug Mode).
RETURNS
true when the user is in Container Debug mode, and false when not.
USE CASE(S)
With the Lookup Table variable, you can collect all your GA hits in Debug mode to a separate, test property. Read about this idea in my Macro Magic article.
You can also send the Debug Mode value as a Custom Dimension, if you want to collect all hits to the same GA property. This way you can filter with the Custom Dimension and collect all your debug hits to a separate Google Analytics profile.
Summary
I’m bold enough to claim that once you understand variables, you can call yourself a Google Tag Master. It’s not just what the different variable types are. It’s how you use them together to create sense out of the complexity that almost any tag implementation brings in its wake.
Just remember to pay heed to the technical details as well. If you don’t understand the process of how variables are resolved, you’ll often run into unexpected situations. Most often it’s a ‘race condition’, where the variable is trying to access some other data source which isn’t ready yet.
Be respectful of the ‘no side effects’ rule as well. Do not use variables for anything else except to build a well-formed return statement. If you feel like you need to increase the complexity of your function calls, use a Custom HTML tag instead.
Were you interested in some other aspect of variables that I didn’t cover here? Or do you have a great use case in mind for some variable type? Sound off in the comments, thanks!
