Track Form Abandonment With Google Tag Manager
Form abandonment isn’t always easy to define. Most often, it refers to when someone starts to fill in an HTML form, but leaves the page without submitting it. As a definition, this works nicely. However, with multi-page forms it naturally refers only to the last page of the form. Also, especially with government institutions, forms can be saved to be submitted later. Here, again, form abandonment must be reconsidered.

In this article, I’ll go over four different ways to track form abandonment in Google Analytics, using Google Tag Manager to setup the tracking. The definition I’ll use is the first one: abandonment occurs when someone enters a form page, but leaves it without submitting the form. Do note that GA might not be the right tool to actually track issues with your form. There are dedicated resources for that, such as ClickTale or Hotjar. But if you want to measure form engagement as part of a more coherent visitor journey, then it might make sense to track this engagement (or lack thereof) in Google Analytics.
The different methods I’ll go over, in order of difficulty (as perceived by myself):
-
Advanced Segment in Google Analytics
-
Event sent if form interacted with
-
Event sent with the last field interacted with
-
Event sent with full interaction history
Well, the first one can be done without Google Tag Manager at all. But the others require some setting up.
The technology, if you will, is based on the beautiful combination of beforeUnload, a browser event that is dispatched when the user leaves or closes the web page, and the transport field in Universal Analytics. With these in place, GA will receive an event that contains information about form interaction when the user leaves the form page. You can then use an Advanced Segment to only view interaction data for sessions where the form was not submitted.
I’ll even show you a simple way of sending the event only if the user didn’t submit the form.
Note that this guide is created around a very simple, basic form, which has been created according to Best Practices; capital B, capital P. If you have some Ajax-postback-dynamic-validation-jQuery-horror-ultra-modern-form, this might not work for you, and you’ll have to put your JavaScript skills to the test as you apply these lessons to the abomination you’re cursed to work with.
Don’t say I didn’t warn you!
(UPDATE. My colleague, Lauri Piispanen, wrote a very, very nice upgrade to the Custom HTML Tag, and it’s freely downloadable from his GitHub repo. It automatically tracks multiple forms on the page!)
XThe Simmer Newsletter
Subscribe to the Simmer newsletter to get the latest news and content from Simo Ahava into your email inbox!
Advanced Segment in Google Analytics
In Google Analytics, the simplest way to track form abandonment is to create an Advanced Segment, which includes Sessions where the form page was visited, but the session itself did not include a conversion for the form submission:
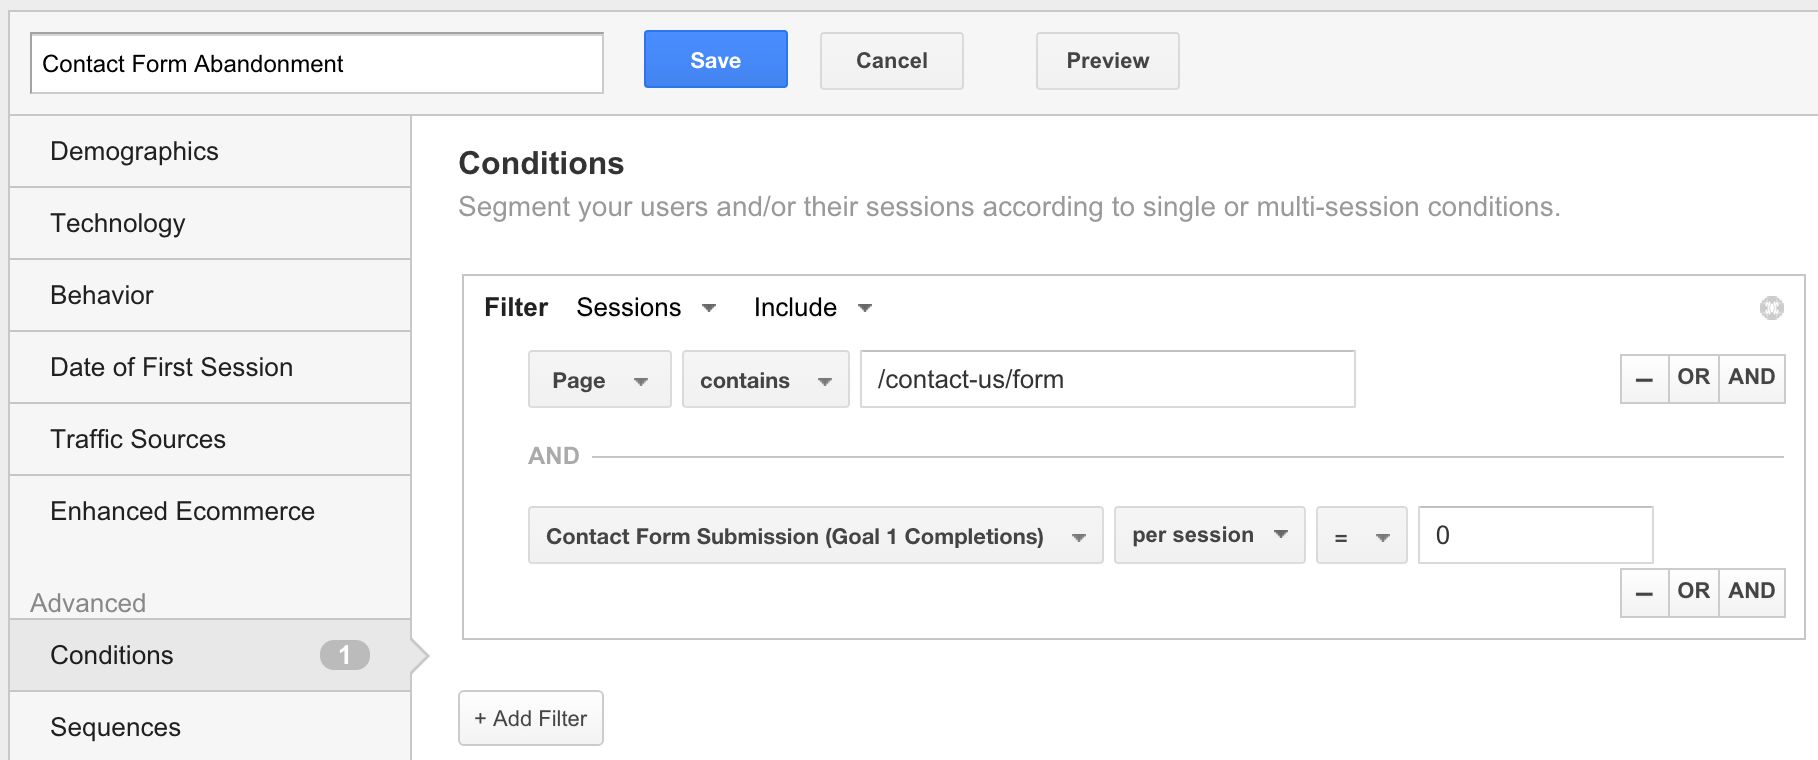
This is OK. It’s not polished, as it doesn’t really tell us anything about why the form was abandoned. Also, a simple page view of the form page is simply not a good way to extrapolate intent. But for all intents and purposes, this exposes possible flaws in a crucial funnel on your website.
As you create the Events in the chapters that follow, you can substitute the Page rule in the segment condition with an Event rule that matches the Event you’ve created.
The base Custom HTML Tag
This Custom HTML Tag is what we’ll use to setup the beforeUnload listener as well as the interaction handlers created incrementally in the following chapters.
So, beforeUnload is a browser event that is dispatched when the page is unloaded from the browser. Most typical ways for a page to unload is if the user is redirected to some other page (via a link or form submission, for example), or if the user decides to close the browser. Naturally, if the user’s computer crashes, no controlled beforeUnload event is dispatched.
We want to use this browser event to invoke a dataLayer.push() when the user leaves the page. This push() will include a custom event key as well as values for the fields in the Event Tag we’ll create in the next chapter.
Create a Custom HTML Tag, give it some illustrious name, and set it to fire only on pages with forms. Here’s the code we’ll work on. Just copy-paste it into the Tag.
<script>
  (function() {
    var eventAction;
    window.addEventListener('beforeunload', function() {
      window.dataLayer.push({
        'event' : 'formAbandonment',
        'eventCategory' : 'Form Abandonment',
        'eventAction' : eventAction
      });
    });

    // Add actual logic here...
  })();
</script>
That’s pretty simple, right? All you do is attach a listener to the page, which waits for the beforeunload event. When that takes place, a dataLayer.push() is invoked, which is then used to fire a Google Analytics Event Tag with all your abandonment issues within. The whole thing is wrapped in an immediately-invoked function expression to protect the global namespace from being polluted with your variables.
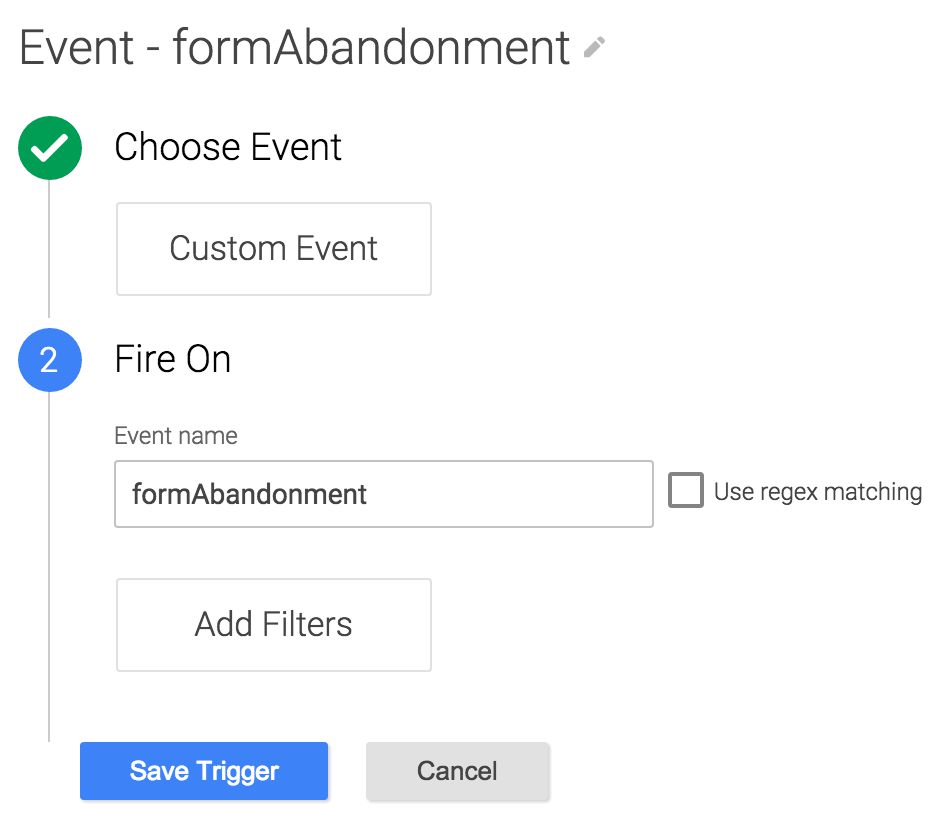
The Event Tag
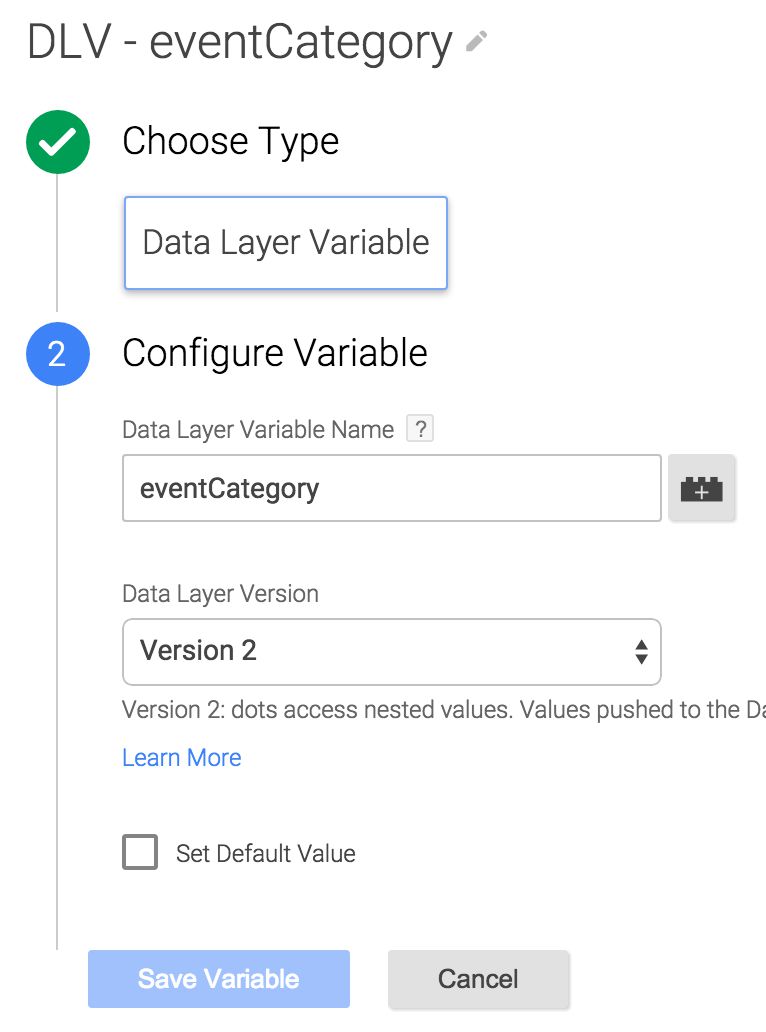
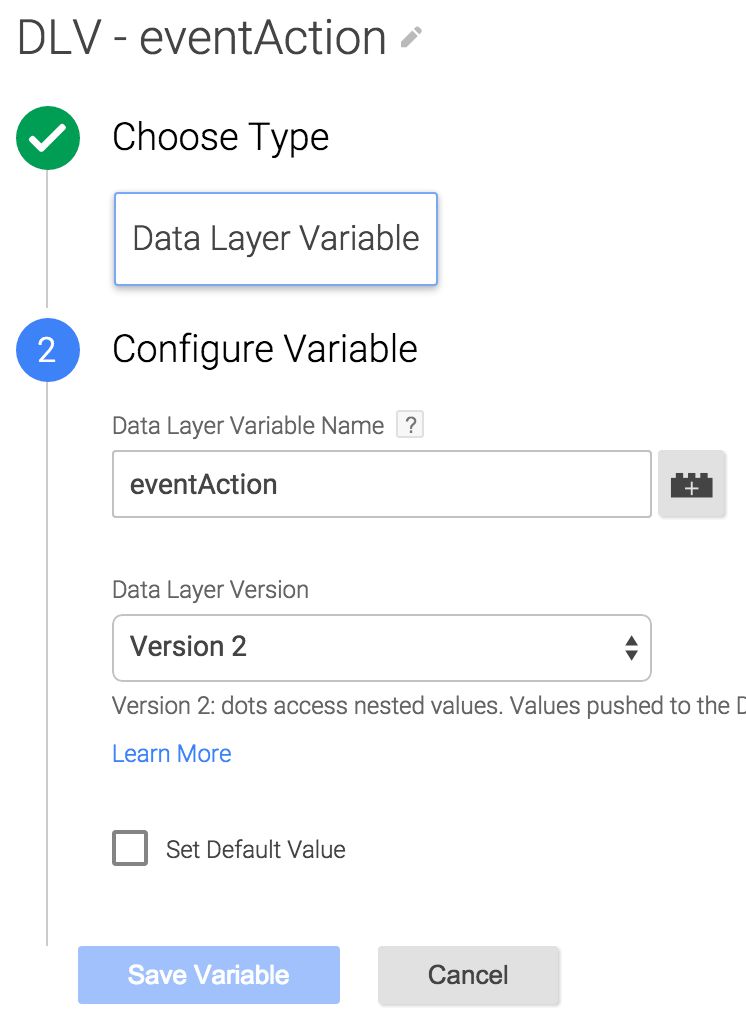
Before we go on, let’s create the Event Tag itself. And before we do that, you’ll need to create a Custom Event Trigger and two Data Layer Variables.
The Custom Event Trigger looks like this:
And the two Data Layer Variables look like this:
Next, onto the Event Tag itself. It’s your basic affair, with a simple Event Category and Event Action. I’ve set the Non-Interaction field to True, since this isn’t really a user interaction but more like metadata about the page view, but you can do as you wish.
Remember to add your new Custom Event Trigger you just created to this Tag.
The Tag itself looks like this:
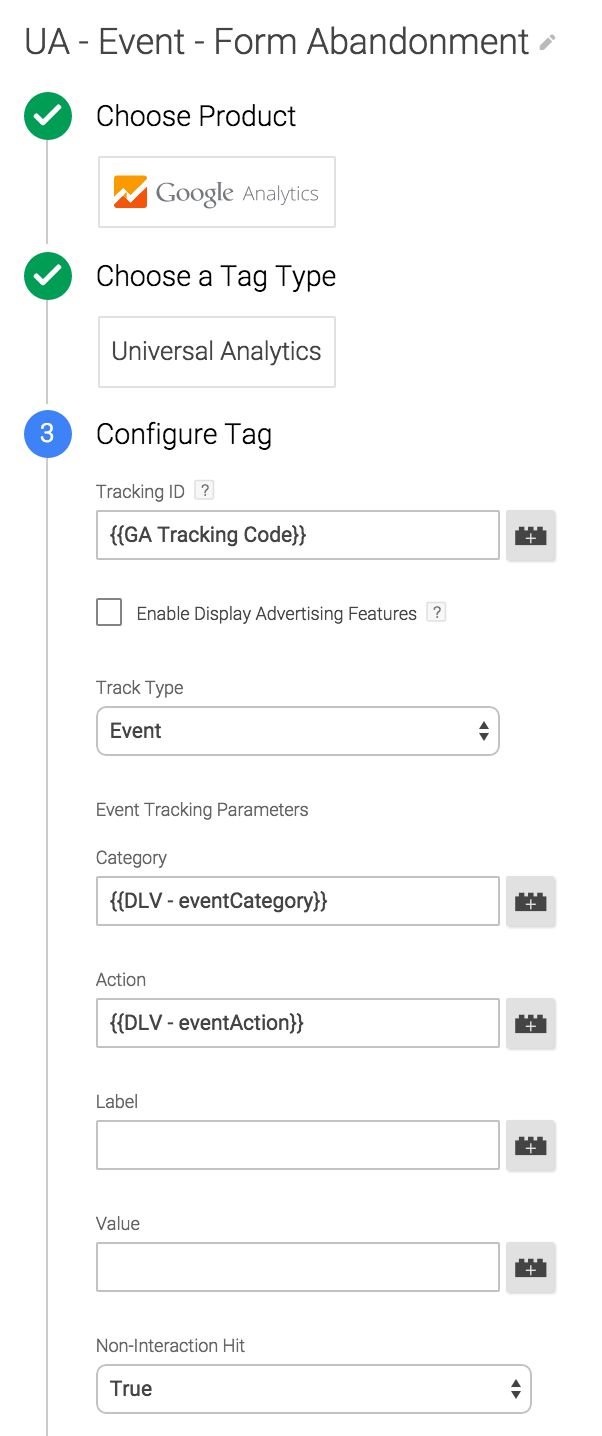
You’ll need one more thing that’s not visible in the screenshot. Go to More Settings -> Fields to Set, and add the following:
Field Name: transport
Value: beacon
This will utilize a beautiful feature of the Universal Analytics library, where any HTTP request that is initiated as the page is unloaded will be allowed to complete before the page or browser is run down. It doesn’t have stellar browser support, which means that horrible browsers such as Internet Explorer might simply exit the page before the request to GA completes. But we can live with that.
Now that we’ve taken care of the foundations, we can get to the juicy stuff. Are you ready? I didn’t hear you? ARE YOU READY?
Sorry for that.
Track simple interaction
“Simple interaction” here translates to: the user changed the value of any form field. That’s all we care about. It doesn’t matter which field, and it doesn’t matter how many form fields. We want to draw a line between two types of people: those who didn’t interact with the form at all, and those who did.
To make this work, you’ll need to add another custom listener into the Custom HTML Tag. Here’s what we’ll go with in the Custom HTML Tag you’ve already created:
<script>
  (function() {
    var eventAction;
    var formSelector = 'form'; // Modify this CSS selector to match your form. Default is first form on the page.
    window.addEventListener('beforeunload', function() {
      if (eventAction) {
        window.dataLayer.push({
          'event' : 'formAbandonment',
          'eventCategory' : 'Form Abandonment',
          'eventAction' : eventAction
        });
      }
    });

    document.querySelector(formSelector).addEventListener('change', function() {
      eventAction = 'True';
    });
  })();
</script>
In the beginning, you define a formSelector. This is a basic CSS selector that you use to target a single form, e.g. ‘#formId’ or ‘.formClass’. If you choose a selector that can have potentially multiple hits on the page, this script will only listen to the first instance.
In the end, we add a change listener to this particular form. If a change event is registered in any of the form fields, i.e. the form field value changes, then the eventAction variable is given a value ‘true’.
Finally, the dataLayer.push() that sends the payload to dataLayer which triggers the Event Tag is set to execute only if the eventAction variable is set. Thus, you’ll only report on potential form abandonments if the user has interacted with the form.
The Event Tag will have Event Category Form Abandonment and Event Action True.
To get the most out of this solution, you’d create an Advanced Segment in Google Analytics, where you
-
Include only sessions where form goal completions is 0
-
AND where Event Category equals Form Abandonment
You need the “goal completions is 0” because this Event will be dispatched when a form is submitted as well. In order to only send the Event when the user has interacted with the form but did not submit it, jump to chapter 7.
Like I said, this is a very simple, rudimentary way of analyzing traffic that interacted but did not submit.
Track last field interacted with
Let’s improve the previous solution a little. Instead of just blindly looking at who interacted and who didn’t, let’s send the last field the user interacted with to GA. Maybe this will give us some clue about what made the user abandon the form.
So, modify the Custom HTML Tag to look like this:
<script>
  (function() {
    var eventAction;
    var formSelector = 'form'; // Modify this CSS selector to match your form. Default is first form on the page.
    var attribute = 'name';
    window.addEventListener('beforeunload', function() {
      if (eventAction) {
        window.dataLayer.push({
          'event' : 'formAbandonment',
          'eventCategory' : 'Form Abandonment',
          'eventAction' : eventAction
        });
      }
    });

    document.querySelector(formSelector).addEventListener('change', function(e) {
      eventAction = e['target'].getAttribute(attribute);
    });
  })();
</script>
We’ve added a new variable, attribute. In this, you specify the attribute name that you want to collect to describe which form field was the last one that was interacted with. I would recommend against choosing value or anything that the user can add content to. This is to protect your GA account from inadvertently collecting personally identifiable information such as e-mail addresses and such.
The other additions are the e parameter in the callback function of the ‘change’ listener, and the attribute value of the e['target'] object as the value that eventAction retrieves. The target parameter of the event object contains the HTML element that was the target of the event action, which in this case would be the form field whose value changed.
I would recommend you use the name attribute, since it’s usually the most descriptive one (especially with well-formed forms).
So, an input field like <input name="email" type="text"> would send ‘email’ as the Event Action of the Event Tag.
Now, again, this would send an Event every time someone leaves the form page, so you’ll get some false positives as well. Remember to apply the Advanced Segment, where you look for sessions with this event (using the Event Category filter in the segment settings), and sessions without any form submissions (using a goal completion filter or something similar).
Get full interaction history
Here we’ll extend the Event Action value that is sent to Google Analytics to include a complete “history” of fields that were interacted with this. This is done as a trail that might look like this:
firstName > lastName > address > creditCardNumber > expirationDate > creditCardNumber
As you can see, it will record multiple interactions as well. The history example above would indicate that the Credit Card Number field was the one that caused the user to disdainfully abandon your form.
To make this work, here’s the revamped version of the Custom HTML Tag:
<script>
  (function() {
    var formSelector = 'form'; // Modify this CSS selector to match your form. Default is first form on the page.
    var attribute = 'name';
    var history = [];
    window.addEventListener('beforeunload', function() {
      if (history.length) {
        window.dataLayer.push({
          'event' : 'formAbandonment',
          'eventCategory' : 'Form Abandonment',
          'eventAction' : history.join(' > ')
        });
      }
    });

    document.querySelector(formSelector).addEventListener('change', function(e) {
      history.push(e['target'].getAttribute(attribute));
    });
  })();
</script>
Let’s see. We’ve removed the variable eventAction, and opted for a new Array named history. Instead of checking for whether the eventAction variable has a value, we now check if the history Array has any contents. If it does, we join() the history Array as a string delimited with whitespace->-whitespace. So, an Array that looks like ['firstName', 'lastName', 'phone'] becomes 'firstName > lastName > phone'.
Finally, in the change listener we use the history.push() method to insert the specified attribute value of the changed form field into the history Array.
Thus, each time the user changes a value of a form field, the specified attribute (‘name’ is again recommended) value will be pushed into the history Array, and this is how we get our neatly formatted interaction history to GA as the Event Action value of the hit.
This is, as you might have guessed, a very simple way of mapping form abandonment. Nevertheless, it does give you some idea about which fields are interacted with and how much. In fact, you can easily convert this from a form abandonment survey into an engagement analysis. Using some simple data analysis, you can map the most common paths in your form.
Only send event when a form isn’t submitted
The major caveat with all the previous examples, apart from the browser support, is that the event is sent every time the page is unloaded and a field has changed, so for successful form submissions as well. This means you’ll need to create an Advanced Segment in GA to make the most of your form abandonment analysis.
However, you can tweak the Custom HTML Tag slightly to only send the form abandonment event when the page unloads for some other reason than a form submission. To do this, the revised Custom HTML Tag should look like this:
<script>
  (function() {
    var eventAction, i;

    var checkSubmit = function() {
      i = window.dataLayer.length - 1;
      while (i > -1) {
        if (window.dataLayer[i]['event'] === 'gtm.formSubmit') {
          return true;
        }
        i--;
      }
    };

    window.addEventListener('beforeunload', function() {
      if (!checkSubmit()) {
        window.dataLayer.push({
          'event' : 'formAbandonment',
          'eventCategory' : 'Form Abandonment',
          'eventAction' : eventAction
        });
      }
    });

    // Add actual logic here...
  })();
</script>
The first change is that you define a new counter variable i. Next, there’s a new mini-function in town called checkSubmit(). This loops through dataLayer, starting from the end, and returns the Boolean value true if an ‘event’ key with the value ‘gtm.formSubmit’ is found. This would indicate that the unload was due to a form submission.
Finally, the window.dataLayer.push() is wrapped in an if block, which is executed only if the checkSubmit() function does not return a truthy value. This is because we want to send the Event only if a form submission didn’t cause the page unload.
You might be wondering why not just check against the value of the {{Event}} key. Well, GTM has some internal logic running which prevents the value of a Data Layer Variable from being modified during the lifetime of a Tag. Thus, {{Event}} will always return gtm.js or whatever event name you’re using to fire the Custom HTML Tag in the first place.
If you already have the if block there to check for either eventAction or history.length, you can simply add the checkSubmit() check with Boolean logic:
if (eventAction && !checkSubmit()) {
  ...
}

if (history.length && !checkSubmit()) {
  ...
}
This solution might not work on single-page apps or web pages which have forms that do not redirect. In these cases, you’ll need to make additional checks to see if the form that was submitted was the one you’re actually tracking. It’s relatively simple, but I won’t explain it here as it’s an edge case.
With JavaScript and GTM, it’s always a little bit of give-and-take, so you’ll need to modify these solutions to fit whatever frameworks and setups you have running on your site. With a generic, Best Practices -infused HTML form, though, these setups should work beautifully.
Summary
Tracking form abandonment is an interesting way to see what types of interactions (or lack thereof) result in your forms not being submitted. Fixing this funnel can be key to opening up your website to exponential goal conversions.
However, abandonment is very difficult to define, and you need to ask the correct business questions first before you can start looking for a solution. The four different methods outlined here serve a very simple hypothesis that correlates the fields of a form with the user’s tendency to leave the form unfinished. This correlation might not work on many forms.
Like I mention in the guide, it would be very simple to convert this from a form abandonment analysis to a form interaction analysis, where you inspect the “history” of the filled fields to see if users are bouncing around the form and not following the chronology or layout that you have established.
If none of this resonates with you, at least you’ll have some cool new tricks up your sleeve with the transport : beacon field as well as the beforeunload browser event!
