Send Weather Data To Google Analytics In GTM V2
In 2013, I wrote a guide for Universal Analytics and Google Tag Manager on how to poll for weather conditions, and send this information to Google Analytics as a custom dimension of the session. The guide was intended as a technical introduction to Google Tag Manager, and I think it succeeded in that.
However, GTM has changed a lot over the last 1.5 years, and I’ve made some improvements to the method along the way. So I wanted to update the guide for the new version of Google Tag Manager (V2), and introduce some changes to the code that make it more flexible and efficient.
(UPDATE 21 August 2017) - I updated this article to work with the Weather Unlocked API (thanks to Kévin Coppens for the tip), due to openWeatherMap upgrading their SSL plan to a pretty expensive level. Do note that Weather Unlocked requires the use of an API key, and passing the API key client-side is risky, and opens up your API plan to abuse. For those who want to take this weather analysis seriously, I really recommend moving to a 100% server-side solution, where the weather data is polled before the page itself is rendered, and the data is written in the dataLayer of the page.
Since this is a whopper of a post, I’ve got a table of contents right here:
Table of Contents
The Simmer Newsletter
Subscribe to the Simmer newsletter to get the latest news and content from Simo Ahava into your email inbox!
1. What it does
The idea behind the solution is to poll a weather service, so that all sessions in Google Analytics would be annotated with information on what the weather conditions were at the time of the session. The underlying question we’re trying to answer is: “Does weather play a part in how people interact with your website or your brand?”. This might be a very relevant question for businesses very dependent on weather conditions, such as those with golf courses and ski slopes.
The technical method is split into three parts:
-
Geolocation - we need to get an approximation of the geographic area the visitor is browsing from.
-
Weather API - we will use this geolocation data to query for the weather conditions in the visitor’s region.
-
Data Layer - finally, we will store all the information we get in the dataLayer object to be available for our Tags.
It’s not the simplest of processes, and there are many ways you can optimize it (I’ll expound these in the relevant chapters). Also, one of the main reasons for writing this guide in the first place is to show a prototype for any generic API call you might want to make. So it’s not just weather, but share price, traffic details, basketball results, and so on. If there’s an API for it, you can use this method to enrich your visitors’ sessions with new Custom Dimensions and Metrics.
The solution itself follows the following flow, visualized with my mad PowerPoint skills:
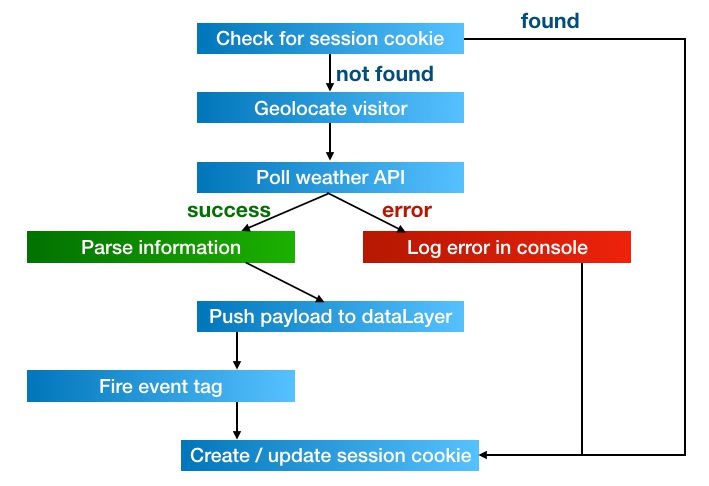
It’s a fairly straightforward process, with only two junctions: session cookie state and success / failure of the API call itself.
2. Core requirements
Regardless of how you wind up doing the solution, you will require some core components. These are:
-
Custom HTML Tag to poll the API and store the information in dataLayer
-
Trigger to fire an Event Tag when the data is in dataLayer Data Layer Variables to pull the information from the dataLayer into the Event Tag
-
1st Party Cookie Variable to maintain session state
-
Session-scoped Custom Dimensions set up in Google Analytics to receive the API data from the Tag
-
Universal Analytics Event Tag to send the data to Google Analytics
We’ll create the Custom HTML Tag later, since it requires a bit more work and deliberation than the other core requirements.
2.1. Trigger
The Trigger is simple. It’s just a Custom Event Trigger that fires when an ‘event’ key with value ‘weatherDone’ is pushed into dataLayer. Give it a descriptive name, such as Event - weatherDone.
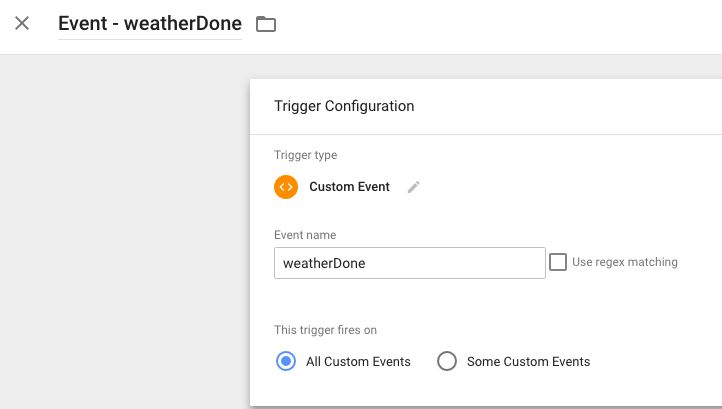
Make sure the Trigger looks like the one in the screenshot above.
2.2. Data Layer Variables
In this solution, we’ll use two Data Layer Variables. One to hold a simplified description of the weather conditions (e.g. “Cloudy”, “Rain”, “Storm”), and one to store the temperature, also simplified (e.g. “5°C - 15°C”).
So, create two Data Layer Variables, one for Variable Name weather, and one for Variable Name temperature.
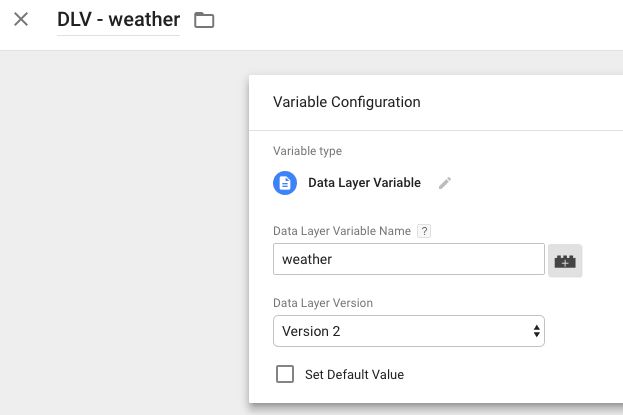
The Variable above is named DLV - weather.
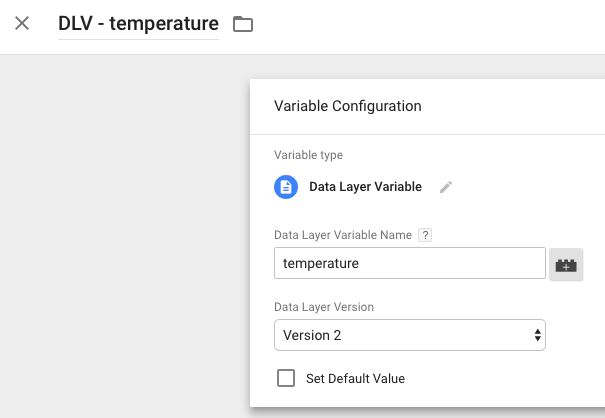
Give the second Variable a name such as DLV - temperature. This is the naming convention I use (DLV stands for Data Layer Variable, of course), but you can name them as you wish.
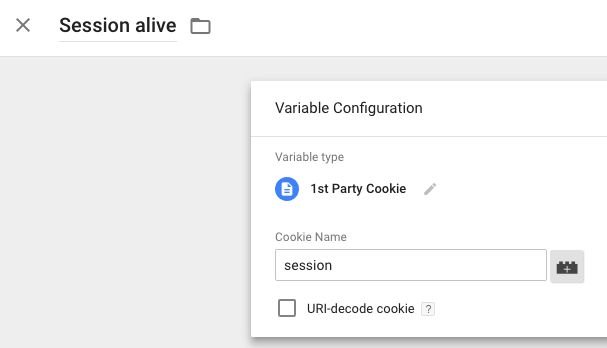
2.3. 1st Party Cookie Variable
We’ll be artificially maintaining session state using a custom cookie, written by the script and refreshed each time the page loads. The reason we want to maintain state like this is because we only want to send weather data once per session.
The API call to the weather service is not light-weight. We want to avoid making calls like this as much as we can, because that way the page load process won’t be hindered by slowly loading asynchronous API calls like this. So, when the visitor first lands on the site, a cookie is created that mimics GA’s session logic by having a 30-minute expiration. Naturally, this isn’t the entire session logic (we’re missing stuff like referral exclusions, cross-domain tracking, etc.), but it’s close enough to save us from making unnecessary calls.
The cookie script is in the actual API script introduced later in this article, but the Variable you’ll need to create should look like this:
2.4. Session-scoped Custom Dimensions
Because we have two measurements we want to send as extra data, we’ll need two Custom Dimensions to store them. Now, you might wonder: “Why not use Custom Metrics for temperature? It’s numeric, after all?”. That’s a good question, and the reason is that you can’t calculate on Custom Metrics yet. So all temperature data that you would be sending would end up as cumulative across your reports. It doesn’t make sense to ask “What was the sum of all temperatures for converting visits from Helsinki?”, but it makes a lot of sense to ask “What was the average of all temperatures for converting visits from Helsinki?”. The latter, unfortunately, is not yet available through Google Analytics.
Anyway, create two session-scoped Custom Dimensions, and name them so that you’ll find them when going through your dimension lists. I’ve used simply “Weather” and “Temperature”.

It’s important to make note of the dimension index number for both new dimensions. We’ll need this information for our Event Tag.
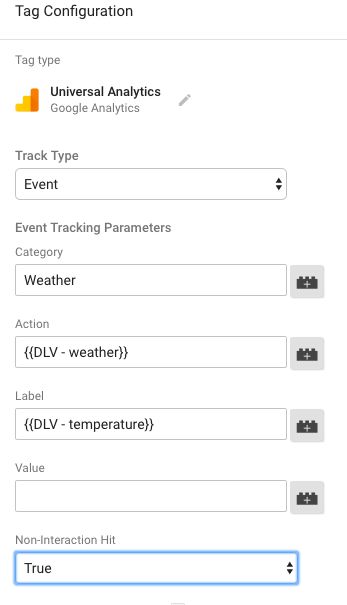
2.5. Universal Analytics Event Tag
The Event Tag has two “customizations”, if you will. First of all, we’re sending this hit as a non-interaction event. This means that it will not affect the bounce rate of the session. The reasoning for this is that weather data isn’t something that results from a visitor action. It’s just meta information about the session, so it’s not interactive.
Use the Trigger you created in step 2.1. to fire this Event Tag.
Why not use a Page View Tag, then? Another great question. Well, the API calls we’ll be making in the Custom HTML Tag take time to complete, since they’re executed asynchronously. This means that we won’t be able to pinpoint the moment in the page load sequence when the data is actually sent, but we will know it will be deferred for as long as the API call takes. If the call takes up a long time to complete, it will delay our Page View Tag from firing. This, I think, is a definite no-no. Page Views are a crucial part of session-based hit collection, and missing them simply is not an option.
There’s no down-side to using a non-interaction event.
Anyway, the Tag I’ve used here has the following event parameters:
Event Category - Weather
Event Action - {{DLV - weather}}
Event Label - {{DLV - temperature}}
Non-Interaction - True
Next, scroll down to More Settings, and expand Custom Dimensions. Here, you will need to add two new rows of Custom Dimensions to accommodate the two dimensions that are hungrily waiting for data to pass through the GA interface.
At this point, you will need to remember or look up the dimension index numbers from Google Analytics Admin. In my example, they’re simply 1 (for Temperature) and 2 (for Weather), but remember to adjust if necessary.
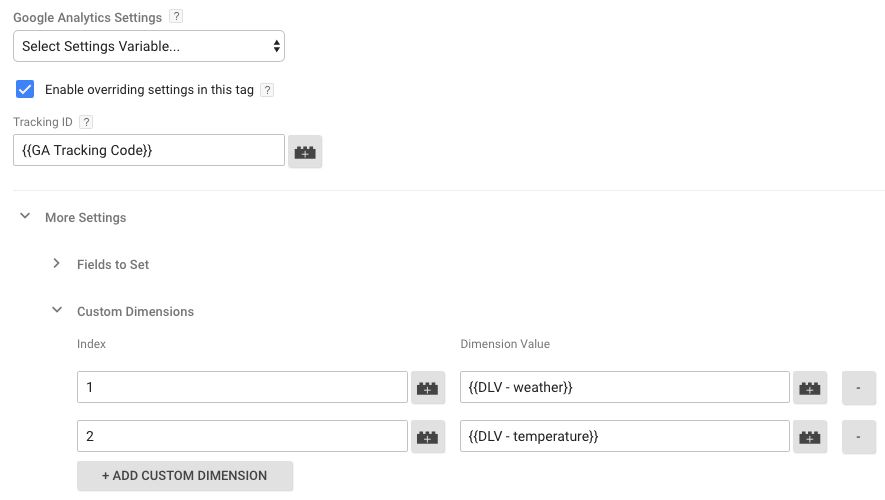
Add the respective Data Layer Variables to the value fields, as in the image above.
That’s it for the core requirements.
The next bit gets quite complicated.
3. Building the script
If you remember from the beginning, this technical solution falls into three parts: geolocation, weather query, and storing the information in dataLayer.
To get started, you will need a Custom HTML Tag that uses the All Pages Trigger. Give it a descriptive name. I’ve used Utility - HTML - Weather Query, but, again, you are free to go with your own naming convention.
This code has been rewritten to work with HTTPS-protected sites. If your site isn’t using HTTPS, much of this will be overkill and needlessly expensive, but I do recommend you upgrade your site security as soon as possible.
The code within, in all its JavaScript glory, is this:
<script src="https://ajax.googleapis.com/ajax/libs/jquery/3.2.1/jquery.min.js"></script>
<script>
  (function() {
    var fetchWeatherData = function(longitude, latitude) {
      // You need to sign up to Weather Unlocked for an account. Once you do,
      // you will find your APP ID and APP KEY in your account dashboard.
      var wuAppId = 'paste_your_weather_unlocked_app_id_here';
      var wuAppKey = 'paste_your_weather_unlocked_app_key_here';
      jQuery.getJSON('https://api.weatherunlocked.com/api/current/' + latitude + ',' + longitude + '?app_id=' + wuAppId + '&app_key=' + wuAppKey)
        .done(function(data) {
          window.dataLayer.push({
            event: 'weatherDone',
            weather: data.wx_desc,
            temperature: data.temp_c
          });
        }).fail(function(jq, status, msg) {
          console.log('Weather request failed: ' + status + ' - ' + msg);
        });
    };

    var geoLocateUser = function() {
      // This is your API key for GeoPlugin, which you can purchase at
      // http://www.geoplugin.com/premium#ssl_access_per_year
      var geoPluginAPIKey = 'paste_your_api_key_here';
      jQuery.getJSON('https://ssl.geoplugin.net/json.gp?k=' + geoPluginAPIKey + '&jsoncallback=?')
        .done(function(data) {
          fetchWeatherData(data.geoplugin_longitude, data.geoplugin_latitude);
        }).fail(function(jq, status, msg) {
          console.log('Geolocation failed: ' + status + ' - ' + msg);
        });
    };

    if (typeof {{Session alive}} === 'undefined') {
      geoLocateUser();
    }

    // Reset "session" cookie with a 30-minute expiration
    var d = new Date();
    d.setTime(d.getTime()+1800000);
    var expires = "expires="+d.toGMTString();
    document.cookie = "session=1; "+expires+"; path=/";
  })();
</script>
Oh my, that’s a lot of code. In the next chapters I’ll walk you through just what the heck is going on here.
It’s important to notice that I’m loading jQuery at the very top of the script. Also, I’ve wrapped the whole script itself in an immediately invoked function expression to scope all variables to the function and thus avoid polluting the global namespace.
If you’re already loading jQuery on the site, you shouldn’t load it again in this Tag, but then you will need to ensure the Custom HTML Tag fires only after jQuery has completely loaded. If you load jQuery asynchronously, it leaves you little choice but to fire the Custom HTML Tag upon the Window Loaded Trigger, since that’s the only moment you can be sure that jQuery has been loaded.
For error logging, I simply invoke the .fail() callback of the JSON requests to the two APIs (geoPlugin and Weather Unlocked). In case of an error, the message is simply written to the console, but you can also invoke a dataLayer.push() to log the error elsewhere, such as Google Analytics.
3.1. Geolocation
There are many ways to do geolocation, but for usability’s sake I use an API call for this as well. If you’re serious about this solution, you might want to install a geolocation service on your own web server, so that you’ll avoid needing to make any extra API calls in the client.
Geolocation hinges on one thing: the visitor’s IP address. There are many ways to get this data, as it is public information, exposed in the HTTP headers of the visitor’s requests. You might have guessed at this point that the accuracy of the solution is thus dependent on what type of proxies or VPNs the visitor might be using. This is something we will not be able to work around, and thus you will need to take the geolocation data, as any other data in the public web, with a grain of salt.
What we’ll need back from the geolocation service are the latitude and longitude of the visitor. IP-based geolocation is usually accurate down to the city the visitor is from, but in many cases it might be a much broader spectrum, such as an entire state or even country. Nevertheless, we’ll take what we can get.
The method in the script uses an all-in-one API for both getting the IP address and retrieving the longitude and latitude of the visit. The service is called geoPlugin, and the SSL plan is fairly inexpensive.
var geoLocateUser = function() {
  // This is your API key for GeoPlugin, which you can purchase at
  // http://www.geoplugin.com/premium#ssl_access_per_year
  var geoPluginAPIKey = 'paste_your_api_key_here';
  jQuery.getJSON('https://ssl.geoplugin.net/json.gp?k=' + geoPluginAPIKey + '&jsoncallback=?')
    .done(function(data) {
      fetchWeatherData(data.geoplugin_longitude, data.geoplugin_latitude);
    }).fail(function(jq, status, msg) {
      console.log('Geolocation failed: ' + status + ' - ' + msg);
    });
};
In this method, you first need to write your API key into the geoPluginAPIKey variable. You’ll get this API key by subscribing to a very cheap plan at geoPlugin. Next, we use the JSONP endpoint of the geoPlugin API to fetch the geolocation data for the user. It’s all wrapped in jQuery’s extremely useful getJSON() method.
The asynchronous request is supplemented with the done() callback, which is invoked if everything goes well. In this callback, we pass the longitude and latitude information to the next function in the chain: fetchWeatherData().
In case of an error, the error information is output into the browser console.
3.2. Building the API call
So now we’ve got geolocation down. The next thing we need to do is use this information to poll for weather data.
I use the Weather Unlocked service for this. It has a pretty generous free plan, and it supports both SSL and non-SSL requests. (UPDATE: Looks like Weather Unlocked Developer API for SSL requests requires a small subscription fee now.)
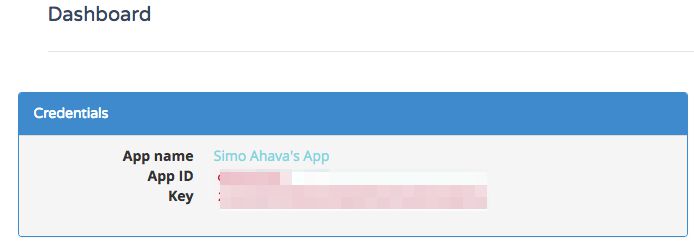
Once you’ve signed up to the service, you will find your APP ID and APP KEY in the dashboard.
The fetchWeatherData() method itself looks like this:
var fetchWeatherData = function(longitude, latitude) {
  // You need to sign up to Weather Unlocked for a free account. Once you do,
  // you will find your APP ID and APP KEY in your account dashboard.
  var wuAppId = 'paste_your_weather_unlocked_app_id_here';
  var wuAppKey = 'paste_your_weather_unlocked_app_key_here';
  jQuery.getJSON('https://api.weatherunlocked.com/api/current/' + latitude + ',' + longitude + '?app_id=' + wuAppId + '&app_key=' + wuAppKey)
    .done(function(data) {
      window.dataLayer.push({
        event: 'weatherDone',
        weather: data.wx_desc,
        temperature: data.temp_c
      });
    }).fail(function(jq, status, msg) {
      console.log('Weather request failed: ' + status + ' - ' + msg);
    });
};
It’s fairly similar to the geolocation method. We use the latitude and longitude information to query the Weather Unlocked API. You’ll need your APP ID and APP KEY handy for this!
Upon a successful request, the response is parsed for the description of the current weather (data.wx_desc) as well as the current temperature (data.temp_c). These are added to the dataLayer object under their respective keys.
Note that all Ajax calls are made using jQuery. Now, the benefits and pitfalls of being dependent on an external, bloated framework like jQuery can be debated, but jQuery handles Ajax requests beautifully. It’s perfect for what we’re trying to achieve here, so I don’t mind using the framework.
And that’s about it! The solution is fairly simple, relying on fairly simple, chained asynchronous requests. If one fails, then the rest doesn’t get executed, so you might want to add some error handling if you want to know what your success rate is. But since we’re using session-scoped Custom Dimensions, you can already get a success rate by looking at how many sessions have weather data out of all sessions.
Just one thing remaining.
3.3. Maintaining state with a cookie
The final bit of the puzzle is to fire the tag just once per session. We do this by only starting the whole process if a custom 1st party cookie has not been set. The {{Session alive}} Variable returns undefined if the cookie is not set, so we can check against this before executing the first step (the geolocation).
  if (typeof {{Session alive}} === 'undefined') {
    ...the geolocation call...
  }

  // Reset "session" cookie with a 30-minute expiration
  var d = new Date();
  d.setTime(d.getTime()+1800000);
  var expires = "expires="+d.toGMTString();
  document.cookie = "session=1; "+expires+"; path=/";
At the end of the script, regardless of whether the cookie was set or not, we create / update the cookie with a new 30-minute expiration.
And that’s it. Easy, right?
Remember to test it carefully in Preview mode. Check the JavaScript console for any errors, test that the cookie logic works, and monitor Real-Time reports in Google Analytics to verify that data is flowing in.
4. Summary
So this is the weather script for Google Tag Manager V2. Feel free to swap the Weather Unlocked API with any other API endpoint you might want to query. You will need to study the API, modify the parameters, and parse the data differently, but the logic is the same.
It would be cool to know if weather analysis has brought you any insights. A great idea for modifying the script would be to not just track today’s weather, but the weather next weekend or over a holiday. Does a warm Easter contribute to fewer bookings in the ski slopes, and does a rainy weekend ahead make green fee sales plummet at the local golf course?
