Measure Ad And Content Blocker Impact
So, looks like iOS 9 has built-in support for integrating “content blocking” extensions on your iPhone. Now, blocking ads and other intrusive content is nothing new, nor do I want to get into a debate about whether it’s a good thing or not. But as a data geek I’m very interested in knowing just what share of my site tracking has some content blocker enabled. In this post, I’ll show two tricks (easy and advanced) to expose these content blockers. It’s always a good idea to keep tabs on the numbers, especially if you’re concerned about them blocking your analytics tools as well (as you should be!).
The two solutions I’m going to introduce differ in their accuracy. Both require that you upload a small file to your web server. After that, the accuracy depends on whether or not you’re interested in knowing how many of these content blockers end up blocking Google Tag Manager as well! As it turns out, there are some that do, and you might want to measure that traffic as well.
NOTE! Just to dispel any confusion, the following solutions will not work if Google Analytics tracking is blocked by preventing the HTTP request from ever leaving the site. The hack using an XMLHttpRequest() will circumvent those blockers which simply prevent analytics.js from loading, but it will not help if the HTTP request to Google Analytics is blocked. To measure THAT share of traffic in GA, you’ll need to relay the hits via a local web server endpoint, and send the Measurement Protocol hit to Google Analytics from your web server, where ad and content blockers can’t reach it.
The Simmer Newsletter
Subscribe to the Simmer newsletter to get the latest news and content from Simo Ahava into your email inbox!
Create the JavaScript file and upload it
First thing you need to do is create a simple JavaScript file called advertisement.js and upload it to the web server. This file has just one single line:
window['noBlocker'] = true;
This file functions as bait. It has the most blatant name you could think to give to an ad library, so most of the blockers should latch onto it with their greedy, publishers’-livelihood-decimating-tendrils.
You need to upload this file to some location on your web server where you can link to it from your page template (or from GTM). Because I’m using WordPress, I uploaded it to the directory /wp-content/.
Once you’ve done this, you can follow either the easy solution (coming up soon), or the more intricate one (coming up later in the article). But start by reading the generic GTM configuration you’ll need for either approach.
Google Tag Manager configuration
First, you’ll need a Custom JavaScript Variable, which we’ll call {{JS - noBlocker}}. This Variable has the following code within:
function() {
  return window['noBlocker'] ? undefined : 'true';
}
This will return nothing if the advertisement.js file loaded and created the global variable, and ‘true’ if the file was not loaded. In other words, if a content blocker blocked advertisement.js, this Variable will return ‘true’.
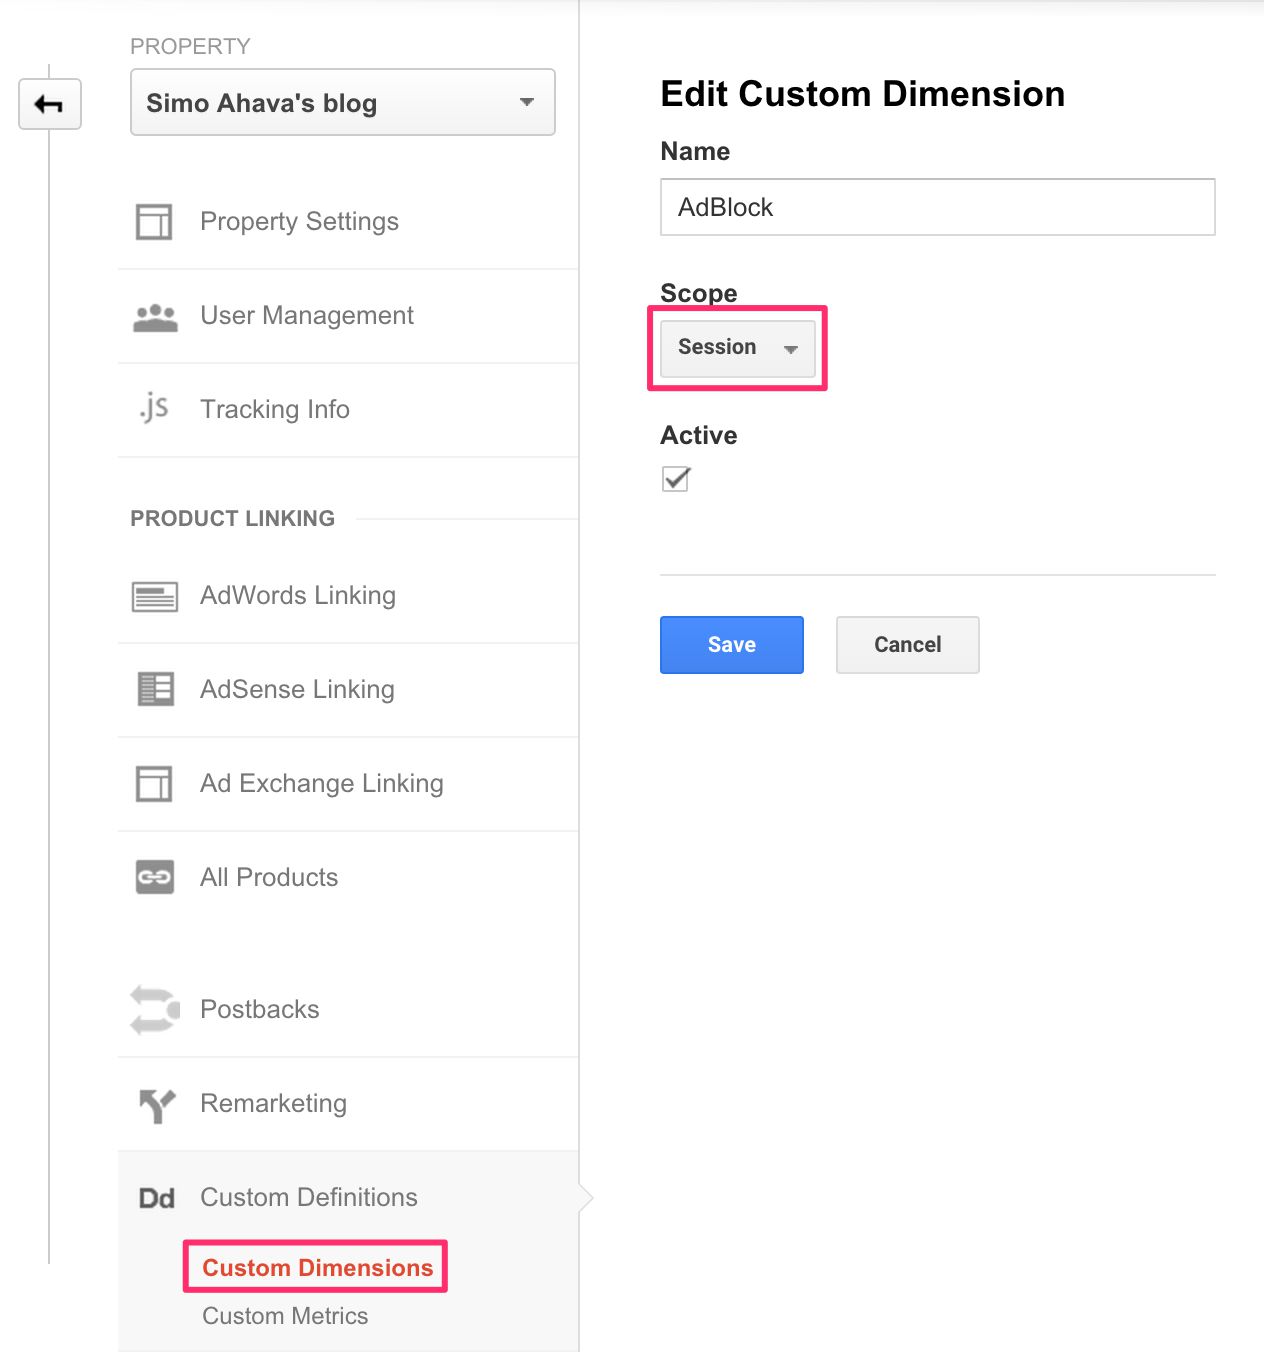
Next, you’ll need to create a Custom Dimension in Google Analytics. I’ve chosen Session as the scope, as Hit-level might be too granular, and User-level might be too broad. But it’s up to you. When you create the Custom Dimension, make note of the Index number that GA assigns to it.
Next, edit your generic Page View Tag. You need to add a new Custom Dimension row to it, with the Index number derived from Google Analytics’ settings, where you just created the new dimension. The value of this dimension needs to be the Custom JavaScript Variable you created earlier. So it would look like this:
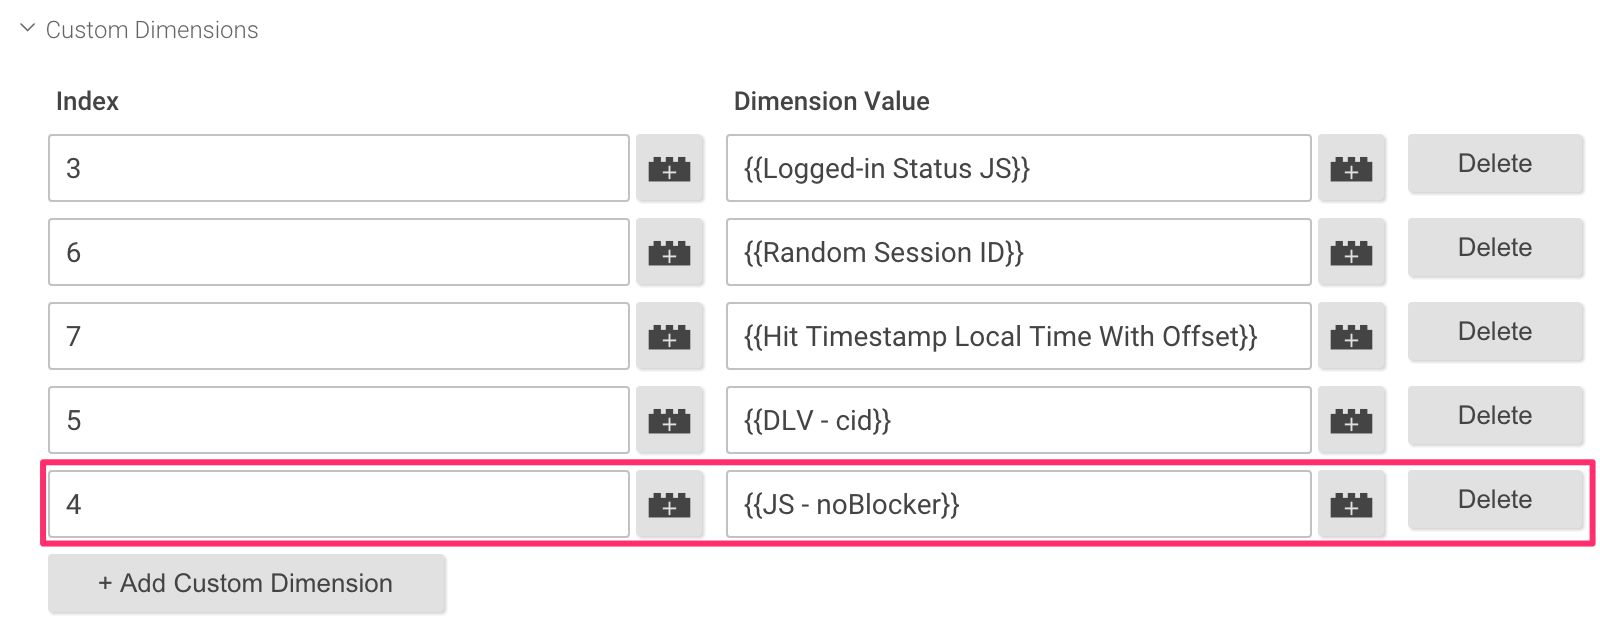
Let’s look at what’s going on here. When this Tag fires, it tries to populate Custom Dimension with Index number 4 with whatever the variable {{JS - noBlocker}} returns. If the site did not load the file advertisement.js, this dimension gets the value ‘true’, which is what’s dispatched to Google Analytics. If the file did load, the variable returns undefined, and the dimension does not get sent.
And that’s the generic setup! That’s how we’ll know if a content blocker is running on the site or not.
Next, we’ll need to choose how to link the file to the site, and whether or not we want to account for blockers that actually block GTM as well.
Easy: link the file via GTM
This is the “easy” setup, as we’ll be only using Google Tag Manager to upload advertisement.js.
Start by creating a new Custom HTML Tag, named SETUP - Link to advertisement.js. This has the following code within:
<script>
  (function() {
    var d = document.createElement('script');
    d.src = '/wp-content/advertisement.js'; // Modify this!
    document.head.appendChild(d);
  })();
</script>
This creates a new element in the DOM (a script element), adds a link to the file you’ve uploaded earlier, and then appends it to the head of the document. Remember to modify the line with d.src = ... to reflect the actual location where you’ve uploaded the file to!
Save the Tag. Note! Do NOT add any Triggers to it. Just save it. Good.
Next, open your Page View Tag (the one where you just added the Custom Dimension to), and open Advanced Settings -> Tag Sequencing.
Under Tag Sequencing, check the box for “Fire a tag before Page View Tag fires”, and choose the SETUP - Link to advertisement.js from the drop-down list.

Save the Page View Tag.
Here’s what’s going to happen. When it’s time for the Page View Tag to fire, the Custom HTML Tag is first executed. This Tag links to and executes the advertisement.js file you’ve uploaded to your web server. Next, the Page View Tag fires, and the Custom JavaScript Variable either detects a content blocker (if one is activated) or doesn’t (if one isn’t activated), and sends the Custom Dimension accordingly.
Still with me? That’s all you’ll need. After this, data will start flowing in with your Page View Tags, annotating sessions which have a content blocker with the value ‘true’ in the new Custom Dimension field.
Advanced: Page Template magic
This is more advanced, as it requires you to modify the page template, but it will also account for traffic which also blocks Google Tag Manager (the b*stards!). It’s not a large share by any count, but it’s still something you might want to be wary of.
NOTE! This solution uses a XMLHttpRequest to dispatch the data to GA, and many blockers filter block these requests as well. So you might be left with no other option than to send the data to an endpoint you own and are certain is not blocked by these tools. That’s left up to you and your developers, of course.
Let’s start with the technical stuff first.
You’ll need to add the following tag to the page template before the Google Tag Manager container snippet. The logical place for it is in the <head> of the document.
<script src="/wp-content/advertisement.js"></script>Remember to change the value of the src attribute to reflect the actual location of the file.
Next, add the following minified JavaScript code to the template as well. You can add it anywhere you want in the template, though adding it to the very end is logical as it’s just synchronous JavaScript.
<script>!function(d,e){window.addEventListener('load',function(){if(!window.noBlocker&&!window.google_tag_manager){for(var t=new XMLHttpRequest,n=(new Date).getTime()+Math.floor(1e8*Math.random()),o='ab_gc=',a=document.cookie.split(';'),i=0;i<a.length;i++){for(var c=a[i];' '==c.charAt(0);)c=c.substring(1);0==c.indexOf(o)&&(n=c.substring(o.length,c.length))}t.open('POST','https://www.google-analytics.com/collect');var r='tid='+e+'&cd'+d+'=true&t=pageview&dp='+document.location.pathname+'&v=1&cid='+n;t.send(r);var g=new Date;g.setTime(g.getTime()+63072e6);var d='expires='+g.toUTCString();document.cookie='ab_gc='+n+'; '+d}})}('1','UA-1234567-1');</script>It looks nasty, I know! Read through the following bit carefully.
This script adds a window.onload listener, which fires after the entire window object has loaded. In other words, it waits for the page load and all scripts, images, and external assets to load as well.
Next, it checks for the existence of the noBlocker global variable, which, if you remember, is created in the advertisement.js file. It also checks for the existence of the google_tag_manager object, which is created by Google Tag Manager.
If both of these are missing, it means that a content blocker has blocked both advertisement.js and GTM!. How rude!
If these are blocked, the script proceeds with the following:
-
Create a new randomized clientId, using the current timestamp and a random number.
-
If a cookie named
ab_gcexists, use its value as the clientId instead. -
Fire a Measurement Protocol hit to Google Analytics, using the clientId established in either step (1) or (2), and send the hit as a Page View, using the current page as the location, and setting the value ‘true’ to a custom dimension.
-
Write/update the cookie
ab_gcwith the clientId.
One important thing to note here. See the very last parentheses in the script: ('1','UA-1234567-1')? You need to update those yourself.
The first value in the parentheses is the index number of the Custom Dimension you want to send details about the ad blocker to. You can, for example, just use the Custom Dimension you created earlier, or you can do what I’ve done.
I created a new Google Analytics property to collect these hits, and the Custom Dimension is a hit-scoped dimension, used in an Include Only filter on the reporting view. In other words, this new property will only accept hits that have this Custom Dimension in them, meaning it will only collect data from users that block both advertisement.js and GTM (grrr!).
So that’s what the second value in the parentheses is. It’s the property ID where you want to dispatch the data to. Personally, I wouldn’t use my main property, as this data simply isn’t comparable. It’s programmatically created, and is very limited as to what information is sent. You can, of course, populate all the dimension fields with some clever JavaScript magic, but I’m not that interested in all those gimmicks.
I’m just interested in knowing how many sessions are blocking both ads and GTM (stop it!).
Summary
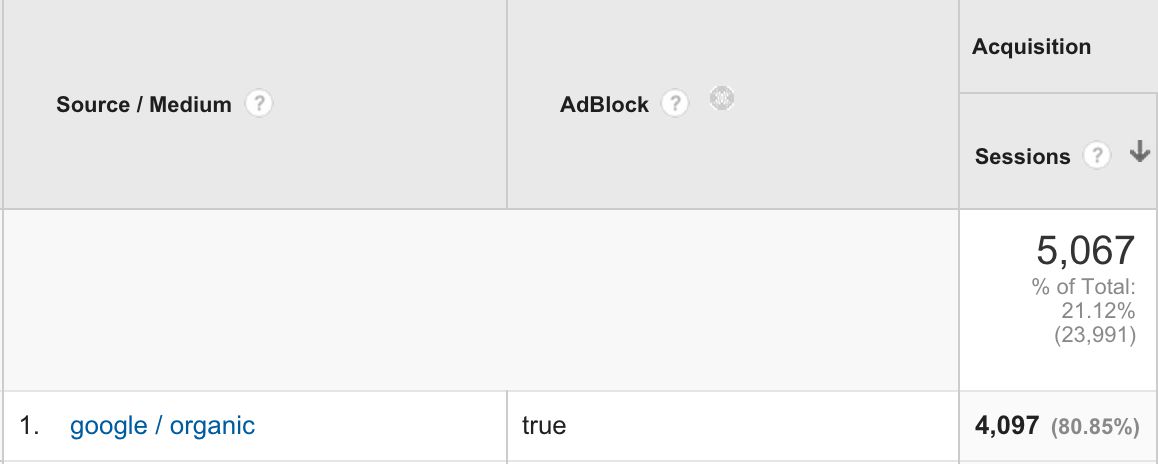
What you do next is up to you. You can create a custom report with session shares for those with a ad blocker vs. those without. With this data, you can optimize your site, making sure no critical information is behind potentially blocked sources.
There are other solutions out there as well that you might want to check out.
Uploading the advertisement.js might not be the most robust solution out there, as it doesn’t require too much imagination from content blockers to disregard this file in the future. Some methods of blocker detection include creating elements in the DOM which resemble slots for advertisements. These will probably work nicely as well.
With this solution, you’ll get some useful information about content blocker shares on your site, and you can immediately act on this information.
I really, really, wish Google Tag Manager wouldn’t be blocked, as it’s not an advertisement or content distribution platform by itself. It’s just a JavaScript injector that can be used for benevolent, cool stuff as well.
Do note that one thing that’s missing is checking whether or not Google Analytics was blocked but Google Tag Manager wasn’t. That’s an interesting use case as well, and it’s simple enough to do with a check for window['GoogleAnalyticsObject'] upon page load. You can do this via GTM or in the page template as well - it just requires some customization.
Do you have other tips for detecting ad and content blockers? What results are you seeing? On my blog, content blockers account for around 25 % of the sessions, and those who block GTM as well are very few (but they do exist).
