Leverage useBeacon And beforeunload In Google Analytics
This nifty little solution will let you calculate the time spent on pages that are not tracked in Google Analytics by default. These include both bounced landing pages and exit pages. Bounced pages and exit pages lack the necessary subsequent pageview, which Google Analytics uses to calculate time-based metrics.
Before you go on, read this excellent article by Yehoshua Coren:
REAL Time On Page in Google Analytics
Yehoshua gives a very nice use case for the technical solution I’m about to explore. He also leverages the Page Visibility API to get an even more accurate overview of visitors who actually digest content, and how much of that time that content is visible on their screens. Fundamental stuff, read it!
So what we’re actually doing here is this:
-
On each page, use the default gtm.start Data Layer Variable to calculate the time when the document has started loading
-
When the user decides to leave the page, either by closing the browser or navigating to another page, first calculate the time when the beforeunload event is dispatched. Then, use the
sendBeacon()API to send a User Timing hit to Google Analytics without having to worry about the unload process cutting the request short.
Hopefully, you’ll end up with data like this:
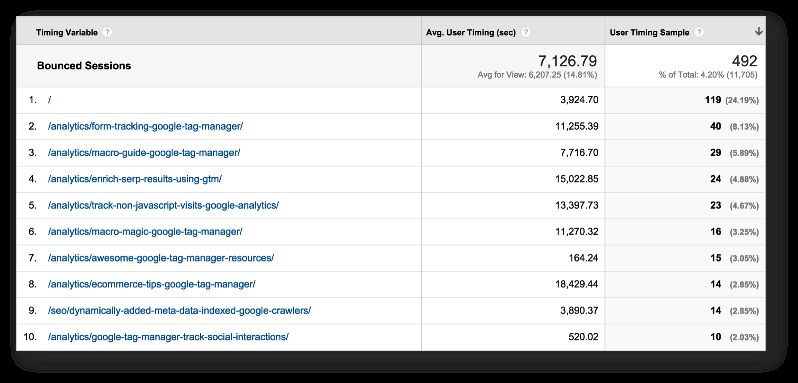
Here you can see the User Timings recorded for pageviews of bounced sessions.
Here’s another report:
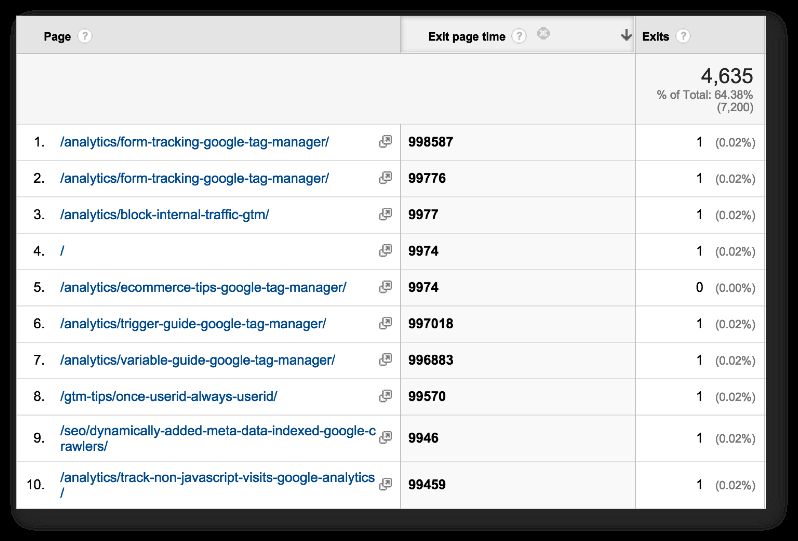
In this report, you can view Exit Pages with the time spent on each page as a secondary dimension.
Naturally, this data would be far more useful when extracted out of the GA interface into a spreadsheet, where you can actually make calculations with the Custom Dimension values, for example. Hopefully, at some point, we’ll have the possibility to calculate our own Custom Metrics, at which point it will make more sense to send this information as a metric instead. Also, read Yehoshua’s article I linked to in the beginning of the post. He uses Custom Metrics, which makes actually a lot more sense if you want to extract the data.
Nevertheless, until such a time that we can calculate on metrics, this is a useful method for obtaining a more accurate time on page across your sessions (so also for bounces and exit pages).
To get it working, you’ll need the following components:
-
New Custom Dimension, session-scoped, to capture this information in GA
-
Data Layer Variable to capture the value for gtm.start
-
Data Layer Variable to store the time on page
-
Custom HTML Tag, which sets the beforeunload listener and does the
dataLayer.push()when the page unload begins. -
Timing Tag which uses the quite new useBeacon field available in Universal Analytics. This field is basically a helper for setting up the
sendBeacon()request.
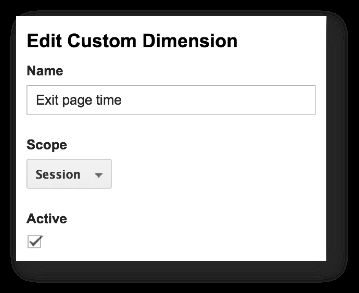
1. Custom Dimension
Let’s start with the Custom Dimension. We’re using a session-scoped Custom Dimension for one simple reason: it will always have the last value sent during the session. This means that since we’re sending the custom time on page on every single pageview, the session-scoped Custom Dimension should always have the exit page time for the session! Once we have this in place, we can add the custom dimension as a secondary dimension in the Exit Page report, giving us the dwell time for exit pages only.
Note that the session-scoped Custom Dimension fails if the user is inactive long enough for the session to expire (30 minutes by default). So it might actually be a good idea to modify the timing script to only allow values up to 1800000 milliseconds (30 minutes).
Make note of the index the new Custom Dimension gets. This is important when you’re setting up the Event Tag.
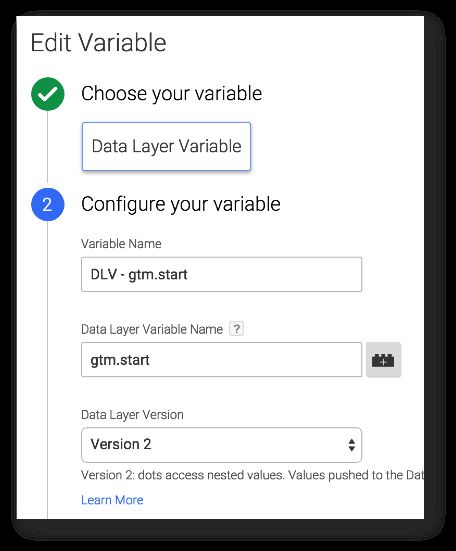
2. Data Layer Variable for gtm.start
The next step is to create the Data Layer Variable for gtm.start. You might wonder what this “gtm.start” is, but it’s actually a property in the very first dataLayer object pushed into the Array by GTM, when the container snippet starts loading:
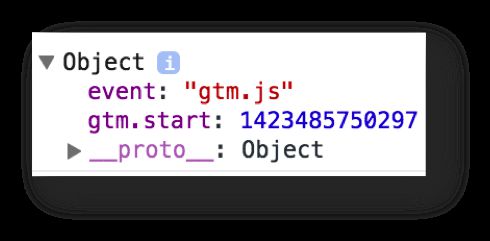
The value for this variable is a timestamp in milliseconds of Epoch time. You don’t have to worry about what this means, since all we’re going to use this for is to calculate the difference between page unload time and gtm.start to get an approximation of how long the user spent on the page. The Data Layer Variable would look like this:
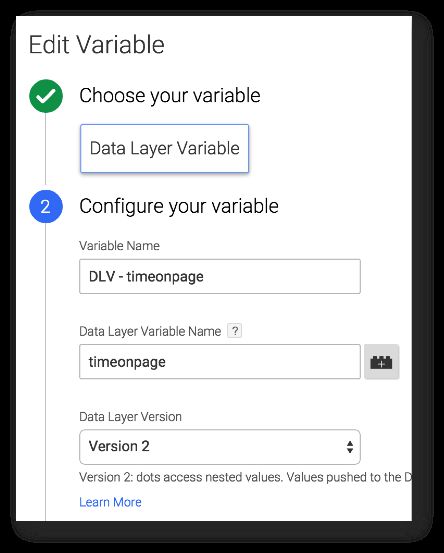
3. Data Layer Variable for timeonpage
You’ll also need to create a Data Layer Variable for timeonpage, which is where we’ll store the time on page, pushed in the beforeunload callback. So create another Data Layer Variable that looks like this:
4. Custom HTML Tag
The next step is our custom beforeunload listener. Create a new Custom HTML Tag, and set it to fire with the All Pages Trigger. Add the following code within:
<script>
  window.addEventListener('beforeunload', function() {
    window.dataLayer.push({
      'event' : 'unloadEvent',
      'timeonpage' : new Date().getTime() - {{DLV - gtm.start}}
    });
  });
</script>
This attaches the beforeunload listener to the global window object. When the unload process begins, i.e. when the user chooses to leave the page, the callback is invoked, and a dataLayer.push() is executed, with a custom ‘event’ value and also a value for the ‘timeonpage’ Variable we just created.
The time on page is calculated by getting the timestamp for the beforeunload event, and subtracting the gtm.start timestamp from it. The result is the time in milliseconds between these two events. If you want to have a safeguard for session expiration, cap this time at 1800000 milliseconds, which is 30 minutes.
Now all we need is the Timing Tag, which sends the timeonpage value both as a Timing value and as a Custom Dimension value.
5. User Timing Tag
User Timing is a hit type that you can use to send your own timing events to Google Analytics. A common use case is to measure the load time of linked assets, such as huge, bloated JavaScript libraries (I’m looking at you, non-minified jQuery!).
But you can use User Timings for anything on the site that can be measured in milliseconds. So it works perfectly with page load time as well.
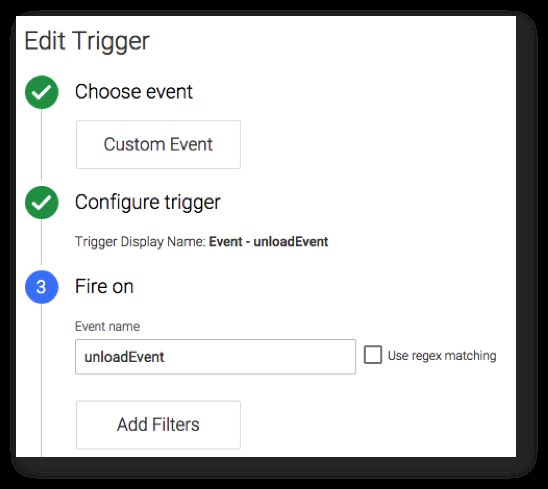
Before you create the Tag, you’ll need the Trigger that makes the Tag fire. The Trigger is simply a Custom Event Trigger, that fires with event name unloadEvent:
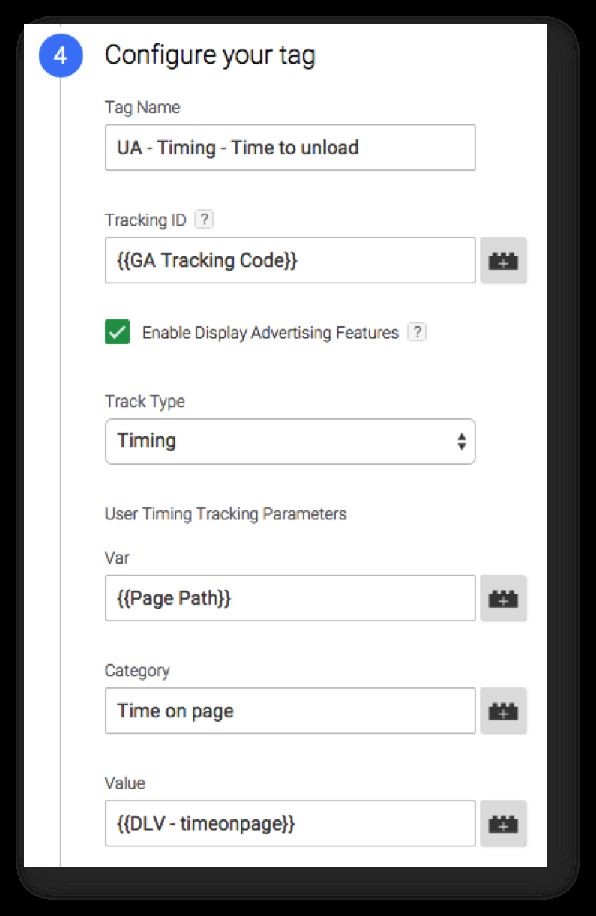
Next, create a new Google Analytics / Universal Analytics Tag, attach the Trigger you just created to it, and set the Tag fields to look something like this:
If you were to save this now and publish your container, the solution would be very unreliable. This is because the beforeunload event signals the browser to start the unload process, and the unload process is brutal. Any threads that are running once the browser reaches the unload stage are cut off, and all requests are cancelled. This is because the browser doesn’t want to let anything impede the user’s desire to leave the page.
Perfectly understandable.
It is for this reason that we’ll leverage yet another little-known API: navigator.sendBeacon(). This API turns any request made in its scope into an asynchronous, uninterruptible call to whatever endpoint you choose. So, even if the browser window closes or you navigate from the site, the request is allowed to complete before the browser instance is unloaded from memory.
Google Analytics were quick to react to this API, and they published their own shorthand for it: the useBeacon field. Read David Vallejo’s nice review about this new feature to get acquainted.
!!! UPDATE !!!
The useBeacon has been deprecated. Use the transport field name instead, and set its value to beacon. Read about the field here.
Anyway, useBeacon turns the call into a POST request (instead of the usual GET), and passes it asynchronously to the GA endpoint using navigator.sendBeacon().
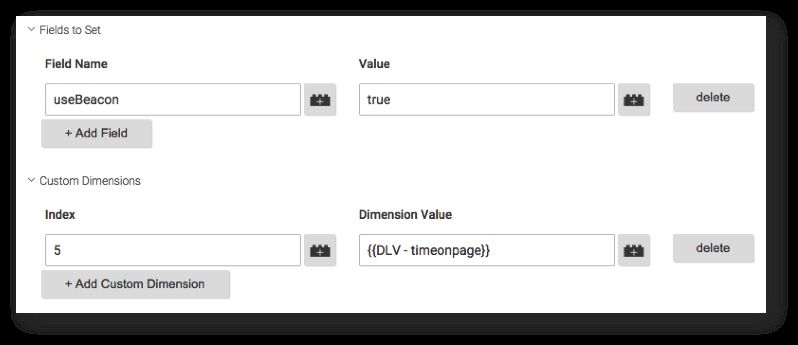
To add this feature to the User Timing Tag, add useBeacon as a Field To Set, and set its value to true.
Also, add the {{DLV - timeonpage}} as a Custom Dimension, using the index number you got from Step 1.
So now the More Settings of your User Timing Tag should look like this:
Save the Tag, Preview & Debug the Tag, and Publish when you’re ready.
Then read the caveats below. Or actually, it would be good if you read these before you publish.
XThe Simmer Newsletter
Subscribe to the Simmer newsletter to get the latest news and content from Simo Ahava into your email inbox!
Caveats
There is actually only one major caveat here. navigator.sendBeacon() has horrible browser support. Like, dismal. Basically, Internet Explorer and Safari do not support it all. This is a big setback, as IE is one of the most popular desktop browsers, and Safari is among the most popular mobile browsers.
The thing is, you don’t really have to write any fallback functions for browsers that don’t support the API. The Universal Analytics library detects if navigator.sendBeacon() is supported, and if it isn’t, the hit is sent normally.
Depending on your site, there’s still a good chance that the hit gets sent. This depends on how long it takes for the browser to unload your site.
If you want to play it safer, you could write your own click handler that intercepts external links, fires the Timing Tag, and only then lets the link redirect proceed. This would cover exits from your site to other sites nicely, but it wouldn’t help with the most interesting use case of people closing browser windows and tabs.
This is a problem we’ll just have to live with. However, as an eternal optimist, I see this as a solution that can only get better with time. Once navigator.sendBeacon() gets better support and once we get calculated Custom Metrics, this solution will be so awesome.
Right now it’s more of a prototype, but as Yehoshua shows you, it can already have very interesting analytics applications.
Well, I’d be remiss if I didn’t mention one other, small caveat. Triggering code on beforeunload invalidates the back-forward cache (BFCache) in Firefox. This means that the page state of the page is no longer cached, and if you’re trusting e.g. form field values to this cache, you’ll need to make adjustments.
Summary
In this quite simple solution we’re leveraging some pretty cool APIs again. The point is partly to give you a tool to get better data out of Google Analytics, but at the same time we’re doing what I love best: using JavaScript and Google Tag Manager to get data from unexpected places.
As I say in the previous chapter, this solution will only get better with time.
Hopefully, once navigator.sendBeacon() get better browser support, it will become the default request mechanism for all Google Analytics hits. It just makes so much sense. Also, it means that you won’t need to protect your tags with setTimeout() calls or the Wait For Tags method in Google Tag Manager.
But from the look of things, this is still a long way off.
