JavaScript 101 For GTM: Part 2
It’s been an awesome summer, with temperatures soaring in the global warming range throughout our northern country. The heat has given me ample reason to not be near a computer, but now it’s time to mine some JavaScript wisdom again. Here’s the second part of my JavaScript for Google Tag Manager series. The first part focused on GTM specific tips and tricks, and I hope that while reading it, you were treated to another grand example of the flexibility of this wonderful tool.
This second part was supposed to be more about general JavaScript practices, but I saw myself going back to the DOM with every step. So the theme here is the elusive Document Object Model. It’s a defining quality of JavaScript in web development, and understanding its mechanics is key to understanding how tag management solutions work as well.
Here’s the list of topics:
-
The Document Object Model (DOM)
-
The DOM API
-
JavaScript injection + GTM
-
Handling false
Here we go again. I implore you to take a look at the list of resources I linked to in the previous post. They should serve you really well in your journey towards JavaScript enlightenment.
XThe Simmer Newsletter
Subscribe to the Simmer newsletter to get the latest news and content from Simo Ahava into your email inbox!
1. The Document Object Model (DOM)
Here’s a very, very simplified account of how a browser works:
-
The browser sends a request to the web server to retrieve a web document
-
This document is just an annotated source code file, so it needs to be parsed into a format the browser can interpret
-
The document is parsed into a parsed node tree, whose syntax is very standardized
-
The node tree is then rendered as a web page, which can be viewed in the browser window
-
The node tree is actually the Document Object Model (DOM), which also provides an interface for interacting with elements in the tree
In short, what you see when looking at the page source of a web page in your browser is just that: the source code of the page. It isn’t the final product, since the source code is parsed into a format which can be better understood by browsers.
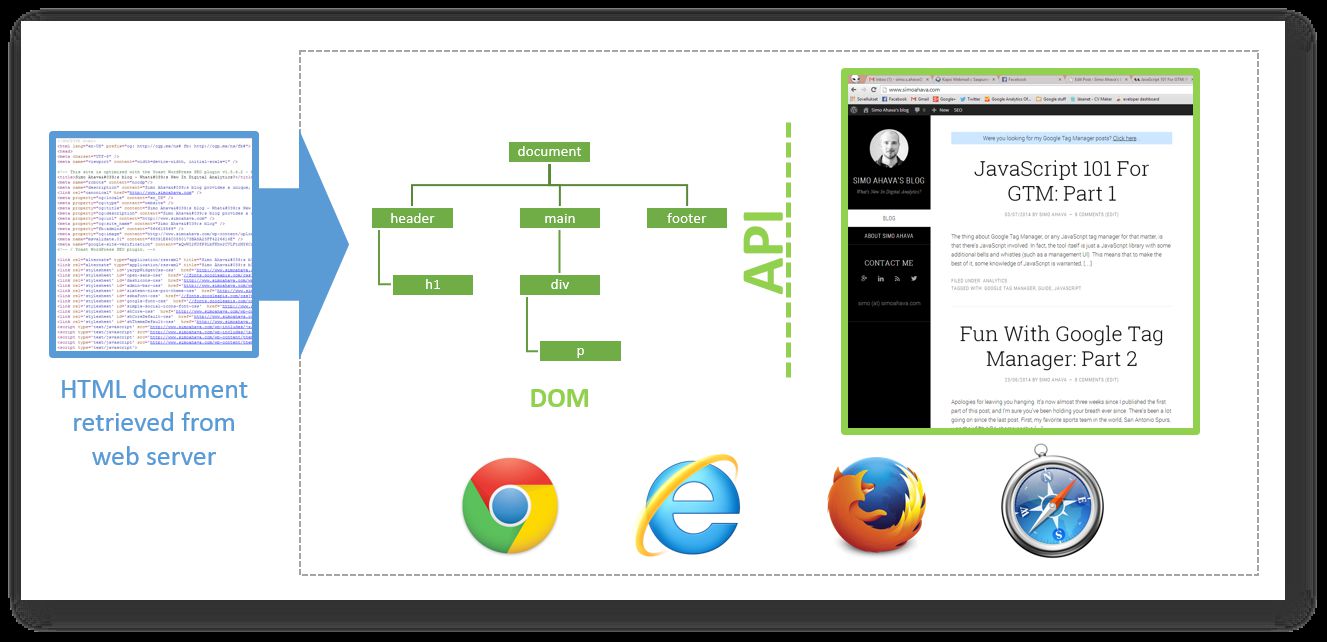
If you’ve messed around with a tag management system or with JavaScript, chances are you already know all this. The DOM is both a representation of on-page elements and an interface (more on this in the next chapter) which describes a standard for interacting with these elements. It’s called the Document Object Model because the HTML elements you lovingly create in your source code are represented as objects, or nodes, or branches of a tree, in a top-level object called document. So when you tag a section of text as a DIV element in HTML, you are actually creating a new node with tag name DIV into the document hierarchy as a new element that can be interacted with.
So the DOM and your HTML document are related, in that they share the same elements, but they are not the same thing. The DOM is the browser’s interpretation of the HTML document. The fact that it’s standardized makes sure that all your sloppiness in HTML markup is glossed over in a perfectly structured DOM.
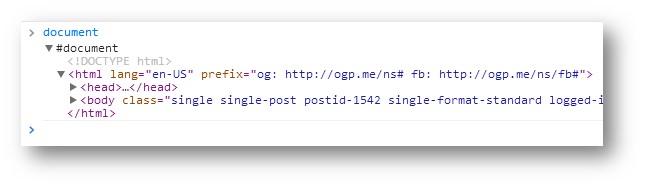
If you want to take a look at what the document object looks like for any given page, just open a JavaScript console, type document and press enter.
Almost all JavaScript that interacts with a page (such as analytics tags) utilizes the DOM. This is because representing a document with a collection of objects allows for scripting languages such as JavaScript to mimic the syntax of more traditional, object-oriented programming languages. Also, using a standardized set of objects and functions in the DOM normalizes the potentially chaotic and horrible markup that many, many web pages out there display.
The thing about the DOM is that if you understand its basic functions and if you read up on the standard, you should be inspired to create better markup as well. If the ID attribute was just a CSS selector to you before, after realizing what a crucial part it plays in the unique identification of a single DOM node, you’ll be more inclined (hopefully) to utilize it in the future in all relevant markup situations.
The DOM is a huge standard and there’s lots to learn. The best way to learn is to inspect objects in the model by utilizing the JavaScript console. Reading up on GTM articles is a good way to brush up your skills as well, since almost all GTM customizations have to do with manipulating the DOM in some way.
There’s also the Browser Object Model (BOM), which is a de facto standard for interacting with the browser window. The BOM houses the window object, which, in turn, contains all the global variables and functions of the page AND the document object. So when you type document in the JavaScript console, you are actually accessing the window.document object.
Confusing? Perhaps, but in the end it’s all quite logical. The DOM is a necessary interface between the client and the HTML document, because so much of today’s web development revolves around dynamic and often subtle modification of the web pages. That’s how you get your animations, transitions, event handlers and so forth to work.
FURTHER READING:
2. The DOM API
The DOM API is actually the DOM itself (remember, it’s a standard for interacting with the document), but for clarity’s sake I use the term API here (application programming interface). Interacting with the document is done via the methods and objects exposed by the API.
When using JavaScript (as most often is the case) to interact with the DOM, all calls should naturally be in the context of a <script> element. This means that you either fetch the JavaScript in the declaration itself, or you add the code inline. Certain attributes such as “onclick” allow you to add JavaScript directly to the context of a HTML element without using <script>, but the most common instance is having the <script> tag in place.
There are many functions and objects you can access via the DOM, so I won’t go into too much detail here. However, I will add an example of what DOM manipulation means in terms of HTML vs. JavaScript. Here’s a typical HTML passage in a normal web page:
<div id="content">
  <span class="header">Why Four Strings Is Enough</span>
  <p class="paragraph">Many dismiss the ukulele because it only has four strings. However, it has more strings than a typical balalaika.</p>
  <div id="request-access">
    <p class="paragraph">Request access to ukulele vault by sending mail to <span class="email">[email protected]</span></p>
  </div>
</div>
So there are some unique elements where I utilize the ID attribute, and some elements which are reused, represented by the CLASS attribute. It’s important to remember that if you use ID, you should only ever have one such element on the page. Otherwise you will make life difficult for anyone wishing to manipulate the element using the DOM API (plus it won’t be valid HTML).
Here are some examples of JavaScript functions I can use to interact with the document:
var content = document.getElementById("content");
This stores the whole #content node with all its children into the JavaScript variable content. I can then use other functions of the DOM to manipulate the node further.
content.setAttribute("id", "main-content");
Changes the ID attribute of the #content DIV to #main-content. Here I utilize the JavaScript object where I stored the entire #content node just before.
var classArray = document.getElementsByClassName("paragraph");
Stores all elements with CLASS .paragraph in an Array object referred to as classArray.
console.log(classArray[0].innerHTML);
Writes the entire HTML content of the first P element with class .paragraph into the console.
alert(document.getElementById("request-access").children.length);
Pops up a dialog box with the number of child nodes for the HTML element with ID #request-access. In this case, the alert will contain the number 1.
There are many, many ways to interact with the document, its objects and functions using the interface of the DOM. You should be pretty comfortable with these especially if you want to do some advanced tag management and web analytics tweaking.
FURTHER READING:
3. JavaScript injection + GTM
Now that you understand perfectly how the DOM works, you’re ready for the next big thing: code injection.
The whole premise of a JavaScript tag management system revolves around code injection. That’s why you’re fine with just adding the container snippet into your source code when installing GTM. By adding this seemingly harmless piece of code into your source code, you’re actually giving permission to the gtm.js library to inject more and more code, elements, and functions into your DOM.
And what is this injected code? Your tags and macros, of course!
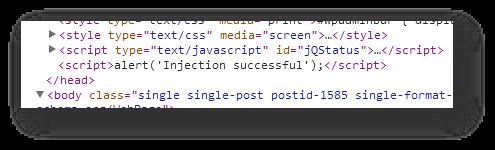
Let’s see how injection works with a simple example of adding a new <script> node into the HEAD of the document:
var s = document.createElement("script");
s.innerHTML = "alert('Injection successful');";
document.head.appendChild(s);
-
Line 1: A new SCRIPT element is created, but it isn’t attached anywhere yet
-
Line 2: Some code is added into the content of the new tag
-
Line 3: The new element is added as the last child of the document HEAD
If you copy-paste this code into a JavaScript console, you should see the pop-up dialog with “Injection successful”.
In this code you utilize the DOM with createElement() and appendChild() functions, the innerHTML property, and the document and document.head elements in the tree. If you now look at your elements (not the source code) by opening the developer tools of your favorite browser, you should see this new element as the last child of the HEAD.
All the Custom HTML tags you create via GTM are added to you page in a similar fashion. When you visit a page where such a tag is set to fire, the script is injected the moment the firing rule triggers. Any code in the tag is run there and then.
This also highlights the dangers of using a tag management solution to fix / hack errors in your web page. Code injection is brutal in the sense that any code within is run verbatim. There are no default checks in place to prevent your code from messing with global objects or your carefully crafted content. Since the DOM API opens all elements in the tree for manipulation, it’s very easy to create AND destroy something beautiful.
So be careful.
FURTHER READING:
4. Handling false
This was all too easy so far, so I’ll leave you with something truly mind-boggling.
I’ve written about this phenomenon before, and I still think its key to understanding how GTM and JavaScript work together.
First of all, I apologize in advance. JavaScript’s treatment of “falsy” values such as undefined, null, and false is notoriously difficult to understand. Not only is it difficult to understand, it’s even more difficult to teach in an understandable manner.
When talking about “truthy” and “falsy” values, we’re not talking strictly about values which are either true or false. Rather, we mean values which are coerced to either true or false in a Boolean context. Boolean is a type which holds either true or false as its value, and a context is Boolean if some statement hinges on whether the expression evaluates to either true or false.
An if-clause is probably the most used Boolean context. The following piece of code is a prototypical example of type coercion:
if(t) {
  ...do something if t evaluates to true...
} else if (!t) {
  ...do something if t evaluates to false...
}
The if-clause is run if t is true, but it doesn’t mean the value of t needs to be true. Rather, the value of t needs to be “truthy”. The else-clause is run if the value is not “truthy” but “falsy” (oh my those are stupid terms).
So in this context, t is coerced to Boolean values. It’s easier to go through the values which evaluate to false, since there are only six of them.
undefined
null
false
0
"”
NaN
So if a variable holds any of these values, it would evaluate to false in a Boolean context.
Still with me? Good. For GTM, we are particularly interested in the values undefined and null.
undefined is a value (and a type, actually) reserved for variables which have either been declared but have no type assigned to them (via value assignment), OR have not been declared at all. This is very relevant for JavaScript, since often and especially with dynamic web pages many variables receive a value and type only after a specific user interaction (such as a click). If a function is executed before such an interaction and without the check for undefined, the function execution will fail in an ugly JS error.
The two simplest ways to safeguard your variable execution are:
if(!t) {
  alert("t is falsy and perhaps undefined!");
}
if(typeof(t) === undefined) {
  alert("t is undefined or has not been declared!");
}
The difference is that using the logical not operator (!) is recommended when you know the variable has been declared but are not certain if it has a value assigned yet, whereas the typeof() operator should be used when you are not certain if the variable has been declared at all.
The logical not operator is literally “not”, so if(!t) { ... } is read as if (t is false is true) { …run this code… }. Thus, the if-clause is only run if t is one of the “falsy” values listed in the beginning of this chapter.
I can see your head spinning - again, I apologize!
The thing is, you shouldn’t really use typeof(var)===undefined, since you should always be able to see whether a variable has been declared either by looking at the immediate local function context or by looking for the variable in the global object.
Yes, let me explain this as well.
JavaScript has static scope. This means that variables are either always global or scoped to the function they are wrapped in. If a variable is scoped to a function and if you’ve observed best practices in your programming, you should quickly see whether or not a variable has been declared by the time your code is run.
var globalVar; // global variable
function t() {
  var localVar; // local variable
  secondVar; // global but bad code
}
alert(localVar); // error since trying to access local variable outside function
Another thing to note is that if a variable is scoped globally, it will be a property of the global window object. Thus, you can use the logical not operator to check for its absence:
if(!window.t) { something... } // run something if t is not a global variable
...
if(!t) { something... } // referenceError if t is not a global variable
When working with GTM and GA, a very important thing to understand is how the DOM API works with elements that are not found on the page. You see, a function such as getElementById() or getElementsByTagName() will always return an object. An object, if you remember, was not among the “falsy” values listed in the beginning. However, this object will have the special value null if the actual HTML element is not found on the page.
If you stretch your memory again, null was among the values that are “falsy”. Thus:
var t = document.getElementById("test"), // "test" exists, will return the DOM element
    y = document.getElementById("testy"); // "testy" does not exist, will return object with value null
if(typeof("t") === undefined) { // does nothing
  alert("t is undefined");
}
if(!t) { // does nothing
  alert("t resolves to false");
}
if(t===null) { // does nothing
  alert("t is null");
}
if(typeof("y") === undefined) { // does nothing
  alert("y is undefined");
}
if(!y) { // will alert the following message
  alert("y resolves to false");
}
if(y===null) { // will alert the following message
  alert("y is null");
}
So the tips of this chapter are:
**1.**Use the global window object and the logical not operator as a fallback in case a variable hasn’t been declared in global scope.
2. Read through your code to see if a variable has been declared in local (function) scope OR if you’re lazy, use the fallback if(typeof(variable)===undefined) { do something; }.
3. Either use the logical not operator with a DOM element, e.g. if(!someDOMElement), OR check for null, e.g. if(someDOMElement===null), to fall back in case a DOM element you are referencing is not found in the DOM.
You don’t want to write a long block of code only to see it miserably explode in JavaScript error mayhem thanks to race conditions or faulty declarations.
FURTHER READING:
5. Conclusions
I’m a huge, HUGE fan of JavaScript. I love it so much I’m seriously considering naming my first-born with initials that spell JS (Jebediah Simo, for example). I also think that anyone wanting to extend the capabilities of Google Analytics, and DEFINITELY anyone working with Google Tag Manager, should understand at least the basics.
There’s a lot to learn, and the splintered mess of cross-browser issues doesn’t make it any easier. However, lots of ridiculously smart engineers are working on the standard, so if things go smoothly, we should see some pretty cool and facilitating additions in the next release of the language.
Remember, an excellent place for advice on JavaScript, especially related to GA and GTM, is Google+. Be sure to follow the communities, and drop a line if you need any assistance with your code.
