
Add IPv6 Support To Your Server-side GTM Load Balancer
If you’re running server-side Google Tag Manager on Google Cloud Run behind an External Application Load Balancer, your tagging endpoint is currently reachable only over IPv4 with a default installation.
For most of your visitors, that’s fine. But for users on IPv6 networks, it creates a silent data quality problem that directly affects how well vendor tags like Meta’s Conversions API (CAPI) can match server-side events to their client-side counterparts.
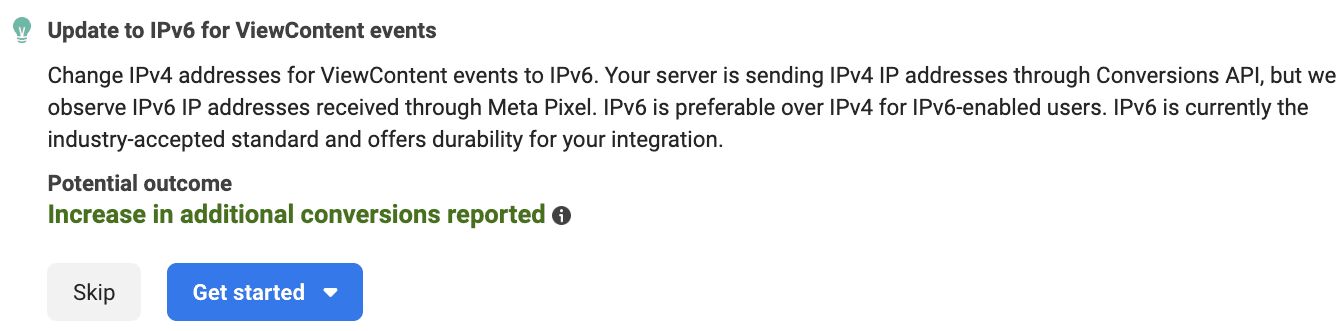
When a user on an IPv6 network fires the Meta pixel on your site, Meta records the event alongside the user’s IPv6 address. Your server-side CAPI tag is then supposed to send the server-side version of that same event, including the client_ip_address field, so that Meta can deduplicate the two and improve match quality.
The problem: if your SGTM load balancer only has an IPv4 frontend, that IPv6 user’s request goes through NAT64 address translation before it ever reaches sGTM. The IP address SGTM reads from the incoming request is a translated IPv4 address. Your CAPI tag dutifully forwards it to Meta, which then compares it against the IPv6 address the pixel recorded. They don’t match. The deduplication is degraded and the match score drops.
The fix is to give your load balancer a dual-stack frontend: one IPv4 address (already in place) and one IPv6 address. When an IPv6 user connects, they reach SGTM natively over IPv6. No translation, no mismatch. The CAPI tag reads the real IPv6 address and sends it to Meta. Events match correctly.
In practice, this is very easy to do. You need to reserve a static external IPv6 address in Google Cloud, attach it as a second frontend on your existing load balancer, and add an AAAA record to your DNS. Cloud Run itself needs no changes: IPv6 termination happens at the load balancer, and the LB continues to forward traffic to Cloud Run over IPv4 internally. Your existing SSL certificate covers both frontends.
Read on to learn how to do this!
Table of Contents
The Simmer Newsletter
Subscribe to the Simmer newsletter to get the latest news and content from Simo Ahava into your email inbox!
How IP address matching breaks without IPv6
It’s worth being precise about the mechanism, because the failure is silent and won’t show up as an error anywhere in your setup.
When SGTM receives a request, it reads the client IP address from the incoming connection. The load balancer forwards this via the X-Forwarded-For header. The official Meta CAPI tag template (and most other vendor templates) reads this header and uses the value as the client_ip_address parameter in the outgoing server-to-server request to Meta’s API.

On Meta’s side, incoming pixel events and CAPI events are compared using a set of customer information parameters: IP address, user agent, email hash, and so on. IP address is one of the stronger signals. When both events carry the same IP, Meta can confidently deduplicate them and attribute the conversion to the correct user journey.
Here is what happens step by step when an IPv6 user hits an IPv4-only SGTM endpoint:
- The user’s device is on
2001:db8::1(an IPv6 address). - The client-side Meta pixel fires. Meta logs the event with
client_ip_address: 2001:db8::1. - The browser sends a request to your SGTM endpoint to trigger the CAPI event.
- Your SGTM endpoint has no IPv6 frontend. The user’s device connects via NAT64, which translates the source address to something like
192.0.2.1. - SGTM reads
192.0.2.1from theX-Forwarded-Forheader. - The CAPI tag sends
client_ip_address: 192.0.2.1to Meta. - Meta compares
192.0.2.1against2001:db8::1. No match. Deduplication is incomplete.
With a dual-stack load balancer, step (4) changes: the user connects natively over IPv6, the address reaches SGTM untranslated, and the CAPI tag sends the correct value. Meta matches the events cleanly.
Meta is the most visible example here, but the same logic applies to any vendor tag that uses the client IP as a matching or enrichment signal.
Prerequisites
This guide assumes you already have:
- A working SGTM deployment on Cloud Run (or Cloud Run-compatible infrastructure)
- A Global External Application Load Balancer fronting that deployment, with an HTTPS frontend and a valid SSL certificate
- Access to your DNS provider to add records
- The Owner or Network Admin role in your Google Cloud project
If you’re still setting up your SGTM infrastructure, this guide covers the baseline Cloud Run deployment. The load balancer configuration described here assumes the standard setup that follows from that guide. I also cover the Cloud Run setup extensively in Simmer’s Server-side Tagging In Google Tag Manager online course.
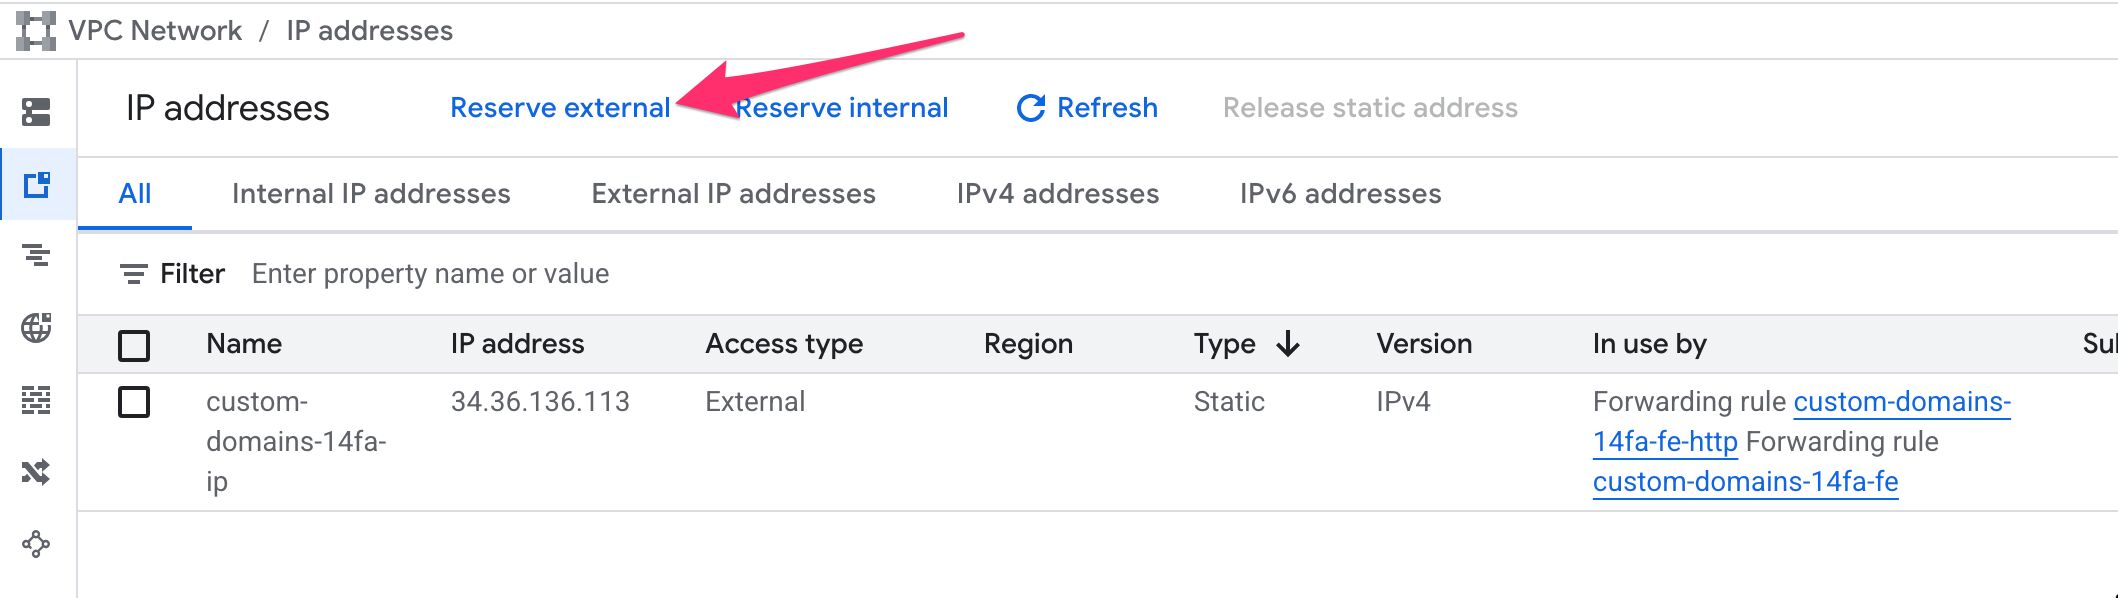
Step 1: Reserve a static external IPv6 address
In the Google Cloud Console, navigate to VPC Network > IP addresses and click Reserve External.
Configure the new address as follows:
- Name: something descriptive, e.g.
sgtm-ipv6 - Network Service Tier: Premium (required for global load balancers)
- IP version: IPv6
- Type: Global
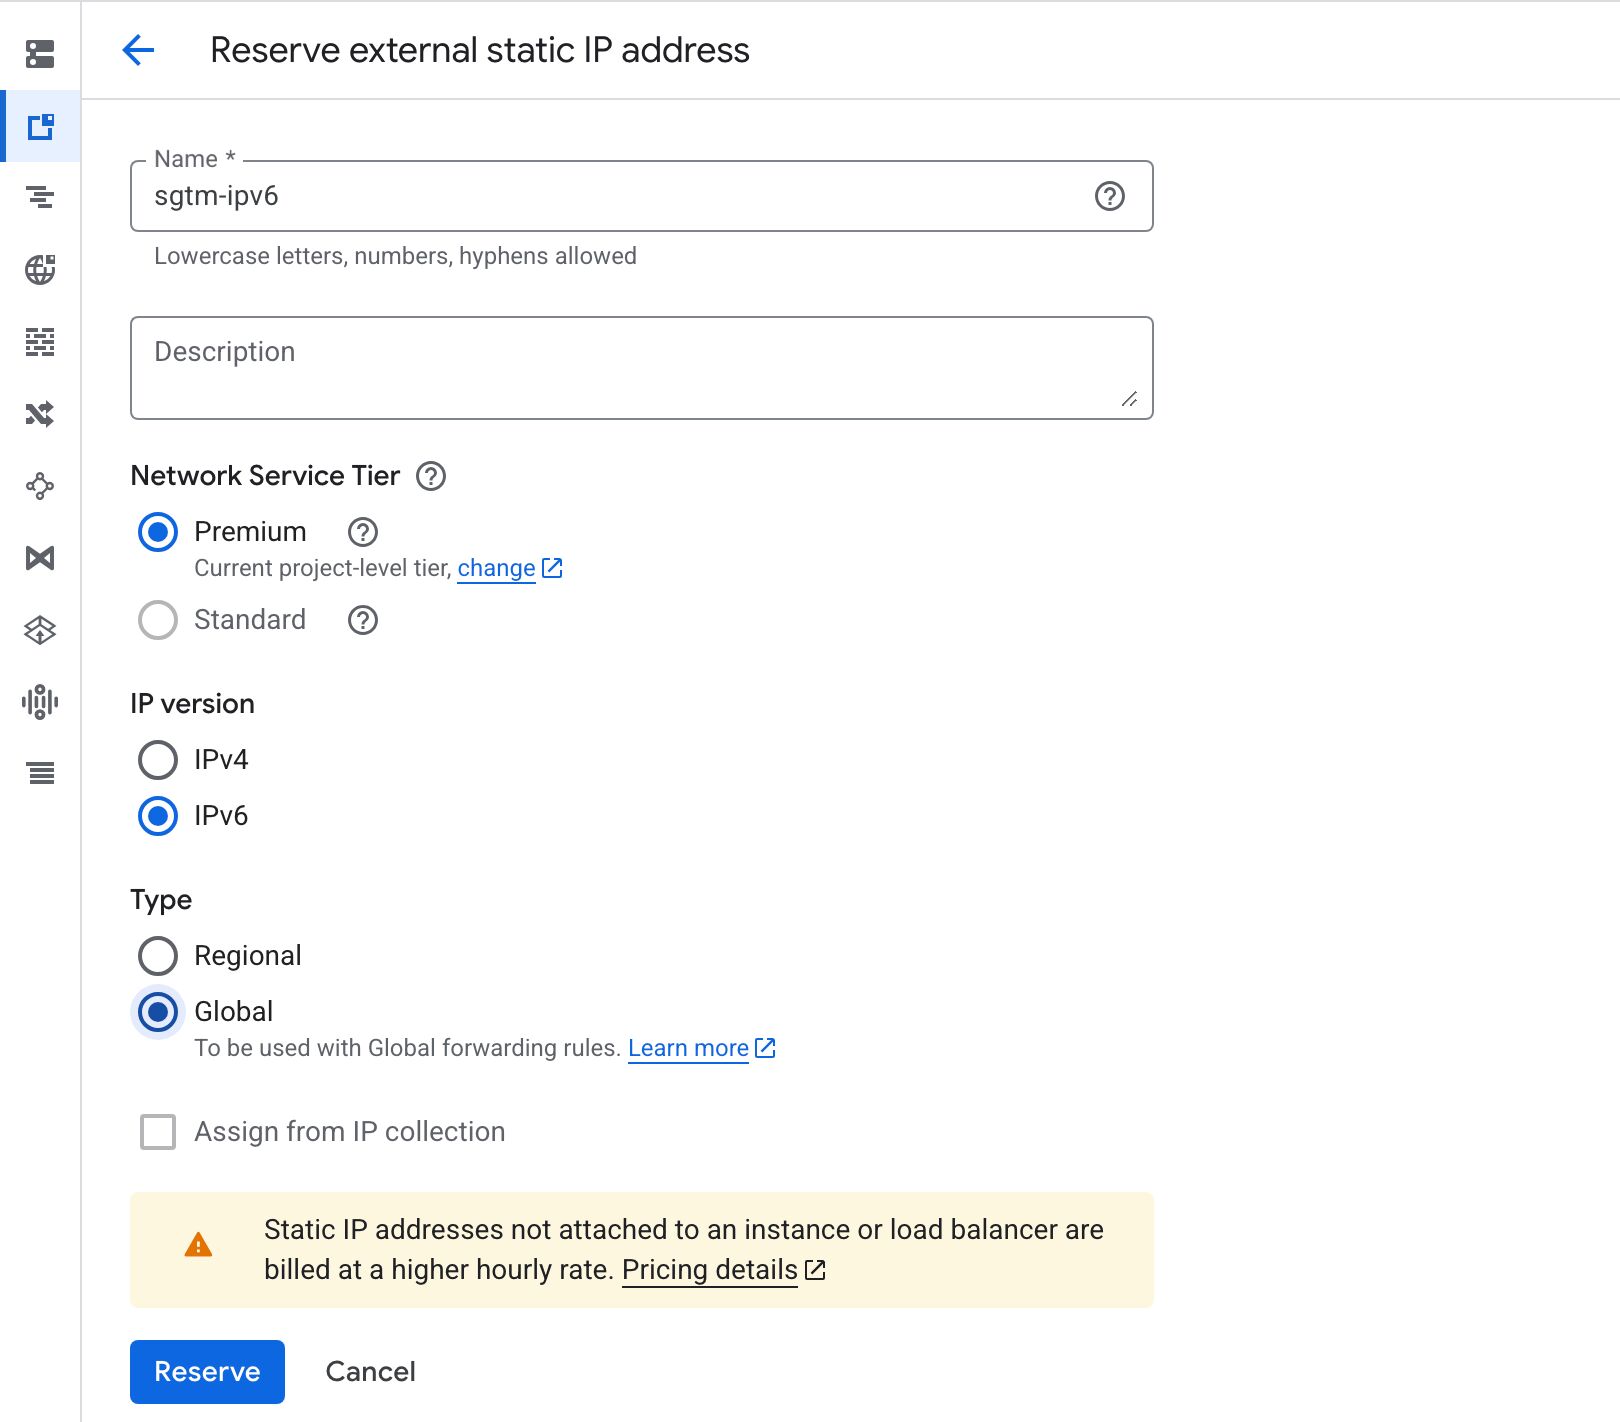
Click Reserve. Google will allocate a /96 IPv6 prefix and surface the first usable address. You’ll see it listed in the IP addresses table. It will look something like 2600:1901:0:xxxx::.
Copy that address. You’ll need it for both the DNS record and the load balancer frontend configuration.
Step 2: Add an AAAA record to your DNS
Before wiring up the load balancer, add the DNS record so that propagation can start in the background while you finish the configuration.
In your DNS provider, add a new record for your sGTM subdomain (e.g. sst.yourdomain.com):
- Type:
AAAA - Name:
sst(or whatever subdomain you’re using) - Value: the IPv6 address you reserved in Step 1
- TTL: your standard TTL (300 seconds is fine)
The screenshot below is what my dual-stack configuration looks like in my DNS settings.

Keep the existing
Arecord in place. The goal is dual-stack. Both IPv4 and IPv6 clients should be able to reach your endpoint. Removing theArecord would break IPv4-only clients.
Step 3: Add an IPv6 frontend to the load balancer
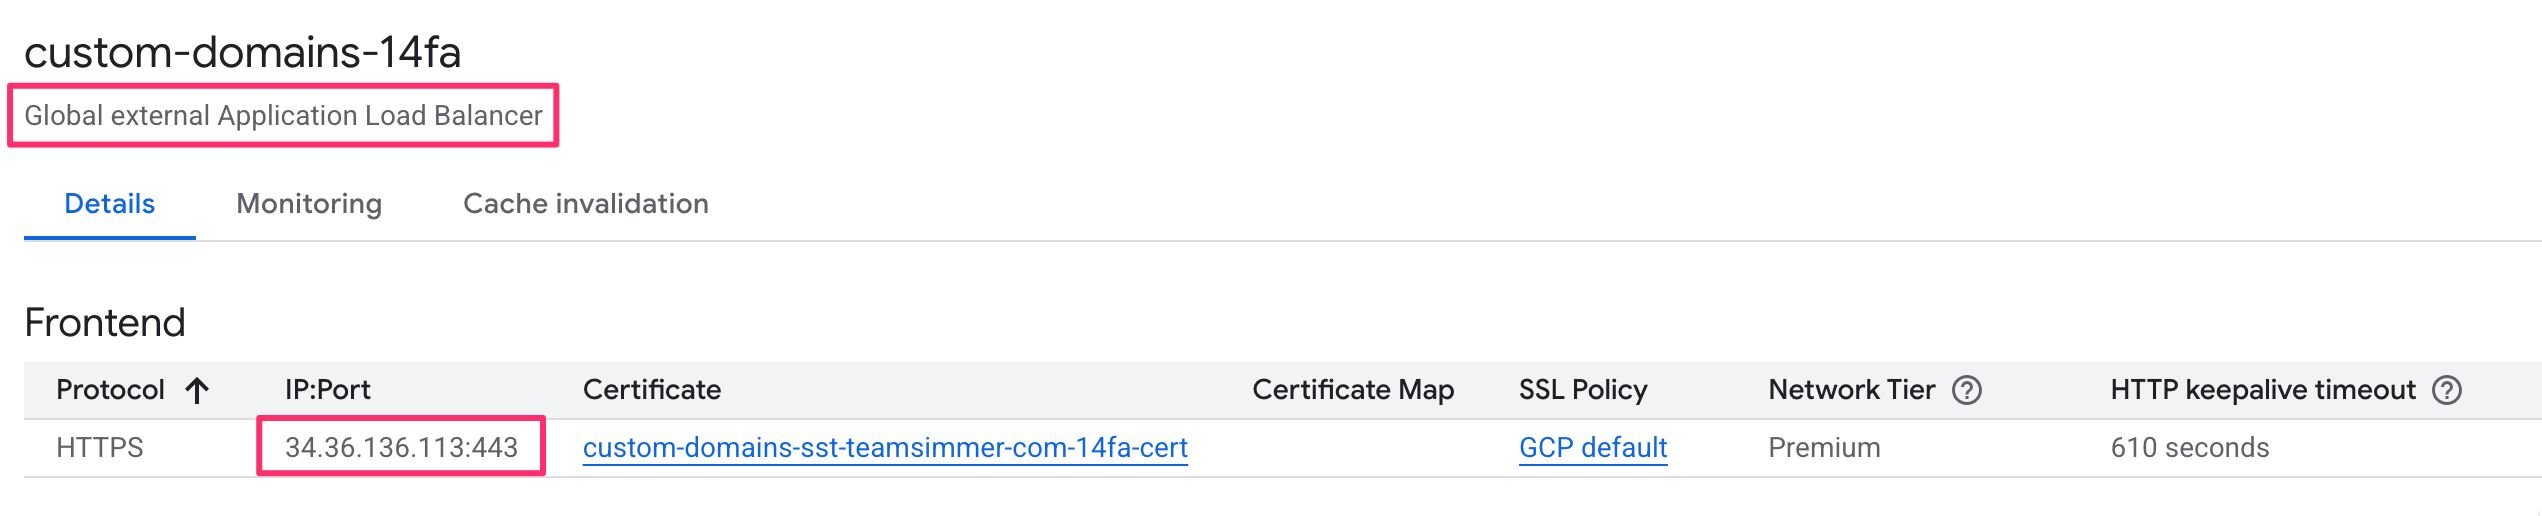
Navigate to Network Services > Load balancing in the Cloud Console and click your existing load balancer.
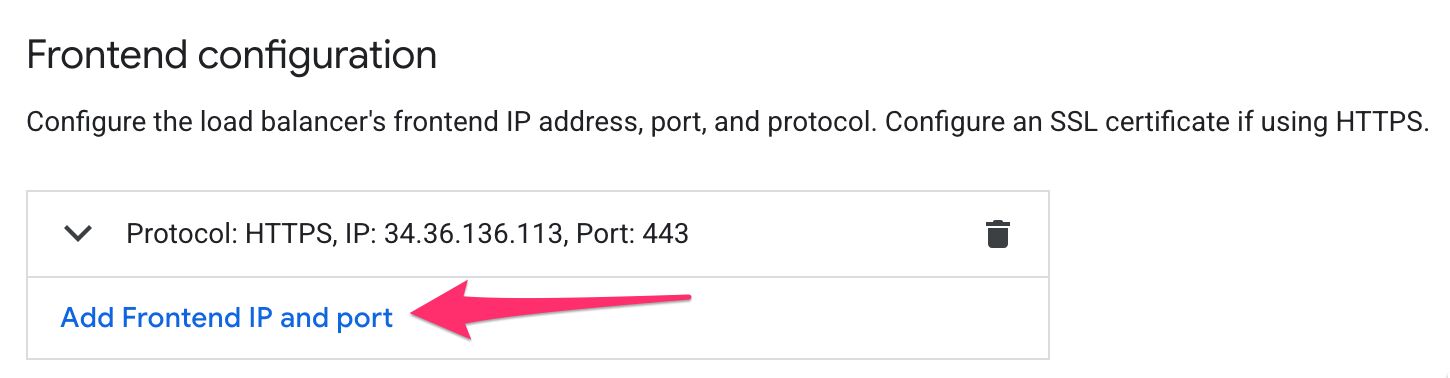
As you can see below, this load balancer has just a single HTTPS frontend, which only handles IPv4 traffic.
Click Edit, then go to the Frontend configuration section and click Add Frontend IP and port.
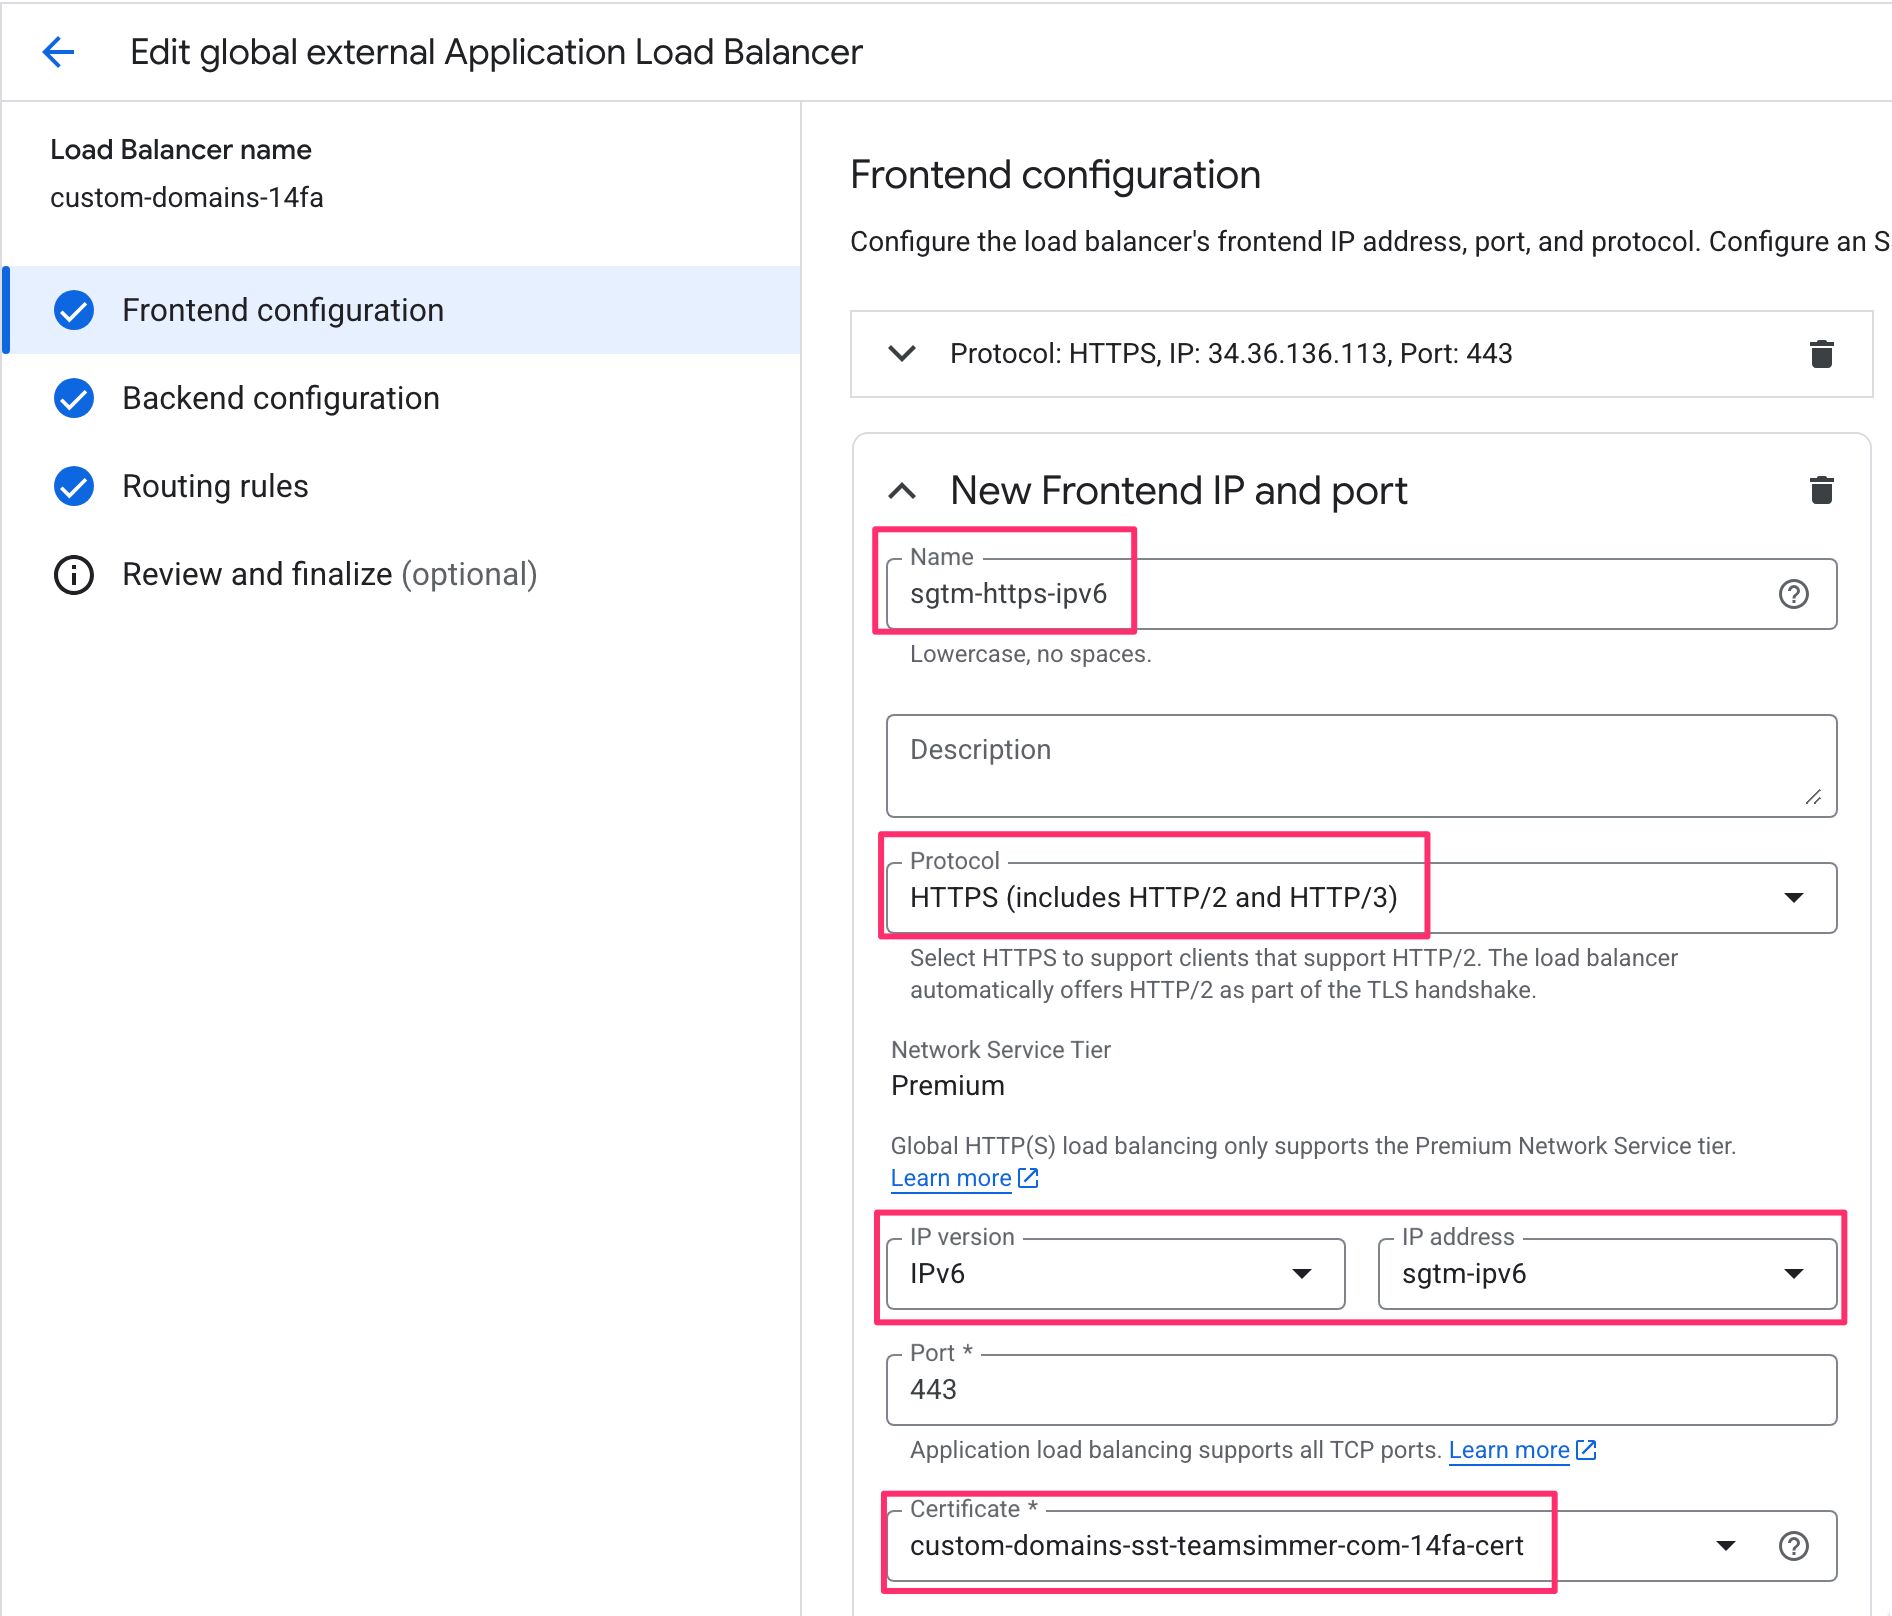
Configure the new frontend:
- Name: e.g.
sgtm-https-ipv6 - Protocol: HTTPS
- Network Service Tier: Premium
- IP version: IPv6
- IP address: select the
sgtm-ipv6address you reserved in Step 1 - Port: 443
- Certificate: select the same SSL certificate your IPv4 frontend uses
You do not need to create a new backend service or routing rule. The new IPv6 frontend shares the same backend and URL map as your IPv4 frontend. Traffic coming in over IPv6 is handled identically once it hits the load balancer.
Click Done, then Update to save the load balancer configuration.
Step 4: Verify the setup
Give DNS a few minutes to propagate, then verify both stacks are working.
Check DNS resolution
From a terminal, confirm that both record types resolve correctly:
# Should return your IPv4 address
dig A sst.yourdomain.com +short

# Should return your IPv6 address
dig AAAA sst.yourdomain.com +short
Test IPv6 connectivity
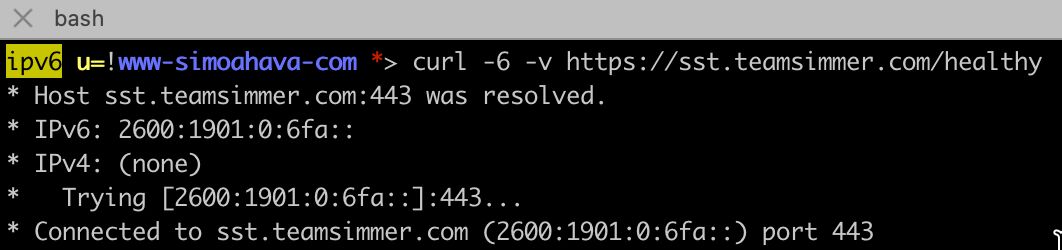
If your local machine has an IPv6 address, curl can force an IPv6 connection:
curl -6 -v https://sst.yourdomain.com/healthyYou should get an ok response (or whatever your sGTM container returns for health checks). The -v flag will show the connection details. Confirm the remote address is an IPv6 address.
If you don’t have native IPv6 at home, test-ipv6.com can give you a sense of your current stack, and tools like test-ipv6.run/domain-checker can do a quick DNS and connectivity check against a domain.
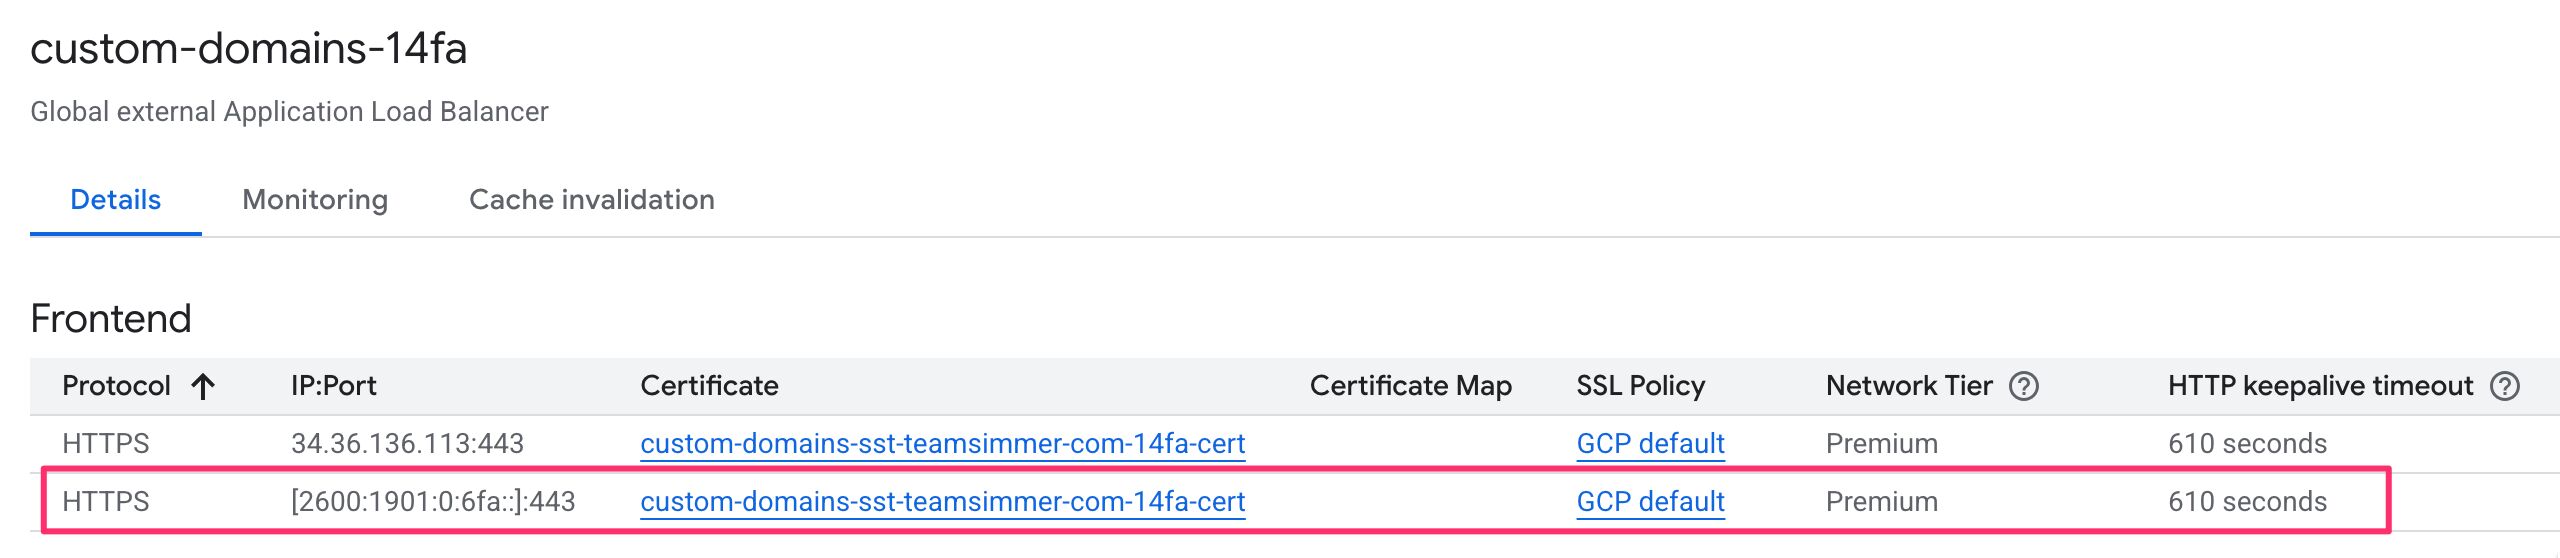
Verify in the Cloud Console
Back in the load balancer detail page, both frontends (IPv4 and IPv6) should now appear under Frontend, each with their respective IP address.
A note on SSL certificates
If you’re using a Google-managed SSL certificate, it covers the domain regardless of which IP version clients use to reach it. No changes are needed.
If you’re using a self-managed certificate, make sure the certificate’s Subject Alternative Name (SAN) already covers your sGTM subdomain. Since the same certificate is attached to both frontends, this should already be the case.
Summary
Adding IPv6 to a Cloud Run sGTM deployment is largely a load balancer exercise. Cloud Run itself stays untouched. The key steps are:
- Reserve a global static external IPv6 address in GCP
- Add an
AAAArecord to your DNS (keep theArecord) - Add an IPv6 HTTPS frontend to the existing load balancer, pointing at the same backend and certificate
- Verify with
digandcurl -6
As you probably noticed, this was not very difficult to do with an existing load balancing stack. The payoff is concrete: IPv6 users reach your SGTM endpoint without address translation, so the client_ip_address your Meta tags collect (and other vendors!) matches what the client-side tags recorded. Better IP matching means better event deduplication and more reliable attribution.
Let me know in the comments if you run into anything unexpected!
