Improve Data Collection With Four Custom Dimensions
Since writing my rant about the schema conspiracy of web analytics platforms, I’ve been giving the whole idea of hit-level data collection a lot of thought. Sessionization is very heavily implemented in Google Analytics, which is understandable, but the regular Google Analytics API just doesn’t give you the kind of information you’d need, if you wanted to stitch hits together differently in your own backend. In fact, there are four distinct levels of aggregation that are not exposed via the API, even though I think they should:
-
Hit timestamp - You can’t query for the exact timestamp of a Google Analytics hit via the API. You can’t get it in your custom reports, either. However, this might be very meaningful information, especially if you want to verify data integrity across systems.
-
Session ID - Hits are grouped together into sessions. However, using the API alone, you will not be able to easily identify if two distinct hits belong to the same session.
-
Client ID - Sessions are bunched under a Client ID. Every instance of the
_gacookie gets a unique Client ID, which is how the Google Analytics backend knows that the same “User” has visited the site multiple times. This Client ID is not exposed in any dimension you can query via the API. -
User ID - The User ID feature in Universal Analytics groups together hits, sessions, and Client IDs. It is the highest possible level of abstraction and aggregation available in Google Analytics. However, the data rows do not expose if a hit/session belongs to a specific User ID.
So, the purpose of this post is to give you the tools to annotate your incoming hit-stream data with all the information listed above. For data integration, this is almost a necessity, especially if you have a complex mesh of systems across which you want to join arbitrary data.
Table of Contents
In the following chapters, we’ll build four Custom Dimensions and four data collection methods that will let you include this information in your data set. We will, of course, be using Google Tag Manager to make things more manageable.
XThe Simmer Newsletter
Subscribe to the Simmer newsletter to get the latest news and content from Simo Ahava into your email inbox!
1. The Method
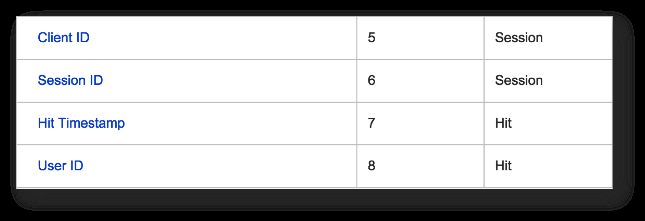
I’ve created a Custom Dimension for each of the four use cases. Two of the dimensions are session-scoped, and two are hit-scoped. The dimensions are:
-
Client ID - session-scoped Custom Dimension that collects the Client ID set by Google Analytics
-
Session ID - session-scoped Custom Dimension that collects a randomized Session ID
-
Hit Timestamp - hit-scoped Custom Dimension that collects the actual timestamp of each hit in local time, with the timezone offset included
-
User ID - hit-scoped Custom Dimension that collects the User ID that gets set when someone logs into your website
Why a hit-scoped Custom Dimension for User ID, you ask? Well, the whole privacy discussion around user tracking is complicated, and I would rather be poked repeatedly in the eye with a dead ferret than be drawn into it. By tracking User ID with a hit-scoped Custom Dimension, you’ll only collect the data from logged-in users. As soon as they log out, or if they re-enter the website having logged out, User ID will not be sent with the hits. If the Custom Dimension were session-scoped, or even user-scoped, you would be collecting User ID for potentially logged-out visitors as well, and that might be in the grey area privacy-wise.
The end result of combining all this information will be something like this:
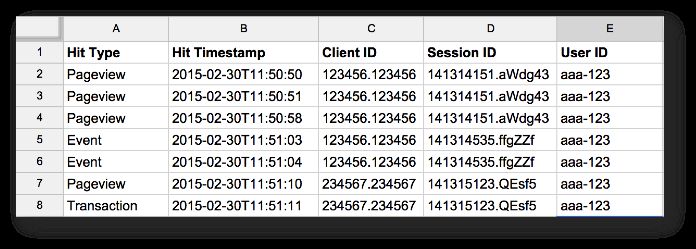
In this (fictional) data export, you can see 7 unique hits, made by two different client IDs (e.g. different browsers or devices), which span across three distinct sessions, but are all made by the same, logged-in user. With layered information like this, you can build intelligent models using GA data alone, but the possibilities it offers for data integration are remarkable as well.
The most difficult one of these solutions to implement, by far, is Client ID collection, so we’ll start with that.
2. Client ID
(UPDATE 5 April 2018: I recommend using this customTask method instead for sending the Client ID in a Custom Dimension. The tracker object method outlined below is more complicated and far more unreliable. With customTask, you can send the Client ID with any tag you want, with 100% accuracy each time.)
The difficulty with Client ID is that the ga interface you use to retrieve the Client ID doesn’t perform well in real time, especially for Tags firing very early in the page load sequence (e.g. your Page View Tag).
You could get the Client ID from browser cookies, but if it’s a first-time visitor to your site, chances are that the cookie hasn’t been set by the time the Page View Tag fires, and you’ll miss this information. Also, if there are multiple trackers on the page, how do you know which _ga cookie to access? You don’t.
So, I’ve opted for a different approach. I’m sending the Client ID using a non-interaction Event Tag, which fires when the page has loaded. This almost certainly guarantees that the ga interface is up and running, and I can use it to pull the Client ID for the correct tracker. The correct tracker is identified by querying the property ID (UA-XXXXXX-X) associated with the tracker object.
This particular data collection method will require the following ingredients:
-
Session-scoped Custom Dimension, to collect the data in Google Analytics
-
Custom JavaScript Variable, which gets the correct Client ID
-
Window Loaded Trigger, which fires when the window has loaded if the Custom JavaScript Variable returns a valid value
-
Event Tag, which sends a non-interaction event to Google Analytics when the Window Loaded Trigger fires
2.1. Session-scoped Custom Dimension
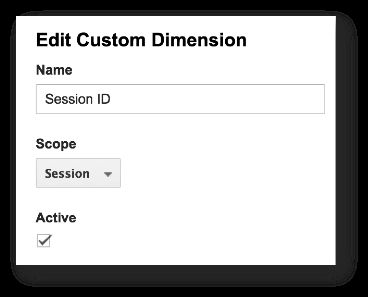
This one is easy. Browse to the Google Analytics Admin of the web property you want to track to, select Custom Definitions -> Custom Dimensions, and create a new Custom Dimension that looks like the one below.

The important thing is to choose Session as the scope, and to make note of the index assigned to it.
Note that if you wish, you could just as well scope this to User instead. The Client ID, by definition, is the same for the user throughout, so it might make sense to scope it accordingly. User-scoped dimensions are a bit questionable in terms of privacy, but in this case I don’t see any issue, as you’re just exposing a dimension that exists anyway. Thanks to Michael Hayes for pointing this out in the comments!
2.2. Custom JavaScript Variable
The Custom JavaScript Variable is named {{Get Client ID for current Tracker}}, and it needs the following code:
function() {
  try {
    var trackers = ga.getAll();
    var i, len;
    for (i = 0, len = trackers.length; i < len; i += 1) {
      if (trackers[i].get('trackingId') === {{GA Tracking Code}}) {
        return trackers[i].get('clientId');
      }
    }
  } catch(e) {}
  return 'false';
}
The function contents are wrapped in a try...catch block, so any errors and problems with loading the ga interface are gobbled up. If you want, you can add your own error debugging code into the catch block. The key thing is to make sure the Event Tag doesn’t fire if there’s a problem with retrieving the Client ID. This means that you might miss some hits, but since we’re sending the information to a session-scoped Custom Dimension, you only need one successful hit sent during the session.
The code is designed so that it cycles through all the GA trackers on the page. Once it encounters a tracker object which tracks to the property ID returned by the {{GA Tracking Code}} variable, it returns the Client ID associated with this object.
This means that you will need to have a variable called {{GA Tracking Code}}, which returns a valid property ID (UA-XXXXXX-X). On my website, for example, it’s a Lookup Table Variable, which returns my main property ID for everyone else, but for me it returns a different property ID. This is because I use this secondary property for debugging implementations.
2.3. Window Loaded Trigger
The Window Loaded Trigger is pretty simple. It’s your basic Page View Trigger, where you set the Trigger Type to Window Loaded. However, you will need an additional condition in it.
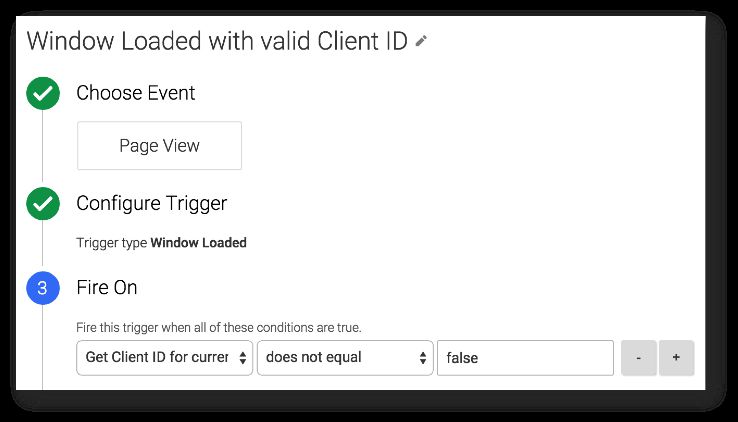
The condition Get Client ID for current Tracker does not equal false ensures that the Trigger only fires if the Custom JavaScript Variable you just created returns a valid value.
2.4. Event Tag
The Event Tag is very basic, except for two customizations. First, you need set its Non-Interaction value to true. This prevents the Event from being calculated into interaction metrics like Session Duration and Bounce Rate.
Also, you’ll need to add a Custom Dimension to the Tag, via More Settings -> Custom Dimensions. Add the index number of the dimension you created in step 1 to the Index field, and add the Variable reference you created in step 2 to the Value field.

You can see how the fields should look from the image above.
2.5. End result
If you did everything correctly, you should see your sessions populating with a new Custom Dimension that you can add to your reports, and pull out of GA via the API or via the reporting interface, if you wish.
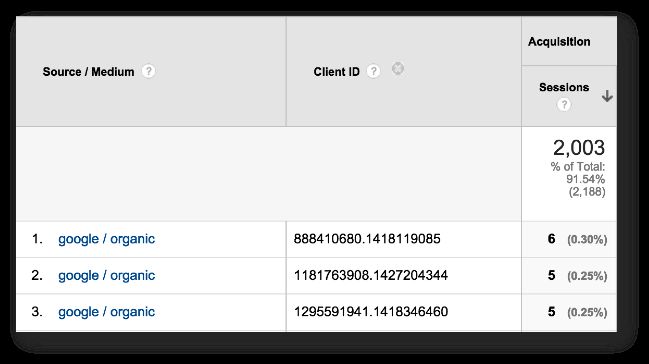
The dimension contains the Client ID of the visitor. You can then use this in your backend, for example, when you want to stitch hits sent from the same _ga cookie together in meaningful ways.
3. Session ID
For Session ID, we’re using a randomized string that is sent with each Pageview hit to Google Analytics. The string changes with each Pageview, but this doesn’t matter. Because you’re sending it to a session-scoped Custom Dimension, only the last value you send will be applied to the hits in the session.
The required components are:
-
Session-scoped Custom Dimension, to collect the data in Google Analytics
-
Custom JavaScript Variable, which returns a valid Session ID string
-
Small modification to your Page View Tag, so that the Session ID is sent to Google Analytics
3.1. Session-scoped Custom Dimension
This is pretty much the same step you went through in the previous exercise.
Just remember to make note of the index number, again.
3.2. Custom JavaScript Variable
The Custom JavaScript Variable is aptly named {{Random Session ID}}, and it has the following code:
function() {
    return new Date().getTime() + '.' + Math.random().toString(36).substring(5);
}
This script creates a pretty unique, randomized session ID. It does it by taking the hit timestamp in Unix time, adding a period, and following with a random string of alphanumeric characters. Because of the timestamp (accurate up to milliseconds), it’s very improbable that two similar session IDs are ever created.
An example of a session ID would be: 1427856715104.jdubr7umobt9.
3.3. Modified Page View Tag
In your Page View Tag, add a new Custom Dimension under More Settings -> Custom Dimensions. Set the index number you got from step 1, and set the value to the Variable reference {{Random Session ID}} you just created.
By using only the Page View Tag, you’ll be sending the Session ID with each page load. Only the last Session ID you send will remain, however, and all the hits in the session will automatically be annotated with this ID, thanks to the session-scoped Custom Dimension. If this is confusing, remember to read up on Custom Dimensions!
3.4. End result
By virtue of the Custom Dimension, you now have an identifier with which you can stitch together arbitrary, discrete hits in Google Analytics.
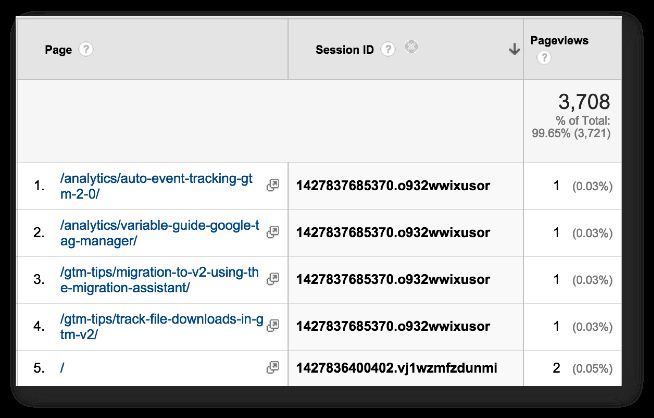
Together with the hit timestamp, you can start building realistic visit paths, if that suits your fancy.
4. Hit timestamp
Hit timestamp is something you should send with every single hit you send to Google Analytics. This means that you’ll need to modify all your Google Analytics Tags, which might seem like a chore.
Accuracy is, of course, completely up to you, and you can opt to only send the timestamp with Pageviews and Transactions, instead.
What you’ll need:
-
Hit-scoped Custom Dimension, to collect the timestamp in Google Analytics
-
Custom JavaScript Variable, which returns a valid timestamp string
-
Modification to all your tags, to which you want the timestamp to be attached
4.1. Hit-scoped Custom Dimension
There’s nothing spectacular about this one. Create a new Custom Dimension in GA Admin, and set its scope to Hit.
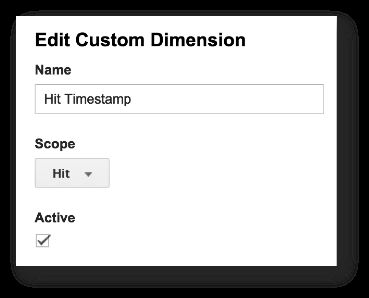
Remember to make note of the index.
4.2. Custom JavaScript Variable
The Custom JavaScript Variable needs to return the timestamp in String format. Now, there are many ways you could do this, for example:
-
Get timestamp in Unix time (milliseconds since Jan 1, 1970), adjusted for client timezone
-
Get timestamp in Unix time, converted to UTC
-
Get timestamp as an ISO string, adjusted for client timezone
-
Get timestamp as an ISO string, converted to UTC
-
Get custom string, adjusted for local time or converted to UTC
-
Something completely different
In my setup, I wanted the timestamp to be customized for my own tastes. That means that I’m parsing it to resemble an ISO timestamp, but I’m using client local time including the timezone offset, so I can see just which timezone the user is in. So, for example, if a visitor comes from Finland, which is GMT+3 (stupid daylight savings time), the hit timestamp might look like this:
2015-04-03T18:55:27.466+03:00
This translates to April 3rd, 2015, at 6:55PM Helsinki time.
Thanks to Tuomas Salste for spotting a couple of bugs in the code!.
So, to get something like this, some JavaScript is required. Create a new Custom JavaScript Variable, and name it {{Hit Timestamp Local Time With Offset}}. Add the following code within:
function() {
    // Get local time as ISO string with offset at the end
    var now = new Date();
    var tzo = -now.getTimezoneOffset();
    var dif = tzo >= 0 ? '+' : '-';
    var pad = function(num, ms) {
        var norm = Math.floor(Math.abs(num));
        if (ms) return (norm < 10 ? '00' : norm < 100 ? '0' : '') + norm;
        return (norm < 10 ? '0' : '') + norm;
    };
    return now.getFullYear()
        + '-' + pad(now.getMonth()+1)
        + '-' + pad(now.getDate())
        + 'T' + pad(now.getHours())
        + ':' + pad(now.getMinutes())
        + ':' + pad(now.getSeconds())
        + '.' + pad(now.getMilliseconds(), true)
        + dif + pad(tzo / 60)
        + ':' + pad(tzo % 60);
}
This code has been gratefully copy-pasted form this StackOverflow discussion.
This script works across all browsers, and returns a parsed string timestamp, with the timezone offset appended to the string.
4.3. Modified Tags
I send this timestamp with every single Tag that’s firing on my site, but if you feel like this is overkill, you can choose to only send it with business-critical hits you’ll use with other backend data, for example.
The only thing you need to do is add the Custom Dimension to any Tag you want to send it with. The setting looks like this:

Remember to set the Index accordingly. Go back to Google Analytics Admin, and look for the Custom Dimension you created in Step 1 to get the correct index number.
4.4. End result
What you’ll get is something like this:
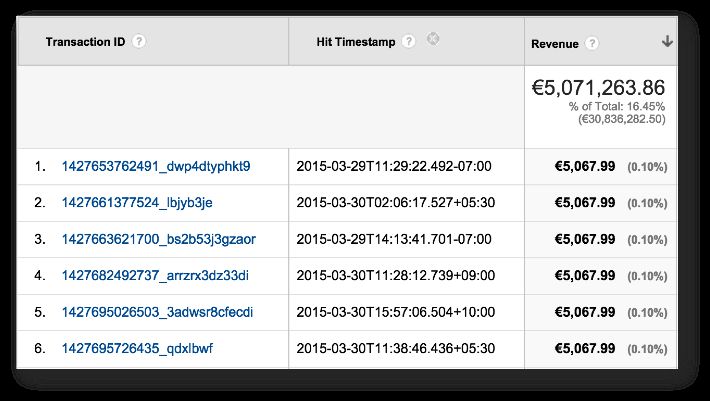
It’s all your transactions, coupled with the accurate hit timestamp in local time when the transaction was recorded. The timezone offset helps you compare data with your backend, if it uses server time or some fixed timezone in its own data collection.
5. User ID
For User ID, you’ll need to have it already implemented in some way or another. In this example, we’ll pull the ID from dataLayer, but you might be using a 1st Party Cookie instead, which means you’ll need to modify the code accordingly.
Remember that tracking Users across sessions and devices is a tricky business both technologically and ethically. I’ll leave things like consent, opt-out, anonymisation, and privacy to linger in the nether regions of your mind, so remember to ensure that what you’re doing is considered OK by at least one other person in the right state of mind.
We’re using a hit-scoped Custom Dimension again, but you can choose what level of accuracy and stitching to implement. I’ve reasoned for hit-level accuracy in the beginning of this article (wow, that was a LONG time ago), and I think the reasoning is well-founded. Also, depending on what you want to do with the data in the backend, you might choose to send the User ID with all hits or with just some hits.
To expose User ID as a Custom Dimension in your hits, you’ll need:
-
Hit-scoped Custom Dimension, to collect the User ID in Google Analytics
-
Data Layer Variable, which picks up the User ID from
dataLayer -
Modified Tags, to which you want the User ID to be attached
5.1. Hit-scoped Custom Dimension
The Custom Dimension is simple, of course. Just go to Google Analytics Admin, browse to Custom Definitions under the web property you want to set this up with, and create a new Custom Dimension of Hit scope:
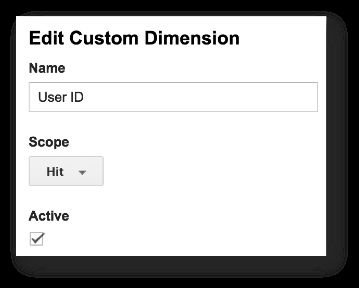
As before, make note of the Index.
5.2. Data Layer Variable
How you actually retrieve the User ID depends on how you expose it in your website. A very good method is to populate it in dataLayer by a server-side process, which renders it together with the rest of the page. This way the User ID will be cemented in the page template, and you can use it with your critical tags that fire early on in the page load sequence.
I use dataLayer to implement User ID, so all I need to create is a Data Layer Variable that picks up the User ID from the data model, and returns the value stored within. On my site, the variable is named {{DLV - userId}}, and it looks like this:
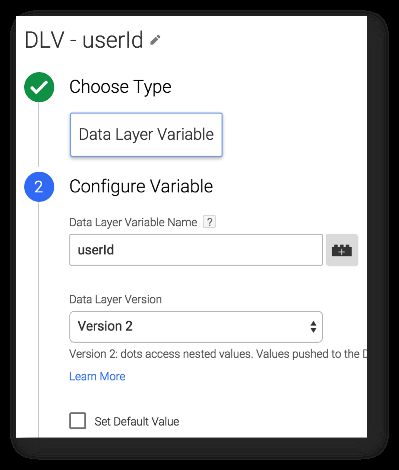
As you can see, I’m not setting a default value in the Variable. This means that if userId is not set in dataLayer, this Variable will resolve to undefined, and the Custom Dimension will be dropped from any Tag that uses it. This is a wonderful feature of the analytics.js library, and it really helps in keeping your Tag setup nice and lean.
5.3. Modified Tags
Next, add the Variable you just created into all the Tags you want to associate with logged in users. I send it with every single hit, because I want a comprehensive analysis of what my visitors do on the site.
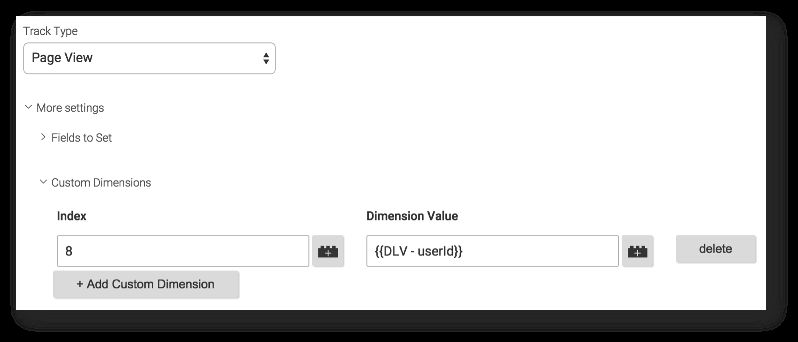
Remember to set the Index correctly according to what you setup earlier in Google Analytics Admin.
5.4. End result
What you’ll get is an extra annotation on all your hits from logged in users:
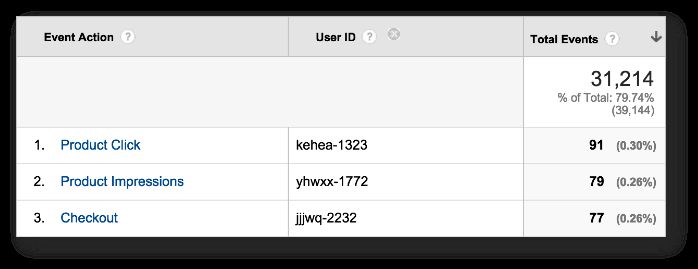
Now, let’s not kid ourselves. If you’re sending User ID with just a handful of hits, and you’re also collecting Client ID, you can extrapolate User ID in your backend to all the hits done by the Client IDs associated with the User ID dimension. Like I wrote in the beginning of this article, the ethical, legal, and privacy-related considerations are yours to make alone.
6. Summary
This article explores something I feel passionate about: meaningful data collection. Google Analytics uses a lot of information that isn’t exposed in the reporting interface or the APIs, even though this information is central to how the platform aggregates the hits coming in from digital properties.
Being able to access this type of granular data shouldn’t be reserved for BigQuery users alone, so the solutions in this post help you add an extra level of accuracy to the stream of data flowing to the tracking platform. You can then pull this data out, combine it with other backend data, and build powerful models that will allow you to optimize your digital properties better than before.
