Google Tag Manager: The History Listener
There’s a new listener in town! It’s a few days now since the Google Tag Manager team unleashed the History Listener, and the time has come for me to tell you what this baby can do.
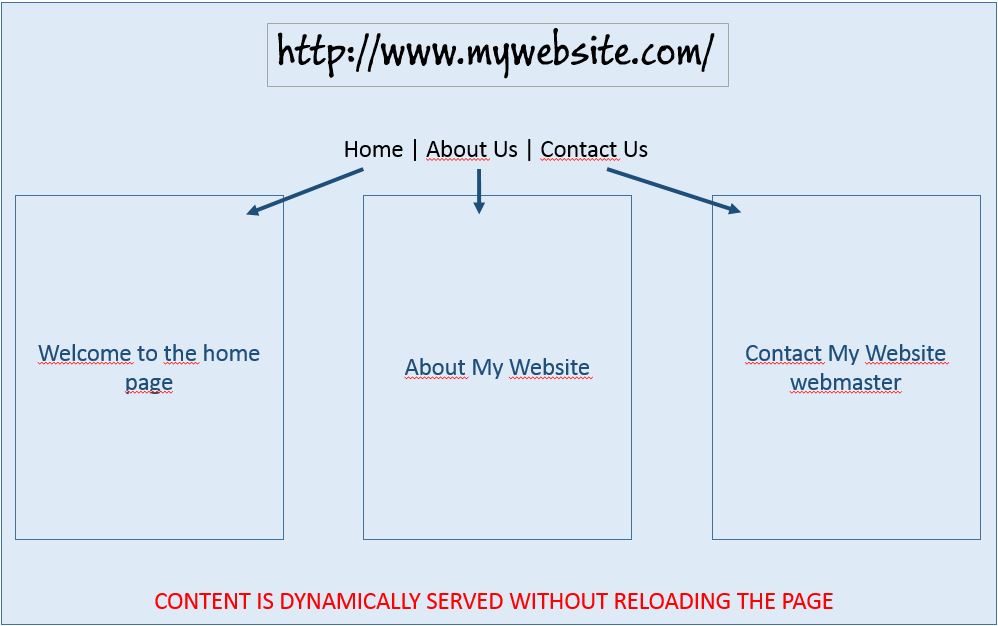
The History Listener is designed to be used on websites where content is loaded dynamically. Typically, these websites make heavy use of AJAX (Asynchronous JavaScript and XML), which is designed for loading content in the background and serving it dynamically without having to reload the page.
Because I don’t want to go too deep into how a dynamic website works, this tutorial should be pretty simple. The key is to understand what events trigger the History Listener, and how you can track your page views in a website without static URLs bound to static content.
XThe Simmer Newsletter
Subscribe to the Simmer newsletter to get the latest news and content from Simo Ahava into your email inbox!
Background
A site which loads content dynamically is usually incompatible with certain default browser events. For example, if you have a site which dynamically loads its content without any change in the URL of the page (nothing happens in the address bar), what do you think happens when a visitor navigates away from your site and then clicks the browser Back button? I can give you a hint, they won’t see whatever dynamic state the page was in just before they left.
This is, of course, a problem for search engines as well, since they want to index pages with unique URL addresses, which each return a static, unique piece of content. This is why URL fragments (AKA anchors AKA hashes) were introduced to solve the problems with browser history. If you loaded content clicking an “About Us” link, your URL would have looked like https://www.simoahava.com/main#aboutus.
This fixed the problem with browser history, since now you could detect changes in the URL fragment and serve appropriate content again, even if the user used the Back button. However, this wasn’t good enough for search engines or for Google Analytics, which have a hard time dealing with URL fragments.
Enter the hashbang (coolest name to be ever given to anything anywhere). The hashbang is a hash followed by an exclamation mark: #!. It’s an old invention, having existed in UNIX systems to facilitate script loading. Google adopted it as a schema to signify an AJAX site with crawlable content. When search crawlers came across the hashbang sequence, they translated it to a proper URL query parameter (escaped_fragment=_the-original-fragment). A query parameter meant that the page could be crawled and indexed for search engine users to find.
However, the hashbang isn’t the easiest solution to implement, it looks absolutely horrible, and it’s just not how you should treat your URLs.
The final chapter of the story, and the most relevant one for the History Listener, is brought about by the HTML5 standard. HTML5 introduced the window.history API, which can be used to manually manipulate browser history when loading content dynamically. You can now manually push a state into the browser history, and when someone navigates with the browser’s Back button to your page, you can look for stored states and load them in order, just like the default behavior of a static website.
The History Listener listens for changes in browser history. If it detects such a change event, it will tell you what happened, whether there’s a state object stored in history, and if there was a URL fragment change involved. You can use this information to send virtual page views, prevent certain tags from firing again, serve dynamic tags, and basically anything that you’d normally do when a page is loaded.
Set up the History Listener
You set up the History Listener like you would any other listener.
-
Create a new tag
-
Name it wisely
-
Set Tag Type to Event Listener > History Listener
-
Set firing rule to All pages ({{url}} matches regex .*)
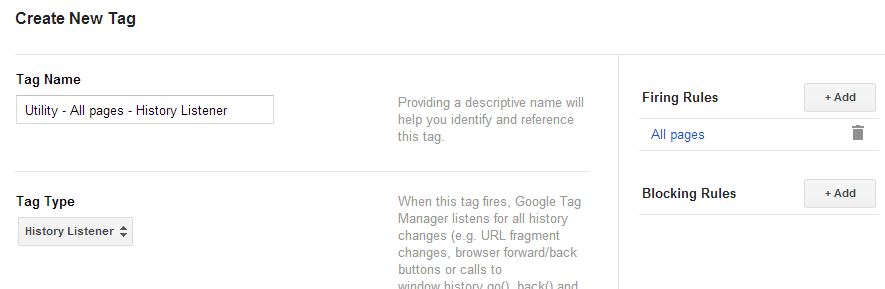
And that’s it. This will set your listener up on all pages to wait for the triggers that activate it.
You’ll also notice that a bunch of new auto-event variables have been provided. You can use these to access properties of the history event change after the History Listener has fired. Read more about these in my Macro Guide.
The triggers
The History Listener will activate every time one of the following occurs:
-
Call to the window.history.pushState() method
-
Call to the window.history.replaceState() method
-
A popstate event is detected
-
The URL fragment (hash) changes
window.history.pushState() is used to add a state into the browser history stack. pushState() takes three arguments: a state object, a title, and a URL.
The state object is where you store details about the content, which you can use later to serve the same content to the returning visitor. The title is just a way to name the history entry, though it can be used with popstate to set the page title. The URL is what will appear in the address bar of your browser after the pushState() csll is completed. This is especially useful, because your site visitors can share this “virtual” URL, which can be then used to serve the correct content to visitors arriving via this link.
window.history.replaceState() is pretty much the same as pushState(), except that it replaces the current history state with the new state.
popstate is what occurs every time the active history entry changes. For example, the browser’s Back and Forward buttons trigger popstate. If the history entry which is activated upon popstate was created by pushState() or replaceState(), the popstate event will have the stored state object as a property. You can use this object to serve the same content to people navigating through browser history to your AJAX site.
Note! There are some differences as to how and when browsers send the popstate. Chrome and Safari, for example, fire a popstate with every page load (since that’s when the active history entry changes), but Firefox doesn’t. Firefox requires a history entry that was created by a pushState() or replaceState() call.
URL fragment changes are remnants of the hashbang era, but fragments are still widely used on websites. For example, if you have internal anchor links, you’ll trigger a fragment change event every time the visitor jumps to an anchor on your page. In AJAX sites, you can listen for fragment change events, and use these to send a page view or fire a tag of your choosing.
{{event}} equals gtm.historyChange
When the History Listener is running, and any of the events described in the previous chapter occur, a gtm.historyChange is pushed into the data layer. Most of the properties in this event can be accessed by the auto-event macros, but it’s good to know what the data layer entry looks like.
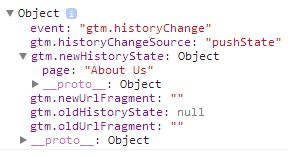
Here’s what your dataLayer object looks like after a pushState() event. Here, the state object I push is very simple. It contains just a single key-value pair, page: “About Us”.
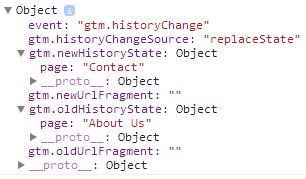
Here’s what you dataLayer looks like after a replaceState() event. The parameters are the same as in pushState(). Note that I fired replaceState() just after pushState(), so you’ll see the previous state object stored in the gtm.oldHistoryState property!
Now, if I navigate away from the page and return with the browser Back button, a popstate event occurs with my state object neatly stored within:
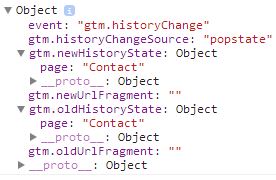
As you can see, the old state and the new state are the same, because I navigated away from the Contact page and arrived on the same page after clicking Back in my browser. When popstate occurs, I can look into the history state object and send the correct page view for the dynamic content. In this case, I can see that the visitor returned to the Contact page.
Finally, here’s me navigating from one URL fragment to another:
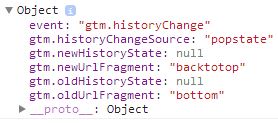
As you can see, I first went to the bottom of the page via URL fragment #bottom. This triggers a popstate event, with #bottom as gtm.newUrlFragment. After that, I clicked “Back to top”, which transported me to URL #backtotop, and this is reflected in the screenshot above.
Example of use
I’ll show a quick example, expanding the idea of navigating to the “Contact” page, where the page details are stored in a state object, created using pushState().
The premise is that when your visitor clicks a link to the “Contact” page, the contents are loaded dynamically. To account for history changes, the pushState() method is called with something like:
var page = {page:"Contact"};
history.pushState(page,'Contact','contact.html');
This pushes a new entry into your browser history stack, with a single property within the state object. This property is the one we’ll want to access in a popstate instance, i.e. when someone returns to the contact page via a history event (browser Back, for example).
-
Make sure your History Listener is running
-
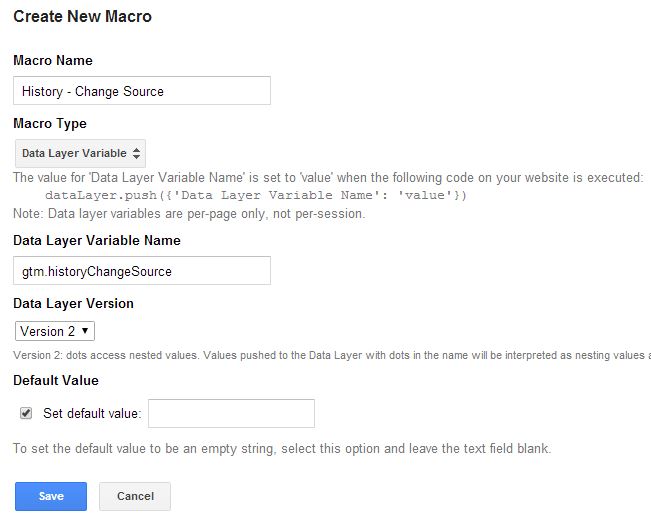
Create a new Data Layer Variable macro to identify what history event took place:
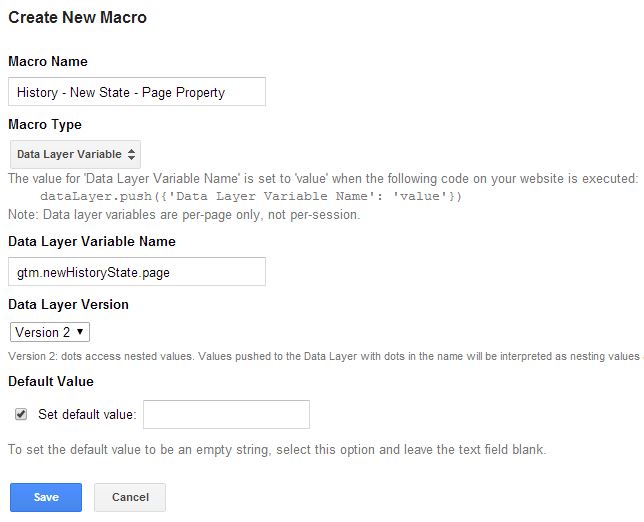
- Create a new Data Layer Variable macro to get the page property of the new history state:
- Create a new rule for your page view tag:
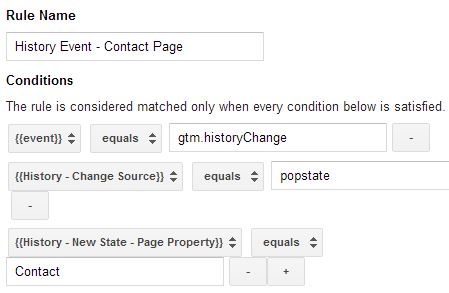
And that’s it. You can attach this sequence to your page view tag, for example, ensuring that the page view is sent every time someone navigates back to your Contact content via browser history (see below for how to make sure the page view properties are in order).
The firing rule is important. You’re looking for a gtm.historyChange event. This is pushed into the data layer when the History Listener is triggered. After that, you’ll want to make sure that the event was popstate (the macro in (2)), and that the page property of the new history state has value “Contact”.
Now when you send a page view, the URL will be correctly contact.html (since you provide that in the pushState() call). However, your document title might be off, unless you explicitly set it in your AJAX logic. A nice way to send the page title is to use the Document Path setting in your page view tag, and populate it with the value of a Lookup Table macro, which in turn evaluates the page property again. Allow me to demonstrate:

That’s your page view tag. In the Document Title field, you’re retrieving the value from a Lookup Table macro, which I’ve named {{ AJAX - Page Title }}.

This sets the page title depending on the page property, pushed into the data layer when the history listener is fired. You could set a default value to the Lookup Table macro, but on the other hand, if it doesn’t return a value, the tag will just send whatever is found in the document.title property.
Conclusions
Phew! This turned into a monster of a tutorial. But that’s to be expected. Working with AJAX and dynamic content is not easy, as there are so many things to factor in. Not only are there usability and browser compatibility issues involved, you’ll also need to take search engines into account, and you’ll need to understand how history events work.
As always, I highly recommend that you brush up on your JavaScript before you start working with the History Listener. There’s no damage to be done, but you don’t want to screw your tracking by not understanding how state objects work, for example. Also, it’s very likely that you’ll have to return to your AJAX setup to make sure that pushState() calls and replaceState() calls provide all the necessary data for you to use.
Using the History Listener on a dynamic site is so much better than resorting to Link Click Listeners. More often than not, you’ll come across event propagation problems with your listeners, since most of AJAX navigation is designed to prevent the default behavior of links. With the History Listener, you’re only listening for browser history events, so on-page conflicts won’t affect the listener’s basic functionality.
You’ll need to be careful and precise with your rules. Make use of all the properties of the gtm.historyChange event, because you’ll want to do different things upon pushState() and popstate, for example.
And if you have any questions, drop me a mail or leave a comment below!
