Google Tag Manager: DOM Listener
In this post, I’ll walk you through a tutorial on how to create a Google Tag Manager extension. This extension will be a new listener, whose sole job is to listen for changes in the HTML and CSS markup on the page.
The reason I’m teaching you how to create a DOM listener is simple. Ever so often I come across people asking for help, but they are unable to touch on-page code. Usually the problem is magnified with form handlers, since the developers might have installed some custom jQuery form manager, for instance, which simply refuses to cooperate with GTM’s form listeners. That is why you might want to fire a GTM event when a certain message pops up on the screen, for example.
With a DOM listener, you can fire a GTM event every time something changes on the page. Well, not every time. Actually, in this example you’re restricted to element insertion and attribute changes. A working use case might be form validation: if you want to track invalid forms, maybe by sending the content of the validation error message with an event, you might just as well create a DOM listener. This listener will then trigger when an error message appears on the page.
DISCLAIMER: To be truthful, I feel quite strongly about using hacks such as this to fix faulty markup or an otherwise shoddy tag implementation. The main idea behind this post is to introduce a feature of JavaScript which can alleviate some of your tag management pains. However, if you find that you need hacks such as the DOM listener to circumvent development problems on your website, I would strongly suggest that you take this up with your developers and try to come up with a solution which works with GTM’s standard features.
XThe Simmer Newsletter
Subscribe to the Simmer newsletter to get the latest news and content from Simo Ahava into your email inbox!
The premise
To create the DOM listener, I will leverage an API known as MutationObserver. This little piece of magic will create an observer object, which triggers every time a mutation takes place. This mutation can come in different sizes and shapes, but for the purposes of this guide, I will listen for two kinds of mutations, for two kinds of use cases:
-
Node insertion - when a new
<span class="error">is injected in the DOM -
CSS style change - when a previously hidden
<span class="error">is displayed
So the first use case is when your form injects a new SPAN element into the DOM upon an error. The script will check if the injected node is really the error message, and if it is, it pushes a dataLayer event with the content of the SPAN (the message itself).
The second use case is when an invalid form causes a hidden SPAN to appear, with the error message within.
Listening for node insertion is a bit different than listening to an attribute change. A node insertion listener can be primed on any node on the DOM, meaning you have much more to work with in terms of flexibility. Listening for attribute changes requires you to pinpoint exactly which node you want to observe, and the attribute change will be reported for that node only.
Preparations
Here are the ingredients:
-
A page where a
<span class="error">is either inserted or revealed with a CSS style change -
Custom HTML tag(s)
My test page code looks like this (I combined both use cases into one here):
<script>
function addHTML() {
var myDiv = document.getElementById("contents");
var newSpan = document.createElement("span");
newSpan.className = "error";
newSpan.innerHTML = "This form contained errors";
myDiv.appendChild(newSpan);
}
function changeCSS() {
var mySpan = document.getElementsByClassName("error")[0];
mySpan.style.display = "block";
}
</script>
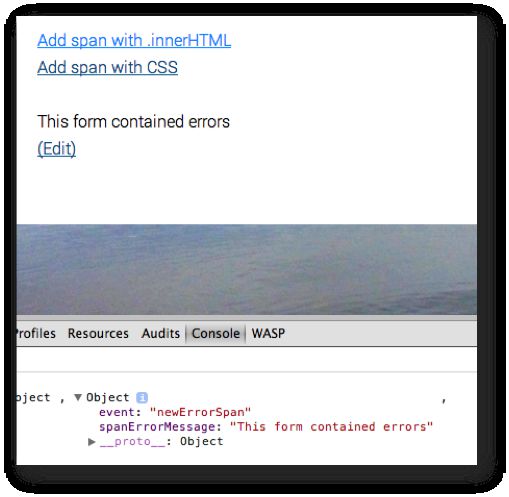
<a href="#" onClick="addHTML();">Add span with .innerHTML</a>
<a href="#" onClick="changeCSS();">Add span with CSS</a>
<div id="contents">
<span class="error" style="display: none;">This form contained errors</span>
</div>Let’s just quickly go over this page.
First, you have two functions. The function addHTML() will insert the following in the DIV#contents below:
<span class="error">This form contained errors</span>
The insertion is done upon clicking a link whose text is “Add span with .innerHTML”.
In the second function, the SPAN.error is already in the DOM, but it’s been hidden with a display: none CSS command. When the link labelled “Add span with CSS” is clicked, this style directive will be changed to display: block.

This is just my test page. Obviously you’ll need to navigate around your current implementation to make things work.
Finally, you’ll need your custom HTML magic. The next two chapters will go over the tags and the code you’ll need to write for them.
Case 1: node insertion
In this use case, a new node (<span class="error">) is inserted into a DIV on the page. The markup on the page looks something like this:
<script>
function addHTML() {
  var myDiv = document.getElementById("contents");
  var newSpan = document.createElement("span");
  newSpan.className = "error";
  newSpan.innerHTML = "This form contained errors";
  myDiv.appendChild(newSpan);
}
</script>
<a href="#" onClick="addHTML();">Add span with .innerHTML</a>
<div id="contents">
</div>
So as you can see, there’s an empty DIV (#contents), which is then appended with a new SPAN, created by the function addHTML() which, in turn, waits for a click event on the link on the page.
Now, the next step is to create the listener itself. You’ll need to use the MutationObserver API to listen for any node which is inserted into the observed target. The node itself can be on any level in the DOM hierarchy, but I chose the DIV#contents to keep things simple. When a node is inserted, a dataLayer push is done with a new GTM event and the text content of the SPAN.
Here’s what you Custom HTML Tag should look like:
<script>
  var contentDiv = document.querySelector("#contents");
  var MutationObserver = window.MutationObserver || window.WebKitMutationObserver;
  var observer = new MutationObserver(function(mutations) {
    mutations.forEach(function(mutation) {
      if(mutation.type==="childList" && mutation.addedNodes[0].className==="error") {
        dataLayer.push({'event': 'newErrorSpan', 'spanErrorMessage': mutation.addedNodes[0].innerHTML});
        observer.disconnect();
      }
    });
  });
  var config = { attributes: true, childList: true, characterData: true }
  observer.observe(contentDiv, config);
</script>
OK, OK, lots of stuff going on here. Let’s go through the script and see what it does. First, you create a reference to the DIV you will be listening to. I’m using the querySelector() function, because it’s a nice way to combine CSS selectors and JavaScript.
Next, you create the MutationObserver itself by first tackling a known cross-browser issue with WebKit browsers. The observer listens for mutations of type childList (a new child node is inserted) and checks if the first added node has CSS class “error”. You’ll have to modify this code if the SPAN with the error is not the first node that your script inserts into the DOM.
If such a mutation is detected, a GTM event is pushed into dataLayer (newErrorSpan), and the error message contents are sent as a data layer variable as well. Note that I use innerHTML to get the contents of the SPAN. If your SPAN has HTML formatting within, you might want to use innerText instead.
The disconnection means that after this particular mutation takes place, no further mutations are listened for. So if someone keeps on pushing the “submit” button, the observer will shut down after the first error. You might want to remove this line if you want to track ALL the potential errors your visitor propagates on the form.
Lastly, I create a configuration for the MutationObserver and prime it on the DIV.
And that’s it for node insertion. If you set this new listener to fire on pages where the SPAN with class “error” is created in a DIV with ID “contents”, a dataLayer.push() will take place every time the SPAN is inserted into the DOM. Try it for yourself!
Case 2: CSS change
In this case, you have a hidden SPAN with the error message, which is then revealed when the form validation fails. Here’s what the HTML might look like:
<script>
function changeCSS() {
  var mySpan = document.querySelector(".error");
  mySpan.style.display = "block";
}
</script>
<a href="#" onClick="changeCSS();">Add span with CSS</a>
<div id="contents">
  <span class="error" style="display: none;">This form contained errors</span>
</div>
So I have a simple SPAN within a DIV with the error message. This is initially set to display: none, but when the link is clicked, the display status is changed to block.
As for your Custom HTML Tag, you’ll need something like this:
<script>
  var spanError = document.querySelector('.error');
  var MutationObserver = window.MutationObserver || window.WebKitMutationObserver;
  var observer = new MutationObserver(function(mutations) {
    mutations.forEach(function(mutation) {
      if (mutation.type==="attributes" && mutation.target.style.display==="block") {
        dataLayer.push({'error': 'modErrorSpan', 'spanErrorMessage': mutation.target.innerHTML});
        observer.disconnect();
      }
    });
  });
  var config = { attributes: true, childList: true, characterData: true }
  observer.observe(spanError, config);
</script>
It’s pretty similar to the previous one but with one or two small changes. First, you’re not listening to the DIV, you’re listening to the actual node you know will be the target of the style change. This is important, and it means that you have to know exactly what the target will be when creating this script.
Next, in the observer itself, you’ll need to specify just what the style change was. I used simply a change from display: none to display: block, but you might have something different in your code. So don’t forget to change the content of the if-clause to match what the new style is.
The benefit here is that you’re listening to just one single node, so there’s a performance boost. I’ve got the observer.disconnect(); again, but you might want to remove that if you want to send events perpetually for each invalid click of the submit button.
Don’t forget to test.

Conclusions
This might seem like a cool hack to you. After all, you’re listening for changes on the page without actually any page refresh happening! Also, you’re extending GTM’s default listeners so you’re kind of like a Google engineer, right?
Well, remember what I said in the disclaimer of this text. This is a hack, a circumvention, a band-aid, designed to overcome problems with your markup or your JavaScript. Having a custom form handler which doesn’t propagate a proper form submit event (which is required by GTM’s default form submit listener) is a bit suspect and reeks of bad practices. So before you resort to this DOM listener, make sure you exhaust all other, more orthodox possibilities with your developers.
Then again, you might not need this to overcome any development problems, but rather to complement your current tag setup. In that case, go crazy! It’s an excellent way to add more flexibility to your tags. Do note the cross-browser support, however. Support is not comprehensive enough to warrant using this listener as a firing rule for some business-critical tag.
