Google Analytics Client ID In AMP Pages
This article is a collaboration between Simo and Dan Wilkerson. Dan’s one of the smartest analytics developers out there, and he’s already contributed a great #GTMTips guest post. It’s great to have him back here sharing his insight on working with Accelerated Mobile Pages (AMP).
So, we’re back on AMP! Simo wrote a long, sprawling AMP for Google Tag Manager guide a while ago, and Dan has also contributed to the space with his guide for AMP and Google Analytics. Both of these guides touched upon a subject that might be one of the reasons to stay away from AMP for now: Client ID matching across AMP, your regular website, and any caches or CDNs that serve the AMP version.
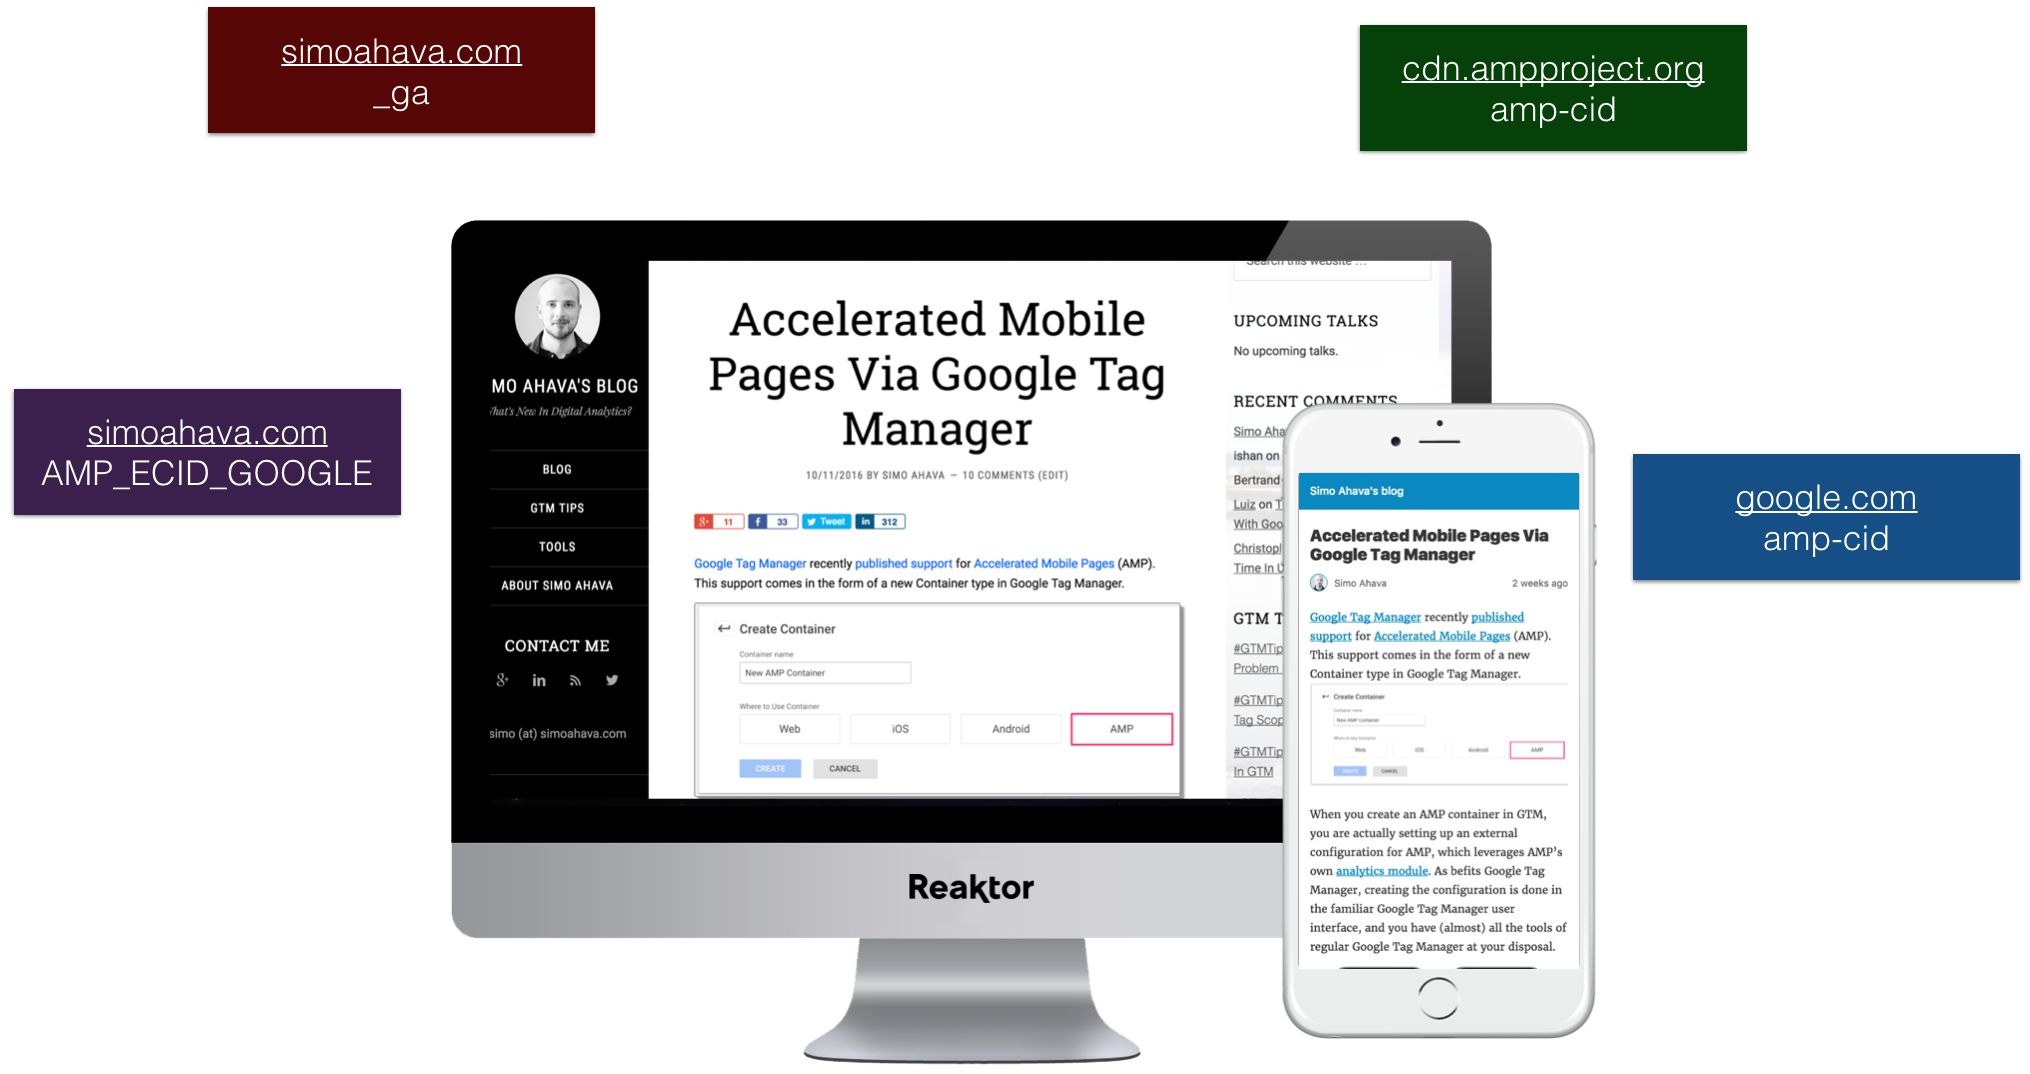
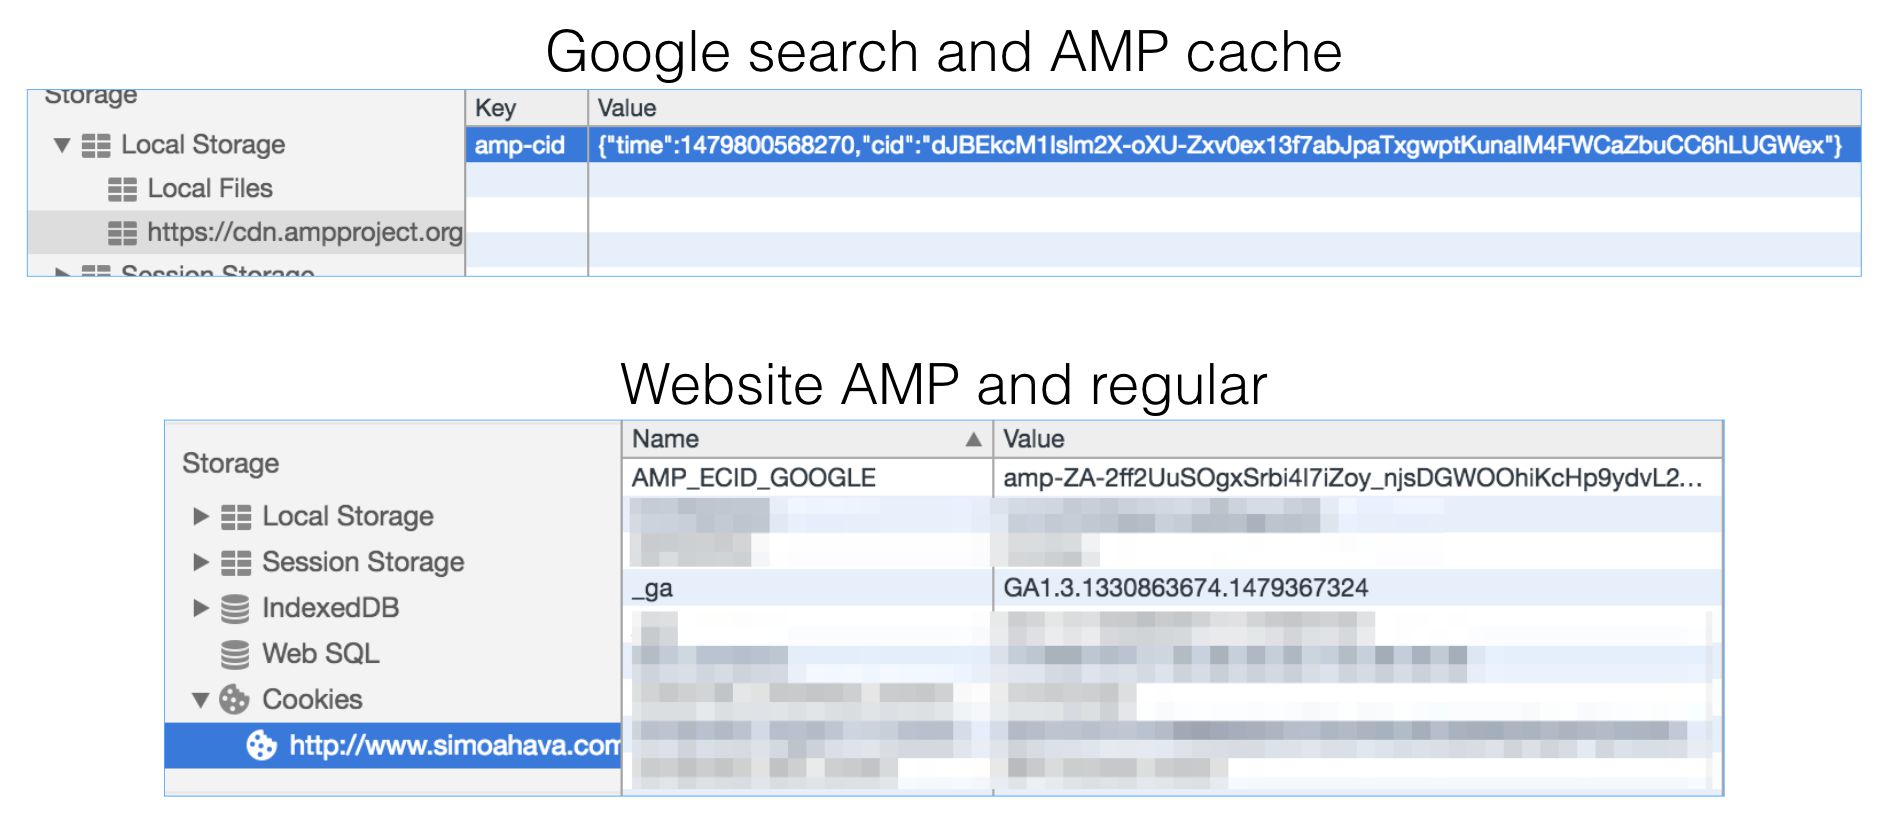
Not only does AMP have its own, unique syntax for the Client ID, it also stores it in different ways. For example, in the AMP Cache (and thus via Google search, too), it’s stored in localStorage. If someone visits your site directly and accesses AMP pages, the Client ID is stored in the AMP_ECID_GOOGLE cookie. And then if someone visits a regular page on your site, the Client ID can be found in the _ga cookie.
In this article, Dan and Simo tackle this issue by showing how to serve the Client ID consistently from the _ga cookie written on your website’s actual domain. This way, AMP pages will use the same Client ID that regular Google Analytics uses, and you will be able to identify customer journeys that may pass through both your regular site as well as your AMP content.
The examples are provided in NodeJS and PHP (WordPress), but the methodology is universal and quite simple to do with any web server software.
XThe Simmer Newsletter
Subscribe to the Simmer newsletter to get the latest news and content from Simo Ahava into your email inbox!
Overview
To recap, Google Analytics stores a unique identifier for every user who visits your site within a first-party cookie. This value, in GA parlance, is called the Client ID, and the name of the cookie is _ga. Here’s what the entire cookie string looks like, with the actual Client ID bolded.
GA1.2.1789536866.1471440764
The GA1 value denotes this is version 1 of the _ga cookie. The 2 denotes the number of dot-separated components in the URL the cookie is stored at. For example, if GA were instructed to store the cookie at shop.example.com, the number would be 3, instead.
Because AMP pages can be cached and served on many different domains, users who might have had a single Client ID could wind up being split into several users instead.
This appears to be at least part of the reason behind why Google Analytics officially recommends using a separate GA Property for AMP data.
However, there’s a way to use only the _ga cookie for all sources that serve your web content. To do this, we’ll need to customize our amp-analytics component.
Custom AMP configuration
amp-analytics is the component that AMP uses for tracking user interactions. If you’d like to learn more about all the features it supports, check out the AMP for GTM guide in this blog; it should have all the information you need.
For our purposes, let’s focus on the config attribute. It’s an optional attribute that we can use to tell AMP: “Hey, we’ve got some additional configurations that we need to you fetch from this location”. This attribute should be set to a URL where additional analytics configurations should be retrieved from. In other words, you need to specify an HTTP request endpoint which returns a valid, AMP-compliant JSON configuration file.
<amp-analytics config="//example.com/analytics.config.json"></amp-analytics>Once the browser has loaded the AMP page, and the page is visible in the browser window, AMP will fetch this external configuration file and use it to supplement any configurations that might already be established on the page. Unlike other resources in your content, your amp-analytics config will always point to your server and the result isn’t automatically cached. When the request to your server comes in, it will include all of the cookies set on the user’s browser on your domain.
NOTE! If, and when, your content is served through the Google AMP Cache, any external configuration must be downloaded from an HTTPS source. Thus if your web server is behind HTTP, you’ll need to either only serve your custom configuration when visitors are on your domain OR use just the default configuration template instead. Or, you know, switch to HTTPS as soon as possible.
Grabbing the _ga cookie
When the request for the custom AMP config is received by your web server, you can check the cookies in the HTTP request to see if a _ga cookie is already set for the user on the website domain. This would be the case if the user has visited your content before (and hasn’t flushed cookies). If the cookie is found, you can use a specific HTTP header (see below) in the response to pass this cookie to the domain where the request originated from, e.g. Google’s AMP cache.
If the cookie is not found, you can generate a new _ga cookie, following the same pattern analytics.js uses - a random unsigned 32-bit integer coupled with a timestamp rounded to the nearest second, like this:
1789536866.1471440764
You can then leverage the Set-Cookie header in the HTTP Response, and instruct the browser to store the new Client ID in a _ga cookie, making sure to set the domain, path, and expiration date to match the domain the request originated from (e.g. cdn.ampproject.org), just like analytics.js does. You’ll need to add the same GA1.X. prefix that GA uses, too. Furthermore, you’ll need to do this on every single request, so that the lifetime of the _ga cookie continues to be extended on each page load. The Set-Cookie should end up looking something like this:
Set-Cookie: _ga=GA1.1.18347199128.1478727498; Domain=example.com; Path=/; Expires=Sat, 10 Nov 2018 21:06:48 GMT;
Finally, you can return the Client ID in the JSON response as a custom AMP variable for use with our AMP requests:
{
  "vars": {
    "clientId": "18347199128.1478727498"
  }
}
Checklist for setting up the request handler
Of course, it’s not quite that simple. In addition to transposing our Client ID and setting it as a cookie, we need to ensure that we’ve dotted a few i’s. Here’s a handy checklist of the configuration steps that need to be taken to ensure everything works in the wild.
-
In the site HTML:
-
Add the
amp-analyticsscript tag andamp-analyticscomponent to your AMP templates. -
Configure component JSON for desired triggers and requests, using
${clientId}for the &cid; parameter. Alternatively, you can use the pre-built Google Analytics vendor template by addingtype="googleanalytics"to the component. -
Point
configattribute to an endpoint or API on your own server. -
Set
data-credentials="include".
-
-
In your web server:
-
In the request handler in your web server, extract the Client ID from the
_gacookie or generate a new one. -
Add the
clientIdparameter to thevarsobject in the JSON configuration. Set it to the Client ID from the_gacookie. -
Add the
Set-Cookieheader with the_gacookie, set to expire in two years. -
Set the
Access-Control-Allow-Originheader tohttps://cdn.ampproject.org. Note: Wildcards (*) are invalid in this context. -
Set the
Access-Control-Expose-Headersheader toAMP-Access-Control-Allow-Source-Origin. -
Set the
Access-Control-Allow-Credentialsheader totrue. -
Set the header
AMP-Access-Control-Allow-Source-Originto the source domain of the document (e.g.https://mysite.com). -
Return the JSON configuration in the response body.
-
For a full example, check out this repository on GitHub. If you’re using the Google Analytics vendor configuration, this is all you need to do. If you’d like to combine this concept with Google Tag Manager, read on!
Google Tag Manager proxy using NodeJS
As Simo covered in his GTM/AMP guide, Google Tag Manager allows us to build Tags and Triggers in a web UI, then compile those down into a JSON configuration in the format AMP expects. If we used the standard GTM implementation, however, the container request is done directly to GTM’s server, which means our custom API wouldn’t be able to serve the proper Client ID. That said, you can still combine both techniques. You’ve just got to roll up your sleeves a little.
Here’s a truncated example, using Node and Express. For the complete code, visit this GitHub repository.
app.get('/gtm-analytics.config.json', (req, res) => {

  const domain = req.headers.host.split(':')[0]
  const gaCookie = req.cookies._ga || generateGaCookie(domain)
  const clientId = parseClientIdFromGaCookie(gaCookie)
  const cookieString = generateCookieString({
    name: '_ga',
    value: gaCookie,
    domain: domain.replace('www.', ''),
    path: '/',
    expires: new Date(1000 * 60 * 60 * 24 * 365 * 2 + (+new Date)).toGMTString()
  })

  res.setHeader('Set-Cookie', cookieString)
  res.setHeader('Access-Control-Allow-Origin', 'https://cdn.ampproject.org')
  res.setHeader('Access-Control-Expose-Headers', 'AMP-Access-Control-Allow-Source-Origin')
  res.setHeader('Access-Control-Allow-Credentials', 'true')
  // AMP-specific header, check your protocol
  res.setHeader('AMP-Access-Control-Allow-Source-Origin', 'https://' + domain)

  request.get({
    url: 'https://www.googletagmanager.com/amp.json',
    qs: req.query,
    json: true
  }, (err, response, data) => {

    if (err) data = {"vars": {}}  // Add additional error handling here

    data.vars.clientId = clientId

    data.requests = Object.keys(data.requests)
      .reduce((map, key) => {

        map[key] = data.requests[key].replace(/(&cid=)[^&]+/, '$1${clientId}')
        return map

      }, {})

    res.json(data)

  })

})
Here’s another checklist, this time for combining your custom Client ID workaround with the Google Tag Manager AMP container. I’ve bolded the new steps.
-
In your page HTML:
-
Add the
amp-analyticsscript tag andamp-analyticscomponent to your AMP templates. -
Point
configattribute to an endpoint or API on your own server. -
Set
data-credentialsattribute toinclude.
-
-
In your web server:
-
In the request handler in your web server, extract the Client ID from the
_gacookie or generate a new one -
Request the container JSON from GTM, passing along all query parameters from the original
amp-analyticsrequest. -
Replace all instances of ‘CLIENT_ID(AMP_ECID_GOOGLE)’ in the request with ‘${clientId}’.
-
Add the
clientIdparameter to thevarsobject in the JSON configuration. Set it to the Client ID from the_gacookie. -
Add the
Set-Cookieheader with the_gacookie, set to expire in two years. -
Set the
Access-Control-Allow-Originheader tohttps://cdn.ampproject.org. Note: Wildcards (*) are invalid in this context. -
Set the
Access-Control-Expose-Headersheader toAMP-Access-Control-Allow-Source-Origin. -
Set the
Access-Control-Allow-Credentialsheader totrue. -
Set the header
AMP-Access-Control-Allow-Source-Originto the source domain of the document (e.g.https://mysite.com). -
Return the JSON configuration in the response body.
-
In your site code you’ll need:
<!-- Google Tag Manager -->
<amp-analytics config="//www.yourdomain.com/gtm-analytics.config.json?id=GTM-XXXXX>m.url=SOURCE_URL" data-credentials="include"></amp-analytics>Congratulations, you have created a web proxy that fetches the Google Tag Manager container from Google’s servers and modifies the JSON to leverage the value stored in the _ga cookie.
Google Tag Manager proxy with WordPress
This blog is running on WordPress, so Simo wanted to see how trivial it would be to create the endpoint. As it turns out, it’s very simple indeed.
WordPress provides the rest_api_init hook, which lets you create an HTTP request endpoint on your web server:
// REST API for GTM container
add_action( 'rest_api_init', function() {
    register_rest_route(
        'amp-gtm',
        '/amp.json',
        array(
            'methods' => 'GET',
            'callback' => 'retrieve_gtm_json',
        )
    );
});
That piece of code in your functions.php would create a GET request endpoint in your web domain path /wp-json/amp-gtm/amp.json. If a GET request to this endpoint is recorded, the callback function named retrieve_gtm_json is then invoked:
// Generate random Client ID
function generate_ga_client_id() {
    return rand(100000000,999999999) . '.' . time();
}

// Set cookie to expire in 2 years
function getCookieExpirationDate() {
    return date('D, j F Y H:i:s', time() + 60*60*24*365*2);
}

// Callback for the GET request
function retrieve_gtm_json( $data ) {
    /* Get the hostname of the request origin, and parse it for the
     * pure domain name. */
    $domain = explode(':', $data->get_header('Host'))[0];
    $domainName = str_replace('www.', '', $domain);

    // Get the number of parts in the domain name
    $domainLength = count(explode('.', $domainName));

    /* Check if the browser already has the _ga cookie.
     * If not, generate a new cookie. */
    $cid = $_COOKIE['_ga'];
    if (!isset($cid)) {
        $cid = "GA1.{$domainLength}." . generate_ga_client_id();
    }

    /* Store the actual Client ID (last two numbers) of the
     * _ga cookie value in the $cidNumber variable */
    $cidNumber = preg_replace('/^GA.\.[^.]+\./','',$cid);

    // Get all HTTP request parameters
    $query = $_SERVER['QUERY_STRING'];

    /* Fetch the actual GTM container, by passing the valid query parameters from
     * the original request. */
    $container = file_get_contents("https://www.googletagmanager.com/amp.json?{$query}");

    // Replace the &cid; parameter value with ${clientId}
    $container = preg_replace('/(&cid=)[^&]+/','${1}${clientId}', $container);

    // Add the clientId to the "vars" object in the container JSON.
    $container = json_decode($container);
    $container->vars->clientId = $cidNumber;

    // Build a new HTTP response from the modified configuration file.
    $response = new WP_REST_RESPONSE( $container );

    // Add the required headers (Set-Cookie, most importantly) to the Request
    $response->header( 'Set-Cookie', "_ga={$cid}; Path=/; Expires=" . getcookieExpirationDate() . " GMT; Domain={$domainName};");
    $response->header( 'Access-Control-Allow-Origin', 'https://cdn.ampproject.org');

    // Remember to check the protocol and change to http if that's where your domain is
    $response->header( 'AMP-Access-Control-Allow-Source-Origin', "https://{$domain}");
    $response->header( 'Access-Control-Expose-Headers', 'AMP-Access-Control-Allow-Source-Origin');

    // Return the HTTP response.
    return $response;
}
This is the API script that handles requests for the Google Tag Manager container. The proxy fetches the GTM container, and replaces the default Client ID with the AMP variable ${clientId}. This, in turn, is added to the configuration JSON with the value retrieved from the _ga cookie. If the _ga cookie doesn’t exist, a new one is generated.
In your site code, you’ll need:
<!-- Google Tag Manager -->
<amp-analytics config="//www.yourdomain.com/wp-json/amp-gtm/amp.json?id=GTM-XXXXX>m.url=SOURCE_URL" data-credentials="include"></amp-analytics>This request is then passed to your endpoint, and the process described above will take place.
Google Analytics setup
Not much has to be done in Google Analytics, but you will want to add ampproject.org into the Referral Exclusion List of your Google Analytics property settings. Otherwise, if the user follows any link from the cached AMP page to the rest of your site, the click will start a new session with a referral from ampproject.org.
Thanks to Adrian Vender for this tip!
Summary
This is a fairly technical topic, but we, the authors, found it necessary to point out this potential flaw in how doing analytics in Accelerated Mobile Pages might be detrimental to your overall tracking plan.
The fact that AMP doesn’t automatically leverage the _ga cookie if the request is to Google Analytics, for example, is a bit odd. Similarly, Google Tag Manager defaulting to AMP_ECID_GOOGLE is weird too, considering how much easier things would be if you could provide a cookie name or an AMP variable for the Client ID in the request.
Because Google’s AMP cache is a different domain from your own, there’s really no way around Client ID stitching that wouldn’t involve the type of third-party cookie scheme as described in this guide. The request must be allowed to process the cookies written on your domain, so that the same _ga cookie value can be used on the pages in the external domain.
Luckily the technical solution to this dilemma is not too complicated. The proxy you create in your web server is simple, and should be easy to configure with any web server software. You might want to add some enhancements of your own, such as caching the Google Tag Manager container locally, and we’d love to hear your tips and experiences in the comments below.
We hope this article gets your stAMP of approval, and that you’ve learned an AMPle amount of new things. Sorry for the puns.
