Google Analytics 4: Ecommerce Guide For Google Tag Manager
Last updated 17 March 2023: Item-scoped Custom Dimensions are now available in Google Analytics 4.
This is an implementation guide for Google Analytics 4. The guide is aimed at Google Tag Manager users and has been designed to complement the official documentation.
A thing to keep in mind is that Google Analytics 4 (GA4) is still very new. The Google Tag Manager integration is still in its infancy, and implementation places a lot of responsibility on accurate tagging and proper dataLayer instrumentation.
In this guide, I’ll explain the new data model from an implementation perspective, and walk you through the nuts and bolts on how to get the different parts of GA4’s Ecommerce machine to work in unison.
Table of Contents
Make sure you follow the official documentation as well:
- Google Analytics 4 data schema
- Google Analytics 4 instructions for Google Tag Manager implementation

For help with analysis and what to do once the data hits the reports, make sure to follow Krista Seiden’s blog, where she’s already added a walkthrough of the Ecommerce reports in Google Analytics 4.
Other great resources include Charles Farina’s blog and Ken William’s Google Analytics 4 resource.
XThe Simmer Newsletter
Subscribe to the Simmer newsletter to get the latest news and content from Simo Ahava into your email inbox!
Universal Analytics vs. Google Analytics 4
It’s only fair to start with a comparison between Universal Analytics’ Enhanced Ecommerce data model and the one put forth by GA4. They’re similar in many places, but also have some key differences that will be covered here.
Available actions
Let’s begin with the types of events you can collect. They represent the discrete funnel steps that the data model uses to reflect the funnels in your website.
The GA4 action in the table below represents the Event name you need to configure in your site’s code or Google Tag Manager tags when building the respective Ecommerce hit to GA4.
The Corresponding Enhanced Ecommerce action column refers to what the analogy in Enhanced Ecommerce would be. It’s not just an analogy, though, as there’s a migration path available when upgrading from Google Analytics Enhanced Ecommerce to GA4 Ecommerce.
| GA4 action | Corresponding Enhanced Ecommerce action | Description |
|---|---|---|
view_promotion |
promoView |
View of promotions. |
select_promotion |
promoClick |
Click on a promotion. |
view_item_list |
impressions |
View of item impressions in a list. |
select_item |
click |
Click on an item in a list. |
view_item |
detail |
View item details. |
add_to_cart |
add |
Add item(s) to cart. |
add_to_wishlist |
N/A | Add item(s) to a wishlist. |
remove_from_cart |
remove |
Remove item(s) from the cart. |
view_cart |
N/A | View the contents of the shopping cart. |
begin_checkout |
checkout* |
Initiate the checkout process. |
add_shipping_info |
checkout_option* |
Add shipping info during the checkout flow. |
add_payment_info |
checkout_option* |
Add payment info during the checkout flow. |
purchase |
purchase |
Purchase items that were checked out. |
refund |
refund |
Refund one or more items. |
* The checkout funnel is collected a bit differently with Google Analytics 4. There are no steps anymore - rather, GA4 offers you the (presumably) most popular checkout steps of adding shipping and payment info to the purchase.
The data model includes some welcome additions that were missing from Universal Analytics, namely add_to_wishlist and view_cart.
Product data
The data model for products has changed somewhat as well. The concept of a product list has been widened to include a list identifier, and multi-level product categories have been expanded to their individual parameters.
| GA4 parameter | Corresponding Enhanced Ecommerce parameter | Description |
|---|---|---|
item_id |
id |
ID / SKU of the product. |
item_name |
name |
Name of the product. |
item_list_name |
list |
Product list name. |
item_list_id |
N/A | Product list identifier. |
index |
position |
Product position in the list. |
item_brand |
brand |
Product brand. |
item_category |
category |
Product category top-level. |
item_category2 |
category |
Product category 2nd level (or alternative). |
item_category3 |
category |
Product category 3rd level (or alternative). |
item_category4 |
category |
Product category 4th level (or alternative). |
item_category5 |
category |
Product category 5th level (or alternative). |
item_variant |
variant |
Item variant name or description. |
affiliation |
N/A | The store affiliation for this event. |
discount |
N/A | Any discount associated with this product. |
coupon |
coupon |
Coupon associated with this product. |
price |
price |
Price of this product. |
currency |
N/A | Currency of the price that is collected. |
quantity |
quantity |
Quantity of the item. Must be an integer. |
As with Enhanced Ecommerce, either the item_id or item_name is always required when products are dealt with. The other parameters might have varying levels of importance, but those two are the only ones that are required.
Some parameters such as affiliation and currency are brought from the action-level in Enhanced Ecommerce to product-level in Google Analytics 4. It’s an interesting choice, as it might not reflect reality to specify these on a product-by-product basis, but it’s never a bad thing to have as many parameters as possible available.
Promotion data
With GA4, it’s still possible to collect information about promotions. As with Enhanced Ecommerce, they’re a bit of an odd duck when it comes to the data model, as they describe banners and other promotions that might not be actually related to any specific products.
| GA4 parameter | Corresponding Enhanced Ecommerce parameter | Description |
|---|---|---|
promotion_id |
id |
ID of the promotion. |
promotion_name |
name |
Name of the promotion. |
creative_name |
creative |
Name of the creative associated with the promotion. |
creative_slot |
position |
Name of the slot where the creative was shown. |
location_id |
N/A | The physical location associated with the item. It’s recommended to use the Google Place ID that corresponds to the location. |
As with Enhanced Ecommerce, either the promotion_id or promotion_name is always required when promotions are sent.
Action data
The importance of different action parameters varies greatly by whatever action is being measured. Broadly speaking, action data refers to parameters the describe the action itself rather than the products within.
| GA4 parameter | Corresponding Enhanced Ecommerce parameter | Description |
|---|---|---|
transaction_id |
id |
Unique ID for the transaction. Required for purchase and refund events. |
affiliation |
affiliation |
The store or affiliation where the purchase occurred. |
value |
revenue |
The value associated with the event. |
currency |
currencyCode |
Local currency of the collected price. Required for purchase events. |
tax |
tax |
How much tax is included in the total revenue of the purchase. |
shipping |
shipping |
Shipping costs included in the total revenue of the purchase. |
items |
products/impressions/promotions |
Products associated with the event. |
shipping_tier |
option |
The shipping tier used with add_shipping_info. |
payment_type |
option |
The payment method sent with add_payment_info. |
coupon |
coupon |
Coupon associated with the event. |
promotion_id |
N/A | ID of a promotion associated with the event. |
promotion_name |
N/A | Name of a promotion associated with the event. |
creative_name |
N/A | Name of a promotion creative associated with the event. |
creative_slot |
N/A | Name of the creative slot associated with the event. |
location_id |
N/A | The physical location associated with the item. It’s recommended to use the Google Place ID that corresponds to the location. |
item_list_name |
N/A | Name of the list associated with the event. |
item_list_id |
N/A | ID of the list associated with the event. |
Parity issues
It looks like there are certain aspects of Enhanced Ecommerce that have not been transported to GA4 yet.
These are things that I hope (and expect) to see in the product before long, at which point I will naturally update this article accordingly.
Product List Attribution
Product list attribution is a staple of Enhanced Ecommerce. It’s extremely useful, as it lets you build the dataLayer so that product list information does not need to be persisted from action to action.
There’s no evidence that a similar attribution setup works with GA4 right now. Granted, attribution is part of a data model that might simply not be exposed in GA4 Ecommerce reports yet, so this is something that is likely to be fixed in the near future. It would be odd to have product lists as a data type without them actually having any functionality.
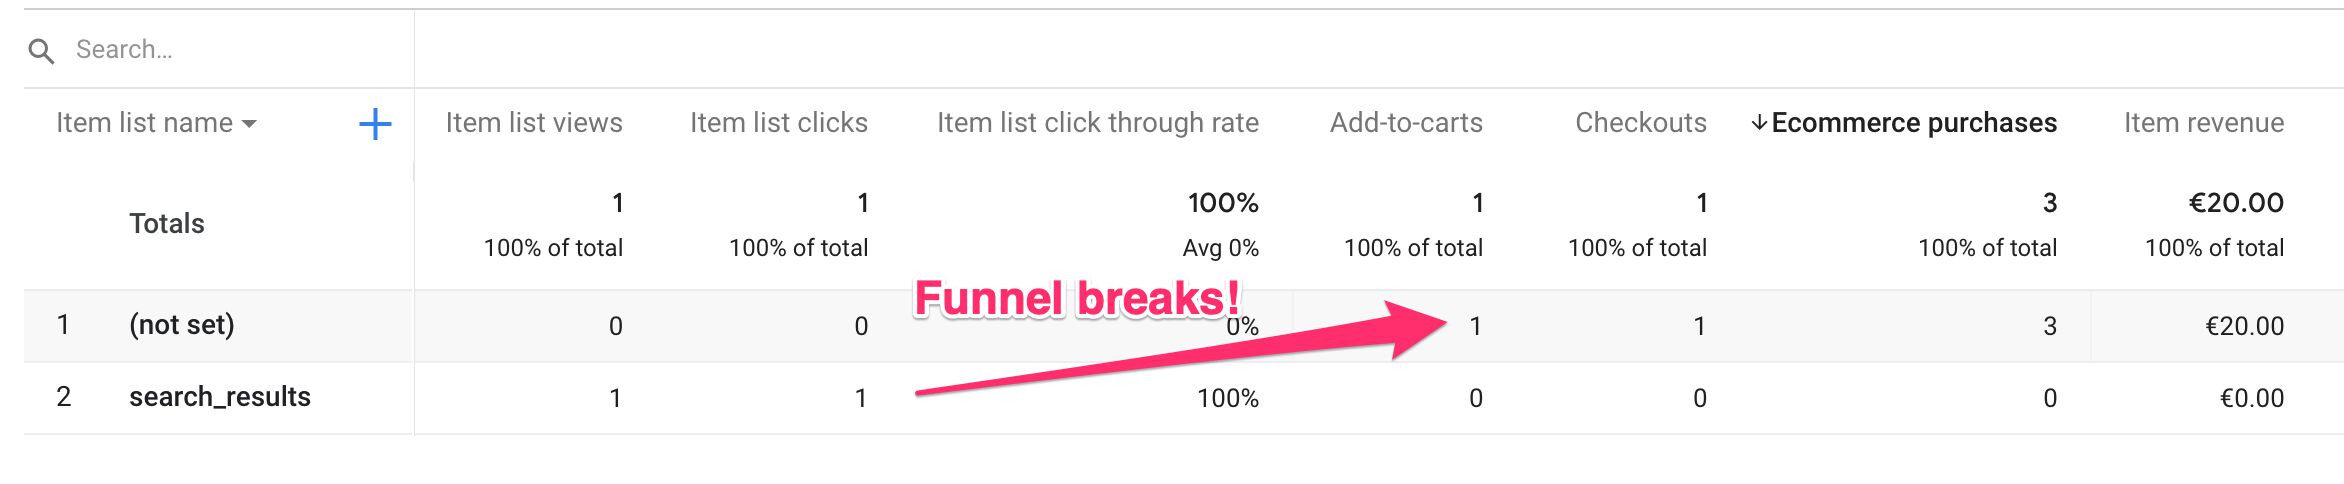
Note that the GA4 data model allows you to send things like item_list_name and promotion_id in any Ecommerce object to GA4. You can add them into an items array to indicate that specific items are in this current action due to an interaction with a list or promotion earlier in the session. Or you can add them as regular parameters to the event tag itself, in case the current Ecommerce action took place in a specific item list or within some promotion context.
Checkout measurement
As mentioned above, checkout tracking has certainly changed between Enhanced Ecommerce and GA4.
Where Enhanced Ecommerce introduces a combination of funnel steps (e.g. view cart, shipping, payment) and checkout options (e.g. shipping method, payment method), GA4 only has the begin_checkout event for establishing entrance into the checkout flow.
There are no additional steps. Rather, you can use actions such as view_cart, add_shipping_info, and add_payment_info to flesh out the funnel.
It would be cool to be able to specify a more complete funnel in whatever way I want, and it would also be amazing if we could have multiple different checkout funnels in the data schema.
But on the other hand, I don’t think this is a very big omission currently. I wouldn’t be too surprised if this isn’t expanded to have full parity with Enhanced Ecommerce.
Implementation with Google Tag Manager
Update 24 August 2022: You can now load the Ecommerce data in your GA4 Event tags directly from the
dataLayer(if you follow the prescribed GA4 schema) or by using a Custom JavaScript variable (or a variable template) that returns an object in the same schema.
When implementing GA4 Ecommerce using Google Tag Manager, the beta-ness of the feature really strikes you hard. The only available event tag type is a generic chassis used for sending any type of event. There’s no built-in Ecommerce integration, as you’ll need to populate the parameters manually.
It would be so much simpler to just have a single tag for Ecommerce events, which automatically collects the action parameters and items from the dataLayer, depending on which event name is included in the dataLayer object.
I’m sure we’ll see something like this before the tags are out of beta, though.
An additional hiccup is the Custom JavaScript variable (or custom template) option, which we’ve been spoiled with when using Enhanced Ecommerce.
Even though you can use a Custom JavaScript variable (or a custom template) to map the items array however you wish, you’re still forced to add all the other parameters as individual fields into the tag.
I hope we get an option similar to Enhanced Ecommerce, where the entire event payload could be fetched from a variable. That way we could have a really dynamic setup and minimize the number of tags we’re using. Not just for Ecommerce but for all GA4 data collection!
Item-scoped Custom Dimensions
Google Analytics 4 lets you send up to 27 custom parameters in the items array. Out of these, you can register 10 (free version of GA4) or 25 (enterprise version) as Item-scoped Custom Dimensions in the Google Analytics 4 user interface.
 Custom item parameters, where k0 is the parameter name prefix, and v0 is the value prefix.
You can create the Custom Dimension following the regular process in the Admin section of Google Analytics 4.
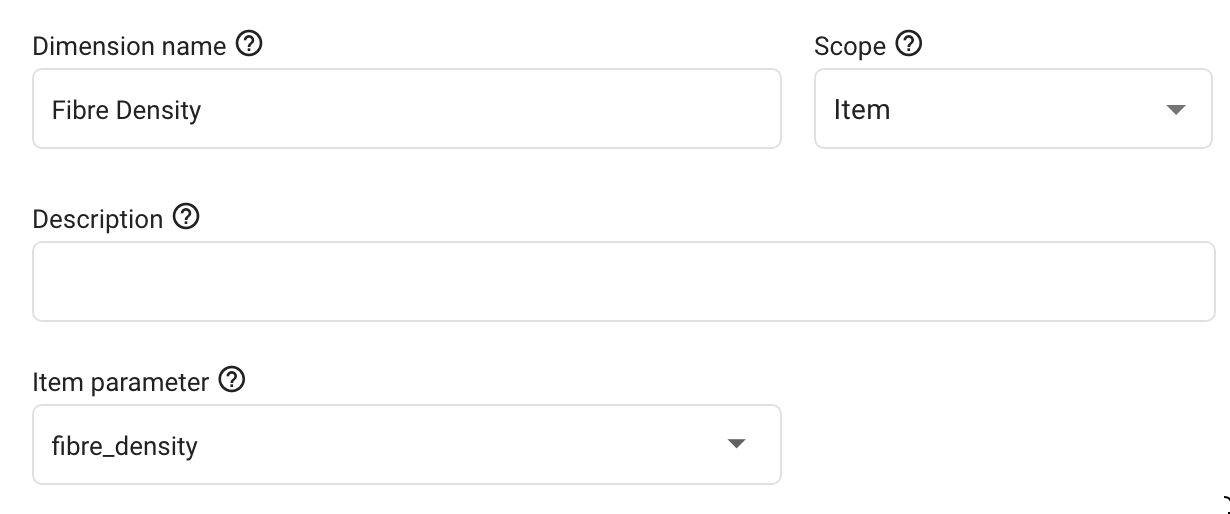
Currently, item-scoped parameters are not part of the Google Analytics 4 export to BigQuery.
Migrating from Enhanced Ecommerce
Before you start rewriting your dataLayer objects, do note that Google Analytics 4 Ecommerce does support the Enhanced Ecommerce data model - at least to some extent.
The main path of migration is that you do not have to provide an items object in GA4 syntax. Instead, you can set the value of the items parameter in the tag to an impressions or promotions or products variable in your Enhanced Ecommerce object. GA4 will be able to map the parameter names in the Enhanced Ecommerce products object to their corresponding parameters in the Google Analytics 4 schema.
If you read through the comparison chapters above, you’ll remember that there are some distinct differences between these data models. For example, there is no item_list_id analogy in Enhanced Ecommerce, and the product category is split into five different levels rather than the slash-separated single parameter in Enhanced Ecommerce.
Note! You do not have to follow the migration path. Considering all the new things that GA4 data model enables, it might make sense to upgrade from Enhanced Ecommerce to GA4 and not resort to using the “old” data schema in your setup.
I’ve built a custom variable template that you can also use to map an Enhanced Ecommerce products (or impressions or promotions) object to its GA4 counterpart. It has some additional bells and whistles, such as automatic parsing of a multi-level product category into the five separate item_category parameters, and a table that lets you map Enhanced Ecommerce’s product-scoped custom dimensions to custom item parameters in the GA4 items objects.
Event names
One of the key features of Google Analytics 4 is how it utilizes the event name to carry quite a bit of semantic weight. To see the list of event names associated with Ecommerce collection, see the chapter Available actions above.
When building the tags to send the Ecommerce data to GA4, you need to make sure that the Event name field is always set to the correct value. A typo or a mismatch between the event name and the parameter map will lead to data quality issues that are impossible to fix retroactively.
Setting the fields
To create an Ecommerce tag in Google Tag Manager, you need to create a new Google Analytics 4 Event tag.
The first thing you need to establish is what its Configuration tag is. For more information about this see this article.
Next, you need to set the Event name. Whether you use a variable for this field or hard-code it, you need to be mindful of what the reserved event names for GA4 are. As you go through the chapters below, each sub-chapter devoted to an Ecommerce action will include details on what the event name should be for that particular action.
Individual parameters are set by adding them to the Event Parameters table. For the most part, you’ll only need to add the items parameter, but some actions (such as purchase) require additional fields to be set.
If you use a Data Layer variable to pull in an
itemsarray, for example, do be mindful of recursive merge. You might want to engineer the setup so that you always use Version 1 of the Data Layer variable to avoid values “leaking” from one object to another.
Trigger
As before, make sure you use a trigger on the tag that fires when the relevant Ecommerce object is pushed into dataLayer.
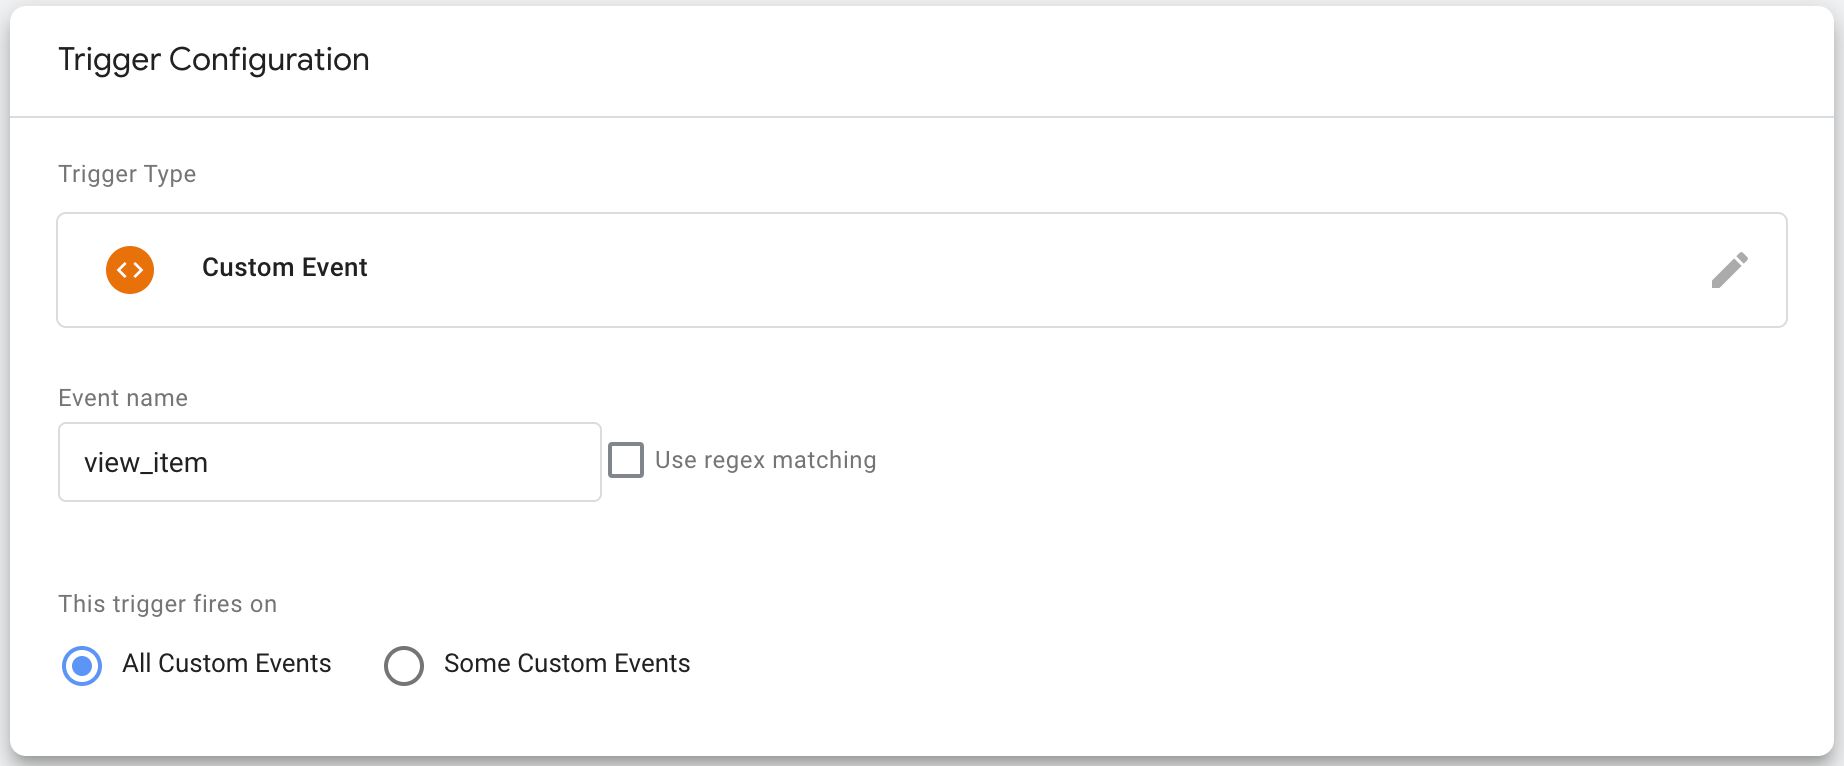
This means that you’ll want to engineer the dataLayer so that each Ecommerce event is its own, distinct push, and each object has the event key. This way you can create a *Custom Event trigger for this event value in order to fire the tag at the exact right moment.
Tips for server-side tagging
One possible path of migration from Enhanced Ecommerce to GA4 is to handle the logic in your server-side tagging setup.
Obviously, it’s not a suitable option for everyone (as there are costs involved), but it would provide a pretty sleek path to having the single Universal Analytics stream sent to the server-side container be fanned out to not just the Universal Analytics endpoint but also to GA4.
When you send a Universal Analytics Enhanced Ecommerce event to a server container, the built-in Universal Analytics client chops it up and outputs an event data object like this:
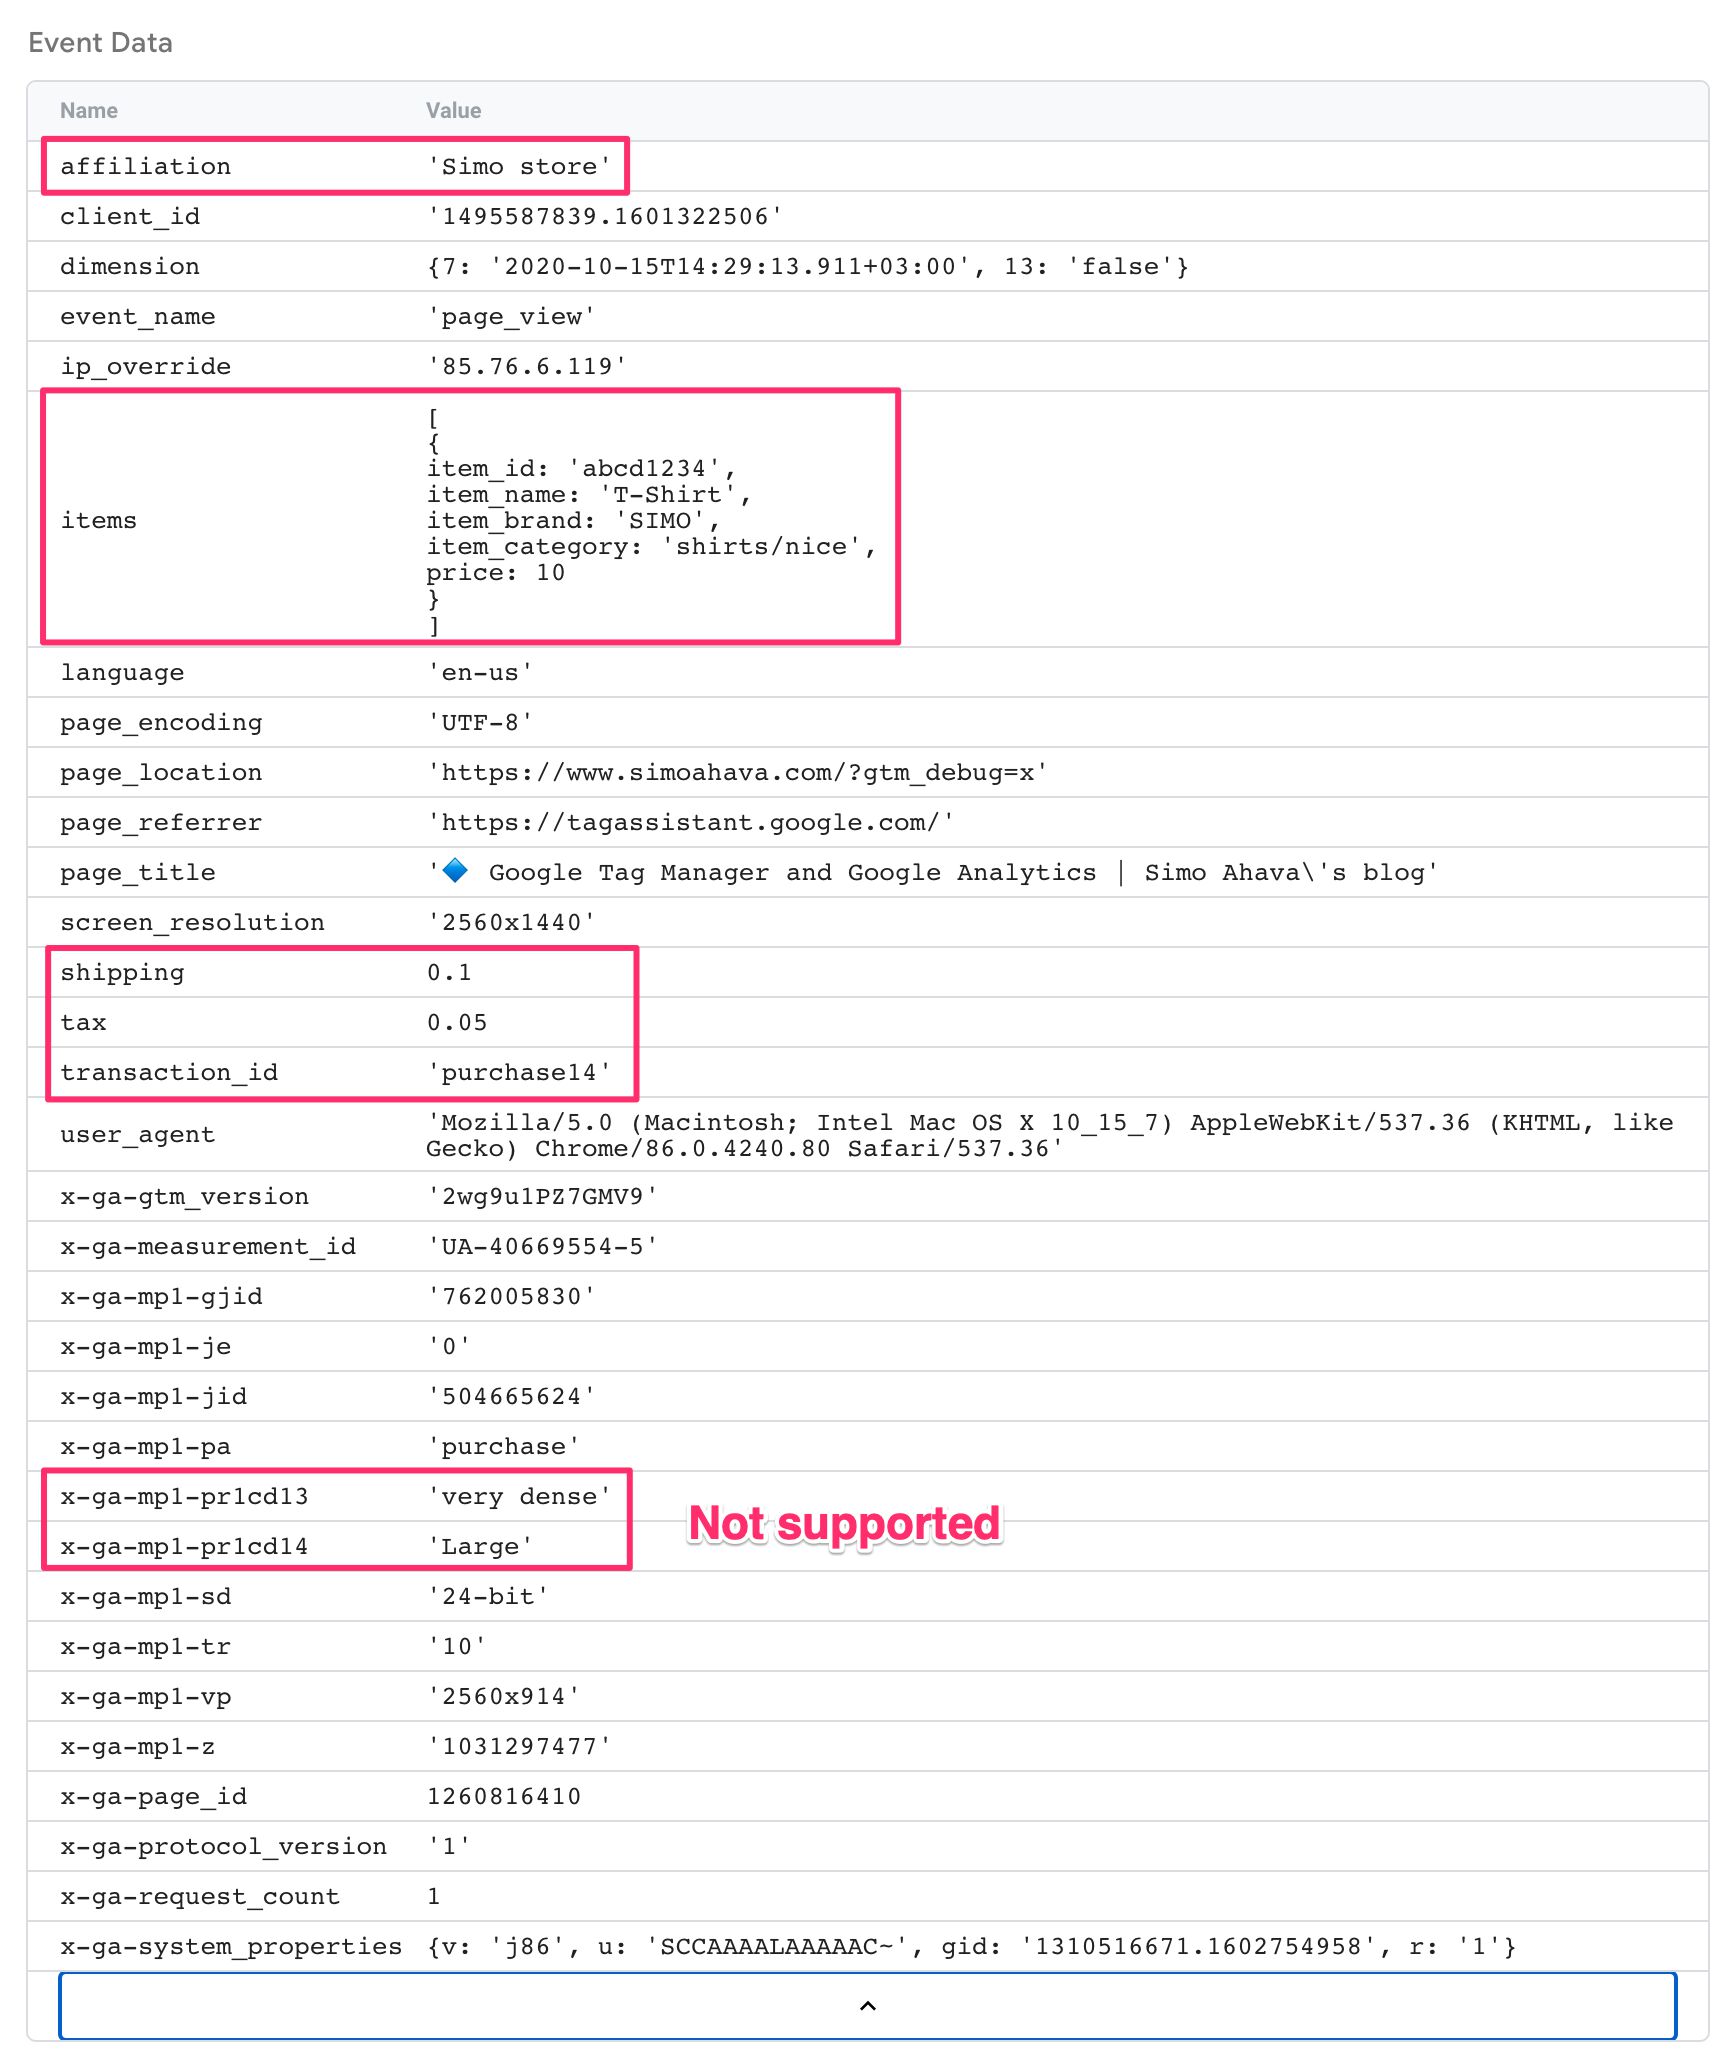
As you can see, the model chops up the Enhanced Ecommerce payload in the Measurement Protocol request and outputs the values into standard event parameters. Notably, product-scoped custom dimensions are not mapped to the items array.
You could thus fire a GA4 tag in the server container with the Universal Analytics client, and it will send a well-formed event to GA4. You’d just need to edit the event_name first, as page_view would not be the correct name for a purchase. You’ll also need to add the correct Measurement ID.
The challenge is, again, creating a custom mapping of the items array, as the Server container does not currently let you run JavaScript variables.
You could build a custom tag template in server-side tagging, but it might be better to just wait for Google to improve the migration path.
Action reference
The following chapters outline how to instrument the dataLayer and the Google Tag Manager tags to measure Ecommerce actions in GA4.
Included with each action chapter is an example of how a migration setup from Universal Analytics to GA4 might work.
I want to reiterate that instead of using the Universal Analytics
dataLayer, you should either engineer or plan to engineer thedataLayerso it’s compatible with the new actions and item parameters that GA4 offers.
view_promotion
A view_promotion event is sent when the user sees one or more promotion items on the page. Promotions are a different data model from the rest of GA4 Ecommerce, as they do not necessarily involve products at all, but rather banners, campaigns, and such.
Data Layer composition
A sample dataLayer object for the view_promotion event could look like this (adapted from the official documentation):
window.dataLayer = window.dataLayer || [];
window.dataLayer.push({
  event: 'view_promotion',
  ecommerce: {
    items: [{
      promotion_id: 'sc2021',
      promotion_name: 'summer_campaign_2021',
      creative_name: 'family_in_bathing_suits_1',
      creative_slot: 'featured_items',
      location_id: 'ChIJ4Us9pPryjUYRn1MzXbSQuPA'
    },{
      promotion_id: 'wc2020',
      promotion_name: 'winter_campaign_2020',
      creative_name: 'family_in_winter_clothes_1',
      creative_slot: 'featured_items_2',
      location_id: 'ChIJ4Us9pPryjUYRn1MzXbSQuPA'
    }]
  }
});
Required parameters are either promotion_id or promotion_name.
The example in the documentation shows also
itemparameters set in the promotion view object. This is something you might consider adding if the promotion is clearly related to an item or a specific set of items. The current suite of Ecommerce reports doesn’t seem to have any options for viewing items in a promotion, but the export to BigQuery would include this information.
Migration from Enhanced Ecommerce
If you want to use the Enhanced Ecommerce promotions array instead of creating a new items object, you need to create the following variable:
- Type: Data Layer Variable
- Data Layer Variable name:
ecommerce.promoView.promotions - Data Layer Version: Version 2
Then you can add it to your GA4 view_promotion event tag as the value of the items field (see the next chapter).
You can also use my custom variable template to convert an Enhanced Ecommerce
promotionsobject automatically to the format required byview_promotion.
Tag configuration
The tag for view_promotion would look like this:
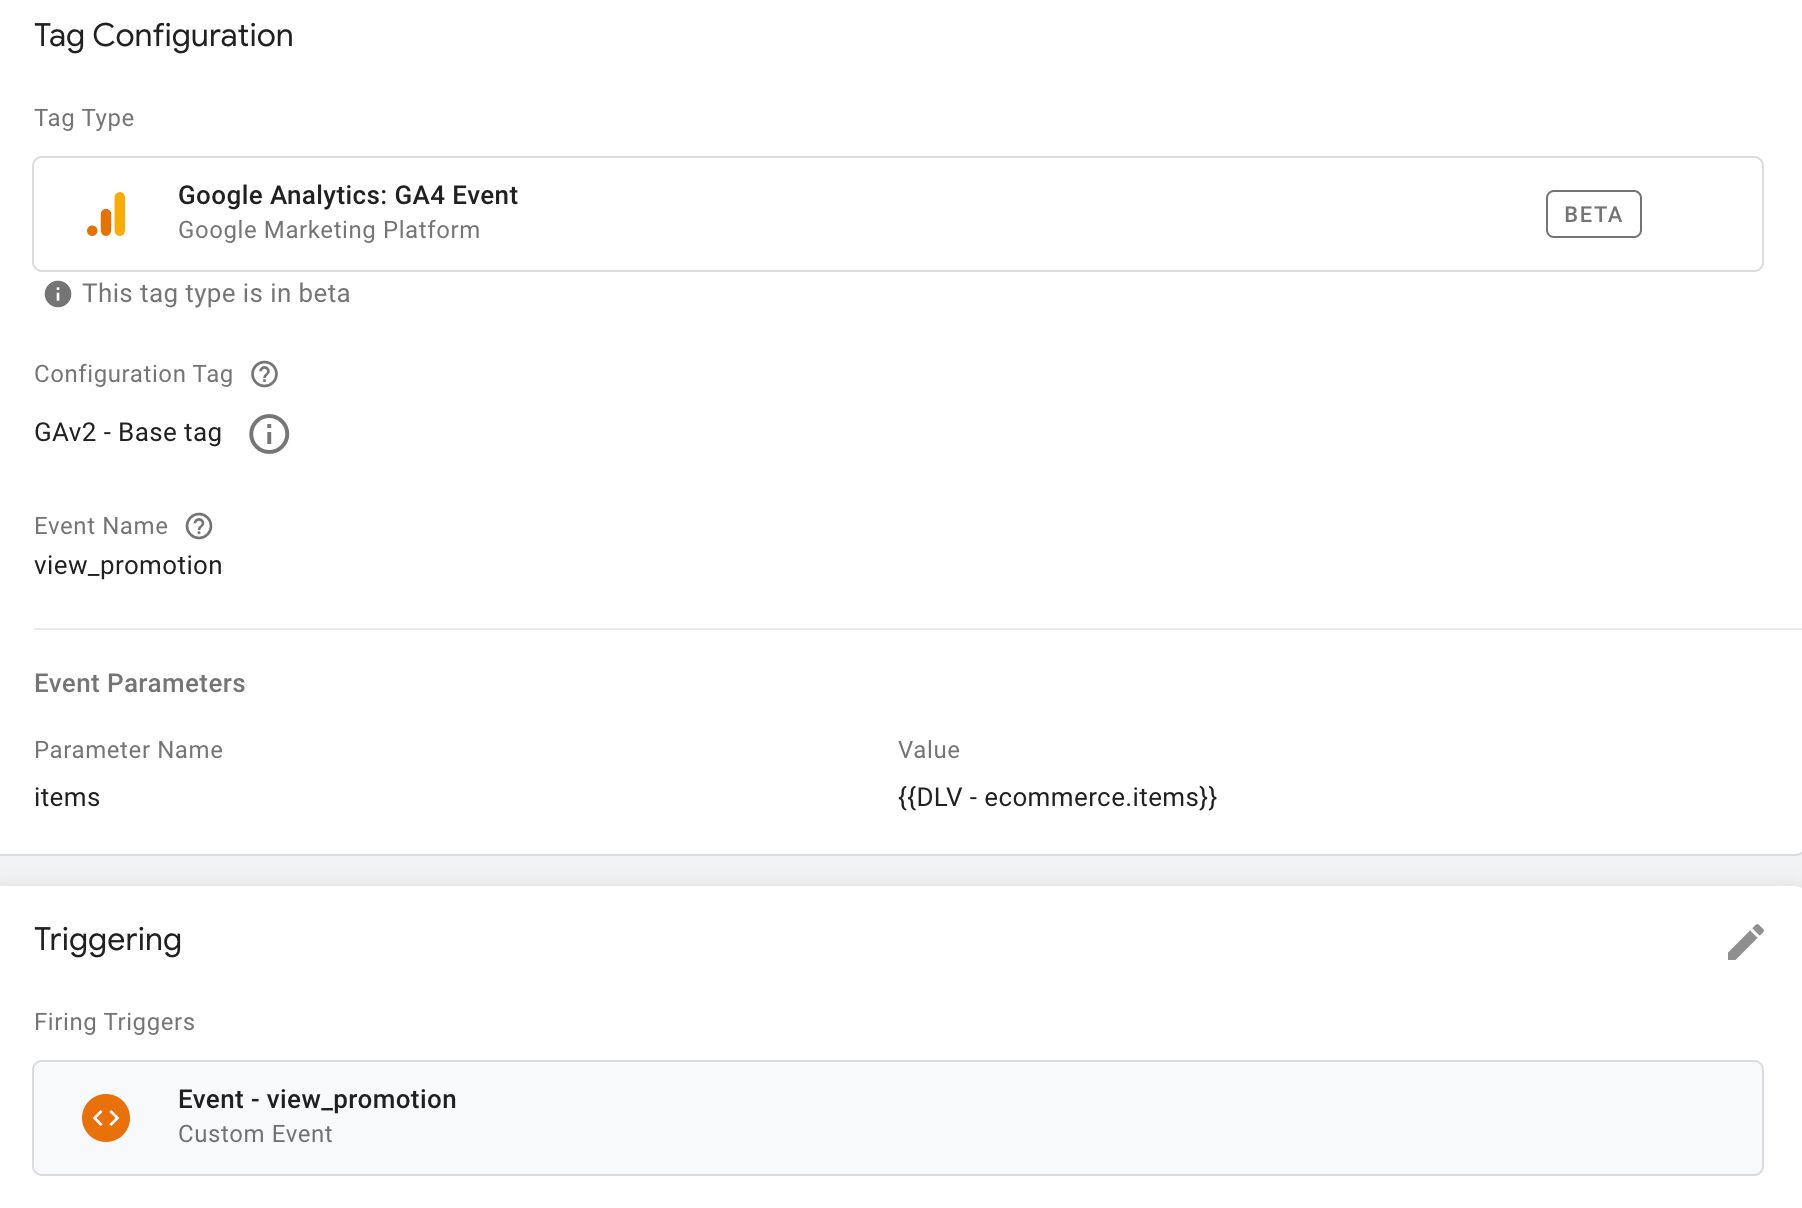
Make sure you set the Event Name field to view_promotion.
Make sure you point the items parameter to a Data Layer variable that contains the items array. This would be:
ecommerce.itemsif you’re following the steps outlined here.ecommerce.promoView.promotionsif you’ve chosen to migrate from Enhanced Ecommerce.
Remember also to set the trigger to a Custom Event trigger, set to the value of the event key in the object that was pushed to dataLayer (in the example above, it would be view_promotion).
select_promotion
The select_promotion event is sent when the user clicks or selects one of the promotions they viewed.
Data Layer composition
A sample dataLayer object for the select_promotion event could look like this (adapted from the official documentation):
window.dataLayer = window.dataLayer || [];
window.dataLayer.push({
  event: 'select_promotion',
  ecommerce: {
    items: [{
      promotion_id: 'sc2021',
      promotion_name: 'summer_campaign_2021',
      creative_name: 'family_in_bathing_suits_1',
      creative_slot: 'featured_items',
      location_id: 'ChIJ4Us9pPryjUYRn1MzXbSQuPA'
    }]
  }
});
Required parameters are either promotion_id or promotion_name.
Migration from Enhanced Ecommerce
If you want to use the Enhanced Ecommerce promotions array instead of creating a new items object, you need to create the following variable:
- Type: Data Layer Variable
- Data Layer Variable name:
ecommerce.promoClick.promotions - Data Layer Version: Version 2
Then you can add it to your GA4 select_promotion event tag as the value of the items field (see the next chapter).
You can also use my custom variable template to convert an Enhanced Ecommerce
promotionsobject automatically to the format required byselect_promotion.
Tag configuration
The tag for select_promotion would look like this:
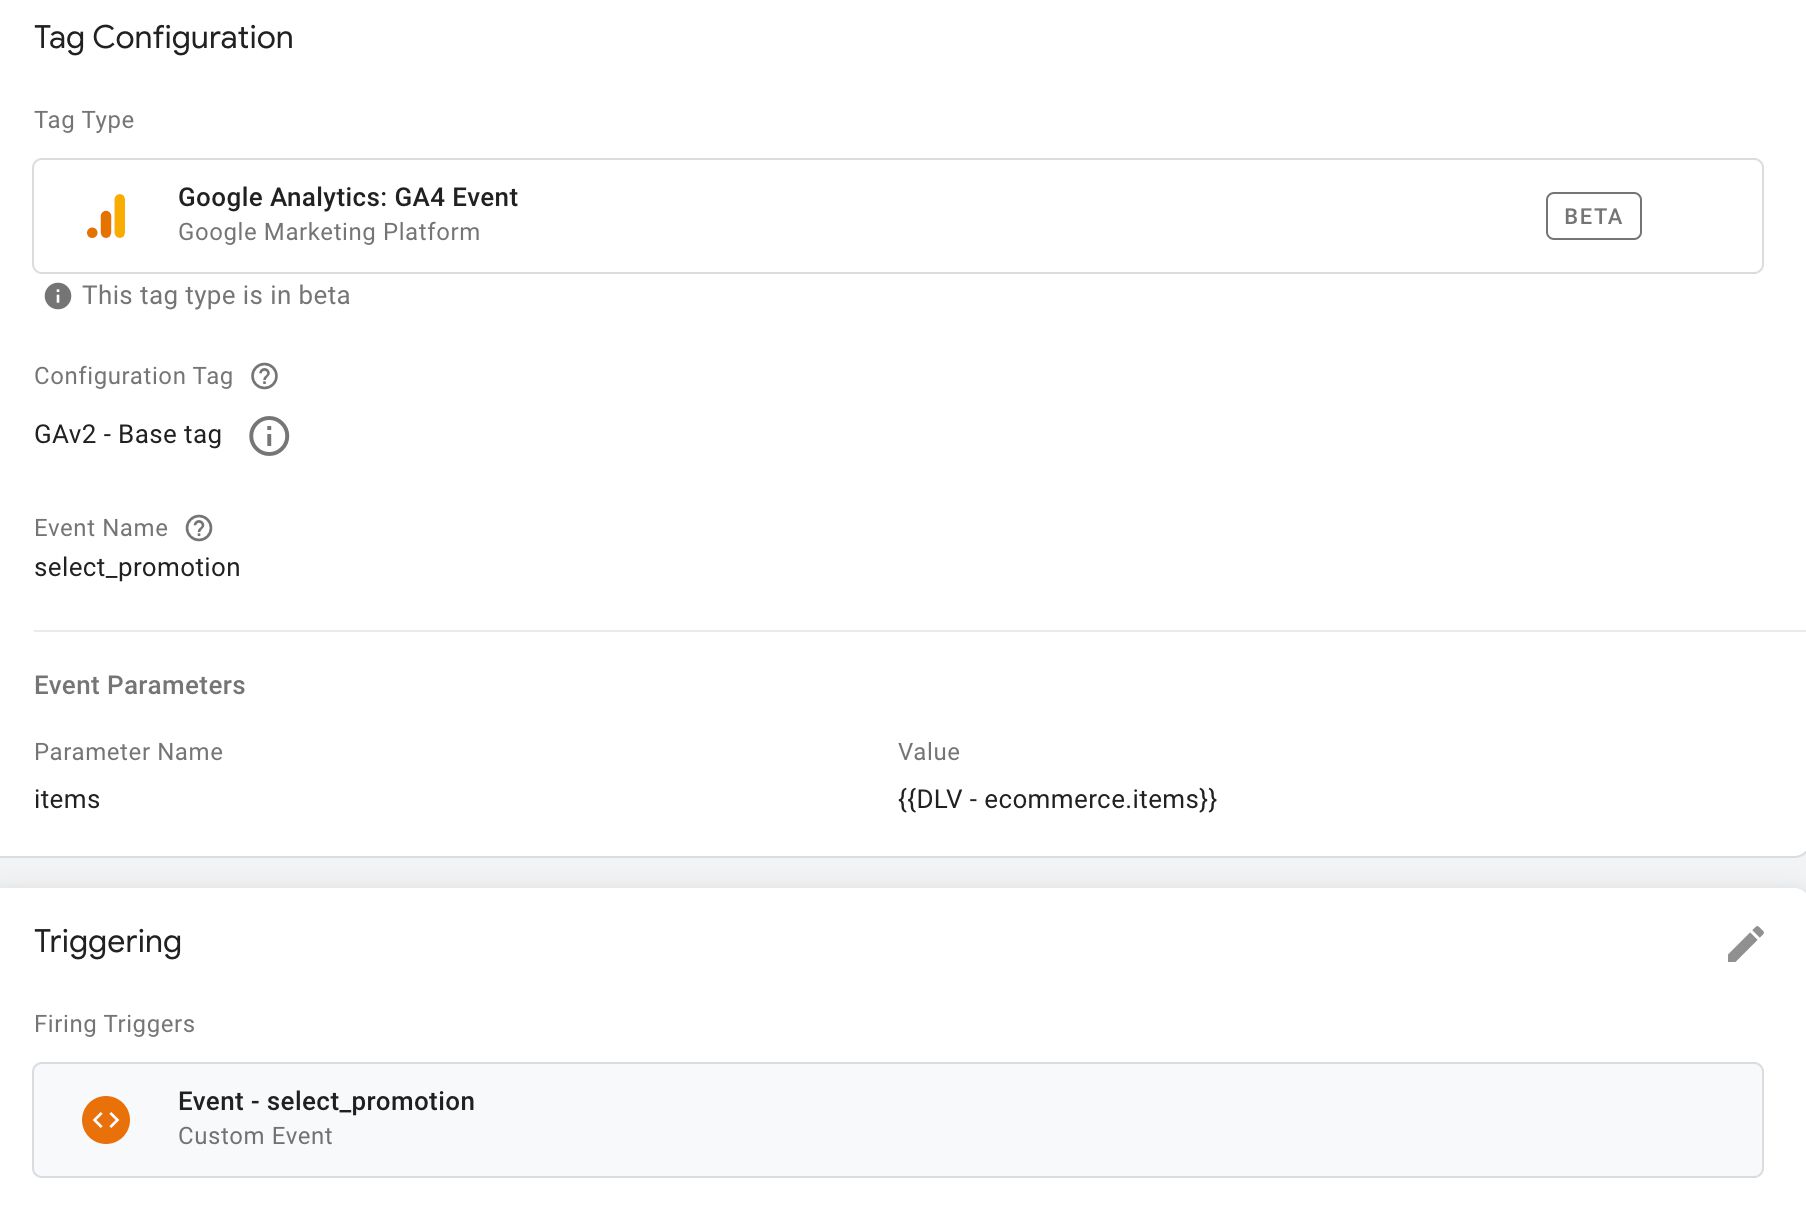
Make sure you set the Event Name field to select_promotion.
Make sure you point the items parameter to a Data Layer variable that contains the items array. This would be:
ecommerce.itemsif you’re following the steps outlined here.ecommerce.promoClick.promotionsif you’ve chosen to migrate from Enhanced Ecommerce.
Remember also to set the trigger to a Custom Event trigger, set to the value of the event key in the object that was pushed to dataLayer (in the example above, it would be select_promotion).
view_item_list
The view_item_list event is sent when the user sees a list of items in a dedicated product list. A product list could be something like search results, featured items, upsell items, and so forth.
Data Layer composition
A sample dataLayer object for the view_item_list event could look like this (adapted from the official documentation):
window.dataLayer = window.dataLayer || [];
window.dataLayer.push({
  event: 'view_item_list',
  ecommerce: {
    items: [{
      item_name: 'Finnish magical parka',
      item_id: 'mp1122',
      price: '31.10',
      item_brand: 'PARKA4LIFE',
      item_category: 'Apparel',
      item_category2: 'Coats',
      item_category3: 'Parkas',
      item_category4: 'Unisex',
      item_variant: 'Navy blue',
      item_list_name: 'Featured items',
      item_list_id: 'FI1',
      index: 1,
      quantity: '1'
    },{
      item_name: 'Swedish regular parka',
      item_id: 'sp2323',
      price: '92.00',
      item_brand: 'PARKA4LIFE',
      item_category: 'Apparel',
      item_category2: 'Coats',
      item_category3: 'Parkas',
      item_category4: 'Unisex',
      item_variant: 'Black',
      item_list_name: 'Featured items',
      item_list_id: 'FI1',
      index: 2,
      quantity: '1'
    }]
  }
});
Required parameters are either item_name or item_id. Note that you should always try to populate the item_list_name field so that you know which list was viewed.
Migration from Enhanced Ecommerce
If you want to use the Enhanced Ecommerce impressions array instead of creating a new items object, you need to create the following variable:
- Type: Data Layer Variable
- Data Layer Variable name:
ecommerce.impressions - Data Layer Version: Version 2
Then you can add it to your GA4 view_item_list event tag as the value of the items field (see the next chapter).
You can also use my custom variable template to convert an Enhanced Ecommerce
impressionsobject automatically to the format required byview_item_list.
Note! If you’re bundling impressions with some other Enhanced Ecommerce action (as you might commonly do), the custom variable template will not really work, as it always looks for the products array first.
Tag configuration
The tag for view_item_list would look like this:
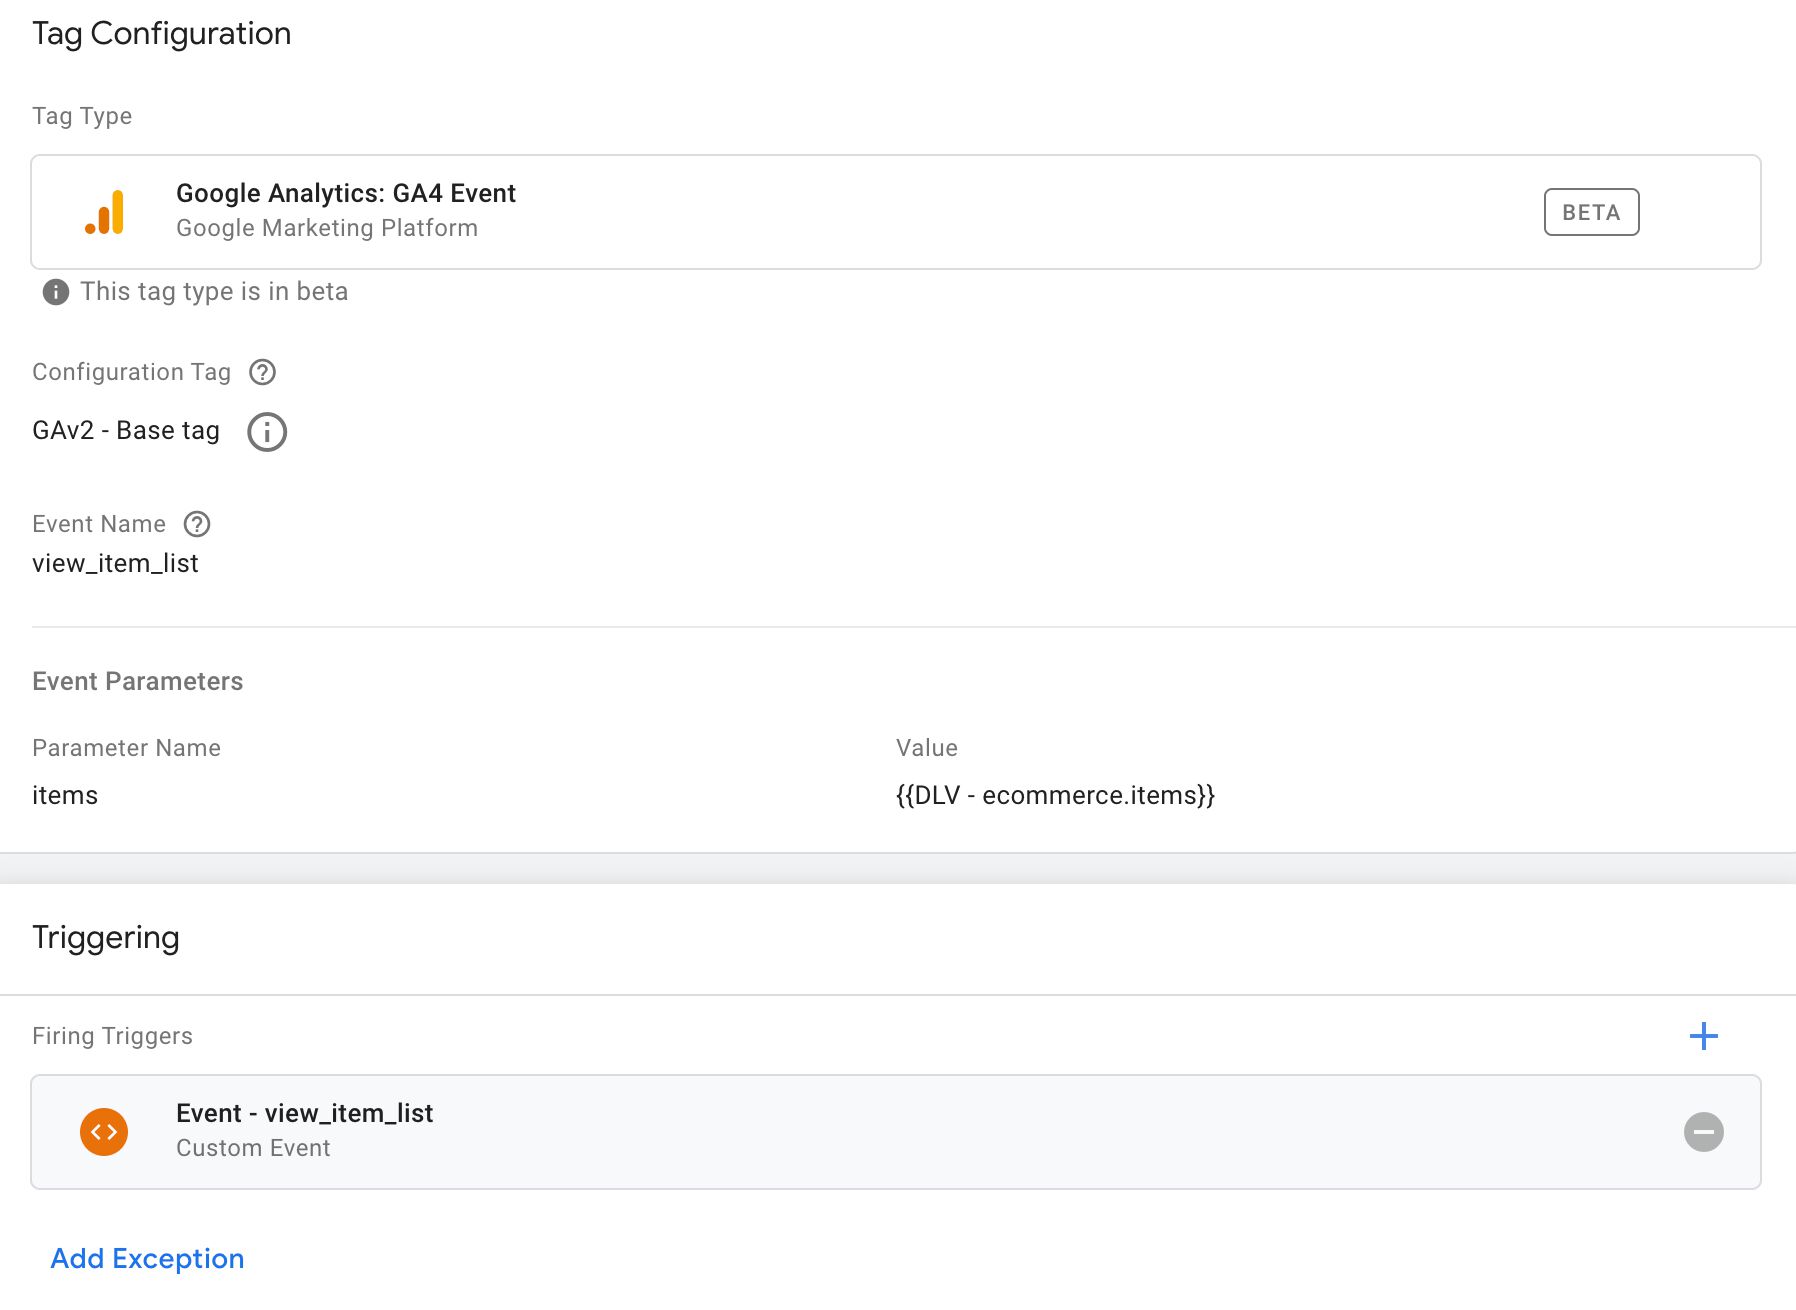
Make sure you set the Event Name field to view_item_list.
Make sure you point the items parameter to a Data Layer variable that contains the items array. This would be:
ecommerce.itemsif you’re following the steps outlined here.ecommerce.impressionsif you’ve chosen to migrate from Enhanced Ecommerce.
Remember also to set the trigger to a Custom Event trigger, set to the value of the event key in the object that was pushed to dataLayer (in the example above, it would be view_item_list).
select_item
The select_item event is sent when the user actually clicks or selects an item after viewing the item’s impression(s) in a list.
Data Layer composition
A sample dataLayer object for the select_item event could look like this (adapted from the official documentation):
window.dataLayer = window.dataLayer || [];
window.dataLayer.push({
  event: 'select_item',
  ecommerce: {
    items: [{
      item_name: 'Finnish magical parka',
      item_id: 'mp1122',
      price: '31.10',
      item_brand: 'PARKA4LIFE',
      item_category: 'Apparel',
      item_category2: 'Coats',
      item_category3: 'Parkas',
      item_category4: 'Unisex',
      item_variant: 'Navy blue',
      item_list_name: 'Featured items',
      item_list_id: 'FI1',
      index: 1,
      quantity: '1'
    }]
  }
});
Required parameters are either item_name or item_id. Note that you should always try to populate the item_list_name field so that you know which list was the target of the click.
Migration from Enhanced Ecommerce
If you want to use the Enhanced Ecommerce products array instead of creating a new items object, you need to create the following variable:
- Type: Data Layer Variable
- Data Layer Variable name:
ecommerce.click.products - Data Layer Version: Version 2
Then you can add it to your GA4 select_item event tag as the value of the items field (see the next chapter).
You can also use my custom variable template to convert an Enhanced Ecommerce
productsobject automatically to the format required byselect_item.
Tag configuration
The tag for select_item would look like this:

Make sure you set the Event Name field to select_item.
Make sure you point the items parameter to a Data Layer variable that contains the items array. This would be:
ecommerce.itemsif you’re following the steps outlined here.ecommerce.click.productsif you’ve chosen to migrate from Enhanced Ecommerce.
Remember also to set the trigger to a Custom Event trigger, set to the value of the event key in the object that was pushed to dataLayer (in the example above, it would be select_item).
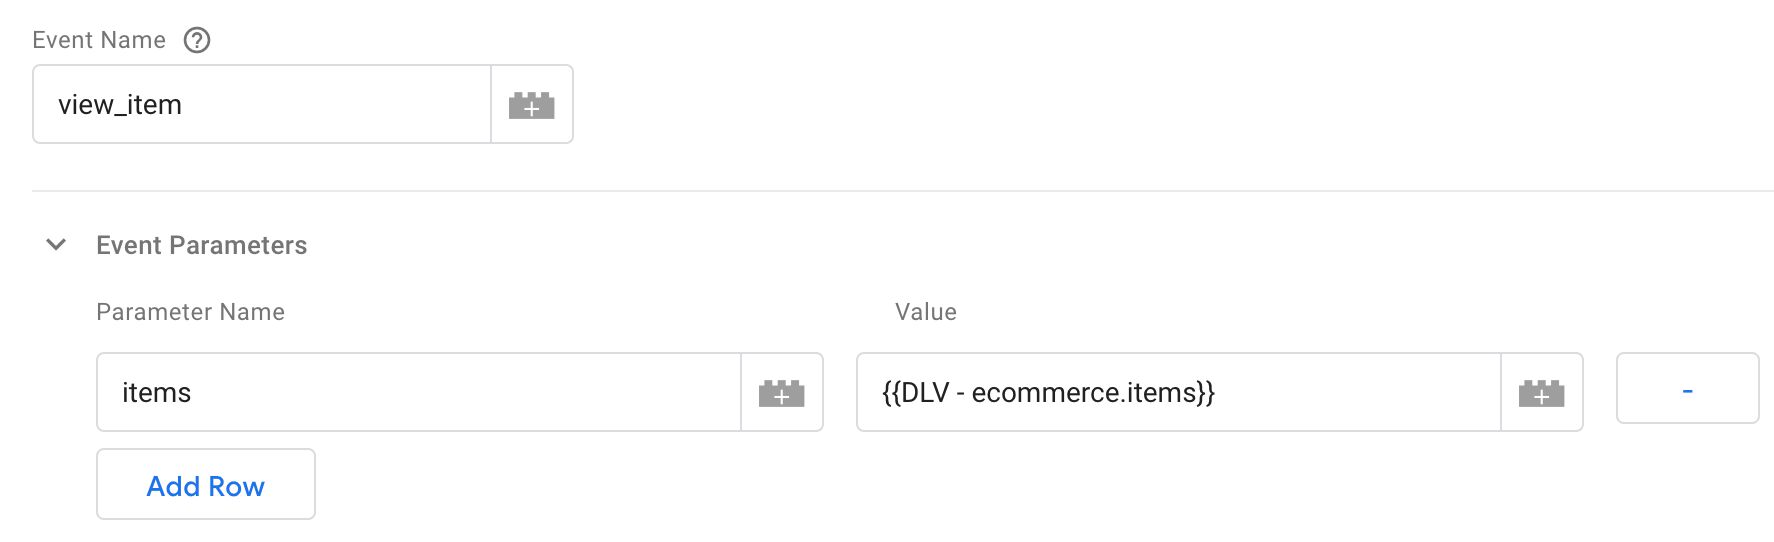
view_item
The view_item event is sent when the user views the details of any given product.
Data Layer composition
A sample dataLayer object for the view_item event could look like this (adapted from the official documentation):
window.dataLayer = window.dataLayer || [];
window.dataLayer.push({
  event: 'view_item',
  ecommerce: {
    items: [{
      item_name: 'Finnish magical parka',
      item_id: 'mp1122',
      price: '31.10',
      item_brand: 'PARKA4LIFE',
      item_category: 'Apparel',
      item_category2: 'Coats',
      item_category3: 'Parkas',
      item_category4: 'Unisex',
      item_variant: 'Navy blue',
      quantity: '1'
    }]
  }
});
Required parameters are either item_name or item_id.
You can also add promotion and item list parameters (e.g. promotion_name or item_list_name) to the items in the items array if you want to add credit to a promotion or an item list for the current action.
Migration from Enhanced Ecommerce
If you want to use the Enhanced Ecommerce products array instead of creating a new items object, you need to create the following variable:
- Type: Data Layer Variable
- Data Layer Variable name:
ecommerce.detail.products - Data Layer Version: Version 2
Then you can add it to your GA4 view_item event tag as the value of the items field (see the next chapter).
You can also use my custom variable template to convert an Enhanced Ecommerce
productsobject automatically to the format required byview_item.
Tag configuration
The tag for view_item would look like this:

Make sure you set the Event Name field to view_item.
Make sure you point the items parameter to a Data Layer variable that contains the items array. This would be:
ecommerce.itemsif you’re following the steps outlined here.ecommerce.detail.productsif you’ve chosen to migrate from Enhanced Ecommerce.
You can add additional parameters (in addition to
items) such aspromotion_nameoritem_list_nameif you want to associate this event with a promotion or an item list, respectively.
Remember also to set the trigger to a Custom Event trigger, set to the value of the event key in the object that was pushed to dataLayer (in the example above, it would be view_item).
add_to_cart
The add_to_cart event is sent when the user adds a product to the cart, either by adding a new product to the cart or by increasing the quantity of an existing item in the cart.
Data Layer composition
A sample dataLayer object for the add_to_cart event could look like this (adapted from the official documentation):
window.dataLayer = window.dataLayer || [];
window.dataLayer.push({
  event: 'add_to_cart',
  ecommerce: {
    items: [{
      item_name: 'Finnish magical parka',
      item_id: 'mp1122',
      price: '31.10',
      item_brand: 'PARKA4LIFE',
      item_category: 'Apparel',
      item_category2: 'Coats',
      item_category3: 'Parkas',
      item_category4: 'Unisex',
      item_variant: 'Navy blue',
      quantity: '1'
    }]
  }
});
Required parameters are either item_name or item_id. Set quantity to reflect the number of items added to the cart in this action.
You can also add promotion and item list parameters (e.g. promotion_name or item_list_name) to the items in the items array if you want to add credit to a promotion or an item list for the current action.
Migration from Enhanced Ecommerce
If you want to use the Enhanced Ecommerce products array instead of creating a new items object, you need to create the following variable:
- Type: Data Layer Variable
- Data Layer Variable name:
ecommerce.add.products - Data Layer Version: Version 2
Then you can add it to your GA4 add_to_cart event tag as the value of the items field (see the next chapter).
You can also use my custom variable template to convert an Enhanced Ecommerce
productsobject automatically to the format required byadd_to_cart.
Tag configuration
The tag for add_to_cart would look like this:
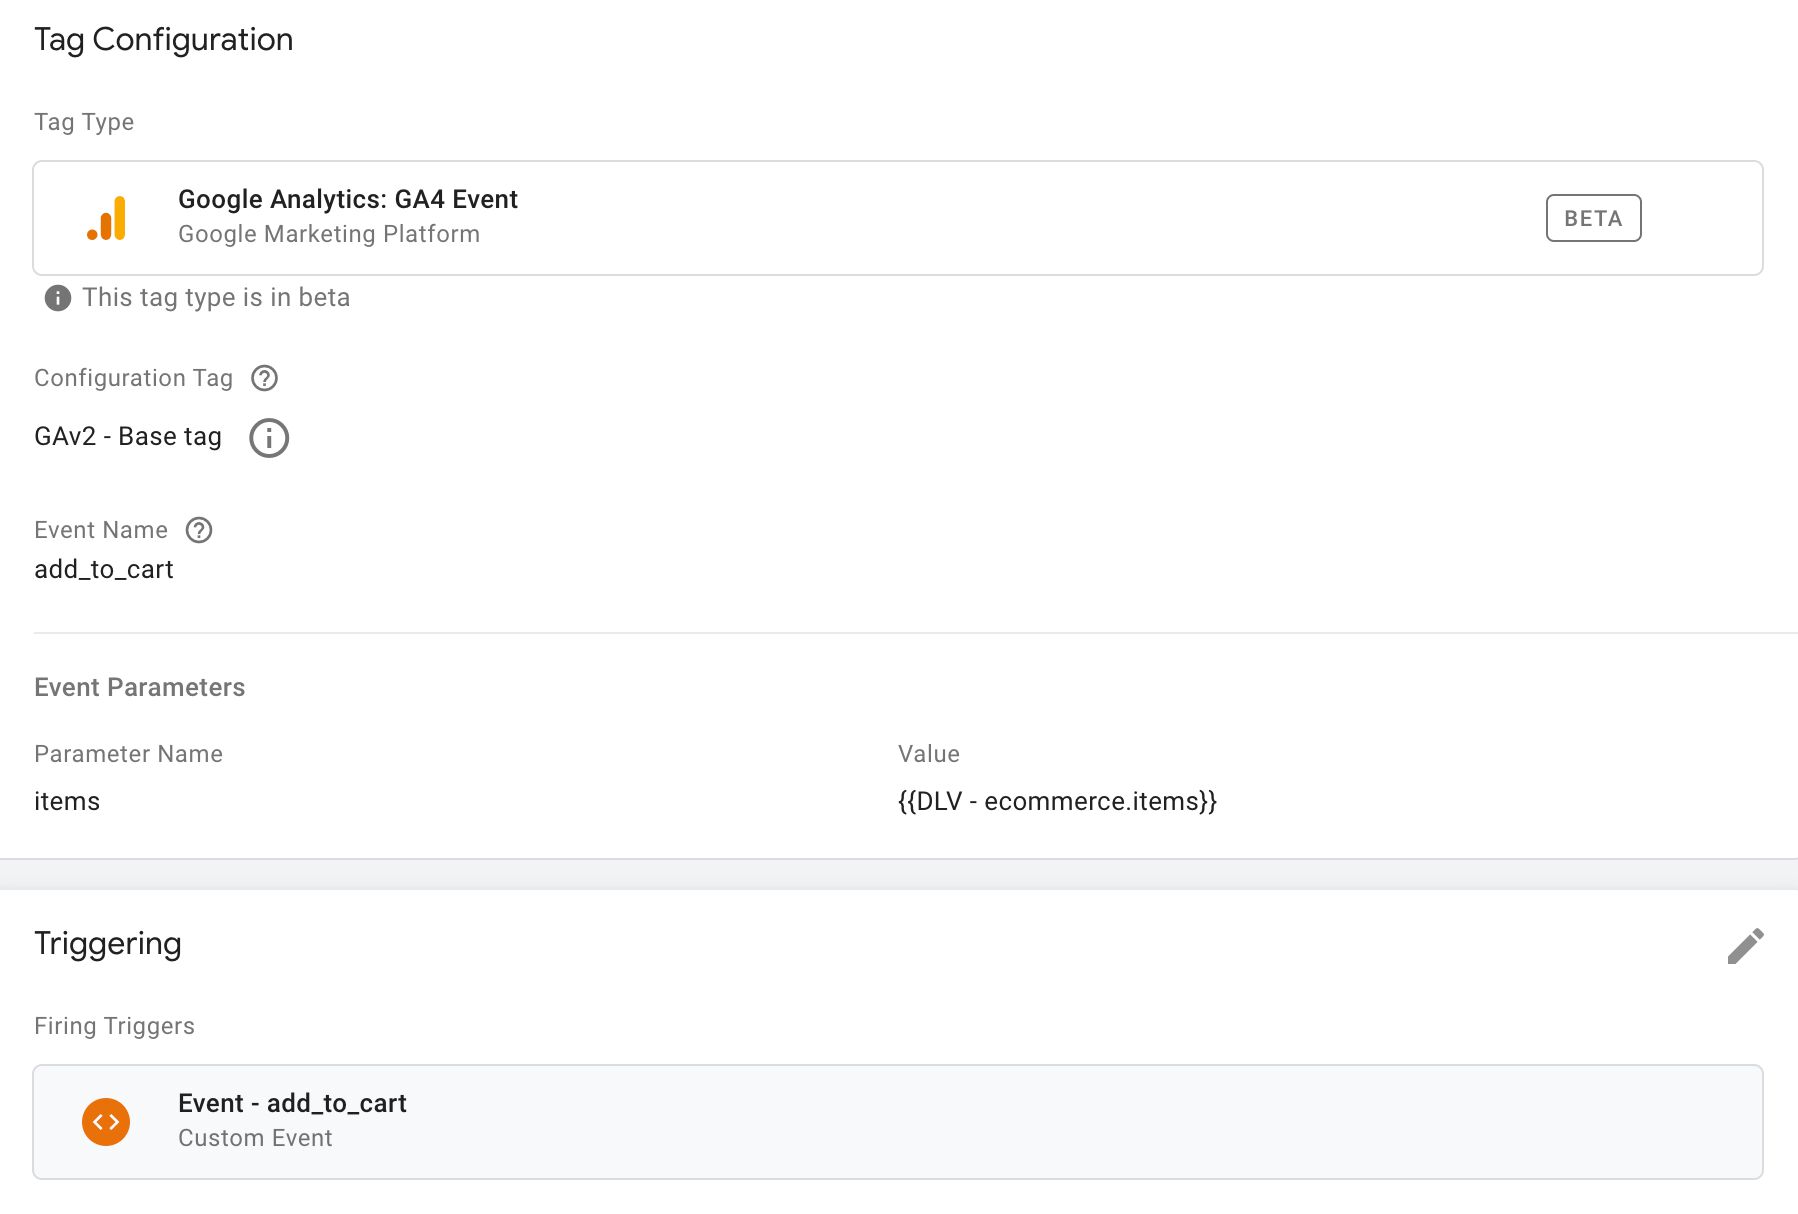
Make sure you set the Event Name field to add_to_cart.
Make sure you point the items parameter to a Data Layer variable that contains the items array. This would be:
ecommerce.itemsif you’re following the steps outlined here.ecommerce.add.productsif you’ve chosen to migrate from Enhanced Ecommerce.
Remember also to set the trigger to a Custom Event trigger, set to the value of the event key in the object that was pushed to dataLayer (in the example above, it would be add_to_cart).
You can add additional parameters (in addition to
items) such aspromotion_nameoritem_list_nameif you want to associate this event with a promotion or an item list, respectively.
add_to_wishlist
The add_to_wishlist event is sent when the user adds a product to a wishlist.
This does not have an analogy in Enhanced Ecommerce. It’s a completely new Ecommerce event type.
Data Layer composition
A sample dataLayer object for the add_to_wishlist event could look like this:
window.dataLayer = window.dataLayer || [];
window.dataLayer.push({
  event: 'add_to_wishlist',
  ecommerce: {
    items: [{
      item_name: 'Finnish magical parka',
      item_id: 'mp1122',
      price: '31.10',
      item_brand: 'PARKA4LIFE',
      item_category: 'Apparel',
      item_category2: 'Coats',
      item_category3: 'Parkas',
      item_category4: 'Unisex',
      item_variant: 'Navy blue',
      quantity: '1'
    }]
  }
});
Required parameters are either item_name or item_id.
You can also add promotion and item list parameters (e.g. promotion_name or item_list_name) to the items in the items array if you want to add credit to a promotion or an item list for the current action.
Tag configuration
The tag for add_to_wishlist would look like this:

Make sure you set the Event Name field to add_to_wishlist.
Make sure you point the items parameter to a Data Layer variable that contains the items array. This would be ecommerce.items if you’re following the steps outlined here.
Remember also to set the trigger to a Custom Event trigger, set to the value of the event key in the object that was pushed to dataLayer (in the example above, it would be add_to_wishlist).
You can add additional parameters (in addition to
items) such aspromotion_nameoritem_list_nameif you want to associate this event with a promotion or an item list, respectively.
remove_from_cart
The remove_from_cart event is sent when the user removes something from the cart or decreases the quantity of an item in the cart.
Data Layer composition
A sample dataLayer object for the remove_from_cart event could look like this (adapted from the official documentation):
window.dataLayer = window.dataLayer || [];
window.dataLayer.push({
  event: 'remove_from_cart',
  ecommerce: {
    items: [{
      item_name: 'Finnish magical parka',
      item_id: 'mp1122',
      price: '31.10',
      item_brand: 'PARKA4LIFE',
      item_category: 'Apparel',
      item_category2: 'Coats',
      item_category3: 'Parkas',
      item_category4: 'Unisex',
      item_variant: 'Navy blue',
      quantity: '1'
    }]
  }
});
Required parameters are either item_name or item_id.
You can also add promotion and item list parameters (e.g. promotion_name or item_list_name) to the items in the items array if you want to add credit to a promotion or an item list for the current action.
Migration from Enhanced Ecommerce
If you want to use the Enhanced Ecommerce products array instead of creating a new items object, you need to create the following variable:
- Type: Data Layer Variable
- Data Layer Variable name:
ecommerce.remove.products - Data Layer Version: Version 2
Then you can add it to your GA4 remove_from_cart event tag as the value of the items field (see the next chapter).
You can also use my custom variable template to convert an Enhanced Ecommerce
productsobject automatically to the format required byremove_from_cart.
Tag configuration
The tag for remove_from_cart would look like this:

Make sure you set the Event Name field to remove_from_cart.
Make sure you point the items parameter to a Data Layer variable that contains the items array. This would be:
ecommerce.itemsif you’re following the steps outlined here.ecommerce.remove.productsif you’ve chosen to migrate from Enhanced Ecommerce.
Remember also to set the trigger to a Custom Event trigger, set to the value of the event key in the object that was pushed to dataLayer (in the example above, it would be remove_from_cart).
You can add additional parameters (in addition to
items) such aspromotion_nameoritem_list_nameif you want to associate this event with a promotion or an item list, respectively.
view_cart
The view_cart event is sent when the user views the cart contents.
This does not have an analogy in Enhanced Ecommerce. It’s a completely new Ecommerce event type.
Data Layer composition
A sample dataLayer object for the view_cart event could look like this:
window.dataLayer = window.dataLayer || [];
window.dataLayer.push({
  event: 'view_cart',
  ecommerce: {
    items: [{
      item_name: 'Finnish magical parka',
      item_id: 'mp1122',
      price: '31.10',
      item_brand: 'PARKA4LIFE',
      item_category: 'Apparel',
      item_category2: 'Coats',
      item_category3: 'Parkas',
      item_category4: 'Unisex',
      item_variant: 'Navy blue',
      quantity: '3'
    },{
      item_name: 'Parka stain removal',
      item_id: 'psr1332',
      price: '5.99',
      item_brand: 'PARKA4LIFE',
      item_category: 'Apparel',
      item_category2: 'Utility',
      item_category3: 'Care product',
      quantity: '1'
    }]
  }
});
Required parameters are either item_name or item_id.
You can also add promotion and item list parameters (e.g. promotion_name or item_list_name) to the items in the items array if you want to add credit to a promotion or an item list for the current action.
Tag configuration
The tag for view_cart would look like this:

Make sure you set the Event Name field to view_cart.
Make sure you point the items parameter to a Data Layer variable that contains the items array. This would be ecommerce.items if you’re following the steps outlined here.
Remember also to set the trigger to a Custom Event trigger, set to the value of the event key in the object that was pushed to dataLayer (in the example above, it would be view_cart).
You can add additional parameters (in addition to
items) such aspromotion_nameoritem_list_nameif you want to associate this event with a promotion or an item list, respectively.
begin_checkout
The begin_checkout event is sent when the user starts the checkout flow.
Data Layer composition
A sample dataLayer object for the begin_checkout event could look like this (adapted from the official documentation):
window.dataLayer = window.dataLayer || [];
window.dataLayer.push({
  event: 'begin_checkout',
  ecommerce: {
    items: [{
      item_name: 'Finnish magical parka',
      item_id: 'mp1122',
      price: '31.10',
      item_brand: 'PARKA4LIFE',
      item_category: 'Apparel',
      item_category2: 'Coats',
      item_category3: 'Parkas',
      item_category4: 'Unisex',
      item_variant: 'Navy blue',
      quantity: '3'
    },{
      item_name: 'Parka stain removal',
      item_id: 'psr1332',
      price: '5.99',
      item_brand: 'PARKA4LIFE',
      item_category: 'Apparel',
      item_category2: 'Utility',
      item_category3: 'Care product',
      quantity: '1'
    }]
  }
});
Required parameters are either item_name or item_id.
You can also add promotion and item list parameters (e.g. promotion_name or item_list_name) to the items in the items array if you want to add credit to a promotion or an item list for the current action.
Migration from Enhanced Ecommerce
If you want to use the Enhanced Ecommerce products array instead of creating a new items object, you need to create the following variable:
- Type: Data Layer Variable
- Data Layer Variable name:
ecommerce.checkout.products - Data Layer Version: Version 2
Then you can add it to your GA4 begin_checkout event tag as the value of the items field (see the next chapter).
You can also use my custom variable template to convert an Enhanced Ecommerce
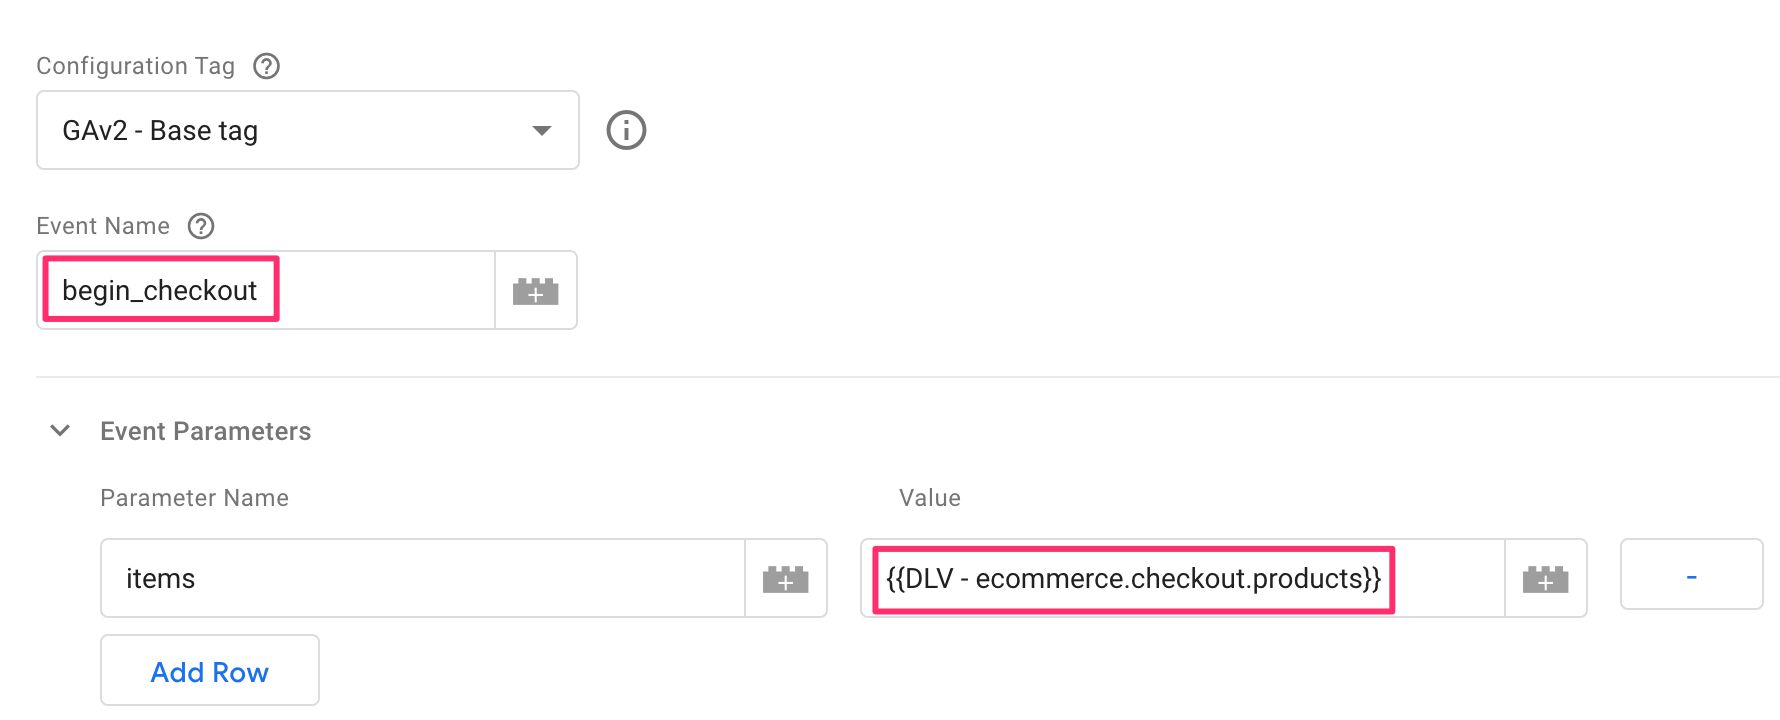
productsobject automatically to the format required bybegin_checkout.
Tag configuration
The tag for begin_checkout would look like this:
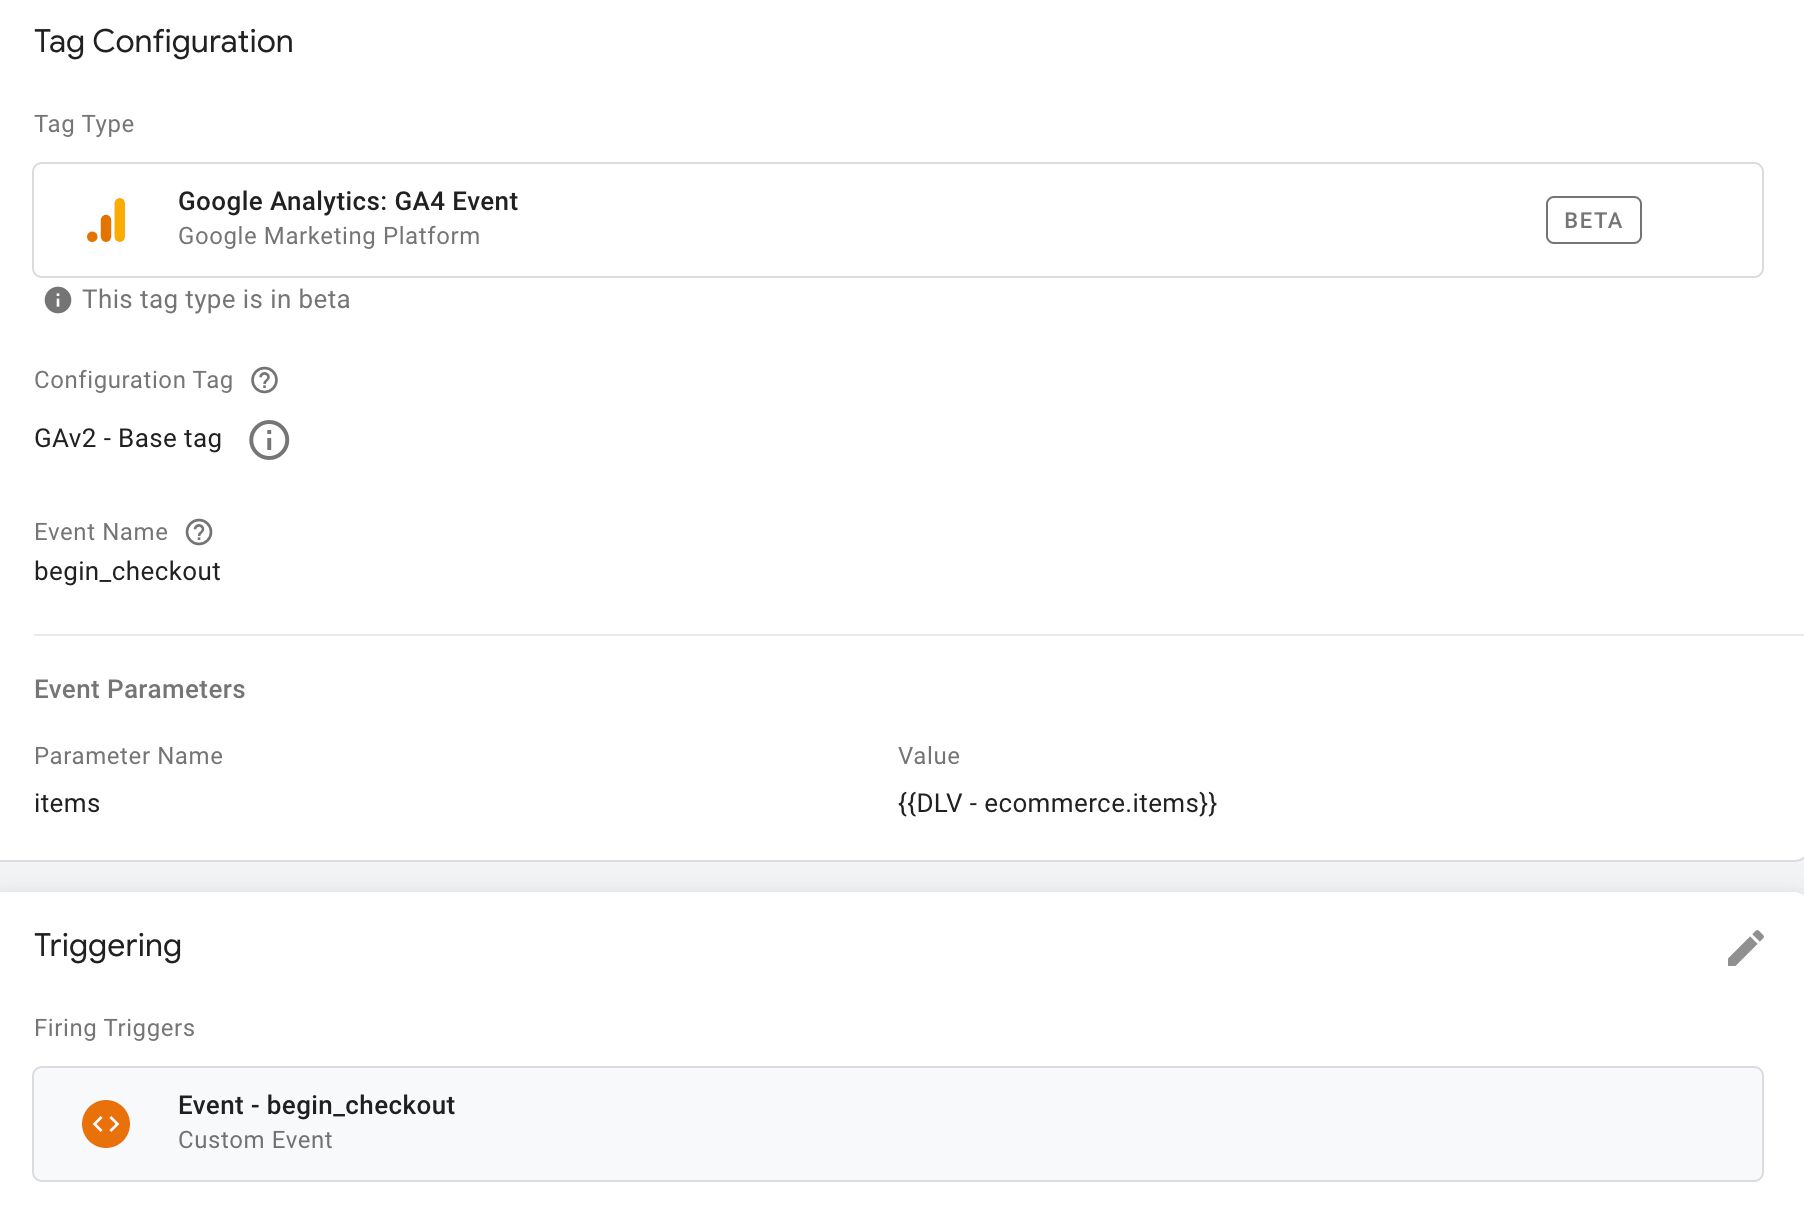
Make sure you set the Event Name field to begin_checkout.
Make sure you point the items parameter to a Data Layer variable that contains the items array. This would be:
ecommerce.itemsif you’re following the steps outlined here.ecommerce.checkout.productsif you’ve chosen to migrate from Enhanced Ecommerce.
Remember also to set the trigger to a Custom Event trigger, set to the value of the event key in the object that was pushed to dataLayer (in the example above, it would be begin_checkout).
You can add additional parameters (in addition to
items) such aspromotion_nameoritem_list_nameif you want to associate this event with a promotion or an item list, respectively.
add_shipping_info
The add_shipping_info event is sent when the user has selected a shipping method.
While Enhanced Ecommerce doesn’t have a direct analogy to
add_shipping_info, most implementations have shipping method selection encoded in acheckout_optionobject.
Data Layer composition
A sample dataLayer object for the add_shipping_info event could look like this:
window.dataLayer = window.dataLayer || [];
window.dataLayer.push({
  event: 'add_shipping_info',
  ecommerce: {
    shipping_tier: 'FedEx',
    items: [{
      item_name: 'Finnish magical parka',
      item_id: 'mp1122',
      price: '31.10',
      item_brand: 'PARKA4LIFE',
      item_category: 'Apparel',
      item_category2: 'Coats',
      item_category3: 'Parkas',
      item_category4: 'Unisex',
      item_variant: 'Navy blue',
      quantity: '3'
    },{
      item_name: 'Parka stain removal',
      item_id: 'psr1332',
      price: '5.99',
      item_brand: 'PARKA4LIFE',
      item_category: 'Apparel',
      item_category2: 'Utility',
      item_category3: 'Care product',
      quantity: '1'
    }]
  }
});
Required parameter is just shipping_tier.
You can also add promotion and item list parameters (e.g. promotion_name or item_list_name) to the items in the items array if you want to add credit to a promotion or an item list for the current action.
Migration from Enhanced Ecommerce
You can migrate from Enhanced Ecommerce by grabbing the shipping method from the ecommerce.checkout.option or ecommerce.checkout_option.option Data Layer variables, depending on how you’ve setup shipping method selection.
You’ll need to make sure that the trigger that fires this GA4 tag corresponds with the correct option item pushed into dataLayer, so that you don’t inadvertently fire this tag when the payment method was selected, for example.
If you want to send the items array as well (recommended), you can use a Data Layer variable like this:
- Type: Data Layer Variable
- Data Layer Variable name:
ecommerce.checkout.products - Data Layer Version: Version 2
Tag configuration
The tag for add_shipping_info would look like this:
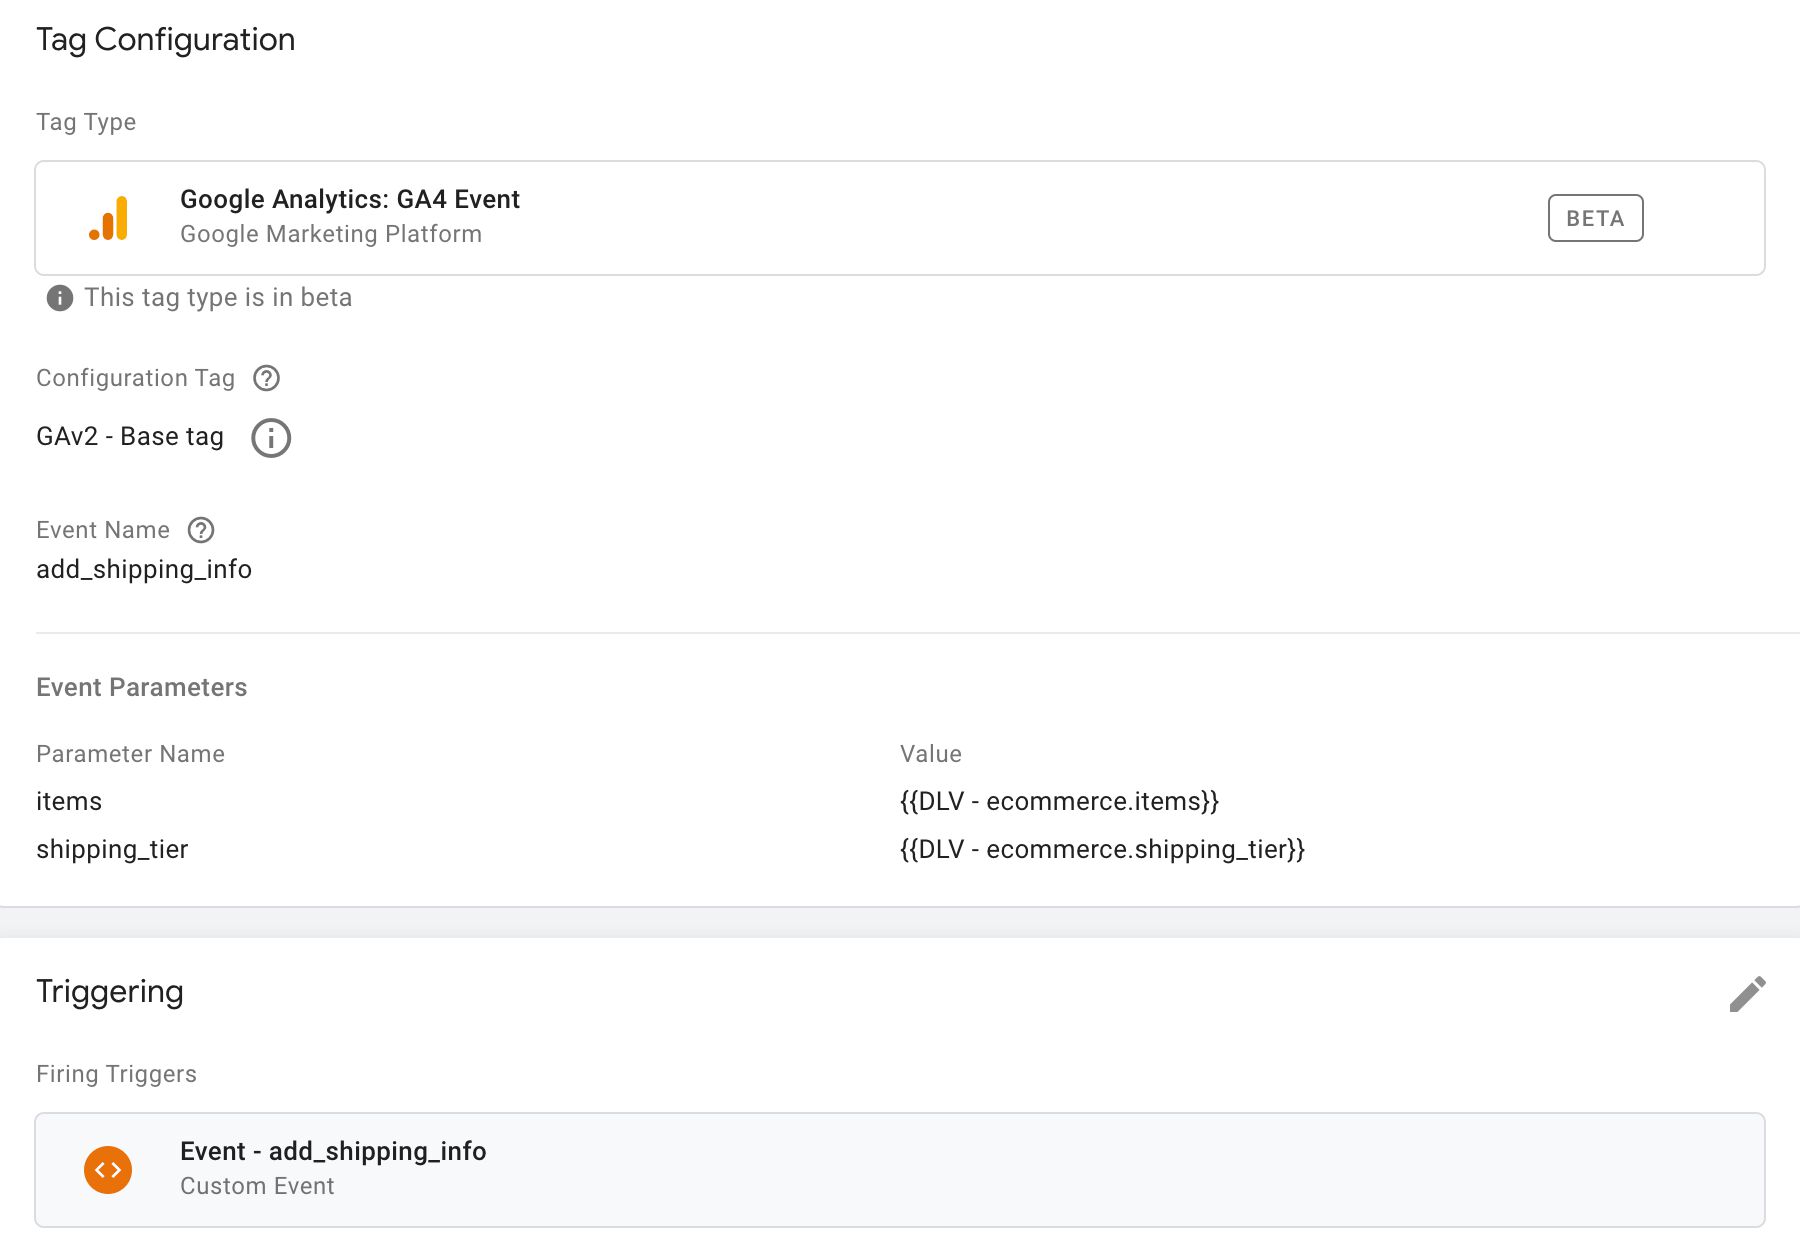
Make sure you set the Event Name field to add_shipping_info.
Make sure you point the items parameter to a Data Layer variable that contains the items array. This would be:
ecommerce.itemsif you’re following the steps outlined here.ecommerce.checkout.productsif you’ve chosen to migrate from Enhanced Ecommerce.
Make sure you point the shipping_tier parameter to a Data Layer variable that contains the shipping_tier value. This would be:
ecommerce.shipping_tierif you’re following the steps outlined here.ecommerce.checkout.optionorecommerce.checkout_option.optionif you’ve chosen to migrate from Enhanced Ecommerce.
Remember also to set the trigger to a Custom Event trigger, set to the value of the event key in the object that was pushed to dataLayer (in the example above, it would be add_shipping_info). If you’re migrating from Enhanced Ecommerce, make sure the trigger fires when the shipping method has been selected, and not for any other checkout option you might have.
You can add additional parameters (in addition to
items) such aspromotion_nameoritem_list_nameif you want to associate this event with a promotion or an item list, respectively.
add_payment_info
The add_payment_info event is sent when the user has selected a payment method.
While Enhanced Ecommerce doesn’t have a direct analogy to
add_payment_info, most implementations have payment method selection encoded in acheckout_optionobject.
Data Layer composition
A sample dataLayer object for the add_payment_info event could look like this:
window.dataLayer = window.dataLayer || [];
window.dataLayer.push({
  event: 'add_payment_info',
  ecommerce: {
    payment_type: 'COD',
    items: [{
      item_name: 'Finnish magical parka',
      item_id: 'mp1122',
      price: '31.10',
      item_brand: 'PARKA4LIFE',
      item_category: 'Apparel',
      item_category2: 'Coats',
      item_category3: 'Parkas',
      item_category4: 'Unisex',
      item_variant: 'Navy blue',
      quantity: '3'
    },{
      item_name: 'Parka stain removal',
      item_id: 'psr1332',
      price: '5.99',
      item_brand: 'PARKA4LIFE',
      item_category: 'Apparel',
      item_category2: 'Utility',
      item_category3: 'Care product',
      quantity: '1'
    }]
  }
});
Required parameter is just payment_type.
You can also add promotion and item list parameters (e.g. promotion_name or item_list_name) to the items in the items array if you want to add credit to a promotion or an item list for the current action.
Migration from Enhanced Ecommerce
You can migrate from Enhanced Ecommerce by grabbing the payment method from the ecommerce.checkout.option or ecommerce.checkout_option.option Data Layer variables, depending on how you’ve setup payment method selection.
You’ll need to make sure that the trigger that fires this GA4 tag corresponds with the correct option item pushed into dataLayer, so that you don’t inadvertently fire this tag when the shipping method was selected, for example.
If you want to send the items array as well (recommended), you can use a Data Layer variable like this:
- Type: Data Layer Variable
- Data Layer Variable name:
ecommerce.checkout.products - Data Layer Version: Version 2
Tag configuration
The tag for add_payment_info would look like this:

Make sure you set the Event Name field to add_payment_info.
Make sure you point the items parameter to a Data Layer variable that contains the items array. This would be:
ecommerce.itemsif you’re following the steps outlined here.ecommerce.checkout.productsif you’ve chosen to migrate from Enhanced Ecommerce.
Make sure you point the payment_type parameter to a Data Layer variable that contains the payment_tpye value. This would be:
ecommerce.payment_typeif you’re following the steps outlined here.ecommerce.checkout.optionorecommerce.checkout_option.optionif you’ve chosen to migrate from Enhanced Ecommerce.
Remember also to set the trigger to a Custom Event trigger, set to the value of the event key in the object that was pushed to dataLayer (in the example above, it would be add_payment_info). If you’re migrating from Enhanced Ecommerce, make sure the trigger fires when the payment method has been selected, and not for any other checkout option you might have.
You can add additional parameters (in addition to
items) such aspromotion_nameoritem_list_nameif you want to associate this event with a promotion or an item list, respectively.
purchase
The purchase event is sent when the user makes a purchase on the site.
Make sure you configure your website so that the purchase data is only collected once. The best way to do this is to invalidate the thank you page once the user has visited it so that they can’t revisit it by reloading the page, using the browser history, or hitting the back button after moving to some other page. Duplicate transactions are things you need to avoid at all costs.
Data Layer composition
A sample dataLayer object for the purchase event could look like this:
window.dataLayer = window.dataLayer || [];
window.dataLayer.push({
  event: 'purchase',
  ecommerce: {
    currency: 'EUR',
    value: 116.47,
    tax: 7.18,
    shipping: 10.00,
    affiliation: 'My Parka Store',
    transaction_id: 'p115-20202000',
    coupon: 'free_back_rub',
    items: [{
      item_name: 'Finnish magical parka',
      item_id: 'mp1122',
      price: '31.10',
      item_brand: 'PARKA4LIFE',
      item_category: 'Apparel',
      item_category2: 'Coats',
      item_category3: 'Parkas',
      item_category4: 'Unisex',
      item_variant: 'Navy blue',
      quantity: '3'
    },{
      item_name: 'Parka stain removal',
      item_id: 'psr1332',
      price: '5.99',
      item_brand: 'PARKA4LIFE',
      item_category: 'Apparel',
      item_category2: 'Utility',
      item_category3: 'Care product',
      quantity: '1',
      item_coupon: 'cheap_stain_removal'
    }]
  }
});
Required parameters are transaction_id and currency.
Make sure
quantityis passed as an integer. A floating point value will cause item revenue to be incorrectly reported in the Monetization reports!
You can also add promotion and item list parameters (e.g. promotion_name or item_list_name) to the items in the items array if you want to add credit to a promotion or an item list for the current action.
Migration from Enhanced Ecommerce
You can grab all the required parameters from the Enhanced Ecommerce purchase event. You need to create Data Layer Variables (Version 2) for each. Here are the Data Layer Variable Names you need to configure in the variables:
| GA4 parameter | Data Layer Variable Name in EEC |
|---|---|
currency |
ecommerce.currencyCode |
value |
ecommerce.purchase.actionField.revenue |
tax |
ecommerce.purchase.actionField.tax |
shipping |
ecommerce.purchase.actionField.shipping |
affiliation |
ecommerce.purchase.actionField.affiliation |
transaction_id |
ecommerce.purchase.actionField.id |
coupon |
ecommerce.purchase.actionField.coupon |
items |
ecommerce.purchase.products |
You can also use my custom variable template to convert an Enhanced Ecommerce
productsobject automatically to the format required bypurchase.
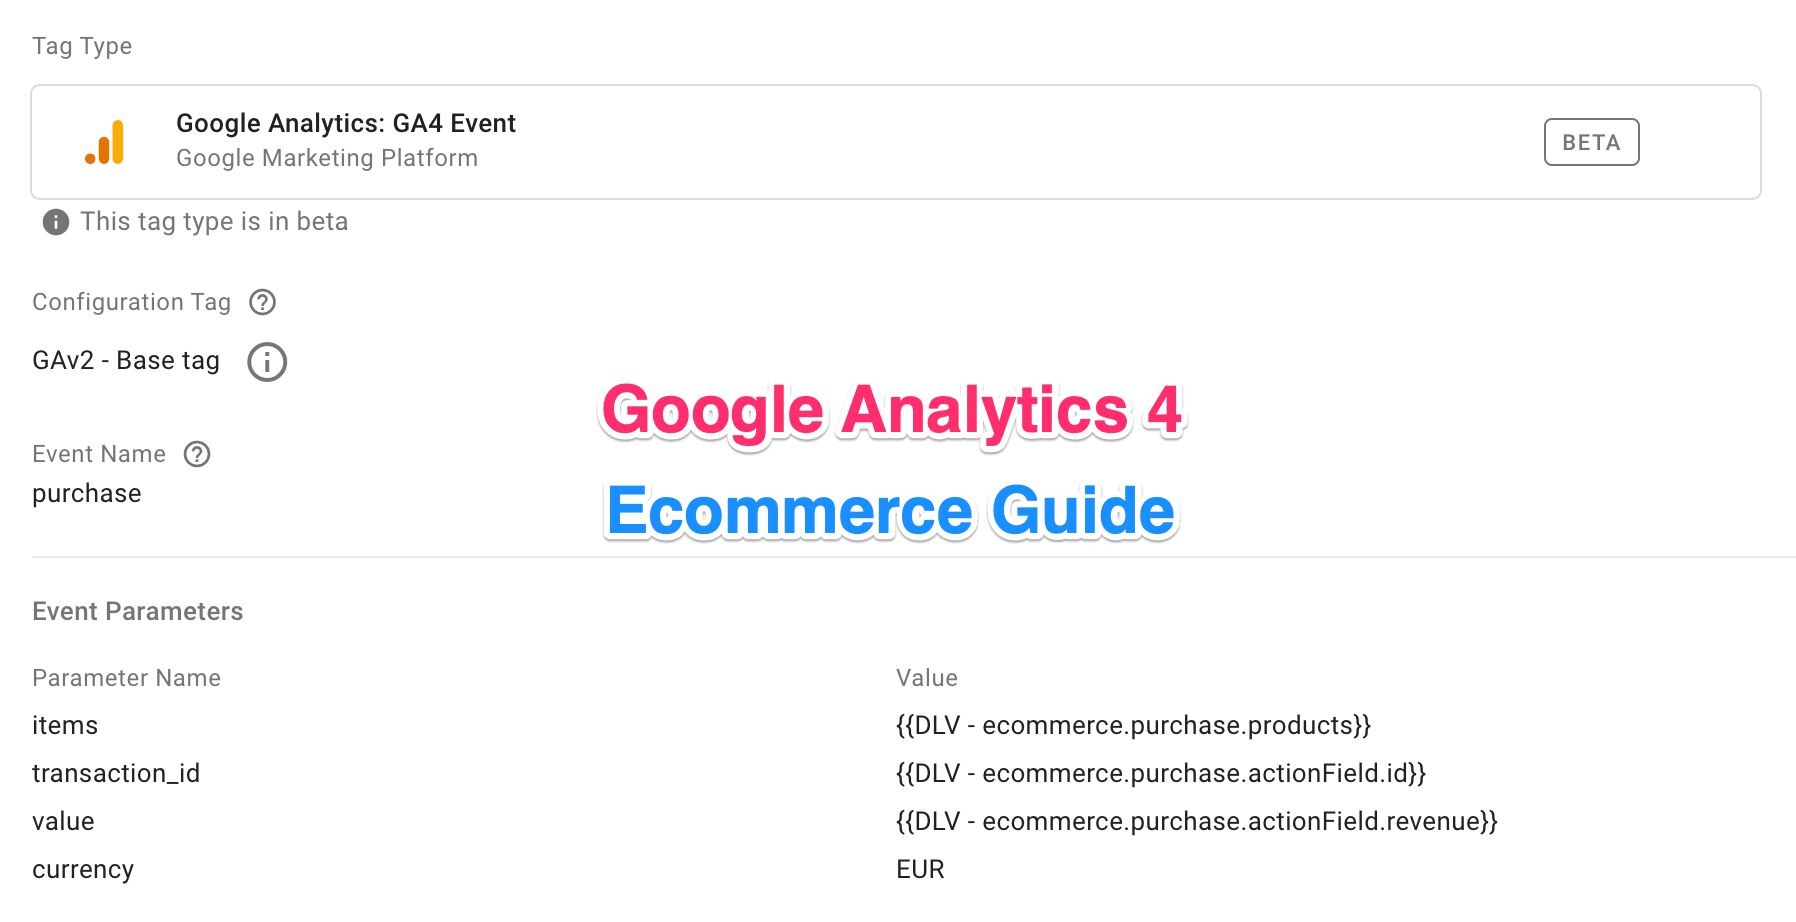
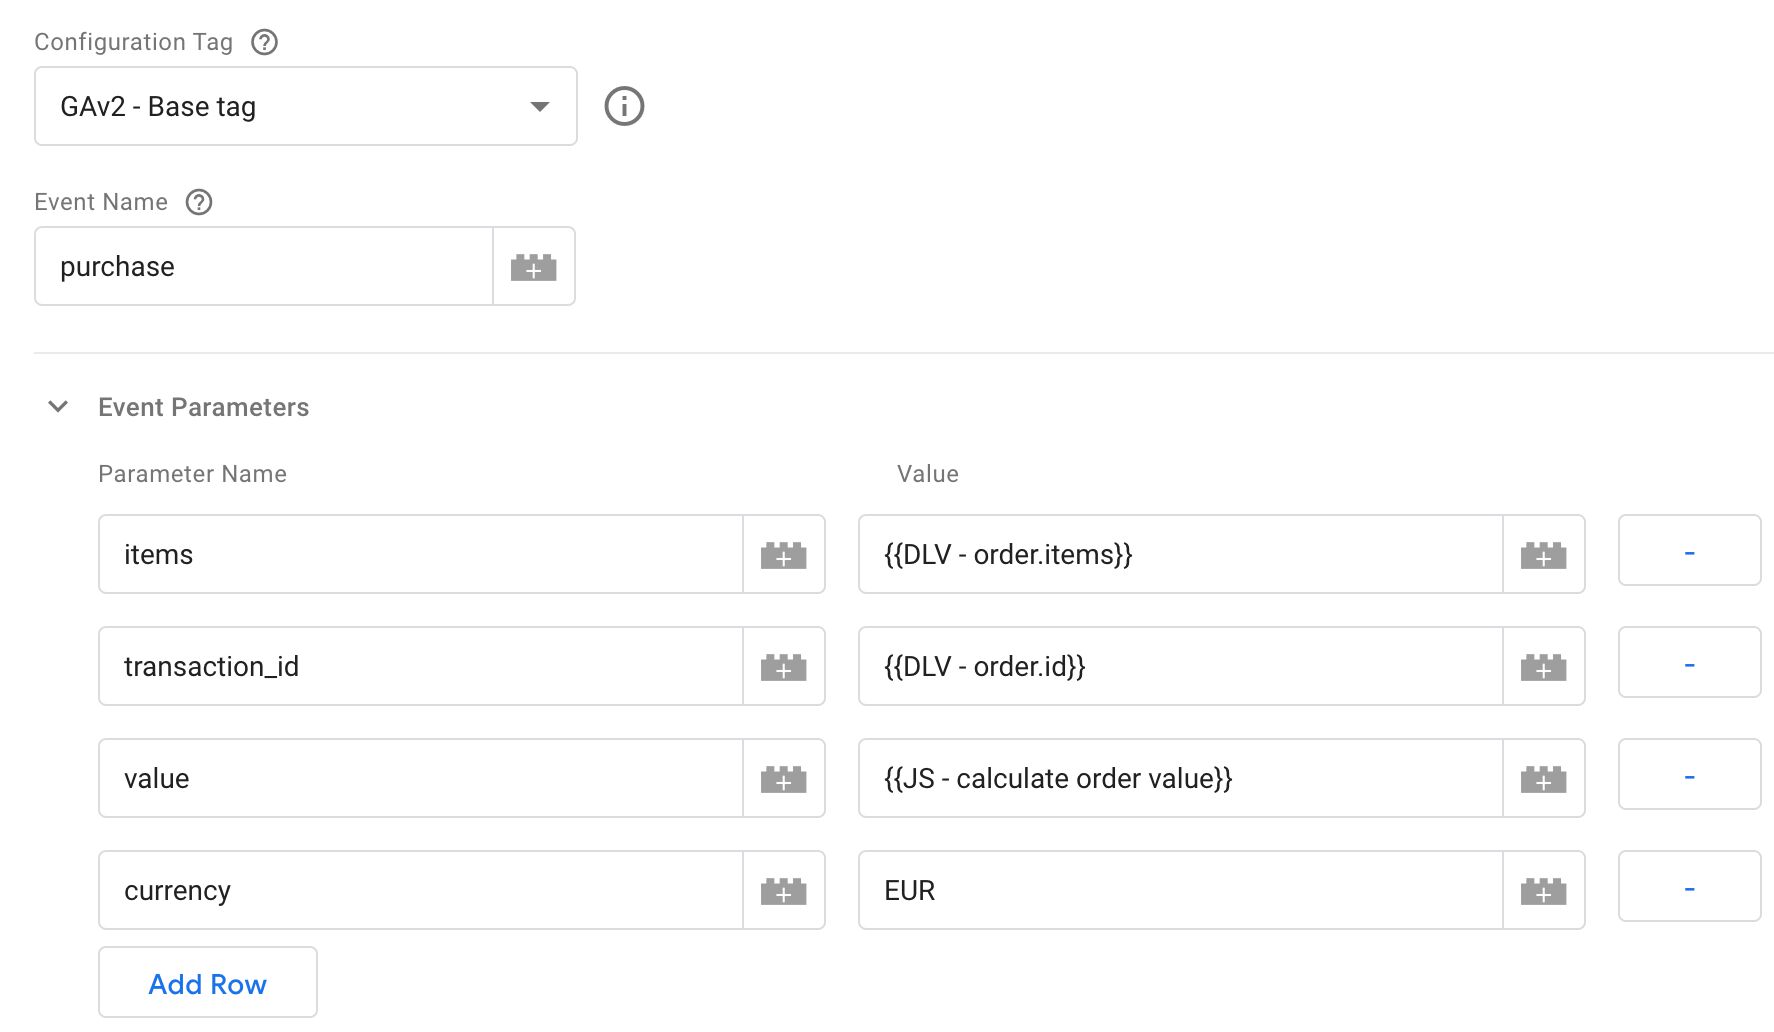
Tag configuration
The tag for purchase would look like this:
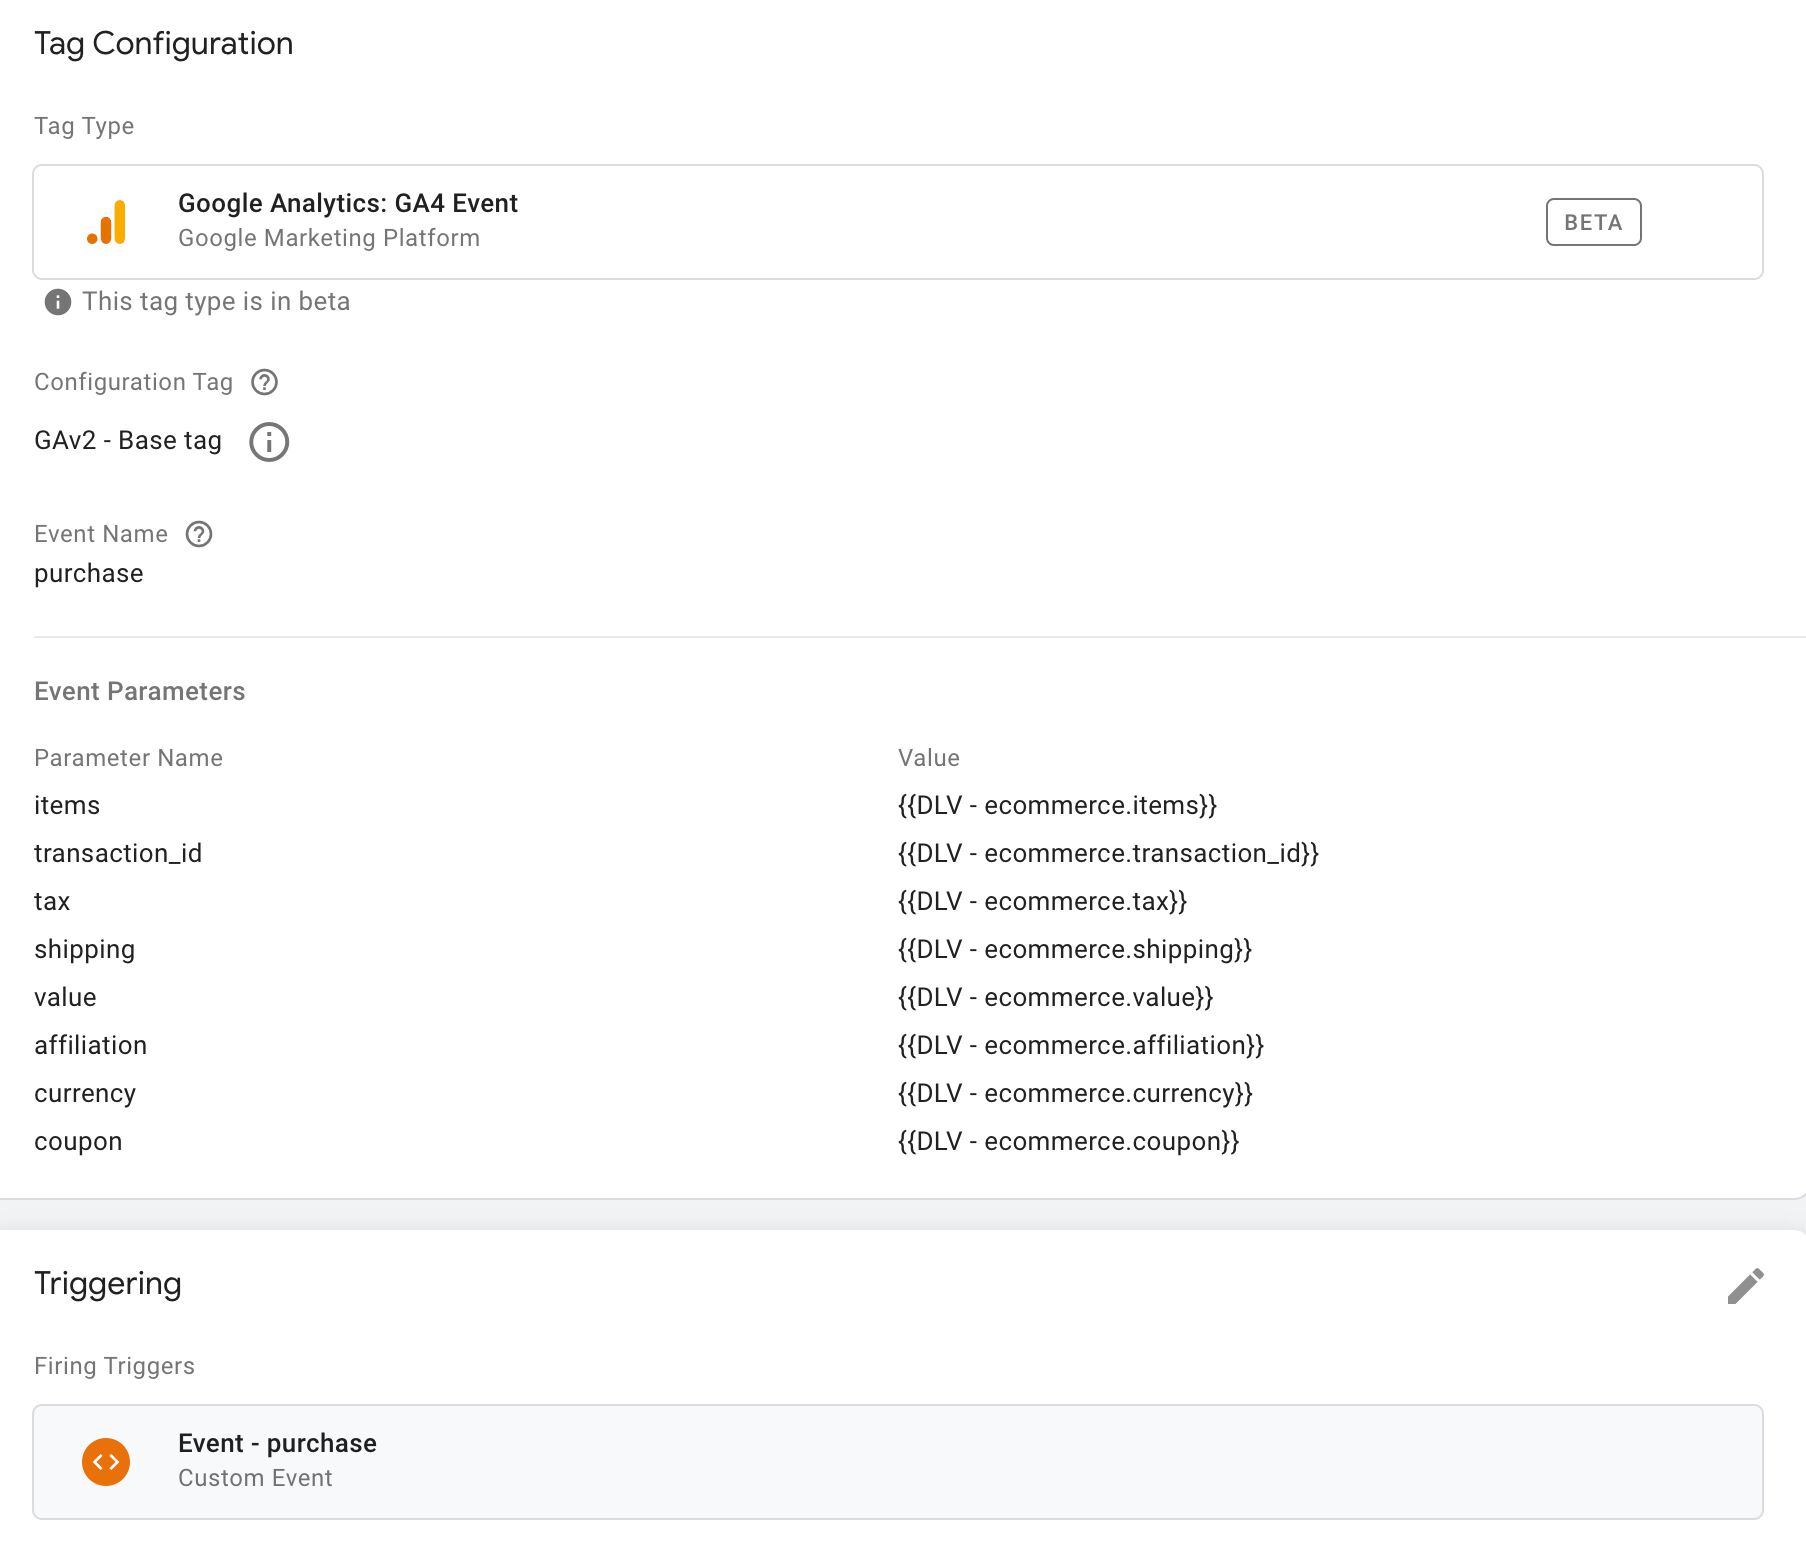
Make sure you set the Event Name field to purchase.
Make sure you point the items parameter to a Data Layer variable that contains the items array. This would be:
ecommerce.itemsif you’re following the steps outlined here.ecommerce.purchase.productsif you’ve chosen to migrate from Enhanced Ecommerce.
Make sure you point all the other parameters to their counterparts in the ecommerce array. If you’re migrating from Enhanced Ecommerce you’d need to set them accordingly.
Remember also to set the trigger to a Custom Event trigger, set to the value of the event key in the object that was pushed to dataLayer (in the example above, it would be purchase).
You can add additional parameters (in addition to
items) such aspromotion_nameoritem_list_nameif you want to associate this event with a promotion or an item list, respectively.
refund
There are two types of refund events you can send: full refund (the entire transaction is refunded) and partial refund (only some items were refunded).
Data Layer composition
For a full refund, this is what a sample dataLayer object would look like:
window.dataLayer = window.dataLayer || [];
window.dataLayer.push({
  event: 'refund',
  ecommerce: {
    transaction_id: 'p115-20202000'
  }
});
Required parameter is transaction_id.
For a partial refund, this is what a sample dataLayer object would look like:
window.dataLayer = window.dataLayer || [];
window.dataLayer.push({
  event: 'refund',
  ecommerce: {
    transaction_id: 'p115-20202000',
    items: [{
      item_name: 'Finnish magical parka',
      item_id: 'mp1122',
      price: '31.10',
      item_brand: 'PARKA4LIFE',
      item_category: 'Apparel',
      item_category2: 'Coats',
      item_category3: 'Parkas',
      item_category4: 'Unisex',
      item_variant: 'Navy blue',
      quantity: '1'
    }]
  }
});
Required parameters are transaction_id, and for each item that is refunded, item_id and quantity refunded.
Migration from Enhanced Ecommerce
To migrate from an Enhanced Ecommerce setup, you’d need to create a Data Layer variable for the transaction ID and another one for the products that were refunded.
The Data Layer variable for transaction ID looks like this:
- Type: Data Layer Variable
- Data Layer Variable name:
ecommerce.refund.actionField.id - Data Layer Version: Version 2
The Data Layer variable for the refunded products looks like this:
- Type: Data Layer Variable
- Data Layer Variable name:
ecommerce.refund.products - Data Layer Version: Version 2
You can also use my custom variable template to convert an Enhanced Ecommerce
productsobject automatically to the format required byrefund.
Tag configuration
The tag for refund would look like this:
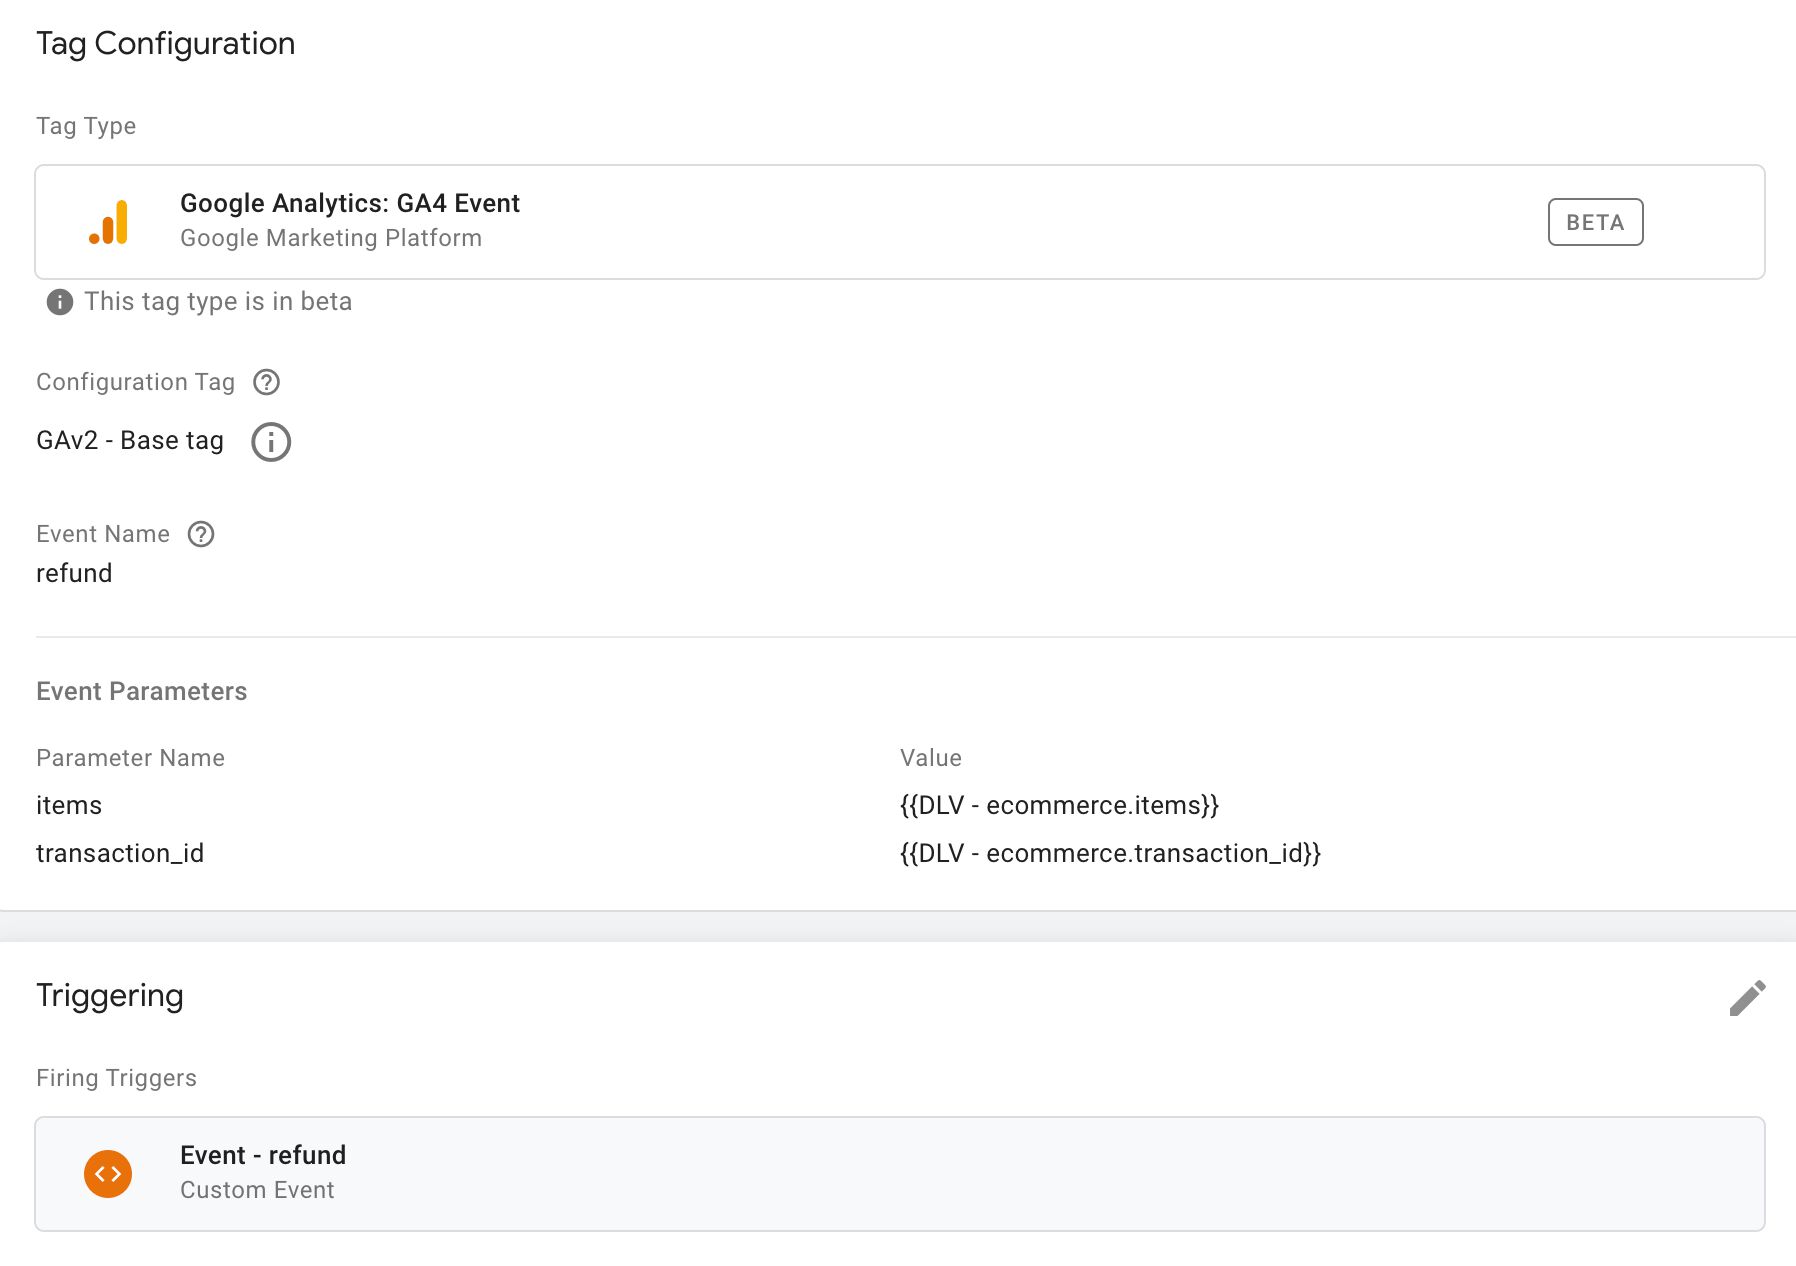
Make sure you set the Event Name field to refund.
If you’re sending a full refund, you only need to configure the transaction_id field. It should point to either ecommerce.transaction_id or, if you’re migrating from Enhanced Ecommerce, to ecommerce.refund.actionField.id.
If you’re sending a partial refund, you’ll also need to configure the items field to point to either the ecommerce.items variable or the ecommerce.refund.products variable, with the latter used in case you’re migrating from Enhanced Ecommerce.
Remember also to set the trigger to a Custom Event trigger, set to the value of the event key in the object that was pushed to dataLayer (in the example above, it would be refund).
Summary
We all knew that Google Analytics 4 properties would include Ecommerce capabilities. I think we were all surprised by how beta they still were by the time GA4 was released out of beta.
It doesn’t really help that the Google Tag Manager tags are still lagging behind in development. There’s a lot of manual work involved in building an Ecommerce setup, and while we’ve been treated with a migration option from Universal Analytics’ Enhanced Ecommerce, it doesn’t necessarily make sense to use.
The new, gtag.js-based format is where all the cool new stuff will be introduced. If you choose complacency over the effort of properly moving to the new setup, you might end up with a suboptimal Ecommerce setup for future iterations of GA4’s Ecommerce reports.
Having said that, it makes sense to implement GA4 Ecommerce as soon as possible. You don’t have to abandon your Universal Analytics setup, but do proceed with either a migration or a completely new dataLayer setup for GA4 as well.
You’ll want to start collecting that GA4 data as soon as possible to prepare for the eventual shift from Universal Analytics to Google Analytics 4. At that point, the more historical data you have, the better you’ll know how the new paradigm works for your organization.
I know absolute use case parity with Enhanced Ecommerce isn’t something GA4 Ecommerce should even pursue, but we’re still missing things like easily managed item list and promotion attribution from the mix.
The Google Tag Manager tags are also missing a few key pieces, such as an option to pull in all Ecommerce data directly from the dataLayer or even from a Custom JavaScript variable (or custom template).
Until we have these things, it’s best to treat GA4 Ecommerce as being in rough beta, even if that label has officially been dropped.
What are you most looking forward to about the GA4’s Ecommerce reports? What do you expect the Google Tag Manager integration to look like?
