Firing A Single Tag Multiple Times In GTM
There might be many reasons you’d want to fire a single Tag multiple times in Google Tag Manager. The most common one is when you want to deploy multiples of a single tracking point on the web. Perhaps you have a roll-up account you want to send the hits to, in addition to the site-specific tracking property.
Quite a while ago, I gave a solution for this with a specific focus on Google Analytics Tags. It leveraged the hitCallback feature of the Universal Analytics library by increasing a global counter each time a Tag had fired. This solution had a number of drawbacks: being GA-specific, polluting the global namespace, and requiring a unique setup for every single Tag you wanted to fire.
Not long after this, I actually started doing the whole thing in a different way. A much more durable, sensible, robust way, and in this article I want to open up the method. In fact, it’s not just me who wants to introduce this. This article is a collaboration with Marco Wekking from Adwise. He approached me with almost exactly the same solution asking for a review. Instead of reviewing, I asked if he would like to contribute to a collaboration of sorts on this post, and he gracefully accepted. So, much of this post is from Marco’s pen, with my typical bad humour and some JavaScript shenanigans intertwined in the rhetoric.
XThe Simmer Newsletter
Subscribe to the Simmer newsletter to get the latest news and content from Simo Ahava into your email inbox!
How it works
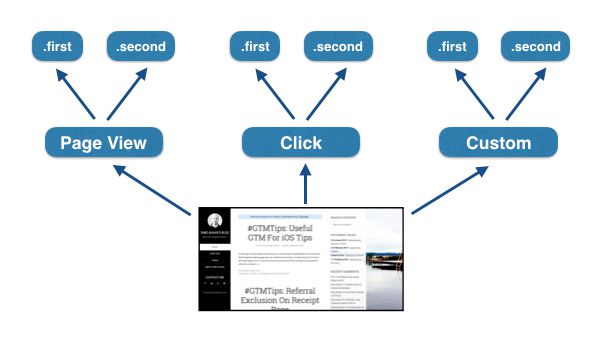
The skilfully grafted diagram above shows how the solution works. Every single event that passes through dataLayer is duplicated by suffixing it with .first and .second. This way, all the Tags you want to fire twice per event just need to be modified to use the original event name plus the two suffixes. You can even use this in a Lookup Table to fire the hits to different Google Analytics tracking properties, for example.
It’s a simple, elegant solution to a pressing problem which, if you ask me, should be handled natively by the platform. This is such a common use case for so many people - it would be immensely helpful if you could just denote multiple cycles to each Tag using the Tag template settings instead of having to resort to hacks like this.
How to do it
The solution comprises three steps:
-
Create a new Custom Event Trigger
-
Create the Custom HTML Tag which manages the duplication
-
Create new Triggers
We’ll wrap it up with an example of how to leverage this when firing to multiple Google Analytics properties! So stay tuned.
1. Create the Custom Event Trigger
To fire the Custom HTML Tag, we’ll need a Trigger which activates on every single event. Why? Because we want to duplicate every single event! There’s just one exception - we don’t want to fire the Trigger when the actual duplication events are pushed into dataLayer, or we might find ourselves in an infinite loop. Ontologically fascinating, but not cool when it comes to site performance.
Before you create the Trigger, make sure you have the Event Built-in Variable checked in the appropriate slot of the Variables page in your container.
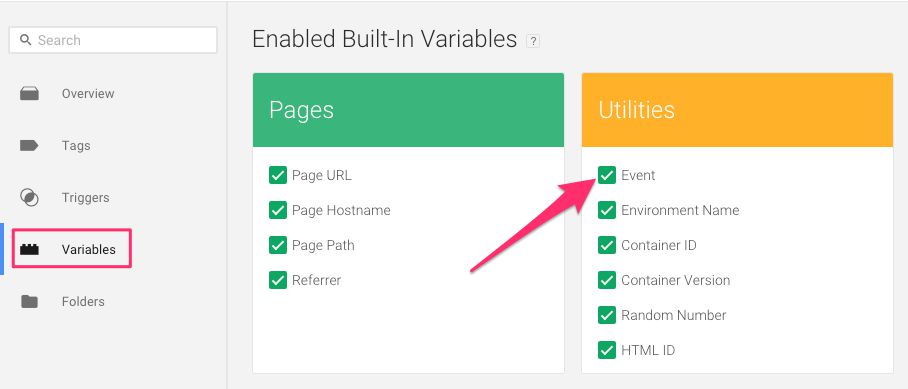
This is required for the Trigger to work.
Next, create a Trigger which matches all events except for the duplicated ones. In this example, we’re using the generic .first and .second as the suffixes, but nothing’s stopping you from using something more descriptive, for example .Country and .Rollup.
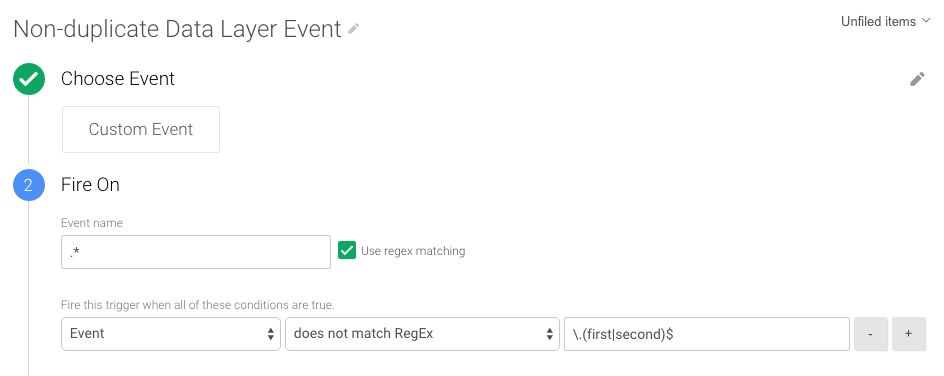
To reiterate: The exception is important! If you don’t add that Fire On condition, you will run into issues, as the Trigger would fire again and again with each duplication cycle. Yes, you could use the Tag Firing Options feature of the Tag templates, but it’s better to nip bad behavior in its bud.
2. Create the Custom HTML Tag
The Custom HTML Tag is the heart and soul of this solution. It’s very simple, but it does have some peculiarities that might surprise if you’re not familiar with how GTM works.
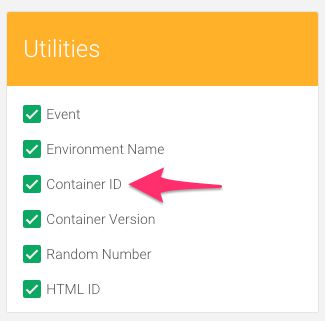
Actually, to ensure that one of these special features works as it should, you’ll need to activate yet another Built-In Variable: Container ID. This returns, surprise surprise, the public ID of the GTM container the Tag is firing in (GTM-XXXX).
Create a new Custom HTML Tag and add the following code within:
<script>
  (function() {
    var event = {{Event}};
    var gtm = google_tag_manager[{{Container ID}}];

    window.dataLayer.push({
      'event' : event + '.first'
    });
    window.dataLayer.push({
      'event' : event + '.second',
      'eventCallback' : function() { gtm.onHtmlSuccess(); }
    });
  })();
</script>
We’re wrapping the whole thing in an IIFE as we want to avoid polluting the global namespace. Next, we’re assigning a local variable event with whatever value is currently stored in the Built-in Event variable (i.e. the event that was pushed in the first place).
Finally, we’re doing two consecutive dataLayer.push() commands, one for each iteration of the cycle. If you want to add more events there, be my guest. As far as we know, there is no limitation to the number of events you can push into dataLayer this way.
The latter push includes the special eventCallback key (read more about it here). The key holds a callback function which is invoked as soon as Tags which fire on this particular push have signalled their completion. Within this callback, we’re using the onHtmlSuccess() feature of GTM’s interface. This is something that was exposed for public use with the Tag sequencing feature. The only thing you need to know about it is that it’s our way of telling GTM that it can now proceed with whatever was going on before this loop of dataLayer.push() commands.
In other words, if you’re duplicating a Click / Just Links, and you’ve got “Wait for Tags” checked (meaning the Trigger will wait for all dependent Tags to fire before proceeding with the link default action), the process goes something like this:
-
The link click Trigger fires this Custom HTML Tag.
-
The Custom HTML Tag pushes the first duplicated event, and any Tags which use it start their execution.
-
Immediately after, the Custom HTML Tag pushes the second duplicated event, and any Tags which use it start their execution.
-
Once the last Tag firing on the second duplicated push signals its completion, the
eventCallbackcallback is invoked, and the Custom HTML Tag tells the link click Trigger that everything is done, allowing it to proceed with the redirect.
Now, add the Trigger you created in the previous step to this Tag, and you’re ready to duplicate. You can preview this to see what happens in your dataLayer with each event.
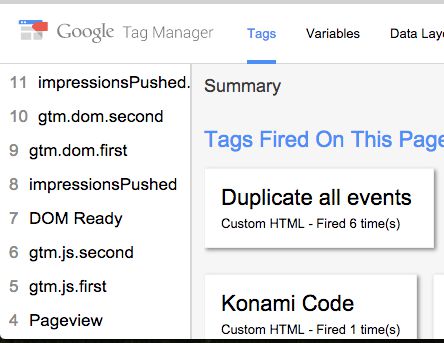
As you can see, each event is duplicated. There’s the Pageview, followed by its duplicates: gtm.js.first and gtm.js.second. There’s DOM Ready, followed by its duplicates: gtm.dom.first and gtm.dom.second, and so on.
(If you don’t understand what “Pageview” and “gtm.js” have to do with each other, the latter is the underlying event representation of the former. More information in my Trigger guide.)
3. Create new Triggers
The only housekeeping pain you’ll need with this solution is with the Triggers. Here’s how it should work:
-
To duplicate a Trigger, you need one “base” Trigger of the event type firing without any delimiting conditions. This is the event that is duplicated.
-
To fire your duplicate Tags, you’ll need to use Custom Event Triggers which use the original event name (e.g. gtm.linkClick) plus .first or .second, all wrapped in a simple regular expression.
In other words, we’re taking a step back to how GTM used to work before the auto-event triggers. We’re creating listeners using the generic event Triggers, and when these are duplicated, the Custom Event Triggers are used to delimit the Tags to fire only when specific conditions exist.
NOTE! You don’t need to create a “base” Trigger for the Page View event type. This is because “Pageview”, “DOM Ready”, and “Window Loaded” are automatically pushed into dataLayer as the page and GTM load. In other words, they are automatically duplicated, and you just need to focus on creating the Custom Event Triggers.
Look at the illustration below for clarity:
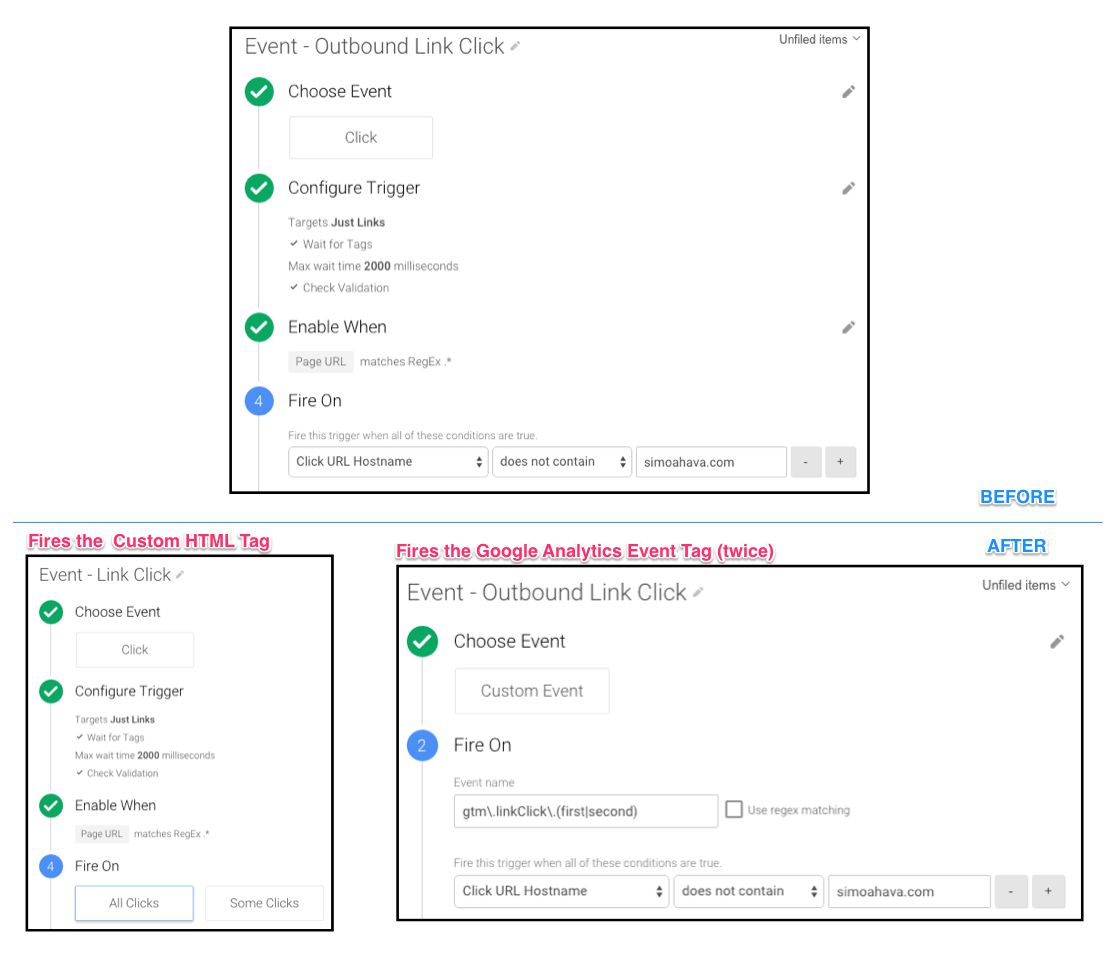
Let’s zoom in. If you have an “Outbound Links” Trigger, which fires when the Click URL is not your own hostname, the duplicated Trigger would look something like this:
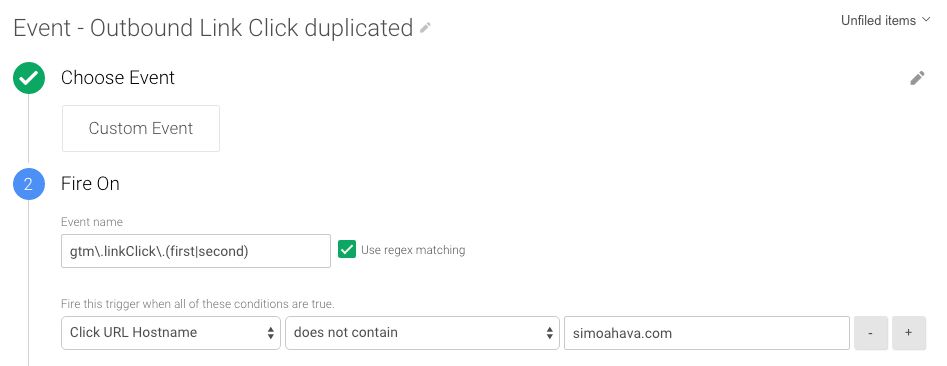
Make note of the “Event name” field. That’s what it should look like for your Triggers. With custom event names it’s easy, as you’re the one pushing them into dataLayer in the first place. With the built-in Triggers it might be a bit more difficult, so here’s a cheat sheet for you:
| Built-in Event | Underlying event name |
|---|---|
| Page View / Page View (also All Pages) | gtm.js |
| Page View / DOM Ready | gtm.dom |
| Page View / Window Loaded | gtm.load |
| Click / All Elements | gtm.click |
| Click / Just Links | gtm.linkClick |
| Form Submit | gtm.formSubmit |
| History Change | gtm.historyChange |
| JavaScript Error | gtm.pageError |
| Timer | gtm.timer |
Make sure you’ve got the Fire On condition on the Custom Event Trigger, as you don’t need it on the generic event Trigger. If you miss it from the Custom Event Trigger, you’ll inadvertently fire the Tag whenever any such event is detected on the page. For example, if we’d left out the Click URL Hostname condition from the example above, the Outbound Links Tag would fire whenever the Link Click event is pushed into dataLayer.
BONUS: Use variable Tracking ID
Here’s a tip straight from Marco. To create a variable which sends a different Universal Analytics tracking ID depending on which cycle of the duplication loop is currently active, use the following Custom JavaScript Variable:
function() {

  var event = {{Event}};

  var regexFirst = /\.first$/;
  var regexSecond = /\.second$/;

  if (regexFirst.test(event)) {
    return "UA-XXXXXXXX-1";
  } else if (regexSecond.test(event)) {
    return "UA-XXXXXXXX-2";
  }

  // Do something in case neither matches

}
This returns the UA code “UA-XXXXXXXX-1” if the Tag is firing on the first loop of the duplication cycle, and “UA-XXXXXXXX-2” if on the second. You might want to setup some type of fallback or default return value in case neither matches.
Overview and summary
While the solution works for all kinds of tags and creates less redundancy in many setups, it has some drawbacks of its own.
First, it inflates the number of dataLayer events significantly. A simple setup with just two events (Page View and Outbound Link Clicks) already triples the amount. Note that this doesn’t really have any impact on performance. dataLayer is just a message bus used by Google Tag Manager’s internal data model. Whenever GTM needs to access the “Data Layer”, it’s actually just performing a lookup in its own data model, so the size of dataLayer is inconsequential here.
Second, it requires a different and probably more difficult approach to triggers. All tags need to be linked to custom event triggers instead of the built-in Trigger types you might have become used to. If you were around during GTM’s previous version, you might be familiar with the setup, as it resembles how things were done with the old auto-event tracking setup. However, when you really chew it down, all you’re actually doing is creating one extra Trigger per event type, and moving from the built-in Trigger types to Custom Event Triggers.
Finally, trigger conditions become more critical as they can cause infinite loops or Tags firing in wrong situations. While such accidents shouldn’t cause infinite regret (assuming you test before publish) it does remain another difficulty for you to deal with.
One thing you might be concerned about is whether or not all the Variables populated with the initial base Trigger are still available when the duplicate Custom Event Triggers fire. For example, you might need the Click URL Variable, and now you’re worried that it’s not available when the duplicate Triggers fire. Don’t worry! GTM persists Variable values until they’re overwritten or there’s a page unload/refresh. So, unless you’re manually overriding the Data Layer values populated by GTM’s auto-event Triggers, you should be fine.
Well, we might have overstated the simplicity and elegance of the setup, but the idea of intercepting each event and duplicating it is far more approachable than the complex hitCallback setup used before.
I want to thank Marco for putting the approach into writing, and most of the content in this article has come from his pen, edited to suit the devil-may-care style of this blog. Any errors, factual mistakes, or radicalist propaganda cleverly hidden in the whitespace is solely the fault of me, Simo, and I take full responsibility for all the uprisings that will inevitably follow.
