Block Internal Traffic With Google Tag Manager
You’ve probably come across a number of guides or posts talking about why it’s necessary to block so-called internal traffic from your web analytics reports. The reasons are pretty solid: internal traffic does not emulate normal visitor behavior, it rarely contributes to conversions (skewing up your conversion rate), it inflates page views, and it wreaks havoc on your granular, page-by-page data.
Internal traffic is vaguely described as “your employees”, “people really close to your brand”, “your marketing department”, “your web editors”, and so on. Basically, it should be a term which covers traffic that does not adequately represent trending visitor behavior on your site. Most often, this is “internal”, in that it is traffic by people who generate the content. It can also be your proof-readers (wives, husbands, best friends), beta testers (wives, husbands, best friends), outreach marketers (wives, husb… you get my drift).
In this post, I’ll introduce two methods to annotate this kind of internal traffic using (mostly) Google Tag Manager. The underlying premise is that your internal traffic comes from such a diverse number of sources that it’s impossible to filter it using Google Analytics’ own filters. Another possibility is that you’ve decided to anonymize IP data sent to Google Analytics servers, which means that even if you’d just have a certain range of IPs, you couldn’t use Google Analytics’ filters, since the last octet has been censored (more about this later).
By the way, I use the term annotate instead of block (except in the search engine friendly title, GUILTY!), because whether or not you actually want to block the data or just segment it is up to you. You could also follow Bounteous’ excellent guide on preventing the data from being sent to Google Analytics in the first place, but I wanted to follow a more reconciliatory route, offering a way for you to still incorporate internal traffic in your reports, if you so choose. And this route is, of course, a custom dimension.
XThe Simmer Newsletter
Subscribe to the Simmer newsletter to get the latest news and content from Simo Ahava into your email inbox!
The premise
I will introduce two methods: 1) Visit to URL, and 2) IP extraction. Both have their pros and cons.
If the people you want included in your internal traffic are constantly on the move, use a variety of devices on the road, or are hard to pin down just by using an IP address range, you should use the first method. This way you’ll also leave these people an out. You see, sometimes your employees are also your customers or normal site visitors, which means that their behavior should be included in your actual traffic reports.
IP extraction requires that you have specific IP address ranges in mind which you want to block. This is best for traffic which originates from stationary places, like office buildings or office networks.
Whichever you choose, you’ll need to set up a custom dimension first, which will store your data. It’s really simple, and Google has a great guide on how to get started.
If you want to provide your internal traffic an out, you should create a session-scope custom dimension. This way internal traffic is annotated separately from one session to the next.
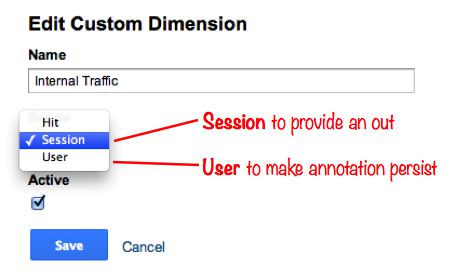
If, however, you want the annotation to stick “for life”, you should create a user-scope custom dimension (user is the same as device). This way the annotation will persist from session to session, even if the IP extraction fails or the user doesn’t visit your designated “internal traffic” URL.
Method 1: Visit to URL
I really like this method, since it’s completely client-side, it doesn’t require any custom functions or external API calls to retrieve the IP address, and it provides an out for your employees or users, if they wish to be treated as external traffic.
One thing that it does require, however, is that your internal traffic remembers to use the URL every single time they visit your site (unless they don’t want to be treated separately). Since you’re using a session-scope dimension here, it’s ok if the internal traffic URL is not the landing page of the visit. A session-scope custom dimension hit is applied retroactively to all hits in the session, so as long as the custom dimension is sent with a single hit during the session, it will suffice to annotate all hits in the session.
I prefer to use a URL query parameter as the trigger that tags the visitor as internal traffic. This means that:
-
You need to make sure that your server accepts query parameters in URL addresses
-
You should canonicalize all pages to the parameter-less version, so that search engines won’t index your internal traffic page by accident (use
<link rel="canonical" href="http://url-of-page-without-query-parameters"/>) -
You should configure your Google Analytics view so that this query parameter is stripped from reports (because it doesn’t add any value content-wise)
For this example, I’ve chosen the query internal=true as the trigger. So if you navigate to the homepage, you’d need to use http://www.mydomain.com/?internal=true to be tagged as internal traffic.
Here’s how you use the query parameter as a custom dimension in your tags.
-
Create a new macro (Macro Name: Internal URL, Macro Type: URL, Component Type: Query)
-
In the field Query Key, add internal
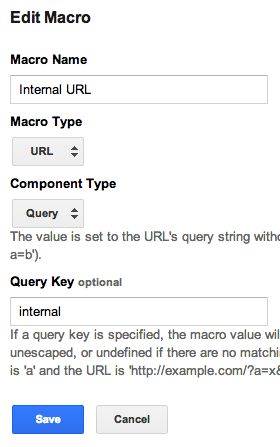
When called, this macro looks at your URL, tries to find the query parameter “internal”, and if it does, it returns its value (“true”). If no parameter is found, it returns an undefined which suits us just fine.
Next, you’ll need to send this along with your page view tag.
-
Open your page tracking tag
-
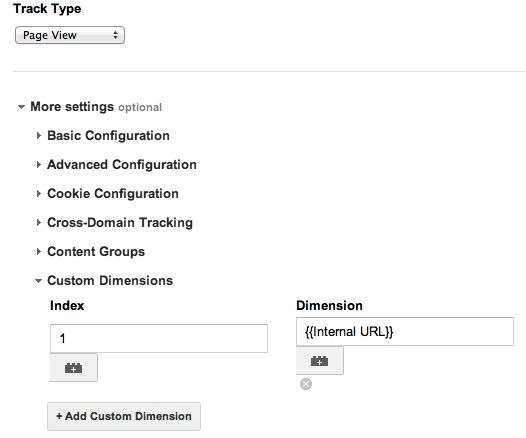
Go to More Settings » Custom Dimensions
-
Add the index number of your custom dimension in the appropriate slot
-
Add {{Internal URL}} into the Dimension field
And that’s it! The beauty of Google Tag Manager macros is that you don’t need a separate page view tag for undefined custom dimensions. You can just use this one macro. If the query parameter “internal” is found, its value (“true”) is sent as a custom dimension along with your page view hit. However, if no such parameter is found, no custom dimension is sent, so you don’t have to worry about overwriting your data with an empty custom dimension or something.
Finally, check with a debugger like WASP that your custom dimension is actually being sent over.
Pro tip, use a URL rewrite
If you or your internal traffic users find that using a URL query parameter is tedious, you should set up a 301 server-side redirection, and use either a vanity URL or a subdomain to handle the redirection. So if http://www.mydomain.com/?internal=true is just too difficult to manage, make it so that http://www.mydomain.com/office or office.mydomain.com redirect the user to the home page with the query parameter in place (or both!). If you have an Apache server, you could try something like this for the subdomain redirect (check with IT first!):
RewriteEngine on
RewriteCond %{HTTP_HOST} ^office\.mydomain\.com$
RewriteRule ^$ http://www.mydomain.com/?internal=true [R=301,L]
Method 2: IP extraction
A popular way to separate internal traffic from external traffic is to use the client’s IP address. The most common method is to use Google Analytics’ standard features to filter out any IP addresses that are within a specified range. Because this is so “standard”, I won’t go into it (you can read the official words here).
This guide is for annotating internal traffic, not for filtering it, so you’ll be checking the client’s IP address against a specified range, and if there’s a match, you’ll send this information via custom dimension.
(Pro tip: This is especially useful if you have IP anonymization set up. In Google Analytics, IP anonymization censors the last octet of the client’s IP (111.222.333.XXX) and sets it to 0 (111.222.333.0). This is what’s sent to Google Analytics servers, ensuring a higher level of security, if you don’t want the geeks at Mountain View looking at your visitors’ IP addresses.)
To extract the client IP, you have a number of choices. The accuracy will vary greatly, since if the visitor is using a proxy, for example, it’s not really their IP that’s retrieved but the proxy’s. In this guide, I’ll introduce you to a simple PHP value retrieval, and also how to retrieve the IP with JavaScript using an external API call.
Retrieve and process the IP with PHP
This is one way to do it, and it should work if you have a site which is parsed with PHP (WordPress, Drupal, etc.). In your page template, before your container snippet, you create the dataLayer object with window.dataLayer = window.dataLayer || [];. Use this to enter the client IP into the dataLayer object as it is created. This way it will be ready when the container is set up and your page views are sent:
  window.dataLayer = window.dataLayer || [];
  window.dataLayer.push({
    "ipaddress": "<?php echo $IPADDRESS ?>"
  });
This will retrieve the IP address using the designated PHP variable, and it will store it in the data layer variable ipaddress.
This is a great way to extract the IP address, since you don’t have to wait for an external API to resolve the address. Here’s a more thorough guide on retrieving the IP with a PHP call.
Next, create a Data Layer Variable Macro through which you can process the IP:
-
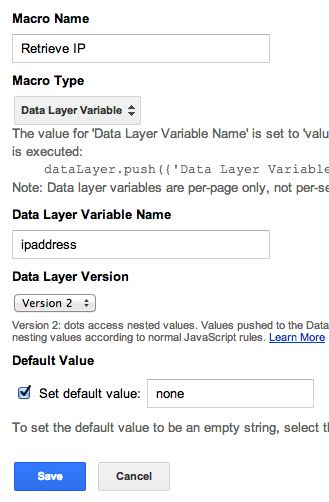
Create new macro (Macro Name: Retrieve IP, Macro Type: Data Layer Variable)
-
Set ipaddress as the Data Layer Variable Name
-
Set none as the Default Value
(Why the default value, you ask? Well I like dealing with declared entities, so that I won’t have to check for undefined every single time I want to process a variable.)
Next, you’ll need a Custom HTML tag in which you’ll process the IP address. The aim is to push a data layer variable “internal”: “true”, if the IP matches a given address or range.
-
Create new Custom HTML Tag
-
Add the following code within:
<script>
  var ipaddress = {{Retrieve IP}}; // Retrieves the IP from the data layer

  // Comment following three lines if you want to use the IP range method
  if (ipaddress == "111.222.333.444") {
    dataLayer.push({"internal": "true"});
  }

  // To use the following IP range check, comment the previous three lines
  // of code and uncomment the following lines
  //
  //  var ipRange = ipaddress.split(".");
  //  var lastOctet = parseInt(ipRange.pop());
  //  if(lastOctet >= 1 && lastOctet <= 100) {
  //    dataLayer.push({"internal": "true"});
  //  }

  dataLayer.push({"event": "ipComplete"});
</script>- Add Firing Rule to tag: {{event}} equals gtm.js
You have two choices in the code above. Either you do an exact match (if your office has just one IP address), or you check against a range. In the range check, I check if the last octet (111.222.333.XXX) is between 1 and 100, so remember to modify this to match the range you want to check for. And if you have multiple IP addresses you want to include in the check, just modify the if-clause to your liking. You can (and should) also use regular expression pattern matching, if the variations get more diverse.
Whatever you do, this should push the data layer variable “internal”: “true” if the IP address matches a given pattern. Finally, you push a trigger event “ipComplete”, which is what will fire your page view tag, with which the custom dimension is also passed along.
The Firing Rule here is {{event}} equals gtm.js to ensure that the code is run at the earliest possible opportunity, to avoid delaying the page view call any more than necessary.
Retrieve and process the IP with JavaScript
If you can’t use PHP or server-side scripting, you can use JavaScript. Well, you can’t technically resolve the client IP using just JavaScript. You need to request the IP from an external resource such as Hostip.info or GeoPlugin. This means that this approach is a bit more suspect, because you have to trust the request endpoint to serve you with the correct data every time. Nevertheless, if you can’t retrieve the IP server-side, this is what you should try.
I use Hostip.info in my example, but there are a number of APIs out there that you can use. I suggest you find an API that allows you to retrieve the data with an asynchronous AJAX request (you could also use an XMLHttpRequest), and which returns the data as a JSON object that you can then parse. This way your contraption won’t go up in flames, taking most of your website along in its carnival of destruction, if the endpoint chooses to change the way it distributes.
I’ve added the AJAX call to the Custom HTML Tag where I’ll be doing the pattern matching as well.
NOTE! This script requires that you have loaded jQuery before this script is run. So make sure the library is loaded first.
-
Create new Custom HTML Tag
-
Add the following code in the tag:
<script>
  function matchIP(ipaddress) {
    // Comment following three lines if you want to use the IP range method
    if (ipaddress == "111.222.333.444") {
      dataLayer.push({"internal": "true"});
    }

    // To use the following IP range check, comment the previous three lines
    // of code and uncomment the following lines
    //
    //  var ipRange = ipaddress.split(".");
    //  var lastOctet = parseInt(ipRange.pop());
    //  if(lastOctet >= 1 && lastOctet <= 100) {
    //    dataLayer.push({"internal": "true"});
    //  }
  }

  var ipaddress = "";
  try {
    jQuery.ajax({
      type : "GET",
      dataType : "json",
      url : "http://api.hostip.info/get_json.php",
      async : true,
      success : function(data) {
        ipaddress = data.ip;
      },error : function(errorData) {
        ipaddress = "none";
      },complete : function() {
        matchIP(ipaddress);
      }
    });
  } catch(e) {
    console.log("Oops, something went wrong: " + e.message);
  }
  dataLayer.push({"event": "ipComplete"});
</script>- Set Firing Rule for tag {{event}} equals gtm.js
Phew!
In this tag, you send an asynchronous HTTP POST request to the endpoint at hostip.info. The request returns a JSON script, which you parse for the node “ip”. The value stored in this node is then stored in the data layer variable ipaddress. Finally, as soon as the request is complete, you call a function called matchIP(), where the actual parsing takes place.
The parsing is identical to what we did in the PHP IP retrieval script, so you can either evaluate an exact match or a range of IP addresses. With small modifications you can check versus multiple addresses and ranges, if you so choose.
Again, the desired end result is a new data layer variable “internal”, which should have the value “true”, if traffic is internal. It should remain undefined if traffic is not internal, or if an error crops up in your AJAX request.
And again, there’s the trigger event “ipComplete”, which is the firing rule for your page view, which will be the vessel for your custom dimension.
The firing rule for this Custom HTML Tag is {{event}} equals gtm.js, because you want to make sure that the script is run at the earliest possible moment to avoid delaying your page view call any more than necessary.
Send custom dimension with page view tag
And, finally, we are about to reach the end of this arduous journey. It’s time to modify your page view tag, so that it includes information about the traffic type in a custom dimension.
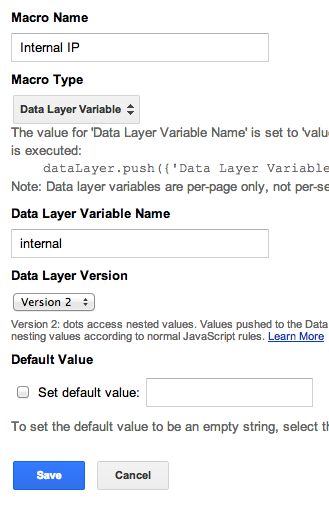
First, create a Data Layer Variable Macro for your internal traffic.
-
Macro Name: Internal IP
-
Macro Type: Data Layer Variable
-
Data Layer Variable Name: internal
Now we’re ready to edit the page view tag.
-
Open your page view tag
-
Go to More Settings » Custom Dimensions
-
Add a new Custom Dimension, and give it the correct index number
-
In the Dimension slot, add your new data layer variable macro ({{Internal IP}})
-
Add Firing Rule: {{event}} equals ipComplete
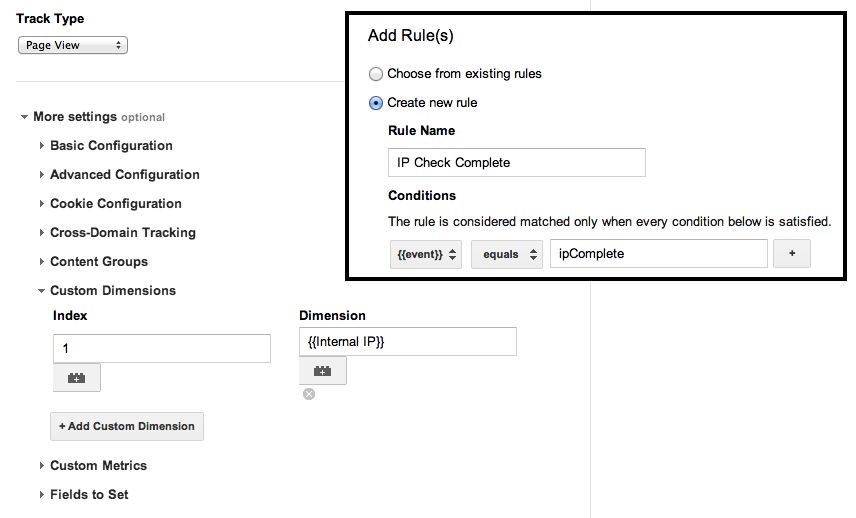
That’s it! Your page view tag obediently waits for the IP check to complete. Once the check is made, if traffic was internal, the value “true” is sent as a custom dimension with the page view tag.
NOTE! Making your page view tag wait for any scripts (especially external API calls) is a bit dangerous, since if there’s a significantly long load time, your page view might not get sent at all. You might want to leave your page view tag as it is, and send the custom dimension with a non-interaction event instead.
Conclusions
I didn’t intend this post to be a be-all and end-all to All Internal Traffic Exclusion Guides on the web, so I’m a bit confused why this ended up being such a long post.
Regardless of my verbosity, I hope this post served to highlight some of Google Tag Manager’s amazing versatility. The combination of macros, tags, and defined / undefined custom dimensions creates opportunities for really complex tagging with a really simple setup.
With the help of this post, you can now segment (or filter) your internal traffic in Google Analytics by looking for “true” in your Internal Traffic custom dimension.
What other ways have you discovered to identify internal traffic (with or without GTM)? I’d love to add a third method to this tutorial, even though then this will really be a bloated guide.
