Better QA With Google Tag Manager Environments
Google Tag Manager, our favorite free tag management solution, has always struggled with its enterprise-worthiness. There are many features still lacking, most of which have to do with working in multi-user environments. Now, grab the last word of that sentence (see what I did there), and hug it tightly, for GTM just introduced a new, enterprise-friendly feature: Environments.
These Environments are actually browser cookies, which you use to link a Google Tag Manager container state with the browser of the user who needs to or wants to view that particular state. In other words, if you have a QA (quality assurance) process, as you should have, or if you do most of your testing on a staging server, as you should do, you can create an Environment in GTM, after which you can publish container versions (even the draft) into that particular Environment alone.
This is, actually, pretty significant compared to how GTM used to work. Before, you had to Share a Preview version, but that was always a container version. When the version changed, you had to retrieve a new authentication token. Now, GTM will distribute Environment tokens instead, meaning as long as the Environment is linked to Google Tag Manager and the authentication is not revoked, that particular token will have access to whatever versions are published into said Environment. Cool!
This makes GTM more manageable across multiple contexts. There are two ways to do this: by sharing a link, as before, or by adding a piece of code into the page templates of each Environment, in which case the link between GTM and the Environment works without you having to distribute authentication tokens via cumbersome links.
Official support documents can be viewed here. Let’s get cracking!
XThe Simmer Newsletter
Subscribe to the Simmer newsletter to get the latest news and content from Simo Ahava into your email inbox!
Why this change?
This development is necessary not only because it makes GTM function better across environments and teams, but also because the old Share Preview feature was not optimal. In this chapter, I’ll briefly walk you through how container version sharing used to work, so that you’ll understand why this development is necessary.
Many thanks to Brian Kuhn, again, for his invaluable insight into the inner workings of Google Tag Manager.

Thus far, when you’ve clicked the Share Preview link either in the yellow preview bar (seen above), or via the Versions page, you get a URL which you can then distribute to whomever should be able to preview (or debug) this particular container version.
This URL, when executed in the browser, actually writes a secret authentication token into the user’s browser while on the googletagmanager.com domain. Now, when requesting the gtm.js library from googletagmanager.com on the website where the container is installed on, GTM will detect this authentication token in the cookies written on googletagmanager.com. Once it detects the authentication token, it will know to download the container version with which this particular token is associated. The following modern art masterpiece illustrates this relationship:
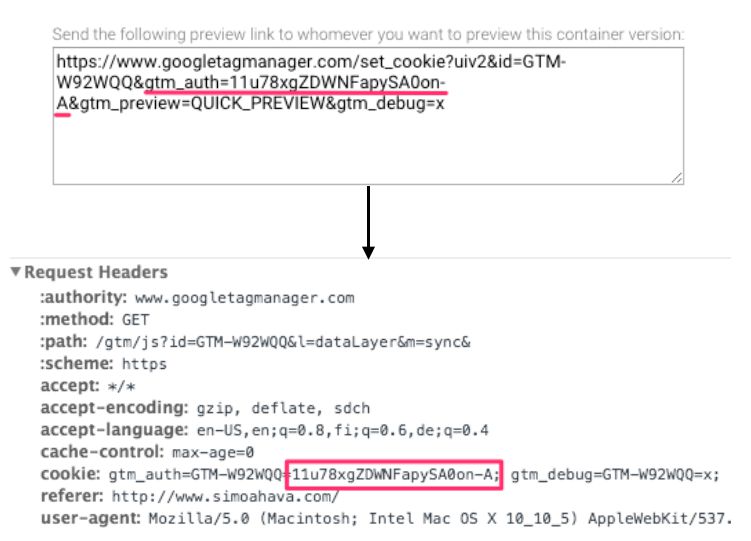
As you can see, the authentication token in the Share Preview link matches that of a specific cookie found on the googletagmanager.com domain.
In other words, since an authentication token links a specific version with the user’s browser, it means that that user is permanently forced to digest that particular container version in their browser.
OK, well, I might be exaggerating a little. The cookie itself is a session cookie, meaning it will expire when you close the browser. However, the token is permanent. So if the user saves the link, they can revisit that version as much as you like, and there’s very little you can do about it (short of deleting the version).
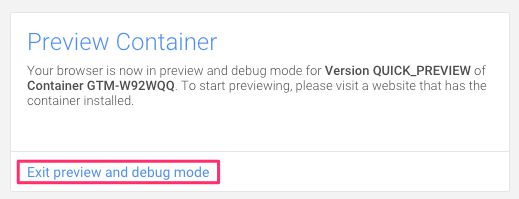
Also, to get rid of Preview mode without having to shut down the browser is a bother as well. Basically, you need to browse again to the page you get when copy-pasting the Share Preview link, and then click the “Exit Preview” link you see. It’s easy to miss and easy to forget.
Not very streamlined.
Anyway, this is how it’s worked thus far. The main problems with the current setup are:
-
Authentication tokens are permanent, so there’s no way for you to revoke authentication. Also, cookies are session cookies, and it’s difficult to delete them (unless you remember to click the “Exit Preview” link on the Share Preview page). The permanence of the authentication token is especially problematic with the Container Draft, as once a user has the authentication token for the draft, they’ll be authenticated against ALL future drafts as well!
-
Since the token is linked to a specific version, it makes the QA process cumbersome. Optimally, you’d want the cookie to be bound to the environment, not the version. Now QA needs a new authentication token whenever a new version of the container is ready for testing.
-
Sharing the container preview link is a hassle, looks suspicious, and is sensitive to errors. Also, it does not scream “FLEXIBILITY”, which is what I do a lot when working with GTM (my co-workers find it amusing).
These are the problems the Google Tag Manager team wanted to tackle with Environments, and they sure did take a step in the right direction with the new feature.
Introducing Environments
The main benefit of Environments is that you no longer share a version cookie, but rather an Environment cookie. In other words, if you want to link a user’s browser with an Environment created in GTM, you don’t have to send them a new token each time the version updates. Instead, you give them the authentication token to that particular Environment, after which you simply publish to that Environment, and the user on the other end with their QA browser will have access to whichever version is currently published to that Environment.
Another thing that has been made simpler is revoking access. You can now nullify an authentication token via GTM, helping you manage who has access to which Environments.
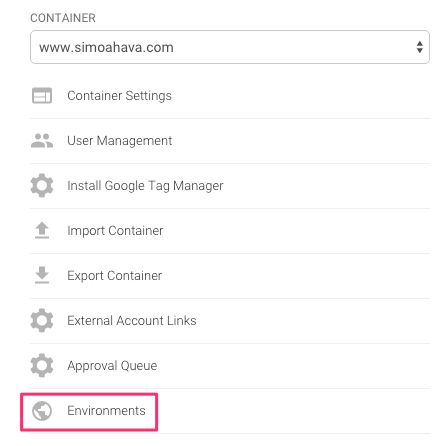
To get started, you will need to enable Environments in your Google Tag Manager container. If you don’t do that, nothing will change in your Google Tag Manager user interface. So, head on over to the Admin section of your container, and click the new Environments link.
This is where you’ll create your own, long-lived Environments. I stress long-lived, since you really only want to create an Environment which lasts more than the lifespan of a single version. I mean, you CAN use Environments to substitute the old “Share Preview” functionality, but they truly come to life when actually creating an Environment for a permanent process in your organization, and then using it methodically to test new versions of the container, without having to share cookies every single time.
Manage Environments
In the list of Environments, you’ll see three default Environments. These can’t be deleted or published to manually. They are:
-
Live - The currently live Container Version is automatically added to this Environment
-
Latest - The newest created version (not the Draft)
-
Now Editing - The current container draft
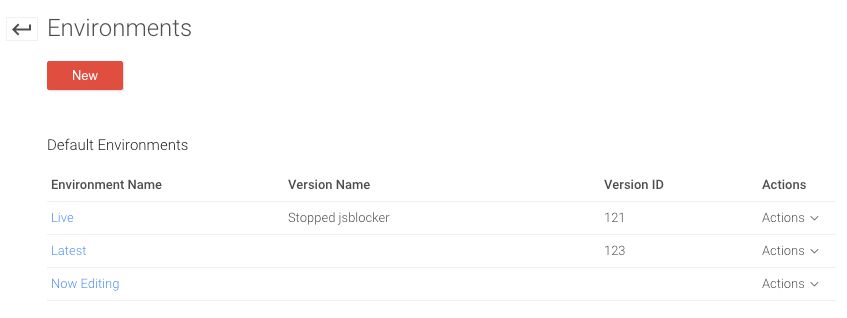
Now, these are all states that exist in GTM with or without creating custom Environments. When you edit a container, the version is maintained in the “Now Editing” Environment. When you save a draft as a container version, the version is maintained in the “Latest” Environment. And when you publish a version, it is published into the “Live” Environment.
Click New to create your first, custom Environment. Give it a honest name and a good description. You can also choose to enable the Debug panel by default (if you don’t check this, then Environments will be Preview only by default, meaning users won’t see the debug panel).
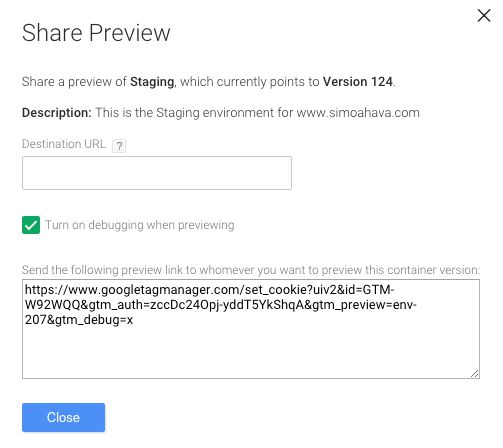
If you want, you can set the hostname of the site where the Environment is. This way the Share Preview dialog will directly link the user to the website.

So, now you’ve created your first custom Environment, and you’ll see it in its own list in the Environments page.

As you can see, the Version ID field is empty, meaning you haven’t published a version into this Environment yet.
Let’s take a look at the Actions menu.
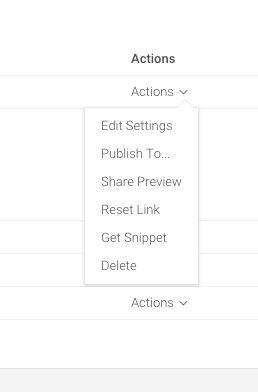
NOTE! The default containers have the same menu, except they do not have the Delete or Publish to… options available.
The options are:
-
Edit Settings - lets you edit the settings you first set when creating the Environment
-
Publish To… - opens a publish dialog, where you can select which container version you want to publish to the selected Environment. After this, sharing a preview link to this Environment will allow users to preview the published container only.
-
Share Preview - shares a preview link to the Environment, allowing users with access to this particular Environment preview and debug it with their browsers.
-
Reset Link - removes authentication from the previously shared link AND from the new snippet (see below). This is very cool but also dangerous (see the next chapter).
-
Get Snippet - gives you the updated GTM Container Snippet which replaces the original snippet. All pages with this Environment will automatically be in preview mode for the Environment.
-
Delete - lets you delete the Environment.
Let’s move on to how the sharing works.
Sharing Environment access
To share Environment access, you have two options.
You can distribute it as a link, as before, which binds the user’s browser to the Environment via an authentication token. This way, the user’s browser is linked to that particular Environment until the authentication token is revoked or the user manually deletes the token cookie using the Share Preview page.
An alternate, more robust way is to modify the container snippet on the website of the Environment (e.g. QA or staging site). The simple modification enables the authentication token to be accessed whenever that site is visited, meaning the site (read: the container snippet) is bound to the Environment instead of just the user’s browser. This method dispenses with the need to share the authentication link, and it allows the user to browse other Environments on the same domain (e.g. the live site) without interference.
In other words, the Environment will only be active on pages with the new container snippet. When you browse to a page or site (even under the same domain) that does not have the authentication token in the snippet, you will be privy to the live, published container as usual.
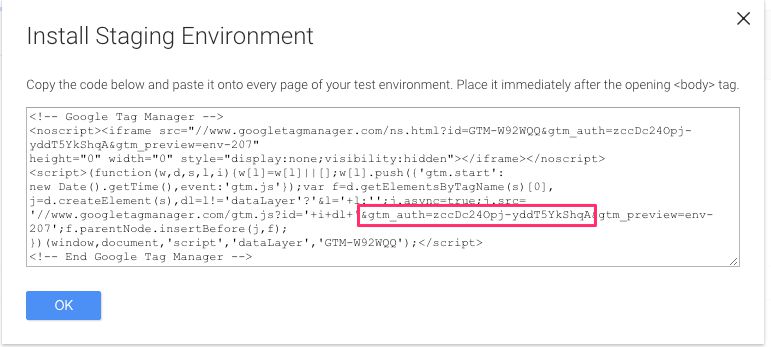
NOTE! When you reset the link to the Environment, it will also make the container snippet for that Environment change! In other words, only reset a link which is used in a container snippet if you are certain it’s necessary. Otherwise you’ll have hell to pay with your developers.
On that note, it’s probably best to avoid using the same Environment both with Share Preview links and distributing the authentication token via the container snippet. Make a note of what the Environment is used for in the Description field or, even better, in the Name field. That way you’ll know what you risk if you want to reset the link.
Things you can do via the GTM UI
Once you enable Environments, you can selectively publish to these Environments, you can use a new Built-In Variable to query which Environment the user is currently in, and you can view which version is currently live in which Environment.
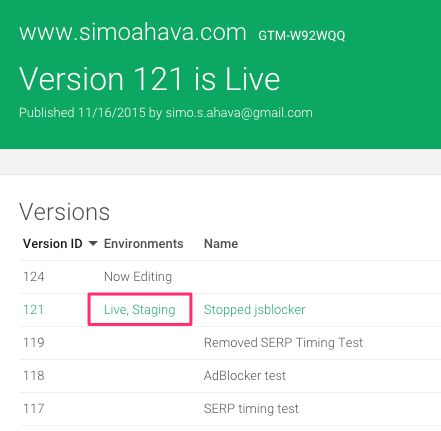
First, go to the Versions screen. As you can see, there’s a new column “Environments”. That column contains information about to which Environments a particular version has been published.
Next, if you click the Actions menu next to a version, you’ll find the Publish To… link again. Here, you can publish the selected version to an Environment of your choice! So no need to go through the Environments page every single time you want to publish a version to an Environment.

Next, go to the Container overview and click the red Publish button. As you can see, you can now choose to which Environment you actually want to publish the container draft to! Live is selected by default, of course.
NOTE! When you publish a container draft, it is first created into a version, and then automatically published to the Latest Environment in addition to whichever Environment you chose in the Publish dialog. Also, the version in the “Now Editing” Environment is updated to the NEW container draft. Phew!
The new Environment Name variable
Yes, there’s a new Built-In Variable in town: Environment Name.
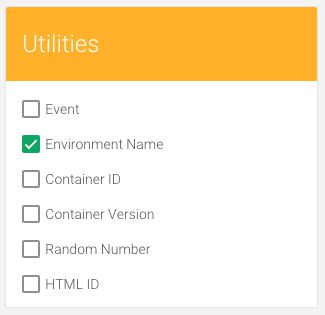
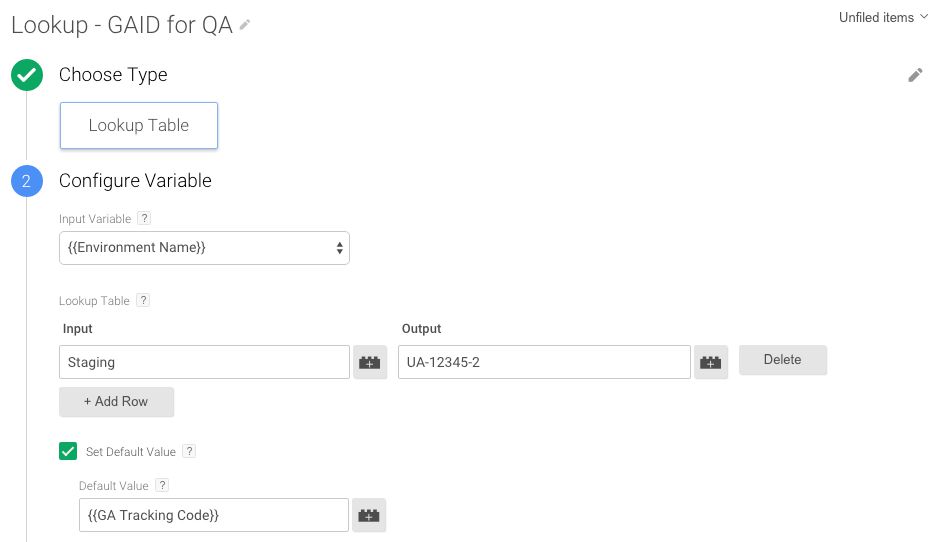
You might be surprised that this variable returns the name of the Environment the user’s browser is currently viewing (shocker!). My favorite use case for this is to create a Lookup Table Variable, which distributes hits to different Google Analytics properties depending on which Environment the user is in:
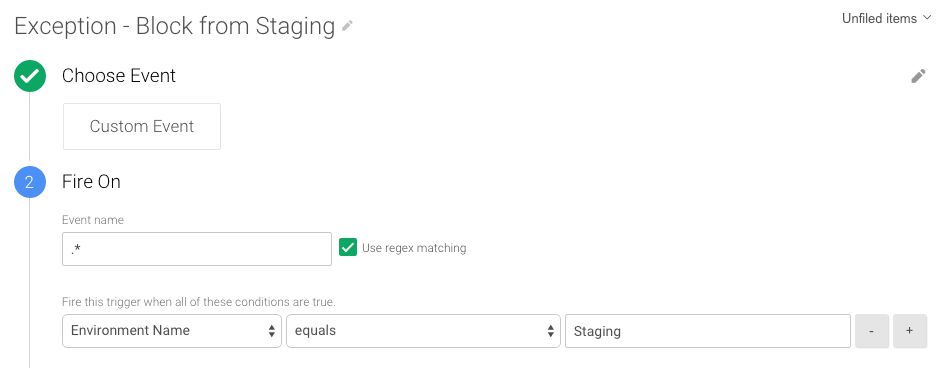
You can also use this Variable in a Trigger, creating a powerful Exception to avoid firing expensive Tags in certain Environments.
All in all, a very useful addition to your arsenal of variables.
Summary
Environments are really useful. They’re a huge leap in the right direction, again, turning Google Tag Manager into a more manageable mess, especially in multi-user projects.
The first thing you’ll want to do is establish some permanent Environments (e.g. QA and Staging), and update the web servers with the Environment container snippet. Then, make sure to write it down clearly that the link for these Environments should not be reset without good reason! If you reset the link, the container snippet needs to be rewritten.
After that, you can start using other Environments for your own purposes as well. Perhaps you want to create an Environment only for a particular side project, where you need to allow preview and debug access to an agency or consultant. Or perhaps you want to start your own “branch” of versions, debugging and previewing them in your own, enclosed Environment, distributing links to anyone who might be able to help you in your work.
The fact that giving and revoking authentication is now completely in your administrator’s hands is also an excellent change. Now you don’t have to hunt down the person you shared the container draft link with, as you can just reset the link to the “Now Editing” Environment, revoking preview access from anyone who used to have it.
One thing that’s missing is the end user’s ability to revoke access by themselves. A simple “Close” link in the debug panel would be awesome. Now you have to revisit the “Share Preview” page to remove access. If the authentication is done via the container snippet, there’s no way to get rid of Preview mode while in that environment. It would be nice if you could temporarily (e.g. via a session cookie) revoke the authentication imposed by the container snippet while browsing the site.
It’s also a bit strange that you can see deleted versions in the Environment lists. For example, if you create a new version and then delete it, it still appears in the “Latest” Environment, and you can publish it to any Environment you want via the Actions dropdown.
Finally, remember that tools don’t create processes, they facilitate them. If you don’t have a process the Environment is designed for, this new GTM feature will bring very little gratification. It will make some aspects of testing and previewing easier, but Google Tag Manager Environments truly shine when they reflect and facilitate existing processes.
