Accelerated Mobile Pages Via Google Tag Manager
Google Tag Manager recently published support for Accelerated Mobile Pages (AMP). This support comes in the form of a new Container type in Google Tag Manager.
When you create an AMP container in GTM, you are actually setting up an external configuration for AMP, which leverages AMP’s own analytics module. As befits Google Tag Manager, creating the configuration is done in the familiar Google Tag Manager user interface, and you have (almost) all the tools of regular Google Tag Manager at your disposal.
In this article, I want to go over how AMP and GTM mesh together to provide your mobile pages with improved tracking capabilities.
Table of Contents
The Simmer Newsletter
Subscribe to the Simmer newsletter to get the latest news and content from Simo Ahava into your email inbox!
1. AMP Overview
Accelerated Mobile Pages is an open-source project, and you can read all about it at https://www.ampproject.org/. In a nutshell, it’s a set of structural instructions for building web pages, where focus is on speed and performance, without sacrificing too much UI/UX along the way.
AMP is based on a number of design principles that might ring true to you if you’ve ever pondered about website performance. Things like asynchronous resource loading, inline CSS styling, web font optimization and optimized pre-rendering of pages are some of the features that AMP relies on to provide users with content super fast.
Creating an AMP site
Creating an AMP version of your site isn’t just a plug-and-play affair. You need to rewrite the HTML, JavaScript, and CSS styles to match the AMP design principles. If you’re using a platform like WordPress, there are plugins available that do most of the configuration for you. And here’s a great tip for AMP development work: anytime you are browsing an AMP page, you can add the URL hash #development=1 to the URL to validate your AMP page, outputting the result of the validation into your browser’s JavaScript Console.

AMP and Google search
Finally, if you’ve setup your site with AMP pages, it’s a good idea to follow the Google Search Guidelines for informing the search engine about your site’s new mobile structure. Google will attempt to direct mobile searches of your site to the corresponding AMP pages, thus providing mobile visitors with fast, optimized access to your precious content.
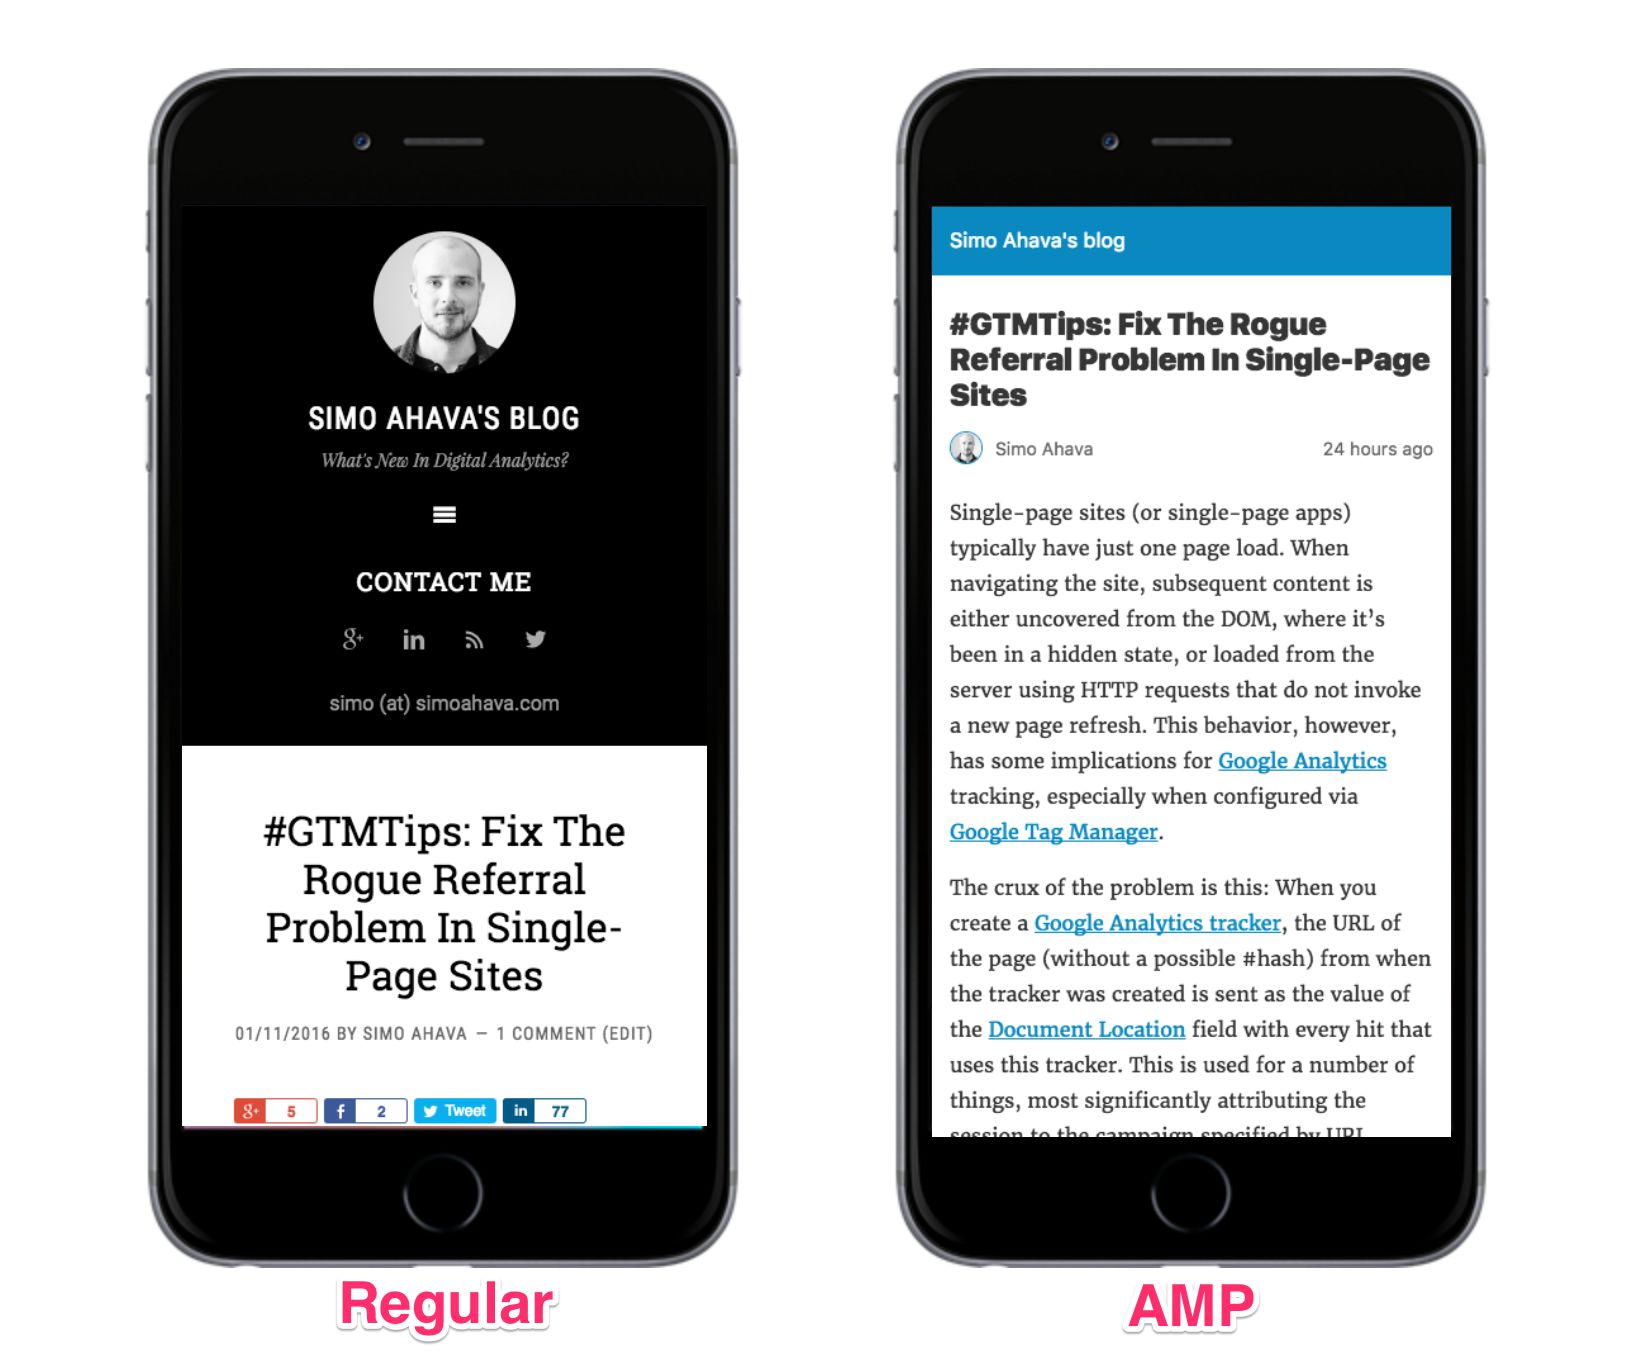
If you want to see what AMP pages look like, you can visit any article on this site, and add /amp/ to the URL (e.g. https://www.simoahava.com/amp/analytics/accelerated-mobile-pages-via-google-tag-manager/.
2. AMP Analytics
The Google Tag Manager AMP container leverages the amp-analytics component. This component, developed within the AMP project, provides a light-weight framework for analytics requests sent either via a number of built-in vendor templates, or to a custom endpoint of your choosing.
The amp-analytics framework is managed by a JSON configuration object, where you specify details of the endpoint you want to send the data to, as well as variables and triggers (sound familiar?) that govern what analytics requests are sent and when.
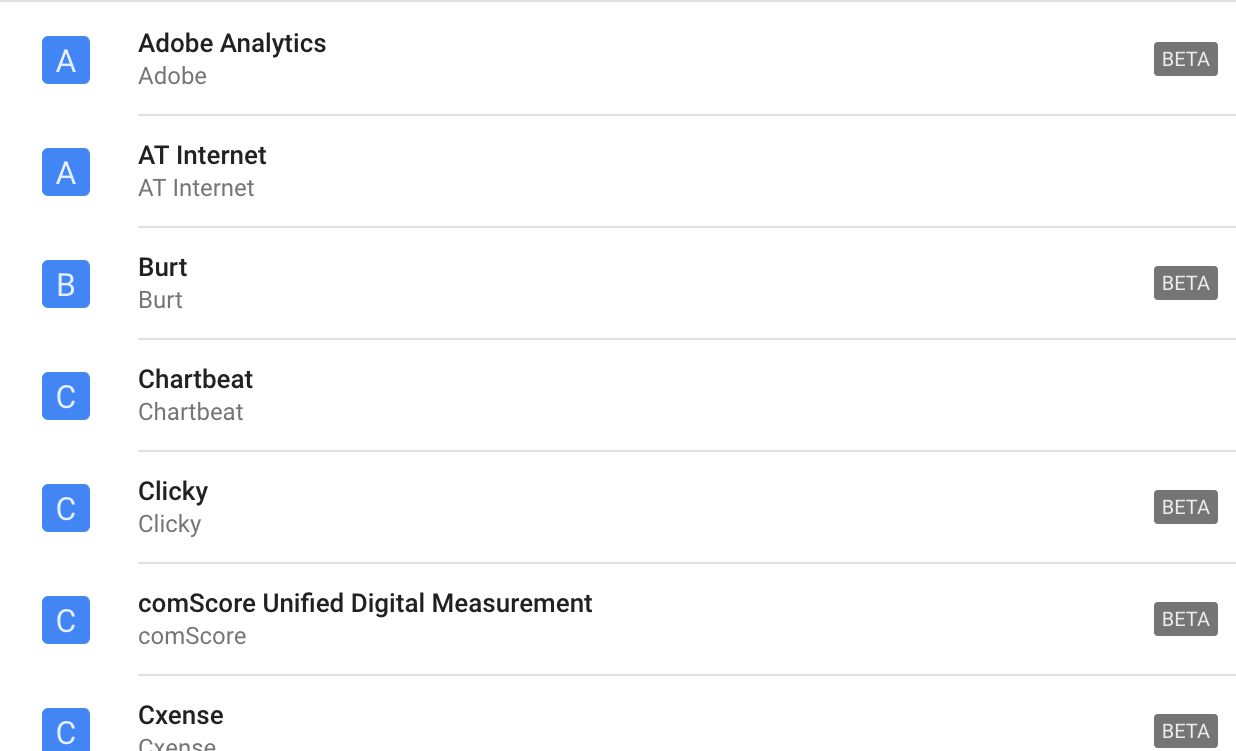
Even though the amp-analytics documentation isn’t particularly long or complex, there’s still many things to consider when configuring a custom tracking scheme. That’s why it’s very useful to have pre-built templates for a number of analytics vendors (e.g. Google Analytics, Adobe Analytics, Snowplow Analytics).
Add amp-analytics to your website
To add support for the analytics component on your site, you need to add the following line of code into the <head> of your document:
<script async custom-element="amp-analytics" src="https://cdn.ampproject.org/v0/amp-analytics-0.1.js"></script>This loads the AMP analytics library, and instructs the page to look for an element named <amp-analytics>. This custom element is where you introduce the JSON configuration object that will eventually govern how the site is tracked.
Google Analytics has a great developer guide for setting up the JSON configuration object manually. For example, to send a Page View hit to Google Analytics when the page is loaded, you’d add the following element to the <body> of the site:
<amp-analytics type="googleanalytics" id="analytics1">
<script type="application/json">
{
  "vars": {
    "account": "UA-XXXXX-Y"
  },
  "triggers": {
    "trackPageview": {
      "on": "visible",
      "request": "pageview"
    }
  }
}
</script>
</amp-analytics>
As you can see, you’re using the custom element <amp-analytics> that you specified when adding the initial script loader to the <head> of your page. The type parameter of the element specifies that you are using the built-in googleanalytics vendor template.
Be sure to check out Bounteous’ excellent guide for Google Analytics and AMP integration!
Load the JSON configuration object as an external resource
You can also load the JSON configuration object from an external source (as long as the request adheres to AMP CORS security guidelines). For example, the Google Tag Manager “container” is actually a request to an external config file that you specify like this:
<amp-analytics config="https://www.googletagmanager.com/amp.json?id=GTM-XXXXXX&gtm.url=SOURCE_URL" data-credentials="include">
<script type="application/json">
{
"vars": {
"someCustomAmpVar": "someValue"
}
}
</script>
</amp-analytics>This downloads a file named amp.json, specified by using your container ID, and the data-credentials attribute allows the resource request to read and write cookies as needed. The <script> block within the amp-analytics element can be used to use your own custom AMP variables on the page.
Note that the external config file download will only begin if the page is visible in the viewport! For example, if you open an AMP page with a remote configuration link in a new browser window without making that window active, the configuration file download will wait until such a moment that the page becomes visible. This means that your analytics tracking will not commence until the page is visible in the browser.
Anyway, back to the JSON configuration object. It details what interactions and events are tracked to the analytics endpoint of your choosing, when they are tracked, and how. I recommend you read through the AMP Analytics documentation, as it sheds quite a bit of light on how the GTM AMP container works, too.
AMP Analytics with its JSON configuration object is quite far removed from the dynamic execution context of JavaScript and the Document Object Model. However, you should respect the fact that all compromises are done in favor of improved performance. I hope some of the AMP Analytics methodology would rub off on the bloated, performance-killing, dynamic mess that “modern”, JavaScript-based web analytics so often is.
2.1. Client ID
Before we move on to how the GTM AMP container works, we need to talk about Client ID. You can skip this chapter if all you want to do is get Google Tag Manager up and running on your AMP site.
Google Analytics uses the Client ID parameter to align hits with the users who sent the hits. This ID is stored in a first-party cookie named _ga. Thus, every time you visit a website running Google Analytics, this cookie is used to make sure all the hits you send are tied together with your previous visits.
First-party cookies can only be written on the domain you are currently on. Consequently, if you want to travel from one domain to another and still maintain all your hits under the same Client ID, you will need to somehow pass your cookie value from one domain to another without violating the restriction outlined in the first sentence of this paragraph.
Client ID and AMP
With AMP, things are slightly more difficult. AMP Analytics does not use the _ga cookie by default, even though you can set it up so that AMP falls back to _ga if one is found. But even if you do set it up to use _ga, what if the user browses the AMP page via Google search or the AMP CDN? Both cache your content in an external domain (www.google.com and cdn.ampproject.org, respectively), which means that they will not be able to access any cookies written on your domain. Also, AMP’s default Client ID syntax is vastly different from the one used by Google Analytics.
This all means that even if you did manage to use your existing _ga cookie as the Client ID in AMP pages on your site, it’s not enough. You see, if the user lands on your AMP page via Google search, which is probably the most typical use case, they’ll actually visit a cached version of your page on www.google.com. This means that no _ga cookie is found, and AMP defaults back to a random, unique ID.
Hacking to create a single, unified Client ID
There are workarounds, and thanks to some brainstorming with the inimitable Dan Wilkerson from Bounteous (who already wrote an excellent guide for Google Analytics and AMP), here’s one suggestion that I’ll probably expand in a later article.
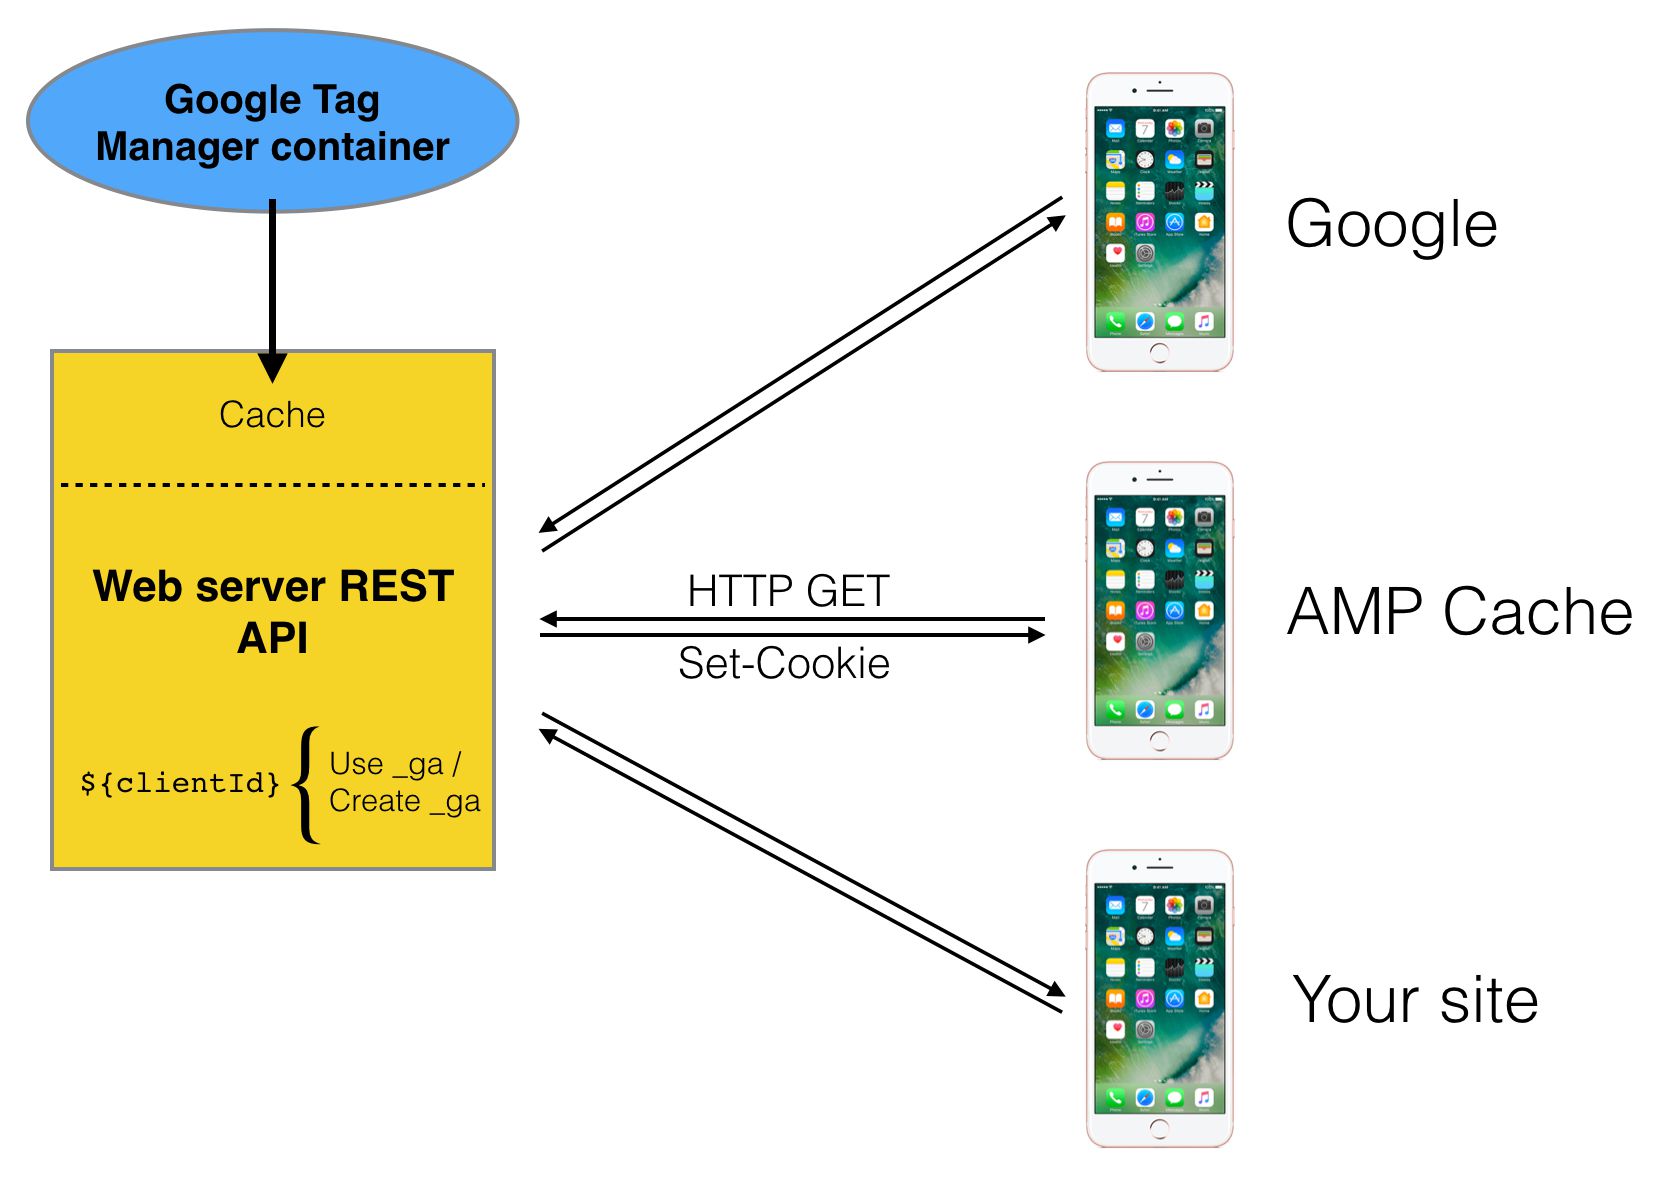
Here’s how this particular solution works:
-
Instead of fetching the GTM container directly, the request is sent to a custom HTTP endpoint you need to set up on your website’s domain.
-
This API serves a cached version of the GTM container, or fetches the most recent version if the cache has expired.
-
Instead of using the default, random Client ID which AMP Analytics uses, Client ID is retrieved from the
_gacookie written on the domain of the REST API, i.e. your website. -
If no cookie is found, a new one is created.
-
The
_gavalue is returned in theSet-CookieHTTP Response Header, so that the cookie will be written on the domain which originated the request (e.g. www.google.com or cdn.ampproject.org). -
The HTTP Response also contains the JSON configuration object (with the new Client ID) used by the site to set AMP Analytics up.
In other words, you’re creating a proxy on your web server, which relays requests for the Google Tag Manager container, while modifying the container so that it includes (or creates) the Client ID used by Google Analytics.

It’s convoluted, yes, and there might be easier ways to handle this, but for now it lets you stitch together AMP traffic with other on-site traffic, such as desktop visits to non-AMP pages. For some publishers, and especially for ecommerce sites, this is vital.
3. Create and implement GTM/AMP container
As mentioned earlier, the Google Tag Manager AMP container is essentially a remote JSON configuration object that AMP Analytics uses for tracking interactions on your page.
Also, there is no dataLayer. Any custom variables you want to pass from the page to the JSON configuration object need to be included in the <script> block within the amp-analytics element:
<amp-analytics config="https://www.googletagmanager.com/amp.json?id=GTM-5BH2HM&gtm.url=SOURCE_URL" data-credentials="include">
<script type="application/json">
{
"vars": {
"gaTrackingId": "UA-12345-1"
}
}
</script>
</amp-analytics>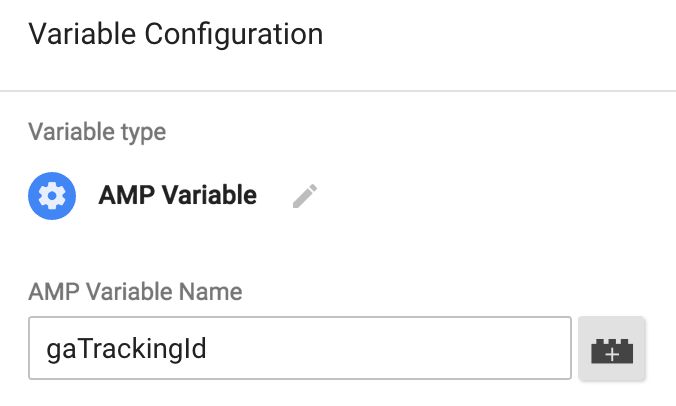
The benefit of using Google Tag Manager is that you can use the trusted user interface to configure your AMP container just as you’d configure your web container. All the supported vendor templates are available as tags, so creating a request for your endpoint is quite simple.
Once you’re done configuring, you need to hit the PUBLISH button, and the AMP Analytics JSON configuration object will be updated automatically for all web visitors.
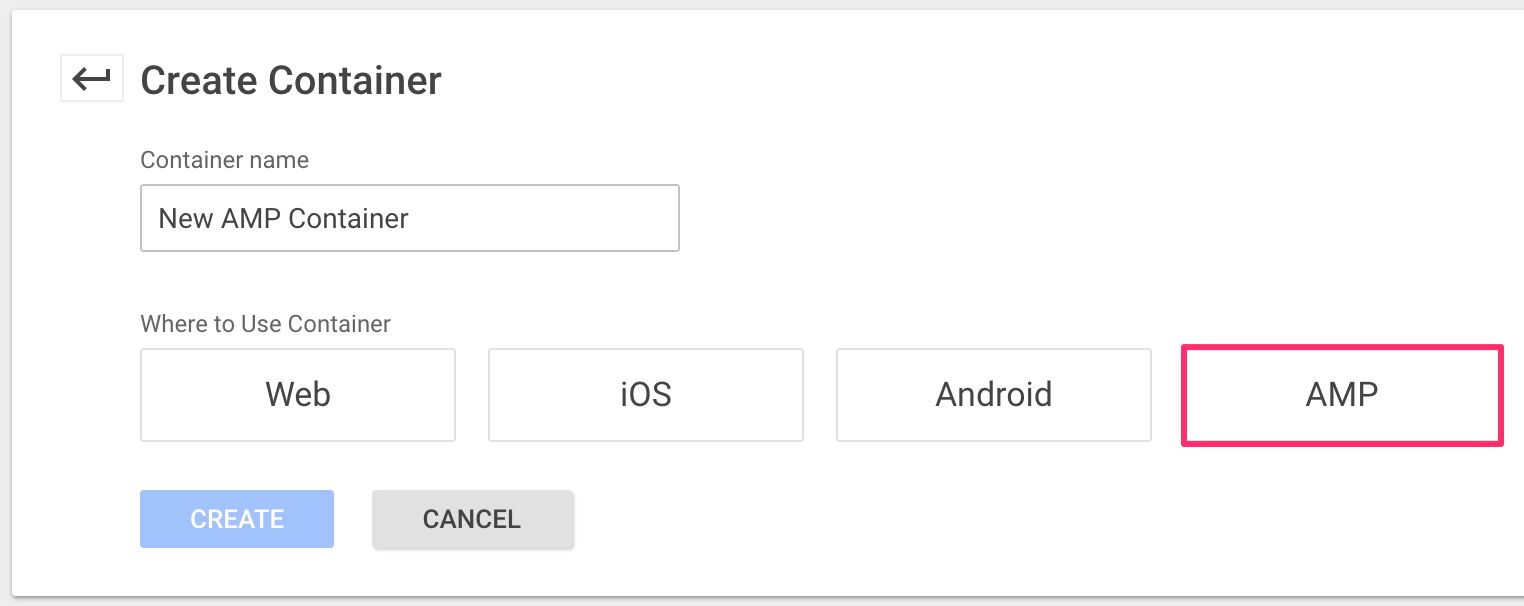
AMP containers are a new selection option in the container creation dialog:

Once you’ve created the container, you might want to click the PUBLISH button, and publish a base container version. It’s OK that you’re not serving any tags yet; you just need to publish the container once to make sure it doesn’t respond with a 404 when accessed by your site.
Now that you’ve created your AMP container, you need to deploy it.
Deploying the AMP container
AMP Analytics consists of two parts: the amp-analytics JavaScript library and the JSON configuration object. To deploy AMP Analytics via Google Tag Manager, you will need to implement both in your page templates.
First, the library. In AMP, it’s actually called an Extended Component of the AMP HTML schema. For AMP Analytics to work, you must deploy the following in the <head> of your website:
<script async custom-element="amp-analytics" src="https://cdn.ampproject.org/v0/amp-analytics-0.1.js"></script>This loads the AMP Analytics library asynchronously. As you can see, you are also foreshadowing the existence of a custom AMP HTML element named amp-analytics.
The next thing you need to do is tell the page where to load the remote JSON configuration object from. If you recall, this is your Google Tag Manager AMP container, so you must add the following code into the of your website:
<amp-analytics config="https://www.googletagmanager.com/amp.json?id=GTM-5BH2HM&gtm.url=SOURCE_URL" data-credentials="include">
<script type="application/json">
{
"vars": {
"someAmpVariable": "someValue"
}
}
</script>
</amp-analytics>This is the custom amp-analytics element we were just talking about. The value of the config attribute is a reference to your GTM container, and the data-credentials="include" part is important, as it gives permission for the downloaded configuration to read and write cookies on your domain. You can pass custom AMP variables to the JSON configuration object by using the embedded <script> block as shown.
Note that if you went ahead and implemented the Client ID hack I introduced earlier (if even possible from my crazy complicated description), you’d need to replace the reference to Google Tag Manager’s servers with your own custom endpoint, e.g.:
<amp-analytics config="https://www.simoahava.com/wp-json/amp-gtm/amp.json?id=GTM-5BH2HM&gtm.url=SOURCE_URL" data-credentials="include"></amp-analytics>Do not forget gtm.url
The >m.url parameter is important. By adding SOURCE_URL as its value, you are instructing AMP to resolve a platform variable as the value of the gtm.url parameter. This particular platform variable is automatically substituted with the URL of the website from which the request was made. If the page is served from a known proxy, such as the AMP Cache, it will still resolve to the actual URL of the website whose content is being served.
This parameter is significant, as it provides a source URL for the GTM container, which you can then utilize the enable triggers only on certain pages of your site.
Once you’ve done these steps, you are ready start configuring your tracking! On the surface and in the UI, things might seem all too familiar. You’ll create your tags just as you used to, filling the fields as before, so it’s as if nothing’s changed.
By the way, if this is all new to you, remember to check out these excellent GTM learning resources.
There are lots of differences compared to GTM for the web, however. For one, there really is no dataLayer anymore, since AMP doesn’t let you run arbitrary JavaScript. This severely delimits what you can do with triggers and variables.
On that note, most of the triggers and variables that are available to you are either completely new or behave differently from before. Also, the way the container is built and validated server-side has changed dramatically.
The following sections of this guide will take a closer look at all these changes.
4. Triggers
To understand how AMP triggers work, you must unlearn most of what you know about Google Tag Manager’s triggers.
In ye olde Google Tag Manager, triggers are dynamic conditions that react to dataLayer.push() commands. If the dataLayer.push() had a specific key-value structure, the trigger would “fire”, executing any tag to which it was attached.
This meant that the GTM container contained all the tags that had any trigger attached to them.
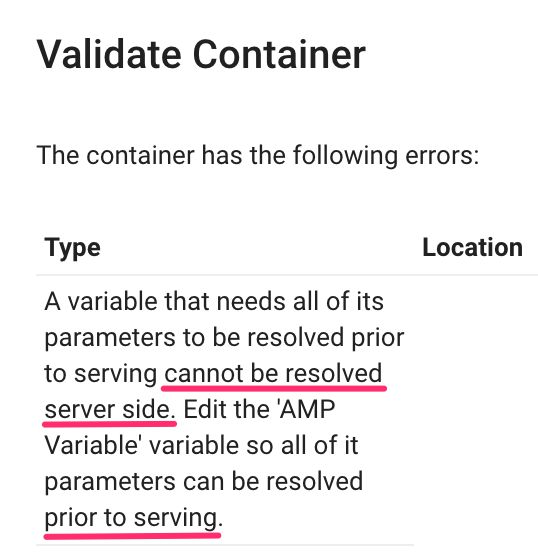
In the AMP GTM container, the JSON configuration object only includes those tag requests whose triggers pass a server-side validation check! In other words, you can forget any triggers whose enabling conditions depend on a dynamic value. No more “Data Layer variable equals this” or “Custom JavaScript variable returns that”. The only Built-In variables you can check against in a trigger enabling condition are:
-
Container ID
-
Container Version
-
Environment Name
-
Page Hostname
-
Page Path
-
Page URL
-
Random Number
The User-defined types (in addition to e.g. Random Number and Container Version, which are also variable types) you can utilize are URL (as long as it uses Page URL as the source), Constant and Lookup Table.
Why just these? Because all of these (and only these) can be resolved server-side by Google when the HTTP request for the JSON configuration object comes in. In other words, you can only use variables whose value is known by Google when the request for the JSON configuration object is received. This rules out all AMP variables, for example, as they are resolved in the browser.
Because validation is done server-side, GTM does not have access to the URL of the page that made the request automatically. You need to explicitly add this information into the container snippet!
Let me show you an example. Say you create a trigger like this in your AMP container:
Any tag that has this trigger attached to it will be added to the JSON configuration object if the HTTP Request for the AMP configuration has the current domain in the gtm.url parameter. If you remember, you need to add this parameter to the container request, and set its value to SOURCE_URL.

The SOURCE_URL AMP variable is resolved to the actual URL of the page when the request for the container JSON is made. Without this parameter, server-side validation against the Page Hostname, Page Path, and Page URL variables will not most likely not work as you expect them to.
If at least one trigger that you have added to the tag passes server-side validation, the end result is something like this in the JSON configuration object:
"5": {
  "request": "2",
  "vars": {
    "gtm.event": "gtm.pageview"
  },
  "on": "visible"
}
This simply means that on the initial page load, this trigger should fire request number “2”, which is the Page View tag turned into a request to GA. As you can see, there’s nothing about trigger conditions in this JSON block.
In fact, all the five (at the time of writing) available trigger types have the same binary setting:

If the trigger does not pass server-side validation, the tag is dropped from the JSON configuration object, and there’s no way to dynamically alter page conditions to fire it in the browser.
I’ve spent quite a bit of time with this change in the basic functionality of GTM triggers, but deservedly so. Server-side validation is a huge difference to how GTM used to work. Again, this ensures that AMP pages are lightning-fast, as the JSON configuration object is basically just a few lines of code. That’s light-weight compared to the complexity of a “regular” GTM container.
Now, let’s take a look at the available triggers themselves.
4.1. Click
The Click trigger in the AMP container is pretty much the same thing as the All Elements trigger in regular Google Tag Manager. In other words, the target of the click (if valid) is the element that is captured. The Just Links trigger, on the other hand, does not exist in the AMP container, and you need to configure link capturing yourself.
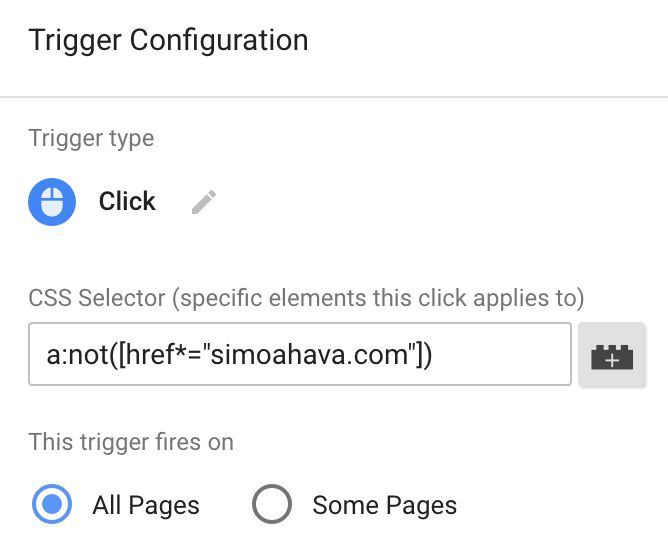
The Click trigger has just one setting: CSS Selector. With this setting, you specify which clicks you want to listen to. If you want a quick refresher on CSS Selectors, read my article on the topic, or check out this excellent CSS Selectors Reference.
To help you get going, here are some useful CSS Selectors for you:
Outbound Link Clicks
a:not([href*="mydomain.com"]), a:not([href*="mydomain.com"]) *
Mailto: Link Clicks
a[href^="mailto:"], a[href^="mailto:"] *
Tel: Link Clicks
a[href^="tel:"], a[href^="tel:"] *
When you add a tag that fires on a click to a container, this is what the ensuing JSON looks like:
"triggers": {
    "11": {
        "request": "2",
        "selector": ":not(*)${gtm_css_2_0}",
        "vars": {
            "gtm.event": "gtm.click"
        },
        "on": "click"
    }
},
"vars": {
    "gtm_css_2_0": ",a:not([href*=\"simoahava.com\"]), a:not([href*=\"simoahava.com\"]) *"
}
The selector is included in the trigger JSON with the following syntax: :not(*)${gtm_css_2_0}. The part in the curly brackets is an AMP variable substitution, which refers to a key in the "vars" object further down the JSON. So, if you replace ${gtm_css_2_0} with the value of vars.gtm_css_2_0, you get the following string:
:not(*),a:not([href*="simoahava.com"]), a:not([href*="simoahava.com"]) *
The first selector, :not(*), clears the selector chain, matching no element on the page. After that, the selectors you specified for the trigger are included. The amp-analytics code then listens for clicks on the page, matching them against the selector, and fires the respective request if the clicked element matches the selectors you have defined for each request.
4.2. Page View
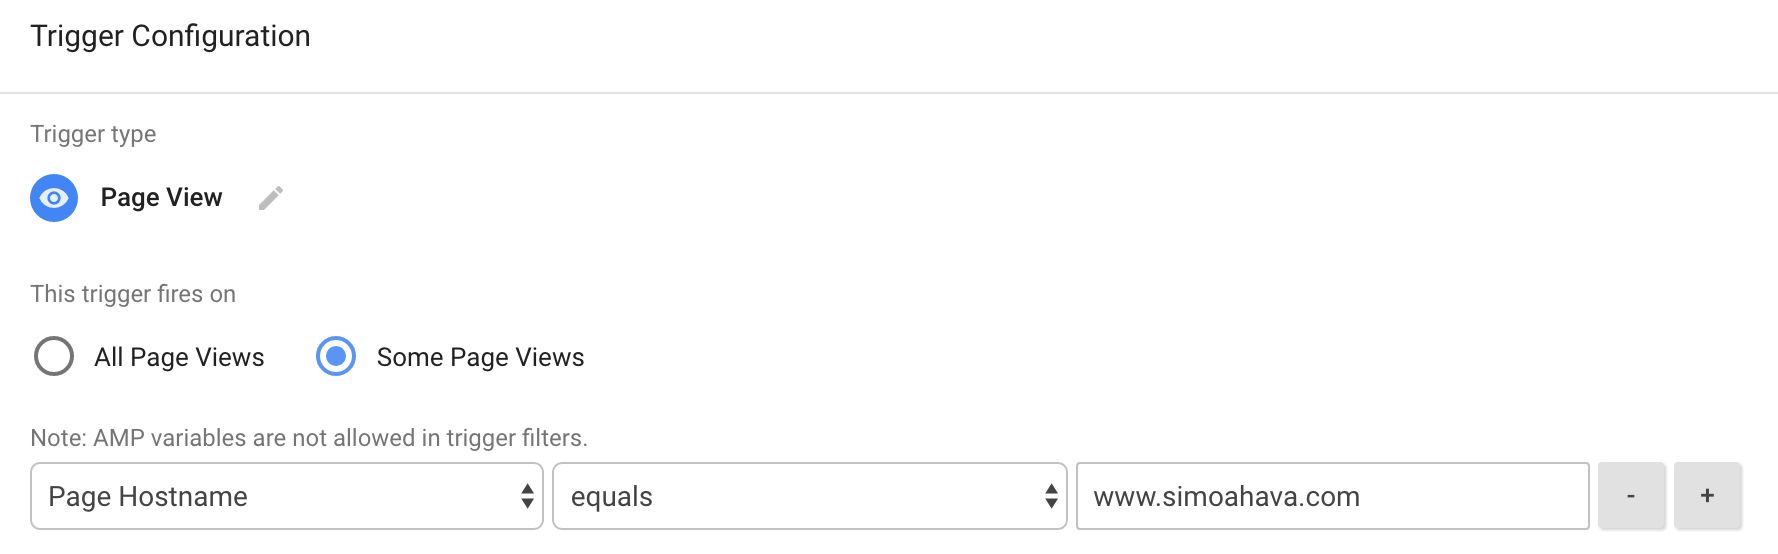
The Page View trigger is very simple. If you have All Page Views selected, or the Some Page Views condition matches the value retrieved from the gtm.url parameter of the incoming HTTP Request, then any tags attached with the Page View trigger will be included in the JSON configuration object. The Page View trigger has no “DOM Ready” or “Window Loaded” differentiation any more - it will fire as soon as possible (see below).
When the trigger passes server-side validation, it is added to the JSON configuration object like this:
"triggers": {
    "5": {
        "request": "2",
        "vars": {
            "gtm.event": "gtm.pageview"
        },
        "on": "visible"
    }
}
The "on": "visible" is quite literal - if the page is visible in the current browser window, the trigger will fire as soon as the AMP analytics JavaScript has loaded. Otherwise, the trigger will wait until such a moment as the page becomes visible. Some time ago, I wrote a custom visibility trigger setup for regular Google Tag Manager, so I’m very happy to see it on by default in AMP containers.
There’s more on the Visibility trigger below.
4.3. Scroll
The Scroll trigger is a very useful little tool. It lets you trigger tag requests on certain scroll thresholds, which are represented by percentage of vertical or horizontal scrolling. The percentage is calculated from the maximum available height or width of the page, respectively.
Scroll tracking has been instrumental in content engagement measurement over the years, so it’s a welcome addition to the default trigger set in amp-analytics, and Google Tag Manager by extension.
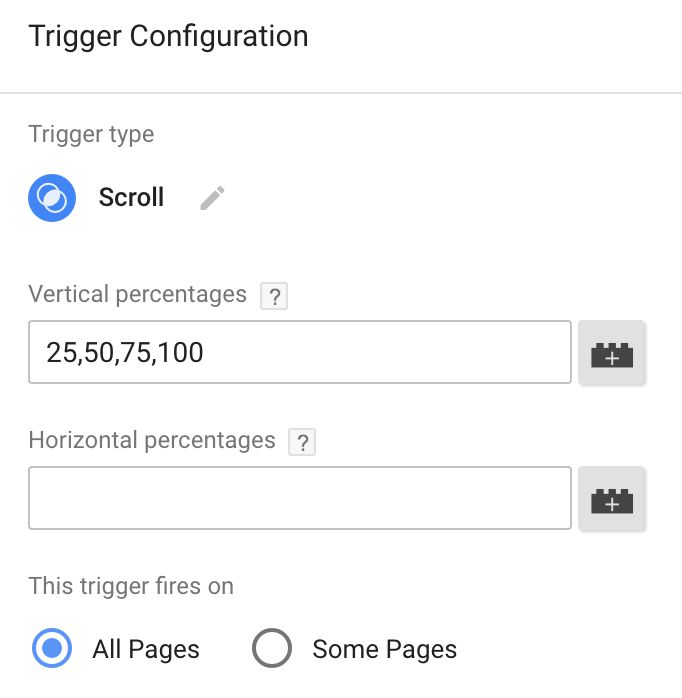
It’s very simple to set up. A single Scroll trigger can handle all the thresholds that you indicate with a comma-separated list of percentages. For example, to fire the Scroll trigger for each 25% increment of vertical scrolling, you would add 25, 50, 75, 100 into the respective field. This will naturally work for both mobile and desktop browsing.
When you add a scroll trigger, it looks like this in the JSON configuration object:
"triggers": {
    "3": {
        "request": "2",
        "scrollSpec": {
            "verticalBoundaries": [25, 50, 75, 100],
            "horizontalBoundaries": [100]
        },
        "vars": {
            "gtm.event": "gtm.scroll"
        },
        "on": "scroll"
    }
}
The problem with the Scroll trigger is that there are no dynamic variables in the AMP GTM container that you can use to detect which increment triggered the tag. So if you have a single Scroll tracker for 25%, 50%, 75%, and 100%, your tag will trigger four times on the page, but you can’t simply use a variable to tell you directly which increment it was that triggered the tag.
Now, AMP knows how far you scrolled by calculating a bunch of document and event properties. Each threshold in your Scroll trigger is checked against the following calculation:
(scrollTop + viewportHeight) / scrollHeight
Coincidentally, all of these are available as AMP variables. Here, scrollTop is the number of pixels the top of your viewport is from the top of the document, viewportHeight is the height of the current viewport in pixels, and scrollHeight is the height of the entire document in pixels.
So the calculation checks how far from the top of the page the current viewport bottom, i.e. the very bottom edge of the content page you see in your browser window, is. If it hits 25%, the tag is triggered, and then again at 50%, 75% and 100%.
If in your analytics solution you want to know which of these thresholds was crossed, here are some solutions:
-
Create a separate tag and trigger for each threshold. So if you want to track 25%, 50%, 75%, and 100%, you would end up with four triggers (one per threshold), and four tags. In each of the tags, you can now tell precisely which threshold was crossed.
-
Use just a single trigger, but send the scrollTop, viewportHeight and scrollHeight as Custom Dimensions (Google Analytics example), and then do the calculations in a spreadsheet or something else where you export the data to.
There’s a nifty AMP variable named counter, which lets you create a counter which increments each time the variable is resolved. This would be the solution for tracking the thresholds, but unfortunately it isn’t supported in the GTM AMP container (yet).
4.4. Timer
The Timer trigger is something you might be intuitively familiar with if you’ve ever worked with Google Tag Manager. When the container is loaded, any Timer triggers in the JSON configuration object are initiated. The firing pattern is determined by the settings you input into the trigger:
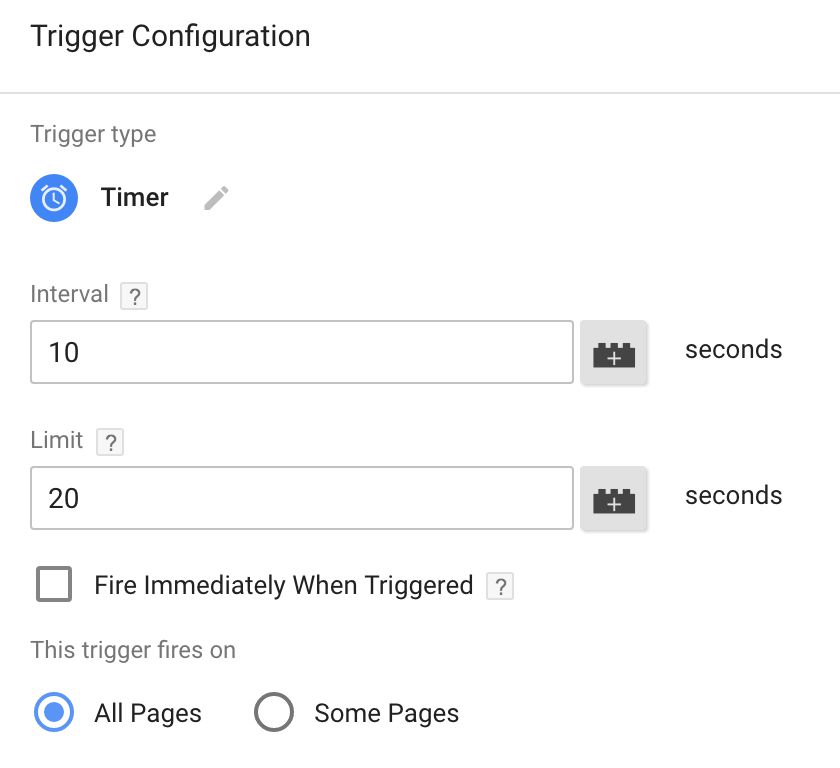
Interval is the number of seconds that needs to pass before the trigger is fired.
Limit is the maximum amount of time that the trigger loops.
Fire Immediately When Triggered when checked fires the request once as soon as the container is loaded.
The Interval and Limit can be quite confusing. First of all, if you want the Timer to have an unlimited amount of activations, just leave the Limit field empty. Otherwise, you should use a multiple of Interval in the Limit field, so that you can specify how many times the trigger goes off.
For example, if you’ve set the Interval to 10 seconds, and you want the trigger to fire six times, you would set the Limit to 60.
The Fire Immediately When Triggered setting governs whether or not the first iteration of the trigger should fire as soon as the container is downloaded (checked), or whether the trigger should wait for one interval before firing (unchecked).
Note that the same caveat about visibility that applied to the Page View trigger is relevant here, too. The Timer trigger will only fire a request if the page is visible. However, the timer will not pause while the page is not visible. Thus, all the timer hits that should have fired within the limitations of the Interval and Limit settings, but were deferred due to the page not being visible, will be fired the moment the page becomes visible again.
When you create a Timer trigger, it will look like this in the JSON configuration object:
"triggers": {
    "3": {
        "request": "2",
        "timerSpec": {
            "interval": 10,
            "maxTimerLength": 20
        },
        "vars": {
            "gtm.event": "gtm.timer"
        },
        "on": "timer"
    }
}
If you left the “Fire Immediately When Triggered” unchecked, under "maxTimerLength": 20 you would have the setting "immediate": false.
4.5. Visibility
Now here’s an interesting trigger! The Visibility trigger lets you fire a tag when a specific element has been visible in the browser window a set amount of time. Heck, you can even define that a certain minimum amount of the element has to be visible for the trigger to fire. That’s really useful for ad impression tracking!
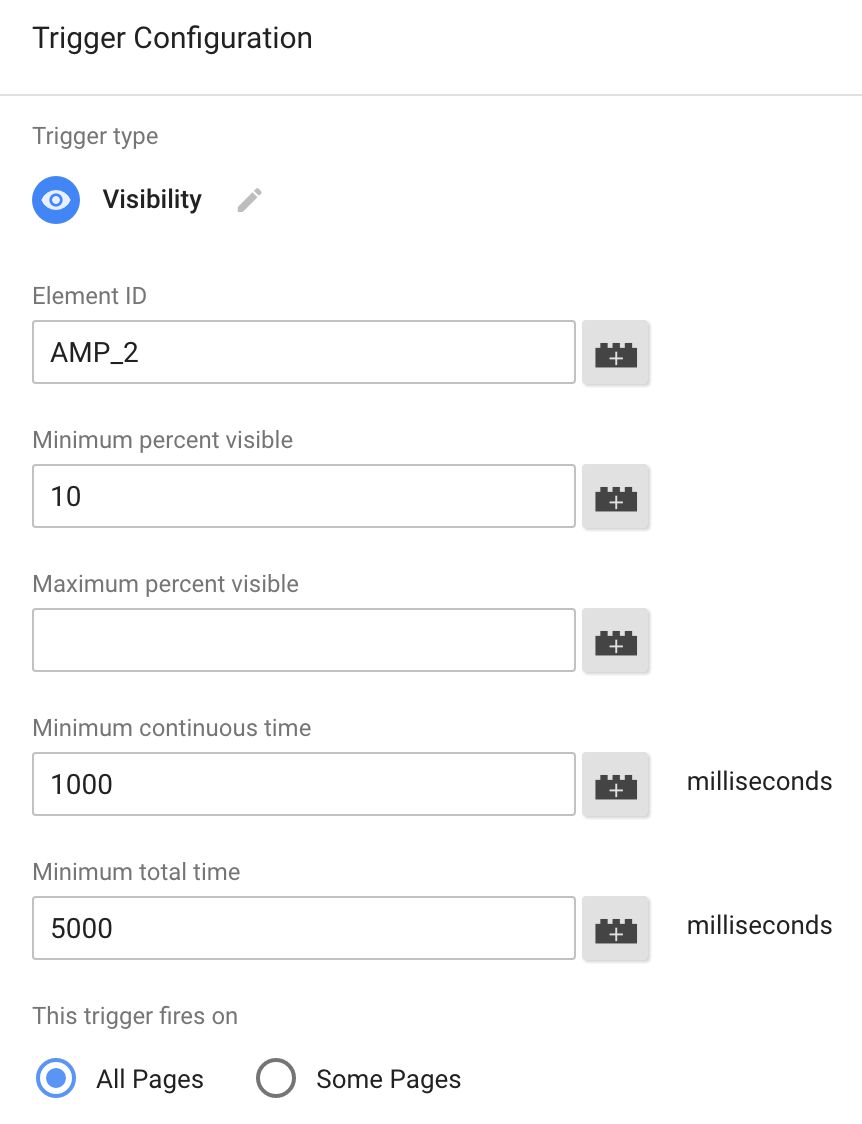
Element ID is the unique identifier of the element. It’s required, so you can’t track the visibility of an element without an ID attribute.
Minimum Percent Visible is the minimum amount of the element that needs to be visible in the browser viewport for the trigger to be valid for firing. If you leave this out, it means that the trigger will fire even if the element is not in the viewport! Kind of defeats the purpose, so try to remember to have at least 1 in this field.
Maximum Percent Visible is the maximum amount of the element that can be visible in the browser viewport. So if you set 10 as the Minimum Percent Visible and 50 as the Maximum Percent Visible, the trigger will only fire when you have between 10 and 50 percent of the element in the viewport.
Minimum Continuous Time is the minimum amount of time in one stretch that the element must be visible in the viewport (in milliseconds). So if you have 2000 in this field, it means that the element must be in the viewport for 2 seconds without interruption for this condition to pass.
Minimum Total Time is the minimum total time that the element needs to be visible in the viewport. If you have 2000 in this field, it’s enough to have the element visible for a total of 2 seconds, but it doesn’t have to be continuous. The user can reveal the element for 500 milliseconds a time, and after four such times the Minimum Total Time of 2000 has been reached.
All of these conditions stack. So, let’s say you have a trigger that looks like the one in the screenshot above. What it translates to is this:
An element with ID AMP_2 must have at least 10 percent of its total area in the browser viewport for at least 5 seconds altogether. Also, the trigger will only fire if the element is in the viewport without interruption for at least 1 second.
When you publish a trigger like this, it will translate into the following JSON:
"triggers": {
    "3": {
        "request": "2",
        "visibilitySpec": {
            "selector": "#AMP_2",
            "visiblePercentageMin": 10,
            "continuousTimeMin": 1000,
            "totalTimeMin": 5000
        },
        "vars": {
            "gtm.event": "gtm.visible"
        },
        "on": "visible"
    }
}
I hope that support for other CSS selectors than just IDs would become available for selecting the element. I guess the reasoning is that such a complex trigger would be difficult to maintain consistently if it matched multiple elements on the page.
5. Variables
AMP Analytics supports two types of variables: platform and page-defined variables. Platform variables are default variables that do not need to be specified in the JSON configuration object. They are automatically resolved based on information available in the Document Object Model.
Page-defined variables are added to the JSON configuration object. They can be defined in multiple places, such as a remote configuration file, top-level of an embedded configuration object, trigger-specific configuration, or even in special data attributes configured in elements themselves. There is an order of priority in variables which share the same name, and they are resolved in the following order of importance:
Remote configuration file > element level data attributes > triggers > top-level of configuration object > platform.
So if you had &cid=${clientId(some-cid-cookie)} in your request to Google Analytics (platform variable), and also "vars": {"clientId": "12345"} in the root of the amp-analytics configuration object, you’d end up with &cid=12345 in the actual request, since the configuration object trumps platform variables in priority.
All variables are resolved when the request to any given endpoint is compiled, so they might well have different values for each request.
In the AMP Google Tag Manager container, you can create variable references to these AMP Analytics variables using the AMP variable type. However, there are other variables at your disposal, too, and we’ll take a look at these as well in this chapter.
5.1. Built-In Variables
The Built-In variables in the GTM container are variables that you do not need to manually create. To enable them, you need to go to Variables in the container, and under the “Built-In Variables” heading click the large red CONFIGURE button to enable / disable any variables. It’s weird that the Built-In variables aren’t all enabled by default, since there’s no harm in having them all available. In regular GTM, enabling Built-In variables meant some extra clutter in the Google Tag Manager library, but here they are only available in the UI to make it easier to configure your tags.
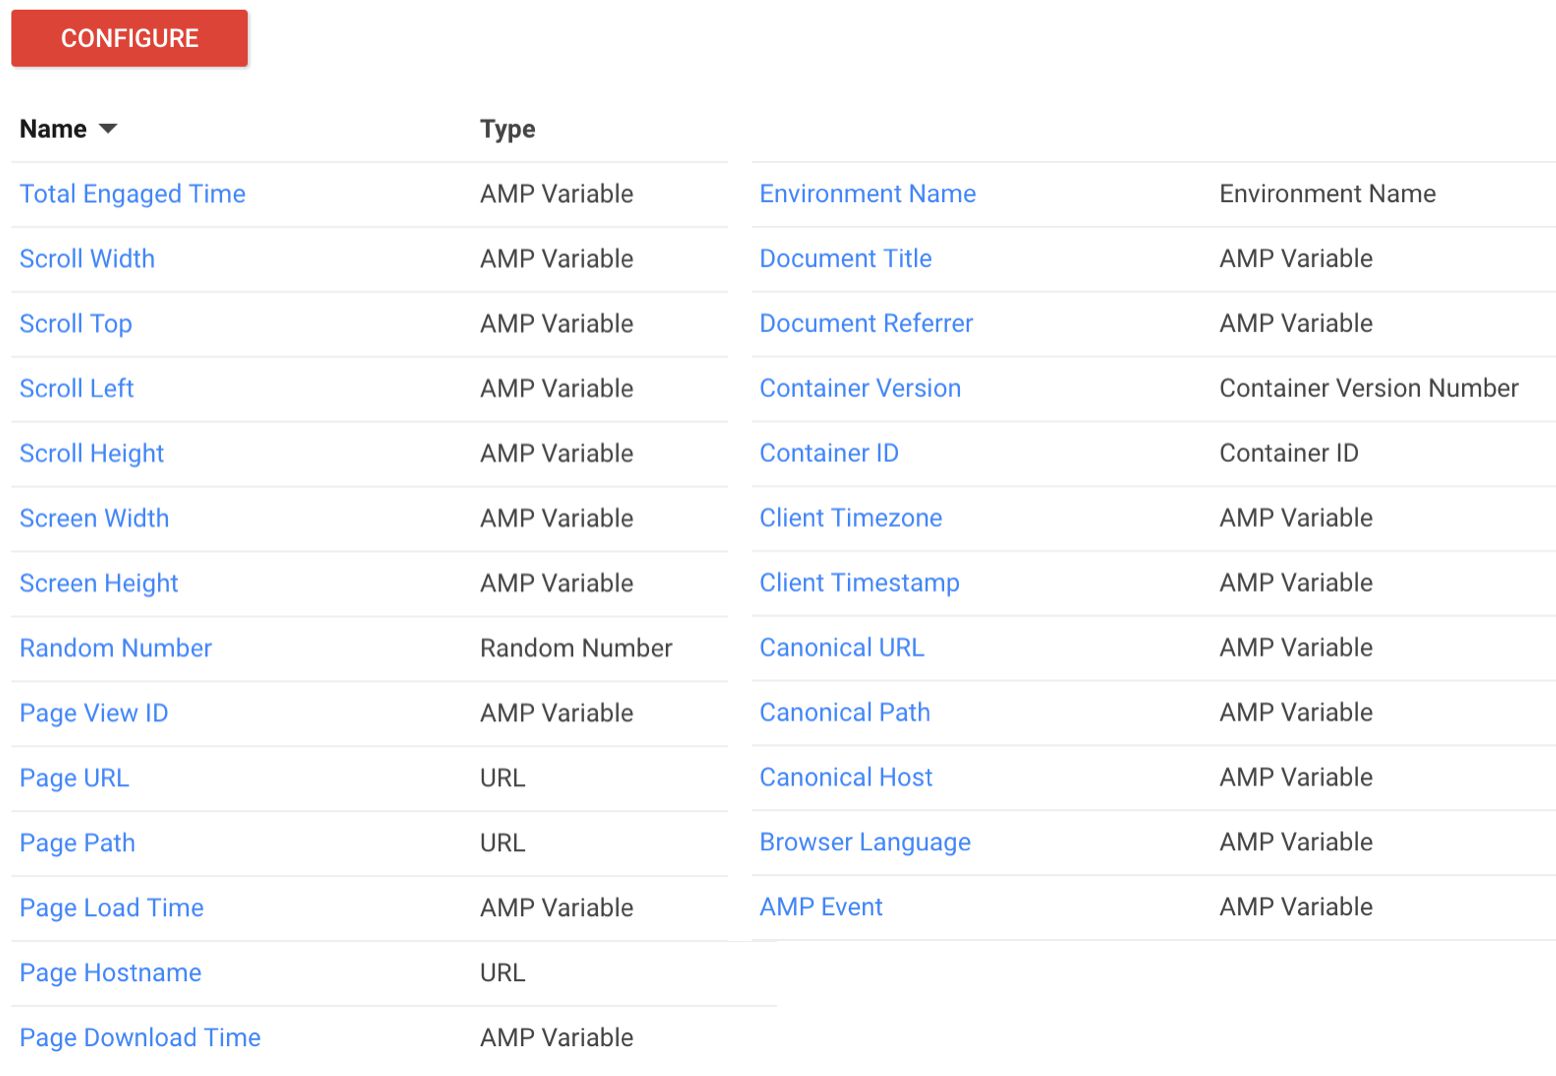
Here are all the Built-In variables with a short description of each.
-
Total Engaged Time (AMP variable): The total time the page has been visible in the viewport in seconds.
-
Scroll Width (AMP variable): Total width of the page in pixels.
-
Scroll Top (AMP variable): Number of pixels between the top of the viewport and the top of the page.
-
Scroll Left (AMP variable): Number of pixels between the left edge of the viewport and the left edge of the page.
-
Scroll Height (AMP variable): Total height of the page in pixels.
-
Screen Width (AMP variable): Total width of the screen. Does not take into account stuff like widgets, scroll bars, etc.
-
Screen Height (AMP variable): Total height of the screen. Does not take into account stuff like bookmark and address bars.
-
Random Number: Generates a random number between 0 and 2147483647. Note that this number is generated server-side by GTM. Once the JSON configuration object is downloaded, any references to this variable will have the same generated number.
-
Page View ID (AMP variable): Random number that is unique per user, URL, and day. Each refresh of a page sets a new random number.
-
Page URL: This is the URL passed to GTM with the
gtm.url=SOURCE_URLquery parameter in the GTM container snippet. This, Page Path, and Page Hostname are the only variables you can use in GTM to delimit tags from triggering only on certain pages. -
Page Path: Returns the path (e.g. /analytics/accelerated-mobile-pages-via-google-tag-manager/) of the URL in the
gtm.urlquery parameter of the GTM container request. -
Page Load Time (AMP variable): This is the entire load time of the page in milliseconds. It is calculated from the moment the previous page started its unload to the moment the current page has fully loaded. If there is no previous page, the timer starts from the moment when the HTTP request for the page content was ready to dispatch.
-
Page Hostname: Returns the hostname (e.g. www.simoahava.com) of the URL in the
gtm.urlquery parameter of the GTM container request. -
Page Download Time (AMP variable): Time in milliseconds from the moment the request for the page content was dispatched to the moment the last byte of the document was downloaded from the web server.
-
Environment Name: The name of the custom created GTM Environment (if any) that the current GTM JSON configuration object is downloaded from. Yes, Environments work in the AMP container, too.
-
Document Title (AMP variable): Title of the current document.
-
Document Referrer (AMP variable): The URL of the page the user navigated from. This variable will resolve to an empty string if no referrer information is available.
-
Container Version: The version number of the container that received the request. If you are in Preview mode, it returns QUICK_PREVIEW.
-
Container ID: Returns your GTM Container ID (GTM-XXXXX).
-
Client Timezone (AMP variable): Returns the timezone offset in minutes from UTC based on client’s system time. For example, if you are in New York City, Client Timezone would return 300, because New York is 5 hours behind UTC. In Helsinki, which is two hours ahead of UTC, Client Timezone would return -120.
-
Client Timestamp (AMP variable): Returns the number of seconds that have passed since Jan 1, 1970 (epoch time).
-
Canonical URL (AMP variable): Returns the full canonical URL of the page. Typically this should be the URL without
/amp/or any other AMP parameter. -
Canonical Path (AMP variable): Returns just the pathname of the canonical URL of the page.
-
Canonical Host (AMP variable): Returns the complete host of the canonical URL of the page (e.g.
http://www.mydomain.com:9000). -
Browser Language (AMP variable): Returns the language of the browser UI, e.g.
en-usorfi. -
AMP Event (AMP variable): Returns the name of the event that triggered the tag. GTM automatically adds event names like gtm.click (Click trigger) and gtm.pageview (Page View) to this variable.
Once you’ve enabled these variables, you can refer to them in your tags, triggers, and variables by using the {{Variable Name}} syntax.
5.2. User-Defined variables
In addition to Built-In variables, you can also create variables of your own. These can be added in the variables page of your container, under the heading “User-Defined variables”.
Remember that you can reference any GTM variable with the {{Variable Name}} syntax.
At the time of writing, here are the variable types you can configure.
URL
URL variables exist in regular Google Tag Manager, too. However, in AMP, the URL variable can only be used to provide data about the URL included in the container HTTP request. If you remember, this URL is resolved in the gtm.url=SOURCE_URL parameter of the request. There are already Built-In variables for Page Hostname, Page URL, and Page Path, so the component types that you could configure variables for are Protocol (e.g. http or https), Port, and Query (e.g. ?test=true).
AMP variable
Jump to the next section to read more about AMP variables.
Constant
This should be familiar from regular Google Tag Manager. A Constant variable can be set to any string value you wish, and any time this variable is referenced, the string you input into the field will be returned.
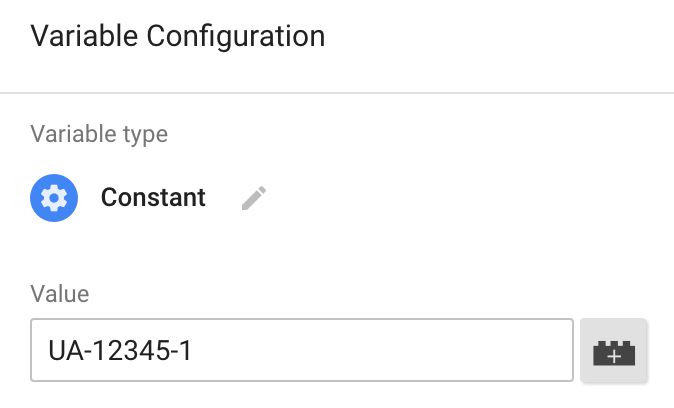
A typical use case would be to set your Google Analytics tracking ID as a Constant String variable.
Environment Name
This isn’t particularly useful, as there already is a Built-In variable for this. It returns the name of the Google Tag Manager Environment where the JSON configuration object is loaded from.
Lookup Table
The Lookup Table variable is a staple from regular Google Tag Manager. It’s very useful, as it lets you do value transformations with dynamic input variables.
However, in AMP GTM it’s not that useful anymore. The Lookup Table must resolve server-side, because AMP doesn’t support the type of dynamic calculation that a Lookup Table would require if resolved in the client. Thus, the only types of input variables you can use are those which have a value within the Google Tag Manager container. This is, unfortunately, a very short list:
-
Container ID
-
Container Version
-
Environment Name
-
Page Hostname
-
Page Path
-
Page URL
-
Random Number
One use case would be to send Preview hits to another tracking endpoint. For that, the Lookup Table would look like this:
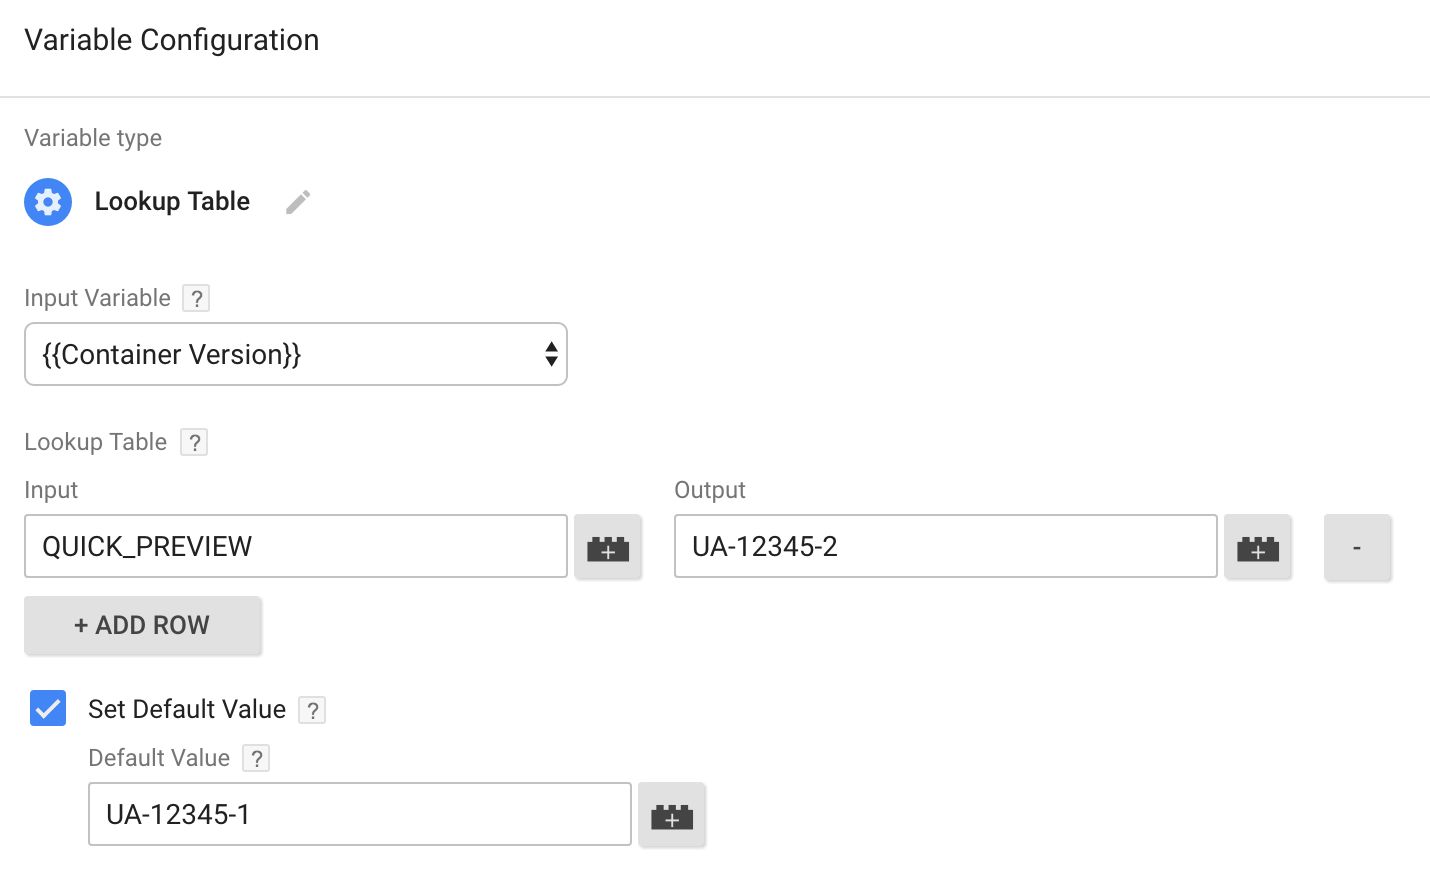
If you add this variable to the Tracking ID field of your Google Analytics tag, it will return “UA-12345-2” if Google Tag Manager is in Preview mode, and “UA-12345-1” otherwise.
Random Number
Redundant. There already is a Built-In variable for this. It returns a random number between 0 and 2147483647.
Container ID
Redundant. There already is a Built-In variable for this. It returns the ID of the GTM container (GTM-XXXXX).
Container Version
Redundant. There already is a Built-In variable for this. It returns the version of the published GTM container, or QUICK_PREVIEW if in Preview mode.
5.3. AMP variables
I’ve already mentioned AMP variables here and there. They are built into the AMP Analytics framework, and comprise two types of variables: platform variables and page-defined variables. Platform variables are sort of “built-in” variables for AMP, in that you don’t need to manually specify them in the JSON configuration object. Page-defined variables, on the other hand, need to be included in the JSON configuration object itself.
To refer to AMP variables, you need to use the syntax ${variableName}. Naturally, Google Tag Manager does this for you when you create a user-defined variable of type AMP variable.
When you add an AMP variable to your Google Tag Manager tag, it becomes part of the request when the JSON is downloaded.
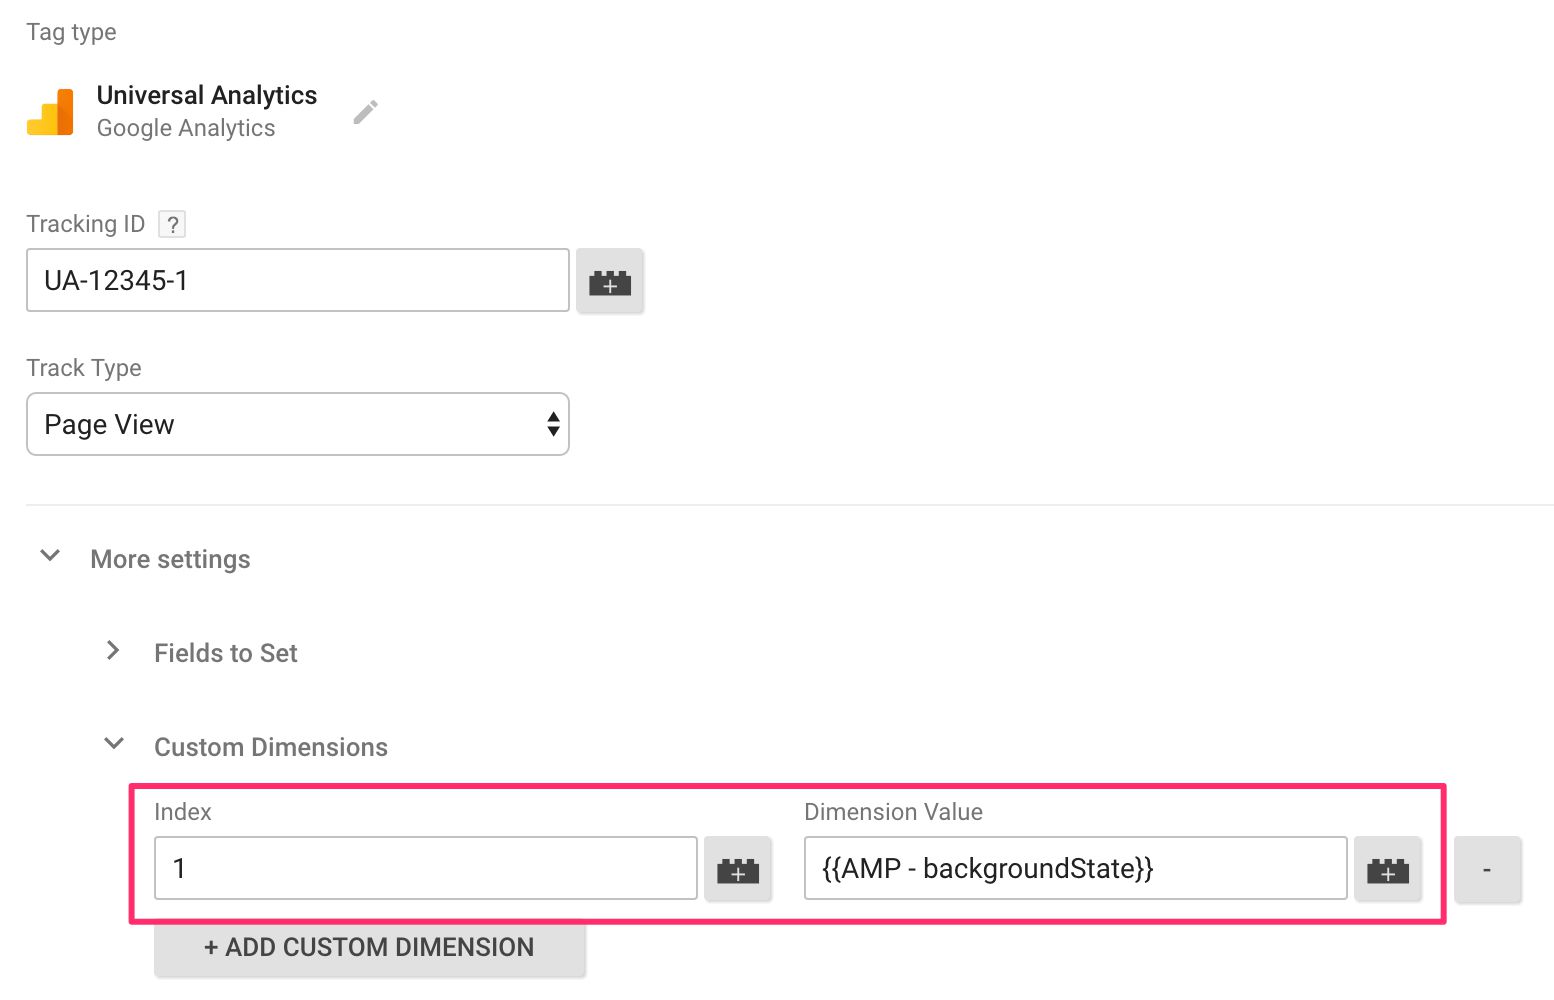
An AMP variable added like this to a Custom Dimension field in a GA tag would look like this in the JSON configuration object:
"requests": {
    "4": "https://www.google-analytics.com/r/collect?...&cd1=${backgroundState}"
}
As you can see, the variable name is still in the request itself, meaning that it isn’t resolved when the JSON configuration object is downloaded. Only once the actual request dispatches will the AMP variable be resolved, which means, in turn, that its value is generated dynamically.
Most of the useful AMP variables are already available as Built-In variables in GTM. In fact, I find it curious that Built-In variables don’t simply include all the pre-defined AMP variables, as that would cut down time required to configure the container.
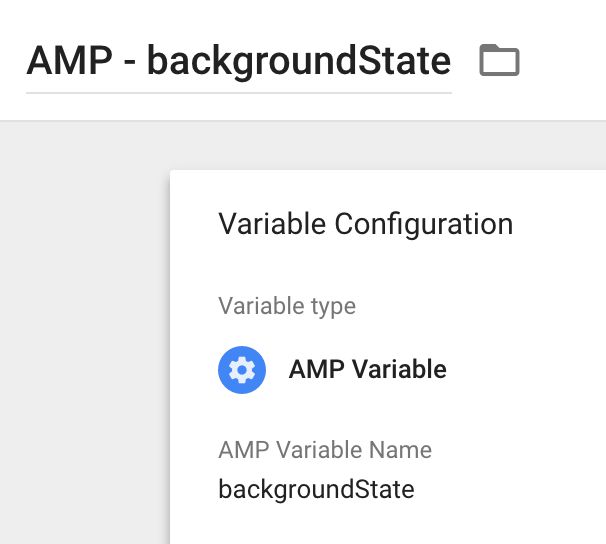
Creating custom AMP variables
If you want to create your own AMP variables, you can. It’s sort of similar to working with dataLayer, in the sense that you are passing semantic information from the page to Google Tag Manager. However, the difference is that you won’t be able to utilize these Variables within GTM itself. So you can’t create trigger conditions based on AMP variables, nor can you use Lookup Tables with AMP variables as the input variable.
To create custom AMP variables, you include them like this:
<amp-analytics config="https://www.googletagmanager.com/amp.json?id=GTM-XXXXXX>m.url=SOURCE_URL" data-credentials="include">
<script type="application/json">
{
"vars": {
"someAmpVar": "someValue",
"someOtherAmpVar": "someValue"
}
}
</script>
</amp-analytics>So you include them in the "vars" block as key-value pairs. Once you’ve done this, you can create AMP variables for these keys, and then include the custom AMP variables in tag fields.
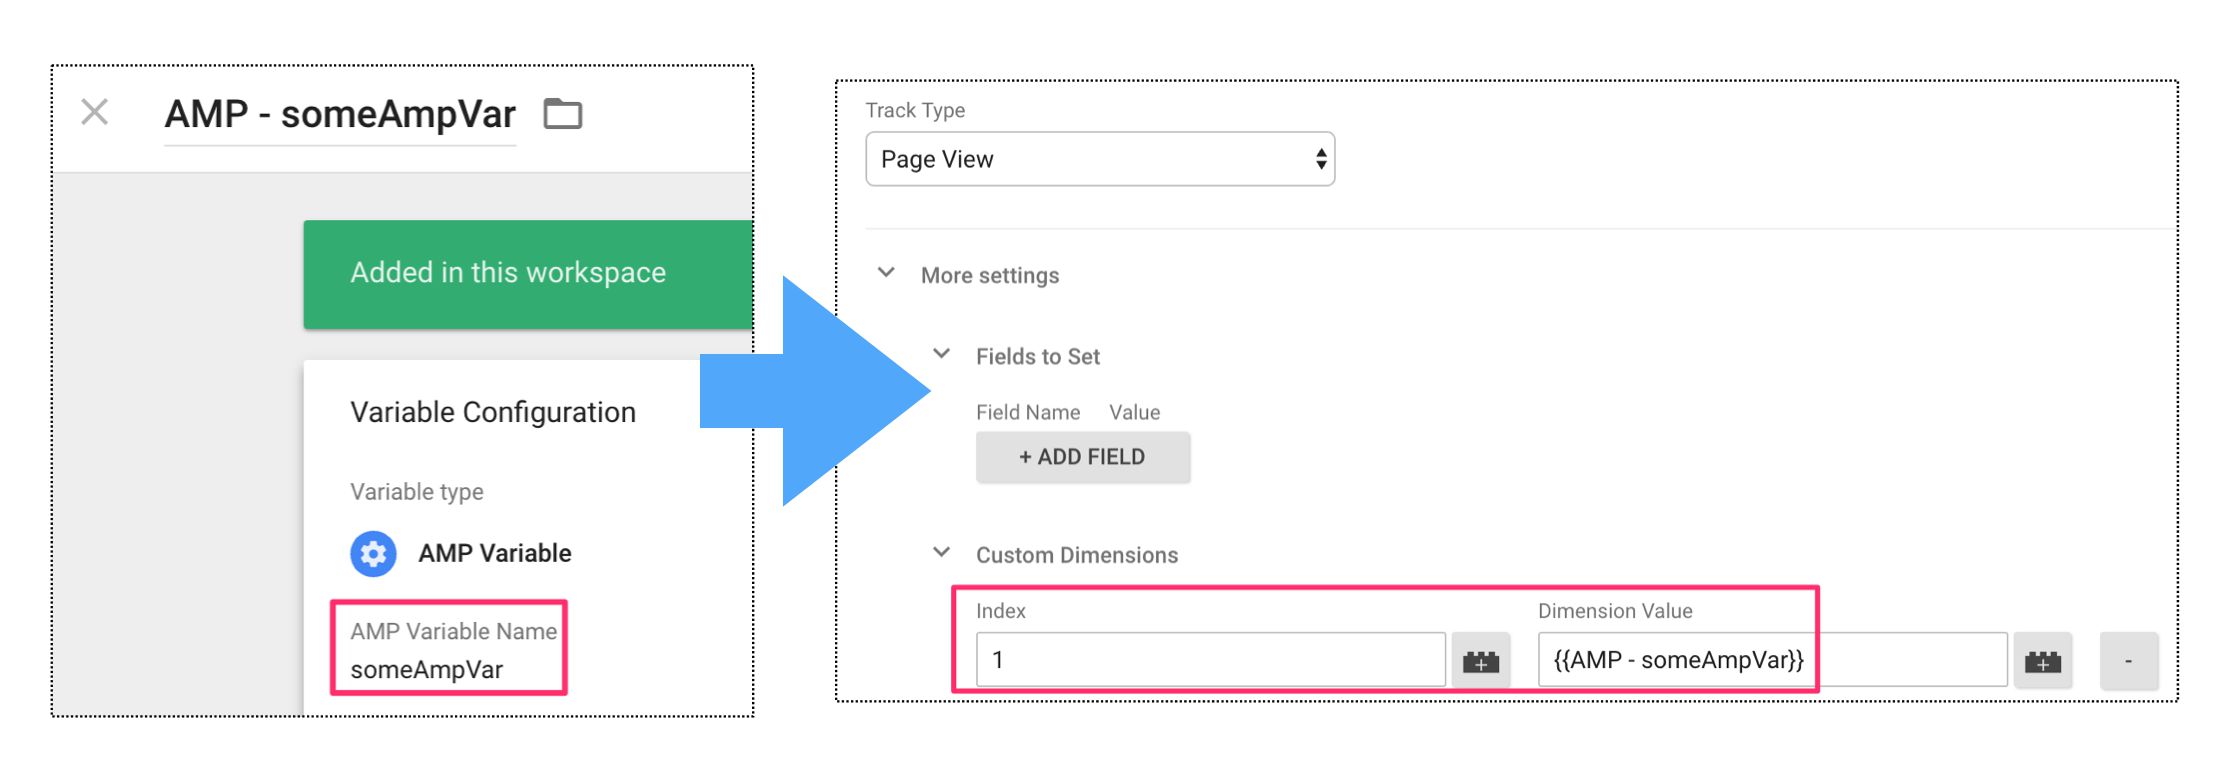
The thing to remember about AMP variables and GTM is that AMP variables are resolved in the client when the requests are dispatched. Thus you can’t use them in any operations within GTM that would require server-side validation. The most notable cases are trigger enabling conditions and the Lookup Table variable.
There’s a great reference guide for all the available AMP variables in the GitHub project itself: AMP HTML URL Variable Substitutions. Read through that document, and create User-Defined variables for any AMP variables that don’t already exist as Built-In variables.
6. Other Google Tag Manager quirks
Google Tag Manager is pretty smooth with AMP. The fact that it compiles the configuration object for you is a huge plus, and the ease of creating a tracking schema for your AMP pages is very much in line with how “regular” Google Tag Manager works, too.
There are some hiccups, though. Most notably, server-side validation can be a difficult thing to come to terms with. GTM needs to build a configuration object dynamically, but because the object is built within Google’s servers, it doesn’t have any access to the variables that would exist on your page. Thus the only dynamic variables it has access to need to be passed in the URL request for the container, gtm.url being the most notable one.
Google Tag Manager for AMP does not support the Debug mode we’re used to with regular Google Tag Manager. The debug panel would require that the AMP page supported the type of JavaScript that is very performance-killing.
However, GTM does work in Preview Mode. So when you enter Preview Mode in Google Tag Manager, once you reload the site with the same web browser you entered Preview Mode in, the container that is downloaded from Google Tag Manager will actually be the one you are previewing and not the one that is published.
This is very useful, even though I know you’ll miss having the excellent Debug panel at your disposal.
Because Preview Mode doesn’t have any verbose logging or anything like that, you should get familiar with other debug tools at your disposal.
7. Summary
I’m a big fan of Google Tag Manager’s AMP container. It’s not just because I’m such a fanboy (I am), nor because I’m typically devoid of a critical voice when it comes to GTM (I am this, too). The reason I really like it is because it does what GTM has always done best: it abstracts a somewhat complex operation of compiling the JSON configuration object, and lets you create it using GTM’s UI, knowing full-well that whatever you create will be syntactically valid for AMP.
That’s the modus operandi for GTM, and it’s refreshing to see how it’s still respected by the development team. On top of that, AMP introduces a number of triggers and variables that I really hope will make their way into regular GTM, too. The scroll and visibility triggers alone would be really useful in regular Google Tag Manager.
Most of my issues with the AMP container have to do with AMP rather than with GTM. Managing a single Client ID across your website and the available AMP proxies is a pain, and I really hope that AMP introduces some methods to facilitate extending a single Client ID (e.g. _ga) across your website and the various proxies AMP might be served through.
I foresee some great applications for AMP through GTM, and I also look forward to some feature leakage to regular Google Tag Manager, too.
