Ever since it was released that server-side tagging in Google Tag Manager would run on the Google Cloud Platform stack, my imagination has been running wild.
By running on GCP, the potential for integrations with other GCP components is limitless. The output to Cloud Logging already introduces interesting pipeline opportunities, but now it gets even better.
It’s finally possible to write directly to Google BigQuery from a Client or tag template!
This means that instead of treating server-side tagging as a “simple” proxy, whose purpose is mainly to replace data streams that would otherwise connect a client directly with an endpoint, it’s now possible to use a Server container as a data collection machine itself.
In this article, I’ll show you how to use the BigQuery API with a use case you might already be familiar with. We’re going to build a monitoring system that writes tag execution data into a Google BigQuery table.
This won’t be the last I’ll write about this integration – there are a lot of possibilities available now that a way to natively write data to a data warehouse from the Server container has become available.
We’ll start with a walkthrough before diving into the API specs.
The Simmer Newsletter
Follow this link to subscribe to the Simmer Newsletter! Stay up-to-date with the latest content from Simo Ahava and the Simmer online course platform.
Official documentation
You can find the official documentation for the BigQuery template API by following this link::
Server-side Tagging APIS: BigQuery
Full example: build a monitoring system
To get started, we’ll build a Google Tag Manager monitor for your server-side tags.
The schema is very simple. It’s designed to collect information about the Client that caused the tag(s) to fire, whether they fired successfully (or failed), and how long the execution time of the tag was.
You can use this to proactively monitor for issues in your Server container setup.
Create the table
Before we get started, we need to create a table in BigQuery. I recommend using the same project as the one where your Server container is running. This way you don’t have to worry about setting up authentication, as the Server container will already have full access to all cloud components running in the same project.
First, Go to BigQuery.
Then, find your project ID in the navigation, and select the project.
Finally, click CREATE DATASET to create a new dataset.
Give dataset an ID, such as gtm_monitoring, and set the data location, if you wish. Once ready, click the Create dataset button.
Once the dataset is created, make sure it’s selected in the navigation, and then click CREATE TABLE.
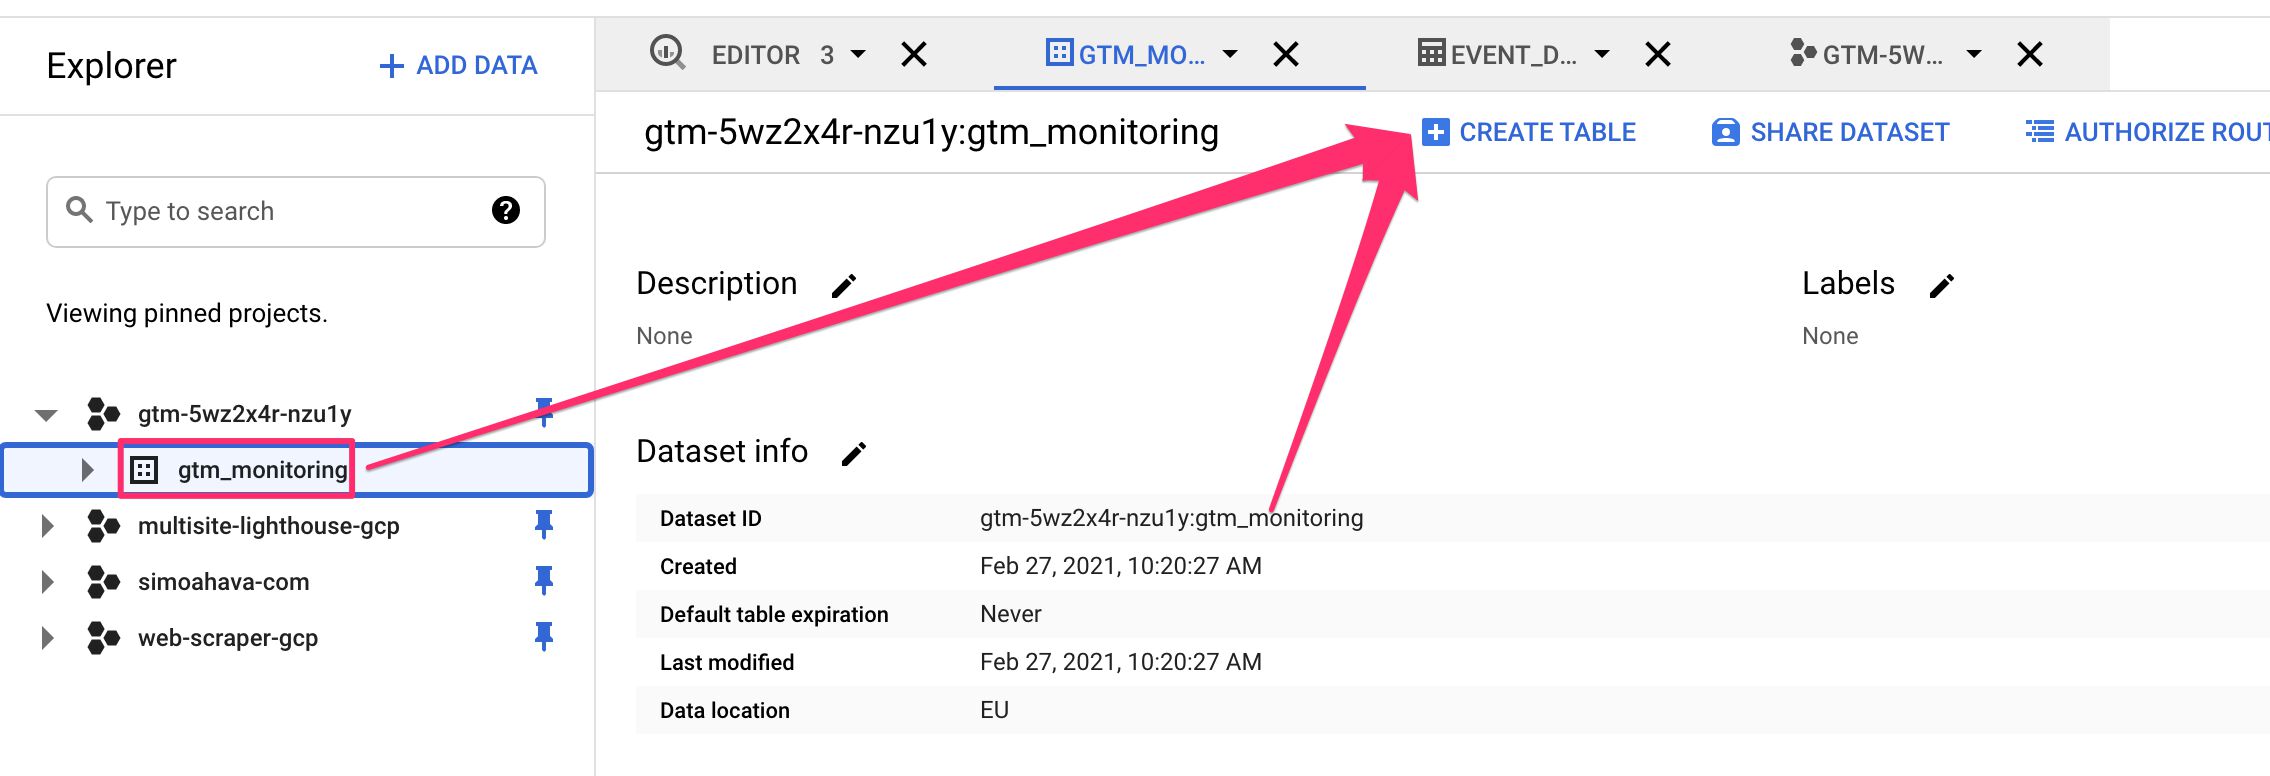
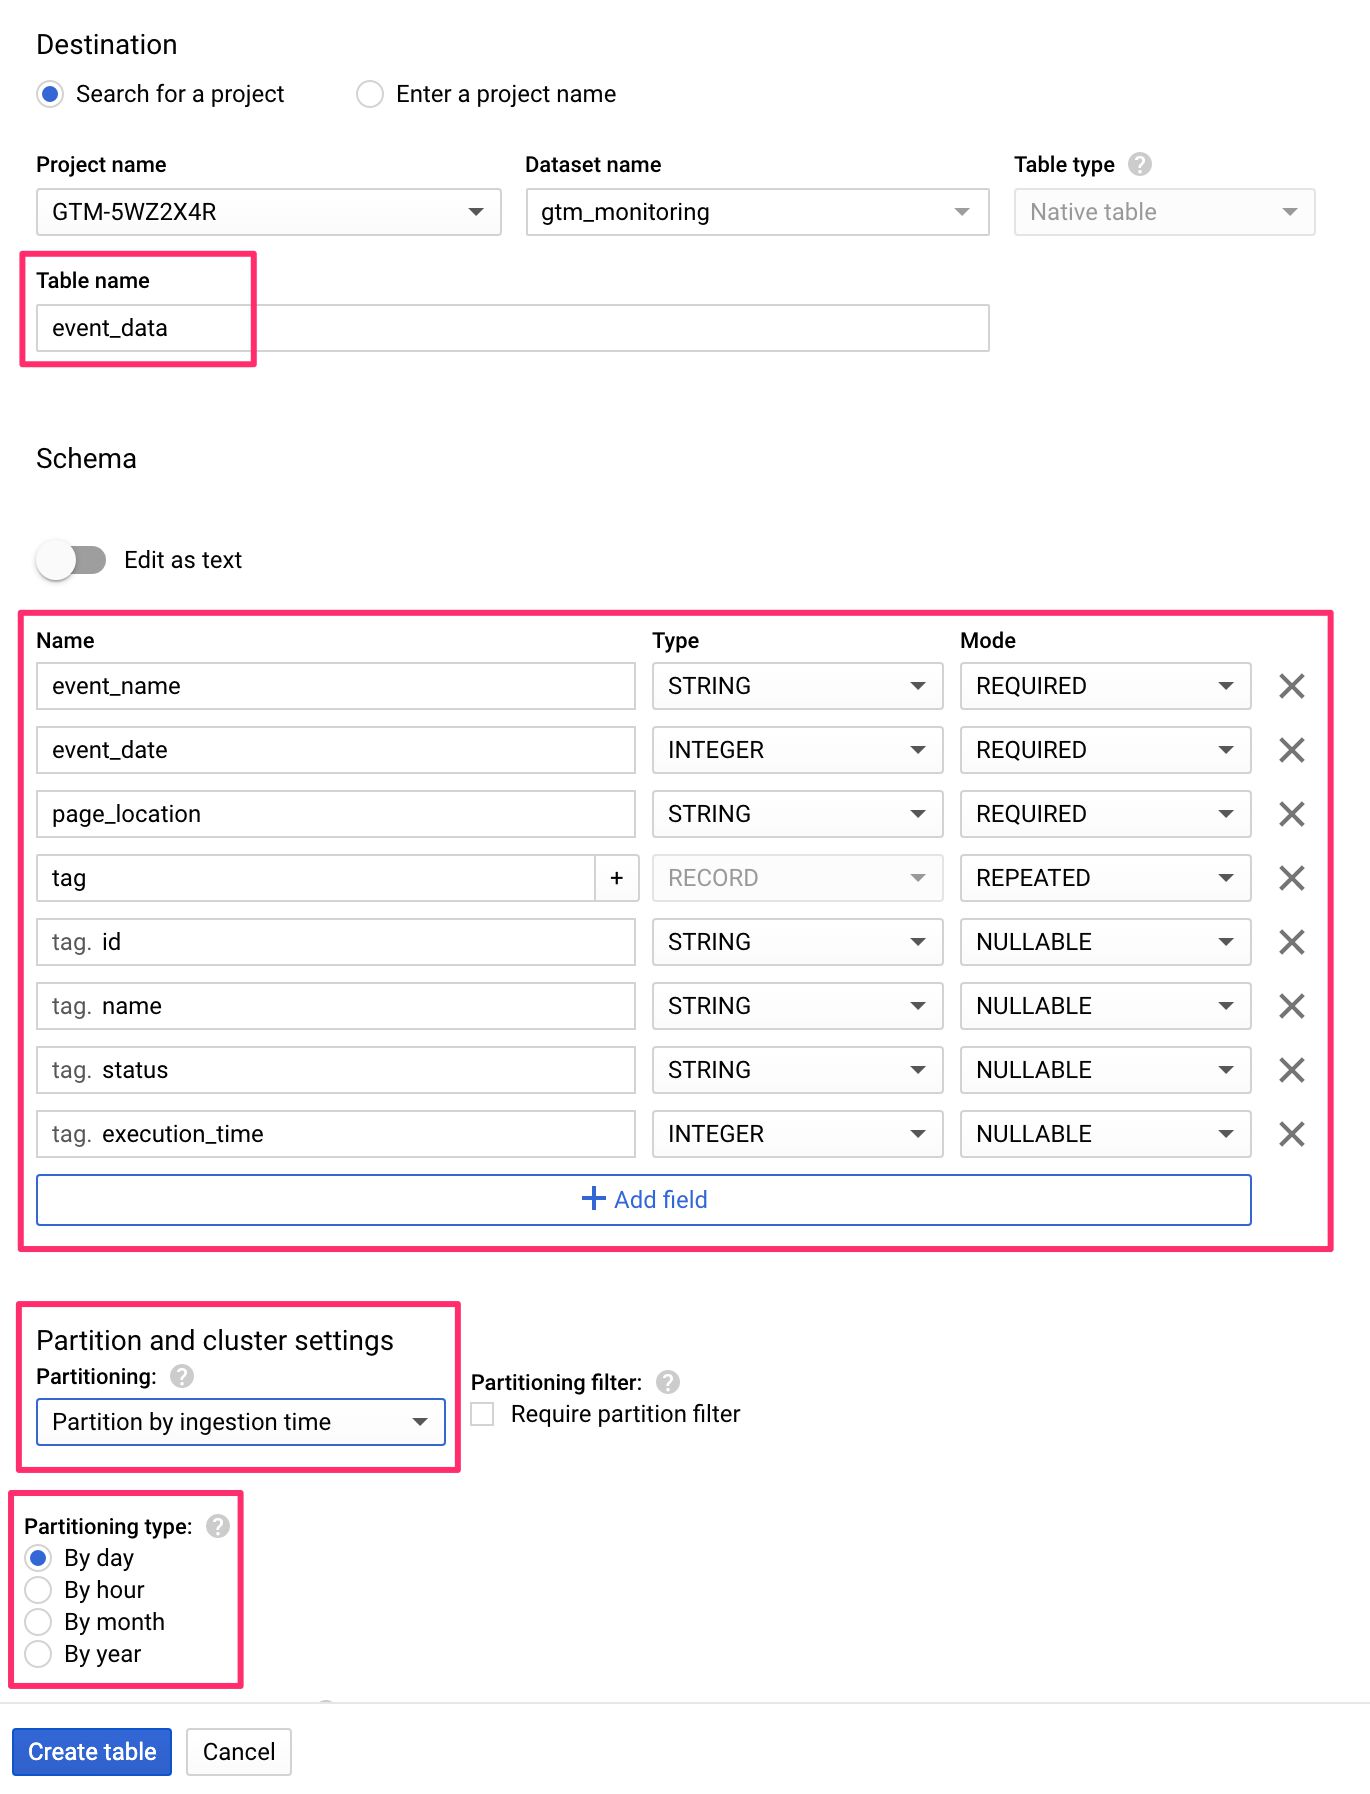
The three settings you’ll want to edit are Table name, Schema, and Partitioning.
Set the Table name to whatever you want to name the table as, e.g. event_data.
Next, click +Add field to start creating the schema.
The schema is essentially a blueprint for what type of data the table expects to be inserted into it. You need to define the fields (or columns) of the table, whether they are required or something else, and what the expected data type is.
See the BigQuery documentation for more details on what options you have at your disposal.
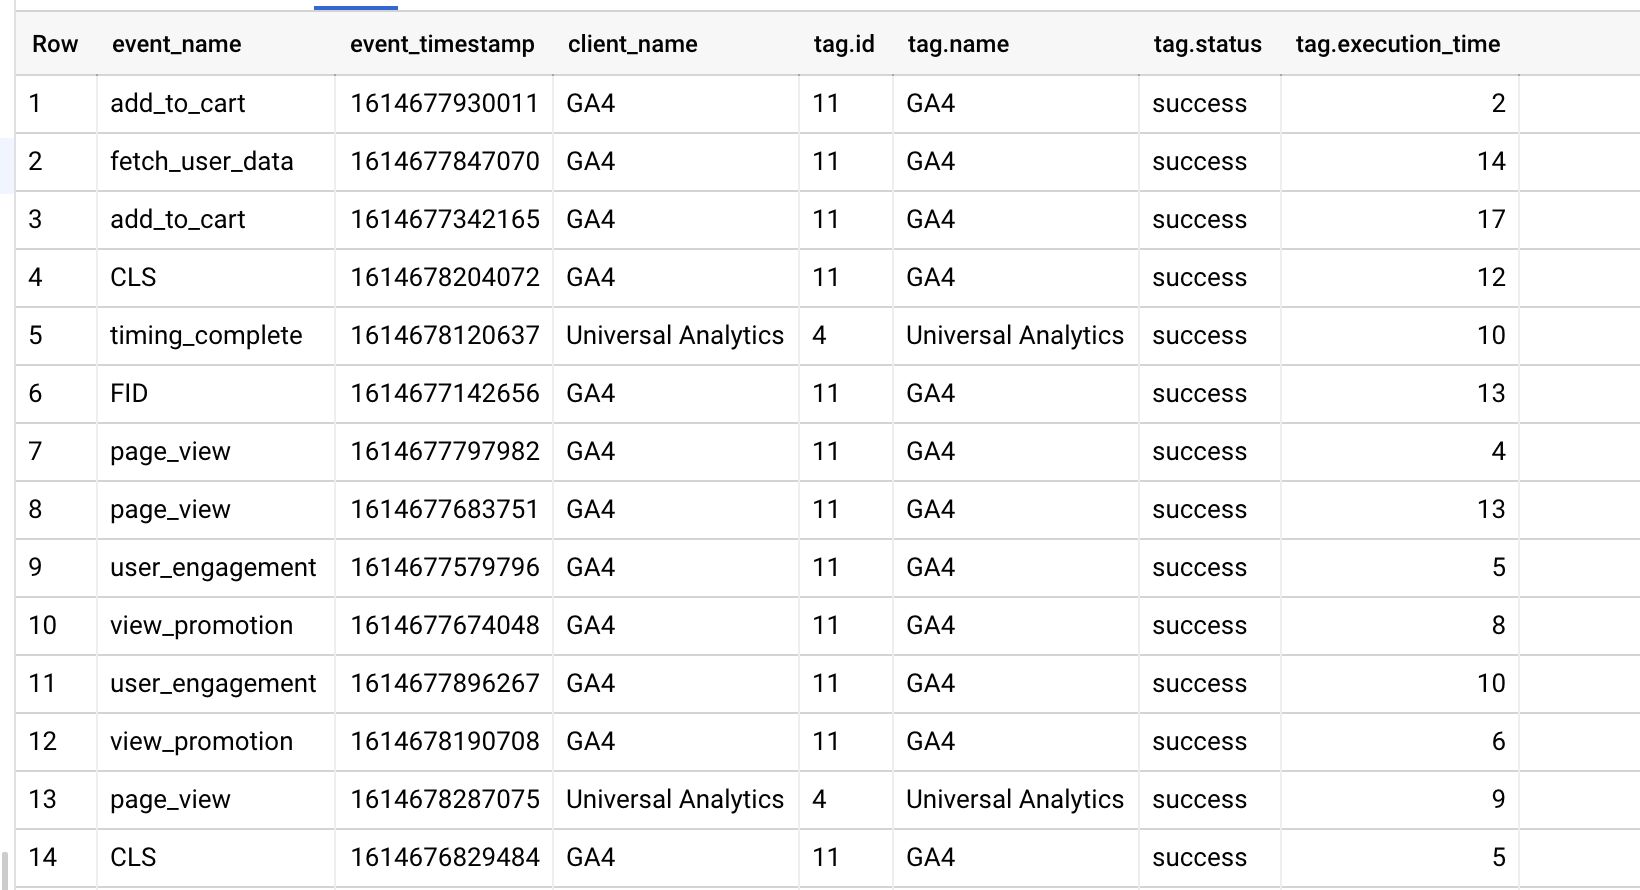
This is the schema I’ve chosen for the monitoring data:
| Field name | Type | Mode |
|---|---|---|
event_name | STRING | REQUIRED |
event_timestamp | INTEGER | REQUIRED |
client_name | STRING | REQUIRED |
tag | RECORD | REPEATABLE |
tag.id | STRING | NULLABLE |
tag.name | STRING | NULLABLE |
tag.status | STRING | NULLABLE |
tag.execution_time | INTEGER | NULLABLE |
For Partitioning, I’ve chosen to partition by day, which means that a table suffix is added to each row with the date of when the data was written to the table. This makes analysis much easier because you can scope your queries by day very easily.
This is what the final configuration for the table looks like:
The tag template
You can find the template soon in the Community Template Gallery. For now, you can also download the template.tpl file by saving this page with that filename.
To load the template in the container, go to the Server container, select Templates, and then create a new tag template.
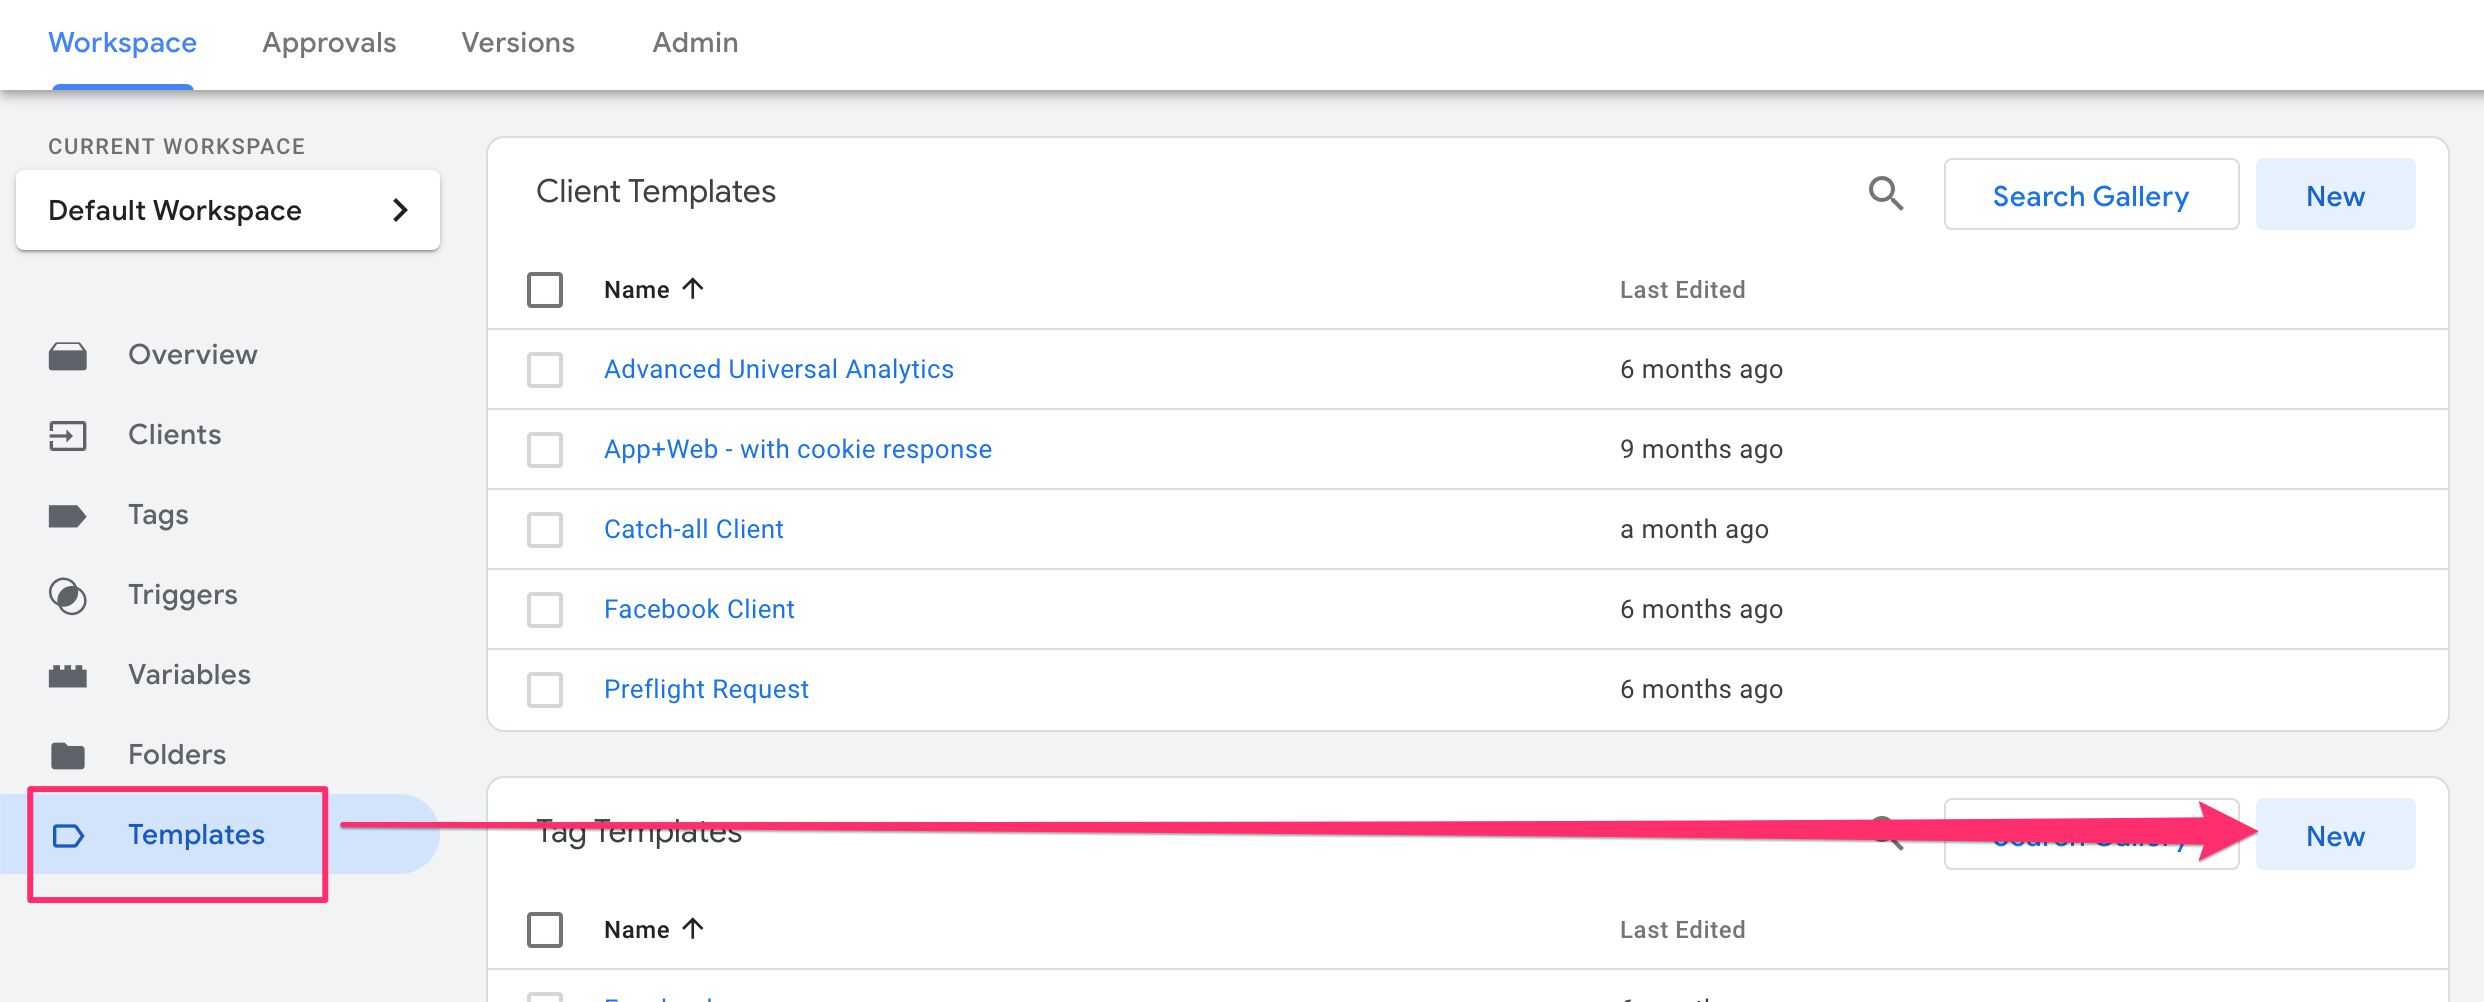
Next, in the overflow menu, choose Import.
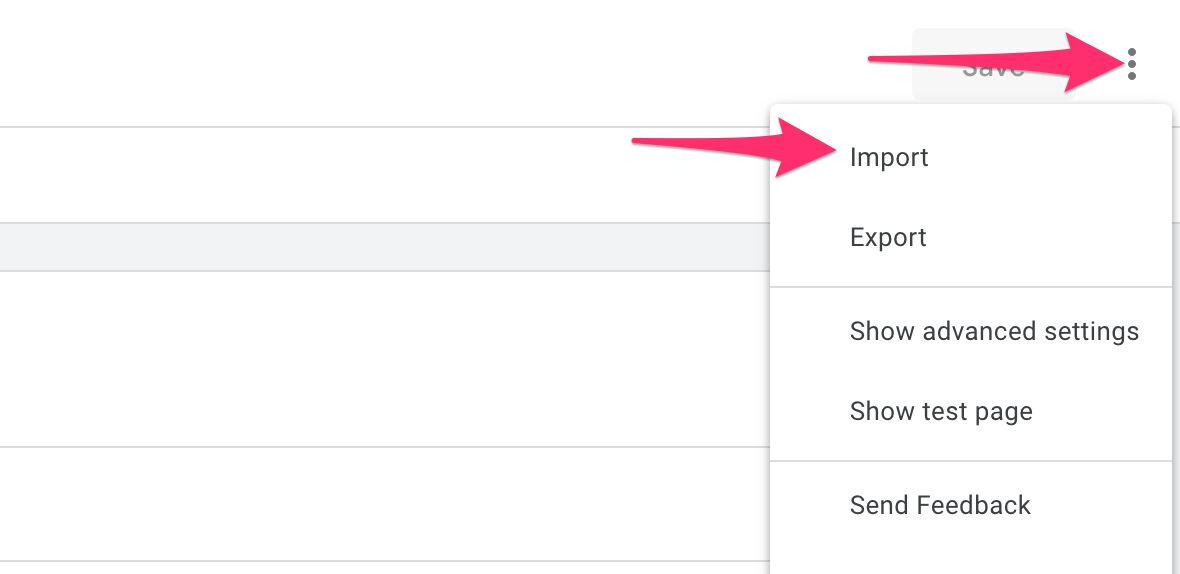
Locate the template.tpl file you downloaded and import that using the system dialog.
Click Save to save the template.
To understand how the template works, read on…
Create the monitoring tag
Go to Tags in the Server container, and click NEW to create a new tag.
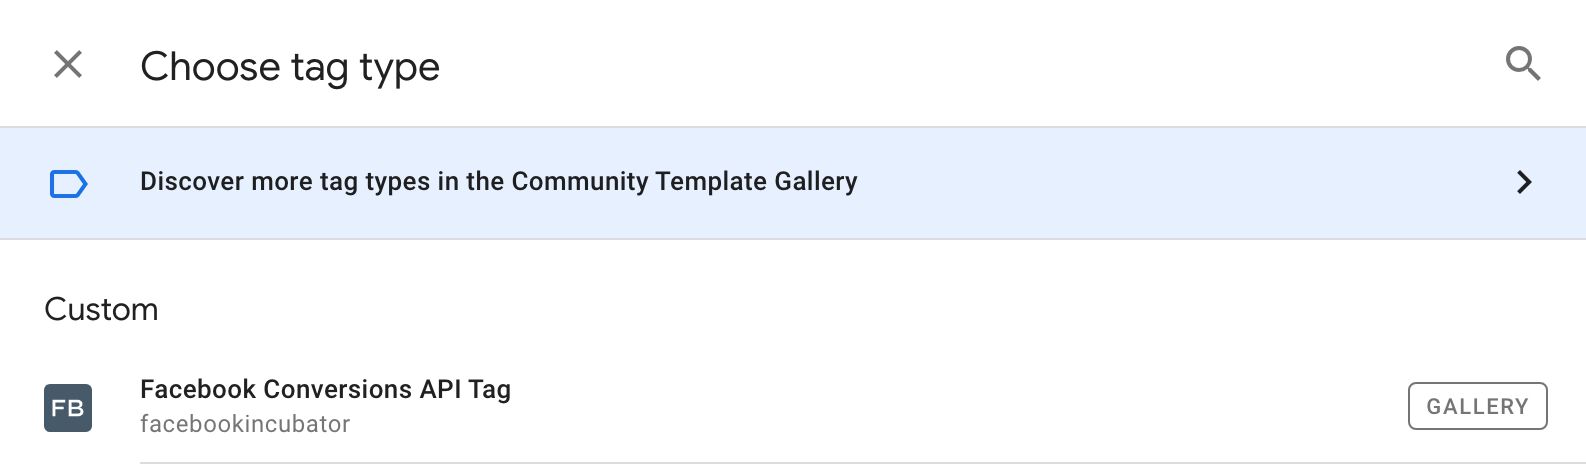
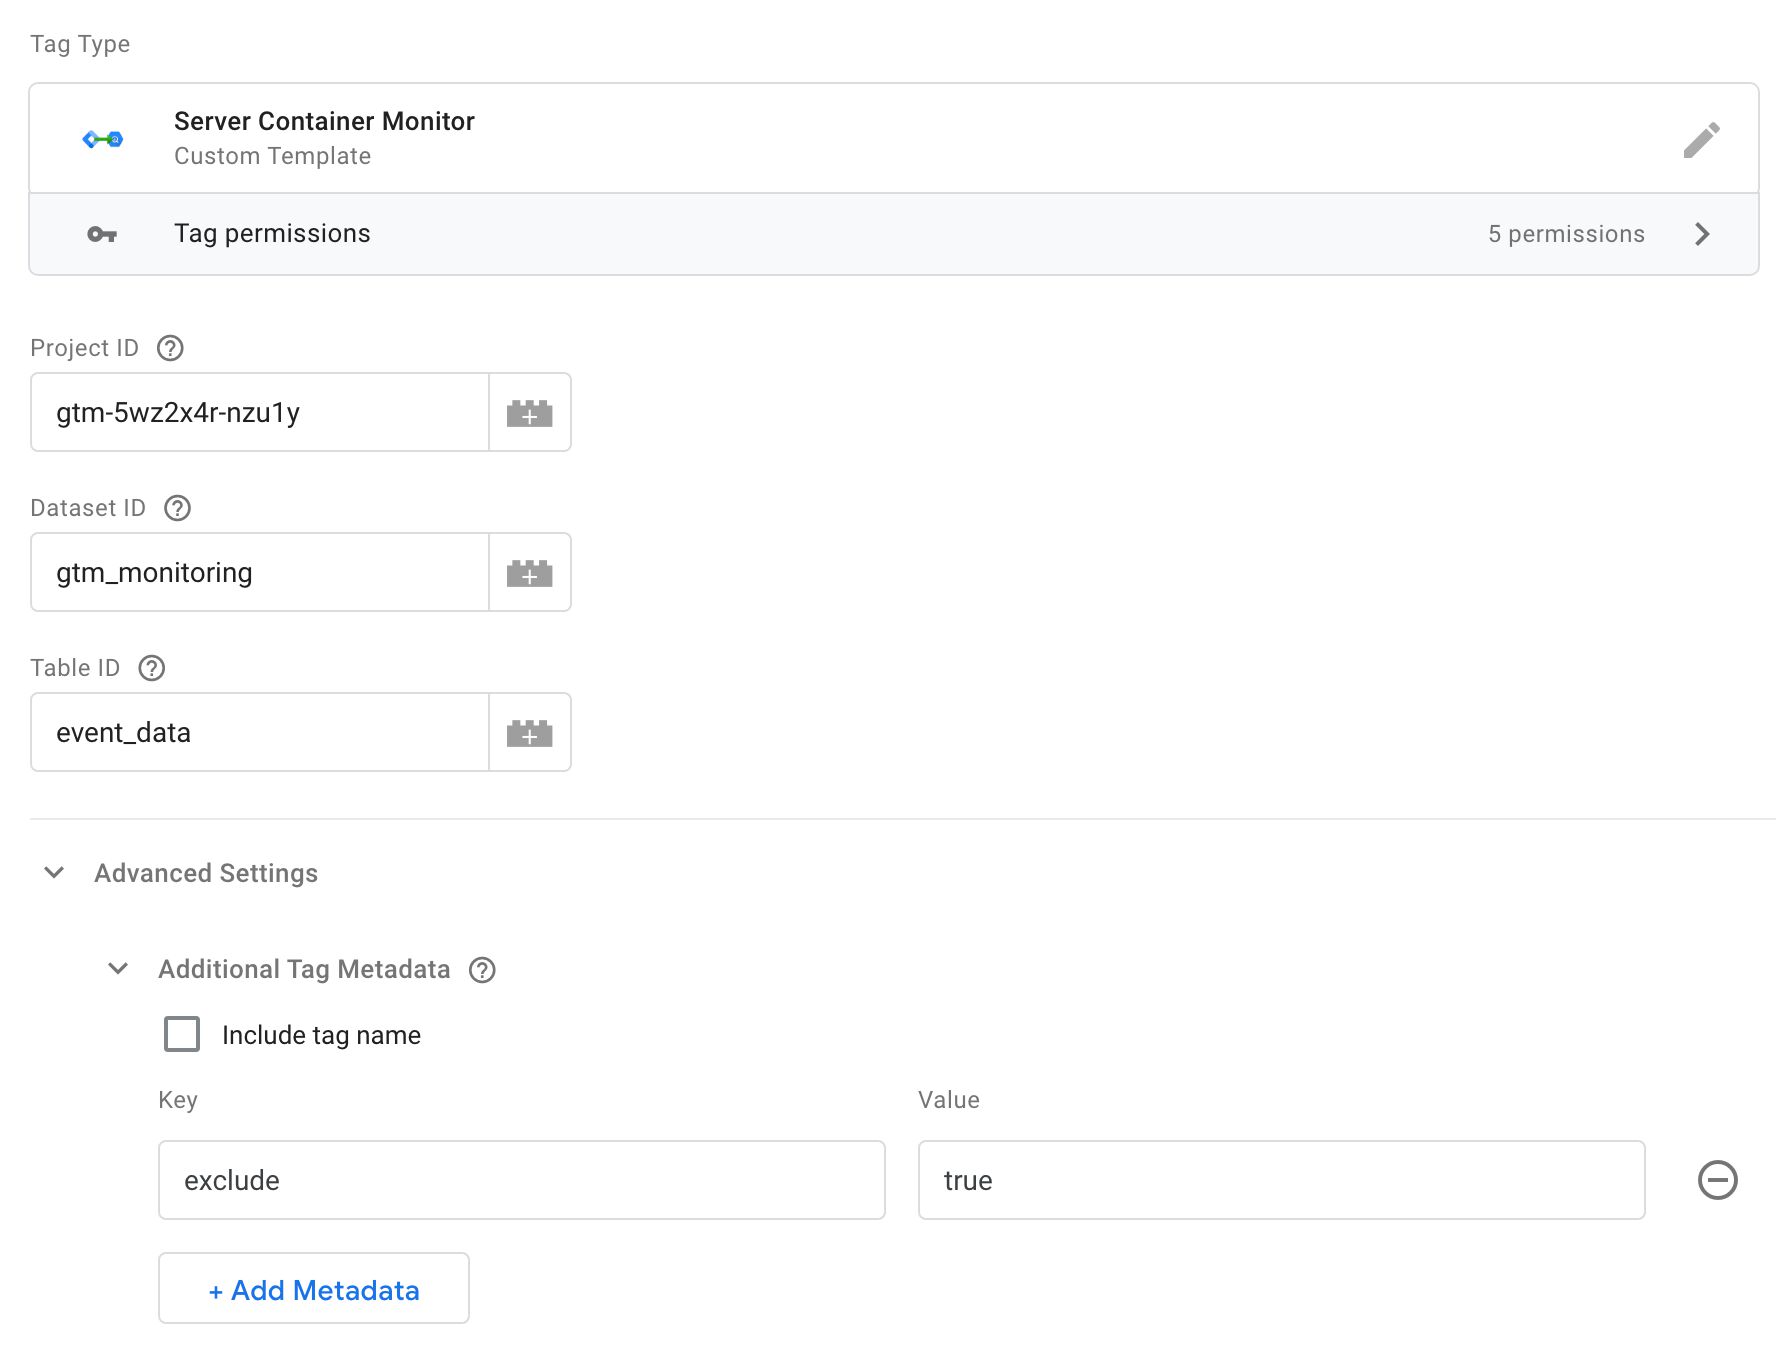
Now you need to configure the tag. There are three fields you need to set:
- Project ID – set to the GCP project ID of the project where the BigQuery table is. If it’s the same project as the one running your Server container, you can leave this field blank.
- Dataset ID – set to the Dataset ID of the BigQuery table.
- Table ID – set to the Table ID of the BigQuery table.
If you’ve followed the examples of this tutorial, Dataset ID would be gtm_monitoring and Table ID would be event_data.
Next, expand Advanced Settings and Additional Tag Metadata, and add a new metadata row with:
- Key:
exclude - Value:
true
This is what the tag should look like:
The Project ID, Dataset ID, and Table ID are used by the tag to make sure the data is written into the correct table.
The exclude key in the Additional Tag Metadata can be used to exclude tags from being monitored. In this case, I find that monitoring the monitoring tag itself just adds to noise and confusion, which is why I’ve chosen to exclude it.
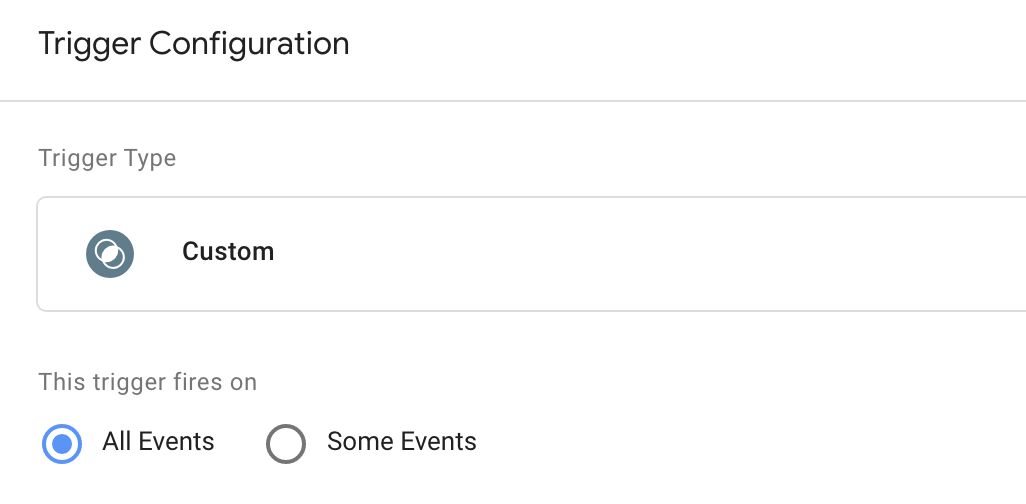
Add the trigger
Once you’ve made the modifications to the monitoring tag, you need to add a trigger to it. This is quite simple – you need a trigger that fires for every single event because every single event has the capability of firing tags.
So go to Triggers and click NEW to create a new trigger.
This is what the All events trigger should look like:
Add this trigger to your monitoring tag, and then save the tag.
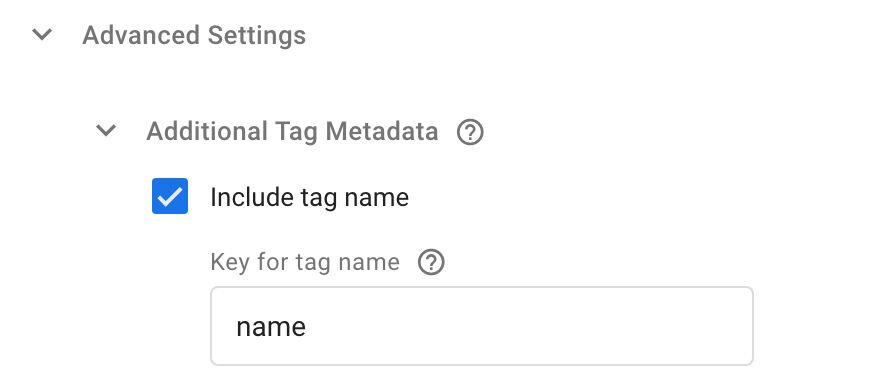
Edit all tags’ metadata
The next step is to edit all the tags in the container. For each tag, you need to expand Additional Tag Metadata again.
Here, you need to check Include tag name, and in the Key for tag name field you need to type name. Like so:
All the fields in Additional Tag Metadata are passed to the event callback which is set in the monitoring tag template itself. This callback is executed once all tags for that event have completed, and the metadata object gives additional details about the tags themselves.
If you wish, you could add even more key-value pairs to the tag metadata – you just need to modify the monitoring template to add these to the BigQuery API call. And, of course, you need a BigQuery table schema that accepts the new values.
Check the results in BigQuery
At this point you should have the following:
- You’ve imported the template from my repository (or the gallery).
- You’ve created a new monitoring tag with the template.
- You’ve configured the monitoring tag with your BigQuery table details.
- You’ve added the All events trigger to the monitoring tag.
- You’ve edited all the tags in the container, and you’ve added the tag name as additional metadata to them.
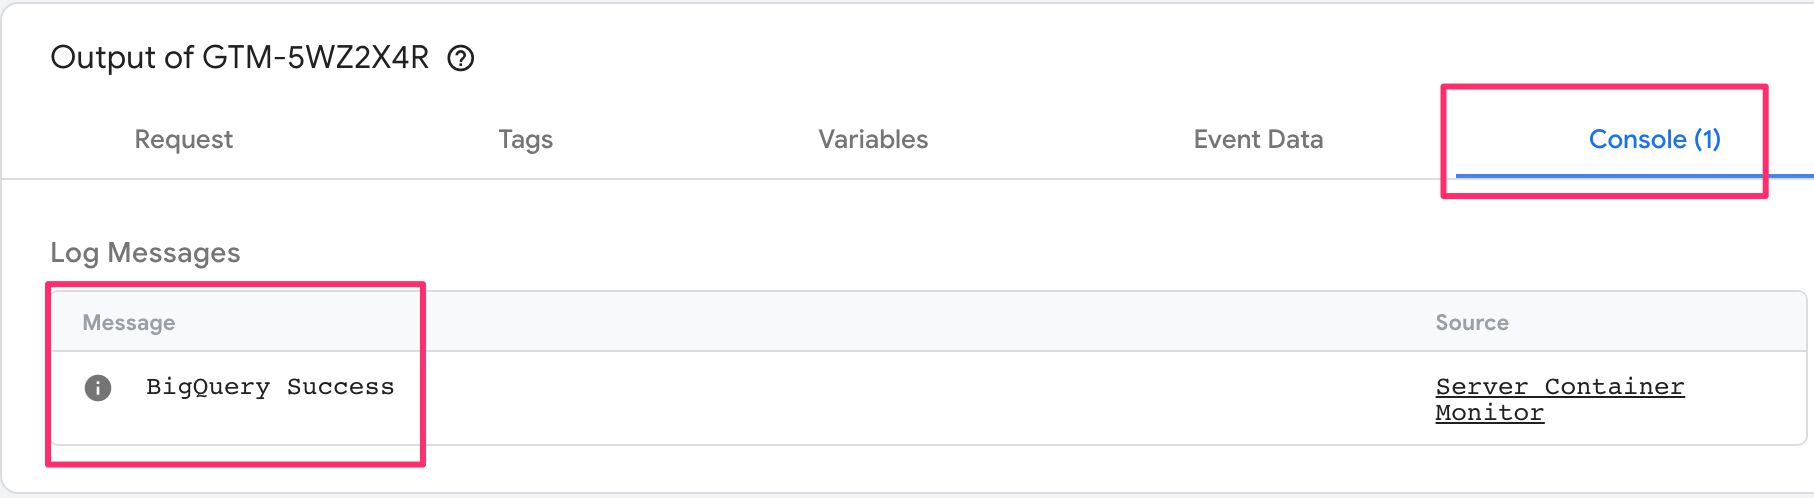
You can now either Preview the container (recommended), or you can just publish it. If you take the Preview route, you should see the BigQuery success! message in the Console tab of Preview mode when any event is selected:
If you see anything else, the error messages should tell you what the problem is (see this chapter for more details).
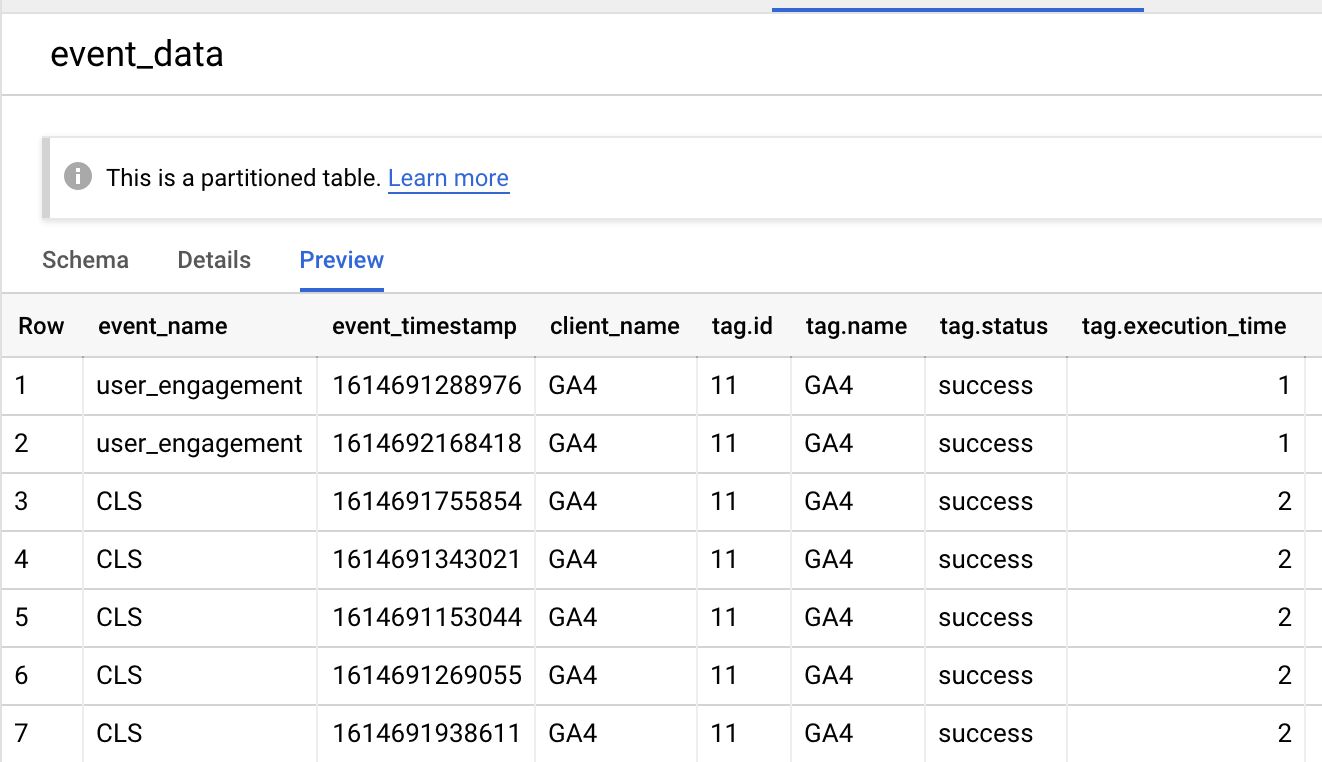
You can check the data in BigQuery as well. The easiest way to do this is to browse to the table itself, and then click Preview.
If you see rows here, it means it’s working!
You’ve now built a simple monitoring system. While this is mostly a proof-of-concept, you can actually utilize this setup to see if tags are consistently signaling failure. Similarly, it should alert you if there are events where no tags fire (even though they should), or if there are unreasonably long execution times with your tags.
And that’s it for this simple walkthrough! Now it’s time to dive into the API design itself.
The BigQuery API
To use the API, you need either a Client or a tag template. If you’re unfamiliar with templates, check out these resources:
Note, only a write API has been released thus far. We’re anxiously waiting for a read API, so that data could be pulled in from BigQuery, too.
The API itself is quite simple, but right now it has a caveat: the table you want to write to must exist already. Unlike some other BigQuery API clients, the custom template API does not automatically create a table for you if one doesn’t already exist.
This is good for control but bad for flexibility. It’s possible this will change in the future. But until it does, you need to have a BQ table ready with a schema in place as well.
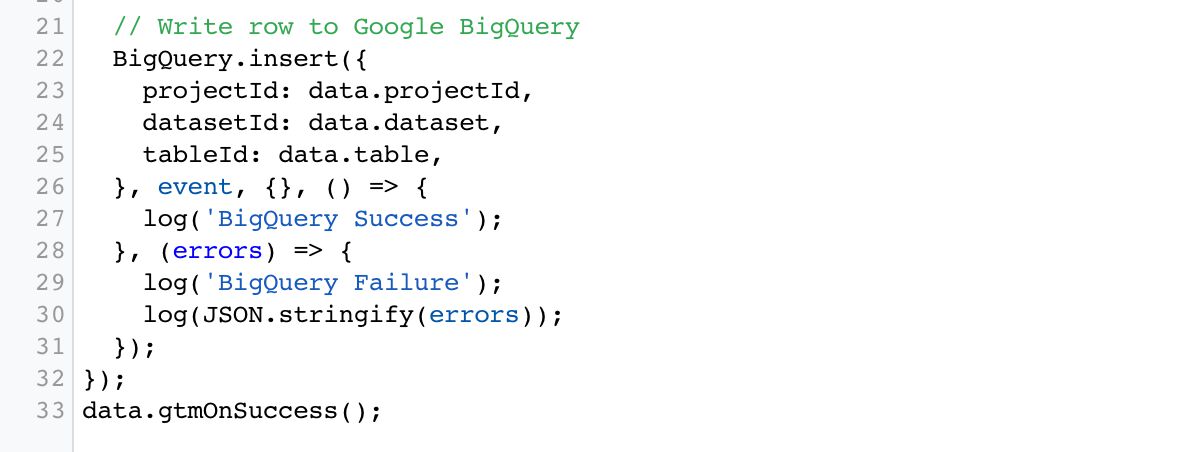
The API is called like this:
// Load the BQ API
const BigQuery = require('BigQuery');

BigQuery.insert(connectionInfo, rows, options, onSuccess, onFailure);
The connectionInfo object
The first parameter is a connectionInfo object, and it looks like this:
{
  projectId: 'gtm-abc123-z1def',
  datasetId: 'gtm_monitoring',
  tableId: 'event_data'
}
Here are the keys you need to use in the object:
| Key | Sample value | Required | Description |
|---|---|---|---|
projectId | gtm-abc123-z1def | No* | Set to the Google Cloud project ID where the BigQuery dataset and table are. You can also omit this from the API call (see below for more information). |
datasetId | gtm_monitoring | Yes | Set to the dataset ID of the BigQuery dataset which hosts the table. |
tableId | event_data | Yes | Set to the table ID of the BigQuery table. |
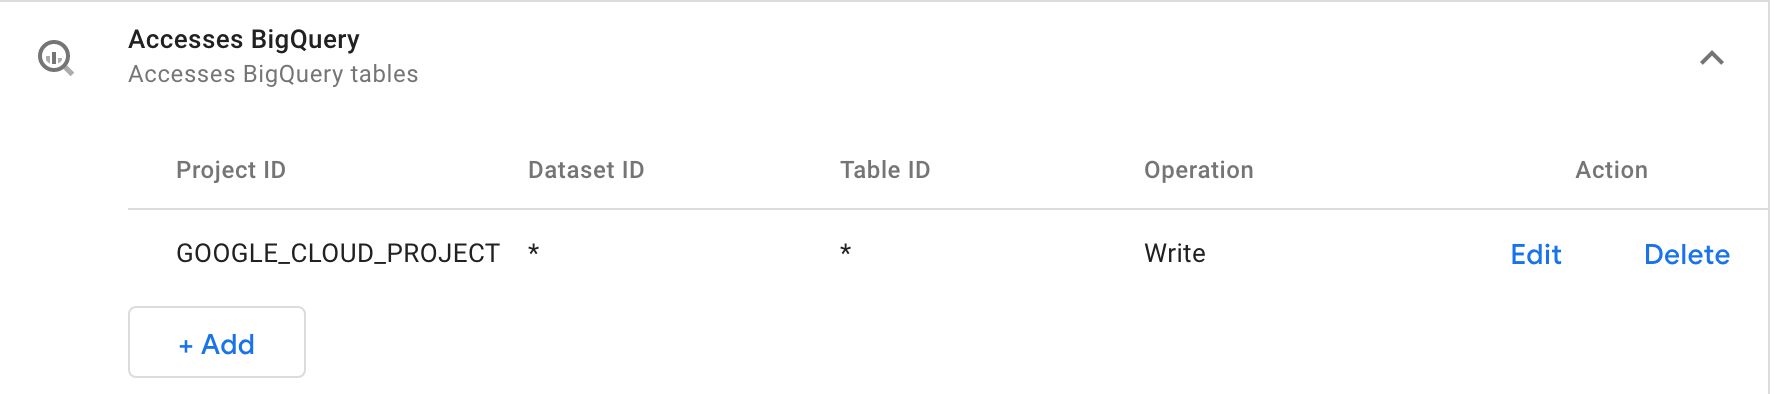
projectId is optional, but only in a specific circumstance. If the API call doesn’t have projectId included, then you must set the Permissions for BigQuery so that Project ID is either * or GOOGLE_CLOUD_PROJECT.
Permissions
When you set the Project ID permission to GOOGLE_CLOUD_PROJECT, the project ID is derived from an environment variable named GOOGLE_CLOUD_PROJECT. The good news is that if you’re running this container on Google Cloud (as is the default), then the environment variable is automatically populated with the current project ID.
If you want to send the data to a table that’s outside the current project, then it’s easiest to just add the project ID to the permission list or to just use the wildcard (though the former is recommended over the latter).
You can wildcard dataset ID and table ID, too, but you should only do this if you’re designing the template for sharing via the Community Template Gallery.
The rows array
The second parameter in the BigQuery.insert call is the rows array.
And this is where it gets tricky.
The rows array must comply with the schema of the table if you want the data to be written correctly. You should try to use the types and formats required by the BigQuery table schema when building the objects in the rows array.
For example, consider a schema like this:
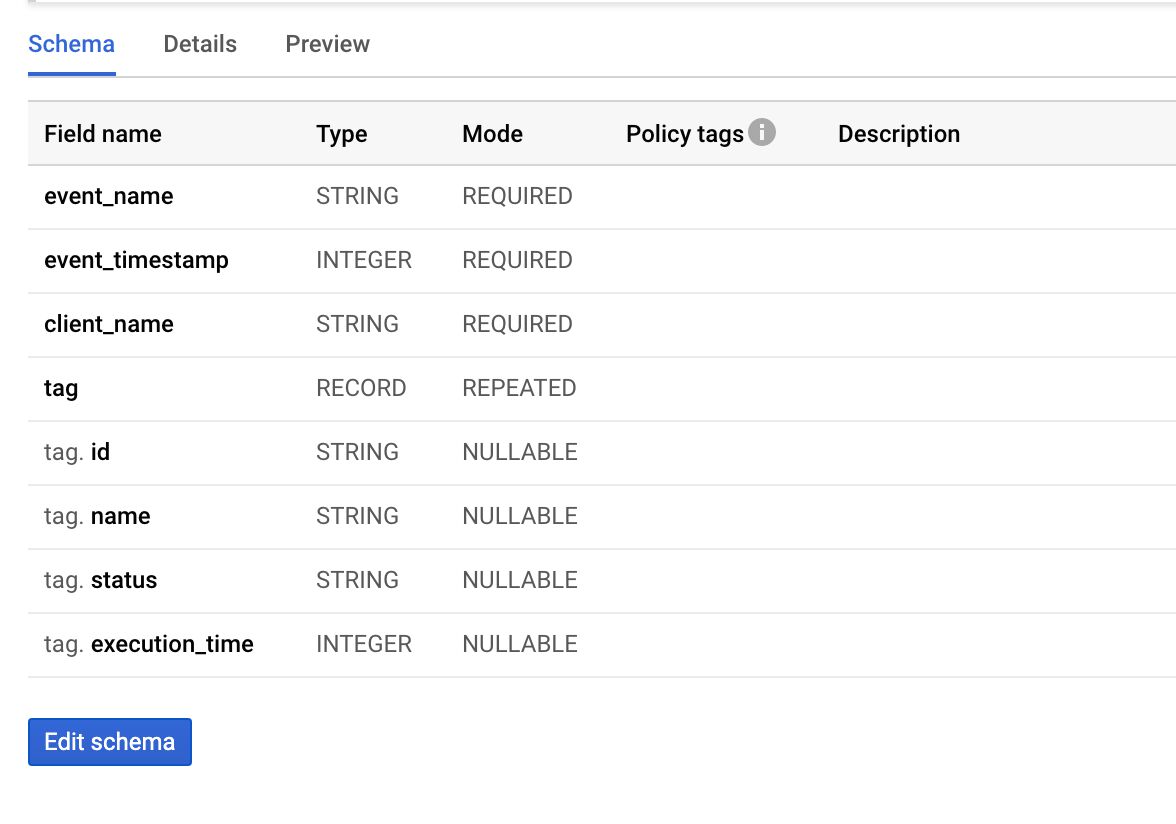
To create a valid row for this schema, the object would look like this:
[{
  event_name: 'page_view', // String, required
  event_timestamp: '1614628341914', // Integer, required
  client_name: 'GA4', //String, required
  tag: [{ // Record, repeated
    id: '1', // String, nullable
    name: undefined, // String, nullable
    status: 'success', // String, nullable
    execution_time: '3' // Integer, nullable
  }, {
    id: '3', // String, nullable
    name: 'GA4', // String, nullable
    status: 'success', // String, nullable
    execution_time: '10' // Integer, nullable
  }]
}]
As you can see, each property set in a row object corresponds with a key in the BigQuery schema, and the values need to match the expected types.
Note: “Integer” refers to the data format, not the JavaScript type. So it can be sent as a Number type or as a String type as in the example above.
The most difficult things to get right, typically, are repeated records. Perhaps it’s easier to think of this in JavaScript terms. A repeated record is essentially an array of objects. Or a list of dictionaries if Python vernacular suits you better.
In any case, the object dispatched to the table must conform to the schema, otherwise you risk running into errors or getting patchy data.
The options object
You can control what the API does when encountering invalid calls.
The options object is the third parameter to the BigQuery.insert method, and it has the following keys:
| Key | Possible values | Default | Description |
|---|---|---|---|
ignoreUnknownValues | true / false | false | If set to true, then rows that have values that do not conform to the schema are accepted, but the unknown values are ignored in the write. |
skipInvalidRows | true / false | false | If set to true then all valid rows of the request are inserted into the table, even if there are also invalid rows in the request. |
What you choose for these options depends on the type of data you want to collect. If you set ignoreUnknownValues to true, you might end up with a patchy table because expected values might end up missing from the table.
If you set skipInvalidRows to true, it might be difficult to debug problems, as requests are allowed to complete even if they had invalid rows.
The onSuccess callback
You can optionally pass a method as an onSuccess callback. This method is invoked without any arguments, and you can use it to run some code after the rows were successfully inserted.
...
const onBigQuerySuccess = () => {
  log('BigQuery rows inserted successfully!');
  data.gtmOnSuccess();
};

BigQuery.insert(connectionInfo, rows, {}, onBigQuerySuccess, data.gtmOnFailure);
The onFailure callback
You can optionally pass a method as an onFailure callback. This method is invoked when an error occurs, and an array of all the errors that happened is passed automatically to this method.
...
const onBQFailure = (errors) => {
  log('BigQuery failure!');
  log(errors);
  data.gtmOnFailure();
};
Note that you don’t generally have to log these explicitly, as the BigQuery errors will show up in the Console tab of Preview mode and in your
stdoutlogs regardless.
If the error happened because insertion didn’t happen at all, for example when trying to insert a row into a non-existent table, the error is simple:
[{
  reason: 'invalid'
}]
If, however, there is an error in the insertion itself, the array of errors is more complex. For every error encountered, an object is added to the array. This object has two keys:
errors is an array with a single object which has the reason key. This key is set to the reason why the error happened (e.g. "invalid").
row is an object which describes the row itself where the error happened.
In the image above, three errors were encountered. The first error was due to an invalid value being sent with the call. Due to skipInvalidRows being set to false (the default value), this results in the execution of the insert stopping, and all the remaining rows throw an error with the reason stopped.
Note that it’s completely optional to use the onFailure callback, but it might be a very good idea if you want to get to the bottom of missing or faulty data in your table!
Authentication
As long as your Server container is running in the same GCP project as the BigQuery table, you’re all set. You don’t need to do anything special in terms of authentication, as the default service account of App Engine has full access to any BigQuery tables added to the project.
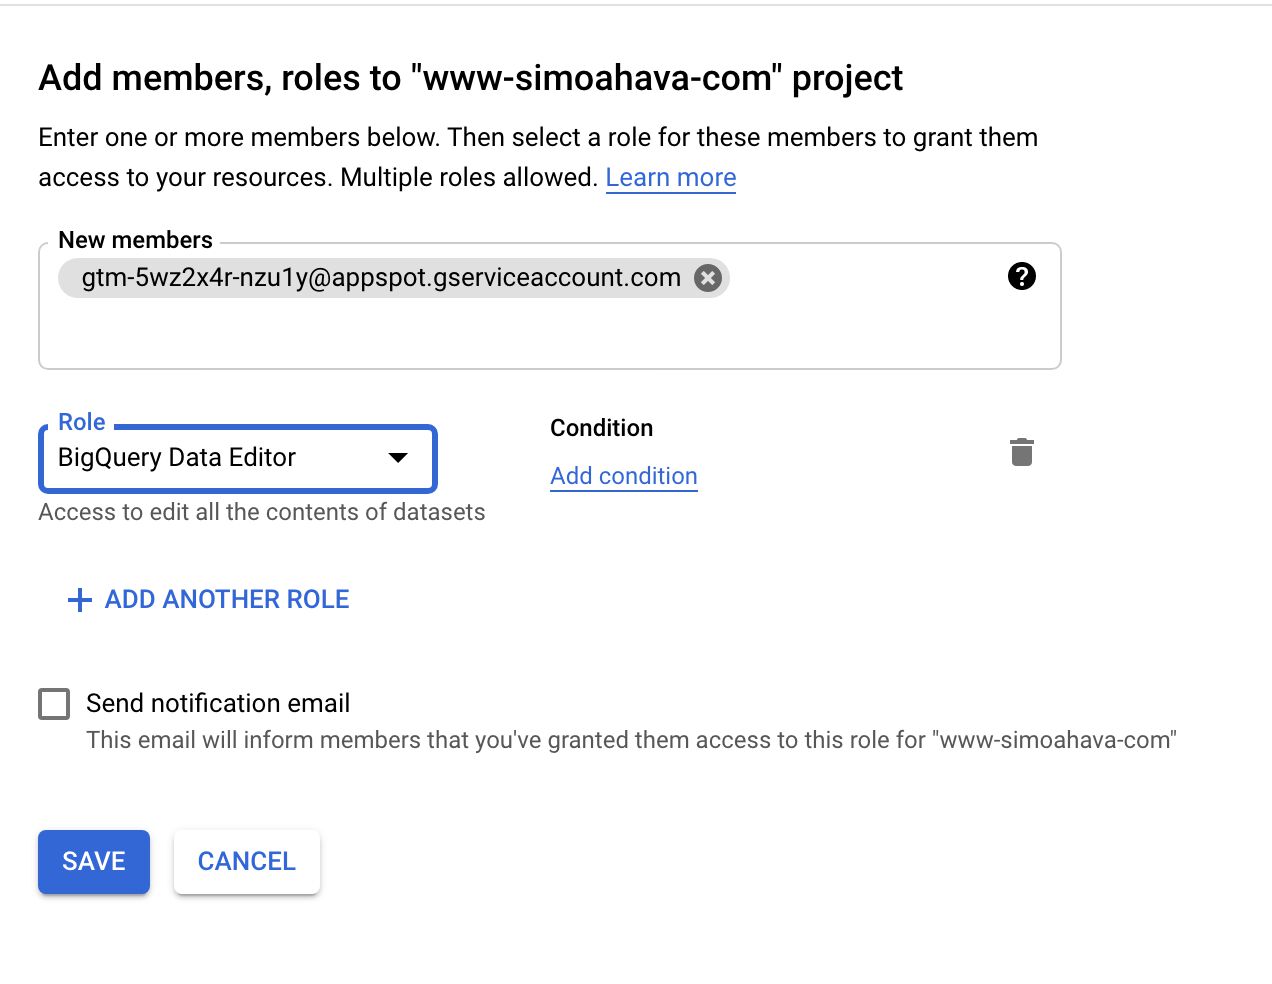
If you want to write to a BigQuery table in another GCP project, you need to do the following:
- Locate the App Engine default service account (under APIs & Services / Credentials) of the Server container project.
- Copy the email address of this service account to the clipboard.
- In the IAM of the GCP project with the BigQuery table, add a new member.
- Set the email address of the member to the email address in the clipboard.
- Set the role of this new member to BigQuery Data Editor.
In other words, you are allowing the Server container GCP project to edit the BigQuery datasets in the target project.
You can, of course, create a dedicated service account just for this purpose to avoid giving too broad access to the Server container project. But this is an easy way to get the integration to work.
If you want to authenticate a non-GCP source to write to BigQuery, it gets quite a bit trickier. I recommend you follow the manual setup guide to do this.
Summary
You can ignore everything I’ve written in this article and just rejoice about one single thing:
Server containers now have access to Google BigQuery!!!
I can’t overstate how important this is. Being able to communicate with other cloud components without having to go through the motions of complicated service account bindings and authentication schemes is very nice. But being able to utilize one of the most powerful and disruptive data warehouses in existence is the real deal.
With the BigQuery API, the sky is the limit for innovation.
How about writing the incoming GA4 requests directly to Google BigQuery, instead of taking the roundtrip through Google Analytics?
How about logging errors and other monitoring data into a BigQuery table for more detailed and cost-efficient analysis later?
How about writing all transactions collected by Facebook into a BigQuery table for deduplication or debugging later?
There’s just so much you can do with Google BigQuery. I can’t wait to see what folks in the template design community come up with.
I hope that this is just foreshadowing the introduction of other Google Cloud APIs as well. Let’s wish for a Cloud Storage API (for quick file read and write operations), and a Pub / Sub API (for intializing other cloud processes), for example.
I also hope that BigQuery gets a read API as well, soon. Having insert capabilities is awesome, but if we could use BigQuery to actually enrich our Server container’s data streams, it would make the setup even richer and more flexible.
What do you think about the BigQuery API? What kinds of things could you envision being done with it?