(Last updated June 2014) Google Analytics provides us with a nifty way of tracking social interactions. With a simple plugin, you can track how many +1s and Likes your pages accumulate.
This guide shows you how to activate social interaction tagging with Google Tag Manager and Universal Analytics. The instructions are for Facebook Likes, Google+ +1s (now deprecated since Google Analytics tracks +1s automatically), Twitter Tweets and Pinterest Pins.
Note that if you use a third-party API (e.g. AddThis) these tricks probably won’t work. You’ll need to use the API functions themselves to enable tracking.
The Simmer Newsletter
Follow this link to subscribe to the Simmer Newsletter! Stay up-to-date with the latest content from Simo Ahava and the Simmer online course platform.
Setting up social interaction macros
Well, first of all, you’ll need a bunch of macros to collect the data from your social actions.
So let’s start with Google Tag Manager.
Steps:
- Create a new container version
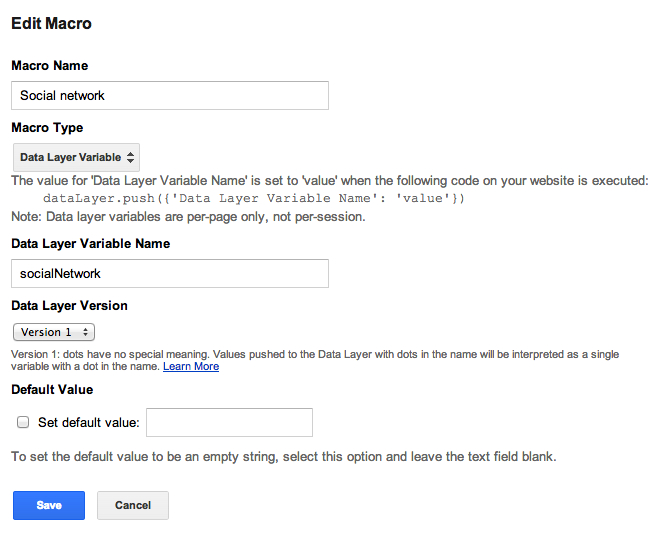
- Create a new macro of the Data Layer Variable persuasion, and name it Social network
- Add socialNetwork as the variable name
- Save the macro
- Create a new Data Layer Variable macro, and name it Social action
- Add socialAction as the variable name
- Save the macro
- Create a new Data Layer Variable macro, and name it Social target
- Add socialTarget as the variable name
- Save the macro
So now you created three important macros, all making it easier for to track social interactions via Google Tag Manager. Network will pass the name of the social network the action belongs to (e.g. Facebook), Action will pass the name of the action performed (e.g. Like), and Target will pass the name of the page the action occurred on (e.g. http://www.example.com/post1).
Setting up the send tag
For social interaction events to appear in Google Analytics, they need to be sent (d’oh again). To send a social interaction, you need to create a tag which will have the macros we just created as its arguments. This tag is then set to fire upon a social action.
- Create a new Universal Analytics tag
- Give it a name (such as Send social)
- Add your tracking ID (it’s best to store it as a macro)
- Choose Social as the Track Type
- Add your macros as the arguments (see image below for clues)
- Set {{event}} equals socialInt as the firing rule (we’ll come back to this soon)
- Save tag
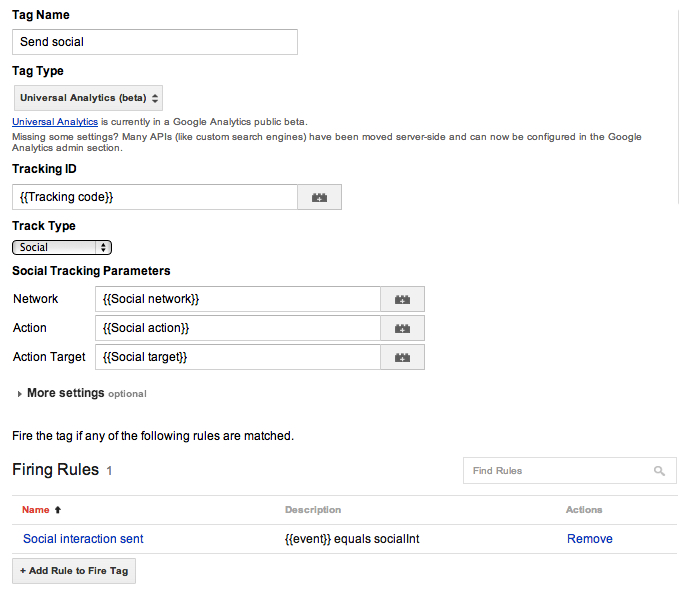
Here we create a new tag which houses the arguments the social interaction will have. The firing rule is primed to wait for an event called socialInt, which we’ll send from our social action tags.
Set up Facebook like
I will not go into how to add a Facebook like button to your page, you’ll have to do that yourself. Facebook has a great guide and tool behind this link which will help you create the necessary code.
However, once you have your button in place, you need to somehow track the clicks. This is done by using a callback function. A callback is a function which is run immediately after an event has completed.
Here’s how to create the callback function in GTM.
Steps:
- Create a new Custom HTML tag (or use a single tag for all your social share callbacks)
- Give it a name (e.g. Social Shares)
- Add the following code:
<script>
if (typeof FB !== 'undefined'){
  FB.Event.subscribe('edge.create',
      function(href) {
          dataLayer.push({
              'event': 'socialInt',
              'socialNetwork': 'Facebook',
              'socialAction': 'Like',
              'socialTarget': href
          });
      }
  );
}
</script>- Set to fire after DOM has been loaded ({{event}} equals gtm.dom)
- Save tag
OK, so here’s your Facebook Like callback function. Upon clicking the Like button, this function is called. Before control is returned to the page, the trigger event for the Send Social tag (socialInt) is pushed into the data layer. After that, the three required arguments are passed along as well. The value for socialTarget is href, which is one of the parameters of the callback function, and it represents the URL of the page the event occurred on.
By using FB.Event.Subscribe, you can listen to a number of different events (e.g. message send, login). Check the available options in the Facebook dev guide.
Set up Google +1
UPDATE: Note that this is pretty much obsolete now, since Google Analytics and Universal Analytics both track +1s automatically.
Again, I’m not going to tell you how to add the button to your page. It’s dead simple, and you can find a good guide here.
With Google+, you need to specify the callback as an argument in the button tag. With Facebook this was automated. Note that there are a number of events for which you can specify a callback: clicks, interaction starts (when someone hovers or clicks the button) and interaction ends (when someone closes the +1 bubble). I just chose the click since it’s the simplest way to track (though a tad inaccurate).
I chose sendPlus as the callback function name. A sample button code would then be:
<g:plusone href="http://example.com" size="standard" annotation="none" callback="sendPlus"></g:plusone>Note that the developers’ reference has the callback as data-callback, but this seems to work as well.
Now to set up the callback function.
- Create a new Custom HTML tag (or use a single tag for all your social callbacks)
- Give it a name (e.g. Google Plus One)
- Add the following code:
<script>
function sendPlus(g) {
    dataLayer.push({
        'event': 'socialInt',
        'socialNetwork': 'Google',
        'socialAction': '+1',
        'socialTarget': g.href
    });
};
</script>- Set to fire on all pages ({{url}} matches RegEx .*)
- Save tag
It’s basically the same as with Facebook.
This callback function hijacks the +1 button click and sends the necessary stuff to datalayer before returning control back to the page.
Set up tweets
To set up a Tweet callback function, you’ll need to make use of web intent events. They add additional JavaScript functionality (such as the option to declare a callback function) to your Tweet button.
Initialize the Twitter widgets with the following code in your HEAD element:
window.twttr = (function (d,s,id) {
  var t, js, fjs = d.getElementsByTagName(s)[0];
  if (d.getElementById(id)) return; js=d.createElement(s); js.id=id;
  js.src="https://platform.twitter.com/widgets.js"; fjs.parentNode.insertBefore(js, fjs);
  return window.twttr || (t = { _e: [], ready: function(f){ t._e.push(f) } });
}(document, "script", "twitter-wjs"));
You don’t have to make any modifications to your Tweet button code (providing it’s not implemented via a third-party API, such as AddThis.
In your social share Custom HTML tag, add the following code:
if (typeof twttr !== 'undefined') {
  twttr.ready(function (twttr) {
    twttr.events.bind('click', clickEventToAnalytics);
  });
}
function clickEventToAnalytics() {
  dataLayer.push({
    'event': 'socialInt',
    'socialNetwork': 'Twitter',
    'socialAction': 'tweet',
    'socialTarget': window.location.href
  });
}
Here you bind the CLICK event to function clickEventToAnalytics. There are a bunch of different events at your disposal, and you can find them in the developers’ documentation.
Note how I use the global JavaScript variable window.location.href as the target this time.
Set up Pinterest Pin It
Pinterest is a bit problematic, since when you load the pinit.js script, it replaces any code you may have used in the link tags. This is problematic because Pinterest doesn’t provide any callback functions, so the social share push would need to be added directly to the link code. With pinit.js, any modifications you do are erased upon page load.
However, you can get your pins tracked using auto-event tracking. With a Link Click Listener in place, create a Custom HTML Tag with the following content:
<script>
  dataLayer.push({'event': 'socialInt', 'socialNetwork': 'Pinterest', 'socialAction': 'Pin It', 'socialTarget': window.location.href});
</script>
The firing rule for this is:
{{event}} equals gtm.linkClick
{{element classes}} contains pin_it_button
So once the Pin It button is clicked (the link has “pin_it_button” in its long list of class names), this custom HTML tag pushes the event into the data layer, after which your social share event tag is fired.
Test implementation
So now you have your callback functions which provide the data, the macros which store the data, and the Universal Analytics tag which sends the data. Wonderful!
Save your container version and publish it.
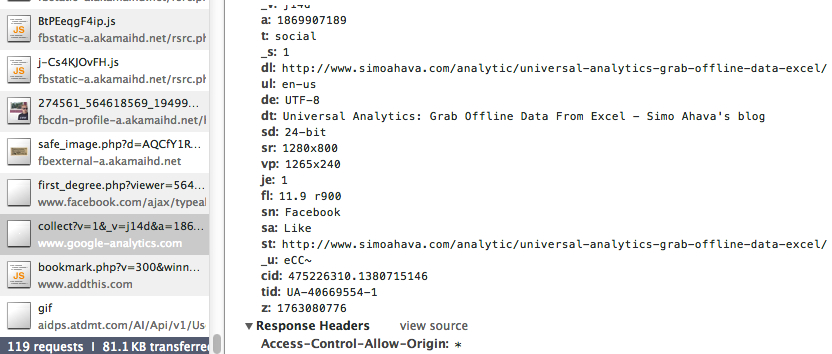
Now go to a page on your site where the buttons can be found. Use a debugger like Firebug, or Chrome’s Developer Tools, and load the page. Pay attention to the Network tab in your debugger, and click Like or +1. You should see something happening, namely a GET request to www.google-analytics.com. Check out the headers of this request, and you should see something like this:
Here you can see the query parameters.
sa is Social Action (Like)
sn is Social Network (Facebook)
st is Social Target (URL of the page)
Of course, don’t forget to check Google Analytics itself (it might take some time for the data to appear).